
Colin McCrate's Blog, page 2
February 13, 2025
String trellising with Colin McCrate
In episode 123 of the Encyclopedia Botanica podcast, host Hilary Dahl and her husband and business partner, Colin McCrate discuss the practice of string trellising in gardening. Colin, an experienced gardener, explains the benefits and methods of vertical and horizontal string trellising, including the use of hemp and jute twine. They describe how this technique supports various crops such as tomatoes, peppers, cucumbers, and peas, enhancing ease of pruning, harvesting, and plant health. Practical tips and recommendations are provided for managing crops and optimizing garden space using string trellising.


December 16, 2024
Growing Broccoli, Cauliflower and Cabbage
In episode 119 of the Encyclopedia Botanica podcast, host Hilary Dahl is joined by her husband and business partner, Colin McCrate, to dig into the cultivation of broccoli, cauliflower, and cabbage. They discuss the importance of scientific nomenclature, focusing on Brassica oleraceae, and emphasize aspects of growing these crops, such as spacing, nitrogen requirements, and transplanting. The episode offers practical advice for dealing with pests, managing nitrogen levels, and ensuring proper growth conditions. It also touches on the challenges of growing cauliflower and the importance of timely harvesting. The discussion aims to help home gardeners improve the success of their brassica crops.
December 9, 2024
Oakleaf Papaya and Guava with Kyle Haggerty
In this episode of the Encyclopedia Botanica podcast, Kyle from Urban Farmstead discusses his experiences growing subtropical plants like oak leaf papaya and various guava varieties in his Sacramento backyard. Kyle shares insights into his zone 9B climate, how he adapts soil for his tropical plants, and specific techniques for growing and maintaining these crops. He also talks about the cold tolerance of different plant varieties, including lemon guava and white sapote, and mentions other noteworthy plants like Babaco papaya and ice cream bean. Check out Kyle's YouTube channel for a full garden tour and more detailed information on his diverse plant collection.
December 2, 2024
Rainwater Harvesting with Kevin Espiritu
In Episode 117 of the Encyclopedia Botanica podcast, host Hillary Dahl discusses rainwater harvesting with Kevin Espiritu of Epic Gardening. Kevin details the extensive rainwater harvesting system he installed on his suburban San Diego property. They talk about the importance of capturing rainwater in a low-rainfall climate like San Diego’s and the logistics of such systems. Kevin provides insights into the economic and practical aspects of rainwater harvesting, while Hilary shares her experiences and thoughts on integrating these systems into home gardens. They also discuss the environmental benefits, costs, and challenges of rainwater harvesting, while offering practical advice for those considering similar projects.
November 25, 2024
Fragrance in the Garden with Stefani Bittner
In episode 116 of the Encyclopedia Botanica podcast, host Hilary Dahl interviews Stefani Bittner, owner of Homestead Design Collective and author, about her latest book, 'The Fragrant Flower Garden.' They discuss the often-overlooked importance of fragrance in gardens, the role of fragrant plants in attracting pollinators, and tips for integrating these plants into existing gardens. Bittner also shares insights on designing a garden with a variety of fragrant plants, the art of creating flower arrangements, and practical advice for small-space gardening using multifunctional, fragrant edibles. The episode concludes with a conversation about ongoing projects, including Bittner's design work in Italy and upcoming workshops.
Order "The Fragrant Flower Garden" from Bookshop.org
Stefani's business, Homestead Design Collective
Morning Sun Herb Farm (source for flowering basil)
November 18, 2024
The Food Forward Garden with Christian Douglas
In episode 115 of the Encyclopedia Botanica podcast, host Hilary Dahl interviews Christian Douglas of Christian Douglas Design and the Backyard Farm Co. about his new book, The Food Forward Garden. They discuss Christian's principles of good food forward design. They also discuss integrating vegetable gardens into existing landscapes. Christian shares insights from his diverse background in horticulture, design, and permaculture, emphasizing the value of growing food for personal and environmental benefits.
Buy Christian's book from Bookshop.org: "The Food Forward Garden: A Complete Guide to Designing and Growing Edible Landscapes"
August 11, 2024
Successful Homegrown Cilantro

Homegrown cilantro ready to harvest!
I think it’s time we have a talk about cilantro. This popular herb is quite possibly the most misunderstood crop in the vegetable garden. If you’ve ever said something akin to: “I can’t grow cilantro. Whenever I try, it bolts right away!”, you’re not alone. Many people have a hard time growing cilantro and some have given up entirely. But all is not lost. With a little bit of planning, it’s possible to harvest perfect cilantro from the garden virtually any time of year.
Like basil and dill, cilantro is an annual herb, meaning that it needs to be replanted in the garden every year. It’s important to note that plants categorized as “herbs'' come in all shapes and sizes. Being an “herb” has much more to do with how the plant is used in the kitchen rather than how the plant grows in the garden. Herbs can be large, woody perennials, herbaceous perennials, biennials, or annuals. The lifespan of any species depends largely on the climate, but cilantro is a particularly peculiar case because of its surprisingly short productive life in just about every climate.
So, you’re not alone when your cilantro bolts, because cilantro always bolts, even under ideal conditions. It should provide some level of relief to most gardeners that fast-bolting cilantro is not an indication that you did something wrong, it’s simply the inevitable growth habit of the crop.
Cilantro grows like a short-lived annual vegetable crop, similar to lettuce and arugula. Given its short lifespan and predilection to bolting, cilantro grows best from seed. Even though most garden nurseries sell transplants in four-inch pots, you’re much better off picking up a packet of seed and sowing it directly in the garden. When selecting seeds, look for a variety labeled as “slow bolting.” It would probably be more accurate to say “slower bolting”, because no matter what variety you select, it’ll still bolt relatively quickly.
Cilantro seed is huge, so it's very easy to see how thick and how evenly you’ve seeded it. It’s best to seed wide and short rows of cilantro, an average planting might be a row about 2” wide and 12” long. These short rows should be seeded frequently and consistently to ensure a steady supply of the crop. If you want usable cilantro from the garden all season, direct seed a 12” row every 1 to 2 weeks.

Cilantro makes a great addition to the fall garden!
Even though the mature plant is very tolerant of cold weather and can survive light frosts, cilantro does not germinate well in cold soil, so start seeding in mid-spring once soil temperatures are above 50 degrees and continue all the way through early fall, coinciding with your last plantings of salad greens. Here in zone 8A, this is usually around mid-September. Surprisingly, these late season plantings will often last throughout the winter and into early spring, the only time of year when the crop holds well in the garden.
During the spring and summer, it’s important to cut the leaves down as soon as they’ve reached harvestable size. The leaves won’t hold long in the garden, so once the plants have reached about 5-8” tall, cut them down to 1” stems with scissors or a sharp knife. If harvested at this stage, the stems will send up a new flush of leaves. A healthy planting of cilantro should yield 2 or 3 cuttings before the plants are too stressed to produce new, healthy leaves. Remove the planting immediately after the third cutting to make room for a new crop in the garden.
You should cut cilantro plants as soon as they are ready for harvest even if you don’t think you’ll be able to use all of the leaves immediately. They’ll often store longer in the fridge than in the garden. By harvesting leaves at their peak, you’ll set the plants up to begin growing another flush of leaves. For continual cilantro harvest, it’s actually better to harvest leaves and compost them (if you can’t use them all), than to leave them on the plants. If left more than a few days, they will bolt, ruining your chances for a good second or third growth from the planting.

Honeybees and other pollinators and beneficial insects love cilantro flowers!
If you’re succession planting cilantro through the season, you may choose to let one or more of your plantings flower and go to seed. The flowers are beautiful and great for attracting beneficial insects to the garden. As you may know, the seed is used in the kitchen as coriander.
To get a year’s supply of coriander seed, simply let a few plantings bolt, flower and set seed. The coriander seed is ready to harvest when the plants have turned brown and the seed fully dried. The entire lifecycle from direct seeding to coriander harvest should be about 3 months.

Saving cilantro seed to plant or to use in the kitchen as coriander is easy!
In short, to go from a no grow to cilantro pro grower: select a slower bolting variety, direct seed into the garden, succession short rows every 1 to 2 weeks, harvest often, and let several plantings bolt for a bonus crop of coriander.
Successful Cilantro

I think it’s time we have a talk about cilantro. This popular herb is quite possibly the most misunderstood crop in the vegetable garden. If you’ve ever said something akin to: “I can’t grow cilantro. Whenever I try, it bolts right away!”, you’re not alone. Many people have a hard time growing cilantro and some have given up entirely. But all is not lost. With a little bit of planning, it’s possible to harvest perfect cilantro from the garden virtually any time of year.
Like basil and dill, cilantro is an annual herb, meaning that it needs to be replanted in the garden every year. It’s important to note that plants categorized as “herbs'' come in all shapes and sizes. Being an “herb” has much more to do with how the plant is used in the kitchen rather than how the plant grows in the garden. Herbs can be large, woody perennials, herbaceous perennials, biennials, or annuals. The lifespan of any species depends largely on the climate, but cilantro is a particularly peculiar case because of its surprisingly short productive life in just about every climate.
So, you’re not alone when your cilantro bolts, because cilantro always bolts, even under ideal conditions. It should provide some level of relief to most gardeners that fast-bolting cilantro is not an indication that you did something wrong, it’s simply the inevitable growth habit of the crop.
Cilantro grows like a short-lived annual vegetable crop, similar to lettuce and arugula. Given its short lifespan and predilection to bolting, cilantro grows best from seed. Even though most garden nurseries sell transplants in four-inch pots, you’re much better off picking up a packet of seed and sowing it directly in the garden. When selecting seeds, look for a variety labeled as “slow bolting.” It would probably be more accurate to say “slower bolting”, because no matter what variety you select, it’ll still bolt relatively quickly.
Cilantro seed is huge, so it's very easy to see how thick and how evenly you’ve seeded it. It’s best to seed wide and short rows of cilantro, an average planting might be a row about 2” wide and 12” long. These short rows should be seeded frequently and consistently to ensure a steady supply of the crop. If you want usable cilantro from the garden all season, direct seed a 12” row every 1 to 2 weeks.

Cilantro makes a great addition to the fall garden!
Even though the mature plant is very tolerant of cold weather and can survive light frosts, cilantro does not germinate well in cold soil, so start seeding in mid-spring once soil temperatures are above 50 degrees and continue all the way through early fall, coinciding with your last plantings of salad greens. Here in zone 8A, this is usually around mid-September. Surprisingly, these late season plantings will often last throughout the winter and into early spring, the only time of year when the crop holds well in the garden.
During the spring and summer, it’s important to cut the leaves down as soon as they’ve reached harvestable size. The leaves won’t hold long in the garden, so once the plants have reached about 5-8” tall, cut them down to 1” stems with scissors or a sharp knife. If harvested at this stage, the stems will send up a new flush of leaves. A healthy planting of cilantro should yield 2 or 3 cuttings before the plants are too stressed to produce new, healthy leaves. Remove the planting immediately after the third cutting to make room for a new crop in the garden.
You should cut cilantro plants as soon as they are ready for harvest even if you don’t think you’ll be able to use all of the leaves immediately. They’ll often store longer in the fridge than in the garden. By harvesting leaves at their peak, you’ll set the plants up to begin growing another flush of leaves. For continual cilantro harvest, it’s actually better to harvest leaves and compost them (if you can’t use them all), than to leave them on the plants. If left more than a few days, they will bolt, ruining your chances for a good second or third growth from the planting.

Honeybees and other pollinators and beneficial insects love cilantro flowers!
If you’re succession planting cilantro through the season, you may choose to let one or more of your plantings flower and go to seed. The flowers are beautiful and great for attracting beneficial insects to the garden. As you may know, the seed is used in the kitchen as coriander.
To get a year’s supply of coriander seed, simply let a few plantings bolt, flower and set seed. The coriander seed is ready to harvest when the plants have turned brown and the seed fully dried. The entire lifecycle from direct seeding to coriander harvest should be about 3 months.
Saving cilantro seed to plant or to use in the kitchen as coriander is easy!
In short, to go from a no grow to cilantro pro grower: select a slower bolting variety, direct seed into the garden, succession short rows every 1 to 2 weeks, harvest often, and let several plantings bolt for a bonus crop of coriander.
February 6, 2024
Growing Vegetable Transplants at Home

Every plant in your garden has to come from somewhere, and for most home vegetable gardeners, that “somewhere” is either a seed in a packet or a transplant tray in a garden center. For the ambitious and curious few, there’s a third way to populate a backyard vegetable patch growing your own transplants at home.
A home nursery gives you the option to explore varieties that are not available from garden centers, and gives you total control over how and when your baby plants are grown.. Home transplant production is not, however, for the faint of heart.
A slapdash propagation space is almost guaranteed to result in stressed crops and a stressed gardener. But with the right approach and some attention to detail, an in-home propagation area can be easy to set up and highly productive. In fact, you can grow hundreds of transplants in a few square feet. A small propagation area with one or two grow lights should provide more than enough room to grow all the transplants needed for a home garden.
When setting up your propagation space, remember that you’re growing plants in an artificial environment. This makes them even more reliant on your care to thrive. You may be able to leave your outdoor garden to its own devices for days at a time, but a home vegetable nursery absolutely requires daily care.
In addition to your dutiful attentiveness, here are the seven key components of a successful home nursery setup:
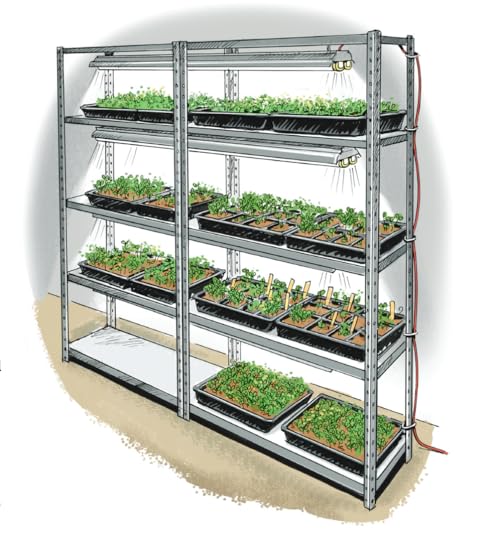
Image courtesy of our book “Grow More Food”
Light: In a typical home, sufficient natural light is rarely available for vegetable seedlings. Even if you have a large south-facing window, your plants will be much more successful with supplemental lighting. Light-stressed plants develop thin, weak, “leggy” stems and are more susceptible to pest and disease attacks. Most vegetable transplants grow best when provided with 12 hours of continuous, supplemental light per day. The intensity of growing lights varies widely. The lower the intensity of the bulb, the closer it should be to the plants. With the right setup, any full-spectrum light (metal halide, fluorescent, or LEDs) should work for propagating transplants.
Heat: If your propagation area is inside the house, you probably won’t need an additional heat source. However, if you are setting up the nursery in an unheated garage, atrium or greenhouse, your plants will need a source of heat to germinate and grow. You have two options: heat the entire space, or heat just the area directly below the seeds. While a small space can be easily warmed up with a space heater, in larger rooms it may be more energy efficient to use a heat mat. Heat mats are available in various sizes, and are perfect for a small nursery. We all know that electricity and water don’t mix, so be very careful when using an electric appliance in your propagation space!

Water: A propagation area will always be a little messy. Make sure to protect any carpet, hardwood flooring, or other delicate material in the area. Most seeds are planted very shallowly, so use a gentle stream of overhead water or bottom-water your flats. Because of the limited soil volume and shallowness of the containers, transplants dry out very quickly. Check moisture at least once a day, and more frequently in hot, sunny weather. The soil should remain evenly moist until the plants have sprouted. Once plants have emerged, allowing the soil’s surface to dry out a bit between waterings will reduce pest and disease issues.
Containers: Plants can be propagated in open flats, plug trays, soil blocks, or recycled containers such as egg cartons and yogurt cups. If you’re using non-standard containers (meaning anything that wasn’t designed specifically for growing seedlings), make sure to poke drain holes in the bottom. Place several seeds in every cell to make the best use of your limited space, then thin to the healthiest plant once sprouted,. As a general rule, always seed at least 20% more than you plan to use in the garden. This will account for unhealthy seedlings and unforeseen disasters. Potting up seedlings into larger containers, such as 4” pots or gallons, may be necessary for cold sensitive crops like tomatoes and peppers that need to live in the nursery for an extended period.
Soil Media: It’s easiest to propagate in germination mix. Germination mix is a finely screened, lightweight medium. The soil’s small particles make it easy for young seedlings to push up through the mixture without being damaged or trapped under a large piece of bark or other substrate in a standard potting mix. As your plants mature, they’ll require more nutrients than a germination mix can provide, which will require you to move them into the garden or pot them up. If you pot up your young transplants to larger containers, use a nutrient-rich, all-purpose potting soil.
Fertilizer: When plants germinate, they have a small stock of nutrients that enables them to become established. However, once sprouted, plants need quick access to additional nutrients. Because propagation containers are shallow and require frequent watering, nutrients leach more quickly than they do in the garden. Frequent, low doses of soluble fertilizer will help your transplants thrive. Keep in mind that over-fertilization can lead to salt buildup or fungal growth, so finding the right dosage and fertilizing schedule is imperative.
Pest and Disease Control: An invasion of insect pests is a real possibility when growing transplants in your home. Keeping your space clean and well ventilated will reduce or eliminate problems. If pests arise, temporarily move the plants outside (weather permitting) and wipe down all surfaces with with alcohol, bleach, or hydrogen peroxide. Sticky traps will help keep persistent insect populations under control. Once plants have sprouted, allow the soil surface to dry out between waterings, this will reduce insect breeding and fungal growth.
Labeling: Label your trays! The importance of plant labeling can’t be overstated. It’s often virtually impossible to distinguish among different varieties of a crop when plants are young. When seeding a entire flat with a single variety, use at least two tags (in case one falls out). When seeding multiple varieties together in a flat, place a tag in each row or each individual cell. The tags can then move with the plants directly into the garden.
If home propagation sounds like your cup of tea, this is a great time to begin building out your home nursery. Allow yourself three or four weeks for ordering supplies and setting up your space, and you’ll be ready to go in early March when it’s time to start this year’s summer crop transplants.
October 30, 2023
Crops you'll love to grow on the Freyr trellis!

A surprising number of annual crops benefit from the support of a trellis. Because we love trellised crops and because we’ve been trialing a ton of varieties, we started carrying a selection of Renee’s Garden seeds in our shop! Here is a short list of some of our favorite crops and varieties to grow vertically in the garden and links to our store where you can find our favorite types:
Beans: This classic garden crop comes in 2 main growth forms: bush types and pole types. Pole beans should always be grown on a trellis. They are very vigorous growers that have tendrils and a habit of wrapping their entire stem around whatever vertical support they can find. This makes them extremely easy to support and we’ve grown pole beans both on vertical strings and right on the posts of our trellis. They’ll wrap themselves around either structure and rarely need any additional training after they initially find the trellis and start wrapping.
Varieties we recommend: Emerite Filet, French Gold Filet, Kentucky Wonder, Painted Lady Runner Beans
Cucumbers: Another very popular crop that benefits tremendously from trellising. Cucumbers can be left to sprawl on the ground, but their fruit become very susceptible to insect damage and rot when grown this way. Sprawling cucumber fruits can also be very difficult to locate in all of the vegetative growth of the plants, so even quality fruits can be missed. Fortunately, like beans, they are very easy to train on a trellis. We prefer to grow them on vertical strings hung from the top bar of the trellis. We drape a piece of twine over the top and secure both ends of the string in a trellis clip at the base of the plant. No knots required! Cucumbers have tendrils and do wrap themselves, but grow best when given a little extra attention to keep them on course. Add a trellis clip or gently wrap your plants around the twine every week or two in the early season. After a few weeks, they’ll be well secured to the string and unlikely to need any additional intervention.
Varieties we recommend: Straight Eight, Suyo Long, Tasty Treat
Eggplant: While eggplant aren’t vines, they can be very top-heavy. Eggplants can grow up to 4-5 feet tall and heavily-loaded plants can topple over under the weight of their fruit. These plants certainly don’t require a trellis, but do tend to be more tidy and less likely to fall over and break if grown with support. To trellis eggplant, drape a string over the top bar of your trellis and secure both ends in a trellis clip at the base of the plant. Gently wrap the stem in the twine, or add an additional trellis clip, 1 or 2 times as the plant grows and that should provide enough support to keep it upright for the entire season.
Varieties we recommend: Italian Violetta Lunga
Melons: Melons are a vining plants with tendrils, so perfect for trellising. Larger melon, like full-size watermelons are best grown on the ground, but fortunately there are a lot of smaller-fruiting melons available that grow perfectly on a vertical string and take up much less space in the garden!
Varieties we recommend: Tuscan Retato Degli Ortolani

Peas: Nearly everyone loves peas of some kind. And there are lots of kinds to choose from! Every year we grow snap peas, snow peas, shelling peas, and sweet peas (sweet peas aren’t edible, but they’re beautiful) on our trellises. Because peas can be planted very closely together, the easiest way to support them is with horizontal strings. Just plant a row of your favorite peas under the trellis, tie a piece of twine on on post, and wrap it across the front and back of the planting. Repeat this every time the plants grow 6-12 inches and you’ll have a very tidy, and easy to harvest crop!
Edible pea varieties we recommend: Sugar Daddy, Oregon Sugar Pod ll
Sweets peas: We’re thrilled to be carrying 10 different sweet pea varieties, hand selected by Hilary. We can list them all here, so pop over to our shop to see what we recommend!
Peppers: Like eggplant, peppers are a non-vining, but top-heavy plant. Supporting your pepper plants with vertical strings will keep them off the soil, protecting your harvest and making the garden look great.
Varieties we recommend: Sweet Italian Sunset Mix, Jalapeno, Sweet Orange & Red Bell
Summer and winter squash: There are many sub-species of squash, but the 2 primary growth habits are bush and trailing. Any trailing squash can be supported with a trellis. Like melons, the largest squash can be difficult to support vertically, but there are dozens of squash varieties suitable for vertical growing. We love to grow smaller-fruit winter squash, and summer squash on our trellis. Many summer squash and zucchini are bush types, but there are trailing types available, like the Incredible Escalator, that we absolutely adore.
Summer squash: We’re super excited to be carrying the hard-to-find, Trombetta di Albenga, and Incredible Escalator, which is exclusive to Renee’s seeds.
Winter squash: Baby Honey Nut, Delicata, Kurin Kabocha

Tomatillos: One of the most sprawling, upright plants in the garden. Tomatillos branch endlessly and often end up with broken branches and dropped fruit. Growing tomatillos on a trellis with either horizontal or vertical strings can help keep them out of the way of nearby crops and protect your harvest, reducing the number of broken branches and dropped fruit.
Varieties we recommend: Fiesta Duo
Tomatoes: Probably the most popular garden crop of all time, tomatoes are nearly always grown on a trellis. Tomatoes come in 2 main growth forms: determinate and indeterminate. Determinate tomatoes stay relatively short and set fruit in a narrow window of time. Most of the popular varieties are indeterminate, which means that they grown indefinitely and fruit over a longer period of time. Both types benefit from trellising, but it’s really the indeterminate ones that need support the most. Tomatoes don’t have tendrils and need a bit more training than other crops, but it’s always worth it. Fortunately, they can easily be supported with either horizontal or vertical strings. Whichever technique you prefer, plan to spend a few minutes every week helping train the plants and keep them on track. This is as simple as adding an additional string, trellis clip, or just wrapping a stem around the existing twine. Check out our tomato trellising videos for more details.
We’re carrying 7 different varieties of tomatoes, all of which we’ve grown and love! Mango Apricot, which is part of the Cherry Triple Treats, is particularly special, and we haven’t found the seed anywhere else!
Nasturtiums and Alyssum: In addition to the crops we’ve highlighted above, we’ve also included nasturtiums and alyssum in our shop. We’ve found that climbing nasturtiums make a great addition to any vertical garden, and the mounding varieties look great at the base of the Freyr trellis. Alyssum is a small plant that packs a big punch, providing season long color, and attracting a ton of beneficial insects to the garden.


