
Colin McCrate's Blog, page 3
October 19, 2023
Easy Garden Clean Up With The Freyr Trellis
One of the best things about using the Freyr trellis and compostable strings to support your crops: end of season cleanup! All you do is cut the strings, bundle up your debris and toss it into the compost. If you’ve ever spent hours detangling vines from metal mesh or plastic netting, you may understand what a game changer this can be! Below you’ll find a few videos of us cleaning up tall, vining crops from the Freyr trellis at the end of the season.
Clearing summer squash off of the Freyr trellis at the end of the season: Cutting down and clearing spring sugar snap peas:After clearing the spring peas off of this lavender Freyr trellis in July, we then planted cucamelons and vining summer squash, which produced into the fall.


October 10, 2023
Fall Vegetable Garden Care and Soil pH

Amending vegetable garden beds with lime and compost in the Fall. Image from “Grow More Food: A Vegetable Gardener’s Guide to The Biggest Harvest Possible”
[The following introduction is an excerpt from our second book, “Grow More Food: A Vegetable Gardener’s Guide to The Biggest Harvest Possible”]
If you have an existing garden that has not been managed with an eye towards ongoing soil management, you likely have depleted some (or most) of the essential nutrients. You many also have an overly acidic or basic pH. Plants absorb significant quantities of nutrients from the soil each year, and unless you are actively replacing these nutrients, plant vigor and yield will decrease over time. Fortunately, it’s never too late to begin rebuilding garden soil and significant improvements can be made relatively quickly.
Soil Fertility
Many gardeners maintain reasonably good soil fertility simply by adding compost, using organic fertilizers, and ensuring that their soil pH is in a reasonable range (between 6 and 7 for most plants). However, if your goal is to maximize your yields using organic methods, a professional soil test will help make sure your nutrient and pH levels are optimum, and will help you identify any trouble spots before they become a problem.
If compost is the only soil amendment you use, your crop productivity and nutrient density is heavily dependent on the quality of the compost. In our experience, the quality of compost (both professional and home-made) varies widely. Without testing, there’s no way to know if your soil and compost contain the full complement of minerals and nutrients necessary to grow quality crops. We have seen many gardeners and farmers get good results for a few years simply by adding compost and organic fertilizer, only to be plagued by poor production as time goes on and specific nutrient deficiencies become more pronounced.
In addition, different soils can have incredibly different latent nutrient bases and the lack of a single micro or macronutrient can dramatically affect the productivity of your garden. Plants do show visible signs of nutrient stress, but these deficiencies can be difficult to correctly identify, especially when you are dealing with micronutrient issues. Identifying your specific soil nutrient levels is a critical first step towards efficiently remineralizing your soil to improve crop yield and nutrient density. And for you single gardeners out there, discussing your soil’s cation exchange capacity is a great way to pick up a date at the next potluck dinner.
Fall is a perfect time to spend a few minutes preparing the vegetable garden for next spring. One of the most important, but often overlooked aspects of soil care is pH management. Although it may sound complicated, monitoring and adjusting your pH is one of the least expensive, easiest, and most impactful ways to improve plant health and crop productivity.

What is pH?
pH is a measurement that indicates the acidity or basicity of a solution. pH is expressed on a scale from 0 to 14, where lower numbers indicate an acidic substance and higher numbers indicate a basic substance. A pH of 3 is very acidic and a pH of 12 is very basic.
More scientifically, pH is a measure of the amount of free hydrogen and free hydroxyl ions in water. Water that has more free hydrogen ions is acidic, whereas water that has more free hydroxyl ions is basic. Distilled water, without hydrogen or hydroxyl ions has a neutral pH of 7.
The pH scale is logarithmic. This means that each number represents a 10-fold change in the acidity or basicity of the solution. For example, water with a pH of 5 is ten times more acidic than water with a pH of 6.
pH changes when minerals become dissolved in water. The pH of soil is largely dependent on the makeup of parent soil in your yard or the soil mix that you purchased for your beds. However, it is also largely impacted by the pH of rainwater. Rainwater is nearly always acidic, because it has naturally occurring minerals dissolved in it. A normal pH for rainfall is 5 or 6.
Why does soil pH matter?
The pH of your soil affects the availability of nutrients to your plants. Even if you add compost and fertilizer, if your pH is too high or too low, your plants may not be able to absorb and use the nutrients you provided.
Nutrients become more available or less available according to the soil’s pH level. The availability range of each nutrient is slightly different, but most essential plant nutrients are maximally available to vegetable crops at a slightly acidic pH, between 6.0 and 6.9.
As an example, an iron deficiency in a crop is indicated by yellowing between the veins of its leaves. However, this condition might not actually be a result of a lack of iron in the soil, but from soil that is too basic for the crop to effectively absorb the iron that is present.
Alternatively, elements in the soil can become toxically available in very high or very low pH ranges. For example, an extremely acidic pH can make manganese available at levels that are actually damaging to your crops; or even allow plants to absorb aluminum from the soil.
How do you test soil pH?
Fortunately, testing your pH is pretty simple. You have three basic options. You can use a pH testing kit that uses litmus paper; you can use an electronic pH tester; or you can send a soil sample into a lab.
For the average home gardener, I usually recommend using a litmus paper kit and sending in a soil sample to a lab. Electronic testers are also great, but in order to get one that is really accurate, you may have to spend quite a bit of money. A soil testing lab will provide a very accurate reading and a litmus paper kit can be used for readings between soil tests.
The cool thing about getting a soil test from a lab is that you also get a lot of other useful information. A good soil lab will not only tell you the pH, it will also give specific recommendations about what to add to your soil to adjust the pH into the proper range.
Once you get your results, you’ll add lime (to raise pH) or elemental sulfur (to lower pH). Keep in mind that these additions will not change your soil overnight. Typically 3-4 months are needed in order for the amendment to take effect. This is why the end of the season is a great time to adjust your pH. With a fall application, your soil should be at the right level by the beginning of next season.
Liming Your Soil
In most yards, soil pH is acidic and lime is the most common amendment to help make it more basic. Lime is “basically” what it sounds like, pulverized limestone rock, also known as calcium carbonate.
There are two main types of lime available: Calcitic and Dolomitic. Calcitic lime is straight calcium carbonate; Whereas Dolomitic lime also has magnesium carbonate mixed in. The advantage of Dolomitic lime is that it also provides magnesium and calcium to your soil, both essential plant nutrients. However, too much Dolomitic lime can throw your calcium-magnesium balance out of whack, which can lead to all sorts of plant health issues. A good soil test result will tell you which one to use, and when in doubt, choose Calcitic lime because there are fewer risks from over-application.
If your soil happens to be basic, you can add elemental sulfur, an organic amendment, to make the soil more acidic.
The Lazy Approach: * Please note that I don’t officially condone this approach, but have seen it performed with good results.
If you aren’t planning to take a soil test, it’s usually safe in our region to add Calcitic lime to your vegetable garden beds once per year. Just pick up a few bags of lime and spread it on top of the beds. Any product should have a recommended application rate listed in pounds or cups to apply per square foot. A typical application might be 1 pound per 25 square feet; one pound of lime is approximately 2 cups.
As a very rough benchmark, a standard lime application may be 3-4 cups of lime per 4’x8’ raised bed. For reference, a standard yogurt container is 4 cups, so applying a yogurt cup of lime to each of your raised beds would be a common yearly liming procedure.
Of course, the best practice is to check your soil pH at least once a year, and add amendments as needed. I think you’ll be amazed at what a little bit of lime can do.
October 9, 2023
Seed Saving Tips for the home Gardener

Harvested cranberry bean seed after drying on the vine.
Seed Saving Tips for the Home GardenerSeed saving is the art of collecting the seed from your crop and using it in subsequent seasons to grow new plants. Even if you save only small quantities of a few crops, understanding more about the life cycle, breeding tendencies, and botany of your crops will help you manage and care for them more effectively.
Only open pollinated crops will produce seed that is viable and that breeds true to itself. Breeding true means that the plants grown from your collected seed will produce a crop with similar traits (growth habit, disease resistance, taste, etc.) to the parent plant. Even with open pollinated crops, to keep the traits you want, you’ll need to learn about their genetics and how to separate flowering crops by time and distance in the garden.
In general, plants that are grown for their flower, seed, or fruit will be easier to manage as a seed saving crop. If you want to collect seed from crops that are grown for their roots, stems or leaves, the plants must be left in the garden past their typical harvest period so that they can continue to grow, flower, and produce seeds. These crops may triple or quadruple in size by the time a seed crop is produced, so must be given wider spacing in the garden. As they send up flower stalks, support and staking may be necessary to keep them upright to maintain good airflow and minimize pests and diseases.
Seed saving strategies are specific to the species you’re working with, so if you plan to delve deep into the world of seed saving and breeding, we highly recommend picking up a few of the books on the subject. While you’re here, let’s dive a little deeper into the basic concepts of seed saving and plant breeding.
If you are saving seed with the goal of preserving the varietal traits of your parent plants, you need to understand the reproductive tendencies of the specific crop you are working with. Certain crops have a strong tendency to inbreed. In this context, inbreeding means that the plant pollinates itself (when a single plant has both male and female flowers). This is particularly common in crops with flowers that remain closed during their fertility period. Other crops tend to outbreed, meaning that they share pollen easily with other plants (also referred to as cross-pollination). The plants they share with must be the same species, but can be different individuals and/or varieties. Most crops are not perfectly inbreeding or perfectly outbreeding, but fall somewhere in the middle.
If you want to preserve varietal traits in your saved seed, you need to make sure each crop variety is pollinated by other plants of the same variety. Strongly inbreeding plants are typically easier for a beginner to save seed from since it is relatively easy to make sure the seed breeds true to itself and don’t need much assistance to become adequately pollinated. However, these plants will have less genetic diversity, meaning that the health and quality of the plant is at more risk.
Too much inbreeding can lead to inbreeding depression. This is especially a concern when dealing with the small population size of the home vegetable garden. Just like any other overly bred organism, too much inbreeding can result in low vigor and susceptibility to all sorts of problems. Even in a small sample population, genetic variation is important. Collect seed from a number of different plants (rather than all of the seed from one particular specimen). Even if a few of the plants are smaller or uglier than their neighbors, collecting their seed will help ensure more genetic diversity within the population, making it healthier and more stable over time.
Genetic diversity helps buffer species against decimation by pests and diseases. More variation in the genetic code means it is more likely that some of the species’ offspring will be resistant to varying pests and diseases.
Outbreeding crops will have more genetic diversity, but also are more susceptible to receiving pollen from undesirable plants. For example, if you are growing both broccoli and kale for seed in the same garden, the plants are so closely related (any two vegetables with the same genus and species name will interbreed) that pollen from the kale plant will end up in the flowers of the broccoli if they are flowering at the same time. This may result in a great new variety of brassica, but more often will result in an undesirable cross between the two plants. A reduced level vigor and fitness resulting from this type of cross can be referred to as outbreeding depression. Strongly outbreeding crops need to be isolated from other crops that will cross with them if you want the seed to breed true to its parents.
If you wish to maintain consistency and genetic stability in your crop, you will need to isolate it from closely related plants while it is flowering. There are three ways to do this: with space, with time, and with physical barriers. The easiest and most manageable isolation method for the home gardener is to separate similar crops by time.
When properly planned, planting related crops at different points during the season will ensure that they flower and set seeds at different times. This is easiest to accomplish with shorter season crops since you can spread out their planting times without running out of favorable weather.
Longer season crops that are strongly outbreeding will inevitably overlap in the flowering phase may need to be isolated by a large amount of space or physical barriers to reduce the occurrence of cross pollination. These isolation methods can be challenging and even impractical on a home scale, so consider focusing your seed saving attention on strongly inbreeding crops or shorter season crops.

Harvesting dried cilantro seed
Dry Seeded CropsMost vegetable crop seeds are collected dry. This means that the seed pod is allowed to desiccate (ideally while still on the plant), after which it is collected and stored.
Dry seed collecting is relatively easy. To learn techniques that apply to specific crops, we recommend expanding your library to include a text or two on seed collecting.
Keep an eye on developing seed heads to determine when they are ready for harvest. Depending on the crop, dried seed heads can be a variety of colors (brown, black, white). It is likely that not all of the seed in a planting will be ready at the same time. Collect seeds in multiple passes over a few weeks or collect all at once and cure the unripe seeds separately from the dry seeds. Partially dried seed can be cured if spread out thinly in a warm, dry location. Many seed heads will open up or shatter if left on the plant too long, so keep a watchful eye on the plants as they develop. An impending rain storm may be an incentive to collect seed, so keep an eye on the weather as well as the plants themselves.
Collect the seed. Depending on the crop, size of the seed pod and quantity you are collecting, you can strip seeds from the plant in the field, collect individual seed pods, or pull up entire plants and bring them in for processing.
Process the seed. Totally dry seed can be separated from the seed pods and chaff by hand or by a combination of screening and winnowing. Pouring the collected seeds through a screen will help separate out much of the debris. Lightweight chaff can be separated by winnowing the seed with a standard house fan.
Store the seed. Once seed is totally dry and separated from chaff and pods, find an appropriate container, label it in detail and put it away until it is needed. Seeds can be stored in paper envelopes, which is an especially good choice if you’re concerned that the seed is not fully dried down (they’ll continue to dry in the envelopes). If seed is convincingly dry, plastic containers or bags will help keep it fresh for years.
Solanaceous crops and cucurbits are typically collected with wet seeds. These fruits are picked from the plant and the viable seeds must be extracted from the fruit and dried manually.
Leave maturing fruit on the vine as long as possible to allow seeds to develop to full size and increase the rate of seed viability.
Collect fruits and separate seeds from the pulp. Cleaning the seed can take various forms, but rinsing the seeds clean in a sink inside a colander (with small enough holes to retain the seed) is an easy, although time intensive method that works very well. Rinse the seeds under warm water and work off all wet pulp until seeds are clean and separated from debris.
Dry seeds immediately and thoroughly by spreading them out thinly in a warm, dry location.
We recommend starting your seed saving adventure with crops that are easy to separate by time, that are strongly inbreeding so that they require small separation distances, or that you plan to only plant one variety of. It’s even easier to collect seed from plants that you are not concerned about cross breeding.
For the casual flower farmer, collecting seed from annual garden flowers can be super simple and satisfying. Sunflowers, scabiosa, calendula, alyssum, marigolds, salvia, nigella all produce high yields of seeds with virtually no additional effort except to collect the seed pods when they have dried but before they open and drop their bounty.


Here are a few of the easiest crops to save for seed:
[DRY] Lettuce: Lettuce is strongly inbreeding so requires very little separation distance, and has a short growing season so can easily be separated by time as well.
[DRY] Cilantro: most growers will only seed one variety of cilantro in the garden, so cross pollination is not a concern. Additionally, the seed of cilantro is the spice coriander, so you may want to let some of it flower and set seed anyways.
[DRY] Radish: these are some of the fastest growing crops in the garden, so planting multiple successions is very easy to separate varieties by time. They may require some staking to support the seed stalks.
[DRY] Beans: a relatively fast growing crop that is strongly inbreeding. Can be separated by distance even in the home garden and by time.
[DRY] Snap Peas: the ovary of the pea is fertile while the flower remains closed, so the flowers typically fertilize themselves. Allow the pods to over-mature on the vine until they have turned brown.
[WET] Tomatoes: tomatoes are actually somewhat technically difficult to save pure seed from, but they are such a beloved crop that they are often the first vegetable that beginning seed savers take on. You can save viable seed from a planting of mixed open pollinated varieties, but be aware that they will have cross-pollinated each other to some degree. The plants grown from the seed might be very similar to their parent, or they might be very different (maybe you’ll discover a whole new delicious variety). If you want to produce tomato seed that breeds true to its parent variety, you should isolate varieties by at least 25 feet in the garden
October 6, 2023
Drip Irrigation How-To, Part 2
In this video we wrap up our irrigation installation by connecting the drip lines and testing the system.
Subscribe to our YouTube channel! We want you to love your garden.We’ve managed hundreds of gardens, from urban rooftop sites, to backyard beds, to multi-acre farms. In our books, we share the tips and tricks we’ve learned along the way, so you can grow a more beautiful, productive and efficient garden, and have fun doing it!
 Grow More Food: A Vegetable Gardener's Guide to Getting the Biggest Harvest Possible from a Space of Any Size By McCrate, Colin, Halm, Brad
  Food Grown Right, In Your Backyard: A Beginner's Guide to Growing Crops at Home By McCrate, Colin, Halm, Brad
October 2, 2023
Fall Tomato Care

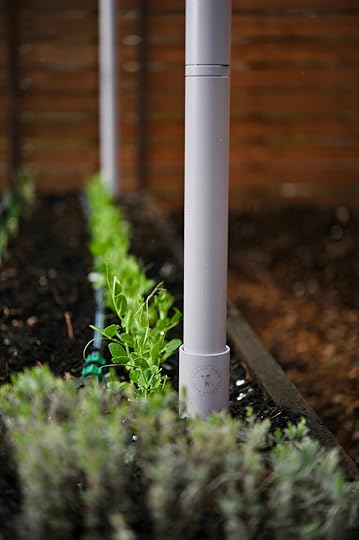
Tomato plants supported by vertical strings on a Freyr trellis.
There are very few vegetable gardens without tomato plants. Unless you’re allergic, it’s hard to imagine why you wouldn’t want them. A healthy tomato plant is beautiful, bountiful and provides a quality of fruit that is virtually impossible to get from a store (although possible to get from a farm stand). Regardless of the length of your tomato harvest season, it’s always a priority to extend it as much as possible.
Unlike some other crops (looking at you green beans) that you may eventually tire of before they’ve finished producing, there is always more room for fresh tomatoes. It begs the question, now that the end of the season is in sight, how do I make the most of my tomato plants?

Cutting off a late-season shoot that won’t have time to develop fruit. These indeterminate tomatoes are supported by compostable twine and clips, and hanging from a trellis.
Late-season blossom and shoot removal: tomatoes come in two general categories, determinate and indeterminate. Determinate tomatoes are shorter plants that ripen all of their fruit in a narrow window, perfect for canning and storage. Indeterminate types are the ones that outgrow your tomato cage by about four feet and try to take over the entire garden. Besides roma and other types of plum tomatoes, most tomatoes planted in the home garden fall into the indeterminate category. By definition, these plants never stop growing, at least until cold weather or blight comes calling. This means that your tall tomato plants will continue to develop new shoots through September and into October, and generally require a tall trellis to support them. These shoots will of course have blossoms, but after a certain point in the season, the blossoms won’t actually have time to develop mature fruit before the plant dies. Thus, to conserve or focus the plant’s energy into the blossoms and fruit that are viable, it’s a good idea to prune off late-season shoots from your indeterminate tomatoes. Typically, these shoots will be emerging from a leaf axis on an existing branch and will be easy to spot because they are thin, near the top of the plant and loaded with fresh flowers. The easiest thing to do is simply snap or prune them off right at the leaf axis. If you start pruning off new shoots in late September, you can help your plants develop and ripen more of the existing fruit on their stems.

Root-pruning
It’s generally believed that tomatoes will ripen fruit faster… if the plant is somewhat starved for water.
Image from Grow More Food
Root-pruning: It’s generally believed that tomatoes will ripen fruit faster, and that the fruits will taste better, if the plant is somewhat starved for water. The general idea is that this lack of water helps concentrate the good stuff inside the fruit without watering it down too much. Kinda like when you decide to add an extra packet of hot chocolate to your mug. If you notice that your plants are setting, but not ripening a lot of fruit, you can stress your plants a bit and incentivize them to finish ripening those fruits by pruning the roots. It’s an easy process, you can simply take a spade shovel and chop a circle around the base of your plant about 12-24” from the stem. It’s almost the same process as preparing a plant for transplanting, except you don’t need to finish digging all the way around and don’t need to lift it out of the ground or replant it. Just chop through the roots in a circle and call it good. The plant will still have plenty of roots to draw nutrients and water from the soil for the rest of the season.

Root pruning stresses the plant, encouraging it to focus energy on fruit ripening. These indeterminate tomatoes are spaced 18 inches apart, and 6 to a row between two vertical trellis posts,
Withhold water: A variation on the root pruning technique is to begin reducing the amount of water you give the plant each week. In hot, dry weather this technique can be a bit of a gamble, but should work well for a well-established fully mature tomato plant. Tomatoes have extensive root systems that can draw moisture from deep in the soil.
Harvest green: If you find yourself at the end of the season with a dying tomato plant still loaded with fruit (like everyone does), pick the green fruits before rot begins to set in. Green tomatoes can ripen on the counter or in a paper bag even when picked very immature from the plant. These end-of-season fruits will rarely be as good as vine-ripened ones, but they are much better than no tomatoes at all.
As the season winds down, fruiting crops may continue to flower late into the season. Indeterminate tomatoes and pole beans won’t necessarily recognize that the season is coming to an end, and will keep producing flowers in the expectation they will have time to mature into fruits with viable seeds.
Knowing your average first frost date, you can anticipate how many weeks of useful production these crops might have left and begin removing any new flower blossoms several weeks before the expected change in weather. By removing blossoms that have no hope of producing usable fruit, you can encourage the plant to ripen its existing fruits more quickly, resulting in a better quality late-season harvest.
May 4, 2023
How to grow tomatoes

San Marzano and Brandywine tomatoes growing on a Freyr trellis using a vertical string support method
TomatoesLycopersicon esculentum
Tomatoes are an incredible crop and probably the most popular garden vegetable. The tomato originated in South America and eventually made its way into the cuisine of just about every culture on the planet. There are many stories about the slow adoption of tomatoes in parts of Europe due to its similarity to poisonous nightshade plants. But eventually the temptation of the sweet, prolific fruits won out over the fear of a horrible death, and pizza was born. Tomatoes contain vitamins A and C and a host of healthful phytochemicals such as lutein and lycopene.
There are two main types of tomato plants you can grow. This is an important distinction, so remember to look for the type on each seed packet or plant tag:
Determinate tomatoes grow to a certain height, then flower and set fruit over a short period of time. Determinate tomatoes can be left to sprawl or given a shorter trellis. They are generally grown for preservation and canning; many determinate types are Roma or plum tomatoes.
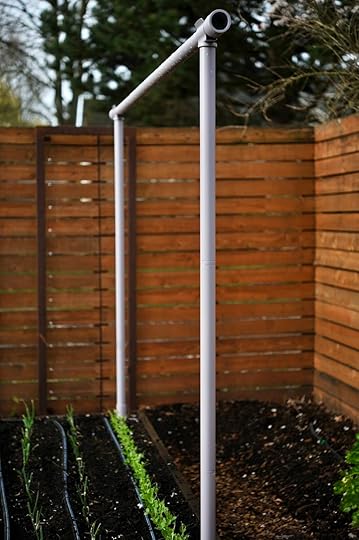
Indeterminate tomatoes will continue to grow larger and larger through the season and continue to set fruit for many weeks (until the end of the season, when they are killed by frost). Indeterminate tomatoes require a tall trellis (either a single pole or fence-our Freyr trellis is a PERFECT way to support your tomatoes). Most cherry tomatoes and many slicing tomatoes are indeterminate varieties.
Tomatoes come in a variety of shapes and sizes. Some principal categories are:
Cherry, Grape: Small, very sweet tomatoes usually eaten whole.
Plum, Roma: Medium-sized fruit, usually with an oblong, narrow shape (similar to a plum), used for sauces and for canning.
Slicing, Beefsteak: Large tomatoes used for slicing for sandwiches, for caprese salad, you name it.
What you eat: The fruit.
Recommended varieties: Cherry: Sungold, Sweet 100, White Currant. Slicing: Stupice (heirloom), Moskvich (heirloom), Big Beef, Black Prince (heirloom). Roma: Window Box Roma, San Marzano.
Hardiness: Frost will kill tomatoes.
Seed information: Germination temp. 60°–90°F, optimal 77°; germination time 14 days at 59°, 6 days at 77°. Seed viability 3–7 years.
Mature plant size: Up to 6 ft. tall and 36 in. wide.

Plant your tomatoes deeply
Trim off lower leaves and plant the stem of the tomato plant underground. The buried stem will grow roots, leading to a more vigorous plant.
How to plant: It’s crucial to start with large, healthy transplants. Look for plants with dark green vegetation in 4 in. or larger pots. Space plants 18 in. apart. If planting with a single pole trellis, drive the post in place first. Next, snip the lowest side branches and the bottom set of leaves off of your transplants, and dig a hole deep enough for each plant to be buried up to the next lowest set of leaves. (Tomatoes set new roots out of the buried stem, so planting them this way gives them the opportunity to develop a large root structure very quickly.) Add 1⁄4 cup of balanced fertilizer to the hole and mix with a trowel. Set the plant in the hole and fill it back in with soil. If you’re using a cir- cular cage, place it over the plant (take care not to puncture your drip irrigation system!).
When to plant: Tomatoes are best planted in late spring, mid- to late May in most areas.
How much to plant: Tomato yield is variable, but you’ll likely harvest 4–8 lb. per plant (up to 20 lb. in ideal conditions). We recommend starting with 1–6 plants for your first year.
When to fertilize: Before planting, and at 3 and 6 weeks after planting. Use 1⁄4 cup balanced fertilizer per plant, or liquid fertilizer.
General care: Prune and train your tomatoes to their trellis. After the plants have started ripening their first fruits, you can stop watering them. This will reduce the size of the tomatoes and the overall yield of the plants, but will encourage ripening and improve flavor.
Pests: Tomato hornworms, aphids, slugs, nematodes.
Diseases: Early and late blight, anthracnose, Verticillium and Fusarium wilt.
Container suitability: Good. Use 5 gal. pots or larger, or anything at least 12 in. in. deep.
When and how to harvest: Tomatoes taste best when ripened on the plant. They’re ready when fully red (or yellow, orange, or purple) and slightly soft to the touch. Harvest by cutting the stem just above the tomato, or by breaking it off with your hand. Tomatoes also ripen well off the vine if held at room temperature. This is useful for large tomatoes that don’t fully ripen on the vine, and in the fall when temperatures aren’t high enough to ripen the fruit outdoors.
Storage and preservation:
Counter: Tomatoes should be stored at 60°–70°F. A basket on the counter is perfect. Avoid the fridge unless you like mealy, tasteless tomatoes!
Freezer: You can puree fresh tomatoes, drain the excess liquid, and freeze them immediately, or you can cook the puree to the desired thickness and then freeze.
Dried: Sun-dried tomatoes.
Canned: Tomato sauce, salsa, whole or sliced tomatoes, paste.
What Tomatoes Can Teach You: How to Prune
Why you do it: Pruning helps ensure high yields of fruit and greater ripening success, especially with indeterminate types. It will limit the overall number of tomatoes, so the plant can produce and ripen higher-quality fruits. It increases air circulation through the plant (which helps keep disease down) and improves sunlight penetration (which helps with ripening). Late-season pruning reduces the production of late-season tomatoes, so that the plant has a better chance of ripening existing fruit. Generally speaking, determinate tomatoes need considerably less pruning than indeterminate types.
How you do it: The ideal tomato plant has two to three main stems, with single lateral branches radiating from each stem. We recommend pruning tomatoes a few times over the course of the season to keep them under control. Prune by breaking excess branches off with your fingers, or use pruning shears if branches are too large to break.
A. At transplanting time, check the crotch of each branch. Break off any new branch growing from the crotch. Also, break off any forming flower buds.
B. Continue to check branch crotches each week and break off new branches. Also, break off any flower buds that appear for 2–3 weeks after transplanting.
C. If using a single pole-type trellis, tie the main stem of the plant to it. If the plant develops other large stems that compete with the main stem, keep only one or two of them and make slings with twine to support them. Cut off any additional main stems that develop.

Tomatoes need support
The Freyr trellis makes is easy to train, prune and harvest your tomatoes!
D. Keep this basic structure going as the plant grows. Prune off any yellowing, dying, or dis- eased leaves. The plant will continue to grow, set new flowers, and fruit.
E. Starting in mid-August, prune off any new flower buds. This will keep the plant from setting fruit too late into the fall.
F. This process sounds kind of complicated, but don’t hesitate! You’ll get more and more comfortable each time you prune.
Also useful for: Pruning tomatoes is a skill unto itself, but the basic technique of selectively removing foliage can help you with managing diseases and improving air circulation for any fruiting crop.
This is an excerpt from our first book, Food Grown Right, In Your Backyard: A Beginner’s Guide To Growing Crops At Home (Mountaineers Publishing 2012)
How to successfully grow basil

I love basil. I love growing basil, eating basil, looking at basil, thinking about basil, and talking about basil. One of the best things about basil is that, while on first blush it may seem like a challenging plant to grow, in reality it is very easy, prolific, and predictable. As long as you go about it the right way.
When you live in the Pacific Northwest, the first thing you need to know about basil is that it hates our climate. For about nine months every year, our weather is the exact antithesis of what basil prefers. Basil hates 40 degree weather and it hates rain. In fact, any temperature below 50 degrees can result in leaf or stem damage, and the plants often become consumed by gray mold during wet spells.
However, basil absolutely loves our summer weather. It grows quickly enough that, even without a warm spring or extended fall season, it can be very successful in the garden.
Like many heat-loving crops, basil needs a head start when grown in temperate climates--if you try seeding it in your garden once the weather gets warm, it just won’t have enough time to grow. Basil can also be slow-growing and finicky if you try to grow your own seedlings indoors, so I recommend purchasing transplants from a nursery when the weather is warm enough to move it right out into your beds.
How and When
It’s best to transplant basil seedlings into the garden once nighttime temperatures are consistently above 50 degrees. Unfortunately, many nurseries begin carrying basil a month before the weather is warm enough for them to go outside. If you ever find yourself looking at basil plants in April, take a few deep breaths and slowly back away from the table. Early planted basil is almost certainly going to fail and need replanting later in the spring.
Unless we’re having a particularly warm spring, I usually wait until at least June 1 before planting basil outside. In fact, we scheduled the publication date for this article late enough in the spring that basil season is almost upon us.
So, once the weather warms up and dries out, plant your basil in full sun and space the transplants about six inches apart. Nursery-grown basil transplants often come very crowded. It’s not uncommon to find a 4” pot with eight or ten plants growing closely together. Make sure that you either snip off the excess seedlings or carefully separate them into individual plants when moving them into the garden.
Prepare the soil as you would for annual vegetable crops, making sure it is loosened and amended with a balanced organic fertilizer. Six or eight basil plants would be a large planting for a typical home garden. If you aren’t planning to make lots of pesto, you will probably be happy with two to four plants. If you are a serious basil fanatic, you may consider succession planting, with the first crop transplanted out in early June and a second crop transplanted out three or four weeks later.
One of the great things about basil is that, the more often you harvest it, the more it will produce during the season. Each time you pinch back the stems on your basil, it will branch out, effectively giving you two branches where you previously only had one. So the more often you pinch the plant back (and harvest the leaves), the more new, leafing branches you will get. If you can keep up with your basil’s growth, you will end up with stout, bushy plants that demand to be made into near daily servings of pesto and caprese salad.
To harvest basil, simply use your fingers or a pair of scissors and cut back the top part of any stem that is becoming elongated. You can start to pinch your basil once the plant is 6” tall. When harvesting, trim each branch back to the next set of leaves. If any branches seem excessively long, you can pinch back two or even three sets of leaves.

To keep up with a healthy basil plant, you may need to harvest once or twice a week once the plant is established. If the plant begins to flower, redouble your efforts to keep the plant trimmed back. If flower stalks are allowed to develop, new sets of leaves will be much smaller and bitter tasting. If you get way behind on harvesting or your plants just seem prone to flowering, you can try cutting the plants back to the lowest set of leaves and letting them re-grow from the base up.
Basil doesn’t have to stop with Italian varieties, although common types like Genovese are popular for a reason. If you want to explore a bit this season, add some Thai, Lime, Lemon, or Cinnamon basil to the garden, and then head out to the potting shed to sharpen up your harvest scissors.
April 20, 2023
Buying Healthy Vegetable Transplants

It’s the time of year when vegetable transplants (or “starts) begin to show up at nurseries, hardware and grocery stores, and plant sales. Transplants are wonderful for many reasons. First, certain crops are difficult to grow from seed and will simply perform better if transplanted. In order to grow to maturity, many summer crops need to be propagated indoors for several weeks while the weather is still too cold to plant outside. Most plants from professional greenhouses arrive healthy and viable, but they don’t always receive the care they need from the retailer. Vegetable plants grow quickly. When stuck in small nursery containers, they can use up all of the available soil nutrients and become so stressed that its hard for them to fully recover. Here are a few things to consider when buying vegetable transplants:
Bigger isn’t always better: You want transplants that are large enough that they are ready for outdoor planting (typically they should be showing at least 2 true leaves*), but not so large that they are discolored stressed or already starting to bolt*. I look for a supple quality in my transplants. Plants that have been potted up too long start to look tall and “leggy”, and the stems often look a little stiff. A vegetable transplant that is oversized for its nursery pot may have a hard time adjusting to the garden and setting out healthy roots.
Look for plants that have recently arrived at the nursery: You want dark green, healthy-looking plants. While some varieties are grown for their unique color (think red cabbage or purple kale), generally if the leaves have started to turn blue, purple, or yellow, they are probably not worth buying. Discoloration is a sign of nutrient deficiency. Keep in mind that, flowers are not necessarily a good thing: It’s enticing to pick out the tomato transplant that already has a set of flowers. Flowers equal fruit, right? Technically, yes, but flowers also signal that a plant believes it has reached maturity and is ready to reproduce. If you purchase an 8” tall tomato plant that is already spending energy on flower production, it may never reach its full size and potential. If allow those first flowers to set fruit, it’s likely the plant will be stunted and you may get 3 lovely little tomatoes this season. However, if you select a dark green, non-flowering tomato, and encourage lots of green vegetative growth before allowing it to set flowers, you’re likely to end up with tens or even hundreds of tomatoes from the same sized transplant. If you do find an otherwise healthy looking vegetable start that happens to have flowers, no worries, just be sure to pinch them off before planting!
Take a close look to and determine how many plants are actually in the pot: If you just bought broccoli, for instance, you will likely see three or four stems coming up from the soil. Congratulations- you just bought four broccoli plants, not one! The problem is, to grow properly, broccoli plants need to be spaced at least 12 inches apart. So you will either need to remove them from the pot and gently separate them, or you will want to cut off all but one plant. Because greenhouse space is valuable, nurseries have to overseed these containers, therefore it’s likely that most of the pots you buy will have more than one plant in it, so take a close look before you plant and make sure to space crops appropriately!!
Plant out quickly when possible: Do not plan to keep purchased plants in their pots for too long. It’s best to shop for plants a day or two before you plan to plant them. When small pots get set aside, it’s very easy to forget about them and let them dry out. If you do have to keep them in the pot for awhile after purchasing, feed them with an organic liquid fertilizer, make sure the receive adequate sunlight and don’t let them dry out.


Common annual crops we highly recommend transplanting INclude:
Leeks
Onions
Cabbage
Kale
Broccoli
Cauliflower
Tomatoes
Peppers
Eggplant
Collards
Brussels
Celery
Fennel (annual bulb-types)
Kohlrabi
Parsley
Tomatillos
April 12, 2023
Freyr Trellis Stockists

In addition to ordering online directly from us, all 4 colors of the Freyr trellis and our compostable trellis clips can be found at the following Seattle-area, locally owned garden centers:
Seattle: Ravenna Gardens // 2600 NE University Village, Seattle, WA 98105, United States
Bainbridge Island: Bay Hay and Feed // 10355 NE Valley Rd, Bainbridge Island, WA 98110-4347


March 31, 2023
SUFCo x Ecolibrium Farm Plant Sale - April 22nd & 23rd, 2023
 Plant SaleSelling certified Organic vegetable starts and Freyr Trellises in partnership with Ecolibrium Farm
We are excited to partner with our friends at Ecolibrium Farm to offer expertly tended, organic veggie & herb starts direct from their greenhouses, and our new Freyr trellises and accessories. Plant sales are first come, first serve, but we’ll have lots!
We will be demoing our Freyr trellis and accessories, which will also be available to purchase on site. If you’ve been looking for a chance to see the trellis in person, this is it! We’ll have a limited number of trellises for sale at the the event, so If know you want to order a trellis, but would like to opportunity to save on shipping fees and pickup in person, pre-order before Friday 4/21 to guarantee we’ll have the color and number of trellises and accessories you want. When checking out just choose “I’ll pick it up myself” and select the Ecolibrium Farm Plant sale so we know where to bring your order!
Saturday, April 22 9am - 2pm + Sunday, April 23 9am - 1pm
at Ecolibrium Farm located at 15410 NE 124 St.Redmond, WA 98052
We’ll are offering a wide variety of oh-so-delicious crops as well as amendments and soil for sale. See below for a full list. Don't miss this special chance to nurture the farm-fresh goodness right in your own backyard. 🥒
Artichoke
Basil - sweet thai, italian
Beet - golden, red, chioggia
Borage
Broccoli
Cabbage - green, red, savoy
Cauliflower
Chard
Chives
Cilantro
Collard Greens
Corn - sweet, ornamental
Cucumber - slicer, persian
Dahlia
Dill
Edible Flowers
Eggplant
Fennel
Kale - red russian, black magic
Leeks
Lettuce - red, butter
Mint
Mixed Greens
Onion - purple, green, white
Oregano
Parsley
Pepper - baby bell, poblano, hot
Rosemary
Sage
Strawberry
Summer Squash
Sunflower
Tarragon
Tomatillos
Tomato - slicer, heirloom, cherry
Winter Squash - pumpkin, ornamental


