
Colin McCrate's Blog, page 23
April 7, 2015
Urban Fringe Farm

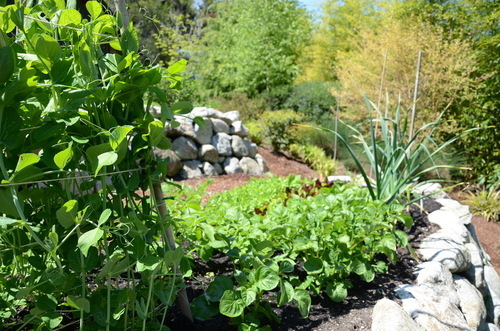
At SUFCo, we are always looking for opportunities to expand the amount of food produced in and around Seattle. One of the most limiting factors in our work is always space. It can be hard to find adequate, sunny space in the city to make our client’s dreams come true. This has been especially proven true for some of the restaurants we work with, who use incredible amounts of produce each week. With this in mind, last season we endeavored to expand our growing capacity by taking advantage of the relative proximity of pristine farmland to Seattle city limits. In the beautiful Sammamish river valley, we leased 4 acres of protected farmland on a parcel known as South 47. Just 15 miles from downtown Seattle, this land is surrounded by small farms, wineries, and a beautiful bike path.

Now entering its second season, the Urban Fringe Farm has proven a wonderful addition to our in-city farming locations. The farm is divided into several ½ acre plots which allow restaurants to grow their own fresh produce within a few short miles of the city. In addition to supplying fresh produce, these customized production farms inform their seasonal menus and provide educational opportunities for restaurant staff.
"The farm has enabled us to have a personal connection to the produce being served at our restaurants and has been a soulful experience," says Jason Stoneburner, head chef of Bastille Cafe & Bar and Stoneburner.
All crops are selected by the restaurant staff and are picked to provide unique options for each kitchen.
This year we will be partnering with the following restaurants and food-production business to provide them with the freshest local ingredients possible. This summer we will be posting a series profiling each restaurant, so stay tuned for more:
Bastille Cafe and Bar
Stoneburner
The Pink Door
Chan
Bacco Cafe
Tray Kitchen
Green Juju Kitchen


Organic Fertilizer Breakdown Part One: Blood Meal

Welcome to our 4-part series on organic fertilizer! Over the course of this series we will break down the 4 ingredients in our custom organic fertilizer blend. Each post will highlight one of the 4 ingredients how it benefits your vegetable garden.
There are a few key steps to growing great vegetables, and fertilizer is just one of them, but it is an important one and is often overlooked. Fertilizer is particularly important when growing vegetables in urban or suburban settings, where the soil may not be as rich as soils in a flood plain or other undeveloped area with naturally deep topsoil.
All fertilizers are rated by their NPK ratio. This number is typically shown prominently on the label and often looks like this: 4-5-6. The numbers indicate the percentage of Nitrogen-Phosphorous-Potassium in the fertilizer. In addition to these “macronutrients”, your plants need a range of other “micronutrients” which should be present in an organic fertilizer, but these micronutrients are not always clearly indicated on the fertilizer label.
Lets begin our exploration of fertilizer ingredients with that first nutrient, N
Part One: Blood MealBlood Meal provides the primary nitrogen component of our fertilizer mix. Other commonly used forms of organic nitrogen are feather meal, alfalfa meal and cottonseed meal. We prefer Blood Meal simply because we find it provides the best results.
We use Blood Meal as a fertilizer in two different applications: as a part of our primary all-purpose fertilizer mix and as a stand-alone nitrogen supplement. For most garden situations, the all-purpose mix is adequate, but we use the Blood Meal as an additional feed for Brassica crops (broccoli, cauliflower, kale, Brussels sprouts, cabbage), as a spring feeding for alliums (garlic and onions) and in soils that are seriously depleted of nitrogen.
Nitrogen is the plant macronutrient most likely to be depleted in your garden soil. Nitrogen comes from many sources, including the air, animal manure, compost and decaying plant residue. However, to be absorbed by your vegetable plants, Nitrogen must be converted into either ammonium (NH4+-N) or nitrate (NO3--N). The chemical form of Nitrogen is always shifting in your soil in a complex process known as the Nitrogen Cycle (read this article for more on the chemistry of soil Nitrogen), the important thing to know as an organic vegetable gardener is that Nitrogen in your soil is often lost due to leaching, denitrification and other natural processes. Therefore, to keep Nitrogen levels adequate in the garden, it is essential to add supplemental forms each season.
Nitrogen is the nutrient that is most responsible for the vegetative growth of a plant. This means that nitrogen is especially important for plants early in their development, as they develop the vegetative structure that will supply your harvest later on in the season.
Generally speaking, the larger and healthier your plant is, the more harvest it can produce. When planting fruiting crops such as tomatoes and peppers, it is essential to encourage lots of bushy growth on the plant before it starts to produce fruit. We’ve all seen the sad-looking bell pepper plant that is about 6 inches tall, has 4 leaves and puts on exactly one tiny pepper. This growth habit is an indication that the plant did not receive adequate nitrogen and has simply made due with the nutrients available. You can certainly commend the tenacity of this pepper, but as a gardener interested in voluminous harvests, it’d be better to encourage large, healthy plants that are able to produce many, many pepper fruits.
Blood meal is a pure source of nitrogen (13-0-0). It is a dry powder derived from cow’s blood which has been steamed or boiled to kill pathogens and remove impurities. It will supply crops with an immediate boost and continue to release useable N over the course of several weeks or months (depending on weather and soil conditions). We recommend using it as part of a balanced fertilizer blend and as a single ingredient application when appropriate. Rough guidelines are as follows:
Apply ¼ Cup of blood meal to brassica plants at planting time
Apply 1 Cup of blood meal per 5’ row of alliums in spring.
Use a balanced fertilizer including blood meal when planting new vegetable crops each season. Application rates for fertilizers vary, follow the recommendations on the product label.
Mixing Fertilizer In a Hole Before Planting

Nutrient Deficient Kale
Plant Winter Squash In The Spring

Spoiler Alert: Winter squash should be planted in the spring! Read on for more information.
One of the most common requests we get when helping to plant fall gardens is for winter squash. As summer starts to come to an end, many people start to imagine themselves in the fall, curling up with a good book and a warm cup of squash soup. Unfortunately, by late summer we’ve already missed our opportunity to plant winter squash.
The “winter” in winter squash, refers to the time of year the crop is eaten. The term harkens back to a time when hardy kinfolk were required to put up a supply of storage crops in order to make it through the cold, dark months of the year. Winter squash is a term that typically refers to storage squashes (butternut, spaghetti, etc.) and pumpkins.
Many winter squash varieties take around 100 days to mature. It is crucial to get them in the ground early in the season so the plants have plenty of time to grow and put on fruit during the warm summer months.
Winter squash can be set out from transplants or direct-seeded into the garden. They are sensitive to disturbances in their roots so should be transplanted very carefully. If direct-seeding, sow 3 seeds in each hole and thin down to one plant when seedlings emerge. Space plants at least 3 feet apart.
There are both vining and bush types of winter squash. If you are planting a vining variety and are short on space, consider planting towards the edge of a bed so the plant can sprawl into the pathway instead of taking over valuable garden bed space.
Winter squash are susceptible to powdery mildew. We recommend preventatively spraying with our Organic Anti-fungal Spray, each week through the season. This spray can be made easily from common household items and can provide you with healthier, better looking and more productive plants.
So, take this early warning to do some winter squash research, pick varieties and get them in the ground on time for a bountiful fall harvest. Our favorite types include: New England Pie Pumpkin, Honey Bear Acorn squash and Delicata.


March 25, 2015
Site Selection for Edible Gardens

Interested in building a new vegetable garden this year or expanding your existing one? Now is a great time to start planning. The first thing you need decide is where the garden is going to be located. Thinking through the entire process and taking the time to make a plan in advance will prevent you from making mistakes that could affect the productivity and beauty of your garden. Here are a few site selection criteria that we consider every time we build a new garden:
Sun Exposure:The most important factor to consider when exploring potential garden sites is exposure to direct sunlight. Nearly every fruit and vegetable plant will benefit from getting as much sunlight as possible. It is essential that your garden receives at least 6 hours of sunlight at the height of summer. If a site gets less than 6 hours of sun per day during the growing season, consider planting shade tolerant perennial edibles instead of vegetables. Remember that the sun is much higher in the sky in the summer than it is in winter, so objects that are casting lots of shade in March may not be casting any shadows in another month or two. Sunseeker is a very useful app for your smartphone that can help calculate hours of sun exposure in a potential garden site.
Access and Visibility:Set yourself up for success by setting up your garden so that it’s easy to get to and work in. You’re much more likely to take care of your garden if you walk by it frequently or see it everyday from the kitchen window.
Dedicated Space:Annual vegetables require different soil management, irrigation, and fertility than established perennial landscaping plants. Making a separate space for your vegetables will ensure they get the care they need and won’t be outcompeted by aggressive perennial roots.
Grade:An even grade is important for a successful vegetable garden. A slight slope is not a problem, but if you have a steeply sloped area that you want use for food production, build terraces to prevent erosion and make the space easier to work in.
Access to Water:Consistent water is vital for your vegetable crops. Make sure you can run a supply line for irrigation from your outdoor hose bib to your garden site, or consult with an irrigation specialist if you need to connect irrigation pipes to your water main.
Initial Soil Quality:If you have poor quality soil, don’t worry! It’s easy to get soil into shape using high quality compost, mineral amendments, and organic fertilizer. If your garden site is adjacent to an older house (built before the mid-1970’s) or structure containing treated lumber, consider testing for lead and arsenic before proceeding with building a food garden.
Site Clearing:If you have multiple spaces to work with, consider the required work to get the space ready for production. Consider if the initial site clearing become a roadblock or if are you ready to re-purpose an overgrown or unused space. Make a plan before starting a site clearing project and ensure you have all the tools you need on hand for an efficient and easy work party.
Fencing:If you have deer, rabbits (or an excitable dog) in the area, plan to fence your garden. This step will save you many future garden management headaches.
I hope these suggestions will help you with choosing a site for your vegetable garden! A little planning will go a long way in making your vegetable garden the best that it can be.
March 23, 2015
Why We Choose Juniper

Edible garden installations are a lot similar to an ornamental garden, only at the end of the project you don't just have a nice place to look at, you've invested in a productive space that keeps giving. As a builder of such gardens, there is a lot to take away from each unique project. It's hard work physically, it's challenging work mentally but it's rewarding work definitely.
One of the Seattle Urban Farm Company's (SUFCO's) signature features is raised garden beds. Raised beds are probably our most built and most essential back yard or rooftop creations. They provide a place for nutrient rich soil, easy access for cultivation and harvesting and fit seamlessly into the landscape. One of our favorite types of raised beds are made with Juniper timbers.
Here are a few reasons we like Juniper. We use 8 foot 6x6 rough cut timbers from Dunn Lumber in Seattle. They source Juniper from Eastern Oregon where this invasive species threatens to choke out Oregon's sagebrush ecosystems. In addition to protecting vital ecosystems, our use of Juniper is also protecting the environment in your backyard and all of Seattle. Unlike traditional pressure treated lumber, Juniper doesn't require a chemical infusion to keep it from rotting. Although the wood is protected, those chemicals slowly leech out into your soil and can be absorbed by the plants you grow and eat. Juniper on the other hand has naturally occurring oils that aren't harmful to your vegetable production but still protect the wood from pests and weather for several decades.

While Junipers' minimal environmental impact tops our priority list for its use, we also just plain love its rustic and earth centered appearance. Juniper adds character to every garden and looks especially good as a terraced growing space. Not only does Juniper make for a great garden bed, it is also a perfect practical solution for a retaining wall, steps or as a border for a walkway.

With all these benefits for using Juniper maybe you're wondering what its disadvantages are, if any. I can only think of two. The first is that they are truly rough cut pieces of lumber. Meaning not every 6x6 is exactly 6 inches by 6 inches. This makes it hard to fit pieces together without gaps. Some can also be twisted and misshapen, which makes tying them together with tight seams and making clean cuts difficult. But scrutinizing over the pieces we choose and having an eye for detail when putting them together has always turned out great looking beds. The second con is that 8 foot 6x6 timbers are heavy! Depending on the size of the bed or beds we could be lifting, cutting and moving dozens of sixty plus pound pieces of wood each day. On the flip side, we get really great sleep every night during construction and we're a lot stronger at the end of the project.
Juniper beds are a great option to consider in your next garden or garden upgrade. From the diversity of its use to the positive environmental impact, improving any aspect of a landscape can be accomplished with Juniper.
By SKIP MACKINTOSHAt SUFCo, Skip is part of our skilled installation team and spends most of his time building urban farms all around the Seattle area. In 2012 Skip worked on a small mixed organic vegetable farm in Oakville, WA. This experience served as a crash course in all aspects of small scale farming in Western Washington and was a springboard into his position as an installation crew member.
All photos by Hilary Dahl

March 11, 2015
Sweet Potatoes in Seattle?

Sweet potatoes in Seattle? Yep, it can be done. At Seattle Urban Farm Co. we love pushing the boundaries of what can be grown in our region, so for the past two seasons we have been growing sweet potatoes in our unheated greenhouse. We are thrilled to report we have had tons of success!
Originating in the tropical regions of Central and South America, Sweet potatoes (Ipomoea batatas) are more closely related to the morning glory flower than true potatoes. In fact, as you will see when growing the crop, the leaves and vines strongly resemble those of the ornamental (and invasive) morning glory. The flowers also look just like morning glory, but these agricultural cultivars do not always flower in temperate climates like ours. Since sweet potatoes evolved in warm, humid climates, they can be a challenge in our region, so any warming assistance you can provide, such as a greenhouse, row cover or cold frame will help improve yields and speed up plant growth.
Interestingly, sweet potatoes are most often planted from "slips", which are cuttings of adventitious roots from another plant or tuber. It is possible to grow your own sweet potato slips by simply sticking an organic sweet potato tuber in a glass of water and waiting. However, this process can take quite a long time, so most growers order slips from seed companies for spring planting.
Consider placing an order for slips now, even though they don't ship or get planted outside until later in the spring, its a good idea to order early to make sure stock doesn't sell out. We recommend the variety Beauregard.
Once your slips arrives, plant them 3-4" deep in raised beds 10-18" apart in rows 36-60" apart. Keep well irrigated until plants are established. Sweet potatoes actually require little attention- we basically just planted them a lightly fertilized planting bed and crossed our fingers!
Good luck!
March 10, 2015
Early Spring Events

It's spring and that means plant nurseries and local gardening organizations are buzzing with activity! Here is short list of a few upcoming events we recommend:
MarchSaturday March 14th: Edible Garden Design Class with Brad Halm at Sky Nursery | 11- 1pmWant to grow food in your yard this season? Let Brad Halm of Seattle Urban Farm Company guide you through designing your own "backyard farm". He’ll discuss how to find the best spot on your property for a vegetable garden, how to lay out the space for maximum production and ease of use, and how to get your soil into condition to grow top quality organic vegetables. He'll also teach you how to incorporate fruit trees and berry bushes into your existing landscape. For those of you with more urban yards, he'll cover growing edibles in container gardens.
Seattle Tilth March Edible Plant Sale | 9-3PM
After Brads talk, stop by the Seattle Tilth Edible Plant Sale! This festive spring gardener gathering has a huge selection of edible plant starts perfect for spring planting on Admission is FREE!Sunday March 15th: Edible Garden Design with the Seattle Urban Farm Company | 11:30–12:30pm
Brad Halm, co-owner of the Seattle Urban Farm company and author of Food Grown Right, In Your Backyard, will share his unique approach to urban edible garden design. He’ll show a series of small, medium, and large home food gardens and talk about the decisions made during the design and construction process of each garden.AprilWednesday April 1st:The Living Future UnConference Ballard Food & Farm Tour | 9-5PM
Join us on a tour through two unique neighborhoods: Fremont, Seattle’s countercultural neighborhood and Ballard, the traditional center of Seattle's ethnically Scandinavian seafaring community. From riding the local bus routes to touring and eating at some of Ballard's favorite spots, this tour will have you feeling like a sustainably-minded Ballardite for a day!Saturday April 11th: Molbaks Nursery Edible Gardening Weekend | April 11& 12, 11am-2pm
Ready to jump into edible gardening but don’t know where to start? Join us for two days of expert advice, information-packed classes and savings good enough to eat!
As part of this event, Colin will be leading an edible garden design workshop on Saturday!
More With Less: Creating a Productive Vegetable Garden in under 15 Square Feet

Just because you don’t have an expansive, sunny backyard doesn’t mean you can’t have your own little slice of vegetable garden heaven. You can can grow vegetables and herbs at nearly any home if you have enough enthusiasm and creativity. In an effort to show the range of possibilities, lets consider what might need to happen to create a 15 square foot garden at your home (a 15 square foot space would be 3’ x 5 or some similar variation’; a 4’ x 4’ space would be 16 square feet).
Site your garden: When creating a vegetable garden of any size, it is importing to choose the right location. Small gardens can be placed in most any site including a deck, patio, driveway, front yard, rooftop or backyard. Three things to consider when looking for the best possible spot for your garden:
You MUST have sun: The most important thing that should dictate your garden’s location is the site’s exposure to direct sunlight. Nearly every fruit and vegetable plant will benefit from getting as much sunlight as possible. It is essential that your garden receives at least 6 hours of sunlight at the height of summer.
Accessibility: Set yourself up for success by setting up your garden so that it’s easy to get to and work in. In a perfect setting, the garden will be highly visible from the house so you see it every day and don’t forget to check up on it!
Consistent watering is key: Aim to place your garden near a water source or a location that is easy to bring water to. Look for your existing outdoor water spigot (check to make sure they work) and figure out the easiest way to deliver water to the garden. You may simply want to use a watering can, or to drag a hose over to the garden and leave it sitting nearby for ease of use. If you are super eager, you can set up a simple timed drip irrigation system for the garden off of the nearest hose bib.
Small-scale garden set-up: A 15 square foot garden can take many shapes, but it is likely that you’ll need to use a series of containers or to build a small garden bed. Things to consider when purchasing containers or building a bed for the garden:
Not all containers are created equal: It is essential that the soil in your garden stays consistently moist without being too wet or too dry. Some containers dry out more quickly than others. In particular, unglazed ceramic like terra cotta can wick moisture out of the soil, necessitating more frequent watering. Some containers are simply designed with undersized drainage holes (or occasionally no holes at all) which can impede or prevent proper water drainage. Consider adding to or expanding the drainage holes in this situation before you set up the garden. If you are building a bed, make sure water can drain freely.
Soil depth is crucial: In a small garden, giving plants all the space they want can be challenging. Since you might be planting crops closer together than normal, having containers or beds with deep soil can help tremendously. The soil can’t be too deep, but a minimum of 8” is recommended. Crops will grow much better in 12” or 18” of soil.
Fill the bed or container with the right type of soil: Make sure you read the label! Some potting soils are designed for specific plant types such as cacti or orchids. You want a blend that is suitable for indoor/outdoor vegetable growing. Examine the ingredients listed on the bag. Good vegetable growing soil may have ingredients like chicken manure, peat moss, perlite, kelp meal and worm castings. Avoid potting soils that contain anhydrous ammonium nitrate or phosphoric acid.
Add organic fertilizers: Even if potting soil contains some organic fertilizers, you will want to add more when planting vegetables. Lack of fertilizer is a very common reason why people have limited success growing vegetables in pots or small garden beds. We recommend adding organic fertilizers to all vegetable plants but this is especially important when it comes to plants that are growing in containers. All vegetables will benefit from an application of balanced organic fertilizer when planted. As a baseline we recommend ½ cup of balanced organic fertilizer per 5 gallon pot before planting.
A dry fertilizer made up of many different components is called “balanced” or “all-purpose” fertilizer. Ingredients can vary but the nutrient breakdown will show approximately equal amounts of nitrogen (N), phosphorus (P), and potassium (K). Fertilizers with the nutrient breakdowns of 5-5-5, 3-4-4, or 3-2-2 can all be considered balanced.
Gardens can take many forms and the exact details of every garden will be somewhat unique, but following these basic steps will propel you far down the road towards a healthy and easy to manage space. For more information on building and managing a home-scale vegetable garden, check out our book “Food Grown Right, In Your Backyard” and stay tuned for part two of this blog series: Choosing Crops for the 15 Square Foot Garden.


How to Build a Bamboo Pea Tri-pod: A Photo Tutorial
Many snap pea and snow pea varieties can easily grow to reach 7' tall so building a structure to support your pea vines is crucial. One of the most inexpensive, and easiest ways to create a tall semi-permanent trellising structure for your peas is with 8' bamboo poles (about $5 each at your local hardware store) and garden twine. The following photos show the process:


1) Place bamboo poles in a triangular shape in your garden bed. Space poles about 2 feet apart and sink poles firmly in the ground. Gather the poles together about 1 foot from the top. Cut a 12 foot piece of twine. Tie one end of the twine around one pole.
2) Wrap the twine around all three poles 8 times, pulling the twine tight with each lap of the poles.


3 and 4) Wrap the twine around itself, crossing at least twice between each pole.


5) Tie the end of your ball of twine to one pole.
6) Wrap the twine around each pole until you make it back to the first knot.


7) Continue steps 5 and 6 every 10 inches until you reach the top.
8) Once all the horizontal twine rungs have been tied, fertilize around the base of the tri-pod.


9) Mix in fertilizer and transplant peas along the base of the trellis. Pea transplants should be spaced about 1 inch apart. Peas can also be seeded along the base if transplants are not available.
10) Water and your done!
February 11, 2015
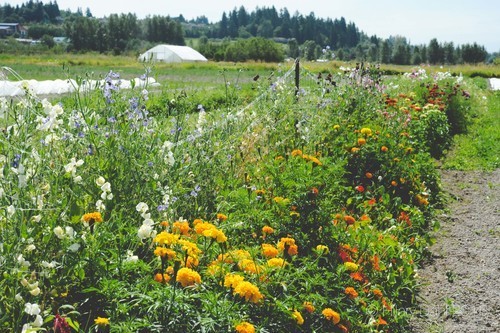
Planning Your Annual Cut Flower Garden
All photos by Hilary Dahl
Getting excited about growing a colorful cutting garden is pretty easy this time of year. Seed catalogues spark our imaginations with romantic descriptions and colorful images of summer. Growing a cutting garden can be easy, is bound to be beautiful and can provide a very important resource for your vegetable garden. Flowers attract pollinating and other beneficial insects to the garden, so by planting an array of flowers in the yard you are contributing to the biological diversity of your neighborhood. Check out this link to more information about flowers and their relationship to beneficial insects: Beneficial flowers link
Lets take a look at some of our favorite and most reliable annual flowers for cutting:
CosmosI absolutely love a stand of tall, dense cosmos, but admittedly, they can start to get a little unwieldy during the late summer months. If you have lots of room, I say go for it and grow the tall 4-footers. If you are tight on space, the short guys (20-26”) can still provide you with an abundance of cut flowers without taking over your entire garden.
As a cut flower: Cosmos, alone can make a cheery or sculptural bouquet. Mix them with other flowers, such as yarrow and nigella, and to create a rustic summertime bouquet. Harvest when petals are just beginning to open.
When and how to seed: Cosmos can be direct seeded mid-April through May.
Varieties we recommend: Unique Mix (Territorial Seeds- 20-26”), Double Click, Sensation. This year we are experimenting with a new-to-us extra short variety from Baker Creek Heirloom Seeds called cosmino. We are excited to plant them in the more compact backyard farms we maintain around Seattle.

Double Click Mix cosmos
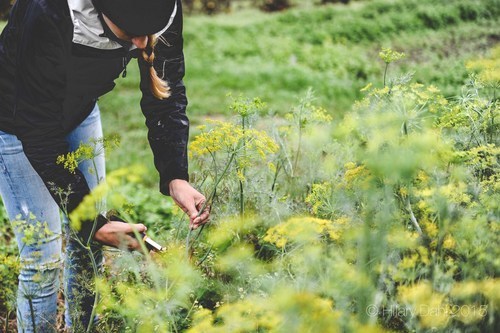
Dill
Traditionally grown for it’s flavorful, foliage and seed heads, dill makes an amazing cut flower. The umbelliferous head provides a shape and texture that isn’t found as often among annual flowers.
As a cut flower: Dill last for up to ten days in a vase with water.
When and how to seed: Dill tends to germinate more consistently once the soil has had a chance to warm up a bit. Direct seed dill in late spring or early summer.
Varieties we recommend: Mammoth, Vierling
I have been growing marigolds for years and have always appreciated them for their powerfully fresh fragrance and organic pest control properties. But despite marigolds obvious virtues, I just wasn’t that inspired to grow them. A year or two ago I started to notice marigolds bud phase and everything changed. The buds are a succulent green, just thin enough for some of the yellow and orange tones to show through. The bud shapes vary, but can be reminiscent of a poppy seed pod.
As a cut flower: Not all marigold varieties provide strong, tall, spear-like stems with robust buds and flowers. Be sure you choose one that gets tall and has sturdy stems. Once cut, they easily last 10 days in water.
When and how to seed: Marigolds transplant well, so to get a jump on the season and ensure we have plenty of healthy baby plants, we seed marigolds in plug trays about 4 weeks before last frost. They can also be direct seeded into the garden after last frost. If direct seeding, thin plants to 8-20 inches apart. Deadhead regularly to encourage season-long color.
Varieties we recommend: Giant Orange, Giant Yellow , Queen Sophia
Vierling Dill
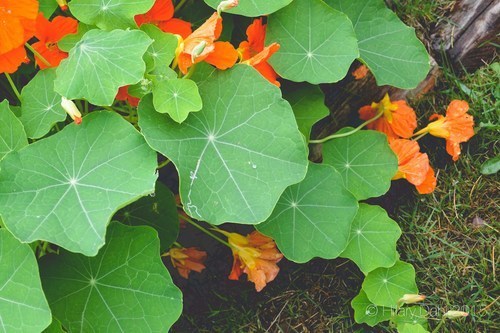
Nasturtiums
When it comes to Nasturtiums, Seattle Urban Farm Co seems to be a team divided. We have one camp who loves their simple, bright, edible flowers and playful, trailing aphid-attracting foliage. The other camp is of the belief that instead of distracting the inevitable summer aphids away from your vegetables, nasturtiums actually attract aphids to a garden in the first place; and although the aphids may initially congregate on the nasturtium plant, they will eventually spread to the rest of the garden. The jury is still out.
As a cut flower: Both the flower and foliage make good cut flowers and last a long time after cut. For me, personally, the leaf of the nasturtium is a unique gem that adds a bold texture to any bouquet.
When and how to seed: Nasturtiums should be direct seeded as early as 2 weeks before the last frost. We seed them from late-April through late-June. Sow in rows 10-12 inches apart at a rate of about 3 seeds per inch. Thin to 1 plants per foot.
Varieties we recommend: Empress of India, Trailing Nasturtium Mix
Nigella are a low-maintenance flower gardener’s dream. They germinate well when direct-seeded, they bloom for long periods of time and their delicate fern-like foliage and exotic looking seed pods are just as lovely as the flower. If left in the ground long enough for the seed pods to dry out, nigella will reseed itself-so it’s up to you to decide if you want them in the same spot next year.
As cut flowers: The petals will last only a few days once cut, but the seed heads will be happy for weeks in a vase with water, or months when dried.
When and how to seed: Nigella plants are sensitive to root disturbance so they are happiest when seeded directly into garden beds. They take about 75 days from seed to flowers, so in the Pacific Northwest, they can be seeded from late-March through July. Sow in rows 10-12 inches apart at a rate of about 3 seeds per inch. Thin to 2 plants per foot.
Varieties we recommend: Love in the Mist, Delft Blue
Nasturtium foliage
Snapdragons
Snapdragons’ stalks of brightly colored flowers are a must for any cut flower garden. They bloom for months and their flowers come in just about every shade, except true blue.
As a cut flower: Harvest when the bottom 3rd of the flowers are open. Their soft, puffy, spikes can easily hold their own in a simple snapdragon only bouquet, and also work well mixed with other flowers.
When and how to seed: Snapdragon seeds need light to germinate, so they cannot be covered with soil. They can be direct seeded into garden beds, but you will have less control over the germination conditions. The seeds may blow away or get cover by soil after a heavy rain. We recommend starting the seed in plug trays. Fill the plugs (or old egg cartons) with germination mix or potting soil and simply press the seed on the surface of the potting soil. Water using a watering can or hose end sprayer set to the “shower” mode. Once germinated, snapdragons are easy to grow! Transplant into the garden in early May.
Varieties we recommend: Madame Butterfly, Rocket Mix, and Animation Mix
Like almost the annual flowers listed here, sunflowers are versatile, making a great bouquet on their own, or complimenting other flowers in a bouquet.
As a cut flower: Once cut, sunflowers last up to 10 days in water.
When and how to seed: Sunflower seeds can be sown directly into the garden from early April through May. Sow 2 seeds per inch in rows at least 12 inches apart. Thin to 1 plant per foot.
Varieties we recommend: Sunflower seed can be really expensive so we save the seed from the sunflowers we grow each year. Unless you need a very specific head-size or height, we highly recommend you save your seed too!
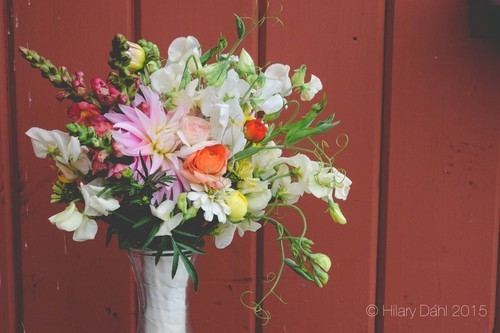
Bouquet including: sweet peas, marigold buds, marigold foliage, snapdragons & zinnias
Sweet Peas
Sweet peas are by far the most fragrant of this bunch. These bright, trailing flowers looks as lovely on the vine as they do in a vase on the windowsill. If you are growing sweet peas near your vegetable garden, avoid confusion by planted them far away from edible peas, as all parts of sweet peas are poisonous.
As a cut flower: Not all sweet peas make great cut flowers. The heirloom varieties often have the most striking color and scent, but their stems tend to be short and thin, making them harder to work with as a cut flower.
When and how to seed: Sweet peas can be direct seeded into garden in late winter or early spring. The plants prefer to grow in cooler conditions, so get them started early so they have plenty of time to mature before the heat of summer sets in. Soak seeds in water for 24 hours before seeding. Sow 1 seed per inch along a sturdy trellis. Sweet peas can reach up to 10’ in height.
Varieties we recommend: Mammoth, Royal, Elegance
Zinnias are commonly called the ‘workhorse’ of a flower garden. They are available in all shapes and sizes from large dahlia-flowered to small button-shaped.
As a cut flower: I have become quite the purist when it comes to zinnias and I am now inclined to think that they are displayed best in zinnia-only bouquets. With that said, I do mix them into more dynamic bouquets (see below).
When and how to seed: We have found that zinnias grow best when direct-seeded. Sow 2 seeds per inch. Thin to about 3 plants per foot. Most zinnia plant spacing guides would say to thin them to 1 plant per foot, but as you cut the flowers, you are effectively thinning as you cut! For season long cutting, succession plant them every 2 weeks from April to the first week of May.
Varieties we recommend: Benary’s Giant, Oklahoma, and Giant Cactus Flowered

Selection of Benary's Giants zinnia
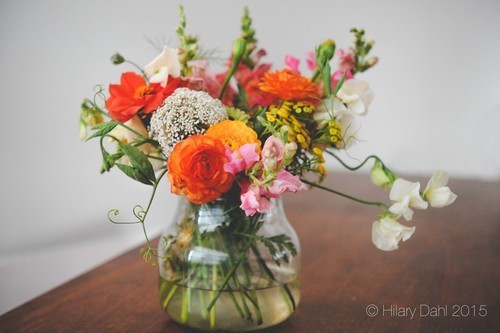
Bouquet including: sweet peas, marigold buds and snapdragons


