
Andrew Skurka's Blog, page 37
May 14, 2018
Review: Big Agnes Tiger Wall UL2 & UL3 || A “couples trip” tent
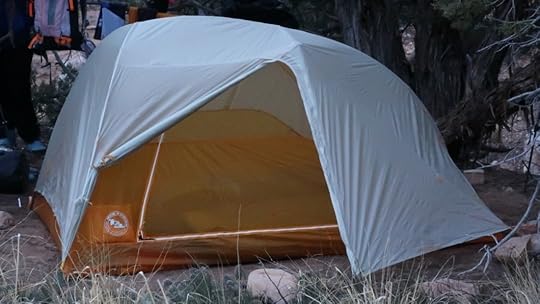

The Big Agnes Tiger Wall UL is the lightest and roomiest two-door/two-vestibule semi-freestanding tent available for $400 or less.
The Big Agnes Tiger Wall UL is new for spring 2018. REI has been the exclusive distributor so far, but more retailers will have it starting next month. It’s available in two sizes:
Tiger Wall UL 2 ($400, 2 lbs 8 oz)
Tiger Wall UL 3 ($450, 2 lbs 15 oz)
With its semi-freestanding pitch, crossover roof pole, and two-door/two-vestibule configuration, the Tiger Wall UL sits functionally between BA’s popular Fly Creek and Copper Spur models, and competes most directly with the MSR FreeLite, Nemo Blaze, Nemo Hornet, and Sierra Designs Sweet Suite.
I wrote a preview of the Tiger Wall UL as part of my Outdoor Retailer coverage in January, and used a production version in Utah’s Grand Gulch in April on a trip with my wife Amanda.
Review: Big Agnes Tiger Wall UL2 and UL3
The Tiger Wall UL was not designed to break records. Instead, it tries to do more while keeping in check its weight and price, and remaining very easy to use. I don’t believe there is a 2- or 3-person semi-freestanding double-wall tent that weighs 2.5 or 3.0 pounds (or less), that retails for $400 or $450 (or less), and that matches or surpasses the Tiger Wall’s interior verticality, two side-entry doors, and two vestibules.
But the Tiger Wall UL is not without compromise. To achieve its low weight, Big Agnes used thin fabrics and light-duty #3 zippers, provided the bare minimum of interior floor space, and was stingy on guyline tensioners and door openings.
I found the Tiger Wall UL to be an ideal “couples trip” tent — it’s the first shelter that Amanda has genuinely liked. She thought it was comfortable and secure, appreciated having her own door and interior pockets, and was able to pitch it without knowing any knots or reading the instructions. Meanwhile, it was acceptably lightweight for me.
Targeted users
You might consider the Tiger Wall UL2 or UL3 if you want a 2- or 3-person shelter that:
Weighs less than 2.5 or 3.0 pounds for fly, inner, poles, stakes, and stuff sacks;
Features two side-entry doors and two vestibules;
Costs $400 or $450, or less if you can wait for a major holiday sale;
Has a double-wall construction, with the ability to use the fly, inner, and footprint independently or together as a system;
Includes a dedicated pole set, perhaps because you don’t use trekking poles;
Has an intuitive, foolproof pitch;
Can be inspected first-hand prior to purchase, and returned painlessly if you change your mind; and/or
Comes with a reasonable warranty.
I would not recommend the Tiger Wall UL for regular use in snowstorms, high winds, or sandy environments. For very extensive use, I would at least plan on buying the accessory footprint, and I probably would look for something less delicate. For ounce-counters, you may be willing to spend more, endure more fuss, and/or be less comfortable to get something lighter.
Key product specs
How much does the Tiger Wall UL weigh?
My Tiger Wall UL3 was about 1 oz (2.7 percent) heavier than its spec weight, which is within a reasonable margin of error.
The “Packed Weight” is closest to what the UL2 and UL3 will weigh on an actual trip when pitched in its default configuration (fly + inner, stock pole set, no footprint). At best, 2.3 oz can be shed: take four stakes (-1.4 oz) for just the vestibules and rear corners, and leave behind the two largest stuff sacks (-0.9 oz).
In marketing material, the Tiger Wall’s “Trail weight” will often be referenced. But this is not a practical weight, since since its performance is greatly diminished if the rear corners and vestibules are not tensioned.
Pitch
As you would expect of a semi-freestanding tent, the Tiger Wall UL has a nearly foolproof pitch that is convenient and fast. However, it’s almost too easy — unlike a perfectly pitched tarp or mid, it provides no sense of satisfaction.
It is easiest to pitch the inner first, and then the fly. If you have the accessory footprint, it’d be possible (but awkward) to pitch the fly first, like in the event it were raining.
The single-pole is clumsily long, but that seems preferable to a more manageable multi-piece pole set that must be assembled on-site and that is at greater risk of losing pieces.
The rear corners and vestibules must be tensioned to maximize interior volume, vestibule volume, and weather-resistance. I strongly recommend attaching adjustable guylines to these tie-outs, in the event that a rock or root is in the way. No tension system is included, which helps to keep spec weight low but which compromises its functionality.

The rear corners of the inner and fly must be staked out in order to maximize interior space and weather-resistance. The stock system offers no tension adjustment or adaptability (if, say, a rock or root prevents stake placement). I strongly recommend replacing it with a better system.
Interior space
The Tiger Wall UL2 and UL3 provide the bare minimum floor space for a 2- and 3-person tent. The UL2 is 52 inches wide at the head, 42 inches at the foot; the UL3, 66 inches at the head, 60 inches at the foot.
With two 20-inch pads inside the UL2, there is just 1 to 6 inches of leftover space on each side. With three 20-inch pads inside the UL3, there is even less leftover space — 0 to 3 inches on each side. If an occupant has a wider 25-inch pad, the Tiger Wall will only fit one or two people.
Amanda and I found the UL3 amply comfortable. But we agreed that we would not want to share it with another adult, especially in inclement weather, and especially for a weight penalty of only 4 oz. A child or small dog would be okay, although I’d have to protect the floor from sharp paws.

The Tiger Wall UL3 is comfortable for two, but I question its practicality for three (especially 3 adults in crappy weather). The floor is 66 inches wide at the head and 60 inches at the foot, so three 20-inch pads would cover nearly the entire floor.
The crossover roof pole helps to maximize the interior volume potential of the footprint. The side walls are near vertical, which allows all occupants to sit up comfortably without needing to lean towards the center as required in fin-style geometries like the Fly Creek and Nemo Hornet.

The 42-inch peak height provided ample head space, especially with the crossover roof pole — it makes the side walls more vertical and creates more interior room.
Double doors
The two side-entry doors and two vestibules offer multiple advantages over a single front-entry door. Entry and exit is physically easier, requiring less contorting. Each user gets their own vestibule, so there is no battle over space, access, or organization. And it allows for cross-ventilation, which helps to minimize condensation in humid conditions and to improve comfort in warm temperatures.
The user-friendliness of the double doors is partially compromised by the door size on the Tiger Wall’s fly. Another 12 inches of zipper (at the cost of about 2 oz) would help here. Big Agnes describes this as a feature (“Low Vent”), explaining that it keeps the vestibule protected while still allowing for air flow.

I admire BA’s vigilance in stripping every extraneous ounce from the Tiger Wall, but question some of the results. The fly door, for example, is unnecessarily small and low, because a more generous opening would have required a longer zipper (for an extra 1 to 2 oz total).
The cost of ultralight
While inspecting the Tiger Wall closely and using it for several days in the field, I began to admire BA’s vigilance in reducing its weight. I don’t necessarily agree with all their decisions and I detest the rationale (to win the “spec war,” which sadly is a big driver for the sales of tents and other outdoor gear), but I can at least admire the effort. My specific concerns:
The weight of a tent is largely a function of its fabrics. And one way that BA achieves very low weights is by using very lightweight fabrics. In the Tiger Wall, BA used 15d coated nylon for the fly and 20d coated nylon for the floor, both rated to 1200 mm hydrostatic head. BA uses the same fabrics in their Fly Creek, and they are serviceable for multiple seasons or a long thru-hike. But they’re not as reliably waterproof or as tear- and puncture-resistant as the 30d nylons or Dyneema Composite Fabric (Cuben) used by cottage companies, which would add weight and cost, respectively.
The #3 zippers on the fly and inner are lighter but less reliable than #5. Treat them with care: keep them clean and don’t tug hard on them. If you camp frequently in southern Utah or other environments with extremely fine sand, I’d probably look for a different shelter.

The #3 zippers on the fly and inner are lighter but less reliable than #5.
The stingy tie-outs and small entryway also fall into this topic, but they’ve been mentioned elsewhere.
Room for improvement
How could Big Agnes improve the Tiger Wall UL, without fundamentally changing it (e.g. using heavier fabrics and #5 zippers, increasing its dimensions, etc)?
1. Adjustable tie-outs. The pole set creates acceptable tension at three points: the two front corners, and the rear center. Stakes are helpful in these locations, but not critical. Four other locations need to be tied down, however: the two rear corners, and the two vestibules. And I think it’s unreasonable to assume a tent can always be staked out in the field like it can be in a showroom floor — rocks and roots have a tendency to get in the way.
2. Pole set length. The compressed length of the pole set is 19 inches, which is longer than the width of nearly all backpacks. So the Tiger Wall (or at least its poleset) must be carried vertically. A shorter pole set that could be oriented horizontally would be preferred, if the weight trade-off was not significant.
3. Burrito-style stuff sack. The stock stuff sack for the Tiger Wall is a conventional tube. I have found top-loading stuff sacks like the MSR Tent Compression Sack to be much more user-friendly. Sierra Designs switched to this style last year, too.
4. Stakes. J stakes from DAC are strong and light, but I don’t care for them. They must be oriented such that the point of the “V” is directed squarely at the shelter; the cord notches are also shallow. I would much prefer Y-shaped stakes like this one:

My preferred setup: conventional 2- or 3-mm reflective cord with a .5-oz aluminum Y-stake
Traditional comparisons
Lets quickly compare the Tiger Wall UL to tents from BA and other wholesale manufacturers.
Tiger Wall vs. Fly Creek
The Fly Creek HV UL2 is 3 oz lighter and $50 less, but has only one front-entry door and a fin-shaped architecture that is less roomy.
The Fly Creek HV UL3 is heavier by 6 oz, but still has only one door. And it’s only $30 less.
Without question, I would prefer the two-door/two-vestibule configuration of the Tiger Wall.
Tiger Wall vs Copper Spur
The Big Agnes Copper Spur HV UL2 and Copper Spur HV UL3 match the Tiger Wall’s dimensions and duel side-entry doors. However, they are 9 to 15 oz heavier and $50 more, which seems like big penalty for one marginal benefit, the Copper Spur’s free-standing design.
The Copper Spur Platinum series is more weight-competitive with the Tiger Wall, but has a $200 or $250 premium. For those prices, I’d be looking at shelters made of DCF.
Tiger Wall vs MSR Freelite
The MSR Freelite 2 and Freelite 3 share a similar architecture as the Tiger Wall UL2 and UL3 — both are semi-freestanding with three points, have duel side-entry doors and the crossover roof pole. Their dimensions are a wash: MSR is a bit wider, BA is a bit taller.
The biggest difference is in weight and cost. The Freelites are about half-pound heavier (despite using thinner 10d and 15d fabrics), and retail for $40 or $50 more. In addition, availability is currently limited.
Tiger Wall vs. Nemo Hornet
The Nemo Hornet 2P is 3 oz lighter than the Tiger Wall UL2 and $30 less expensive. But it uses even thinner (and less durable) fabrics, and it has a fin-style architecture (no crossover roof pole) that creates less interior volume. A 3-person version of the Hornet is not available.
TW for the win, again.
Tiger Wall vs Nemo Blaze
The Nemo Blaze 2P is 1 oz lighter than the Tiger Wall UL2. Its interior volume is comparable. But it uses more delicate fabrics (10d fly and floor), and it’s pitch is non-freestanding and less storm-resistant.
Tiger Wall vs Sierra Designs Sweet Suite
The Sierra Designs Sweet Suite 2 and Sweet Suite 3 are also new for spring 2018. They are roomier (in peak height, and width at the floor and shoulders) and use heavier-duty fabrics (20d and 30d for the fly and floor, respectively), but notably heavier, by about a pound. The SS2 is $30 less than the TWUL2, but the SS3 is $10 more than the TWUL3.
More competitive comparisions
To find something better (i.e. lighter, less expensive, or higher performance) than the Big Agnes Tiger Wall UL3, you need to look at the cottage industry and to move away from semi-freestanding double-wall tents. It’s more difficult to claim that one shelter is “best” here, because they cater to different types of users.
Tiger Wall vs Zpacks Duplex and Triplex
The Zpacks Duplex and Triplex are substantially lighter and stronger, because they are made with DCF/Cuben. But it’ll cost you: the 22-oz Duplex sells for $200 more than the Tiger Wall UL2; the Triplex, $250 more than the UL3. In addition, the ZPacks shelters are single-wall, not modular; so the fly and inner cannot be used independently.
Tiger Wall vs Mountain Laurel Designs DuoMid
The Mountain Laurel Designs DuoMid + InnerNet is lighter (28 oz equivalent trail weight), stronger (30d sil-nylon), and more storm-resistant. But it’s not as easy to use; you can’t inspect it before you buy it; it’s marginally more expensive, and never on sale; and it’s sloping walls feel less roomy.
Tiger Wall vs Tarptent
Tarptent has a few models that are competitive with the Tiger Wall, notably the Bowfin, Double Rainbow, and Saddle 2. In general, the Tiger Wall will be easier to use and lighter, while the Tarptents will be more durable and less expensive.
Questions about the Big Agnes Tiger Wall UL3? Leave a comment
Disclosure. This website is supported mostly through affiliate marketing, whereby for referral traffic I receive a small commission from select vendors, at no cost to the reader. This post contains affiliate links. Thanks for your support.
The post Review: Big Agnes Tiger Wall UL2 & UL3 || A “couples trip” tent appeared first on Andrew Skurka.


May 11, 2018
Comps: inReach Mini vs SE+/Explorer+, SPOT Gen3, and PLB’s
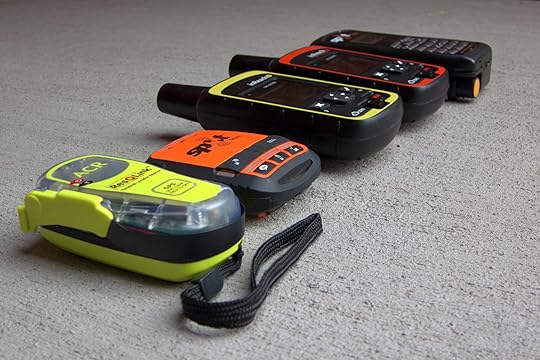
For Outside I have written a piece on the primary differences between the new Garmin inReach Mini, which was released last week, and existing satellite communication devices like the inReach SE+, inReach Explorer+, SPOT Gen3, and personal locator beacons like the ACR Electronics ResQLink.
Here’s the link:
The Garmin InReach Mini vs. the Competition
If you have questions or comments, leave it here, since Outside does not have this feature enabled on their site.
The post Comps: inReach Mini vs SE+/Explorer+, SPOT Gen3, and PLB’s appeared first on Andrew Skurka.
May 9, 2018
Thursday night in Golden, Colo.: Gear & skills show-and-tell

Tomorrow night (Thursday, May 10) I’m giving a 90-minute clinic on backpacking gear, supplies, and skills at the Colorado Mountain Club in Golden, Colo.
Doors open at 6:30. Presentation starts at 7, and will run for about 1:30 to 1:45, depending on how many questions I’m getting.
Tickets cost $12 (or $10 for members) and proceeds go entirely to supporting CMC programming. Buy tickets from the CMC website, or get them at the door.
Copies of The Ultimate Hiker’s Gear Guide will be available for purchase, for $20 (including tax) cash or check. If you already have a copy, bring it if you’d like it signed.
Hope to see you there!
If you live in Boulder and don’t care to make the trip south on Highway 93, there’s another event scheduled that may interest you. Paul Magnanti is putting on a Thru-Hiking 101 seminar at Neptune Mountaineering, starting at 7 PM.
The post Thursday night in Golden, Colo.: Gear & skills show-and-tell appeared first on Andrew Skurka.
May 7, 2018
Job posting: Backpacking guide for High Sierra trips


I am seeking one exceptionally accomplished backpacker to join my guided trip program. Employment will be short-term and seasonal.
This year I need help in guiding one 3-day Backpacking Fundamentals course and two 5-day Adventure trips, starting Friday, September 21 and finishing Wednesday October 3. The trips are in Sequoia-Kings Canyon National Park in California. If you are not local, you would need to arrive the day before (September 20) and could fly out the day after (October 4, or possibly late on October 3).
You will work with three world-class backpacking guides: Alan Dixon, Flyin’ Brian Robinson, and yours truly.
Necessary qualifications
Please apply only if you have:
1. Extensive backpacking experience. I’m interested in applicants who have:
Slept on the ground (or between trees) for hundreds of nights and have hiked about (or in excess of) 10,000 miles;
Mastered a variety of seasons and ecosystems;
Robust knowledge of backpacking gear, supplies, and skills;
Completed multiple long-distance trails; and,
Undertaken multiple routes with significant off-trail travel (e.g. high routes, Alaska, self-made).
2. Community credibility. Have you been recognized by media outlets for your accomplishments? Have you written a book or developed route guides? Does your website and/or social media profiles have notable followings? Do you work with outdoor brands as an athlete or ambassador? Have trail associations, hiking clubs, retail stores, or community organizations asked you to speak for their group?
4. Interpersonal skills. Do you enjoy working with people? Can you effectively communicate your thoughts? Are you comfortable managing groups and group dynamics?
5. Physical fitness. Applicants must be capable of comfortably hiking:
20 miles per day consecutively when on-trail;
Off-trail on uneven, loose, and snow-covered surfaces; and,
At elevations up to 14,000 feet, though usually between 10k and 12k.
I am most concerned with the aforementioned qualifications. But I will give greater weight to applicants with:
Prior guiding, instructing, or general teaching experience;
Wilderness medical training (e.g. WFA, WFR);
Demonstrated efforts to professionalize your backpacking experience; and,
Geographic proximity to the High Sierra or Colorado Rockies.
Examples of qualified applicants
Not sure if you are qualified? To help illustrate the caliber of desirable candidates, please refer to the current guide roster.
FWIW, I was hoping that Cam Honan would fill this position, but unfortunately he’s unavailable.
Compensation
You will be paid a daily rate for days in the field, plus one preparation day. Travel expenses will be reimbursed.
To apply
Please email me your qualifications, following the format above.
Deadline: Friday, May 18, though I may review applications as I receive them.
Please be succinct. I stop reading long applications. Focus on your most noteworthy qualifications.
If you have general questions about this position, leave a comment below. I will answer it there, to avoid multiple private answers to the same questions. If you have a question that pertains specifically to your application, please email me.
Andrew Skurka Adventures LLC is an equal opportunity employer.
The post Job posting: Backpacking guide for High Sierra trips appeared first on Andrew Skurka.
May 3, 2018
Preview: Garmin inReach Mini || 2-way satellite messaging for 3.5 oz!


The new Garmin inReach Mini is half the weight and size of the existing inReach SE+ and Explorer+. It will be available in late-June/early-July 2018.
Garmin dropped a big surprise this morning: a new addition to its popular inReach line, the inReach Mini. This new device is noteworthy for two reasons:
1. Size
The inReach Mini weighs just 3.5 oz (100 grams) and measures 4″ x 2″ x 1″ (5 cm x 10 cm x 2.5 cm), making it about half the weight and size of Garmin’s two existing inReach devices, the inReach SE+ and inReach Explorer+. Its more comparable to the SPOT Gen3 than the other inReach units.
2. Functionality
The Mini retains the essential inReach function: two-way satellite messaging, i.e. it can send and receive text and emergency messages anywhere in the world, using the Iridium satellite network.
To achieve its weight and size, some secondary features had to be sacrificed, like navigation and battery life; the new virtual keyboard is even more painstakingly slow. When paired to a smartphone via the Earthmate app, however, most functionality is fully regained.
The Mini also has functionality that not even the larger SE+ and Explorer+ have, such as compatibility with other Garmin devices like the Fenix 5 GPS watch.
Preview: Garmin inReach Mini
Due to its size and weight, I would expect the inReach Mini to gain traction with user groups that would never consider the SE+/Explorer+. I’m specifically thinking of trail runners and cyclists. Many long-distance and ultralight backpackers will gravitate to this device as well — they’ve been asking Garmin for a Mini-like device for a while now.
I would have thought that such a noteworthy product would be launched at a press or industry event, but I don’t think that was the case here. Garmin did not show it at the last Consumer Electronic Show or Outdoor Retailer, both in January, nor did it seed the Mini for testing with major outdoor media outlets like Outside and GearJunkie. The Mini appears to have launched with just a press release.
According to the Garmin website, the Mini will be available in “5 to 8 weeks,” or mid-June to early-July.
Key product specs
MSRP: $350
Weight: 3.5 oz (100 g)
Size: 2.0″ x 3.9″ x 1.0″ (5.2 x 9.9 x 2.6 cm)
Service plan required ($12 to $100 per month)
Connects via Bluetooth with free Earthmate smartphone app and with some Garmin devices
Functionality
As a standalone device
When used independently of other devices, the inReach Mini can:
Send an SOS message;
Send preset messages (set beforehand in the inReach online portal);
Send custom messages, using a painfully slow virtual keyboard;
Receive messages;
Send and receive messages with other inReach devices;
Broadcast its location to an online map, at 2- or 10-minute intervals; and,
Request a weather forecast for a current or future location.
The Mini can also store 500 waypoints and 20 routes. The 0.9″ x 0.9″ display does not have a grid map (like the SE+) or color topo map (like the Explorer+).
When paired
The functionality and user-friendliness of the inReach Mini greatly improve when it’s paired via Bluetooth to a smartphone using the free Earthmate app. Menus can be more quickly navigated; custom messages can be typed much faster; and your entire contact list can be accessed.
Equally important, Earthmate gives your phone the functionality of a conventional handheld GPS device. View your location (retrieved by the GPS chip in the Mini or in your phone) on a color topo map, create and navigate to waypoints, and record tracks. Multiple map and imagery layers can be downloaded to Earthmate, as detailed here.
Unlike earlier inReach devices, the Mini is also compatible with other Garmin devices, notably the Garmin Fenix 5. Especially on runs, I appreciate being notified by my Suunto Ambit3 watch of incoming phone calls and text messages without needing to stop. Now, this same functionality is possible with messages sent via satellite.
inReach Mini service plans
The inReach Mini requires a service plan. Garmin offers four personal plans for all its inReach devices, ranging from $12 to $100 per month. The more expensive plans include higher (or no) caps on text messages, tracking, and weather forecasts.
The plans are available as an annual contract ($12 to $80 per month) or month-to-month ($15 to $100 per month, plus a $25 annual fee).
Battery life
Relative to the inReach SE+/Explorer+, the Mini has a shorter battery life. It is spec’d at:
20 days at the 30-minute interval power save mode
50 hours at 10-minute tracking with 2-minute logging
30 hours at the 10-minute tracking with 1-second logging
In comparison, the SE+/Explorer+ spec at 30 days, 100 hours, and 75 hours, respectively.
On longer trips, the shorter battery life is easily negated with a portable battery charger like the Anker PowerCore 10000. The Mini’s battery capacity (mAh) is not specified in the press materials, so I’m uncertain how many times it could be recharged with a, say, 10k mAh portable battery.
Questions about the inReach Mini? Leave a comment.
Disclosure. This website is supported mostly through affiliate marketing, whereby for referral traffic I receive a small commission from select vendors, at no cost to the reader. This post contains affiliate links. Thanks for your support.
The post Preview: Garmin inReach Mini || 2-way satellite messaging for 3.5 oz! appeared first on Andrew Skurka.
Reader Q: Recommended guyline lengths for backpacking shelters

A client on one of my 5-day guided trips in Colorado recently asked:
What guyline lengths do you recommend for my shelter?
In this case, the client has a 8′ x 8′ flat tarp. But I’m going to expand my answer to include all common backpacking shelters: tents, mids, A-frame tarps, flat tarps, and hammocks.
These recommended lengths assume that you’re using my recommended guyline system, which relies on 2.5 knots — the bowline, trucker’s hitch, and McCarthy hitch (which is half of the truckers hitch). Other systems may consume different amounts of cord (e.g. a figure-8 on a bite needs more cord than a bowline loop), and therefore may call for different lengths.
Not too little, not too much
An extra foot or two of cord weighs very little, just a few grams. And the value-added of this extra length can be huge — it can often make the difference of staking into firm dirt (instead of an impenetrable granite slab) or tying off to a nearby sapling (instead of into loose sand). So avoid giving yourself “just enough” cord for best-case campsites. That’s stupid light.
On the other hand, excessively long guylines are difficult to work with and tend to tangle. So don’t use longer lengths just because you can. Use what you need most often, and get creative when that’s not enough.
Cord loss
The minimum cord lengths are probably more than you would imagine, because knots consume cord and reduce the effective length. For example, if your anchor (e.g. stake, sapling, rock) is 1 foot away from your tie-out, you will need at least 2 feet of cord to complete a truckers hitch, because you will lose:
3 inches to the bowline,
3 inches to the slip loop, and
6 inches to the slippery hitch
The McCarthy hitch would require even more than 2 feet of cord, because it requires two of the aforementioned knots (bowline + slippery hitch, for a total of 9 inches) and it doubles back on itself. With a 2-foot cord, the maximum distance between the anchor and tie-out to complete a McCarthy hitch would be about 8 inches.
The exact amount of lost cord will vary with the:
Cord thickness (thick cord = more loss),
Diameter of the loops (bigger loops = more loss), and
Length of your tails (long tails = more loss).
Tents & mids
Ground-level perimeter
For ground-level perimeter tie-out points like at the corners and vestibules, I recommend 4 feet of cord.
With a 4-foot length, the McCarthy hitch (my preference) can be completed if the anchor is less than 1.5 feet away. If the anchor is 1.5 to 3 feet away, I can use the truckers hitch.
4-foot lengths on the perimeter tie-outs
Side-panels
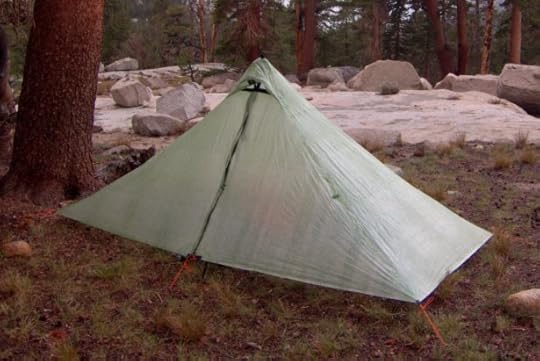
Many shelters have optional tie-outs at mid-height, for use during stormy conditions (e.g. high winds, heavy snow). The exact height and location of these tie-outs makes a difference in the recommended length. For example, I use a 5-foot cord for the tie-out above the vertical door on the Sierra High Designs High Route 1 FL. But I need an extra foot for a side panel tie-out on a traditional mid with sloping panels.
Normally I use a trucker’s hitch on this location, and may use a stick, ski, or tree branch in order to get more horizontal tension.

4-foot perimeter lengths, 5-foot side panel lengths, and 8-foot apex lengths
Apexes
The apexes on some tents and mids must be secured with line, including the ZPacks Duplex, Six Moon Designs Lunar Solo and Duo, High Route, and others.
For a 48-inch peak height, I use an 8-foot length. Unless I can tie it off to a tree immediately outside the door, a truckers hitch is required.

For apexes with 48-inch peak heights, I recommend an 8-foot length. The apex guyline on this shelter is too short, and would be problematic if a stake could not be placed in the ideal spot.
A-frame tarps
Ridgelines
For the head-side ridgeline, I use an 8-foot length, exactly the same as the apex on mids with 48-inch peak heights.
A shorter length can be used for the foot-side ridgeline, because that side is normally lower — maybe 6 or 7 feet, or keep it simple and cut another 8-foot length.
Sides
A 5-foot length seems to work well for the sides of an A-frame tarp. Normally I use a McCarthy hitch, and the sides end up being about 12-18 inches off the ground. With a truckers hitch, an airier pitch can be acheived.

8-foot ridgelines and 5-foot sides
Flat tarps
Admittedly, I’m still in the process of mastering the flat tarp. The versatility is appealing on paper, but in the field I find myself less enamored by the art and longing for a pre-shaped shelter.
On my 9 x 9 tarp, I use eight 8-foot lengths, and keep them permanently attached with a bowline. This is sufficient for nearly all pitches and scenarios without needing to relocate any of the guylines. But 64 feet of cord is a lot, and I’ve considered shortening some of the lengths and attaching them with a girthhitch instead, for easy relocating.

A flat tarp (left), with 8-foot lengths; and an A-frame tarp (right) with different lengths for the front apex, rear apex, and sides.
Hammock tarps
The size of the tarp will affect the recommended lengths by a foot or two. Larger tarps need shorter cords, because they reach further to the ground and cover more of the space between the trees.
Ridgelines
My hammock tarp has an 11-foot ridgeline, and I have found that 10-foot guylines work well. Even with a thick tree, the tarp can be 3 or 4 feet away from the trunk, which is sometimes necessary due to branches or nearby trees.
Sides
I use 8-foot lengths, which gives me the option of going straight to the ground, “porching” it with a trekking pole, or tying off to a nearby tree. Most often I use a truckers hitch.

Alan Dixon’s hammock setup, on which he appears to use 10 foot ridgelines and 8-foot sides.
Your turn: What guyline lengths do you use on your shelters, and why?
The post Reader Q: Recommended guyline lengths for backpacking shelters appeared first on Andrew Skurka.
April 24, 2018
Running & racing in cold rain: What should I wear?

At my Outside Online blog I have shared clothing recommendations for racing in cold rain, inspired by the recent Boston Marathon during which runners endured 40-degree temps, a 10 to 20 mph headwind, and an inch or rain.
I wasn’t at Boston this year (or, fortuitously, Barkley, which also suffered from difficult weather), but I’m no stranger to these conditions. They can’t be entirely offset, but they can be managed.
Read now: The Definitive Guide to Running in the Rain
Outside does not allow comments, but you can comment here if you have suggestions, questions, or an experience to share.
The post Running & racing in cold rain: What should I wear? appeared first on Andrew Skurka.
Quickstart guide: Cedar Mesa & Grand Gulch, Utah || Wild archaeological epicenter


Green Mask petroglyphs, Grand Gulch, Utah
Years ago I was turned on to Cedar Mesa by Alan Dixon, but needed inspiration this spring from the roamings of Paul Magnanti to plan a trip of my own there. It was a perfect couples trip for Amanda and me: the wilderness that I needed after a winter inside, with an additional and more unique dimension for her.
What is Cedar Mesa?
Cedar Mesa is an uninhabited 400-square-mile plateau in the southeastern corner of Utah, with elevations ranging from 4,500 to 7,000 vertical feet above sea level. Starting below Elk Ridge in the north, the cedar-covered mesa slopes southwards to the San Juan River, a major tributary of the Colorado; it is bordered by Combs Ridge to the east and Grand Gulch to the west.
The original boundaries of Bears Ears National Monument set by President Obama included Cedar Mesa, but the new boundaries established by President Trump do not.
What is Grand Gulch?
Most of the eastern half of Cedar Mesa is drained by Grand Gulch, a mostly dry meandering canyon that runs about 50 miles in length and that has a dozen named tributaries like Bullet, Shieks, Todie, and Cow Tank. It flows into the San Juan River, and is managed by the Bureau of Land Management (BLM) and National Park Service (NPS) as part of the Grand Gulch Wilderness Study Area.
Why should I go?
Cedar Mesa has many of the same appeals as other destinations in southern Utah: it’s a wilderness playground of deep canyons, lonesome plaeteaus, and endless slickrock.

Lower Bullet Canyon, typical southern Utah canyon country, with vertical walls and lots of slickrock
But Cedar Mesa — and Grand Gulch, in particular — has one additional appeal: thousands of Ancestral Puebloan cliff ruins and rock art.

Yellow House Ruins, upper Shieks Canyon
Overall, Cedar Mesa combines a wilderness experience on par with the Dirty Devil, Escalante, or Dark Canyon with an archaeological experience of a scaled-down Mesa Verde National Park. You will not find tourists, paved walking trails, restrictive backcountry regulations, and a glossy visitor center here.
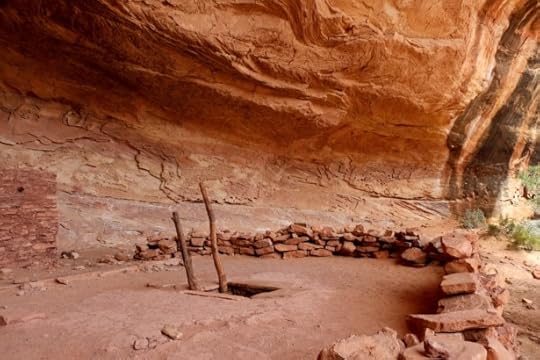
Perfect Kiva in Bullet Canyon. It has been restored and reinforced so that you can climb down into it.
How do I get there?
Cedar Mesa is in a figurative middle-of-nowhere. It’s:
2 hours from Moab,
3 hours from Durango,
4 hours from Flagstaff, and
5.5 hours from Salt Lake City.
It cannot be reached with public transit. A personal or rental vehicle is necessary.
What is the best time of year to go?
Cedar Mesa is a high desert. Winters are surprisingly blustery, and summers are insanely hot. Spring and fall are ideal.
Personally, I prefer the second half of April: new leaves and sprouts inject a lively color, and the days are pleasantly long.
Where can I stay and eat?
There are no commercial services on Cedar Mesa. Bring all the food and water you will need, and plan to car-camp or wilderness camp.
On your approach to or departure from the area, find limited services in the historically Mormon communities of Blanding and Bluff, as well as Mexican Hat. Expect small grocery stores, tired-looking motels, and short business hours.
We had a very good experience with Canyonlands Lodging at their facility south of Monticello. We also considered Stone Lizard Lodging in Blanding, but it was full.

The kitchenette in the very cute, very clean, and very comfortable Silver Cabin Room at Canyonlands Lodging
What should I bring?
A recommended gear list is beyond the scope of this quickstart guide. Consult my gears lists and The Ultimate Hiker’s Gear Guide for discussions of appropriate gear, supplies, and skills.
In general, be prepared for ample sunshine, brushy canyon bottoms, fine sand, and (usually) little water.
Is Cedar Mesa suitable for beginner backpackers?
I would not recommend Cedar Mesa for first-time or beginner backpackers, unless accompanied by someone with more experience. It’s an unforgiving place with few gimmes. The roads and trailheads are well marked, but otherwise there is no signage. The most popular canyons have unmaintained use trails with unreliable cairns. Water is scarce. Cell service is non-existent.

None of the use trails are maintained, and some are quite rugged. Shieks Canyon had several steep pitches up crumbly slopes of hardened mud.
What should I do while I’m there?
Cedar Mesa is appropriate for car-camping, day-hiking, and backpacking. I did not see promising terrain for or evidence of mountain biking or off-roading.
The San Juan is navigable, and a terrific (albeit ambitious) loop could be made by floating from Slickhorn Canyon to Grand Gulch.
The most popular canyons are those closest to the Kane Gulch Ranger Station and Highway 261. Loops can be formed by combining Grand Gulch proper with the side-canyons of Kane, Toadie, Coyote, Shieks, or Bullet. These loops do entail some overland travel that’s comparable to navigating the open ocean: there are few landmarks.
Do I need permits or to be aware of other important regulations?
A permit from the BLM is required to overnight camp in most Cedar Mesa canyons and to visit some day-use areas. More information. The permit can be reserved beforehand on Recreation.gov, and must be picked up from the Kane Gulch Ranger Station between 8 AM and noon.
Fires are not permitted in the canyons or on the mesa. Pack out toilet paper, because it does not degrade quickly in this environment. And do not foul the water sources.
Finally, and perhaps most importantly, please “take only photographs and leave only footprints” in Cedar Mesa. The ecosystem is very sensitive, and the ruins and rock art even more so.

Unnamed ruins in a deep alcove in Grand Gulch, between Bullet and Shieks Canyons
Where can I get more info?
The BLM has free maps and brochures.
For weather at Kane Gulch, use this point forecast from the National Weather Service.
AmericanSouthwest.net has good information about many of the canyons.
National Geographic Trails Illustrated offers a good overview map of the area, helpful for transportation and trip planning.
Use CalTopo to plan your route in greater detail and to print small-scale topographic maps, including USGS 7.5-minute tiles.
Peter Tassoni has written the sole guidebook for the area, A Hiking Guide To Cedar Mesa. It is the most comprehensive reference, and can supplement or be supplemented by online information.
Have questions about Cedar Mesa or Grand Gulch, or would you like to share your experience there? Leave a comment.
Disclosure. This website is supported mostly through affiliate marketing, whereby for referral traffic I receive a small commission from select vendors, at no cost to the reader. This post contains affiliate links. Thanks for your support.
The post Quickstart guide: Cedar Mesa & Grand Gulch, Utah || Wild archaeological epicenter appeared first on Andrew Skurka.
April 7, 2018
Not bear- or idiot-proof: Documented canister failures

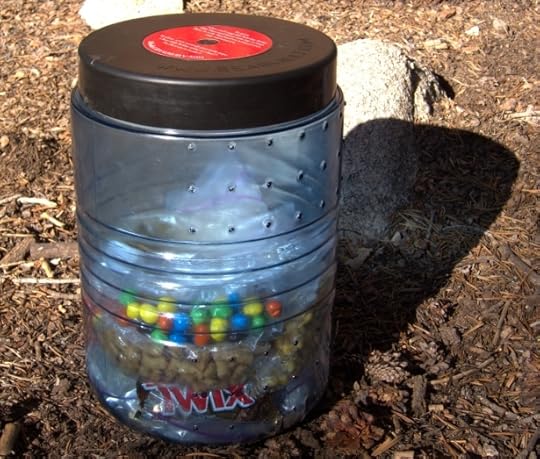
The Bear Vault BV500, which offers good volume for its weight at a reasonable price
At least most of the time, hard-sided canisters like the BearVault BV500 successfully protect food from bears and “mini-bears” in the backcountry. But it turns out that they’re not 100 percent bear- or idiot-proof.
Recently, I received a spreadsheet that documented 199 food-related bear incidents with backpackers in Yosemite National Park between July 2012 and July 2017. The actual number of incidents in Yosemite and the larger High Sierra is probably greater (maybe much greater), because many incidents are not reported and because black bears inhabit most corners of this world-class wilderness.
The sheet describes multiple failures of “approved” canisters from Bearikade, BearVault, Garcia, and Lighter1, due to both human error and design/structural flaws, as well as of early Ursack models. It also provides anecdotal support for Yosemite’s food storage regulations — for every one bear canister failure, there are several cases of bears obtaining food or scented items that were:
Kept inside of an unattended backpack or shelter;
Hung in tree;
Buried; or,
Left out overnight unprotected.
These storage “techniques” may work elsewhere, but not in Yosemite, which is home to arguably the best trained camp robbers in North America.
Geographical concentration
One striking takeaway from the spreadsheet was the geographical concentration of the incidents. Of the 199 reports, 142 (71 percent) happened in just four places:
Snow Creek,
Little Yosemite Valley (LYV),
John Muir Trail (JMT) above LYV, and
Lyell Canyon, the main trail through which is the JMT.
While it’s reasonable to expect more incidents in high-use backcountry areas (i.e. more backpackers = more incidents), the frequency still seems disproportionate — I’m doubtful that on any given night, three-fourths of all backpackers in Yosemite are camped in just these four locations.
These epicenters make a strong case for selecting campsites more deliberately and avoiding high-use spots and corridors. Like a berry patch in August, bears have learned that some sites are reliable sources of calories.
I think it’s also worth mentioning that these four areas tend to attract many first-time and beginner backpackers, who generally will not be as educated in backcountry matters like proper food storage and bear behavior. I wonder if the frequency of bear incidents is exacerbated by the lower average skill level of this demographic.

Lyell Canyon, one of four epicenters of bear activity in Yosemite
Failures
Bear canisters are more vulnerable to failure than I thought, mostly due to human error. The incidents fall into five buckets:
1. Overflow
July 31, 2012. Troop of boy scouts couldn’t fit all their food into their 14 bear canisters, so they hung two stuff sacks with food from a tree. The bear climbed the tree and dragged the food down and ate it. There was approximately 5 to 10 pounds of food. Troop leader got a mandatory appearance citation.
For a canister to do its job, all food and scented items (e.g. toothpaste, sunscreen) must be stored inside, not just most of it. This can be a challenge at the start of long trips, because the typical capacity of a full-size canister is about 6 days of food, plus/minus depending on your daily caloric intake and your food’s spatial and caloric density (e.g. bagels versus Snickers, canned soup versus dried soup mix).
But, understandably, you may be reluctant to carry two canisters, at double the weight and cumbersomeness. In that case, what are your options? Until all of your food and scented items can fit in one canister, consider:
1. Staying in established backcountry campsites with permanent food lockers. In Yosemite, find them in Little Yosemite Valley and at High Sierra campgrounds like Glen Aulin. In Sequoia-Kings, refer to this map of locations.
2. Camping in areas where non-canister storage methods (e.g. Ursack Major, hanging) are permitted. Canisters are required throughout Yosemite but only in the highest-use areas of Sequoia-Kings and the National Forests (e.g. Mt. Whitney Zone in Inyo). In lower-use areas, there tends to be less bear activity.

Last summer I yo-yo’d the Pfiffner Traverse in 9 days, starting at Berthoud Pass. By the time I reached Rocky Mountain National Park, where canisters are required, I was able to fit all of my food inside the canister. In the James Peak and Indian Peaks Wilderness, I used other accepted methods to store my food at night.
2. Unlocked
July 20, 2012. A bear came into the campsite and broke into an improperly closed carbon fiber canister. The bear was able to eat a bag of trail mix before it was scared away. Initial verbal yells and rocks did not phase the bear. After screaming loudly the bear ran away. The visitor was contacted and disclosed that only one of three clasps on the canister were latched properly. The bear pried the top off and sheared the single closed clasp to obtain the food. The canister was not smashed.
July 25, 2013. The bear canister was screwed closed but not past the locks on the lid. The canister was opened but not broken. The bear clawed through plastic bags and obtained food. Food eaten includes pancake mix, salami, power bars, Gu gel, crackers, and nuts.
This would seem like an obvious one, but there were at least 10 cases of bears getting into unlocked canisters. Bears are smart and persistent, and have exceptionally strong and dexterous claws. Due to past successes, they will attempt to twist off the tops of BearVaults and pry off the tops of Bearikades and Garcias.
The solution to unlocked canisters is easy: lock them! Establish the double-checking of canisters as part of your nightly routine, along with brushing your teeth and emptying your bladder. In some groups, it may be worth assigning a canister tsar who oversees this responsibility.
3. Open
August 29, 2015. 2 bear cans in camp, one was closed the other was open. Hikers were cooking soup. Bear walked up behind a log and stood up on its hind legs to peer at the hikers cooking soup. Hikers yelled and stood up and grabbed poles to bang together. Hikers became scared and thought the bear was becoming aggressive so they backed away from their open canister. Bear approached canister, grabbed it by its opening, and walked away. Canister was unrecovered. Bear obtained trail mix, bars, and medications from a first aid kit.
Some bears in Yosemite exhibit remarkably brazen behavior, because they have been “trained” to, i.e. brazen behavior = food. Sometimes they get shot with rubber bullets by rangers and hit by rock-throwing backpackers when they get too close, but they also encounter scared individuals and groups who “sacrifice” their canister for the sake of personal safety.
That reaction is understandable, but it does not help the backpacker or the bear. If your canister is open, never be more than a step away. And if a bear enters camp, immediately lock your canisters and then start throwing things at it (e.g. rocks, sticks, sugar pine cones), aiming for non-face areas. In bear language, this defensive behavior says, “Go away. There are easier calories elsewhere.”
4. Rolled away
June 2, 2015. Campers at Snow Creek bridge had bear canister taken. Second time in 2 years at the same area. Could not find canister in surrounding area. No evidence of bear. Model of container is Bear Vault 450.
June 5, 2015. Two bear canisters were rolled into Snow Creek overnight. Even after taking all precautions. Also the bear chewed on some camping gear like our table cloth and plastic bag probably due to tiny amounts of food residue.
No less than 30 canisters went “missing” after a bear rolled it away in the middle of the night. This was exceptionally common along Snow Creek — canisters get rolled into the creek (which has enough volume in late-spring/early-summer to carry away a canister) or off the nearby cliffs.
The park recommends storing canisters outside of camp, for safety reasons. But pick the spot wisely. Personally, I keep my canister about 20 feet away and leave my (clean) cookpot on top, so that I would be woken up by the commotion.

5. Structural failure
August 3, 2012. Bear got food from IGBC approved “Lighter1.com” brand canister by breaking the hardware that keeps the lid on. The visitor reported the bear at 2300 and described it as being “black”. The bear got the complete contents of the container including: 2.5 bags of mixed nuts, half a salami, 2 bags of triscuits, 6 “Zoneperfect” bars, half a bag of vita-light juice mix.
July 18, 2013. Bear took rental Garcia canister out of a spot in the bushes around 1:40am. I got out and chased the bear away. I placed the canister deeper in the bushes. We were awake for another hour-hour and a half. We didn’t hear it again, but in the morning it was gone. On our hike out we found the empty and broken canister without lid about half way down the [Snow Creek Trail] switchbacks.
July 31, 2013. A JMT hiker decided to use an Ursack [pre-S.29 AllWhite version, now Ursack Major] for most of the JMT because, “it was much lighter and pack friendly.” The visitor understood that, “it was not approved for parks like Yosemite because the food could be obtained by the bears by chewing on the fabric even if they didn’t tear it open.” When she got to Yosemite she, “signed up for a free bear canister loan program, but kept her Ursack in case of overflow items.” She and her friend woke up in the night to scratching and saw a sow with cub, “trying to get into her food bag 80 ft. away. They shouted, shone lights, and threw rocks.” By ’30 minutes’ into the encounter, “the bears had a hole in the side of the ‘bear proof’ bag.” Eventually those bears moved on, but before the night was out, two more bears had stopped by to eat the food and garbage still left. The visitor was left with, “a demolished Ursack and a whole lot of slobbery bear smelling mush.”
August 10, 2014. Bear juggled and threw bear canister until it popped open. Bear consumed all contents: oatmeal, rice, shot blocks, cliff bars.
When used properly, only a few canisters flat-out failed. In most cases, they were smashed open after being rolled off a cliff, usually along — you guessed it! — Snow Creek.
It would be helpful to know the brand of the broken canister, but the spreadsheet did not always specify it or include sufficient clues (e.g. “carbon fiber” = Bearikade). From what I can gather, when used properly there were no reported cases of broken Bearikades or the Ursack Major (formerly S.29 AllWhite), and only one BearVault. The Garcia canister failed most often, but you’d expect that since they are the most common rental canister.
Questions about bear canister best practices? Have an experience to share? Leave a comment.
Disclosure. This website is supported mostly through affiliate marketing, whereby for referral traffic I receive a small commission from select vendors, at no cost to the reader. This post contains affiliate links. Thanks for your support.
The post Not bear- or idiot-proof: Documented canister failures appeared first on Andrew Skurka.
April 6, 2018
Retirement


Time for a reset. Yellowstone National Park, 2009.
Today my father, Robert (“Bob”) Skurka, finishes a 44-year thru-hike of the banking services industry. Like most long walks through the wilderness, his career gave him purpose and identity, and included both peaks and valleys. I’m unconvinced that he’ll take to a conventional retirement — to an even greater degree than his successor, he quickly gets restless — but I’m hoping that a few weeks or months at home will help inspire his next act.
By the mid-1980’s — when my earliest memories begin — my father was settled at Durfee-Attleboro Bank in Fall River, Mass., as a commercial loan officer. It would prove to be the position that he was best at, that he enjoyed the most, and that he would finish his career with in 2018 at Bristol County Savings Bank in Taunton.
Essentially, my father worked with established local companies that needed extra capital, like to fund inventory, purchase new machinery, or construct a new office building. Making loans that only occasionally crept into 7-figures was not as sexy as investment banking, private equity, or venture capital, but everyday he helped small business owners fulfill their goals, feed their families, and create jobs. My dad took his work seriously, often to the detriment of his personal well-being; and, based on his narrow extracurricular interests, it seemed to intellectually satisfy him.
During the consolidation of the banking industry in the 1990’s and early-2000’s, he had the experience of being both the acquirer and the acquiree. Durfee-Attleboro became South Shore Bank, where he was a Senior Vice President until BankBoston took over in 1994 and consolidated the corporate hierarchy.
Trying times followed. The family finances got tight, especially when his unemployment surpassed his severance. I trace my own frugality to this period, specifically when my mother — while driving the streets of Seekonk in our royal blue Caravan — disclosed the situation and asked me to be more conscious of my needs and wants.
But even tougher to manage during this time was my dad’s loss of self-worth. Dad always saw himself as as provider for my mother, sisters, and me — and he no longer was. Dad is also a doer, and without a project to focus his energy he will drive everyone around him nuts.

My second day in Colorado after a father-son road trip from North Carolina to Boulder. Rocky Mountain National Park, May 2003.
But it can’t always get worse. And his next employer, FirstFed of Swansea, Mass., would change his fortunes. He oversaw the Business Banking division as a Vice President, and financially benefited when the bank went public in 2001 and was purchased by Webster Bank in 2003. He is loyal to a fault and hung on with Webster longer than he should have, but finally jumped to Bristol County nine years ago.
This proudly local and old-fashioned institution became the perfect exit, by governing my dad’s hard-working instincts. He couldn’t access his email from outside the office. He had to leave promptly at 5pm, when his Pawtucket branch closed. Management tasked him with informally training younger loan officers. And the bank paid for golfing tournaments so that he could golf with clients during the summer. Each fall when my dad would complain about needing to work five days per week again, I knew that his time was near.
What’s next for Bob? I don’t know, and neither does he. For now, I wish him the best, and a huge congratulations for everything he has done. I’m sure there’s another walk in him still.
Love you, Dad.
The post Retirement appeared first on Andrew Skurka.


