
Andrew Skurka's Blog, page 51
March 19, 2017
On the road, again || Clinics this week in NC & UT

This week I’m speaking in Asheville, NC and Sandy, UT. In both locations I will be giving a clinic on backpacking gear & skills. View event details.
As an extra incentive to attend, I have these Sierra Designs coupons to distribute:

The post On the road, again || Clinics this week in NC & UT appeared first on Andrew Skurka.


March 18, 2017
Review: Hoka Clifton 2 || Featherlight, plush, & well fitting running shoe
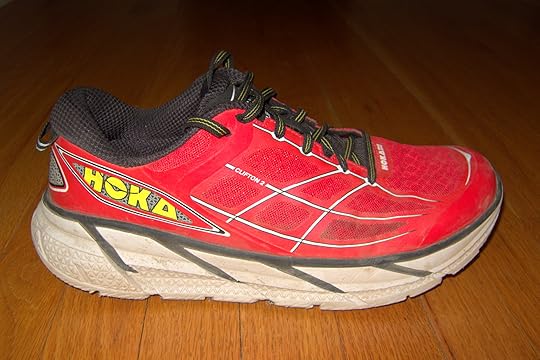

The Hoka Clifton 2, a featherweight and generously cushioned running shoe that excels on paved surfaces.
Count me among the Hoka One One skeptics when it first arrived on the scene. I assumed the exceptional stack height would translate into a wobbly ride. I was turned off by the obnoxious color pallette. And I observed one client destroy a new pair in just 60 (hard) miles in the High Sierra.
But based on the brand’s growth, clearly I was missing something. So when Campsaver offered to send me the Hoka One One Clifton 2 for review (in an attractive cherry red, no less), I jumped on the opportunity.
Review: Hoka One One Clifton 2
The Hoka One One Clifton 2 is a featherweight running shoe with plush midsole cushioning and a secure upper that excels on easy and moderate runs on paved surfaces.
It will be most comfortable and natural for runners with small- or medium-volume feet, neutral pronation, and a forefoot or midfoot foot strike.
The Clifton 2 has been replaced by the Clifton 3, which seems identical except for a slightly wider forefoot that should be better for medium-volume feet.
Please support this review by buying from Campsaver.
Key product specs
Weight: 7.7 oz (M’s 9), 6.6 oz (W’s 7), 9.7 oz (my M’s 11.5)
Stack height: 29 mm (heel) and 24 mm (forefoot)
Drop: 5 mm
Upper: Breathable mesh with reinforced overlay
Pronation: Neutral
MSRP: $130, now at Campsaver for $85
Personal use
In six weeks I have run 150+ miles in the Clifton 2, about 100 miles more than I needed to solidify my opinion of them. For any easy or moderate run on paved surfaces (and sometimes with sections of gravel or singetrack), they are my first pick.
The $130 retail price is mid-tier and would give me pause. But at $85 from Campsaver they are very attractive, and I have considered buying a second pair with personal funds. Free shoes are great, but shoes that I like to wear are even better.
Weight
At 7.7 oz the Clifton 2 is a featherweight. In my closet, only the Salomon Sonic Pro 2 (which I will race in next month at the Boston Marathon) is lighter, at 7.2 oz.
Normally I prefer a heavier training shoe, because the extra weight translates into more cushioning and durability. So far at least, I have not found tradeoffs for its airiness; and I’ve enjoyed feeling more light-footed than normal on my easy days.

In my size M11.5
Fit
I have a small-volume foot with a narrower width. For context, the Salomon Sense Pro (my long-term review) has been a longstanding favorite, and I tend to swim in Altras. I’m a reliable size 11.5.
The Clifton 2 fits me perfectly, in both shape and size. For runners with wider feet or who prefer a slightly wider toebox, you might consider the Clifton 3.

Without even putting on the Altra Provision (left), Hoka Clifton 2 (middle), and Salomon Sense Pro (right), you can see that the Clifton and Sense Pro share a more similar shape than the Provision, which is notably wider.
Upper
The breathable upper has the right balance of stiffness and suppleness. It’s secure and stable, but never pinchy.
After 150 miles the upper shows no signs of wear. However, the shoe has not been subjected to abrasion and it has never been caught in the rain. (Blame the recent May-like weather along Colorado’s Front Range, not the reviewer.)
Tongue
The tongue is one of two complaints that I have about the Clifton 2. Its tip is too stiff, which can cause minor tenderness at the crease of my foot/leg. I would prefer it be softer, but making it shorter or more cushioned would have been an improvement, too.

The tongue is one of my two complaints. It’s badly positioned and stiff, which can cause tenderness.
Cushioning
The Clifton’s enormous stack height, courtesy of 25 mm to 29 mm of EVA foam, is one of Hoka’s signature features. Its softness makes road-running much more tolerable; “pounding miles” is no longer such an apt description.
The cushioning comes at a price, however. The shoe feels mushy, like a road bike with under-inflated tires. It’s not a responsive shoe, with energy undoubtedly lost during push-off. I therefore do not recommend the Clifton 2 for fast workouts or races, assuming you can tolerate a firmer shoe for those applications.
The midsole/outsole is flared, i.e. it’s wider than the base of the upper. This counterbalances the top-heavy design, and makes the shoe much more stable than appearance would suggest. If not for its road-oriented outsole, I would be willing to take it on Boulder’s most technical trails, even with the mushy cushioning.
Outsole
The Hoka One One Clifton 2 has a low-profile outsole that is designed for paved surfaces. It has poor traction in loose soils and mud; it’s acceptable on packed trails. The outsole rubber appears largely unphased by 150+ miles of use.
I’m baffled why Hoka did not cover the entire outsole with rubber. Instead, in a number of places — including high-torque areas in the forefoot — the “outsole” is exposed midsole foam. The abrasion-resistance of this foam is a fraction of outsole rubber, and I fear the lifespan of the Clifton 2 will be needlessly shortened by this design decision.

The outsole design is mystifying to me, because the foam “outsole” is not wear-resistant relative to conventional outsole rubber. The lifespan of this shoe may end prematurely early due to this design decision.
Buy the Clifton 2 now from Campsaver
Disclosure. This website is supported mostly through affiliate marketing, whereby for referral traffic I receive a small commission from select vendors, at no cost to the reader. This post contains affiliate links. Thanks for your support.
The post Review: Hoka Clifton 2 || Featherlight, plush, & well fitting running shoe appeared first on Andrew Skurka.
March 17, 2017
High water: Gear & skills for hazardous creek fords
This multi-post series discusses recommended gear, supplies, and skills for backpacking in the Mountain West in early-season conditions. These normally prevail in May/June, and in July after exceptionally snowy winters.
Introduction
Clothing
Footwear
Creek fords
Flotation, traction & self-arrest
Navigation
Unbridged creek crossings are the greatest hazards in the early-season. High water volume (due to snowmelt) and steep gradients (due to mountain topography) is a dangerous combination.
In comparison, other early-season conditions like sun cups, postholing, intense bugs and even hard snowfields seem like a mere annoyance or inconvenience.
Let’s discuss how to safely manage this element.
Gear
Your most valuable asset in safely crossing creeks will be your brain. But let’s first discuss gear that will and will not help:
Trekking poles
If trekking poles on not on your gear list, add them. You will find them useful at all times: powering uphill, braking on descents, staying upright on roots and small rocks, and setting up your freeform shelter.
During creek crossings, use your poles to check depth and to double your points of ground contact, which will make you more steady.
Specific recommendations. If you want and can afford the best, buy the Black Diamond Alpine Carbon Cork (my long-term review). If you want to spend less, spend a lot less with the Cascade Mountain Tech Quick Lock Poles (my long-term reviews). I know of no pole between these two price points that is worth consideration.

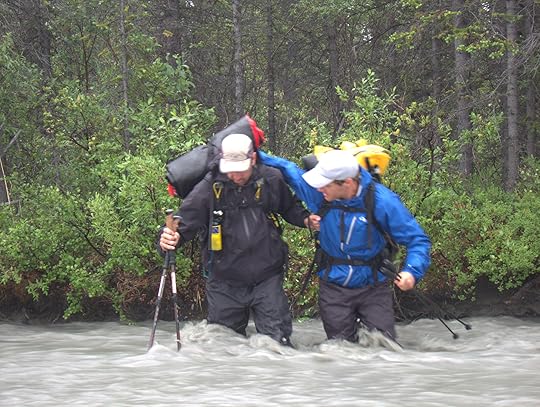
While fording this small but swift creek in Alaska, trekking poles provided two extra points of contact, and a way to test water depth.
Rope
A rope can be slung across a creek to be used as a handline. I generally wouldn’t recommend it:
Heavy;
Of potential value only for a group of 3+.
No value-added during the first and last crossing;
Time-consuming and a lot of fuss;
Bark damage to the trees used as anchors; and,
Ideal anchors may not exist at the ideal fording location.
Simply put, I think there are better solutions than a rope.

On the Otter Trail in South Africa, I watched two husbands try to set a handline for their wives across this ford. It looked very manly, but the handline was of no help: there were no good anchors for it, and there was too much slack in the line for it to be reliable.
Packraft
A primary benefit of these revolutionary inflatable boats is that they provide safe passage across unsafe bodies of water like rivers, lakes, and glacier fjords.
But, like the handline, I generally don’t think they are the best solution for early-season conditions, especially in the context of a PCT/JMT or CDT hike. First, they’re heavy — about 10 pounds total, with raft, PFD, and paddle.
Second, the swiftwater could quickly carry downstream an unskilled packrafter. If attempted in the wrong place, missing an eddy takeout could be fatal.

Packrafting across Alaska’s Copper River Delta
River shoes
I discussed “water shoes” in an earlier post in this series. Don’t bring them. Fords can be done more safely in your hiking shoes or boots, which have a better outsole, more protective upper, and more secure fit.
Skills
In addition to trekking poles, I have a number of other recommendations to stay safe during creek crossings:
Timing
Schedule your day so that you ford potentially dangerous creeks in the morning, when they are relatively low. Snowmelt increases as the sun and temperatures rise, and water levels normally peak in early-evening.

The “official” ford of Evolution Creek in late-June 2006, at its peak flow in the evening. This is a notoriously difficult ford at all times, but in the morning it would be much easier. Better recommendation: ford at Evolution Meadow, just upstream.
Alternates
On your topographic maps, identify alternative crossing points where the creek will be slower and/or shallower, or where there is no immediate hazard downstream like a waterfall.
Do NOT assume that the trails cross at the best spot. In many cases, they do not, because the trails were built for July-September use, after peak flows. To be safe, you may have to temporarily leave the trail.

Where the JMT/PCT crosses the South Fork of the Kings River, it is a torrent. For scale, notice the hiker on the opposite bank.

Rather than ford the South Fork twice, simply stay on the east side of it through meadows and open woodlands. It will be a few minutes slower without the trail, but much safer.

In the evening at its peak flow, Rush Creek could not be safely crossed on its bridge, which was wet and slick.

If the trail crossing is unsafe, head upstream to the flat area between tarns. The creek may be deeper there, but it will be much slower.
Break it down
Rather than ford a single scary creek, tackle independently its smaller tributaries. Apply the same advice to these smaller crossings: ford them in the morning, and at a location where they are relatively slow and/or shallow.

Bear Creek ford on the JMT/PCT, in mid-May 2007, after a very dry winter and before peak runoff in June.

If Bear Creek is running high, ford its East and South Forks individually. The alternate fords should be smaller, slower, and safer.
Natural bridges
Search upstream and downstream for a downed tree that spans the creek. But don’t get too cute — balance-beaming across a thin and slick trunk several feet above raging rapids may be more dangerous than wading through it.
Tag team
Wrap your arm over your hiking partner’s shoulder, and cross together. Put the lightest/weakest person on the downstream side of the line, so that the other group members break the current.

Tag-teaming a swift channel of Alaska’s Yanert River, which was safer than doing it alone. Put the lightest/weakest person on the downstream side.
Pick your line
Like hiking off-trail, identifying the path of least resistance between two shores is an art, and improves with practice. A few simple recommendations:
Avoid the biggest rocks;
Avoid the deepest and swiftest areas;
Angle downstream as you cross, so you are fighting less current. Avoid crossing perpendicular to or against the flow, unless it’s necessary or relatively safe.
Have questions? Have additional tips? Please leave a comment.
Disclosure. This website is supported mostly through affiliate marketing, whereby for referral traffic I receive a small commission from select vendors, at no cost to the reader. This post contains affiliate links. Thanks for your support.
The post High water: Gear & skills for hazardous creek fords appeared first on Andrew Skurka.
March 14, 2017
The Wine Bible, America’s Test Kitchen & The Ultimate Hiker’s Gear Guide


Reviews about the second edition of The Ultimate Hiker’s Gear Guide are being posted around the web. So far, very good.
Amazon: 4.8/5, 10 reviews
Goodreads: 4.8/5, 5 reviews
AndrewSkurka.com: 5/5, 6 reviews (some website reader bias, perhaps)
It’s more fun to read the reviews though:
“Just wow! So worth the price in gear savings alone. Don’t buy any gear until you read this. Hands down, your best investment starts here.” — verified Amazon customer
“This 2nd edition continues to provide the clearest thinking about backpacking for hikers of all ability levels.” — Tommy Hayes, on Goodreads
“This is a truly comprehensive guide written by a well-travelled adventurer who methodically tells you everything you need to know to maximize your enjoyment outdoors. Personalities are taken into account, weight weenies to kitchen sink carriers are welcomed, and this book literally covers the gamut of what tools and techniques are needed to have both a successful and safe trip.” — Kovas Palubinskas of Midwest Basecamp.
And a new favorite that just came through tonight, from David Noll:
“You could research a multitude of expert hiker’s websites on recommended gear lists, but they still wouldn’t comprehensively provide the insight in a more thorough and attainable method than Mr. Skurka’s new edition to his book. It’s like The Wine Bible for serious and beginner backpackers alike. Picture America’s Test Kitchen and how much insight it has provided for the home cook. That’s what The Ultimate Hiker’s Gear Guide (2nd Edition) can do for backpacking enthusiasts.”
Buy a signed copy of the Gear Guide now. Use coupon FREE-SHIPPING to save $3.
Or, if you want to save a few bucks, buy it from Amazon. But at least please use this link so that I get an affiliate commission on the sale, thanks!
The post The Wine Bible, America’s Test Kitchen & The Ultimate Hiker’s Gear Guide appeared first on Andrew Skurka.
Footwear & foot care for early-season conditions
This multi-post series discusses recommended gear, supplies, and skills for backpacking in the Mountain West in early-season conditions. These normally prevail in May/June, and in July after exceptionally snowy winters.
Introduction
Clothing
Footwear
Creek fords
Flotation, traction & self-arrest
Navigation
Bear Creek ford on the JMT/PCT, in mid-May 2007, after a very dry winter and before peak runoff in June. Due to unbridged crossings such as this, there are no reliable and safe strategies for keeping your feet dry.
What must you absolutely get right when selecting footwear for early-season conditions? As with every other season, they must fit. Period.
All other footwear characteristics are secondary. However, if you get these right, too, you’ll be much better off than having a well-fitting shoe that never dries and performs poorly on snow.
Boots & shoes
“Waterproof”
Let me be really clear about this:
Your feet will NOT stay dry in early-season conditions.
You will have to ford multiple creeks and streams, with many that are knee- to crotch-deep. You will hike for miles on melting snow. And you will slosh through standing water and waterlogged meadows.
“Waterproof” footwear will be overwhelmed by the wetness. And once they fail, you will have a waterlogged shoe or boot that never dries and that traps your foot in a hot & wet environment. Not convinced? Do some reading:
Why “waterproof” shoes will not keep your feet dry
Complete failure: I gave “waterproof” Gore-Tex hiking shoes a second chance
So here is my best advice: Learn to manage the effects and aftermath of wet feet. Read my full tutorial, or follow these steps:
Wear breathable trail shoes and thin socks that will not retain water and that will dry relatively quickly.
At any rest break longer than about 15 minutes, remove your shoes and socks.
Sleep in warm and dry socks. In very wet conditions, you may have to carry dedicated sleeping socks that are for nighttime use only.
After arriving in camp and allowing your feet to dry thoroughly, apply Bonnie’s Balm Healing Salve or similar to the bottoms of your feet, then put on a dry sock. The balm will help remoisturize your skin (and prevent cracks) and resist maceration the following day. Reapply in the morning if your skin feels dry.

A shoe-free rest break in Colorado in mid-June. By removing shoes & socks, feet can temporarily dry out, improving comfort and health.
Traction and stiffness
Short of wearing crampons or spikes, how can you feel sure-footed on snow? Wear a shoe with a/an:
Aggressive outsole tread
Protective upper, and
Reasonably stiff midsole.
Such shoes provide decent purchase on snow, allow you to kick steps without bruising a toe or making a hole in the shoe, and will hold an edge on steeper slopes.
Specific recommendations
Footwear is a very personal choice, due to nuances of fit, so I’m cautious about making recommendations. But I will anyway, so that you have specific examples of shoes with desirable characteristics. If you find a different model that is similar and that fits you better, go for it.
Altra Lone Peak 3.0 (my review)
Brooks Cascadia
La Sportiva Ultra Raptor
Salewa Ultra Train (my review)
Salomon X-Ultra Prime
Scarpa Neutron

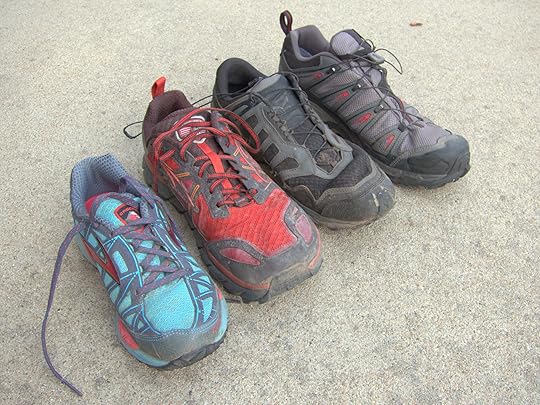
Four shoes that would I think would work well in early-season conditions, due to breathable uppers, abrasion-resistant toeboxes, and aggressive outsoles. L to R: Cascadia, Lone Peak, Ultra Train, X Ultra.

An aggressive outsole will have better purchase on snow. When combined with midsole stiffness, the shoe can be used to kick steps and hold an edge.
Water shoes
I would discourage the carrying of water shoes like the NRS Kicker Remix Wetshoe. They will be needed so often that they will become your default footwear. Furthermore, some fords may be unsafe in typical water shoes. Your hiking shoes are more up to the task; they have a:
More secure fit,
More protective upper, and
Stickier outsole.
Camp shoes
I don’t carry dedicated camp shoes on personal trips, because I’m either hiking (in my wet shoes) or sleeping (in my dry sleeping socks). But they’re a treat for longer camps, to avoid standing around in wet shoes.
Look for something that is ultralight and inexpensive, and that can be worn with socks, like the ALL CLEAN Sandals. Even lighter:
Spa slippers, or
Durable bread bags worn between your dry sleeping socks and your wet shoes.

After a long day of plodding through wet snow and runoff, Sam cooks dinner while wearing dry sleeping socks and camp shoes.
Socks
At a minimum I would carry two pairs of socks:
Hiking socks that get wet and and that will probably stay wet or damp (depending on the route and the amount of lingering snow and runoff). For over a decade I have used the DeFeet Wooleator.
Sleeping socks that are worn only at night. They stay clean and dry. I would recommend a heavy fleece or wool sock; I use the DeFeet Woolie Boolie, which in the winter I use as my primary hiking sock.
Some may prefer using a Woolie Boolie-like sock for hiking and for sleeping, because it better insulates than the thinner Wooleator. Snowmelt is frigidly cold, and frequent water crossings will numb your toes. The tradeoff: thicker socks retain more moisture and therefore dry more slowly; they can also become too hot on dry and exposed sections of trail. Whatever you do, I would avoid polyester socks — they are notably chillier than wool when wet.
A second pair of hiking socks is optional in the early-season. In extremely wet conditions, you will simply end up with two pairs of wet socks, which is no better than one wet pair — and twice the weight. But once there is less snow and runoff, you can begin to rotate the pairs to keep your feet drier, and to accelerate the drying out of wet shoes. Secure the unused pair to the outside of your pack so that it can dry.

In the dry air and intense sun, thin socks will dry quickly if secured outside the backpack.
Have footwear questions? Leave a comment.
Disclosure. This website is supported mostly through affiliate marketing, whereby for referral traffic I receive a small commission from select vendors, at no cost to the reader. This post contains affiliate links. Thanks for your support.
The post Footwear & foot care for early-season conditions appeared first on Andrew Skurka.
Footwear for early-season conditions: Hiking shoes, camp shoes, water shoes & socks
This multi-post series discusses recommended gear, supplies, and skills for backpacking in the Mountain West in early-season conditions. These normally prevail in May/June, and in July after exceptionally snowy winters.
Introduction
Clothing
Footwear
River fords
Flotation, traction & self-arrest
Navigation
Bear Creek ford on the JMT/PCT, in mid-May 2007, after a very dry winter and before peak runoff in June. Due to unbridged crossings such as this, there are no reliable and safe strategies for keeping your feet dry.
What must you absolutely get right when selecting footwear for early-season conditions? As with every other season, they must fit. Period.
All other footwear characteristics are secondary. However, if you get these right, too, you’ll be much better off than having a well-fitting shoe that never dries and performs poorly on snow.
Boots & shoes
“Waterproof”
Let me be really clear about this:
Your feet will NOT stay dry in early-season conditions.
You will have to ford multiple creeks and streams, with many that are knee- to crotch-deep. You will hike for miles on melting snow. And you will slosh through standing water and waterlogged meadows.
“Waterproof” footwear will be overwhelmed by the wetness. And once they fail, you will have a waterlogged shoe or boot that never dries and that traps your foot in a hot & wet environment. Not convinced? Do some reading:
Why “waterproof” shoes will not keep your feet dry
Complete failure: I gave “waterproof” Gore-Tex hiking shoes a second chance
So here is my best advice: Learn to manage the effects and aftermath of wet feet. Read my full tutorial, or follow these steps:
Wear breathable trail shoes and thin socks that will not retain water and that will dry relatively quickly.
At any rest break longer than about 15 minutes, remove your shoes and socks.
Sleep in warm and dry socks. In very wet conditions, you may have to carry dedicated sleeping socks that are for nighttime use only.
After arriving in camp and allowing your feet to dry thoroughly, apply Bonnie’s Balm Healing Salve or similar to the bottoms of your feet, then put on a dry sock. The balm will help remoisturize your skin (and prevent cracks) and resist maceration the following day. Reapply in the morning if your skin feels dry.
A shoe-free rest break in Colorado in mid-June. By removing shoes & socks, feet can temporarily dry out, improving comfort and health.
Traction and stiffness
Short of wearing crampons or spikes, how can you feel sure-footed on snow? Wear a shoe with a/an:
Aggressive outsole tread
Protective upper, and
Reasonably stiff midsole.
Such shoes provide decent purchase on snow, allow you to kick steps without bruising a toe or making a hole in the shoe, and will hold an edge on steeper slopes.
Specific recommendations
Footwear is a very personal choice, due to nuances of fit, so I’m cautious about making recommendations. But I will anyway, so that you have specific examples of shoes with desirable characteristics. If you find a different model that is similar and that fits you better, go for it.
Altra Lone Peak 3.0 (my review)
Brooks Cascadia
La Sportiva Ultra Raptor
Salewa Ultra Train (my review)
Salomon X-Ultra Prime
Scarpa Neutron
Four shoes that would I think would work well in early-season conditions, due to breathable uppers, abrasion-resistant toeboxes, and aggressive outsoles. L to R: Cascadia, Lone Peak, Ultra Train, X Ultra.
An aggressive outsole will have better purchase on snow. When combined with midsole stiffness, the shoe can be used to kick steps and hold an edge.
Water shoes
I would discourage the carrying of water shoes like the NRS Kicker Remix Wetshoe. They will be needed so often that they will become your default footwear. Furthermore, some fords may be unsafe in typical water shoes. Your hiking shoes are more up to the task; they have a:
More secure fit,
More protective upper, and
Stickier outsole.
Camp shoes
I don’t carry dedicated camp shoes on personal trips, because I’m either hiking (in my wet shoes) or sleeping (in my dry sleeping socks). But they’re a treat for longer camps, to avoid standing around in wet shoes.
Look for something that is ultralight and inexpensive, and that can be worn with socks, like the ALL CLEAN Sandals. Even lighter:
Spa slippers, or
Durable bread bags worn between your dry sleeping socks and your wet shoes.
After a long day of plodding through wet snow and runoff, Sam cooks dinner while wearing dry sleeping socks and camp shoes.
Socks
At a minimum I would carry two pairs of socks:
Hiking socks that get wet and and that will probably stay wet or damp (depending on the route and the amount of lingering snow and runoff). For over a decade I have used the DeFeet Wooleator.
Sleeping socks that are worn only at night. They stay clean and dry. I would recommend a heavy fleece or wool sock; I use the DeFeet Woolie Boolie, which in the winter I use as my primary hiking sock.
Some may prefer using a Woolie Boolie-like sock for hiking and for sleeping, because it better insulates than the thinner Wooleator. Snowmelt is frigidly cold, and frequent water crossings will numb your toes. The tradeoff: thicker socks retain more moisture and therefore dry more slowly; they can also become too hot on dry and exposed sections of trail. Whatever you do, I would avoid polyester socks — they are notably chillier than wool when wet.
A second pair of hiking socks is optional in the early-season. In extremely wet conditions, you will simply end up with two pairs of wet socks, which is no better than one wet pair — and twice the weight. But once there is less snow and runoff, you can begin to rotate the pairs to keep your feet drier, and to accelerate the drying out of wet shoes. Secure the unused pair to the outside of your pack so that it can dry.
In the dry air and intense sun, thin socks will dry quickly if secured outside the backpack.
Have footwear questions? Leave a comment.
Disclosure. This website is supported mostly through affiliate marketing, whereby for referral traffic I receive a small commission from select vendors, at no cost to the reader. This post contains affiliate links. Thanks for your support.
The post Footwear for early-season conditions: Hiking shoes, camp shoes, water shoes & socks appeared first on Andrew Skurka.
March 13, 2017
Dinner recipe: Peanut Sauce & Noodles (Updated)
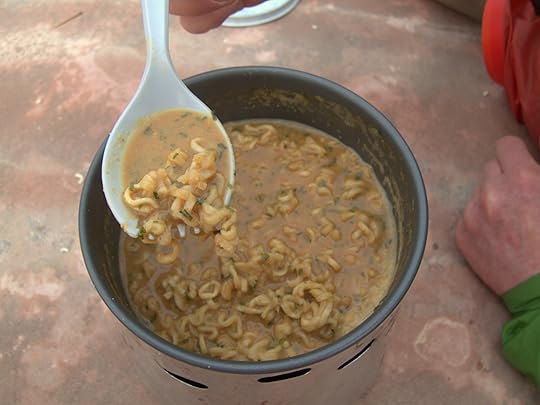
A reliable crowd-pleaser, now with a simpler and runnier sauce for easier preparation and transport. This sauce is so good that Amanda and I frequently have it for dinner.
The post Dinner recipe: Peanut Sauce & Noodles (Updated) appeared first on Andrew Skurka.
Backpacking clothing for early-season conditions in the High Sierra


Young and dumb. While I was most comfortable hiking in shorts, t-shirt, and visor in Yosemite in late-May, I should have protected more of my skin from the intense sun.
This multi-post series discusses recommended gear, supplies, and skills for backpacking in the Mountain West in early-season conditions. These normally prevail in May/June, and in July after exceptionally snowy winters.
Introduction
Clothing
Footwear
River fords
Flotation, traction & self-arrest
Navigation
Outdoor clothing brands and retailers present backpackers with a paralyzing number of options. The situation is exacerbated by marketing hype and the infusion of “outdoor lifestyle” clothes, which perform relatively poorly in the field.
Two years ago I published a series on Core 13 Clothing, and those posts remain as relevant as ever. These items can be mixed-and-matched to create appropriate systems for the full range of three-season conditions, whether that be in the Blue Ridge Mountains in March, Glacier National Park in July, or Alaska’s Brooks Range in September.
Within the Core 13 Clothing framework, let’s discuss early-season conditions in the High Sierra.
Conditions
What is a normal summer day in the High Sierra? Sunny with bluebird skies. So during prolonged sections of snow travel (e.g. for a few hours, on the climb to and descent from an alpine pass), you will feel like you’re in a solar oven — the sun cooks you from above, and the snow reflects the rays back at you from below.
It rains occasionally, mostly in July and August, as part of the North American Monsoon. The storms usually follow a pattern: steady cloud build-up during the day, and intense but short-lived rain/hail in the afternoon.
Daytime temperatures are normally comfortable, and warrant shorts and a t-shirt (maybe a long-sleeve) in the absence of a relentless sun and biting insects. Lingering snowpack causes nighttime temperatures to be lower than they would be otherwise. Normally, expect high-10’s/20’s in May, 20’s/30’s in June, 30’s in July, and 30’s/40’s in August. Learn to find relatively warm campsites.
The mosquitoes normally hatch in early-July, after the snowpack has melted and temperatures become warm enough for survival. They fade in August as the ground dries up. After a wet winter, they will hatch later in the month, and stick around until the first frosts of September.

Moderate mosquito pressure in mid-August in 2011, after a very wet winter. My hiking partner’s shirt was made of knit merino wool and was not treated with permethrin, and the bugs easily bit him through it. During rest stops he would put on his windshirt to keep them off.
Recommended accessories
These items should not be afterthought, so I will put them above the clothing systems. In addition to the Core 13 items specified below on this page, you will want:
Polarized sunglasses, e.g. Julbo Dirt (long-term review)
Hat that covers your head, ears, and neck (if your hair does not), e.g. Headsweats ProTech
Sun gloves, e.g. Glacier Glove Sunglove
Insulated headwear for hiking in brisk conditions, e.g. Wool Buff
Rain mitts to preserve finger dexterity during cold-and-wet storms, e.g. REI Rain Mittens
Recommended clothing systems
I have three clothing systems for the High Sierra:
Late-spring,
Early-summer,
and Late-summer/early-fall
More than any other factor, the bug pressure influences my clothing choices: once they hatch, you must be prepared for them. Sun exposure is the runner-up: early in the season, when the sun is high and the snowpack reflects the sun’s rays, I am less willing to leave skin uncovered.

Early-summer clothing, with full-coverage clothing and permethrin-treated shirts, prepared for biting insects and intense sun exposure. Photo: Buzz Burrell
Late-spring

Early-summer
Normally I would not consider July through mid-August as being “early season.” But I know that many hikers who will read this series have trips planned for this time. So here you go:

Disclosure. This website is supported mostly through affiliate marketing, whereby for referral traffic I receive a small commission from select vendors, at no cost to the reader. This post contains affiliate links. Thanks for your support.
The post Backpacking clothing for early-season conditions in the High Sierra appeared first on Andrew Skurka.
Tutorial: Backpacking in early-season conditions || Recommended gear, supplies & skills


From Muir Pass on May 18, 2007, after a “dry” winter. Travel was excellent in the morning, when the snowpack had a solid crust. But by early-afternoon I would badly posthole; this was a better time to rest or hike at lower elevations, which were snow-free.
Recently I explained how an exceptionally snowy winter in California will affect summertime backpacking conditions throughout the Sierra Nevada, including in Yosemite, Sequoia-Kings Canyon, and Desolation Wilderness, and along the John Muir Trail, Pacific Crest Trail, Sierra High Route, and Kings Canyon High Basin Route.
For all the details, read the post. In short, expect:
Extensive lingering snowpack,
Saturated ground and flooded meadows;
Hazardous fords; and,
A delayed and prolonged mosquito season.
I think the information helped readers to set their expectations. But it actually instigated another round of questions, to the effect of:
What gear, supplies and skills do I need to safely manage these early-season conditions?
So, here we are.
Early-season tutorial
Rather than publishing one 2,500-word post that will challenge attention spans (mine included), instead I have broken it up into more digestible parts.
Introduction (you are here)
Clothing
Footwear
River fords
Flotation, traction & self-arrest
Navigation
Applicability
The impetus for this post is California’s exceptional winter, on the heels of five years of drought and one average winter. Essentially, come June and July, many backpackers — notably, thru-hikers on the Pacific Crest Trail and John Muir Trail — will confront conditions that they have never before experienced. Since recent thru-hiking classes did not experience these conditions either, sound advice may be in short supply.
But the information in this tutorial is relevant every spring and throughout the Mountain West. This year the timing is just different, and it will overlap with more of the traditional backpacking season.
Usually early-season conditions are a May/June phenomenon, and by July — when traffic in the high country really picks up — everything is back to “normal.” Thru-hikers on the PCT and CDT usually experience early-season conditions in June in the High Sierra and San Juan’s, respectively, but this year it will be more intense.

Leading a group in Rocky Mountain National Park near Haynach Lakes, at over 11,000 feet on June 16, 2016.
Snowpack updates
Since my original post on February 21, the High Sierra’s snowpack has continued to grow, nearly on pace with the record-setting winter of 1982-83. For the latest, refer to these snowpack plots.
Elsewhere in the West, it’s also been a bountiful winter, with most regions experiencing snowfall that is well above-average. For non-California states, use SNOTEL data, which is produced by the Natural Resources Conservation Service, a division of the Department of Agriculture.

The post Tutorial: Backpacking in early-season conditions || Recommended gear, supplies & skills appeared first on Andrew Skurka.
March 11, 2017
From ultra(slow) runner to 2:3X marathoner || Training methodology, with coach David Roche
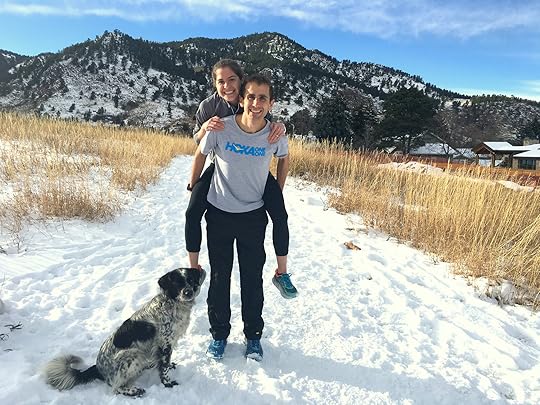

David, wife and speedster Megan, and rescue dog Addie, a spaniel/retriever mix
For the last three years I have perhaps been more serious about running than about backpacking. It’s a function of lifestyle and age: running 10-20 hours per week is more compatible with marriage than thru-hiking would be, and at nearly 36-years-old I have only a few years left in which to run really fast lifetime PR’s.
I took my seriousness to a new level in December, when I hired a running coach, David Roche. David is an accomplished runner in his own right — in 2014 he was the US Sub-Ultra Trail Runner of the Year — but his primary value to me and others on the SWAP team (“Some Work, All Play”) is his coaching knowledge.
In 2016 the SWAP roster consisted of the male and female US Skyrunners of the Year; the 2nd-ranked female international skyrunner; the 30k, 50k, and 50M national champions; the North American Mountain Running champion; and several Top 10 Western States finishers.
David must be doing something right. In this interview, we’re going to tap into his magic, focusing specifically on road and ultra marathon training, primarily from the perspective of a veteran ultra runner.
Q | When you looked at my pre-Roche training data, what struck you most about what I was doing right or wrong? How typical was my training for an ultra marathoner?
You clearly had the tools to be better than you’ve been. Your mistakes are common to lots of ultrarunners, whether they have your talent or not — you were skipping steps on the path to reaching your potential.
You did lots of workouts and long runs, with a unifying element of grinding it out and suffering. However, you weren’t spending enough time building yourself up as a runner, improving your running economy so that you could get the most out of those long, grinding workouts later.
Note: This a representative example of pre-Roche training: high mileage, lots of vertical, and slow. This run was done towards the end of a 100-mile week with 20k vertical feet of gain, benchmarks that I’d hit the week prior, too.
So we went back to the drawing board and attacked running economy from all sides. I was pleasantly surprised by how quickly your body responded to strides, short hills, and short intervals. Very quickly, what was moderate became easy, and what was hard became moderate.
Recently, your workouts have shocked some of your Strava followers, but are right in line with what I expected given your previous ultra-focused approach.
Q | Let’s dive into running economy. To start, how do you define it?
(takes down massive textbook from the shelf)
(drops textbook because biceps are not strong enough to support weight)
Running economy is essentially how much energy output it takes to run a given pace. That’s why Galen Rupp can look and feel like he is jogging at 5-minute per mile pace, but a cyclist with the same VO2 max will look like an angry hippo trying to do the same.
Better running economy translates to better performance even if underlying physiological variables like VO2 max and lactate threshold (LT) stay constant.
Q| How did we improve my running economy? Are these improvements largely responsible for my recent performance gains, or did we also work on VO2 max and lactate threshold as well?
Improving running economy is where science and art meet, as if Picasso wrote a physiology textbook. The two most straightforward ways to improve economy are to: run more, and run fast.
Given your ultra background, we began with nearly a month of training that focused entirely on short surges between 20 and 40 seconds in the context of daily runs. Each of these mini-intervals were at the fastest pace you can go without straining.
What you saw pretty quickly is that your body got “comfortable” running fast at all paces, not just the surge pace. As a result, your daily aerobic miles got faster too, forming a positive feedback loop between running economy and aerobic development.
Lots of factors go into that “comfortable” fast running, with some being neuromuscular, some being based on energy systems, and some being based on oxygen-processing power. However, the changes in your major physiological variables — like VO2 max and lactate threshold — were likely minor, since you have been pushing your body for decades already.
Instead, what improved is your velocity at VO2 max and lactate threshold. The entire system is designed to improve vVO2, vLT, and vAT through progressive overload of different training strategies, from those initial strides, to short intervals, to more sustained tempos. By building from the ground up, each successive workout is more economical than it would be otherwise.
In the process, you learn that what you previously considered to be your genetic limits was actually a limitation in how your brain and body work together to move fast over variable terrain.
First run with striders, back in December:
Q | In those early workouts, doing 10-ish striders, each 20 to 30 seconds long and separated by 30 to 100 seconds of easy running, felt very elementary — they were far less taxing on my body than, say, a 45-minute tempo run, which I was plenty capable of doing. If we’d skipped these early bursts, how would my experience be different at this point in the training cycle, five weeks out from Boston?
You’d be running harder, but slower. An ultrarunner doing a 45-minute tempo run without the tools to run fast is like asking a school bus to hold 80 miles per hour for 45 minutes. Instead of forcing the bus to go fast, I’d rather upgrade to a Porsche. The first 12 weeks of training — including the fast strides and short intervals — were all about making that upgrade.
So that readers can see the difference, I want to share similar workouts from pre-Roche and post-Roche training:
December 1, 2015 versus February 25, 2017. The first effort was just before my last ultra of the 2015 season, Vulcano Ultra Trail in Chile, where I placed third. Ten weeks earlier I had also placed third at Run Rabbit Run 100. In the more recent workout, I ran 12 seconds faster per mile, and one mile further, on the exact same loop.
April 23, 2016 versus March 3, 2017. These two efforts are less similar, but I still think they are telling. The first — a 17-mile effort at 6:21 pace with 155 bpm average heart rate — was my last hard effort before the Colorado Marathon, where I ran 2:44. The second was my most recent long run, on which I averaged 6:11 pace for 21+ miles, including a 10-mile stretch at marathon pace (5:44/mile, 161 bpm average HR) and an easy 1.5-mile cool down.
Q | Are these performance gains mostly attributable to improved economy, i.e. faster velocity at the same VO2 and lactate threshold levels? I struggle to think that I am “fitter” now than I was earlier, but I would definitely say that I’m “faster.”
Economy is definitely the main factor at play. You probably have marginal gains in VO2 (especially since you were a bit under-trained at that end of the spectrum) and the percent of lactate & aerobic threshold you can sustain. But when an athlete has a long history of fast running like you, there won’t be too much movement, or at least not enough to explain the big leaps in performance you and other people on SWAP have had.
It’s important to consider all the component parts of running economy, which is a catch-all term that incorporates hundreds of physiological variables. For example, cardiac stroke output is how much blood your heart can pump with each beat. The main way to improve stroke output is to do short, fast intervals (like the strides) that strain the heart’s capacity to pump enough blood over a short period of time. So that likely plays a large role in the heartrate variation we’ve seen.
And there are still other things to think about. For example, I’ve taken you out of the mountains, which has improved your recovery since you are no longer thrashing your legs everyday. That translates to better workouts and aerobic runs, and the positive feedback cycle continues.
Q | If I were training for a 100-mile ultra, in which I might only average 12-minute-per-mile pace, do the benefits of running economy workouts still apply? Relative to race pace, my standard 7-minute easy pace is flying. It’s hard to believe that 30-second bursts at sub-5 pace have any bearing on an ultra.
Now that is the million-dollar question! Can we apply the principles of fast running at short distances to ultra distances?
I think that too many runners over-emphasize specificity in their training. Yes, we are talking about a really long, slow jog — But who wins those long, slow jogs most of the time? The answer is the fastest runner, as long as the fastest runner has the endurance and resilience to handle the distance. That axiom applies to all events, from the 10k to 100 miles. The demands on endurance and resilience are just higher at 100 miles.
For Boston, now almost a month away, we are about to switch 100 percent of your training into long-distance mode, to prepare for miles 20 to 26, focusing on slow-twitch muscle fiber recruitment. For UTMB, the switch will happen much sooner, since that race relies more on endurance and resilience.
A rising running economy tide raises all aerobic ships. While those 30-second bursts may seem irrelevant, they would be programmed early in an ultra training cycle. As you have seen firsthand, improving economy improves aerobic performance at all paces, not just fast ones. So your all-day effort level gets faster too. Add in a hearty dose of endurance and resilience work before an ultra and voila — you have a fast all-day effort that can actually be sustained all day.
Q | After two weeks of striders-only, you added a fartlek and a long run to each week of training. Let’s talk about the fartlek. The first was 12 x 1-minute intervals separated by two minutes of easier running. Each week the interval increased and rest decreased, until I was doing 12 x 3-minute intervals with 1-minute easy. What is the fartlek meant to accomplish?
If strides and sub-aerobic threshold running are on the Running Economy 101 syllabus, Economy 201 is adapting to the biomechanical and aerobic demands of going faster for longer. Basically, the fartleks are about progressively extending the distance you can sustain your newfound speed while also decreasing rest to enhance aerobic stress.
It all builds — at first, during the 1-minute intervals, you are running around VO2 max effort, so you are working on your vVO2. As the rest decreases, you move into Critical Velocity (about 40-minute pace), an area that blends energy systems and has big bang-for-buck with limited injury risk. If you jumped to CV first, you’d be running far more slowly. By starting at the ground level, the top levels are on more stable ground.
Typical fartlek workout:
Q | And then the long runs. What purpose do these serve? They started as easy 16- or 18- mile efforts. Then you instructed me to run them faster, so say 6:30 pace instead of 7-minute pace. And finally we added “marathon pace” efforts, so 5:45 pace for some specific distance. We started with 4 miles at MP in the middle of a 20-mile run, and next week it will climax with a 16-mile effort while on a 24-mile run.
While I’ve been beating around the bush while focusing on running economy, the number one determinant of running performance is aerobic development. Across the board, we have increased the average length and speeded up the pace of your runs. Up to a point (and especially over 75-80 minutes), the longer the run, the more the aerobic development at the cellular and systemic levels.
You had run long before, but not longer and faster before. So all the runs (not just the long runs) are designed to hit that aerobic sweet spot while engaging the muscle fibers that matter on race day.
The long runs matter, and the runs at marathon pace really matter, but what matters most of all is just sustained aerobic development while stressing the musculo-skeletal system with run-fast biomechanics.
Recent long run:
Q | If my background had been shorter road and track distances, rather than trail ultras, how would my training have been different?
The first questions I ask after looking at training history, race results, and workout files is where an athlete falls in two areas: running economy and aerobic development.
When a post-collegiate human rocket joins SWAP, usually they have solid running economy, with big gains to be made aerobically. For them, short intervals are done on short rest, and there is a lot more steady-state running throughout the training cycle.
A great example is Scott Trummer. While he didn’t run in college, he is a 24-year old that likely has 13:30 5k talent. In his last race before joining SWAP, he cramped up at mile 23 of the US 50k championships.
His training did three things: blended economy/vVO2 to use his efficiency for added aerobic stimulus (lots of 30/30s as his version of strides), relaxed aerobic threshold runs (15 miles at 5:34 pace at 154 average heart rate), and intervals on short rest (3:1 ratio to 6:1 ratio). He is making his 50-mile debut at the American River 50 Miler, and I already have some popcorn to watch that unfold.
Essentially, people like him and Megan Roche are pinnacle SWAP athletes — outstanding economy that translates to effortlessly fast running through minor training tweaks geared at race goals. You’re working toward that same outcome — if we had 2 or 3 more training cycles to adapt, the best approach for you would look similar to Scott or Megan, but with slightly more focus on strides and economy due to age and background.
Q | The Boston Marathon is April 17. Bighorn 100 is June 15. UTMB is September 1. What is the training plan from here?
This question gets back to a major point: while training happens in the full workouts and long runs, adaptation happens in the empty spaces. If you have a tragic flaw as an athlete, it’s that you work too hard to recover adequately.
The first week after Boston will be recovery, easing back into runs a few days later, but taking it painfully slowly at first. The next 2 weeks will be quick reintroductions of the basic training building blocks: economy in week 1, vLT in week 2. Then, you’ll spend a full month in the mountains, emphasizing endurance and resilience needed for Bighorn. Starting a month from race day, strides will vanish completely and workouts will be focused on tough climbs and descents.
On race day, you’ll combine your marathon speed with mountain strength, mixed with plenty of recovery to let the stew come together. I think Boston is a bit of a crapshoot — as are all marathons given the vagaries of race day — I know you’ll have the best race of your life at Bighorn.
For UTMB, we’ll fully recover for 2 weeks, then get back to the grind, doing a more substantial economy rebuild before launching into a month of long mountain days interspersed by recovery periods. I never want you to lose sight of the new Andrew — an athlete that is fast enough to run at the front of any race in the world, and strong enough to rip people’s legs off late in the race.
Q | On that note, let’s put some people on notice. What are your predictions for my finishes at Boston, Bighorn, and UTMB?
Haha, classic Andrew, always willing to stir the pot!
My honest answer is I don’t give a sh*t. If you show up prepared, nailing the daily process like you have, the results will fall into place. Or possibly they won’t if you have a bad day.
Either way, in training and racing, if we can reframe the goals from emphasizing the finish line to thinking more about the start line and each step along the way, you’ll be the most fulfilled runner you can be. And supporting that long-term fulfillment is my goal as a coach.
Q | Dude, cop out! You know that’s not how I roll. So let me put it out there.
Assuming that race day conditions are at least average, here’s what would make me happy:
At Boston, sub-2:33;
Sub-20 hours at Bighorn, which is usually on the podium;
Top 15 at UTMB, with a possible readjustment to Top 10 based on Bighorn and summer training.
I suspect you’re ready to get me there. Thanks for doing this interview. Hope readers get something out of it.
Have a question for David or me about training or racing? Leave a comment!
The post From ultra(slow) runner to 2:3X marathoner || Training methodology, with coach David Roche appeared first on Andrew Skurka.


