
Andrew Skurka's Blog, page 49
May 22, 2017
Grab one: Fourteen spots remaining on 2017 guided trips
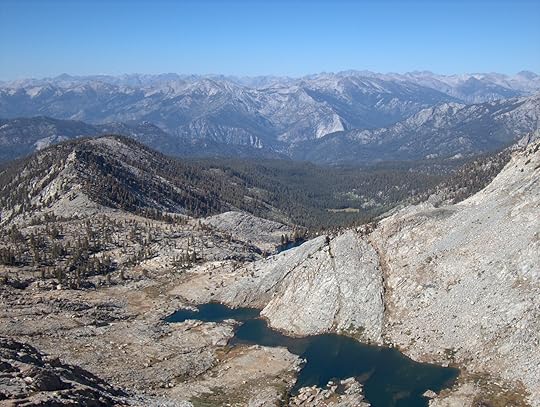

The view north from Tablelands. The South Fork of the Kings River runs right to left through the center of the photo, out of view deep in a canyon. On the skyline can be seen the Palisades (right side) and Black Divide (left side).
“Wait a minute? You’re offering guided trips this year?”
Indeed, earlier this spring I decided to offer trips again in 2017. My original thought was to open them only to alumni, some of whom have be waiting a few years to take a longer trip with me, and then launch a broader program in 2018.
But the alumni interest was so strong that to make room for everyone I decided to double capacity. Of the six sessions, five still have some space on them, and these spots are up for grabs. I am accepting applications immediately.
Each session will have two guides and up to eight clients. I am guiding half of the sessions. My assistant, or the guides leading the sister session, will be the all-star crew of Alan Dixon, Mike Clelland, and Brian Robinson. Refer to the schedule below for guide assignments, if you have a preference. Honestly, you can’t go wrong.
The trips will take place in late-September in Sequoia-Kings Canyon National Park, the southern bookend of California’s High Sierra. The primary goal is adventure — we will travel extensively off-trail and camp in seldom visited areas of the park. Early-winter weather could add some spice, too.
But the trips will also be learning-intensive. Ultimately, my goal is for clients to feel as if they could undertake a similarly ambitious trip on their own, such as when Rud, Krishna, and Nathan completed Loop 8 of the Wind River High Route and when David, Paul, and Chris did Loop 1 of the Kings Canyon High Basin Route.
Speaking of, some of our routes will follow segments of the KCHBR. We will also be visiting the Mineral King area, which has been on my list for years for but which hasn’t happened until now.
I have partnered with Southern Yosemite Mountain Guides to make these trips possible. This allows me to focus on guiding, while SYMG manages the related admin.
Here is the schedule:
Interested? Quick links:
Guided Trips page
About High Sierra Adventure trips
Planning map with trailheads, approximate routes, and nearby travel hubs
Apply now
Prices
Testimonials
Questions? Leave a comment, or contact me privately.
The post Grab one: Fourteen spots remaining on 2017 guided trips appeared first on Andrew Skurka.


May 21, 2017
Less different but better: Brand flip of Sierra Designs in 2018
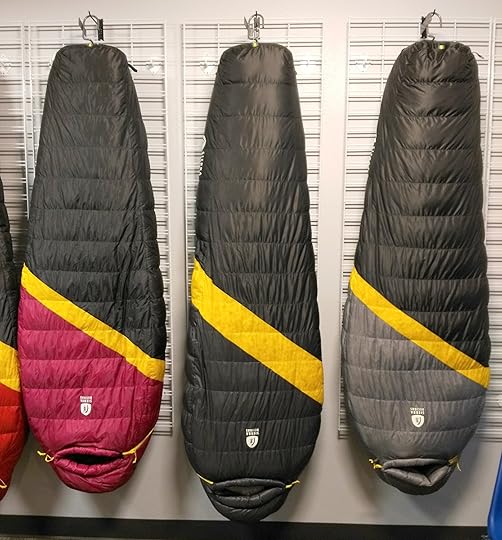

The new Nitro bags, which are classic mummies with a few thoughtful features and best-in-class prices. Available in 35, 20, and 0 degree ratings. Women-specific bags in 20 and 0.
Last week was the semi-annual sales meeting for Sierra Designs, during which shelters, sleeping bags, backpacks, apparel and accessories were shown to our domestic and international sales representatives. Most products will release in February 2018.
Sierra Designs is a 52-year-old brand, and for decades was a dominant player in multiple categories. But due to a range of factors — e.g. changes in ownership and leadership, the evolving retail landscape, mission creep, and strong competition — Sierra Designs lost its pole position.
I joined Sierra Designs in early-2015, a year after then-Brand Manager Michael Glavin and his team had launched a slew of innovative new products, like sleeping bags with bed-like features, rain gear with long torsos and chaps, and single-wall tents with generous ventilation and dedicated gear storage areas. An essential design criteria was that everything be “better and different.”
This relaunch earned Sierra Designs significant press and flattering awards, but sales generally did not follow suit. Stubborn consumer behavior, noncompetitive prices, and an unintuitive line architecture were probably most to blame.
To make matters worse, SD failed to modernize proven mainstays like the Clip Flashlight Tent and Hurricane Jacket, which were correctly perceived as not being better or different but which had kept the lights on for years because they were iconic and well priced.
A year ago the brand was given new life, when Stephen Barnes took over. The “new” SD will be no different than the old when it was most successful: better designs and functionality at more affordable price points. (In this Facebook Live interview, Stephen and I talked in-depth about his vision for the brand.) The brand personality — which is captured well in SD’s Instagram feed — is already in place.
Stephen’s influence will first be seen this September, when four new tents from the 2018 line become available from select online retailers. They will be followed up with 31 other new products in February 2018.
The Sweet Suite and Studio tents convey the brand flip perfectly. They are free- or semi-freestanding double-wall tents, available in 2- and 3-person sizes, with either a 1-door/1-vestibule or 2-door/2-vestibule configuration. Due to the pole geometry and the use of pre-bent poles, these models have more livable space than category benchmarks from Big Agnes, MSR, Nemo, and REI.

The double-wall and semi-freestanding Sweet Suite 2, which has two doors and two vestibules. It weighs 3 lbs 1 oz and will retail for $400.
The new tents won’t excite the UL crowd, but three other new products might:
Nitro bags ($300, 1 lbs 6 oz and up), featherweight mummies with thoughtful features and best-in-class prices, available in 35-, 20-, and 0-degree comfort ratings, plus 20- and 0-degree women-specific models;
Highside ($280, 1 lbs 14 oz), which will compete with other coffin-sized double-wall tents like the Big Agnes Fly Creek HV UL1 and Nemo Hornet 1; and,
Animas Pillow ($25, 2 oz), an unnecessary splurge that’s exceedingly more comfortable than a sil-nylon stuff sack filled with dirty socks and a fleece.
The two products currently in the Skurka Series — the High Route Tent 1FL and Flex Capacitor 40-60 Pack — remain in the line. Our plan is to grow the series in Spring 2019, with a tarp & bivy system, sleeping quilt, smaller backpack, and perhaps a Core 13 Clothing-inspired collection.
I’m not an industry pro and I’m reluctant to predict how SD’s new products will be received in the marketplace. Needless to say, I hope that it’s turned a corner.
Whatever happens, I want to applaud the current team — notably Stephen, Casey, Candyce, Sako, and Suzanne — for what we saw at the sales meeting. The flipped brand represents an astounding amount of deliberate thought, coordinated effort, and hard work.
The post Less different but better: Brand flip of Sierra Designs in 2018 appeared first on Andrew Skurka.
May 3, 2017
Backpacking camera shopping: Two helpful questions


LeConte Canyon in Sequoia-Kings Canyon National Park, seen from Windy Ridge. Taken with a 7-oz compact camera.
In my buyers guide for backpacking cameras, I identified the pros and cons of various options and discussed the optimal user profile for each. The guide is designed to help you settle on a specific form factor: smartphone, point-and-shoot, enthusiast compact, or interchangeable lens.
Camera shopping does not necessarily get any easier from there, however. Within each category, there are dozens of prospective models to consider; interchangeable lens cameras have an additional variable, lenses.
To narrow the list of candidates and to eventually settle on just one, I found it helpful to ask two questions:
What price is unjustifiable for a camera?
What features are must-haves, versus those that would be nice to have or that might be useful in the future?
Budget
With cameras, you generally get what you pay for. If you spend $50 more than your baseline price, you get feature X. And if you go up another $50 (now $100 more total), you get features X and Y.
Quickly, you can find yourself migrating into uncomfortable price points. Last week, for example, I started at $400, and soon I was looking at $750 models.
I saw what was happening, and made a smart move: I established an upper bound, i.e. “I will not spend more than $X.” Price tags beyond $X just seemed stupid to me.
When calculating a budget, don’t forget to account for a spare battery, carrying case, memory card(s), and an extended warranty (which I always get and which has paid for itself with every camera that I have ever owned).

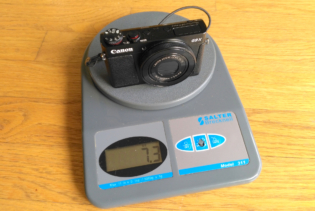
Eventually I settled on the Canon G9X II. I could justify its price, and it had all the features that I know I need, with some opportunities to grow.
Future use
Shopping for a camera is like shopping for a lot of outdoor gear: It’s tempting to buy the product that is capable of fulfilling your dreams, not just your current or realistic needs. If you buy that $400 shell with the helmet-compatible hood, you’ll learn to ice climb, right? Or not.
In my case, pricier models had 4K video, burst shooting with auto-focus, better performance at 3200 ISO, and inputs for swiveling flashes and higher quality microphones.
Would I use these features? Maybe some, but they’re not must-haves, barring some change in my photography interests. And, if that were to happen, I can always sell my under-powered camera and upgrade.
Your turn: What other questions or key considerations helped you in buying your camera?
The post Backpacking camera shopping: Two helpful questions appeared first on Andrew Skurka.
May 2, 2017
Buyers Guide || Cameras for backpacking: Phones, point-and-shoots, compacts & interchangeable-lens

Photography is often more about being at the right place at the right time. But a good camera helps, too. Sunset on the St. Vrain Glaciers, Indian Peaks Wilderness.
Last week I spent many more hours researching and deliberating about the purchase of a new camera than any non-obsessive person ever would. While they’re still fresh and relevant, I’ll share some backpacking-specific buying and product insights that I wish I had found elsewhere.
Personal context
I primarily use my camera for backpacking, followed by travel, social and family events, and website content. Photography is mostly a secondary concern: I like to have high quality recordings of my trips, but I’m not willing to dedicate serious time (or pack weight) to it.
For over a decade I used Canon Powershot S-series cameras — the S80, S90, and for the past four years the S100. (For a short while I also used a Panasonic Lumix LX-3, but it incurred irreparable water damage during a wet snowstorm in the Wrangells.) The S-models were lightweight, slipped easily into a hipbelt or pants pocket, and offered impressive image quality for their size, weight, and cost.
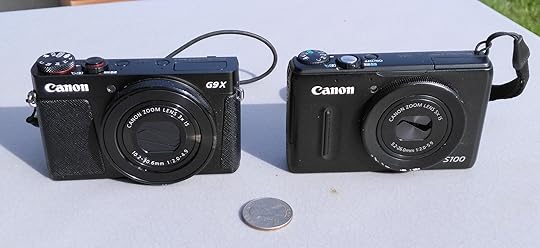
Alas, it was time to upgrade — in the six years since my S100 was released, technology has leapt ahead. Plus, the lens cover on my S100 was no longer working properly, and the screen got cracked last summer when I slipped on some slimy granite.

Old and new: my extensively used Canon S100, right; and its replacement, the Canon G9X II. Size and weight are similar, but the image quality on the G9X is far better.
Form factor
When shopping for a backpacking camera, first:
Assess the importance of photography/videography to you, both the art and the results; and,
Identify the features that you must have.
These two considerations will help get you to the appropriate form factor.
Smartphones
Two years ago Apple launched its “Shot on iPhone 6” campaign, featuring photographs on billboards and in glossy magazines shot with its then-flagship model. Look no further for proof that smartphones are legitimate cameras — and, for many people, the only camera they need.
I’m less convinced that they make good backpacking cameras, but they do have a few advantages:
Acceptable image quality for most applications;
Fast and easy sharing of photos and video on social platforms;
Lightweight, because you probably will carry it anyway:
It’s generally unwise to leave it in the car at a trailhead; and,
In the field it doubles as a handheld GPS, keyboard for an inReach satellite messenger, entertainment device, and (where cell service is available) telephone; and,
Inexpensive, because you probably already own it.
For infrequent shooters and for those who want to regularly update their social media platforms, the smartphone is probably the best option. Do yourself a favor though: use a grippy case that is resistant to shock and the elements, and on longer trips bring a Anker PowerCore 10000 charger or similar.

Crater Lake and the Lone Eagle Cirque, taken with a Nexus 5 smartphone

Nearly the same photo, taken with a 6-year-old point-and-shoot. Notice how this photo has more detail in both the shadows and in the sunny areas. Closer inspection shows better resolution of small features like clouds and trees, too.
Point-and-shoots
Smartphones have eviscerated the low-end point-and-shoot (P&S) market, typified by the 5.2-oz Canon Elph 360. But, at least for backpacking, there is still a case to be made for using one, instead of a phone:
Physical dials that can be operated in the rain and with cold or gloved hands;
Better shooting ergonomics;
Longer-lasting battery;
Optical zoom lens, for higher resolution of zoomed images & video;
Faster start-up and focus;
Less screen glare in bright sunlight;
Extreme resistance to water and drops (possibly), such as with the Olympics TG-4 Tough;
Better low-light performance (probably);
Reasonably priced; and;
Reduces exposure of your expensive smartphone to precipitation, sand, tree sap, and drops.
P&S models are suitable for moderate users who want a better camera and shooting experience than offered by a smartphone, but who are unwilling or unable to spend more money on the next category up, enthusiast compacts.
Enthusiast compacts
The smartphone may have killed off the point-and-shoot, but it also created the enthusiast compact category. To remain relevant camera manufacturers were forced to develop P&S-sized cameras with image quality and a shooting experience that was head-and-shoulders above any smartphone.
Enthusiast compacts are ideal for backpackers like me: frequent shooters who value image quality and manual control, but who want the weight and packability of a P&S.
Sony was the first to squeeze an oversized sensor and fast lens into a compact body. It released the groundbreaking RX100 in 2012, and has followed up with four subsequent models. Unfortunately, each successive generation seems to get heavier, larger, and more expensive. The latest, the Sony RX100 V, retails for an astounding $1000 and is almost 25 percent heavier than the original. As new models have been introduced, the older models have remained available at lower price points.
Canon and Panasonic have entered the category as well. Of note, Canon holds the entry-level price point with the PowerShot G9 X, which now sells for $400 and which weighs 7.3 oz. It’s a S-series camera on steroids, and even weighs 0.3 oz less than the S120, which was the last of the S-series.
Personally, I chose the second-generation Canon G9 X II, which shares the exact same body and lens but which has better low light performance, more rapid burst shooting, and faster start-up and focus thanks to a next-generation processor, the same used in the Sony RX100 III (which costs $220 more, $480 versus $700, although some might consider the electronic view finder, swiveling screen, and superior video quality to be worth the premium price).
Interchangeable lenses
If an enthusiast compact is still not enough camera, then you’re looking at an interchangeable-lens model. Enthusiast compacts can compete with this category up to a point; ultimately, however, interchangeable-lens cameras will produce the best images and video, with better image sharpness, less contrast, and no color fringing.
Interchangeable-lens cameras can be further divided into:
Mirrorless, like the Sony A6500; and,
DSLRs, like the Canon EOS 7D.
Mirrorless models are lighter and smaller than DSLR’s, but both are beyond pocketable or lightweight. They are a commitment, and suitable only for those who prioritize photography as part of their backpacking experience. Alan Dixon is one such backpacker, and on his website has written about his top picks.

The Sony RX100 versus the Sony A6000. The former is small enough for a hipbelt pocket and light enough for a gram weenie. The latter is much more of a commitment, but ultimately can take better photos. Photo credit: Alan Dixon.
In my limited experience carrying mirrorless and DSLR cameras, and watching others try to as well, my biggest complaint is the awkwardness, not the weight. On some trips I’d be willing to carry a kick-ass 1.5-lb camera, but I don’t because the size is not easily portable:
Hands get tired and are needed for other things;
If slung over a shoulder, it doesn’t stay put;
Chest mounts get in the way on difficult trails or when off-trail; and,
If it’s inside the backpack, it’s never used.
The smoothest system I’ve seen is Alan’s shoulder strap mount, although this would seem limited to lightweight mirrorless cameras with lightweight lenses.
Your turn: What do you use for a backpacker camera, and why?
Disclosure. This website is supported mostly through affiliate marketing, whereby for referral traffic I receive a small commission from select vendors, at no cost to the reader. This post contains affiliate links. Thanks for your support.
The post Buyers Guide || Cameras for backpacking: Phones, point-and-shoots, compacts & interchangeable-lens appeared first on Andrew Skurka.
April 27, 2017
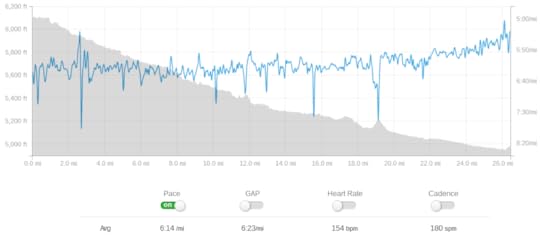
Data dump: Boston Marathon course GPX & vertical profile; plus pacing, heart rate & workout details

My Boston Marathon coverage finishes with a data dump. It’s mostly for my purposes, so I can quickly access and compare the information in the future; but there are a few resources that will be useful for any Boston participant.
Boston Marathon course GPX file
During the race I wore a Suunto Ambit GPS sport watch. It recorded a distance of 26.38 miles, which probably includes some wider corners than the official course.
Vertical profile
Multiple sources agree that the starting line is at 442 feet above sea level and the finish at 17 feet above sea level. But I found multiple listings of vertical change:
MyMarathonPace.com: 783 feet of gain, 1225 feet of loss, 442 net down
MyMarathonPace.com: 544 feet of gain, 922 feet of loss, 378 net down
GPSRunning: 693 feet of gain, 1095 feet of loss, 402 net down
GPX track from my Suunto Ambit: 600 feet of gain, 1064 feet of loss, 464 net down
If you take the average of these, you get:
655 feet of gain
1077 feet of loss
422 net down
In an average mile, you gain 25 feet and lose 41 feet, so 16 feet net down

This is from my Suunto Ambit. It looks like the starting altitude was off by about 60 feet, but the profile should be the same otherwise.
Logistics map
To help orient myself and to help my family plan their spectating, I created the map below. You’re welcome to use it for your own purposes.
Pacing
I ran a slightly negative split, which is probably rare at Boston on a hot day. My slowest 5K split was through the Newton Hills, and fastest was the final full 5K from the top of Heartbreak Hill into downtown Boston.
Heart rate
The most surprising piece of data was my heart rate, which averaged 165 bpm and which peaked at 177 bpm.

In training I had not seen my HR exceed 175 bpm. And based on tempo workouts and the Daniels’ Running Formula, I thought my maximum sustainable marathon effort would be in the high-150’s. Daniels puts it at 88 percent of max HR for a 2:20 marathoner, or 158 bpm in my case.
I suspect that the heat played a role in my elevated HR. If anyone has insight into this, please chime in.
Telltale workouts
Are you ready to run a 2:32:01 at the Boston Marathon on a warm day? The workouts below, from the final six weeks of training, might give you an indication. Unless otherwise noted, these were done in Boulder, Colo. at 5,300 feet above sea level.
2 x 15 minutes with 5-min rest
5:19 pace for interval 1
5:17 pace for interval 2
Flat loop
16-mile marathon pace effort starting at mile 4
5:49 pace for the MP segment, with 500 vertical feet of climbing
5:45 pace at sea level
1,000 vertical feet of climbing
33:23 overall or 5:23 pace
Sea level conversion is 32:17
Flat loop
The post Data dump: Boston Marathon course GPX & vertical profile; plus pacing, heart rate & workout details appeared first on Andrew Skurka.
Review: ASICS GEL-Hyper Speed 7 || Wispy & inexpensive road racing shoe


The ASICS Gel-Hyper Speed 7, with re-laced black laces
Six weeks out from the Boston Marathon, I was inclined to race in the Salomon Sonic Pro 2 (my review), which fit me well and which had proven themselves on multiple long runs. But I was open to other options: the Sonic Pro 2 is heavy relative to a true road-racing shoe, and I found its ride to be a bit slappy.
Enter the ASICS GEL-Hyper Speed 7, which my training partner Steve gave to me. He had bought them on clearance but they were a size too small. I used them first for a short easy run, and after two hard workouts (including a 10K in 33:23 at altitude) I was sold — they were going to Boston.
Review: ASICS GEL-Hyper Speed 7
The ASICS GEL-Hyper Speed 7 is a wispy 6-oz running shoe that is suitable for long road races (e.g. marathon and half-marathon) and for fast road workouts. It will best fit narrow-to-medium width feet with small-to-medium volume.
Unless I had something lighter in my closet, I would not hesitate in using the GEL-Hyper Speed 7 for a 5K or 10K on roads. And I would also consider it for longer races on the track in dry conditions, when I might be willing to sacrifice some traction for more cushioning.
At least for me, the GEL-Hyper Speed 7 is too minimalist for a regular trainer. It has a short lifespan (about 250 miles, I’m guessing), and it’s cushioning is too thin for daily pavement pounding. I would much rather use the Hoka One One Clifton 2 (my review) or similar.
Finally, the GEL-Hyper Speed 7 is not a trail running shoe, or even a trail racing shoe. The upper is too delicate and unprotected; it does not have enough cushion; and the outsole lacks durability and traction.

I found the GEL-Hyper Speed 7 to be perfect for Boston: light, cool, quick to dry, and sufficiently cushioned. It’s a neutral shoe with a 6 mm drop that allows me to run naturally.
Products specs
6.0 oz (US M’s 9), 6.8 oz (US M’s 12)
Neutral pronation
Stack height: 16 mm (heel), 10 mm (forefoot)
Drop: 6 mm
Seamless upper made of mesh and reinforcing exoskeleton
For enhanced airflow and dry times, the sock liner is perforated sock liner and the outsole & midsole have air ducts through them
MSRP: $85
Limited sizes may also be available from Road Runner Sports (men’s, women’s).
Sizing & fit
In Salomon, Altra, Merrell, La Sportiva, Hoka One One, and Salewa I am a consistent size 11.5. In the ASICS GEL-Hyper Speed 7, I need a size 12.
The Speed 7 will best fit narrow- or medium-width feet with small- or medium-volume. If you are pushing the bounds of a normal Altra shoe, known for a very generous toebox, the Speed 7 is not for you.
Fugly
Damn, these are some ugly shoes. Could they make them any more obnoxious?

Could ASICS make uglier shoes if they tried?
Once I concluded that they fit me and that I would use them, the first thing I need was re-lace them with black laces from an older shoe. I like them better, but they’re still pretty ugly.
The ASICS Gel-Hyper Speed 7, with re-laced black laces
There is a more attractive blue & green model as well. If given the choice, I’d go with them, no doubt.
Cost
The $85 MSRP is refreshingly low. Granted, it’s not a 500-mile shoe, but at least you feel like its cost is proportional to what you get. It seems counter intuitive to see minimalist racing shoes with $160 or $180 price tags (and soon $250!).
Weight
The GEL-Hyper Speed 7 specs at 6.0 oz for men’s size 9. It does not set the bar in its category, but it’s still feathery. Further weight reductions would have to come at a cost, e.g. less cushioning, less durability, or higher price.

Size US 12
Upper
There’s not much to the upper. It’s made of very lightweight mesh with a thin and flexible reinforcing exoskeleton. It breathes well and dries fast, due to its air permeability and its simplicity.

Very lightweight mesh upper (also seamless) with slightly sturdier reinforcing exoskeleton
Outsole
The outsole rubber is soft in two ways. First, it wears quickly — I have not put even 100 miles on this pair, yet already it’s wearing down to its base in toe-off and landing areas. (Thankfully, there is still plenty of rubber left, and for this application the outsole does not need to do much.) Second, the rubber is cushion-like soft, which further adds to the midsole cushioning.
The outsole is very low-profile, suitable only for man made surfaces.

Full outsole. Notice the “ports” that go through to the interior. I’m doubtful these do much for airflow through the shoe, even with a perforated sock liner, but I appreciate the effort.

Worn rubber at the toe, after not even 100 miles. There is still a few mm of rubber left, but this is not a 500-mile shoe.
Midsole
With a stack height of 16/10 at heel/forefoot, and with a thin outsole, the GEL-Hyper Speed Racer is decently cushioned for a 6-oz shoe. As I said earlier, I can’t use it for daily training runs, but for races and fast workouts — when I’m more willing to beat up my feet if it means running faster — it’s acceptable.

Side profile. 16/10 mm stack height with 3 mm drop.
Ride
The GEL-Hyper Speed Racer 7 offers a very smooth ride. There’s not much to get in the way of natural biomechanics: it’s a neutral shoe with a thin upper and simple EVA midsole.
More info about the ASICS GEL-Hyper Speed 7
Disclosure. This website is supported mostly through affiliate marketing, whereby for referral traffic I receive a small commission from select vendors, at no cost to the reader. This post contains affiliate links. Thanks for your support.
The post Review: ASICS GEL-Hyper Speed 7 || Wispy & inexpensive road racing shoe appeared first on Andrew Skurka.
April 24, 2017
GPS sport watch settings for road running races & the Boston Marathon
A GPS sport watch like the Suunto Ambit3 Peak and Garmin Fenix 5 offers pace, distance, heart rate and other data on a current, average, cumulative, and lap basis.
I consider my GPS watch an indispensable tool for training and racing, especially in longer events like marathons and trail ultras, when early on I need to remain patient and to run within my abilities so that I don’t blowup later in the race and hemorrhage time (or DNF).
Customizable displays
One of my favorite features of my Suunto Ambit is the ability to customize its displays. This is done in the owner’s Movescount profile. Garmin GPS watch displays are also customizable, but I’m less familiar with the process.
With customizable displays, I can specify exactly what data I want visible. For example, I have created different displays for ultra-marathons and for backpacking. In this post I will detail the displays I used recently at the Boston Marathon. These settings are equally applicable to longer road races like the 10K and half-marathon.
Prefacing remarks and notes
Before I owned a GPS sport watch, I used a pace chart with split times. I could memorize a handful of splits (e.g. for a 1- or 2-mile race on the track) but it’s virtually impossible to memorize splits for longer races. At that point, a laminated print-out must be carried or worn. With a GPS sport watch, I can leave the pace chart at home. I simply memorize the necessary pace to achieve my goal time. I also memorize a slower “baseline” pace and a faster “best case scenario” pace. During the race, I need only glance at my watch — which can display my average pace — to know whether I’m on pace, or faster or slower.
You can trust the mile- and 5K-markers at a well organized race like Boston, but not the street clocks. The clocks start when the gun fires, but in a large race you may not cross the start line for minutes or even hours later.
The auto-lap feature on your watch also should not be trusted. It may be accurate, but it probably does not synch perfectly with the exact course, which is the most efficient line from start to finish. You will probably run longer, because you’re unable to match this line, especially in a crowd. Even if you run 0.01 miles longer per mile, that amounts to 0.26 miles extra over the course of a marathon, which equals about 90 seconds if you are holding 6-minute pace.
The Garmin Fenix has a “Finish Time” calculating feature. I haven’t used it, but it might be worth testing. Late in the race when you are deeply fatigued, it can be difficult to remember even just a few pace/finish time relationships.
Sport Mode settings
In Movescount, “Create a new sport mode.”
Give it a relevant name, like “Boston Marathon.”
For the Activity, select Running.
Scroll below for Display instructions.
Recording interval: 1 second
GPS accuracy: Best (GPS ping every 1 second)
Pods to search: If you are using a heart rate belt, check that box.
For this application I would leave alone the advanced settings. The defaults are fine.
Display 1: My pick
Screen 1: Pace
Top: Chrono
Main: Pace
Bottom: Average pace, Lap average pace, Heart rate

Screen 2: Heart rate
Top: Chrono
Main: Current heart rate
Bottom: Average heart rate, Pace, Average pace

Display 2: My picks with a split twist
Even at Boston, which is known its downhill start and rolling Newton Hills, it is possible to maintain a fairly steady pace from start to finish. My slowest and fastest 5K splits, for example, were separated by just 20 seconds per mile, and both were within 10 seconds of my overall average.
A mountain ultra race is entirely different, due to the variability in vertical and footing. For example, at the San Juan Solstice last year I ran one 7.8-mile section at 9:18 pace and a 3.3-mile section at 16:51 pace.
So at Boston, I chose to focus primarily on current and cumulative data, not split data between mile or 5K markers, even though I hoped to run a strong negative split.
In Display 1 above, I added just one split data field: Average lap pace. By hitting the lap button at the halfway mark, I had a “fresh” average pace for the second half. However, I don’t recall consulting it often: by that point I was mostly running by feel, and with about 10K to go it was a full-out redline, pace be damned.
All that said, if you want to watch your mile or 5K splits more religiously, this is what I would recommend:
Screen 1: Pace
Top: Lap time
Main: Pace
Bottom: Average pace, Lap average pace, Heart rate, Average heart rate
Screen 2: Heart rate
Top: Chrono
Main: Heart rate
Bottom: Average heart rate, Pace, Lap average pace
Display C: No heart rate
I am an avid user of heart rate, in both training and racing. Most importantly, the data helps me to govern my pace during long intervals or races, when starting too aggressively can have disastrous results later on.
Versus other senses, my HR is less likely to lie. In contrast, my legs feel fresh and spritely after a race taper. And early on in a long effort, my body is not suffering from muscular fatigue or glycogen shortages — but it will eventually, and by monitoring my HR I can ensure that I don’t reach that point too early.
If you are not a HRM user, my recommended changes to my recommended display settings should be obvious: eliminate any HR-related field, including the entire second screen.
Disclosure. This website is supported mostly through affiliate marketing, whereby for referral traffic I receive a small commission from select vendors, at no cost to the reader. This post contains affiliate links. Thanks for your support.
The post GPS sport watch settings for road running races & the Boston Marathon appeared first on Andrew Skurka.
Boston Marathon || Notes for next time: Tips, advice & reflections on training, pacing, spectating & more

I thought Boston would be a one-and-done affair. I’m not so sure now. For the next time, here are some tips, advice, and reflections that will be useful for first-timers and veterans alike:
General
Until race day, I didn’t fully grasp the scale of the event. The numbers help convey this:
Nearly 30,000 runners participate.
At the pre-race dinner, which only a fraction of the racers attend, they cook 3,400 pounds of pasta.
About 1,500 portable toilets are staged at the Athletes Village, starting area, and along the course.
Bottom line: Mentally prepare yourself and plan accordingly for a huge affair.
Thankfully, race management is excellent. The event is 121 years strong, and the organizational professionalism has grown with the race.
The crowds are surreal, especially in the town centers (Ashland, Framingham, Natick, Wellesley) and throughout downtown Boston. I can think of a few times in my life when I’ve felt like a superhero. Boston was one of them.
Expo
My father and I went early on Saturday morning, arriving shortly after it opened at 9 AM. The line for bib pick-up was already long but it moved quickly. When we left an hour later, the line was out the building and around a city block. Lesson learned: Be a contrarian, and attend during off-hours when it’s less zoo-y. This will make for a better expo experience, too, rather than feeling as if you’re shopping on Black Friday.
Unlike Outdoor Retailer, it’s a consumer-oriented expo, so vendors are set up for retail sales. Everything is priced at retail and my favorite sections — the clearance racks — were no where to be seen, but it’s a good chance to see entire product lines from clothing and equipment brands like Adidas, Hoka One One, and Garmin.
I found it funny the number of products touting some cure for runner aches and pains. There seemed to be about as many booths selling compression products, massage chairs, no-impact treadmills, and healing creams as shoes, clothing, and nutritional products. Is long-distance running really healthy for you?

Fifteen minutes after the Expo opened at 9 AM, the line for bib pick-up was already long. The line on the right is walking towards the turnaround point, to join the line on the left.
Logistics
Since my parents live near Providence, it made more sense to have them drop me directly in Hopkinton than in downtown Boston, from where the official BAA buses start.
But I was unable to get a reliable recommendation for a drop-off time in Hopkinton. At the South Street drop-off location, how long does the line get and how long does the shuttle take? To avoid all of it, I had them drop me off at 6:50 AM about 200 yards from the Athlete Village, which was refreshingly empty at that hour. I might have been able to sleep another 30 minutes that morning, but that would have added 30 minutes of extra lines and shuttling.
I carried in with me: caffeine, calories, a water bottle that served as a pee bottle in the corral, reading material, high quality toilet paper, and sunscreen. I was dressed in Goodwill-quality clothing appropriate for inactivity in 60-degree temperatures. The one thing I regret not having was a closed-cell foam sit pad and a waterproof ground sheet, to cushion my bony butt and to give me a dry area for stretching.

Passing time with Sean-Patrick (left) and Steve (right), two other Duke track alumnus, at the Athlete Village before the race.
Find a good spot, sit down, and don’t relinquish it. With a steady stream of athletes entering the village, any free real estate quickly gets taken.
There are hundreds of bathrooms in the village and just before the starting area. Plan accordingly.
Indecent exposure notwithstanding, males (and skilled females) can pee last-minute. Multiple race veterans carried 20-oz Gatorade bottles into the corral specifically for this purpose.
Pacing
Jay M Dee accurately claimed that, “the whole race is a trap.” In any marathon, racers normally start too fast. At Boston, the pattern is magnified by the 400-foot vertical drop in the first 16 miles. Then, just as racers are beginning to tire and slow down, Boston whacks them with the Newton Hills.
The trap is made worse by warm temperatures, as runners now must also manage heat-related risks (e.g. overheating, dehydration, cramping) in addition to normal fatigue and glycogen shortages.
It seemed that many runners wilted in the latter half of the race, due to the marathon distance, the hills, and finally the heat. I ran a negative split (1:16:34-1:15:27), which is probably rare but which wasn’t so strong to explain not a single runner passing me from Wellesley to the finish.
A short pre-race warm-up would have been beneficial. Instead, I started off cold, with little stretching beforehand. Race pace is easy-peesey at the start, but I think it would have felt even smoother with warmed-up muscles.
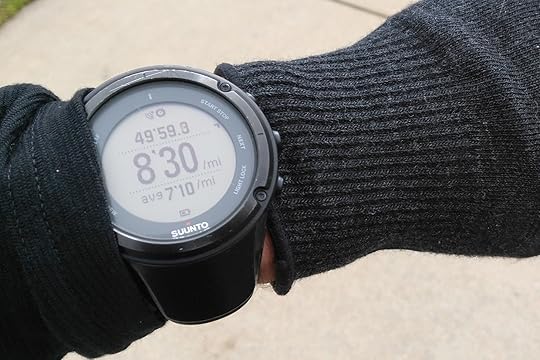
A GPS watch like the Suunto Ambit (read my long-term review) makes worthless a pace chart printout. I had memorized the necessary paces to achieve my goals finish times, and my watch gave me very accurate pace data. For example, I knew that 5:43 pace equated to sub-2:30. It was not useful to know that I should reach Mile 16 in 1:31:47.
However, add 1 second per mile to the average pace, because it’s difficult to take each apex perfectly if running in a crowd. In other words, almost all runners who complete the Boston Marathon run a distance in excess of 26.2 miles.

Hydration & nutrition
Last-minute I decided to run wear my Naked Running Band (read my review) so that I could hydrate as-needed for the first hour of the race. I filled a 10-oz bottle with 8 oz of water and 2 oz of honey. Both the band and the “honey water” was long run-tested on multiple occasions.
On a warm day, I would probably do this again. At race pace, drinking from a bottle is more efficient than a splashy cup. And having a personal bottle allowed me to steer clear of the aid station bottlenecks. Instead of discarding the bottle after empty, however, maybe next time I would try to refill it so that I could continue to drink regularly and reliably rather than depending on cups in the later miles.

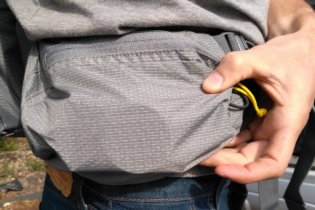
With a windshirt in the side pocket, and a 17-oz soft bottle in the rear. Bottles must have lock-out valves, or the lateral tension on the valve from the fabric will cause it to leak.
In addition to the honey water, I consumed one Clif shot and a few cups of Gatorade, each with a few ounces of fluid. My caloric intake was sufficient, but YMMV — thankfully I burn fats at relatively high outputs.
I should have drank more fluids. I was drinking to thirst, but probably should have been more preemptive given the heat and my lack of heat training. The body is best able to absorb liquids early in the race, when it still has extra bandwidth. Later on, GI distress is more likely. I’ve only suffered from muscular cramps in one other race. Not surprisingly, it was an April race on Colorado’s western slope in temperatures that I had not seen in six months.
To make more sensitive my body’s caffeine receptors, I eliminated daily caffeine intake for about 1.5 weeks before the race. Twenty-five minutes before the start, I took 200 mg of caffeine, the same as in about 16 oz of coffee. I don’t think I felt its effects until a few miles down the road, although it’s hard to say exactly because there were so many other stimulants and distractions around.
I took another dose at Mile 14, but regret having done so. There was no perceived bounce, and the surge of caffeine made me feel out-of-body for a few miles. I did this once before on a long run and had a similar experience. That’s enough of a pattern for me.
My caffeine intake during races may need reexamination. Some at the start seems helpful, but mid-effort doses seem to just screw things up.
The day before, I ate heartily at an Easter brunch; later I had a light dinner, and was done eating by 7 PM. This gave my body enough time to squeeze everything out before the 10 AM start.
That morning, I had two Premier Protein bars, at about 6 AM and 10 AM.
Spectating
My parents were able to see me at the start and again at the end. But it required some advance planning to account for road closures, parking shortages, and walking times.
Ashland was a logistically easy spot, but it was difficult for them to sort through the steady stream of runners. If I had not seen them, they would have missed me.
By the time they arrived in downtown, the crowd was already thick. Thankfully my dad was able to climb up on a wall to watch.

Packed crowds on Hereford Street, about a half-mile from the finish
The remainder of my family spectated from Boston College. Parking was easy; they had space for a ground blanket; and they could see the runners stretched out along Heartbreak Hill.

Sisters Kerri and Christine, niece Anne Marie, and nephews Colin and Nathan await at the top of Heartbreak Hill.
Training
For detailed workouts, consult my Strava profile.
Within a few months, David helped me to drop massive amounts of time. I expected that structured training would result in improved performances, but the magnitude of the improvements was surprising — I’m 36 years-old and have been running since I was 14.
As a spring marathon, I had ample opportunities to train in crappy weather, but few to train in heat. I regret passing up on the limited opportunities that I had. In many recent years, Boston has seen warm temperatures. Next time, I will be more prepared for that risk.
Recovery
For about an hour afterwards, I was pretty knackered. Slow-moving, and shivering despite 70-degree ambient temperatures. My calves were very tight still. Have warm clothing ready, even on a hot day.
My calves, hamstrings, and quads were pretty delicate through Thursday, when I ran again for the first time. By Saturday the tenderness had gone away, and on Monday I will resume training for Bighorn.
The post Boston Marathon || Notes for next time: Tips, advice & reflections on training, pacing, spectating & more appeared first on Andrew Skurka.
April 22, 2017
Race Report || Boston Marathon: 2:32:01, 72nd overall


I might need to do this one again. It is surreal.
Two weeks out from the Boston Marathon, I had my heart set on sub-2:30, or 5:43 pace. I thought my workouts proved that it was within reach.
But as the race day forecast solidified — high-60’s/low-70’s, sunny, and low humidity — I wisely gave up on that best case scenario, and honed in on 2:32, or 5:48 pace. The risk of heat-related issues during an all-out effort seemed too likely.
My finishing time, officially 2:32:01, good enough for 72nd overall and 64th male, would suggest flawless and robotic execution. But it was more difficult and interesting than that.
The taper
If you’re interested in specific workouts, consult my Strava profile. If you’re interested in the training rationale, read this interview with my coach, David Roche.
In the final days before the big show, my legs felt pretty crappy — tight muscles and discombobulated form. I’m unsure if it was due to the taper, cross-country travel, or a change in routine (e.g. time zone, eating schedule, diligence in stretching and rolling), but I tried not to over-analyze it. On Monday, I knew I would be ready.
Forecast: Hot AF
Optimal temperatures for a marathon are in the 40’s. In such conditions, minimal attire can be worn (shorts, singlet, headband, and light gloves), but hydration and core temperature can be mostly ignored.
The race day forecast was far from optimal. Low-60’s at the 10 AM start in Hopkinton, and high-60’s a few hours later in Boston. (I’m unsure what the official temperatures were, but while running through one town I saw a bank sign reading 71 degrees.) Mostly sunny skies would make it seem even warmer, especially on dark pavement and without leaf cover. The 10-15 MPH west-northwest tailwind was appreciated, but it would not be enough to offset the heat.
In a last-minute attempt to acclimate, I did my final runs at high-noon and overdressed for them. It probably didn’t help, but mentally it made me more comfortable.
Passing time before the race with Sean-Patrick (left) and Steve (right), two other Duke track alumnus, at the Athlete Village. Even in the shade at 8 AM, temperatures were very mild.
Intended strategy
A road marathon is a fraction of the distance (and time) of an ultra. But my preferred race strategy is the same for both:
Remain relaxed and patient throughout the first half; and,
Begin racing at some point in the second.
I admire runners who embrace a go-big-or-go-home attitude and who charge hard off the line. But I don’t have the risk appetite for it, especially since I enter only a few big races each year and need to make them all count. Instead, I’d rather remain under the radar, have strong and consistent (but never exceptional) performances, and in the later miles hunt down more talented athletes who overestimated their fitness or who botched their hydration or nutrition.
At Boston, a conservative strategy is especially prudent. From Hopkinton, the course drops 400 vertical feet in the first 16 miles, with little climbing. Many runners are lured into an excessively fast pace: it’s early in the race and downhill, and their legs are fresh after a two-week taper.
Then, at Mile 16, when many marathon runners begin to fatigue, the course reaches the rolling Newton Hills, which culminate with the famed Heartbreak Hill at Mile 21. The last five miles are subtly downhill, but are no gimme for a runner with spent legs and glycogen reserves.

This is the risk of being aggressive at Boston, especially on a hot day. Stud Alex Varner was running strong through the Newton Hills, with very consistent 5K splits. But he really struggled in the final 10K and lost significant time.
On a hot day, the risk of hemorrhaging time in the second half at Boston is even greater. Overheating, dehydration, and cramps cost minutes (sometimes tens of minutes), not just seconds.
I wanted to reach the Newton Hills without digging too deep. This would limit my downside risk, while putting me within striking distance of a solid time if I could come back in an even or negative split.
First half
After emptying my GI for the final time, I entered the back of Corral 1 of Wave 1, located immediately behind the Elite Men. My positioning was intentional: I didn’t want to be swept up with the almost-elites at the front of the corral.
Fifteen minutes before the start, the ringers were paraded down the north sidewalk. It was cool to have Meb, Jared Ward, a very focused Galen Rupp, and a handful of wispy Africans walk within a few feet of me, some even high-fiving the line. But I was equally excited to see Jorge Maravilla, Mike Wardian, and Tommy Rivers Puzey, who are better known for their trail running, among the ranks. I was not the only one who noticed:
I love the fact that there are 3 crazy ass ultra runners in the lead pack @mikewardian @1jorgemaravilla @tommy_rivs #BostonMarathon

April 11, 2017
Risk vs. Reward: Pacing conundrum for Boston Marathon & endurance events generally
At this point in the training cycle, within a week of my first big race of 2017, I have as clear an understanding of my current fitness as I will get. While the taper does include some workouts, they are less telling than near-max efforts weeks and months ago.
So this is an appropriate point to settle on a final goal time and a pacing strategy. I’ve been pondering the subject all week — the answers do not come easily.
Variables
The challenge is this: How can I accurately extrapolate my training data to a specific race and to specific race day conditions?
Ideally, I would have a vast and relevant dataset. For example, if I’d finished the Boston Marathon multiple times, seen a wide range of race day weather, and followed the same training regimen for years, my finish time would be predictable and my pacing strategy would be well informed.
But I’m working with much less data. I have:
Not raced Boston.
Completed only one other marathon, the Colorado Marathon, but that course is dramatically different and my fitness has dramatically improved since then.
Seventeen percent less oxygen in Boulder, Colo. than in Boston, Mass.
No training routes that match perfectly Boston’s vertical profile. And,
Not done the same workouts so many times that I know precisely how changes in temperatures, wind, and sun exposure affect my performance.
In this case, input from a coach and/or race veterans is extremely useful. By sizing up my workouts and past performances against those of other runners, I can narrow the range of possibilities, in my case to within about a 4-minute window. Still, four minutes is huge:
A 2:29-high is more impressive than a 2:33-high, but more importantly,
Attempting to run a 2:30 if you’re in 2:34 shape, or a 2:34 if you’re in 2:30 shape, will not result in a peak performance.
Pacing: Risk versus reward
The optimal pacing strategy for a marathon depends on the runner and the course, but generally it involves even or slightly positive splits. If my goal time is spot-on and if I follow the racing plan, the last few miles should really suck, but I’ll roughly maintain my pace through the finish line.
If I start more aggressively than what I believe to be my optimal pace, I may surprise everyone with a huge PR (in which case my goal time proved to be too conservative), or I may blow up and slow down dramatically.

A training partner swings for a new PR but struggles to bring it home, losing significant time in the final miles.
If I start more slowly than what I believe to be my optimal pace, I can’t offset all the time I “lost” early on, but the race won’t be an epic fail either because I won’t be relegated to a jog or even a walk for the final 10k (unless my goal time was way too ambitious, in which case it’ll be a great thing that I started as conservatively as I did).

My pace at last year’s Colorado Marathon steadily increased, but not enough to offset the “lost” time from an overly conservative start.
Besides finishing time and place, there is an emotional aspect to how a race ends. If I run conservatively and leave some on the table, I remain hungry for the next race, wanting to prove I can do ever better. If I put it all on the line, motivation to return to the well again may be lacking for some time.
Boston predictions
To help illustrate this conundrum, here are coach David’s predictions for my Boston finish:
I think the range of times in a normal weather year is:
2:31 to 2:34, if you go out at 2:33 pace;
2:29 to 2:39, if you go out at 2:30 pace; and,
2:28 to 2:42, if you go out at 2:29 pace.
So around here this week, the two big questions are:
1. How accurate is David’s sense for my fitness? (I’m inclined to believe him — he’s been pretty good so far.) And,
2. On Monday am I going to swing for a homerun (and risk a strikeout) or try for a humble double (and settle for a single if I don’t get the exact pitch I want)? If you know me at all, you probably know what I’m currently thinking.
The post Risk vs. Reward: Pacing conundrum for Boston Marathon & endurance events generally appeared first on Andrew Skurka.


