
Andrew Skurka's Blog, page 44
October 8, 2017
Garmin responds: S.O.S. lock switch failure on inReach SE & Explorer

Last month on Roman’s blog you may have read a report by and plea for help from Nathan Shoutis, about his experience with faulty S.O.S. lock switches on the DeLorme inReach SE and Explorer. He also shared his experience in a comment on this blog.
The short story is that while on an 18-day packrafting trip in Kamchatka, Russia, Nathan unintentionally sent an SOS message with his inReach, despite the lock switch being engaged. A helicopter “rescue” and a $4,400 bill ensued.
The concern is that this could be a widespread design flaw with the DeLorme inReach SE and Explorer, which have been since replaced by the Garmin inReach SE+ and Explorer+ but which still remain in widespread use. In these two videos, watch how an SOS message can be initiated even with the lock switch engaged:
https://drive.google.com/file/d/0B5PbINrDaRF_MjV5aDJmS0hEbFk/view
https://drive.google.com/file/d/0B5PbINrDaRF_LXFtY0pISFhkekU/view
Thankfully, the lock switch on my personal DeLorme Explorer appears to work properly:
What action you should take
Given Nathan’s experience and possibly that of others, I recommend that you:
Confirm that the SOS lock switch works properly on your unit.
Check regularly in the field that the SOS lock switch is engaged, noted by an audible click-to-lock sound.
The concern only pertains to the DeLorme inReach SE and Explorer. I know of no issues with the newer SE+ and Explorer+.
With all inReach devices (original and + versions), when carrying the device inside your backpack, I recommend that you enable the Screen Lock, which will greatly reduce the risk of unintentional button presses and an accidental SOS initiation. Personally, I have heard my device turn on (and then turn off, once the Screen Lock kicks in) multiple times inside my backpack, especially when packing or rummaging through my backpack.
Garmin’s response
When I received Nathan’s comment, I forwarded it to my Garmin contact, who is the Senior Product Manager that overseas the inReach program. He later sent me a response that can be shared with those interested in this issue.
Garmin’s response is thorough, but it does not address or acknowledge documented cases of faulty SOS switches, as demonstrated in the videos linked earlier and as claimed by Nathan. Therefore, I recommend that you still check your personal device to confirm that the lock switch works properly.
We want our inReach users to know that we take customer feedback very seriously and want to share the following information about the inReach SE and Explorer, the SOS Lock, and the ways that emergencies can be declared with the device.
The inReach SE and Explorer use a slider to prevent the SOS button from being accidentally pressed when in a backpack. To open the SOS Button Lock the user needs to press in on the slider and then push the slider to the left to release the SOS button. To close the SOS Button Lock the user needs to push the slider all the way to the right and click it into place. It is important to confirm that the SOS Button Lock is properly closed, we say “click it to lock it” to ensure that the lock is fully engaged.

There are two ways to trigger an SOS message with the inReach SE and Explorer.
The first method uses the SOS Button Lock and SOS Button previously described. During an emergency, the user can unlock the SOS button, press and hold the SOS button for five seconds, and then observe that a 20 second countdown timer announces that an emergency message is about to be sent. The user has 20 seconds to cancel this message and prevent notification from going to our search and rescue dispatch center, otherwise the emergency message will automatically send at the end of the countdown.
The second method of triggering an SOS involves the inReach Home screen and the SOS button shown in the lower-right corner of the page. The user can select the SOS page and follow a series of dialogs that lets them confirm that they have an emergency and want to send an SOS message.

While these methods for declaring an SOS have built-in safety precautions, there are times when users accidentally send an emergency message.
1. One type of accidental SOS message that we have observed can occur when the user has not properly engaged the SOS Button Lock. If the user has opened their SOS Button Lock to explore the slider mechanism but then failed to properly “click it to lock it” before their trip, they are at risk of accidentally pressing the unlocked SOS button. This is why the packaging, instruction text, and support site emphasize the “click it to lock it” process. We describe it on the opening flap of the inReach box and then again in the Quick Start Guide.
2. A second potential for an accidental SOS occurs if the user places the device in their backpack, powered on, without the Screen Lock engaged. This would allow accidental button presses to move the highlight around the Home screen and potentially access the SOS page. Keep in mind that there are five button presses that need to happen in a specific order and in a specific timeframe without any errant button presses for an accidental SOS to be declared. Given this potential, we strongly encourage people to keep their Screen Lock enabled if they plan to hike with their inReach in their backpack where it could be bumped.
3. If a significant amount of force is put on the SOS button, the plastics of the SOS Button Lock can be deformed to cause the button cover to touch the internal SOS button. If this significant level of force is maintained for the 5 second “press and hold” duration needed to declare an emergency the SOS countdown timer will trigger. We have verified this process and confirmed that the amount of force necessary to trigger the SOS is considerably greater than could be expected in a normal use case, so great that it is approaching a level that would damage the screen and display lens too.
We want to emphasize that the device was not designed for users to bypass the SOS lock by pressing with enough force to deform the plastics and trigger the alert.
We understand that a small group of users have triggered an accidental SOS. We encourage users to:
Double check your gear before leaving, to make sure the SOS button has been moved all the way to the right, into the “click it to lock it” position.
Enable the Screen Lock, especially if you carry the inReach SE or Explorer in a location where it could have accidental buttons presses
Avoid placing their inReach satellite communication device in a location where it may be subject to undue pressure on the device, as one would with all electronic devices. While it is a rugged device, it is also an important piece of technology and should not be stressed under the weight of heavy objects in your pack.
We believe that following these precautions will ensure the inReach functions properly for messaging and tracking and that it is available to help should an emergency occur, all without the risk of accidentally sending any messages, emergency or otherwise, while being carried in a pack.
Please direct any additional questions regarding the inReach SE or Explorer to Garmin’s Customer Care team at product.support@garmin.com.
The post Garmin responds: S.O.S. lock switch failure on inReach SE & Explorer appeared first on Andrew Skurka.


October 3, 2017
Review: Sierra Designs High Side Tent || Light & packable, but small
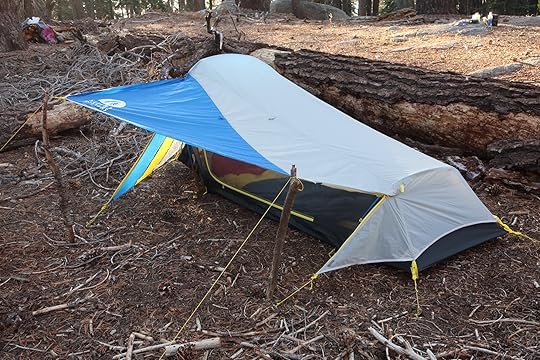

The Sierra Designs High Side, perched at 10,000 feet in Silliman Creek in Sequoia-Kings Canyon National Park.
The most interesting new shelter from Sierra Designs in its spring 2018 lineup is the High Side. I previewed it in my summer Outdoor Retailer coverage, and recently used it on two 5-day/4-night backpacking trips in Sequoia-Kings Canyon National Park in the Sierra-Nevada.
Testing conditions were varied. We camped in forest, at treeline, and in the alpine. Nighttime temperatures ranged from the low-20’s to low-30’s; the dew point was exceeded several times. Unfortunately, it never rained or snowed, and we never encountered howling winds, but I feel confident in speculating on its performance in these regards.
Review: Sierra Designs High Side Tent
The 1-person High Side is new from Sierra Designs, and will be available in Spring 2018. It falls into the “ultralight/ultra-small” category: it weighs just 1 lb 15 oz for the fly, body, and pole set; but it offers only 24.9 square feet of protected space (17.2-sq ft interior, 7.7-sq ft vestibule) and a 32-inch peak height. It has enough room to lie down or sit in a hunched position, and to keep your gear out of the rain, but nothing more.
The High Side features one side-entry door, two fly vents, a porch-able vestibule awning, and wind-resistant torpedo shape. Its pitch is intuitive and fast, and requires a minimum of seven stakes. The dedicated pole set has abnormally short segments (12.5-in rather than standard 14- or 16-in), which greatly improves its packability.

The High Side is a 3-season non-freestanding 1-person tent that weighs less than 2 lbs for tent, fly, and poles. MSRP is $280.

The production version will feature two fly vents, to maintain some ventilation when the vestibule is closed. My review sample did not have them.
Target user
What types of users may be interested in the High Side? If you:
Are willing to sacrifice livable space for weight-savings.
Seek a shelter with a small footprint and/or small packed size.
Want a dedicated pole set, because you don’t use or need trekking poles, or because you are willing to carry more weight in exchange for a less fussy pitch.
Camp in humid environments, and therefore benefit from a physical barrier between you and a possibly condensation-soaked fly.
Always use the fly and tent body together, for a full-sided and fully enclosed experience.
Have a limited budget, or don’t care to spend $300-$600 for a shelter that is marginally lighter and/or uses more premium fabrics like 7d nylon or Cuben Fiber.

The High Side falls into the “ultralight/ultra-small” category. There is just enough room to lie down (or sit in a hunched position), and to keep your gear out of the rain.
Comparison chart
How does the High Side compare to other ultralight/ultra-small, 3-season, 1-person tents with dedicated pole sets? In general, it has the most affordable price and shortest peak height; its weight and protected space are middle-of-the-pack.
The primary explanation for these rankings is the fabric: the fly, floor, and body mesh are 20d, 30d, and 15d, respectively. These are more cost-effective but heavier than the 15d, 10d, and even 7d fabrics used in the pricier models.
Design
The High Side consists of a non-interchangeable inner tent body and fly. The tent body can be used on its own during dry nights, but there is no fly/footprint option for bug-less trips. A separate footprint is available for $30 and weighs 3.8 oz (108 g).
The tube-style non-freestanding shape relies on two pre-bent half-hoop poles. The squatty 32-inch peak height is partially offset by the resulting verticality of the side walls. The overall interior volume is probably comparable to a fin-style shelter (e.g. BA Fly Creek or Nemo Hornet) with a taller peak height, because so little of the ceiling space is usable in that architecture.

The tent body can be used on its own during dry nights. The pre-bent half-hoop poles create more usable space than fin-style tents, but the interior volume of the High Side is still stingy due to the 32-inch interior height.
The pre-bends in the poles are exceptional on the High Side’s door side. This “high side” provides a few inches of extra clearance during entry/exit, versus a less dramatic pre-bend.
The vestibule awning can be closed shut or porched open. In the former configuration, ventilation rests with the perimeter gap and with two fly vents. Ventilation is never a full substitute for good campsite selection, and under challenging circumstances condensation may be inevitable regardless of the shelter’s design.
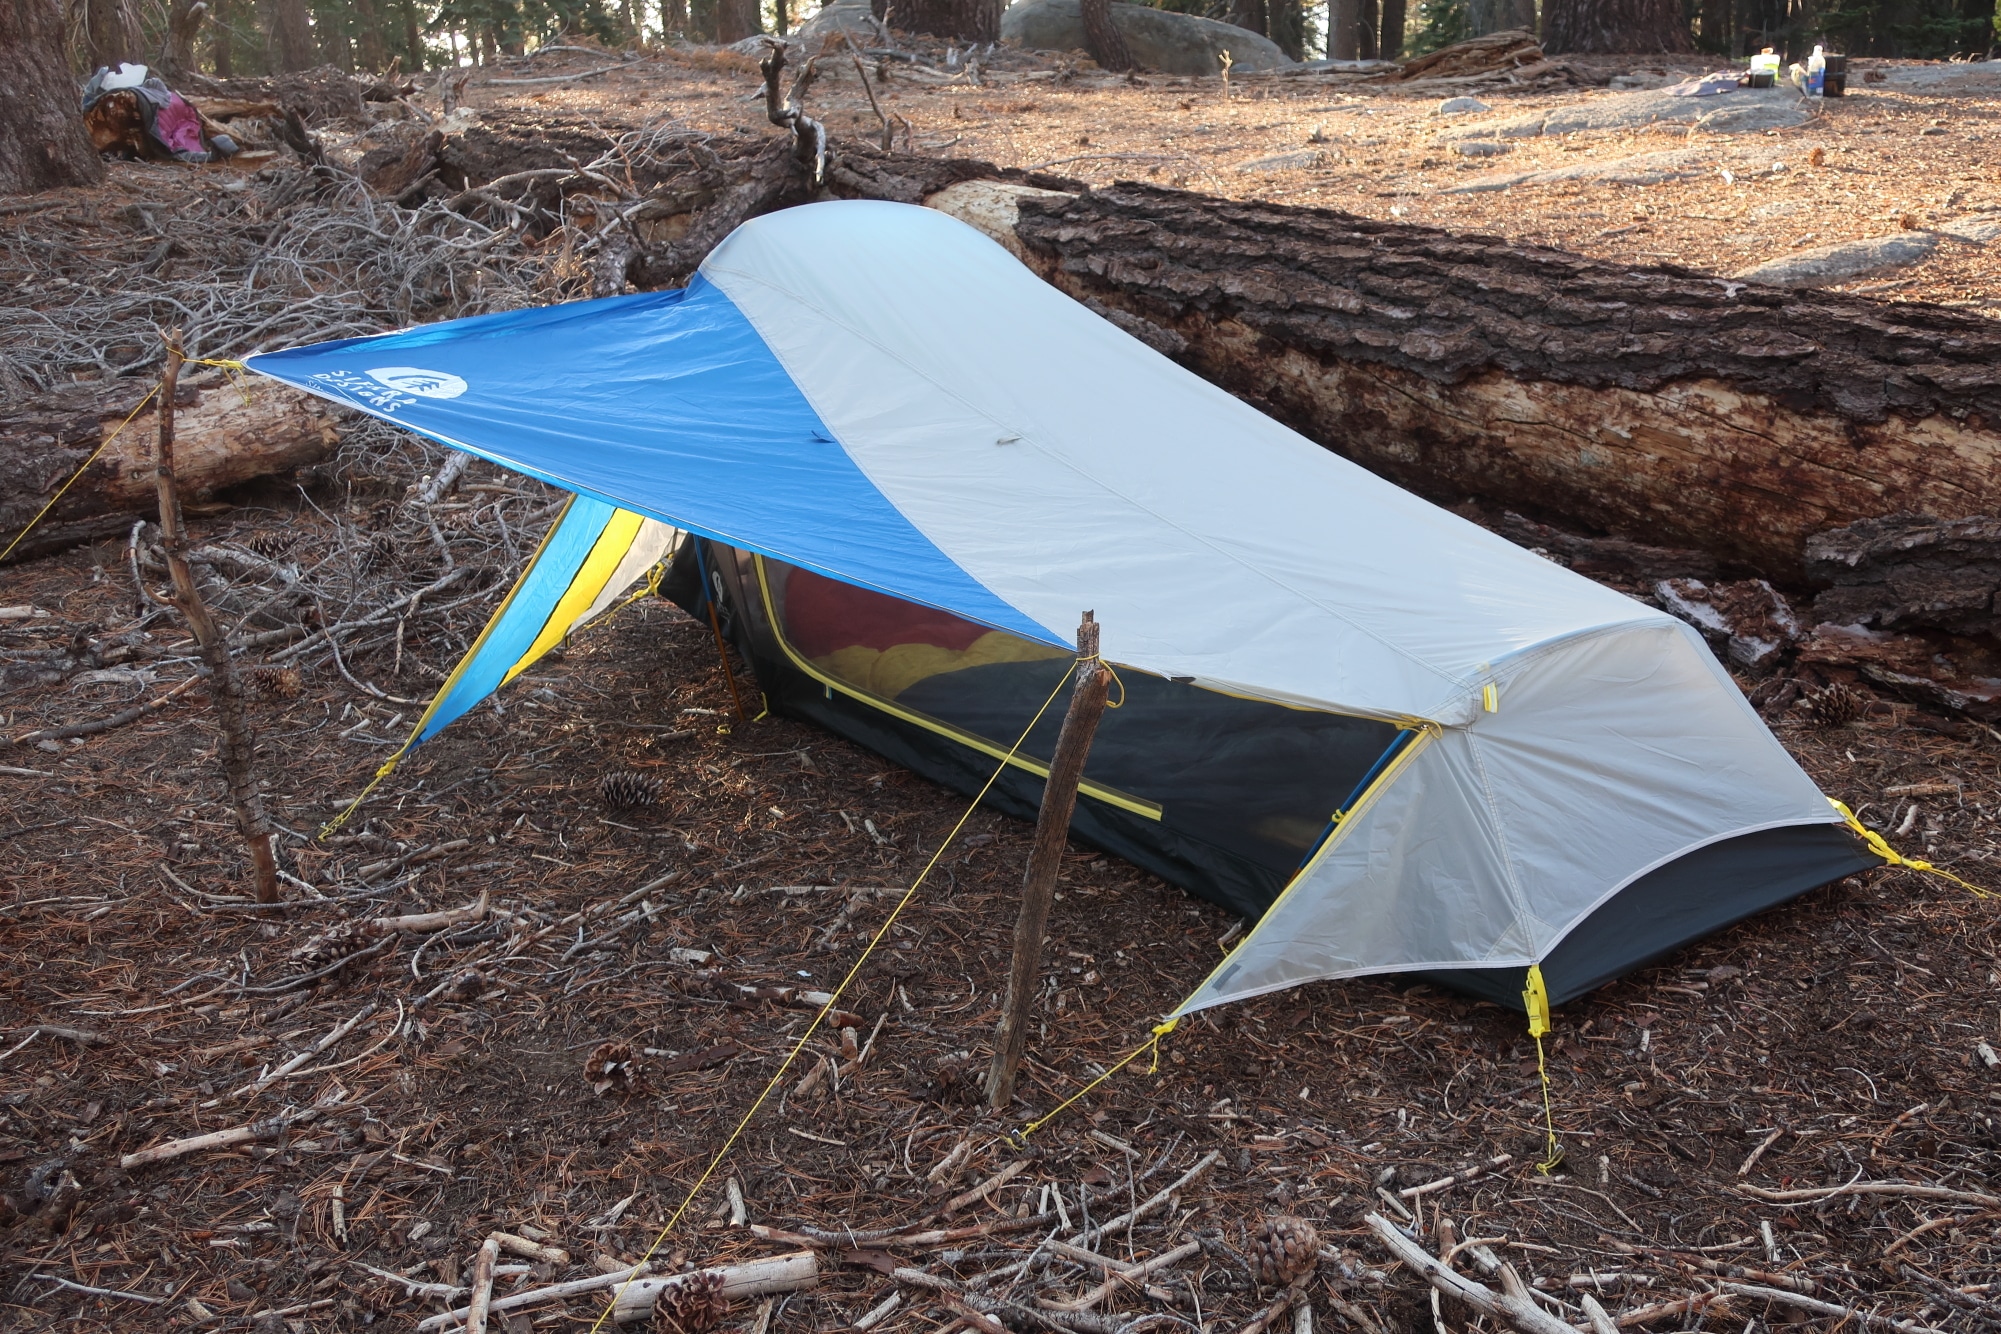
The porch-able awning greatly improves ventilation (and therefore condensation resistance) and increases usable space. The side-entry is much more convenient than head-entry for entry and exit.
Pitch
The High Side has a straightforward and intuitive pitch:
Stake out the four corners of the inner body.
Attach the body to the two poles, using clips.
Drape the fly over the inner body. Attach the fly to the poles using the four Velcro loops under the fly. And attach the fly to the inner body using four side-release buckles.
Stake out the vestibule and the opposite fly panel.
As described, this basic pitch requires seven stakes. I would recommend nine, however, so that the vestibule awning can be porched in calm conditions. This greatly improves ventilation (which will help to minimize condensation) and creates more usable living space.
For high winds, the High Side has four additional tie-out points, one on each side of the two poles. With its small profile and torpedo shape, I suspect it would do well in high winds, although its cramped size would be a challenge in frequent inclement weather.
For improved perimeter ventilation, bring up two more extra stakes to pull the fly away from the inner tent body along the non-vestibule side.
Packed size
Rather than conventional 14- or 16-inch pole segments, the High Side pole set uses 12.5-inch lengths. This adds some weight, due to duplication of materials at the joints, but overall it’s a winning spec: the High Side has a much smaller packed size. Inside my Sierra Designs Flex Capacitor 40-60 Pack, the High Side easily fit horizontally, stacking neatly with my sleeping bag, sleeping pad, and full-sided BV500 bear canister. I did not need to store it vertically, or stow the pole set on the outside of my pack.

Due to the short pole segments, the High Side will fit horizontally inside many backpacks, including my Flex Capacitor.
Its storage sack is another nice detail. The burrito-style bag, which is modeled after a climbing rope bag, is less conducive to stuffing than a normal stuff sack. But I found that loose folding was adequate, and the compression straps were useful in shrinking it further.

A size comparison
Room for improvement + personal opinion
For what it is, I think the High Side is designed well. But I have a few recommendations:
Offer a fly/footprint pitch, so that the High Side can be used in bug-free seasons without carrying the inner body.
Install side-release buckles mid-way on the vestibule zippers, so that the door can be partially porched without stressing the zipper. Currently, the porch option is all-or-nothing, and in the “all” configuration precip will land just a few inches from the inner body.
Add two plastic rods along the non-vestibule side of the fly, so that the fly can be tensioned away from the inner body (to improve ventilation) without needing a stake, reducing the minimum number of stakes to six (and recommend number to eight).
I’d be much more interested in the High Side if it were bigger, because small shelters feel like coffins in bad weather, but I understand this fundamentally changes the nature of the High Side. Similarly, I’m sure that other backpackers would like to see it available in Cuben Fiber or gossamer nylons, although these fabric substitutions would dramatically increase the price.
As someone who uses trekking poles, who is willing to work with fussy pitches, and who is willing to carry some extra weight for liveable space, the High Side is not my top choice. Personally, I would prefer the Sierra Designs High Route 1FL, or a similar modular double-wall shelter system. But I have no doubt that the High Side will find a market due to its weight, price, packed size, and easy pitch.
Disclosure. This website is supported mostly through affiliate marketing, whereby for referral traffic I receive a small commission from select vendors, at no cost to the reader. This post contains affiliate links. Thanks for your support.
I am a marketing and product consultant for Sierra Designs, but had no involvement in the design of the High Side.
The post Review: Sierra Designs High Side Tent || Light & packable, but small appeared first on Andrew Skurka.
September 26, 2017
How-to video || Dinner Recipe: Peanut Sauce & Noodles

This Thai Peanut Noodle recipe competes with my Beans & Rice for the crowd favorite. It goes on nearly every single guided trip, and on most personal trips, especially if I have a prepared batch of sauce already in the fridge.
The post How-to video || Dinner Recipe: Peanut Sauce & Noodles appeared first on Andrew Skurka.
September 14, 2017
Review: Sierra Designs Cloud 35 & 20 || Premium mummy/quilt hybrid
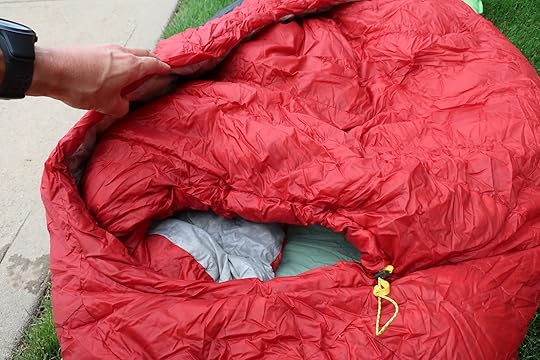

A cowboy camp with the Sierra Designs Cloud 35 in upper Cascade Creek on the Pfiffner Traverse.
For eight consecutive nights in July, I slept in the Sierra Designs Cloud 35, which is new for spring 2018 and which may establish a new sleeping bag category. SD describes it as a “zipperless mummy,” but it takes just as many design cues from top bags and quilts.
Review: Sierra Designs Cloud Sleeping Bag
I can think of at least three audiences for the Cloud:
1. An existing mummy bag sleeper who finds it overly restrictive, who rolls off their pad at night, and/or who are annoyed by snagging zippers.

When closed up, the performance of the Cloud is on par with a conventional mummy.
2. A new backpacker who want a lightweight sleeping bag with premium materials that is priced lower than comparable models from the likes of Marmot, Mountain Hardware, and Sea to Summit. And,
3. An existing quilt user who wants a less drafty bag for colder temperatures, but who fears being confined in a mummy after enjoying the freedom of a quilt. Personally, I’m in this camp.

But its versatility and variable girth are more quilt-like.
The Cloud features 800-fill power water-resistant DriDown and 15d shell fabrics. It is most suitable for backpacking, when warmth-per-weight is a paramount concern. For camping, comfort and cost can be prioritized ahead of weight. It will be available in two versions:
35-degree (1 lb 7 oz, $270, blue)
20-degree (1 lb 13 oz, $300, red)
Each version is available in two lengths: regular (up to 6-foot) and long (up to 6’6″; +$20).
The 20-degree will also be available as a women’s bag (1 lb 12 oz, $300), fitting up to 5’8″. It includes the same fill weight as the unisex 20-degree regular (14.8 oz), but since it’s proportionally smaller it should be a few degrees warmer; extra down was allocated to the footbox and top core. An EN test was not done for this version, as an expensive-saving measure.
Backstory
The Cloud originated with SD’s admission that it’s innovative Backcountry Bed can not compete with traditional mummies or quilts on a warmth-per-weight basis, all things being equal (like fill power, shell fabrics, and sizing). It simply requires too much build, like overlapping panels, extra seams, and a pad sleeve.
The Cloud, however, can and does. The 35- and 20-degree versions are each just 1 oz heavier than the new Nitro bags, which are pure vanilla mummies that feature the same materials and sizing.
Zipperless mummy
The Cloud differs from a conventional mummy (e.g. the Nitro) in two respects. First, it has no zipper. Instead, the top of the Cloud from the waist to the shoulders is more like a comforter or quilt, detached from the bag’s side on sleeper’s left. Despite this zipperless opening, drafts should be minimal or non-existent: the comforter hooks around the shoulder, and it overlaps with the side insulation when the sleeper is laying down.

The top comforter tucks into the side of the bag and has a shoulder “hook” to eliminate drafts even without a zipper.
Second, the Cloud is technically a top bag: it features a sleeve on its backside, into which a sleeping pad should be inserted. From the waist to the shoulders, the Cloud has no insulation on its underside, instead relying on the insulating value of the sleeping pad.
The weight consequences of these design differences are mostly a wash. By eliminating the zipper and underside insulation and baffling, the Cloud drops weight. But the overlapping materials and pad sleeve add it right back.
Gram weenies may wonder if the pad sleeve is critical. It’s not, but I’d leave it alone — I think it’s advantages are worth an extra ounce. The pad sleeve prevents the user from rolling off the pad, and allows the user to rotate within the bag. And in the particular case of the Cloud, the sleeve keeps tension on the bag’s top side, helping keep open the hole.

The pad sleeve adds about an ounce of weight, but improves the tension on the comforter and prevents the user from rolling off the pad.
Variable girth and sizing
Versus a traditional mummy, the Cloud is less restrictive and it lacks a snag-prone zipper. It has one more advantage, too: variable girth, due to the overlap between its comforter and sides.
This feature is most meaningful to backpackers who supplement the warmth of their sleeping bag by wearing their hiking clothes at night. For example, the Cloud fit me perfectly on warm nights, when I slept in just my hiking shirt and underwear. But it remained a perfect fit on cooler nights, when I also wore my insulated jacket (and later removed it because I was too warm).
I’m 6-feet tall, weigh in the upper 150’s, and have a 40-inch chest. The regular-sized Cloud offered sufficient height and more than enough width.
Temperature rating
The 35- and 20-degree versions have both been EN-tested. Your nighttime comfort may not coincide perfectly with the EN test (thankfully, mine does), but at least it gives you apples-to-apples comparison data between sleeping bags.
During my July trip — on which I used a drafty open-sided tarp — nighttime temperatures were typically in the 40’s. I found the 35-degree bag amply warm. If I had sealed it up while wearing my hiking shirt, shorts, pants, lightweight fleece, and puffy jacket, I’m certain that I could have been comfortable with temperatures in the 20’s.
Room for improvement
My single criticism of the Cloud is the side-sleeping experience. In this position, my face was directed at the side of the bag, whereas a traditional mummy bag would have rolled with me. This problem is inherent with top bags, and was remedied easily enough — I tucked the side or top of the Cloud under my face.
Thankfully, I’m generally a back sleeper, so the Cloud worked for me. And it’s not as if mummies aren’t also flawed — active sleepers can roll completely off their pads or become utterly twisted inside of the bag.
The post Review: Sierra Designs Cloud 35 & 20 || Premium mummy/quilt hybrid appeared first on Andrew Skurka.
September 13, 2017
UTMB data: Results, split times, course GPX, & pace charts
If you plan to race UTMB — or use the course as a training camp — and if you’re a data dork like me, the resources on this page will be useful in your preparations:
Official results
At the UTMB website, official results are available for each year, back to 2003. The more recent years include split data from 20+ checkpoints.
The course has been modified several times — by design or due to race-day conditions — so the results are not necessarily comparable across years. The current official course was followed by racers in 2015 and 2016, but not in years prior and not in 2017.
From LiveTrail, the timing company hired by UTMB, you can get the official results and some more granular data, plus some graph/chart options: 2017 results.
Course GPX file download
Maps of the UTMB course are available on the UTMB website, but they’re not very useful due to the resolution. And because the course is not marked until a few days before the race, it’s difficult to know exactly where the course goes in areas where there are lots of options (e.g. in the towns, in ski areas with lots of trails).
Download a GPX file of the UTMB course.
The file is based on the data I gathered during the 2017 race using my Suunto Ambit3 Peak, which recorded my location every 5 seconds. Three changes were made to the 2017 course; the official segments are also included in the GPX file:
Bypass of Col des Pyramides Calcalres
North of La Fouly, we ran on roads and tracks rather than trail
Bypass of La Tete aux Vents
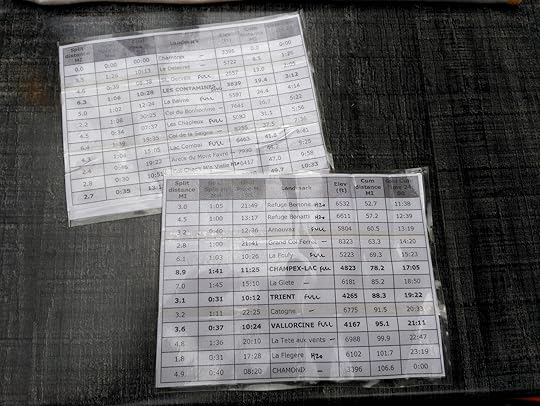
Split charts & pace charts
Essential: Read my pace chart tutorial, which includes a discussion of its value and my process for making one.
My UTMB pace chart is available for download. Click here. To make your own copy of the chart, sign into Google and “Make a copy” under the File menu.
The pace chart assumes the official course, an official time chart for which is available under “Time Chart” on this page. (Note: As of Sept 13, the time chart posted is for the modified 2017 course.) If there are permanent or last-minute changes to the course, some split and pace data will no longer be accurate. Unless I run UTMB again, I probably won’t update the data, so buyer beware.
You will want to hide rows and columns in order to make the pace chart more user-friendly. This was my print-out (“laminated” with packaging tape) for the race:

Before the race, I settled on a 24-hour goal time. I had 23- and 25-hour splits ready to go, depending on different race day conditions or circumstances. My goal splits were proportional to split data from 2015 and 2016 races that I hoped to emulate, like the performances of David Laney and Seth Swanson. You will need to adapt the pace chart for your own purposes.
The post UTMB data: Results, split times, course GPX, & pace charts appeared first on Andrew Skurka.
September 12, 2017
Mixed bag: UTMB performance assessment || Perils of racing conservatively

Just twelve hours after finishing UTMB in Chamonix, Amanda and I split for the second half of our vacation, in Provence, hence the delay in post-UTMB coverage. For my sake, I hope to post it all this week before my guided trips start on Sunday and my recollection fades.
I placed 34th at UTMB, with a finishing time of 24:44:07. That’s respectable, given that it was the most talented field in the history of ultrarunning, and that the 104-mile course had 31,000 vertical feet of climbing.
But relative to my potential, my performance feels so-so. And it certainly fell short of my expectations. On an exceptional day, I thought top-10 was possible, and top-20 seemed likely if I ran strong. (In hindsight, top-15 and top-25 would have been more appropriate, since there were ahistorically few DNF’s.)
For 1.5 years I’d invested an extraordinary amount of time, energy, and expense into preparing for UTMB, so I’m a bit disappointed that my performance wasn’t magical. On my flight back across the Atlantic I’d hoped to feel as I did after Leadville in 2008, Run Rabbit in 2015, or Boston in April.
Being too hard on myself
There are some reasons to be pleased:
1. It felt near max
At the finish there was unused gas in the tank, but not much, and it could have been depleted if there’d been more runners within striking distance at the end. (Instead, when I left the final aid station, Vallorcine with 11 miles to go, the next vulnerable runner was 28 minutes up.)
2. Seed vs finish
I was bib #134, but finished 34th, meaning that I outperformed my seed by a net 100 spots. A few DNS’s and DNF’s helped my cause, but relative to the field I raced better than past performances suggested I would.
3. Patience, patience, patience
At the first timing checkpoint, Le Delevret (Mi 8.5), I was in 128th place. Over the next 96 miles I steadily gained 94 net spots. One-hundred mile races reward patience.

A steady improvement in my placement throughout the race
4. Not chicked
Versus the world’s best female ultra runners, I’m usually a little bit faster. The first two females, Nuria Picas and Andrea Huser, finished about an hour later.
5. Better than it looks
The low number of DNF’s among the elite men made cracking the top 10 or top 20 unusually difficult. And while was the course was shortened slightly, times were slowed by mud, limited visibility, and frequent layering transitions due to intermittent precip.
But, it wasn’t magical
Why am I not thrilled with my performance?
1. Spanked by the elites.
The winner, Francois D’Haene, finished in 19:01, an embarrassing difference of 5:43, or 3.5 minutes per mile. That gap is insurmountable even if I was a full-time professional runner, knew the course intimately, and was on a world-class PED program. It’s humbling to witness the inferiority of my God-given talent.
2. Never mixed it up with the elites.
Besides Sage Canady and Jason Schlarb, who had off days, I didn’t beat or even temporarily match strides with any of the US elites. You can’t become one if you don’t run with them.
3. Low average HR.
My average HR was 121 bpm, which is significantly lower than my last best 100-mile effort, Run Rabbit (127 bpm), and surprisingly lower than Bighorn 100 (123 bpm), which was sub-max. Quantifiably, this indicates that I ran below my physical capacity.

4. Poor ITRA score.
The Performance Index establishes apples-to-apples comparisons across races and between runners. My 24:44 was given a score of 727, which is one of my lowest scores ever, even lower than decidedly disappointing performances like Bighorn, Silverheels, or Golden Gate.
What happened?
If UTMB hadn’t been my apex race or if my calendar had an obvious next endeavor, I’d more quickly and more easily get over it and move on. But that wasn’t the case, so let me dwell.
1. Training
My fitness does not explain a so-so performance. I was in the best ultra fitness of my life, as evidenced by my workouts: this summer I set a new FKT on Pawnee-Buchanan and new PR’s at will on oft-run segments. Under David Roach’s guidance, I was peaking at just the right time.
2. Minor strains
Part of my struggle was physical handicapping. I strained my left calf on the ascent of Col du Bonhumme (Mi 25), which left me with restricted range of motion and fearful of it blowing up completely. My psoas muscles (i.e. hip flexors) were also tight for about half the race, further hindering my stride.

Four full days after the race, my right leg was back to normal, but my left calf was still noticeably swollen.
3. Race strategy
But I think the real flaw was my conservative race strategy. My race was textbook cute: I started slow, caught many runners who went out too fast, and looked strong at the finish.
But it lacked the deep suffering that’s necessary for a career performance. If I’d gone out faster, I most certainly would have been worse for wear in the final half or quarter. But I think I would have been carried to a better time: I’d have utilized the faster momentum of the elite field, and would have been more psyched that I was in the mix. Instead, I mostly floated in No Man’s Land, passed quickly those who had fallen off the back, and wondered what was happening at the front.
UTMB 2018?
Do I have unfinished business at UTMB? Yes. But I need to ponder my broader one- and two-year goals before committing to that. About two years ago I decided to utilize the remaining years of my physical prime by investing myself fully in endurance running. I’ve done that, and now must decide whether I should double-down or whether I should find another place to play.
The post Mixed bag: UTMB performance assessment || Perils of racing conservatively appeared first on Andrew Skurka.
September 11, 2017
Tutorial: Dead-reckoning navigation | Basic but oft-used skill
Dead-reckoning is the simplest navigation skill. It’s much easier to learn than reading a map, or operating a compass, GPS, or altimeter watch.
Yet I find it to be one of the most useful and frequently used, especially when hiking on well-maintained trails where a consistent physical effort yields consistent results. Such trails include well-known long-distance footpaths (e.g. Appalachian, John Muir, Wonderland) and most trails in National Parks and high-use Wilderness Areas (e.g. Yellowstone, Indian Peaks).
This technique is less useful when hiking off-trail or on trails with extreme vertical change. Off-trail terrain is more variable (i.e. it’s sometimes great, sometimes awful), so results are less predictable. And in extremely mountains environments, forward progress is more a function of vertical hiking speed (e.g. 30 vertical feet per minute), and the horizontal distance over which this vertical change happens is less relevant (if not entirely irrelevant).
Benefits
I use dead-reckoning to:
Predict ETA at future landmarks, like water sources, trail junctions and campsites;
Approximate my current location relative to the last or next landmark; and,
Rule out “false” features like false summits and unmarked trail junctions.
In general, regular dead-reckoning helps to to “stay found” because it sets expectations about what should be happening. If reality does not match expectations (e.g. did not reach a landmark when expected, or reached a different landmark than expected), it’s a cause for a map-check.
Tools
To dead-reckon, two out of three following items are needed:
Distance between two landmarks, derived from a topographic map, databook, or guidebook;
Rate of travel, which can be measured (e.g. with a GPS unit) or calculated on past trips; or,
Time, using a simple watch (although if you want to get serious about backpacking, I recommend a GPS sports watch).
Advanced tip: In mountainous environments, it is useful to know the vertical change between two landmarks, because this factor may influence your calculations. Vertical change between two points can be quickly measured on a map so long as the gradient is consistently up or down; in rolling terrain, vertical change calculations are more time-consuming.
How to dead-reckon
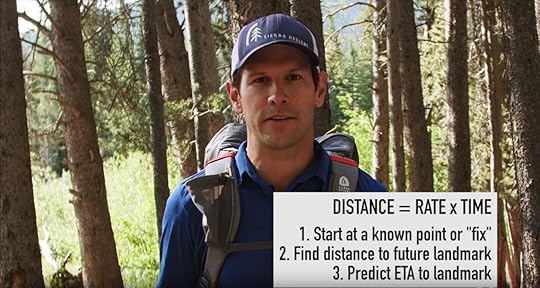
You might recall this formula from high school physics: Distance = Rate * Time, whereby:
Distance = miles or kilometers
Rate = MPH or KPH
Time = Hours
The main formula can be reconfigured to solve for other variables:
Rate = Distance / Time
Time = Distance / Rate
To dead-reckon, essentially you insert two known variables to determine the third.
Tip: It’s useful to remember that 2 MPH = 30 minutes/mile; 2.5 MPH = 25 minutes/mile; and 3 MPH = 20 minutes/mile.
Examples of dead reckoning
1. I’ve been been walking non-stop for 1:20 minutes from my last known landmark, Crystal Spring. On this kind of rolling terrain, I generally walk at around 3 MPH. I’m planning to camp at Buchanan Creek, which is 5.5 miles from Crystal Spring, per my guidebook. How much further until camp?
Using the formula Distance = Rate * Time, I calculate that I’ve walked about 4 miles (3 mph for 80 minutes). That would leave 1.5 miles to camp.
2. Today is the first of a 3-day trip with two new guys I met on an ultralight backpacking forum. Normally I walk at 3 MPH, but our pace feels much slower than that — these guys have dialed kits, but it looks as if they never actually do any hiking. A 5-mile section of easy trail takes us 2.5 hours.
Using the formula Rate = Distance / Time, I calculate that we’re walking at about 2 miles per hour, or about one-third slower than my usual hiking pace.
3. My databook says that it’s 2.5 miles between Pawnee Lake and Pawnee Pass, and I know that I normally hike at 3 MPH. Using the formula, Time = Distance / Rate, I determine that it should take me 50 minutes.
However, these two landmarks are separated by 2,500 vertical feet, and yesterday on a similarly steep section of trail I climbed at about 25 vertical feet per minute. So I adjust my expectations: rather than 50 minutes, it will take about 100 minutes (2,500 vertical feet divided by 25 vertical feet per minute).
The post Tutorial: Dead-reckoning navigation | Basic but oft-used skill appeared first on Andrew Skurka.
August 31, 2017
Track me live as I race around Mont-Blanc on Friday & Saturday

UTMB takes live tracking to the next level. Their coverage is easily accessible, remarkably accurate, and incredibly extensive.
The race starts at 6 pm on Friday. Chamonix is +1 hour relative to GMT/UTC; for those in the US, the race starts at:
ET: 12 pm
CT: 11 am
MT: 10 am
PT: 9 am
I expect to finish in about 24 hours on Saturday evening.
Track UTMB live
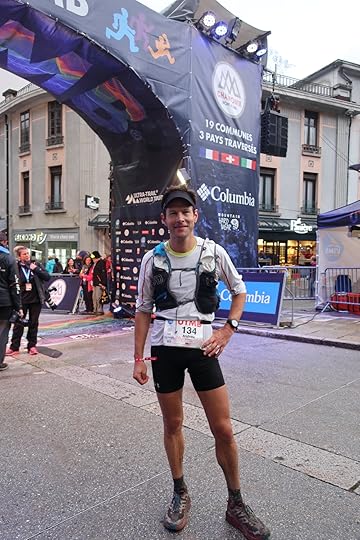
Visit the race website: http://utmbmontblanc.com. The homepage is now dedicated to live coverage.
You can search me by name (I’m the only “Skurka” in the race) or bib number (#134). Save runners you’re watching as “Favorites” for quick access.
In addition to current standings, you can see historical tracking and forecasted splits, e.g. that I was 75th at Mi 45 and 35th at Mi 75; and that I’m expected to arrive in Trient at 3:42 pm. If you’re really into it, there’s also video coverage and live commentary.
Social media
Amanda will have my cell phone and will be posting throughout the race to Facebook: http://www.facebook.com/andrewskurka.
Don’t forget to cheer on Amanda, too — she’s going to have to stay up through the night and navigate a shuttle system with drivers that don’t speak fluent English!
I might also get a mention on the iRunFar Twitter feed, although I suspect they will be more focused on Top 10 men and women, and I wouldn’t expect to join those ranks until late in the race, if ever.
The post Track me live as I race around Mont-Blanc on Friday & Saturday appeared first on Andrew Skurka.
August 29, 2017
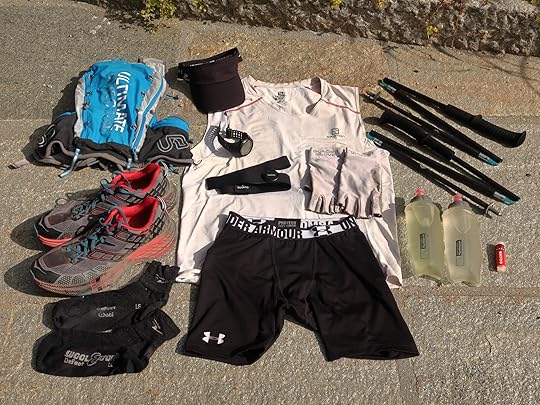
Gear List: Ultra-Trail du Mont-Blanc (UTMB) || Personal & obligatory gear

Mont Blanc from across the Chamonix valley, on the UTMB course south of Col des Montets
Ultra Trail du Mont Blanc (UTMB) and its growing race series (CCC, TDS, OCC, and PTL) are held in the last week of August in the Savoy Alps, an extreme mountain environment. Since the first race in 2001, racers have experienced a wild range of weather: snow, cold rain and snow, fierce winds, relentless sun, and scorching heat.
Conditions vary year-to-year and throughout the course. Elevations are between 800 to 2550 meters above sea level (2700 to 8500 feet), and temperatures and precipitation amounts fluctuate accordingly. Typical finishing times are between 25 and 45 hours, so all racers spend at least one night on the course. And the immense topographic relief produces localized weather patterns.
UTMB gear list: Personal and obligatory gear
Relative to US races, UTMB participants are required to be more self-sufficient. Most importantly, this reduces the potential burden on aid stations and SAR teams in the event of inclement weather. It also levels the playing field, since crews become less critical.
Race organizers enforce this self-sufficiency with a comprehensive list of obligatory gear. These items are checked during bib pick-up and must be carried from start to finish.
Some obligatory items overlap with standard personal clothing and equipment. For example, I would wear a brimmed cap during the race, whether required or not. Others I would consider weather-dependent (e.g. rain gear), or I would plan to retrieve them from a crew or drop bag at a particular spot (e.g. headlamp). Finally, some items are solely for an emergency (e.g. space blanket).
In developing my gear list, I strived to be both properly prepared and compliant, but at minimal weight. With a favorable forecast, some additional weight can be shed while still satisfying requirements; with an unfriendly forecast, preparedness trumps weight — a few more ounces of gear can make the difference between 5th, 25th, or a DNF.
Personal clothing & items worn
These items are like a second-skin: they are worn from start to finish, and other items are layered over them. Exception: the water bottles and poles, which are simply in constant use. These items have been vetted extensively in training and previous races.

Element protection and night kit
If not in use, these items stay inside my pack. (Accordingly, my race pack has more volume than normal.) Even if conditions are favorable, many of these items would be necessary at night, when it gets dark and temperatures drop.

Emergency and ID
Finally, there are a few cover-my-a$$ items, plus required identification, since the course passes through three countries. If I need to dig into this kit, it’s a sign of desperation or poor decision-making, or both.

Alternatives
Your UTMB kit need not look like mine, but perhaps it will be a starting point. Here are few other items that I think are worth consideration:
Shirt & hat. If conditions are cool and wet, which unfortunately is the current forecast for the 2017 race (three days out), a thin lightweight long-sleeve like the Patagonia Capilene Lightweight Crew ($50) will provide more overall comfort than a singlet or short-sleeve. For temps below 55 or 60, I find that I also need a Buff Original to protect my ears.
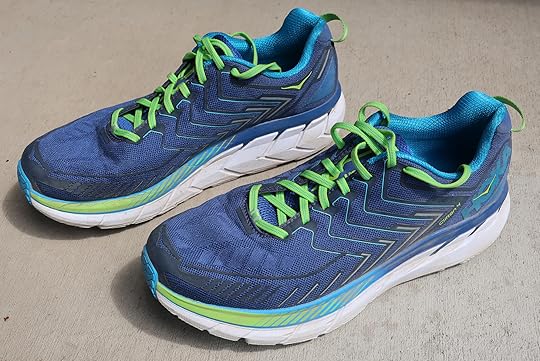
Shoes. I plan to start with the Speedgoat, but my wife will have a pair of Salomon Sense Ultra in the event I wish to swap out. Read my review of these shoes, and my comparative analysis versus the Speedgoat.
Rain gear. The most high-performance ultralight rain jacket is The North Face HyperAir ($250), due to the permanently beading Gore-Tex fabric. Another decent option is the Outdoor Research Helium II ($160), for which there is a matching set of pants, although this has the traditional wet-out problem.
Have questions about my selections? Wish to mention viable alternatives, or seek feedback about them? Please leave a comment.
Disclosure. This website is supported mostly through affiliate marketing, whereby for referral traffic I receive a small commission from select vendors, at no cost to the reader. This post contains affiliate links. Thanks for your support.
The post Gear List: Ultra-Trail du Mont-Blanc (UTMB) || Personal & obligatory gear appeared first on Andrew Skurka.
August 27, 2017
Review: Hoka One One Clifton 4 || Reliable road trainer, but not characteristically Clifton

The Clifton 4, a firm (by Hoka standards) daily road running shoe that will best fit normal and wide feet.
The Clifton 2 was my first Hoke One One shoe. I loved it: its plush midsole was wonderful; its last fit my narrow-ish feet; its reinforced upper provided good lateral control; and its weight was feathery, all things considered. (Read my full review.) But after running 550+ miles in them, they needed replacement.
Review: Hoka One One Clifton 4
Naturally, I looked to the recently released Hoka One One Clifton 4, the fourth (and newest) generation. Hoka describes it as having an “air of refinement” relative to earlier iterations, and states that, “we believe Clifton 4 is the best Clifton yet.”
In some respects, it is. It’s a reliable daily trainer for roads and non-technical trails. Consider that I have laced up mine — which were generously sent by Hoka — for nearly every road session since I received them, now totalling over 100 miles.
But the Clifton 4 is not characteristically Clifton. It’s firmer, wider, and heavier; and the construction of its upper has changed. It therefore has different optimal users and uses than earlier generations.
Key specs
Weight: 9.3 oz M’s US 9; 11.3 oz M’s 11.5
Stack height: 29 mm/25 mm at heel/toe, respectively
Drop: 5 mm
Midsole: EVA that is firmer than earlier generations
Outsole: Low-profile rubber, only in high-abrasion areas
Last: Average and wide feet
Upper: Breathable mesh with minimal exoskleton
MSRP: $130
More product specs
The Clifton 4 seems to fit true to size. My review pair is size 11.5, as were my Clifton 2’s. I am also size 11.5 in Altra, Merrell, Salewa, and Salomon; and size 45.5 in La Sportiva.
Please support this review by purchasing the Clifton 4 or other products from the featured vendors below, or from Amazon.
Fit
The Clifton 4 will best fit medium and wide feet. In comparison, the Clifton 3 was designed for medium feet, and the Clifton 2 was snugger, notably in the forefoot.
This single factor changes the Clifton 4’s core customer. If you love, say, the Altra Instinct or Lone Peak (my review), you should now also consider the Clifton 4. Whereas if you loved earlier Clifton generations or, say, the La Sportiva Bushido (my review), you probably will have to look elsewhere.
Upper
In addition to the wider last, the new upper construction also contributes to the wider-feeling fit. Previous generations were made of breathable mesh and a reinforcing TPU exoskeleton.

The Clifton 4 upper is made of highly breathable mesh, which helps to reduce the buildup of heat and perspiration.
The Clifton 4 upper is less reinforced, which improves foot mobility and air-permeability, but which reduces lateral and fore/aft control. The cumulative effect is noticeable: whereas I felt like the trail-worthiness of the Clifton 2 was limited only by its road-oriented outsole, I keep the Clifton 4 on roads and flat graveled surfaces only.
As with the Speeedgoat, the Clifton 4 features elasticized laces. In theory, this could improve fit and comfort, but I’d prefer standard static laces, which are more secure and more durable, and which retain less water.

Comparison of the Clifton 2 (red) and Clifton 4 uppers. Notice how the Clifton 4 is less reinforced. This improves foot mobility and breathability, but reduces foot control.
Midsole
In my view, the typical Hoka shoe is “marshmellowy” — they’re like pillows for your feet. The squishiness has drawbacks (e.g. lack of sensitivity on technical trails), but it eliminates — or at least greatly minimizes — any sense of “pounding.” In the Speedgoat 2 (read my review), for instance, I can barrel through gravel beds and leap down log staircases with minimal caution.
The Clifton 4 is notably firmer, especially when new. It’s soft enough, but not “Hoka soft.” The change does improve responsiviness (and therefore speed), and probably midsole longevity, too.
Outsole
Perhaps my chief complaint about the Clifton 2 was its outsole, which was stingy on rubber, notably in the push-off zone for the big toe. No surprise, the exposed foam became disproportionately worn in this area, and was the most limiting factor in the shoe’s lifespan. This was fixed for the Clifton 3, and remains fixed for the Clifton 4.
The exposed foam elsewhere on the outsole proved to not be a concern on the Clifton 2. The design is unconventional, but seems to work, and helps reduce the shoe weight.

Outsole of Clifton 2 (right) and Clifton 4, which feature rubber only in high-abrasion areas. The Clifton 2 lacked rubber in one critical spot, below the big toe. That has been fixed for the Clifton 4.
What questions about the Clifton 4 do you have? Or what has been your experience with them?
Learn more about the Clifton 4
Disclosure. This website is supported mostly through affiliate marketing, whereby for referral traffic I receive a small commission from select vendors, at no cost to the reader. This post contains affiliate links. Thanks for your support.
The post Review: Hoka One One Clifton 4 || Reliable road trainer, but not characteristically Clifton appeared first on Andrew Skurka.


