
Andrew Skurka's Blog, page 42
January 4, 2018
Guided trips in Rocky Mountain & Sequoia-Kings: Apply now, through January 21


A lush wildflower-filled meadow in upper East Inlet, below the Continental Divide
After a year off in 2016, I resurrected my guiding program last year, ultimately offering six 5-day Backpacking Adventure trips in Sequoia-Kings Canyon National Park.
Originally, I had planned to guide just three sessions with Flyin’ Brian Robinson. But for the 24 spots I received 52 applications, many from alumni. So I doubled the schedule and flew out Alan Dixon (“Adventure Alan”) and Mike Clelland to help cover the rest. For the program to be sustainable in the long term, I’d known that I could no longer guide every single trip, and this seemed like a good moment to finally take that step.
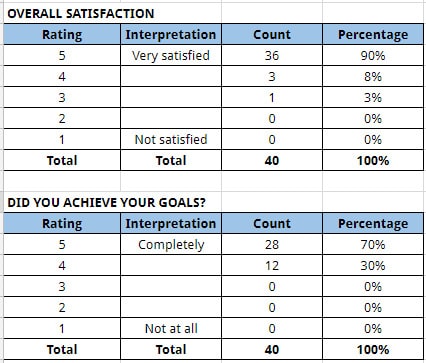
Alan, Brian, Mike and I had a great time, and so did the clients. These post-trip survey results (with 40 of 47 clients responding) confirmed our anecdotal observations from the field:
The 2018 program
This year I intend to expand the program further. I’m committed to offering at least nine sessions in two world-class locations: Rocky Mountain National Park in Colorado, and again in Sequoia-Kings Canyon National Park. Pending demand, I may add additional sessions.
The 3-day Backpacking Fundamentals courses are ideal for first-time and beginner backpackers, and some intermediate backpackers who need updated training. Over a long weekend (and a few hours on the computer beforehand), we teach more about backpacking gear, supplies, and skills than you would learn in years on your own (and probably at a far greater cost). The second day is dedicated almost entirely to on- and off-trail navigation, which I think is the single most powerful backcountry skill.
The 5-day Backpacking Adventure trips are best for intermediate or advanced backpackers, and some ambitious beginners. We run through the same core curriculum as on the Fundamentals courses, but have two additional days to master skills and to hike deeper into the wilderness. This year we will follow sections of the Pfiffner Traverse and Kings Canyon High Basin Route.

A classroom tutorial in upper Buck Canyon, on the Kings Canyon High Basin Route
Apply now
Applications for 2018 trips received by Sunday, January 21 will be considered equally. After this date, applications will be considered on a first-come-first-served basis.
I will review applications during the week of January 22, and will contact all applicants by Sunday, January 28. Do not submit a deposit until you have received a PDF invoice from me.
I’m certain that many of the sessions will fill during this open application period. In fact, as of January 4, some sessions already have more applications than spots available. I will try to tweak or expand the schedule to accommodate demand, but I’m limited by guide availability and commercial permit regulations.
Priority will be given to (a) alumni and (b) applicants who were waitlisted in past years. To maximize your odds of being offered a spot, please be flexible by being open to more dates, more locations, and more trip types. I will try to give you your first-choice trip, but it is not always possible.
Questions about the trips?
Leave a comment below, or contact me directly for personal questions.
The post Guided trips in Rocky Mountain & Sequoia-Kings: Apply now, through January 21 appeared first on Andrew Skurka.


January 3, 2018
Reader Q: Can a bear canister fit horizontally in the Flex Capacitor?
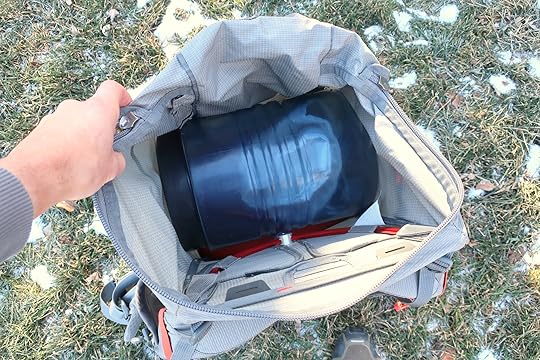

The Flex Capacitor loaded with a BV500, about 6 inches from the bottom on top of sleeping bag and pad.
A question from reader, Scott F:
Will a Bearikade Weekender canister fit horizontally in the Sierra Designs Flex Capacitor 40-60 Pack?
To this specific question, my answer is: I don’t know for sure, but it should. I don’t own a Bearikade so I have not tested its compatibility, and I don’t recall any guided clients last year with both a Flex and a Bearikade.
However, I know that the BearVault 500 (which I own and which is similarly sized) will fit horizontally inside the Flex Capacitor when it’s fully expanded. I keep it about 6 inches from the bottom, sitting on top of my sleeping bag and pad, even though this is the narrowest part of the pack (because of the curvature of the Y-shaped stay). If loaded higher in the pack, it fits even better, with no tension on the pack body.

The BV500 fits horizontally into the Flex, with some room to spare.
The BV500 slides in and out easily of the Flex — it’s not a fight. And it has no adverse effects on the pack: the side pockets and compression straps remain fully functional, and there is no change in its load-carrying ability or its back panel shape.
The only minor issue is that the canister will place disproportionate tension on the pack body — the main compartment is shaped more like a half-cylinder than a rectangle, and therefore doesn’t have “corners” that match those of the canister. Just be careful of abrading the pack where the top or bottom of the canister is pushing hardest against the fabric.

Beware of abrading the pack body where the canister is pressing hardest against the fabric.
The Bearikade Weekender is slightly smaller than the BV500, especially in the length:
Bearikade Weekender: 9-inch diameter x 10-inch length
BearVault BV500: 8.7-inch diameter x 12.7-inch length
Based on the fit of the BV500, I will speculate on how several other popular canisters will fit inside the Flex Capacitor:
Ursack S29.3 AllWhite (8″ x 14″): better than the BV500, because it is soft-sided
Backpackers Cache Garcia (8.8″ x 12″): slightly better than the BV500
Lighter1 Big Daddy (8.7″ x 13″): similar to the BV500
When considering the suitability of a backpack for trips on which canisters are required, the “Does it fit?” question is an important one. But I think it’s equally necessary to ask, “How well does the pack carry with a canister?” Canisters add weight and bulk, and many otherwise nice packs perform poorly when loaded with this item. More specifically:
If a pack has too little volume, after inserting the canister there is little room left for anything else;
If the pack is too narrow, the canister alters the shape of the pack, possibly creating a “bulge” against your pack or putting excessive pressure on delicate stays; or,
If the pack is not designed to carry heavier loads, it becomes uncomfortable to wear.
In this regard, I think the Flex performs exceptionally well. On multiple trips last year I loaded the Flex with up to 40 lbs, including a full BV500 and sometimes guide gear or an ice axe. To finish the season I carried out 70 pounds of elk meat. While the Flex is 8-16 ounces heavier than the bulk of “ultralight” packs, it carries weight better than perhaps all of them.

At the end of a 9-day yo-yo of the Pfiffner Traverse. At the start, my pack weighed in the low-30’s, including a fully BV500 and an ice axe.
Questions about bear canisters or the Flex? Leave a comment.
Disclosure. This website is supported mostly through affiliate marketing, whereby for referral traffic I receive a small commission from select vendors, at no cost to the reader. This post contains affiliate links. Thanks for your support.
Additional disclosure: I co-developed the Flex Capacitor with Sierra Designs. I have been honest about its shortcomings. Overall, I think it’s an excellent product.
The post Reader Q: Can a bear canister fit horizontally in the Flex Capacitor? appeared first on Andrew Skurka.
January 2, 2018
Trip Report || Wind River High Route, Loop 4


Camp on the first night, below Angel Pass, the wide saddle on the ridgeline
Trip Data
Dates: Tuesday, August 29th to Saturday, September 2nd, 2017
Route: Wind River High Route, Loop 4
Weather: Temperature 60’s to 70’s, rained only one day, otherwise sunny and pleasant
Distance: 43 miles
Time: 4.5 days
Trailhead: Elkhart Park
Passes: Angel Pass, Douglas Lake Pass, Alpine Lakes Pass, Indian Pass
Background
Chris Barrett, Paul Bennett and I met in 2015 on a 5-day guided trip with Andrew. In 2016 Andrew took a year off from guiding, so the three of us decided to undertake on our own Loop 1 of the Kings Canyon High Basin Route. It was a huge success for us and increased our confidence in our abilities. Read the trip report here.
Before the end of that trip, we had already started planning our next trip in 2017, to the Wind River Range. Unfortunately, Paul had to drop out this year due to a newborn baby, although we did bring a picture of Paul for photos. Chris and I decided to forge ahead, and undertake Loop 4 of the Wind River High Route, with the option of doing Loop 5 (which is only 11 miles longer but has two additional hard passes) if things were going smoothly.

Left to right: David, Paul (in spirit), and Chris
Warm-up: Climbing the Grand Teton
As part of this trip we decided we also wanted to hone our sense of mountains, rock-climbing and alpine awareness. We signed up for a three day guided trip to climb the Grand Teton with Exum Mountain Guides. This was going to be our intro to Wyoming and it was a fantastic trip, apart from almost getting killed by rockfall.

The pre-trip to the Grand Teton, the iconic peak in the center of the photo. We did a three day course with Exum Mountaineering.
The main take-away here was that the alpine environment can be unforgiving and there is some luck involved. You basically want to minimize the chances of something happening in dangerous places by keeping your time in that zone to a minimum. In our case we were in a steep couloir and there were descending climbers above us that brought rockfall down on us. “Rock, rock, rock!” We sprinted under some modest ledges and just missed some mini-fridge sized rocks crashing down on where we had been standing. Yikes. Needless to say we made it to the summit and it was a great trip — I highly recommend Exum Mountain Guides and my comfort in the alpine went up significantly.

The Grand Teton had exposure and required ropes. This is our guide Colby Stetson belaying one of us down.
Wind River High Route: Day 1
With a three-day summit of Grand Teton and about 12 hours total of driving behind us, it was time to start on the real reason for our trip — the Wind Rivers! Immediately you get a sense that this place is in the middle of nowhere. It’s a long drive from Denver or any other major airport and it feels like it is just sitting smack in the middle of millions of square miles of cattle ranching plains. As you leave Elkhart Park trailhead, though, you quickly get in to some beautiful forests and alpine meadows.
For us the first day was straightforward trail hiking, intended to gain elevation and get us off-trail. We met an amazing lady in her 70’s that was hiking by herself. She had previously had some hiking partners she had met on a course, like we did, but as life changed she found herself hiking solo and enjoying it with little fear or hesitation.
We camped at Spider Lake with our morning objective in site, Angel Pass.

Approaching the crest on Day 1.
Wind River High Route: Day 2
The next morning we went over Angel Pass at about 11,600 feet and dropped down to Dennis Lake. So far, the route finding had been very straightforward and perhaps even easier than the High Sierras, which frequently seemed to have more confusing and complicated talus that required better micro-navigation. In the Wind Rivers, everything seemed very clear and obvious to us. The only trouble we had at all on the trip was linking with the trail above Dennis Lake by going through very dense thickets of trees.
So far so good, with a feeling of true alpine beauty around us at all times. We made our way down to the Golden Lakes basin, again picking up a trail for a period of time. There was beautiful camping along the shores of the lakes and there were a number of horse packers present. We pressed on upwards again, reaching the foot of Douglas Peak Pass at dusk and camped on the shore of Lake 10787.

Dropping into Golden Lakes. Douglas Peak Pass is the low spot on the skyline.
Wind River High Route: Day 3
The next morning brought some rain for a couple of hours and we lolled around in our sleeping bags. Both our tents performed very well, in my case a Mountain Laurel Designs Solomid XL and Chris had a Skurka designed Sierra Designs High Route 1 FL. Skurka’s design definitely had substantially more room, though it required a bit more staking skills. In a head to head they’d come out pretty even on a variety of factors and it probably comes down to personal preference. Chris had both the Skurka backpack and tent and really liked them both a lot.
While we were waiting for the rain to subside, we saw the first of two backpackers that we encountered on the High Route portion of the trip, both of them going solo. He was cheerfully walking through the rain and asked us for directions. Shamed by our lolling about in our tents, we decided to pack and got a late start around 11am just as the rain stopped.

Chris and our two tents just below Douglas Peak Pass. The surprisingly good route goes on the right side of the talus slope, along the base of the cliff.
Our first goal was to summit Douglas Peak Pass, which looked very intimidating from this side. But per Skurka’s excellent route guide, there was an incredible route just below the steep right side cliff that carried us all the way to the top. Once to the top we were feeling elated, until we turned to look down and out to our next destination — the Alpine Lakes Basin, culminating in Alpine Lakes Pass. Gulp. At this point I started to feel a sense of mounting dread. Alpine Lakes Pass lay at the end of the namesake chain of lakes, jammed at the bottom of a series of cold serrated peaks dripping in glaciers. The pass itself from this distance appeared to be a sheer wall of snow, almost vertical and perhaps four or five hundred feet in height.

The view from the top of Douglas Peak Pass towards Alpine Lakes Pass. The pass is the snowfield in the top of the frame. My sense of dread started to grow.
Neither of us really had any experience on snow with self-arrest. We did have Kahtoola Microspikes and Camp Corsa ice axes. Definitively I would say the microspikes are required. This trip could not have been done without them, since there were significant sections of snow this year. Some of the snow fields were above steep plunges in to lakes. The ice axes were never put to the test, but I would imagine they too are required for self-arrest.
The closer we got to Alpine Lakes Pass, working our way through the talus and jumbled lake setting, the more dread I felt. What if I slipped at the top, could not self-arrest, and ended up bashing my head on a rock or breaking a leg on the boulder field at the bottom? The Alpine Lakes Basin was an environment of the sublime, with feelings of both awe and terror. I definitely felt like the mountains were crowding around us and keeping us penned in by the shores of the three lakes. We finally made it through the interminable jumble of lakes, snowfields, talus and moraine to reach the base of the pass by dusk, where we would set up for the night. We decided we would get up early and hit the snow slope while the temperatures were colder.

The final view of Alpine Lakes Pass. We camped on the far shore of the lake in the boulder field to the right.
Wind River High Route: Day 4
I had a terrible night of dreams of various kinds of alpine death. When I woke up I told Chris that I was not sure about this and if I felt we had to turn around that I would need his support. Chris was rock-solid, just said that we should go one step at a time and check it out. It is very important to choose your partners wisely. In this case Chris was solid when I was wobbly.
We made our way to the base of the snowfield, got our crampons on and pulled out our axes. I started up the snowfield and the moment I was on it, I knew it could be done no problem. Though it seemed steep, I felt very safe, probably because it was early morning and the snow was hard and the crampons gripped securely. I set off at a fast pace and made it to the top of the pass with no issues. Chris followed shortly behind and we felt elated. The view of the next valley was not a problem for us now, even though it was even more snow-filled and actually had true blue glaciers that we had to ascend.

The view up towards Knifepoint Glacier and Indian Pass at the top. We went straight up the blue ice directly in front of us and by this time of day it was streaming with water.
This was the moment of decision — finish early with Loop 4 or carry on to try Loop 5 and Bonney Pass. We had just met another solo hiker at the top of Alpine Lakes Pass and he told us Bonney Pass was pretty intense. That sealed it. After three days on the Grand Teton and already four on the Wind Rivers we felt like eight days in total was probably enough for us. Loop 5 would require at least one, if not two extra days, and it felt like it might be tight to catch my flight back to Toronto from Denver. We choose Loop 4 and turned left in the valley to go up and over Indian Pass.

David on the Knifepoint Glacier on the way to Indian Pass. The low spot on the opposite valley wall is Alpine Lakes Pass.
This was relatively straightforward, though it was even more intense snow and glacier travel. By now we were feeling more secure travelling on snow. However the early morning starts are very important. In hindsight we could have gotten up even earlier to do Alpine Lakes Pass in order to make sure Knifepoint Glacier was also travelled during the early morning. By the time we reached it, it was approaching noon and the conditions were very slushy, creating difficulty in getting a positive foot placement on the steeper terrain.
We made it over Indian Pass and then dropped down on to trail travel again, passing by Titcomb Basin, where the backpacker traffic greatly increased. We found a final beautiful campsite by Hobbs Lake. The fish were literally jumping out of the lake at dusk. Note to self: this could be a great fishing destination as well. We had a swim and a final celebratory campfire.
Wind River High Route: Day 5
Our last day was a short four hour hike out on trail. Between here and Elkhart Park trailhead we passed horse-packers, goat-packers and llama packers, but it was kind of fun to see. Back to the car and we were done.

Our final campsite at Hobbs Lake, which was full of fish.
Concluding Thoughts
The Wind Rivers are a spectacular and stark alpine environment. It is a special environment and it was a great trip. Combined with the Grand Teton experience, I felt like my alpine experience significantly increased. In hindsight,however, I somewhat wish we had tried Loop 5 and Bonney Pass. Once again, thank you to Andrew Skurka for the superb instruction on his trips that prepared us well and his excellent High Route guide books.
I must admit, though, I also found the Sierras trip the prior year more challenging. Maybe because it was our first trip without the guidance of Skurka? The navigation in the Wind Rivers seemed much more straightforward and obvious. For me, the only challenge was mental, at the base of Alpine Lakes Pass. And although the Wind Rivers are sharper, more alpine, more sublime, there is something unique about the scale and sheer square footage of the Sierras. In the Winds it felt more like a long narrow range of mountains, whereas the Sierras felt vast and interminable in all directions.
So already I am thinking about our next trip in summer 2018. These trips always have about six months of excitement in the planning stages through the winter months and then a lifetime of memories, paying off many fold through time. Maybe back to the Sierras, perhaps coming from the east side instead? And maybe longer again. Four a half days felt too short. Seven day is too long, so maybe a six day loop from somewhere around Bishop? Stay posted for more next year.
Have questions for David about Loop 4 or the larger Wind River High Route? Leave a comment.
The post Trip Report || Wind River High Route, Loop 4 appeared first on Andrew Skurka.
December 28, 2017
RIP: Ken Oelkers, SHT trail angel & builder extraordinaire
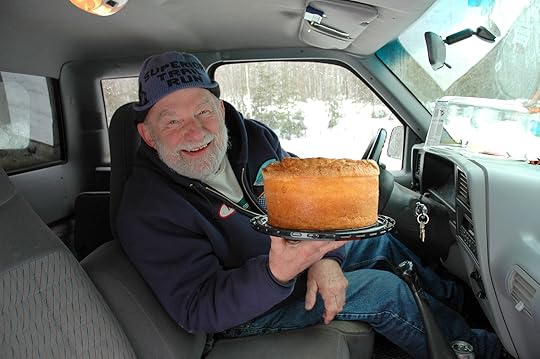

Birthday cake delivery, March 25, 2005, somewhere on a backroad along the north shore of Lake Superior
I first met Ken Oelkers in March 2005, seven months into the Sea-to-Sea Route. His beloved Superior Hiking Trail was buried under feet of snow, and he understandably was looking for an excuse to keep him out of the house and close to the trail after a long winter in Silver Bay, Minnesota, a small blue-collar town on the Lake Superior. I became that excuse.
As I moved up the North Shore, admiring the sturdy bridges that Ken had helped construct as the trail’s Trail Maintenance Supervisor, he met me at various road crossings, offering a warm truck, fresh water, an endless supply of Spanish nuts, and — on March 25 — even an angel food birthday cake. In typical thru-hiker fashion, I ate most of it on the spot. The birthday cake photo and story was a standard part of my slideshow for many years.
In contrast to my ultralight 800-fill parka and moisture-wicking base layers, Ken proudly wore a blue cotton sweatshirt with American flag and Superior Hiking Trail patches, in both 2005 and 2007, when I hung out with him again during a January hike from Duluth to Ely. Salt of the earth, no pretense, 100 percent real.

Trail angeling
When the logistics worked out, Ken would ferry me back to Silver Bay, sparing me another night of camping in the snow and near-zero temperatures. In the 2.5 months prior, I had snowshoed about 1,000 miles from Battle Creek, Michigan, and didn’t feel like I had anything to prove still. We’d sit around his wood stove, which he never seemed to think was burning too hot, and talk or read.
Ken had an extensive collection of books about Alaska, which at the time he had never before visited. Perhaps fittingly, the last time I saw Ken was in 2011 or 2012, at a presentation in Minnesota about the Alaska-Yukon Expedition. He was coping with health issues at the time, but managed to attend briefly. His obituary says he was able to experience Alaska first-hand before his death — I’m glad he finally had the chance to go.
Thanks for the memories, Ken. Among many people I have met in my travels, you stand out. I’ll see you on the other side.

At South of the Border Cafe in Grand Marais with Sam Haraldson, January 2017, during my “Ultralight in the Nation’s Icebox” hike
The post RIP: Ken Oelkers, SHT trail angel & builder extraordinaire appeared first on Andrew Skurka.
December 21, 2017
Job posting: Backpacking guide for 2018 trips


I am looking for one additional person to help guide my 2018 trips. Employment will be short-term and seasonal: probably 11 days total in July or September, in either Colorado or California. You will work with other world-class backpacking guides, including Alan Dixon, Flyin’ Brian Robinson, Mike Clelland.
Necessary qualifications
Please apply only if you have:
1. Female expertise. Are you intimately familiar with the female backpacking experience? Can you speak confidently to women about preferred clothing and equipment, hiking style and safety, and women-specific hygiene concerns? Could you successfully lead an all-female trip in 2019?
2. Extensive backpacking experience. Have you slept on the ground (or between trees) for hundreds of nights and in a variety of seasons and ecosystems? Do you have a robust backcountry skill set?
3. Community credibility. Have you been recognized by media outlets for your accomplishments? Have you written a book or developed route guides? Does your website and/or social media profiles have notable followings? Do you work with outdoor brands as an athlete or ambassador? Have trail associations, hiking clubs, retail stores, or community organizations asked you to speak for their group?
4. Interpersonal skills. Do you enjoy working with people? Can you effectively communicate your thoughts? Are you comfortable managing groups and group dynamics?
5. Physical fitness. Can you comfortably hike consecutive 20-mile days? (Assume that you are: on-trail, in rolling terrain, and at an oxygen-rich elevation (e.g. a moderate section of the AT or PCT); and carrying a normal overnight kit.) Are you comfortable hiking off-trail, on uneven and sometimes loose surfaces, and at elevations up to 12,000 feet?
I am most concerned with the aforementioned qualifications. But I will give greater weight to applications that demonstrate:
Prior guiding, instructing, or general teaching experience; and,
Efforts to professionalize your backpacking experience.
Compensation
You will be paid a daily rate for days in the field, plus one preparation day. Travel expenses will be reimbursed.
To apply
Email me with:
Personal info: name, email, city
Qualifications
Availability for these 2018 dates:
June 22-July 2
July 13-23
September 21-October 1
Deadline: Sunday, January 7, 2018
Please be succinct in your application. Wow me with your most noteworthy qualifications, not every somewhat relevant qualification.
If you have general questions about this position, leave a comment below. I will answer it there, to avoid multiple private answers to the same questions. If you have a question that pertains specifically to your application, please email me.
Andrew Skurka Adventures LLC is an equal opportunity employer.
The post Job posting: Backpacking guide for 2018 trips appeared first on Andrew Skurka.
December 13, 2017
Review: Showa 281 Gloves || Inexpensive water- & windproof shell
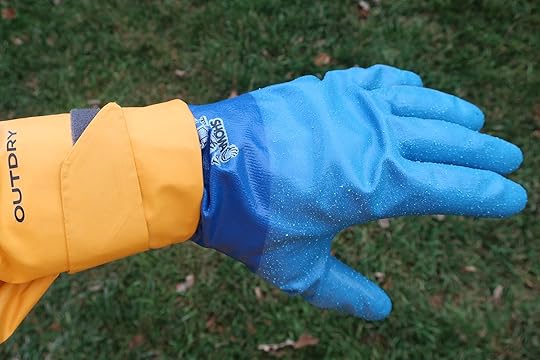

The Showa 281 Glove is suitable as a wind- & waterproof shell for hiking and running.
The Showa 281 Glove is an inexpensive (less than $15), lightweight (sub-2 oz), and somewhat breathable shell made of waterproof/windproof polyurethane. Its exterior is textured and very abrasion-resistant. It is the unlined version of the Showa 282 Gloves, about which I have written a more in-depth review.
Online availability of the 281 is limited. I purchased mine from Seattle Marine & Fishing Supply Co, despite the $8 shipping charge for an $11 product.
Review: Showa 281 Gloves
For cool or cool-and-wet conditions, the Showa 281 Glove is best used in conjunction with a thin liner glove. The 281 provides resistance to wind and water. The liner adds warmth and buffers moisture. My favorite liner is the DeFeet Duraglove Wool, which is made of merino wool and nylon.
The 281 can also be worn alone in milder weather and for applications that require dexterity or abrasion-resistance. For example, I have used them to:
Cut the wind while on biking errands,
Cleaning leaf debris out out of the gutters, and
Clean up a pile of scrap wood and razor-sharp brass weather stripping left behind after replacing my front door.
The 281 interior is lightly textured, consisting of exposed vertical fibers. It grabs a little bit, but it’s not like gloves made of pure latex, nitrile, or rubber.
Fabric breathability is noticeable — after a recent 1-hour run in sub-freezing temperatures, there was minimal perspiration build-up inside the glove. If hands overheat or become uncomfortably sweaty, the solution is easy: I can cool down and air out my hands by removing the gloves.

I pair the 281 with a liner glove, the DeFeet Duraglove Wool. The 281 adds warmth by blocking wind and keeps my hands dry from external precip.
For colder conditions, consider the Showa 282 Gloves, which have an acrylic liner that adds warmth and buffers moisture. At the bottom of this post, I have explained the spec and use differences of the 281 and 282. On its own, the 282 is comparable in warm to a 281/liner combination, and a notch warmer than the 281/liner when combined with a separate liner.
The 281 has several imperfections as a waterproof/breathable shell glove, including its “Smurf blue” color, limited retail availability, and lack of a wrist closure. I’d also like to see it available as a mitt, which is inherently warmer than a glove. That said, compared to other existing rain gloves and rain mitts, I think the 281 is a very strong candidate.
Product specs
Weight: 1.6 oz (size L), 1.8 oz (size XL)
Textured waterproof/breathable micro-porous polyurethane shell
Articulated fingers
10.6-11.0 inches long (270-280 mm) when flat, from tip to cuff

The Showa 281 Glove
Fit guide
I’ve not seen the 281 or 282 at a local retailer, so they’ll probably need to be purchased online without trying them on. I’ll share my sizing experience to help you.
My hand size:
Length: 8.25 inches from wrist to tip of middle finger, + 0.125 inches for glove liner;
Width: 8.25 inches around the palm, + 0.25 inches for glove liner; and,
Middle finger: 3.375 inches (3 3/8) from base to tip.
I purchased the 281 in three sizes:
Medium is too tight.
Large fits snugly when worn without a liner, providing excellent dexterity but no layering opportunity. The fingers are too short by about 1/4 inch, which is partly offset by the fabric stretch.
X-Large is comfortable without a liner, though a bit oversized and clumsy. With my liners, the fit is about perfect.
The 281 is also available in XXL. In theory, it should have enough interior volume to combine it with a thicker liner, such as the Outdoor Research PL 400. I wear the PL400 while running in temperatures in the 20’s or 30’s, and the combination of it with the 281 would make it winter-worthy.
Showa 281 vs 282
The 281 and 282 models differ in just one respect: the 281 is just a shell, whereas the 282 has an acrylic liner attached to the shell. This liner adds about $10 in cost, and 2.4 oz in weight to the size XL. The shell of both models is made of Temres, a waterproof/breathable micro-porous polyurethane that has a textured and abrasion-resistant exterior.

The 282 (left) and 281 (right). The only difference is that the 282 has an integrated acrylic liner.
I was not impressed by the 282’s acrylic liner: it pills quickly, and with extended use I fear that it will delaminate from the interior. However, it does add notable warmth, which allows the 282 to be worn alone in cool-and-wet conditions (rather than needing a separate liner, as would be needed with the 281) and which makes the 282 suitable for colder temperatures (assuming the same liner is used with both).
Which pair do I recommend more, the 281 or 281? Honestly, I can see it both ways. Assuming that the 281 is paired with a liner, the 281 and 282 are about the same cost and weight. The bigger difference is versatility: Do you want a two-piece system that can be mixed-and-matched in accordance with the conditions, or do you prefer a simpler all-in-one product?
Questions about the Showa 281 or 282 Gloves? Leave a comment.
Disclosure. This website is supported mostly through affiliate marketing, whereby for referral traffic I receive a small commission from select vendors, at no cost to the reader. This post contains affiliate links. Thanks for your support.
The post Review: Showa 281 Gloves || Inexpensive water- & windproof shell appeared first on Andrew Skurka.
December 6, 2017
Giveaway: My Trail Company Chrome Umbrella

Gleefully taking shelter from evening drizzle under my MTC Chrome Umbrella while preparing dinner ingredients in the Indian Peaks Wilderness.
The My Trail Company Chrome Umbrella is an alternative to conventional rain gear. It’s lighter, more waterproof, and more comfortable in warmer temperatures. Wind, off-trail travel, and poorly maintained trails are a challenge for it, however. Read more pros & cons of backpacking umbrellas.
I am giving away one new Chrome Umbrella, which was given to me my MTC for this purpose.
Giveaway rules
Submit your information through the form below.
Item will be shipped only to a continental US address.
No exchanges
Each entry will be assigned a number, in the order of submission. One numbers will be selected randomly using the number generator at random.org.
I will notify the winner via email.
The contest will remain open until at least Thursday at 8 AM MST. If the form is visible below, it’s still open.
Enter the giveaway
Loading…
Disclosure. This website is supported mostly through affiliate marketing, whereby for referral traffic I receive a small commission from select vendors, at no cost to the reader. This post contains affiliate links. Thanks for your support.
The post Giveaway: My Trail Company Chrome Umbrella appeared first on Andrew Skurka.
December 4, 2017
Science of Ultra Podcast: Five must-listen-to episodes

Last week I sat down for an interview with Dr. Shawn Bearden of Science of Ultra. Lace up, pop in your ear buds, and stream it via iTunes, Google Play, IHeart Radio, or Stitcher during your next hour-long run. Or listen to it here:
I’ve known Shawn since 2014, when he joined me on a guided backpacking trip, and I was delighted when he launched Science of Ultra — the community was in need of science-based information specific to the sport. The bulk of his 60+ episodes are in-depth interviews with academics that study various aspects of running and endurance sports. Coaches and athletes are also frequent guests.

Shawn preparing the best backpacking dinner known to man, Beans & Rice with Fritos & Cheese.
Many mindless miles have passed by underfoot while listening to Science of Ultra. Here are a few episodes that stood out:
#51 | Coaches Corner: David Roche
I’m biased about this one, since I’ve been working with David for about a year and have bought fully into his program. I have posted five interviews with David on my blog. While some of the information between those posts and the podcast is redundant, I felt like the podcast encapsulates well David’s approach to maximizing the success of his athletes.
#31 | High intensity training: Martin Gibala, PhD
If you hope to race fast, you have to run fast, at least sometimes. Intuitively, absurdly high volume at slow paces would seem to be a viable ultra running training program (If you can average 15-minute miles at Hardrock, you’re a stud!), but my experience was that high intensity training took my performances to the next level.
#19 | Fat Adaptation: Louise Burke, PhD
This is a very popular topic among ultra runners. What’s fact, and what’s fiction?
#25 | Running Economy: Drs. Kilding and Barnes
Running economy is one of the most important aspects of performance: At various levels of energy output, how fast can you run? And unlike other holy grails, like VO2 max, running economy can be improved by working at it.
#42 | Optimizing Protein Intake: Luc van Loon, PhD
Whether real or imagined, my intake of protein seems to have a greater and more positive impact on my recovery and body composition than other nutrients. Moreover, on long backpacking trips I find it to be the most challenging nutrient to consume in sufficient quantities.
The post Science of Ultra Podcast: Five must-listen-to episodes appeared first on Andrew Skurka.
December 3, 2017
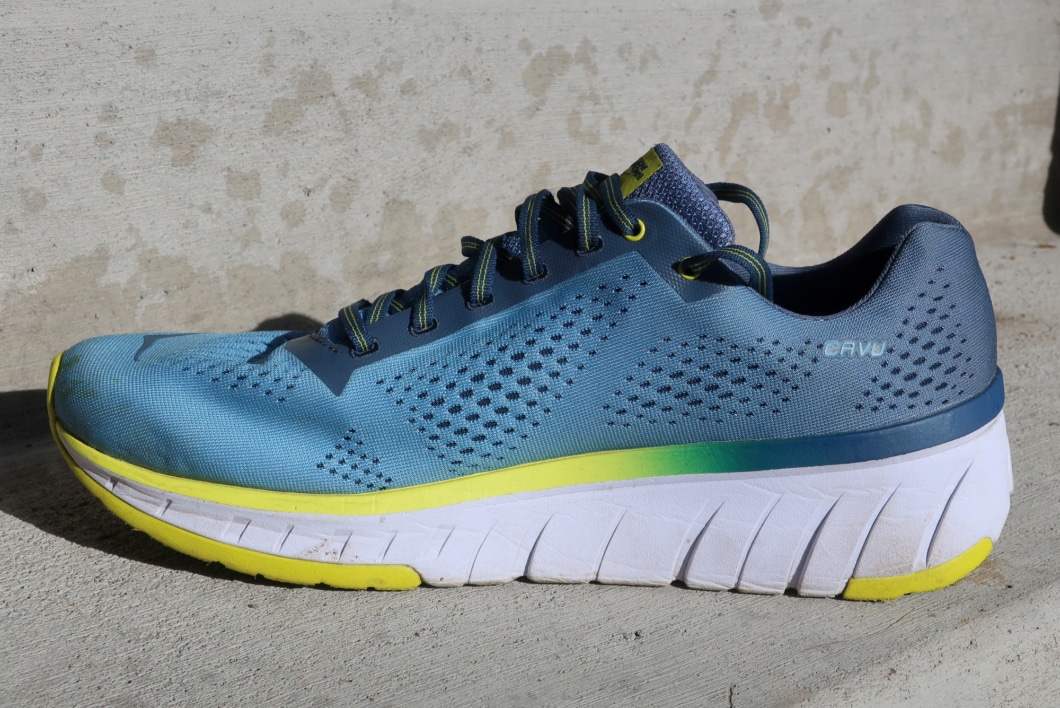
Review: Hoka One One Cavu || Light, responsive & fast road trainer
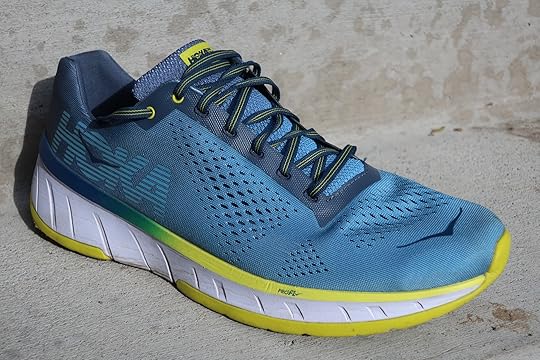

The new Hoka Cavu will be released in February 2018. It’s a lightweight trainer with a responsive forefoot, best for fast road efforts and perhaps racing.
The Houston Marathon is less than six weeks, and for all of my tempo workouts and hard long runs — including multiple 10K’s at race pace and distances up to 24 miles — I have been wearing the new Hoka One One Cavu. The Cavu is a neutral lightweight road trainer that is moderately cushioned, responsive, and fast. It will best fit feet with average width and volume.
The Cavu is more durable and cushioned than a racing flat like the ASICS GEL-Hyper Speed 7 (my review), but more nimble than a standard road shoe like the Hoka One One Clifton 4 (my review). For Hoka’s trio of sub-2:14 marathoners, the Cavu may be a delightful daily trainer. For veteran but non-elite runners like me, it’s best for workouts or marathon+ races. And for others, it could be racing-worthy.
Want a pair? Unfortunately, you’ll have to wait until February 2018. I was able to obtain a production-quality sample in my size from Hoka for review. It will be released around the same time as the new Mach, which is the next generation Clayton 2.
Key product specs
Weight: 8.2 oz (men’s size 9), 6.6 oz (women’s size 7); 9.0 oz for men’s size 11.5 (verified)
Stack height: 24/20 mm (men’s), 22/18 mm (women’s) for heel/forefoot
Drop: 4 mm
Engineered mesh upper
ProFly midsole: firm forefoot, softer heel
RMAT outsole (blended rubber & foam) with exposed midsole foam
$110 MSRP
Release date: February 2018
More info
Fit
Average-width feet will best fit the Cavu. However, wider feet may find that the soft and unstructured upper is acceptably forgiving, and narrower feet (like mine) may feel secure enough with a simple tightening of the laces.
The Cavu shares the same last as the Clifton 4 and new Challenger ATR 4, but it fits and feels differently than both. To me, the axis of the Clifton 4 feels off by a few degrees, with my big toe and arch skewed towards the inside edge of the shoe. In the Cavu, I feel more centered, as I do in the Challenger ATR 4 as well. However, the Challenger has a vastly different outsole (4 mm lugs), midsole (softer), and upper (reinforced toe bumper and forefoot overlays).
Versus the Clifton 2 and Speedgoat 2, the Cavu is wider throughout, particularly in the toebox.
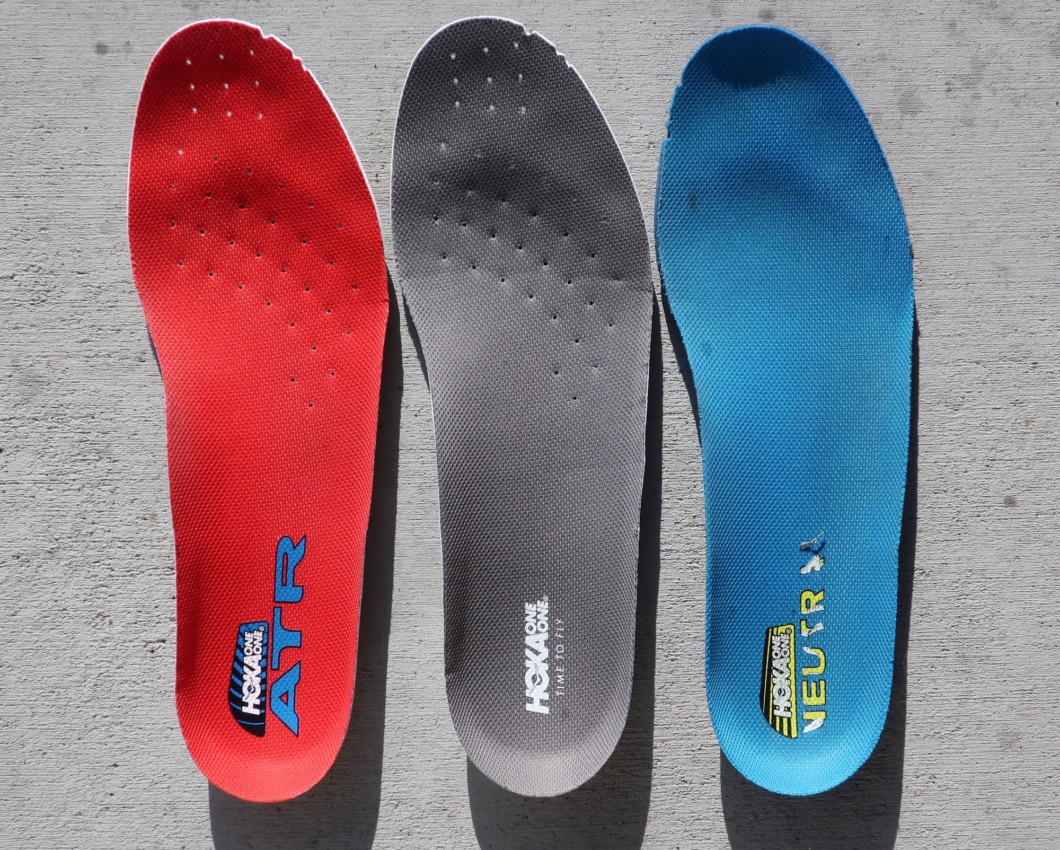
The Cavu shares the same last and similar sock inserts as the new Challenger ATR 4 (red) and Clifton 4 (right). It fits most similar to the Challenger, but doesn’t feel similar to either.
Sizing
I am size 11.5 in other Hoka models (Clifton 2, Clifton 4, Speedgoat 2, Challenger 4) and with other brands, including Altra, Merrell, Salomon, and Salewa, and 45.5 in La Sportiva. The Cavu fits true to size, based on my experience.
Ride & midsole
The Cavu is a neutral trainer with only 4 mm of drop from the heel to toe; it has no deliberate stabilizing or supportive features. As a runner with generally efficient biomechanics, I prefer it this way.
The Cavu’s ProFLY midsole is soft in the heel, for a forgiving landing, and firmer in the forefoot, for a more responsive push-off. The transition between soft and firm foams is continuous, not abrupt — the two midsole foams transition over a zone, without a concrete line or seam.

The Cavu has a two-foam midsole: a soft and forgiving heel and a firm and responsive forefoot.
The heel cushioning feels on par with the Clifton 4 or Challenger ATR 4, but it’s not “marshmallowy” like the Clifton 2 or Speedgoat 2. The forefoot is stiffer than any Hoka shoe I have worn. However, it’s still pliable, not slappy; and with 20 mm of foam and soft foam/rubber outsole under the forefoot, it does not feel “thin” like other fast trainers, such as the Salomon Sonic Pro 2 (my review), which is only 16 mm at the toe and which uses a harder outsole compound.
As a neutral shoe with a responsive forefoot and 8.2-oz weight (in men’s size 9), the Cavu feels suitable for and natural at high speeds. For context, my Houston goal is sub-2:30, and my harder efforts are in the low-5:00 minute/mile range. The only faster shoe in my closet is the aforementioned Asics flat; the Odyssey Pro 2 is on par, but the Cavu has a smoother heel-to-toe transition and better cushioning.
The stack height (for men’s) is 24 mm at the heel, 20 mm at the toe, giving a 4 mm drop. For women, it’s 22/18.
Outsole
In high-friction areas on the outsole (e.g. forefoot and heel), the Cavu features a thick layer of proprietary R-MAT, which is a blend of midsole foam and rubber. It’s lighter and more cushioned than pure rubber, but more wear-resistant than pure foam.
In low-friction regions like the arch, midsole foam is directly exposed. My initial skepticism about using abrasion-prone foam as an outsole material proved unfounded by other Hoka models, so long as the foam is not in high-stress spots.
On asphalt roads, concrete multi-use paths, and paint stripes, I have found the Cavu’s outsole grip to be more than adequate. On pea gravel bike trails and sandy road shoulders, there is some slipping; it’s decidedly not a trail shoe.
R-MAT is not as durable as a conventional outsole rubber, but this shortcoming is partially offset by its thickness on the Cavu. After 135 miles of use, the outsole appears to have at least two-thirds of its life remaining, probably more.

The Cavu outsole has a thick R-MAT layer in high-stress areas, and midsole foam everywhere else. The wear in this photo is after 65 miles of roads.
Upper
The Cavu has a secure heel counter, but otherwise the upper is slipper-like: a seamless, stretchy bootie covered by a soft and slightly stretchy engineered knit mesh, with no reinforcing overlays and a minimal toe bumper. The upper is very comfortable, with no pinching or pressure points.
Lateral and fore-and-aft control is supplied mostly by the elasticized bootie. If you have narrower and smaller-volume feet like mine, you might wish for a more snug fit, but it’s a shortcoming I can accept — unlike while trail running, I rarely encounter tight turns or steep descents while training or racing on the roads.

Highly breathable, soft, and slightly stretchy engineered knit mesh
Fabric breathability is excellent, and it should dry and expunge water quickly (though I can’t yet verify this first-hand).

The upper is double-layered. Underneath the knit mesh exterior, there is a stretchy bootie.
Aesthetics
By Hoka standards, the Cavu has wickedly understated looks. Its lines are clean and natural, and its colors will not offend (although the predominant blue is a shade too close to Carolina blue, in the opinion of a former Duke runner). I welcome this design change — I’m not a flashy person or flashy runner, and previous Hoka color schemes have given me a reason not to buy an otherwise worthy shoe.
Questions about the Hoka One One Cavu? Leave a comment.
Disclosure. This website is supported mostly through affiliate marketing, whereby for referral traffic I receive a small commission from select vendors, at no cost to the reader. This post contains affiliate links. Thanks for your support.
The post Review: Hoka One One Cavu || Light, responsive & fast road trainer appeared first on Andrew Skurka.
November 29, 2017
Giveaway: Sierra Designs Tioga & Sierra Insulated Jackets
Recently Sierra Designs released four new insulated jackets: the Tuolumne, Tioga, Sierra, and Whitney. They are nicely designed and featured, and priced very competitively (starting at $100). Read my full review.
This FREE giveaway will be for the two jackets used for the review:
Tioga Hoodie: men’s Medium, synthetic insulation, hood, red
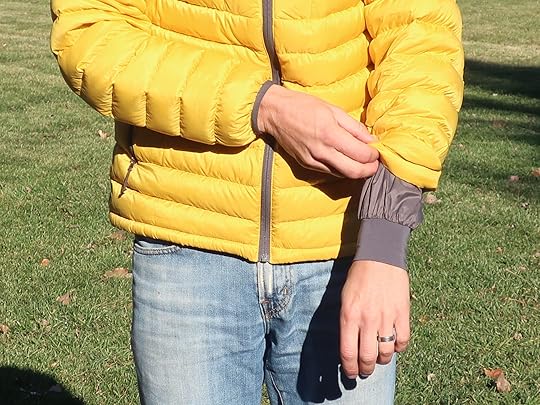
Sierra Jacket: men’s Medium, 800-fill DriDown, hood-less, yellow
The jackets are lightly used. The Tioga is like new. The Sierra has several faint blood stains in inconspicuous places (near the wrist cuffs and bottom hem), all smaller than a pencil eraser. They’re not smelly or dirty, and neither jacket has been washed.
Giveaway rules
Submit your information through the form below.
Items will be shipped only to a continental US address.
No exchanges.
Each entry will be assigned a number, in the order of submission. Two numbers will be selected randomly using the number generator at random.org.
I will notify the winners via email. The first winner to reply back gets to choose the jacket that they want; the other winner will receive the other jacket.
Enter the giveaway
Loading…
The post Giveaway: Sierra Designs Tioga & Sierra Insulated Jackets appeared first on Andrew Skurka.


