
Andrew Skurka's Blog, page 39
February 27, 2018
Six questions I ask before drinking unpurified backcountry water


There was little doubt if I needed to purify the water from this stock tank on Arizona’s Coconino Plateau.
Earlier this month there was a healthy online debate over the true risk of drinking water from backcountry sources without purifying it first. I appreciate that Ethan Linck brought up the topic and agree that many sources are safe to drink without treatment.
But I agree more with Wes Siler and Christie Wilcox:
It’s difficult to be certain of the contamination risk, and
Waterborne cooties can be uncomfortable (understatement).
So, as a general rule of thumb, just purify it.
Missing from their debate, however, was any instructional knowledge, specifically:
How to effectively purify water sources in the backcountry; and,
How to assess water quality and risk in the field.
I’m generally competent in explaining the how’s of backpacking, so in this two-part series I will try to fill this gap.
If you’ve read The Ultimate Hiker’s Gear Guide, some of this text may sound familiar — it’s from the chapter on Water, which also includes discussion of contaminants and water storage. (A clause in my contract allows me to share short sections of the book.) If you haven’t read the Gear Guide, you should consider it: it’s filled with trail-tested advice, and almost certain to save you time and money.
They say to practice what you preach, but I’ll be honest: While I recommend that you purify backcountry water sources, I generally do not.
But your mileage may vary. Normally I hike off-trail and in low-use corners of the Colorado Rockies and High Sierra — at the headwaters of the Colorado and San Joaquin Rivers — where the water quality is top-shelf. I minimize the risk even further by being very selective about the exact sources from which I drink. In the less regular occasion that I’m backpacking in water-challenged environments like southern Utah or in high-use areas like the Appalachians, the rules of the game change.
In this post I will explain how I assess the quality and risk of a backcountry water source. But read it with a grain of salt: I have no academic training in this subject matter, and my approach is based entirely on personal experience, common sense, and a layman’s understanding of contaminants. So far, it’s worked out pretty well for me.
Before drinking unpurified backcountry water, I consider multiple factors. My ultimate decision is not based on a scoring system (e.g. “Three strikes and you’re out.”), but rather a holistic assessment of its quality and risk. If I deem the risk acceptably low, I’ll go for it; if the risk is too high, I’ll bypass the source or purify it first.
1. What is the distance to the source?
Water quality will typically be best at its source, like where it gurgles out of the ground or drips from a snowfield. Here, it is least likely to carry harmful pathogens like giardia or E. coli, or pollutants like heavy metals or pesticides. When it’s reasonable, I will hike uphill to the highest possible collection point — the top pool or pour-over, or at least beyond the “convenient” spot that everyone else is using.

Notice the streams flowing from the base of these talus fields in Colorado’s Indian Peaks Wilderness. That water is low-risk, because it’s so close to the source.
2. How much poop is upstream?
Most pathogens are transmitted by the fecal-to-oral route, i.e. you ingest water that has been contaminated by the feces of an infected carrier. So if I suspect herds of elk, families of beavers, grazing livestock, or hordes of other hikers upstream of my water source, that’s a reason for concern.

Look closely: mountain maggots (i.e. sheep) on Snow Mesa, along the Colorado Trail
3. What’s the volume?
In this context, the solution to pollution really is dilution — a water source with a low concentration of contaminants poses low risk. For example, in 2000, San Francisco’s primary water source — the Hetch Hetchy Reservoir, which is fed by the Tuolumne River in northern Yosemite — regularly tests positive for giardia. But the levels are so low that, on average, a person would have to drink eight liters of water just to ingest one cyst, a small fraction of the the minimum needed for infection.

The Napeequa River, in Washington’s Glacier Peak Wilderness. Miles from its source, it may have been carrying contaminants, but they would have been diluted by the spring snowmelt.
4. Is it flowing or stagnant?
You would think that a flowing water source would be better than a stagnant one: the flowing source is constantly flushed, whereas a stagnant source could be a one-way collection site for contaminants.
However, flowing sources are not necessarily better: they can carry upstream contaminants directly into my water bottle. I do not shy away from stagnant sources like lakes and potholes, but with one caveat: I try to take water from the top few inches, which get blasted with UV light, a proven purification method.

A large pothole in southern Utah
5. Is it crystal clear?
Turbid water is a bad sign. Microbes tend to burrow into sediment and other floaties, and the effectiveness of some purification methods (notably, chemicals and UV light) are compromised.

Silt-filled water that I let sit overnight. Chemical and UV treatments are less effective in turbid water.
6. What does it look, smell, and taste like?
I use my senses. If I see nasty-looking algae, I purify it. If I smell cow shit, I purify it. If I taste heavy metals, I filter it, or bypass it if I’m not carrying a filter that extracts heavy metals. This is just common sense.

A spring in Big Bend National Park. We were at the source, but the algae did not give me great confidence in its quality.
Questions drinking unpurified water, or am I missing an important factor? Leave a comment.
The post Six questions I ask before drinking unpurified backcountry water appeared first on Andrew Skurka.


February 26, 2018
Reader Q || Poles for ultra trail running: recommendations, sizing, & carrying


Pushing hard on my poles at UTMB, climbing out of Arnouvaz towards Grand Col Ferret shortly after sunrise at Mile 61.
From reader Matt. P of Knoxville:
I’ve been hiking for years with conventional telescoping poles and love them. But in May I’m running/hiking the Cruel Jewel 100, which has 33,000 vertical feet of gain, and I’m looking for a trekking pole that is better suited to an ultra trail marathon. What poles do you recommend, and do you have any tips on how to size and carry them?
The value of poles in an ultra depends on:
Individual fitness,
Course length, and
Amount of vertical climbing.
Essentially, the more hiking you expect to do, the more valuable they will be. Participants in the middle and back of the pack will hike more than the front-runners, but some courses like Hardrock — a 100-miler with over 30,000 vertical feet of climbing at elevations up to 13,000 feet above sea level — bring even the world’s fittest ultra runners to a crawl. Whether to bring poles is a personal decision for every competitor: Is the benefit worth some added weight and fuss?
I’ve used poles only in two races: Vulcano Ultra Trail, a 100k with 13,000 vertical feet of gain and 30 miles of beach sand-like volcanic ash; and Ultra Trail du Mont Blanc, the famous 100-miler in Europe that last year had 32,000 vertical feet of gain. Other runners in these races made their own calculation.
Benefits of poles for ultra runners
Backpackers have considered poles to be essential equipment for many years, and ultra “runners” are slowly coming around. When I ran the Leadville 100 in 2008, I was one of the few who used them. But when I last spectated the race in 2013, they seemed much more common. The realization is, “If Kilian, Francois, and Walmsley all use poles in hard races, maybe I should, too.”
Poles enable the arms to help the legs with forward and upward propulsion, and with braking on descents. Net energy burn may actually be greater with poles, but the workload endured by the legs is reduced, helping to preserve strength for later in the race. Poles also provide stability on slick surfaces like mud or wet rocks, and additional points of contact when fording or rock-hopping across streams.
Recommended poles for ultra runners
Traditional telescoping poles like the Black Diamond Alpine Carbon Cork (long-term review) or Cascade Mountain Tech Quick Lock Poles (long-term review) do not work well for ultra running. They are:
Too unwieldy even at their minimum length;
Slow to extend or collapse; and,
Unnecessarily sturdy (and heavy).
Much more appropriate for ultra running are foldable poles like the:
Black Diamond Carbon Z ($160, 10 oz), which I own;
CAMP Xenon 4 ($110, 10 oz); and,
RaidLight Compact Folding Carbon ($150, 12 oz).
These models pack down much smaller, and are therefore less clumsy to carry. For example, my 47.2-in (120-cm) poles collapse to just 15.4 in (40 cm). In comparison, my go-to backpacking poles collapse to just 25 in (63 cm), or almost 10 inches longer.

Foldable poles are dramatically shorter than traditional telescoping poles, making them much less unwieldy while being carried.
Most foldable models are fixed-length, i.e. non-adjustable. Some offer a micro-adjustment of 6 inches (15 cm) but I don’t find this to be a valuable feature for ultra running. It also adds weight and expense — about $20 and 3 oz per pair, in the case of the Black Diamond Distance Carbon Z versus the Distance Carbon FLZ.
To keep these poles lightweight, these poles have thin shafts that are not as strong or sturdy as most telescoping poles. But for running/hiking on trails without a heavy pack, I think they are sufficient, and I don’t see reason to buy poles with beefier shafts like the Black Diamond Alpine Carbon Z.

The length of traditional telescoping poles is finely adjustable, whereas most foldable poles are fixed-length. To collapse them, press the push-button at the lower end of the grip. To lock them, extend the poles until the bush-button snaps into place.
Sizing
When holding my pole vertically, I like my elbow to be at a 90-degree angle. If I’m between sizes, I size up, so that my elbow is slightly less than 90 degrees. A longer pole allows for a more sustained push, as demonstrated by Nordic skiers.
Baskets & straps
If possible, I remove the included “mud baskets” — they serve little purpose, and they slow down the swing speed.
Straps are more optional. With them, greater pressure can be applied to the pole, and they need not be held so tightly. However, they tether the poles to my hands, which I also need for eating, drinking, and — God forbid — catching myself if I were to fall. For races with long, sustained climbs, they make more sense to me than on rolling courses with short but constant climbs that will necessitate frequent transitions.
Carrying
Do not wait until race day to determine how best to carry poles when not in use. Bring them on training runs beforehand so that you can practice transitions and experiment with various carrying options. If you do not heed this advice, you will probably find the the poles to be clumsy and you will probably lose time to futzing with them.
There are several options for carrying stowed poles, listed below. Your equipment may have a default method — if you don’t like it, buy something different or modify its attachment system.
In your hands;
Attached vertically to shoulder straps, a la Ultimate Direction Mountain Vest 4.0;
In a rear mesh pocket;
Secured horizontally at the waist, a la Naked Running Band;
Diagonally across the back, a la Salomon Advanced Skin 12; and,
A dedicated holster, like the Salomon Custom Quiver.
There is no perfect technique — each has downsides, some more than others. Ultimately, your method should:
Allow for a quick and clean transition;
Secure the poles well, with no bouncing and no risk of them falling out; and,
Keep your hands free and your poles out of the way.

Prior to Vulcano Ultra Trail I had not trained with my poles and did not have a good way to carry them, besides in my hands. I thought the poles were worth it, but I regretted my lack of preparation.
Questions about buying or using poles for an ultra? Have an experience that you’d like to share? Leave a comment.
Disclosure. This website is supported mostly through affiliate marketing, whereby for referral traffic I receive a small commission from select vendors, at no cost to the reader. This post contains affiliate links. Thanks for your support.
The post Reader Q || Poles for ultra trail running: recommendations, sizing, & carrying appeared first on Andrew Skurka.
February 24, 2018
Stove face-off: Kojin, StarLyte, 12-10 & Supalite || Boil times & efficiency
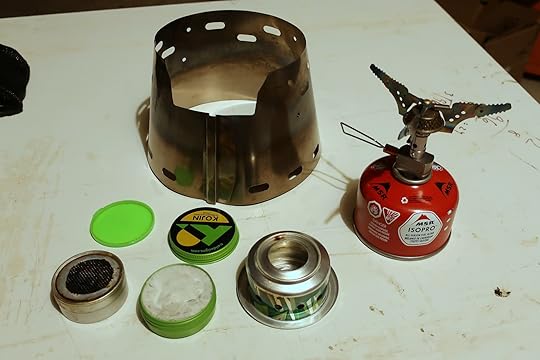

Tested stoves (left to right): Zelph Modified StarLyte, Trail Designs Kojin, Trail Designs 12-10 (all paired with the Sidewinder), and the Kovea Supalite.
The new Trail Designs Kojin competes head-to-head with the Zelph Modified StarLyte, which for several years I have used as the burner in my go-to solo alcohol stove system. They have similar weights and size, and are both designed to work with a cone-style stand/windscreen like the Trail Designs Sidewinder.
After an interview with Russ Zandbergen of Trails Designs about the Kojin, I was asked by a reader, Andy V, to compare the boil times and fuel efficiency of the Modified StarLyte and Kojin, as well as the Trail Designs 12-10, which had been TD’s only stove.
I was curious about the performance anyway, so I went for it. For additional perspective, into the mix I added the Kovea Supalite, an upright canister stove that makes for a good shoulder season and couples stove.
Setup & process
In each test, I brought one pint of water (12 oz, 355 ml) to a rolling boil, using the Modified StarLyte, Kojin, 12-10, or Kovea Supalite (in that order). I tested each stove twice. Here in Boulder, Colo. at 5,350 feet above sea level, the boiling point is 202 F (94.4 C).
On the first round of tests, I used fresh tap water. I didn’t record the temperature, but it’s normally about 55 degrees. During the tests I kept the water nearby in a 1-gallon soft-sided canteen. It may have cooled by a few degrees during the tests, but not enough to worry me. If there was any effect, it would have penalized the stoves tested last, notably the 12-10 and Supalite.
For two hours before the second round of tests, I left the 1-gallon canteen in the testing area, so that it was a consistent “room temperature.” The boil times were all slower during the second round, which I believe is due to the lower starting water temperature.
I used the same cookpot (the Evernew Ultra-Light 900 ml) and stand/windscreen for the alcohol stoves (the Trail Designs Sidewinder). The 12-10 requires the use of two titanium stakes to raise the pot height inside the Sidewinder, which I did. The Supalite is a standalone stove, with no matching windscreen.
The tests were conducted in my garage, inside of which the ambient temperature was in the mid-30’s. I kept the side door open so that there was some air circulation, but conditions could be described as calm.
I weighed each stove three times: at the start of each test, after adding fuel, and after achieving a boil and snuffing out the stove. Because the alcohol stoves did not burn all of the fuel during the first test, they weighed more at the start of the second test.

My testing setup. Notice the orange glow — the Trail Designs Kojin puts out serious heat.
Results
Actual results will vary due to changes in the conditions, including ambient air temperature, starting water temperature, water volume, and wind. But these results are at least suggestive of relative performance.
For fuller viewing, open these tables in a new window.
Analysis
In words, what do these results say?
Modified StarLyte vs. Kojin
When tested under identical conditions, the Zelph Modified StarLyte used 18 percent less fuel than the Trail Designs Kojin to achieve a rolling boil. On a 5-day/4-night trip with eight 12-oz meals (four coffees + four dinners), the StarLyte would use 0.5 oz (15 g) less fuel.
Typically, fuel efficiency and boil times are inversely related, and that is the case here, too. The Kojin achieved a boil 40 percent faster than the StarLyte.
I don’t own a non-modified StarLyte so I can’t say exactly how it performs relative the Kojin. They probably are more similar in both fuel efficiency and boil times.
Kojin vs. 12-10
In both fuel efficiency and boil times, I found that the Kojin outperformed the 12-10: it used 8 percent less fuel, and achieved a boil 15 percent faster.
In the interview with Russ, he said that the 12-10 is still recommended for large-volume pots. I wonder where the 12-10 beings to outperform the Kojin. Personally, given the additional fuss of the 12-10 (i.e. propping up the pot on the Ti stakes, and not being able to store inside the pot both the stove and cone), I would wait for very compelling data before using the 12-10.
Kovea Supalite vs. the world
I love alcohol stoves: they’re simple, ultralight, silent, and inexpensive; and the fuel is widely available. But on trips when I want hot water fast (e.g. big game hunting in Colorado in November) or when the stove will be heavily used (e.g. a couples trip, with morning coffee, a hot breakfast, mid-day coffee, dinner, and finally Sleepytime tea), a canister stove is the way to go.
Simply put, the Kovea Supalite kicked ass. It used 21 percent less fuel and achieved a boil 38 percent faster than the second-best stoves, the Modified StarLyte and Kojin, respectively.
Questions about the tests or the results? Leave a comment.
Disclosure. This website is supported mostly through affiliate marketing, whereby for referral traffic I receive a small commission from select vendors, at no cost to the reader. This post contains affiliate links. Thanks for your support.
The post Stove face-off: Kojin, StarLyte, 12-10 & Supalite || Boil times & efficiency appeared first on Andrew Skurka.
Accuracy of Suunto Ambit3 Peak at Okay/60-second GPS pings (200-hr)


Following my long-term review of the Suunto Ambit3 Peak, friend and fellow guide Alan Dixon sent me an email with the title, “Suunto 200 hr mode not cutting it,” and shared that on a recent 8.2-mile hike his Ambit3 shortchanged him by 1.5 miles (18 percent). He had set the GPS accuracy of the Ambit at “Okay” and was comparing it to the distance measured with his iPhone using the GaiaGPS app.
Alan’s experience is consistent with that of Ethan, a reader who recently commented that his Ambit3 Peak was also 20 percent short when set to “Okay,” versus the listed mileage in the guidebook and on trail signs. (Importantly, he found it to be 75 percent short when the auto-pause was on.)
I’ve never intentionally and precisely tested the accuracy of the Ambit3 Peak in the “Okay” setting, but the observations made by Alan and Ethan sound intuitively correct: the recorded distance will be short of the actual distance. The exact margin of error will vary; 20 percent is probably a safe expectation.
In this post I will explain the cause of this inaccuracy and offer guidance on best uses of the Ambit.
Context
The GPS accuracy of the Suunto Ambit3 Peak (and all other Suunto GPS watches, too, including all Ambit2, Ambit3, and Spartan models) can be set to:
“Best,” or 1-second pings;
“Good,” or 5-second pings; or,
“Okay,” or 60-second pings.
It takes energy to acquire a GPS location, so unfortunately the watch’s accuracy is inverse to its battery life. The Ambit3 Peak is rated to 20, 30, and 200 hours when set to 1-, 5- and 60-second pings, respectively. I pushed the Ambit2 and Ambit3 Peak to the brink on multiple occasions (notably, during a half-dozen 100-mile races) and have found that these battery life estimates are reliable.
Note that the “GPS accuracy” setting is different than the “Recording interval,” which can be set a 1- or 10-second intervals. Ambit does not just record its GPS location — it also collects data from its accelerometer (e.g. cadance), barometer (e.g. pressure and altitude), thermometer, and any accessory devices like the Smart Sensor HR strap or Stryd power meter. The 1-second interval will generate the most accurate data set, but it will fill the internal memory faster. On longer outings with infrequent opportunities to download data, use the 10-second interval.
Most Garmin GPS watches have a similar battery-saving mode, known as Ultratrac. I’m less clear about how it works, but it will also extend battery life by a multiple. For example, the Garmin Fenix 5 is rated “up to 24 hours” in its most accurate setting, but “up to 60 hours” in Ultratrac. With older models, Garmin has been criticized for optimistic battery life estimates; I’m unaware of the consensus about the Fenix 5 models.
Accuracy of Ambit3 Peak at Okay/60-second GPS pings
Why did Ethan and Alan get shortchanged by 20 percent when using the Okay/60-second GPS interval?
One reason is that the Ambit fails to record every meander, such as turns and switchbacks. To illustrate this, last night I walked in a zig-zag pattern down the nearby frontage road, once with the Ambit at the Best/1-second interval and a second time with it at Okay/60-second. The recorded tracks are shown below. Notice how the red line (1-second interval) records my zig-zags perfectly, while the blue line (60-second interval) missed all of them.

The red line is my recorded track at 1-second GPS pings. The blue line is my recorded track at 60-seconds. Notice how all of the meanders are missed when recording at the 60-second interval.
On straight trails, the accuracy of the Ambit at 60-second intervals is probably quite good. But on trails with lots of tight turns and meanders, its accuracy will decrease.

On straight trails, including trails with long straight switchbacks such as here in Rocky Mountain National Park, the Ambit does well. Notice how closely the recorded track (blue line) follows the mapped trail.
In addition to missed meanders, I think there is a second explanation for the inaccuracy of the Ambit at the Okay/60-second interval: its GPS location data does not seem as accurate. For example, notice in the zigzag test that the blue line shows a path through the grass, even though I was on the road. And in the image below, notice the dramatic zigzag across Fifth Lake even though I remained on its west side.
I have a few theories about what’s happening here. It’s possible that less battery power is being sent to the GPS chip, resulting in less accurate location data. Or, with GPS pings far and few between, the Ambit struggles to remain connected with multiple GPS satellites, thus compromising its accuracy. If you have a better understanding of GPS and GPS watch technology, please share.

When set to 60-second pings, the Ambit occasionally records an erratic GPS position.
Accuracy of the Ambit3 Peak at Best and Good GPS settings
When using its Best or Good setting, I have been remarkably impressed with the accuracy of the Ambit3 Peak (and its predecessor, the Ambit2), especially in consideration of its $300 price, 2.50 oz weight, and battery life.
With the Ambit in Best/1-second mode, I have run three certified marathon courses: Colorado, Boston, and Houston. The Ambit recorded distances of 26.44, 26.39, and 26.51, respectively, versus the official marathon distance of 26.22 miles, or about 1 percent less. However, this difference can be partially explained by how I ran the course (e.g. swinging wide around tight corners, and not running in a perfectly straight line between apexes), not the accuracy of the watch.
With the Ambit in Good/5-second mode, I have run multiple 100-mile ultra marathons. Throughout these races, the Ambit has displayed reliable pace, heart rate, and vertical change data. The recorded distances seem fairly accurate, too. At Ultra Trail du Mont Blanc (UTMB) last year, my Ambit3 Peak recorded a total distance of 105.18 miles, versus the official 104.76 miles, or an overshot of just 0.4 percent. It recorded 31,821 of vertical gain, versus the official 32,398, or 1.7 percent less.
In other ultras, the difference between the official distance and my recorded distance has been greater, like 107.12 miles at Run Rabbit Run 100, which officially is 102.9 miles. That’s a difference of 4.1 percent. However, I don’t necessarily trust the official distances for ultra courses — they are not professionally measured or certified. (UTMB is the biggest ultra in the world, and I bet they have measured their course with more accuracy than most.)
Guidance
Based on my experience with the Ambit, in terms of its accuracy, here are my usage guidelines:
Use Best/1-second mode if:
Your activity will be completed in less than 20 hours; or,
You need the greatest level of accuracy.
Examples: marathons, 50-mile ultras or fast 100k/100M courses, day-hikes, trail mapping
Use Good/5-second mode if:
Your activity may exceed 20 hours but will finish within 30 hours; or,
You need reasonably accurate data.
Examples: 100k or 100M races, 1- or 2-night backpacking trips
Use Okay/60-second mode if:
Your activity will exceed 30 hours; or,
The data needs to be only generally accurate.
Examples: 3-day backpacking trips or longer
If the Ambit is not offering the level of accuracy you need for the duration that you need it, remember that it can quickly and easily be recharged in the field (or during a long stop in an aid station). It has a 500 mAh battery, so a portable charger like the Anker PowerCore+ mini could recharge it about four or five times (after accounting for the energy lost from current conversion).
Guidebook writing
When performing field research for my guidebooks, I use the Okay/60-second setting. It:
Produces a functional GPX track of where I went;
Displays roughly accurate average pace data, especially over longer distances;
Records accurately my net vertical change, which is usually the limiting factor each day, not horizontal mileage; and,
Gives me a generally accurate mileage read-out for the day and between landmarks.

This GPX track confirmed what I observed in the field: that the mapped location of the Gourd Lake Trail is not correct. However, it is not sufficiently accurate for public sharing — it clearly missed a few switchbacks and got some wonky location pings.
However, the mileage data and GPX track are not suitable for public consumption. The listed mileages in my guides are measured in Caltopo later on. And I intentionally do not include a GPX track of the routes — if you need that level of assistance, you probably shouldn’t be on it. If I wanted to skip the Caltopo step and/or share a very accurate GPX track, I would need to use the 1- or 5-second setting.
Have questions about the accuracy of the Ambit? What’s been your experience with it at Okay/60-second GPS pings? Leave a comment.
Disclosure. This website is supported mostly through affiliate marketing, whereby for referral traffic I receive a small commission from select vendors, at no cost to the reader. This post contains affiliate links. Thanks for your support.
The post Accuracy of Suunto Ambit3 Peak at Okay/60-second GPS pings (200-hr) appeared first on Andrew Skurka.
February 23, 2018
Long-term review: Salter Brecknell Model 311 Scale || An unsung essential
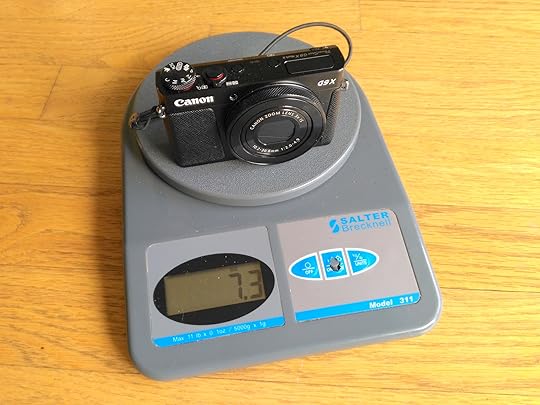

While pouring myself a stiff night cap (f’ing tax prep) and then readying tomorrow morning’s coffee last night, it dawned on me that I should write a long-term review of the unsung device on which I rely so often: the Salter Brecknell 311.
This $28 postal scale has an 11-lb capacity that measures in 0.1-oz increments. (For those who don’t live in the US or the two other Imperial backwaters, Liberia and Myanmar, the 311 has a 5-kilogram capacity and measures in 1-gram or 0.001-kg increments.)
My 311 is at least six years-old, and has been used over 10,000 times. In addition to coffee and (less regularly) alcohol, I use it for weighing:
Letters and packages,
Gear, particularly when reviewing products and developing gear lists; and,
Most of all, food. This year alone, for personal and guided trips I will prepare 1,500+ servings of beans and rice, breakfast granola, and chocolate covered cashews. And I use it regularly for home-cooked meals, too, like when I need two pounds of ground elk for shepherd’s pie.
A reliable scale is an essential possession of a dedicated backpacker, especially those who are considerate of their pack weight. And you might be surprised with how often it gets used for non-backpacking applications, too.
Long-term review
When or if this scale dies, I will most definitely buy it again:
1. With an 11-pound capacity, I can weigh every piece of gear that I own, and most packages.
2. The 0.1-oz increment is sufficiently precise for most things, including the weight of, say, a tent stake or a bag of M&M’s. The next level of precision (0.01-oz increments) is unnecessary for most jobs.
3. Battery life is excellent. I think I’ve only replaced its 9-volt battery once.
4. After weighing powdery foods (e.g. mashed potatoes, Parmsean), it can be easily and thoroughly cleaned by removing the weighing platform (just twist and pull).
5. The reading speed is acceptable. I don’t feel like I’m always waiting on it, and it does not bob between measurements like a digital pendulum.
Room for improvement
I have found only two flaws with the Model 311, neither of which are probably fair:
1. With large items (e.g. a big box), the display can become hidden. A remote display would be more useful. However, that feature would also cost more.
2. Last year I wore through the pliable plastic that covers the ON/TARE button. The functionality is not affected, and at this point I don’t need a visual reminder of where the ON/TARE button is. But this does expose a weak point of the device.

My scale collection: (left to right) for little things, most things, and big things.
Other scales I own
The 311 does not do it all, so I own two other scales as well.
The Etekcity Digital Postal Hook Fishing Scale has a convenient hook and a 110-pound limit. I take it to the trailhead on important solo trips and on guided trips in order to weigh full backpacks, food sacks, and meat bags — these are useful points of reference later. The scale is small and easily portable.
The Smart Weigh SWS100 Elite Series Digital Pocket Scale has a capacity of just 3 oz, but measures in increments of 0.01 oz. It’s very useful for weighing spices or very small items that collectively add up, including side-release buckles, cord locks, and short lengths of guyline.
I’ve owned both scales for a few years, but don’t use them as often. Based on my experience so far, they are both on my recommended list.
Disclosure. This website is supported mostly through affiliate marketing, whereby for referral traffic I receive a small commission from select vendors, at no cost to the reader. This post contains affiliate links. Thanks for your support.
Own the 311? What’s been your experience? Own another scale? Which one, and what do you think of it?
The post Long-term review: Salter Brecknell Model 311 Scale || An unsung essential appeared first on Andrew Skurka.
February 22, 2018
Review: Suunto Spartan Sport Wrist HR Baro || What am I missing?
The new Suunto Spartan Sport Wrist HR Baro has a nice color touchscreen, but at $550 there are other watches I’d recommend.
For a few weeks I have been using a friend’s Suunto Spartan Sport Wrist HR Baro. I am a longtime user of Suunto’s original GPS watch family, the Ambit, but this is the first Spartan series model that I have worn. It has a few nice features, but my recommendation is to stay away from this watch: it’s overpriced for what it does, and it has several annoying (or fatal) flaws.
Review: Suunto Spartan Sport Wrist HR Baro GPS watch
Suunto released the Spartan Sport Wrist HR Baro — which I will shorthand to “Baro” for the remainder of this review — in September 2017, making it the fifth Spartan family member and the third Sport-level model. Its most notable features include:
Color touchscreen,
Bluetooth connectivity,
GPS and GLONASS compatibility,
10 to 40 hours of battery life depending on the GPS accuracy setting, and
Some activity tracking and smartwatch functionality, such as steps, calories, push notifications, a customizeable watch face, and sleep tracking.
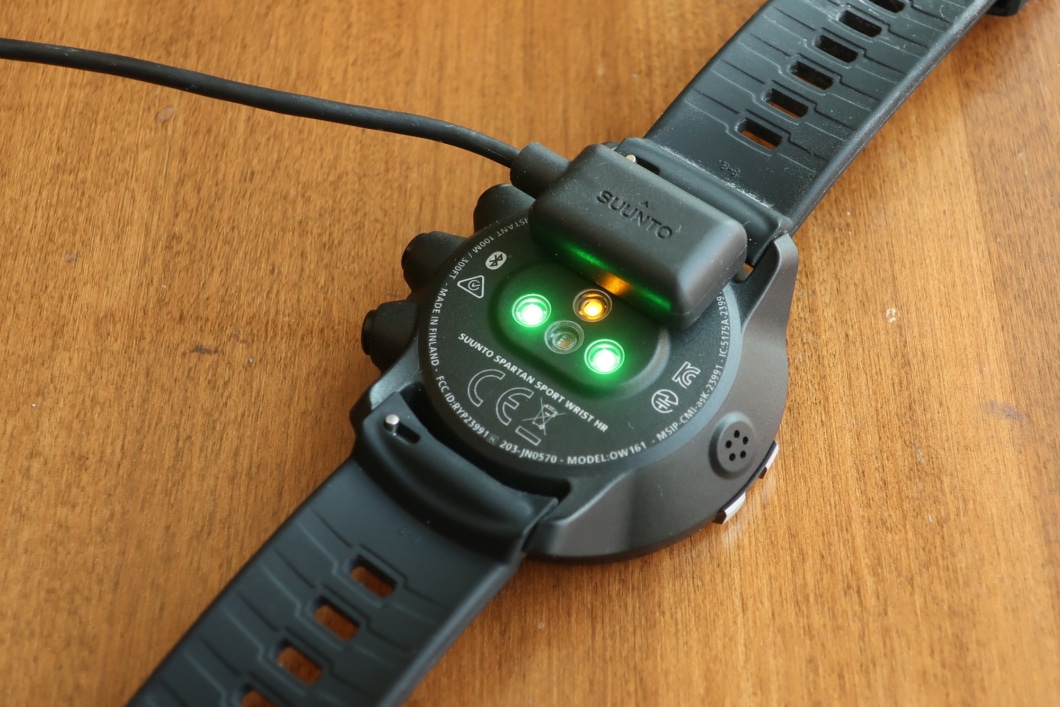
The Baro is different from its two predecessors — the original Spartan Sport and the Spartan Sport Wrist HR — in that it has both a wrist-based heart rate sensor and a barometer. The former enables heart rate monitoring without a chest strap (more on this later), and the latter creates additional functionality, including altitude readings in watch-only mode, weather forecasting, and vertical change tracking when the GPS interval is set at 5- and 60-seconds (not only when at 1-second intervals).
At the time of publishing, it’s $550 price point seems to be holding. It costs $50 more than the Spartan Sport Wrist HR (which does not have a barometer) and $230 more than the now-discounted Sportan Sport (which does not have wrist HR or a barometer).
Product line clean-up
Before diving into details, I feel compelled to criticize the big picture. The Baro is the third Spartan watch that has been released individually. The collection started with the Spartan Ultra and Spartan Sport. Then Suunto released the:
Spartan Sport Wrist HR, which is a Spartan Sport with a wrist HRM;
Spartan Trainer Wrist HR, which offers most of the Spartan Sport Wrist HR features (notably, not the touchscreen) but for a $280 price tag and in a smaller size; and, now the,
Spartan Sport Wrist HR Baro, the subject of this review.
These standalone launches have filled gaps in the original series, but they’ve come at a cost to the overall product line architecture:
Suunto can no longer tell a good-better-best story, because two of its mid-tier Sport models have a significant feature (wrist-based HRM) that its flagship model, the Ultra, does not.
Its latest model requires a 6-word name to differentiate it from existing models. And,
The minor functionality difference between the Spartan Sport Wrist HR and Baro makes it more difficult for most customers to make a decision, not less.
I think Suunto would be well served by restructuring its product line. Create a three-model Spartan2 family that shares wrist HR. Make tweaks to the Spartan Trainer and carry it forward. Drop the Spartan Sport Wrist HR. And outfit the Ultra with a wrist HR.
Okay, let’s move on.
The good
I don’t recommend the Baro, but it does have a few praiseworthy features:
1. The color watch face is easy to read, even in low light. Its graphics are pleasant. And I appreciated the size of its display — even though the Baro and Ambit3 Peak have 50-mm watch faces, the Baro’s display is a little bit bigger, which affords room for additional display arrangements (e.g. 4-field views).
2. The buttons have good action and are responsive.
3. The magnetic USB charger/data cable snaps immediately into place. It’s as user-friendly as the male/female cable on the Garmin Fenix 5 series, and much better than the Ambit’s fussy pronged clamp.
The magnetic USB cord snaps perfectly into place.
4. After every workout the watch immediately asks me, “How was it?” and gives me the option to rate it as Excellent, Very Good, Good, Average, or Poor. If this feature is consistently used, it could establish quantitative training trends. With the Ambit, I only have qualitative narrative assessments that I must add later.

This simple question can create quantifiable trends in training.
5. When I’m wearing warm clothing, running in crunchy snow, or surrounded by loud vehicles, the vibration alarms are very helpful in confirming start/stop/lap.
The bad
Why do I not recommend the Spartan Sport Wrist HR Baro?
1. At least on this this watch, I don’t think the touchscreen offers any value. The technology cost is reflected in the price, but it doesn’t give you anything in return. The menu system is simple, and it can be navigated quickly and efficiently with the buttons. In fact, I prefer the buttons — I don’t have sausage fingers, but I still find that my fingertips lack the precision necessary to navigate such a small screen.
2. The stretchy silicone strap is comfortable. But it makes the watch irritatingly difficult to put on — the silicone is slightly tacky and very pliable, so the excess strap material does not feed easily through the slider loops. The end also grabs clothing while running (especially when wearing looser-fitting shirts/jackets or in strong cross winds), and the entire band collects lint. I do not have hairy arms, but I would be scared for those who do.

The silicone strap is the worst I’ve used. It’s comfortable once on, but its overly pliable and tacky, and it collects lint.
3. The wrist-based HRM is unacceptably inaccurate. Its behavior on this 8-mile run (different than the run shown in the graph below) is representative of my experience with it. Supposedly, my average HR was 160 bpm, max was 188 bpm, and minimum while running was 148 bpm. I have religiously worn a chest strap for years, and can say with 100 percent certainty that the HR was NEVER accurate during this run. My average HR was probably around 140 bpm, and it probably never went above 150. At 188 bpm, I would be dead. And 160 bpm is my 50K race effort.

Wildly inconsistent and inaccurate heart rate readings. On this 7-mile run, my HR apparently averaged 172 bpm. That’s probably my 2-mile race effort.
4. The lap button’s lower-left position is a poor place for it. Pressing it with the right-hand index finger or thumb is awkward while on the move — go ahead, try it at home. I would strongly prefer that this button be in the upper-left corner.
5. When set to the “Best” GPS accuracy (1-second pings), the battery lasts just 10 hours. When set to 5- or 60-second pings, it will last 20 and 40 hours, respectively. For ultra endurance athletes like myself, this spec is a deal-breaker, because it wouldn’t last through most of my races. But even for the majority of users, the short battery life is annoying — it has to be charged too regularly.
Recommendations
Don’t buy the Spartan Sport Wrist HR Baro.
If you have a $550 budget, consider the Garmin Fenix 5 instead. Like the Baro, it has a color screen (no touch), wrist HR sensor, and barometer. It also has a longer-lasting battery, fuss-free wrist strap, and more activity tracking and smartphone features. I also find the Garmin ecosystem to be more visually welcoming.
But, personally, I would buy the Suunto Ambit3 Peak HR, about which I recently wrote a long-term review. You’d give up the larger color touchscreen, magnetic USB cable, some activity tracking, and the unreliable wrist HRM. But you’d get much better battery life and a strap that doesn’t annoy you — and you’d save $225!

The $550 Spartan Sport Wrist HR versus the $325 Ambit3 Peak
Questions about the Suunto Spartan Sport Wrist HR Baro, or have an experience with it? Leave a comment.
Disclosure. This website is supported mostly through affiliate marketing, whereby for referral traffic I receive a small commission from select vendors, at no cost to the reader. This post contains affiliate links. Thanks for your support.
The post Review: Suunto Spartan Sport Wrist HR Baro || What am I missing? appeared first on Andrew Skurka.
February 19, 2018
Reviews: Slim full-size keyboard & mouse combos || Logitech, Jelly Comb, Moko, VicTsing

This series of keyboard & mouse reviews may seem off-topic, but please consider the hundreds of hours that I spend each month tapping away at my desk. It’s worth finding good ones.
In December I replaced my six year-old HP laptop, which had outlived its expected service life by at least 2x. It was showing its age: it was annoyingly under-powered; it was twice as heavy as modern equivalents; its battery life was about 20 minutes; and the embossed letters on one-quarter of its keys had been impressively worn off.
I replaced it with a desktop, the Acer Aspire Desktop TC-780-ACKI5, which represented a major performance upgrade but which was still reasonably priced at $500. Its lack of mobility was not a concern — for traveling and coffee shops, I have a three-year-old Samsung Chromebook 2 with an 11-inch screen that weighs less than 3 lbs.
The stock Acer keyboard and mouse were functional, but I wanted to replace both — they are ugly, wired, and unremarkable to use.
Parameters
Initially, I limited my search to Windows-compatible keyboard and mouse combinations that were wireless and that were full-size (with number keypad).
But after my first attempt failed, I added an additional parameter: it had to be slim/ultra thin. As a lifelong laptop owner (I’m 36 years-old and the Acer is my first desktop), the keys on slim keyboards feel more familiar: they are flat-topped and low-profile, and have less travel and require less force than conventional keyboards. The keyboards also consume less desktop space and do not require a wrist rest.
Review: Logitech MK520 Wireless Keyboard and Mouse Combo
The first replacement candidate was the Logitech MK520 Wireless Combo, which was well reviewed, reasonably priced, and produced by a reputable brand.
But I was unimpressed. They keyboard on the first unit experienced regular delays, ranging from a few seconds to a few minutes. Short delays are annoying, and long delays cause work stoppages — and neither is acceptable. So I requested a replacement.
The second unit was delay-free, but several of the keys — especially those immediately above the center of the space bar, like C, V, B, and N — required exceptional force. As a result, I was making typing mistakes with unacceptable frequency.
On the plus side, the mouse was nice, and all the batteries were included.

Logitech MK-520 Keyboard & Mouse Combo

I disliked the keys: they were noisy, had a lot of travel, and required significant force.
I went shopping again, and ultimately ordered three models — I wasn’t willing to waste more time, and I had realized that the choice is too personal to rely solely on reviews. I was specifically looking for reasonably priced alternatives to the Apple Magic Keyboard with Numeric Keypad, which retails for $130 and is not accompanied by a mouse.
Review: VicTsing Ultra-thin Wireless Keyboard & Mouse Combo
At just $20, the VicTsing Ultra-thin Combo Model PC132A is at the opposite end of the price spectrum. I assumed that its build quality and durability would be lacking, but I was willing to take the chance.
It seems like a great value for the price, but it will be going back to Amazon. I liked its keys more than those on the MK520, but I felt that they still required too much force — I want to simply tap on the keys, not bang on them.
The mouse seemed decent, too.

VicTsing Ultra Slim Keyboard and Mouse Combo, $20

The low-profile keys had low travel, but they were not responsive or soft enough
Review: Jelly Comb Ultra-thin Wireless Keyboard & Mouse Combo
The Jelly Comb Ultra-thin Combo (model JC0317WS) was the nicest and most expensive of the three wireless slim models that I purchased, at $60. It has a solid all-aluminum build and is available in four colors: black, white, white and gold, and white and silver. I haven’t seen the Apple Magic Keyboard first-hand, but I imagine it to be similar.
The keyboard is almost perfect, IMO. The keys are responsive and low-travel, and need only a light touch. And it sits low (just 0.16 to 0.59 inches tall, front to back), eliminating the need for a wrist rest.
It has only one minor flaw: the space bar has a distinct “clack,” versus the muted key taps. I might get used to it, or it might always bother me — only time would tell.
Like the keyboard, the mouse is also very low-profile, though I wouldn’t consider this characteristic to be an advantage here — it does not cup inside your hand like a full-size mouse. On the other hand, the left- and right-click buttons are completely silent, while the roller noise is acceptably subtle.
For $60, I think Jelly Comb should include the two AAA batteries for the mouse, but it does not. It does include a silicone keyboard cover, however, which would help to keep it clean when not in use.

Jelly Comb Ultra Slim Keyboard and Mouse Combo, $60

Silicone cover included

I think the key travel and feel are perfect, but the space bar needs help.
Review: Moko Ultra Thin Wireless Keyboard & Mouse Combo
The Jelly Comb is nice, but I instead settled on the Moko Ultra Thin Combo (ASIN B078MCFCDX). The two units are nearly identical: the keyboards and mice share the same size and format, and the keys have the same feel. Even the boxes are identical, except the printed-on branding.
There are a few subtle differences, however:
The Moko space bar sounds consistent with the other keys, instead of clacking;
The base of the Moko keyboard is made of aluminum, but the top is plastic;
The right- and left-click buttons on the Moko mouse make a “click” and are not silent;
The Moko is available in only one color, black; and,
No silicone cover (or batteries) is included.
The Moko is available for just $35, and I didn’t feel that the Jelly Comb’s aluminum top, silicone cover, or silent mouse was worth the extra $25. Moreover, the black keyboard blends into my black desk and will not show stains like white keys.

The Jelly Comb and MoKo models are identical, with just a few subtle differences

The MoKo keyboard is perfect, like the Jelly Comb, but the space bar does not have the loud “clack.” Its top is plastic, however, not aluminum.
Disclosure. This website is supported mostly through affiliate marketing, whereby for referral traffic I receive a small commission from select vendors, at no cost to the reader. This post contains affiliate links. Thanks for your support.
The post Reviews: Slim full-size keyboard & mouse combos || Logitech, Jelly Comb, Moko, VicTsing appeared first on Andrew Skurka.
February 18, 2018
Preview: Trail Designs Kojin Stove, a StarLyte replacement || Russ Zandbergen interview

While I am frequently linked with the Super Cat Stove and was a longtime user, for the last three years I have relied on a more engineered system that is more fuel-efficient, wind-resistant, and stable. Its cornerstone is the Trail Designs Sidewinder Cone.
Trail Designs has just released the Kojin Stove, which is meant to be paired with the Sidewinder. It has a significant advantage over TD’s longtime flagship stove, the 12-10, because it can be stowed inside an Evernew 600 ml and 900 ml pot. It performs similarly to the Zelph StarLyte, but will be available directly from Trail Designs as a standalone product and as part of its Sidewinder package.
I interviewed Trail Designs owner Russ Zandberger about the new Kojin.

The new Kojin stove weighs 16 grams and can be stowed inside the Evernew 600 and 900 ml pots.
Q | What’s the significance of its name, “Kojin”?
Kojin is the Japanese god of fire, the hearth, and the kitchen.
Q | Besides its significantly smaller size, what are the other major differences between the Kojin and 12-10?
The 12-10 stove was our ONLY stove for years. Twelve, I think.
The smaller size allows it to be stowed inside the Evernew 600 ml and 900 ml pots, along with the sidewinder cone. That’s a big win for Sidewinder users.
The Kojin will function well with the Sidewinder Ti-Tri Cone. The pot can be put directly on the cone. No stakes are required for an alcohol burn.
This was the primary reason for us doing the new burner. We resold the Zelph StarLyte when Dan would sell it to us. The Kojin replaces the StarLyte quite well.
The 12-10 will not go away. The 12-10 performs better with large 3- to 5-cup boils. The Kojin seems to have a sweet spot at about 2-cup boils. We will still recommend the 12-10 if the customers plans include boiling 4 cups of water at one time.
My brother has been testing with 4 and 5 cups of water in a 2-quart pot.

Left to right: the Trail Designs 12-10 and new Kojin, and the Zelph StarLyte
Q | How much engineering went into the Kojin? It looks incredibly simple: an oversized Dermatone tin with some fiberglass-like material inside. What am I missing?
In terms of the final design, you are missing only one thing: the lid seal. It’s a silicone material that will not be damaged by using the lid to snuff out the burner. We buy the raw material and make the seal.
More engineering went into the Kojin than you might think, but not as much as for the 12-10. We got lucky in finding that filler materiel. I will keep this part a trade secret as long as I can.
I was working to a performance goal. Many versions were made and tested. The final design was driven by actual performance data — boil time and fuel use. Many of the iterations were more complicated than the final design.

The fiberglass-like material in the Kojin is a trade secret for now. The cap liner is covered with silicone.
Q | What are the ordering details?
It will distributed through our website only. It will be an option with some systems, notably the Sidewinders. And it can be purchased separately for $12. We expect existing Sidewinder owners to want it as an upgrade for the Starlyte.
It’s available now.
We will continue to offer the 12-10 as a standalone stove.

Unlike the 12-10, the Kojin will fit inside an Evernew 600 ml and 900 ml pot, along the Sidewinder cone.
Disclosure. This website is supported mostly through affiliate marketing, whereby for referral traffic I receive a small commission from select vendors, at no cost to the reader. This post contains affiliate links. Thanks for your support.
Additional disclosure. Three years ago Trail Designs gave me a Sidewinder Cone, and more recently the Kojin Stove. Trail Designs had no expectations in return, but promote these products anyway because I think they’re excellent.
The post Preview: Trail Designs Kojin Stove, a StarLyte replacement || Russ Zandbergen interview appeared first on Andrew Skurka.
February 13, 2018
Long-term review: Suunto Ambit3 Peak || Unmatched performance for the price

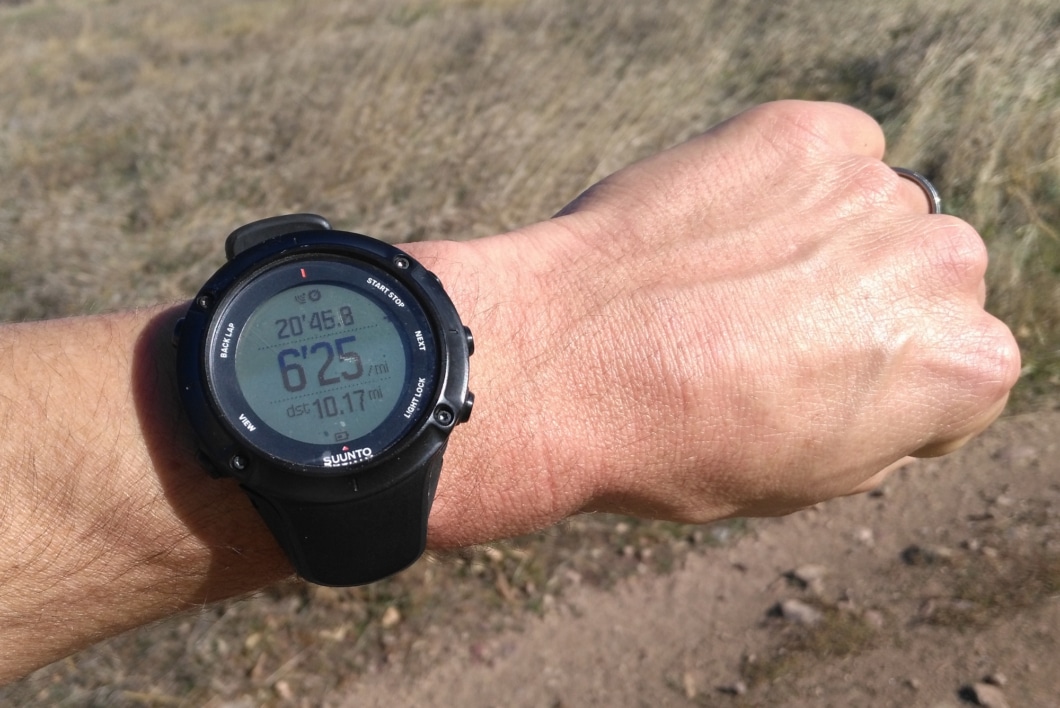
For ultras and backpacking, the Suunto Ambit3 offers unmatched performance at its price point.
Last August I upgraded to the Suunto Ambit3 Peak, after using for four years the previous iteration, the Suunto Ambit2 (read my long-term review). Since I train regularly based on heart rate, I bought the HR package, which includes the Smart Sensor Belt.
To date I have worn the Suunto Ambit3 Peak for more than 150 runs or hikes, totaling over 1,500 miles and 300 hours. Most significantly, I used it for racing Ultra Trail du Mont Blanc (UTMB), guiding backpacking trips in Sequoia-Kings Canyon National Park, hunting big game in Colorado, and training for the Houston Marathon.
How I use the Ambit3 Peak
To put this review in context, I’ll explain how I use a GPS sport watch. I’m a two-sport athlete, and use the Ambit3 Peak exclusively for both:
Running (roads, trails, ultras)
The Ambit3 Peak records my current and average pace, lap and cumulative times, lap and cumulative distance, current and average heart rate, and net vertical ascent and descent, plus some other data.
Its screens can be customized, to display the data of greatest interest to me. For example, during an ultra marathon I rotate between four screens, each dedicated to a specific data group: pace, heart rate, vertical, and cumulative.
The information available may sound overwhelming, but I think it’s allowed me to train and race smarter. For example, I was able to accurately compare my Houston Marathon training against my Boston Marathon training (from 9-12 months earlier), despite my workouts not being on the track or on standardized routes. And at UTMB, my watch provided accurate pace and heart rate data, which helped me to run evenly from start to finish.

Worse for wear, at the UTMB finish line in 24:44. My Ambit3 had less than a 10 percent charge. I had the HRM and Bluetooth turned on the entire time.
Backpacking
The Ambit3 Peak makes mostly obsolete the traditional outdoor ABC watch, like the Suunto Core, which has only an altimeter, barometer, and compass. The Ambit3 Peak matches this functionality, and is capable of much more. For example, it can:
Calculate the distance I’ve hiked from a trailhead or camp, or some intermediary point like a trail junction;
Measure cumulative vertical gain and loss, which in extremely mountainous environments is more limiting than horizontal distance traveled;
Perform basic GPS functions, like showing its coordinates, storing waypoints, and navigating to a pre-programmed landmark; and,
Create a GPX track of a route that can be shared or published later.

Among other things, the Ambit will display my altitude, net vertical gain, and net vertical loss. In extremely mountainous terrain, vertical change is a better indication of my effort (and limits) than horizontal distance.
Long-term review: Suunto Ambit3 Peak
For ultra runners and backpackers, the Ambit3 Peak bests the competition in three ways:
1. Long-lasting battery
The Ambit3 Peak will run for 20, 30, or 200 hours when the GPS ping interval is set to 1, 5, or 60 seconds, respectively. It will remain operable (and reliably accurate) throughout most ultras (including 100-milers like Western States and Leadville, even for cutoff-chasers) and for backpacking trips up to about 20 days long (10 hours of run time per day * 20 = 200 hours). On longer trips, it can be quickly recharged in town or with a portable battery like the Anker Powercore 5000.
2. Barometer
This instrument accurately measures altitude, vertical gain, and vertical loss, regardless of the GPS ping interval setting. It also forecasts potential weather changes, which normally coincide with changes in barometer pressure. During long intervals between GPS pings, watches without altimeters can miss out on vertical movement, like in rolling terrain. And barometer-less Suunto devices won’t even display cumulative vertical change, due to accuracy concerns.
3. Price
When the Ambit3 Peak was released in mid-2014, it retailed for $500. Now, it’s available from authorized dealers in the low-$300’s, with an up-charge of about $30 for the HR belt.
Ambit3 Peak vs other GPS sport watches
Most other GPS sport watches — even newer, glossier, and more expensive models — fail to match the functionality of the Ambit3 Peak for ultra running and backpacking. The Suunto Ambit3 Vertical has half the battery life. The Ambit3 Sport and Ambit3 Run have less battery life, and no barometer. Ditto for the Suunto Spartan Sport and Spartan Sport Wrist HR.
The Garmin Fenix 5 and Garmin Forerunner 935 have barometers but short-lived batteries, from 24 hours to 60 hours (when using the fickle UltraTrac mode). Plus, they retail for $500 and up, and Garmin is very good at enforcing MAP (minimum advertised price).
For my purposes, the only watch that rivals the Ambit3 Peak is the Suunto Spartan Ultra HR. Its battery life is estimated at 18, 35, and 140 hours depending on the GPS ping interval. And it has the same outdoor functionality as the Ambit3 Peak. However, at the time I wasn’t willing to pay $600-ish for it, or about 75 percent more, just for a sleek color touchscreen, vibration alerts, and some activity tracking. The price difference is less now — about $110 on Amazon.
Other considerations
A long-lasting battery and a barometer may not be as crucial to other prospective buyers. Here are some other important observations about the Suunto Ambit3 Peak performance:
GPS accuracy is very good. Look at my runs on Strava using the satellite layer.
It quickly connects with GPS satellites and my HRM.
It’s comfortable to wear, thanks to a soft and pliable wrist strap, and rounded edges on its base.
The stock screen (non-Sapphire) is amply scratch-resistant. I abused my Ambit2 for four years, and it had very few scratches when I replaced it.
Recorded data is reliably and quickly transferred with the USB cable. It can be transferred via Bluetooth, too (using the Movescount app), but it’s slower and less reliable.
The Movescount website and app are functional and generally user-friendly.
I have found just one area for improvement: the buttons, which are a touch slow.

The track of a recent run (in red), recorded by the Ambit3 Peak, overlaid onto Landsat imagery. The accuracy is not commercial-grade, but it’s very good for a 2.5-oz watch.
Why not wait for the Ambit4 Peak?
The Ambit3 Peak was released in mid-2014, and I wondered last August when I purchased it if an Ambit4 Peak would soon replace it.
My concern was partly irrelevant, since I wanted a new watch in August, not sometime this year. My Ambit2 was suffering from a sticky Start/Stop button and, more importantly, I thought its battery might die before I crossed the finish line at UTMB.
But I also checked in with Suunto. In January 2017 at Outdoor Retailer, they told me development of the Ambit4 was uncertain. That seems to still be the case — in a November 2017 email, its PR firm told me that, “We will be keeping the Ambit3 Peak in the line for the foreseeable future.” And they also reported that, “There isn’t another watch in the pipeline that closely rivals the Ambit3 Peak in terms of battery life and price point.”
These comments leave open the possibility of an Ambit4 Peak. But it will almost certainly be more expensive and its battery life may decrease, perhaps due to a color screen, touch screen, or wrist-based optical heart rate monitor.
Ambit3 Peak vs. Ambit2
The Ambit3 Peak is an evolutionary improvement over its direct predecessor, the Ambit2. My long-term experience with the Ambit2 was excellent, so I was accepting of simple yet beneficial refinements.
The Ambit2 and Ambit3 Peak share nearly identical bodies. They’re about the same size, have the same buttons, and use the same GPS antenna.
The menu system is the same, but has a few new options related to new Ambit3 Peak features such as Bluetooth pairing. The font is slightly different.

Few physical changes were made between the Ambit2 (left) and Ambit3 Peak (right): same size, same buttons, same screen (but a different font).
The same USB charger is carried over. It works, but it’s a bit finicky compared to chargers for the Garmin Fenix 5 or the Suunto Spartan Sport Wrist HR Baro.
The most noticeable physical difference between the Ambit2 and Ambit3 Peak is the wrist strap. The Ambit3 Peak strap is softer and more pliable, which makes it more comfortable and more accommodating of various wrist sizes.

The wrist strap on the Ambit3 Peak is softer and more pliable. I did not mind the Ambit2 strap, but it was relatively rigid and plastic-y hard.
Under the hood, the Ambit3 Peak battery has been upgraded. The Ambit2 rates at 16, 24, and 100 hours at 1-, 5-, and 60-second GPS pings (described as “Best,” “Good”, and “Okay” in Movescount settings). During multiple ultra marathons up to 23 hours, I found these estimates to be accurate. Suunto estimates battery life for the Ambit3 Peak at 20, 30, and 200 hours.
Unlike the Ambit2, the Ambit3 Peak has a Bluetooth chip. By pairing it with my phone, I can now transfer activity data wirelessly (rather than needing to connect it with my computer using the USB cord), change sport mode settings using the Movescount app, and get notifications on my watch about incoming text messages, emails, and phone calls. I have found this latter functionality to be useful in deciding whether I need to reply/answer immediately or if it can wait.
Finally, when connected with the USB cord, data download speeds are noticeably faster on the Ambit3 Peak.
Smart Sensor Belt
The Ambit3 Peak cannot communicate with ANT accessories, including the Dual Comfort Belt (my long-term review). Instead, it communicates only with Bluetooth-enabled heart rate straps, power meters, and foot pods.
The Smart Sensor Belt can be packaged with the Ambit3 Peak or purchased as an accessory. I recommend the former, to save on long-term costs.
It shares the same black 30-mm wide elasticized belt with the Dual Comfort, but it has a different attachment mechanism and receiver. The two loose ends connect with a metal hook, rather clipping the ends into the receiver. The girth adjuster had been moved towards the side, rather than on the spine (as it was for me), so it can no longer be pressed into your back by a running pack or vest.
The receiver is smaller and not easily removed from the belt. Since it’s waterproof to 30m, I’m not concerned about hand-washing it daily during my post-run shower.
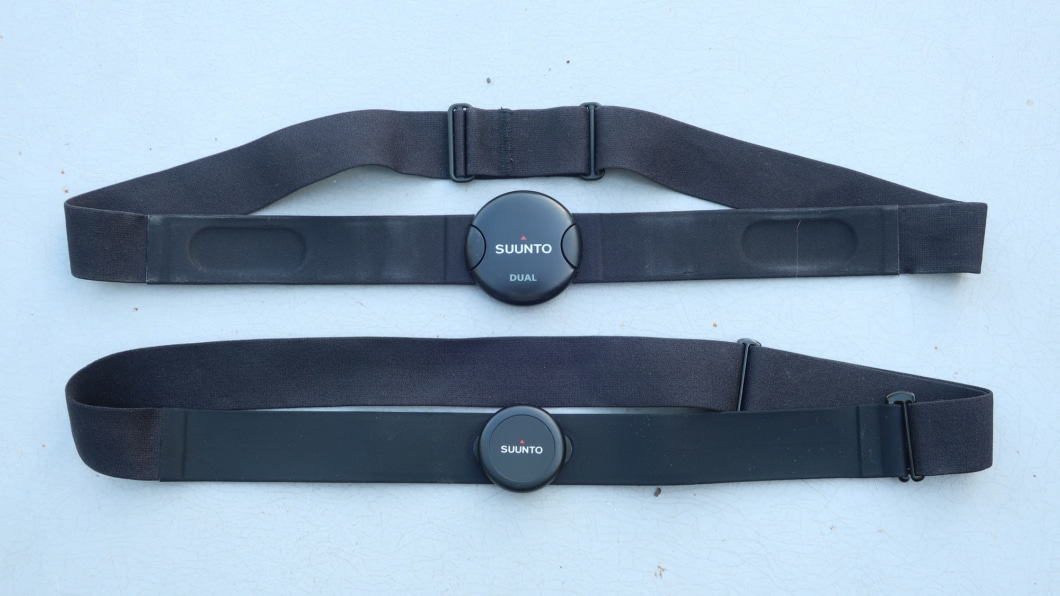
The Dual Comfort Belt (top) versus the new Smart Sensor Belt (bottom). Notice that the Smart Sensor has a smaller receiver, relocated girth adjuster (back right), and different closure system (front right).
Room for improvement
There is only one feature that I wish the Ambit3 Peak had: vibration alerts. When running in loud environments (imagine running down Broadway with CU buses pulling out of campus) or when wearing layers of clothing over the watch, it can be difficult to hear the beeps. A vibration alert would confirm operations, like Start/Stop or Lap.
A Wi-Fi chip would be a nice-to-have, but it’s not a must. I appreciated this feature with the Fenix 5X — my activity data uploaded as soon as I walked into the house, instead of only when I connected the watch to my computer (via USB) or phone (via Bluetooth).
Otherwise, I haven’t found missing must-have features or functionality:
Activity tracking and smart watch features: I don’t care.
Wrist-based HR: The technology is not there yet. For serious HR training, this feature is worthless; a chest belt is still required.
Color- and/or touch-screen: An additional expense with no meaningful value.
Topographic maps, such as with the Garmin Fenix 5X: I much prefer paper maps or the larger screen on my smartphone (which has a great mapping app, GaiaGPS).
I suppose the Ambit3 Peak could be prettier and less utilitarian, but I have yet to see a GPS sport watch (including the Garmin Fenix 5 series) that looks good enough to replace a dress watch or an everyday watch in professional work environment.

The Bluetooth-enabled Smart Sensor, which can be purchased with the Ambit3 Peak for a small charge. It’s a must for serious HR training. And, yes, that’s nipple tape — when you’re running 15 hours a week, it also is a must.
Questions about the Ambit3 Peak, or how it compares to other GPS watches? Leave a comment.
Own the Ambit3 Peak? What’s been your experience.
Disclosure. This website is supported mostly through affiliate marketing, whereby for referral traffic I receive a small commission from select vendors, at no cost to the reader. This post contains affiliate links. Thanks for your support.
I purchased my Ambit3 Peak with personal funds at a discounted priced that Suunto offers to members of the outdoor industry.
The post Long-term review: Suunto Ambit3 Peak || Unmatched performance for the price appeared first on Andrew Skurka.
February 12, 2018
Review: Aspire Residences at The Stanley Hotel || Modern rooms & facility with easy access to historic charm


A powder day at Hidden Valley, an old ski area in Rocky Mountain National Park that closed in 1994 but that is still open to backcountry skiing.
Most winters Amanda and I make a weekend getaway to Estes Park, Colo., the eastern gateway town to Rocky Mountain National Park. It’s only an hour away and doesn’t require driving on congestion-prone I-70. Room rates are cheap, especially Sunday through Thursday, because it’s the slow season. And it offers quick access to big mountain terrain and backcountry skiing, neither of which we have in Boulder.
On Superbowl Sunday the rates were especially good at The Stanley Hotel, a prominent landmark in Estes perhaps best known as the inspiration for The Overlook Hotel in Stephen King’s The Shining. It was just $89 on Groupon before taxes, so we jumped on it. We’ve stayed at The Stanley a handful of times, and on a blustery night in February 2012 we got engaged on the front steps.

The historic Stanley. Amanda and I got engaged here on a cold and windy night in February 2012.
I didn’t read the fine print on the Groupon deal, and learned when we arrived that our reservation was actually for the Aspire Residences, not The Stanley proper. The woman at the front desk tried to offset our visible disappointment: “It’s a nice facility, built in 2016. It lacks the historic charm but I think you’ll like it.”
She was spot on, and Amanda and I both agreed that we prefer the Aspire to the main lodge. The main floor has a casual lobby with multiple seating areas, plus a well equipped fitness area. Our suite room was small but comfortable, featuring a dreamy feather-top mattress, thick feather comforter, Nespresso machine, new television, and a snazzy bathroom with a deep soaking tub and modern shower.


The Aspire felt more like a run-of-the-mill Hilton or Marriot than The Stanley. But I can’t say that we missed the historic “charm” — the creaky floors, thin walls and doors, never-hot-enough water, slooooowwww elevator, and drafty single-pane windows that rattle in the wind (and it’s always windy in Estes in the winter).

The original Otis elevator in The Stanley, installed in 1909. It’s about as fast as you would think a 100+ year-old elevator would be.
Plus, Amanda and I still got our historic fix: After a late-afternoon hike near Fern Lake, we watched the Superbowl and had dinner in the main hotel at the Whiskey Bar, which makes a killer cheeseburger and has yummy drinks and beers on draught.
Disclosure: We paid for our room with personal funds and have never been in communication with managers of The Stanley.
The post Review: Aspire Residences at The Stanley Hotel || Modern rooms & facility with easy access to historic charm appeared first on Andrew Skurka.


