
Andrew Skurka's Blog, page 35
September 4, 2018
Trip Report: Scouting the Yosemite High Route


Mt. Lyell, the highest peak in Yosemite. Russell Pass, a hard Class 2 over the Cathedral Range, is the low spot on the far-right ridge, to the right of the small tower.
Last month I had two goals for a 9-day backpacking trip in Yosemite National Park. First, to simply enjoy what is likely to be my only solo trip in 2018. This year I will spend about 55 nights out, but the bulk of them will be on guided and private group trips that come with responsibilities and compromises that solo trips do not.
And, second, to scout the Yosemite High Route. I went in open-minded, uncertain if it would even be merited by the topography and terrain. But I suspected that it was, and hoped that I would finish with a sense for exactly where it should go (and not go), and how it could be best completed as a thru-hike and in sections.

Upper Spiller Canyon, as seen from below Twin Peaks Pass, which probably won’t be part of the recommended route unless you adore loose scree.
I hiked through Yosemite in 2006 and 2007 on the Pacific Crest Trail, in 2008 on the Sierra High Route, and in 2011 on the John Muir Trail. But I didn’t appreciate Yosemite’s true grandeur or size — or realize the potential for a standalone high route — until 2012, when I led three week-long trips into areas I’d never been, like the Clark Range and the upper canyons of the Tuolumne River.

A bee on Sierra butterweed above Grace Meadow in Falls Creek.
The process
Development of a high route takes time. It starts with research: in this case, pouring over topographic maps and Landsat imagery in CalTopo, filling in details with the help of Secor and High Sierra Topix, and consulting rangers and other avid Yosemite backcountry users. Personal familiarity with the area made this step much more efficient — I already knew where to start looking.
Then, the fun part: weeks or months (depending on your pace and the route length) in the field, hiking a preliminary route and alternates (some of which will prove superior and become the recommended route), forwards and backwards, in different seasons (and, eventually, in different years), with other people of different abilities, and at least once in its entirety.

Chips of obsidian found below Tower Peak, a reminder that every single segment of an eventual Yosemite High Route has been traveled on before, by Miwok indians, sheep herders, park rangers, and backcountry enthusiasts.
Finally, there is the guidebook, which is a project of its own. I expect that a complete first edition — with preparatory information, a route description, datasheets and maps for a thru-hike and section-hikes, and a rudimentary GPX file — will require 100+ hours to produce. (It’ll be a good winter 2018-19 project.) As more user feedback comes in, a revised second edition becomes necessary.
Overall, it’s a lot of work, and time-wise it’d be more financially fruitful for me to focus on other projects, like guiding trips or writing product reviews. But I love every step of the process, and would do it full time if I could.

Upper Matterhorn Canyon, on the link-up between Burro Pass and Matterhorn Pass
Overview: Yosemite High Route
Where the boundary of Yosemite National Park overlaps with the Sierra Crest, from Dorothy Lake Pass in the north to Rodgers Peak in the south, there exists a world-class high route around the upper headwaters of the Tuolumne and Merced Rivers that stays entirely within the park.

Fireweed in upper Stubblefield Canyon
South of Rodgers Peak, the park boundary straddles the divide between the upper Merced and the North Fork of the San Joaquin, two major west-bound rivers. This topography remains conducive to a high route to Triple Divide Peak, beyond which the watershed divide and boundary fade into less interesting foothills.

Alpenglow, with Foerster Peak prominent across Harriet Lake
Thankfully, here the seldom visited Clark Range t-bones the boundary, providing worthy terrain for another ten miles.

Obelisk Lake is perched in a hanging valley below Mt. Clark, two miles and 2,500 vertical feet away from the closest trail and guarded by sheer granite walls, extensive talus, and manzanita thickets.
North and west of Dorothy Lake Pass, the park boundary roughly follows the watershed divide between the Tuolumne and Clavey Rivers, the latter of which drains Emigrant Wilderness. I spent one day in this area and found it to be wild and pretty, but not sufficiently dramatic. Perhaps it will be offered as an Extra Credit segment.

Otter Lake, looking north towards Tower Peak. This area was pretty and wild, but not on par with the remainder of the route.
So “the good stuff” (understatement) on the Yosemite High Route runs for about 95 miles and lies between:
Grace Meadow, in upper Falls Creek, a few miles downstream of where the Pacific Crest Trail exits the northern park boundary at Dorothy Lake Pass; and,
Quartzite Peak, at the north tip of the Clark Range, which presents a commanding view of the Cathedral Range across the Merced and downstream into Yosemite Valley.

A rarely seen sight: the headwaters of the Lyell Fork of the Merced, as seen from Foerster Ridge Pass.
The route is majestic, remote, and largely off-trail, but still technically practical for a backpacker. It shares just one pass with the Sierra High Route and utilizes the Pacific Crest Trail/John Muir Trail for only a half-mile. The wilderness experience matches and sometimes exceeds that of other established high routes like Roper’s, the Kings Canyon High Basin Route, Wind River High Route, Glacier Divide Route, and Pfiffner Traverse.

Alpenglow on Mt. Conness, a prominent peak on the Sierra Crest north of Tuolumne Meadows, with a perfectly split boulder.
Tioga Road (CA-120), the east-west tourist highway that traverses the park, splits the Yosemite High Route in half. At Tuolumne Meadows, a broad plain at 8,500 feet through which the Lyell Fork of the Tuolumne River meanders, there is a wilderness permit station, post office, store and grill, and multiple trailheads.

A typical camp: cowboy camping (no shelter), tucked in among trees for wind protection and thermal cover. I carried a mid tarp and didn’t set it up once.
The dilemma that I am currently pondering is where to start and end the route. Logistically, Tuolumne is the best option. From there, the route can be undertaken as a North Loop or South Loop, or in its entirety in a figure-8. In this latter case, Tuolumne can serve as a mid-trip resupply.

By starting and finishing at Tuolumne Meadows, you can undertake the Yosemite High Route as a North Loop, South Loop, or Figure 8 with a resupply in the middle.
Qualitatively, Tuolumne is probably the rightful southern terminus, too. An excellent low-use route via Echo Creek can be followed for 15 miles to the base of the Clark Range, avoiding the dusty stock highways over Cathedral, Tuolumne, and Vogelsang Passes. The alternative is Yosemite Valley, but I’m reluctant for many reasons.

Echo Creek offers a quiet route between the Clark Range and Tuolumne Meadows, and is more consistent with a high route than the dusty horse highways over Cathedral and Tuolumne Passes.
The northern terminus is more up for debate. The two closest options are on Highway 108, Leavitt Meadow and Sonora Pass, at 17 miles and 21 miles. It’s a little bit further to Grace Meadows from Hetch Hetchy Reservoir, 23 miles, but it’d be an easier hitch or shuttle. Finally, from Tuolumne Meadows there are two possibilities, both 48 miles: the Pacific Crest Trail and the Grand Canyon of the Tuolumne.
I chose the Grand Canyon, because Tuolumne Meadows is the most logistically convenient option and because I — probably like most other prospective Yosemite High Route hikers — have already completed the PCT through the park. Even in late-August after a dry winter, the Grand Canyon is spectacular, with countless waterfalls, lovely riverside camps, and imposing granite walls.

Waterwheel Falls. The Grand Canyon of the Tuolumne has countless slides, drops, and pools, and more swimming holes than there are summer days.
The post Trip Report: Scouting the Yosemite High Route appeared first on Andrew Skurka.


September 1, 2018
Review: Osprey Exos/Eja backpack || Super comfy, needs hipbelt pockets


Testing grounds: Rocky Mountain National Park, with its reliable gale-force winds when atop the Continental Divide
For two weeks in June and July I wore the new Osprey Exos backpack while guiding overnight trips in Rocky Mountain National Park. To accommodate a guide-sized kit and a full-size bear canister (which I prefer to pack horizontally), I used the largest of the three-pack series:
Exos 38 ($180, 2 lbs 8 oz), for streamlined kits and overnights;
Exos 48 ($200, 2 lbs 9 oz), the Goldilocks of the family; and,
Exos 58 ($220, 2 lbs 10 oz), for beginners and bulkier loads.
The Exos line was entirely updated for 2018, the first time in four seasons. In addition, Osprey released new women-specific equivalents of the Exos: the Eja 38, Eja 48, and Eja 58. Because the Exos and Eja are identically featured, most of my comments about the Exos will apply equally to the Eja. The Eja differs only in fit, with a targeted body type that has narrower shoulders, shorter torso lengths, and more curve.
State of the market
The Exos/Eja fits squarely in today’s sweetspot for backpacks. At about $200 and 2.5 pounds, this class of packs will withstand years of use (or two thru-hikes), remain comfortable with loads up to 30 or 40 pounds, and offer limited but practical features like exterior pockets, a top lid, and utility attachments for an ice axe, foam sleeping pad, or snowshoes.
In addition to the Exos/Eja, this space is also occupied by the:
Granite Gear Crown VC 60 ($200, 2 lbs 2 oz);
Gregory Optic 48 and 58 ($190 and $210, 2 lbs 8 oz) and women-specific Octal;
REI Co-op Flash 45 ($150, 2 lbs 12 oz);
Sierra Designs Flex Capacitor 40-60 ($200, 2 lbs 9 oz), which I helped to develop; and,
ULA Circuit ($235, 2 lbs 9 oz).
If you are about to purchase a 3-season backpack that is more expensive or that weighs more than these packs, I think you need an exceptional reason, e.g. it’s for a 6-month thru-hike, Utah slot canyons, or big game hunting.
Review: Osprey Exos/Eja
The Exos/Eja is awesomely comfortable, priced well, widely available, and backed with an excellent guarantee. Its suspension is unique, excelling at lower weights but floundering when pushed to its recommended max. And it lacks hipbelt pockets (and a shoulder strap pocket, like the previous generation had), which is really annoying but which can be rectified with aftermarket accessories.
Key specs
2 lbs 8 oz to 2 lbs 10 oz (1134 grams to 1190 grams)
$180 to $220 USD
Recommended weight range: 15 to 30 pounds, or 20 to 40 pounds
Pliable Lightwire alloy peripheral frame
100d nylon for main body, 210d nylon for bottom, stretch mesh + 100d for rear and side pockets
Two side pockets, one rear pocket, one top lid pocket
Trampoline-style Airspeed mesh back panel
The highlight: Comfort
The Exos is supremely comfortable. In fact, it’s probably the most comfortable backpack that I’ve ever used. It achieves this by:
Distributing weight evenly and widely across the hip belt, shoulder straps, and trampoline-style back panel to eliminate completely any hot spots or pressure points; and,
Using soft, cushioned, stretchy, spongy, and breathable materials for all body/pack contact zones.
I was aware of Osprey’s reputation for comfort and fit, and now understand why they excel in stores. It felt like the Exos simply molded to my body. During side-by-side comparisons in the field against the Flex Capacitor, ULA Ohm, HMG Southwest, and Hancor Marl, the Exos stood apart for its wearability.

Every body/pack contact zone is soft, cushioned, breathable, and stretchy, making for a supremely comfortable fit.

The hipbelt is permanently attached, and is patterned perfectly for model-shaped backpackers.

The Airspeed back panel is highly breathable and conforms to your back.
Pros and cons: Load carrying
The harness and frame is identical on the Exos/Eja 38, 48, and 58. Osprey puts the load carrying comfort range of the 38-volume edition at 15 to 30 pounds, which seems appropriate to me, and at 20 to 40 pounds for the 48- and 58-liter models, which seems generous.
I pushed the Exos 58 to the upper end of its recommended range, leaving the trailhead twice with nearly 40 pounds.
The Exos was not uncomfortable with these loads. Rather, it struggled to keep the load stable, even after attempts to better compress it (using the side compression straps) and to reorganize the weight distribution (with more weight towards the bottom).
I believe there are two causes for this load instability:
1. Harness system materials. The soft, cushioned, and stretchy meshes and foams used throughout the harness system are damn comfortable, but they lack rigidity and stiffness. The Exos rides like a Buick, but truer load-haulers will have sports car-like suspension systems.
2. Flexible alloy frame. The 4-mm Lightwire alloy peripheral frame supports the Airspeed mesh back panel and helps to transfer some weight from the shoulders to the hips. Lightwire is shockingly flexible — the frame can be twisted and bent with gentle pressure, and will spring back to its original shape when that pressure is relieved.
When hiking down the trail, the flexibility in the Lightwire gives the sensation of a “floating” pack — in comparison to packs with more rigid frames, the Exos is a less jarring ride. However, heavier loads overwhelm the frame. It’s akin to carrying a restless toddler or a 35-pound bobblehead — Lightwire cannot control the load’s independent momentum that is generated while hiking or scrambling.

The Lightwire alloy frame is remarkably pliable. It absorbs shock better than stiff packs, but it’s overwhelmed by heavier loads, akin to carrying a restless toddler or a 40-lb bobblehead.
Omission: Hipbelt and shoulder strap pockets
As soon as possible, Osprey needs to add back hipbelt pockets (at a minimum) and shoulder strap pockets (ideally) to the Exos/Eja. I’m mystified why these wonderfully convenient features were not included, especially since the previous generation Exos had them. (They were small, but better than nothing.) Frankly, for me this would be a deal-breaking omission when comparing the Exos/Eja to other lightweight packs.
Hipbelt pockets are ideal for small oft-needed items like a camera or phone, sunscreen, lip balm, headnet, Aquamira, and some calories. Without hipbelt pockets, these items must be carried in clothing pockets, in side pockets (in which they can be hard to find and which I’d rather use for water bottles), or in the top lid (which can be accessed only by taking off the pack). Shoulder strap pockets are well suited for a 20-oz water bottle, reading glasses, or bear spray.
I suspect that the decision to remove the hipbelt and shoulder strap pockets was driven by weight and/or cost considerations, or the believe that the excellent side pockets were enough. But it was the wrong one: if I wanted to use the Exos long-term, I’d plan to spend $40 on accessory pockets from Gossamer Gear, MLD, or ZPacks. Unfortunately, these pockets won’t work as well as native pockets because they are not designed specifically for the Exos/Eja.

The previous generation Exos had hipbelt pockets and shoulder strap pockets. The new generation does not. Also note: to prevent your water bottle from sticking out annoyingly as in the photo, insert it cap-first, and then rotate the bottom of the bottle into the pocket.
Side pockets
The side pockets on the Exos/Ea are excellent. They are tall enough to support tent poles or an 80-oz PlatyBottle, but they can be easily accessed while on-the-move by using the secondary side opening.
Most side pockets with only a conventional top opening fail to achieve this happy-medium. Either they are too tall, making them secure but difficult to access, or they are too short, making them easy to access but insecure and limited in usability.
Note: If using a 1-liter smartwater bottle, I suggest inserting it cap-first through the side-entry, and then rotating the bottle so that it falls into the pocket. If inserted bottom-first, it annoying pokes diagonally out of the pocket, and the cap cannot clear the side-entry opening.

The side pockets are excellent: tall enough to hold everything secure (in this case, poles for a 3-person tent, and a 1L smartwater bottle), but accessible via the side entry.
Top lid
Most lightweight packs have a roll-top closure, which is lighter and simpler (and therefore less expensive and easier to sew). The Exos retains a more conventional top lid, which it outfits with a generous pocket in which I stored small odds-and-ends like toiletries, my headlamp, sunglasses case, and water purification.
The top lid is removable, which reduces the weight of the Exos by 4.5 oz. When the top lid is removed, the Exos has a non-removable secondary flap to cover the main compartment. It seems like Osprey could remove some weight and cost from the Exos by eliminating this redundancy, but I appreciated the versatility.

The top lid can be removed, to eliminate some volume and weight. A secondary flap takes its place.
Rear pocket
The rear shove-it pocket is a good size, with enough volume for rain gear, a wet rain fly, or a mid-layer. But the pocket does not constitute a major share of the pack’s overall volume. The Exos 58 felt like a true 58-liter pack, not a 30-liter pack with an exceptionally large rear pocket or tall extension collar.
Bear canisters
My Bearvault BV500 bear canister fit horizontally (with a little bit of room to spare) in the Exos 58. YMMV with the Exos 38 and 48. I think a BV450 will fit horizontally; the BV500 seems like a stretch. Maybe other users can chime in with their experience.
Horizontal orientation of canisters is preferred to vertical, because canisters are difficult to pack around — it’s best if they fill entirely one “row” inside the pack, with other items stacked tightly under and atop the canister.
Compression system
The Exos/Eja has a unique compression system, consisting of very thin webbing that runs in a zig-zag pattern down both sides of the pack. It offers more adjustment options than the more customary webbing strap or two: each segment can be tightened independently, and it can be routed over or under the side pocket.
Functionally, however, I thought this system was only so-so. First, I was reluctant to pull hard on such dainty webbing and O-rings, for just cause or not. Second, I never found that I needed all of that adjustment — a horizontal strap with a ladder lock or side-release buckle would do, thanks. Finally, I wished that the top end was detachable, so that items could quickly be strapped to the side of the pack, rather than needing to be threaded between the compression webbing and the pack.

The zig-zag side compression system is highly adjustable — each segment can be independently tightened, and it can be routed over and behind the side pocket. But I didn’t utilize it fully, and would have preferred a traditional horizontal strap with one detachable end.
Overall
I would highly recommend the Exos/Eja with caveats. If you don’t overload it and if you won’t miss hipbelt pockets (or are willing to attach aftermarket models), you’ll love the Exos/Eja for its comfort, while being satisfied with its weight, durability, price, and guarantee. You’ll also appreciate that it’s available at your local REI or (probably) outdoor retailer, allowing you to try it on and to size it properly before you buy it.
Questions about the Exos/Eja? Have an experience you’d like to share? Leave a comment.
Disclosure. This website is supported mostly through affiliate marketing, whereby for referral traffic I receive a small commission from select vendors, at no cost to the reader. This post contains affiliate links. Thanks for your support.
The post Review: Osprey Exos/Eja backpack || Super comfy, needs hipbelt pockets appeared first on Andrew Skurka.
August 31, 2018
Review: Hanchor Marl backpack || Novel brand, clean look, core features


The Hanchor Marl is best suited for small but dense 3-season loads. It has 50 liters of total volume, twin aluminum stays, a practical feature set, and a clean look. It retails for $260 and weighs 37 oz.
For nearly two full seasons a new Hanchor Marl backpack sat in my garage, waiting for the right opportunity to be taken out. It should not have taken so long, but it did — I was preoccupied with designing the Flex Capacitor, and I need more than 50 liters of capacity when guiding trips.
Last month it finally got called up, for an off-trail 9-day/8-night route in Yosemite National Park. It was the perfect pick, and I will definitely use it again on similar outings.
Review: Hanchor Marl
The Marl is ideal for small but dense 3-season kits. If the weight of your consumables often weighs as much or more than your streamlined setup (e.g. a thru-hiker crossing a desert or going a week between resupplies), the Marl is worth a look.
In my case, I left the trailhead for my first loop with 30 pounds: a 15-pound base weight, 2-pound bear canister, 5.5 days of food, and 2 pounds of water. (My pack weighed just 22 pounds when I left for the second loop, which was shorter.) This load did not push the Marl to its max, in terms of volume or comfort.
Its main compartment has 42 liters of capacity (plus ~10 liters of external storage), and the load is well carried with twin aluminum vertical stays and a modest harness system. The shoulder straps, hip belt, and back panel are cushioned and supportive, yet firm and not overbuilt.
The Marl sits close to the body, has a tall-and-narrow main compartment, is made mostly of premium durable fabrics, offers minimal but practical external storage (rear pocket, two side pockets, two hipbelt pockets), and has a clean overall aesthetic.
Among other packs that I have used, the Marl reminds me most of the Hyperlite Mountain Gear Southwest 3400. Of the two, I’d prefer the Marl. It has more generous hipbelt pockets (at least relative to HMG’s older design) and a taller rear pocket. It costs less, has a slightly better and more comfortable suspension and harness (e.g. load-lifter straps, more ventilated back panel), and is more novel.

The Marl has twin aluminum stays that anchor directly into the hipbelt for efficient load transfer. Padded mesh columns on the back panel cushion these stays and provide some ventilation.
About Hanchor
Hanchor is a Taiwan-based cottage gear company that specializes in packs — daypacks, climbing packs, messenger bags, chalk bags, and two hiking packs. It ships internationally for a flat fee of about $20 USD; import taxes and fees may apply.
Key specs
NT$7990 ($260 USD), not including shipping ($20 flat international) or import fees
2 lbs 5 oz (1053g) for Regular torso and Small hipbelt
Fabrics: X-Pack VX21 for main body and side pockets, VX42 for bottom panel
Five external pockets: rear, two side, two hipbelt
Roll-top closure
Available in 16 sizes: four torso lengths and four hipbelts

The main compartment of the Marl fits a BV450 nicely, with a little bit of room to spare. I was able to slide a folded-up tarp next to it.
Durability
With the exception of its rear pocket, the Marl is bomber. It’s masterfully constructed, with impeccable stitching, binded seams, and reinforced joints and wear-prone areas.
The main body and side pockets are made of X-Pack VX21; the bottom, heavier-duty VX42. Dave, whose opinions on backpack fabrics I trust most, would be happy with these choices; in my short-term use, these fabrics seemed unphased by regular scrapes with sharp-edged Yosemite granite. This pack does not need to be babied.
When Hanchor sent me the Marl, its side pockets and rear pocket were both made of large-pored mesh. Now, only the rear pocket is. I wish it were not — several inconsequential holes developed where it was snagged by brush or rock.

With the exception of the rear pocket, the Marl is made of premium durable fabrics. The rear pocket should be, too: it did not withstand run-ins with sharp Yosemite granite.
Load carrying
The Marl has twin vertical stays that anchor directly into the hipbelt for efficient load transfer. They are removable (not easily) and made of aluminum. A third horizontal stay near the top prevents barrelling.
The hipbelt and shoulder straps are sturdy, modestly cushioned, and covered in mesh. They look similar to those from ULA. The back panel has two strips of padded mesh that cushion the body against the stays and that provide some ventilation (i.e. better than HMG, worse than Osprey).
The stays stop at the crest of the shoulder straps, which is probably appropriate on the Marl. This height gives function to the load-lifter straps, and supports weight that is placed slightly above the shoulder strap anchor points (which are a few inches below the crest). Taller stays would more effectively carry heavier loads, but probably be overkill for a 50-liter pack.

The Marl has twin aluminum stays (that are removable, but not easily) and one lateral stay near the top to prevent barreling.
Feature set
The features that I would describe as critical are all included on the Marl: two hipbelt pockets, two side pockets, a rear pocket (which is “critical” with roll-top designs), compression straps, and some additional utility infrastructure (notably, two linear daisy chains that could be used to secure an axe or snowshoes).
The Marl has some thoughtful features, too. For example, the loose end of the top lid strap is connected to the pack, so it does not flutter in the wind. And the bottom seam is bound externally with webbing, which gives it a flatter bottom and makes it more easy to stand up (like a PlatyBottle).

The Marl has several nice touches that don’t add significant weight, indicating to me a real attention to detail. By attaching the top strap to itself, it does not flutter in the wind or swing sloppily.
Room for improvement
Overall, I really liked the Marl, and would most definitely use it again on this trip and others like it. It could be even better with a few modifications, however:
Reverse the orientation of the hipbelt zippers, so that the bottom stop is on the vertical portion of the opening. In the current configuration, small objects (e.g. pen, lip balm dispenser) can slip out of the pocket if it’s not fully closed.

The hipbelt pockets are perfectly sized (they store what they need to while remaining low-profile), but the zipper orientation should be reversed so that small things don’t fall out if the pocket is not completely closed.
Substitute the rear pocket fabric for VX21, which will be dramatically more durable. I’d happily pay another $10-20 at retail for this.
The side compression straps should have side-release buckles, not ladder-locks, so that objects can be more easily attached to the side of the pack, instead of needing to be slid down between the webbing and pack. This would also create better infrastructure for a horizontal compression strap across the entire pack, if one was needed (e.g. for snowshoes).
When Hanchor changed the side pocket fabric from large-pored mesh to VX21, it also appears to have redesigned the pocket, too, and I’m hoping that my issues were addressed. My side pockets need cupped bottoms, so that bottles sit flush. They also need greater tension/elasticity along the upper seam, to keep items in place and to prevent them from slipping out.
Questions about the Hanchor Marl, or have an experience with it? Leave a comment.
Disclosure. This website is supported mostly through affiliate marketing, whereby for referral traffic I receive a small commission from select vendors, at no cost to the reader. This post contains affiliate links. Thanks for your support.
The post Review: Hanchor Marl backpack || Novel brand, clean look, core features appeared first on Andrew Skurka.
August 15, 2018
Tutorial || Wildfire & smoke management: Strategies & resources


A dramatic sunset in Montana during a wildfire-caused road-walking detour.
For the past month I have been watching the Ferguson Fire, a 100,000-acre blaze on the western outskirts of Yosemite National Park, to assess and predict its effects on my planned backpacking trip there next week. I had to change my destination airport (to Reno instead of Fresno) and I’m expecting some smoke, but fortunately the fire has been brought under control.
Other backpackers this summer have been less lucky, and have been forced to endure thick smoke or to reschedule, relocate, or cancel their trips. Notable closures (both full and partial) have been ordered in San Juan National Forest, Philmont Scout Ranch, Yosemite National Park, Glacier National Park, and the Grand Canyon.
Wildfires and smoke are a fact of life (and probably increasing so) in the semi-arid West, which receives the bulk of its moisture in the winter and which gets dried out during the summer by scorching temperatures and relentless sunshine. In this tutorial, I’d like to share strategies and resources to better manage these factors and to increase your odds for unimpeded summertime fun.
Strategies
How can backpackers best manage the risk of wildfires and smoke?
1. Schedule purposefully
After a winter with normal precipitation, July seems to be the most reliable month for backpacking. The snowpack has just melted off, and peak summertime temperatures have not yet dried everything out. Unfortunately, July also coincides with peak mosquito season (view my recommended clothing system).
August and September are higher risk months. Hopefully, just before your trip an active monsoon pattern or an early-winter storm suppresses fire activity or blows out lingering smoke.
Scheduling challenges are greater after drier winters. July becomes in-play for fire activity. The conditions in August and September are almost inevitable. And June does not necessarily become the preferred month: lower elevations can be scorched by long days and high temperatures, and higher elevations may not yet be melted out.
2. Have a Plan B
If your planned trip becomes impractical (e.g. closure of the CDT through San Juan National Forest, thick smoke on the John Muir Trail), do you have a backup plan? Yes, you will need to plan two different trips (which means two permits, two map sets, and two travel plans), but that extra effort may prove worthwhile.
3. Have flexible reservations, or travel insurance
It can be difficult to cancel flights, car rentals, and motel rooms without being charged fees or losing your deposits. When booking travel, try to maintain flexibility (e.g. by flying Southwest Airlines or buying a fully refundable fare) so that you’re not financially committed to a plan. Or, buy travel insurance so that you can recoup losses later.

Smoke-obscured views in Glacier National Park
Resources
Where can you find current information about wildfires and smoke?
InciWeb
InciWeb is an interagency all-risk incident information management system, and is the best starting point for wildfire-related information. Landing pages are created for each incident (e.g. Ferguson Fire), and they’re updated regularly with new developments. Land managers may post fire-related information on their websites, too, but they use InciWeb as the definitive resource.

InciWeb is a multi-agency aggregator of wildfire-related information.
Wildfire Agencies
Most of the information on InciWeb is retrieved from the regional Wildfire Agencies, e.g. Rocky Mountain Area Coordination Center. In addition to incident information, these agencies are also responsible for issuing fire restrictions, fire potential outlooks, and other materials.
Wildland Fire Air Quality Response Program
WFAQRP is also an interagency platform, and focuses specifically on smoke. Forecast outlooks are issued in areas where wildfire smoke may be of concern.

Screenshot from WFAQRP for the Yosemite Area.
If a smoke outlook from WFAQRP for your area of interest is not available, you may be able to find information from other organizations. For example, the Colorado Department of Health & Environment has issued a smoke advisory for the Front Range today and tomorrow.
NASA Worldview
In this app, you can browse over 600 global satellite imagery layers, which are usually updated within three hours of observation. Given current technology, this is as close to knowing what Earth looks like at the moment. For our puposes, it’s useful for determining smoke coverage and trends.

Screenshot from NASA Worldview, showing smoke from the Ferguson (south) and Donnell (north) fires, plus lingering smoke in the Central Valley.
Webcams
This technology is laughably 1990’s, but it remains remarkably useful for on-the-ground observation. Rangers and online trip reports can be helpful, too, but webcams contain more real-time information. I don’t know of a consolidated list of webcams, so consult Google.

The views of Crater Lake are currently badly obscured by smoke, due to wildfires within and just outside the park.
NWS and CalTopo
In a recent backcountry weather forecasting tutorial, I wrote about my favorite tools from the National Weather Service, so I won’t repeat that information here.
But I wish to highlight one tool that received only cursory mention. CalTopo can retrieve NWS point forecasts (for temperatures, precip, and wind) as well as fire data, to create an insightful map for short-term behavior of wildfires and smoke.

Screenshot from CalTopo, which can retrieve weather- and fire-related information from other sources. The current wind forecast suggests that smoke from the Ferguson Fire will continue to impact the upper Merced watershed and Tuolumne Meadows.
Questions about managing wildfires and smoke? Did I omit a helpful resource? Leave a comment?
The post Tutorial || Wildfire & smoke management: Strategies & resources appeared first on Andrew Skurka.
August 12, 2018
Review: Hoka One One Clifton 5 || Iterative changes from 4th gen
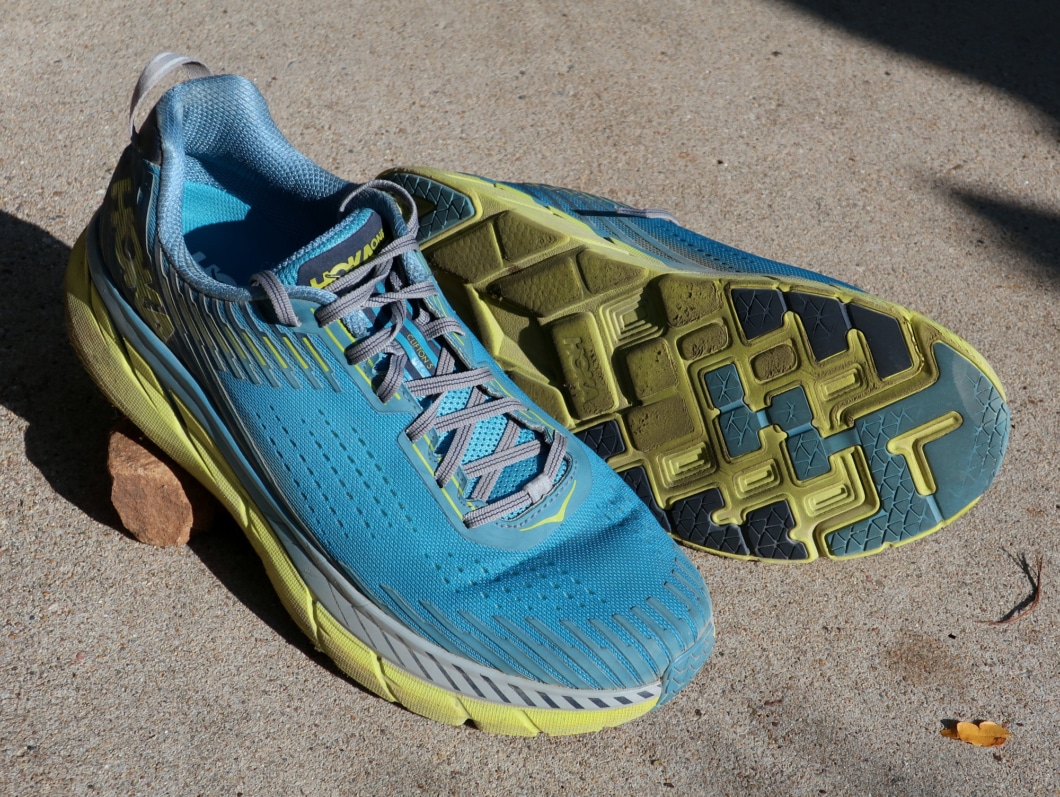
The Clifton 5 is a reliable trainer, most suitable for easy days and recovery runs.
The fifth-generation Hoka One One Clifton 5 arrived in retail stores a few months ago, and the fourth-generation Clifton 4 (my review) is being phased out (REI clearance here). It is available in two versions:
Clifton 5 ($130, 9.4 oz)
Clifton 5 Knit ($135, 9.2 oz)
I was sent the standard Clifton 5 for review. Both styles are available in wide sizing.
Review: Hoka One One Clifton 5
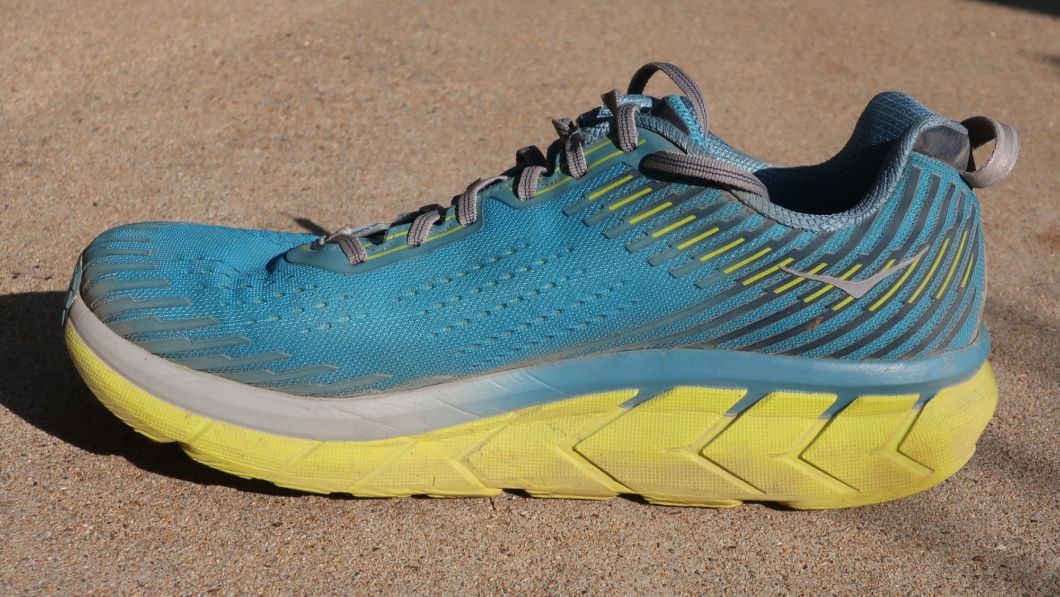
The standard Clifton 5 fits and performs nearly identically to its predecessor. It will best fit average-width and average-volume feet, with a comfort range that extends both bigger and smaller. It fits true to size. Its rockered outsole and ample midsole foam results in a smooth and cushioned ride, for both heel and mid-foot strikers.
Personally, the Clifton 5 (and the Clifton 4 before it) has been my go-to for easy runs and recovery days on paved surfaces and gravel roads. I’d recommend it as a reliable everyday trainer. When I want to run fast or run on trails, I reach for other shoes.
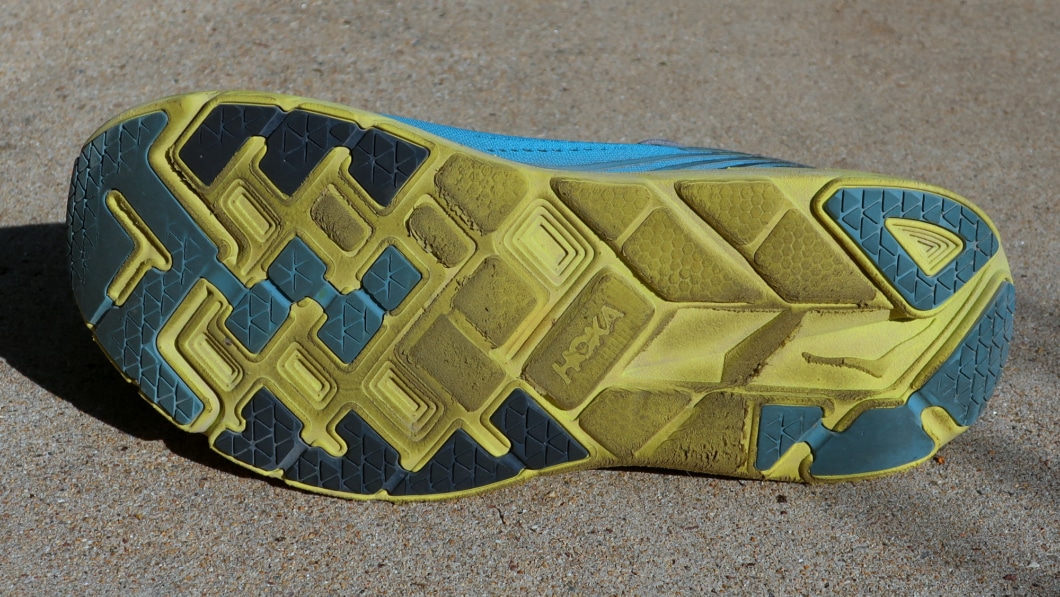
The outsole has rubber only in the most abrasion-prone areas. It’s unconventional, but it works.
Key product specs
Height: 29mm (heel) to 24 mm (forefoot)
Drop: 5 mm
Weight: 9.4 oz (M’s size 9); 7.6 oz (W’s size 7)
Midsole: EVA foam
Outsole: Low-profile rubber, only in high-abrasion areas
Upper: Breathable mesh with minimal exoskleton
MSRP: $130
More product specs
Clifton 5 vs. Clifton 4
If this were a review of two successive Altra shoes, I’d be writing about the Clifton 4.0 and the Clifton 4.5. The “Clifton 5” implies a generational change, but in reality only iterative changes were made. The Clifton 4 and Clifton 5 share the exact same:
Last shape,
Midsole thickness and density,
Outsole layout and rubber compound,
Weight (9.4 oz, an increase of just 0.1 oz over the 4), and
MSRP, at $130.
The most significant difference (and, overall, it’s pretty minor) is that the upper of the Clifton 5 has fewer overlays than the Clifton 4, to improve breathability and flexibility. I notice the difference, but it’s slight. Frankly, I thought the Clifton 4 upper was already pretty good in both respects.
Nearly everything that that I included in my Clifton 4 review will apply to the Clifton 5, too.
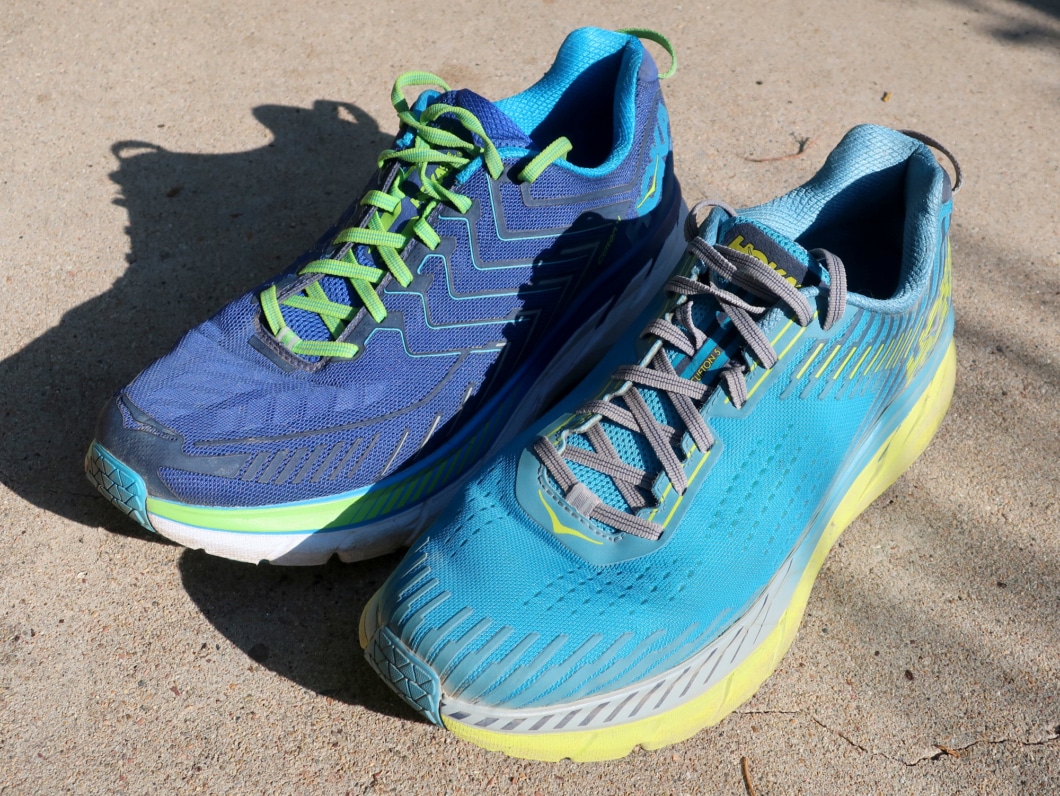
The most significant difference between the Clifton 4 and Clifton 5 is the upper, but overall it is still very subtle: the 5 has less overlays, making the upper more flexible and breathable.

Clifton 5 (left) versus Clifton 4 (right). If you’re not seeing any differences, you’d be correct.
A reliable everyday trainer
In its marketing literature, Hoka describes the Clifton 5 as being “light, cushy and very, very fast.” Historically, the Clifton was both light and cushy (e.g. my Clifton 2 review). (I’m not sure it was ever fast — the marshmellow-y midsole slowed turnover speed and absorbed toe-off power.) But the Clifton 5 is really none of these things:
9.4 oz is middle-of-the-pack.
It’s nicely cushioned, but not “cushy” (it’s less plush than that) and certainly not marshmellow-y.
And, sorry, a 9.4-oz shoe with a semi-soft 28-mm heel stack is just not going to be fast.
For a truly “light, cushy, and very, very fast,” shoe, consider the Hoka One One Cavu (my review) or its smoother and better fitting sibling, the Hoka One One Mach ($140, 8.2 oz). I have worn through a pair of each, and found them both well suited for road workouts and long runs, when I wanted a light and fast shoe but didn’t want to hammer my legs with minimalist racing flats.
I have found that the Clifton 5 is best suited for easy outings and recovery runs, i.e. it’s just a modest everyday trainer. I put 430 miles on the Clifton 4 (which have life left still), and so far 250 miles on the Clifton 5. Some of these distances were in the form of 20-mile long runs or inconsequential faster reps (e.g. a handful of striders at the end of a run or while warming up for a track session), but most of the miles were very average. That may not sound inspiring, but these types of miles constitute the bulk of most training systems, and the Clifton 5 is perfect for them.

The upper is soft and breathable
Have questions about the Clifton 5? Leave a comment.
Disclosure. This website is supported mostly through affiliate marketing, whereby for referral traffic I receive a small commission from select vendors, at no cost to the reader. This post contains affiliate links. Thanks for your support.
The post Review: Hoka One One Clifton 5 || Iterative changes from 4th gen appeared first on Andrew Skurka.
August 8, 2018
Preview: Salomon Odyssey Triple Crown || Altra Lone Peak alternative
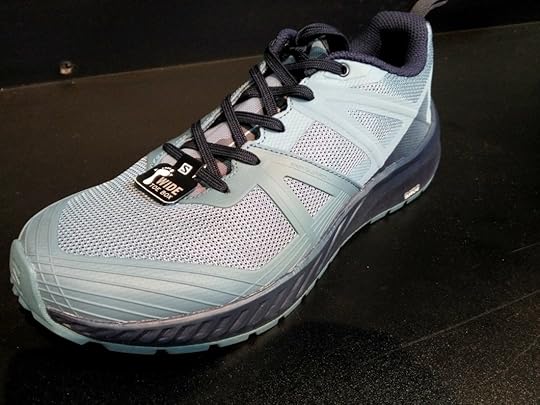
The Odyssey Triple Crown is the successor to the Odyssey Pro, with which it has more similarities than differences.
The Salomon Odyssey Pro (my review) is somewhat unique: instead of being a trail running shoe that has been adopted by hikers, it’s a hiking shoe that has the comfort, breathability, and weight of a trail runner.
In spring 2019 Salomon will release the second generation Odyssey, the Odyssey Triple Crown. The target market is not subtle: thru-hikers (and other backpackers with a similar focus and style) who prefer most things about a trail running shoe, but who would benefit from hiking-specific touches like additional heel cup stability, tougher materials and construction, and a more wear-resistant outsole.
Salomon denied that the Odyssey is its answer to the Altra Lone Peak (my preview of the 4.0), which is the most popular shoe on the Appalachian and Pacific Crest Trails. The Odyssey Pro apparently did “really well” at retail, but I’m uncertain that it’s getting Lone Peak-level attention within the hiking community. At least on paper, I think it should.
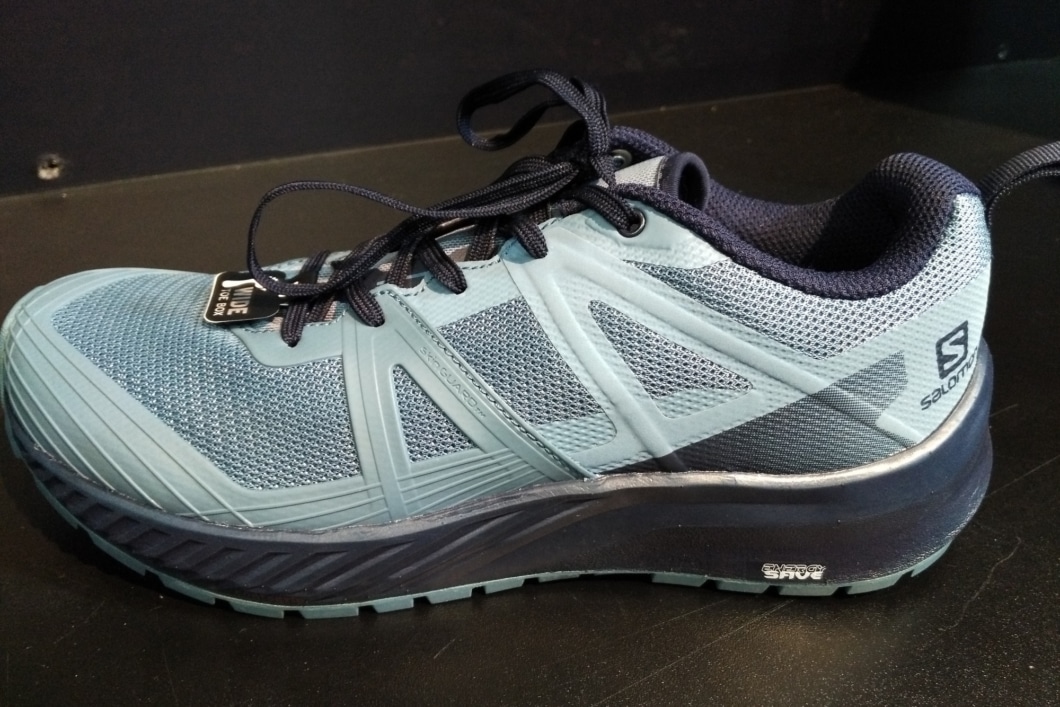
Odyssey Triple Crown vs Odyssey Pro
The Odyssey Triple Crown could have been named the Odyssey Pro 2.0. It’s not an entirely new model, and it will replace the Pro. I didn’t ask about the reasoning behind the name change, but it makes sense: “Pro” may resonate with trail runners, but “Triple Crown” speaks much more to hikers.
Overall, the two generations are more similar than different. MSRP is still $140. The upper is still a mix of breathable mesh and TPU overlays. The outsole is still made of Contragrip and it retains the same pattern. And, of course, the intended application is the same.
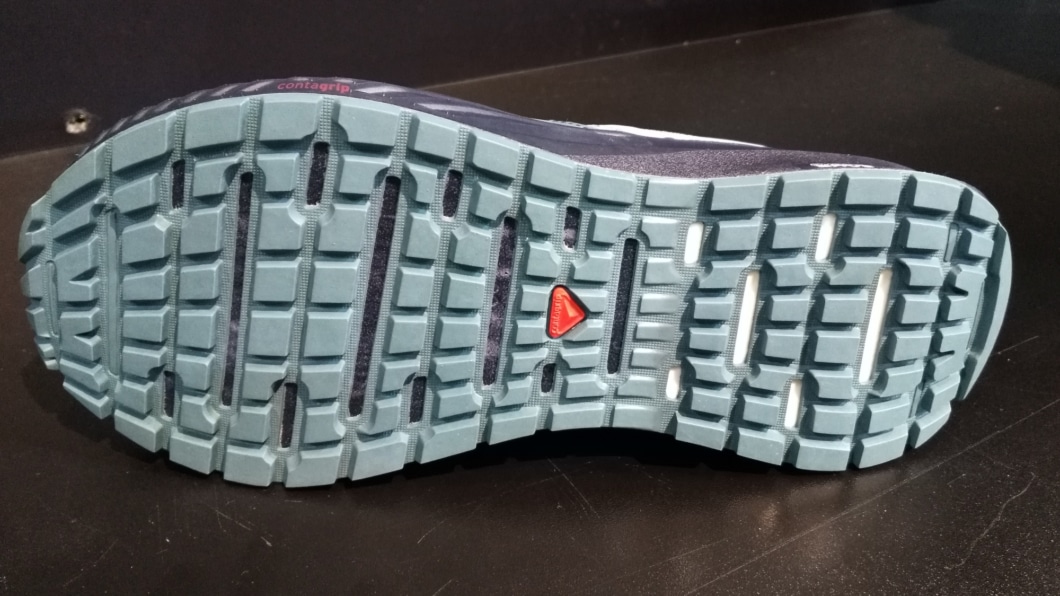
The outsole is made of Contragrip and consists of much more rubber (read: longer lifespan) than a conventional trail running shoe.
But Salomon did make tweaks. It replaced the Vibe EVA midsole with a PU insert, which is lighter and should provide longer-lasting cushion. This switch changed the stack height — it’s now 28mm at the heel and 18mm at the toe (versus 31 and 21 in the Pro), with a 10mm drop.
I thought the Pro had a wide toebox, but the Triple Crown has “a bit more space,” according to press materials.
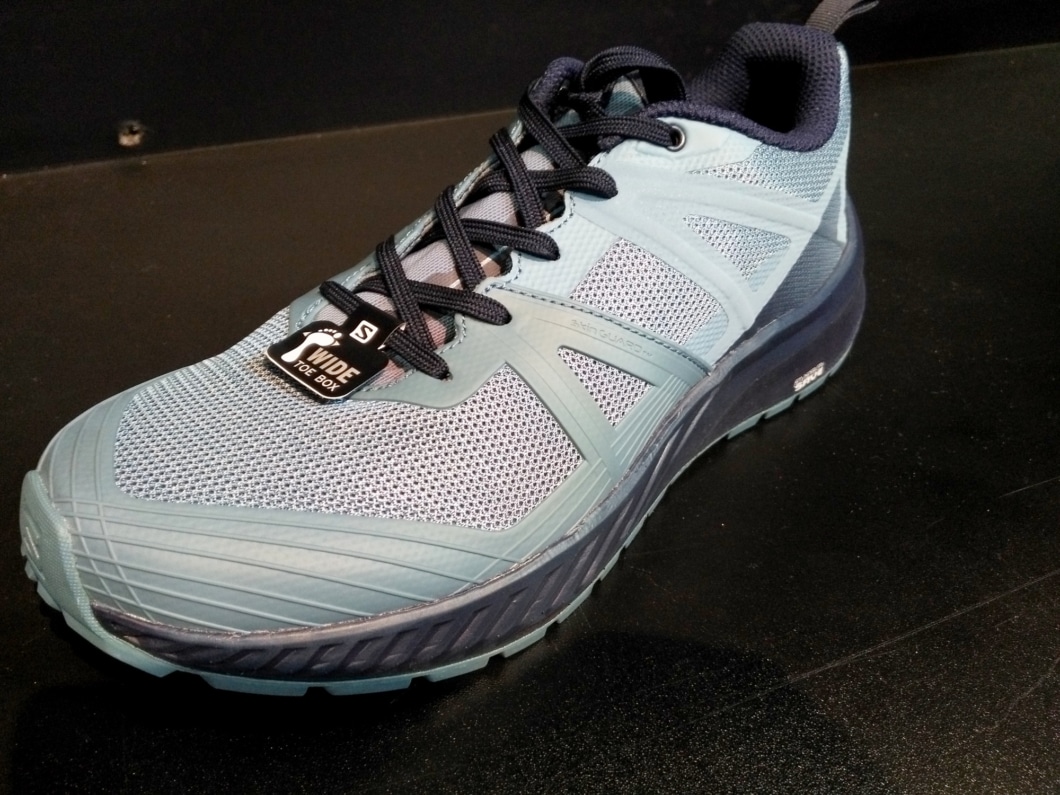
I thought the toebox of the Pro was roomy, but press materials indicate that the Triple Crown will be even more generous.
Finally, the toe guard and TPU overlays have been beefed up, for improved toe protection and durability.
These changes caused a small weight increase, to 11.6 oz (325 g) for men’s size 9, an increase of just 0.5 oz from the Pro.
The Salomon Triple Crown will be available on February 1, 2019.

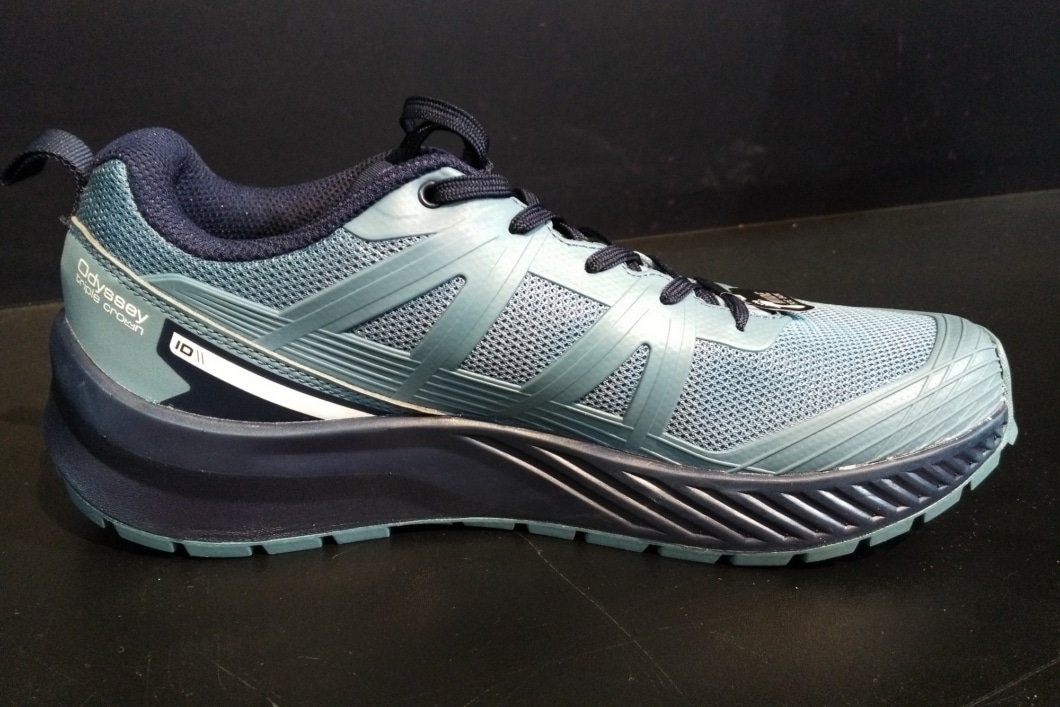
The other colorway, for those wanting to attract attention (or be easily found) on the long trails.
Questions about the Odyssey Triple Crown? Leave a comment.
Disclosure. This website is supported mostly through affiliate marketing, whereby for referral traffic I receive a small commission from select vendors, at no cost to the reader. This post contains affiliate links. Thanks for your support.
The post Preview: Salomon Odyssey Triple Crown || Altra Lone Peak alternative appeared first on Andrew Skurka.
Preview: La Sportiva Bushido II || Go-to “high route shoe” gets better


The La Sportiva Bushido II is mostly the same as the first-generation, but with a few nice tweaks.
The La Sportiva Bushido is designed for running on rugged mountain trails, but I’ve found it to be best suited for backpacking high routes. Most notably, it:
Sits low to the ground, for stability on uneven surfaces;
Features a stiff midsole, for kicking steps in snow and hard dirt, and for holding an edge on side-hills and steep slopes;
Has an aggressive and sticky rubber outsole, for excellent traction on rock, dirt, and vegetation;
Is well constructed, so that it can endure the abuse that high routes dish out; and,
Fits snugly, for precise control.
Read my full review of the first-generation La Sportiva Bushido.
La Sportiva is updating the Bushido for spring 2019. The Bushido II will retain all its winning features, but gets a few tweaks that should make it even better.

Preview: La Sportiva Bushido II
La Sportiva employees at the Outdoor Retailer booth sounded mostly happy with the performance and sales of the first-generation Bushido. Both guys I spoke with said that it’s their favorite trail running shoe, and one mentioned that it’s the best-selling women’s trail running shoe at REI.
So La Sportiva’s approach to a second-generation Bushido was similar to that of Altra when it released the Lone Peak 4.0 — improve it some, but don’t mess with why people love it.
The Bushido and Bushido II are more similar than different:
Same MSRP, at $130;
Same weight, at 10.5 oz (300 grams) for men’s and 8.8 oz (250 grams) for women’s;
Same narrow last, the Racing Lite Ergo;
Same low-volume fit;
Same outsole rubber and pattern, the Dual-Density FriXion XT V-Groove with Impact Brake System;
Same tongue; and,
Same stack height and drop: 19mm to 13mm, with 6mm drop.

The outsole rubber and pattern is unchanged, but the exterior of the arch was updated to improve durability.
Updates
Changes to the Bushido II are relatively minor, but still significant enough to warrant a second-generation designation.
The biggest difference between the first- and second-gen is the EVA midsole. The Bushido II is supposedly more responsive and springier, due to the inclusion of proprietary LaSpEVA in addition to the holdover compression molded MEMlex.
The exterior of the arch is covered in a more durable material. This was one of the first blow-out points on the first-generation, although it was inconsequential — when the TPU was abraded off, the plastic underneath was exposed.

Rubber (instead of synthetic leather) now covers more of the toebox, and the upper mesh fabric was changed to improve breathability (hopefully without affecting durability).
The upper is made of a more breathable mesh fabric. I didn’t have complaints about this, and I’m hoping that the new mesh is at least as durable.
Finally, the toe guard was redesigned. Rubber (rather than synthetic leather) has been extended out over the toebox. And the small strip of synthetic leather on the lateral perimeter of the toebox has been removed, apparently to avoid some complaints about pinching.
Questions about the Bushido II? Leave a comment.
The post Preview: La Sportiva Bushido II || Go-to “high route shoe” gets better appeared first on Andrew Skurka.
August 1, 2018
Preview: Sierra Designs High Route 2.0 || Smaller, but now just 27 oz for fly + inner
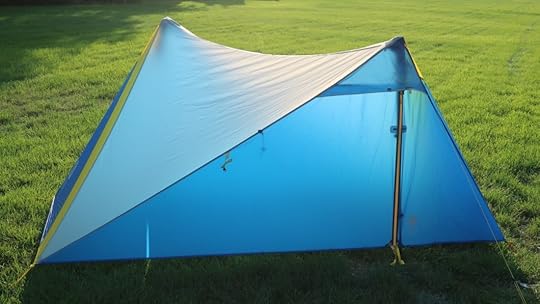

The updated Sierra Designs High Route 1 will be smaller and 10 oz lighter than the original.
The Sierra Designs High Route 1FL was launched in fall 2016, and a second-generation will arrive in spring 2019. Its name will not change (i.e. not High Route 2.0 or High Route II), and the existing design will be phased out. MSRP remains $300.
Most notably, the updated High Route is smaller than the original. Instead of being an oversized one-person tent that can fit two, it’s now a true solo shelter.
Along with a few other tweaks, this downsizing translated to significant weight savings. The second-generation specs at just 1 lb 11 oz (27 oz; 765 grams) for the fly and inner, versus 2 lbs 5 oz for the original, a 10-oz reduction. More specifically, the fly is 16 oz and the inner body is 11 oz. These weights include guylines and tensioners.
The High Route requires a minimum of six stakes, and two more are included so that its doors can be porched open (+3.5-ish oz total). Stuff sacks add another ounce. SD is reporting the packaged weight, which includes everything, as 1 lbs 15 oz (31 oz; 890 kg).

On its own, the fly weighs 16 oz and requires six stakes, although I recommend eight so that its doors can be porched out in calm conditions to improve airflow and increase protected space.
In its slimmed down form, the High Route is much more competitive in its category. In comparison, it’s:
5 ounces lighter than the Tarptent Statosphire,
1 ounce lighter than a seam-sealed sil-nylon Mountain Laurel Designs SoloMid XL + InnerNet,
1 ounce lighter than Dan Durston’s new X-Mid, and
1 ounce heavier than the Yama Mountain Gear Swiftline, which is a single-wall design.
Each of these shelters (plus others like them) has unique pros and cons, and I’d recommend full consideration of each to better understand their advantages and tradeoffs (e.g. size, ventilation, materials, ease of pitch, price, availability).
Disclosure
I designed the original High Route from start to finish, with critical technical assistance from Sierra Designs. Due to a combination of personal and brand-related factors, I chose not to renew my contract with SD last January, after three years with them. My last project for SD was developing a plan to overhaul the High Route. I saw the second-generation High Route for the first time last week at Outdoor Retailer, and have no stake in its success or failure.
Hindsight
The original High Route has one major flaw: it’s relatively heavy, at 2 lbs 5 oz for the fly and inner. Unfortunately, there are many one-person, double-wall, trekking pole-supported, $300-ish tents that weigh 8 to 16 ounces less, and I think the High Route was a non-starter for many, especially those who don’t understand or appreciate the sources of that weight. In particular, the High Route offered massive interior volume, double doors and double door awnings, #5 double zippers, durable 20d and 30d fabrics, taped seams, and line-locks and ample cordage.
Otherwise, I thought the original High Route was a really solid shelter. Its poles do not block the entryways or dissect the sleeping area. It ventilates extremely well, even when it’s raining or snowing. Its vertical and steeply sloping walls maximize interior volume for the size of its footprint. Its most vulnerable panels (the vertical doors) are reinforced by sturdy trekking poles. It’s well built and reasonably priced. The pitch is very simple, and can be adjusted for the conditions. And it’s comfortable in crappy weather, on gear-intensive outings, and for larger backpackers.

With its generous dimensions and storm-worthy design, the High Route performs superbly in crappy weather.

With two (or now 1.5) doors, ventilation is excellent in the High Route.
Second-generation: What’s the same? What’s different?
The primary goal in redesigning the High Route was to reduce its weight, but without great compromises to its functionality or service life.
The basic geometry has not changed. But it’s smaller:
The new fly is 42″ x 102″ (width x length) with 45-inch peaks, which is a reduction of 3 to 6 inches in each dimension versus the original;
The new inner is 27.5″ x 87″ (width x length) with 40-inch peaks, which is a reduction of 2 to 3 inches in each dimension.
The fly is still 20d sil/PU-coated nylon, rated to 1200mm hydrostatic head. But the floor is now, too (instead of 30d). The bug mesh remains 15d. The seams are taped.
The colors and patterning was updated, so that it’s consistent with other SD shelters.
One door remains as-is.

Full door side
But the other side is now more of a “gear closet.” On the fly, the zipper is half length; the panel can still be rolled up or porched out. On the inner, a D-shaped door provides access to this vestibule space.

Instead of two full doors, one door has been converted to a gear garage. The panel can still be rolled up or porched, to vent or to create additional protected space.

The D-shaped gear port on the inner. Notice how the half-door on the fly can be rolled up.
Hardware, trims, and accessories (e.g. side-release buckles, webbing, Velcro tabs along the door, NiteGlo) that were over-sized (for gloved hands) or that proved unnecessary were downsized or eliminated. But it still has ample cordage and either line tensioners or line cleats on the four fly corners, two fly apexes, two fly doors, and four inner body corners.
Assessment
The original High Route was generously sized and featured. But the market failed to appreciate it, because the market either doesn’t care enough or because we did a poor job in telling the story, or both.
The updated High Route is more consistent with market norms. It’s a true one-person shelter, not a 1+ or 2-person; it now has “just” 1.5 doors, rather than two; and its hardware is perfectly functional, but now less glove-friendly. With the resulting weight-savings, I suspect that more backpackers will give it serious consideration.
Questions or thoughts about the updated High Route? Leave a comment.
Disclosure. This website is supported mostly through affiliate marketing, whereby for referral traffic I receive a small commission from select vendors, at no cost to the reader. This post contains affiliate links. Thanks for your support.
The post Preview: Sierra Designs High Route 2.0 || Smaller, but now just 27 oz for fly + inner appeared first on Andrew Skurka.
July 31, 2018
Preview: Black Diamond Distant Tent || Got ventilation?

The BD Distance Tent is new for spring 2019, and the first BD tent that uses trekking poles for support. It’s full sided, fully enclosed, and weighs about 1.5 pounds.
Nearly all backpacking shelters from cottage manufacturers use trekking poles for support, e.g. MLD SoloMid, TarpTent Notch, and ZPacks Duplex.
The explanation is simple: This saves weight over geometries that require dedicated pole sets, e.g. Big Agnes Copper Spur, REI Quarter Dome. Some of the weight must be given back to achieve a minimum of interior space — extra fabric or lightweight struts help to counter sloping walls and near-useless perimeter space — but the savings are still considerable.
In the brick-and-mortar and online retail channel, however, shelters supported with trekking poles have gained little traction. Big Agnes offers just one model; MSR, three; Nemo, one; REI, none; Sierra Designs, one. Is this a reflection of consumer preferences or the result of slow innovation? I think it’s probably both.
Preview: Black Diamond Distance Tent
So I was pleased to find the new Black Diamond Distance Tent at Outdoor Retailer. It’s a full sided, fully enclosed single-wall design that uses two trekking poles for support. It reminds me most of the LightHeart FireFly ($275, 1 lb 13 oz), which similarly uses a short ridge pole to increase interior volume in the peak area.
When paired with Black Diamond’s new Distance Carbon AR (“accessory ready”) trekking poles, the Distance Tent weighs 1 lb 7 oz. If you already own trekking poles, you will need two 1-oz pole grip adapters, bringing the total weight to 1 lb 9 oz. It will retail for $400 with the Distance Carbon AR poles, or a reasonable $250 with the adapters.

The Distance Tent is designed to work specifically with the new Distance Carbon AR trekking poles, which have a special female piece in the grip.

If you already own poles, BD will include two 1-oz adapters and knock $150 off the $400 MSRP.
The fly and floor are made of 30d coated polyester, which stretches less than silicone- and polyurethane-coated nylons.
The Distance is described as a 2-person shelter, but I think it’s more suitable for one: it has just 26 square feet of interior space, no vestibules, only one door, and sloping (not vertical) side panels. For context, the FireFly — which LightHeart describes as “a roomy 1-person” shelter — has dimensions of 105″ x 55″ x 45″ (length x max width x height), whereas the Distance is 95″ x 58″ x 41″.
My prediction: A sweat box
I want to like the Distance Tent, and I want Black Diamond (and other brands) to utilize trekking poles in more of their shelters. But on the showroom floor, the Distance Tent seemed fundamentally flawed. Why? Because its ventilation is woefully inadequate.
The Distance Tent has just two small vents, at the peak and at the foot. Both are covered with no-see-um bug mesh, the air permeability of which is shockingly low — without at least a moderate breeze, air does not push through. There are no vents along the bottom perimeter, and the side door does not have a separate mesh panel.

Peak vent

Foot vent

The Distance Tent does not have any vents along the bottom perimeter, and the door does not have a separate mesh screen.
So if it’s raining or buggy, the Distance Tent will need to be zipped tight. In most environments — where nights are generally calm and low temperatures approach the dew point — I think the two vents will be quickly overwhelmed. As configured, the Distance Tent may perform adequately in arid and bug-free areas.
Black Diamond has six months to remedy this design. A door awning and mesh door would go a long way. While they’re at it, I also hope they rearrange the door zipper so that the door does not fall in the dirt/sand when the shelter is opened, which will reduce the lifespan of the zipper.
The post Preview: Black Diamond Distant Tent || Got ventilation? appeared first on Andrew Skurka.
July 30, 2018
Preview: Big Agnes Carbon Tents || Dyneema for the (rich) masses


In spring 2019 Big Agnes will release five shelters made of Dyneema Composite Fabric, making it the first wholesaler to offer DCF tents and the only source for semi-freestanding DCF models.
My coverage of Outdoor Retailer Summer Market 2018 begins with Big Agnes, which revealed new editions of three existing tent geometries:
Fly Creek 1 Carbon ($800, 1 lb) and Fly Creek 2 Carbon ($850, 1 lb 2 oz)
Tiger Wall 2 Carbon ($1000, 1 lb 9 oz)and Tiger Wall 3 Carbon ($1200, 1 lb 14 oz)
Scout 2 Carbon ($700, 11 oz)
This new family also includes two new products:
Onyx Tarp Carbon ($500, 8 oz), a 8.5′ x 8.5′ square tarp; and,
Flower Wall Bivy Carbon ($TBD, 6 oz)
These “Carbon” models are made primarily of Dyneema Composite Fabric (aka DCF, and formerly known as Cuben Fiber), which is lighter, more waterproof, and stronger than the more conventional 15d and 7d nylons that Big Agnes uses in its UL and Platinum editions. So the point is not lost, I will repeat that: DCF is a better shelter fabric in all key metrics, and it weighs less.
Of course, DCF comes at a price. The prices of Carbon models are 1.5 to 2.6 times more expensive than the UL and Platinum equivalents. For example, the Tiger Wall UL 3 (my review) costs $450 and weighs 2 lbs 11 oz (for its trail weight, or fly + inner + poles). The new Carbon version weighs 13 oz less and will retail for a staggering $1200, or $57 per ounce saved.
Read more about the performance and price of DCF.

The Tiger Wall Carbon uses .34-oz DCF for its fly, .51-oz for its floor, and an uncoated poly or nylon for the bulk of its inner body.
BFD?
Cottage manufacturers like Hammock Gear, Mountain Laurel Designs, and Zpacks have been successfully making DCF shelters for over a decade. So the Carbon tents are not unique in this regard. But they are still newsworthy:
1. Big Agnes is the first wholesaler to make DCF tents, and it’s possible that Carbon models will be available in Spring 2019 from Backcountry.com and your local REI. Is DCF about to go mainstream? Will more widespread use translate into lower prices for DCF?
2. The Fly Creek and Tiger Wall are the first semi-freestanding DCF tents in the marketplace. Many backpackers are unwilling to fuss (even a little bit) with shelters that are supported with trekking poles, so this demographic now has DCF options.
Fabric specs
Per Big Agnes, the tent flies are made with 12 g/m2 (0.34 oz/yd2) DCF; the floors, with 18 g/m2 (0.51 oz/yd2). I’m not a DCF expert, and I’m hopeful that Big Agnes extensively tested its Carbon lineup, but these seem like bold selections. Just ask the experts:
According to Zpacks, which uses a LOT of DCF, the 0.34-oz is, “very thin and does not take much to puncture. We use it for our limited use/emergency shelter, the Hexamid Pocket tarp.” And Ripstop by the Roll, which sells DCF for DIY projects, describes it as being, “best for super ultralight tarps, tents, flys, and light duty stuff sacks. Note that this variant is the lightest, least abrasion resistant DCF variant on the market. Extra care is needed to ensure longer life of your project or product.”
The 0.51-oz variant is the default weight for Zpacks tarps and tents. “It has high tensile strength, but only moderate abrasion and puncture resistance due to the thin membrane material.” Ripstop says it’s best for, “ultralight tarps, tents, flys, and light duty stuff sacks.” And Mountain Laurel Designs, which also uses a LOT of DCF, reports that it, “will have a shorter service life [than the 0.75-oz version]” but that, “it is good for 3+ season use.”
What does all of this mean?
Treat the Carbon products extremely delicately.
If you need a shelter that will endure a few hundred nights, consider one made of heavier 0.75-oz DCF or a premium sil-nylon with a 3k+ hydrostatic head rating.
Use a ground sheet made of polycryo to protect the floor from abrasion.

The tent flies, Onyx Tarp, and Flower Wall bivy are made of 0.34-oz/yd2 DCF, which is stronger than it looks but still delicate relative to heavier .51- and .75-oz variants.
Pole set
DCF is the headline, but the Carbon tents have another unique spec: carbon fiber poles, instead of aluminum.
It sounds like additional R&D will be necessary to pull this off, however. When carbon fiber poles are stressed, they break catastrophically, and a sharp-edged pole will make quick work out of a 0.34-oz tent fly. Breakage can be negated with thicker pole shafts, but at some point the weight and price will make aluminum a better option.
BA’s PR rep ended the conversation by saying, “There is a possibility that there will be some tweaks” to the Carbon tents between now and Spring 2019.
Assessment
The Fly Creek Carbon and Tiger Wall Carbon models are jaw-droppingly priced, but they’re unique and there’s probably an audience for them.
I think the single-wall Scout 2 Carbon is the most interesting. At just 11 oz, it’s a lot of tent for one person, and technically big enough for two.
I’m struggling with the the Onyx Tarp and Flower Wall Bivy. The former does not stand out among the competition (it’s just a simple 8.5′ x 8.5′ tarp), and it’s priced much higher. In comparison, look at the Zpacks 7 x 9 or 8.5 x 10 tarps, which cost about half of the Onyx. Meanwhile, the bivy is made completely out of DCF, which is a non-breathable fabric, so moisture (from insensible perspiration and damp clothing) will remain stuck in the bivy. It might be okay for FKT-style sufferfests, but I don’t see it as being a sustainable shelter choice.

The 8.5′ x 8.5′ Onyx Tarp weighs an amazing 8 oz, or $62.50 per ounce.
Final thoughts
The Carbon products remind me of the Osprey Levity/Lumina. On one hand, I’m excited to see respected and influential wholesalers being innovative and pushing limits. On the other, I’m nervous for them: Do their customers really understand the limitations and care requirements of these items? And would they be better off as-is, by selling Exos/Eja packs and Fly Creeks by the pallet at REI, and leaving the fringe stuff to cottage manufacturers that attract a better educated customer and that have business models better suited to low-volume premium goods?
Questions about the Big Agnes Carbon line? Leave a comment.
Disclosure. This website is supported mostly through affiliate marketing, whereby for referral traffic I receive a small commission from select vendors, at no cost to the reader. This post contains affiliate links. Thanks for your support.
The post Preview: Big Agnes Carbon Tents || Dyneema for the (rich) masses appeared first on Andrew Skurka.


