
Andrew Skurka's Blog, page 33
November 23, 2018
Hunt report: Almost a successful timber sneak


Looks like good elk habitat. It is good elk habitat. But where are they?
Morapos Creek delivered last year, our first hunt in Colorado’s GMU 12. Steve and I saw elk or fresh elk tracks several times per day, encountered few other hunters, and shot a 4-point bull on Sunday afternoon.
Hoping for a similar experience and results, we returned this year. For extra manpower, we added Noel, with whom I hunted in 2014 and 2015.
Unfortunately, our hunt ended how most of mine have: with empty coolers, and regret that I couldn’t stay out a few more days. But at least Noel and I got really close: we tracked a half-dozen cows for five hours, but spooked them in thick timber before we were able to get off a clean shot from 50 yards.
When I began to write this report, it was not my intention for it to be 2,500 words. But in recent weeks I’ve learned that at least a few other hunters learn from my reports — including out-of-state Kyle, who shot a bull on Wilson Mesa, and a local trail runner who ID’d me while I was on a long run — so I included more detail than an unsuccessful hunt might warrant.
Friday: In position
Under overcast skies and in mild temperatures, Noel and I departed the upper Morapos Trailhead around 4:30 pm, aiming for a well protected camp at the base of Baldy Mountain. The trail was in tough shape — it’d been badly rutted by horses and was very muddy — and I hoped that the freezing temperatures and snow in the forecast would firm it up and fill it in.
Steve planned to meet us in the morning. He wasn’t able to get out of work early, so he would drive up afterwards and camp at the trailhead. It would be a short hunt for him this year: he’d have to leave on Sunday afternoon so that he could be back at work on Monday morning to manage a systems integration.
Noel and I pulled into camp with our headlamps on, and quickly pitched our floorless mids and laid out our sleeping pads and bags. A few inches of snow covered the ground at 8,600 feet, except under our spruce cluster. For dinner we had Ramen noodles with homemade pesto (made with homegrown basil).

Backcountry gourmet: Ramen noodles with homemade pesto (with homegrown basil) and sun-dried tomatoes
Saturday: Opening day
My alarm went off at 5:15 AM, two hours before sunrise. Since we planned to return to this camp tonight, we left behind anything we didn’t need for the day. I had bought into the plan yesterday, but now questioned if the weight-savings justified the sacrifice to our flexibility. My shelter (with stakes and ground sheet), sleeping bag and pad, and a day’s worth of food weighed only about 6 pounds.
When we joined back up with the trail, we saw one set of tracks in the light dusting of snow that had fallen overnight (much less than the 3 to 5 inches in the forecast). I correctly assumed it was Steve — the length and power of his stride is rare among hunters.
In the snow we also saw tracks from a small group of elk, but we didn’t feel that they were fresh enough to chase.
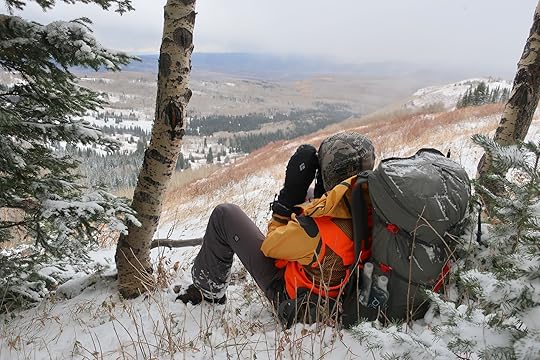
Morning sit
Like last year, we spent the first few hours of opening day atop Baldy, glassing the meadows and stands of aspen below. Also like last year, we saw nothing, except for two other hunters on the Salt Park Trail and an approaching storm that would soon shut down this vantage point.
Down valley, hunters were having more success. I heard at least eight shots; Steve said it was more like eighteen. We speculated that they were coming from private land, on which we saw at least one-hundred mule deer during the drive in on Friday night.
After losing visibility in the storm, we descended Baldy’s north ridge towards the game camera that Noel had installed a week before First Season. The results were discouraging: a bull, one week earlier; a cow and calf, a few days ago; and a half-dozen hunters, two of which were perched on a knob 50 yards away.

After a few hours atop Baldy Mountain, we were shut down by an approaching storm.
More sitting
During a break in the weather we discussed our afternoon options. One was to hunt the dark timber in Baldy’s northern valleys, where Steve and I had bumped a bull and a small group of cows the year prior. With no wind or noise-muffling snowfall, we deemed it a low-odds strategy. It also seemed too ambitious given the remaining daylight and the location of our fixed camp.
Instead, we decided to hunt Baldy’s west slopes. In one shallow draw we intersected a set of cow-and-calf tracks, climbing towards Baldy. We decided not to pursue, for the reasons cited earlier.
In the next draw we saw a group of five hunters, which appeared to have a few father/sons in it. Upper Morapos Creek is public land and has good wildlife habit, and we expect to see other hunters here. Nonetheless, we were getting frustrated with bumping (and being bumped by) other hunters at every turn. I can’t imagine what’s it’s like during First Season — Noel said that the trailheads were completely full the weekend before it started.
We ended the day on Baldy’s open west shoulder, from where Steve and I first saw last year’s 4-point bull. The only elk we saw this time were four miles north-northwest, happily situated on private land about one mile from the National Forest boundary. That evening we heard no shots anywhere.

From here we saw dozens of elk about 4 miles away, comfortably hanging out on private land.
Sunday
Our alarms went off early again, and we filed out of camp in the dark towards a long meadow where we saw three mule deer grazing the evening prior. We hadn’t been to this area before either, and were curious about it.
Morning meadow
With temperatures in the teens, we sat on the edge of the meadow, hoping that elk would arrive for a morning feed. I was the first to become too impatient (and cold), and collected the group.
Fueled by coffee, we started to hunt our way back to the trailhead. We crossed one set of elk tracks, but lost them in an area that had melted out yesterday afternoon. We also spooked three mule deer — we’d seen their tracks, but without deer tags we didn’t care.
Run-ins with other hunters were more reliable. One hunter had entered our morning meadow. We saw one staked out above Konopik Reservoir, two above Cove Reservoir, and a mule train south of Iles Mountain. And at a random spot in the woods a half-mile from the trailhead we encountered two more.

Not my idea of fun: staking out a meadow with temperatures in the 10’s, hoping that elk would arrive for a morning feed.
Reset
We pulled into the trailhead around noon, discouraged with the hunt thus far. Steve needed to leave, but Noel and I planned to continue on after replenishing our food bags.
It was snowing hard, probably at a rate of two inches per hour. And it wasn’t supposed to let up, with the forecast calling for six inches overnight, three inches on Monday, and more snow Monday night into Tuesday. After Steve left, Noel and I huddled in my Ram 1500 rental, cranked up the heat, and discussed our options.
Heading back out into those conditions was about the last thing that I wanted to do. Attempts at hunting were unlikely to be productive: the game would be bedded down and waiting it out, and the snow would curtail greatly our visibility. In addition, I was unexcited by the prospect of several days with damp clothing, damp boots, and a damp sleeping bag.
To pass a few hours we agreed to drive into Craig, Colo., where cell service and a Mexican restaurant might lift our spirits. If conditions were favorable at these lower elevations, we could also hunt a few small parcels of public land.

Morale boost in Craig, Colo.
Trip saver
At the lower elevations the conditions were no better: it was windier, and squalls of wet snow regularly rolled through. So we settled on cell service and a restaurant meal.
Over a bottomless bowl of tortilla chips and a massive plate of deep-fried chili rellenos, Noel pitched a trip-saving plan. He reminded me that he had a basic base camp setup in his car, including a 14-foot tepee tent and a small propane heater.
Tonight we could stay dry and warm in the base camp, and in the morning depart for Wilson Mesa, an area to which we hadn’t been but about which we’d heard good things. On Monday night, we could camp in the backcountry, or return to the relative luxury of our base camp.
We drove back to Morapos, arriving just before dark. It took us only about 30 minutes to set up the tepee, which was as comfortable as I’d hoped: it was storm-worthy, spacious, and reasonably warm. Noel dried out his feet and boots with the space heater, while I tried to suppress my excitement about tomorrow so that I could get to sleep.
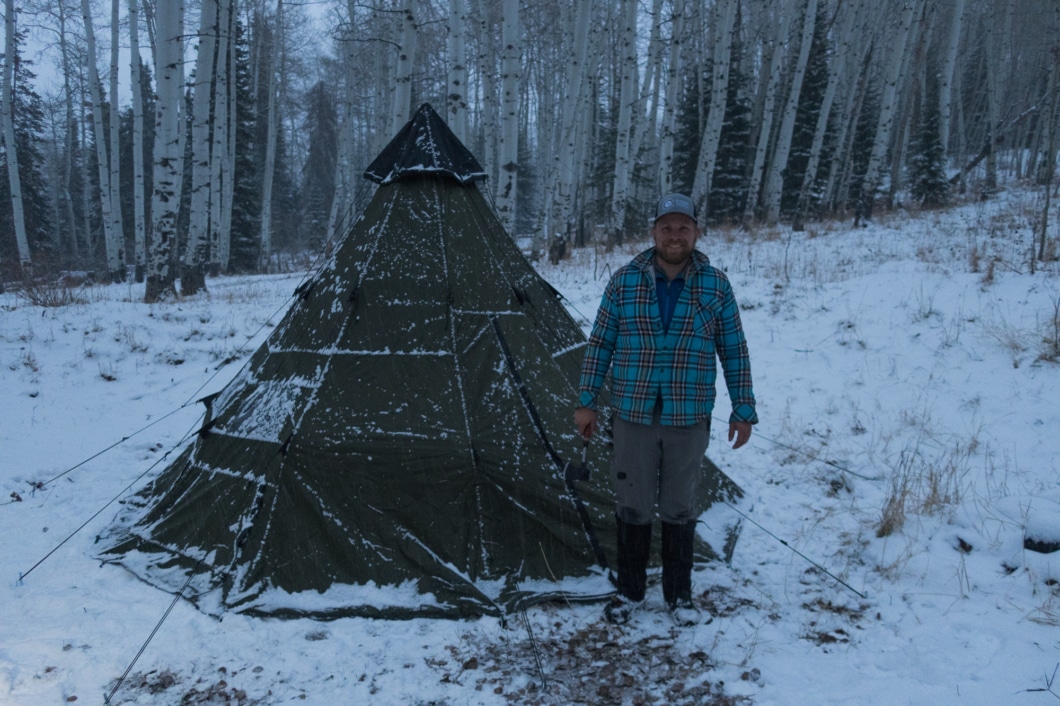
Being able to “reset” at a trailhead base camp proved far more valuable than I could have imagined.
Monday: Wilson Mesa
Overnight the storm dropped 4 to 5 inches of snow at the trailhead, but had cleared by 5:30 am when Noel and I emerged from the tepee — we could see stars. We correctly speculated that we’d find several additional inches atop Wilson Mesa, another 1,000 feet higher.
By headlamp we began the tough hump to the mesa. Normally, a climb with 1,000 feet of vertical gain wouldn’t phase me, but the trail was slick and even more rutted than the upper trail, and my pack weighed 45 or 50 pounds. Noel and I were prepared to spend the night atop Wilson Mesa, and had a full day’s worth of water.
We chose to hunt Wilson Mesa for several reasons. First, it was the only zone within a practical distance from the trail (about 4 miles, plus/minus depending on the terrain) to which we hadn’t been. In the other areas we had seen no elk and little recent sign. Second, other hunters we’d met at the trailheads were reporting more success and sign in that direction. Third, we’d never been up there, and wanted to scope it out — after all, we’re still learning this area.
Tracks!
About a half-mile after topping out on the mesa, Noel and I intersected the tracks of a cow and calf that couldn’t have been more than 6 hours old, after the snow had stopped. Our elapsed time was 2:20 and we were 2.75 miles from the trailhead.
Early on opening day of my first hunt in 2013, Rob and I had intersected tracks just like this. Being the total rookies that we were, we followed them at a normal hiking speed, still with our rifles attached to our packs, imagining that we’d get an easy shot while they were grazing in a meadow — just like on MeatEater. Instead, we bumped them about 400 yards later, and they all vanished into the forest like ghosts.
To achieve a different outcome this time, I suggested to Noel that we mentally prepare ourselves. If we slowly and patiently hunted these tracks, we might get an opportunity for a shot — in a few hours, this evening, or maybe even tomorrow.
In pursuit
After a quick breakfast we started our pursuit. Hike for 30 or 60 seconds, stop, glass, glass, glass some more. Repeat. Our visibility was limited to about 200 yards by the subtle terrain and the mixed aspen and spruce.
Two hours and less than one mile later, the cow and calf appeared to join four other elk. Their individual tracks meandered and suggested no goal or urgency. When their tracks splintered, Noel and I each followed an outermost track, so that we’d know if the group had fractured.

Meandering tracks, suggesting no goal or urgency
Soon the tracks started to loop back on themselves in a counterclockwise direction, and continued doing so until at one point we were just 400 yards from where we first picked up the tracks. We were conflicted about this trend: either the elk were inside this loop, and therefore weren’t far away; or, they had been inside this loop, but took off after seeing or smelling us as we unknowingly walked around them.
Three hours and 1.5 miles into our chase, we found elk beds in the snow. This made us nervous — Did they leave because of us? But we soon found a better explanation: horse tracks. We noted that the elk beds had refrozen, and concluded they’d probably been spooked by the horse, not us.
Thankfully, where the elk punched through their and our earlier tracks, the horseman followed our old tracks. We continued to follow the fresh tracks, which were more single-file and seemed to have more intent.
About a half-mile from the first elk beds we were surprised to find another group of beds. This time, they were still slushy, suggesting the elk were there very recently. Again we asked, Did they leave because of us?
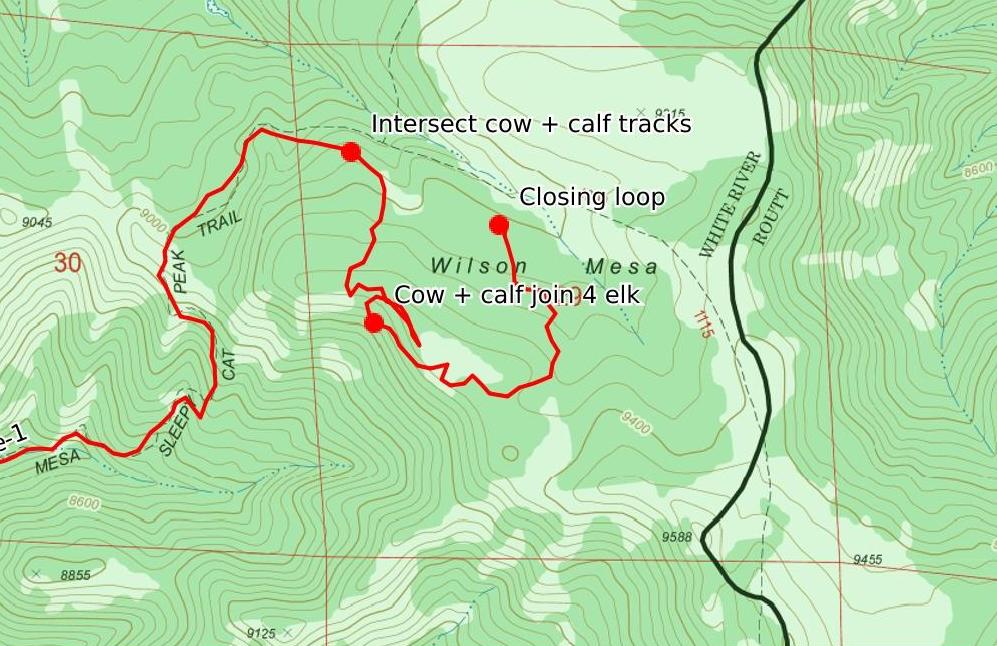

The second set of elk beds were still slushy, suggesting they had been there recently.
Closing in
At this point, Noel and I should have prepared for a shot, by putting a round in the chamber and carrying our rifles in our arms (instead of slung across our chests). But we thought we’d have time for that later. We also should have resisted the urge to pick up the pace — “They’re close! Let’s go get ’em!” — and actually slowed things down.
We followed the tracks across a small opening and entered a spruce grove. That’s when I first saw movement. I whispered back to Noel, and we both quietly dropped our packs and chambered a round.
Then I saw more movement through a small window in the spruce — six heads in succession, quickly moving right to left. There was no opportunity for a shot: it happened too quickly, and I never got a look at their bodies.
Noel and I slowly closed in, hoping for a more open shot, but they were gone. Our elapsed time was 7:20 and distance was 5.0 miles, meaning we’d been in pursuit for 5 hours and 2.25 miles, averaging less than 0.5 mph.
Game over
We were still hopeful as we hiked back to our packs. The elk had looked nervous, but not panicked. Maybe they would circle up again in a few minutes and a few hundred yards away.
But, no, that’s not what they did. Instead, they plunged over the southeast edge of Wilson Mesa, galloping at full speed down a 25-degree slope and lunging over downed trees.

Not a good sign: a single-file track of churned dirt and snow.
Noel and I knew that these elk would probably not come back to us. But we decided to follow them anyway, at least until we found something better — they were still the freshest tracks we had. Plus, they were going in the direction of the trailhead.
The tracks took us across nasty sidehills and through thick scrub oak. It’s like they were f’ing with us. Our hopeless chase ended about two miles later, when the tracks crossed the Wilson Mesa Trail and entered private land.

Exhausted and deflated, Noel and I returned to the trailhead, disappointed by the result but encouraged by how close we’d come and optimistic about next year.
The post Hunt report: Almost a successful timber sneak appeared first on Andrew Skurka.


November 20, 2018
Yosemite High Route: A route overview || Its general track, challenges, and highlights

The core of the Yosemite High Route spans 95 miles between Grace Meadow in Falls Creek near park’s northern boundary, and Quartzite Peak at the tip of the Clark Range. Per mile, the best route to Grace Meadow starts at Sonora Pass, and follows the Pacific Crest Trail south. The approach from Hetch Hetchy also looks very good — it’s a similar distance, and it follows endless granite slabs through the Emigrant Wilderness.
The post Yosemite High Route: A route overview || Its general track, challenges, and highlights appeared first on Andrew Skurka.
November 16, 2018
How to choose: Jetboil backpacking stoves || Zip v. Flash v. -Mo v. Joule


The FluxRing is one of several features that help make Jetboils fast and efficient.
Yesterday I attended a Jetboil press event in Boulder. It was an opportunity to examine the product line and to speak with Jetboil reps in a less time-crunched setting than Outdoor Retailer.
Stove system overview
To simplify decision-making for its dealers and customers, Jetboil seems to have worked hard to keep its product line tight. It sells just seven backpacking-worthy stove systems:
Fast Boil: for boil-only meals and hot drinks
Zip ($80, 12 oz, 0.8 liters, soloist): the most economical option; and,
Flash ($100, 13.1 oz, 1.0 liters, 1-2 people): the original Jetboil with signature speed and efficiency, and still the best-selling unit.
Precision Cooking (gas feed): for simmering and colder temperatures
MicroMo ($130, 12 oz, 0.8 liters, soloist): smallest and lightest system with a regulated burner;
MiniMo ($135, 14.6 oz, 1.0 liters, 1-2 people): identical to the MicroMo, but with a bigger pot;
SUMO ($140, 16.0 oz, 1.8 liters, 2-4 people): a MicroMo for groups;
Precision Cooking (liquid feed): the most winter-worthy
milliJoule ($180, 19.3 oz, 1.5 liters, winter soloist): smallest and lightest winter system; and,
Joule ($200, 28 oz, 2.5 liters, 2-3 winter campers): like the milliJoule, but with more volume.

With a single purchase, the Jetboil gives you nearly a complete stove system: pot, burner, and windscreen. Simply add a fuel canister and utensil.
Universal pros and cons
Across its line, all Jetboil stoves have the same advantages and liabilities:
Pro: Simplicity
With the purchase of a single Jetboil system, you get an effective and nearly complete kitchen setup. Just add a fuel canister, utensil, a lighter (as a backup, even if it has push-button ignition), and separate eating & drinking vessels for each person of the group (if applicable). In comparison, a la carte stove systems require more research and thought.
Pro: Speed & efficiency
A Jetboil system includes an integrated burner, pot, and windscreen. By designing these components to work together, Jetboil achieves excellent boil times and fuel efficiency.
Pro: Compactness
When not in use, the components of a Jetboil system nest together and become very compact. Inside the pot of the Flash and Zip, for example, you can neatly fit the burner, fuel canister stabilizer (which clips into the burner), optional pot/pan support, and a 240-gram fuel canister. The pot lid secures everything in place.

All Jetboil systems nest neatly together, minimizing space when not in use. Inside the MiniMo, you can fit the burner, canister stabilizer, and 240-gram canister.
Con: Weight
The lightest Jetboil system weighs 12 oz. In comparison, my go-to gas stove system weighs one-third less — just 8.1 oz — in a similar configuration: stove, pot, and coffee mug. The extra weight of a Jetboil is attributable to its materials (e.g. aluminum, not titanium) and to extra features that increase efficiency, such as the FluxRing and pot cozy.
Con: Canister gas
Since Jetboil first launched in 2004, its stoves have been compatible with canister gas only. It has never wandered into alcohol or liquid fuels, which are more widely available and more economical. It’s difficult to find gas canisters outside of outdoor retail stores, and you cannot mail or fly with them.
Jetboil Fast Boil vs. Precision Cooking Systems
Jetboil stoves fall into three categories:
Fast Boil,
Precision Cooking, and,
Basecamp
The Basecamp systems are slick, but impractical for backpacking: the lightest model, the Halfgen, tips the scales at 3.5 pounds; and its propane gas canister (which must be made of steel, instead of lighter weight aluminum) adds even more weight.
Fast Boil and Precision Cooking stoves are differentiated in just one respect: fuel regulation. The Precision Cooking burners have a regulator, which governs the fuel pressure out of the canister, specifically to 12 psi. This component adds expense and marginal weight, but allows the stove to:
Simmer, and
Operate reliably in colder temperatures, down to a canister temperature of 20* F.
The Fast Boil stoves are unregulated. Simmering is difficult — if the stove is on, it’s basically a flame-thrower. And stove performance varies more with the canister pressure, which is a function of its temperature, fullness, altitude, and gas blend.

The regulated MightMo stove is available as a standalone stove, and is the centerpiece of the MiniMo, MicroMo, and SUMO systems.
Jetboil Zip vs Flash
The Zip and Flash use the same unregulated burner, making them most suitable for boil-only meals and drinks.
The Zip ($80, 12 oz) is barebones and best for soloists. The Flash ($100, 13.1 oz), with 25 percent more pot volume (1.0 liters versus 0.8 liters), can be more easily stretched to hungry soloists and 2-person groups. In addition, it has a push-button ignition, which is convenient so long as it works.
Jetboil MicroMo vs. MiniMo vs. SUMO
The centerpiece of the MicroMo ($130, 12 oz), MiniMo ($135, 14.6 oz), and SUMO ($140, 16.0 oz) is the MightyMo burner, which is regulated and available as a standalone product ($50, 3.3 oz).
These Mo-based systems vary only in their pot volumes and shapes. Differences in boil times and fuel efficiency are negligible or non-existent. The tall-and-skinny MicroMo is the lightest and most compact, but meals can be more easily eaten directly out of the wide-and-short MiniMo. The SUMO is suitable for groups.
Jetboil Joule vs -Mo stoves
The milliJoule ($180, 19.3 oz) and Joule ($200, 28 oz) are more winter-worthy than the -Mo stoves, due to the burner.
The milliJoule/Joule can operate on a liquid feed (i.e. an inverted canister), which makes them more reliable on cold, wintertime outings. The burner’s distinguishing feature is the pre-heat tube, in which the liquid fuel emerging from the canister is vaporized before reaching the burner jets.
Questions about Jetboil stoves, including how they compare to each other and to stoves from other brands? Leave a comment.
Disclosure. This website is supported mostly through affiliate marketing, whereby for referral traffic I receive a small commission from select vendors, at no cost to the reader. This post contains affiliate links. Thanks for your support.
The post How to choose: Jetboil backpacking stoves || Zip v. Flash v. -Mo v. Joule appeared first on Andrew Skurka.
November 14, 2018
Brand intro: Norrøna || Premium & technical, ubiquitous in Norway


The Lyngen Down 850 Parka, with 850-fill down and 10d face fabric. It weighs 12 oz (M’s Large) and retails for $419.
Outdoor Retailer is an opportunity to learn about brands I’ve never heard and brands about which I know little. So when I was invited into the Norrøna booth, I said yes.
Norrøna is a 90 year-old Norwegian company that is still owned and managed by the original family. The intended application, materials and construction quality, and prices of its products remind me most of Arc’Tyrx, or premium lines from Patagonia or TNF. The product line is expansive, covering all four seasons and multiple outdoor sports, including hiking, alpine climbing, mountain biking, running, skiing and snowboarding, and even surfing and hunting.
In Norway, where Norrøna is apparently as ubiquitous as LL Bean, there are lower-priced products, too, but for now the US will only see its premium goods. And the products will be focused on hike, run, and the snow sports.
Current US distribution includes:
Direct, at www.norrona.com;
Backcountry.com;
REI.com and some REI flagship stores; and,
Some premium outdoor specialty stores.
Norrøna is also exploring possible retail locations in the U.S., and it’s likely to open a branded retail location in 2019.
Can Norrøna break into the US? Personally, I find the price points difficult to swallow (e.g. $420 for a 3+ season parka, or $250 for a 20d Pertex windshirt), but I know there’s a market for them — other brands successfully play in this space. The product quality is excellent. It has a novelty/up-and-coming element. And it seems genuinely committed to corporate social responsibility.
At OR earlier this month their product line was skewed towards winter activities. But I’ll swing by again in future shows to see what products might be more applicable to backpacking and trail running.
Disclosure. This website is supported mostly through affiliate marketing, whereby for referral traffic I receive a small commission from select vendors, at no cost to the reader. This post contains affiliate links. Thanks for your support.
The post Brand intro: Norrøna || Premium & technical, ubiquitous in Norway appeared first on Andrew Skurka.
November 13, 2018
Preview: Hoka Challenger ATR 5 || Multiple changes, wide sizes
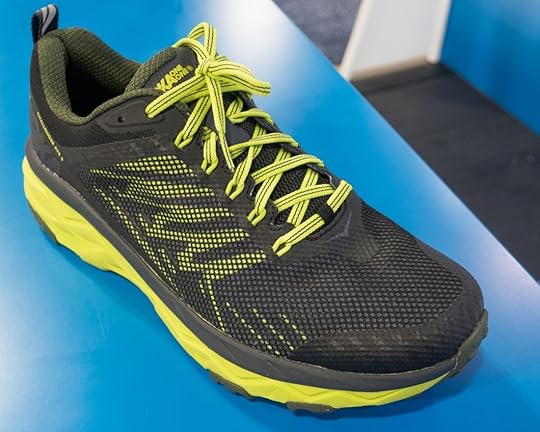

On easy and moderate singletrack, and on mixed runs with pavement and dirt, the Challenger ATR 5 should excel.
The intended use of the next generation Challenger ATR remains the same: easy and moderate trails, and runs with mixed pavement and dirt. But multiple changes have been made to its construction and features.
The Hoka One One Challenger ATR 5 retails for $130 and will be available exclusively from REI on December 1, 2018. Distribution will be more widespread after the New Year.
Historically, the Challenger ATR was a trail version of the popular Clifton road trainer: it had the same chassis as the Clifton 1, 2, and 3 (my review of the Clifton 2), but featured a firmer midsole, trail-worthy outsole, and more durable and secure upper.
Starting with the fifth generation, the Challenger will have its own fit system. The standard fit will be similar to the Challenger ATR 4 (my review). It will also be available in wide sizes: EE for men’s, and D for women’s. With some “wide” models, the manufacturer simply increases the interior volume. But Hoka had to create dedicated lasts for the standard and wide sizes, so that the foot sits properly in the cradle-like Active Frame.
The outsole has been redesigned, with more and larger lugs. This should result in improved wear-resistance and grip. The proprietary rubber is unchanged.
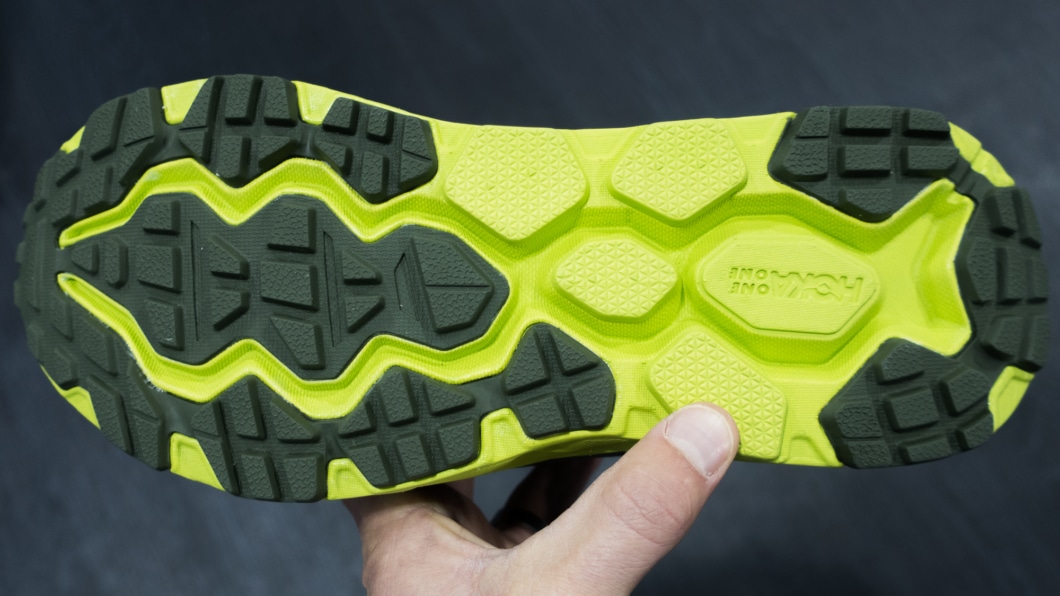
The outsole has more rubber and larger lugs.
To offset the increased stiffness of the new outsole and to preserve smoothness from landing to toe-off, Hoka reduced the density of the midsole foam. It also dropped the shoe by 2 mm, so stack heights are now 29 mm and 24 mm at the heel and forefoot, respectively, for a 5 mm drop. The Challenger ATR 4 was 31/26.
The upper is still made of a two-layer mesh, for a combination of breathability and debris-resistance, and overlays still wrap around the midfoot. Some rigidity has been extracted from the upper: the U-bar (i.e. lace eyelets) is more flexible, and the TPU toe cap no longer has a “point” that created an unnatural crease across the toebox of the Challenger ATR 4.
The Challenger ATR 5 appears to have slightly more padding in the heel cup and tongue.
Its weight is now 9.4 oz (266 g) for men’s 9, and 7.7 oz (218 g) for women’s size 7.
Have questions about the Challenger ATR 5? Leave a comment.
The post Preview: Hoka Challenger ATR 5 || Multiple changes, wide sizes appeared first on Andrew Skurka.
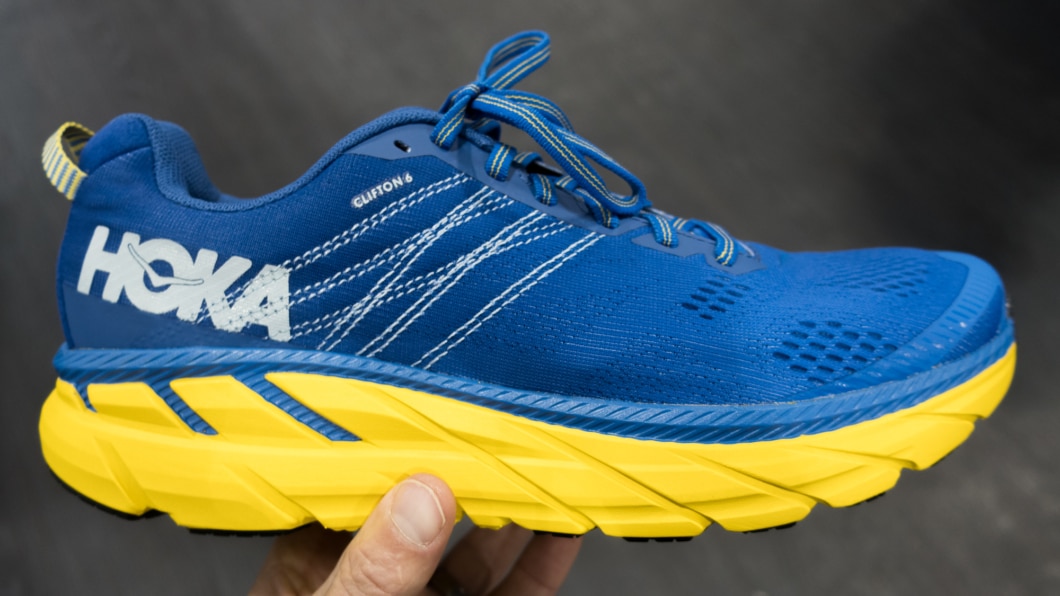
Preview: Hoka Clifton 6 || Mix of old & new generations


The new Clifton 6 is a mix of old and new: it’s lighter and softer than recent generations, but keeps the improved fit and durability.
The first three generations of the Hoka One One Clifton (my review of the Clifton 2) were wonderfully plush and lightweight. They were widely adored, to the degree that Hoka recently re-released the Clifton 1 for a limited time.
But v1, v2, and v3 were not flawless. Specifically, the fit was too narrow and low-volume for most; the uppers and outsole didn’t hold up; and the midsole foam lacked resiliency.
With the Clifton 4 (my review) and similar Clifton 5 (my review), Hoka went in a different direction. These versions worked for more runners, because of the wider last, higher-volume interior, and more accommodating upper; and the midsole was firmer and more durable. They’re less fun, but they’re more suitable for everyday use.
The upcoming Clifton 6 is a mix of the old and new generations. It’s lighter and softer than the Clifton 4 and 5, but better fitting and more durable than the Clifton 1, 2, and 3.
The Clifton 6 will be released in June 2019, with an unchanged MSRP of $130. It weighs 9 oz (255 g) for men’s size 9, and 7.4 oz (209 g) for women’s size 7, which is a reduction of 0.3 and 0.4 oz over the Clifton 4 and 5, respectively, but still more than an ounce heavier than the earliest iterations. At this price and weight, few other shoes match the Clifton 6’s cushioning and durability.
TPU overlays have been entirely removed from the upper. The engineered mesh locks down the foot in some areas, and accommodates it in others.
The upper is made exclusively of breathable tech mesh, which is deliberately knit to lock down some areas of the foot (like the arch) and to accommodate it in others (like across the crease). Hoka hopes it is the perfect combination of control and comfort. The TPU overlays have been removed entirely.
The outsole has been re-mapped, with more coverage for improved wear-resistance.

The Clifton 6 has more and more widespread outsole rubber.
The Clifton 6 rides 2 mm lower than earlier generations. Its stack height is 27 mm and 22 mm at the heel and forefoot, respectively, for a drop of 5 mm. The midsole is softer than the Clifton 4 and 5, although not as soft as the Clifton 1, 2, and 3. Resiliency should be more similar to the Clifton 4 and 5, preserving it for everyday use.
The last, midsole, and outsole have been widened under the arch by a few millimeters in order to improve stability and to fit more feet. I’m uncertain how this will affect those with narrower feet. Hoka says that the upper should provide sufficient lock down, but I wonder if some control will be lost.
Questions about the Clifton 6? Leave a comment.
Disclosure. This website is supported mostly through affiliate marketing, whereby for referral traffic I receive a small commission from select vendors, at no cost to the reader. This post contains affiliate links. Thanks for your support.
The post Preview: Hoka Clifton 6 || Mix of old & new generations appeared first on Andrew Skurka.
Preview: Hoka Speedgoat 3 || Tweaks to a top-seller


Why mess with success? The Speedgoat 3 has been tweaked, but mostly remains the same.
For two years the Hoka One One Speedgoat 2 (my review) has been the brand’s top-selling trail shoe. So in developing the third generation, it was understandably reluctant to mess with success.
The most significant change to the Speedgoat is the midfoot lockdown. The TPU overlays have been re-mapped, and a yoke-like collar has been added inside. These are welcome additions, and should reduce the shifting and lifting on steep downhills and uphills experienced with the Speedgoat 2.
Otherwise the Speedgoat 3 is mostly the same, retaining the previous generation’s:
Outsole rubber and mapping, using Vibram MegaGrip and 5-mm lugs;
Stack heights of 32 and 28 mm at the heel and forefoot, respectively; and,
Soft, generously cushioned EVA midsole.

The outsole rubber and mapping remains the same, with Vibram MegaGrip and 5 mm lugs.
Its weight has increased to 10.4 oz in men’s size 9, versus 9.8 oz for the Speedgoat 2.
I was told that the last and volume are identical. This means, unfortunately from the perspective of many, that the Speedgoat 3 will keep the conical-shaped toebox. A wider toebox is being considered for G4, but at this point that’s only speculative. That all said, official product info speaks of a “wider midsole and toebox.” So maybe it will fit more generously after all.
The MSRP is unchanged at $140. It will be available in March 2019.
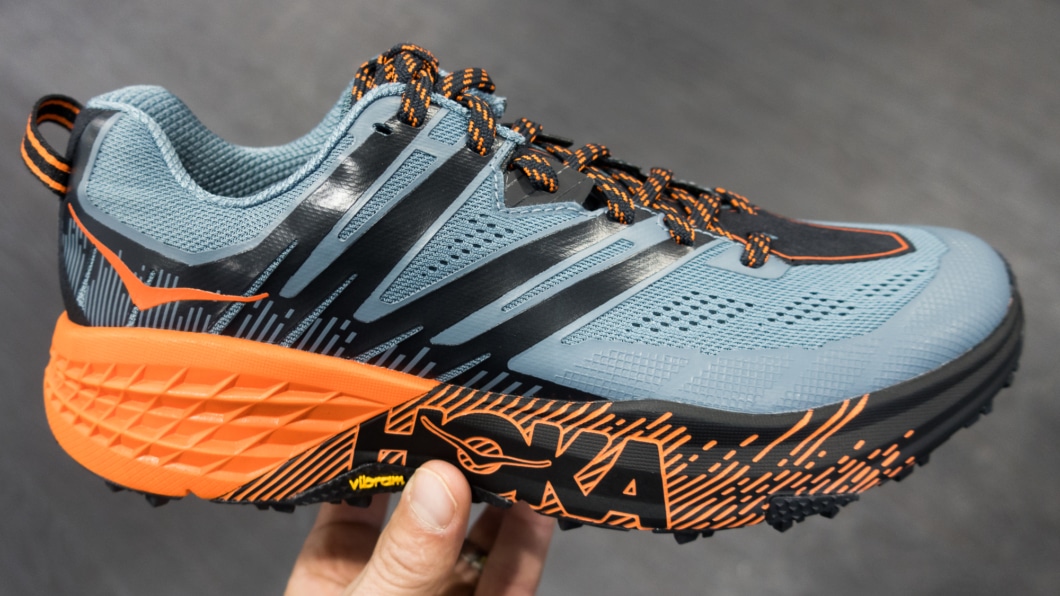
The TPU overlays (black) have been re-mapped to better lock down the arch and heel.
Questions about the Speedgoat 3? Leave a comment.
The post Preview: Hoka Speedgoat 3 || Tweaks to a top-seller appeared first on Andrew Skurka.
November 12, 2018
Preview: Salomon X Alpine Pro || For scrambly runs, maybe high routes

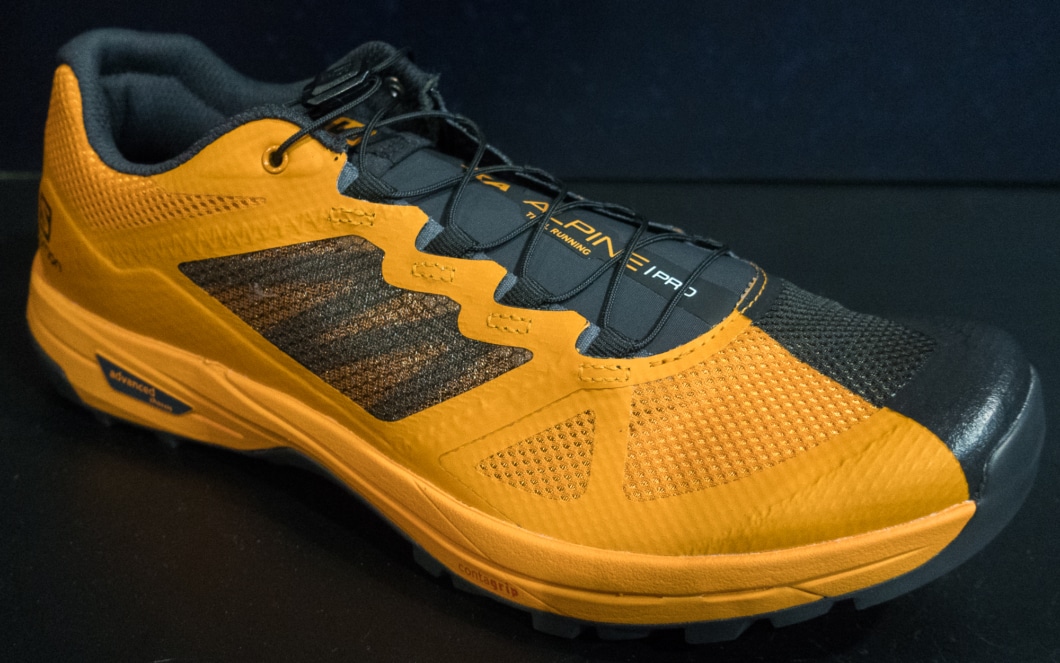
The new Salomon X Alpine Pro is designed for techy mountain trails and scrambles, and maybe high routes.
When running and racing on trails, I normally wear Salomon Sense or Salomon Ultra shoes.
But for hiking and backpacking, I currently have to look elsewhere. For two years my go-to has been the La Sportiva Bushido (my review; and my preview of the Bushido II), which is perfectly suited for high routes: they’re securely fitting, durable, grippy, protective, moderately stiff, lightweight, and low to the ground.
Will the new Salomon X Alpine Pro be another option for this niche application?
The X Alpine Pro is best considered a toned-down variant of the S/Lab XA Alpine (or a beefed-up variant of the X Elevate). Salomon carried over the outsole, narrow fit, and midsole construction; removed the integrated water- and debris-resistant gaiter; and reinforced the now-exposed mesh upper.
The X Alpine Pro weighs 10.4 oz (295 g, for men’s 9; 9.5 oz, 270 g for women’s 7), and will retail for $160. It will be available in August 2019.
A Salomon rep described the X Alpine Pro to me as “the perfect 14’ers shoe.” It’s light and nimble enough to comfortably run the lower sections. But it’s sturdy, grippy, and protective enough to scramble through the techy alpine bits up top.
The outsole is made of Salomon’s proven Premium Wet Traction Contagrip, which Salomon may rebrand simply as Contagrip . The lugs are 5 mm tall, and are larger than those on the Sense Pro 2, Sense Ultra, and S/Lab Ultra. In the interest of durability and grip, I’d love to see a few more lugs. The “climbing zone” lug across the toes should be excellent for talus-hopping and scrambling.
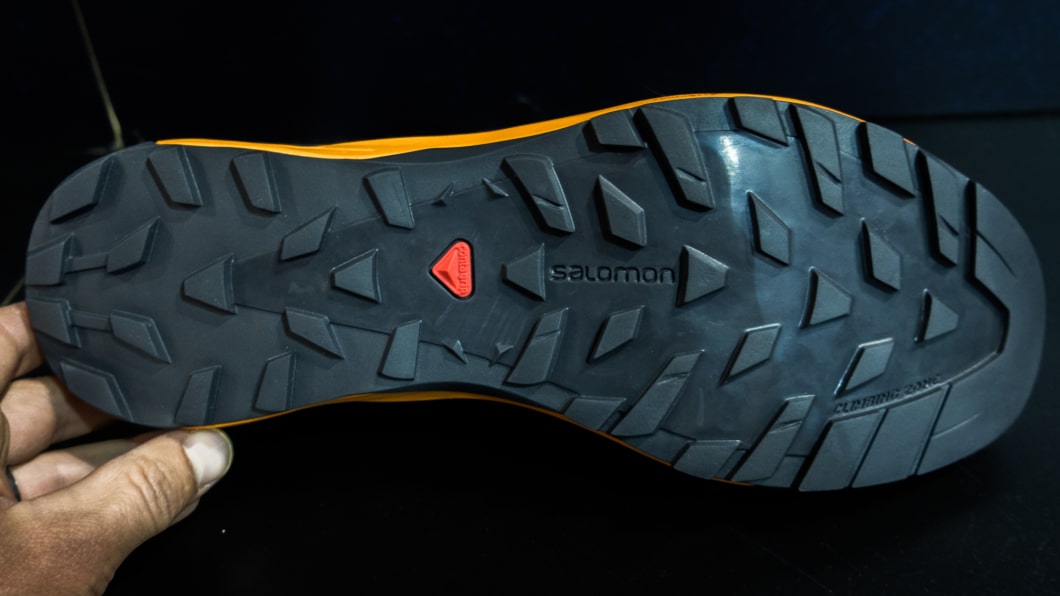
The outsole is made of Premium Wet Traction Contagrip, a proprietary rubber that has been proven on other Salomon models.
To increase lateral stability and control, Salomon stiffened the midsole, or perhaps just the heel. It’s branded as a Carbon Edging Chassis, but details on the exact construction were unclear. Stack height is 24/18 mm at heel/forefoot, for a drop of 6 mm.
The upper is reminiscent of other Salomon Sense shoes: breathable mesh with TPU film overlays, an elasticized mid-foot yoke (“Endofit”), and Quick Laces. The extra reinforcement is notable, however — the TPU film is thicker and more widespread. I hope it will be enough defense against brush and mineral-infused granite, we’ll see.
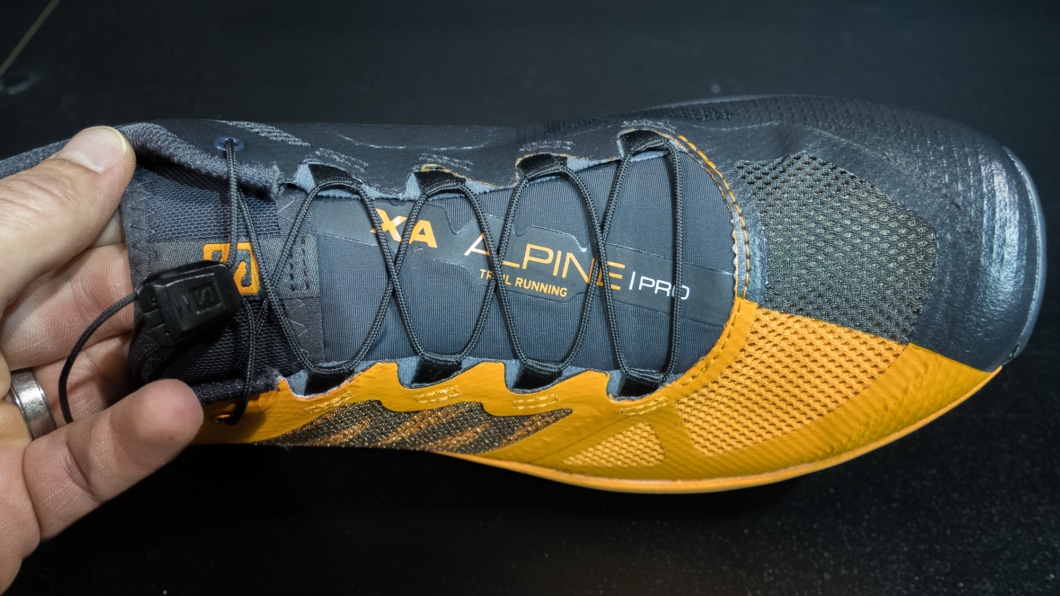
The upper looks like other Sense shoes: mesh with TPU overlays, elasticized tongue, and Quick Lace. The TPU film is thicker and more widespread, however.
Questions about the X Alpine Pro? Leave a comment.
Disclosure. This website is supported mostly through affiliate marketing, whereby for referral traffic I receive a small commission from select vendors, at no cost to the reader. This post contains affiliate links. Thanks for your support.
The post Preview: Salomon X Alpine Pro || For scrambly runs, maybe high routes appeared first on Andrew Skurka.
November 11, 2018
Preview: Altra Tusher || Hiking boot with zero drop & foot shape

My coverage of Outdoor Retailer Winter Market 2018 starts with Altra, which has developed a cult-like following among hikers and runners for its zero drop shoes, wide lasts, and gender-specific fits.
Altra revealed three new shoes at the show: the Tusher, Grafton, and Wahweap. They will be available in July 2019. Availability is uncertain at this time.
Teaser: Altra Lone Peak 4.5 or 5.0
Before previewing Altra’s new models, I would like to tease the next-generation Lone Peak.
Historically, the Lone Peak has been updated every six months, but going forward it will be on an 18-month cycle. If you love or hate the Lone Peak 4.0 (my preview), you’ll be stuck with it until Spring 2020, when we’ll finally see a Lone Peak 4.5 or 5.0.
Preview: Altra Tusher Hiking Boot

The Altra Tusher will be released in July 2019. It is a conventional hiking boot but with Altra’s famed zero drop and wide foot-shaped last.
The Altra Lone Peak is said to be the single most popular shoe on long-distance trails like the Pacific Crest, Appalachian, and Continental Divide Trails. Clearly, there’s demand for zero drop and wide lasts among hikers.
But does this demand run deeper than backpackers who are willing to hike in running shoes, and to backpackers who prefer to wear traditional hiking or backpacking boots? With the Tusher, Altra will find out.
This hiking boot will retail for $200 (or maybe $180), have a 27-mm stack height, and weigh 19.8 oz (or a bit less, for men’s size 9). It will only be available in a “waterproof” version.
Aggressive carbon rubber outsole
The Tusher retains the features that put Altra on the map:
Zero drop between heel and forefoot,
A wide (“Foot Shape”) last, and
Gender-specific builds.
But otherwise the Tusher has the looks and features of a conventional hiking boot:
Upper exterior made of 1000-denier ballistic nylon and rubberized overlays;
Seam-sealed waterproof/breathable eVent bootie;
Compression-resistant polyurethane midsole (not EVA); and,
Aggressive carbon rubber outsole.
The Tusher is built on Altra’s HFS last, which is higher-volume than the Standard last used in the Lone Peak. However, the Tusher’s eVent bootie and stiff upper materials should negate some of this extra volume, keeping the fit reasonably secure.
The Tusher is compatible with traditional and Dirty Girl-style gaiters. The outsole has an artificial instep, and the upper is equipped with Altra’s popular GaiterTrap.
Production will begin in a few months, but the Tusher remains a work in progress. Altra hopes to increase its midsole flexibility (which is atypically stiff for an Altra shoe) and to scale down its overbuilt toe cap. Wear-testing also needs to be completed, though to me the timeline seems too tight to address any fundamental issues that are discovered.

The Tusher has a traditionally constructed waterproof upper: an eVent bootie surrounded by more durable 1000d nylon and rubberized overlays.
Preview: Altra Grafton
The Grafton looks like an approach shoe, with its Vibram circle outsole, rugged toe cap, long lacing system, and minimally padded suede upper. But Altra described it only as an “all-purpose outdoor shoe with approach qualities and characteristics.” Its relatively wide last (specifically, the XC last, which is one of Altra’s narrowest) will not provide the lateral stability and edging performance of a true approach shoe.

The Altra Grafton, new for July 2019, has the looks of an approach shoe but is more of an outdoor generalist.
Preview: Altra Wahweap
Among the three new models, the Wahweap is the most well suited for everyday casual wear. It has a simple lined upper made of 75 percent hemp and 25 percent nylon, a big rubber toecap and heel, and a low-profile outsole that is laterally scored to increase flexibility.

The Altra Wahweap, new for July 2019, suitable for everyday casual use.
The post Preview: Altra Tusher || Hiking boot with zero drop & foot shape appeared first on Andrew Skurka.
October 30, 2018
Pre-trip backpack hunt checklist: To do before you go

Glassing in the Flattops
This weekend is the start of Third Season for elk and deer. Steve and I liked what we saw last year in the Flattop Mountains in northwestern Colorado, and will be going back, along with Noel, my partner on my first successful hunt four years ago.
This is my sixth backpack hunt now, and each year I further refine my pre-trip to-do list. It’s not perfectly applicable to all locations, seasons, or hunting styles, but this checklist will get you most of the way there.
Game licenses
Choose a hunting zone, season, and species.
Apply for the draw (April) and/or purchase an over-the-counter tag (August+).
Read or re-read regulations that are specific to the location, season, species, and license.
Identify several specific areas to hunt, ideally under a range of conditions (e.g. severe fall, stormy forecast).
Travel
Finalize trip dates.
Coordinate travel plans with hunting partners.
Book airfare.
Book ground transportation.
Book pre-trip, intra-trip, and/or post-trip lodging.
Gear
Research likely environmental and route conditions.
Create gear lists (tip: for templates, use my 3-season backpacking gear list and my backpack hunt gear lists).
Acquire all gear.
Wash, renew, and repair gear, fabrics, and insulations.
Hunting gear
Sight-in rifle.
Practice with rifle to determine ethical shot distance.
Lightly clean rifle and optics, and sharpen cutting tools.
Place electrical tape over the muzzle to keep out debris.
Electronics
Insert an empty memory card into camera.
Load data (e.g. topo map tiles, management boundaries) onto GPS or smartphone.
Top off batteries for all electronic devices by recharging or replacement; pack spare batteries, if appropriate.
Supplies
Calculate food needs.
Purchase, prepare, and package shelf-stable food.
Purchase stove fuel.
Assemble first aid, foot care, and repair kits.
Create and print topographic maps.
For outside the field
Casual clothes and footwear
Travel food and drinks
Toiletries
Phone, tablet, e-reader, laptop (with chargers)
Emergency
Leave itinerary information with an emergency contact.
Update settings on satellite messenger and satellite phone.
Last-minute
Refresh on field dressing technique (I like this video best, and this one and this one, too).
Pack up gear
Purchase perishable food.
Pack up supplies.
Get a forecast for the hunting area(s).
Settle on a starting hunting area based on last-minute forecast.
Close up the house, e.g. set up email auto-reply, backup files.
What is this list missing? Leave a comment.
The post Pre-trip backpack hunt checklist: To do before you go appeared first on Andrew Skurka.


