
Andrew Skurka's Blog, page 41
January 25, 2018
Osprey Levity/Lumina vs. Exos/Eja: What will you sacrifice for 12 oz?


The new Osprey Levity/Lumina is about 12 oz lighter than Osprey’s previous lightest backpacking pack, the Exos/Eja. But it sacrifices performance, durability, and price to make that happen.
This spring Osprey has released a new backpack design that is aimed squarely at the ultralight and thru-hiking communities. It’s available in men’s and women’s sizes, each in two volumes:
Levity 45 and
Levity 60 for men; and,
Lumina 45 and
Lumina 60 for women.
For many years, Osprey’s answer for these backpackers has been the men’s Exos 38, 48, and 58 and the women’s Eja 38, 48, and 58.
At Outdoor Retailer I spoke with Chris Horton, a Product Line Manager for Osprey who was involved in the development of the Levity/Lumina, about the major differences between these two packs, in terms of design and intended uses.
Overview
The Levity/Lumina is lighter, but less durable, $50 more expensive, and comfortable only up to about 30 pounds. It’s stripped down to the essentials, and some of its remaining features seem fussy, like tiny side-release buckles and 2mm compression strap cords. It’s designed for experienced, gram-conscious backpackers who want Osprey’s renowned fit and AirSpeed suspension.
The Exos/Eja is about 12 oz heavier, but more durable and less expensive. Its comfort limit is about 40 pounds, thanks to more cushioned body/backpack contact points. It has several nice-to-have features, like ice axe loops and a removable top lid; and its other features are often more user-friendly, like webbing compression straps and a sliding sternum strap. It’s a durable and reasonably priced ultralight pack that is suitable for beginner and veteran backpackers alike.
Weight
The headline story about the Levity/Lumina is their weight: in all sizes, the 45L and 60L are less than 2 pounds. As one specific example, in size medium the Levity 40 is 1 lb 13 oz and the Levity 60 is 1 lb 15 oz.
On average, the Levity/Lumina are about 12 oz lighter than an Exos/Eja of comparable volume, which is a decrease of about 25 percent. The exact difference will vary with volume and size.
Of course, everything is a tradeoff. In the case of pack design, weight-savings are normally at the expense of performance, durability, and/or price. To shed those 12 oz, Osprey had to make sacrifices in all of these regards.
Load carrying
The Levity/Lumina and Exos/Eja share the same load-support system, Osprey’s AirSpeed Suspension. It tensions a mesh back panel across a peripheral frame made of spring steel to create an air channel between the wearer and pack bag.
The main compartments are similarly proportioned, therefore have a similar balance and ride.
The mesh back panel on the Levity/Lumina is lighter than on the Exos/Eja. But to maintain durability, the mesh is less porous and air permeable.

The Levity and Exos both have Osprey’s AirSpeed suspension. The Levity uses a lighter mesh, but to maintain durability it’s less air permeable.
The more significant differences in the suspension are the shoulder straps and hip belts. Those on the Exos/Eja are more cushioned: the shoulder straps about twice as thick as on the Levity/Lumina; and the hipbelt is lightly padded, not just mesh.
The extra cushioning in these key contact points explains why Osprey recommends an upper weight limit of 40 pounds for the Exos/Eja, but only 30 pounds for the Levity/Lumina. For backpackers who have not streamlined their kits or who will have to carry significant food or water, the Exos/Eja will be more forgiving.

The shoulder straps on the Exos are about twice as thick as those on the Levity. Also, notice the sternum strap: the Exos has a conventional sliding rail, while the Levity is more minimal.

The Levity hipbelt is purely mesh and uses 20-mil webbing, while the Exos is lightly padded and has 35-mil webbing. This extra cushioning and surface area (and that on the shoulder straps) give the Exos more load carrying ability.
Fabrics
The main pack body of the Exos/Eja is made of 100d nylon, and its more abrasion-prone bottom uses heavier 210d nylon.
The pack body of the Levita/Lumina, meanwhile, is made of 30d silicone-impregnated nylon (“sil-nylon”), which is used frequently as a floor fabric in lightweight tents but which to me seems risky as a pack fabric: yes, it’s light; but it’s less durable than a comparably light Dyneema Composite Fabric (“Cuben”) or even a run-of-the-mill pack fabric like the 100d in the Exos/Eja.

The Levity pack is made of 30d nylon, which strikes me as a risky pack fabric. At least it’s covered with a 200d x 210d “Chineema” in the most abrasion-prone areas. Also notice the narrow top lid attachment webbing, narrow SR buckle, and 2-mil compression strap cord. Osprey was obsessed with eliminating weight.
Thankfully, Osprey covered the most vulnerable sections of the pack — including the bottom, side pockets, rear pocket, and top lid — with a 210d nylon x 200d ultra-high-molecular-weight polyethylene (UHMWPE), which is essentially an unbranded equivalent to the Dyneema fabric used by, say, Mountain Laurel Designs and My Trail Company. At Sierra Designs we used a similar “Chineema” on the Flex Capacitor 40-60 Pack, in order to get high performance at less cost.
Osprey branded this fabric as NanoFly. It’s more durable, more water-resistant, and marginally lighter than the 210d used on the Exos/Eja. But it’s largely responsible for the $50 price premium between the two packs.

The delicate 30d sil-nylon is covered in the most abrasion-prone areas with a much more durable 210d x 200d “Chineema.”
Warranty
All Osprey products are backed with an All Mighty Guarantee, whereby it promises to repair any damage or defect free of charge (or replace the product if it’s beyond repair).
The Levity/Lumina is not intended for canyoneering in southern Utah, bushwhacking through Alaskan willow or Appalachian guard spruce, or scrambling on mineral-infused High Sierra granite, but the cost of such foolish behavior will be incurred by Osprey, not the user (at least once they’ve made it back to the trailhead). The Exos/Eja do not need to be babied as much.
Top lids
The Exos/Eja has a removable top lid. Osprey considered saving weight on the Levity/Lumina by excluding this feature, but ultimately kept it: it protects the main compartment from precipitation, improves compression, and creates a convenient pocket. However, it’s permanently attached, to eliminate the weight of some hardware and straps.
Pockets
Each pack has two side pockets, one rear pocket, and a top lid pocket. The Exos/Eja has one additional pocket on the underside of the top lid.
The side and rear pockets on the Exos/Eja are made partially with stretch mesh, which makes for a cleaner aesthetic. The Levity/Lumina pockets are dimensional (i.e. pre-shaped) because they are made of the 210d NanoFly, which has no stretch.
Trims
Osprey went gram-hunting on the Levity/Lumina trims. It removed several convenient and thoughtful — but ultimately unnecessary — features, like ice axe loops, sleeping pad straps, its Stow-on-the-Go trekking pole attachment system, the extra ring on its compression system pivots that allows for more nuanced adjustments, and even the 2-inch loop that opens up the hipbelt when the pack is picked up by a shoulder strap.
Trims on the Levity/Lumina that could not be removed were often scaled back relative to the Exos/Eja. For example, it has 15-mil webbing on the shoulder straps (vs 20), 20-mil webbing on the hipbelt (vs 35), 2-mil cord on the compression system (vs 5-mil webbing), and half-inch webbing for the top lid compression (vs three-quarter inch). I would describe some of these efforts as “stupid light,” but I admire Osprey’s weight obsession.

The Levity was pared down to the max. Nice-to-have but often extraneous features were removed, like ice axe loops. And the trims (mostly webbing and buckles) were all scaled down.
Price
The Lumina/Levity is about $50 more than the Exos/Eja: $250 and $270 for the 45 and 60, versus $180, $200, and $220 for for the 38, 48, and 58.
Ideal use
It sounds like the Levity/Lumina could have been priced for less, but it was intentionally not. Osprey believes that the higher price point will encourage newer backpackers — who tend to be more budget-conscious — to go with the Exos/Eja, which will better endure heavier loads and which does not need to be as babied. Chris specifically said, “The Levity/Lumina should not be someone’s first backpack.”
The Levity/Lumina is really designed for veteran backpackers, who generally have lighter kits and who take better care of their gear. Relatively speaking, the $50 premium is a small price to pay for a 12-oz weight-savings.
Questions about the Levity/Lumina or Exos/Eja? Leave a comment. If I can’t answer it, I’ll get the answer from Osprey.
Disclosure. This website is supported mostly through affiliate marketing, whereby for referral traffic I receive a small commission from select vendors, at no cost to the reader. This post contains affiliate links. Thanks for your support.
The post Osprey Levity/Lumina vs. Exos/Eja: What will you sacrifice for 12 oz? appeared first on Andrew Skurka.


January 24, 2018
Suunto Ambit3 vs. Garmin Fenix 5 || Core differences + ideal uses


The Suunto Ambit3 Peak (left) and Garmin Fenix 5X (right)
For a week I have been wearing a borrowed Garmin Fenix 5X, which is Garmin’s flagship multi-sport GPS sport watch. I’m a longtime user of the Suunto Ambit3 Peak (and, before that, the Ambit2), and this first-hand experience with a competing brand and product has been informative.
I’ve always been curious how the Ambit3 compares to the Fenix 5, and what would compel the purchase of one model over the other. The differences are more significant than I thought they would be, and to make an informed buying decision you need not immerse yourself in the minutia of product specs. It’s easier than that.
Product families
Before I compare the Fenix and Ambit models, let me give a quick overview of each collection.
The Fenix 5X is the most feature-rich of the three-watch Fenix 5 family. Versus the base Garmin Fenix 5, the 5X has a larger face so that it better displays pre-loaded 100k topographic maps. (The 5X is the only map-enabled Fenix watch.) The Garmin Fenix 5S is a shrunken version of the Fenix 5, with identical software but a smaller face and less battery life.
For the remainder of this article I will cumulatively refer to these watches as the Fenix 5. For a more in-depth explanation of their differences, read this preview.
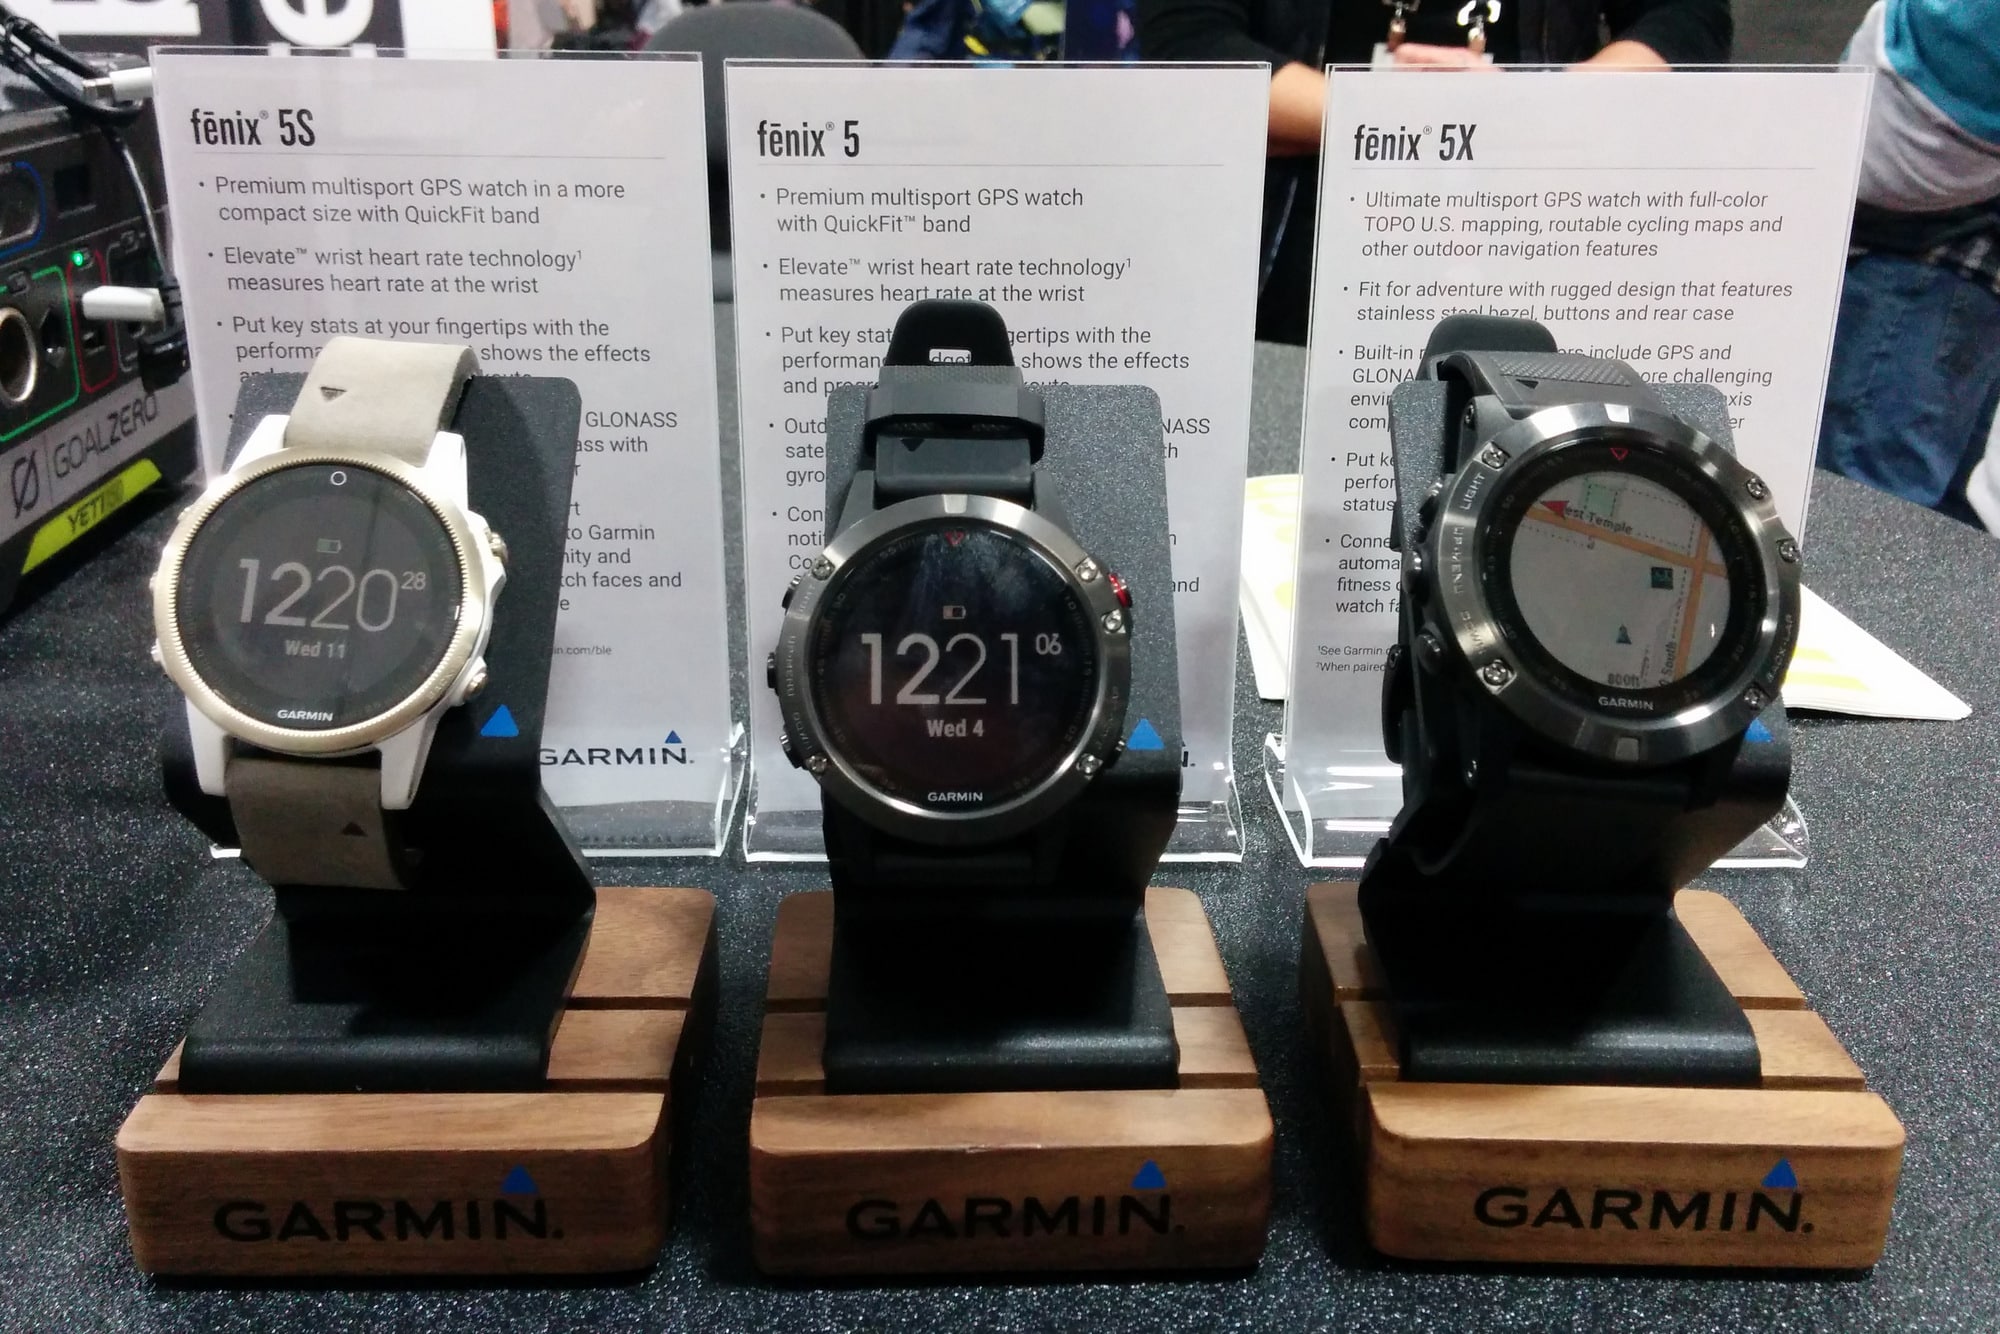
Garmin’s fourth-generation Fenix series: the 5S, 5, and 5X.
The Ambit3 Peak is the top-of-the-line Ambit, followed by the Ambit3 Vertical. There is also an Ambit3 Sport and Ambit3 Run, but they have been discontinued and are being sold out. The Ambit3 Peak is more accurate and has a longer lifespan than the Vertical, while the Vertical has a vibration alarm and comes in a smaller package.
Again, for simplicity I will refer to these watches as the Ambit3. To better understand this family, and Suunto’s other GPS watches like the Spartan series, read this history.
Intended use
The Ambit3 is ideally suited for endurance sports like running, biking, and hiking. It tracks pace, distance, vertical change, heart rate (with a compatible heart rate monitor), and other key exercise metrics, with a surprising level of accuracy.
It’s almost exclusively an exercise watch, and is best thought of as workout gear: like my running vest or trail shoes, I put on the Ambit3 before working out and take it off afterwards. Between exercise sessions, it’s of little value.
The Fenix 5, meanwhile, combines the functionality of the Ambit3 with the design ethos and features of a smart device like the Apple Watch and an activity tracker like the Fitbit Charge 2. It is meant to be worn all day, which its relatively refined looks (at least for an athletic watch) makes generally permissible.

The Fenix 5X has a nice color display (with multiple face options) and clean looks, and it may pass muster as an all-day watch depending your work environment.
In addition to recording the details of your run or ride, the Fenix 5 will alert you after long periods of inactivity (i.e. “Hey, you, step away from your desk.”), track you sleeping patterns, and even tell you the distance to the 8th hole from your current spot on the fairway.
Through Connect IQ, more functionality can be unlocked by downloading free apps. For example, the Uber app will display the name of your driver, a description of their vehicle, and their exact ETA. There is a Suunto app store, too, but the programs are overwhelmingly exercise-centric.
Ecosystem
The Fenix 5 and Ambit3 are analogous to an iPhone and Google Pixel 2. Similar in function, but so sophisticated and different that it will take days or maybe weeks for an expert user of one device to become proficient in the other.
The Ambit3 is part of the Suunto ecosystem. It connects through Moveslink desktop software or the Movescount app, and recorded data is displayed in the Movescount online portal or the Movescount app. If interested, the data can be forwarded to an independent platform like Strava.

Screenshot of Movescount
In contrast, the Fenix 5 is part of the Garmin ecosystem. It connects through Garmin Express desktop software or the Garmin Connect app, and recorded data is displayed in the Garmin Connect online portal or the Connect app. If interested, the data can be forwarded to an independent platform like Strava.

Screenshot of Garmin Connect
In terms of functionality, my experience with both ecosystems has been positive. They’ve now each developed three or four generations of GPS watches, and in the process they have found and fixed most of the bugs. Software is updated automatically and doesn’t cause crashes; accessory devices pair successfully; and the platforms don’t go down.
Design and user interface
The Ambit3 is utilitarian: it works exactly as intended, but has little polish. Most notably, it has a two-color matrix display (which limits the styling of data fields and menu system), and the GPS antenna awkwardly protrudes from the bezel. When I asked my wife to describe it, she said, “It’s very plain, kind of ugly.”

The GPS antenna of the Ambit awkwardly bulges from the bezel. The Fenix 5 is more refined, although it’s still athletic-looking.
Similarly little effort has been invested into beautify-ing the Movescount platform, which has a dark background, small type, limited color palette, and always stoic imagery.
The Fenix 5 and the Garmin Connect platform are more refined and welcoming. The Fenix 5 has a high-resolution color display and clean look. When I showed it to my wife, she immediately said, “I like that one a lot better.” Garmin Connect has a fun, light, and colorful look, and celebrates everyday-looking people.
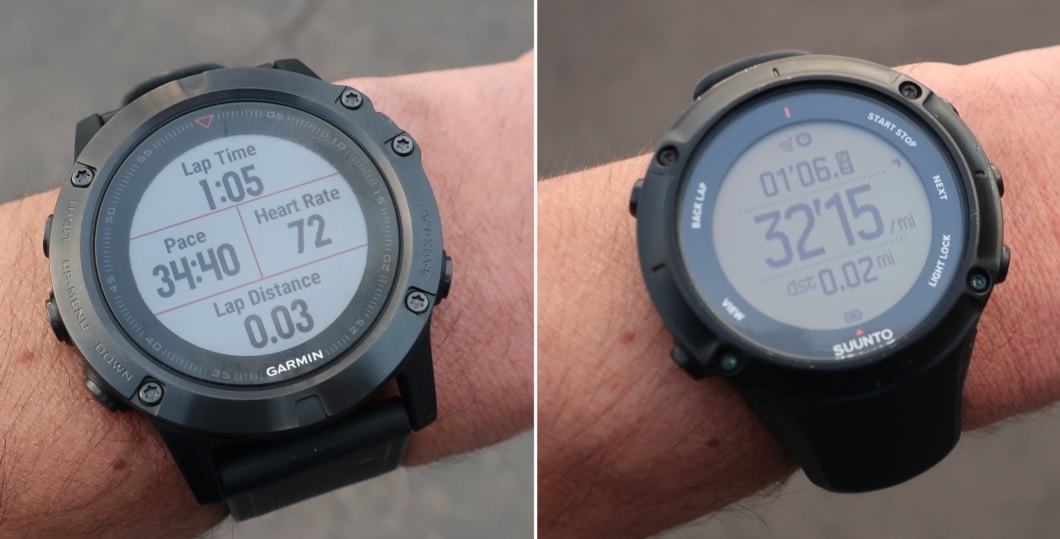
The Ambit3 and Fenix 5 record the same data during runs, rides, and hikes, but Garmin’s color display is more pleasant to look at and has more display options.
Critical specs and features
Exercise tracking
As previously stated, the Amit3 and Fenix 5 will both accurately track your run, ride, hike, and other activities. They record very similar data, including all of the most important stuff.
I give the Fenix 5 a slight edge in exercise tracking because of its optical heart rate monitor. I have not found it reliable enough for specific heart rate-based training or racing — it’s often off by 5-10 bpm at any given moment. However, the average HR is usually within 1-2 bpm, which makes it accurate enough for easy runs or unstructured training.

The Fenix 5 watches have optical wrist heart rate monitors. I’ve not found it accurate enough for specific HR training, but it’s accurate enough for easy days and unstructured training.
Activity tracker and smart watch
The Fenix 5 also serves as an activity tracker and smart watch. The Ambit3 really doesn’t try.
Battery life
Unless you’re into ultra-distance events (e.g. ultra marathons, 24-hour races, adventure races) or backpacking, the battery life of both watches is sufficient. The Fenix 5 models range from 14 to 24 hours with 1-second GPS pings, and 35 to 60 hours in UltraTrac mode, which is less accurate.
The Ambit3 gets the win here. The Peak is rated at 20, 30, and 200 hours when the GPS ping is set to 1, 5, and 60 seconds, respectively.
Navigation
The Ambit3 and Fenix 5 both have a barometer-based altimeter, which is useful for navigating in mountainous environments. They also have a digital compass, which is handy for finding north but not much more; and some other clumsy or frustratingly hidden features that I don’t bother to use.
The Fenix 5X is unique for having pre-loaded 100k topographic maps. For serious navigation I prefer paper maps on 11 x 17 paper, but I could see occasional value in this feature if running or day-hiking in an unfamiliar place.
Pricing
Overall, the Fenix 5 is “better” than the Ambit3, with superior functionality and design.
However, how valuable is that extra functionality and gloss? I can’t answer that for you, but personally I don’t feel like I’ve missed out for the past 36 years of my life because I didn’t have a watch that tracks how many glasses of water I have drank today.
If you decide you want the Fenix 5, you will pay a premium for it. Retail prices on the Fenix 5S, Fenix 5, and Fenix 5X are $550, $550, and $650, respectively, with a $100-$150 extra charge for a sapphire face and $70 more for a heart rate strap. Garmin controls their distribution tightly, and you won’t see them available for less in the usual places (e.g. Amazon).
The Ambit3 costs substantially less. The base Ambit3 Peak is available online for low-$300’s, and the heart rate strap bundle adds about $25.
Bottom line: My buying advice
If you want the better watch and can afford it, go with the Fenix 5. The 5 will work for most. The 5S will be preferred by those with smaller wrists. And the 5X may be worthwhile if you would at least occasionally rely on the pre-loaded 100k maps.
If you would like to have an activity tracker and/or smart watch in addition to a multi-sport GPS watch, again go with the Garmin. It may actually save you money, if you would otherwise buy one of these devices.
If you just need a multi-sport GPS watch, buy the Suunto Ambit3 Peak. I love mine, and you won’t be disappointed.
If you want a watch for backpacking or ultra-distance events, the Ambit3 is the winner again.
Need help in making a decision? Leave a comment.
Disclosure. This website is supported mostly through affiliate marketing, whereby for referral traffic I receive a small commission from select vendors, at no cost to the reader. This post contains affiliate links. Thanks for your support.
The post Suunto Ambit3 vs. Garmin Fenix 5 || Core differences + ideal uses appeared first on Andrew Skurka.
January 23, 2018
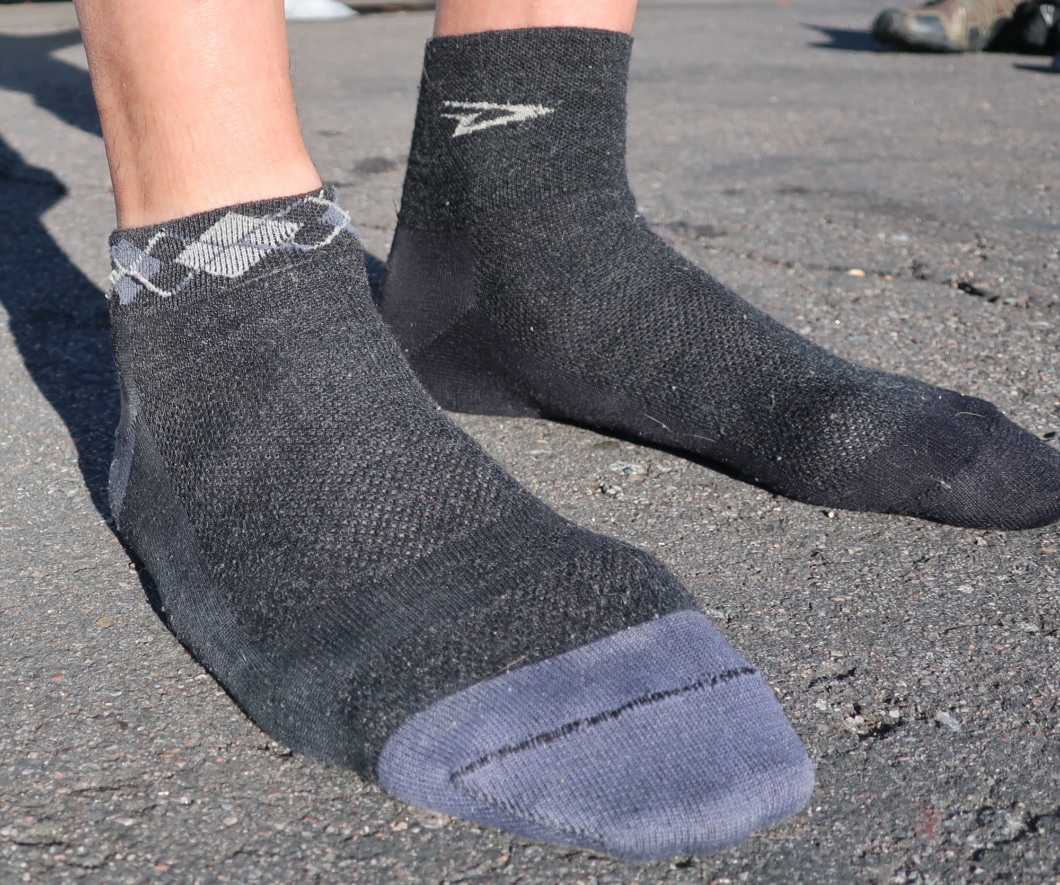
Long-term review: DeFeet Wooleator Sock || Go-to sock for a decade-plus

In December I visited my parents in Massachusetts, and my mom had waiting for me a box of possessions that I needed to bring back to Colorado or throw out. Along with newspaper clippings from the Sea-to-Sea Route, a Valentine’s Day card from a high school sweetheart, and running logs from the pre-Strava era, I found some clothing and equipment from the Great Western Loop in 2007, including a pair of DeFeet Wooleator socks.

A blast from the past. For the entire 6,875-mile Great Western Loop (which earned me “Adventurer of the Year” honors from National Geographic Adventure), I wore the 3-inch Wooleator. Every 600 miles I received two fresh pairs. In this photo they’re out view, hidden by my gaiters and GoLite shoes (which I most definitely am no longer wearing).
Long-term review: DeFeet Wooleator Socks
A decade later, my go-to sock is still the Wooleator, which is a non-padded, thin sock made of 61 percent USA merino wool, 37 percent nylon, and 2 percent spandex. All told, I have hiked and run at least 20,000 miles in the Wooleator. I ran 4,000 miles in them just last year.
The Wooleator shares a similar construction to DeFeet’s original classic, the Aireator, which uses polyester fiber instead of merino. The top of both socks is a highly air-permeable mesh, which improves the dissipation of heat and moisture.
The Wooleator (and its polyester equivalent, the Aireator) has a mesh top that dissipates heat and moisture more quickly than non-mesh areas of the sock.
Optimal uses
I wear the Wooleator for:
Backpacking and hiking in 3-season conditions;
Road and trail running year-round, with temperatures as low as the single-digits;
Alpine skiing, as a liner sock inside my plastic boots; and,
Nordic skiing and snowshoeing, as a liner sock beneath the warmer DeFeet Woolie Boolie socks and sometimes a vapor barrier liner sock.

I use the 1-inch Argyle version for running in warm temperatures, like the 2017 Boston Marathon with 70-degree temperatures. They are the fastest looking iteration of the Wooleator.
I use the Wooleators for casual purposes, too, except if I’m wearing flipflops or brown dress shoes. They can be worn with black dress shoes, no problem, although my wife dislikes the pairing on principal.
Don’t ask me to compare the Wooleators to other hiking and running socks from Darn Tough, Smartwool, DryMax or others brands — I’ve never been compelled or curious to try them. If it ain’t broke, don’t fix it, I suppose.
In addition to its performance, the Wooleator offers another perk: it’s made in the USA, like all DeFeet products. Since 2005 I’ve been a grassroots brand ambassador for the Hildebrand, North Carolina-based company, receiving a few pairs of socks and wool Duragloves each year in exchange for sharing my experience with clients and readers.

The 5-inch version is best for cooler temperatures. It provides more ankle and lower-calf coverage, and ensures no gapping between shoes and running tights. It’s also an effective liner sock beneath a thicker insulating sock, and optional VBL sock.
Versions
There are several versions of Wooleator, with the only difference being the cuff height. I wear the:
1-inch Argyle for 3-season running, because they insulate the least and look the fastest;
3-inch D-Logo for backpacking and ultra marathon races, because they cushion my shins from my hiking gaiters and they seem less vulnerable to debris entering the sock than the 1-inch Argyle; and,
5-inch HiTop for colder temperatures, when I need to cushion my lower-calf from tall boots and to cover fully the gap between my running tights and shoes.

Three versions of the Wooleator: 1-inch Argyle, 3-inch D-Logo, and 5-inch High Top. Each version excels in a particular application and set of conditions.
Winning characteristics
Why do I keep wearing the Wooleator, mile after mile and year after year?
1. Wearable range
The Wooleator performs excellently for nearly all of my purposes. One sock and done.
The only notable exception is when big game hunting in the Colorado Rockies in October or November, when I find that one pair of Woolie Boolies work best — it’s too cold for the Wooleators on their own, but not yet cold enough for Wooleators+Woolie Boolies.
2. Moisture management
After becoming wet with perspiration, submerged in a snowmelt-fed creek, or washed during a rest stop, the Wooleators dry quickly and retain little moisture. They are thin and unpadded, and consist mostly of hydrophobic fibers like merino wool and nylon (with a tiny bit of spandex and no cotton).
Moisture management performance is not as good as a pure synthetic sock like the Aireator, but overall I think the tradeoffs are worthwhile. Plus, wool remains relatively comfortable when damp.

On long summer days in the West, I can wash-and-dry two pairs of Wooleators. I wash Pair A in the morning, while wearing Pair B. They’re dry after a few hours, and I swap them in early-afternoon. Pair B gets washed, and is dry within a few hours. I wear this clean & dry pair to bed, and start the cycle again in the morning.
3. Anti-microbial
If you have worn both polyester and merino wool shirts, you know that wool produces far less odor. The same is true of polyester and merino socks — the inherently anti-microfibial wool fibers help to reduce foot funk (though not eliminate it entirely, especially on longer and wetter trips).
4. Fit
Spandex improves fit, but it’s heavier, more water absorbent, and less durable than polyester, nylon, and merino. It’s advantageous for a sock to include some spandex, but it’s not a substitute for a well fitting design. The Wooleator contains only 2 percent spandex, and fits my feet like a glove.
My size 11.5 feet are narrower and lower volume than average, and I find that size Large (for sizes 11-13) are best. If your feet are wider or larger, I’m interested to hear how they work for you. Please leave a comment.

A conservative estimate for the lifespan of the Wooleator is 300 miles per pair. Under good conditions (i.e. they are normally clean and dry), I think it’s probably more like 400-500 miles per pair. The most common blowout point for me is at the bottom of the cuff, followed by wearing through the heel. The sock on the right is trash; the sock on the left still has about 100 miles of life.
5. Durability
Even if I get them for free, I’m not interested in a high performance sock that can’t withstand extensive abuse — they’d be unreliable on longer backpacking trips, and it’d simply feel wasteful.
It’s difficult to specify the lifespan of the Wooleators, because it’s affected by user factors (e.g. weight, gait), choice of shoes, environment (e.g. wet, gritty), and perhaps a few others. On the Great Western Loop, during which I was following established hiking trails through semi-arid environments, I sent two fresh pairs about every 600 miles. During the Alaska-Yukon Expedition, my records show one fresh pair every 300 miles. Normally, I would mail my used pairs home because they were not yet completely worn out.
More recently, two new pairs easily endured trips of 150-200 miles on the rugged Kings Canyon High Basin Route, Wind River High Route, and Pfiffner Traverse. At the finish, they were still in “good” condition.
The most common blowout point for me is along the Achilles, at the bottom of the cuff, although they remain usable for a while so long as I don’t yank hard on the cuff. The true death kneel is normally a hole in the heel, or sometimes on the underfoot. I have never had a hole develop in the toebox.
Questions about or have an experience with the Wooleator? Leave a comment.
Disclosure. This website is supported mostly through affiliate marketing, whereby for referral traffic I receive a small commission from select vendors, at no cost to the reader. This post contains affiliate links. Thanks for your support.
The post Long-term review: DeFeet Wooleator Sock || Go-to sock for a decade-plus appeared first on Andrew Skurka.
January 20, 2018
Race report: Houston Marathon || 2:28:24, 33rd place


Boom, in the sub-2:30 Club. And checking the clock just to make sure!
After a solid but underwhelming performance at UTMB last September, I was forced to ponder the future of my running. I was emotional fatigued from three years of intense training, and was lacking an obvious or compelling “why” to sustain it. But at 36 years-old, I recognized that it’d be easier (and probably more fruitful) to work through my remaining bucket list now than to circle back later.
At least for a little while longer, in October I decided to double-down. The Boston Marathon in April would have been ideal: it’s my most favorite race, it doubles as a family visit, and I would have had 6.5 months to prepare. But I missed the registration window. PSA: It’s open for just a day or two, and if you miss it you’re SOL.
So for another shot at sub-2:30 I settled on the Houston Marathon, which has a flat course and an elite field. My running and hunting partner, Steve, whose wife Emma is from Houston, agreed to register as well.
Training
The single downside to Houston was its timing: I had just 3.5 months to redevelop my marathon speed, which had gone away while while training for 100-mile mountain ultras. Moreover, in early-October my body was still residually fatigued from UTMB, which was a massive effort — 104 miles with 31,000 vertical feet of climbing.
For more in-depth training details, read this recent interview with coach David Roche and view my training on Strava. Here’s the synopsis: it was a rough transition, with many workouts that felt harder than they should have and that were slower than I wanted them to be. But as David predicted, in the last few weeks I finally started to feel good — great, actually — and it was clear that I was “riding the wave” into Houston.
Based on the final workouts (notably a solo sub-max 10K in 34:00), David put me at 2:29:XX, assuming that the race day weather was cooperative and that there were no last-minute surprises (e.g. the flu). He said that a 2:27:XX was possible, but not a recommended race plan. I’ve never asked to see David’s calculators, but intuitively these goal times felt about right.

Pre-race with Steve in our “warm up clothes,” which we’d purchased at Goodwill the day before and tossed over the corral fence 5 minutes before the start.
The first half
At the 7 AM start I felt prepared and confident. My legs were fresh and spritely. I was hydrated and nourished. My bowels were empty. And the forecast was ideal: temperatures in the mid- and high-30’s, with a mild east wind.
The starting line at Houston felt like a free-for-all. Entries with a confirmed result of 4 hours or less are placed in the A corral. Signage helps the field to self-sort (e.g. “If your goal pace is 8:00 minutes per mile, line up here.), but it’s not enforced. Thankfully, I was able to position myself just behind the elite and development fields, and didn’t have to dodge many runners wearing basketball shoes or Superman costumes who had pushed their way to the front in the hopes of getting on TV.
Within 800 yards I had caught Sarah Crouch, who like me was aiming for sub-2:30 and who was being paced by her husband, Michael, who had offered me his pacing services, too. I ran with them for about a mile, but it felt pokey and I slowly pulled away, wondering if i would regret it later.
Even for someone who runs 100-mile races, I consider the marathon a long effort that demands respect. The first half needs to feel easy, or else the second half will probably be really ugly. Essentially, you’re a frog in a pot of increasingly hotter water, and it’s imperative to not boil too soon.
After the first mile or two, I settled into a natural pace in the mid- and high-5:30’s. Whereas at altitude this would be my 10-mile or half-marathon race pace, at sea level it’s just below my lactate threshold, making it much more sustainable. I tried to stay mentally relaxed, and saved additional energy by drafting behind other runners. My heart rate was purring around 160 bpm.

Fresh and relaxed at around Mi 7, just before the marathon and half-marathon courses split.
My Suunto Ambit3 Peak GPS watch showed a gradual drop in my average pace, eventually bottoming out at 5:37 minutes per mile. I figured my actual pace was slightly slower, maybe 5:38 or 5:39 — it’s difficult to hit each course apex perfectly, so you actually run longer than 26.2, resulting in a slower official pace. Even though the effort felt comfortable, I debated if I was naively succumbing to the race’s early excitement and momentum.
When the marathon and half-marathon courses split near the 8-mile marker, two-thirds of the runners within sight disappeared, increasing the individual pacing duties at first. But we slowly regrouped, and even had a six-man pack for a while around Mi 20 before it splintered in the final 10K.
I didn’t ask for names, but I’ve since learned some of them. Brian Hurley was third in my 35-39 age division. Bobby Zeller finished in 2:28:55, and Steve Heagy just behind me in 2:28:29. And Chris Maxwell closed best, in 2:27:57.
I ran my fastest 5K of the day between 15K and 20K, in 17:22 (5:35 pace), and hit the halfway mark in exactly 1:14:00.
Hold, hold, hold
As I made the sharp 180-degree turn immediately after the halfway mark, I gave up a stride on a three-man pack to delegate the wind-breaking and pace-setting responsibilities. It was a cowardly but prudent move. The effort felt sustainable, but barely so; a negative split seemed unlikely at this rate. Plus, I was on track to break my goal time by two minutes, and I saw little sense in pushing now at the risk of losing everything later. Pigs get fat, but hogs get slaughtered.
Our small pack steadily rolled north past The Galleria and towards the northwestern corner of the route. Frankly, I don’t remember much of it — with my body locked into a pace and onto two other sets of heels, I mentally checked out, suspecting I would need the bandwidth later. I was described as looking “very focused” on the eastern boundary of Memorial Park at Mi 22, where Emma’s parents were spectating. Almost subconsciously, I returned a raised fist.
Our pace slowed, but not dramatically: from 20 to 25K, 25 to 30K, and 30 to 35K, we averaged 5:41, 5:40, and 5:40 pace, respectively. Indeed, it was a steady roll. A few runners joined us from the back, increasing our group to six. I was thankful for the camaraderie and momentum.

The first half felt sustainable, but just barely so. Between Mi 13 and 20 I pulled in behind other runners and simply tried to hold on.
Final 10K
The most significant “hills” on the course are punchy rollers where the course climbs over I-610 at Mi 12.8 (21K) and drops under it at Mi 20.0 (32K). In the final 6.2 miles (10K) along Memorial Blvd, a few others catch attention from those whose legs are giving out on them.
I was falling into that group. While climbing back up to grade after the second I-610 crossing, both hamstrings began to lock up. So close yet still so far from the finish, it was a terrifying feeling.
Interestingly, the exact same thing had happened to me at Boston. I felt the first twinges around Mi 17, and then had moderate cramping in my hamstrings and calves between Mi 18.6 to 21.7 (30 to 35K) through the Newton Hills. Due to the 70-degree temperatures at Boston, I had suspected heat and hydration as the culprits, but I’m thinking now that it’s a muscle fatigue issue that I can possibly rectify with strength building.
Since the halfway mark I thought I would probably have to slow down in order to finish, and finally I was being forced to. My 5K split from Mi 21.7 to 24.9 (35 to 40K) was the slowest of the day, in 17:56 (5:46 pace), and my heart rate dropped from the low-160’s into the high-150’s. I was just trying to hold on and not give up too much time.

The hurt finally arrives, especially between 35 and 40K (Mi 22 to 25). I still managed to keep moving at 5:46 pace, though.
The mile-markers could not come fast enough, but eventually I hit Mi 25.0 and decided it was time to go again. Over the final 1.2 miles (2K) I averaged 5:25 pace and picked up two spots. I passed under the finish in 2:28:31, for a gun-adjusted official time of 2:28:24. Woot, woot!

Rolling down the homestretch in downtown Houston. After a rough 5K between 35 and 40K, I closed well for the final 1.2 mi (2K), averaging 5:25 and passing two.
A half-tear
On the return to the expo hall, I was ecstatic but also reflective. This life milestone represented not just 3.5 months of work, but three years of solid commitment, and over two decades of training, since the age of 14. At the moment I may be without an inspiring “why” and may feel more content with riding into the sunset after Houston than UTMB. But, running, can I quit you? I can’t imagine.

Lots of smiles! I joined the sub-2:30 club, and Steve ran 2:50 (10 minutes faster than his goal time) with a flying final 10K.
The post Race report: Houston Marathon || 2:28:24, 33rd place appeared first on Andrew Skurka.
January 19, 2018
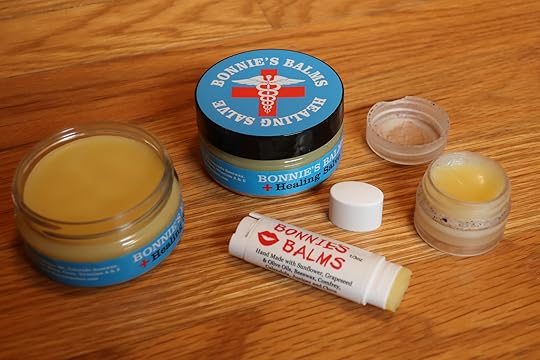
Back in stock: Bonnie’s Balm || For wet feet, chafing, and cracked lips & skin
Badly macerated feet after the Alaska Mountain Wilderness Classic
Last year the owner and founder of Bonnie’s Balm, Bonnie Searcy, had a host of health issues (among other things, two black widow spider bites) and the business seemed to evaporate. Orders went unfulfilled, calls and emails garnered no response, and the website even went down. As a long-time supporter and distributor of the products, I was both baffled and utterly frustrated. No doubt, the closure hurt the brand’s reputation among some prospective customers.
A few weeks ago I heard that Bonnie was up and running again, so I put in a call to Glenwood Springs and managed to catch her. I’m willing to give second chances, especially to Colorado-based small businesses. Also, I had tried to reverse engineer the product, but wasn’t happy with the results and wasn’t certain that I wanted to convert my kitchen into a balm-making facility.
Bottom line: I have inventory again of 2-oz jars of Bonnie’s Balm Healing Salve.

For solo and short trips, I recommend decanting salve from the 2-oz jar into a smaller .25-oz jar. The first 30 orders will receive a lip balm, too.
The jar lists multiple uses. I have found it truly effective for a few:
1. Wet feet. Apply the night before you expect you feet to get wet, so that the balm has time to be absorbed by the skin. It helps to waterproof the skin and reduce maceration (“pruning”), which is itchy or painful, and makes the skin more susceptible to blisters. After a wet day of hiking, apply the Salve after your feet have dried out. This will help prepare them for the next day, and to prevent them from cracking overnight. When my feet are really beat up or dried out, I will apply in the evening and again in the morning.
For short and personal trips, I decant the balm in 0.25-oz plastic jars, which lasts 5-7 days assuming daily use.
2. Chafing. If I use the backcountry bidet technique every day or two, and if my clothing is dialed, it’s rare that I chafe while hiking. It seems less avoidable when running, however, especially ultra-marathon distances in high heat and humidity. When chafed, I find that the Healing Salve works very well. The sunflower oil and beeswax are natural lubricants, and the essential oils seem to accelerate healing.
3. Cracked lips and skin. Bonnie’s Balm substitutes for a dedicated lip balm. In fact, the Healing Salve is available in Chapstick-type containers, too. I also apply the Salve to other tortured skin, like cracked hands from dry winter air, and minor abrasions like road rash.

Order now
If you would like some Healing Salve for the upcoming season, order it here. The cost is $13 per unit, plus $3 flat shipping via First Class regardless of quantity.
Orders normally are fulfilled within 24 hours.

Disclosure. This website is supported mostly through affiliate marketing, whereby for referral traffic I receive a small commission from select vendors, at no cost to the reader. This post contains affiliate links. Thanks for your support.
The post Back in stock: Bonnie’s Balm || For wet feet, chafing, and cracked lips & skin appeared first on Andrew Skurka.
Notes for next time || Houston Marathon: Pace chart, course GPX, clothing & in’s-and-out’s

This post is part of a long-running series that I publish after a big race or trip. It’s purpose is to capture important and helpful — but easily forgettable, perhaps — details that would be helpful to me on a second attempt, or to someone on their first.
Numbers and data
2018 results
Download a GPX file of the couse
My race: Strava, Movescount
Interview with coach David Roche about my training
Finally, my split chart:
Clothing and equipment
Conditions: mid-30’s to high-30’s, sunny, mild east wind
The day before we bought some disposable clothes at Goodwill (e.g. sweat pants and sweatshirts), so that we could stay warm while waiting for the race to start. At Houston this is probably a rare concern, since temperatures normally are in the 40’s or 50’s.
Most runners wore singlets and arm sleeves, and most wore their arm sleeves throughout the race. I started with a wispy long-sleeve shirt, arm sleeves, liner gloves, and a Buff. I dropped the arm sleeves at Mi 3.5 and removed the Buff at Mi 13, but was happy to have L/S and gloves for the rest of the race. Note: I run colder than average.
I deliberated for too long over whether I should a L/S or S/S. Ultimately, Steve asked an insightful question: What is the worst case outcome? For me, it was being too cold, and having my muscles lock up. So I went with the L/S, thinking that at worse I could roll up the sleeves. For Steve, the worse case outcome was overheating, so he want with a singlet and arm sleeves.
I had only screen on my GPS watch, rather than two. Pace was in the main window, and cumulative time on the top. On bottom: HR, average pace, and distance. This was a great setup.

In’s and out’s
On Saturday night we ate at Carabba’s Original, which is more upscale than the chain. I had a chicken breast with some feta cheese, bread, and some pasta. We finished at 7:30, which was a little later than I’d hoped.
I drank a cup of Smooth Move when we got home. I felt a little blocked up, and I was nervous about a 7 am start that was really 6 am in my time zone. My experience is that so long as you get everything out in the morning, it’s an effective strategy. But it turns poop into pudding, so it’s critical that you get it all out. I went to the bathroom at least four times, maybe five, before the race. Normally before morning long runs, I’m a reliable two-stop, and often three.
We woke up at 4:45 and left Emma’s house at 5:30, reaching the Expo around 5:50 AM. This gave us enough time to get into the Expo hall, stretch out, and empty the GI.
In the morning I had a 16-oz cup of coffee and a 16-oz mug of Emergency drink mix. I drank another 20 oz of tea before the race, finishing by 6:30 AM. I ate one PremierProtein bar with coffee, and another half before we left the house, finishing the other half about a half-hour before the race start.
I carried my 20-oz water bottle to the starting line and used it as a pee bottle, then tossed the bottle over the corral fence. In the dark and packed in with other runners, I had plenty of privacy. There were no spectators around.
At 6:30 I took a 100-mg caffeine pill, effectively drinking a second cup of coffee for the morning. The surge of caffeine may make the easier miles feel too easy, but I like having the momentum early in the race — if I do it right, the second half of the race is going to hurt regardless.
To bypass bottle-necked aid stations and to ensure that I got some liquids and calories in early, I started the race with a full 10-oz bottle with 1.5 oz of Maurten powder. I kept the bottle in my Naked Running Band. Unless you are an elite and can use the elite hydration stations, I think it’s worth starting with your own bottle: it’s really difficult to successfully drink liquids from a paper cup while at race pace, and it allows you to avoid bottlenecks at the aid stations. Also, I gained at least a few seconds on every runner that had to stop at the aid station.
I consumed a gel at Mi 15 and Mi 22. So total caloric intake was about 350 calories, plus a little bit more in Gatorade. Total liquid consumption was about 20-25 oz. With temperatures as low as they were, this race had minimal hydration needs.
Expo & logistics
We picked up our bibs around 9 AM on Saturday, after an 8 AM run in downtown. It was an easy process, with no lines.
I would happily have paid another $10 for a better race shirt. I regularly wear my Boston shirt, for example. The Houston shirt was a cheap cotton short-sleeve. I wore it on Sunday morning and discarded it five minutes before the start, along with my Goodwill clothes.
Houston is a big event, but it’s not a world major, so the expo is smaller and less polished than at, say Boston (and Steve said Chicago, too). We walked through the hall for about 10 minutes and left, uninspired to investigate anything further.
Downtown Houston is a dead zone on the weekends. There is ample parking. And it was easy for Emma’s mom to drop us off at around 5:50 AM on Sunday morning.
Recovery
Overall, it’s about what I would have expected.
Hamstrings are the last to come around fully.
I took Monday-Thursday off, but could have run by Tuesday.
Questions about the Houston Marathon? Leave a comment.
The post Notes for next time || Houston Marathon: Pace chart, course GPX, clothing & in’s-and-out’s appeared first on Andrew Skurka.
January 12, 2018
Live tracking: Houston Marathon, Sunday 7 AM CST!


The finish, Boston Marathon, April 2017
On Sunday I’m racing the Houston Marathon. The gun fires at 7 AM CST, and I should be done about 2.5 hours later.
Track the race live. I’m bib 1513.
At a minimum, I’d like to improve upon my current PR, set last year at the Boston Marathon, in 2:32:01. Workouts suggest that I’m not quite as fast right now as I was last April, but the weather forecast for Houston is perfect (high-30’s, sunny, and light wind, versus the 70-degree temps at Boston) and it’s generally considered a faster course because of its remarkable flatness. Also, with a solid PR in the bag, I can afford to be more aggressive, at the risk of a difficult final 5K.
Really, I’d love to break 2:30, which requires averaging 5:43 minutes per mile for 26.2 miles. This barrier, contrived as it might be, has been my focus for the entire training cycle.
I probably will not post a race report until the middle of next week, but I’ll probably shares results and a short commentary on Facebook after the race.
The post Live tracking: Houston Marathon, Sunday 7 AM CST! appeared first on Andrew Skurka.
January 11, 2018
DIY || An original: The Cat Food Can Stove, by Roy “TrailDad” Robinson


Flyin’ Brian Robinson, son of Roy “TrailDad” Robinson, enjoys a pesto noodle dinner cooked on his original TrailDad Cat Food Stove in Sequoia-Kings Canyon National Park.
Roy “TrailDad” Robinson created and popularized the Cat Food Can Stove, one of the original DIY homemade alcohol stoves. Roy was the father of Flyin’ Brian Robinson, who used this stove on his groundbreaking Calendar Triple Crown in 2001 and who still uses one today.
When Roy passed away last year, the family decided to take down his website, where the Cat Food Can Stove directions had been posted for over fifteen years. With permission from Brian, I have republished (with some light edits) Roy’s original instructions, diagrams, and photos.
This summer I will try to get some better photos of the stove while guiding trips with Brian in the High Sierra. (The originals appear to have been taken with a film camera and then scanned.) In the meantime, please appreciate that these materials date back to the second ADZPCTKOP, when few could have imagined Wild, PCT Facebook groups, or a map app on a smartphone.
The Cat Food Can Stove is a powerful DIY alcohol stove that is best for hungry soloists or couples. It specializes in rapid boil times; versus other models, it’s not as fuel-efficient or as ultralight, although it’s respectable in both regards. The system includes a burner and air jacket, pot stand, and windscreen.
The Cat Food Can Alcohol Stove
A Lightweight version of the Tuna Can Stove
By Roy L. “TrailDad” Robinson
The original tuna can stove hiked with me along the Pacific Crest Trail last year (1999) for over 1500 miles, from Donner Pass near Lake Tahoe to Manning Park, British Columbia. lt served me well for almost three months, heating water for soup, cooking dinners and warming the occasional morning cocoa without any problems or failures.
This new, lightweight version of my stove was introduced at ADZPCTKOP2, (i.e., the Second Annual Day Zero Pacific Crest Trail Kick Off Party,) at Lake Morena. lt wasn’t the prettiest or the lightest stove there, but it did boil one cup of water the fastest — in 2 minutes, 24 seconds.
Like the original tuna can alcohol stove, it will bring two cups of water to a boil in about 5 minutes, has no moving parts and will fit inside your cook pot. Unlike the original, the new cat food can stove weighs just 1.6 ounces including the stand and windscreen.
To save space, let’s just call it the Cat Stove.

Materials
The drawing below shows the three parts of the stove. The Burner is made from a 3 oz. cat food can and the Air Jacket is a 5.5 oz. cat food can. 2×3 inch welded wire screen is used to make the Stand. The aluminum foil windscreen is not shown in the drawing.
The raw materials needed to make the stove are shown in Photo No. 1. These are:
Two cat food cans, one 3 oz. and one 5.5 oz.
Fiberglass insulation.
2 x 3 inch welded wire for stand.
Heavy aluminum foil for windscreen.

Photo 1. Required materials
Making the burner
Using a small church key-type can opener, cut six tabs from the inside out around the sides of the smaller can.
Cut some fiberglass material and place it around the inside of the can, holding it in place temporarily with a coil of metal window screen. The fiberglass should come no higher than the bottom of the tab holes (about 1 inch above the bottom of the can), and should be about 0.2 inch thick. See Photo No. 2.

Photo 2. Two Cat Food Cans. Air Jacket (left) and Burner.
The window screen can be removed after the stove has been used once or twice. If you prefer, you can burn a couple tablespoons of fuel in the burner now, and then remove the screen.
Making the Air Jacket
Cut a 1.75-inch diameter hole in the bottom of the larger can and six tabs from the outside in around the edge. I cut a hexagonal hole in my stoves for no reason other than it’s easy. You can see this in Photo No. 2. Use a large church key to cut the tabs if you have one.
Assembling the Burner and Air Jacket
Straighten the tabs so they point directly toward the center of the can and cut the sharp points off the tabs, no more than 1/16 inch. This will help the tabs hold the inner can in place more firmly when they are assembled.
Now, aligning the tabs on the two cans so they will miss each other, push the burner into the air jacket. Adjust the tabs, if necessary, so the burner is centered inside the jacket.
The jacket should be pushed down onto the burner until it and the burner are both resting on the work surface.

Photo 3. Windscreen and Stand (left), with the Burner and Air Jacket in Position for Assembly.
Making the stand
The completed stand and windscreen are shown in Photo No. 3. Approximate dimensions for the stand are given in the diagram near the top of this page. Bend the wire into a diameter that will fit inside your cook pot and a height that will hold the pot about 1 inch above the burner/air jacket.
My stand is about 2.6 inches high. That is as tall as will fit inside my pot. With this stand, my pot sits a little more than one inch above the stove. If you make the stand higher so that your pot sits 1.5 to 2 inches above the stove, it will work even better! Try this if your pot is big enough to store the higher stand or if you don’t care to pack the stand inside the pot.
Making the windscreen
The windscreen is critical for proper operation of this or any alcohol stove. Cut the windscreen out of heavy aluminum foil. An oven liner or disposable baking pan is a good source of foil. Cut a rectangle that is wide enough so the pot handle will just clear the windscreen, and long enough so it will encircle the pot with about 1/4- to 1/2-inch of clearance. Mine is 3.75 x 22 inches.
The screen must come up around the sides of the pot. If your pot handle won’t allow that, cut a notch out of the screen for the handle.
Punch two rows of holes around the bottom edge of the windscreen. A paper punch works well. I use a 1/4-inch canvas grommet punch. Bend the foil into a cylinder and hold the ends together with paper clips. (Carry a couple extra paper clips. If you drop one in camp, it’s hard to find.)
The windscreen can be rolled around your fuel bottle when not in use. I keep the bottle and windscreen rolled inside my sleeping pad while on the trail.
Operation
Using my 0.9 liter pot, the stove will bring one pint of cold water to a boil in about five minutes. Use no more than 2 or 3 tablespoons of alcohol, and plan to let it burn out.
With the pot on the stove, there will be no visible yellow in the flame. At night, you can see a nice blue glow around the pot.
Caution: ln bright daylight, you may not be certain the stove is lit even when it’s at full heat. Be careful you don’t find out the hard way by getting part of yourself or any burnable material too close to the stove while it is burning.

Photo 4. The Cat Stove in Operation.
Finally
This is an ALCOHOL stove. DON’T USE WHITE GAS, COLEMAN FUEL OR ANY OTHER GASOLINE FUELS IN THIS STOVE!
Use pure alcohol, either alcohol stove fuel, shellac thinner, or fuel line antifreeze (not radiator antifreeze!). Read the label to be sure it is 100 percent denatured alcohol. Rubbing alcohol contains up to 30 percent or more water, and it doesn’t burn well.
If you’re having problems with soot, you’re probably using rubbing alcohol or isopropyl alcohol instead of denatured methyl alcohol normally used as fuel. The outside of my pot has darkened somewhat from long use, but remains clean, not sooty. (l do stow my cooking gear in a storage bag anyway, just so it all stays together.)
Brian Robinson in Rocky Mountain National Park with the TrailDad Cat Food Stove
Add a simmer ring to your Cat Stove
In recent email, the sender wrote:
“The trouble with these alcohol stoves is, they don’t have a simmer setting…. I can turn [my gas burner] down to simmer when I want to, conserving fuel…”
OK. You talk, we listen. My son Brian was over last night to celebrate Father’s Day. We spent a good part of the evening playing with the Cat Stove. Here are the results:
Cut a 1 x 11 inch piece of the aluminum foil which you have already used to build your windscreen, and wrap it around the air jacket of your Cat Stove, covering the air intake holes. Tape the ends together so it forms a simmer ring that will slide up and down over the air jacket to either shut off or expose the air holes (or anything in between).
I used metal tape but a staple (punched from the inside, out, to avoid hangups) will also do the job. You want to cut the simmer ring down to where it will just cover the air holes. That way, it won’t obstruct airflow when you raise it to let the stove roar. Mine ended up at 7/8 inch in width.
With the air holes closed and 2 tablespoons of fuel, the stove kept a pot of water simmering for 25 minutes (!) before burning out. It acted like a Sterno can, burning the fuel very slowly because it was starved for air.
Next, we slid the simmer ring up so the air holes were completely open. Again, 2 tbsp of fuel and a pint of cold tap water in the pot. Light it off, and the water comes to a full, rolling boil in under four minutes. (Under ideal conditions: 70-degree evening, no wind.)
I then took the pot off, slid the simmer ring down to cover the air holes and returned the pot to the heat. It simmered for another full six minutes (10 minutes, total) on the original 2 tbsp of fuel!
BTW, is anyone still unconvinced about the merits of an air jacket to improve the efficiency of an alcohol stove?
With the addition of the simmer ring, your Cat Stove can now be set to burn 2 tbsp of fuel in anywhere from 6 minutes (will normally bring a pint of water to a boil in 4-5 minutes) to 25 minutes (keeping your soup or cocoa hot for as long as you would like).
I tried to weigh the simmer ring to see how much it would add to the total weight of the stove (1.6 oz including stand and windscreen), but it wouldn’t move the needle on a scale that weighs to 0.1 oz. You want to heat more water or simmer longer? Put in 3 tbsp of fuel!
If you don’t want to fool with a simmer ring, try dropping a bit of paraffin wax or candle into your stove. It will continue to burn after the alcohol fuel is burned, keeping your coffee warm. Go easy with this; it creates some soot and will blacken your pot.
Questions about the Cat Food Stove? A long-time user of one? Please leave a comment.
The post DIY || An original: The Cat Food Can Stove, by Roy “TrailDad” Robinson appeared first on Andrew Skurka.
January 9, 2018
Houston Marathon training: Re-finding purpose & speed || David Roche interview


A perfect November day on rolling singletrack near Marshall Mesa, with views of the Green Mountain and Bear Peak.
Prior to my big races last year — Boston, Bighorn, and UTMB — I interviewed David Roche, who has coached me for 12+ months now. They were opportunities to discuss the rationale behind each training block and to reflect on the results they generated, with the hope of providing readers with some value. Read the interviews.
Five days out from my next race, the Houston Marathon, I give you another Roche interview. This one is different than the others, however, focusing less on workout dorkdom and more on the psychological component.
Q | In September 2017 I ran UTMB, an apex race in which I’d invested extraordinary time and energy. For a few months afterwards, and to a lesser degree still now, my running felt “lost.” After such a race, how do you manage athletes who are trying to re-find purpose?
Visit a dispensary and buy something nice, because this is going to get deep.
All runners have the same finish line: death. That sounds melodramatic, but it’s true, and it’s essential to thinking about “post-race blues.” Whether an athlete wins, loses, or DNF’s, nothing changes at the finish line — they realize it’s just another part of the life journey, a checkpoint at best. So getting there, especially after months and years of trials and tribulations, can be a let down.
It’s the mortality melodrama played out on a less consequential scale. For the athlete going through it, though, it can come with all the same emotions as coming to grips with the meaning of life itself. Does any of this even matter?
Our old approach was to wait it out, but now we try to question it out. We try to ask questions that will help the athlete find what they care about, what balances their lives, and the runner they want to become over time. Some of the questions center on feelings; the rest center on the “why.” As in, Why are we racing and training and living the way we do?
If we ask those questions early enough, a world-view can start to crystallize that is centered on process, not results. While results come and go like dust in the wind, process is forever. So before and after a race, we ask “Why?” so often that we sound like 5-year old kids, emphasizing answers that support a long-term love of running, independent of finish lines.
For you, I think the “Why?” has really become pure. You want to balance the things you care about (family, adventure, performance) in a sustainable way. This time, even before Houston, we’re talking about the next adventure, and how we can make top-level running a process you can sustain forever. With that crystal-clear “Why?”, all the rest falls into place, and post-race blues are viewed as just another part of the journey, rather than an existential crisis.

Finishing UTMB, an apex race that I’d been training for (directly or indirectly) for the 18 months prior
Q | Following UTMB, which was a major race in terms of both my racing calendar and effort (100+ miles, 30k vertical feet of climbing), what is your recommended recovery period and comeback?
Ultra recovery is like barbecue sauce — everyone has a similar approach, but the magic is in the individual variation.
So let’s start with the basic sauce. A general rule that I first heard from Pam Smith is one day of complete rest for every 10 miles raced. Coach Joe Uhan’s addendum is that it should be 1 day for every 10k for mountain races. Thus, a standard athlete might take 2.5 weeks completely off after UTMB.
Now, the spice comes in. If the athlete has a long aerobic history and has competed in lots of 100s, the time can be reduced a bit. If it’s the first 100, or if an athlete went deep into the well, it might be a month.
Finally, how does it all mix together? During that time off, low-level aerobic activity is great — hiking, light biking, and eventually some slow jogging, like twice your 5k pace. A good example is Cat Bradley after Western States on June 24. She didn’t run again until mid-July, but did swim and hike to jump-start her hormonal system.
On the return, after a few days of easy running, we have found it is key to start doing some short, fast hill strides (supplemented with weight-lifting for some athletes) to continue the hormonal rebound, which we often track using blood testing service, Inside Tracker.
After that, the athlete does the taste test. Are they ready? When they are, we start from the ground up, going through cycles of aerobic base and running economy development prior to any longer, harder efforts.
In total, the process usually takes 6 to 8 weeks to be back at full steam. It’s key not to take too much time off, though, since we have observed that there can be a major neuromuscular and fitness lag if an athlete hibernates entirely after a big ultra.

My training log after UTMB (big red circle). I resumed regular running on October 3, after a few weeks of hiking and a few light runs.
Q | In my case, it was 4 weeks total before I resumed regular running. That left us just 3.5 months until the Houston Marathon. Roughly, what were the training blocks, and how much time was dedicated to each?
One key principle of training is to start where you are. It’s easy to get ahead of ourselves based on past performance or what others are doing, but defining that start point is an individual exercise. The process of planning from there brings to mind the butterfly effect — initial conditions lead to eventual outcomes. We can control for most things, except perhaps the pesky butterfly flapping it’s wings and causing a hurricane.
To put it bluntly, instead of starting at 0, you started this block a bit in the red. UTMB plus 4 weeks with long backpacking trips led to both some residual fatigue (unlike more full rest) and a reduction in running economy. So we needed to recover on the fly. Or as Tom Petty sang, our training approach: “learning to fly, but I ain’t got wings.”
Your engine was still humming, but the chassis needed work. Thus, the phases broke down like this:
Aerobic base: just a few days. You had limited time and lots of aerobic work in your legs, so the full Lydiard-style base period would be overkill and possibly slow you down.
Economy phase A (vVO2 emphasis): ~1 month. We focused on strides and short intervals with shorter rest as we tried to improve running economy, primarily through neuromuscular adaptations.
Economy phase B (vLT emphasis): ~1 month. Layered on top of the strides and short intervals, we emphasized vLT, improving the pace you ran without tipping that lactate curve, while maximizing aerobic volume.
Specific phase (vAeT emphasis): ~1 month. Now, there was a heavy emphasis on easy running volume and time spent at marathon effort, targeting vAeT, improving the pace you ran while using fat as a primary fuel source.
Taper: ~2 weeks. Getting you fresh and focusing on slow-twitch muscle fiber recruitment to optimize fat burning on race day.
In practice, the phases mixed like a thick gumbo. In Houston, we feast!
The most difficult and one of the most important workouts of the cycle, a long run with 16 miles at MP. It falls into the “specific phase” category.
Q | You have described my Houston taper as “riding the wave,” versus the normal “sharpening taper.” Can you elaborate on that?
Tapers for any event are where the art and science meet, kind of like how Leonardo Da Vinci dissected cadavers to have a full understanding of anatomy when he painted the Sistene Chapel.
SWAP breaks tapers down into two general approaches, with dozens of variations in each. In a perfect world, every taper is just “sharpening.” Those involve athletes that go through an entire training cycle, from aerobic base to the specific phase, on or ahead of schedule. Volume peaks 4 to 6 weeks out, and the workouts become focused solely on making race effort feel easy. So race-day fitness is just month-out fitness plus some marginal gains from recovery and feel. It’s like sharpening an already sharp steak knife.
If the athlete is a bit behind in building and time is limited, harder workouts and steadily building volume at race effort continues to 10 to 14 days out in many instances. It’s riskier, since we are trying to absorb training stimuli until the last possible second (most studies indicate 10 to 14 days is how long it takes for aerobic adaptations to settle in, though it varies based on the person). If we hit it right, we can ride that cresting fitness wave until race day — and the performance is a breakthrough beyond what is predicted by training.
Q | In addition to the compressed schedule, we were also challenged by the unique demands of UTMB and Houston. UTMB is a 100-mile mountain ultra with huge vertical. Houston is an exceptionally flat road marathon. How can the body be quickly and effectively retrained for these differences? Under a more ideal scenario, how much time would you need for complete adaptation?
Fitness is a slow-turning ship. Turning the Titanic is not impossible, but it takes planning and time.
After UTMB or any long ultra, flat ground running economy will be poor at all effort levels except perhaps aerobic threshold, since the final part of the training block is solely based on transitioning from a speed framework to a power/climbing framework. The body will be loaded up with capillaries and slow-twitch muscles will be firing, but the top-end speed and sustained power output will be lacking.
So how can you avoid the iceberg of a slow marathon?
The key is working from the ground-up, first targeting the variables that are quickest to adapt, then targeting the longer-term aerobic development component.
The first priorities are:
Increasing cardiac stroke output;
Improving muscle strength, essentially enhancing power output with each stride; and,
Neuromuscluar tuning, so that faster paces don’t make you feel like a placenta-covered baby gazelle.
In addition to raising flatter-ground easy volume, each variable responds to strides and hills that are short enough to avoid an anaerobic stimulus, which detracts from aerobic enzyme activity. These serve as plyometrics with lots of little forward jumps. By raising the speed ceiling, there is more room to play in the aerobic house.
Ideally, an athlete would spend at least 6 full weeks in that phase. After that, it’d be 6-8 more weeks in the economy phases (improving vVO2 and vLT) before hopping back into a race specific phase (vAeT for road marathons, strength for mountain 100s, a mix for for shorter ultras).
So in total, in a perfect world, 18-24 weeks. But perfect worlds are boring!
Q | It felt like the transition from Boston to Bighorn 100 (road marathon > ultra marathon) last spring was much easier than from UTMB to Houston (ultra marathon > road marathon). Wheres Boston seemed like an asset going into the summer, UTMB has felt like a liability going into Houston. Do you agree about the relative difficulties of transitioning, or was this just my experience?
Most definitely! It’s always easier to get slower than it is to get faster.
While that makes intuitive sense, part of it likely has to do with actual “strength” of muscles, rather than raw aerobic variables like VO2 max or lactate threshold. If each step is like a plyometric jump forward, with more power at faster paces, it may be difficult to get muscle fibers to deliver as much force as they once did at both aerobic and anaerobic efforts. The problem may be exacerbated by age, with peak strength potential decreasing slightly every year after age 25.
Sub-27 minute 10k runner Chris Solinsky has been attributed with the idea that he knew it was time to consider retirement when he had to do strides after every run to maintain his speed.
While that may be apocryphal, it’s a true sentiment. It gets harder and harder to run fast with age, just like it gets harder and harder to hit home runs with age. Add extra long-distance stimuli to the mix, and it may add some extra low-speed inertia to the system.
Trail running relies a lot more on endurance and aerobic threshold, which actually can improve with age and long-distance stressors. So going roads to trails is easy, the body wants to go in that direction. Going trails to roads is fighting physiological (and age-related) entropy. It can be done, and done well. It’s just harder.
At least one-third of my easy runs included striders, usually a handful for about 30 seconds with a full rest (about 90 seconds). They’re meant to improve or maintain speed, without significantly stressing the bodies between true workouts.
Q | To close, I’m going to ask a question that circles back to your first answer. I’m now almost 37 and I’ve been training hard for three consecutive years. I don’t feel like I’m learning as much as I once was, and I’ve run most of my “bucket list” races (and therefore struggle to find the stoke to maintain the intensity of training). How do you put a runner like me on a training and racing plan that is sustainable for the next 13 or 30 years, not just three?
As you are seeing, eventually the “results well” runs dry. Heck, the “experiences well” does too. The key is to understand why it is drying up and tap into a more renewable resource. Process is more like a flowing stream that keeps flowing by no matter how many buckets you take out.
Okay, that is hippie-dippie stuff, and I acknowledge that. But if the goal of running is to make check marks on the bucket list, eventually the list gets completed. And if the goal is to be an elite athlete, the realities of aging and injury will smack your love of running right across the face.
What process means in practice is finding the long-term purpose that guides the daily decisions you want to make. So, start with a simple question: “What do I want to do with my running in 5 years?” If the answer is “I don’t want to be running when I am 42,” then it’s probably wise not to be running now either.
Better answers are “I want to be the best runner I can at 42.” Or, even better, “I want to be training purposefully, because that daily grind brings me meaning and joy.” Or, “I want to move efficiently through the mountains, having transcendent experiences while minimizing sacrifices along the way.”
Make daily decisions that align with your long-term running goal.
For all three, I think the best answer is to find a training approach that best balances your perspectives on life, business, and adventures. In practice, that means:
Running fewer miles
Maintaining running economy through some focused work, and
Scratching your adventure itch.
You might sacrifice a few seconds now, but you’ll be giving yourself many, many years of happy running in the future.

In future years I suspect I will be doing more of this (guiding groups and backpacking solo) and probably less competitive racing.
The post Houston Marathon training: Re-finding purpose & speed || David Roche interview appeared first on Andrew Skurka.
First impressions: Nike Zoom VaporFly 4% || Yes, they’re pretty different

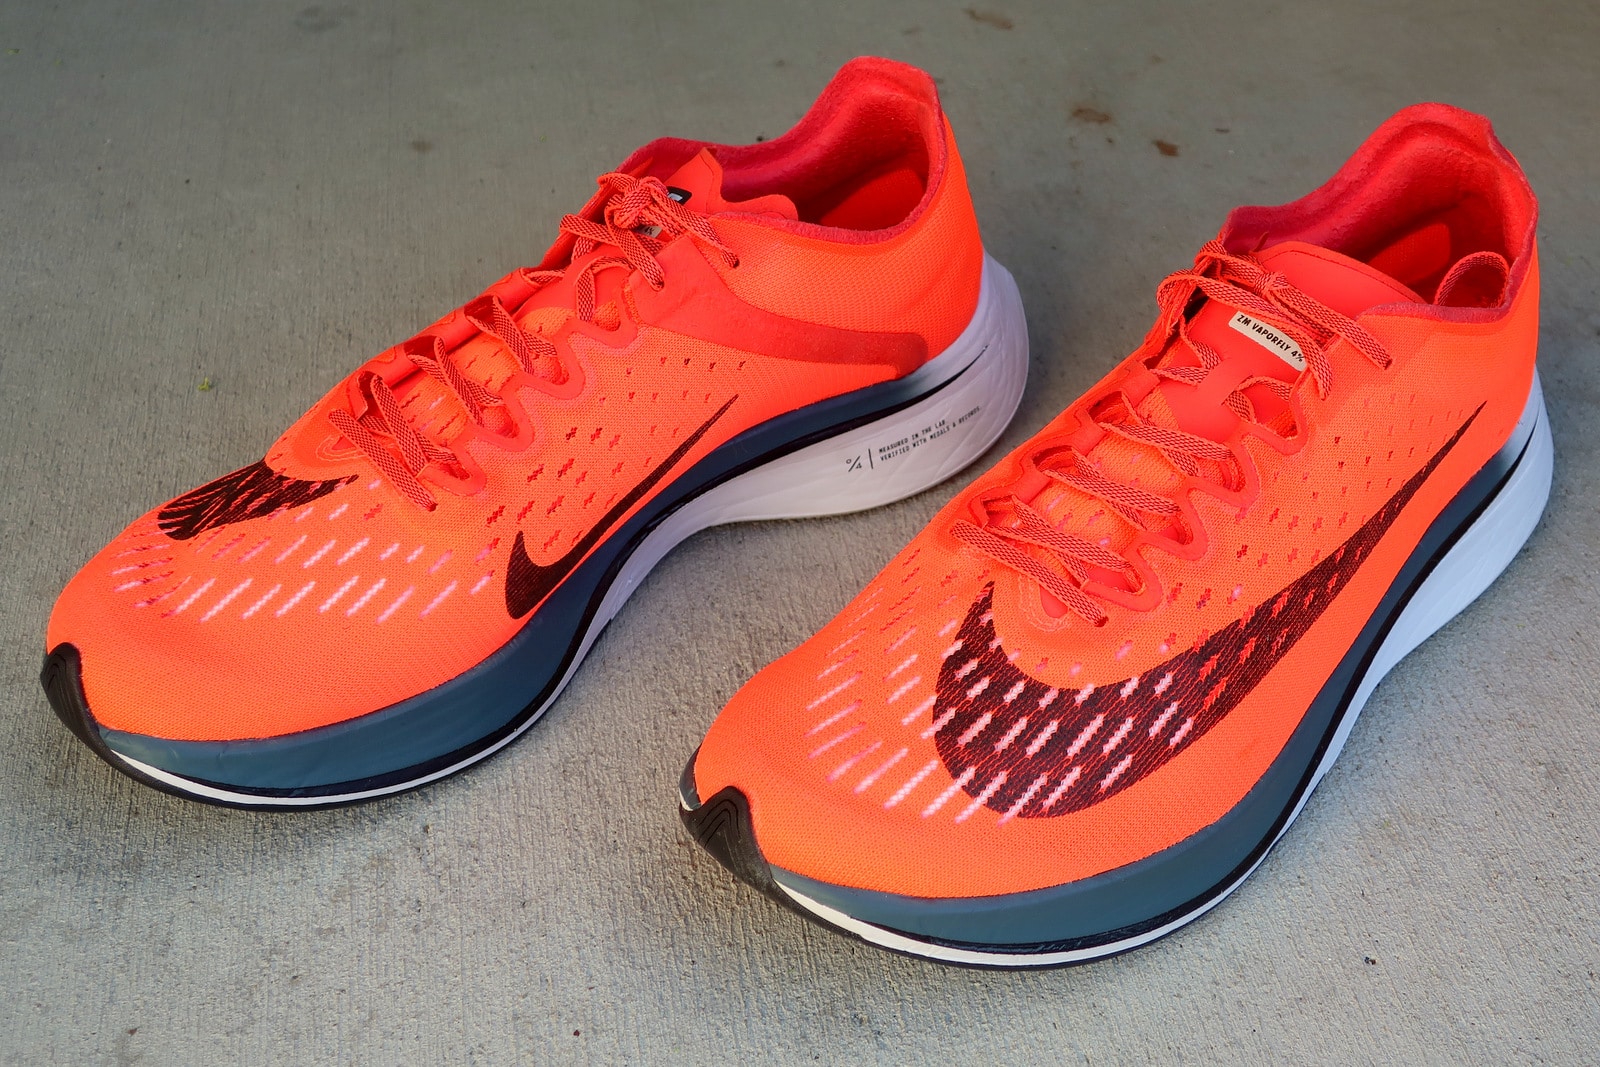
The Nike Zoom VaporFly 4% is a 6.5-oz road racing shoe with resilient midsole cushioning and a unique carbon fiber midsole plate.
Twice per year I attend the Outdoor Retailer tradeshow, where I’m told about dozens of products that are the best thing since sliced bread and where I’m bombarded with increasingly stretched marketing hype to match these supposed earth-shattering advances.
When I first heard about the Nike Zoom VaporFly 4% road racing shoes, I applied this same BS filter, doubtful that they would be materially better than Nike’s previous top-of-the-line model, the Nike Air Zoom Streak 6, which also had been presented as revolutionary in its day:
Marathoners, rejoice! You’ve found a new shoe that’s sure to improve your results and your comfort, the Nike Air Zoom Streak 6. You’re sure to feel the difference when you go the distance in these shoes that boast a profile that’s built to the exact specifications of some of the best marathoners in the world.

Nike has not specified the stack height, but the consensus is low- or mid-30’s with a 10 mm drop between heel and toe. Because of the aggressive rocker under the toes, I found the drop to be overstated — it feels like my usual 4 to 8 mm shoes.
Yet I bought a pair anyway
It was painful to enter my credit card last week at Nike.com, which is currently the exclusive distributor of the VaporFly 4%. I own a few $250 shoes, but they’re leather dress shoes that I’ll wear for 15 years.
Ironically, I would have been financially better off by buying two pairs. On eBay, new pairs currently sell for more than $300 because Nike can’t keep them in stock. Crazy.
So why’d I pony up?
First, a coaching friend of mine specifically asked me if I’d bought a pair, because he was seeing unexpected results among his athletes. “They’re worth 3-6 minutes based on our estimation. Maybe placebo, but man, that’s a strong placebo.”
Second, the shoes were independently tested by a local lab at CU, and the findings were consistent with Nike’s: when wearing the VaporFly 4%, the 18 highly trained runners in the study used an average of 4 percent less metabolic energy versus the Nike Zoom Streak 6 and the Addidas Adios Boost 2 (now the Adizero Adios 3), which Dennis Kimetto wore for his marathon WR of 2:02:57.
Third, I’m nearly 37 years-old and this may be my last marathon while I’m still in (or still very close to) my physical prime. I’ll take full advantage of the resources that I can afford, including coaching, whole foods, and $250 shoes.
Some have argued that the VaporFly 4% should be banned, on the grounds that it provides an unfair advantage. We’ll see. It seems difficult to make a clean distinction between “fair” and “unfair” footwear technologies, and I’m more inclined to think that the VaporFly 4% is the start of something, not the end of it.

The engineered mesh upper is highly air-permeable and very comfortable.
First impressions
After the Houston Marathon, perhaps I will feel sufficiently confident to properly review the VaporFly 4%. But for now, to address apparent interest among readers, I will provide initial impressions based on casual wear and a single 8-mile workout.
Does it make a difference?
I don’t know yet. Maybe I can say with more conviction after Houston. For now, I can only say that they are different than any other shoe I have worn. I did have a good workout yesterday and I felt like my kick-back was higher than usual, but I’m also in a taper and it’s not unusual to have random good days and bad days.
Feathery light
As you would expect and hope of a road racing shoe, the VaporFly 4% is feathery. They spec at 6.5 oz in men’s size 10, although that seems optimistic relative to my size 11, which weigh 7.7 oz.
Cushioning
Conventional road racing shoes are low-to-the-ground. For example, the ASICS Gel-Hyper Speed 7 (my review), in which I ran the Boston Marathon last year, have a stack height of 16 mm/10 mm at the heel and toe, respectively.
In contrast, the VaporFly 4% is Hoka-like, with significant underfoot volume. Nike does not specify the stack height, but the consensus is low- to mid-30’s in the heel and low- to mid-20’s in the toe, with a 10 mm offset.
Stiff but not hard
The most unique component of the VaporFly 4% is the stiff, full-length carbon fiber plate in the midsole. Because of it, the shoe cannot be folded or twisted. However, because the plate is sandwiched between two layers of foam, the VaporFly 4% remains well cushioned, not hard.
Bounce house bouncy
I’ve worn generously cushioned shoes before, like the Hoka Speedgoat 2 (my review) and Hoka Clifton 4 (my review). But I’ve never worn a shoe that is bouncy. When I weight the VaporFly 4%, I feel an almost equal force pushing back, a sensation that I believe is attributable to the midsole foam, not the carbon plate.
In geeky lab talk, bouncy foams are described as “resilient,” in comparison to more standard “complaint” foams that feel softer and more marshmellowy.
Aggressive rocker
The VaporFly 4% has a heel/toe offset of 10 mm, but this spec seems overstated because of the aggressive rocker shape under the toes. I felt no shift in my gait or footsrike-to-push-off sequence versus my normal shoes, which have 4 to 8 mm of drop.
Upper
The engineered mesh upper is minimally constructed: it lacks reinforcing overlays, and has scant padding around the rim of the heel cup. The quick-dry fabric is extremely air-permeable, making it a liability for workouts in wintertime temperatures.

The upper has no overlays and minimal padding — just a small bit around the rim of the heel cup.
Outsole
About two-thirds of the outsole is covered with rubber, including the entire forefoot and several rubber pods in the heel. The outsole is minimally textured — caution is advised when running on oil patches, sandy shoulders, ice, or wet paint stripes.
The remainder of the outsole is exposed midsole foam. So long as the foam is not in landing or push-off zones, my experience (based on Hoka shoes) is that the foam wears no more quickly than the rubber.

Low-profile rubber covers about two-thirds of the outsole, mostly importantly in the landing and push-off zones.
Color
The Bright Crimson appears predominately red in online photos. In person, it’s more pink-ish.
Between the eye-catching color and the huge swoosh logo on the lateral side, the VaporFly 4% is a flashy and distinct shoe. Be prepared to run your fastest.
Sizing
I am a consistent size 11.5 in Altra, Hoka One One, La Sportiva, Merrell, Salewa, and Salomon.
In the VaporFly 4%, size 11 seems to fit perfectly. This was convenient, because size 11.5 was already sold out.
Fit
First, some context: I have a narrow and low-volume foot.
The mesh upper is perfectly shaped. It wraps my foot like a slipper, securely locks down my heel, and offers my toes a comfortable amount of wiggle room without being sloppy.
At first, I was less sold on the last, which seemed extremely narrow under the arch. It felt like the inside of my foot was hanging over the edge of the shoe. After my workout yesterday, I’m less concerned — when at speed, they felt natural, not narrow.
Overall, I think the VaporFly 4% will best fit narrow and small-volume feet, and will be acceptable for average feet due to the forgiving upper. Paddle feet may want to look elsewhere, sorry. If your fit experience has been different, please leave a comment.

The last is exceptionally narrow under the arch, about 54 mm at its narrowest point. Those with wide feet may feel like they are hanging off the edge of the shoe.
Questions about the Nike Zoom VaporFly 4%? Leave a comment.
Disclosure. This website is supported mostly through affiliate marketing, whereby for referral traffic I receive a small commission from select vendors, at no cost to the reader. This post contains affiliate links. Thanks for your support.
The post First impressions: Nike Zoom VaporFly 4% || Yes, they’re pretty different appeared first on Andrew Skurka.


