
Ali Edwards's Blog, page 40
October 26, 2023
December Daily® 2023 | Foundation Page Ideas 01

Welcome back to another December Daily® 2023 post!
This year I'm sharing my foundation pages a bit differently than I have in the past by breaking up it up into a few posts vs. one big post.
So far I've shared the following:
Reason Why + Intro Page Simple Collage Square Page Idea
In this post I'l be sharing two foundation page ideas and then I'll be back with another post soon sharing a few more ideas along with a look at all the things I've pulled out that I think I'd like to play around with in December. In that post I'll share images of what I'm planning and the general flow of my album at this point. What feels the most fun for me this year is to keep things a little more loose heading into December which will give me more creative freedom going into the month (which is similar to how I approached it last year).
Check out the video below for some foundation page thoughts + a flip through of some of the things I've got in my album so far along with step by steps for today's page ideas:

As I was looking at what I might want to do as a foundation for my first story I couldn't help looking at the back of my Reason Why/Intro page and the circle trail. I decided to create a mirror image of the 1/2 circle and the large wreath (from the Main Kit). I used the Noel 1/2 circle from the Die Cut Page Insert pack + one of the wreaths + a pattern paper from last year from my stash + the awesome dark green chipboard phrase from the Main Kit + an embossed number 1 on the pattern paper. I also added a chipboard star from the Sticker Advent Calendar.
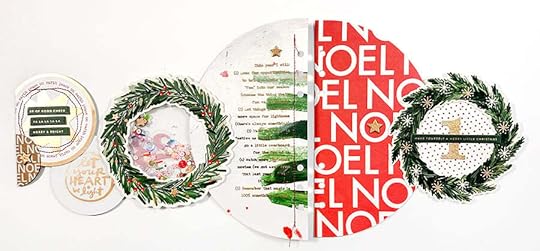
Here's a look at the back:
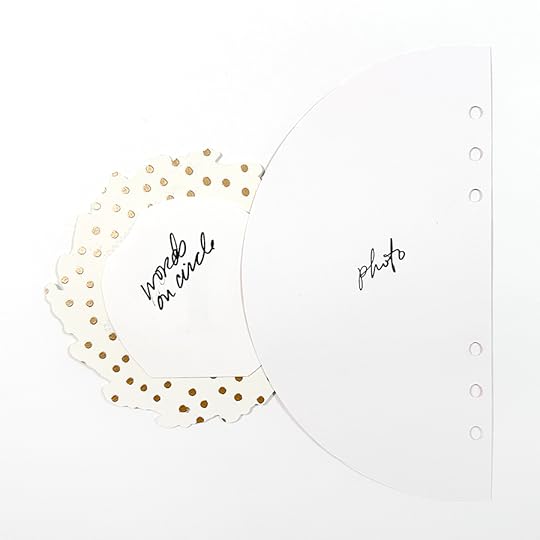
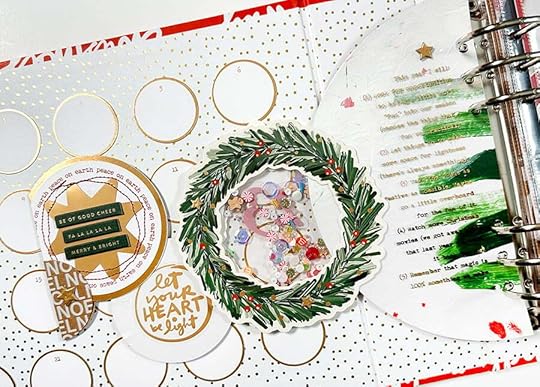
Knowing that I would see the back of the wreath when I add my words + photo(s) I went ahead and used a dotted stencil and gold embossing powder.
On the first of December - when it comes time to tell a story - I'll likely add journaling onto a 3.5 inch circle and add a 1/2 circle photo and call it good (or a 3 inch circle photo and longer journaling). This is what I love about foundation pages - I get to do some of the work in advance and then focus on the words/photos in December.
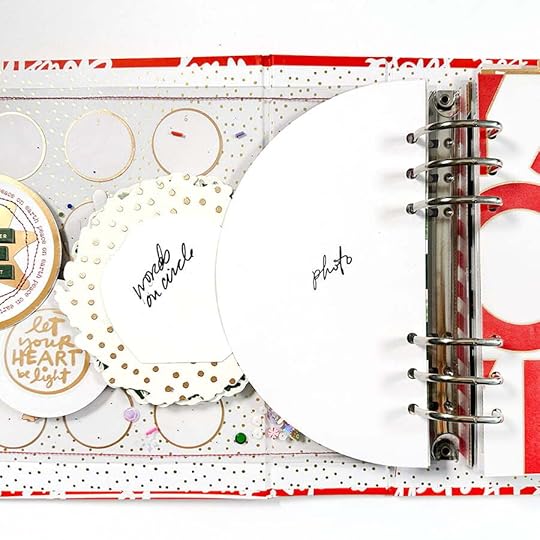
In this case I even hand wrote on the backs to help me remember what my initial intentions were (even if I change it up a bit on December 1st).
IDEA 02
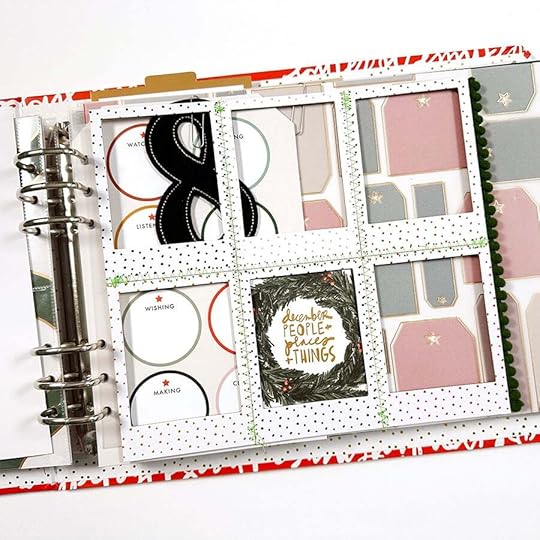
The second page foundation page I put together features the chipboard frames.
I love a good grid set up and arranging six of these together is a great way to create some homes for words, photos and/or embellishments.
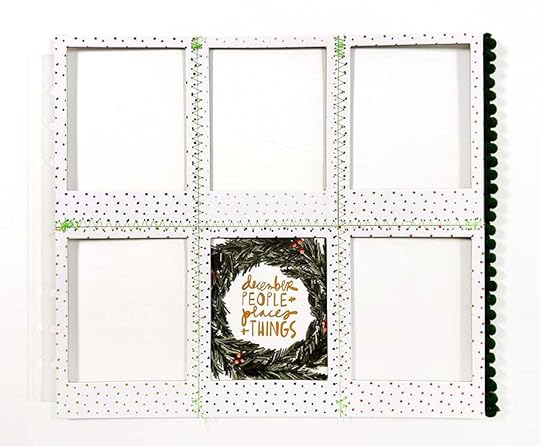
I laid these all out upside down and used scotch tape to temporarily adhere them before running them through my sewing machine and added a zigzag stitch with a fun green thread.
Along the left edge I added a plastic page attacher (you could also use the attacher stickers for this or simply adhere the group onto a piece of transparency and punch holes in order to add it to your album). Along the outside edge I adhered dark green pom trim with red line tape.
Right now I've got the "people, places, + things" card from the Main Kit inside one of the frames and I might use that as the jumping off point for my story. It would be wonderfully simple to add a combination of words + photos right behind each frame.
Have you started playing yet?
Don't forget that our Product Play workshop starts next week that includes 30 days of ideas for using items from our December Daily® collection this year.
SUPPLIESDecember Daily® Main Kit 6 inch x 6 inch Square Dot Stencil Pom Pom Trim December Daily® Chipboard FramesPage Attacher (another option are the attacher stickers) Versamark Embossing Ink Gold Embossing Powder Paper Pouncer Snappy Tray Heat Gun 3.5 Inch Circle Punch Number Stamp Set Red Line Tape


December Daily® 2023 | Revisiting Ali's Pages 01
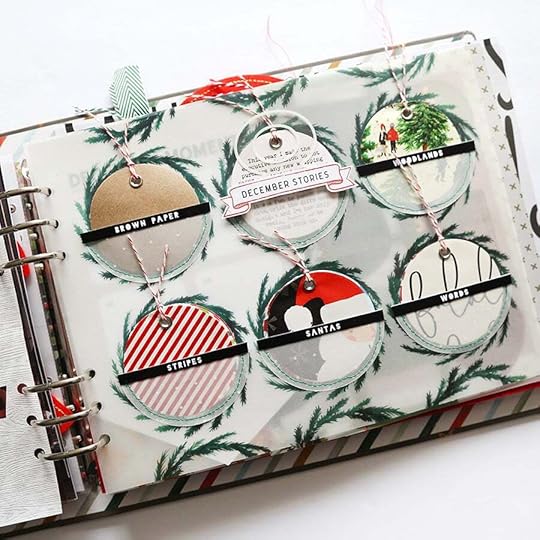
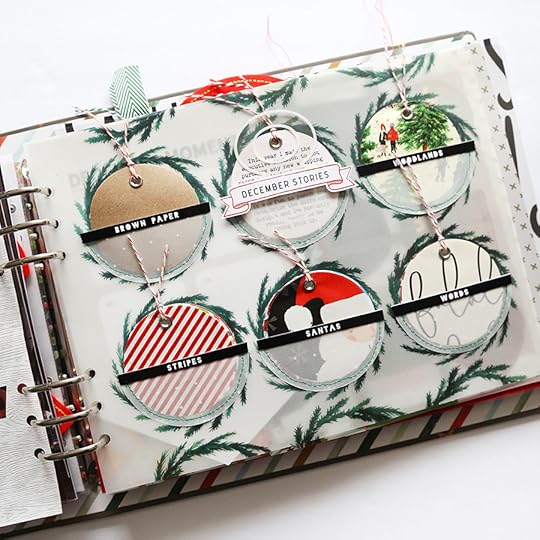
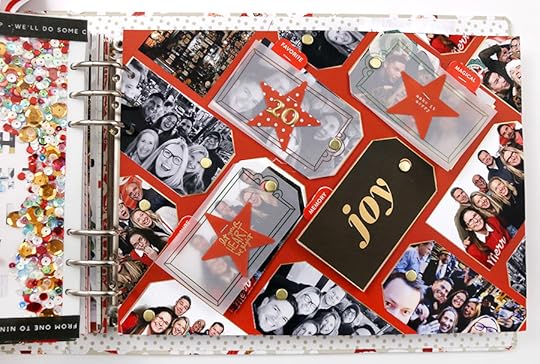
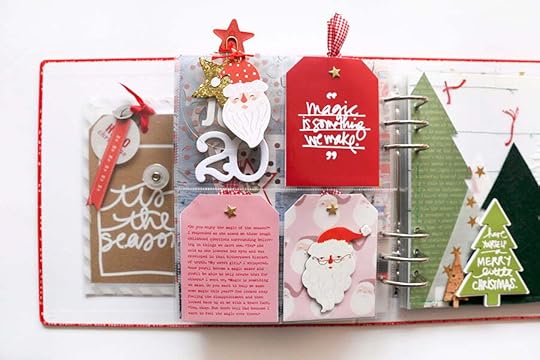
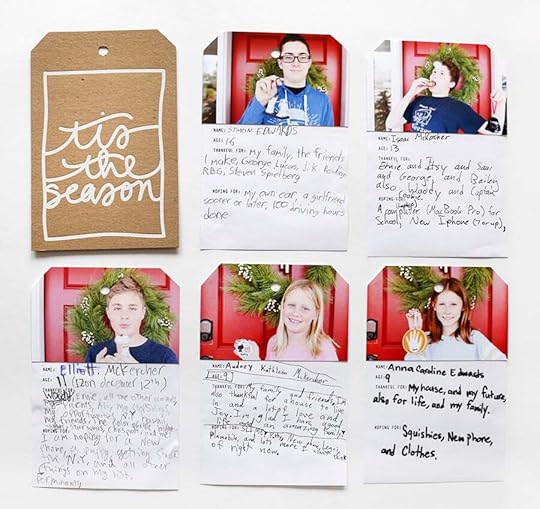
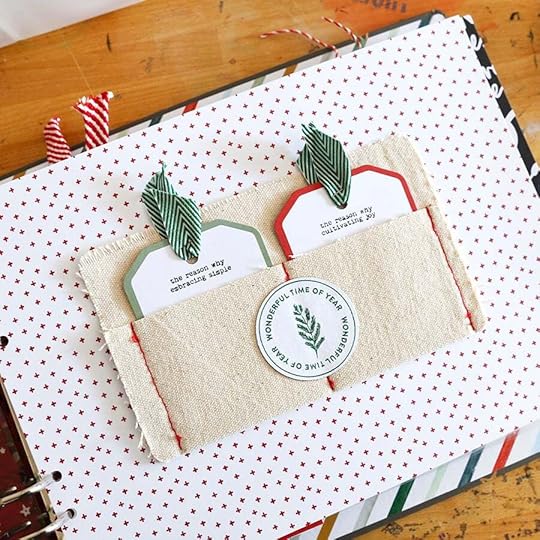
Hello friends! This is Lisa. Today I thought it might be fun to share some of my all-time favorite December Daily® pages created by Ali. My original thought was to put together my personal top ten favorites, but I quickly realized after looking through nearly 15 years of pages that she's shared here on the blog...it would be impossible to narrow it down. Instead I'm going to share some of my favorite page designs using circles and tags. Even narrowing those down was tricky! For those of you that are new to the community, Ali has been sharing her December Daily® pages on an almost daily basis since 2007. The inspiration available from her here is endless. You can find those posts by searching the tag "December Daily®". Each of her daily posts incudes a process video, her thoughts on the page and story, as well as multiple photos. Let's dive in!
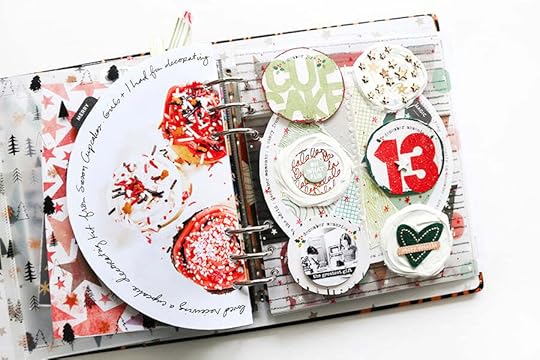
December Daily® 2020 | Story Thirteen
December Daily® 2021 | Story 08 + December Daily® 2021 | Story 09
December Daily® 2021 | Story 11
December Daily® 2022 | Ali's Album Start

December Daily® 2023 | Ali's Start + Reason Why
December Daily® 2018 | Day Twenty-Three
December Daily® 2022 | Story 20
December Daily® 2018 | Day Twenty
December Daily® 2018 | Tag Book Bonus Video
I had a lot of fun going back through Ali's pages and have lots of ideas I want to try and translate to my own albums. Do you have any favorite Ali circle or tag pages you think I should have included? Please share in the comments! Don't forget that each of these posts includes her process videos, thoughts on her stories, as well as additional photos.
Shop the collection
here. Join a group of like-minded and passionate crafters in our December Daily® With Ali Edwards Design Inc Facebook group. Find inspiration and updates over on our official Instagram account: @decemberdaily. And check out our newest December Daily® classes for a wide variety of topics related to the project:
2023 DECEMBER DAILY® PREP DAY. Join the December Daily® community for a fun online December Daily® prep day on Saturday, November 18th, 2023. Use this opportunity to finish past December Daily® projects or start working on your project for 2023. The first live video will start on Saturday, November 18th at 10:00 am Eastern. Cost is $5.
DECEMBER DAILY® PRODUCT PLAY | TRY THIS. December Daily® Product Play is all about ideas and inspiration for working with physical products from the December Daily® Collection. For 30 days in November, you'll receive one idea per day from the contributors to this class (includes Ali). Ideas in this workshop will focus on physical products from our 2023 December Daily® collection. Whether you are preparing to document 2023 or finishing up telling stories from past years, we hope these fun, creative ideas help you use your products to get your stories told.
2023 DECEMBER DAILY® HYBRID PRODUCT PLAY. Hybrid scrapbooking combines digital products with physical supplies to create paper (or printed) memory-keeping projects. For this class, our contributors will share with fun, creative ideas and inspiration for working with these digital products from the 2023 December Daily® Collection.
October 25, 2023
December Daily® 2023 | Ali's Collage Of Squares Foundation Page Idea
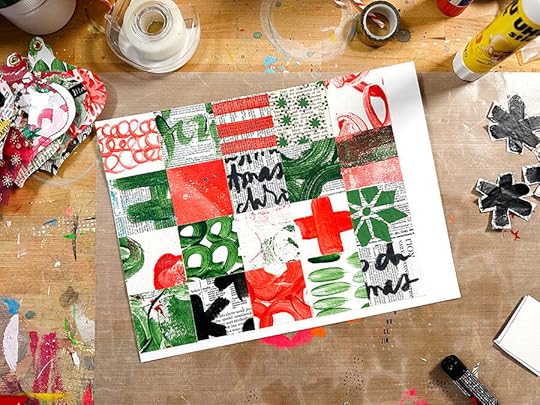
Last night I was wanting to do a little clean up here in my office but I got distracted by a simple idea to use a 2 inch punch to create a bunch of squares that could be used as a foundation page in my
December Daily® project. I grabbed my 2x2 inch Passport Punch and got to work punching + gluing squares (using a glue stick - so easy) to a sheet of 8.5 inch x 11 inch piece of cardstock.
Here's a look at how this came together:
I used collage papers I've been creating over the last few months for my ornament project. I've shared a couple posts about that project already including my
and . I'm still working on making more ornaments and I'll share again when I have more completed.
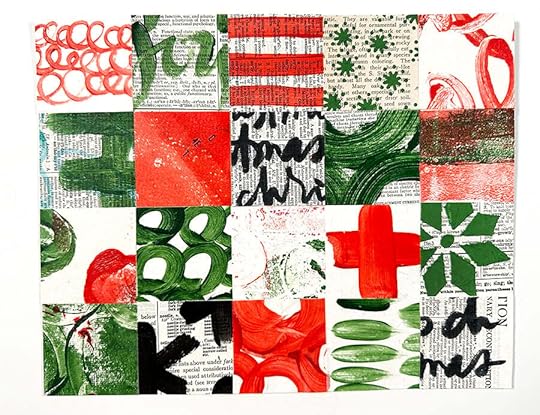
For this simple foundation you could use pattern papers, scrap papers from your stash, or even cut up something such as Christmas cards or catalogs that come in the mail. Most likely I'll pair this foundation with a story about making all my collage ornaments this season.
After I punched, adhered and let it sit overnight I ended up trimming this down to 10 inches x 8 inches. When I use this to support my story in December I'll punch the holes (waiting to punch the holes gives me a little more freedom to make additional decisions during the month.
December Daily® Paints December Daily® Stencils December Daily® Silkscreens 2 Inch Passport Punch UHU glue stick Deli Sheets
December Daily® 2023 | Let's Play Series Recap
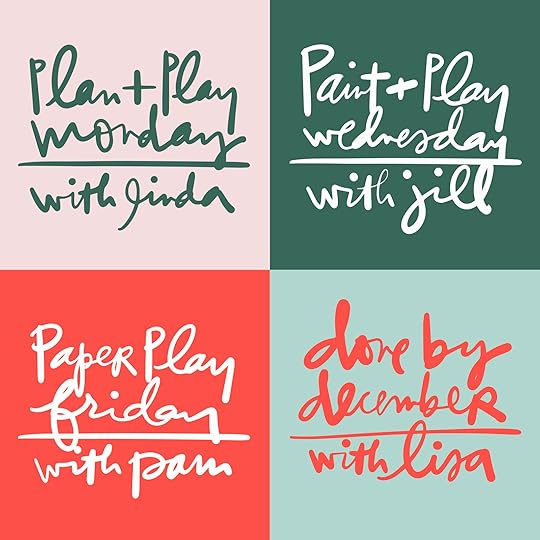
All this week we're sharing some of our most popular and most informative posts related to December Daily®. Today we're sharing a recap of our Let's Play series featuring content from Pam Baldwin, Linda Jordan, Jill Drangsholt, and Lisa Varshine.
Plan + Play Monday was led by Linda Jordan, creative team alum, Story Planning contributor, and the instructor behind Plan, Prep, and Play. Linda shared how to set yourself up for success with the project focusing primarily on the main kit. She'll had planning and organizational tips and tools, guidance on selecting your format, streamlining your stash, finding inspiration, and more.
Paint + Play Wednesday was led by Jill Drangsholt, a creative team alum and frequent class contributor. Jill shared her expertise as a mixed media artist, offering tips and inspiration on using stencils, silkscreens, acrylic paint, and more. Jill's posts include fun ideas that can translate directly to our December Daily® spreads.
Paper Play Friday was led by Pam Baldwin, another creative team alum, frequent class contributor, and the instructor behind Playing With Paper. Pam did what she does best: working her magic with products from this year's collection. She demonstrated creative ideas for fun, easy, DIY and interactive elements.
Each of the ladies featured ideas that can easily be translated across album sizes and formats, and can be replicated using either products from this year's collection, or your stash.
Done By December will be back this year and led by Lisa Varshine, AED team member, creative team alum, class contributor, and the instructor behind Magic of Moments. Lisa will be completing spreads from her 2022 album using mix of product from this year's collection along with previous years.
We're so excited to share the inspiration these ladies put together for you! In addition to these series, we're looking forward to sharing other phenomenal voices from this community during our
December Daily® Product Play 2023 | Try This, Hybrid Product Play, and December Daily® 2023 Prep Day classes, in addition to other fun content we'll be sharing both here and on our Instagram channels.
Bring on the December Stories!
October 24, 2023
December Daily® 2023 | In The Classroom
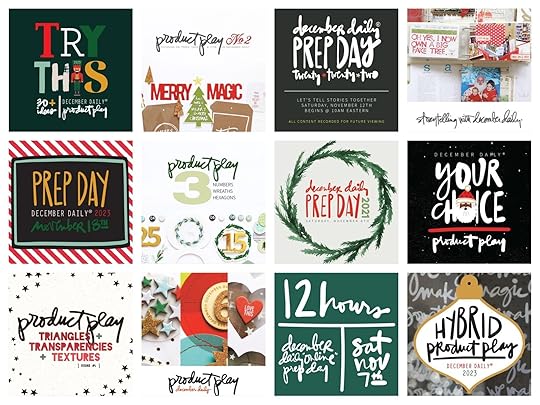
Over the years Ali, the AED team, and countless talented contributors have created more than a dozen classes devoted to December Daily®. If you've taken any of these classes, or others, you know our classes offer a tremendous amount of high quality content. Below is a quick reference for all of the classes we offer related to this beloved project, covering a multitude of different formats and topics.
Our 2023 Roster of ClassesDecember Daily® 2023 Prep DayJoin the December Daily® community for a fun online prep day on Saturday, November 18th, 2023. Use this opportunity to finish past December Daily® projects or start working on your project for 2023. The first live video will start on Saturday, November 18th at 10:00 am Eastern.
Each lesson will be open for you to access 15 minutes prior to the live content which will be available at the top of each hour. Then after the discussions and/or project ideas, you are free to work on your own projects, clean up, prep, etc.
December Daily® Product Play is all about ideas and inspiration for working with physical products from the December Daily® Collection. For 30 days in November, you'll receive one idea per day from Ali and the contributors to this class. Ideas in this workshop will focus on physical products from our 2023 December Daily® collection. Whether you are preparing to document 2023 or finishing up telling stories from past years, we hope these fun, creative ideas help you use your products to get your stories told.
Our goal for this class is to provide inspiration to support your December storytelling by showcasing a wide variety of voices and project styles. For this workshop each contributor has selected a different product to create with. Some ideas shared in this workshop will be completed spreads with images and journaling, some ideas will be for foundation pages, and others will be mock-up examples to spark your creativity and help you to create homes for your December stories.
Class Contributors
Ali Edwards, Amanda Wilder, Amber Dawson, Amelia Tatalovic, Annette HaringBarbara Picinich, CJ Flynn, Diane Dziuband, Elizabeth Heinz, Emily Stebbins, Holly Devore, Jasmin Collier, Jeanne Williams, Jen Wong, Jill White, Kelly Watson, Kim Chaffin, Kirsten Heal, Kristin Ladström, Kristin Tweedale, Laura Wonsik, Lesley Vander Waal, Morgan Beal, Neela Nalam, Danielle Menage-Jensen, Pascha Shepard, Sabrina Poole, Sarah Juers, Shu-Wen Tham, Steph Grimes, Virginie Goujon, Yin Goh, Zoe Currie.
Hybrid scrapbooking combines digital products with physical supplies to create paper (or printed) memory-keeping projects. For this class, our contributors will share with fun, creative ideas and inspiration for working with these digital products from the 2023 December Daily® Collection:
December Daily® 2023 Digital Main KitDigital Large Plastic HeartsDigital Holiday Phrases Large Sticker SheetAli's Christmas Phrases Digital Stamp Set
All of the projects and techniques provided in this self-paced class will demonstrate how versatile digital products can be in helping you get your stories told. Our hope is that you will come away with ideas for using digital products to create homes for your December stories.
Class Contributors
Denine Zielinski, Jennie Rey, Jessica Luther, Kim Hurst, Rachel Hart, Ronelia Motroni.
What stories will you tell this December?
Storytelling with December Daily® is designed to get you in the mood for documenting your December, one story per day. Here's a look at what I'll be covering over the coarse of the workshop.
Lesson One | A look back at all eight of my past December Daily® albums with individual video walk-throughs. The take-away from this lesson is the opportunity to learn from the past and reflect on what's worked and what's not worked to create a plan for this year.
Lesson Two | Process exploration. Setting expectations and setting yourself up for success by establishing a storytelling mindset. Lesson Three | Specific storytelling ideas, encouragement and inspiration, along with photo ideas to spark additional stories. Lesson Four | Techniques for including stories in your album including digital, hybrid, interactive, etc. December Daily® Prep Day 12 Hours | December Daily® 2019 Prep Day
***The live event has now passed but you can still access all the videos (everything was archived), inspiration, and downloads. As with all my workshops you can go at your own pace and you have ongoing access to the content.
Join the December Daily® community for a fun online prep day on Saturday, November 9th, 2019. Use this opportunity to finish past December Daily® projects or start working on your project for 2019. The classroom will open at 7:30am Pacific with the first live video happening at 8am Pacific.
At the top of each hour Ali will be live from her office (these will be recorded + available for viewing later) chatting about a specific topic for 10-15 minutes. The goal is to give you a few ideas and then send you off to work on your own projects, clean up, prep, etc:
8am Pacific | Foundations Pages 9am Pacific | Stash Organization 10am Pacific | Tackling Unfinished Projects 11am Pacific | New Page Idea #1 Noon Pacific | 5 Things I Want To Try In December with Jen Schow 1pm Pacific | Stamping 2pm Pacific | New Page Idea #2 3pm Pacific | Incorporating Ephemera (stuff from life) 4pm Pacific | December Story Ideas 5pm Pacific | New Page Idea #3 6pm Pacific | Photos In December 7pm Pacific | Wrap Up12 Hours | December Daily® 2020 Prep Day
***The live event has now passed but you can still access all the videos (everything was archived), inspiration, and downloads. As with all my workshops you can go at your own pace and you have ongoing access to the content.
Join the December Daily® community for a fun online prep day on Saturday, November 7th, 2020. Use this opportunity to finish past December Daily® projects or start working on your project for 2020. The classroom will open at 7:30am Pacific with the first live video happening at 8am Pacific.
This year we are excited to mix things up and welcome Tazhiana Gordon + Krystal Idunate as your hosts for Prep Day. Ali will be online and participating and sharing ideas along the way as well.
At the top of each hour there will either be a live video or new content uploaded. The goal is to give you a few ideas and then send you off to work on your own projects, clean up, prep, etc:
Our schedule for this year is a work-in-progress and may change before the actual date. Here is the current line-up for the day:
8am Pacific | Welcome, Overview, + Intro With Ali, Tazhiana, + Krystal 9am Pacific | Organization With Tazhi + Krystal 10am Pacific | New Page Idea from Krystal 11am Pacific | How To Get It Done By January (If You Want To) Noon Pacific | Live Craft Hour with Tazhi: Mixed Media Play 1pm Pacific | New Page Idea from Ali 2pm Pacific | Live Craft Hour with Krystal: Interactive Elements Using 4x6 + 3x4 Cards 3pm Pacific | Creative Team Guest (TBA) 4pm Pacific | Repeated Stories In December Daily® with Tazhi 5pm Pacific | New Page Idea from Tazhi 6pm Pacific | Community Suggested Topic (TBA)
7pm Pacific | Wrap Up, Q+A with Ali December Daily® 2021 Prep Day
***The live event has now passed but you can still access all the videos (everything was archived), inspiration, and downloads. As with all my workshops you can go at your own pace and you have ongoing access to the content.
Join the December Daily® community for a fun online prep day on Saturday, November 6th, 2021. Use this opportunity to finish past December Daily® projects or start working on your project for 2021. This year we are delighted to welcome Laura Wonsik and Pam Baldwin as your hosts for Prep Day. Ali will be online and participating and sharing ideas along the way as well.
Entrance to the classroom will be available upon registration, and we have included some fun party prep ideas and a printable package to help you get ready for the day. The first live video will start on Saturday, November 6th at 9:00 am Eastern.
Each lesson will be open for you to access 15 minutes prior to the live content which will be available at the top of each hour. Then after the discussions and/or project ideas, you are free to work on your own projects, clean up, prep, etc.
Here is our schedule for this year’s Prep Day:
9am ET // Hour 1: Intro and Welcome | Mindset 10am ET// Hour 2: Live Hour with Ali 11am ET // Hour 3: Workflow + Organization 12pm ET // Hour 4: Live Hour with Pam 1pm ET // Hour 5: Diverse Approaches to December Daily® Storytelling 2pm ET // Hour 6: Live Hour with Ali 3pm ET // Hour 7: Same Story Different Ways 4pm ET // Hour 8: Live Hour with Laura 5pm ET // Hour 9: Hybrid Page Idea with Jennie Rey 6 pm ET // Hour 10: Wrap up and Q&A December Daily® 2022 Prep Day
***The live event has now passed but you can still access all the videos (everything was archived), inspiration, and downloads. As with all my workshops you can go at your own pace and you have ongoing access to the content.
Join the December Daily® community for a fun online prep day on Saturday, November 12th, 2022. Use this opportunity to finish past December Daily® projects or start working on your project for 2022. The first live video will start on Saturday, November 12th at 10:00 am Eastern.
Each lesson will be open for you to access 15 minutes prior to the live content which will be available at the top of each hour. Then after the discussions and/or project ideas, you are free to work on your own projects, clean up, prep, etc.
Here is our schedule for this year’s Prep Day:
10am ET | Hour 1: Kick Off With Ali 11am ET | Hour 2: Live Challenge 12pm ET | Hour 3: Notebooks 3 Ways 1pm ET | Hour 4: Photo Tips Panel 2pm ET | Hour 5: Ali Page Idea 3pm ET | Hour 6: Calendar With Linda 4pm ET | Hour 7: Making Journal Cards With Stamps 5pm ET | Hour 8: Bringing Tech Into Your Albums 6pm ET | Hour 9: Go-To Ideas With Krystal 7pm ET | Hour 10: Wrap up and Q&A December Daily® Product PlayDecember Daily® Product Play
Hearts, Stars, Circles
In this workshop we will take a closer look at playing with three specific shapes in December Daily® documentation: circles, hearts and stars. These are three of my favorite shapes and there are so many different ways you can creatively play with them to support and complement your stories - from using already designed products to creating your own. We'll also be talking about the specific design concepts that go into working with these shapes which will be useful for you in projects going forward (repetition, layering, scale). I'll be using products from this year's December Daily® collection but the products are not required as many ideas can be translated to what you might have in your memory keeping product stash. As always I'll be coming at this with storytelling and simple design at the forefront.
Class Contributors
Brandi Kincaid, Ingunn Markiewicz, Laura Wonsik, Jen Schow ,Kelly Ishmael, Pam Baldwin.
December Daily® Product Play 2
Trees, Titles, Tags
In this brand new workshop - inspired by the original December Daily® Product Play - we will take a closer look at playing with three specific shapes in December Daily® documentation: trees, tags and words (for this workshop words = titles + other playful ways to incorporate words into your design vs. a focus on journaling). There are so many different ways you can creatively play with them to support and complement your stories - from using already designed products to creating your own. We'll also be talking about the specific design concepts that go into working with these shapes which will be useful for you in projects going forward (repetition, layering, scale). I'll be using products from this year's December Daily® collection but the products are not required as many ideas can be translated to what you might have in your memory keeping product stash. As always I'll be coming at this with storytelling and simple design at the forefront.
Class Contributors
Laura Wonsik, Jen Carlson, Lisa Varshine, Ingunn Markiewicz, Amy Gretchen, Pam Baldwin.
Hexagons, Numbers, Wreaths
This year we will take a closer look at playing with three specific shapes in December Daily® documentation: hexagons, numbers, and wreaths. There are so many different ways you can creatively play with them to support and complement your stories - from using already designed products to creating your own. We'll also be talking about the specific design concepts that go into working with these shapes which will be useful for you in projects going forward (repetition, layering, scale). I'll be using products from this year's December Daily® collection but the products are not required as many ideas can be translated to what you might have in your memory keeping product stash. As always I'll be coming at this with storytelling and simple design at the forefront.
Class Contributors
Amy Gretchen, Pam Baldwin, Laura Wonsik, Lisa Varshine, Morgan Beal, Elizabeth Heinz.
Triangles, Transparency, Texture
This year we will take a closer look at playing with three specific shapes in December Daily® documentation: triangles, transparency, and texture. There are so many different ways you can creatively play with them to support and complement your stories - from using already designed products to creating your own. We'll also be talking about the specific design concepts that go into working with these shapes which will be useful for you in projects going forward (repetition, layering, scale). I'll be using products from this year's December Daily® collection but the products are not required as many ideas can be translated to what you might have in your memory keeping product stash. As always I'll be coming at this with storytelling and simple design at the forefront.
Class Contributors
Krystal Idunate, Morgan Beal, Tazhiana Gordon, Lisa Varshine, Laura Wonsik, Amy Gretchen.
For 2021 we are changing up our December Daily® Product Play workshop and this year will be focusing on an overall theme of Back To Basics.
For 30 days in November you’ll receive one new idea per day (for a total of 30) brought to you by members of our December Daily® Creative Team, our AED Creative Team, and Ali. Ideas in this workshop will focus on physical products from the Main Kit and our 2021 collection (see slider image for details on those specific products). Our goal with this workshop is simple, fun ideas to use your products to spark stories.
For this workshop each Creative Team member has selected a different product to create with. Some ideas shared in this workshop will be completed spreads with images and journaling, some ideas will be for foundation pages, and others will simply focus on ways to use the product to spark/create a home for your stories in December. We are here to help you use the products to get your stories told whether you are preparing to document 2021 or if you are finishing up telling stories from past years.
Class Contributors
Kasha Gage, Jess Forster, Morgan Beal, Linda Jordan, Jennie Rey, Kim Chaffin, Ingunn Markiewicz, Krystal Idunate, Barbara Picinich, Jenny Theriault, Pam Baldwin, Laura Wonsik, Lisa Varshine, Elizabeth Heinz, Jen Schow, Amy Gretchen, Amanda Zampelli, Nolana Lynch, Pascha Shepard, Ashley Horton, Neela Nalam, Emily Stebbins, Sabrina Poole, Kari Stiles, Virginie Goujon, Shu-Wen Tham, Jill Drangsholt, Yin Goh.
For 2022 we are changing up our December Daily® Product Play workshop and this year will be focusing on an overall theme of Your Choice.
For 30 days in November, you’ll receive one new idea per day (for a total of 30) brought to you by Ali and the contributors to this class. Ideas in this workshop will focus on physical products from this year’s December Daily® Collection (specifics listed below). Each product with have three lessons taught by three different instructors and will be classified into different project levels depending on the amount of time or steps involved.
Level 1 – Super straightforward without a lot of steps, the simplest way to use something (< 20 minutes) Level 2 - One step up from that with a few more steps (45 minutes and under) Level 3 – An idea with the most steps and takes the most time. (1 hour +)
Our goal for this class is to provide inspiration to support your December storytelling by showcasing a wide variety of voices and project styles. We hope the framework of this class will help you tailor your projects based on your amount of time, energy or creativity on any given day before + during the holiday season.
Some ideas shared in this workshop will be completed spreads with images and journaling, some ideas will be for foundation pages, and others will simply focus on ways to use the product to spark/create a home for your stories in December. We are here to help you use the products to get your stories told whether you are preparing to document 2022 or if you are finishing up telling stories from past years.
If you have ever struggled to learn Photoshop or the host of other apps and programs to work digital products, this class is for you! Join guest instructor Kim Hurst as she guides you through tutorials for hybrid memory-keeping exclusively using Canva design software.
In this recorded, self-paced workshop, Kim will introduce you to the technology of Canva, a free, design anywhere, graphic design platform that is filled with powerful tools for memory keepers. Learn how to organize your digital files, print your photos, and work with all types of digital elements to create hybrid projects that unleash your creativity.
Taught by: Kim Hurst
The Magic of MomentsAs memory keepers, we have a vast array of tools at our disposal, each designed specifically to help us tell the story of our lives. Among those tools, there are very few that are as powerful, or as personal, as photographs. The Magic of Moments is a photography class built around the simple idea that you have the most intimate access to your life and the people in it—take the pictures no one else can.
Throughout the course of the workshop, Lisa Varshine will guide you through the process of finding your unique photography voice, capturing authentic moments, making intentional creative choices, and editing photos to further enhance their storytelling aspect.
Someone wise once said, “Life is not measured in time. It is measured in moments.” This class will help you move beyond snapshots to artfully capturing the moments of your life, from the ordinary to the extraordinary. Lisa's class includes a bonus lesson devoted to photographing holiday moments.
Taught by: Lisa Varshine
Stories of HanukkahStories of Hanukkah is all about fun ways to document Hanukkah. We will explore several different approaches on how to include Hanukkah in your memory keeping and dive into some really fun interactive techniques to tell your stories. We will be working step by step through several pop-up pages, creating Hanukkah papers with mixed media, and making Hanukkah layouts using items from the December Daily® shop. This class is for anyone who wants to find fun ways to document your Hanukkah stories and learn some awesome techniques that can be used year round!
Taught by: Jenny Simon
Looking for more?
Shop the collection
here. Join a group of like-minded and passionate crafters in our December Daily® With Ali Edwards Design Inc Facebook group. Find inspiration and updates over on our official Instagram account: @decemberdaily. And check out our newest December Daily® classes for a wide variety of topics related to the project:
October 23, 2023
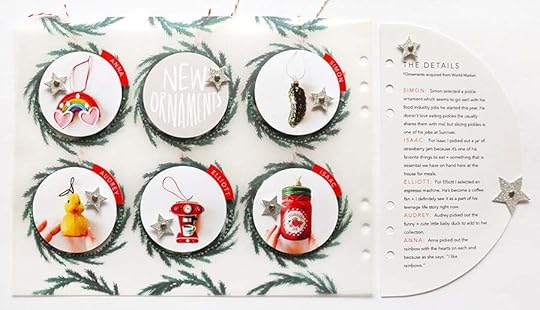
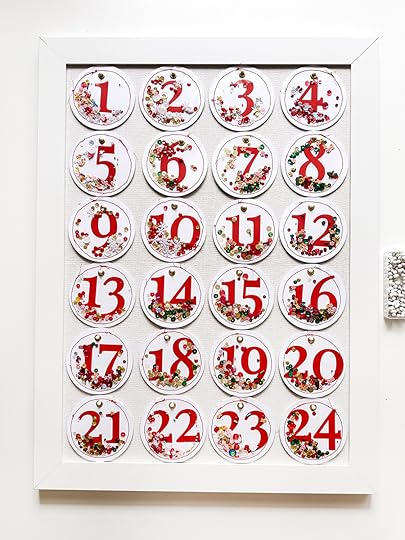
Ali's Completed Circle Shaker Advent Calendar
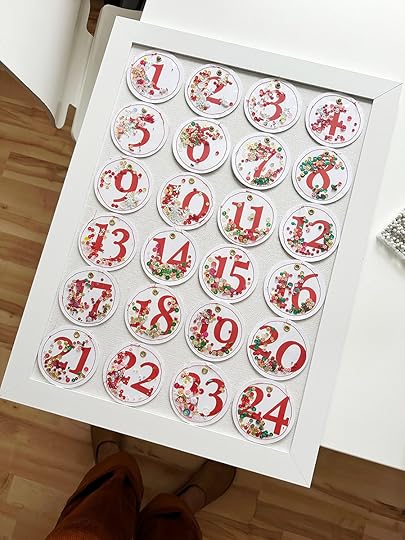
Welcome to a follow-up post on my Circle Shaker Advent Calendar using the number cards from the packaging of our 2023 Sticker Advent Calendar.
Check out my first post on this project here which details the beginning of the process.
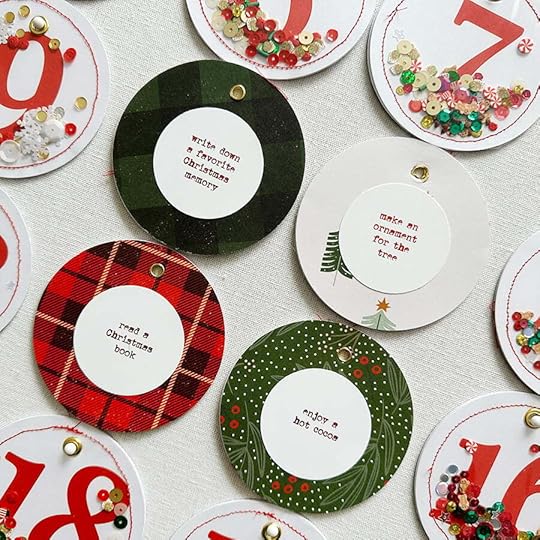
After completing all the shakers from part one this project I moved on to the 2 inch prompt circles for the back. I printed out the PDF you can download below and punched out each prompt circle using a 2 inch circle punch. Next I adhered each circle to the back of the shaker circles (on the pattern paper side). Before adhering I laid out all the prompts so I could decide which ones I wanted during the first half of the month and which ones I wanted during the second half of the month.
Download the PDF of circle prompts here.
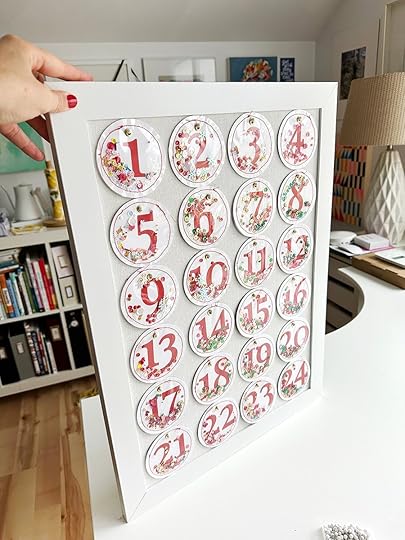
As I was thinking through ideas for how to display/hang these I decided to try pinning them all to a cork board. I laid them all out and found that they could all fit on a 24x18 cork board which I ordered from Amazon. I liked that it was something that could hang downstairs and all we'd have to do was turn one over each day. I also like that at the end of the season I can bag up the circles for storage and re-use the cork board in a different spot in our house. I used these white circle push pins to hang them on the cork board.
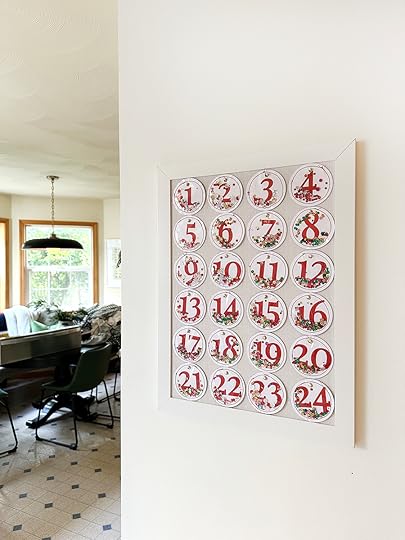
Here's a fun little video I put together to share on Instagram showing where I'm going to hang it in my house in December.
It was such a fun, crafty project! I can't wait to hang it up "for real" when I start putting up my Christmas stuff (which this year I'm pretty sure I'm going to do early).
2023 Advent Calendar
Pattern Papers
3.5 Inch Circle Punch
We R Memory Keepers Hole Punch
Gold Eyelets
Crop A Dile
Brother Sewing Machine
Sequin Mixes
Page Protectors (or other plastic) to stitch on top
2 inch circle punch
24x18 Cork Board
White Push Pins
December Daily® 2023 | Start Here
Happy Monday, friends! As we get closer to documenting December, all week long we're taking a deep-dive into the treasure trove of education, advice, and inspiration that can be found here on the blog. Going back to 2007, this has been the home for Ali's daily pages and more. To kick off the week, we've gathered all of her posts related to the fundamental ideas behind December Daily® and what she hopes you take away from this project. We hope you enjoy this trip down memory lane! We hope you enjoy this trip down memory lane!
December Daily® 2023 | Ali's Start Reason Why
5 Tips For Getting Ready For December Daily®
December Daily® 2020 | Let The Storytelling Begin 2020
December Daily® 2019 | Bring On The Stories
December Daily® 2018 | Here We Go
December Daily® 2017 | Let's Begin
December Daily® 2016 | Let's Begin
December Daily® 2016 | Beginning Preparations
December Daily® 2016 | My Hopes For You
December Daily® 2015 | Let's Begin
December Daily® 2014 | Let's Begin!
December Daily™ 2013 | Let's Begin!
December Daily™ 2012 | Saying Hello & Looking Back & Looking Ahead
December Daily 2011 | 25 Ideas And Story Inspirations
December Daily 2010 | Simple Tips Thoughts On The First Of December
Shop the collection here. Join a group of like-minded and passionate crafters in our December Daily® With Ali Edwards Design Inc Facebook group. Find inspiration and updates over on our official Instagram account: @decemberdaily. And check out our newest December Daily® classes for a wide variety of topics related to the project:
2023 DECEMBER DAILY® PREP DAY. Join the December Daily® community for a fun online December Daily® prep day on Saturday, November 18th, 2023. Use this opportunity to finish past December Daily® projects or start working on your project for 2023. The first live video will start on Saturday, November 18th at 10:00 am Eastern. Cost is $5. DECEMBER DAILY® PRODUCT PLAY | TRY THIS. December Daily® Product Play is all about ideas and inspiration for working with physical products from the December Daily® Collection. For 30 days in November, you'll receive one idea per day from the contributors to this class (includes Ali). Ideas in this workshop will focus on physical products from our 2023 December Daily® collection. Whether you are preparing to document 2023 or finishing up telling stories from past years, we hope these fun, creative ideas help you use your products to get your stories told. 2023 DECEMBER DAILY® HYBRID PRODUCT PLAY. Hybrid scrapbooking combines digital products with physical supplies to create paper (or printed) memory-keeping projects. For this class, our contributors will share with fun, creative ideas and inspiration for working with these digital products from the 2023 December Daily® Collection.
October 20, 2023
In Case You Missed It | October 20

Happy Friday, friends! Welcome to the latest
In Case You Missed It. Just a reminder that this is a quick post that will happen every Friday afternoon with all the updates and links that have happened throughout the week. So, let's get to it:
Only three days left! From now through October 23rd at 11:59pm ET stock up on select past for only $10! Kits included in the sale are Story Kits™, Story Stamps™, Stories By The Month™, and Project Kits. We have so many gorgeous kits available. Shop the sale here.
DECEMBER DAILY® DIGITALS
The 2023 December Daily® Digitals are here! Kits, Stamps, Paper, and Embellishments...the same fun & festive designs as the physical @decemberdaily products, only in digital format. We love to see how this incredibly creative community plays with digitals! Resizing elements and cards, adding journaling to papers, creating cut files, transforming files into transparencies, the sky is the limit with digital files. Want to learn more about creating with digital files? Our newest class December Daily® Hybrid Product Play is live today. We have incredible content from six amazing contributors ready to explore at your convenience. Shop digitals here.
NEW CLASSES
2023 DECEMBER DAILY® PREP DAY. Join the December Daily® community for a fun online December Daily® prep day on Saturday, November 18th, 2023. Use this opportunity to finish past December Daily® projects or start working on your project for 2023. The first live video will start on Saturday, November 18th at 10:00 am Eastern. Cost is $5.
DECEMBER DAILY® PRODUCT PLAY | TRY THIS. December Daily® Product Play is all about ideas and inspiration for working with physical products from the December Daily® Collection. For 30 days in November, you'll receive one idea per day from the contributors to this class (includes Ali). Ideas in this workshop will focus on physical products from our 2023 December Daily® collection. Whether you are preparing to document 2023 or finishing up telling stories from past years, we hope these fun, creative ideas help you use your products to get your stories told.
2023 DECEMBER DAILY® HYBRID PRODUCT PLAY. Hybrid scrapbooking combines digital products with physical supplies to create paper (or printed) memory-keeping projects. For this class, our contributors will share with fun, creative ideas and inspiration for working with these digital products from the 2023 December Daily® Collection.
ORDER ISSUES
If you experienced any issues at checkout, or have questions about the release please reach out to our Customer Service team and they will be happy to help you! Contacting them ensures we are keeping track of these questions and answering them in a timely manner. It's difficult for our team to keep track of all of the questions left on multiple threads/posts on social media with all the excitement-- we are doing our best and we want to make sure your questions get answered! Click here to start a new conversation.
As always, we’re so grateful to have you all as members of this community! Thanks for joining me today and have a great weekend!
December Daily® 2023 | Ali's Start + Reason Why

Welcome to my first post for the December Daily® documenting season.
As many of you know, I've long enjoyed doing some work in advance of December to set me up for storytelling success. There is not one right or wrong way to approach this project and what I've personally learned over the years of doing this project is that I really enjoy spending time setting up some pages (I often call these foundation pages) prior to the documenting month that will help me focus on the stories during December.
If you are brand new to December Daily® I highly recommend checking out our Storytelling With December Daily® workshop. It's one I put together a number of years ago to give a deep dive into my approach to this project. It includes a story menu, walkthroughs of past albums, and techniques you might want to include in your own project. Many people in our community go back and re-watch this workshop as they get ready to embark on the upcoming season - it's a great way to get your mind and heart ready for December.
Also, don't forget to check out our new December Daily® classes for 2023:
December Daily® Hybrid Product Play: learn how to use our digital products to create paper projects using this year's digital collection December Daily® Product Play: one idea per day presented in November using products from this year's collection December Daily® Prep Day: our $5 community celebration day happening on Saturday, November 18th
Today's post includes a look at my table of contents, intro page, and my reason why. I'll be sharing another post soon with a look at additional foundation pages and how I'm planning out my album this year.
Let's dive in with my welcome and process video:
And here's a look at my starting place via images.
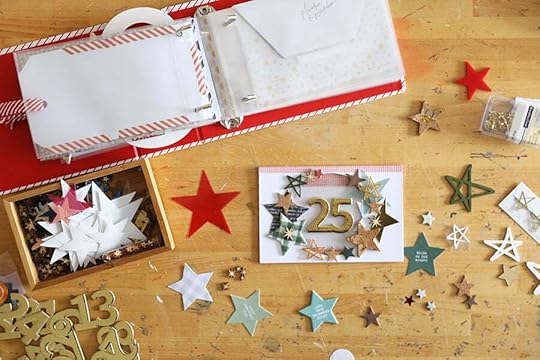
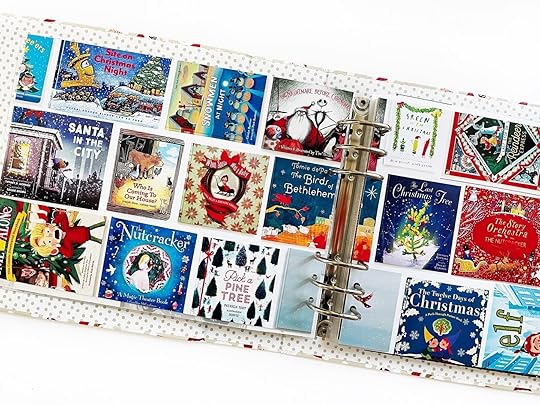
TABLE OF CONTENTS
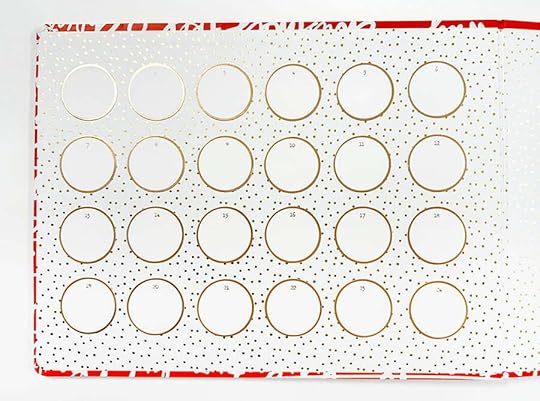
Last year was the first year I put together a Table Of Contents page and I really liked that addition to my album. This year I decided to adhere the gold rimmed circles from the Main Kit on the inside cover of my album. As I tell one story per day in December I'll add a couple words here to describe the story (might be the title, prompt, or an icon). When I laid out all the circles going through 24 enabled me to create even rows + columns which feels just fine for me since we all know the 25th is Christmas Day.
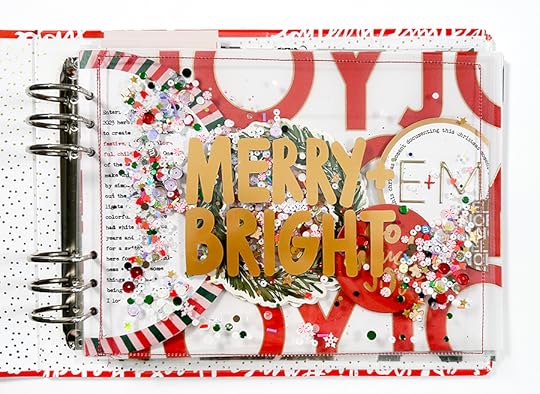
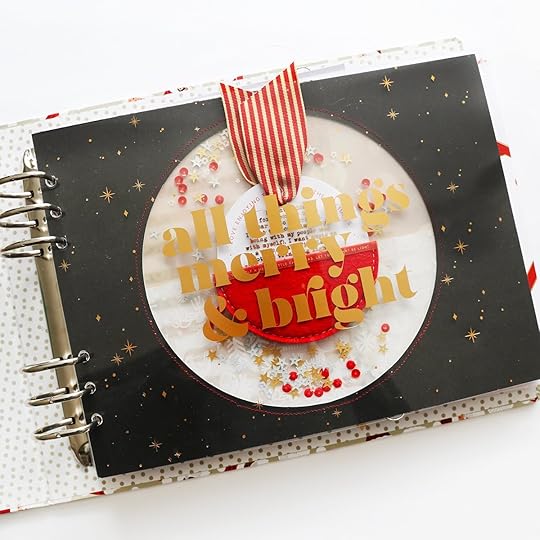
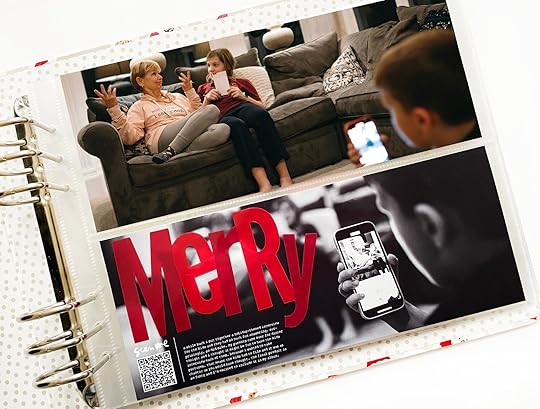
When you watch my process video you'll hear me say at the beginning that I'm not going to start with a shaker page. I actually built my Reason Why page first and then decided to add this because it's just so fun + festive and that's a big piece of my intentions for this year.
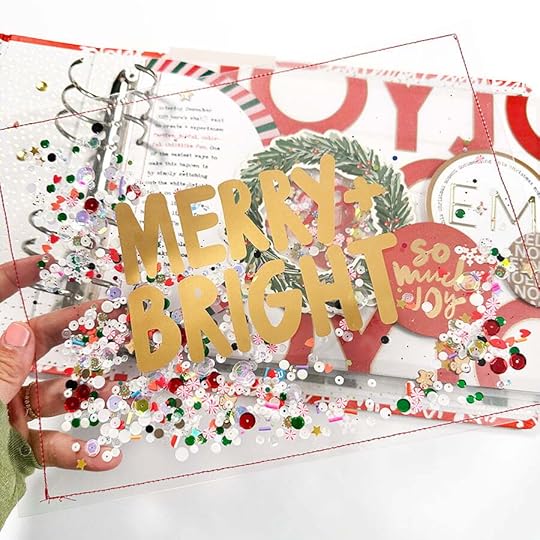
To create this I paired the Merry + Bright transparency with a piece of Grafix Plastic cut to 11 inches x 8.25 inches. I ran the two pages through my sewing machine and then added before sewing up the fourth side.
This seriously made me so happy.
You could also use a full page protector from the album to make something like this and simply stitch up the side (or use a Fuse tool or add washi tape or hand stitch to close it off).
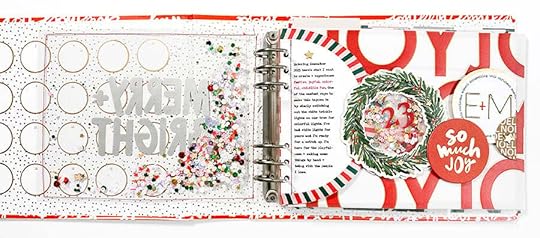
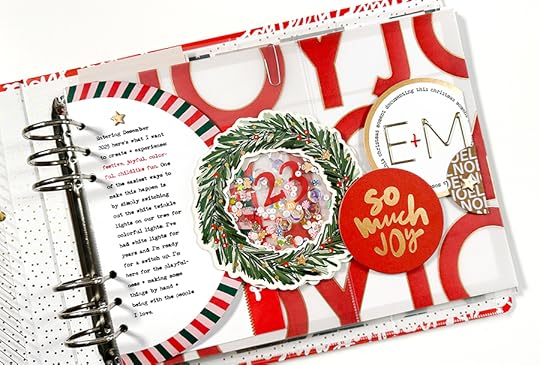
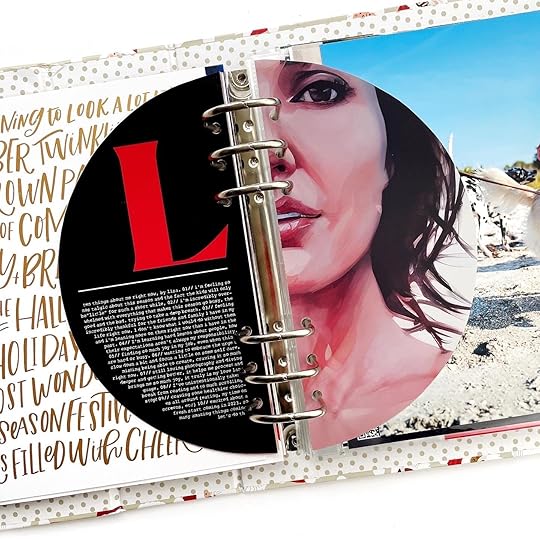
For this year's Reason Why page I decided I wanted to create a circle trail using a variety of circle shapes from this year's collection. When I first brainstormed this idea I wasn't sure if it was going to need to live on top of a transparency or piece of vellum but I'm happy to report that I was able to make them into a unique page shape by layering the circles on top of one another. In the process video you'll see how it evolves from start to finish.
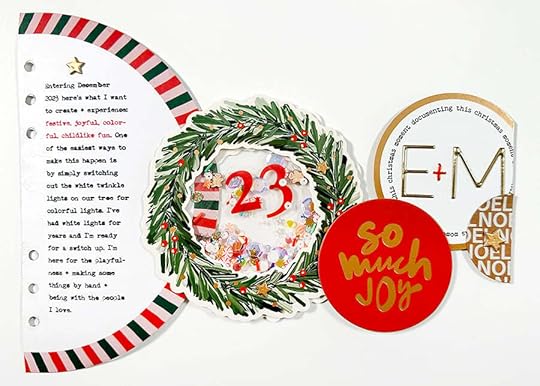
This page includes one of the 1/2 circle die cut pages from the Die Cut Page Insert Pack (digital available) + wreath from the Main Kit + "so much joy" chipboard circle from the Sticker Advent Calendar + large paper circle from the Die Cut Pack (digital available) + gold foil alphabet + plastic numbers + .
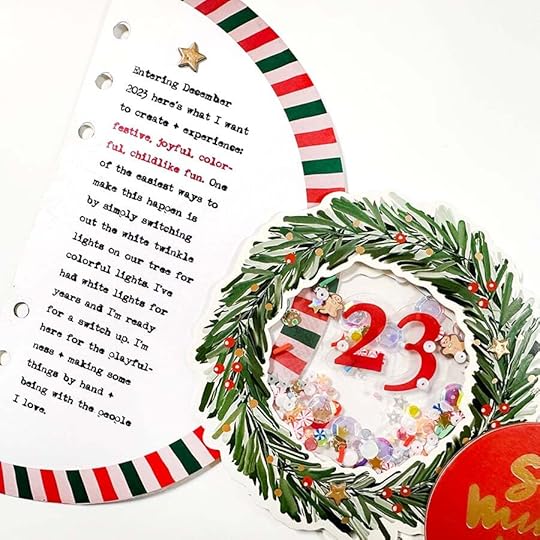
This year my reason why is to create + experience festive, joyful, colorful, childlike fun.
After I got everything set on the front of my circle trail I tackled the back.
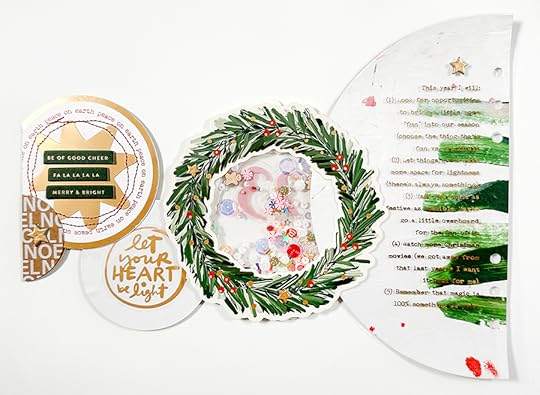
In the process video above you'll see me talk through a couple of ideas for the back of the 1/2 circle. I end up using a mixed media paper I had in my stash from on top of the 1/2 circle and then I printed some additional writing on laser transparency and ran it through the Minc machine to add the gold foil.
I added another wreath from the Main Kit on the back of the front shaker. I added a clear sticker sheet to the back of the red chipboard circle. On the gold foil circle I added a star from the Main Kit along with three of the chipboard phrases. I ran that through my sewing machine to add the stitching before adhering it to the original circle.
The additional writing I added included more thoughts on how I'm going to welcome that childlike fun into my own season using the prompt "this year I will."

That's it for today! I'm currently working on some foundation pages to share in the next couple of weeks.
SUPPLIESI've also created an Amazon page that includes many of the basic products I use regularly including printers, paper, etc. You can check that out here.
December Daily® Main Kit December Daily® 10x8 Album December Daily® Advent Calendar Holiday Phrases Clear Sticker Sheet Gold Foil Puffy Alpha Stickers Minc Machine Gold Foil for Minc Laser Printer Transparency (to go through the Minc machine)Embroidery Thread Grafix Transparent Sheets December Daily® Paper Die Cut Inserts (digital available) December Daily® Variety Die Cut Bundle (digital available) December Daily® Specialty Paper Pack (digital available) Red Small Plastic Numbers Brother Sewing MachineBig Roll of Foam Adhesive
October 18, 2023
December Daily® 2023 | Done By December With Lisa 02
Hi guys! This is Lisa and today I’m checking back in with a few completed spreads for my 2022 December Daily® album in our second installment of Done By December. I have not been quite as productive/efficient as I'd like, BUT I've made progress and any progress is a win (for me). As I've been working on these pages I've noticed I'm approaching the project differently than I do when I'm working on it during December. While I'm enjoying it, and not necessarily rushing, I'm focusing on getting pages done. That's translating to simpler pages and resistance to incorporating time consuming elements like Minc or Silhouette. I'm not sure if I'll regret that.
Before I share my most recent pages, here are the ones I had completed last year during December (these were also in my first blog post).
2022 Completed Pages
As I mentioned, I've got a spreadsheet with my stories and I'm slowly working my way through. I am going in chronological order, but I don't think you have to. If you're not feeling motivated, I'd recommend starting with the stories or photos you are most excited to document.
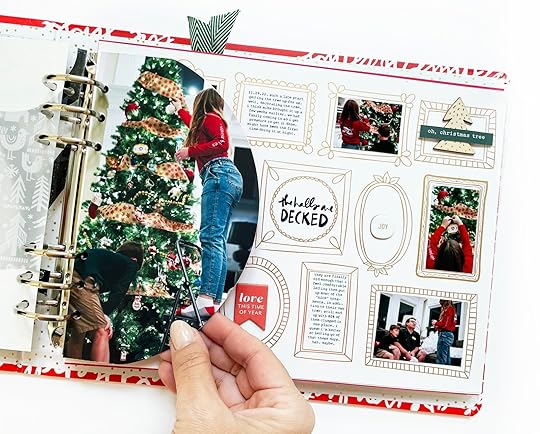
The first story I added happened before December 1st. It's the process of putting up our tree. Because I hd already finished my "official" story 01, I'm just putting this one in front of that one, but after my title page. It works. Story 01 for me almost always has to be the arrival of Chippy our elf. Lots of enthusiasm in our house for that guy's arrival.
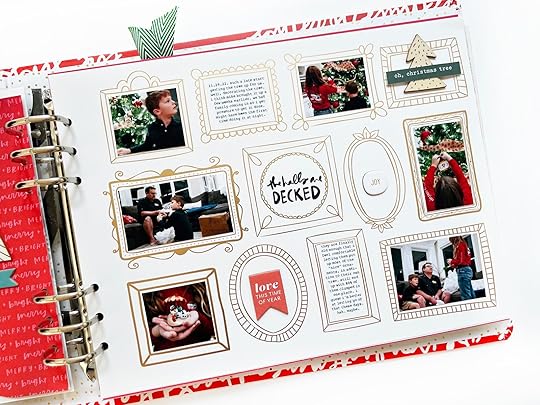
For some reason that I can't remember, we decorated the tree at night. Normally I'd have a big pretty full page photo, but I honestly didn't love any of the pictures I took enough to enlarge them. My favorite was the one of Ava on the step ladder. That prompted me to use this page from last year and just add thumbnail-sized photos nixed with a little journaling and a few embellishments. Good enough.
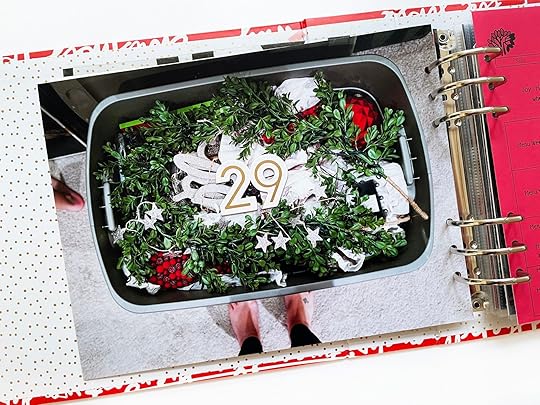
On the back of the specialty paper, I adhered an enlarged photo of one of our Christmas bins. I loved that you could see Ben's little foot in the upper left hand corner. I added the number 29 because this happened November 29th.
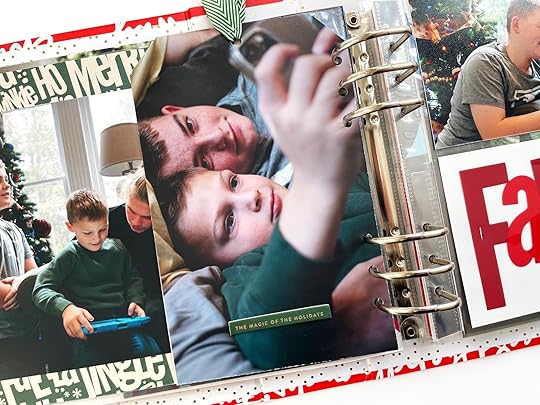
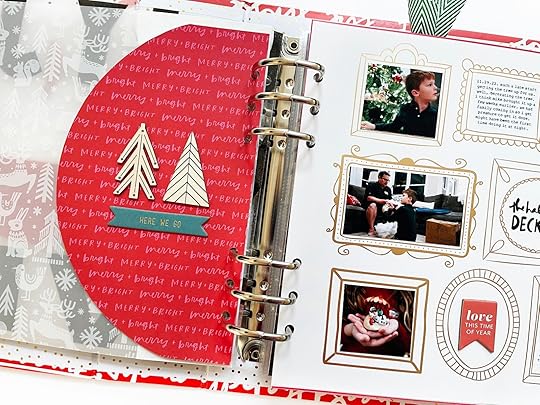
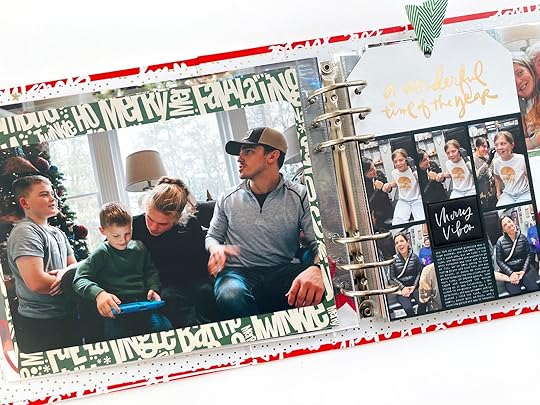
Next I actually added on to a story that I had already finished. I dug up these additional photos of the kids wrestling in front of the tree and a shot of Chippy. I was honestly inspired to add these purely because of the 4x6 card from Liz's kit (2023). It seems like such a great fit for the story.

On the back I used the gold puffy stickers and a piece of chipboard from this year's Main kit.
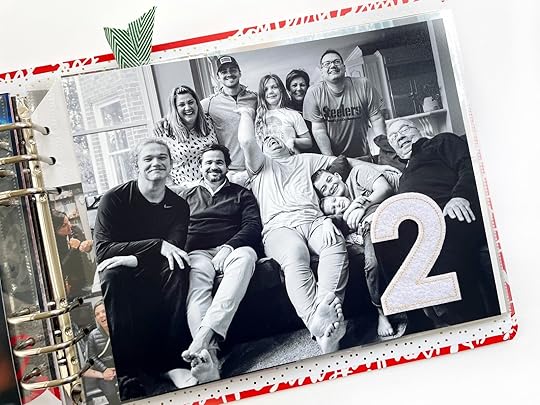
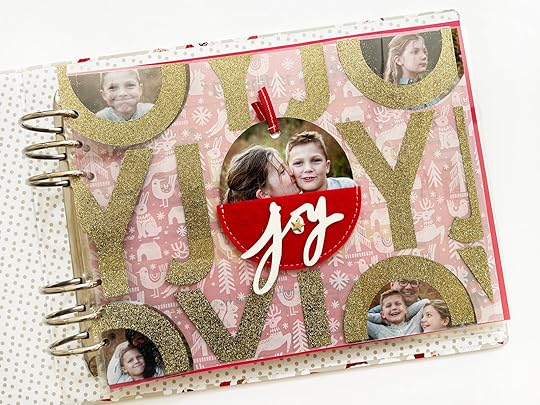
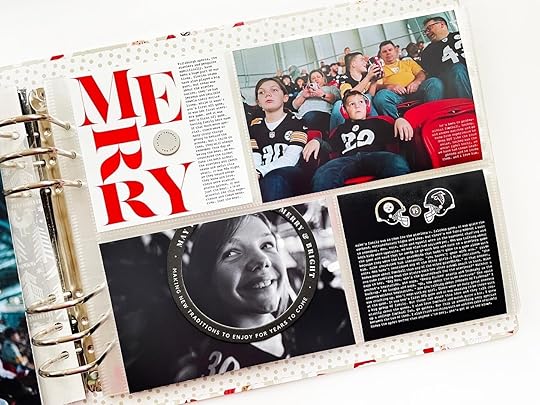
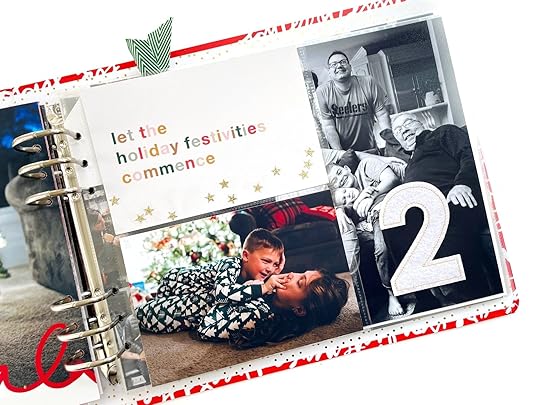
Story 02 is a big outtake. These are always my favorites, especially in group photos. I rarely like the pictures with everyone looking at the camera and smiling. We obviously had a bunch of family come stay with us.
We love, love, love when we get to spend time with the cousins. These kids are the absolute BEST! My kids are the babies of seven and the older ones spoil them, especially Ben. The tag tells a little story of Ava getting her 2nd piercing. A few of us went with her (I also got another piercing). Jake took pictures and video. She loved having them there.

Ben and Nate are especially close. Ben isn't happy unless he's right next to Nate and always has something he wants to show him or tell him. Both my family and Mike's family are sports fanatics, so it's often sports-related.

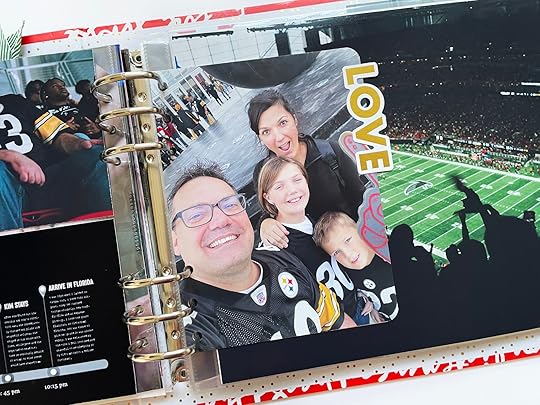
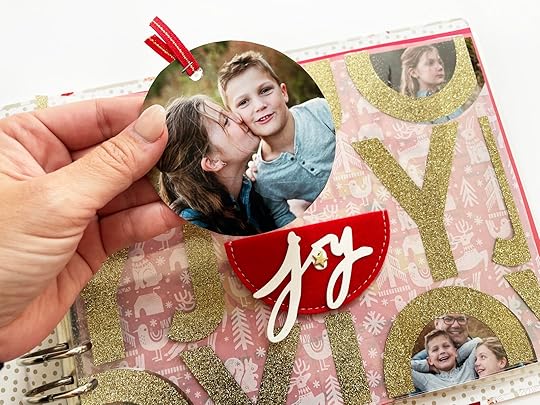
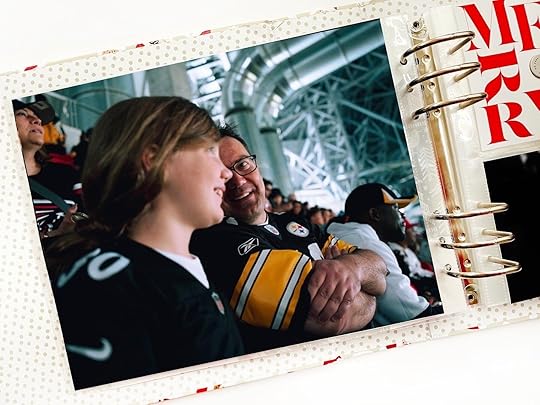
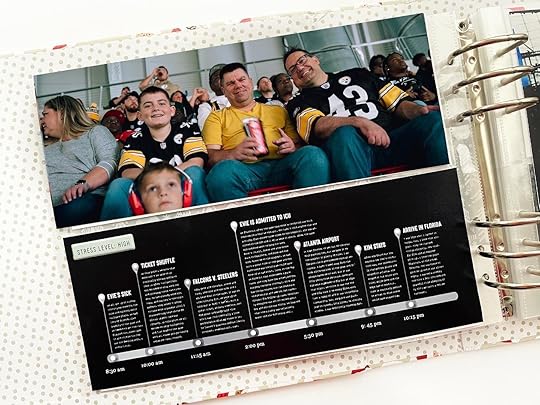
I'm trying to do better about including photos of myself, so I went back and added this one to the already completed story about all of us at the Steelers game. I used a paper die cut as a tab to help flip the smaller page.
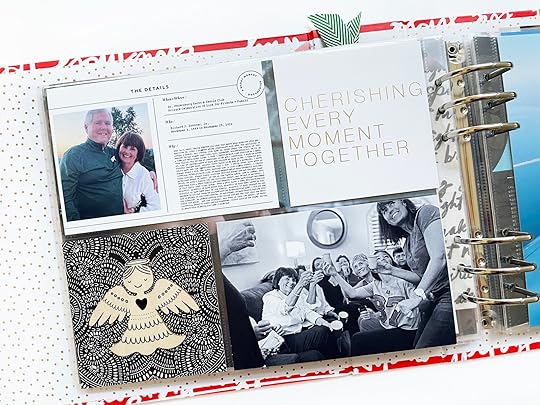
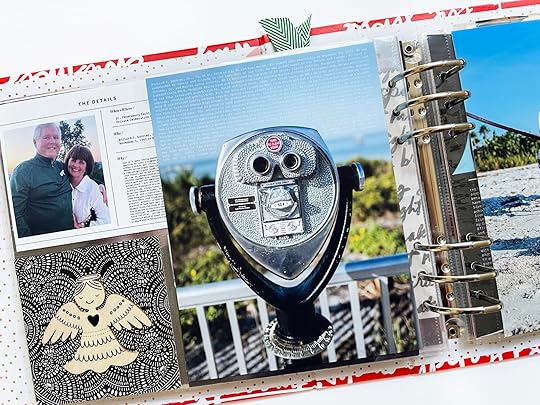
The next story is a hard one for me. I lost a beloved family friend in late November and had to fly home for his celebration of life. Rick comes from a very big, loud, loving, Irish family and there was quite a rowdy celebration of his amazing life.
Even though a funeral doesn't qualify as the most wonderful time of the year, gathering with friends and family really rang true.
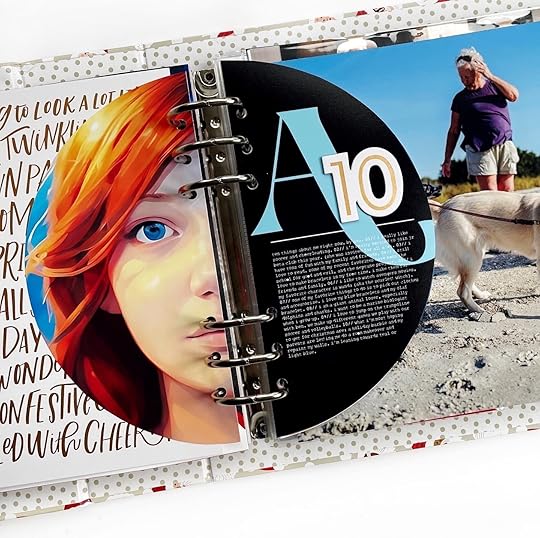
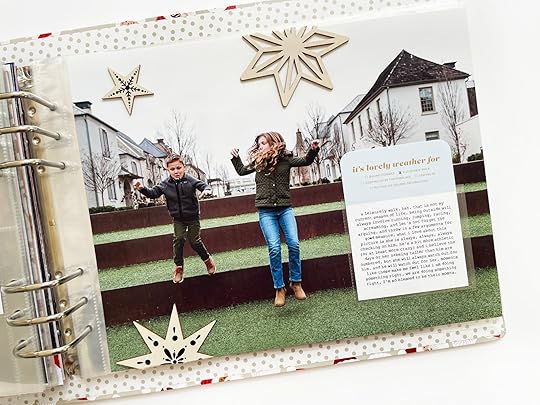
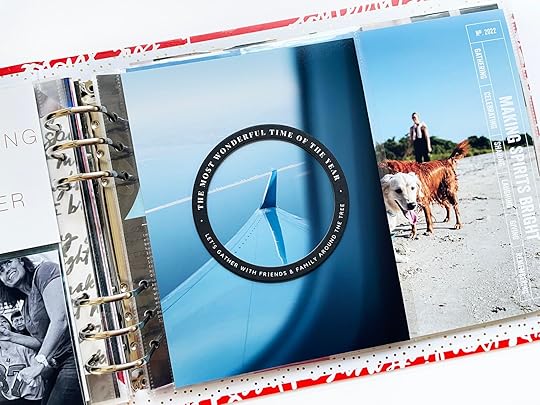
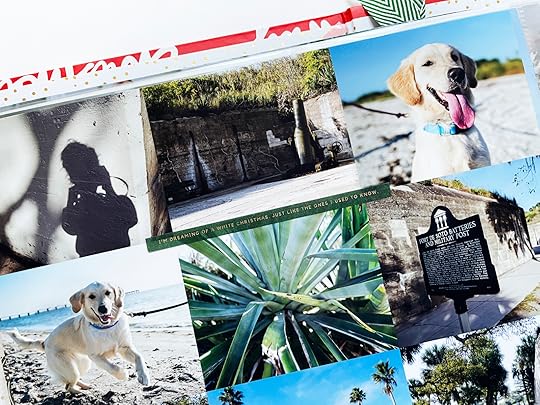
While I was home for the funeral, I went with mom to take Sasha, their golden retriever puppy, on her very first visit to the beach. At that point, Sasha did not care for water, but she loved the sand and other dogs.
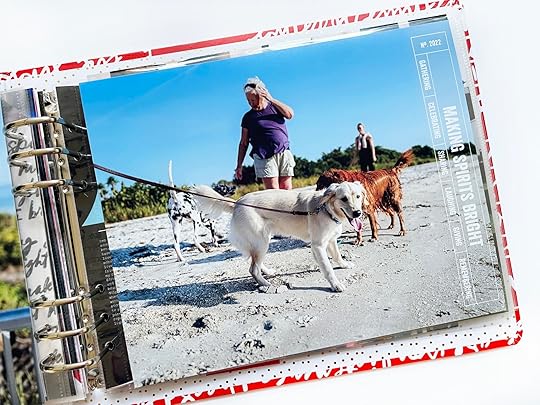
The morning was such a big hit, but we did learn that she was not ready to be let off the leash. It took forever to catch her after she tasted freedom.
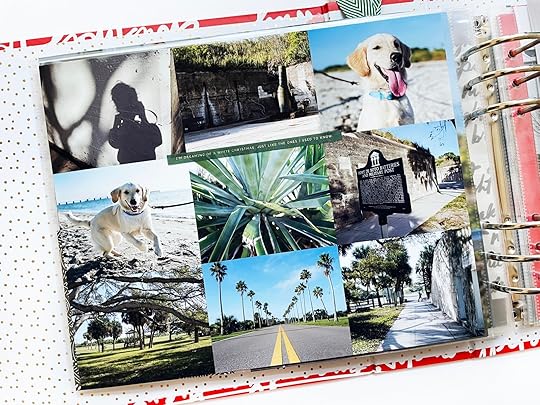
Per the usual, I was just meandering around while mom and I were talking and taking a few photos. Mom had wanted to capture her first visit to the beach. I put a bunch of the pictures into a quick template and adhered one of the vellum phrase strips from last year's kit. The sentiment of a white Christmas felt like a fun little joke on a December beach page.
I think that brings me up to story 06, with several additional ones that I completed last year out of order. Slowly but surely, friends! Let me know if you have any questions!
You can find all of my December Daily spreads from the past seven years on IG:
@frecklepickle


