
Ali Edwards's Blog, page 38
November 17, 2023
Story Play | Little Moments Live Zoom Call

Thanks for joining me for this Little Moments Story Play series! We wrapped up the week today with a community zoom call chatting and sharing about documenting Little Moments.
Check out the recorded conversation here:
Story Play will return next year with four themes: Day In The Life™, Love Story, Food and Read.


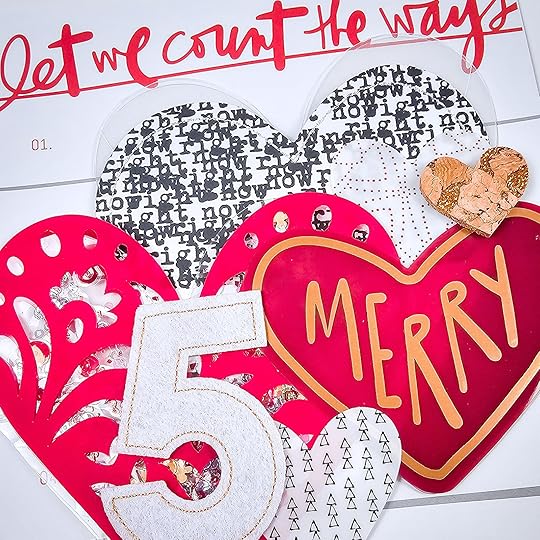
December Daily® 2023 | Special Guest Nolana Lynch
Hi Everyone! Nolana (@nehlan.has.a.plan) here again to share with you where I am at with my December Daily Preparation!
Love that Prep Day is this weekend and I absolutely can not wait to play with all the things!
Over the past week, I’ve been preparing for my Prep Day lesson and I am so very excited to be contributing; I can’t wait to share it all with you!
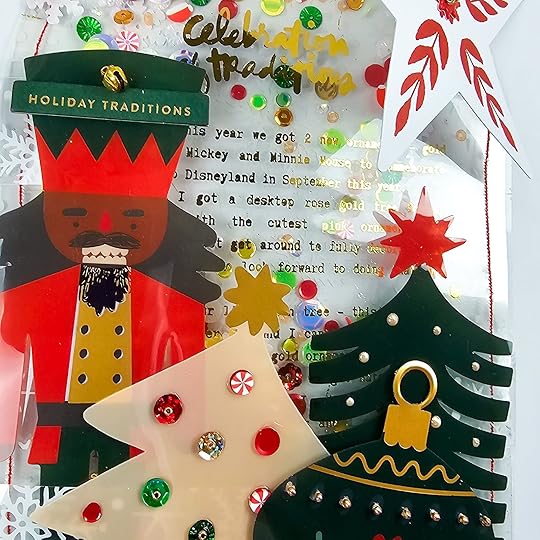
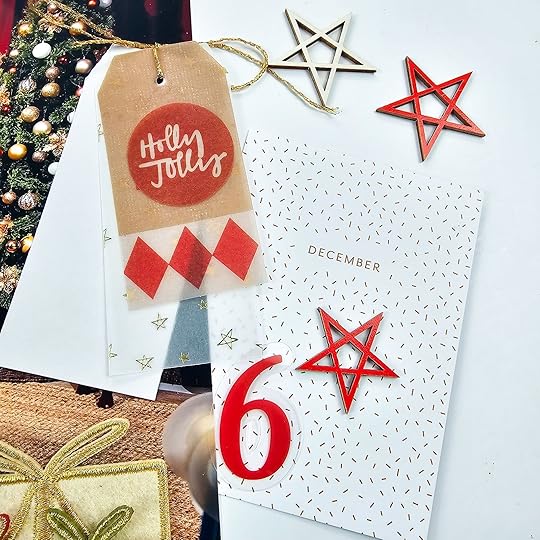
In addition to that mini album, we received our Santa photos, so I was happy to begin playing with those. Since our son was born in 2021, I have loved doing a double photo spread using one of my favourite photos from our Santa visit, so I’ve been playing with the embellishments for that layout. I decided to try stitching sequins to the wood veneer stars inspired by CJ’s Product Play lesson and loved how they turned out!
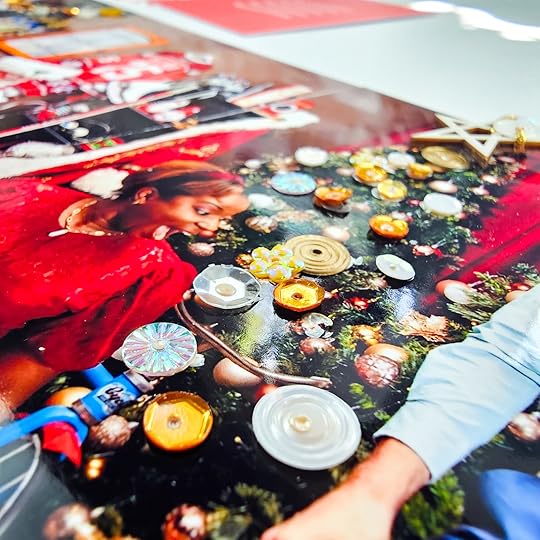
I needed some “slow crafting” time - so I decided to add sequins in the position of the baubles in the wreath in the photo.
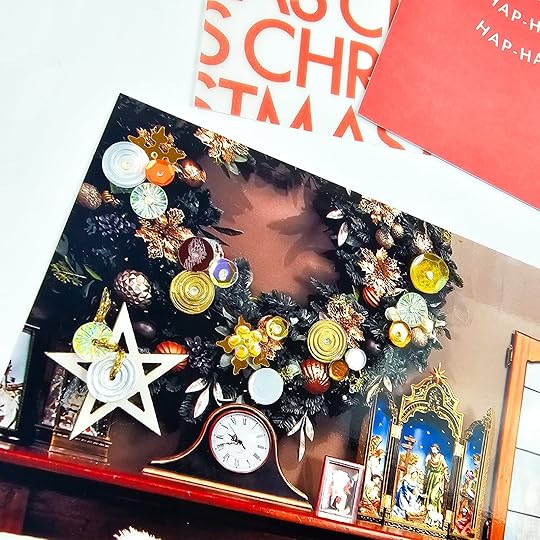
My initial thoughts were to embroider stitch all over the page, but since sequins are my favourite, here we are! I used these sequins here (https://shrsl.com/4b0e4) and I loved how it turned out, subtle and almost looks like it’s part of the photo, so I added it to the Christmas tree to the right.
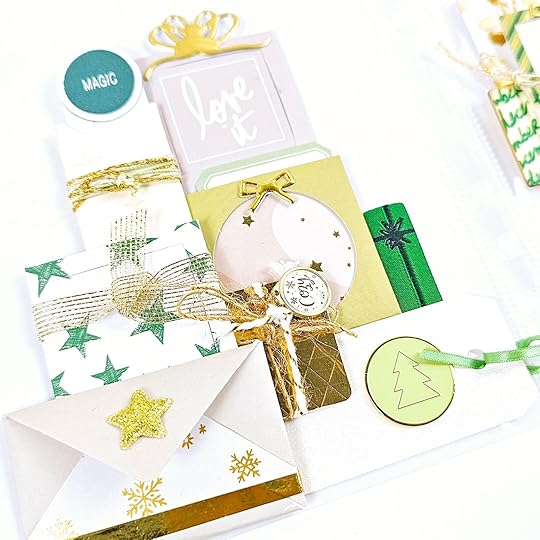
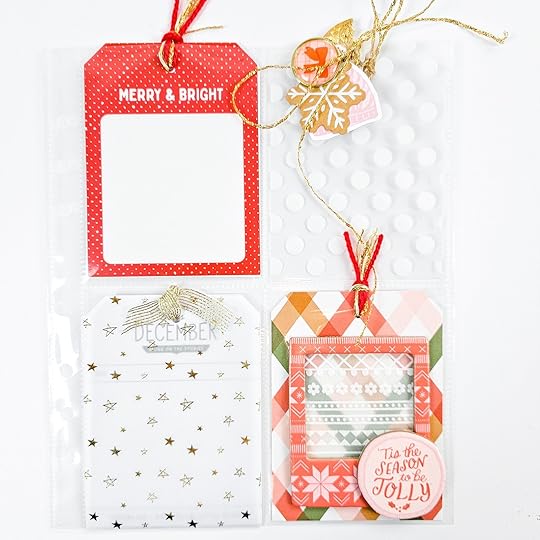
I also played around with some clusters of the felt presents - I love these embellishments from last year, and happily made them into a pocket to hold my journaling. I put together a cluster of tags using a tag from the Main Kit, some star vellum and a journal card from the Paislee Press kit.
This year, I also want to lean into “Creating Easy Pages” - using the products to make the page creation process a bit easier. One of the things I challenged myself to do was use more journal cards. I typically use very little of the journal cards in my December Daily albums - so I pulled out these from the Paislee Press kit and the Specialty Cards and added them into these 3x4 pockets - I would use a mix of embellishments, photos, and words to create stories during some of the busier periods of the month.
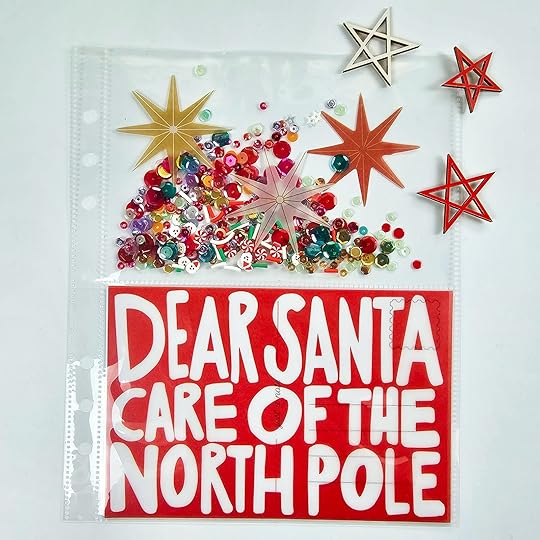
Inspired by Santa, I wanted to use this 4x6 Specialty Card, with the postcard from the PP kit to open up the story about “Letters to Santa”, I would back this with a felt pocket and actual letters to Santa, or letters that I write to our family each year.
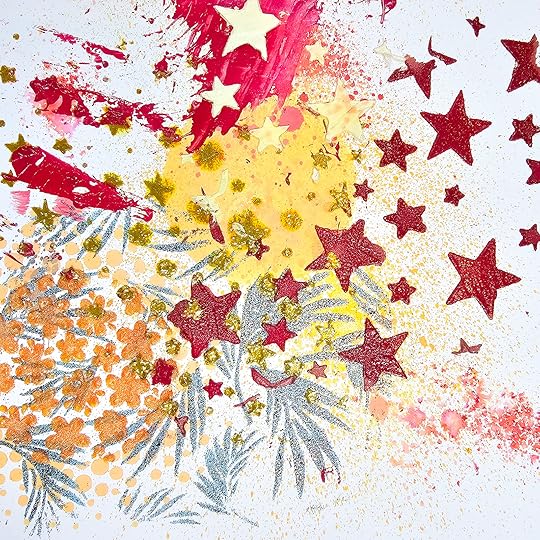
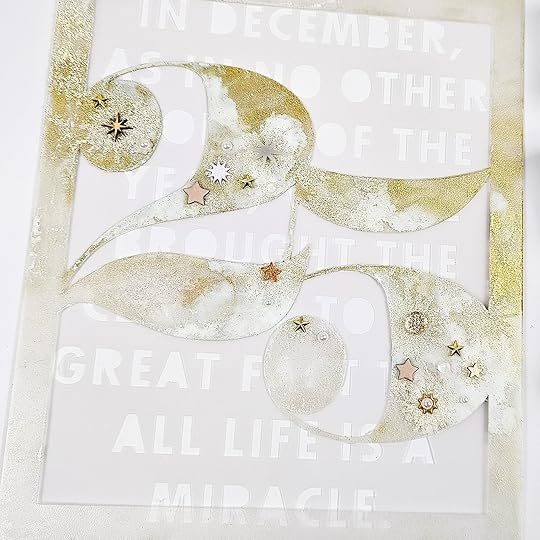
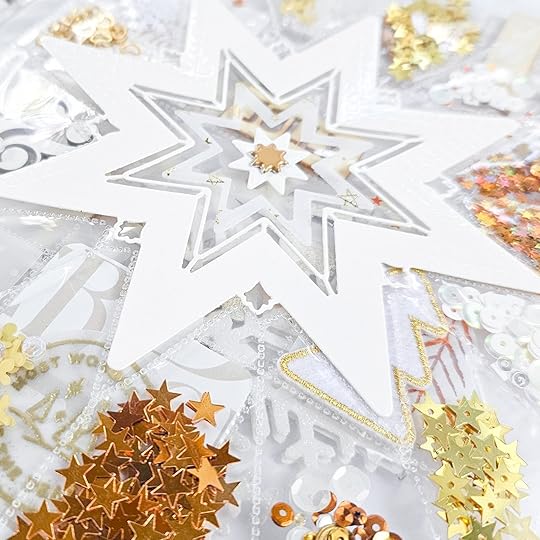
Other projects that I have worked on over the past week, are some mixed media fun, which I’d create some more structure around over the next few days. Here are some quick sneaks of what I created.
For this one, I used a mix of texture paste and the ornament, of which I’d create a full-page acetate pocket with photos and journaling inside.
This one would be the base of a foundation page/layout for an upcoming Tropical Shirt Christmas party. I look forward to sharing with you how I used this background next week!
If you’d like to have a look at my December Daily Process videos and flip throughs from the past few years, here’s my December Daily playlist.
I hope you’ll be joining in on all the DD Prep Day fun this weekend! Wishing you a great week ahead and happy December Daily Prepping!!!
November 16, 2023
Mixed Media Collage Ornaments With Ali | Completed Project
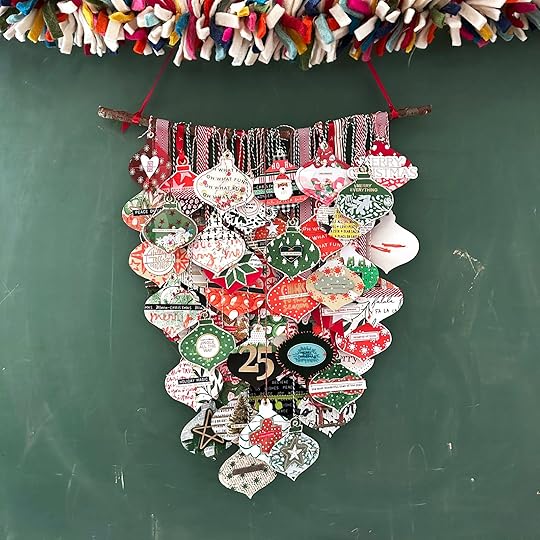
I am so excited to share the end result of my collage ornament adventure!
You can read previous posts on this project and .
I had the best time working on this over the last few months and I'm so pleased with how it turned out! I love that I can add more if I want or just let this be the magic that it is right now!
After collaging up more ornaments I went outside my house and cut a branch from one of our trees to use as the hanging rod. I love that makes it feel like it's rooted in this house and this season of my life. I used this
red ribbon to tie a knot in each end in order to hang it on the chalkboard.
I ended up making about 50 ornaments.
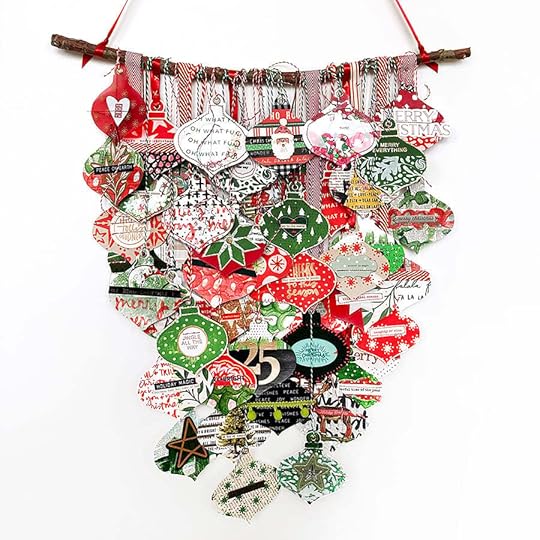
I used a variety of different twines and ribbons to hang each ornament from the branch. I liked mixing in some thicker ribbon with the thiner twine. With the thicker ribbon I used my Tiny Attacher stapler to staple the two ends after they go through the eyelet on the ornament and also stapled them together after looping the ends over the branch. When using the twine I tied knots.
Here are links to the ribbons I used:
Red + White Chevron Stripe Twill Red Satin Ribbon Bakers Twine set that includes green/white + red/white + red/green/white Cream with Two Red Stripes
Here's a quick video showing what it looks like hanging in my house:
I love the textures and the patterns and the different materials used to make this collection of mixed media ornaments. Seriously so fun.
SUPPLIESDecember Daily® Stencils
December Daily® Paints
December Daily® Silkscreens December Daily® Stamps Watercolor Paper (originally offered with One Little Word®) Watercolor Paper from a notebook (140lb) Dylusions Star Flurry Stencil (this is the one I called a poinsettia) Tim Holtz Rub Ons (similar) Tim Holtz Christmas Sticker Book (similar to the one from my stash) Tim Holtz Label Stickers Embossing Powders Versamark Embossing Ink We R Memory Keepers Hole Punch Texture Paste Deli Sheets Paint Brushes Matte Medium or Gel Medium (use either as an adhesive) POSCA Paint Pens Gold Eyelets Crop A Dile Eyelet Setter Embroidery Floss Sewing Machine Sequin Mixes Felt Plastic Pots for Paints
Story Play | Going Big With Little Moments
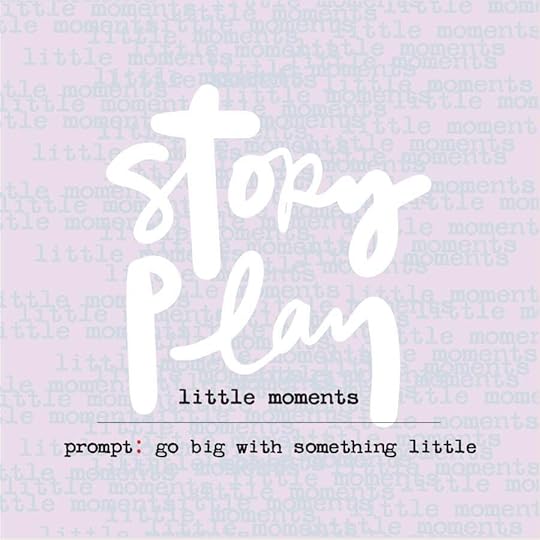
Welcome back to our Little Moments Story Play series.
Don't forget to join me for our live community zoom tomorrow (November 17th) at 10am Pacific. You can find the link details in this post. If you can't make it to the live call it will be recorded and shared on the blog after the call is complete. If you have specific questions you'd like addressed in the call please leave them in the comment section below.
In the first post in this series I wrote about how elevating a little moment happens when we choose to document it. Today I want to encourage you to look for an opportunity to go big with a little moment.
Going big with a little moment can mean a couple things:
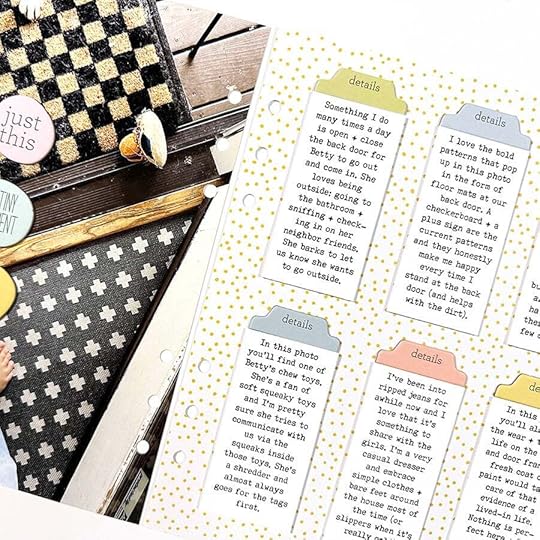
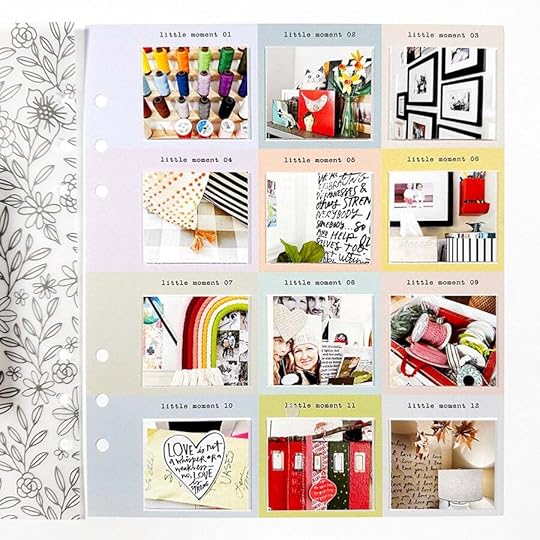
Literally enlarging a "little moment" photo to be bigger (such as a full page photo). The other projects I've shared this week have focused on bringing images of little moments together to tell a story. Today I want to invite you to go big with one little moment photo.In addition to going physically bigger with your photo (or title or journaling) you are invited to go deeper to see how many stories you can actually pull from that one little moment. In my example below I took a photo of the moment when I'm letting Betty back into the house after she had gone out into the backyard. From that one photo I pulled six micro stories that reflect pieces of life right now. Another option would be to take your "little moment" photo and tell a much longer story about one piece of the photo (something you see, something you feel, something you remember, something you are reminded of as you look at the photo). PROMPTLook through your photo archives (or take a new photo) for a "little moment" style of photo. Print that photo to a full size page (whatever size you want) and then pair it with either a longer story or a series of short stories that are pulled from your photo. This is a fun exercise that helps to excavate more of the stories and teach you that little moments often have layers of stories (also check out this blog post from our Facts + Feelings week that focused on the concept of photos having layers of stories).
Let's see what that looks like in practice:
Here are images of my project:

In keeping with my simple theme in this series for this project I paired a full page photo with a full page of pattern paper. On top of my photo I added three of the chipboard circles in a vertical trail down the middle and I created custom journaling blocks that feature six details pulled from this "little moment" photo.

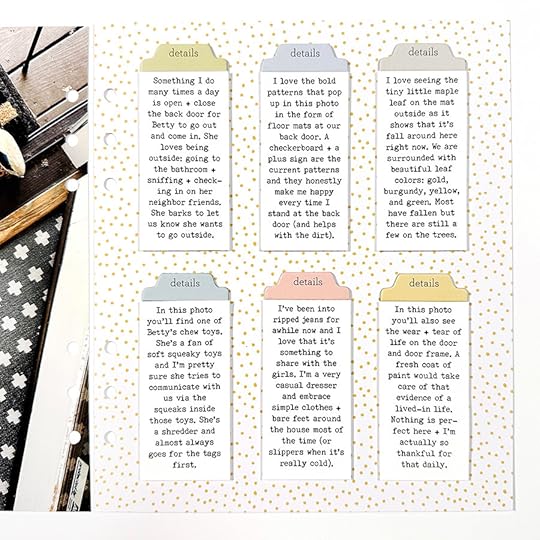
My journaling blocks were 1.5 inches x 3 inches and adhered with foam adhesive squares that lifts them up a bit off the back of the page. I loved looking at my "little moment" photo and pulling out this variety of stories reflective of my life right now.
SUPPLIESStory Play Little Moments Mini KitBasics supplies can be found in my Amazon Storefront (trimmer, 6 hole punch, foam adhesive, etc)November 15, 2023
Story Play | Little Moments Prompt: In My Hands
Welcome back to our Little Moments Story Play series.
As I was thinking of prompts to share this week I started thinking about all the little things I hold in my hands and the stories those pieces represent about my life right now.
STORY PROMPT
Document things you hold in your hands over the course of the day or a few days. I loved having this concept in my back pocket over the past week and finding things to capture. I loved becoming more aware of the things I hold in my hands - the things I grab, the things I eat, the things I use, the things that are annoying to have in my hands, etc.
What do you hold in your hands in this season of life?
Here's how my project came together:
For this prompt I put together a little digital package if you want to follow along with my design formula. I've included a 3x4 layered PSD file with a spot for your photo and journaling along with a title card as a jpg and as a png word art file.
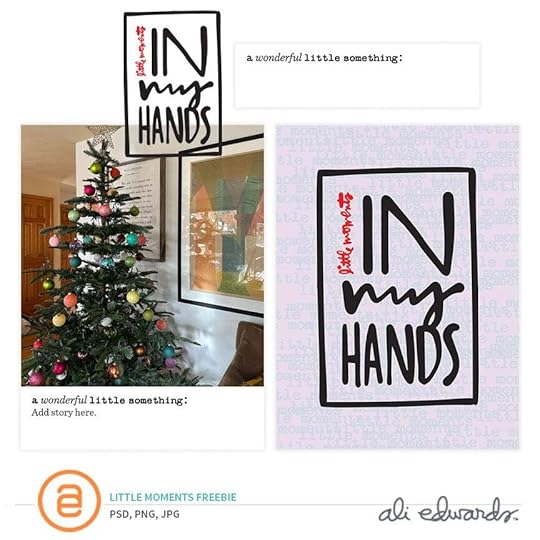
Download the digital package here.
Here's a look at my project:
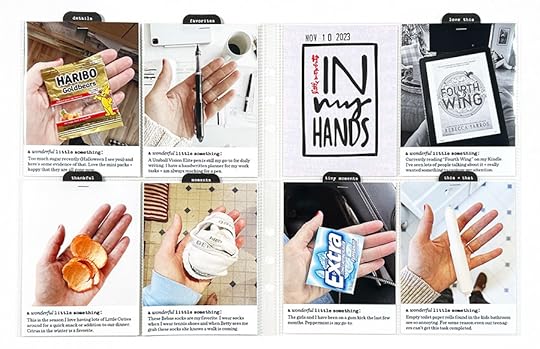
I used the PSD file in the freebie digital package (download above) to organize my words and photos before printing.
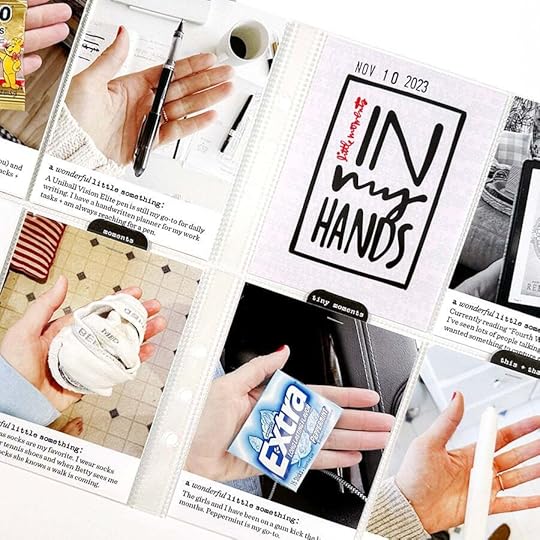
I printed out the jpg title card from the digital freebie and added it to the pocket after using a rolling date stamp on top.
Along the tops of each of my photos I added a tab sticker from the kit using a Tiny Attacher stapler.
You can do this! It's a simple and fun story about little things in your life right now.
SUPPLIESStory Play Little Moments Mini Kit 6x8 Page ProtectorsTiny AttacherRolling Date Stamp Check out my Amazon storefront for more basic supplies (trimmer, printers, etc)
November 14, 2023
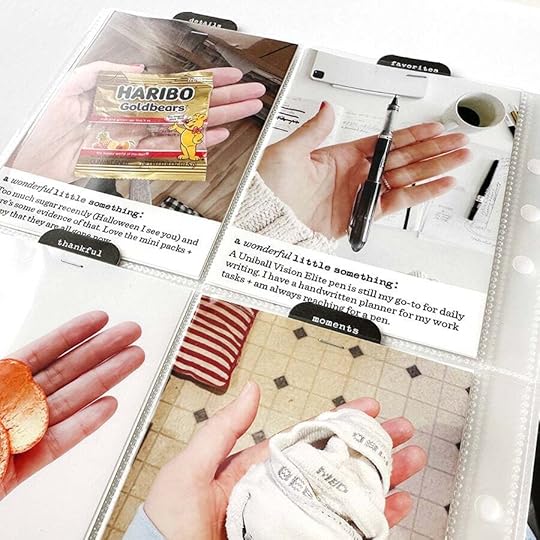
Story Play | Little Moments Prompt: Around The House
Welcome back to our Story Play Little Moments series!
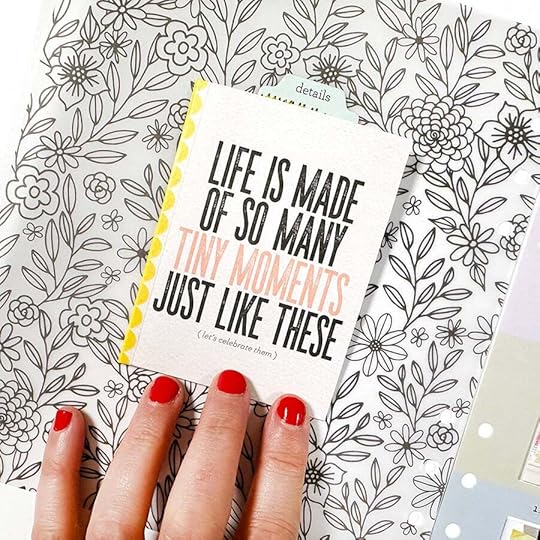
As I was thinking about what story I'd like to tell with the Little Moments pattern paper I decided to take a walk around my house and capture some little moments.
I knew I wanted to keep my projects fairly simple for this series and I love having pattern papers that guide me through the process of getting my story told. We do have a few of the Story Play Mini Kit bundles available if you want the physical version of this kit and we also have the digital version available.
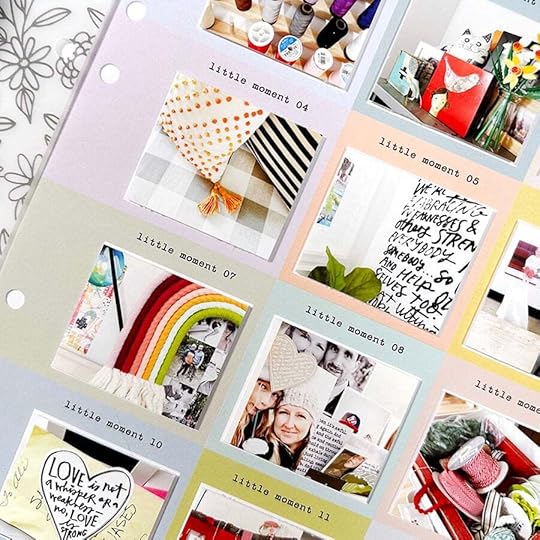
I stood in my office and started taking photos of little areas, views I enjoy, little things that have been clustered together in the cocoon of my office. They are pieces of my own "whole" around here - little (and big) corners that I live with all the time but may or may not actively recognize as something I love about my environment. My goal was to simply capture some of the things that exist in my spaces. Read below for other ideas of little things (categories) you might want to document around your house.
Grab your camera and walk around your home. Take photos of the little things that are important to you. Use the pattern paper from the Mini Kit or create your own grid of photos to document this story. You might find you want to do this for each room in your house or some other sub category - maybe choose a color to focus on or things from your childhood or things that include text, etc. Have fun! Let yourself be an explorer in your own space.
Some things to think about:
What is your house have you never taken a photo of but maybe you look at every single day?
What are the little corners you love?
What are the patterns or colors you love in your house?
Are there little treasures around your house that are meaningful only to you?
Focus on documenting + celebrating what is already in your house vs. focusing on what you wish it looked like or wish you had. This can be one of those added benefits of memory keeping that shifts our perspective for the better.
Here's today's video which includes a look at how I crop + edit my photos for this kind of project:
Now let's move on to the images of this project:
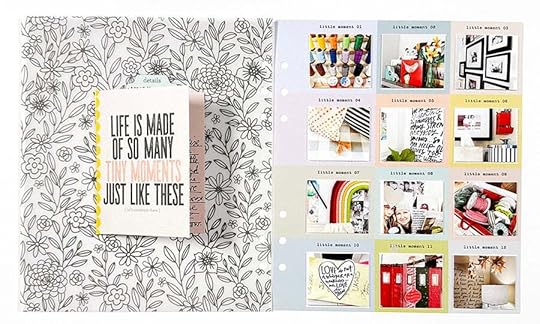
My photos were cropped to 1.75 inches x 1.5 inches (to fit into the white spaces on the pattern paper) and adhered using foam adhesive.
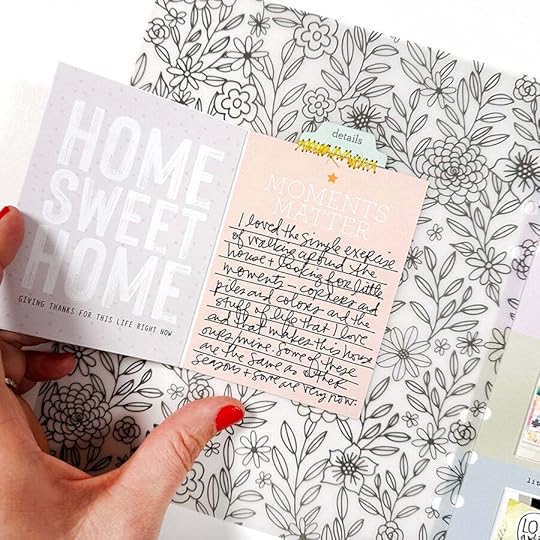
I paired my full page of photos with the floral vellum from the kit. To hold my journaling I created a flip open card using cardstock and red line tape and an extra sentiment card from my stash. I added yellow scalloped washi tape along the outside edge.
I added one of the "details" chipboard pieces to the top of my journal card and ran that through my sewing machine. I love the added texture and the pop of yellow color.
Sometimes it's the simplest projects are the ones I love most. I love how this page turned out and the photos I collected and the colors and the repeated shapes.
Have fun with this one!
SUPPLIESStory Play Little Moments Mini Kit
Foam Adhesive
Uniball Vision Elite Pen
Scalloped Washi Tape
Basic supplies in my Amazon storefront (adhesive, trimmer, printer, photo paper, etc)
November 13, 2023
Story Play | Little Moments Kick Off
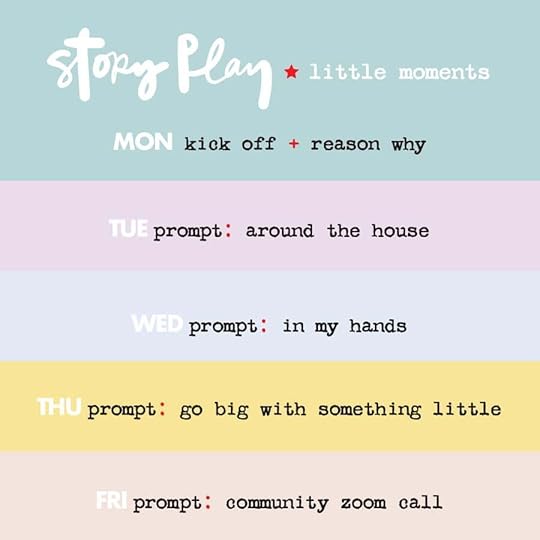
Welcome to the last Story Play week for 2023!
You can check out our previous Story Play weeks from this year here. Story Play will return in 2024 with the themes of Day In The Life™, Love Story, Food, and Read. Look for details at the beginning of the year.
For the last Story Play this year we are focusing on the lens of Little Moments/Little Things.
The little moments are the tiny pieces of good stuff in our lives. Sometimes they are things, experiences, moments that other people might dismiss or not recognize as a gift. As memory keepers we are given the opportunity to be the people that both pay attention and document the little moments that all come together to make up the actual bulk of our lives.
As I started thinking about what I'd like to share this week related to little moments I kept coming back to the concepts of recognizing, elevating, and documenting/celebrating the details of everyday life. Many of you reading this right now are already adept and practiced at both looking for and capturing these pieces of your story and to others of you this might be a newer concept.
(1) Recognize + Elevate: The first step in this process is deciding that you want little moments to be a part of your memory keeping. Once you set that as an intention you can begin the practice of paying attention. The more you start to recognize little stories happening around you the more you will be able to add these to your scrapbooking adventures. When you start identifying the little moments you are immediately elevating them from a mundane/ordinary piece of your day to a recognition that these are the things that make up the bulk of our lives.
(2) Document/Celebrate: To me, documenting a little moment is the act of celebrating it. We are making something that might have happened in an instant concrete through the act of photographing or writing it down. You might add little moments to your weekly pocket scrapbooking or you might create an entire layout around one little moment or you might take photos of a bunch of little moments/things and bring them all together on one page.
Little moments/things might be:
a thought (one that sticks around or one that is fleeting)
a feeling (one that sticks around or one that is fleeting)
an overheard conversation
a note from a friend
text messagesfoods you like or dislikeroutines/daily rhythmswhat you are reading, watching or listening toa tree outside your windowwalking your dog or snuggling with your grouchy cathow you wake upthe way you take coffee
So much of capturing and documenting little moments is about rooting yourself in the present moment. It's about living with your eyes and your heart wide open in order to be a witness to this glorious event called life with all the highs and lows and moments in between.
This week we are documenting + celebrating little moments. For the next three days I'll be sharing a prompt a day here on the blog to encourage you to document some little moments in your life right now. On Friday you are invited to join me for a community zoom call. Details below.
JOIN ME ON FRIDAY FOR A ZOOM CALL
Join me on Friday, November 17th at 10am Pacific for a community zoom call. This call will be recorded + archived on a blog post.
Topic: Little Moments Zoom Meeting
Time: Nov 17, 2023 10:00 AM Pacific Time (US and Canada)Join Zoom Meeting
https://us06web.zoom.us/j/82563694148... ID: 825 6369 4148
Passcode: 529367Find your local number: https://us06web.zoom.us/u/khH3te2KVLO... AT LITTLE MOMENTS DOCUMENTED
To kick off this week I decided to do a couple walkthroughs of past compilation albums and talk about the little moments:
Last week our team surveyed our Craft The Story Facebook Group with two questions:
Do you have a favorite "little moment" or a list of little moments/little things you love to document?Why do you think it's important for you to capture/document the little things in your life?
I decided to share all the comments here because I loved reading what people had to say. Feel free to respond to those questions in the comments if you'd like to share!
LINDA: Sunsets, clouds, drinking cup of coffee in a.m., flowers seen on my walk, wildlife in yard.
LISA: I know Susan @littlethingsbigdays takes photos of her passenger seat from time to time to show her errands etc. I love taking photos of my feet in different places because it tells a story of where I have been during the week.
AMBER: I love how one memory can make you think of lots of little moments over the years. They all add up to a full life.
SHANNON: For me it’s important to document the little things for two reasons: because things change so quickly, even things that I wouldn’t expect to change; and because when I am having hard days, or big things in my life are difficult, there are still ALWAYS little things to be grateful for and to remind me of all the seen and unseen good in my life.
STACY: I document the little moments when my kids and grand kids : 1. draw me on their magma doodles or iPads as I like to see how they see me or their selves 2. Bedtime / story times or bath times to see them grow. 3. Baking / cooking nights … and how we interact 4. Family game nights 5. Movie nights . 6. Playing with them and their favorite toys - it’s so funny when I look back with my grandkids and even my adult kids and see how much these things change … toys turn to coffee hot coco dates. These are just a few of the little moments I capture on the random as they change with the seasons and I like to go back and see how they change and they grow .
KIRSTEN: Talk time with the kids in the car // things that happen on the stairs // walks in the neighbourhood // season changes // weather // tv series // a song
MORGAN: Overheard conversations (esp with talkative littles!), text messages, lists (e.g., to dos, grocery lists, etc), "glimmers" (opposite of triggers, small things that spark joy/peace).
SHARON: I document my dozens of orchids when they bloom. It’s fun watching how each one blooms the same time of year as the previous years. As they grow they usually have more blooms than the year before. It’s so much fun getting to know each orchid by documenting them.
PATTY: Our daily trip to the dog park. We see the same people and dogs and it’s such a nice start to our day.
PAT: I love to find random toys in my house after my grandkids go home and take photos of them. I especially like to catch them when they are lined up in a row or sitting around like they are in a deep conversation
JENNIFER: My favorite little moments are funny conversations between myself and my husband. I like to write them like a screenplay and add bits and pieces like facial expressions or how he Stomps into a room. When I go back and read them I always laugh and I don't always remember that moment unless I write it down. By writing it in that way I can almost transport myself back to that moment and relive it. And laugh.
AMY: When my kitty chooses to come sleep on my lap. When hubby looks at me and I KNOW we are thinking the same thing and will discuss it later. When I notice nature. When that song plays.
LAUREN: Definitely funny and clever things my grandsons say and do. I keep a running list in the Notes on my phone so I can remember. Also, I take a lot of photos and tend to try to capture faces and expressions, but my daughter-in-law is SO good at stepping back and catching moments in time. I love those little captures that tell a story! Her photography style helps me remember to zoom out and look at the bigger picture sometimes. It can really make a difference.
MAGGIE: I love documenting my 3 year old grandson’s “little” things! Like their shoes or their church bow ties or tricycles… even little phrases they say. I’ve learned how fast they grow up and those little things and little stories (memories) are something worth preserving.
PAMELA: I like a retrospective & present moment. I do a "This is me now" layout & use the same 10 statements. i.e. fave song now; how I'm doing physically, emotionally, my weight, fave catch phrase... the little things. The flip through after a few years is really fun & sometimes surprising. It also forces me to use a current photo.
CARLA: What the grandkids are into at the moment- trucks, chickens, farm equipment, etc. Words they mispronounce. Everyday things I find cleaning out my parents' house.
KIM: When I feel a little sad or discomfort and I make a picture of something’s little and I write done a story of it, it helps me to feel better. It could be my animals or a bird, flower or simple a nice cup of tea…Like a therapie.
AMANDA: Interaction with my dog during the day, watching birds at the water bowl, changing seasons are all little moments I like to capture to serve as gratitude for being alive.
HEATHER: I always take pictures of my food. I don’t know why. I guess to help me remember what I ate. But I do it almost every day. I also often take pictures of the books I’m reading. And I take pictures of my kids and dog every day and my parents when I can catch them. Because you just never know.
LISA: Lunchtime walks with my husband during the workweek to get a break from the computers.
CORISSA: The way my kids pronounce or say things. "rainbrella instead of umbrella". Photos of shoes in the pile. And hands: the size, the dirtiness, the sunspots.
TEKA: I often take screenshots to remember a little game or post on social media. Little glimpses into how I spend my little free time.
NADINE: I like to “reverse engineer” what most people consider the BIG moments . . . I know we all want to document our kids opening birthday presents and blowing out the candles on their cake or waiting for the bus on the first day of school. I always told my girls I go behind the scenes to document when I was running from store to store trying to get them the newest Nintendo DS when they were in elementary school. . . or when I was finishing baking the pumpkin and apple pies at 3:00 am on Thanksgiving morning! These are the stories I like to tell them because they are some of my “regular mom duties” that they didn’t witness but are part of our family heritage. I also want them to learn to pay attention to “the little things” because they are often some of the sweetest moments of our lives. . . Like listening to them giggle while all three were in the bathtub together or when we were trying to assemble a shoebox diorama (boy, that’s an old word!) and couldn’t get the glue to stick!
AMBER: Commute to work. Daily cup of coffee. Soft slippers. Fresh cut flowers. A rainy day. A stack of books.
JANET: Seeing a rainbow after a storm; unexpected hugs from my grandchildren; watching a chipmunk or groundhog pop it’s head up; a phone call or text from a friend; a beautiful sunset; It’s important to document these moments as time passes so quickly and things never remain the same. Documented memories have the ability to take you right back to that time and to evoke a lot of emotions.
LAURA: Since my recent hip replacement my “little things” are putting on my own socks, taking a shower without an audience, walking, picking something up off the floor, depending on others for rides to my therapy, not being able to go to the grocery store and pick out my own groceries, being at the mercy of others for my meals, while I am thankful for all the people in my life that helped me out I hate the fact that I have taken all those “little things “ for granted.
KATE: What’s in my purse, my granddaughter getting bangs, my Starbucks runs.
SASCHA: I really often document little moments about my dog. I always have a lot of pictures of her, but generally not big stories. So the little moments are her enjoying a play in the dog park with a 3.5 month old pup and being pooped out after, her new agility tunnel to play in or how I found a local farm that sells eggs and meat for her food that we make ourselves.
KATINA: I read once that when you stop and notice something beautiful or something that you’re grateful for they’re known as glimmer, which are the opposite of triggers. So if you struggle with different things, and you find that we are triggered the best way to combat that is by stopping and taking in the little moments. Such as noticing a beautiful tree, in the fall, or a beautiful sunset, or being grateful for the rain. Something as little as taking an extra moment to pause while you take your first sip of coffee and enjoying it. All of those things are glimmer, and those will combat the triggers, and you will have more ways to overcome. I loved the way this was put… I am in love with little moments. I think they are so much better than big moments. I feel like it’s the little moments that shaped so much of our lives. Since I read that I am much more vocal about the little moments. If I’m driving in the car with my kids, I will vocalize a glimmer that I’m having. So that they are able to see those and gravitate towards the glimmer !!!!!
NOLANA: New words and conversations with my 2 year old. That moment when I make my first coffee of the day after drop-offs. Morning solo walks or runs - that first breath of fresh, crisp air. Pure laughter. A meal that hits your soul at its core. Dancing to music that you're hearing for the first time and have fallen in love with it. Moments of bursting in to song.
JOELLE: Family dinners…We are so busy we don’t always have them. Cherished when we do. Sitting and waiting while kids are in activities. Grocery shopping. Quiet evenings at home. Lazy days. Everyone just doing own thing around the house. Yard work.
CYNTHIA: Thanks to Week in the Life, I take pictures of “ambience” like a screenshot of what I’m listening to on my phone, or the piles on the stairs, or what’s on our kitchen counter. I love those little windows of our daily life that don’t usually merit a photo. It’s something you see everyday but don’t notice. So it helps shift your perspective. It can also take you right back to the moment. Amy Poehler in her book Yes Please said something like I believe I can time travel and then described experiencing a flash to the future looking at her kid’s face, or a flash to the past when she sees an echo of something her kid used to do years ago. I believe I can time travel when I see my ambience photos from years ago.
SONIA: The little things matter and are most likely the ones I’ll forget therefore important for me to snap and document as often as possible.
DONNA: I try to capture my husband in action-doing what he does to make our home a home - mowing the lawn, raking the leaves, cooking, doing dishes, etc. I also love photos of him walking the grandkids to school (shot from behind). These shots remind me to be grateful for the little things in life.
DEEVONNA: My 5 year old grandson recently passed away from brain cancer, and I have so many pictures of the little messes, I call them “signs of Ezra Blue.” His tub toys and baby soap, little shoes by the door, medical tape, a pile of folded clothes. Those things I’ve documented as “little moments” that are actually monumental moments.
MEGAN: Because life is mostly a series of little moments only occasionally punctuated with big moments. If we only look for the big moments, we miss out on a lot of tiny magical moments and ordinary moments that are really the fabric of life.
LAURA: Random things that make me smile. Like right now I’m looking at my 15 year old daughter who just found out she likes reading - a lot - in the last year. I’d probably sneak a pic of her sitting in the chair reading. Any time my kids are laughing. Weird things I find around the house - like why is there something in the bathroom that clearly doesn’t belong there. Sunrises and sunsets. All day every day. I could probably make an album of all the times I’ve taken those types of photos. Pets doing snuggles with each other or humans. Cool flowers. Every time my dad comes to his grandkids games or events. I always take a photo of that.
November 10, 2023
In Case You Missed It | November 10
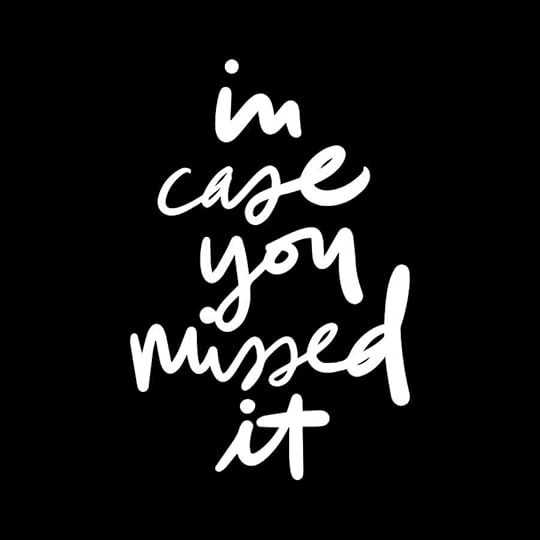
Happy Friday, friends! Welcome to the latest
In Case You Missed It. Just a reminder that this is a quick post that will happen every Friday afternoon with all the updates and links that have happened throughout the week. So, let's get to it:
DECEMBER REVEAL IS LIVE
It's the 10th of the month which means that today we are revealing a new Story Kit™ theme: COMFORT! Comfort is defined as a state of physical ease and freedom from pain or constraint, and the easing or alleviation of a person's feelings of grief or distress. This month we are exploring stories of comfort in our lives and the people, places, things, and thoughts that bring us comfort in the various seasons of life. In addition to our new Story Kit™ theme, we also have a brand new Stories By The Month™ kit, the next edition in our Alphas Are Awesome series, and our newest Scrapbook Kit. Head to the blog for Ali's post with all the details about this month's release.
BUY MORE, SAVE MORE
We are starting our holiday sales early. ✨ Spend $75 in the shop and save $15 from now until November 12th at 11:59 pm. Don't forget that subscribers save more! Subscribers, use code SAVE25 to save even more. Spend $75 in the shop and subscribers will save $25. If you're not a subscriber, you can join at any point during the sale to redeem the deepest discount. Sale excludes 2023 December Daily" products. Use code SAVE15 and enjoy. Subscriber Terms: Valid thru 11/12/2023 until 11:59pm ET. Promo code must be entered at checkout. Some exclusions may apply. Cannot be combined with other codes. Not valid on previous purchase. Not valid on December Daily® 2023 Classes or December Daily® products released in 2023. Not valid on gift card purchases. Not responsible for forgotten or misused promo codes. Offer subject to change. Code is only valid for Subscribers. Cart Subtotal must be $75+.
Non Subscriber Terms: Valid thru 11/12/2023 until 11:59pm ET. Promo code must be entered at checkout. Some exclusions may apply. Cannot be combined with other codes. Not valid on previous purchase. Not valid on December Daily® 2023 Classes or December Daily® products released in 2023. Not valid on gift card purchases. Not responsible for forgotten or misused promo codes. Offer subject to change. Cart Subtotal must be $75+.
MARK YOUR CALENDARS | STORY PLAY LITTLE MOMENTS
Mark your calendars! Next week, beginning Monday, November 13th, Ali will be leading our final Story Play week for 2023: Little Moments. For the last Story Play week of the year we are focusing on the lens of Little Moments while we seek out the seemingly insignificant moments that are often overlooked, or dismissed. Looking for products to support your storytelling next week? The individual Little Moments Kit is currently sold out, but it can be found in the Story Play Mini Kit Bundle of 3, or in the digital version. Now is a great time to grab the bundle during our spend more, save more event. Spend $75 in the shop and save $15 from now until November 12th at 11:59 pm. Use code SAVE15 and enjoy. Don't forget that subscribers save more! Subscribers, use code SAVE25 to save even more. Spend $75 in the shop and subscribers will save $25. If you're not a subscriber, you can join at any point during the sale to redeem the deepest discount. Sale excludes 2023 December Daily" products.
DECEMBER DAILY® PRODUCT PLAY IS HAPPENING NOW
Class has started in the December Daily® Product Play classroom. It's not too late to sign up! December Daily® Product Play is all about ideas and inspiration for working with physical products from the December Daily® Collection. For 30 days in November, you'll receive one idea per day from the contributors to this class (includes Ali). Ideas in this workshop will focus on physical products from our 2023 December Daily® collection. Whether you are preparing to document 2023 or finishing up telling stories from past years, we hope these fun, creative ideas help you use your products to get your stories told. Register here.
DECEMBER DAILY® DIGITALS
The 2023 December Daily® Digitals are here! Kits, Stamps, Paper, and Embellishments...the same fun & festive designs as the physical @decemberdaily products, only in digital format. We love to see how this incredibly creative community plays with digitals! Resizing elements and cards, adding journaling to papers, creating cut files, transforming files into transparencies, the sky is the limit with digital files. Want to learn more about creating with digital files? Our newest class December Daily® Hybrid Product Play is live and available to watch at your convenience.We have incredible content from six amazing contributors ready to explore at your convenience. Shop digitals here.
NEW CLASSES
2023 DECEMBER DAILY® PREP DAY. Join the December Daily® community for a fun online December Daily® prep day on Saturday, November 18th, 2023. Use this opportunity to finish past December Daily® projects or start working on your project for 2023. The first live video will start on Saturday, November 18th at 10:00 am Eastern. Cost is $5.
DECEMBER DAILY® PRODUCT PLAY | TRY THIS. December Daily® Product Play is all about ideas and inspiration for working with physical products from the December Daily® Collection. For 30 days in November, you'll receive one idea per day from the contributors to this class (includes Ali). Ideas in this workshop will focus on physical products from our 2023 December Daily® collection. Whether you are preparing to document 2023 or finishing up telling stories from past years, we hope these fun, creative ideas help you use your products to get your stories told.
2023 DECEMBER DAILY® HYBRID PRODUCT PLAY. Hybrid scrapbooking combines digital products with physical supplies to create paper (or printed) memory-keeping projects. For this class, our contributors will share with fun, creative ideas and inspiration for working with these digital products from the 2023 December Daily® Collection.
As always, we’re so grateful to have you all as members of this community! Thanks for joining me today and have a great weekend!
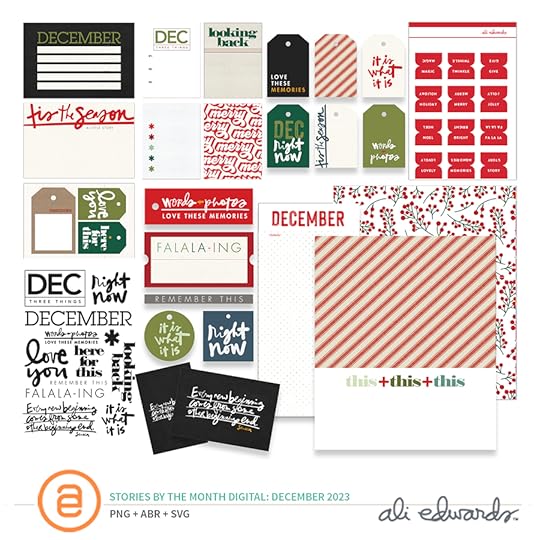
Comfort Story Kit, December 2023 Stories By The Month, Daily Scrapbook Kit
Today's the 10th of the month and that means a new
Story Kit, Story Stamp, and Stories By The Month kit.
This month we are focusing on stories related to the theme of Comfort.
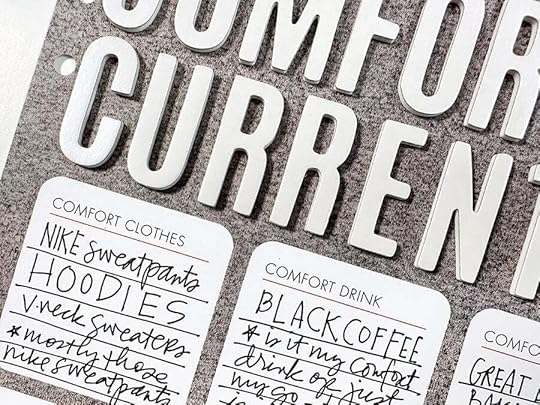
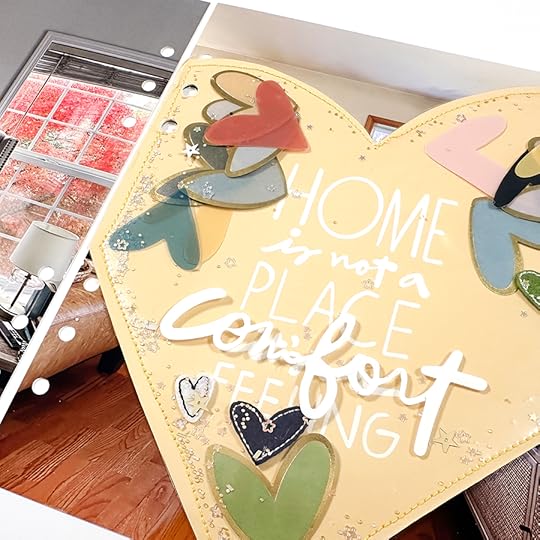
Comfort is defined as a state of physical ease and freedom from pain or constraint, and the easing or alleviation of a person's feelings of grief or distress. This month we are exploring stories of comfort in our lives and the people, places, things, and thoughts that bring us comfort in the various seasons of life.
Initial story ideas for this theme include:
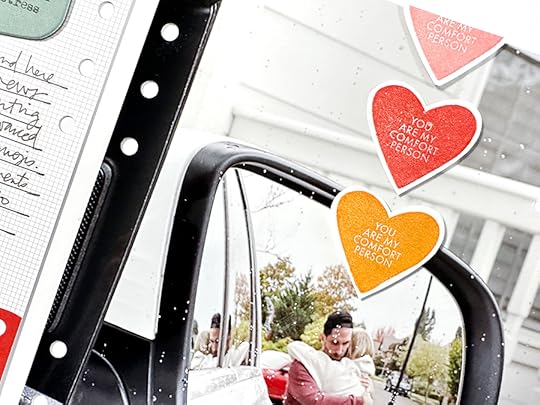
What are the things that are you bringing you the most comfort right now? When was a time you chose to be uncomfortable knowing that it could be a path to more comfort in the future? Who is your comfort person or pet? Tell that story. STORY KIT
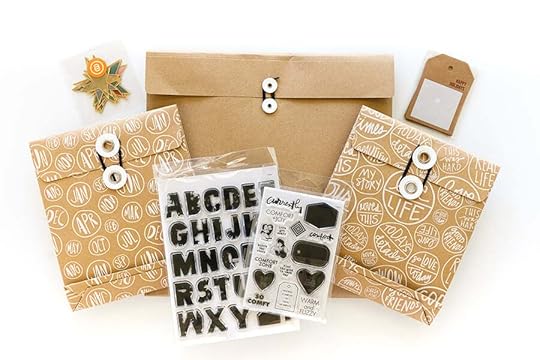
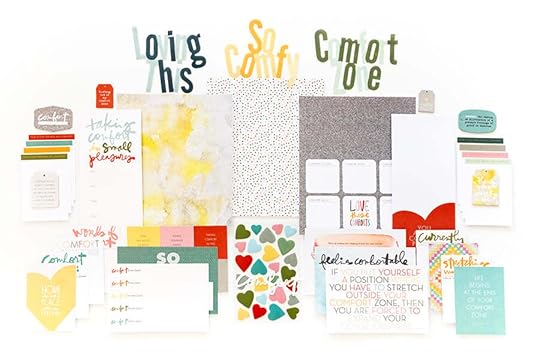
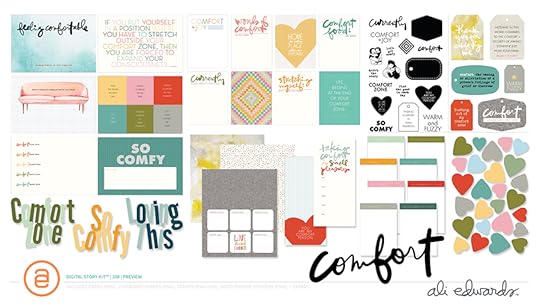
The Story Kit™ includes:
Here's a video overview of the
Story Kit™ and Add-On options this month:
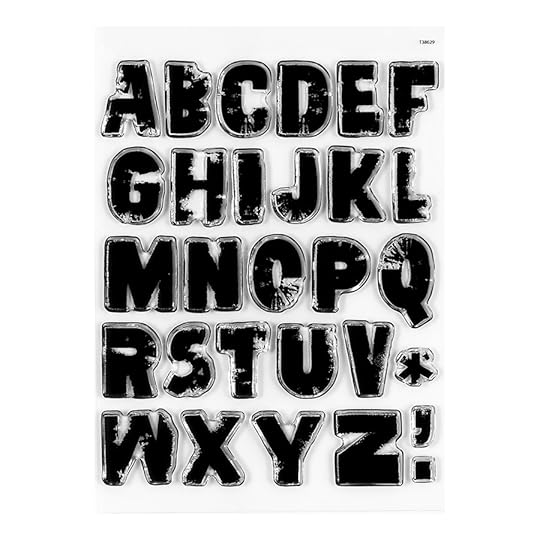
STORY STAMP™
The
Stamp Set:
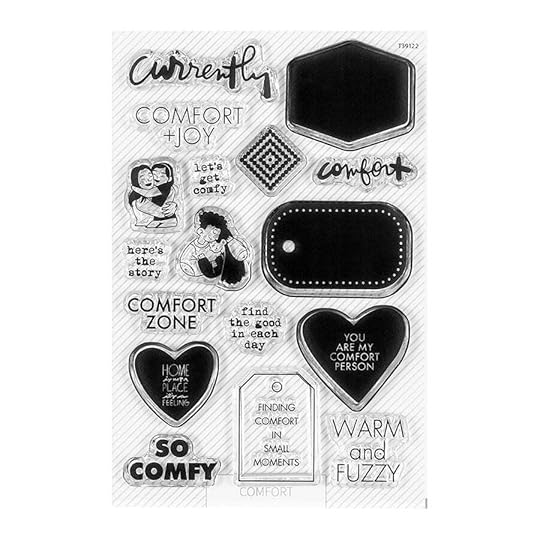
Here's a video overview of the Story Stamp:
STORY CLASS // INCLUDES DIGITAL STORY KIT
Here's a look at what's included in the Digital Story Kit™:Your digital kit and the classroom and any Add-Ons purchased will be available to you on the 12th once your card has been charged for the month.
This kit is also available to physical kit subscribers as an Add On each month.
Here are a few project samples from Ali:
Again, thanks so much for subscribing and/or considering our
Story Subscription program! If you have any questions about this program please let us know below in the comments.
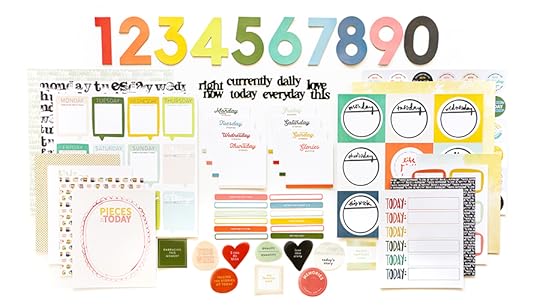
Here is a full look at the kit this month:
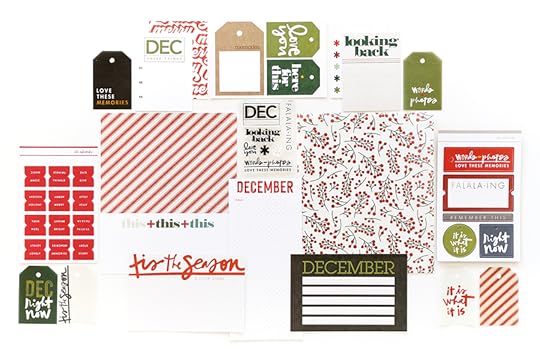
The kit includes a sheet of vellum or transparency (sized outside the page protector in a 6 inch x 8 inch album), a pattern paper, a 3 inch x 8 inch (outside the page protector) journal card with the month at the top which will be repeated each month, a 3 inch x 4 inch stamp set, chipboard, 4, 3 inch x 4 inch journal cards, 3, 4 inch x 6 inch journal cards and an embellishment.
And a video overview:
This subscription is a great option for those who are looking to tell more calendar/everyday life sorts of stories.
Our Digital Stories By The Month™ kit is now called Inspiration By The Month™. With this subscription you receive access to the Inspiration By The Month™ classroom and the digital kit.
This kit is also available to physical Stories By The Month™ kit subscribers as an Add On each month.
This stamp set is available to subscribers to add to their box during the Add On period and
also offered in the shop for anyone else.
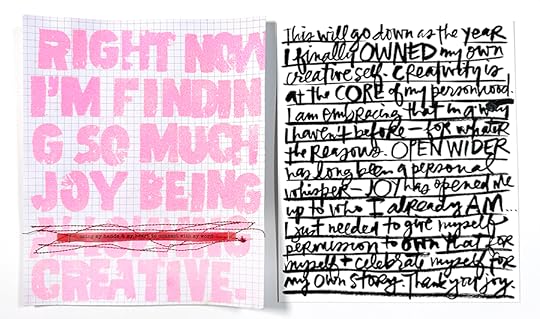
Here's a look at how Ali used this stamp set in her One Little Word® album:
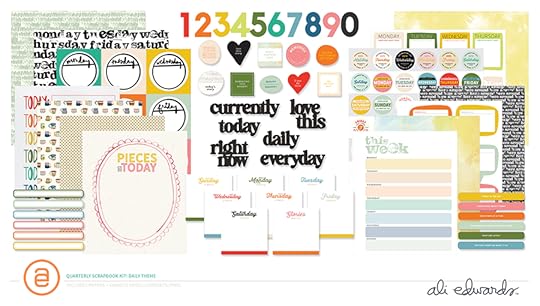
This month we are also releasing our last Quarterly Scrapbook Kit for 2023 with the theme of Daily. Our Quarterly Scrapbook Kit will return again next year with the themes of Alphabet, Frames, Punctuation, and Watercolors.
Here's an overview video:
Our Quarterly Scrapbook Kit also includes the digital kit for free:
December Daily® | Special Guest Nolana Lynch
Hi Everyone!
How are you doing? This is Nolana (@nehlan.has.a.plan on Instagram) and I am so very happy to be here with you today to share my process as I prepare to document December Daily.
This is my absolute favourite time of year and full disclosure, I begin thinking about December Daily by the time Christmas in July comes around.
I start by reviewing last year's notes and taking note (pins, saves, photos) of things I'd like to try this year, whether it's a new mixed media technique or a new interactive feature. In going through my notes from last year, I see if there were any sketches I made or ideas I jotted down that I didn't get to include in my album, and suss out if I'd like to try it this year.
To be honest, these first few months of making foundation pages are all about HAVING FUN! Here are some foundation pages I created between August and September, that I've always wanted to include in my album!
I've always wanted to create a floating gifts page and I'm so so happy I finally did it! This is one of the December Daily Pages that I worked on for my Big Picture Class "Pockets of Fun".
I also always wanted to do a 3x4 tag page - simple I know- but since this is currently my favourite page protector orientation, I just had to pay homage that!
Without further ado, here's a Flip Through of where I'm currently at with my 2023 Foundation Pages. My goal every year is to have as many foundation pages as possible going in to December, as this makes the documenting process super easy for me. Find my video on YouTube here.
So where to next? When I get to this point in my foundation pages, I want to make sure that I am 1. Not over making foundation pages and that I am staying on track with the stories I love to tell and want to tell. To help with this, I love looking through my past albums and seeing which stories I DO in fact tell each year.
Here's a quick flip through of my albums from last year. It brought me so much joy going through these to see what I loved. There were also a few Foundation pages that I didn't get around to using, which I may try to use this year. I also listed the events which are happening again this year, like Christmas parties, Santa visits and so forth, that I am yet to make pages for, and I jot down any ideas for layouts that spring from looking through this. Find my video on YouTube here.
I love revisiting the stories I told in previous years, as well as look for any new stories I'd like to tell this year. For example, last year I wanted to go to a wreath making workshop, so I most certainly booked one for this year and I'm so excited to include it in my album! I also love looking for new age appropriate Holiday activities for my toddler. This year I've found a Kids Holiday Cooking class, and a Christmas Messy Play activity, we also made some abstract art painted ornaments for his teachers and I'm so happy to be adding these new stories in to my album this year.
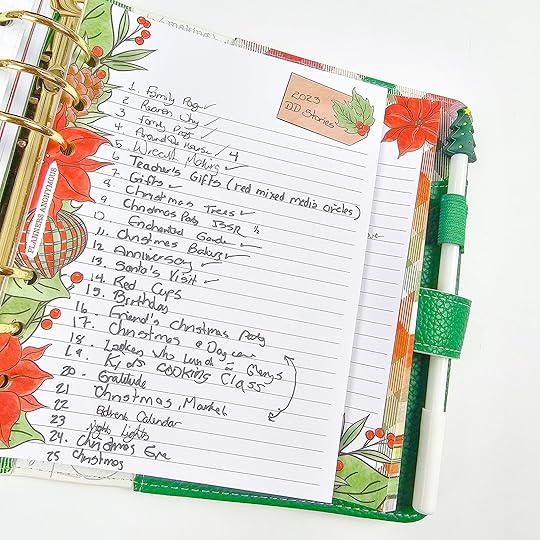
Here's my December Daily planner with a quick list of the stories I'd like to tell this year:
Once my stories are listed, and I do a stock take of the pages I've made, I begin to envision layouts for the additional stories. I look through my stash to see which things I love and I'm still holding on to. I pull these out and organise them on my desk.
Sometimes it may be a colour scheme I haven't tried before - this year, I wanted to try creating some black, white and gold layouts - so I pulled these out!
Another thing I like to do is work through my mixed media pages early. You're welcome to check out my Instagram feed, but from the end of July, I began testing out and playing with some mixed media techniques to try this year for my album.
I enjoy compiling notes, photos, pins and saves that are really inspiring to me and choosing a few for my December Daily album. I will do a follow up blog post which focusses solely on the mixed media projects I have embarked on this year.
So what's next, each week in November, I note which tasks I'd like to work on to bring me closer to my goal of completing foundation pages.
This week, I'll be working on pages for the events that occur every year, like Christmas Parties, Santa's visits and so forth and I look forward to sharing them with you next week!
Until then, happy December Daily Prepping! If you'd like to work along with me in preparing pages, feel free to DM me on Instagram- I'd love to connect with you!


