
Ali Edwards's Blog, page 35
December 14, 2023
December Daily® 2023 | Story 13
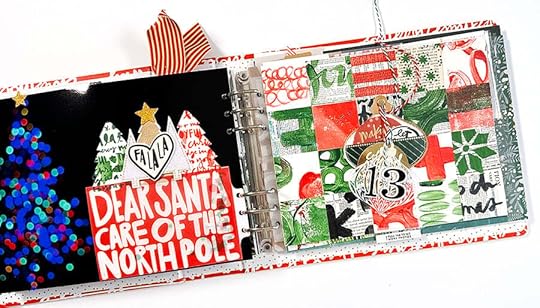
Welcome to Story 13 in my 2023 December Daily® album.
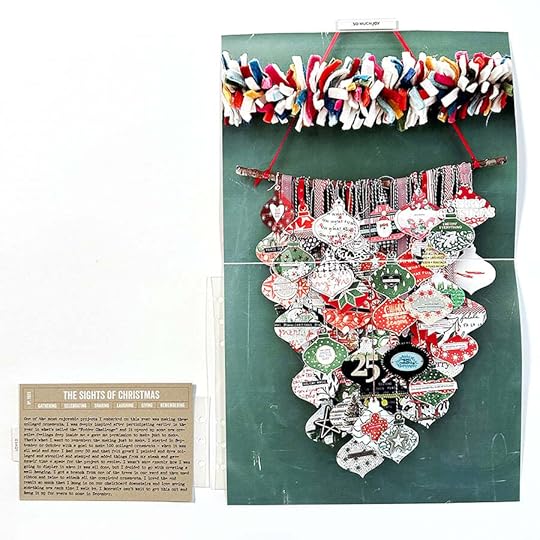
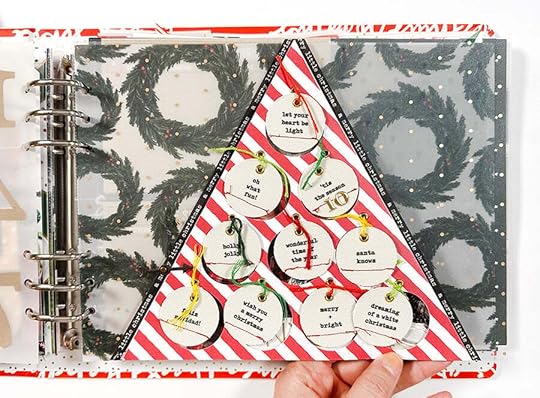
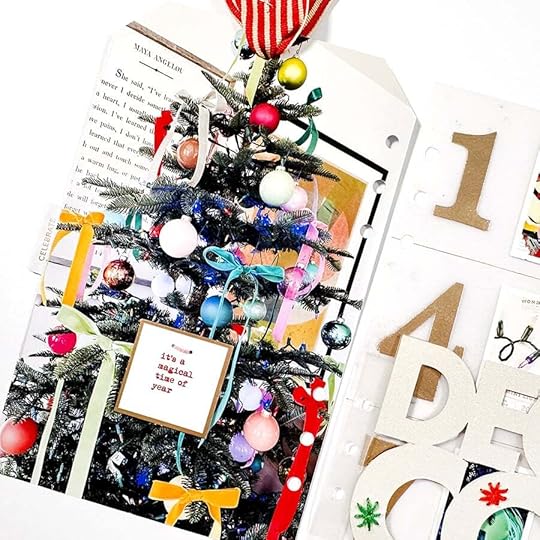
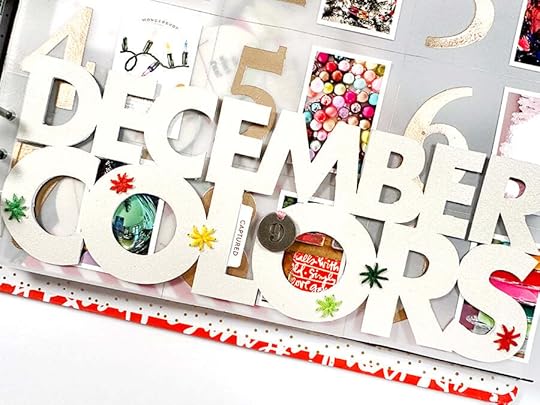
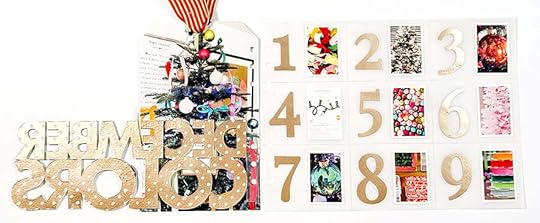
One of the stories I knew I wanted to tell in my album this year was about the collage ornaments I created over the last few months. I decided to go very big with a photo of all of them hanging together and paired that with the 2x2 collage page I made with some of the leftovers.
Posts about my collage ornaments can be found and and .
A post about my collaged page with the squares can be found here.
Here's today's video:
Table of contents:
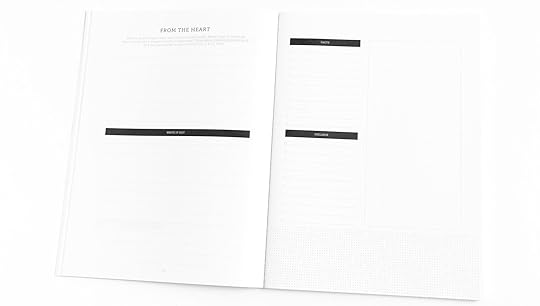
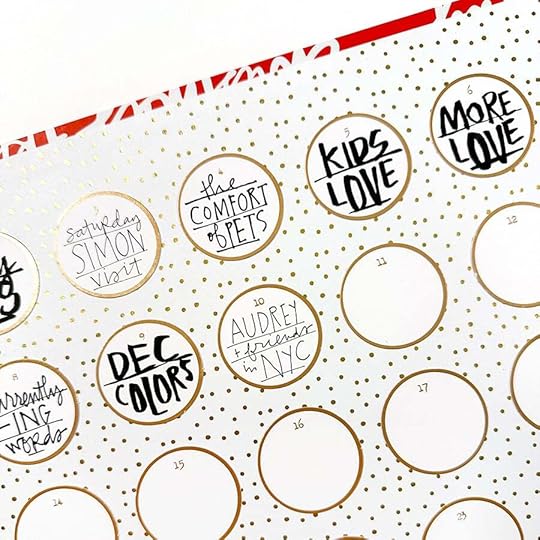
Here's a look at my page via photos:
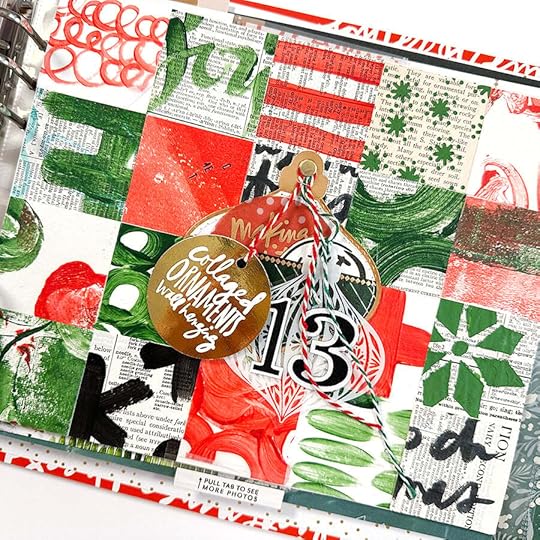
The outside of my enlarged flip-up photo is a page of 2 inch x 2 inch squares. On top of that I added one of the pocket ornaments from the Main Kit along with two additional hanging tags. One has my collage ornament title and the other is one of the ornaments cut from the transparent pattern paper with fabric numbers added on top. I also tucked a couple more circles inside the ornament pocket.
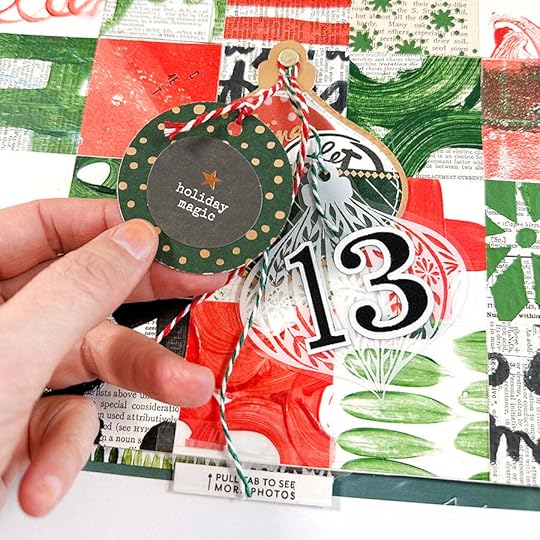
That little "holiday magic" circle is from a past December Daily® collection.
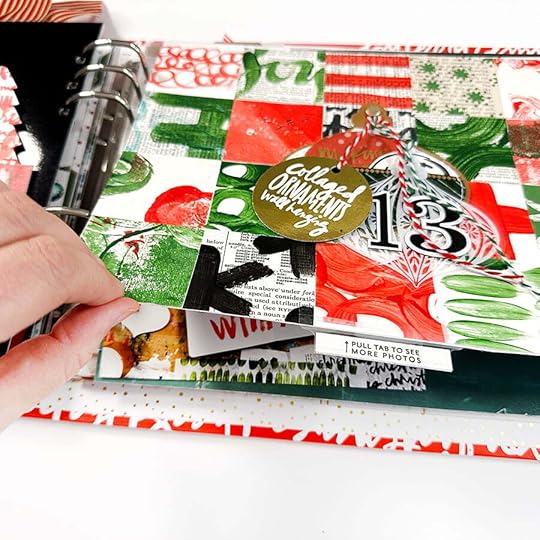
Along the bottom of the page I added an Avery Index Tab with the "pull tab to see more photos" stamp from this stamp set.
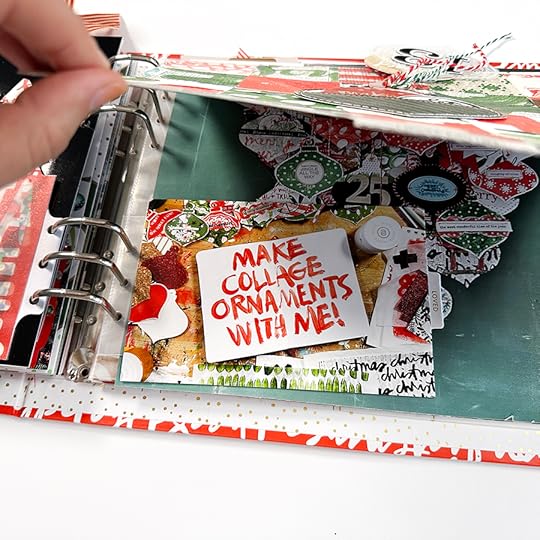
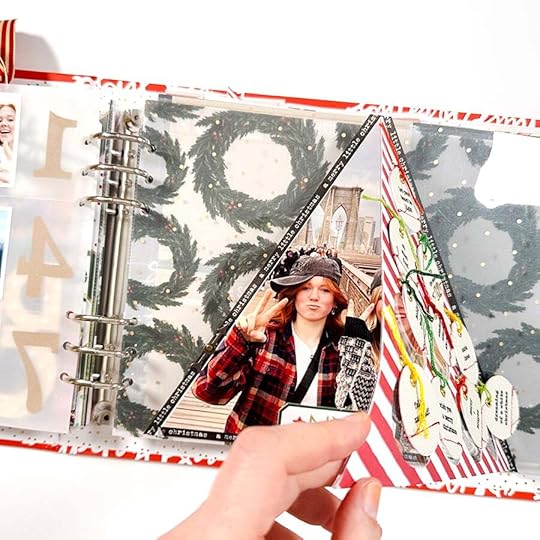
When you fold the page open it reveals a 4 inch x 6 inch photo that I'd taken when I first started working on the ornaments which is adhered back to back to my journaling card.
I added the journaling directly to this card by running it through my Epson PictureMate PM400 printer.

When you lift it up here's what you see on the inside. The photo is 10 inches x 16.25 inches. I cut it about 8.25 inches and used a piece of paper to create the flip up (see the video for details). I considered adding journaling to my photo but am really happy with it just being on the journal card as a separate page that is tucked inside the flip up.
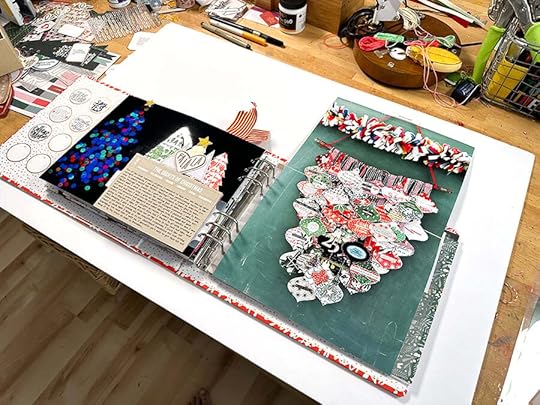
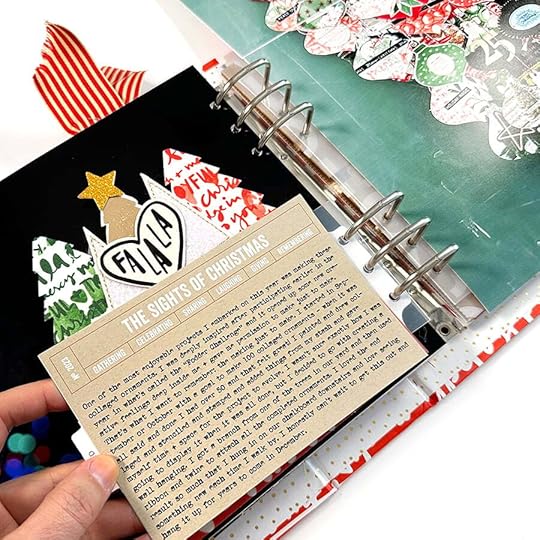
That's what it looks like laying on my work table.
I used our plastic page attachers to add these pages to my album. Hoping those come back in stock soon - they are so useful!
I love how this page turned out.
December Daily® Main Kit (digital available)
Epson PictureMate PM400
Plastic Page Attachers
Sticker Page Attachers
Avery Index Tabs
December Daily® Paislee Press Stamp Set
Gold Foil Tab Stickers
13x19 Photo Paper
Epson XP15000 Printer
Holiday Twine
MINC Machine
2.25 Inch Circle Punch
We R Memory Keepers Hole Punch
Gold Brad
Black + White Fabric Numbers


December 13, 2023
One Little Word® 2023 | Completed Album Walkthrough
In this video I'm sharing a look at my completed 2023 One Little Word® project.
As with all our projects there isn't a right or a wrong way to approach your storytelling/documenting. I continue to use a binder album because that works well for me while others in our community like to use a notebook or other way to tell the story of life with their word.
Documenting the stories of living with a word each year is something I've done consistently since 2011 and it's absolultely made a difference in my life.
Check out previous video walkthroughs here:
2022: https://aliedwards.com/2022/12/one-little-word-2022-completed-album-walkthrough
2021: https://www.youtube.com/watch?v=h0m71-rbf4w&t=6s
2011-2017: https://www.youtube.com/watch?v=en3SQJLWFX8
2018-2020: https://www.youtube.com/watch?v=c3aG1L2_G8g&t=1s
Interested in a conversation about choosing a word? Take a listen
here.
If you are interested in joining the conversation about living with a word of the year you're invited to join our team + community in our year long One Little Word® workshop.
Sign up before 12/31/23 for $5 off.
If you are looking for supplies to help you tell the story of your word,
check out our 2024 collection here.
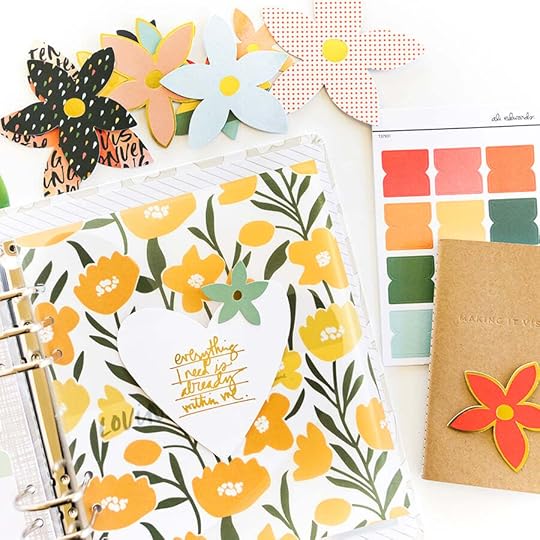
One Little Word® 2024 | Collection Release + Workshop Registration

Welcome to an overview post for the
One Little Word® 2024 product collection which supports our annual One Little Word® project. Everything is in the warehouse and ready to ship to you.
Brand new to One Little Word®? Click here for additional details.
2023 SHIPPING SPECIAL: Use code OLWSHIP24 and enjoy free shipping ($20 international flat rate) when you spend $75+ in the One Little Word® category through December 17th. Offer valid on orders with subtotals of $75 or more from the One Little Word® category. Code valid through 12/17/2024 at 11:59pm EST. Must enter code at checkout to receive offer. Refunds will not be issued for forgotten or misused promo codes. Code not valid on previous purchases. Offer is subject to change.
The 2024 One Little Word® workshop registration is now open.
The early bird workshop price will be $45 and after January 1, 2024 it will be $50 for 12 months of inspiration and community support as you make your word visible in your life.
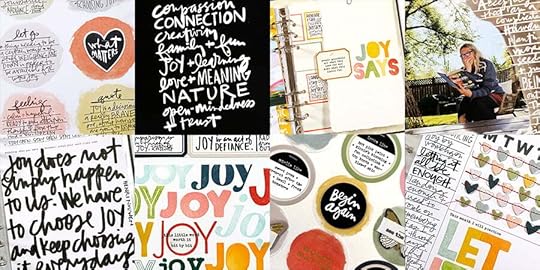
In 2006 Ali began the tradition of choosing one word for herself each January – a word she could focus on + get curious about as she went about her daily life over the course of a year. Her words have included play, peace, vitality, nurture, story, light, up, open, thrive, give, whole, connect, space, habit, less, heart, pause, joy, and wild (2024). Each word has become an individual thread that weaves together stories of her life. They’ve been imbedded into who she is + into who she is becoming. They’ve helped her to breathe deeper, to see clearer, to embrace mistakes, and to grow.
At the end of 2019 Ali felt moved to change the way she was running this workshop and invited a group of people to join her in co-leading this adventure. Her goal was to bring in other voices, perspectives, and life experiences and to make it more about the wonderful, wholehearted community that comes together around this project.
Each monthly prompt (available on the first of each month) is designed to invite you back into conversation with your word. Some are writing exercises, some are crafty adventures, some are rooted in photography. Our goal is simply to help you stay connected to your word throughout the year in a way that is meaningful to you and your season of life. Some of the lenses we've used in the past to be in conversation with our words include: vision, adventure, practice, small wins, beginning again, reflection, etc.
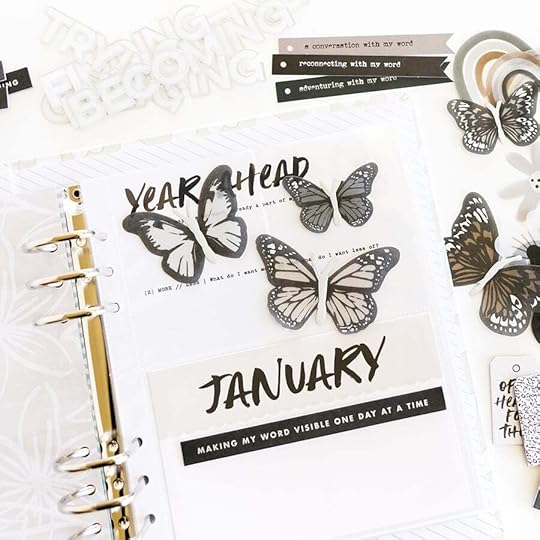
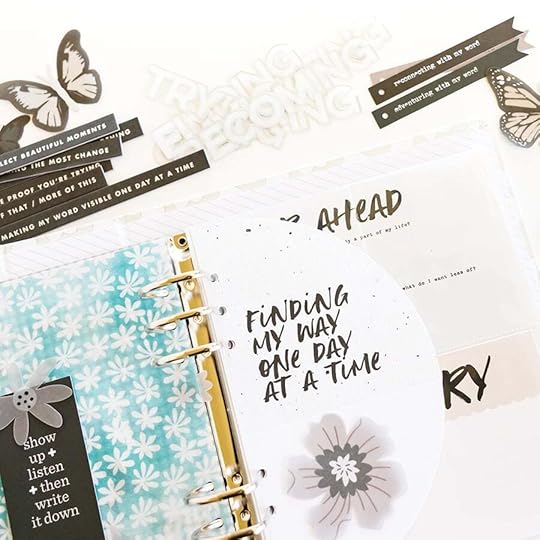
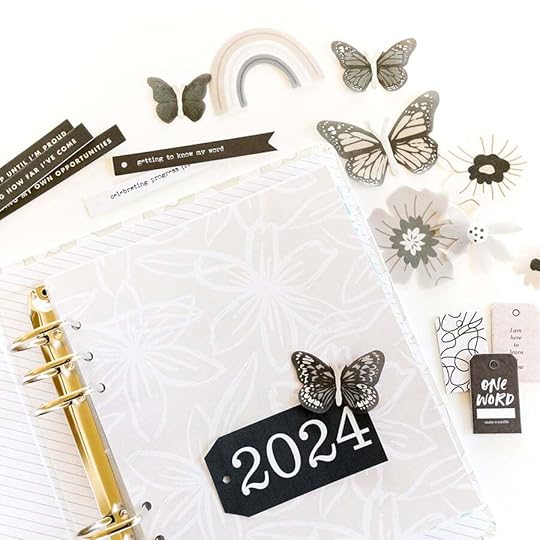
Here's a look at some of the monthly responses in Ali's album for 2023:
In 2022 we added a live monthly Zoom call where we connect to share ideas, reflections and stories related to the monthly prompt. This has become a much-loved way to come together to learn from one another, to listen, to share our successes + our struggles, and to cheer each other on as we walk with our individual words. These calls are recorded and added to the classroom for future viewing on your own time.
Our team believes in the power of documentation + the power of words to make a difference in our lives. You are invited to come get curious about your chosen word alongside us as we journey together in 2024.
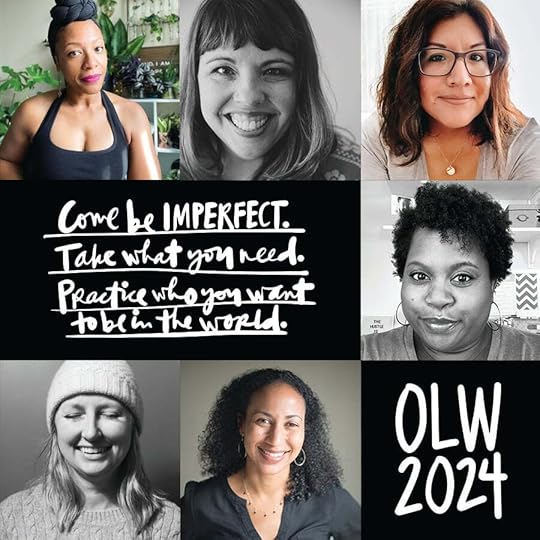
Joining Ali this year again on the One Little Word® team will be:
Azzari
Lucrecer
Liz
Victoria
Felicitas
Interested in seeing what these albums look like from past years?
Check out a video walk-through here.
What comes with the class:
12 prompts (one per month) that invite you to be in conversation with your word (delivered in a classroom via video + written handout)One Little Word® Main Kit Digital Package ($14.49 value)Monthly live Zoom callMid-month prompt reflection from members of our OLW teamGallery for sharingOptional Closed Facebook Group for additional community + connection (details on how to access this group will be coming soon)Register for 2024 here. Registration includes the full Digital One Little Word® kit.
ONE LITTLE WORD® 2024 COLLECTION
Here's a video overview of our 2024 One Little Word® collection which is in stock + ready to ship:
Digital versions of these products will be released the first Friday in January. Everyone who signs up for the OLW Workshop will receive the Digital Main Kit.
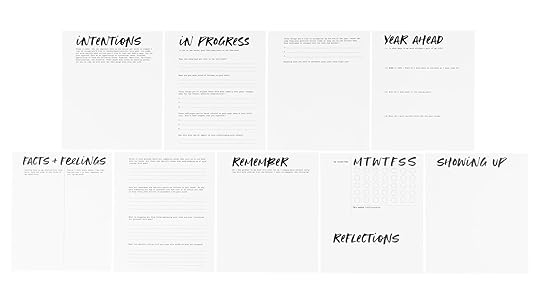
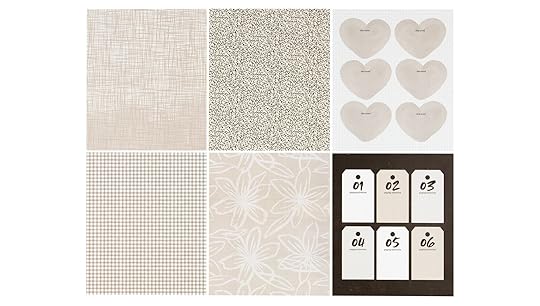
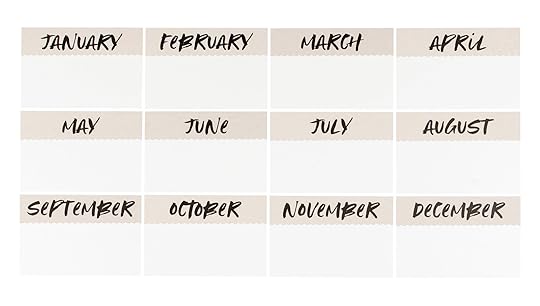
Here's a closer look at the product images:
The digital version of the Main Kit is included with the One Little Word® workshop.
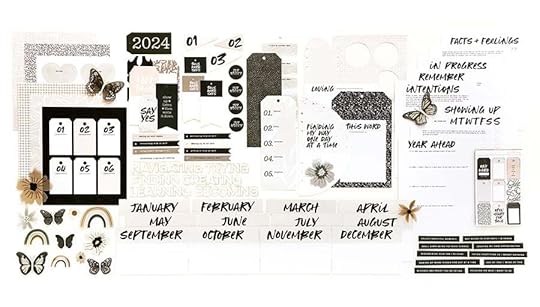
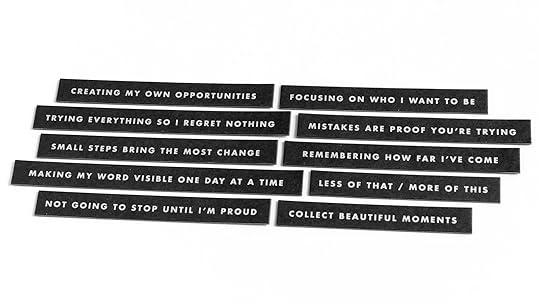
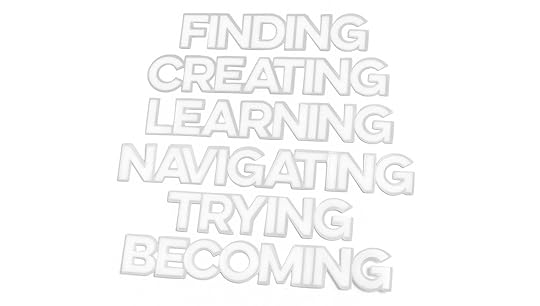
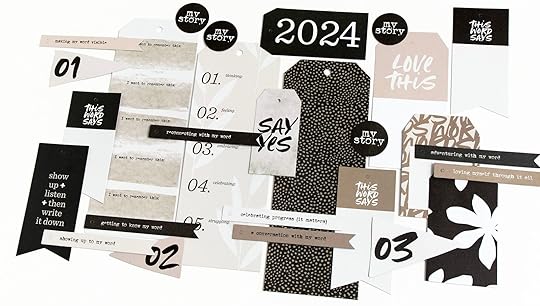
The Main Kit includes prompt pages:
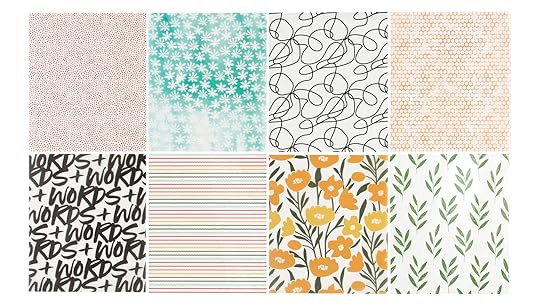
Pattern papers:
Monthly 4x6 cards:
Die cut page inserts:
Vellum pieces:
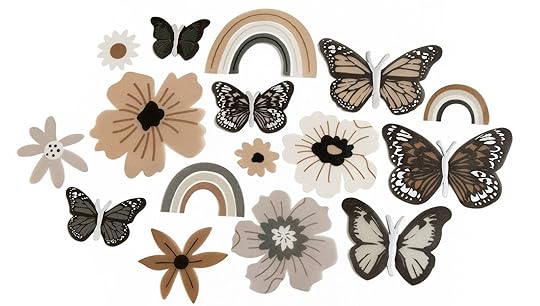
Chipboard:

Plastic words:
Tag Die Cut:
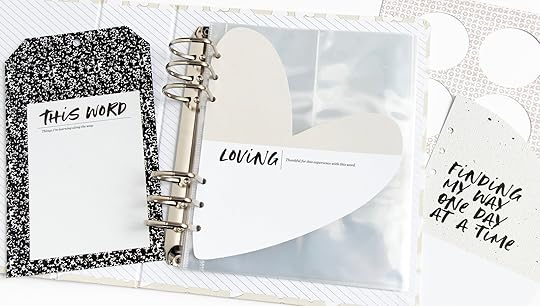
Here are a few styled images of the kit within the album:
A couple years ago we introduced a new product option for One Little Word® in the form of a quarterly Mini Kit subscription. Purchasing the first One Little Word® Mini Kit commits you to an "auto-shipment" + charge of the remaining three kits at the time of their shipping. The remaining three kits will be charged + shipped on/around 3/15/24, 6/15/24, 9/15/24.
You can see the Mini Kits that were offered in 2020 and 2021 here.
Here's the first mini kit for 2024:

We hope that spreading out the kits throughout the course of the year will do two things: (1) help keep you continue to connect to your word by giving you products you can use as you make your word visible in your album throughout the year, and (2) spread out the cost over the course of the year rather than a bigger purchase all at once (since we totally get that this is a busy time for spending).
The Mini Kits will ship free for $1 for domestic customers/$5 for international customers.
The Mini Kit is excluded from the shipping threshold minimum for the shipping special. If any kits remain after we've shipped to subscribers then we will add them to the shop for $30.
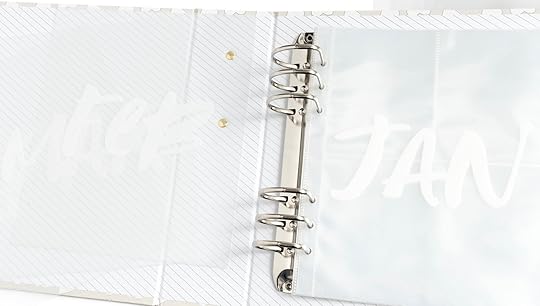
 MONTHLY TRANSPARENT DIVIDERS // $9.99


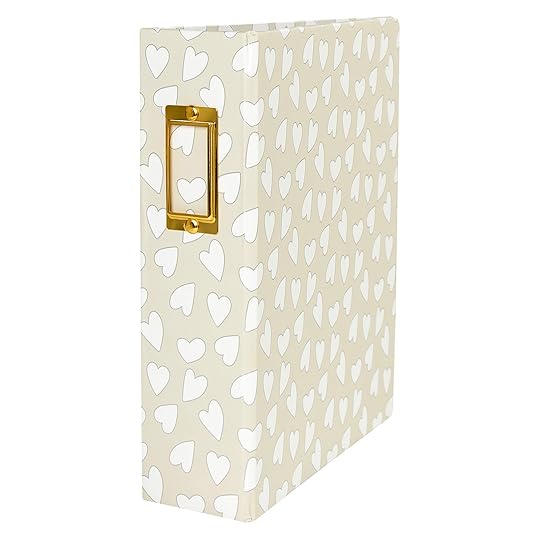
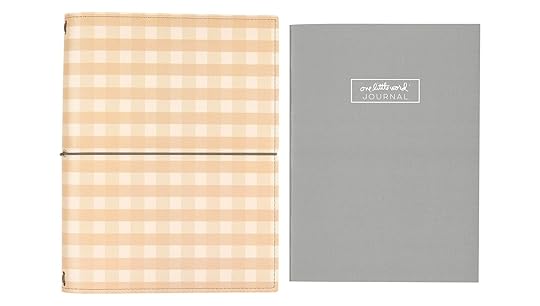
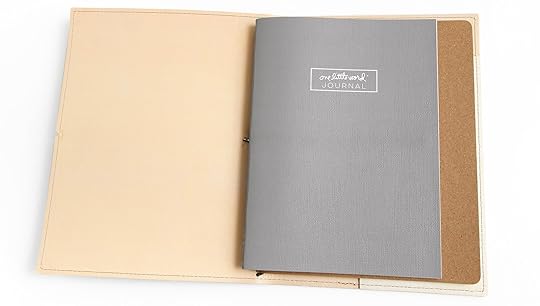
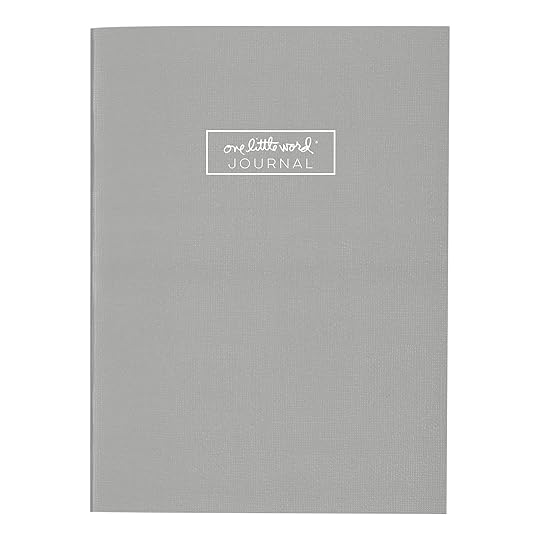
 STITCHED JOURNAL + FOLIO BUNDLE // $29.99
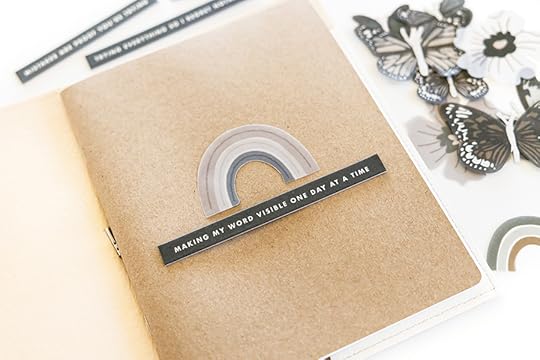


RAINBOWS + ICONS
MONTHS + NUMBERS
Additional items from past year's will also be available under the One Little Word® category.
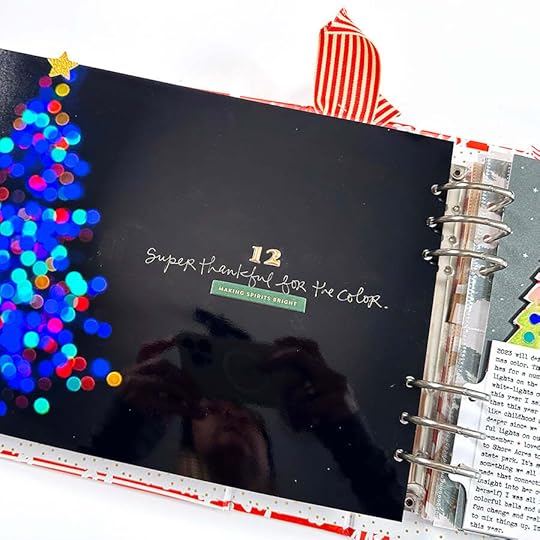
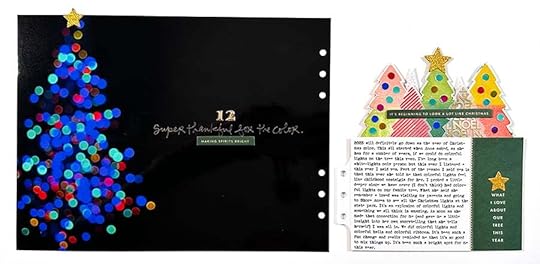
December Daily® 2023 | Story 12
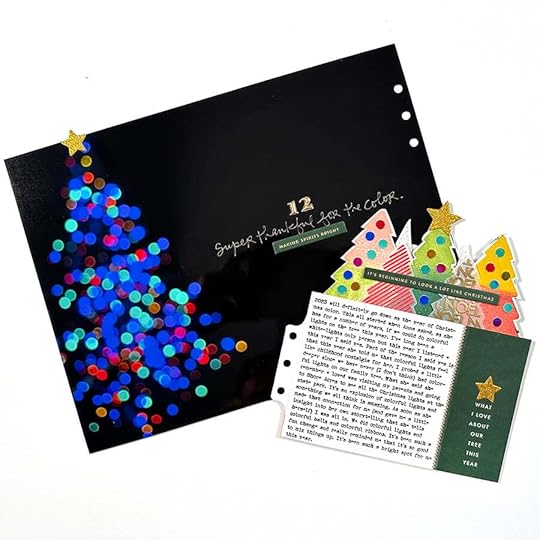
Welcome to Story 12 in my 2023
December Daily® album.
Today I'm telling the story of our colorful tree and how it came to be. In addition I'm trying out a
Fine Tip Freestyle Foil Quill Pen for adding foil onto photos, embellishments, etc, and playing with sticker paper for getting my journaling onto my journal card. Today's video also includes a tutorial about how I extended this image to fit a full page outside the page protector (it was originally a vertical image).
Here's the post that includes the
how-to for creating the stamped forest.
Let's dive in:
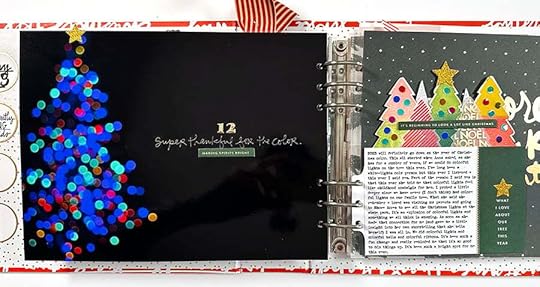
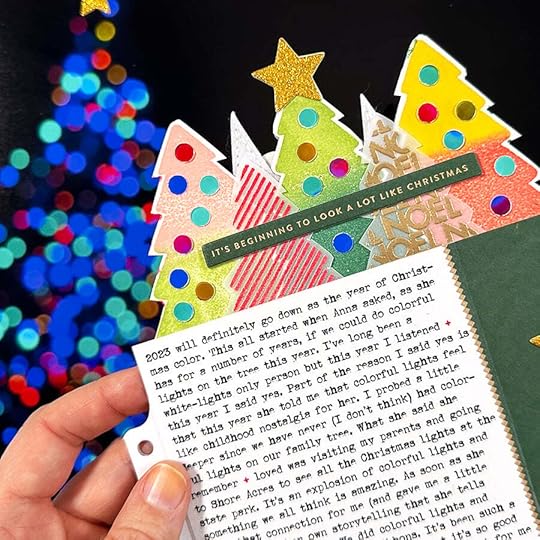
Full page photos forever and ever! This look is called "bokeh."
Here's a tutorial you can watch on how to do it with an iPhone. If you don't have an iPhone just google "bokeh" and whatever camera you are using.
I especially love it paired with a super crafty little forest of
stamped trees + my story about our colorful tree this year.
Originally I had a tree die cut insert paired with my little forest of stamped trees above my journal card. As I worked through this page I decided to take that out and just have it be the full page photo + the journaling and tree combo.
I tried out the
Freestyle Foil Quill pen for the first time today and it was GREAT!
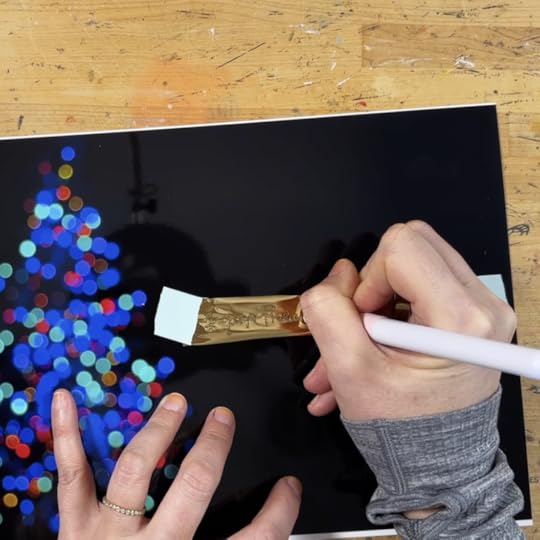
I have the fine tip version but now I definitely want to get the other ones. Such a fun way to add handwritten foil especially directly onto a photo. Above it I added the number 12 with the puffy numbers from the Main Kit and below I added a gold foil chipboard phrase.
Looks like they have a cordless version of the Freestyle Pen too.
As I was working through my story one of the things I decided I wanted to do was try to get some of the colors from the photo onto my little stamped + embossed forest.

The way I decided to do that was by printing a second bokeh photo and using a hole punch to punch out some of the circles. This worked out really well as a way to bring the colors from my photo onto my journaling card gathering.
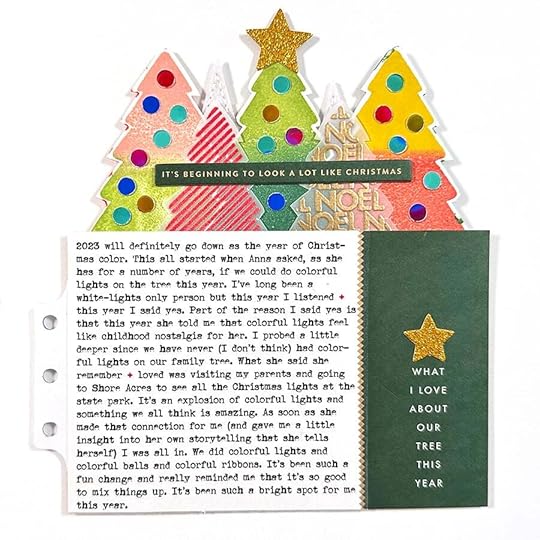
The other thing I wanted to try today was printing my journaling on
Maco Sticker Paper and then adding it to my journal card. I measured out my journaling space and then set that up on my computer and printed it out. It also worked great!
December Daily® 2023 Main Kit (digital available)
December Daily® Sticker Advent Calendar
Attacher stickers
Fine Tip Freestyle Foil Quill Pen
Maco Sticker Paper
Scrapbook.com Blue Tape
We R Memory Keepers Hole Punch
December Daily® 10x8 Album
December Daily® Specialty Journal Card Pack (digital available)
6x8 Tree Stamp
Gold Embossing Powder
Red Embossing Powder
Versamark Embossing Ink
AED Inks: McKenzie (dark green), Willamette (light green), Redwoods (red), Rose Garden (pink), Honeyman (yellow)
Vellum
Attacher Stickers
AED Paint Pack
December Daily® Silkscreen
Red Line Tape
(restock coming November 4th)
December 12, 2023
December Daily® 2023 | Story 11
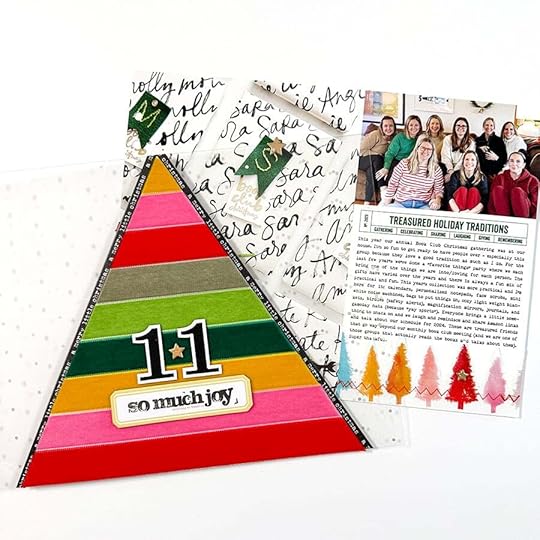
Welcome to Story 11 in my 2023 December Daily® project.
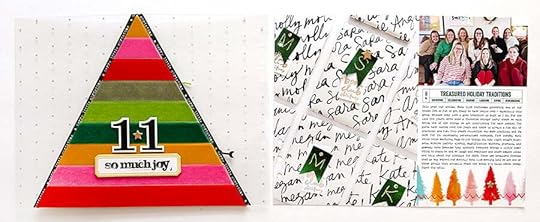
One of the notes I had to myself to try this month was to create something with
the velvet ribbon I ordered from Amazon this year for our tree. I was originally thinking I'd do strips on a full page (potentially interspersed with journaling), but when I started looking at the back of this triangle I knew this would work great as a home for my ribbon.
Even if you don't have ribbon on your tree you can use this idea to highlight a number of things from this season:
Wrapping paper A variety of ribbons Fabrics from your family Pattern papers or cardstock or vellum or specialty papers Photos (you can make them any height you want)
Let's dive in to the process video:
Today's Table Of Contnents pen was a Slick Writer:
Here's a look at this spread in my album:
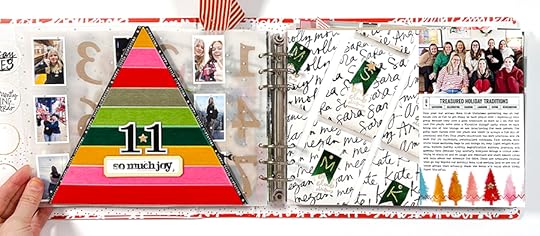
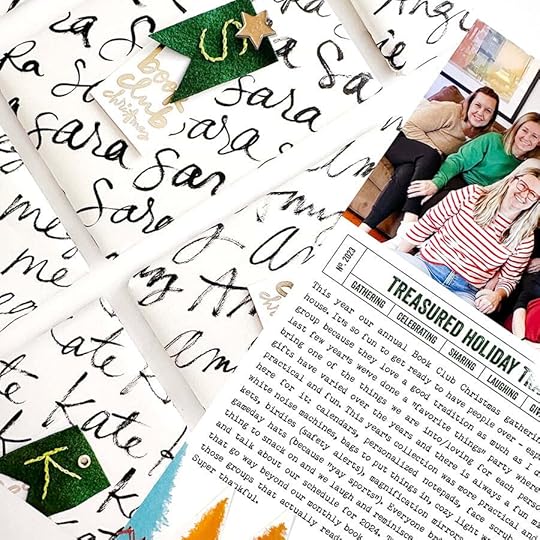
Today's story - to go along with my colorful velvet ribbon tree - is about my annual Book Club Christmas gathering.
The spread started off with the back of the triangle from Story 10 and flows into a "mainly" digital page with a little bit of wrapping paper along the bottom.
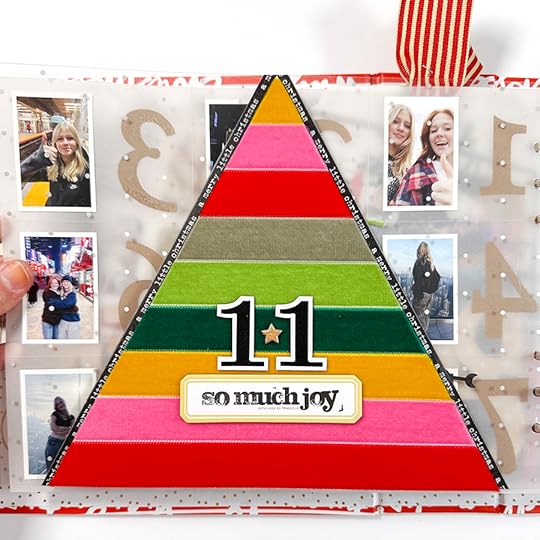
For this page I simply cut strips of the velvet ribbon and then added a chipboard piece from the
Hobby Story Kit and two fabric number ones and a chipboard star.
Along the outside edges I repeated the same
washi tape from Story 10.
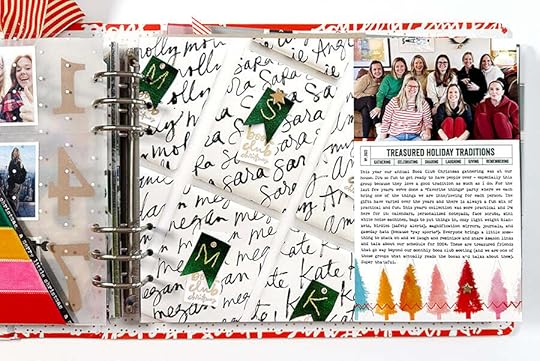
For the second page of my spread I created a custom page in Photoshop using a photo of my gifts + a photo of our Book Club + journaling. I left a little space below my journaling in order to cut out the trees from wrapping paper from one of my friends. You can find the "treasured holiday traditions" on a journal card in the Main Kit and it's also included in the
10x8 Layered Template Set.
I added a line of zig zag stitching across the trees and added two chipboard stars to this page to go along with the one between the number ones on the triangle.
I made my own wrapping paper this year using some craft paper and one of my
brush pens. I hand-stitched the initial tags and used the foil quill to make the Book Club Christmas tags. I seriously had the best time - it's such a fun way to personalize gifts.
I made a little video of the process here:
SO FUN.
So thankful for these friends.
Also just so thankful for the colorful festive fun this season.
December Daily® 10x8 Layered Template Set ("treasured holiday") Velvet Ribbons "So Much Joy" chipboard from Hobby Story Kit Black + White Fabric Numbers December Daily® 10x8 Album Merry Little Christmas Washi Tape Epson XP15000 Printer 6 Hole Punch Slick Writer
December 11, 2023
December Daily® 2023 | Story 10
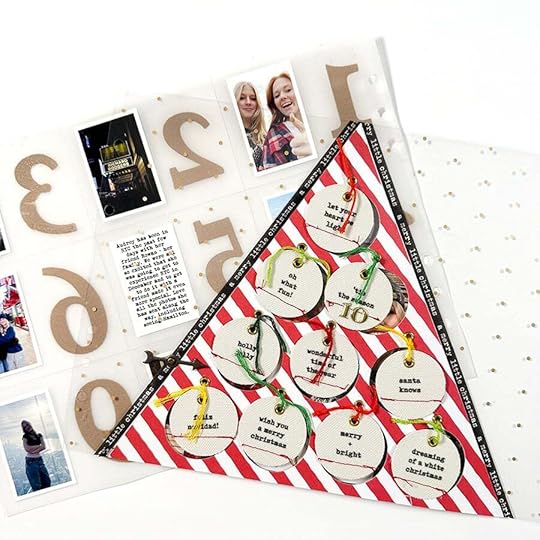
Welcome to Story 10 in my 2023 December Daily® album.
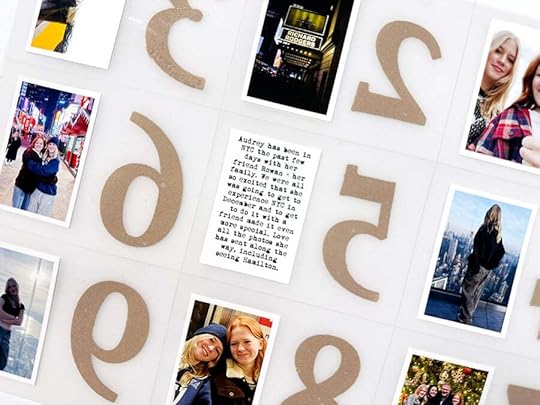
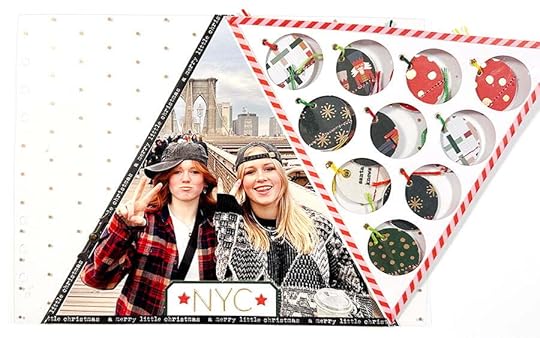
Today's story is about Audrey traveling to New York this month with her friend + family. She's been sending us photos along with way and it was so fun to incorporate them into my storytelling this year. The foundation page for today is one I put together for our December Daily® Product Play workshop (that lesson includes a cut file for the 10x8 and 6x8 sizes).
Here's the video that takes you through my ideas for this one:
Today's Table Of Contents pen is the Micron:
And here's a look at the full spread.
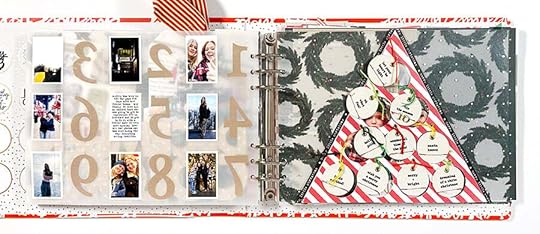
At first I was thinking that I would leave the back of Story 09 blank but those squares presented an opportunity for me to include a bunch of the photos that Audrey has been texting. I could have saved this story for later in my album but decided, with the help of all those spaces on the back, to use it for today. I used the same layered template that I shared in the Story 09 post.
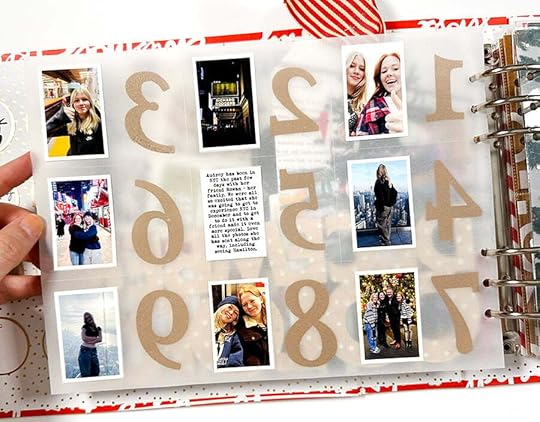
In one of the rectangles I added a bit of journaling for context about the basics of her trip.
I considered adding word phrase stickers or some embellishments to the photos but decided they were great without anything added.
There are so many different things you could do with this triangle as your base! You might want to put a photo or memory behind each photo or count up something around your house. I loved making this when I put it together for the workshop.
Rather than using each of those circles as a home for one piece of content I decided instead to pick one of those photos that Audrey has sent and go big with it to fit the triangle shape.
This is our friend Rowan. She's one of the cool teenagers we get to have around in this season of life. She gives great hugs.
To create the flip open I cut and folded a piece of cardstock. It ended up being about 1 inch x 9 inches and then I trimmed it at the end after adhering it with red line tape.
On the underneath of the die cut triangle I ended up adding a piece of Grafix Plastic cut to the triangle shape. Doing that keeps the hanging circles on the front side of the triangle. You could also use that plastic piece as a base and add embellishments on top for the front or the back (and still end up using an enlarged photo).
I used red line tape to get all these pieces stuck together and then covered up that tape with pattern washi tape.
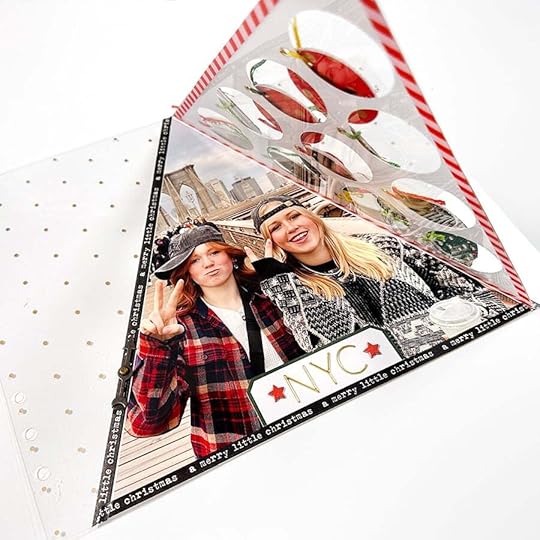
Along the bottom edge I used one of the labels for a NYC title using gold puffy letters and chipboard stars.
So fun!
DD23 Canvas Circles (digital also available)
DD23 Main Kit Pattern Paper
DD23 Pattern Paper Pack (digital available)
DD23 Specialty Paper Pack (digital available)
1.5 Inch Circle Punch
Small Gold Eyelets
We R Memory Keepers Hole Punch
Crop A Dile (for setting the eyelets)
Embroidery Floss
Merry Little Christmas Black + White Washi Tape
Silhouette Machine
Gold Puffy NumbersRed Line TapeGrafix Plastic Other basics via my Amazon Storefront
December 10, 2023
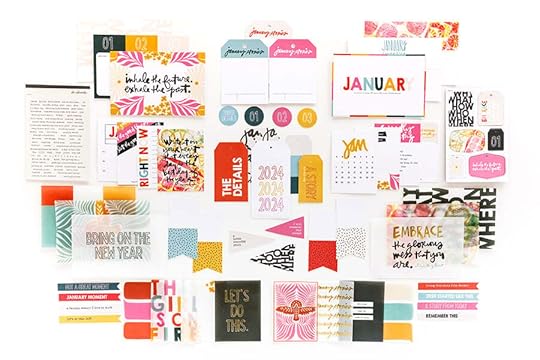
Present Story Kit™ + January 2024 Stories By The Month
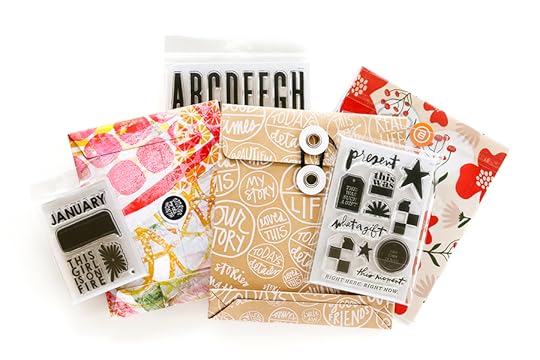
Today's the 10th of the month and that means a new
Story Kit, Story Stamp, and Stories By The Month kit.
This month we are focusing on stories related to the theme of Present.
As we wrap up another trip around the sun, focusing on the dual meanings of the word present feels like a wonderful storytelling invitation. This time of year is often full of presents - the gifts we give and receive AND there's so much to be gained from grounding ourselves in the present moment. This month we are telling stories of gifts - things, moments, memories - and what it means for each one of us to be living in the present moment in our own season of life.
Initial story ideas for this theme include:
What is the best present you've ever received and why?
How are you practicing being present in your life right now? What does that mean for you?
Use "this moment" as a repeated phrase to jumpstart journaling about a specific event. STORY KIT
The
Story Kit™ includes:
Here's a video overview of the
Story Kit™ and Add-On options this month:
The
Stamp Set:
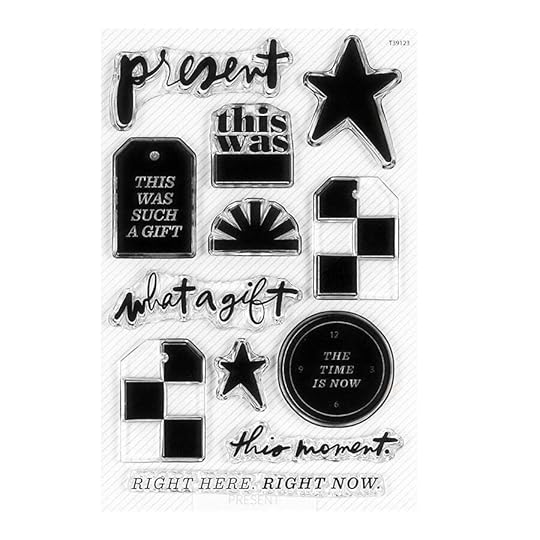
Here's a video overview of the Story Stamp:
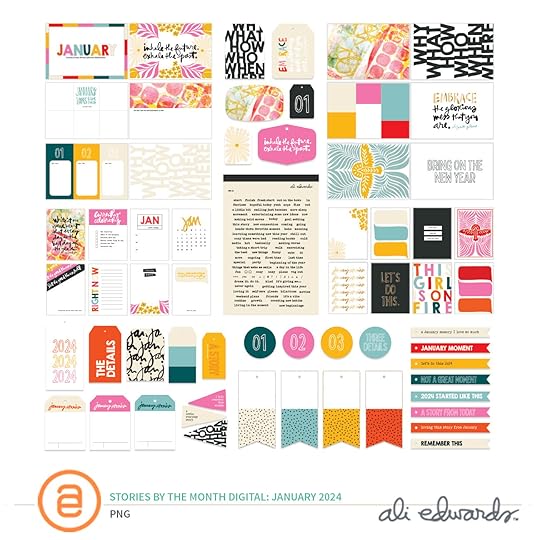
Here's a look at what's included in the Digital Story Kit™:

Your digital kit and the classroom and any Add-Ons purchased will be available to you on the 12th once your card has been charged for the month.
This kit is also available to physical kit subscribers as an Add On each month.
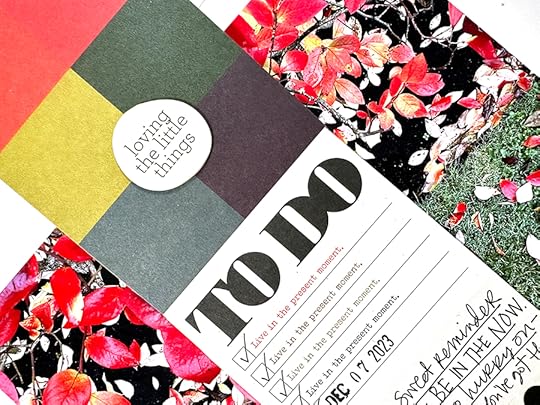
Here are a few project samples from Ali:

Again, thanks so much for subscribing and/or considering our
Story Subscription program! If you have any questions about this program please let us know below in the comments.
We are changing things up with our Stories By The Month™ subscription for 2024 and you can read all the details here.
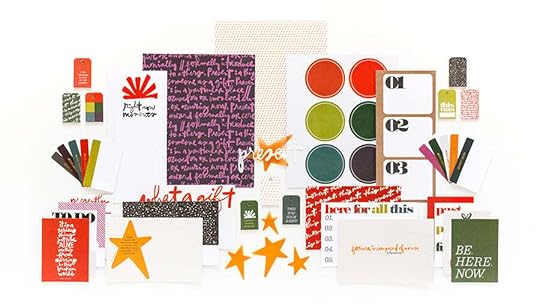
Here is a full look at the kit this month:
And a video overview:
This subscription is a great option for those who are looking to tell more calendar/everyday life sorts of stories.
Our Digital Stories By The Month™ kit is now called Inspiration By The Month™. With this subscription you receive access to the Inspiration By The Month™ classroom and the digital kit.
This kit is also available to physical Stories By The Month™ kit subscribers as an Add On each month.
This stamp set is available to subscribers to add to their box during the Add On period and
also offered in the shop for anyone else.
Ali used it in one of her projects here:
ADD ONS

New Add-on's this month include a 6x8 paper pack (7 inches x 8.25 inches including vellum and transparency) and a 3x4 January stamp. Subscribers will also be able to add a variety of other items listed in the Add On category under My Subscriptions.
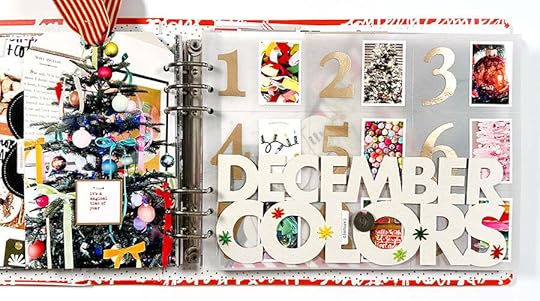
December Daily® 2023 | Story 09
Welcome to Story 09 in my 2023 December Daily® album.
Today's foundation page was one I created for our $5 Prep Day this year (includes 10 hours of content with page ideas + inspiration). Originally I thought I would document individual colors around the house but decided instead to simply take and print photos that showed some of the different colorful things happening around here this year.
Here's the video of how this one came together:
Table Of Contents today was written with a Kuretake Brush Pen:
Let's take a look at the finished page:
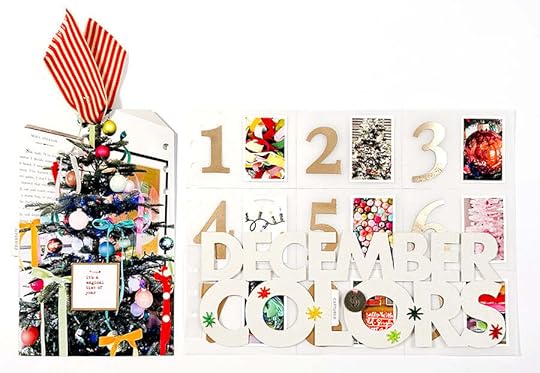
On the back of the tag from Story 08 I added a daytime photo of our tree. I'm planning a longer story about the tree for an upcoming page later in the album so I loved being able to simply document colors here.
In addition to the photo added to the tag, this page also includes a large die cut title and a vellum grid page with gold embossed numbers on top using this stamp set.
On top of the photo of the tree I added one of the labels from the Main Kit and ran a little bit of pink embroidery floss through the top.
As you'll see in the video, I had planned to add another color of floss to the die cut title but I didn't think that through all the way before I dove in. To cover up my mistake I added a metal number token from Tim Holtz that has the pink embroidery floss ran through the upper hole.
To document some of the colors I went around the house and took some additional photos of colorful "moments" around the house in this season.
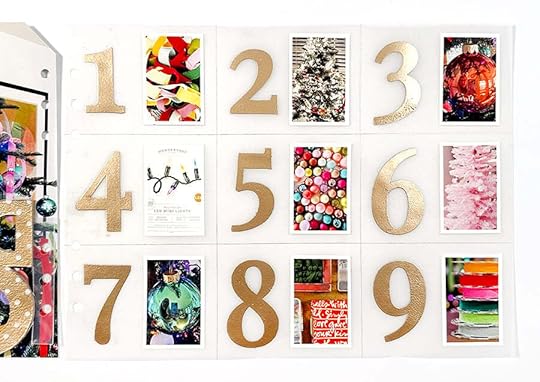
I created a template in Photoshop for the images - with the white border they are 1.5 inches x 2.25 inches.
Download the Photoshop Layered Template for the photos with the white border here.
December Daily® 10x8 AlbumDecember Daily® Main Kit (digital available)Tim Holtz Metal Number TokenDecember Daily® Specialty Paper Pack (digital available)
Silhouette Machine
Glitter Paper
Embroidery Floss
Texture Paste
Tim Holtz Dot Stencil
Versamark (Embossing Ink)
Gold Embossing Powder
Number Stamps
December Daily® Tab Stickers
December 9, 2023
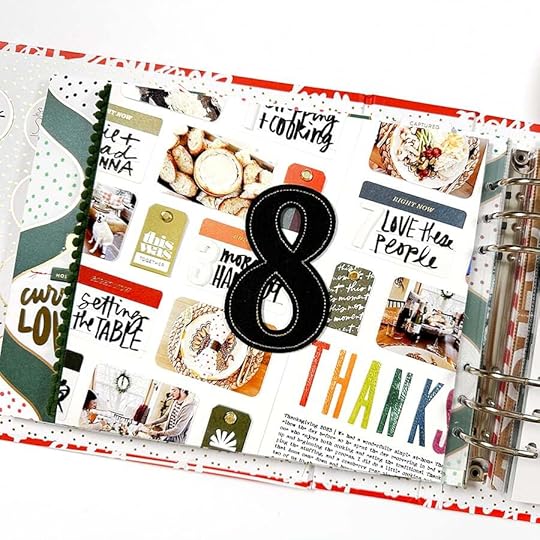
December Daily® 2023 | Story 08
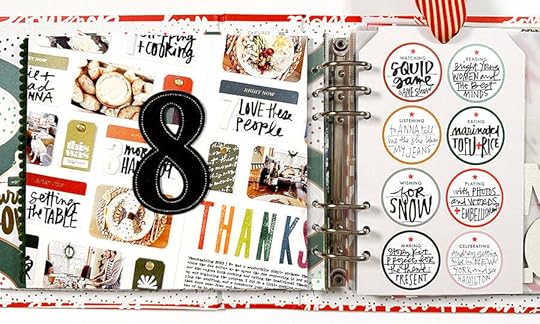
Welcome to Story 08 in my 2023 December Daily® project.
Today I'm using the die cut tag insert with -ing words as the jumping off point for my story. I've been working on content for our next Story Kit (theme = present) and including a photo of that project felt like a fun representation of what I'm currently "making." I also loved, loved, loved continuing to play with a few different pens/pen weights to document the pieces of my story on the tag page.
Let's jump in to today's video:
I used a Slick Writer for today's Table Of Contents entry:
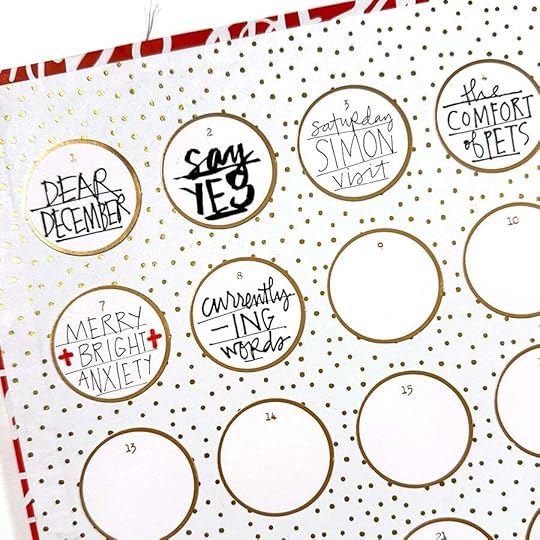
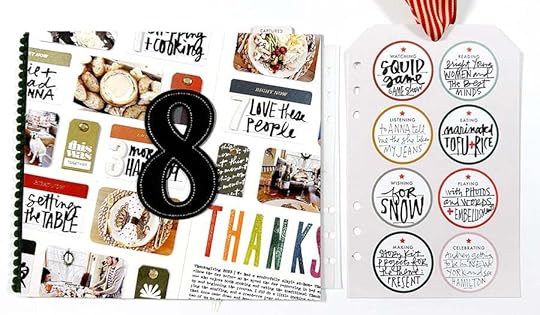
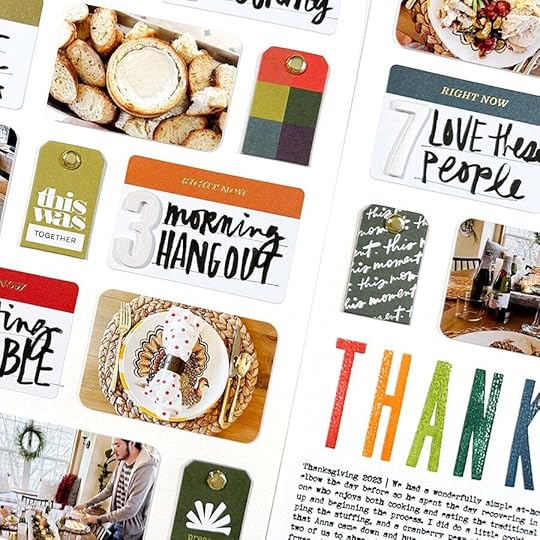
I knew I wanted to pair a photo with the -ing tag words. I considered taking a photo of myself while I was working but instead I decided to include an image of one of my projects for the "present" story theme (coming out on December 10th). I loved the colors and the grid design and the brush pen on the story cards. That influenced my choice to use all three pens I've been using for the Table Of Contents on my tag.
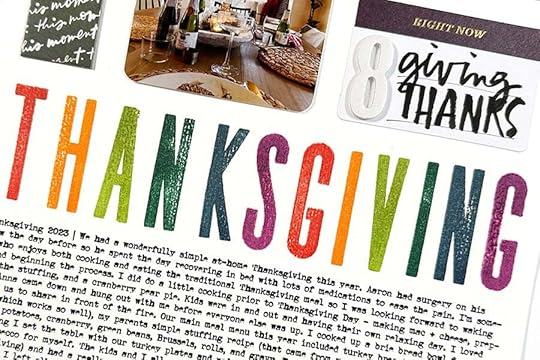
Super fun colors in the next kit and I also used the newest Alphas Are Awesome to stamp "thanksgiving."
It's fun to take a photo of a project and add it in to this project!
I think my favorite thing with this story was using the different pens all together. I love that I can use the thicker brush pen for shorter responses and thinner pens for the longer responses. I love how it makes the whole page feel fun.
SUPPLIES
December Daily® Die Cut Insert Set (digital available)
Past December Daily® Felt Number
Brush Pen
Miron Pen
Slick Writer Pen
POSCA Paint Pen
May Arts Ribbon
Scrapbook.com Rolling Adhesive
Red Line Tape
December 8, 2023
In Case You Missed It | December 8

Happy Friday, friends! Welcome to the latest
In Case You Missed It. Just a reminder that this is a quick post that will happen every Friday afternoon with all the updates and links that have happened throughout the week. So, let's get to it:
CHANGES TO OUR 2024 SBTM SUBSCRIPTION
Earlier this week we announced changes to our 2024 Stories By The Month™ subscription, beginning on the 10th of this month with the January-themed kit. Find all of the details on the blog here.
DECEMBER DAILY® IS HAPPENING NOW
December Daily® is a December mini-album project that documents the 25 days leading up to Christmas. The simple goal is to capture the spirit of December via one story per day. Ali and Lisa have been chatting about various topics related to the project over the past few weeks. Community member Linda Jordan was live today talking about story ideas. Find those recordings on Instagram. Ali is sharing her stories in the same way she has in years past, almost-daily blog posts and videos. Find all of those on the blog, as well. Thank you all for making this project so incredibly special.
DECEMBER DAILY® DIGITALS
The 2023 December Daily® Digitals are here! Kits, Stamps, Paper, and Embellishments...the same fun & festive designs as the physical @decemberdaily products, only in digital format. We love to see how this incredibly creative community plays with digitals! Resizing elements and cards, adding journaling to papers, creating cut files, transforming files into transparencies, the sky is the limit with digital files. Want to learn more about creating with digital files? Our newest class December Daily® Hybrid Product Play is live and available to watch at your convenience.We have incredible content from six amazing contributors ready to explore at your convenience. Shop digitals here.
NEW CLASSES
2023 DECEMBER DAILY® PREP DAY. Join the December Daily® community for a fun online December Daily® prep day on Saturday, November 18th, 2023. Use this opportunity to finish past December Daily® projects or start working on your project for 2023. The first live video will start on Saturday, November 18th at 10:00 am Eastern. Cost is $5.
DECEMBER DAILY® PRODUCT PLAY | TRY THIS. December Daily® Product Play is all about ideas and inspiration for working with physical products from the December Daily® Collection. For 30 days in November, you'll receive one idea per day from the contributors to this class (includes Ali). Ideas in this workshop will focus on physical products from our 2023 December Daily® collection. Whether you are preparing to document 2023 or finishing up telling stories from past years, we hope these fun, creative ideas help you use your products to get your stories told.
2023 DECEMBER DAILY® HYBRID PRODUCT PLAY. Hybrid scrapbooking combines digital products with physical supplies to create paper (or printed) memory-keeping projects. For this class, our contributors will share with fun, creative ideas and inspiration for working with these digital products from the 2023 December Daily® Collection.
As always, we’re so grateful to have you all as members of this community! Thanks for joining me today and have a great weekend!


