
Nancy Zieman's Blog, page 60
August 3, 2019
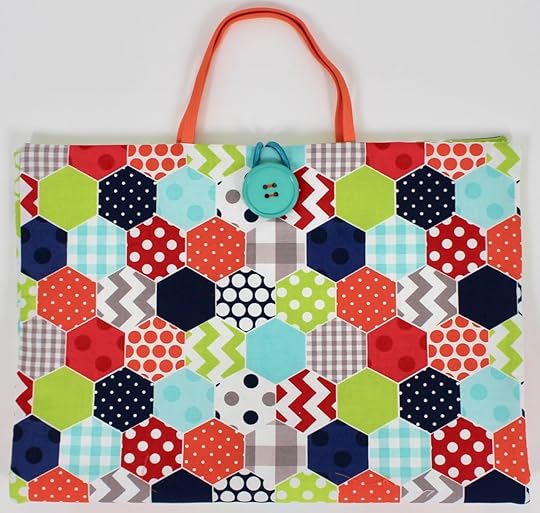
I Sew For Fun Project Tutorial: Art Caddy
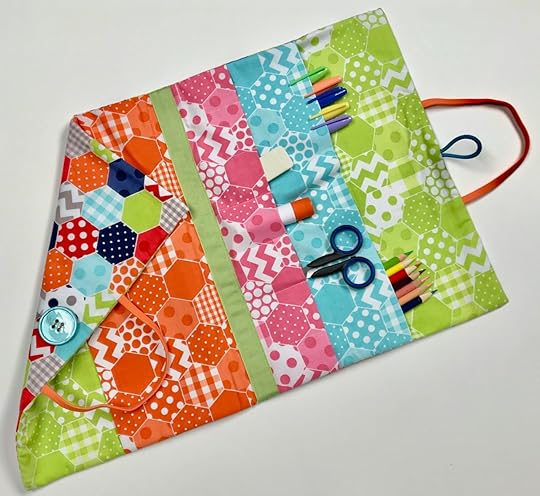
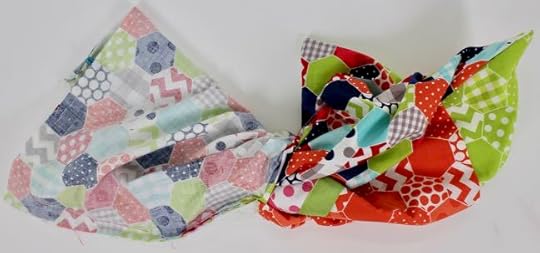
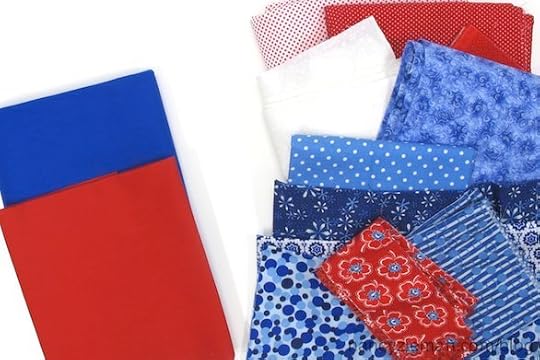
Do you have a fat quarter pack of fun fabrics and an a few hours to spend with your little sewing partner? If your answer is “YES,” then we have an artistic sewing project for you. Stitch an Art Caddy made up of rectangles, ribbon and hair accessories with this FREE! I Sew For Fun Art Caddy Tutorial by Nancy Zieman.

You’ll find this easy sewing project, plus 19 additional I Sew For Fun projects, in Nancy Zieman’s 72-page book, I Sew For Fun. Nancy shares her step-by-step directions for 20 super-easy sewing projects.
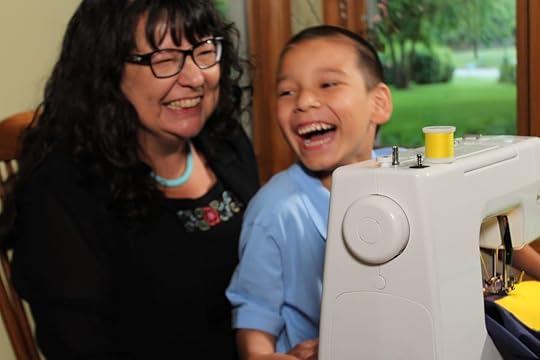
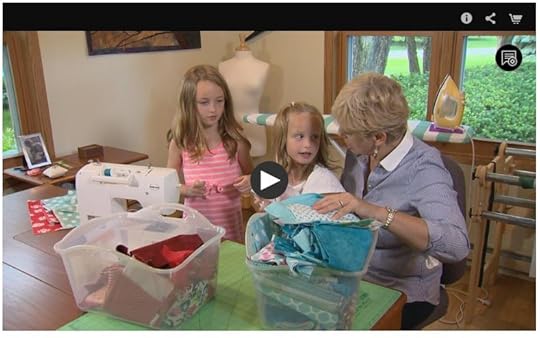
Tune in and watch Nancy and her granddaughters, along with friends, take a modern approach to sewing. Nancy shares her team sewing-for-fun experience along with many tips for a big partner, and numerous insights for involving a little sewing partner—all while making simple, easy to sew kid-friendly projects. Watch I Sew For Fun on Sewing With Nancy!
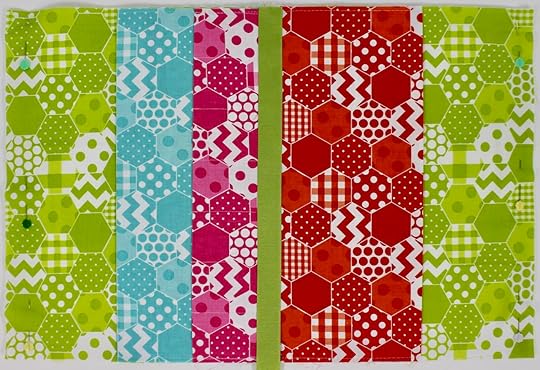
Art Caddy Sewing Tutorial
Approximate Finished Size: 13″ X 20″
Supplies Needed:
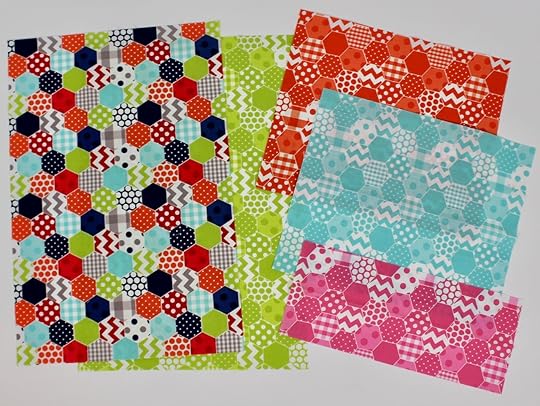
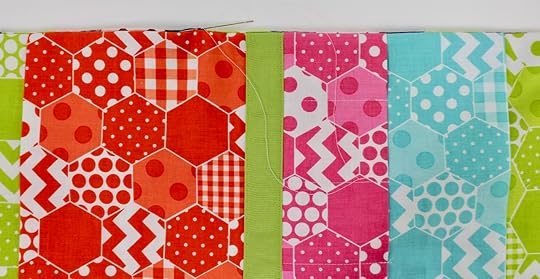
Five coordinating fabrics at lease 14″ x 21″
One 14″ x 21″ rectangle fleece batting
1/2 yd. 1″ grosgrain ribbon
One 1-1/2″ decorative button
One ponytail elastic
One elastic hairband
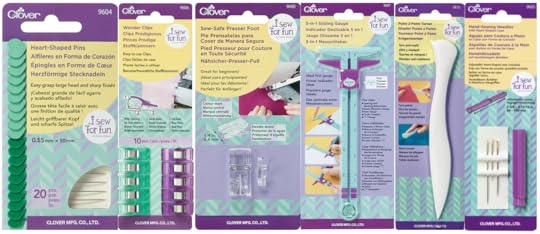
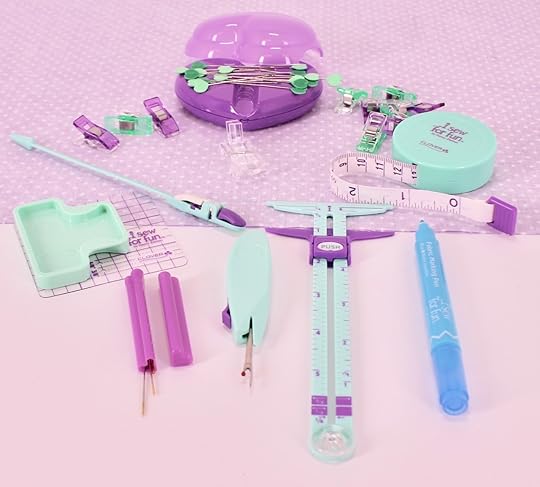
Optional: I Sew For Fun Notions:
I Sew For Fun Heart-Shaped Pins
I Sew For Fun Wonder Clips
I Sew For Fun Sew Safe Presser Foot
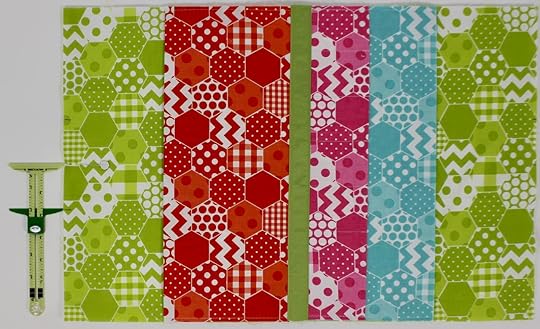
I Sew For Fun 5-in-1 Sliding Gauge
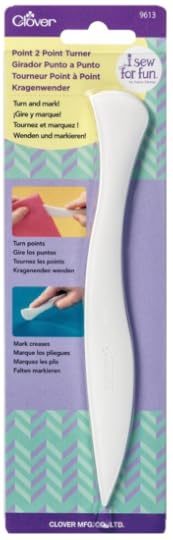
NEW! I Sew For Fun Point 2 Point Turner
I Sew For Fun Hand-Sewing Needles with Heart-Shaped Case
Instructions:
Please read all instructions before beginning. Use the width of the presser foot as the depth of the seam allowances.
1. Cut and label fabrics:
Cut two 14″ x 21″ rectangles for caddy outer panel and lining.
Cut two 12″ x 14″ rectangles for large pockets.
Cut one 6″ x 14″ rectangle for divided pocket.
Cut one 14″ x 21″ rectangle for fleece batting.
2. Prepare and position pockets:
Fold each pocket piece in half, wrong sides together, aligning 14″ edges. Press.
Make dividers for crayon pocket:
Layer 3″ x 14″ pocket on top of one 6″ x 14″ large pocket on a flat work surface, aligning cut edges.
Mark; then stitch dividers 2″ apart on short pocket. Reinforce stitching at top edges of pockets.
Position pockets on caddy lining:
Fold lining fabric in half, aligning 14″ edges. Press-mark center fold of lining fabric.
Unfold lining and layer it on top of the fleece batting, aligning cut edges.
Place large pocket on the caddy lining, matching long cut edges with press-marked center of lining; pin to secure all layers.
Place crayon pocket on caddy lining with divided pocket facing up, matching long cut edge with pin -marked center of lining; pin .
Baste layers together, stitching and guiding presser foot along each side of the caddy, starting at the top of one pocket and ending at the top of the opposite pocket.
Add the ribbon center:
Pin grosgrain ribbon across the center of caddy lining, covering cut edges of the pockets.
Edgestitch along both long edges of the ribbon, stitching through all layers.
3. Prepare and attach handles:
Fold top edges of the caddy in half; place a pin at each center fold mark.
Measure and mark 2″ from each side of the center marks.
Align cut edges of band at the 2″ marks; pin or use Wonder Clips to secure.
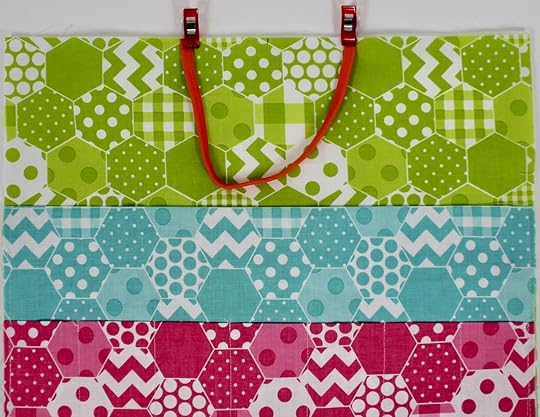
Stitch across elastic ends.
 Hairband elastic is perfect for this project because it is sturdy and colorful. Plus, it is easy to find.
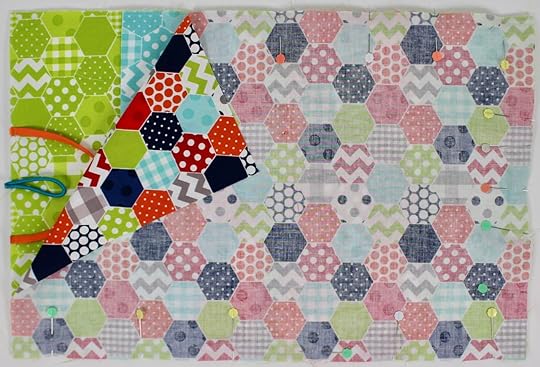
4. Prepare and attach button loop:
Ponytail elastic works great for this large button loop. It is sturdy, like the hairband elastic, but smaller, so there is hardly any waste. Again, it comes in lots of colors!
Cut metal from the elastic ponytail holder.
Make a loop of the elastic.
Align cut edges at one center mark; pin .
Stitch across elastic ends
5. Stitch the caddy:
Place the caddy outer panel on top of caddy lining, right sides together, matching cut edges.
Stitch all four sides, guiding presser foot along the edges, leaving a 4″ opening on one long edge. Pivot at each of the corners.
Clip corners.
6. Complete the caddy:
Turn caddy right side out through opening in side seam. Push out corners with Point 2 Point turning tool.
Turn under the seam allowance in the 4″ opening and secure with pins or Wonder Clips.
Slipstitch the opening closed.
Center and stitch a button between the handle opposite loop closure.

You’ll find this easy sewing project, plus 19 additional I Sew For Fun projects, in Nancy Zieman’s 72-page book, I Sew For Fun. Nancy shares her step-by-step directions for 20 super-easy sewing projects.
Tune in and watch Nancy and her granddaughters, along with friends, take a modern approach to sewing. Nancy shares her team sewing-for-fun experience along with many tips for a big partner, and numerous insights for involving a little sewing partner—all while making simple, easy to sew kid-friendly projects. Watch I Sew For Fun on Sewing With Nancy!

Watch I Sew For Fun on Sewing With Nancy online at NancyZieman.com.
For a complete listing of all I Sew For Fun companion products by Nancy Zieman, visit isewforfun.com

To win a NEW! I Sew For Fun Point 2 Point Turner from Clover, please leave a comment below sharing a sewing project you’ll be stitching with your little sewing partner.

The randomly selected winner of a set of eight Landscape Quilt Note Cards by Nancy Zieman, is Sheelagh.
Her comment is: Front Porch is my favorite—reminiscent of a beautiful summer day.
Happy Sewing!
Team Nancy Zieman
Nancy Zieman Productions. LLC.

Content in this feed is © copyright 2019 by Nancy Zieman Productions, LLC and may not be republished without written permission. You’re welcome to forward the email to a friend or colleague but it’s not okay to add the RSS feed automatically as content on a blog or other website.
The FTC requires us to tell you that Nancy Zieman Productions, LLC has provided products by other companies in the course of doing business. The FTC requires us to advise you to take this information into consideration when reading this posting.
Make sure you are subscribed to Nancy Zieman Productions, LLC enews mailing list so you won’t miss a thing. Sign up here . Join us on Facebook , plus a host of other social media channels. Connect With Nancy and Friends today!


August 1, 2019
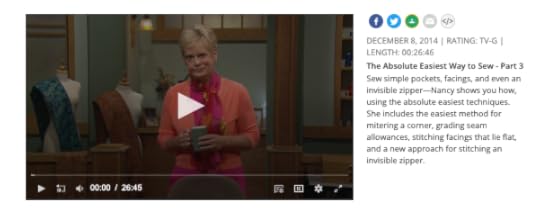
The Absolute Easiest Way to Sew – Part Three

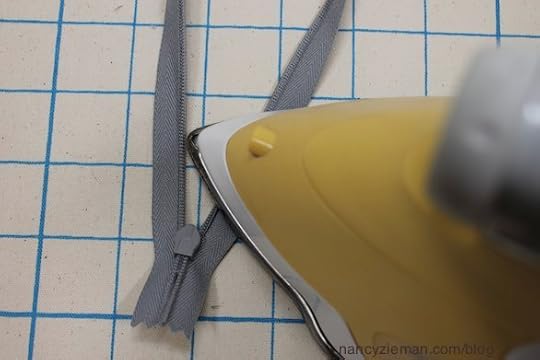
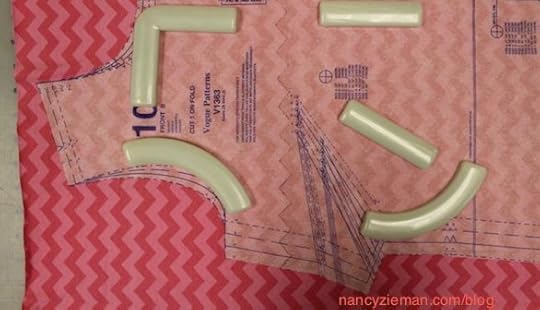
Sew it simple. Sew to have fun. How? It’s straightforward after you learn The Absolute Easiest Way to Sew! This time, learn how to insert an invisible zipper. To seamlessly—pun intended—insert an invisible zipper into the seam use this modified approach, attaching the facing before sewing the zipper. It’s a new approach and one of Nancy Zieman’s absolute easiest sewing tips.
How to Insert an Invisible Zipper
Stitch the shoulder seams of the top or dress.
Fuse interfacing to the front and back neckline facing fabrics.
Stitch the shoulder seams of the facing pieces.
Do not stitch the center back seam at this point.
Align the facing to the garment, right sides together, matching notches.
Stitch the facing to the neckline.

Grade the seam allowances, using a pinking blade with a rotary cutter for the fastest and easiest results.

Press the seam allowances toward the facing.
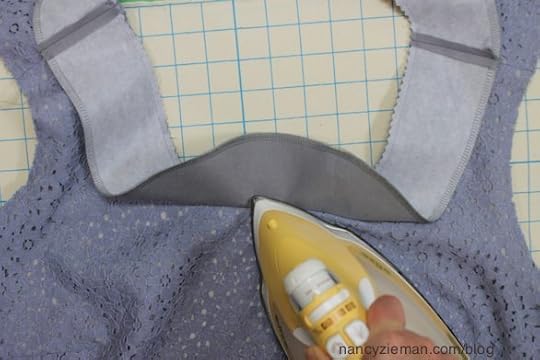
Understitch, stitching the seam allowances to the facing. Use a multizigzag.

Flatten out the zipper tape, pressing the teeth to the outside.
Place a piece of tape or a pin above the zipper stop on one side of the zipper.
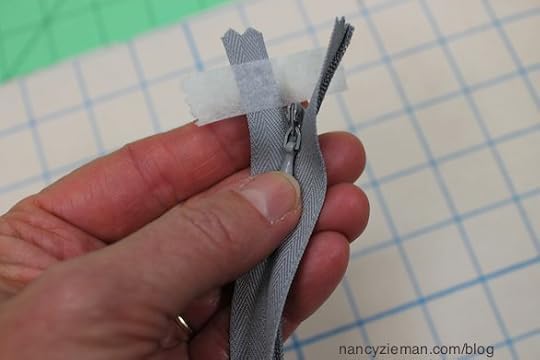
Mark the 5/8″ seam allowances along both sides of the center back seam. Begin marking at the neckline seam, and continue marking the length of the zipper opening.
Align one side of the zipper tape to the corresponding side of the dress, meeting the zipper teeth to the 5/8″ marking and placing the zipper top slightly below the neckline seam.
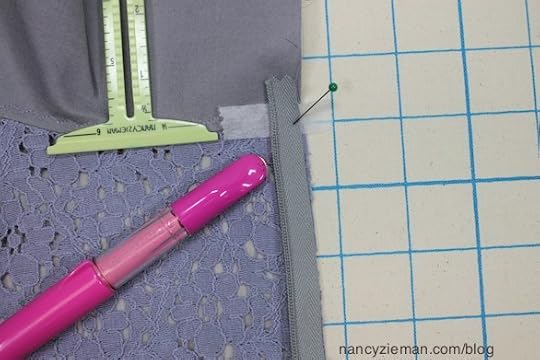
Pin one side of the zipper to the fabric.
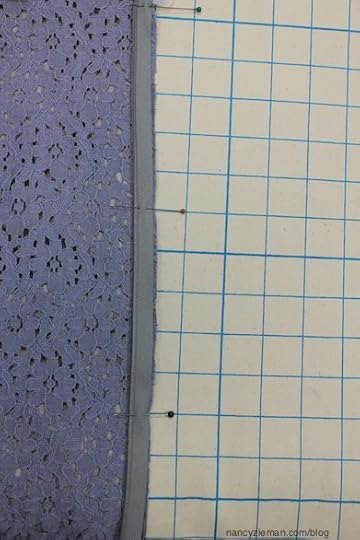
Attach the I nvisible Zipper Foot . Starting at the neckline seam, position the presser foot on top of the zipper tape with the needle stitching along side of the zipper teeth.
After stitching, close the zipper to check that the zipper stop is directly below the neckline seam.
Align the second half of the zipper at the top of the neckline, placing the remaining side of the zipper at the same distance from the top of the neckline.
Align the zipper teeth to the marking; pin. Then, stitch the zipper to the remaining side of the dress/top.

After stitching, check to make certain the neckline edges align.
Fold the facing over the zipper tape; hand stitch.

Pin the lower portion of the seam from the hem to the end of the zipper.
Move the invisible zipper foot completely to the left of the needle. Stitch from the zipper stopping point to the hem.

Ta dah!

The Invisible Zipper technique, plus much more is printed in The Absolute Easiest Way to Sew.

Kudos to Diane Dhein, the editor, and Laure Noe, the illustrator, for making this book possible.
All of Nancy’s favorite sewing tips are in one book.
The Absolute Easiest Way to Sew chapters include:
Sewing Notions
Sewing Machine Confidence
Serger Spotlight
Patterns
Fabric Facts
Sewing Basics
Beyond the Basics

Watch Absolute Easiest Way to Sew (Part One, Part Two, and Part Three) on Sewing With Nancy online.

For your chance to win a copy of The Absolute Easiest Way to Sew from Nancy’s Notions, leave a comment sharing your most common sewing challenge.
Happy Sewing,
Team Nancy Zieman
Nancy Zieman Productions, LLC.
Content in this feed is © copyright 2019 by Nancy Zieman Productions, LLC and may not be republished without written permission. You’re welcome to forward the email to a friend or colleague but it’s not okay to add the RSS feed automatically as content on a blog or other website.
The FTC requires us to tell you that Nancy Zieman Productions, LLC has provided products by other companies in the course of doing business. The FTC requires us to advise you to take this information into consideration when reading this posting.
Make sure you are subscribed to Nancy Zieman Productions, LLC enews mailing list so you won’t miss a thing. Sign up here . Join us on Facebook , plus a host of other social media channels. Connect With Nancy and Friends today!
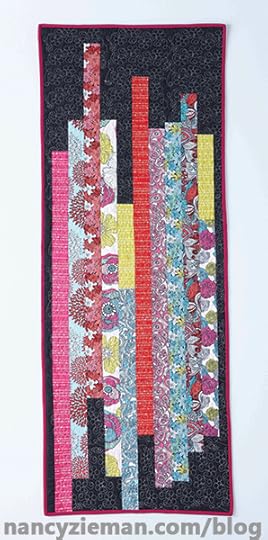
July 30, 2019
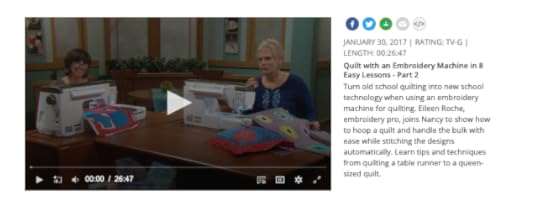
Quilt with an Embroidery Machine in Eight Easy Lessons – Part Two

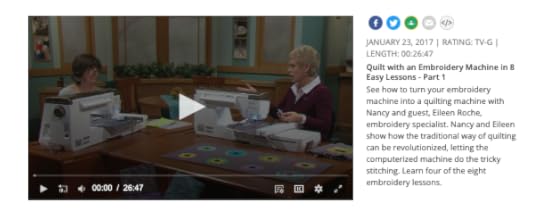
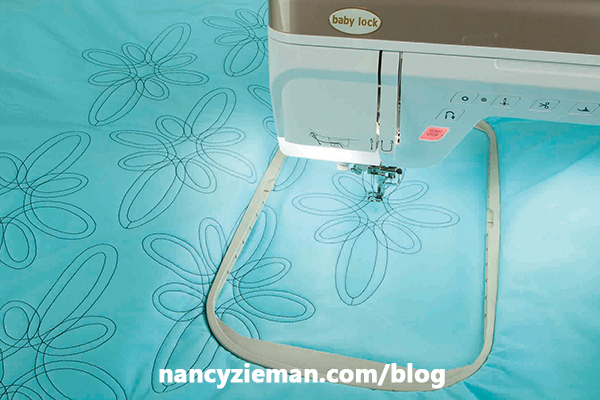
If you own an embroidery machine, most likely you’ve added monograms to towels or a cute design to baby clothes. But, did you ever think that your embroidery machine’s hidden talent was to quilt layers of fabric with remarkable finesse? Welcome back embroidery and quilting expert Eileen Roche, who will show you how to double the use of your embroidery machine.
Watch as Eileen shares the magic in quilting on part two of Quilt with an Embroidery Machine in 8 Easy Lessons on Sewing With Nancy. If you missed part one, last week, you can always watch it online at NancyZieman.com.
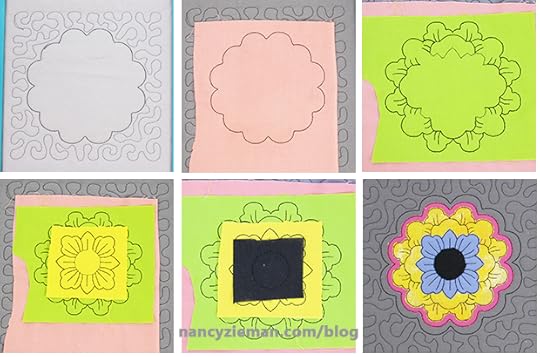
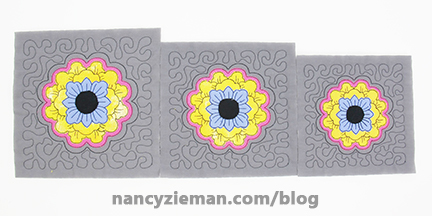
Quilted Shapes
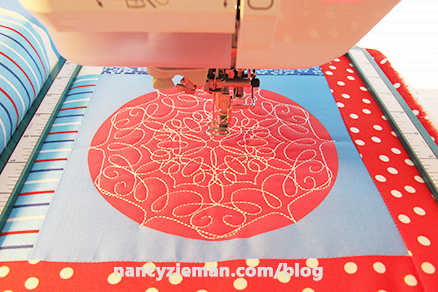
Embroidery isn’t limited to a design created by thread-dense stitches. Swirls or geometric shapes can also be embroidered. For example, the squares, circles, and hexagons as featured in Eileen’s sampler pillow, can easily be quilted with an embroidery machine. The end result is the appearance of stitching that was done by hand or with a long-arm quilting machine.
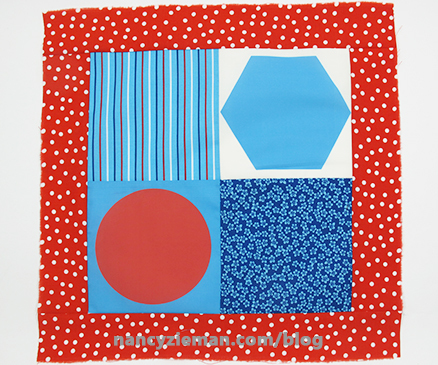
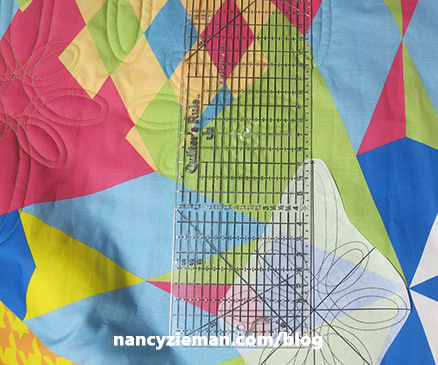
Use the DIME (Designs in Machine Embroidery) template to align shapes under the embroidery machine. See how on today’s featured episode of Sewing With Nancy.
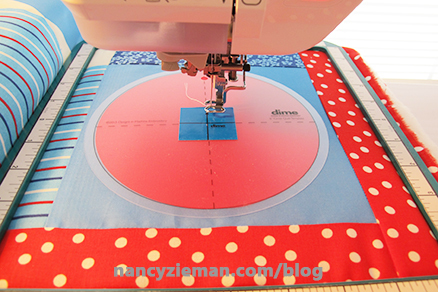
Select a design to fit the shape and let your embroidery machine do the work of a computerized longarm. You’ll be amazed with the simplicity and thrilled with the results.
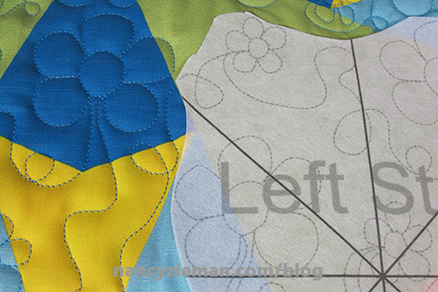
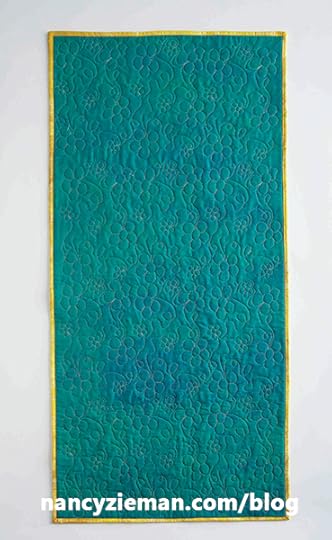
All-Over Quilting Designs
If you’ve pieced a quilt top but have never taken the time to quilt all the layers together, Eileen’s all-over quilting with an embroidery machine technique is for you. The quilt sandwich is hooped section by section. Templates are used for perfect placement and then the stitching begins with the touch of a button.
Start by drawing a grid over the quilt top using a water-soluble pen. Eileen Roche and Nancy Zieman demonstrate how easy it is to quilt in-the-hoop: one shape at a time, one row at a time. We then nestle the subsequent row, stitch, and finish. Watch all the steps to finishing this quilt on Quilt with an Embroidery Machine in 8 Easy Lessons—Part Two.
. .
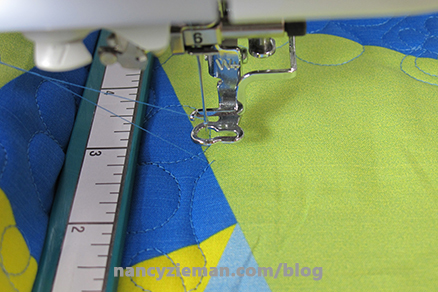
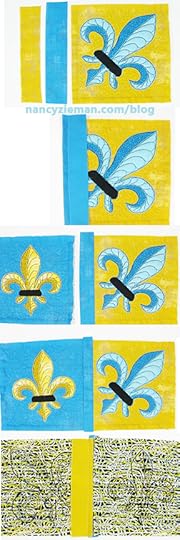
Continuous Line Quilting
If you’re a quilter first, embroiderer second, you no-doubt appreciate the look of quilts that have been stitched with a continuous design. If your machine has an embroidery unit, you can accomplish the same look that is generally reserved for long-arm quilters. It’s rather magical.
Use templates to determine placement within the hoop. Eileen shares how on today’s Sewing With Nancy episode.
. .
 The result is a stunning quilting line that appears continuous.
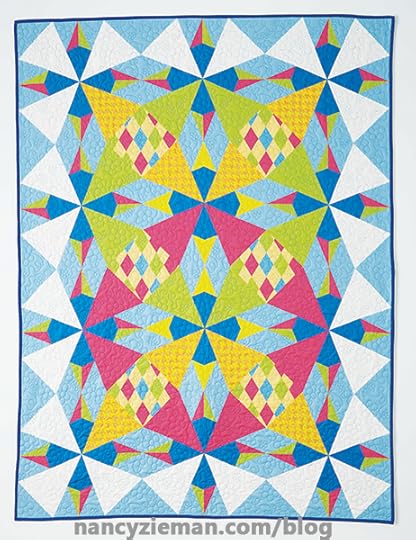
Eileen and Nancy showcase how this continuous line quilting design can work on a variety of different sized projects.
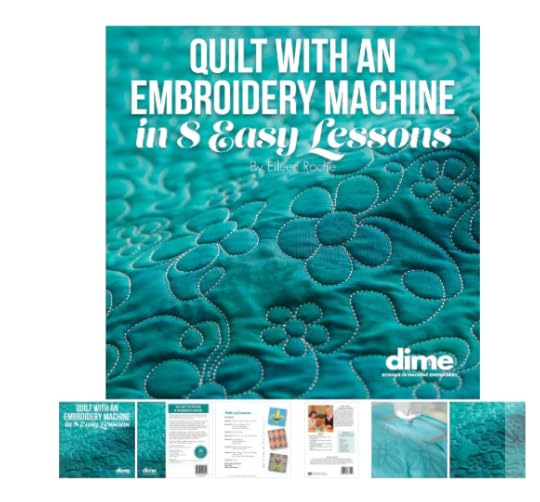
Easily learn the machine embroidery quilting process. There’s no reason to be intimidated. This easy process is presented from a beginner’s perspective and is broken down into eight easy lessons, including many useful tips and techniques for professional results, which are all included in the Nancy’s Notions machine embroidery starter kit.

The kit includes:
Quilt with an Embroidery Machine in 8 Easy Lessons book
Quilt with an Embroidery Machine DVD
Wonder Under
Quilting Needles 80/12 and 90/14
Print & Stick Target Paper
Watch Quilt with an Embroidery Machine in 8 Easy Lessons (Part One and Part Two) on Sewing With Nancy online.
Tell us which size design (6″, 7″, or 8″ quilt blocks) would best suit your project dimensions, for a chance to win the Quilt with an Embroidery Machine in 8 Easy Lessons book.


Happy Sewing!
Team Nancy Zieman
Nancy Zieman Productions. LLC.
Content in this feed is © copyright 2019 by Nancy Zieman Productions, LLC and may not be republished without written permission. You’re welcome to forward the email to a friend or colleague but it’s not okay to add the RSS feed automatically as content on a blog or other website.
The FTC requires us to tell you that Nancy Zieman Productions, LLC has provided products by other companies in the course of doing business. The FTC requires us to advise you to take this information into consideration when reading this posting.
Make sure you are subscribed to Nancy Zieman Productions, LLC enews mailing list so you won’t miss a thing. Sign up here . Join us on Facebook , plus a host of other social media channels. Connect With Nancy and Friends today!
July 27, 2019
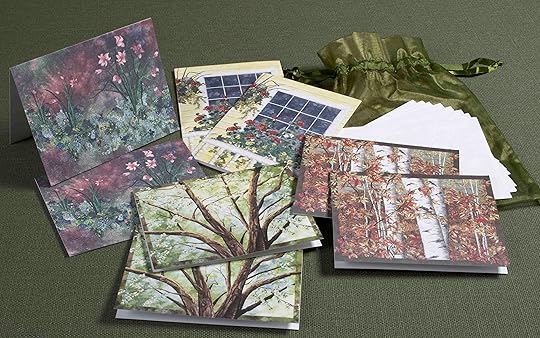
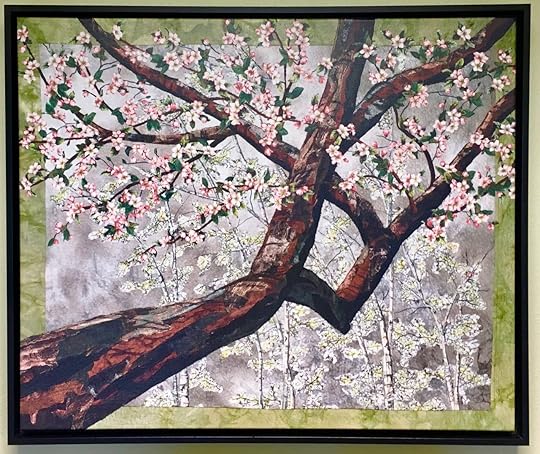
Nancy Zieman Original Giclée Canvas Landscape Art Prints
Now Available! Original Framed Giclée Canvas Print Reproduction of Artwork by Nancy Zieman, using only the highest quality Giclée printing techniques.
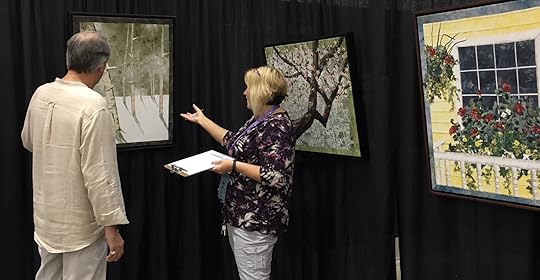
Now you can have your very own Landscape Quilt Art Print by Nancy Zieman—enjoy in your home or give as a gift.
Front Porch – 31″ x 27″ $249
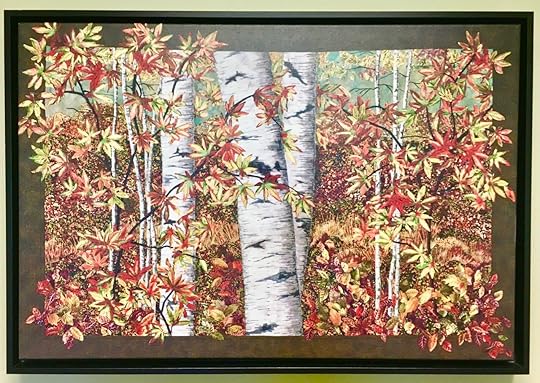
Peak Color – 21″ x 31″ $229
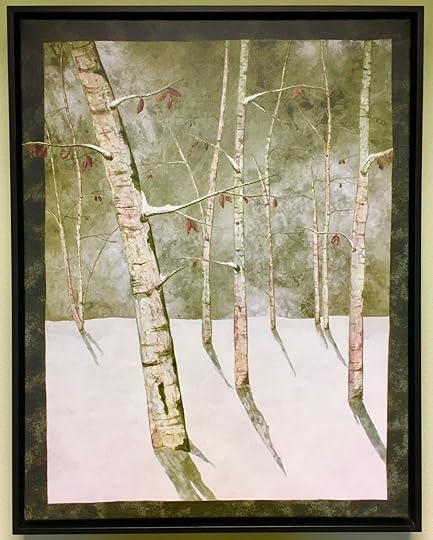
Moon Lit Birches – 31″ x 24″ $239
Out on a Limb – 25″ x 30″ $239
To purchase your Landscape Quilt Canvas Print Reproduction of Landscape Quilt Artwork by Nancy Zieman, please mail the completed order form and check or money order to Nancy Zieman Productions, LLC.
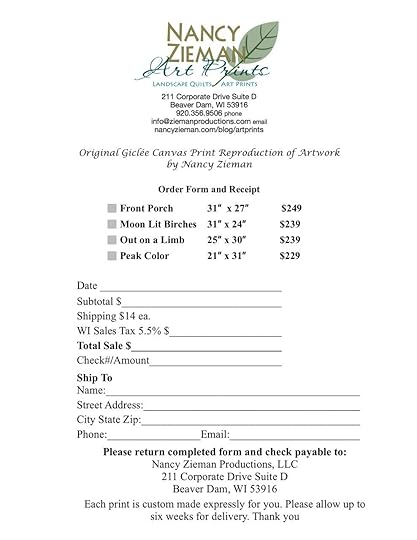
Print the Order Form—and Order Today!
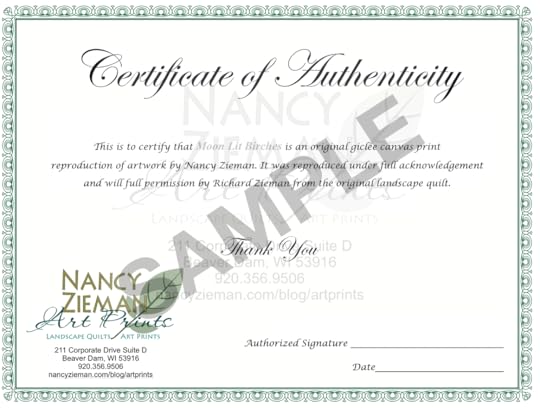
You will receive a certificate of authenticity with each purchase of Original Giclée Canvas Print Reproduction of Artwork by Nancy Zieman.
Each print is made expressly for you. Please allow up to six weeks for delivery.

For a chance to win a set of eight Landscape Quilt Note Cards by Nancy Zieman, please leave a comment below and tell us which Original Giclée Canvas Print Reproduction of Artwork by Nancy Zieman is your favorite.


The randomly selected winner of Nancy Zieman’s New! Afternoon Picnic Fat Quarter Pack from the July 20 Blog post is, Donna Pfost.

Her comment is: I love this fabric, and I love the quilt blocks that have been made thus far. The fabric just lifts one’s spirits—the flowers are so joyful and colorful!! Thanks for the opportunity to win this fabric!! 
Happy Sewing,
Team Nancy Zieman
Nancy Zieman Productions. LLC.
Content in this feed is © copyright 2019 by Nancy Zieman Productions, LLC and may not be republished without written permission. You’re welcome to forward the email to a friend or colleague but it’s not okay to add the RSS feed automatically as content on a blog or other website.
The FTC requires us to tell you that Nancy Zieman Productions, LLC has provided products by other companies in the course of doing business. The FTC requires us to advise you to take this information into consideration when reading this posting.
Make sure you are subscribed to Nancy Zieman Productions, LLC enews mailing list so you won’t miss a thing. Sign up here . Join us on Facebook , plus a host of other social media channels. Connect With Nancy and Friends today!
Happy Sewing!
Team Nancy Zieman
Nancy Zieman Productions. LLC.
Content in this feed is © copyright 2019 by Nancy Zieman Productions, LLC and may not be republished without written permission. You’re welcome to forward the email to a friend or colleague but it’s not okay to add the RSS feed automatically as content on a blog or other website.
The FTC requires us to tell you that Nancy Zieman Productions, LLC has provided products by other companies in the course of doing business. The FTC requires us to advise you to take this information into consideration when reading this posting.
Make sure you are subscribed to Nancy Zieman Productions, LLC enews mailing list so you won’t miss a thing. Sign up here . Join us on Facebook , plus a host of other social media channels. Connect With Nancy and Friends today!
July 25, 2019
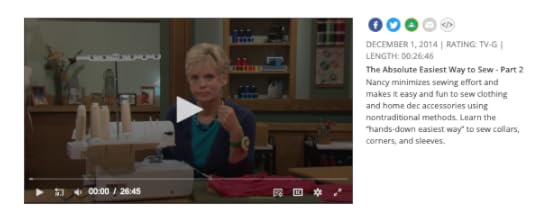
The Absolute Easiest Way to Sew – Part Two
We are going to make a rather bold statement: Collars are so easy to sew that even a first time stitcher will have success. That kind of statement is out of character for us, but it’s true. Let us show you . . .
The Absolute Easiest Way to Sew Collars
In the second episode of this Sewing With Nancy series and companion book, Nancy Zieman shared her favorite absolute easiest way to sew techniques. The collar being Nancy’s signature speedy sewing tip. Here goes!
Interface the collars. Cut out two collar shapes from lightweight fusible interfacing and fuse one to the wrong side of each collar. One of our favorite fusible interfacings is Pellon’s Sof Shape .
Meet collars right sides together. Stitch the outer collar seam.
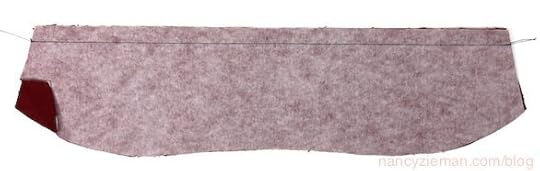
Grade the seam, trimming the under collar seam allowance narrower than the upper collar.

Press the seam flat; then press toward the under collar.
Understitch, stitching the seam allowance to the under collar. We like to use a multizigzag. Or, you could use a straight stitch.
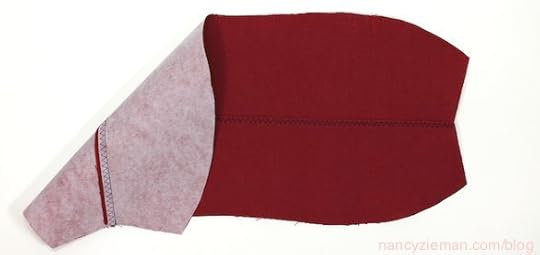
Fold the collar along the first stitching line, right sides together. Meet the collar front edges. Notice the outer collar seam allowance is already graded (trimmed) and completely understitched. This wrapped-corner sewing technique is what makes it the absolute easiest way to sew collars!

Stitch both collar front seams.
Grade the seam allowances, and angle cut the corners.
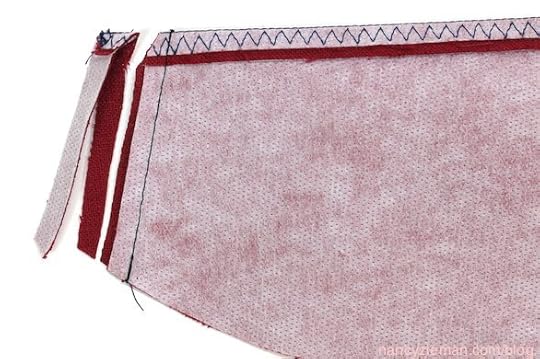
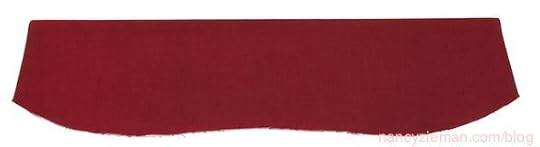
Turn the collar right side out and press. That’s it!
All of Nancy’s easiest sewing tips are in one book .
The Absolute Easiest Way to Sew chapters include:
Sewing Notions
Sewing Machine Confidence
Serger Spotlight
Patterns
Fabric Facts
Sewing Basics
Beyond the Basics
Watch The Absolute Easiest Way to Sew (Part One, Part Two, and Part Three) on Sewing With Nancy online.
For your chance to win a copy of The Absolute Easiest Way to Sew from Nancy’s Notions, leave a comment sharing your most common sewing challenge.
Happy Sewing!
Team Nancy Zieman
Nancy Zieman Productions. LLC.
Content in this feed is © copyright 2019 by Nancy Zieman Productions, LLC and may not be republished without written permission. You’re welcome to forward the email to a friend or colleague but it’s not okay to add the RSS feed automatically as content on a blog or other website.
The FTC requires us to tell you that Nancy Zieman Productions, LLC has provided products by other companies in the course of doing business. The FTC requires us to advise you to take this information into consideration when reading this posting.
Make sure you are subscribed to Nancy Zieman Productions, LLC enews mailing list so you won’t miss a thing. Sign up here . Join us on Facebook , plus a host of other social media channels. Connect With Nancy and Friends today!
July 23, 2019
Quilt with an Embroidery Machine in Eight Easy Lessons

The art of quilting often combines techniques. Traditional quilts are frequently appliquéd, then pieced, and finally all the layers are quilted. If you have an embroidery machine, you can streamline the processes with the touch of a button—the brainchild of Nancy Zieman’s guest Eileen Roche. The quilting technique is practically hands free! Watch as Eileen shares the magic in quilting on part-one of Quilt with an Embroidery Machine in 8 Easy Lessons on this Sewing With Nancy series.
Easily learn the machine embroidery quilting process. There’s no reason to be intimidated. This easy process is presented from a beginner’s perspective and is broken down into eight easy lessons, including many useful tips and techniques for professional results, which are all included in this machine embroidery starter kit.
The kit includes:
Quilt with an Embroidery Machine in 8 Easy Lessons book
Quilt with an Embroidery Machine DVD
Wonder Under
Quilting Needles 80/12 and 90/14
Print & Stick Target Paper
A machine that’s commonly used to create embroidery designs, is equally a quilting machine. Let’s start with a simple table topper, which features what at first glance is a complicated appliqué. You’ll soon see that the process is perfect for the novice quilter.
Prepare Quilt Sandwich
Like any method of quilting, we first must prepare a quilt sandwich. The quilt sandwich refers to the top, batting, and backing layers of the project. Eileen will show us how easy it is to prepare your sandwich for in-the-hoop quilting on this episode.
Embroidered Appliqué Designs
In the traditional appliquéd quilt process, you’ll create your project using these steps (in order):
Appliqué
Piece
Quilt
In this Sewing With Nancy featured program, Eileen shares the embroidered appliqué quilt process and explains how the steps are similar to traditional quilting, yet are executed quite differently. It’s easy once you watch Eileen’s methods on Quilt with an Embroidery Machine in 8 Easy Lessons Part One .
Size and Variety
On the design CD included in the new Quilt with an Embroidery Machine in 8 Easy Lessons book, you’ll have the option to create projects in a variety of sizes including 6″, 7″, or 8″ quilt blocks. Choose a size that best suits your project dimensions.
Piecing Techniques
The next step is to join the quilted blocks. Eileen walks us through this process with ease! Here’s a sneak preview. See the complete piecing demonstration on Sewing With Nancy.
Give it a try and join us next week for part two of Quilt with an Embroidery Machine in 8 Easy Lessons!
Watch Quilt with an Embroidery Machine in 8 Easy Lessons (Part One and Part Two) on Sewing With Nancy online.

Tell us which size design (6″, 7″, or 8″ quilt blocks) would best suit your project dimensions, for a chance to win the Quilt with an Embroidery Machine in 8 Easy Lessons book.

The randomly selected winner of the Fashion Sewing: Plain to Fabulous DVD and Two Patterns from Nancy’s Notions, is Mary Ann Stauffacher. 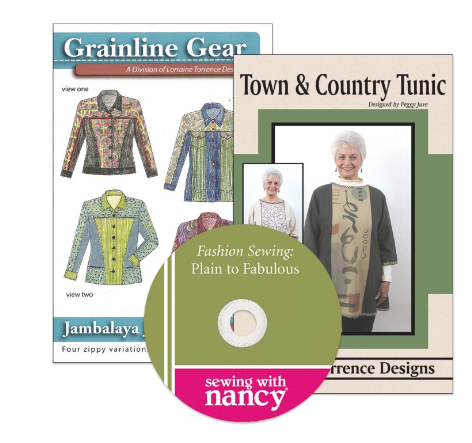
Her comment is: I love the longer jacket with the angled front panels. I just might use some orphan quilt blocks in the panels! Love it!
Happy Quilting!
Team Nancy Zieman
Nancy Zieman Productions. LLC.
Content in this feed is © copyright 2019 by Nancy Zieman Productions, LLC and may not be republished without written permission. You’re welcome to forward the email to a friend or colleague but it’s not okay to add the RSS feed automatically as content on a blog or other website.
The FTC requires us to tell you that Nancy Zieman Productions, LLC has provided products by other companies in the course of doing business. The FTC requires us to advise you to take this information into consideration when reading this posting.
Make sure you are subscribed to Nancy Zieman Productions, LLC enews mailing list so you won’t miss a thing. Sign up here . Join us on Facebook , plus a host of other social media channels. Connect With Nancy and Friends today!
July 20, 2019
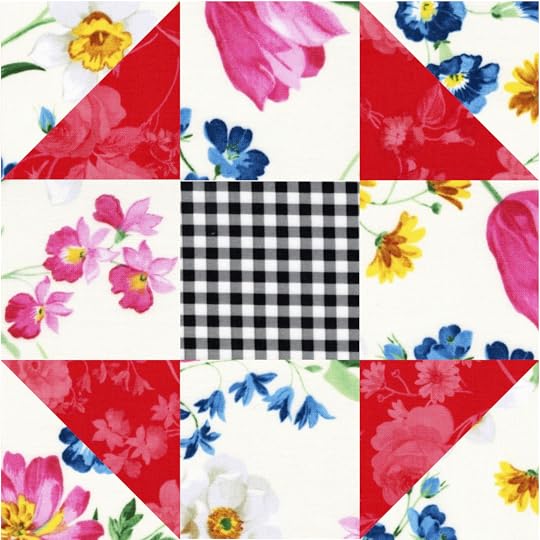
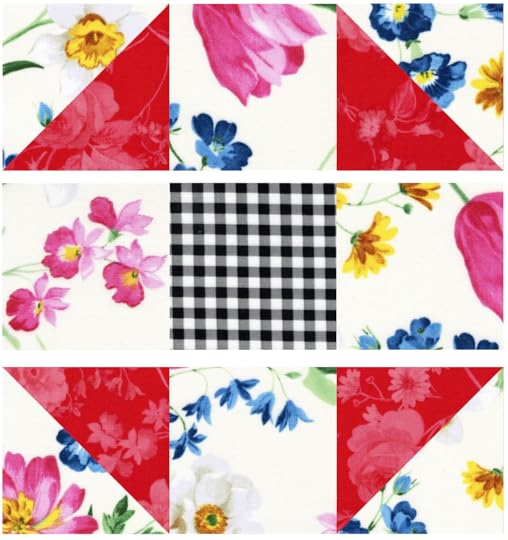
July 2019 Block of the Month: Shoo Fly Quilt Block
2019 Block of the Month—July: “Shoo Fly” Quilt Block
In January, Team Nancy Zieman introduced the first of 12 blocks in the New! Summer Picnic 2019 FREE! Block of the Month Series. Find the January through June Quilt Block Tutorials under Popular Blog Posts: 2019 Block of the Month. Join the New! Summer Picnic 2019 Block of the Month Series, anytime, by viewing the supply listing in the January 5th NZP Blog Posting.
Each month, we’re featuring one quilt block design. The quilt blocks are created using Nancy Zieman’s NEW! Afternoon Picnic Fat Quarter Pack* from Riley Blake Designs (*18″ x 22″ fabric rectangles) plus background, sashing, border, and binding fabrics. Follow along as we demonstrate how to create this Month’s “Shoo Fly” Quilt Block (below).
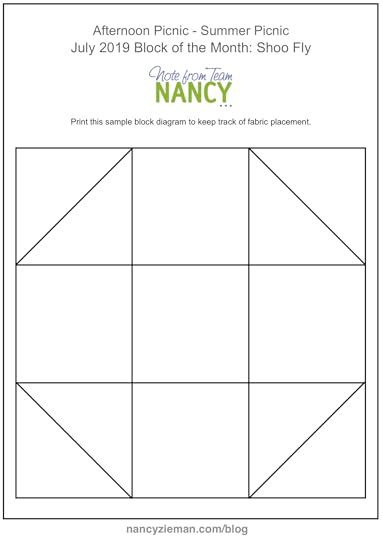
Keep your fabric choices sorted using this handy Fabric Planner diagram. Download the planner HERE. Make notes or pin swatches to remind you of the fabric placements.
2019 Block of the Month Afternoon Picnic Summer Picnic July Shoo Fly PDF
Choose the Fabrics
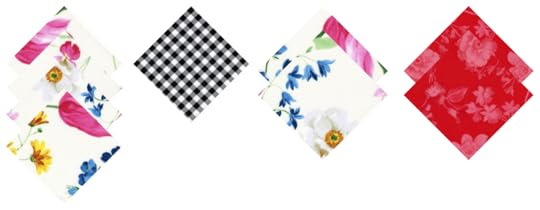
For the New! Summer Picnic 2019 FREE! Block of the Month Series, “Shoo Fly” Quilt Block, select the following fabrics from your Nancy Zieman’s NEW! Afternoon Picnic Fat Quarter Pack from Riley Blake Designs and a Nancy Zieman’s No-Hassle Triangle Gauge by Clover.

Afternoon Picnic Cream Main, Afternoon Picnic Red Tonal, and Afternoon Picnic Black Gingham
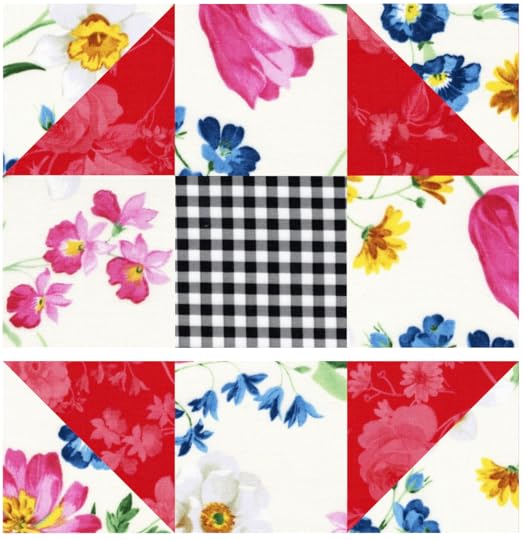
“Shoo Fly” Block
This whimsical Shoo Fly block is a great addition to our Afternoon Picnic, Summer Picnic block of the month series. Using four half square triangles and five squares this quilt block will go together in a flash, then you can enjoy the warm summer evenings with family and friends.
Instructions: (Each block is a 12″ finished square. Finished quilt measures approximately 44-1/2″ x 57-1/2″)
Cut Fabric for Block
Cut four 4-1/2″ squares of Afternoon Picnic Cream Main.
Cut one 4-1/2″ square of Afternoon Picnic Black Gingham.
Cut two 4-7/8″ squares of Afternoon Picnic Cream Main.
Cut two 4-7/8″ squares of Afternoon Picnic Red Tonal.
Construct The Units
All seam allowances are scant 1/4″ unless otherwise stated.
The step-by-step photos illustrate construction of the block.
Half Square Triangles (HSTs)
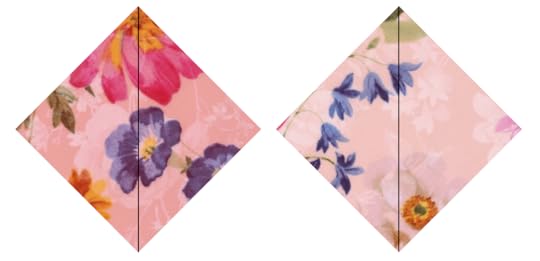
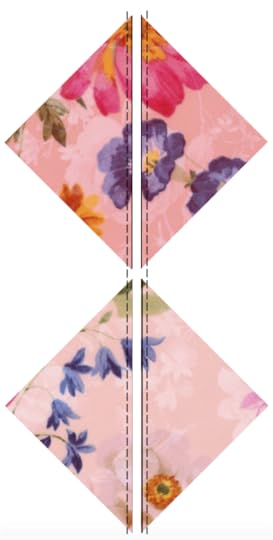
1. Create four 1/2-square triangle blocks of Afternoon Picnic Cream Main and Afternoon Picnic Red Tonal.
Align 4-7/8″ squares cut from Afternoon Picnic Cream Main and Afternoon Picnic Red Tonal right sides together to create block sets.
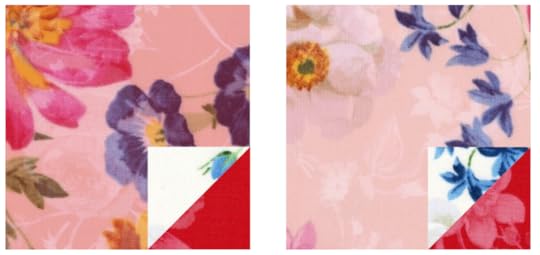
Mark blocks using a No-Hassle Triangles Gauge and an erasable gel pen.
Use a No-Hassle Triangles Gauge . The left side of the gauge is designated to create 1/2-square triangle blocks. Depress button on sliding portion of the gauge and move to size of the desired 1/2-square triangle.
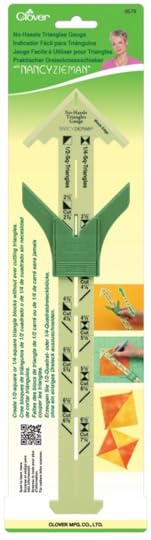
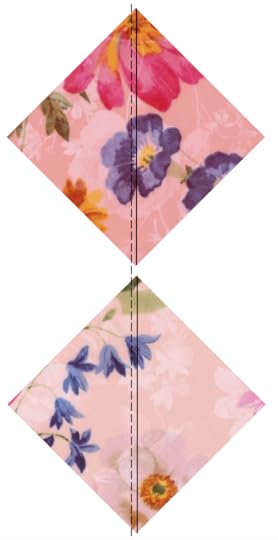
 The advantage of using the No-Hassle Triangle Gauge is accuracy. It’s easy to double check that the block set fits within the confines of the gauge. If the block set extends beyond or is shorter, trim or cut another block.
With block sets right sides together, place No-Hassle Triangles Gauge corner to corner. Match corner marks of gauge with corner of block sets. Mark fabric through center of gauge with an erasable gel pen .
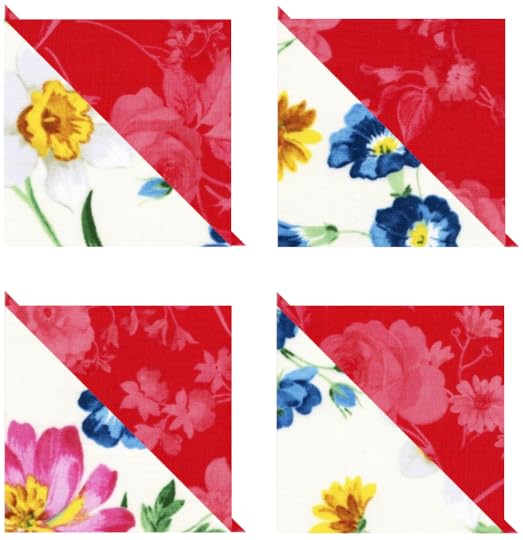
Stitch Blocks
Align presser foot along one side of center mark, stitch.
Kiss the next block set to the stitched block and chain stitch from one block to the other.
Rotate block, stitch along other side of center mark.
Cut blocks apart along center markings with a rotary cutter, ruler, and mat.
Press seams to darker fabric.
Assemble Blocks
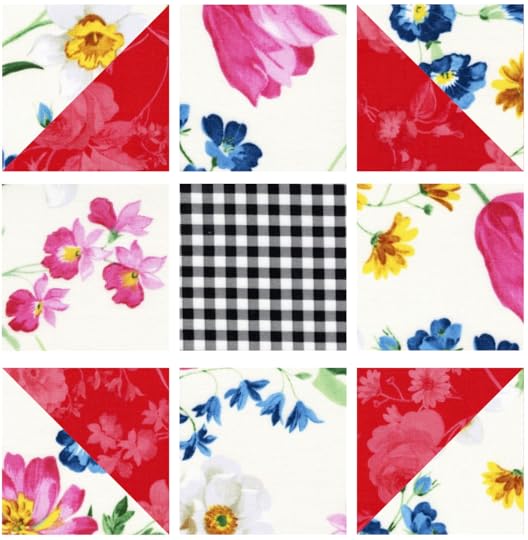
2. Lay out Shoo Fly block, rotating squares as necessary.
Join Squares
3. Stitch the Shoo Fly block.
Place squares from first column onto second column, right sides together.
Chain stitch from one block set to the next. Clip threads between blocks.
Press seams open, or press seams to alternate sides.
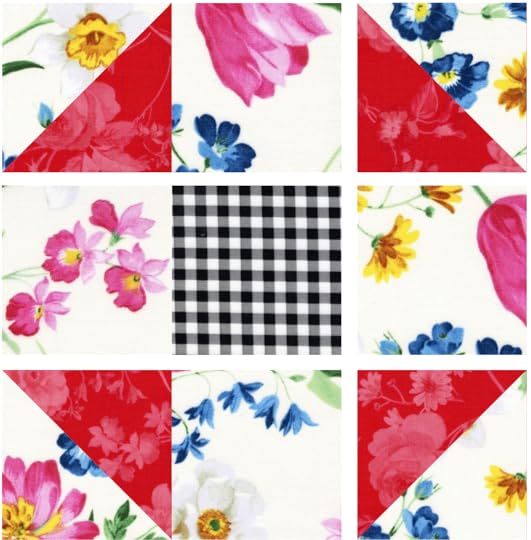
Place squares from third column onto second column, right sides together.
Chain stitch from one block set to the next. Clip threads between blocks.
Press seams open, or press seams to alternate sides.
Stitch top row to middle row, right sides together.
Press.
Stitch bottom row to middle row, right sides together, to create the complete Shoo Fly block.
Press
Nancy Zieman’s No-Hassle Triangles Quilt Blocks book shows how to create 12 additional quit blocks. For best results, use the No-Hassle Triangles Gauge.
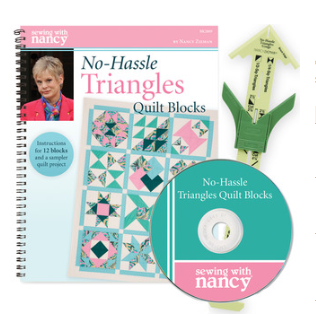
Watch No-Hassle Triangles Quilt Blocks (Part One and Part Two) on The Best of Sewing With Nancy online.

For a chance to win Nancy Zieman’s New! Afternoon Picnic Fat Quarter Pack please leave a comment below.

The randomly selected winner of two tickets to Quilt Expo and two Quilt To Give Volunteer Pins, from the July 13 Blog post, is Marlene Milligan.
Her comment is: I am jumping on board and making a Quilt to Give! I’m also hoping to attend the show in Madison and would love to participate in sewing a quilt.
Happy Quilting!
Team Nancy Zieman
Nancy Zieman Productions. LLC.
Content in this feed is © copyright 2019 by Nancy Zieman Productions, LLC and may not be republished without written permission. You’re welcome to forward the email to a friend or colleague but it’s not okay to add the RSS feed automatically as content on a blog or other website.
The FTC requires us to tell you that Nancy Zieman Productions, LLC has provided products by other companies in the course of doing business. The FTC requires us to advise you to take this information into consideration when reading this posting.
Make sure you are subscribed to Nancy Zieman Productions, LLC enews mailing list so you won’t miss a thing. Sign up here . Join us on Facebook , plus a host of other social media channels. Connect With Nancy and Friends today!
July 18, 2019
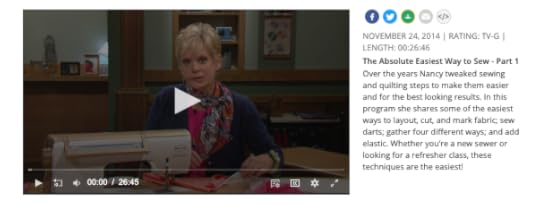
The Absolute Easiest Way to Sew – Part One

We generally think of two or three different ways to stitch most techniques, yet we generally use just one method. Which one? The absolute easiest way, of course!
This week’s featured online Sewing With Nancy program is the first of a three-part series on The Absolute Easiest Way to Sew.
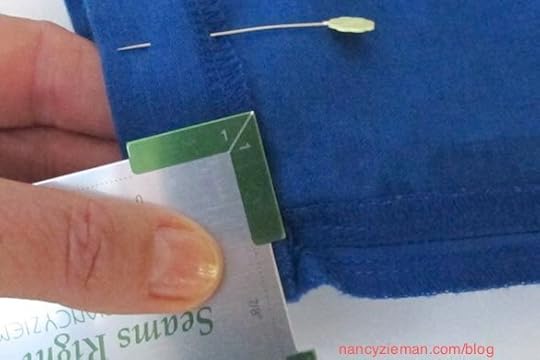
Use just a few pins for pattern layout.
Starting with pattern layout, cutting, and marking, learn ways to streamline and improve your sewing skills.
Do sewing darts have you in a dither?
Learn how to use an index card or sticky notes as the sewing guide for effortless dart stitching, It’s the next Absolute Easiest technique.
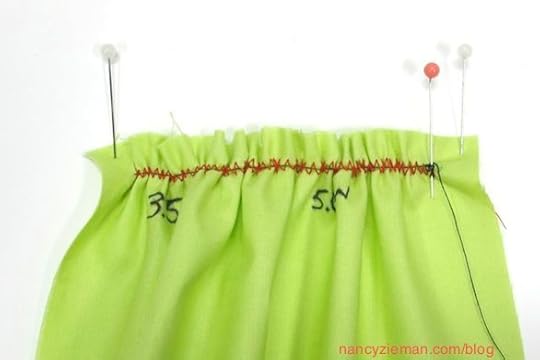
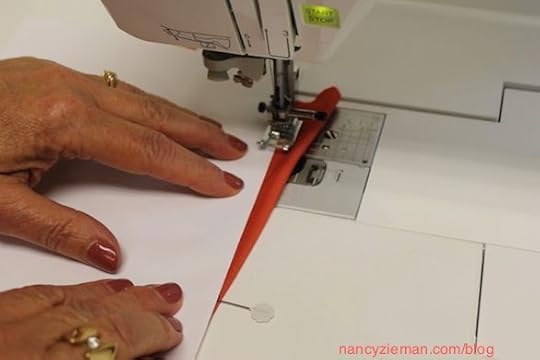 One size does not fit all when it comes to sewing gathers!
The type of fabric, the width of the seam allowances, and the project dictate the absolute easiest way to add gathers to fabrics. Nancy Zieman show’s you four options during this TV episode, plus there are more in the book, The Absolute Easiest Way to Sew.
 Changing the rules is part of the sewing game.
When adding elastic to knits, you’ll find this, by far, the simplest way to a sew casing. You’ll be stitching less and enjoying it more.
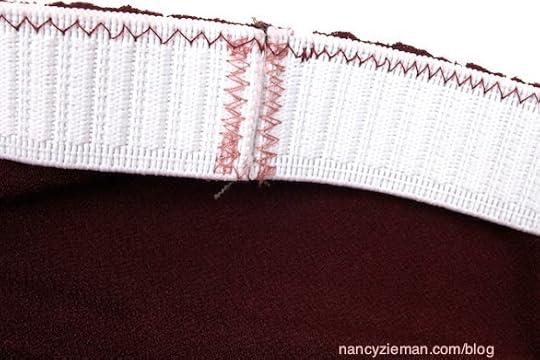
There’s a secret trick when sewing a casing in sportswear.
You’ll think to yourself, “Why didn’t I think of that!” ( Watch online for the trick.)
All of Nancy’s favorite sewing tips are in one book.
The Absolute Easiest Way to Sew chapters include:
Sewing Notions
Sewing Machine Confidence
Serger Spotlight
Patterns
Fabric Facts
Sewing Basics
Beyond the Basics
Watch The Absolute Easiest Way to Sew (Part One, Part Two, and Part Three) on Sewing With Nancy online.
For your chance to win a copy of The Absolute Easiest Way to Sew from Nancy’s Notions, leave a comment sharing your most common sewing challenge.

The randomly selected winner of a copy of the No-Hassle Triangles Quilt Blocks book, is Kar.
 Her comment is: Card Trick and Nancy’s Spool are my favorites. Love how Nancy has turned this sampler quilt into something even a beginner, like me, can be successful at and enjoy making.
Happy Sewing!
Team Nancy Zieman
Nancy Zieman Productions. LLC.
Content in this feed is © copyright 2019 by Nancy Zieman Productions, LLC and may not be republished without written permission. You’re welcome to forward the email to a friend or colleague but it’s not okay to add the RSS feed automatically as content on a blog or other website.
The FTC requires us to tell you that Nancy Zieman Productions, LLC has provided products by other companies in the course of doing business. The FTC requires us to advise you to take this information into consideration when reading this posting.
Make sure you are subscribed to Nancy Zieman Productions, LLC enews mailing list so you won’t miss a thing. Sign up here . Join us on Facebook , plus a host of other social media channels. Connect With Nancy and Friends today!
July 16, 2019
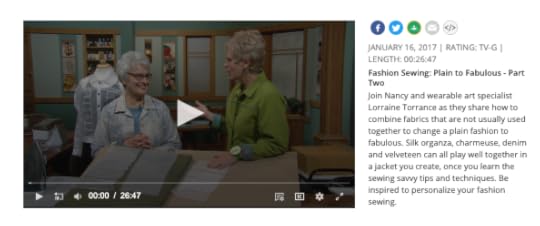
Fashion Sewing: Plain to Fabulous – Part Two
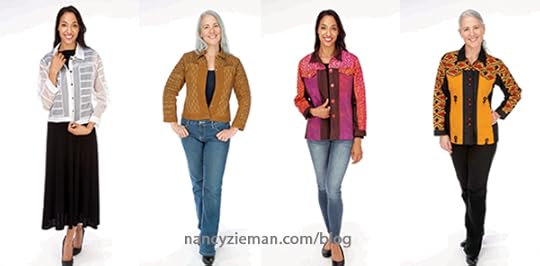
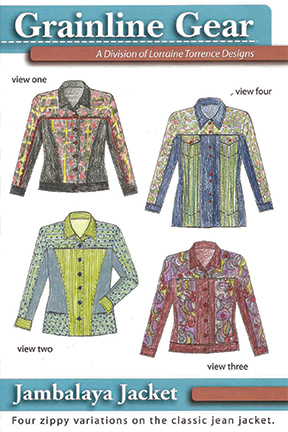
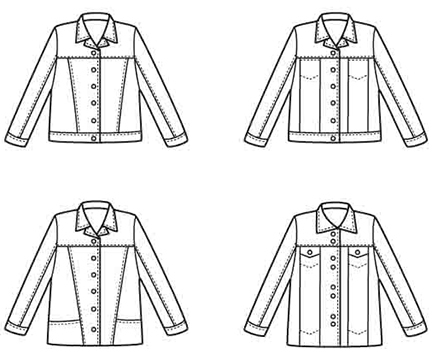
A jeans jacket is a go-to wardrobe basic. They’re casual, comfortable, and essential. Today’s guest took that wardrobe staple and gave it options—many options. Welcome back Lorraine Torrence, fashion sewing expert, who takes our fashion sewing to the next level on Fashion Sewing: Plain to Fabulous Part Two.
On this Sewing With Nancy episode, you’ll see how innovative sewing can be, using a denim jacket style as a base. To show style changes, Lorraine and Nancy used a classic jacket called the Jambalaya Jacket. Anytime there is a panel to fill, use that space to show your style! See how easy it is in part one of this series, Fashion Sewing: Plain to Fabulous. If you missed part one, Lorraine and Nancy modified and personalized her Town & Country Tunic. Watch part one here.
Catch up on Sewing With Nancy episodes by watching online or pick up Fashion Sewing: Plain to Fabulous DVD and Two Patterns from Nancy’s Notions.
Global Influence
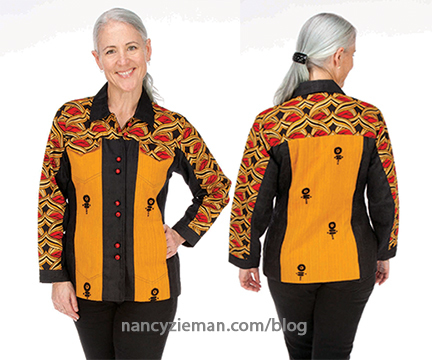
If you’re spending time and talent to make a jacket, why not personalize it. Lorraine’s version of a jeans jacket is the perfect palette to showcase unique fabric combos. Lorraine’s first version of the Jambalaya Jacket combines African and Guatemalan fabrics. It’s a jacket with global influence.
Strike a Cord
You might think of cording as a mundane accent, added along an edge or insert in a buttonhole. Cording can be anything but routine when you add Lorraine’s free form, meandering stitching to fill a space. Not only does this type of stitching add interest, there’s an added benefit of creating texture. We call this technique—Strike a Cord! Watch how this jacket is created on Sewing With Nancy.

Unlikely Partners
Jeans Jackets and denim are a dynamic duo. But what about the iconic jacket style made with organza! On today’s featured episode, sheer fabric and this structured pattern at first thought seemed unlikely partners. In reality, they make a testimony to the power of sewing where creativity is only limited by your imagination.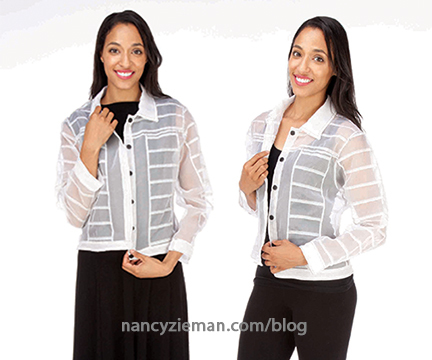
Carefree Couching
Small lengths of decorative thread and random stitching create the unique centerpiece sections of Lorraine’s next technique. No need to measure or worry about being accurate, this carefree type of couching—topstitching a heavy thread on fabric—is an ideal way to add an accent without a great deal of planning. See how easy it is to use a Free Motion Couching Foot on your machine as we demonstrate the technique in today’s episode of Sewing With Nancy.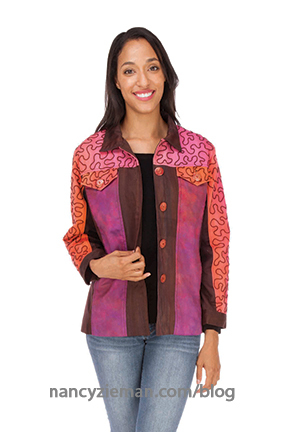
Watch Fashion Sewing: Plain to Fabulous (Part One and Part Two) on The Best of Sewing With Nancy online.
For a chance to win the Fashion Sewing: Plain to Fabulous DVD and Two Patterns from Nancy’s Notions, please leave a comment sharing which jacket/tunic style is your favorite.
Happy Sewing!
Team Nancy Zieman
Nancy Zieman Productions. LLC.
Content in this feed is © copyright 2019 by Nancy Zieman Productions, LLC and may not be republished without written permission. You’re welcome to forward the email to a friend or colleague but it’s not okay to add the RSS feed automatically as content on a blog or other website.
The FTC requires us to tell you that Nancy Zieman Productions, LLC has provided products by other companies in the course of doing business. The FTC requires us to advise you to take this information into consideration when reading this posting.
Make sure you are subscribed to Nancy Zieman Productions, LLC enews mailing list so you won’t miss a thing. Sign up here . Join us on Facebook , plus a host of other social media channels. Connect With Nancy and Friends today!
July 13, 2019
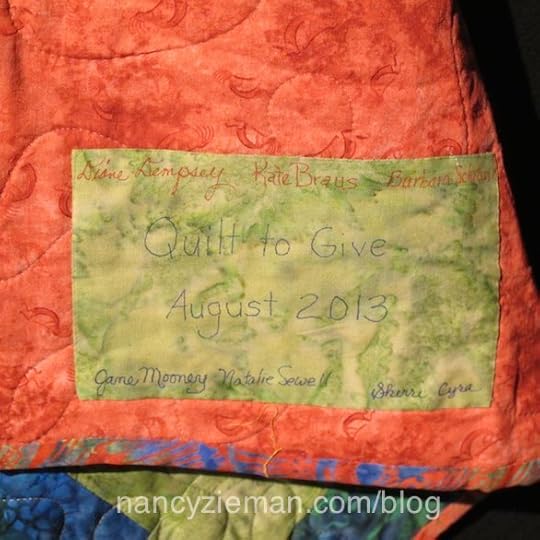
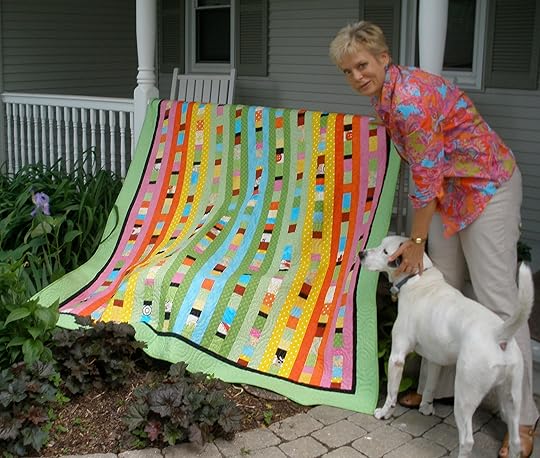
Quilt To Give – Helping Individuals and Families – One Quilt at a Time
Sewing a quilt and giving it as a gift is gratifying. Sewing a quilt for someone in need or who is going through tough times shows compassion. Most importantly, the recipient feels loved. Win. Win!
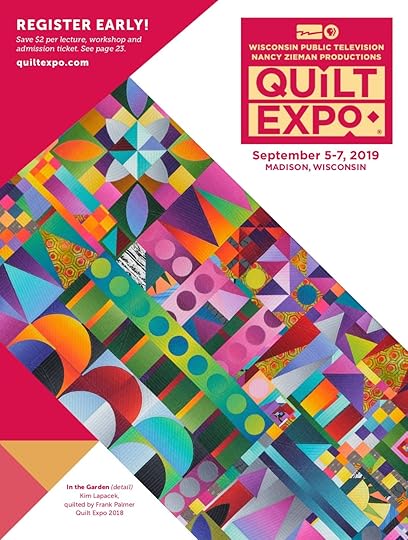
This will be the nineth year that Nancy Zieman’s Quilt to Give quilt pattern will be sewn and quilted during the annual Quilt Expo in Madison, WI, September 5–7, 2019. If you aren’t able to be at the event, you, too, can make a twin-sized quilt, then donate it to a local shelter or charity.
Nancy made the first Quilt to Give design in 10-days, sewing a little each day. She chronicled the 10-day journey with full instructions on how to make the quilt on the NZP blog. Our hope is that sometime in the near future, you and/or your quilting group will consider making this easy quilt design, made with columns instead of blocks, and then give it away. Hence the name Quilt to Give.
Quilt to Give Community Service Project
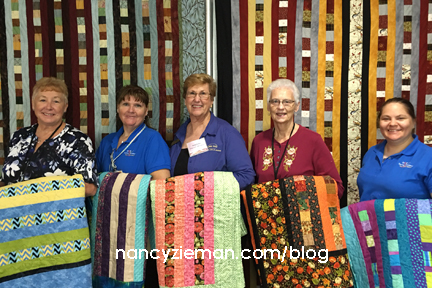
The Quilt to Give project will again be the community service project at the annual Quilt Expo, Last year over 29 bed-sized quilts were made and/or donated by participants. Quilts were donated to Enchanted Makeovers and Domestic Abuse Intervention Services (DAIS).
Nancy Zieman Productions and Wisconsin Public Television would like to thank the many Quilt Expo Volunteers, Quilt Expo Attendees, the talented team at M&R Sewing and Vacuum, for your many years of sponsorship and service for Nancy Zieman’s Quilt To Give.
Several kind souls present completely finished quilts at Quilt Expo—New Quilts of all patterns and colors are welcome.
Quilting groups also take on the challenge
Others donate time to cut, press, and stitch, during the Quilt Expo event

Receive a Quilt To Give Volunteer Pin
Receive a Quilt To Give Volunteer Pin when you stop in and stitch 30 min., donate fabric in bright colors (1/4 yd. or more), a quilt batting (twin or larger), and/or donate a finished/new bed quilt!

Bed-sized quilts are in demand
We’re looking forward to seeing some of the NZP blog readers at the Quilt Expo in Madison, WI, September 5–7, 2019. For many of you, the logistics of attending may not be in the cards. Yet, we encourage you to make one of these easy Quilt to Give projects with the intent of giving it away!
Bed-size quilts of all sizes are welcome. Twin-sized quilt donations are great, too—twin-size is the size we’ll be sewing during the event, too. Why? Two organizations that will be receiving finished quilts, Enchanted Makeovers and Domestic Abuse Intervention Services (DAIS) have both requested this particular size. Enchanted Makeovers services national women’s shelters and Domestic Abuse Intervention Services (DAIS) is a Madison-area woman’s shelter with twin-sized beds in each room.
Make a quilting plan
Download the twin-sized quilt worksheet. Click here to download the twin-sized quilt worksheet . It will assist you in sorting and cutting fabrics.
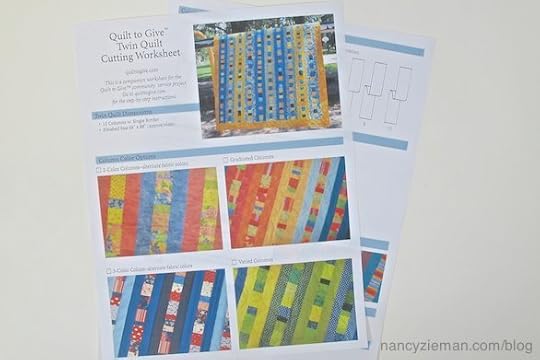
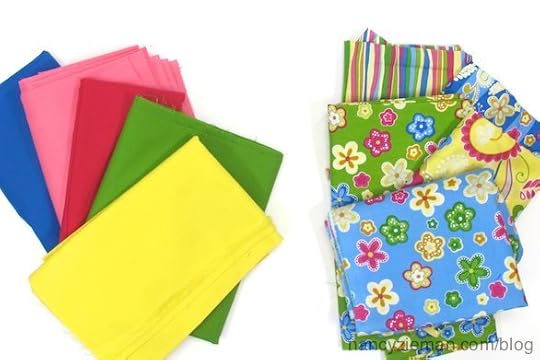
Sort fabrics from your stash. Begin by selecting a print or prints that will be used as the inspirational fabrics. Then choose other fabrics that coordinate with the inspirational fabric.
Gather solid-color fabrics that coordinate or match with the inspirational fabrics. Choose many solids or mottled fabrics (subtle prints that appear as solid colors from a distance) as possible for this project. Read the full lesson on sorting fabrics.
Determine which fabrics will be the outside columns (the more solid the better) and which will be used for the scrappy center columns. Fill out the worksheet to denote which fabric colors will go where.

Free online instructions
Here are links to all 10 Quilt to Give Lessons, or visit QuiltToGive.org.
The Easiest Ever Quilt to Give Design
During our first community quilting project, a donation of four yards of striped fabric with a salsa flavor was given. Great donation, but it just didn’t seem to fit with any other fabrics.
 Then it dawned on Nancy to use the striped fabric as the center section of each column—no piecing needed for the center columns! You’ll find optional fabric cutting instructions when using a stripped fabric when you download the twin-sized quilt worksheet
Quilt To Give by the Numbers
2011: Thirty-five quilts were collected and an additional 10 were completed during the show. Quilts were distributed locally and twenty-five were sent to Joplin, MO.
2012: Twenty-five quilts were collected and 11 were completed during the show, which were distributed to those in need by Baby Lock dealers across the country.
2013: Sixteen quilts were collected and 15 were completed during the show, which were distributed to those in need by Baby Lock dealers across the country.
2014: Twenty-one quilts were collected and 10 were completed during the show and donated to Enchanted Makeovers and Domestic Abuse Intervention Services (DAIS).
2015: Thirty-five quilts were collected and an additional 10 were completed during the show and donated to Enchanted Makeovers and Domestic Abuse Intervention Services (DAIS).
2016: Fifteen quilts were collected and an additional 12 were completed during the show and donated to Enchanted Makeovers and Domestic Abuse Intervention Services (DAIS).
2017: Seventeen quilts were collected and an additional 11 were completed during the show and donated to those affected by the 2017 flooding in Houston, TX, Enchanted Makeovers and Domestic Abuse Intervention Services (DAIS).
2018: 14 gorgeous bed-size quilts were generously donated, plus an additional 15 quilts were stitched and completed on site at Quilt Expo. Plus, post-Quilt Expo additional quilts were finished and shipped to Nancy Zieman Productions in time for ALL quilts to be donated to Enchanted Makeovers and Domestic Abuse Intervention Services (DAIS).
300 Total Beautiful Bed Quilts—to date—Donated to Individuals and Families in Need!
Nancy & Lucas with Nancy’s First Quilt To Give, 2011
For a chance to win two tickets to Quilt Expo, and two Quilt To Give Volunteer Pins, please leave a comment below pledging your support for Nancy Zieman’s Quilt to Give.
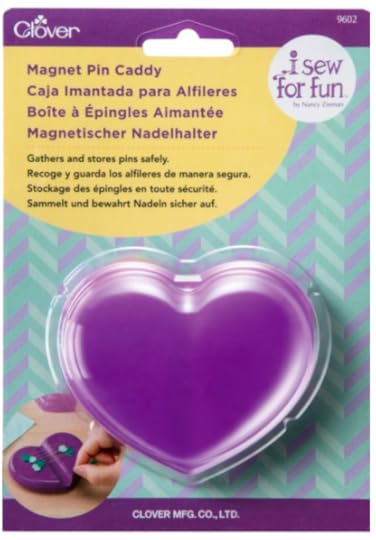
The randomly selected winner of an I Sew For Fun Magnetic Heart-Shaped Covered Pin Caddy from Clover, is Jennifer.
Her comment is: I’m so excited to work on some pillow cases with my nephew this summer! I’m looking forward to learning some of Nancy’s tricks for myself, too. I’m going to have to make some extras because I’ve been wanting to embellish some pillow cases with embroidery and crocheted edges. So/sew excited!
View the Quilt Expo Advance Registration Guide and register for Lectures, Workshops, Evening Events, and more!
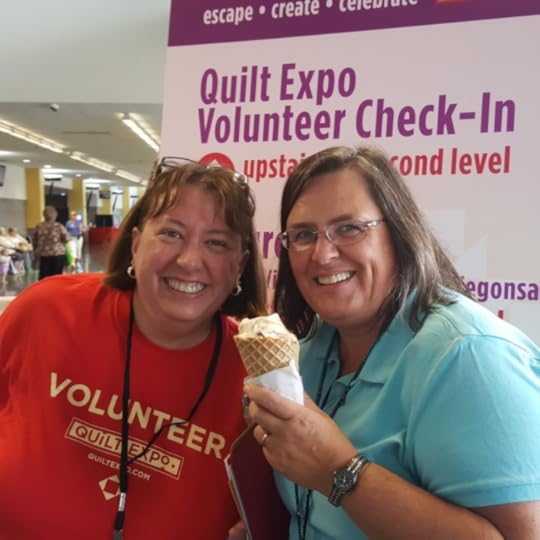
Join in the fun and become a Quilt Expo Volunteer, today!
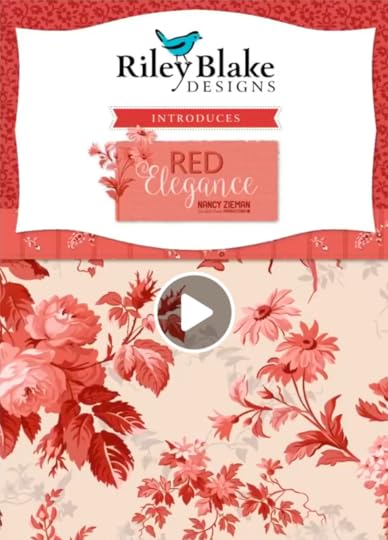
The NZP Team is thrilled to share an advance peek at our NEW! RED ELEGANCE FABRIC LINE with Riley Blake Designs – in stores NOV. 2019. Please ask your favorite quilt shops and retailers to pre-order this gorgeous NEW! Red Elegance cotton quilting fabric line, TODAY! The NZP Team is creating all new projects for this elegant fabric line! Stay Tuned …
Happy Quilting and See you at Quilt Expo!
Team Nancy Zieman
Nancy Zieman Productions. LLC.
Content in this feed is © copyright 2019 by Nancy Zieman Productions, LLC and may not be republished without written permission. You’re welcome to forward the email to a friend or colleague but it’s not okay to add the RSS feed automatically as content on a blog or other website.
The FTC requires us to tell you that Nancy Zieman Productions, LLC has provided products by other companies in the course of doing business. The FTC requires us to advise you to take this information into consideration when reading this posting.
Make sure you are subscribed to Nancy Zieman Productions, LLC enews mailing list so you won’t miss a thing. Sign up here . Join us on Facebook , plus a host of other social media channels. Connect With Nancy and Friends today!
Nancy Zieman's Blog

- Nancy Zieman's profile
- 21 followers

