
Nancy Zieman's Blog, page 58
September 17, 2019
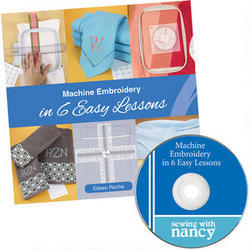
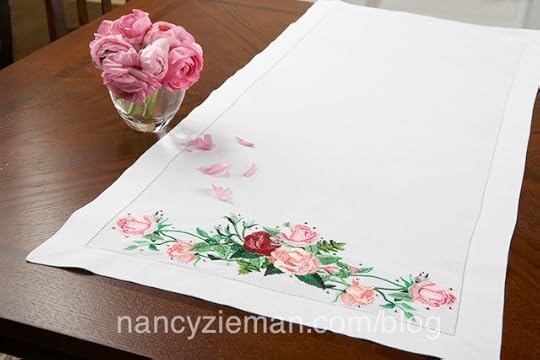
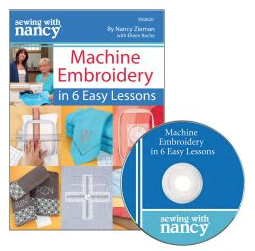
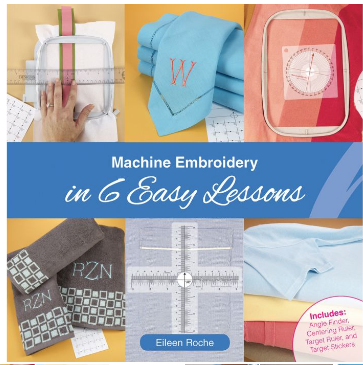
Machine Embroidery in 6 Easy Lessons – Part Two
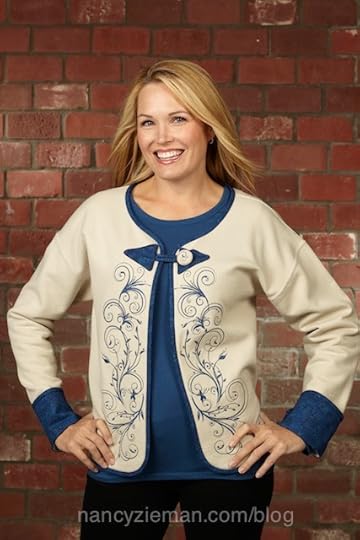
Six lessons, it’s usually a great start in learning a new skill set—be it dancing, Zumba, or hang gliding! (Anyone hang glide?) That same 6-lesson approach can easily be applied to the creative skill that Nancy Zieman’s guest, Eileen Roche has mastered. Eileen is the editor of Designs in Machine Embroidery Magazine, and she joins Nancy in the Sewing With Nancy program Machine Embroidery in 6 Easy Lessons, Part 2.
Last week, The NZP Blog featured the first video in this series, showcasing Lessons 1–3. You can also watch the first episode online if you missed seeing it last week. Now it’s time for the final three lessons.
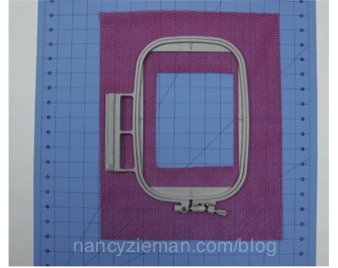
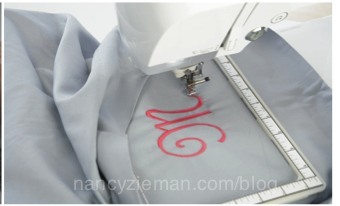
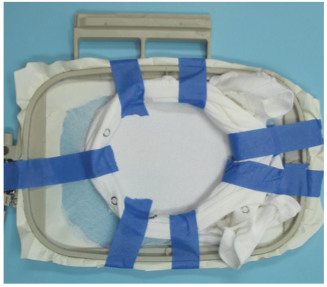
Lesson #4: Hooping
The fourth lesson showcases hooping. Hooping the fabric and stabilizer is like buckling-up for a car trip. It’s got to be done, and it’s got to be done right!
Eileen teaches a hands-on class called 50 Ways to Hoop Fabric. Who knew there’d be so many ways to position fabric in a hoop? We didn’t go over the 50 techniques during this Sewing With Nancy TV series, but we did show some of the most common hooping techniques. Our favorite techniques involve using an ironing board and shelf liner!
Lesson #5: Embroidering
It’s the fifth of 6 lessons and it’s finally time to sit at the machine and sew! Embroidering is the fifth lesson, and it can be as simple as pushing a button. But, before giving that button a tap, there are a few more checks and balances to review.
Lesson #6: Finishing Tips
All of your planning and preparation in the first five lessons have brought you to this point, lesson #6—the Finishing Tips! The steps are simple, but important, and then you can enjoy your accomplishment. Critiquing the design, removing the stabilizer, trimming the threads—all seem obvious, but there are hints that accompany each step.
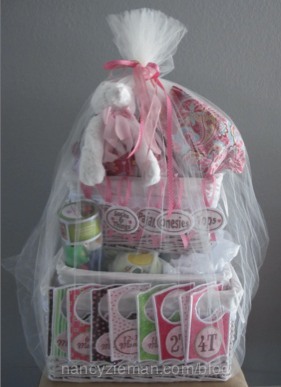
In her book, Eileen added presentation as part of lesson #6! If you’re giving away your embroidered creation, take time to make the packaging as pretty as the embroidery.
Watch Machine Embroidery in Six Easy Lessons—Part Two online!

Machine Embroidery in 6 Easy Lessons, Part 2 is the featured video this week. Watch 52+ of the most recent Sewing With Nancy shows online at www.nancyzieman.com.
You’ll find all machine embroidery guidelines in Eileen’s book/DVD, Machine Embroidery in 6 Easy Lessons.

What’s your biggest embroidery stumbling block? Post it below and we’ll choose a random winner. The winner will receive Eileen Roche’s book, Machine Embroidery in 6 Easy Lessons from Designs in Machine Embroidery.

Happy Embroidering,
Team Nancy Zieman
Nancy Zieman Productions. LLC.

Content in this feed is © copyright 2019 by Nancy Zieman Productions, LLC and may not be republished without written permission. You’re welcome to forward the email to a friend or colleague but it’s not okay to add the RSS feed automatically as content on a blog or other website.
The FTC requires us to tell you that Nancy Zieman Productions, LLC has provided products by other companies in the course of doing business. The FTC requires us to advise you to take this information into consideration when reading this posting.
Make sure you are subscribed to Nancy Zieman Productions, LLC enews mailing list so you won’t miss a thing. Sign up here . Join us on Facebook , plus a host of other social media channels. Connect With Nancy and Friends today!


September 14, 2019
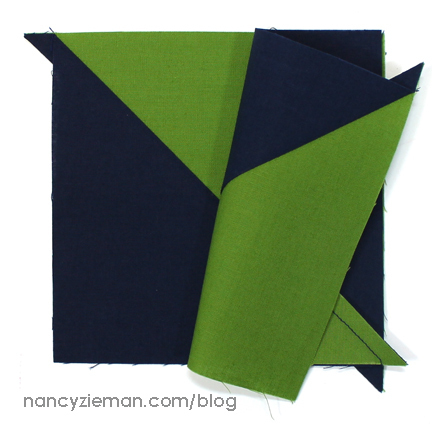
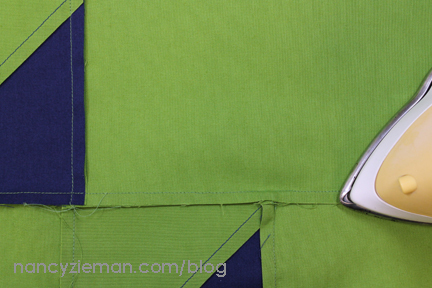
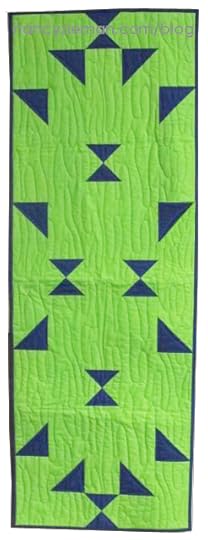
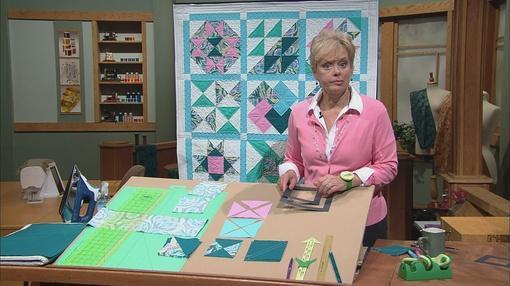
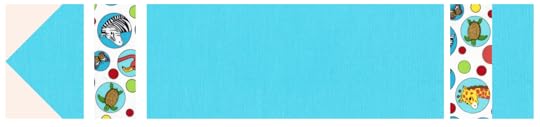
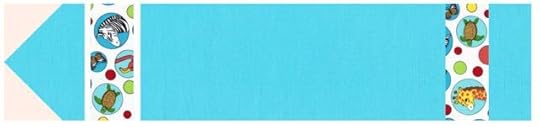
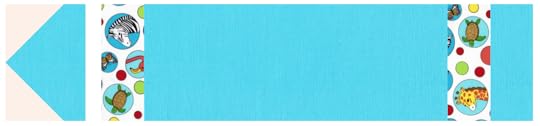
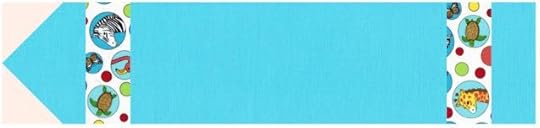
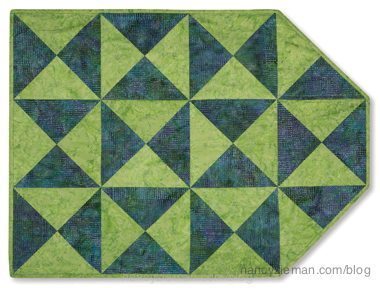
No-Hassle Triangles Summer Table Runner Tutorial

Make an easy-to-sew table runner (or wall hanging!) with a few fabric rectangles, half-square triangles, quarter-square triangles, and Team NZP’s FREE! No-Hassles Triangles Table Runner Sewing Tutural – below. With our step-by-step directions, and timesaving notions, we’re confident you’ll add the No-Hassle Triangles Table Runner to your stitching projects to-do list.
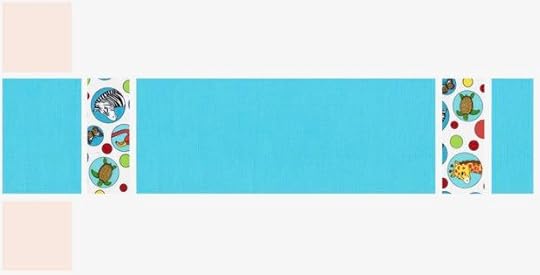
Made in the same style as the quilt projects featured in Nancy Zieman’s Quick Column Quilts, the triangle blocks and column strips(fabric rectangles) make for a fast, easy, and no-hassle assembly of this 21″ x 56-1/2″ table topper.
Notions, Fabrics, and Supplies:
2-1/4″ yards solid green fabric (background & backing)
2/3 yard solid navy blue fabric (triangles & binding)
Pellon Fleece Batting, 22″ x 58″
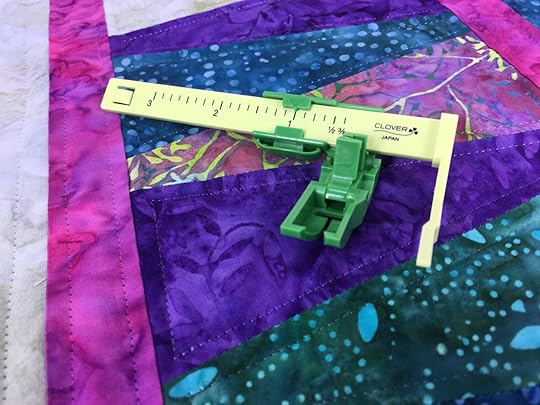
Clover’s No-Hassle Triangles Gauge by Nancy Zieman
Mechanical pencil or other fine-point marking pen
Cutting Directions:
Green Fabric:
Cut one 21″ crosswise strip (backing).
Cut one 10″ crosswise strip (backing).
Cut one 5-1/4″ crosswise strip (triangles).
Cut one 4-7/8″ crosswise strip (triangles).
Cut six 4-1/2″ crosswise strips (background).
Subcut the following from the six green 4-1/2″ background strips:
Subcut four 4-1/2″ x 4-1/2″ squares.
Subcut ten 4-1/2″ x 8-1/2″ rectangles.
Subcut two 4-1/2″ x 10-1/2″ rectangles.
Subcut four 4-1/2″ x 18-1/2″ rectangles.
Subcut one 4-1/2″ x 20-1/2″ rectangles.
See green fabric Cutting Diagram Below:

Navy Blue Fabric:
Cut one 4-7/8″ crosswise strip (triangles).
Cut one 5-1/4″ crosswise strip (triangles).
Cut four 2-1/2″ crosswise strips (binding).
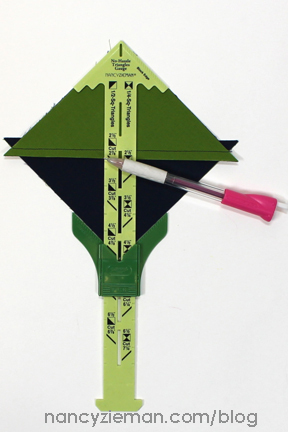
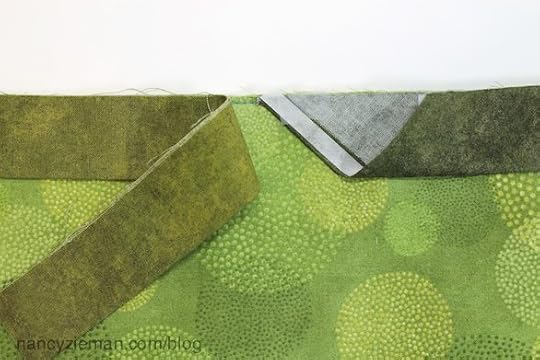
First Step, Building the Half-Square Triangle Units
Create 12 Half-Square Triangle Units using the No-Hassle Triangles Gauge.
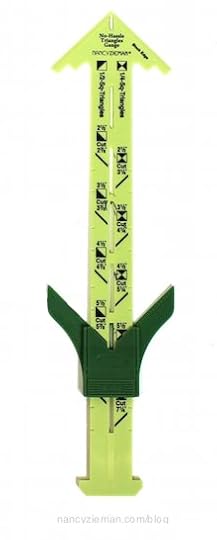
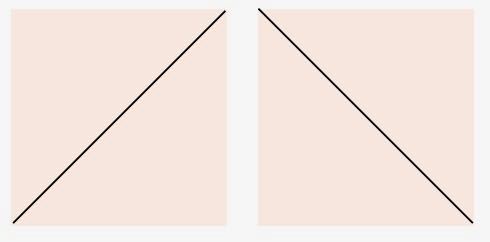
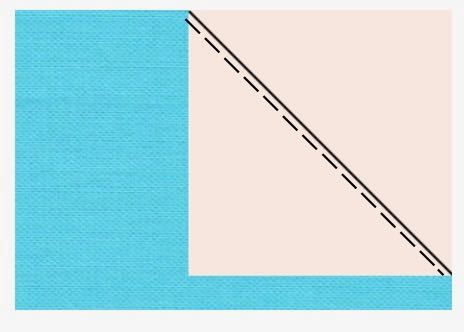
Set theNo-Hassle Triangles Gauge to 4-1/2″ block size on the left side of the gauge. The left side notes Half-Square Triangle sizes. The gauge tells you what size blocks to cut, 4-7/8″.
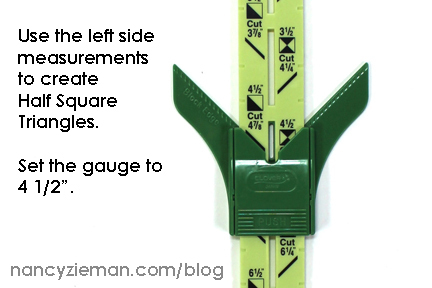
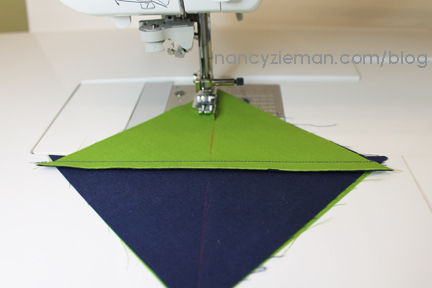
Cut 4-7/8″ crosswise strips of green and blue. Layer a 4-7/8″ green strip on a 4-7/8″ blue strip and cut six square pairs, measuring 4-7/8″ x 4-7/8″.
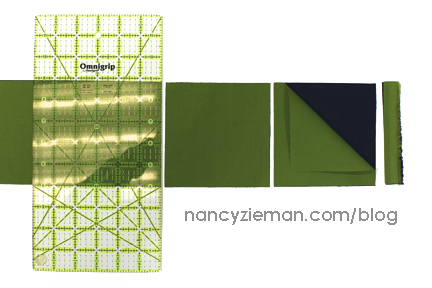
Position the No-Hassle Triangles Gauge on a pair of squares.
Use the fine point marking tool to draw a diagonal line.

Use a 1/4″ presser foot as a guide to stitch 1/4″ from the right and the left sides of the marked line.
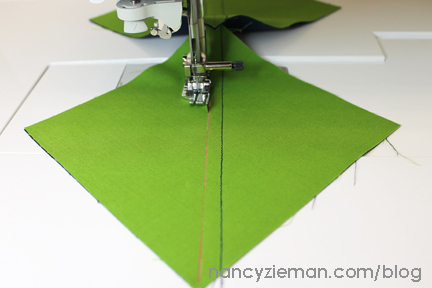
Chain piece these half-square triangle shapes. Stitch one set of squares right after another. After creating a long “chain,” simply clip the threads to separate the units.
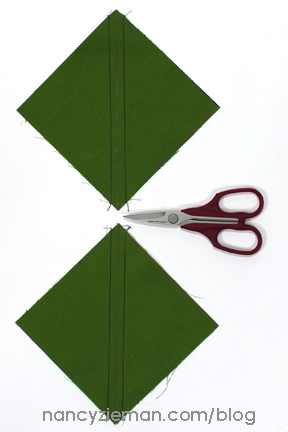
Take the stitched units to the rotary cutting mat and cut the two halves apart along the marked line.
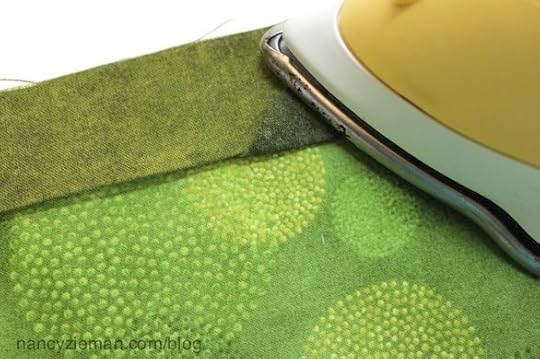
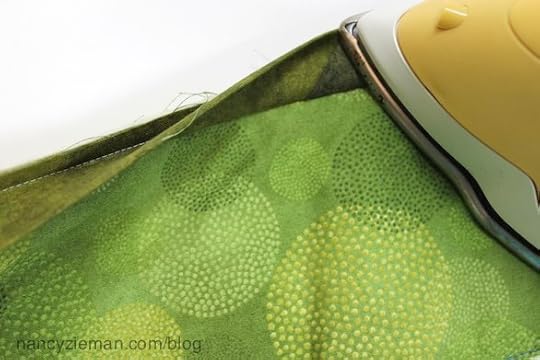
Open and press the seam allowances to the darker blue side.
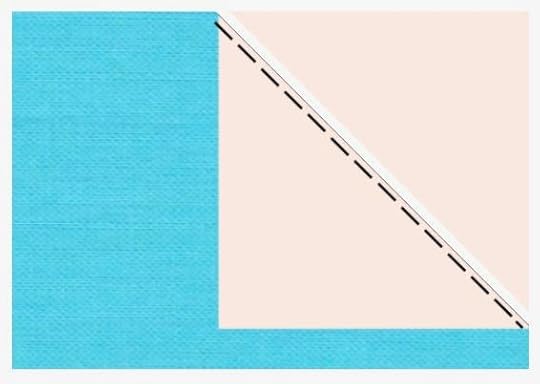
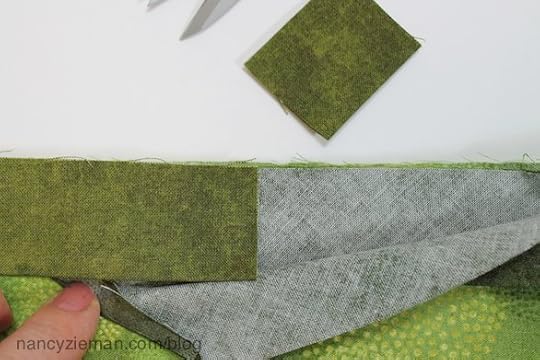
Second, Create the Six Quarter-Square Triangle Units

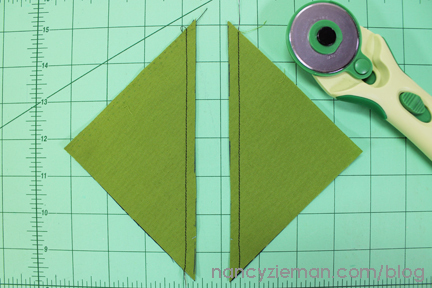
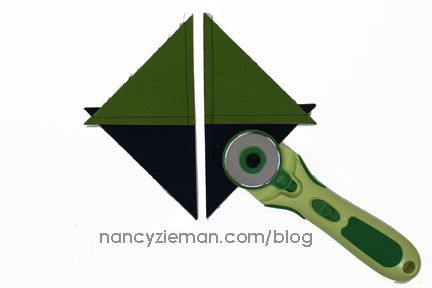
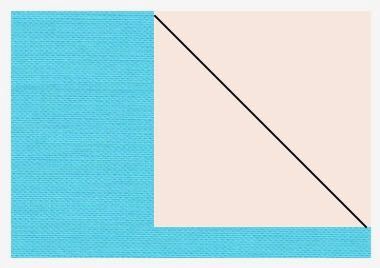
Set the No-Hassle Triangles Gauge to 4-1/2″ block size on the right side of the gauge. The right side notes Quarter-Square Triangle sizes. The gauge tells you what size blocks to cut, 5-1/4″.
Cut 5-1/4″ crosswise strips of green and blue. Layer a 5-1/4″ green strip on a 5-1/4″ blue strip and cut square pairs, measuring 5-1/4″ x 5-1/4″.
Place a blue and green square under the gauge and mark the diagonal line.
Stitch 1/4″ from the marked line, following the guidelines for the Half-Square Triangle Units, in the first step, above. Cut the units apart and press. These blocks should measure 4-7/8″ x 4-7/8″.
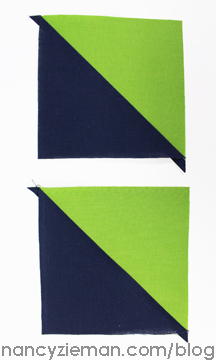
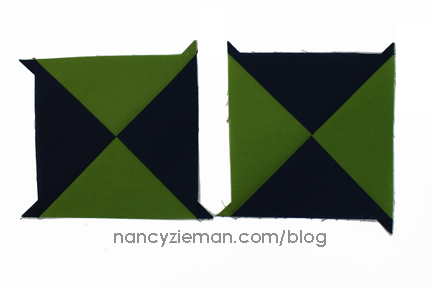
Lay one Half-Square Triangle block on another, matching right sides. It is important that the diagonal lines lock. You’ll feel this “lock” as the seams meet.

Set the No-Hassle Triangles Gauge to 4-1/2″ on the left side of the gauge.
Mark a diagonal line, perpendicular to the seamline.
Use a 1/4″ presser foot as a guide to stitch 1/4″ from the right and left sides of the marked line.
Chain piece the three units, stitching one right after another.
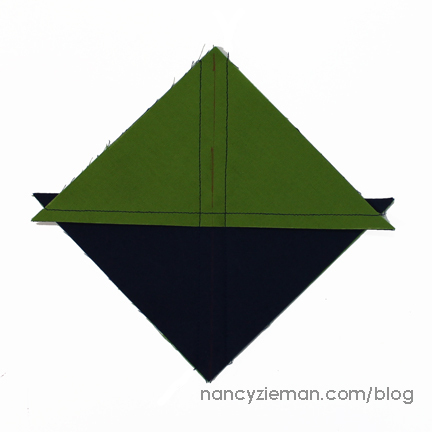
Use rotary cutting tools to cut the units apart.
Press the Quarter-Square Triangle Units.
Third, Arrange the Table Runner Rows
Arrange the table runner into rows as detailed below.
Stitch the pieces using 1/4″ seam allowances.
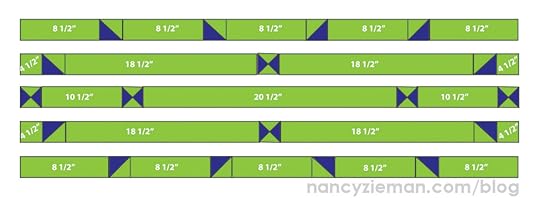
Assemble the runner by joining the rows to each other, using 1/4″ seam allowances.
Press the row seam allowances in one direction.
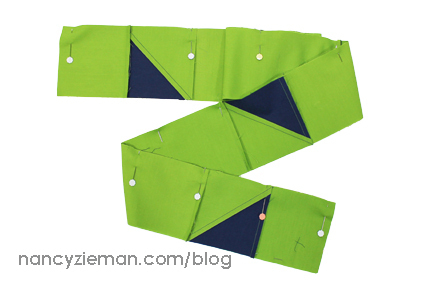
After all five rows are stitched, the No-Hassle Triangles Table Runner top is complete.
Create the Backing
Cut the backing piece measuring 10″ x 42″ into two pieces measuring 10″ x 21″ each. Use those two pieces and the larger piece, 21″ x 42″ to assemble the table runner back as described below, using 1/4″ seam allowances.

Quilt and Finish the No-Hassle Triangles Table Runner
Layer the quilt backing, seam-side-up, the Pellon Fleece Batting, and the table runner quilt top–to create a quilt sandwich. Pin.
Machine quilt the table runner layers together with straight line machine quilt the table runner with The Ultimate Quilt ‘n Stitch Presser Foot.
New! The Ultimate Quilt ‘n Stitch Presser Foot designed by Nancy Zieman Productions, LLC for Clover! An all-new presser foot with a built in stitch alignment ruler for guiding rows of parallel stitching. The New! Ultimate Quilt ‘n Stitch Presser Foot is ideal for parallel-line straight stitching, topstitching, and straight-line machine quilting! Premiering today at the NZP Blog!
Or, use free-motion quilting to machine quilt the table runner layers together.
Trim away excess batting and backing fabric.
Join the 2-1/2″ crosswise strips of blue binding fabric, end-to-end, using 1/4″ seam allowances.
Press the binding strip in half, lengthwise.
Bind the table runner, using your favorite technique. Or, use Nancy Zieman’s Easy quilt binding instructions.
Watch Sewing With Nancy online at NancyZieman.com
Tune in and watch Nancy demonstrate how to make Half-Square Triangles and Quarter-Square Triangles.

Please share a comment below, and let us know about your next quilting project, for a chance to be the random winner of a No-Hassle Triangles Gauge from Clover.

Happy Quilting!
Team Nancy Zieman
Nancy Zieman Productions. LLC.
Content in this feed is © copyright 2019 by Nancy Zieman Productions, LLC and may not be republished without written permission. You’re welcome to forward the email to a friend or colleague but it’s not okay to add the RSS feed automatically as content on a blog or other website.
The FTC requires us to tell you that Nancy Zieman Productions, LLC has provided products by other companies in the course of doing business. The FTC requires us to advise you to take this information into consideration when reading this posting.
Make sure you are subscribed to Nancy Zieman Productions, LLC enews mailing list so you won’t miss a thing. Sign up here . Join us on Facebook , plus a host of other social media channels. Connect With Nancy and Friends today!
September 12, 2019
How to Sew Art – Part One
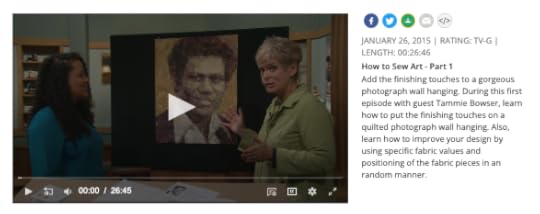
 Believe it or not, all of us can be textile artists—one step at a time—with Tammie Bowser’s stitched art techniques. You may not have considered yourself an artist, but with Tammie’s help and demonstration, that notion will change! Tammie is an award-winning, international quilter, and Nancy Zieman’s guest on The Best of Sewing With Nancy—How to Sew Art, part one.
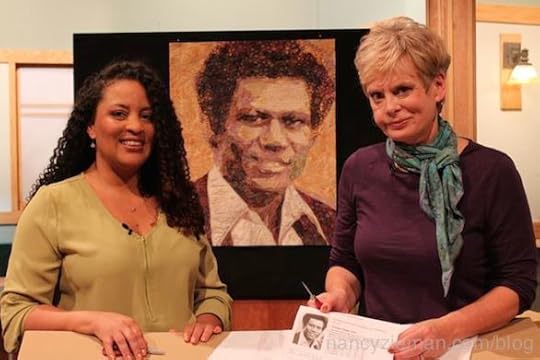 Often the first reaction to Tammie’s stitched art is, “That looks too difficult to make—I could never do that!” In the How to Sew Art TV show, book, and DVD, Tammie shares how starting with a great photo, choosing 9–12 fabrics, and then following her steps, you too can make fabric art projects that you’ll be proud to show.
In How to Sew Art, part one, you’ll learn:
Tips for choosing a great photo

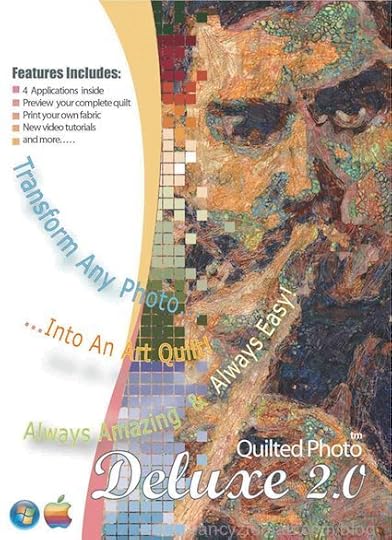
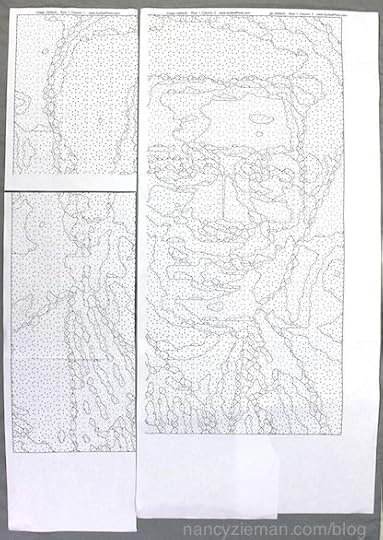
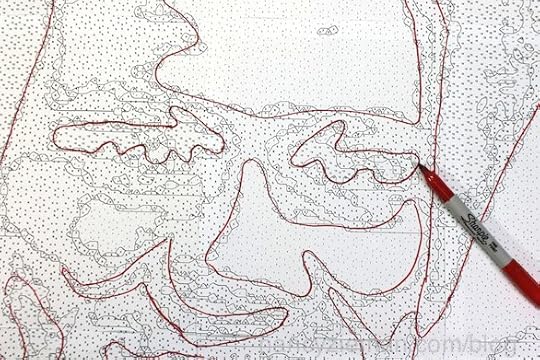
How to make a pattern from the Stitch A Sketch Art Quilt Software or Quilted Photo Deluxe 2.0 Art Quilt Software, and how to download a free trial at Tammie’s web site, howtosewart.com.
How to print and tile the pattern pieces
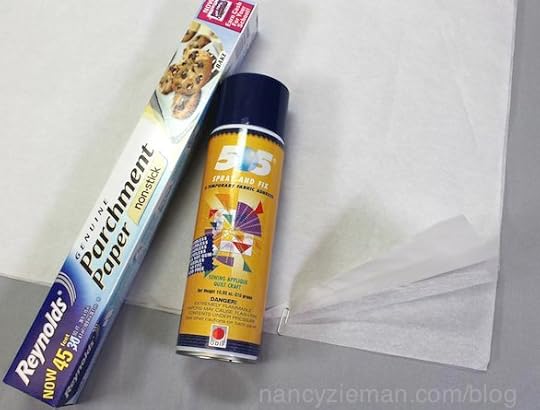
How to create a fusible foundation for an art quilt with parchment paper, Wonder-Web Fusible and 505 Spray and Fix Adhesive
How to choose 9–12 batik fabrics
 In How to Sew Art, part one, Tammie also shares her techniques for preparing the pattern for cutting fabrics.
Thank you to Nancy’s guest Tammie Bowser for sharing How to Sew Art with fabric and photos. Tune in next week for part two—when fabrics are cut, positioned, and quilted into art.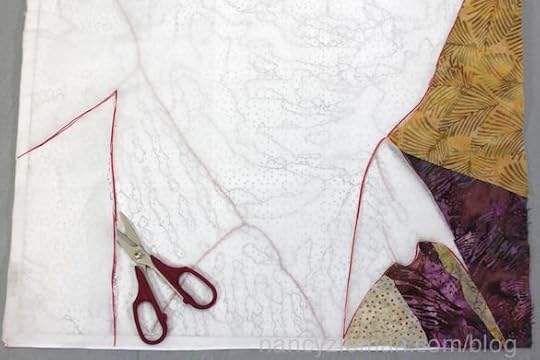
Watch How to Sew Art (Part One and Part Two) on The Best of Sewing With Nancy .
Tell us who you would choose for a Sew Art photo in a comment below, for a chance to be the winner of an electronic quilt pattern created by Tammie Bowser, plus a video course in her stitched art techniques. Tammie will personally create the winner’s quilt pattern using their random photo.
Happy Sewing!
Team Nancy Zieman
Nancy Zieman Productions. LLC.
Content in this feed is © copyright 2019 by Nancy Zieman Productions, LLC and may not be republished without written permission. You’re welcome to forward the email to a friend or colleague but it’s not okay to add the RSS feed automatically as content on a blog or other website.
The FTC requires us to tell you that Nancy Zieman Productions, LLC has provided products by other companies in the course of doing business. The FTC requires us to advise you to take this information into consideration when reading this posting.
Make sure you are subscribed to Nancy Zieman Productions, LLC enews mailing list so you won’t miss a thing. Sign up here . Join us on Facebook , plus a host of other social media channels. Connect With Nancy and Friends today!
September 10, 2019
Machine Embroidery in 6 Easy Lessons – Part One
Machine embroidery could possibly be your passion, or maybe it’s something you’d like to try. If you’re a newbie or want-to-be embroiderer, Eileen Roche, Nancy Zieman’s friend and Sewing With Nancy guest, will teach you Machine Embroidery in 6 Easy Lessons on a 2-part series.
The embroidery process comes down to six key learning points. Learn lessons 1–3 in this first episode.
Lesson #1—Embroidery Basics
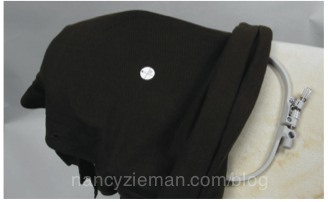
We begin with the embroidery basics. Eileen shares her checklist of what to look for in a machine and supplies in order to begin your embroidery journey.
If you are overwhelmed with all the features available on embroidery machines, no fear, we’ll tell you what basic features are needed.
We’ll also give a list of supplies and notions that will help you in your embroidery journey, like painters tape. How unique is that! (The photo features a onesie that is hooped and ready for embroidery.)
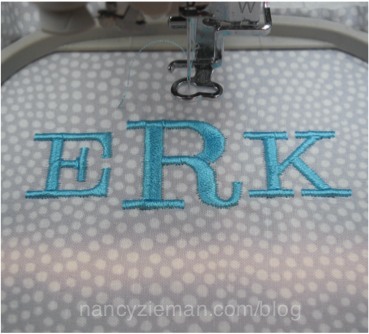
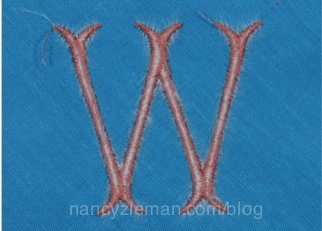
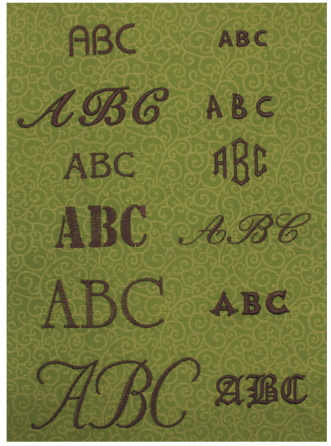
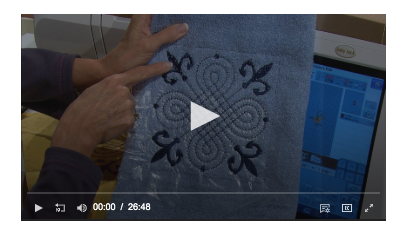
Lesson #2—Types of Designs
The star of your embroidery is obviously the design. Knowing the types and categories of designs—there are many—can help you make wise embroidery choices. Lesson 2 of our Machine Embroidery Class is simply, Types of Designs.
We’ll start by showing you how designs are stitched. Think of it as an anatomy of embroidery! We like to know how designs are created.

When it’s time for monogramming, learn why stitch underlay of designs is so important. (Side note: Monogramming is the most popular type of embroidery. After all, who doesn’t like monogrammed towels?)
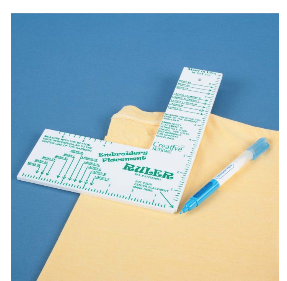
Lesson #3—Placement
Machine embroidery is easy; it’s the placement that can be the tricky part! For that reason, Eileen has chosen Embroidery Placement as the 3rd Lesson in this series. Without perfect placement, even the most beautiful embroidery doesn’t make the grade.
We start with the elementary way of placing embroideries, making a template from stitched designs. When embroidery machines were first introduced, this was our only option of perfect placement. Now there are many alternatives.
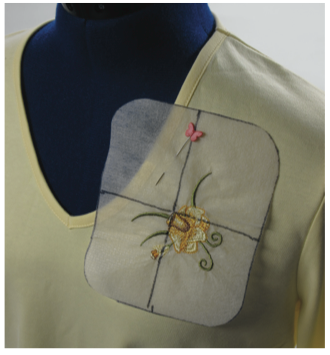
One speedy placement option is the Embroidery Placement Ruler.
Machine Embroidery in 6 Easy Lessons is our featured online video.
Next week, you can tune in to watch the remaining lessons. Plus, find all machine embroidery guidelines in Eileen’s book, Machine Embroidery in 6 Easy Lessons, and the Sewing With Nancy DVD.

What’s your biggest embroidery stumbling block? Post it below and we’ll choose a random winner. The winner will receive Eileen Roche’s book, Machine Embroidery in 6 Easy Lessons from Designs in Machine Embroidery.
Have Fun Embroidering,
Team Nancy Zieman
Nancy Zieman Productions. LLC.
Content in this feed is © copyright 2019 by Nancy Zieman Productions, LLC and may not be republished without written permission. You’re welcome to forward the email to a friend or colleague but it’s not okay to add the RSS feed automatically as content on a blog or other website.
The FTC requires us to tell you that Nancy Zieman Productions, LLC has provided products by other companies in the course of doing business. The FTC requires us to advise you to take this information into consideration when reading this posting.
Make sure you are subscribed to Nancy Zieman Productions, LLC enews mailing list so you won’t miss a thing. Sign up here . Join us on Facebook , plus a host of other social media channels. Connect With Nancy and Friends today!
September 7, 2019
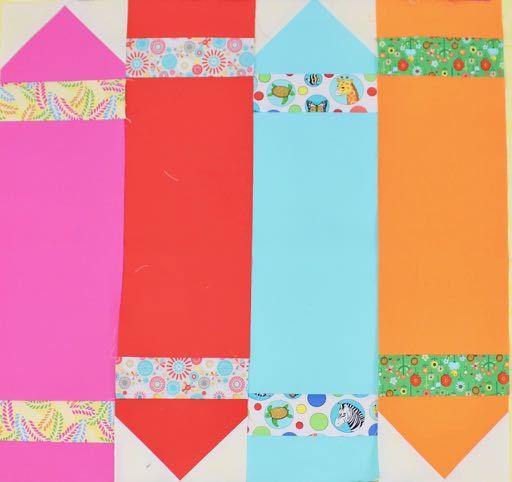
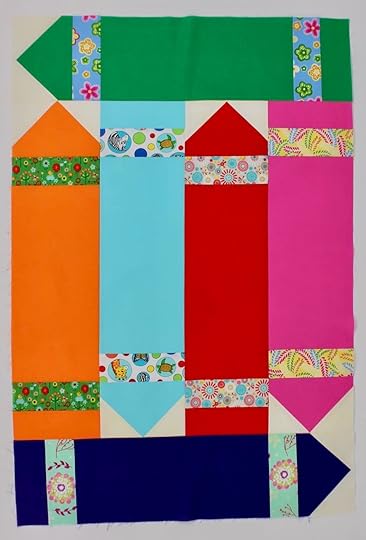
I Sew For Fun Project Tutorial: Crayon Quilt
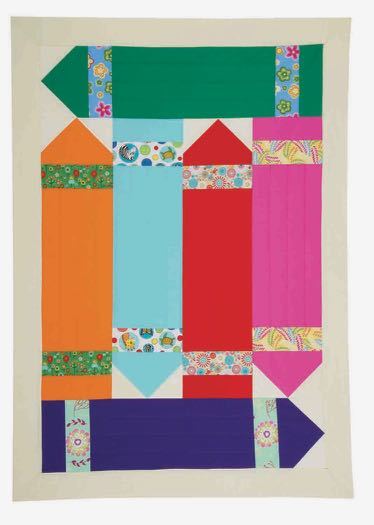
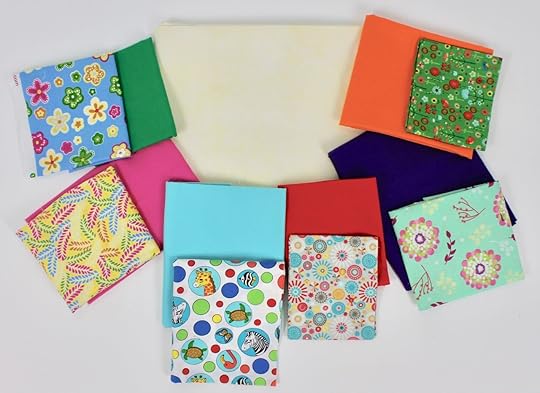
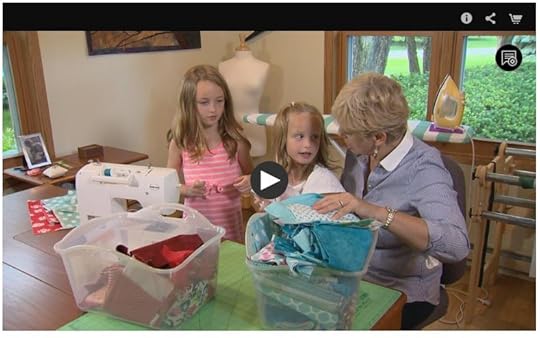
Do you have a fat quarter pack of fun fabrics and a few hours to spend with your little sewing partner? If your answer is “YES,” then we have an artistic sewing project for you. Stitch an Art Caddy made up of rectangles, ribbon, and hair accessories with this FREE! I Sew For Fun Crayon Quilt Tutorial by Nancy Zieman.

You’ll find this easy sewing project, plus 19 additional I Sew For Fun projects, in Nancy Zieman’s 72-page book, I Sew For Fun. Nancy shares her step-by-step directions for 20 super-easy sewing projects.
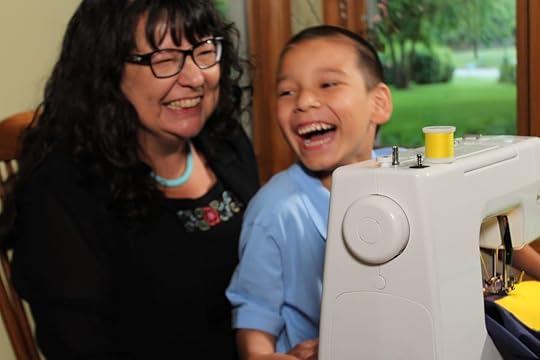
Tune in and watch Nancy and her granddaughters, along with friends, take a modern approach to sewing. Nancy shares her team sewing-for-fun experience along with many tips for a big partner, and numerous insights for involving a little sewing partner—all while making simple, easy to sew kid-friendly projects. Watch I Sew For Fun on Sewing With Nancy!
Crayon Quilt Sewing Tutorial
This “colorful” quilt is perfect to make for back to school. It will be a future “Crayons to College” keepsake.
Approximate Finished Block Size: 6″x 23 3/4″
Approximate Unfinished Block Size: 6-1/4″ x 24-1/4″
Approximate Quilt Finished Size: 28-1/2″ x 40-1/2″
Binding technique: 2″ wide self-binding
Supplies Needed:
1/4 yd. Fabrics A–F—crayons
1/8 yd. Fabrics G–L—crayon bands
1-1/2 yd. Fabric M—background, border, backing with 2″ self-binding
29″ x 41″ batting
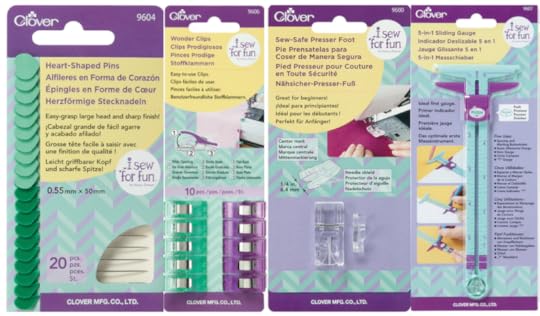
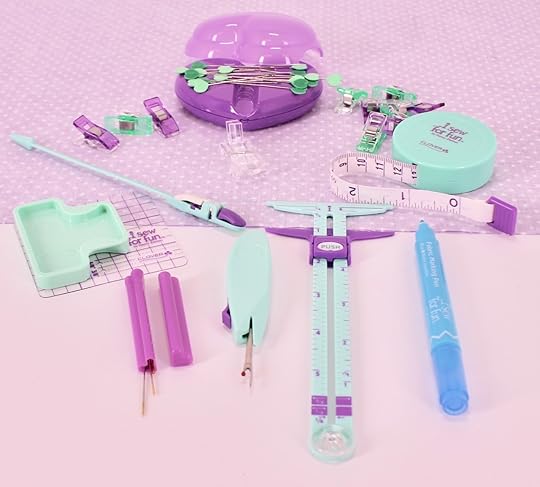
Optional: I Sew For Fun Notions:
I Sew For Fun Heart-Shaped Pins
I Sew For Fun Wonder Clips
I Sew For Fun Sew Safe Presser Foot
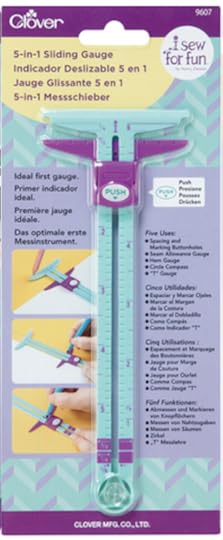
I Sew For Fun 5-in-1 Sliding Gauge

Let your little kiddo choose their favorite colors for this special quilt. They will enjoy showing it to their friends.
Instructions:
Please read all instructions before beginning. Use the width of the presser foot as the depth of the seam allowances.
1. Prepare and cut fabrics.
Press and straighten fabrics.
Using a rotary cutter, ruler, and mat:
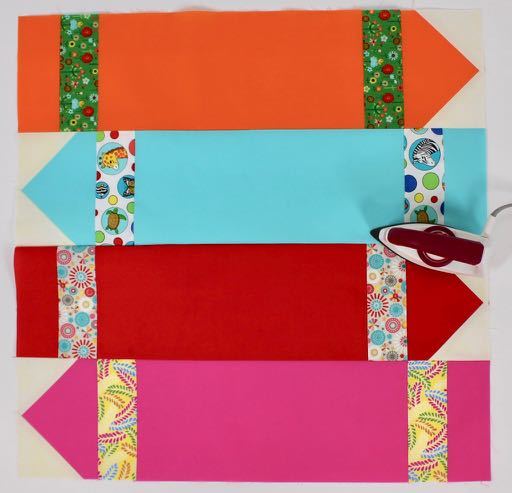
-Cut one 6-1/2″ crosswise strip of Fabrics A–F. Subcut each strip to yield a 2-1/2″ x 6-1/2″ rectangle, a 4-1/2″ x 6-1/2″ rectangle and a 6-1/2″ x 14-1/2″ rectangle.
-Cut one 2-1/2″ crosswise strip of Fabrics G–L. Subcut two 2-1/2″ x 6-1/2″ rectangles.
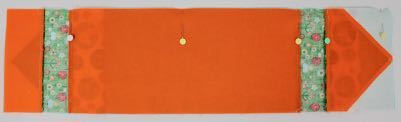
-Cut two 3-1/2″ crosswise strips of Fabric M. Subcut twelve 3-1/2″ squares. Set aside remaining fabric for backing.
2. Arrange and stitch crayon block components.
Arranging the crayon pieces is like doing a puzzle together.
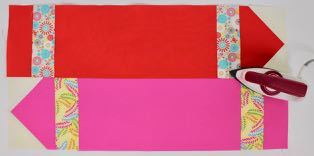
Create crayon point:
-Mark diagonal stitching lines on two 3-1/2″ squares, using an erasable fabric marking pen or pencil.
-Place a square on the 4-1/2″ x 6-1/2″ rectangle, right sides together, aligning upper and right cut edges.
-Stitch along marked line. Trim to a 1/4″ seam allowance. Press seam flat, then press seam toward background fabric.
-Repeat with remaining square on the 4-1/2″ x 6-1/2″ rectangle, right sides together, aligning upper and left cut edges. Stitch along marked line; trim to a 1/4″ seam allowance. Press seam flat, then press seam toward background fabric.
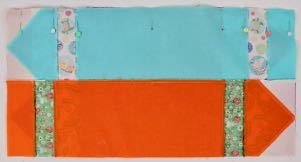
Assemble crayon:
-Place 2-1/2″ strip for crayon end and crayon band right sides together, aligning 6-1/2″ edges.
-Stitch. Press seam flat, then toward crayon.
-Place stitched portion of block on crayon body, right sides together, aligning 6-1/2″ edges.
-Stitch. Press seam flat, then toward crayon.
-Place stitched portion of block to remaining crayon band right sides together, aligning 6-1/2″ edges.
-Stitch. Press seam flat, then toward crayon.
-Place stitched portion of crayon on crayon point, right sides together, aligning 6-1/2″ edges.
-Stitch. Press seam flat, then toward crayon. Block measures approximately 6-1/2″ x 24-1/2″.
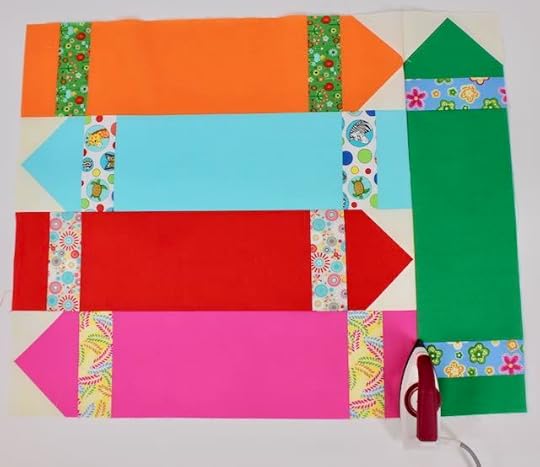
Repeat steps and complete remaining five crayon blocks in the same manner.
3. Arrange and assemble quilt top.
Arrange four crayon blocks side as pictured below:
Place crayon block 2 on top of crayon block 1, right sides together, aligning long edges. Stitch.
Place crayon block 4 on top of crayon block 3, right sides together, aligning long edges. Stitch.
Press seams flat, then to one side.

Place crayon blocks 3 and 4 on top of crayon blocks 1 and 2, right sides together, aligning long edges. Pin. Stitch.
Press seams flat, then to one side.
Place a crayon block across the upper edge of the four pieced crayons, right sides together, aligning long edges. Pin. Stitch.
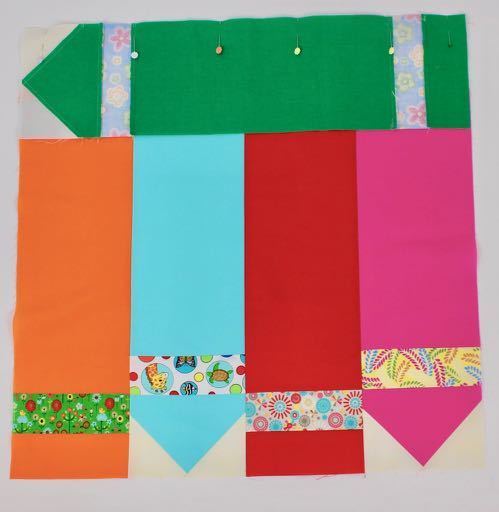
Press seam flat, then to one side.
Place a crayon block across the lower edge of the four pieced crayons, right sides together, aligning long edges. Pin. Stitch.
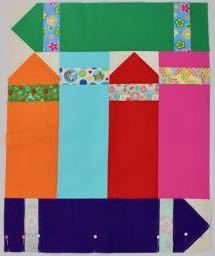
4. Finish quilt by following instructions for adding borders, layering, quilting, and binding (on page 61 of Nancy Zieman’s book I Sew For Fun).
You’ll find this easy sewing project, plus 19 additional I Sew For Fun projects, in Nancy Zieman’s 72-page book, I Sew For Fun. Nancy shares her step-by-step directions for 20 super-easy sewing projects.
Tune in and watch Nancy and her granddaughters, along with friends, take a modern approach to sewing. Nancy shares her team sewing-for-fun experience along with many tips for a big partner, and numerous insights for involving a little sewing partner—all while making simple, easy to sew kid-friendly projects. Watch I Sew For Fun on Sewing With Nancy!
Watch I Sew For Fun on Sewing With Nancy online at NancyZieman.com.
For a complete listing of all I Sew For Fun companion products by Nancy Zieman, visit isewforfun.com.
 To win a NEW! I Sew For Fun 5-in-1 Sliding Gauge from Clover, please leave a comment below sharing a sewing project you’ll be stitching with your little sewing partner.
Happy Sewing!
Team Nancy Zieman
Nancy Zieman Productions. LLC.
Content in this feed is © copyright 2019 by Nancy Zieman Productions, LLC and may not be republished without written permission. You’re welcome to forward the email to a friend or colleague but it’s not okay to add the RSS feed automatically as content on a blog or other website.
The FTC requires us to tell you that Nancy Zieman Productions, LLC has provided products by other companies in the course of doing business. The FTC requires us to advise you to take this information into consideration when reading this posting.
Make sure you are subscribed to Nancy Zieman Productions, LLC enews mailing list so you won’t miss a thing. Sign up here . Join us on Facebook , plus a host of other social media channels. Connect With Nancy and Friends today!
September 5, 2019
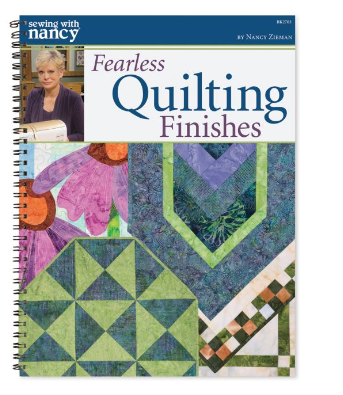
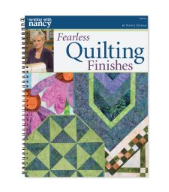
Fearless Quilting Finishes – Part Three
Joining quilt binding ends together with ease can be a tricky task. The goal is to stitch the beginning of the quilt binding and the end together with a bias seam. The solution—use a strip of fusible web!
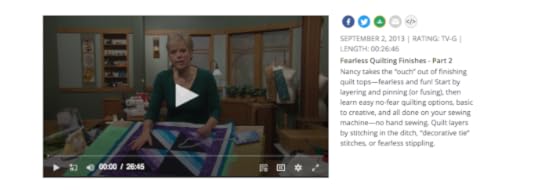
Sewing With Nancy team member, Donna Fenske came up with this idea and the technique was incorporated in this week’s featured Sewing With Nancy video. It’s the third part of the three-part series, Fearless Quilting Finishes. During this 30-minute show you’ll learn all sorts of quilt binding finishes. Watch the process online for all the details.
Watch Fearless Quilting Finishes (Part 1, Part 2 and Part 3) on The Best of Sewing With Nancy.
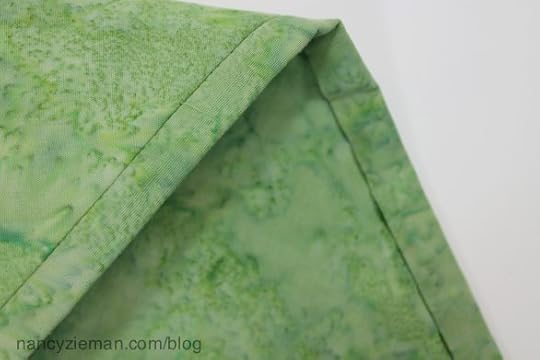
Here’s how to join the ends of quilt binding.
Cut one end of the binding with a 45-degree angle. Press in 1/4″ at the beginning angled edge.
Press a 1/4″ wide strip of paper-backed fusible web on top of the folded inner edge.
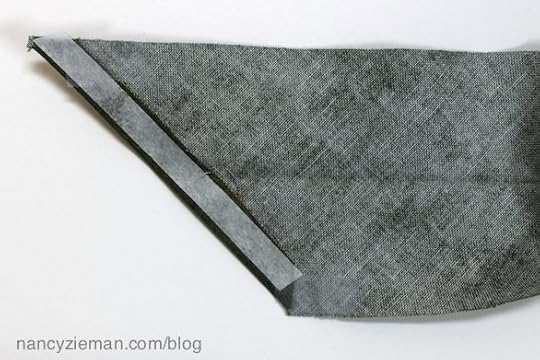
Fold and press the binding in half, wrong sides together, meeting lengthwise edges.
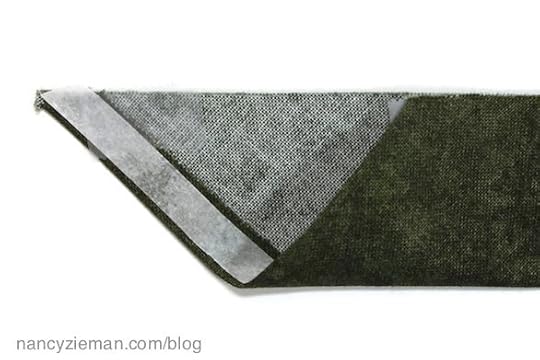
Stitch the binding to the quilt with a 1/4″ seam, starting about 4″ from the end of the binding. (See the white thread at the far right of the photo!)

Nancy Zieman details how to fold and stitch the binding at the corners. Watch online !
Remove the paper backing from the fusible web.

When the binding reaches the starting point, tuck the end of the binding into the beginning.
Trim off the excess binding, if there is any.
With the binding end sandwiched between the starting point, press. The bias seam is secured without stitching.
Next, continue to stitch the remaining 1/4″ seam.

Press the binding up.
Wrap and pin the binding to the wrong side, covering the stitching line.

Stitch in the ditch, sewing in the well of the seam.

Or, hand stitch the folded edges, stitching on the wrong side of the fabric. (We’ve obviously used another sample!)
There’s more to learn online or read in the Fearless Quilting Finishes book!
If the corners of your quilting project are hexagon or octagon shaped, learn the tips on how to add binding to easily finish those edges. Also, learn how to add binding to curves.
 Did you catch the first two episodes of Fearless Quilting Finishes?
Watch episode one and episode two online. Or, check out our blog posting on borders and stippling!
Here’s a reference to have close at hand.
All the information shown in the 3-part series is written and illustrated in Nancy’s book, Fearless Quilting Finishes. The Sewing With Nancy staff made certain that all the steps were carefully written and illustrated. Presenting sewing and quilting techniques is a team effort!
For a chance to win a copy of Nancy Zieman’s Fearless Quilting Finishes book from Nancy’s Notions, please tell us your favorite quilt finishing technique.

The randomly selected winner of a pair of Quilt Expo one-day Admission Tickets is Patricia M Radloff.

Her comment is:
Upon arrival the first item to do would be thank the people for putting this great day of adventure together, as I have only been once quite awhile ago with my quilter friend who no longer lives in WI. I would love to experience this fantastic show again!
Happy Quilting,
Team Nancy Zieman
Nancy Zieman Productions. LLC.
Content in this feed is © copyright 2019 by Nancy Zieman Productions, LLC and may not be republished without written permission. You’re welcome to forward the email to a friend or colleague but it’s not okay to add the RSS feed automatically as content on a blog or other website.
The FTC requires us to tell you that Nancy Zieman Productions, LLC has provided products by other companies in the course of doing business. The FTC requires us to advise you to take this information into consideration when reading this posting.
Make sure you are subscribed to Nancy Zieman Productions, LLC enews mailing list so you won’t miss a thing. Sign up here . Join us on Facebook , plus a host of other social media channels. Connect With Nancy and Friends today!
September 3, 2019
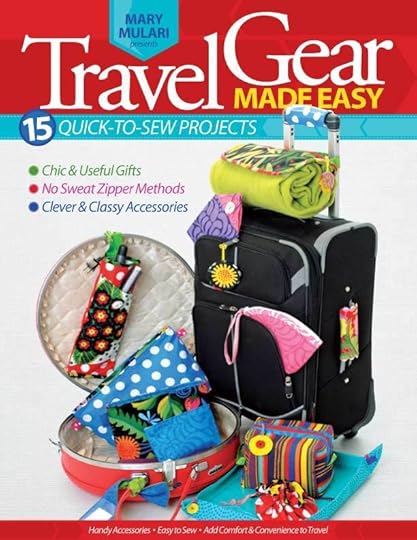
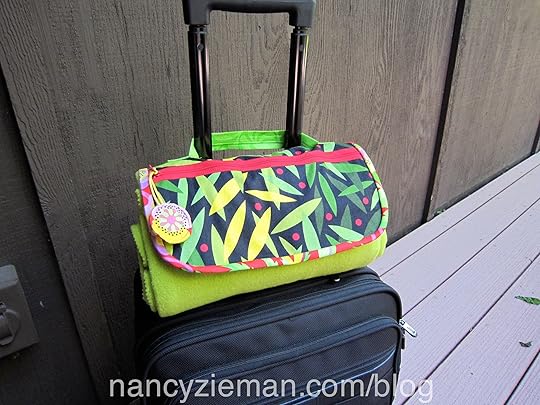
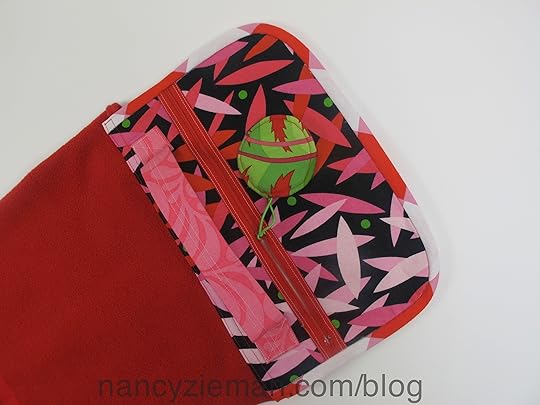
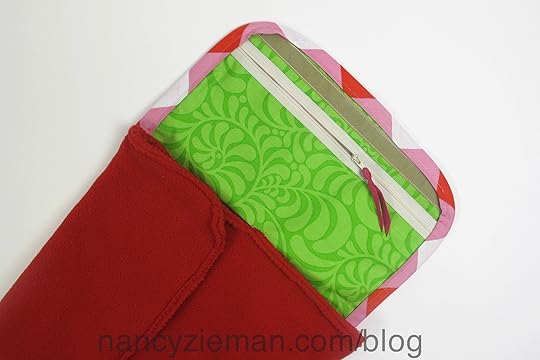
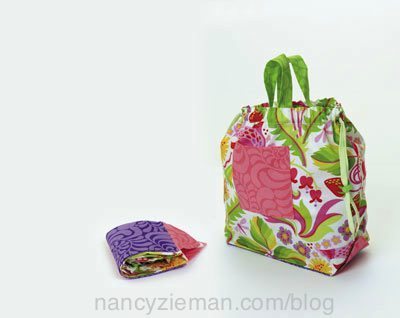
Travel Gear Made Easy – Part Two

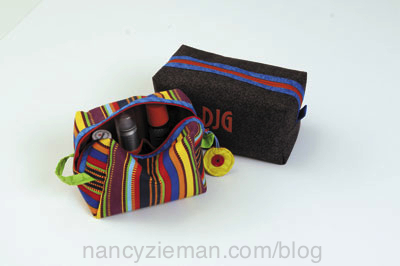
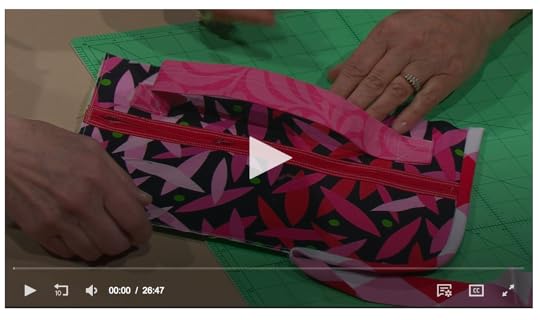
If you like creative stitching projects that can be made in an evening or less? You’re in for a treat! In part two of the TV series, Travel Gear Made Easy, this week’s featured video, guest Mary Mulari teaches how to quickly stitch travel gear for everyday travel or extended trips. Mary knows all about travel, but even more about making travel easy. Watch Travel Gear Made Easy Part Two. (If you missed part one, watch Travel Gear Made Easy Part One).
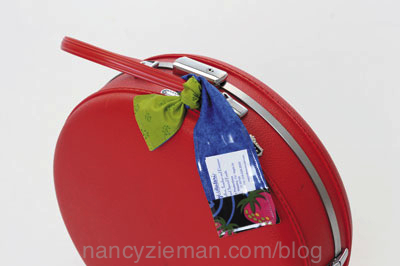
In part two of the TV show, and in her book, Mary shares her easy zipper technique for the hidden zipper used to make the Travel Trio Bag Set (pictured above). The clever recessed zipper adds style to this collection of bags.

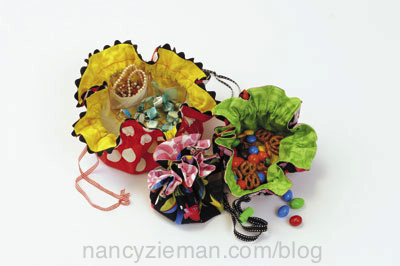
A few weeks after Mary and Nancy recorded the Travel Gear Made Easy series, Mary sent Nancy a package. Inside was a Travel Trio Bag Set. Aren’t the fabrics delightful?

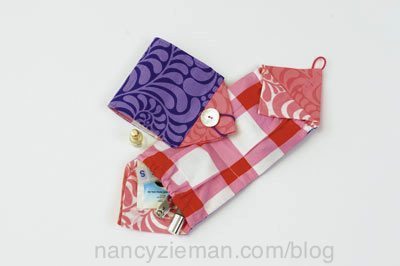
Mary designed these bags for carrying electronic components, jewelry, or makeup. Plus, they nest together for gift-giving and for easy storage.

The gift package also included a Tie One On Tag. You can always find your luggage with this brightly colored tag tied to the handle. Choose two coordinating fabrics and a piece of clear vinyl to hold your identification info or business card.
Find even more projects in part two of the online show and in the book, including these travel projects—great gifts for others and yourself!
Jewels & Treats Bag: As a smart traveler, you’ll find multiple uses for this round drawstring bag. With a pocket-divided circular insert, the bag becomes a jewelry carrier. As a simple lined and washable bag, it can be used to carry dry snacks and treats on the plane or in a lunch box, saving on the use of plastic bags. In other words, it’s a Jewels & Treats Bag!
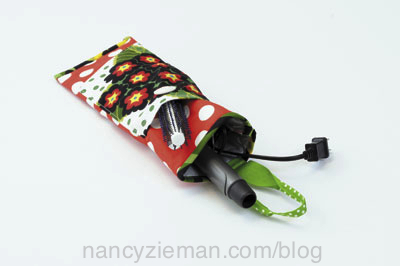
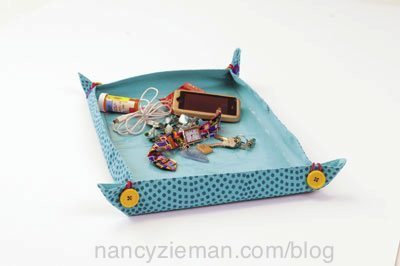
The Possibility Bag: It’s possible to store travel-sized bottles upright for ease of travel. Turn a placemat or layers of fabric into this nifty holder. Make the bag for gals or guys. It’s a versatile style.
Hair Iron Holder: Travel in style with a curling iron or flat-iron in a quick-to-sew carrier made from a placemat. The bag’s lining is Quilted Iron Quick, so a hot iron can be stashed quickly after use. An outer pocket stores the cord or hairbrush, and the ribbon loop serves as a hanger. This great organizer will streamline your travels.
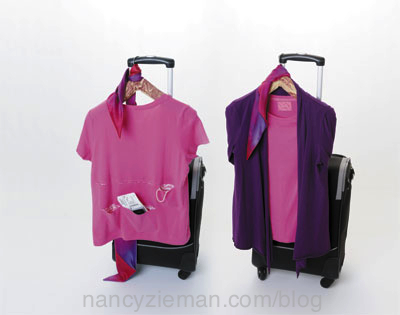
Tee Safe: We’d like to share a secret—you’re looking at a safe! Hanging underneath the jacket is a Tee Safe—a T-shirt with pocket sections sewn in the back. It’s a “made-easy” hiding place to use while traveling or for a college student’s dorm room. Watch online or buy the book to learn the easy construction details.
Watch Travel Gear Made Easy (Part One and Part Two ) on The Best of Sewing With Nancy online.

Would you like to win a copy of Mary’s Travel Gear Made Easy book? Let us know your favorite travel gear project. We’ll choose a random winner from the comments from last week and this week’s Travel Gear Made Easy blog postings.
Happy Sewing,
Team Nancy Zieman
Nancy Zieman Productions. LLC.
Content in this feed is © copyright 2019 by Nancy Zieman Productions, LLC and may not be republished without written permission. You’re welcome to forward the email to a friend or colleague but it’s not okay to add the RSS feed automatically as content on a blog or other website.
The FTC requires us to tell you that Nancy Zieman Productions, LLC has provided products by other companies in the course of doing business. The FTC requires us to advise you to take this information into consideration when reading this posting.
Make sure you are subscribed to Nancy Zieman Productions, LLC enews mailing list so you won’t miss a thing. Sign up here . Join us on Facebook , plus a host of other social media channels. Connect With Nancy and Friends today!
August 31, 2019
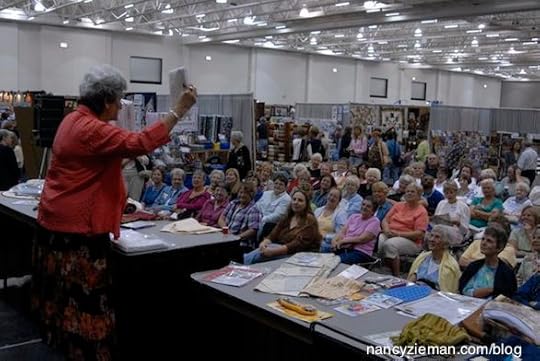
Celebrating 15 Years of Quilt Expo in Madison WI – Sept. 5-7, 2019
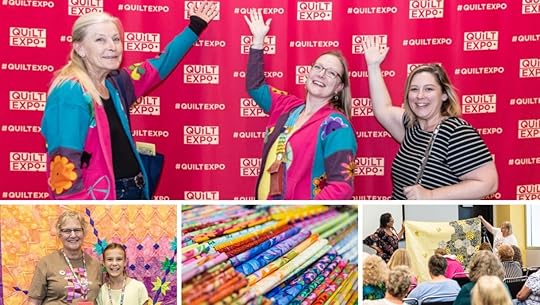
Quilt Expo Celebrates 15 Years of Quilting Fun, September 5–7, 2019 in Madison, WI
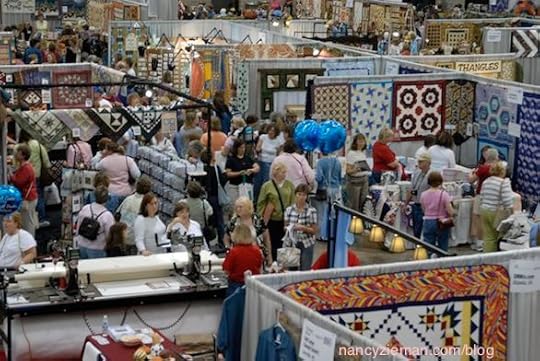
September 5–7, thousands of quilting enthusiasts will gather in Madison, WI to find inspiration, learn new techniques, stock up on fabric & quilting supplies, and celebrate the joy of quilting! Now in its fifteenth year, Quilt Expo continues to be the Midwest’s premier quilting destination. Team NZP invites you to join us at this year’s event!
It’s a Big Deal!
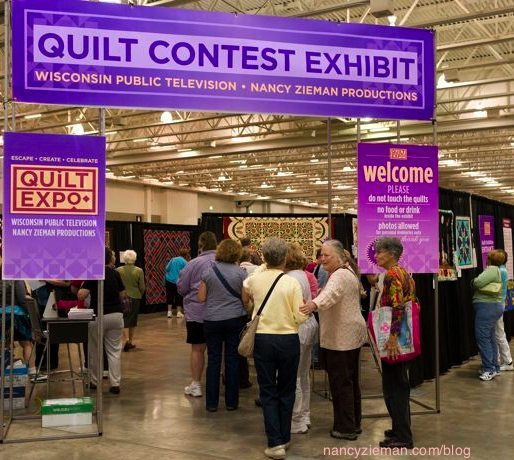
Presented by Wisconsin Public Television (WPT) and Nancy Zieman Productions(NZP), Quilt Expo is designed to capture and revitalize the creative quilting spirit. Here’s a sampling of the highlights for this year’s event. With over 200 educational lectures, sit & sew workshops, and hands-on workshops, and 191 vendors, there’s something for everyone. Plus you’ll find hundreds of quilts on display.
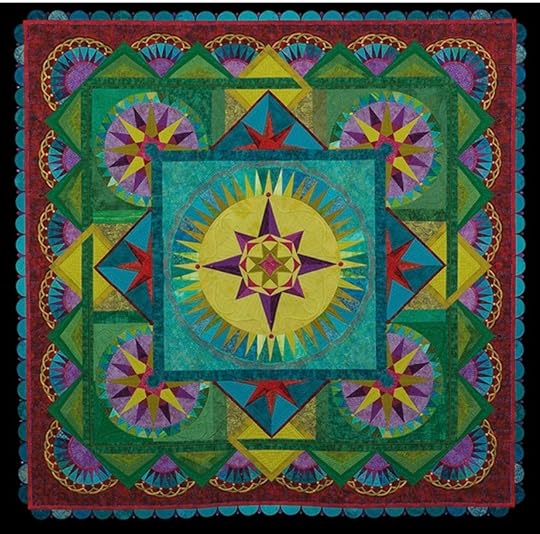
View the juried and judged quilt contest exhibit of nearly 300 amazing quilts
Best of Show 2018—Taking the Unmapped Road by Margaret Solomon Gunn (below)
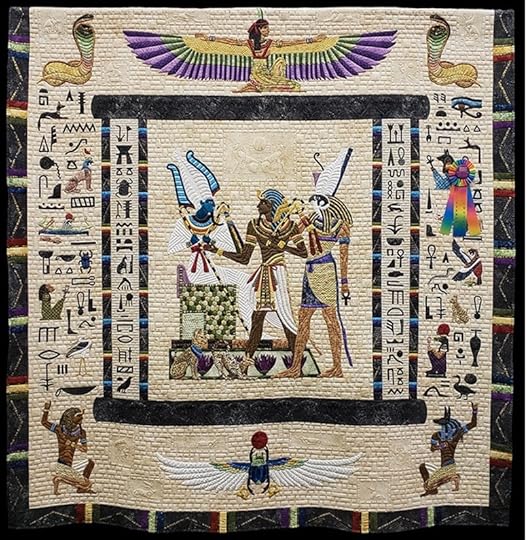
2018 Category 4—Machine Quilted Bed Size—Appliqued: In The Garden by Kim Lapeck, quilted by Frank Palmer (below)
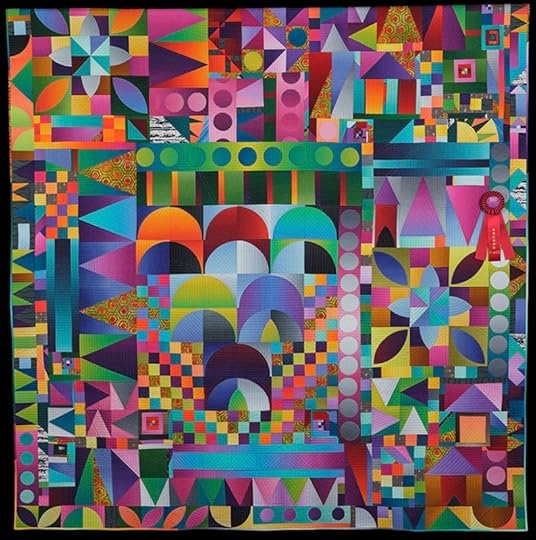
Vote for your favorite Viewers’ Choice quilt: 2018 Quilt Expo Best of Show—Judgment of Osiris by Georgia Spalding Pierce (below)
Visit the Special Quilt Exhibits
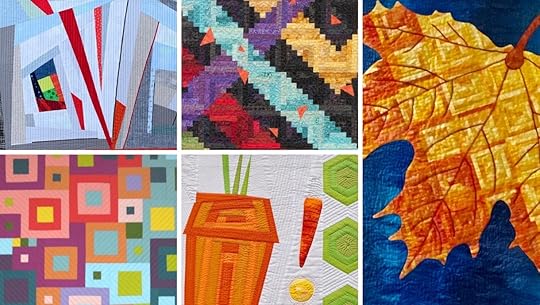
Here’s a glimpse at five of the 41 2019 Log Cabin Quilt Challenge quilts(above). Quilt Expo 2019 attendees will also be able to view the following collections, on loan from organizations from throughout the country:
• Block of the Month Club at Mill House Quilts: Amish With a Twist, Series Two—The Classics
• Cherrywood Hand Dyed Fabrics: Prince Challenge Traveling Exhibit
• Mary DeRay: Simply Sashiko!
• Monroe Street Arts Center: Kids’ Fabric Storyscapes
• Professional Art Quilters Alliance (PAQA): Impressions
• Rumi O’Brien: Quilting Bees and Striding Lines
• Sun Prairie Quilters: Remembering Nancy Zieman
• ThreadBenders: Photo Inspiration—Door
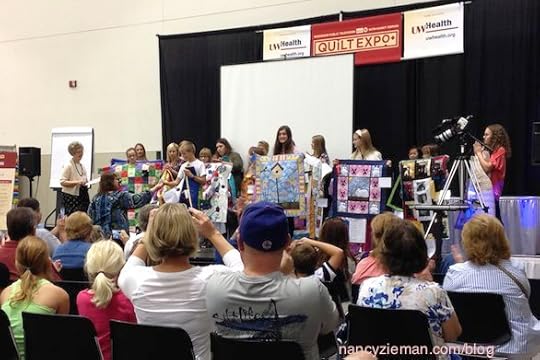
• Quilt Expo 2019 Kids’ Quilt Challenge
• Quilt Expo 2019 Modern Mini Challenge
• Quilt Expo 2019 Log Cabin Challenge
Shop in the 85,000-square-foot vendor mall with 397 vendor booths representing 191 businesses and organizations from across the nation.
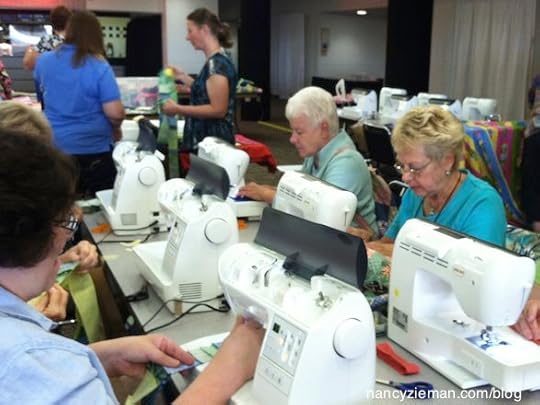
Take a class from a nationally known presenters—purchase lecture, sit & sew, and workshop tickets on site at Quilt Expo. Seating is limited.

Attend a stage presentation—stage presentations are included with your admission ticket
Our Kids’ Quilt Challenge Awards Presentation takes place on the stage, Saturday morning at 11:15 a.m.
Attend an evening event—purchase tickets on site at Quilt Expo. Seating is limited.
Thursday night, September 5, join Madison, Wisconsin’s own internationally bestselling author, Jennifer Chiaverini, for a special presentation celebrating the 20th anniversary of the launch of the beloved Elm Creek Quilts book series.

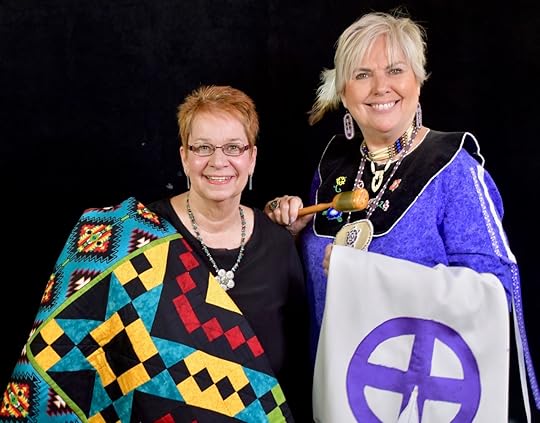
Friday night, September 6, join Pat Ehrenberg & Debra Morningstar for Native Stitches & Stories—A creative presentation artfully weaving Native American quilt making, cultural education, tribal stories and flute music into an entertaining and thought-provoking program!
Participate in the Quilt to Give community service project—plan a few minutes during Quilt Expo to stitch on a community quilt!
Our goal is to make and collect twin-sized quilts. Enchanted Makeovers and DAIS (Domestic Abuse Intervention Services) will be the recipients of the quilts..

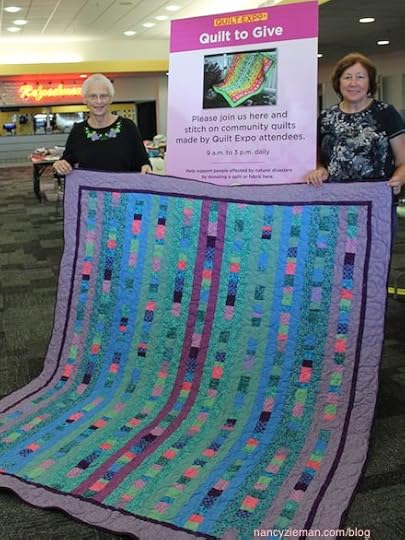

For a chance to be the random winner of a pair of Quilt Expo one-day Admission Tickets, please comment below and share what’s the first thing you’d do when you arrive at Quilt Expo (getting a cup of coffee doesn’t count  )
)
The randomly selected winner of the I Sew For Fun 5-in-1 Sliding Gauge from Clover, from the August 24 Blog post is, Teresa Bishop.

Her comment is: I think this would make a fabulous gift bag that could be filled with clothing, household items, or even baby necessities. Better than paper that gets tossed away.
Happy Quilting,
Team Nancy Zieman
Nancy Zieman Productions. LLC.
Content in this feed is © copyright 2019 by Nancy Zieman Productions, LLC and may not be republished without written permission. You’re welcome to forward the email to a friend or colleague but it’s not okay to add the RSS feed automatically as content on a blog or other website.
The FTC requires us to tell you that Nancy Zieman Productions, LLC has provided products by other companies in the course of doing business. The FTC requires us to advise you to take this information into consideration when reading this posting.
Make sure you are subscribed to Nancy Zieman Productions, LLC enews mailing list so you won’t miss a thing. Sign up here . Join us on
August 29, 2019
Fearless Quilting Finishes – Part Two
 Today’s Sewing With Nancy online featured video is Fearless Quilting Finishes, Part 2. During this 30-minute show you’ll learn three quilting options: stitching in the ditch, decorative “tie” stitching, and stippling.

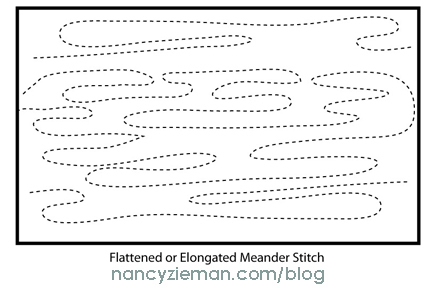
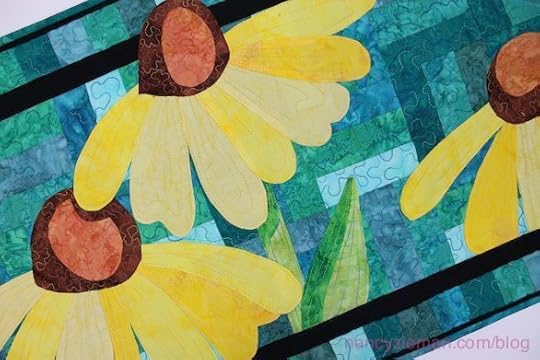
It’s easy to show stippling, but not as effective to write about it. After all, it’s the action that causes many to shy away from this particular quilting process. So, what better way to teach the technique than to watch Fearless Quilting Finishes! Plus, you can find all the details written in the book that accompanies this 3-part series, Fearless Quilting Finishes.
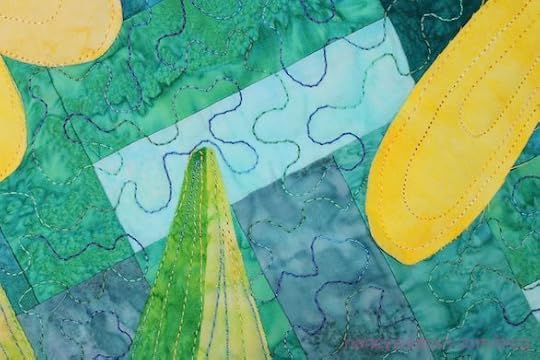
Stippling Review
Setting up your sewing machine is the first step in learning stippling.
Lower the feed dogs.
Attach a quilting foot.
Set the machine for a straight stitch.
Choose a thread that matches the background, or use a variegated thread as featured in the quilted project.
Use a needle compatible with the thread. With the thicker variegated thread, We suggest a topstitching needle—the large eye accommodates the thread.
Helpful notions
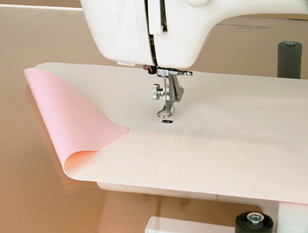
With the feed dogs lowered, you’ll be guiding and moving the quilt layers underneath the needle area. This is the motion or process that makes many people leery! Consider using a Supreme Slider on the bed of the machine. We use it since it helps the fabric move effortlessly under the needle. It has a Teflon top and a tacky underside that sticks to the machine.
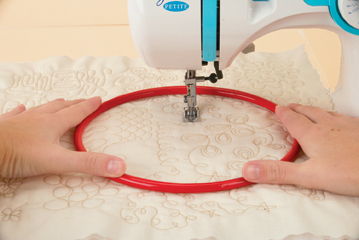
To help control the fabric, comparable to the steering wheel on a car, use a Quilt Halo. Position the halo on top of the basted quilt and slide it under the foot of the machine. Then, hold the sides of the notion using gentle pressure. The tacky underside of the Quilt Halo grips the fabric while giving you a sense of control.
 Begin by stippling a small project
Choose a small quilting project for your first stippling adventure such as a placemat or small wall hanging, Then, move the fabric under the needle to create medium to even large “puzzle-end” shapes. Big shapes are okay, in fact that’s the best way to learn. Just be consistent in size.
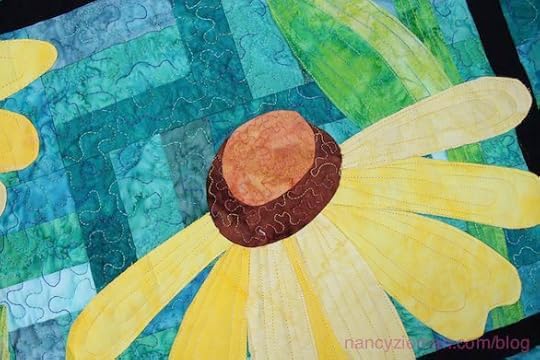
Or, stipple following the shape of the design as featured in the petals and leaves of the coneflower. It’s best to watch the process online!
Here’s a reference to have close at hand
All the information shown in this 3-part series is written and illustrated in Nancy Zieman’s book, Fearless Quilting Finishes.
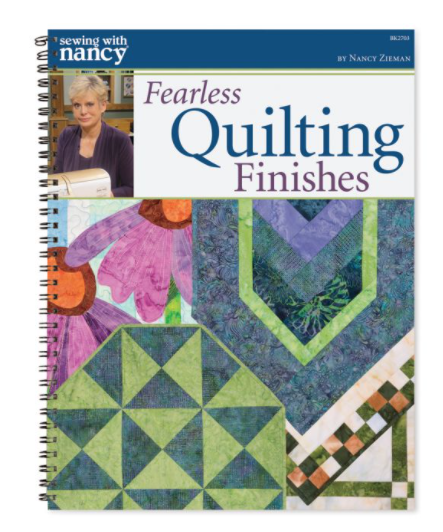
Watch Fearless Quilting Finishes (Part 1, Part 2 and Part 3) on The Best of Sewing With Nancy.

For a chance to win a copy of the Fearless Quilting Finishes book from Nancy’s Notions, please tell us your favorite quilt finishing technique.
Happy Quilting,
Team Nancy Zieman
Nancy Zieman Productions. LLC.
Content in this feed is © copyright 2019 by Nancy Zieman Productions, LLC and may not be republished without written permission. You’re welcome to forward the email to a friend or colleague but it’s not okay to add the RSS feed automatically as content on a blog or other website.
The FTC requires us to tell you that Nancy Zieman Productions, LLC has provided products by other companies in the course of doing business. The FTC requires us to advise you to take this information into consideration when reading this posting.
Make sure you are subscribed to Nancy Zieman Productions, LLC enews mailing list so you won’t miss a thing. Sign up here . Join us on
August 27, 2019
Travel Gear Made Easy – Part One
Nancy Zieman met Mary Mulari early in her career at a seminar that she was presenting in Minnesota. Mary introduced Nancy to her decorated sweatshirt patterns, a novel idea back then. She didn’t limit her repertoire to embellishing sweatshirts—no, far from it! Each season on Sewing With Nancy, Mary joined Nancy to share her new clever sewing topics. Today, Travel Gear Made Easy, Part One is our Sewing With Nancy video feature. Mary has a knack for designing fun and useful travel accessories—you’ll be impressed!
Travel Gear You’ll See in the First Episode
The Roll-Up Travel Blanket is the first project in program one of this 2-part The Best of Sewing With Nancy series, Travel Gear Made Easy. Start with 1-1/3 yd. fleece fabric and fun cotton fabric prints. Mary shares easy step-by-step tips on how to add zipper pockets–to hold travel documents, music players, earplugs, and more.
While you’re using the blanket as a coverup during a quick nap, store your eyeglasses, a book, and more in the back zipper pocket.
Roll up the blanket and use as a neck pillow. Loop the handle strap over a luggage extension handle for travel. It’s handy and lightweight.

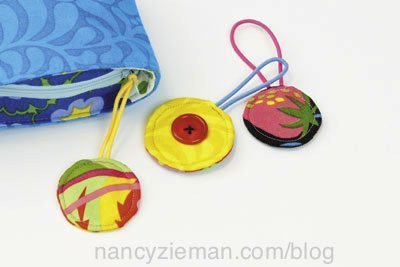
In the video feature and in her book , Mary even shows how to create her Easy as 1-2-3 Zipper Pulls by combining scraps of fabric with ponytail elastics—to create user-friendly zipper pulls—it’s really as easy as 1-2-3.
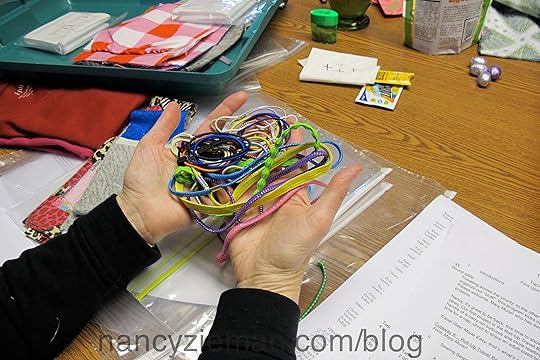
Check out Mary’s ponytail elastics stash!
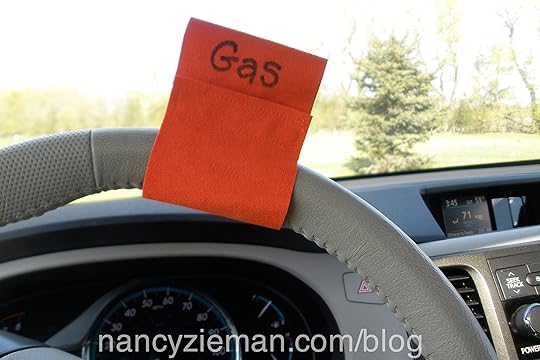
Mary’s clever Reminder Tags prompt you to fill your car with gas or to purchase milk. Wrap them on your car’s steering wheel and avoid being stranded on the side of the road with an empty gas tank. Don’t ask how we know this!
Don’t forget the milk! 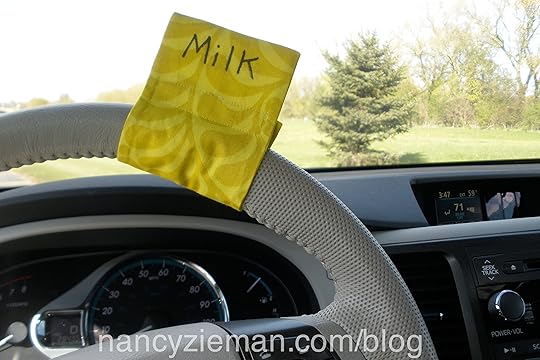
Find even more projects in Travel Gear Made Easy, Part One and in Mary’s Travel Gear Made Easy book—including Mary’s Fold-Up Tote, Supply Side Pouch, and Gathering Place Tray—what great gifts to make and give or keep!
Watch Travel Gear Made Easy ( Part One and Part Two ) on The Best of Sewing With Nancy online.
Would you like to win a copy of Travel Gear Made Easy from Mary Mulari? Let us know your favorite travel gear accessory. We’ll choose a random winner from the comments on this week and next weeks’ Travel Gear Made Easy blog postings.

The randomly selected winner of the Ultimate Fancy Footworks book from Nancy’s Notions is:C DeLamare
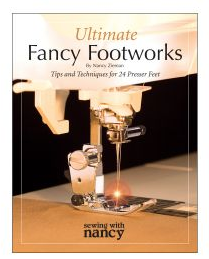
Her comment is: I would like to try the free motion foot. Thank you for the video.
Happy Sewing,
Team Nancy Zieman
Nancy Zieman Productions. LLC.
Content in this feed is © copyright 2019 by Nancy Zieman Productions, LLC and may not be republished without written permission. You’re welcome to forward the email to a friend or colleague but it’s not okay to add the RSS feed automatically as content on a blog or other website.
The FTC requires us to tell you that Nancy Zieman Productions, LLC has provided products by other companies in the course of doing business. The FTC requires us to advise you to take this information into consideration when reading this posting.
Make sure you are subscribed to Nancy Zieman Productions, LLC enews mailing list so you won’t miss a thing. Sign up here . Join us on Facebook , plus a host of other social media channels. Connect With Nancy and Friends today!
Nancy Zieman's Blog

- Nancy Zieman's profile
- 21 followers

