
Nancy Zieman's Blog, page 57
October 8, 2019
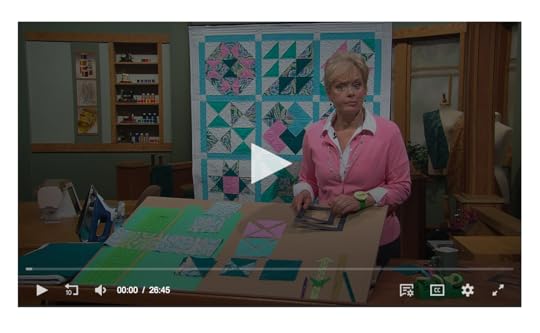
Stress Free Quilting With Machine Embroidery Part One

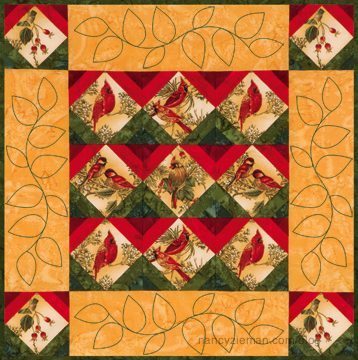
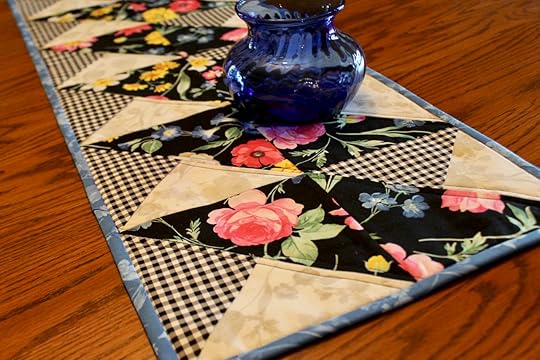
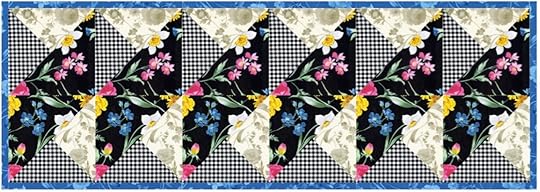
Piece perfect blocks and quilt with ease using your embroidery machine. Discover the amazing results you can achieve with ease when quilting and machine embroidery combine, that’s what this Sewing With Nancy episode is all about. Nancy Zieman and embroidery guru Denise Abel show you how to turn your computerized embroidery machine into a piecing and quilting machine.
Here’s a preview of what you’ll learn!
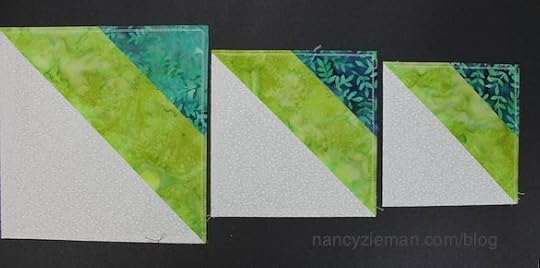
The piecing of the Simple Shadow Block was stitched on a stabilizer, assuring precise piecing without precise cutting of strips. You can piece a quilt without being a quilter! Nancy and Denise developed a book with 30 embroideries, some of the embroidery designs are for piecing, while the others are for quilting! The embroideries are found on the companion CD that is included with the Stress-Free Quilting with Machine Embroidery book. Here are the specifics—it’s quite a deal!
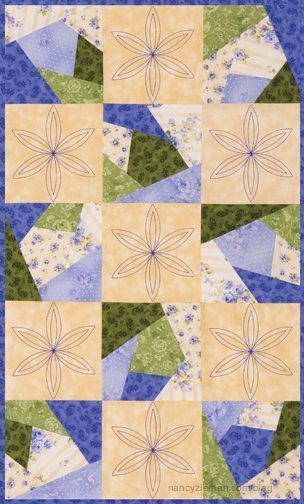
Four piece in-the-hoop quilt block designs: Simple Shadow blocks, Quilt Charm blocks, Fancy Squares blocks, and Crazy Quilting blocks.
Six free-motion inspired quilting designs: Leaves block, Leaves border, Flower block, Flower half, Modern Star block, and Modern Star half.
Includes 10 designs in three sizes each for a total of 30 designs:
30 designs: 10 (5″ x 7″), 10 (6″ x 10″), 10 (8″ x 8″).
Includes:
Thread color sequence charts for each design.
10 embroidery formats: ART, BLF, DST, EXP, HUS, JEF, PES, SHV, VIP, VP3
Amazing Designs Edit Xpress software to re-size, re-color, preview and print templates of Amazing Designs designs.
 How to Piece a Quilt Block in an Embroidery Hoop
Listed below is an overview of the technique. There’s more detail shown on the Sewing With Nancy episode and in the book. Each quilt block design is available in three sizes. Obviously, the larger the block, the larger the embroidery hoop size needed:
8″ block requires an 8″ x 8″ hoop or larger
6″ block requires a 6″ x 6″ hoop or larger
5″ block requires a 5″ x 5″ hoop or larger
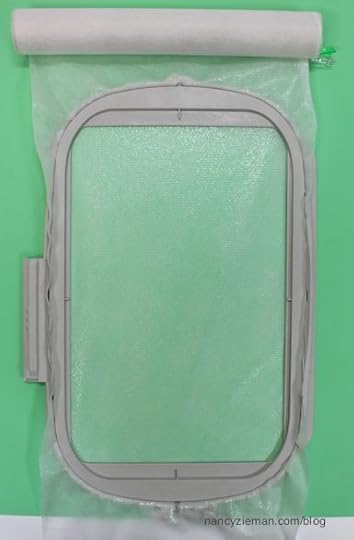
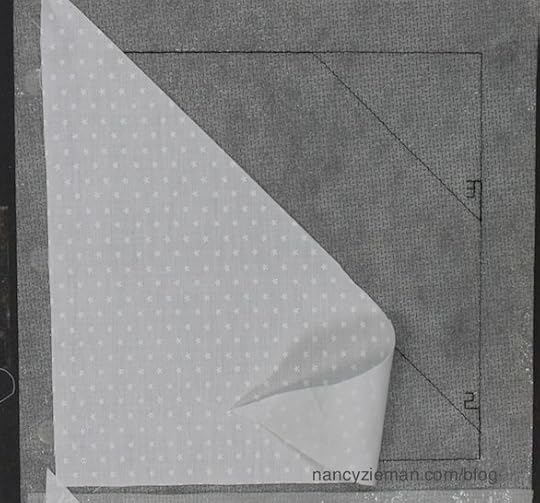
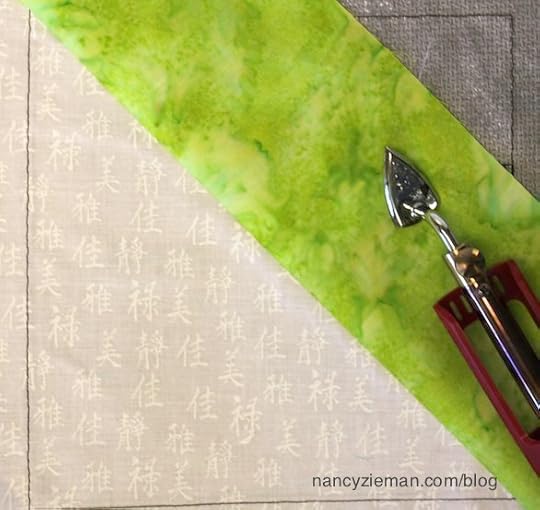
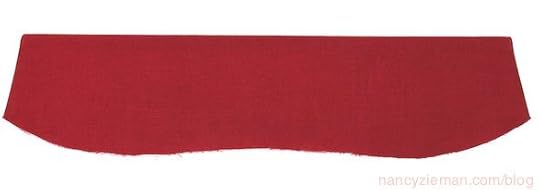
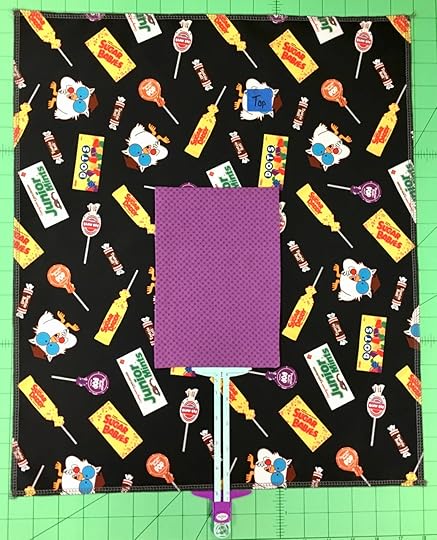
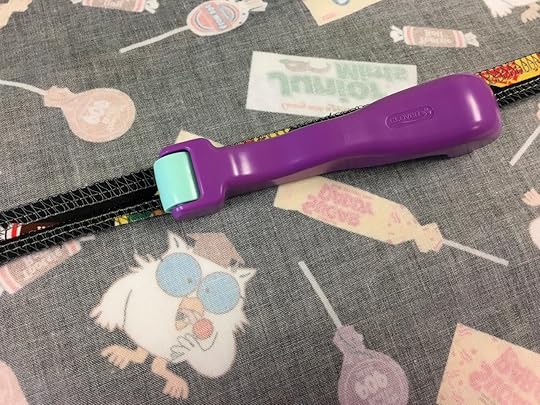
Hoop a section of cut-away fusible no-show mesh stabilizer; fusible side up. (The photos feature the 5″ Simple Shadow blocks.)
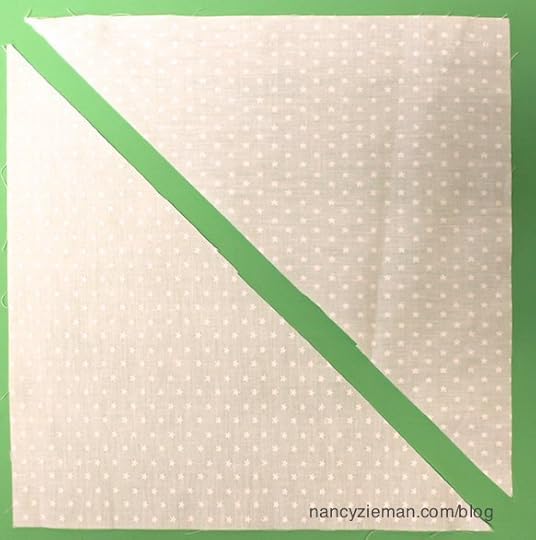
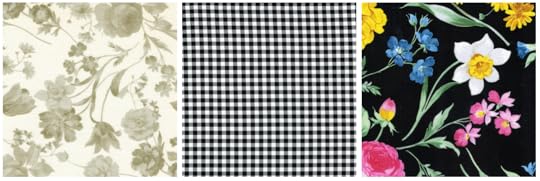
Select three fabrics: a light, medium, and dark.
Cut 6-1/2″ squares of the light (white) color; then cut them in half, point to point, to create half-square triangles.
Cut one 3-1/2″ crosswise strip of the medium (green) color, and one 3-1/2″ crosswise strip of the dark (aqua) color.
Set up the sewing machine with embroidery unit and appropriate embroidery foot.
Import and select the piece in-the-hoop Simple Shadow Block design.
Select all-purpose poly or poly/cotton thread; wind the bobbin with the same thread as used in the needle. A slightly contrasting color works best. (We are using black thread for easy viewing.)
 When stitching decorative embroideries, a lightweight bobbin thread is generally recommended. Since this type of embroidery is really construction, follow quilting guidelines and use the same thread in the needle and bobbin.
.
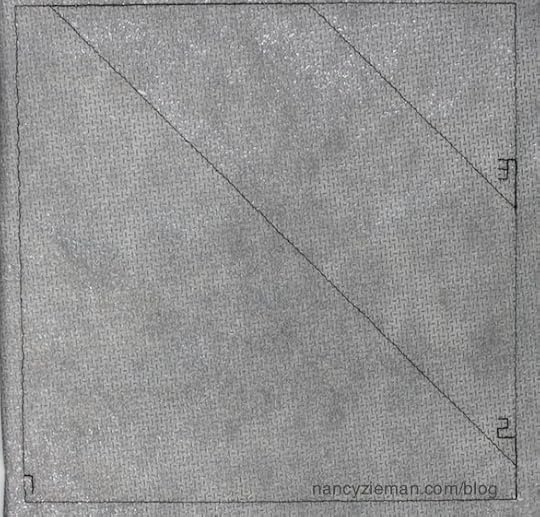
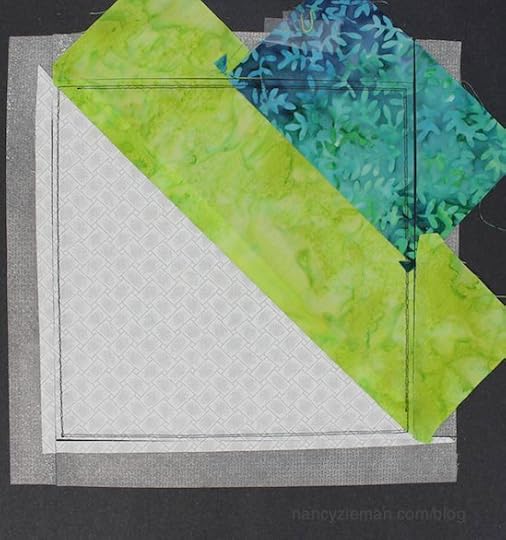
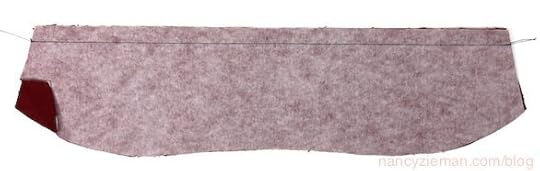
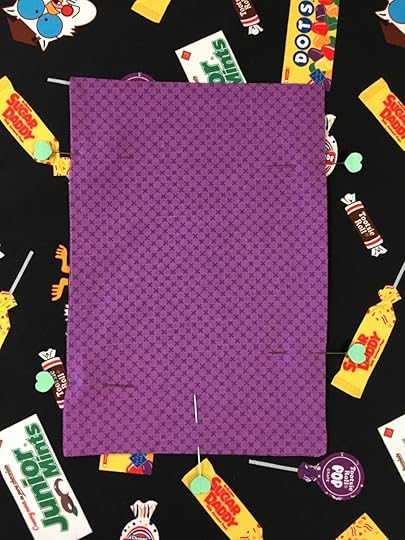
Stitch the first embroidery sequence directly on the stabilizer; the outline of the quilt block plus the numbers 1-3.
Place half-square triangle of color #1 (white) over the section marked #1, right side up. Ensure that the fabric extends beyond the stitching outline lines. Press fabric to fusible stabilizer with a miniature iron, working from one edge to the opposite edge so there are no wrinkles. (Watch how to press while the hoop is still attached to the machine. Click here to view .)
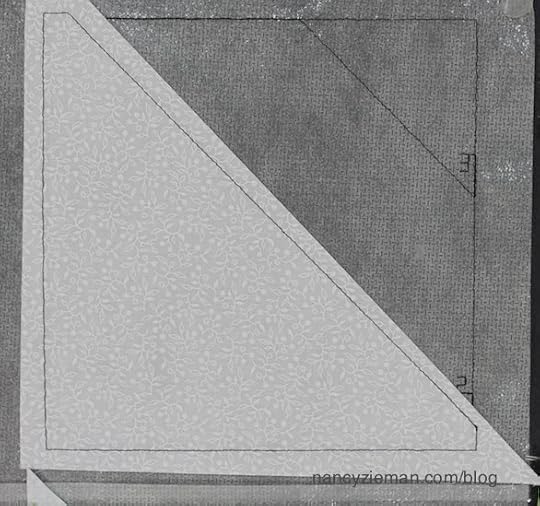
Stitch the second embroidery sequence, which attaches fabric #1 to the stabilizer.
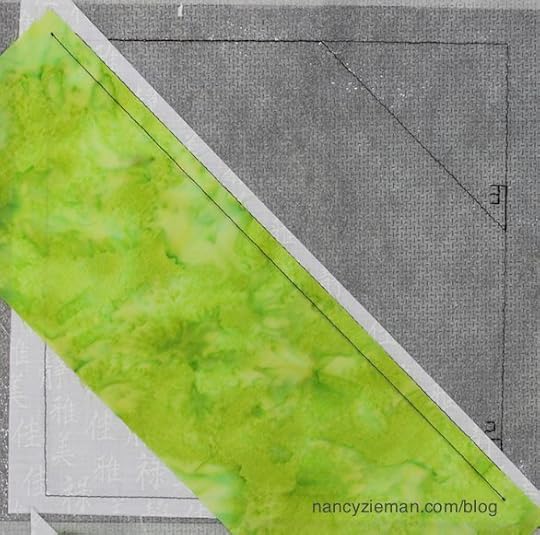
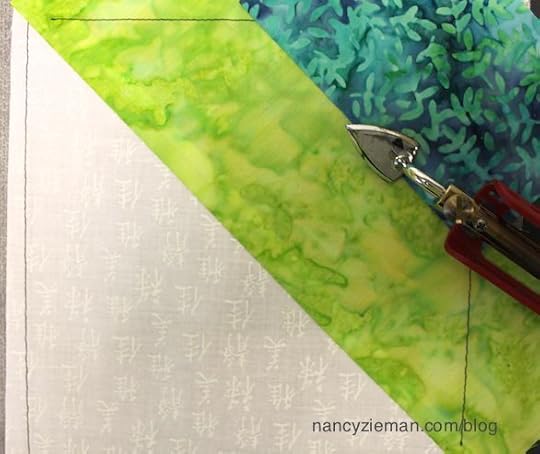
Align fabric strip #2 (green) along the diagonally stitched line, right sides together. Make certain that the fabric is extending ½″ beyond the stitched outline on the stabilizer at the upper left and bottom right corner.
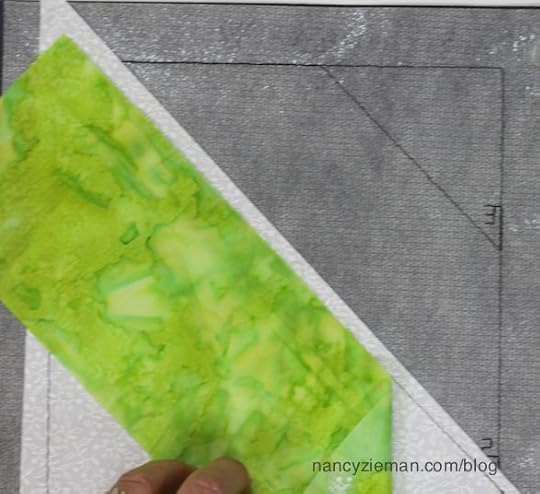
Stitch the third embroidery sequence, basting down fabric strip #2.
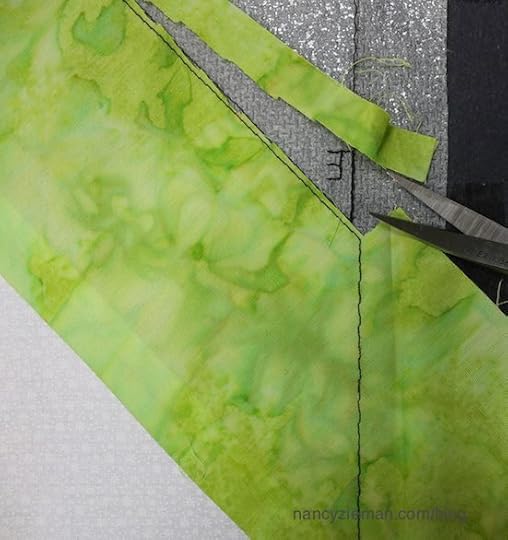
Trim away the excess of fabric #1 (white) along the previously stitched line separating section 1 from section 2.
Fold up fabric strip #2. Press from folded edge with a miniature iron, and work to the opposite corner so there are no wrinkles.
Stitch the next embroidery sequence, which attaches fabric #2 to the stabilizer.
Trim away the excess of fabric #2 along the previously stitched line separating section 2 from section 3.
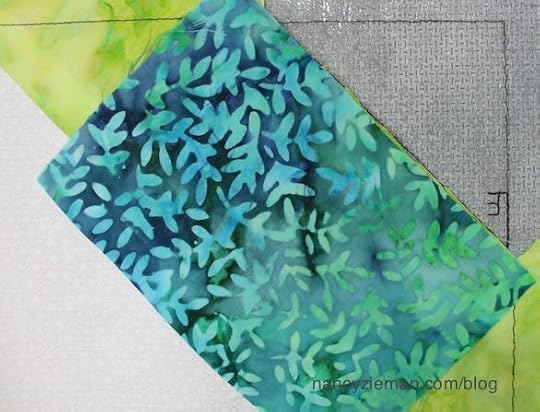
Align fabric strip #3 (aqua) along the previously stitched diagonal line, right sides together. Make certain that the fabric is extending ½″ beyond the outline on the stabilizer at the upper left and lower right corner.
Stitch the next embroidery sequence, basting down fabric strip #3.
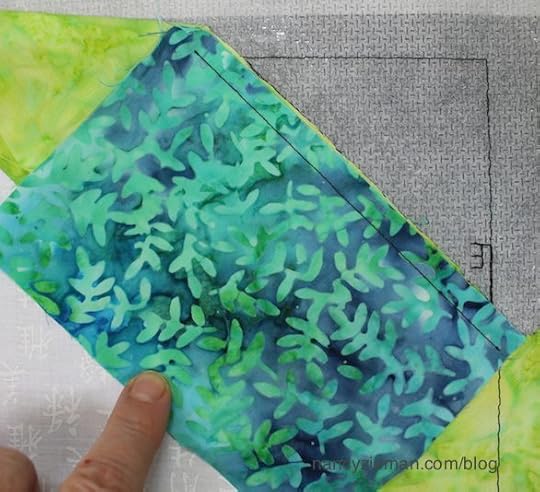
Fold up fabric #3. Press from the folded edge, and work to the opposite corner ensuring that there are no wrinkles.
Stitch the next embroidery sequence, which attaches fabric #3 to the stabilizer.
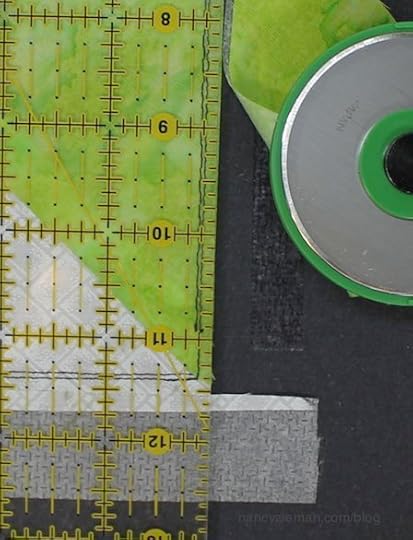
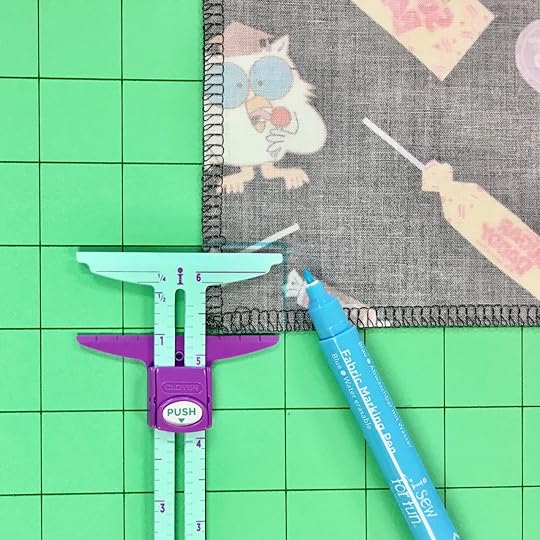
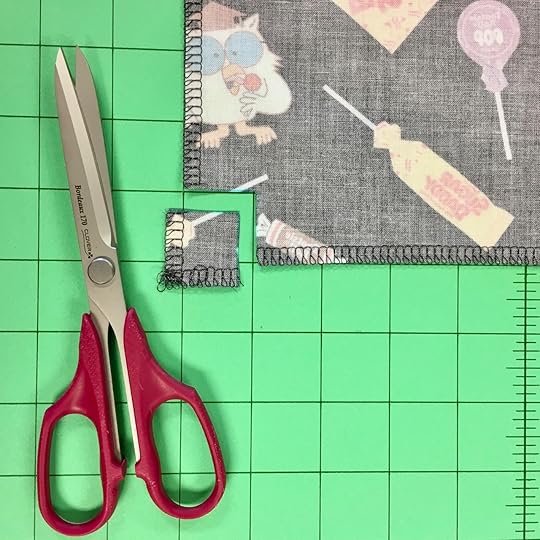
Then, stitch the final embroidery sequence. This stitching gives a cutting guideline.
Trim the block. It’s the perfect size!
There are more design options to piece with your embroidery unit. The best part is that each block is perfect in size!
Watch Stress Free Quilting with Machine Embroidery ( Part One and Part Two ) on Sewing With Nancy online.


For a chance to win a copy of the Stress-Free Quilting with Machine Embroidery book with CD from Nancy’s Notions, leave a comment sharing your most stressful step in the quilting process.

Enter the NEW! 2019 Nancy Zieman Productions Fall Sewing Challenges!
Join the 2019 NZP Table Runner Sewing Challenge by stitching a table runner and showcasing your sewing and quilting talents. Table runner entries may be any color palette, feature any sewing, quilting, or machine embroidery techniques, and must be a size that fits on a kitchen or dining table—use your imagination! Find challenge details in the October 1st NZP Blog Posting .

All youth, age 15 and under, are invited to participate in the NEW! 2019 I Sew For Fun Kids’ Sewing Challenge! Enter the challenge by purchasing the Official 2019 I Sew For Fun Kids’ Sewing Challenge Cinch Sack Kit, at the NEW! NZP Shop. Quantities are limited! Find challenge details in the September 30th NZP Blog Posting.
Show us What You’re Making! We love to hear from you, so whether you’ve tried one of Nancy’s Sewing Patterns, or you’re planning on stitching a project you’ve seen on Sewing With Nancy or on The Nancy Zieman Productions Blog, share your experiences and photos with us on Facebook or Instagram!
Happy Stitching!
Team Nancy Zieman
Nancy Zieman Productions. LLC.

Content in this feed is © copyright 2019 by Nancy Zieman Productions, LLC and may not be republished without written permission. You’re welcome to forward the email to a friend or colleague but it’s not okay to add the RSS feed automatically as content on a blog or other website.
The FTC requires us to tell you that Nancy Zieman Productions, LLC has provided products by other companies in the course of doing business. The FTC requires us to advise you to take this information into consideration when reading this posting.
Make sure you are subscribed to Nancy Zieman Productions, LLC enews mailing list so you won’t miss a thing. Sign up here . Join us on Facebook , plus a host of other social media channels. Connect with Team Nancy and Friends today.


October 5, 2019
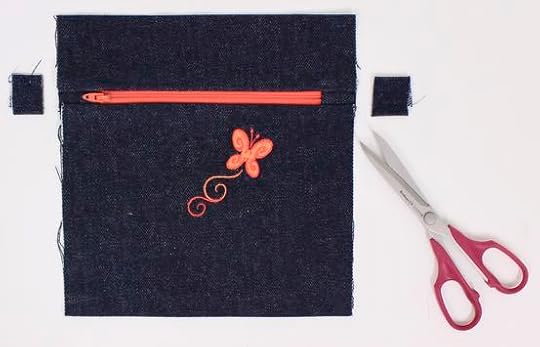
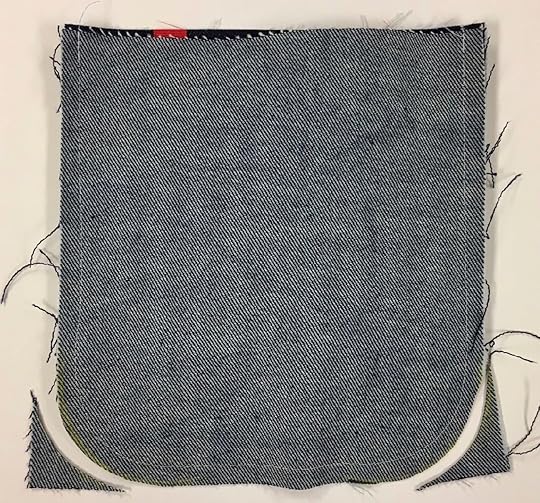
I Sew For Fun Project Tutorial: Shoulder Bag

Introduce your youth sewing partner to sewing zippers. Choose 3/8 yd. denim-weight fabric, two 1-yard cuts of ribbon, a coordinating 12″ zipper, and stitch this Easy Shoulder Bag. FREE! I Sew For Fun Shoulder Bag Tutorial by Nancy Zieman.

You’ll find this easy sewing project, plus 19 additional I Sew For Fun projects, in Nancy Zieman’s 72-page book, I Sew For Fun. Nancy shares her step-by-step directions for 20 super-easy sewing projects.
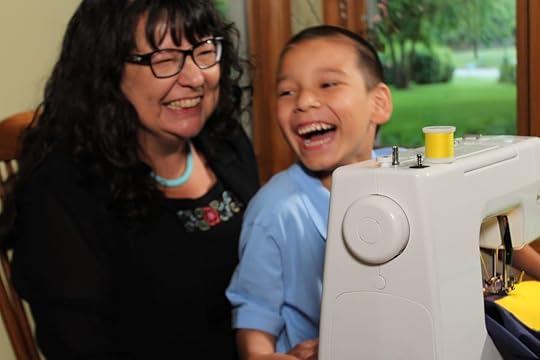
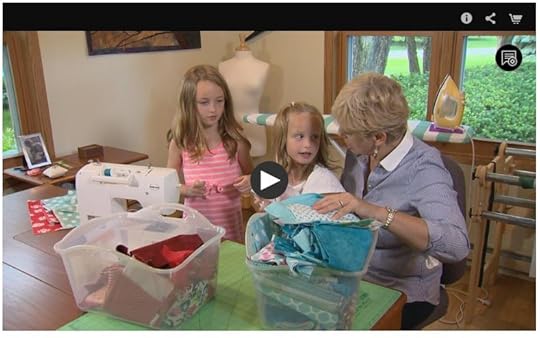
Tune in and watch Nancy and her granddaughters, along with friends, take a modern approach to sewing. Nancy shares her team sewing-for-fun experience along with many tips for a big partner, and numerous insights for involving a little sewing partner—all while making simple, easy to sew kid-friendly projects. Watch I Sew For Fun on Sewing With Nancy!
Shoulder Bag Sewing Tutorial
Here’s a stylin’ denim shoulder bag with streamlined shoulder straps and an easy zipper technique. The machine embroidery is optional. Kids love to be part of the embroidery process.
Approximate finished size: 8″ x 8-1/2″ excluding strap
Supplies Needed:
3/8 yd. denim or cotton duck canvas
1 yd. 7/8″ wide grosgrain ribbon
1 yd. 3/8″ wide grosgrain ribbon
12″ nylon coil zipper
Optional Notions:
Optional: Paper Glue stick
Optional: Machine embroidery design
Optional: Stabilizer to back embroidery design
Optional: Embroidery thread
·Optional: Embroidery needle
Optional: I Sew For Fun Notions:
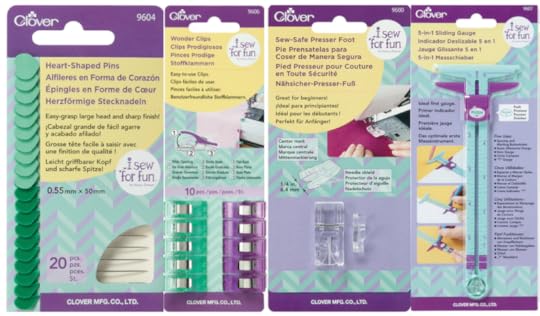
I Sew For Fun Heart-Shaped Pins
I Sew For Fun Wonder Clips
I Sew For Fun Sew Safe Presser Foot
I Sew For Fun 5-in-1 Sliding Gauge
Instructions:
Please read all instructions before beginning. Use the width of the presser foot as the depth of the seam allowances.
1. Prepare and cut fabrics.
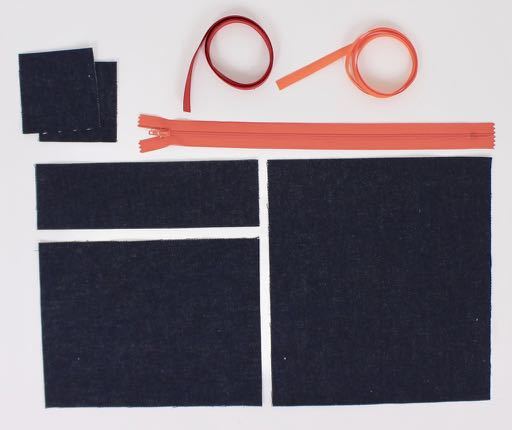
Using a rotary cutter, ruler, and mat, cut:
One 2½” x 8½” rectangle (upper front)
One 6½” x 8½” rectangle (lower front)
One 9″ x 8½” rectangle (back)
Two 3″ squares (zipper ends)

2. Prepare ribbon strap.
Stack and center ⅜” wide ribbon on length of ⅞” wide ribbon. Secure with pins, Wonder Clips, or glue stick.
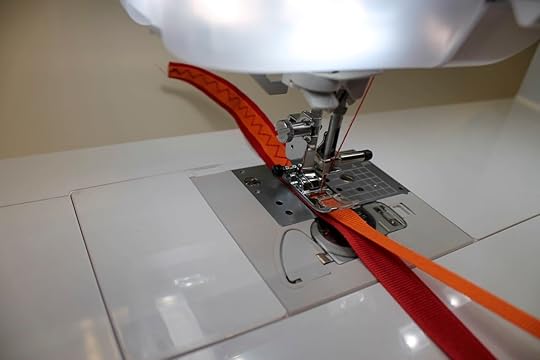

Stitch ribbons together lengthwise using a decorative stitch.
 You’ll find many decorative stitch options to use. Test out several on fabric before choosing one for the bag.
3. Optional: Add machine embroidery.
The world of machine embroidery is stimulating, satisfying and exciting. Your embroidery machine has an amazing wealth of options and designs, just waiting for the two of you.

Position embroider design on lower bag front, allowing sufficient space around design for zipper and side seam allowances.
Stitch machine embroidery design on bag front following manufacturer’s instructions
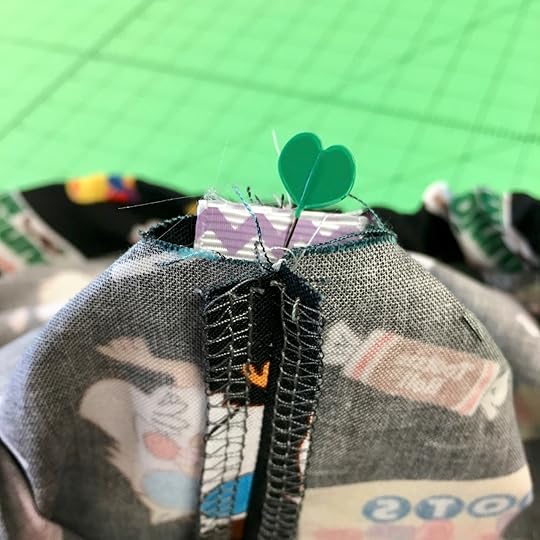
4. Attach zipper.
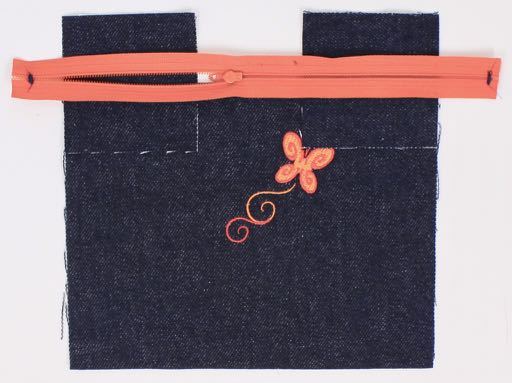
Align 3″ fabric squares, right side up, along each side of the width of the lower bag front. Center zipper, right side down, over squares. Note: Make certain the zipper pull is in between the two 3” fabric squares as illustrated. (Later you’ll turn the bag inside out through the zipper opening.)
Wrap fabric square around zipper and . Repeat with opposite upper edge of lower bag front.
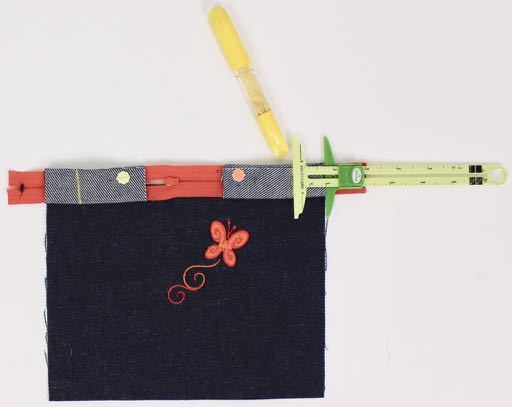
Mark 1″ from both sides over the zipper/fabric. Carefully remove zipper from lower bag front after marking.

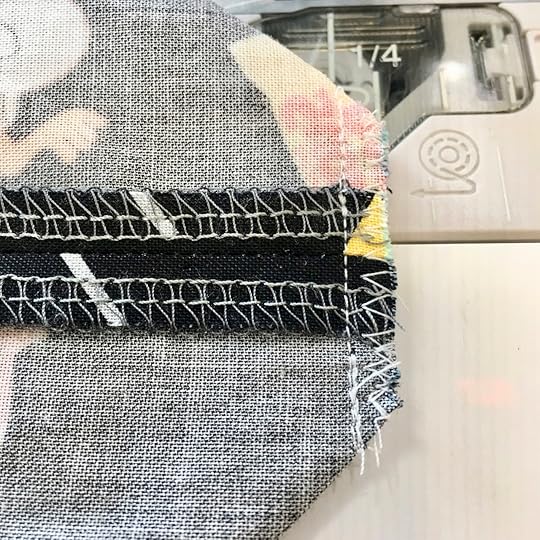
Stitch through zipper and wrapped fabric at markings.

Trim ¼” from outside of stitching.

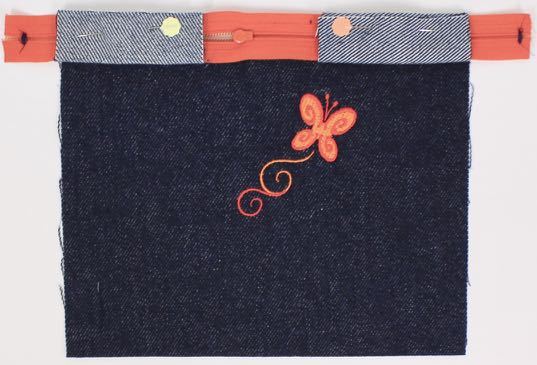
Turn fabric on zipper ends right side out.
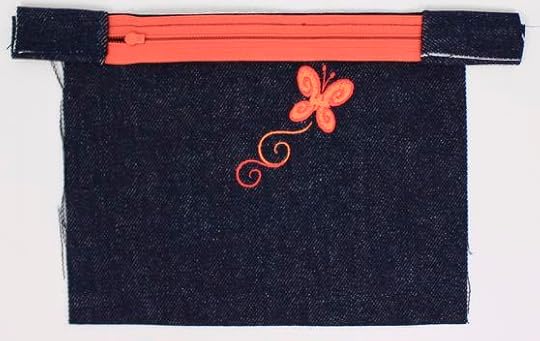
Align zipper to top edge of bag, meeting long edges, right sides together. Stitch, guiding edge of presser foot with cut edges.
Turn zipper right side up and edgestitch along fold.
Attach upper bag front piece to remaining edge of zipper using pins or Wonder Clips , meeting long edges, right sides together.
Stitch, guiding presser foot with cut edges.
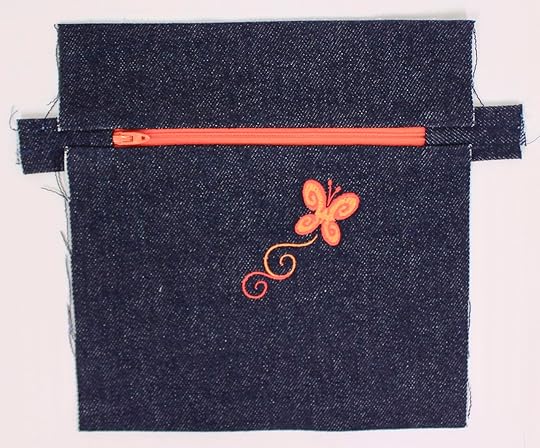
Turn upper bag right side up and edgestitch along fold.
Trim fabric extending from zipper even with bag.
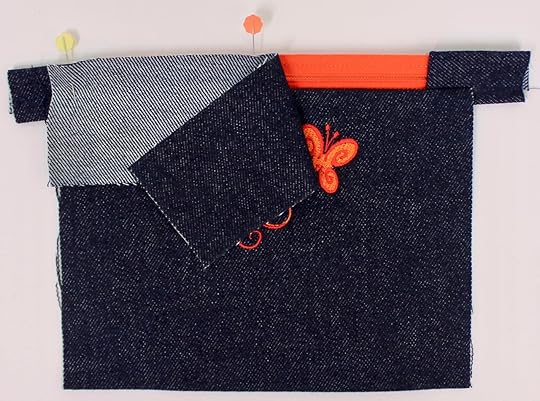
5. Add shoulder strap.
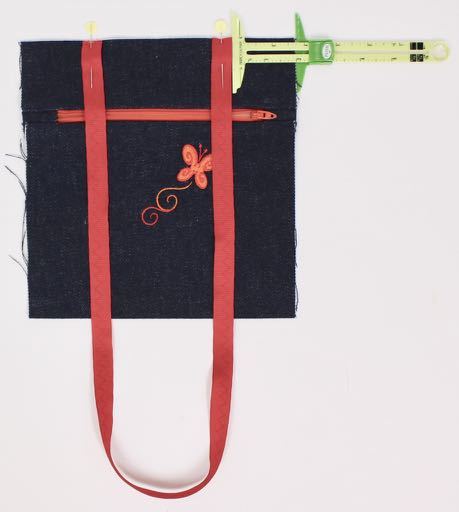
Secure ribbon to upper edges of bag front using pins or Wonder Clips , right sides together. Ribbon should be 2″ from side edge of bag. Make sure ribbon is not twisted.

Baste strap to bag.
6. Complete bag.
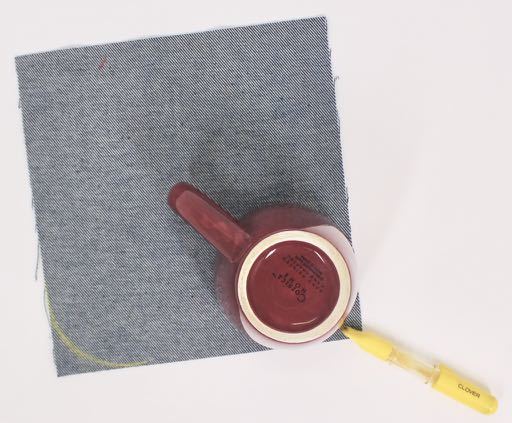
Use chalk to trace rounded edge of coffee mug on wrong side, lower edge of bag back.
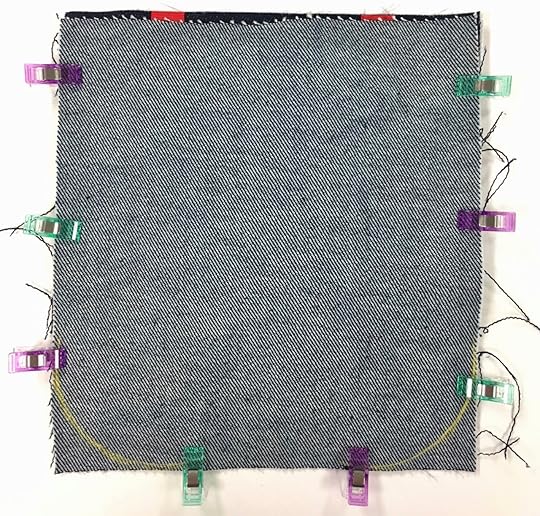
Pin or use Wonder Clip to hold bag front and back, right sides together, aligning cut edges. Make sure zipper is open and the ribbon strap is not caught in the bag seam allowance!
Stitch, beginning at one upper edge, and ending at the other upper edge. Trim excess fabric from curves.
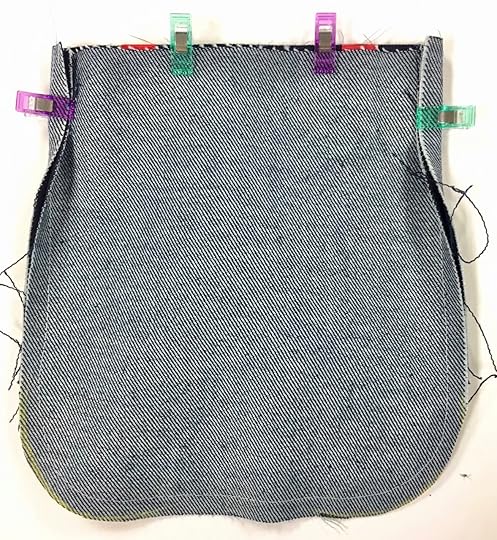
Wrap seams toward center, folding along stitching line.

Stitch seam across upper edge, starting at fold.

Angle cut seam allowances at corners.
Turn bag right side out through zipper opening.
You’ll find this easy sewing project, plus 19 additional I Sew For Fun projects, in Nancy Zieman’s 72-page book, I Sew For Fun. Nancy shares her step-by-step directions for 20 super-easy sewing projects.
Tune in and watch Nancy and her granddaughters, along with friends, take a modern approach to sewing. Nancy shares her team sewing-for-fun experience along with many tips for a big partner, and numerous insights for involving a little sewing partner—all while making simple, easy to sew kid-friendly projects. Watch I Sew For Fun on Sewing With Nancy!
Watch I Sew For Fun on Sewing With Nancy online at NancyZieman.com.
For a complete listing of all I Sew For Fun companion products by Nancy Zieman, visit isewforfun.com.
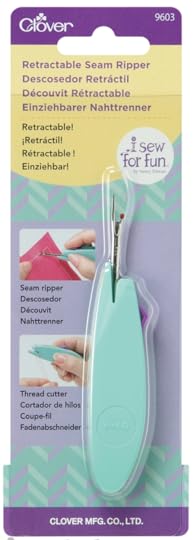
 To win a NEW! I Sew For Fun Retractable Seam Ripper from Clover, please leave a comment below sharing a sewing project you’ll be stitching with your little sewing partner.

The randomly selected winner of a set of eight Landscape Quilt Note Cards by Nancy Zieman, is Hannah W.
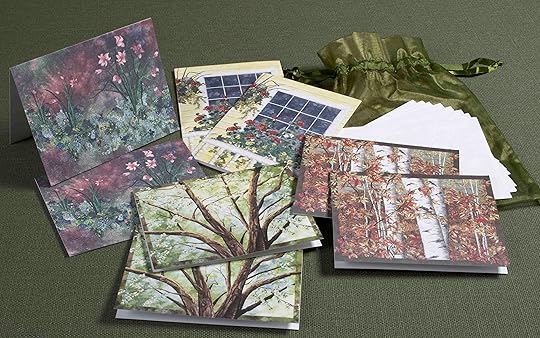
Her comment is: I think Peak Color is lovely.
Enter the NEW! 2019 Nancy Zieman Productions Fall Sewing Challenges!
Join the 2019 NZP Table Runner Sewing Challenge by stitching a table runner and showcasing your sewing and quilting talents. Table runner entries may be any color palette, feature any sewing, quilting, or machine embroidery techniques, and must be a size that fits on a kitchen or dining table—use your imagination! Find challenge details in the October 1st NZP Blog Posting .
All youth, age 15 and under, are invited to participate in the NEW! 2019 I Sew For Fun Kids’ Sewing Challenge! Enter the challenge by purchasing the Official 2019 I Sew For Fun Kids’ Sewing Challenge Cinch Sack Kit, at the NEW! NZP Shop. Quantities are limited! Find challenge details in the September 30th NZP Blog Posting.
Show us What You’re Making! We love to hear from you, so whether you’ve tried one of Nancy’s Sewing Patterns, or you’re planning on stitching a project you’ve seen on Sewing With Nancy or on The Nancy Zieman Productions Blog, share your experiences and photos with us on Facebook or Instagram!
Happy Sewing!
Team Nancy Zieman
Nancy Zieman Productions. LLC.
Content in this feed is © copyright 2019 by Nancy Zieman Productions, LLC and may not be republished without written permission. You’re welcome to forward the email to a friend or colleague but it’s not okay to add the RSS feed automatically as content on a blog or other website.
The FTC requires us to tell you that Nancy Zieman Productions, LLC has provided products by other companies in the course of doing business. The FTC requires us to advise you to take this information into consideration when reading this posting.
Make sure you are subscribed to Nancy Zieman Productions, LLC enews mailing list so you won’t miss a thing. Sign up here . Join us on Facebook , plus a host of other social media channels. Connect With Nancy and Friends today!
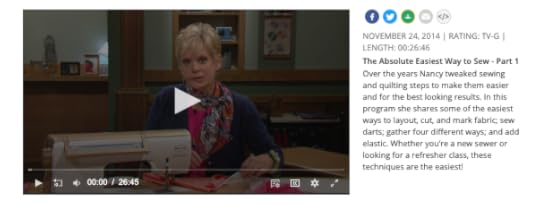
October 3, 2019
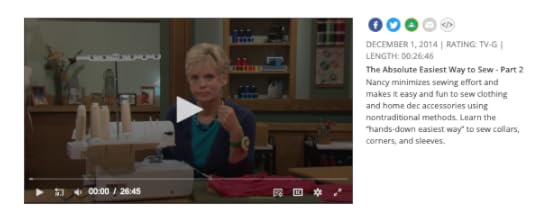
The Absolute Easiest Way to Sew Part Two on Sewing With Nancy
Collars are so easy to sew that even a first time stitcher will have success! Learn Nancy Zieman’s “hands-down easiest way” to sew collars, corners, and sleeves.
The Absolute Easiest Way to Sew Collars
In the second episode of The Absolute Easiest Way to Sew Collars on Sewing With Nancy, Nancy shares her favorite absolute easiest way to sew collars, corners, and sleeves.
Interface the collars: Cut out two collar shapes from lightweight fusible interfacing and fuse one to the wrong side of upper collar, and one to wrong side of under collar.
Meet collars right sides together. Stitch outer collar seam.
Grade seam, trimming under collar seam allowance narrower than the upper collar.

Press seam flat; then press toward under collar.
Understitch, stitching seam allowance to the under collar: We like to use a multi-stitch zigzag. Or, you could use a straight stitch.
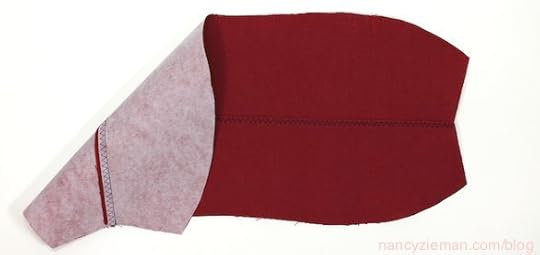
Fold collar along first stitching line, right sides together. Meet collar front edges. Notice outer collar seam allowance is already graded (trimmed) and completely understitched. Nancy Zieman’s wrapped-corner sewing technique is what makes it the absolute easiest way to sew collars!

Stitch both collar front seams.
Grade seam allowances, and angle cut corners.
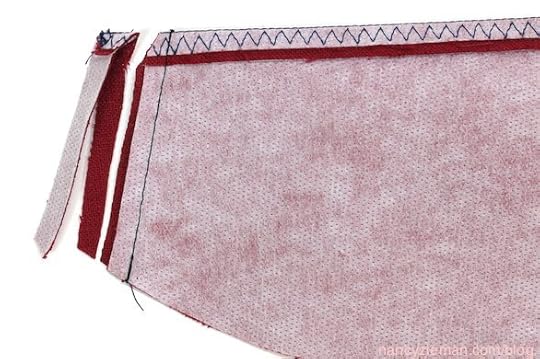
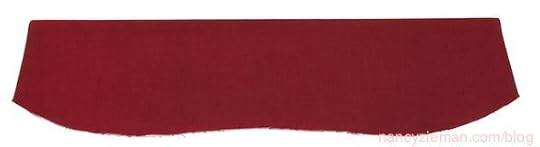
Turn collar right side out and press. That’s it!
All of Nancy’s easiest sewing tips are in one book .
The Absolute Easiest Way to Sew chapters include:
Sewing Notions
Sewing Machine Confidence
Serger Spotlight
Patterns
Fabric Facts
Sewing Basics
Beyond the Basics

Watch The Absolute Easiest Way to Sew (Part One, Part Two, and Part Three) on Sewing With Nancy online.

For a chance to win a copy of The Absolute Easiest Way to Sew book from Nancy’s Notions, leave a comment sharing your most common sewing challenge.

Enter the Nancy Zieman Productions 2019 Fall Table Runner Sewing Challenge!
Join the 2019 NZP Table Runner Sewing Challenge by stitching a table runner and showcasing your sewing and quilting talents. Table runner entries may be any color palette, feature any sewing, quilting, or machine embroidery techniques, and must be a size that fits on a kitchen or dining table—use your imagination! Find challenge details in the October 1st NZP Blog Posting .
All youth, age 15 and under, are invited to participate in the NEW! 2019 I Sew For Fun Kids’ Sewing Challenge! Enter the challenge by purchasing the Official 2019 I Sew For Fun Kids’ Sewing Challenge Cinch Sack Kit, at the NEW! NZP Shop. Quantities are limited! Find challenge details in the September 24th NZP Blog Posting.
Show us What You’re Making! We love to hear from you, so whether you’ve tried one of Nancy’s Sewing Patterns, or you’re planning on stitching a project you’ve seen on Sewing With Nancy or on The Nancy Zieman Productions Blog, share your experiences and photos with us on Facebook or Instagram!
Happy Sewing!
Team Nancy Zieman
Nancy Zieman Productions. LLC.
Content in this feed is © copyright 2019 by Nancy Zieman Productions, LLC and may not be republished without written permission. You’re welcome to forward the email to a friend or colleague but it’s not okay to add the RSS feed automatically as content on a blog or other website.
The FTC requires us to tell you that Nancy Zieman Productions, LLC has provided products by other companies in the course of doing business. The FTC requires us to advise you to take this information into consideration when reading this posting.
Make sure you are subscribed to Nancy Zieman Productions, LLC enews mailing list so you won’t miss a thing. Sign up here . Join us on Facebook , plus a host of other social media channels. Connect With Nancy and Friends today.
October 1, 2019
Nancy Zieman Productions 2019 Fall Table Runner Sewing Challenge Announced
The Nancy Zieman Productions Team is excited to announce the 2019 Table Runner Sewing Challenge, taking place October 1–29, 2019! You’re invited to join the 2019 NZP Table Runner Sewing Challenge by stitching a table runner and showcasing your sewing and quilting talents. Table runner entries may be any color palette, feature any sewing, quilting, or machine embroidery techniques, and must be a size that fits on a kitchen or dining table—use your imagination! Enter one table runner that has been sewn within the last year and has not been entered into a previous Nancy Zieman Productions Table Runner Sewing Challenge. All challenge details are listed near the bottom of this posting. You could win a prize from one of our generous 2019 Table Runner Sewing Challenge Sponsors!
Join the 2019 Nancy Zieman Productions Fall Table Runner Sewing Challenge!
Choose any design ideas, including the FREE! Table Runner Sewing Tutorial (below), or choose one of our Classic NZP Table Runner Sewing Tutorials for inspiration, then enter the Fall 2019 Table Runner Sewing Challenge. Deadline to enter is October 22, 2019.
FREE! Afternoon Picnic Table Runner Tutorial!
Make sure you are subscribed to Nancy Zieman Productions enews—so you won’t miss a thing. Sign up today! Join us on Facebook, Pinterest, and Instagram.
 Finished Size Approximately 12-1/2″ x 36-1/2″
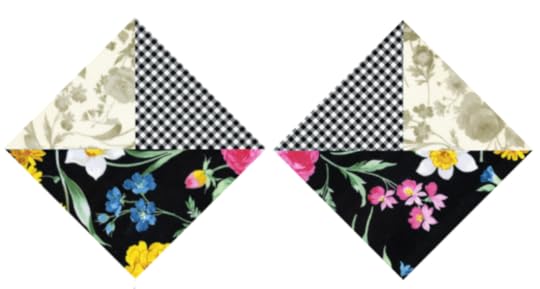
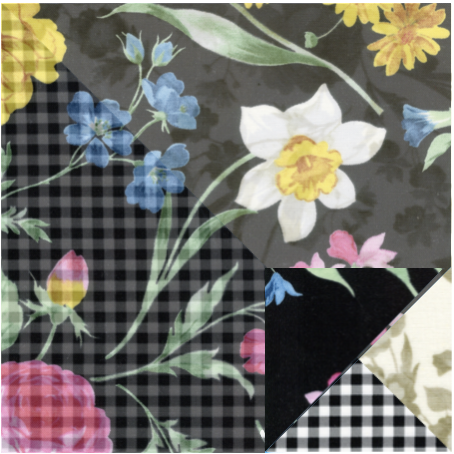
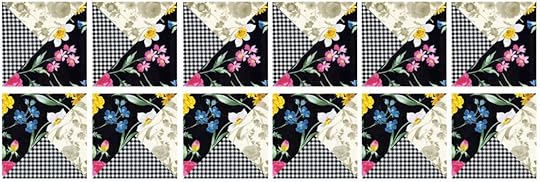
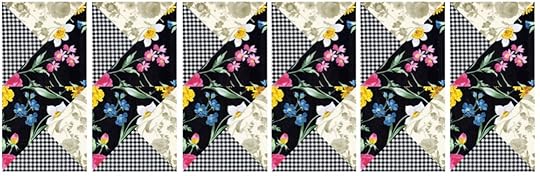
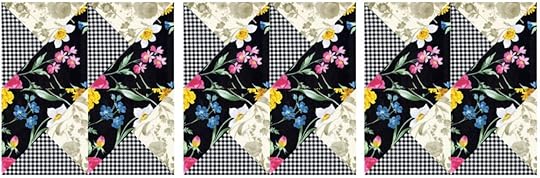
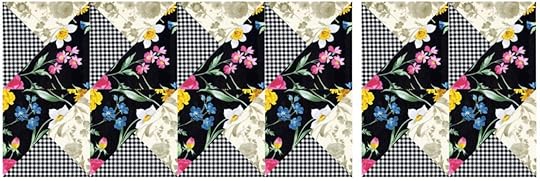
This NEW! Puzzling parallelogram Patchwork Table Runner, by The Nancy Zieman Productions Team, goes together in an afternoon of sewing and features twelve 6″ modified 1/4-square triangle quilt blocks—all made from just three fat quarters, and a fourth fat quarter for binding. This design looks complicated, but is truly easy to make and is a great project for beginning quilters.
Supplies
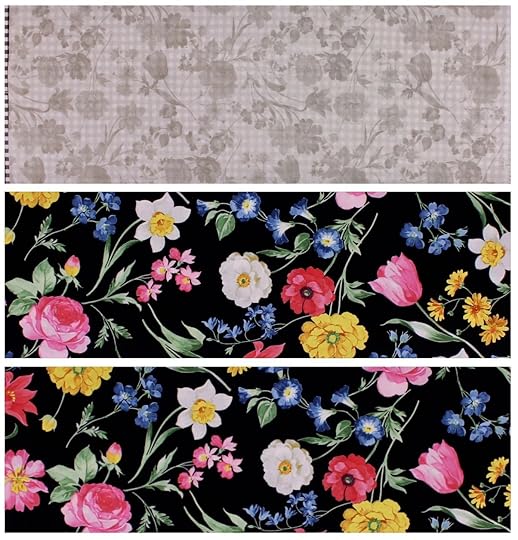
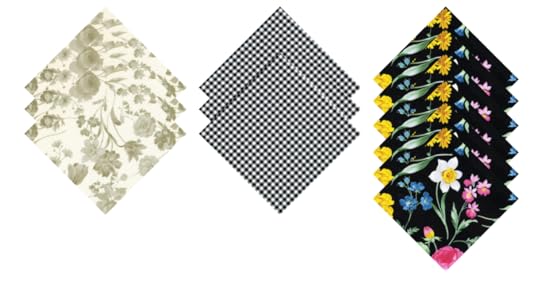
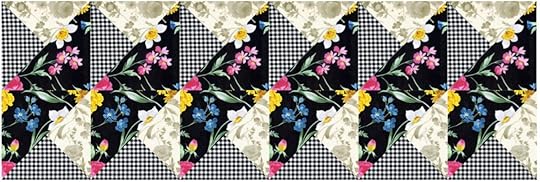
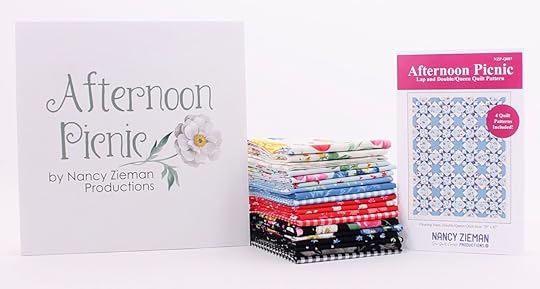
Three fat quarter fabrics (for quilt blocks) from Nancy Zieman’s NEW! Afternoon Picnic Fat Quarter Pack from Riley Blake Designs.
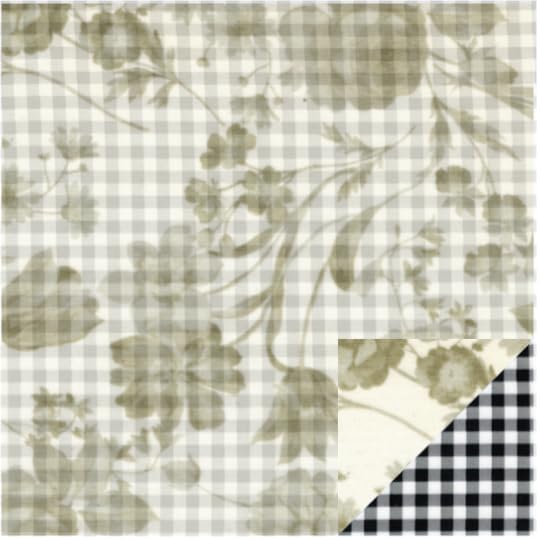
Afternoon Picnic Cream Tonal(light), Afternoon Picnic Black Gingham(medium) & Afternoon Picnic Black Main(dark)
Choose one additional fat quarter (for binding the table runner). We selected the Afternoon Picnic Blue Tonal from the NEW! Afternoon Picnic Fat Quarter Pack from Riley Blake Designs.
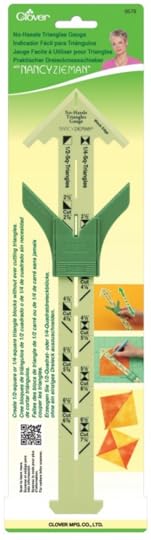
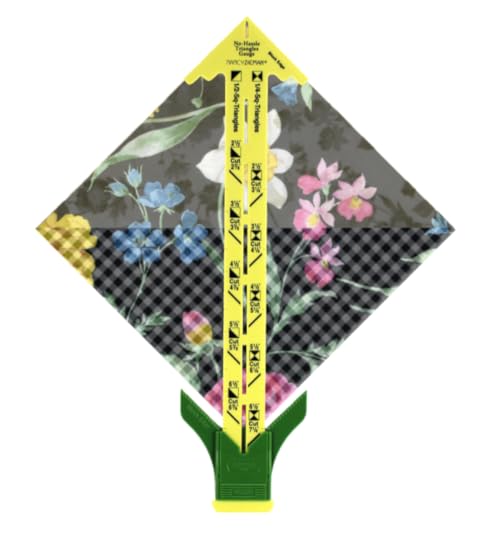
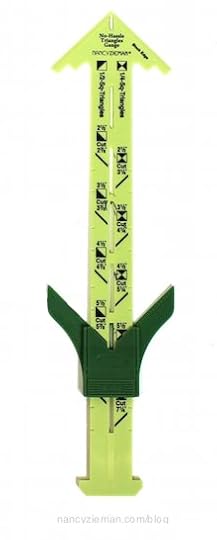
Nancy Zieman’s No-Hassle Triangle Gauge by Clover
3/8 yd. Pellon Fleece Batting
3/8 yd. backing fabric
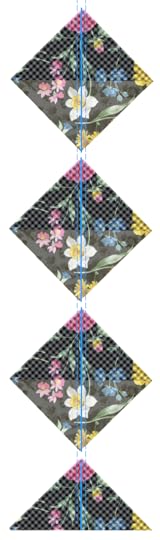
Create 12 Modified 1/4-Square Triangle Units
Make this easy table runner top with a dozen super-quick Modified Quarter-Square Triangle Blocks using the speediest, most accurate, no-math, “Nancy Zieman” way. Make all 12 blocks from just three fat quarters!
Each block is a 6-1/2″ (6″ when sewn into table runner).
Cut Fabrics
1. Cut crosswise fabric strips.
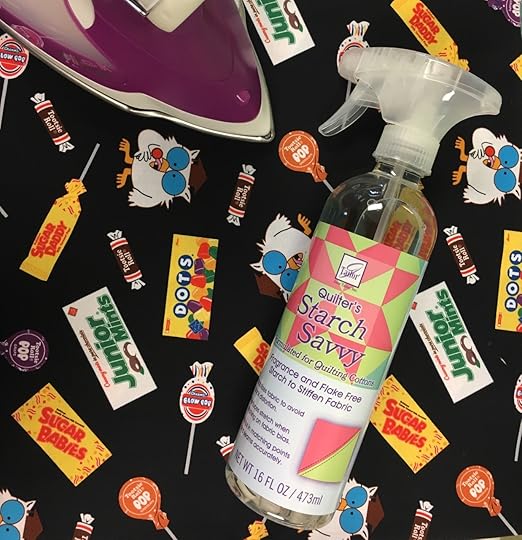
Spray starch fabric or use starch alternative, such as June Tailor’s Quilter’s Starch Savvy.
Stack two starched fat quarters, Afternoon Picnic Cream Tonal and Afternoon Picnic Black Gingham, right sides together. Cut one 7-1/2″ crosswise strip, from each of the two fabrics.
Cut two 7″ crosswise strips, from Afternoon Picnic Black Main.
2. Cut squares.
Subcut strips into squares—also known as block sets.
Cut three 7-1/2″ squares from Afternoon Picnic Cream Tonal.
Cut three 7-1/2″ squares from Afternoon Picnic Black Gingham .
Cut six 7″ squares from Afternoon Picnic Black Main.
Construct The Units
All seam allowances are scant 1/4″ unless otherwise stated.
The step-by-step photos illustrate construction of block pairs.
Half-Square Triangle Units (HSTs)
1. Create three 1/2-square triangle blocks.
Align 7-1/2″ squares, from Afternoon Picnic Cream Tonal and Black Gingham , right sides together.

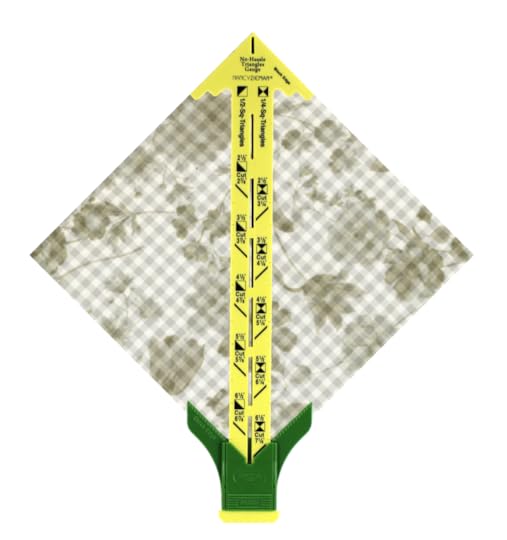
Mark block sets using a No-Hassle Triangles Gauge and fabric marking pen. The left side of the gauge is designated to create 1/2-square triangle blocks. Depress button on sliding portion of the gauge and move to size of the desired 1/2-square triangle.
Place No-Hassle Triangles Gauge on block set, corner to corner. Match corner marks of gauge with corner of block sets. Mark fabric through center of gauge with fabric marking pen.
2. Stitch blocks.
Attach Patchwork Foot to sewing machine (optional).
Set machine for straight stitch 2.0–2.5 mm.
Align foot along one side of center mark; stitch. Do not cut the thread.
“Kiss” the next block set to the stitched block, and chain stitch from one block to the other.
Rotate blocks 180 degrees, and stitch the second side of the blocks.
Continue chain stitching until all three block units have been stitched.
Clip threads between chain stitched blocks.
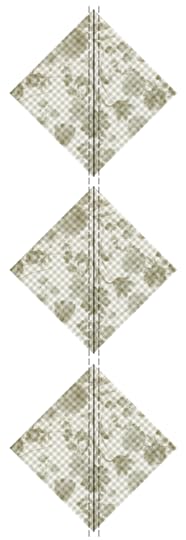
Cut the blocks apart along center markings with rotary cutter, ruler and mat. Clip threads between blocks.

Press seams to the Afternoon Picnic Black Gingham side of the squares.
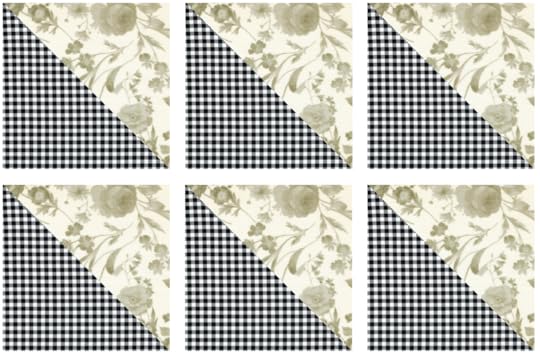
Create Modified 1/4-square Blocks
Align each 1/2-square triangle unit(above) to one 7″ Afternoon Picnic Black Main square, right sides together.
Mark as a 1/4-square using a No-Hassle Triangles Gauge .
Stitch squares.
 The advantage of using the No-Hassle Triangle Gauge is accuracy. It’s easy to double-check that the block set fits within the confines of the gauge. If the block set extends beyond or is shorter, trim or cut another block.
Using a rotary cutter, ruler and mat, cut squares into modified 1/4-triangles.
Press seams to the Afternoon Picnic Black Main side of the square.
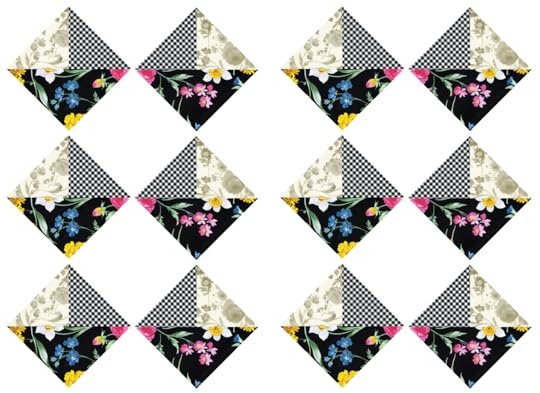
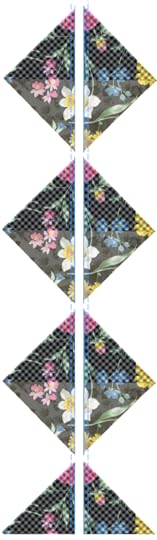
3. Lay out blocks into desired table runner quilt pattern. Team NZP had fun rotating the 12 Modified 1/4-Square Triangle Units, and we enjoyed discovering fun table runner design options!

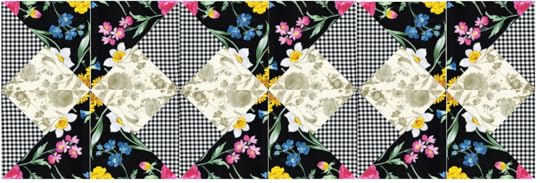
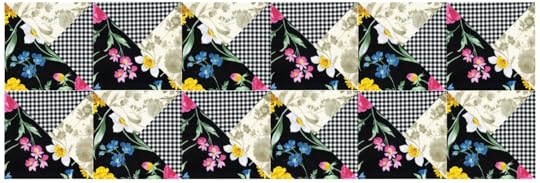
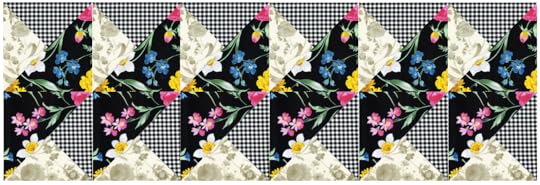
4. Team NZP selected the fourth layout option (above) and we named our design, Puzzling Parallelogram Patchwork!
Assemble and Finish Table Runner
Lay out blocks into desired table runner quilt pattern.
Place blocks from top row on blocks from bottom row, right sides together, creating six sets. Chain stitch from one block set to the next. Clip threads between. Press seams in opposite directions.
Place block sets from left to right first column on to second column, right sides together, making creating three sets. Chain stitch from one set to the next. Clip threads between. Press seams to open or to one side.
Place block sets from left to right first set on to middle set, right sides together. Stitch. Press seams to open or to one side.
Place block from right on to middle set right sides together. Stitch. Press seams to open or to one side.
Cut the Backing
Cut the backing piece approximately 13-1/2″ x 38-1/2″ (or larger).
Layer the quilt backing (wrong side up), the Pellon Fleece Batting, and the table runner quilt top(right side up)—to create a quilt sandwich. Pin layers together with safety pins.
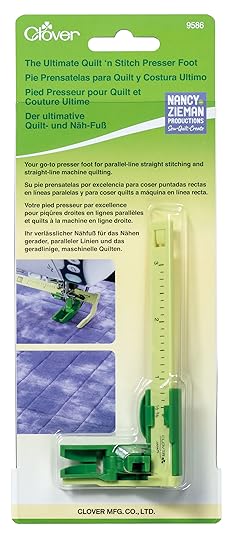
Machine quilt the table runner layers together with straight line machine quilting using The Ultimate Quilt ‘n Stitch Presser Foot by Nancy Zieman Productions for Clover.
Bind the table runner using Nancy Zieman’s Easy quilt binding instructions.
For more quilting inspiration for 1/2-square and 1/4-square triangles, watch No-Hassle Triangles Quilt Blocks (Part One and Part Two) on The Best of Sewing With Nancy online.
Over $700 in prizes! Thank you to our generous 2019 Fall Table Runner Challenge Sponsors!

Clover-USA: Iron Finger, Point 2 Point Turner, Hot Hemmer, Hold it Precision Stiletto, Hot Ruler, Roll & Press, Wonder Clips (10pc/Asst) and Bordeaux Ultimate Scissors 130. A $154 value


Riley Blake Designs: 10″ Stacker—Painter’s Pallet by Joy Studio, 2 x 5″ Stackers—In the Meadow by Keera Job, Riley Blake Designs Spray Mister Bottle, 9.5″ Cute Cuts Trim It Ruler by Lori Holt of Bee in my Bonnet, 1 Pack Lauren Nash Washi Tape, 4″ Magnetic Pin Bowl by Pleasant Home. A $110 value


Martingale: One $100 electronic gift certificate to shopmartingale.com. A $100 value

June Tailor : Quilt As You Go Wine Totes—3 pack, Quilt As You Go Pillow Cover—3 pack, Quilt As You Go Tree Skirt—one pack, Quilt As You Go Placemat—Venice Pattern, Quilt As You Go Table Runner—Venice Pattern and Starch Savvy, 16 ounce trigger. An $80 value


Nancy Zieman Productions: NEW! Afternoon Picnic Fat Quarter Pack and Afternoon Picnic Quilt Pattern. A $72 value

Stitch it! Sisters: NEW! Modern Floating Triangles Wall Hanging/Table Runner Bundle Box. Including: NEW! Modern Floating Triangles Wall Hanging/Table Runner Pattern, Riley Blake Cotton Fabrics and Clover’s Ultimate Quilt ’n Stitch Presser Foot by Nancy Zieman. A $62 value

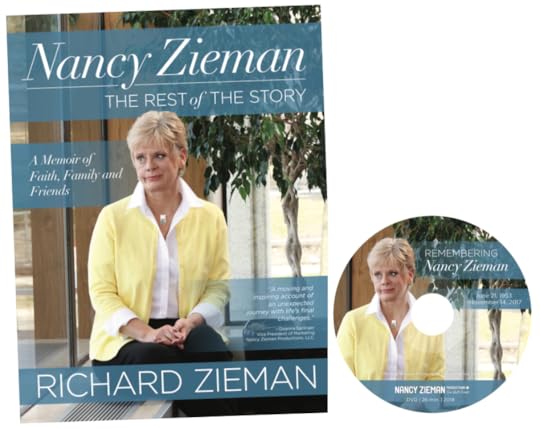
Sewing With Nancy: Five Random Winners of Nancy Zieman The Rest of the Story—A Memoir of Faith, Family, and Friends Book with DVD by Richard Zieman.
Enter the Nancy Zieman Productions Fall Table Runner Sewing Challenge today!
Join the 2019 NZP Table Runner Sewing Challenge by stitching a table runner and showcasing your sewing and quilting talents. Table runner entries may be any color palette, feature any sewing, quilting, or machine embroidery techniques, and must be a size that fits on a kitchen or dining table—use your imagination!
Enter one table runner that has been sewn within the last year and has not been entered into a previous Nancy Zieman Productions Table Runner Sewing Challenge.
How to enter: Send one high-resolution image of your table runner to info@ziemanproductions.com by 5 p.m. CT on Tuesday, October 22, 2019. Include your full name, hometown, and a sentence or two about your table runner.
All table runner entries will be judged, and winning quilts will receive a prize from our generous sponsors! Explore the full list of prizes, totaling over $700 (see above).
Winners will be announced, here at the NZP Blog, on October 29, 2019.
Share your progress on social media throughout the challenge by using #NZPTableRunner2019! The NZP Team will post winning entries on October 29—right here at the NZP Blog. Be sure to sign up for enews updates from the NZP Team.
Nancy Zieman Productions Giveaway!
For a chance to be the random winner of a No-Hassle Triangles Gauge by Nancy Zieman Productions for Clover, please leave a comment sharing your thoughts and interest in joining the 2019 Nancy Zieman Productions Table Runner Sewing Challenge!
All youth, age 15 and under, are invited to participate in the NEW! 2019 I Sew For Fun Kids’ Sewing Challenge! Enter the challenge by purchasing the Official 2019 I Sew For Fun Kids’ Sewing Challenge Cinch Sack Kit, at the NEW! NZP Shop. Quantities are limited! Find challenge details in the September 24 NZP Blog Posting.
Be sure you’re subscribed to the Nancy Zieman Productions enews—so you won’t miss a thing. Sign up today! And, join Team NZP on Facebook, Pinterest, and Instagram.
Happy Quilting,
Team Nancy Zieman
Nancy Zieman Productions, LLC.
Content in this feed is © copyright 2019 by Nancy Zieman Productions, LLC and may not be republished without written permission. You’re welcome to forward the email to a friend or colleague but it’s not okay to add the RSS feed automatically as content on a blog or other website.
The FTC requires us to tell you that Nancy Zieman Productions, LLC has provided products by other companies in the course of doing business. The FTC requires us to advise you to take this information into consideration when reading this posting.
Make sure you are subscribed to Nancy Zieman Productions, LLC enews mailing list so you won’t miss a thing. Sign up here . Join us on Facebook , plus a host of other social media channels. Connect With Nancy and Friends today!
September 30, 2019
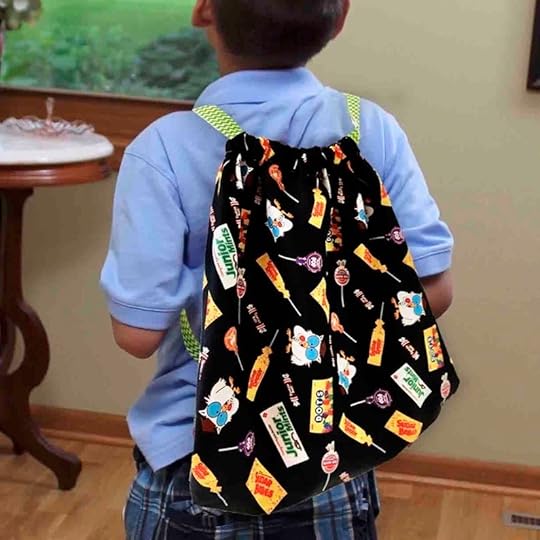
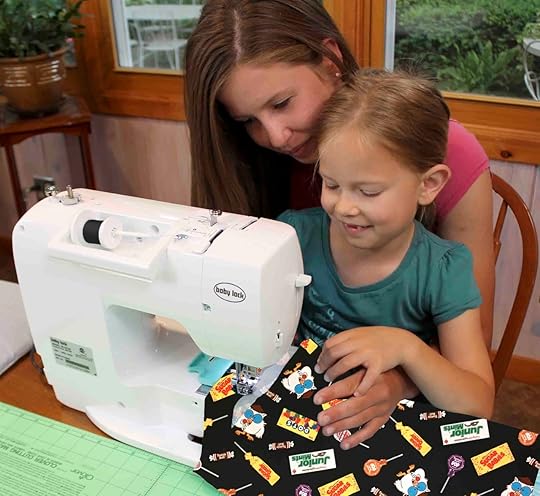
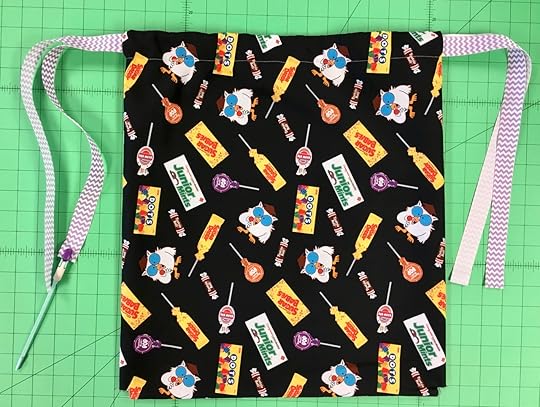
NEW! I Sew For Fun Kids’ Sewing Challenge Part Two: Cinch Sack Sewing Steps
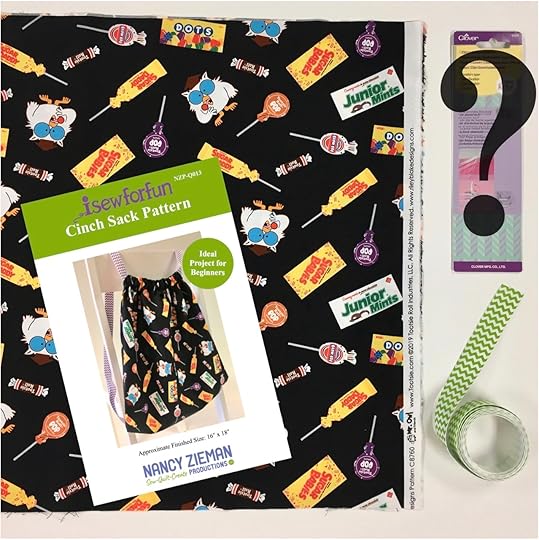
![]()
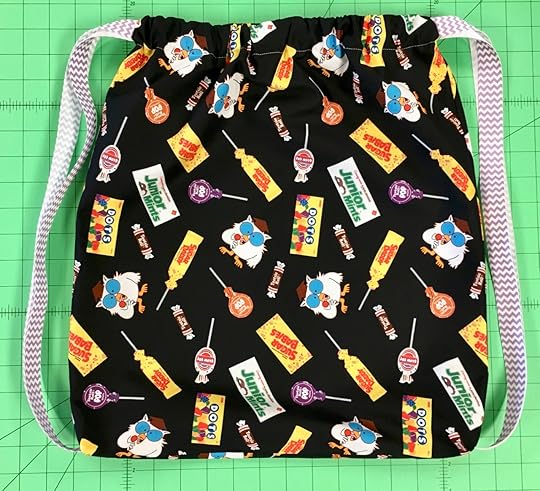
NEW! I Sew For Fun Kids’ Sewing Challenge sponsored by Nancy Zieman Productions, Clover Needlecraft, and Riley Blake Designs. All Youth ages 15 and under are invited to share how they “sew for fun”— while making a cinch sack with Mr. Owl and Friends fabric by Riley Blake Designs, along with an I Sew For Fun sewing tool by Clover.
Youth age 15 and under may participate in the NEW! 2019 I Sew For Fun Kids’ Sewing Challenge by reading and understanding the contest rules listed here, sewing a cinch sack using one of the 2019 I Sew For Fun Kids’ Sewing Challenge Cinch Sack Kits purchased by an adult, and emailing two photos to info@ziemanproductions.com on or before October 28, 2019: One photo showing youth sewing/working on the challenge project using the I Sew For Fun Tool (included in the challenge kit), and a second photo of youth wearing and/or using completed cinch sack. Note: It’s okay if you prefer not to show youth’s face in photos. Be sure to include challenge participant’s first name, city, state, and age–when emailing photos to info@ziemanproductions.com.
To reserve a spot in the NEW! 2019 I Sew For Fun Kids’ Sewing Challenge, an adult parent or guardian must purchase the Official 2019 I Sew For Fun Kids’ Sewing Challenge Cinch Sack Kit. Purchase the challenge kit at the NEW! NZP Shop, as soon as possible. Quantities are limited!
NEW! I Sew For Fun Kids’ Sewing Challenge Kick Off—Part One: Purchase and Prep Your Supplies
Supplies Needed
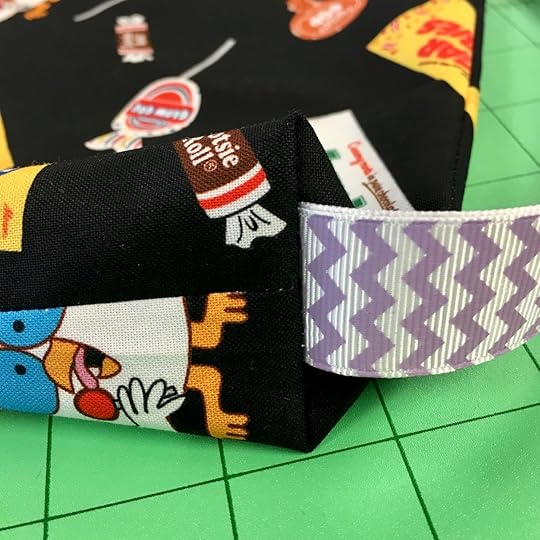
Official 2019 I Sew For Fun Kids’ Sewing Challenge Cinch Sack Kit includes 1/2 yard Mr. Owl and Friends fabric by Riley Blake Designs, one mystery I Sew For Fun sewing tool by Clover, 3-1/2 yards purple/white or green/white ribbon, and the official Cinch Sack Sewing Pattern by Nancy Zieman Productions.
Sewing Machine, sewing thread, and basic sewing tools.
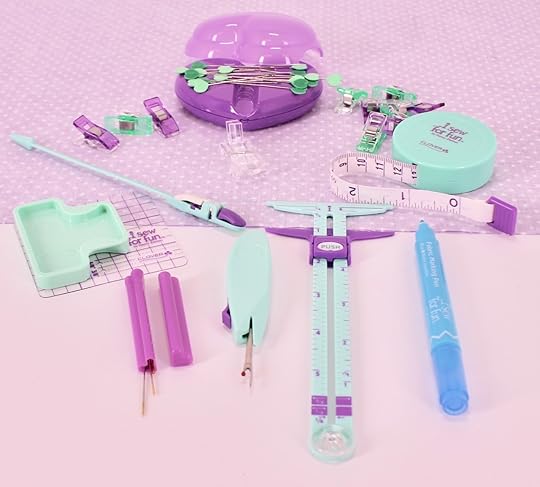
Here’s a listing of the ISFF Tools we’ve used to make our cinch sack: I Sew For Fun 5-in-1 Sliding Gauge, I Sew For Fun Clip ‘n Glide Bodkin, I Sew For Fun Fabric Marking Pen, I Sew For Fun Heart-Shaped Flat Head Straight Pins, I Sew For Fun Heart-Shaped Magnetic Pin Caddy, I Sew For Fun Point 2 Point Turner, I Sew For Fun Roll ‘n Press, I Sew For Fun Seam Guide, I Sew For Fun Sew Safe Presser Foot, and I Sew For Fun Wonder Clips.
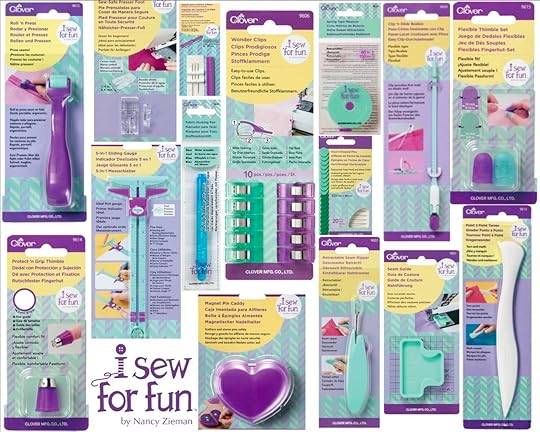
Helpful Notions
 Using the right sewing tools assists with creating a successful sewing project! Above is a photo showing all the I Sew For Fun Tools by Nancy Zieman Productions for Clover. You may use any of the above I Sew For Fun sewing tools while sewing your cinch sack challenge project!

As soon as you receive your 2019 I Sew For Fun Kids’ Sewing Challenge Cinch Sack Kit, start sewing your challenge project! You’re the designer: You may choose to use a different color ribbon for the straps, add a patch pocket from your stash fabric, or decorate your cinch sack as desired. Remember, you must use the Mr. Owl and Friends fabric, the Cinch Sack Sewing Pattern, and the I Sew For Fun sewing tool—all included with the challenge kit!

Show us What You’re Making! We love to hear from you, so email your photos—anytime—to The NZP Team at info@ziemanproductions.com, and/or share your experiences and photos with us on Facebook or Instagram!
Prep Before You Sew
Gather your sewing supplies and prep your fabric for sewing. Included with the Official 2019 I Sew For Fun Kids’ Sewing Challenge Cinch Sack Kit is the Cinch Sack Sewing Pattern. When you receive your challenge kit, open the package and locate the Cinch Sack Pattern. Read all the pattern directions, before beginning.
Before the sewing process, pressing and starching the fabric adds a bit of stiffness that helps make cutting and sewing easier.
Cutting Directions

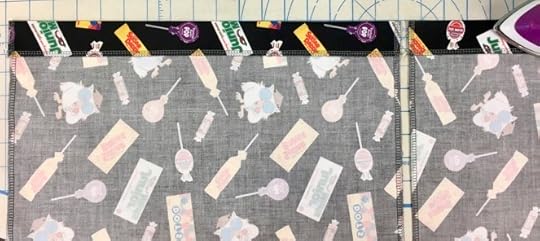
Using a scissors, or rotary cutter, ruler, and mat; cut two 17″ x 21″ fabric rectangles for cinch sack front and back.
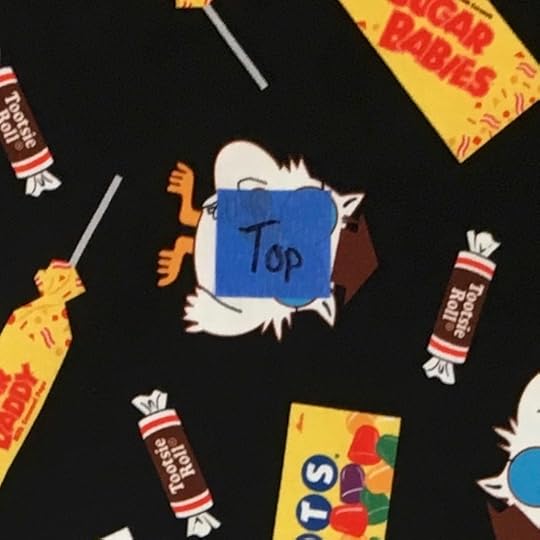
To easily identify the cinch sack top, during the sewing process, place a piece of painter’s tape—on both fabric rectangles—near the fabric wrong side, near the top 17″ wide edge.
Sewing Directions
Sew a cinch sack with our super-easy step-by-step directions. This sewing project is ideal for beginners! Stitch this project in a weekend, then wear the cinch sack as a backpack – for carrying books or workout gear. The cinch sack also makes a great trick or treat bag! Approximate Finished Size: 16″ x 18″ – fits most youth and adults
Use the edge of the I Sew For Fun (ISFF) Sew Safe Presser Foot – for a quick and easy seam allowance reference.
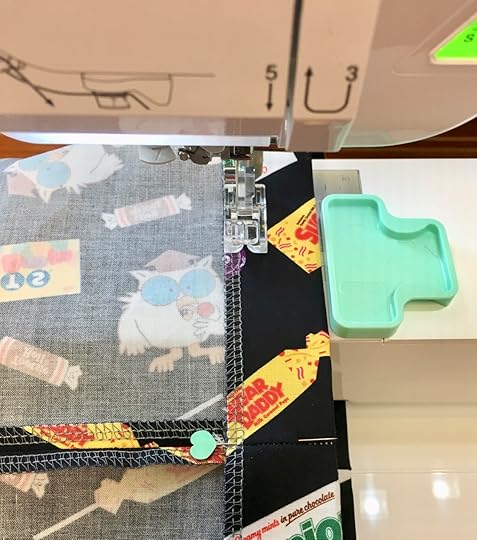
 Finish Raw Edges
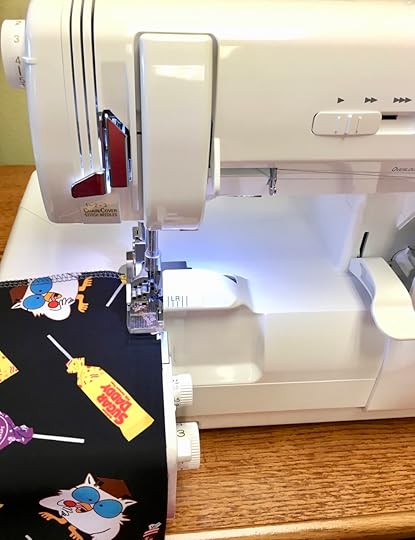
Clean finish cut edges with a zigzag stitch, or Serger machine stitching, around all four edges of both fabric rectangles.
Optional! Add a patch pocket to the front of your cinch sack.
Cut a contrasting 9″ x 16″ fabric rectangle for pocket.
Fold pocket rectangle right sides together, meeting short ends. Using the ISFF 5-in-1 Sliding Gauge, mark a 3″ seam opening along one long edge.
Stitch around three edges, leaving a 3″ opening for turning. Optional: Use Nancy Zieman’s Wrapped Corner Sewing Techniques to create quick and easy pointed corners.
Using the ISFF Point 2 Point Turner, turn pocket right side out. Press.
Center and pin patch pocket to cinch sack front, right sides up, with lower pocket edge approximately 4″ from lower edge of cinch sack front panel.
Stitch sides and lower edge of pocket, guiding pocket edge along edge of ISFF Sew Safe Presser Foot, and pivoting (with needle down) at corners. Backstitch to reinforce top edges of pocket.
Mark and Prep Cinch Sack

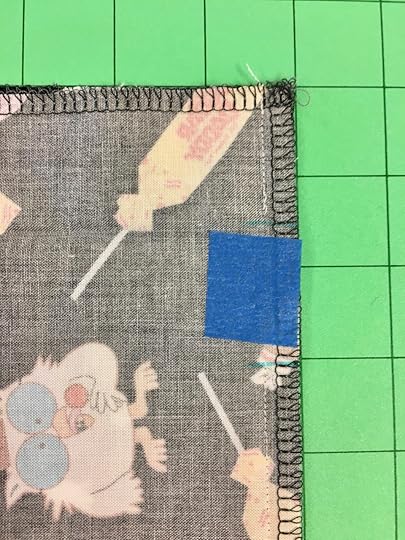
On the wrong side of upper right corner, using the ISFF 5-in-1 Sliding Gauge and ISFF Fabric Marking Pen, place a mark 1-1/4″ below top edge – at side seam. Place a second marking 1-1/4″ below the first marking. Repeat on all four front and back upper corers – this will later form the ribbon casing openings.

For reference later during the sewing process – place a piece of painter’s tape on the fabric wrong side, between each of the markings.
At lower left corner, using the ISFF 5-in-1 Sliding Gauge and ISFF Fabric Marking Pen, mark a 1″ square – to form a gusset.
Using a scissors, cut out lower 1″ corner square along marked lines. Repeat above steps on all four front and back lower corners.
At top edges, fold 1-1/4″ to wrong side on front and back panels. Press, then open. This step later forms ribbon casings.
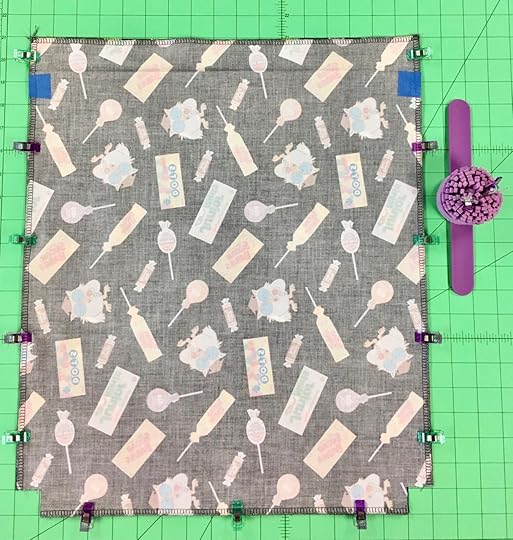
Place cinch sack front and back right sides together, aligning edges. Hold edges together temporarily with ISFF Wonder Clips.
Assemble Cinch Sack
Stitch side seams and lower edge seam.
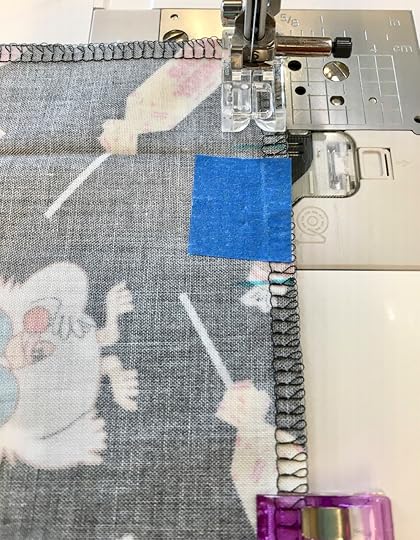
At upper right, stitch cinch sack side seam to first marking, backstitch and cut threads. Advance fabric under presser foot to second marking. Stitch remaining side seam, backstitching at the beginning and ending of seam. Repeat steps on remaining left side seam. Press seams open.
Placing a piece of painter’s tape on the fabric wrong side, between each of the markings, provides a visual marker for “no stitching zones”, and automatically forms the ribbon casing openings. It’s okay to remove the painter’s tape, after seams are stitched.
Stitch lower/bottom seam, backstitching at beginning and ending of seam.
Using the ISFF Roll ‘n Press, press seam open. The rolling action opens the seam—without the heat of an iron.
Fold over top edges at 1-1/4″ pressed line. Pin in place along clean finished edge.
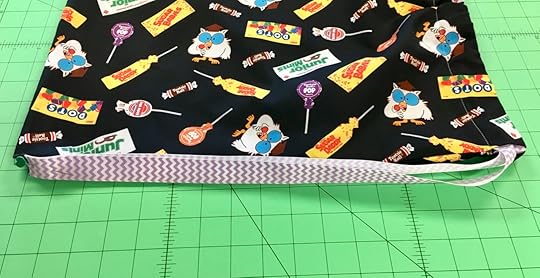
Stitch along clean finished edge, about 1″ from folded edge. Backstitching at beginning and ending of seam – this forms the ribbon casing. Turn cinch sack right side out.

For evenly spaced seams, place the ISFF Seam Guide on your sewing machine – to the right of the fabric fold.
Add Ribbon Straps
Cut two 60″ lengths of ribbon.
Using the ISFF Clip ‘n Glide Bodkin, thread ribbon through front casing beginning at right edge, then through back casing at left edge, and exit out the right edge. About 17″ of ribbon will extend out right edges of both front and back casings.
Using the ISFF Clip ‘n Glide Bodkin, thread ribbon through front casing beginning at left edge, then through back casing at right edge, and exit out the left edge. About 17″ of ribbon will extend out left edges of both front and back casings.
Center ribbon along outside right side seam, matching cut edges of ribbon to center of side gusset opening at lower right edge. Pin.
Reach into cinch sack, grasping pin head and ribbon layers, and turn cinch sack wrong side out.
Form Gussets and Complete Cinch Sack
Align cut edges of gusset corner openings, stacking side seam on lower/bottom seam – centering ribbon layers between fabric layers. Realign pin as needed and re-pin.
Stitch gusset seam through all fabric layers, securing ribbon ends within seam. Clean finish cut edges with a zigzag stitch or Serger stitching.
Repeat above steps to form gusset at lower left corner.
Turn cinch sack right side out. Enjoy!
NEW! I Sew For Fun Kids’ Sewing Challenge Guidelines
1. Challenge is open to all youth, ages 15 and under, residing in the continental US.
2. The challenge is limited to the first 24 persons whose parent or guardian purchases the Official 2019 I Sew For Fun Kids’ Sewing Challenge Cinch Sack Kit. Purchase kit as soon as possible to reserve challenge spot.
3. Sew a cinch sack using the official Official 2019 I Sew For Fun Kids’ Sewing Challenge Cinch Sack Kit pattern and fabric, along with any sewing and/or serging techniques. Construction may be done by hand or by machine. Participants may use any type of embellishment, decorations, and may add designer touches, such as adding a pocket made from a different fabric, choosing different colors of ribbon straps, etc. Work may be done exclusively by the participant, and/or with the assistance of an adult. One cinch sack per participant. Challenge participants, and/or an adult parent/guardian must email two photos to info@ziemanproductions.com on or before October 28, 2019: One photo showing youth using Clover’s I Sew For Fun Tool(s) while sewing and/or working on the project, and a second photo of youth wearing and/or using the completed cinch sack. Note: It’s okay if you prefer not to show youth’s face in photos. Be sure to include challenge participant’s first name, city, state, and age when photos to info@ziemanproductions.com.
Participants will be judged on workmanship, creativity, and overall appearance. Participants photos will be shared on sponsoring companies social and web sites to promote the love of sewing.
Prizes will be awarded to those making the top three cinch sacks, along with additional prizes awarded randomly. Winners will be announced on the Nancy Zieman Productions Blog on October 30, 2019.
Sign up for Nancy Zieman Productions enews, then watch your inbox for updates from the NZP Team.

To reserve a spot in the NEW! 2019 I Sew For Fun Kids’ Sewing Challenge, an adult parent or guardian must purchase the Official 2019 I Sew For Fun Kids’ Sewing Challenge Cinch Sack Kit (above left with green ribbon, or above right with purple ribbon). Purchase challenge kit, at the NEW! NZP Shop, as soon as possible. Quantities are limited!
![]()
NEW! I Sew For Fun Kids’ Sewing Challenge Prizes 2019
Thank you to our sponsors!
Clover I Sew For Fun Sewing Notions Bundles, four different. $125 value


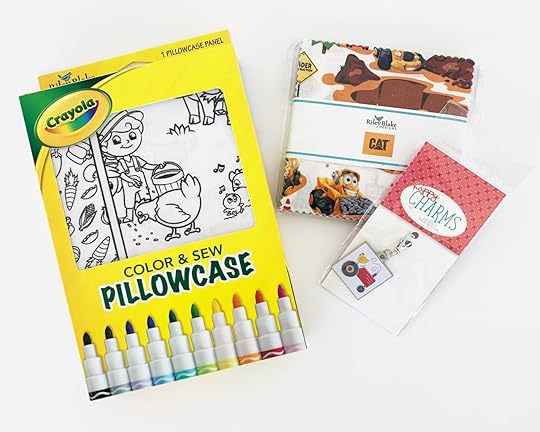
Riley Blake Designs Crayola™ Color & Sew Pillowcase Bundle, four bundles. $160 value
Nancy Zieman Productions I Sew For Fun Book with DVD, by Nancy Zieman, six copies. $120 value
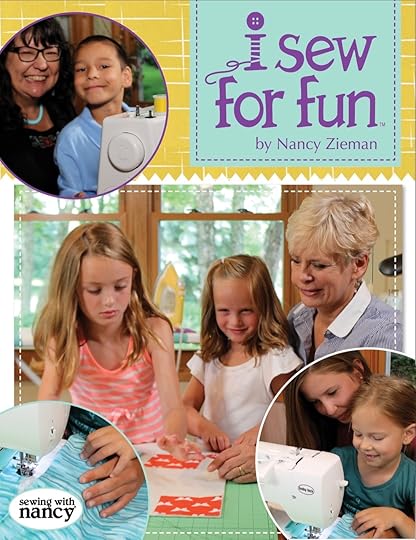
For Adults and Sewing Teachers: Tune in and watch Nancy Zieman and her granddaughters, along with friends, take a modern approach to sewing. Nancy shares her team sewing-for-fun experience along with many tips for a big partner, and numerous insights for involving a little sewing partner—all while making simple, easy to sew kid-friendly projects. Watch I Sew For Fun on Sewing With Nancy!
For a listing of all I Sew For Fun Tools by Nancy Zieman Productions for Clover, visit the NEW! NZP Shop.


For a chance to win a NEW! I Sew For Fun Sew-Safe Presser Foot from Clover, please leave a comment below and share if your youth, age 15 and under, is interested in joining us for the NEW! 2019 I Sew For Fun Kids’ Sewing Challenge.
Coming Soon: 2019 Nancy Zieman Productions Fall Table Runner Sewing Challenge at the NZP Blog. Watch for details to be announced TOMORROW!
Show us What You’re Making! We love to hear from you, so whether you’ve tried one of Nancy’s Sewing Patterns, or you’re planning on stitching a project you’ve seen on Sewing With Nancy or on The Nancy Zieman Productions Blog, share your experiences and photos with us on Facebook or Instagram!
Happy Sewing,
Team Nancy Zieman
Nancy Zieman Productions, LLC.
Content in this feed is © copyright 2019 by Nancy Zieman Productions, LLC and may not be republished without written permission. You’re welcome to forward the email to a friend or colleague but it’s not okay to add the RSS feed automatically as content on a blog or other website.
The FTC requires us to tell you that Nancy Zieman Productions, LLC has provided products by other companies in the course of doing business. The FTC requires us to advise you to take this information into consideration when reading this posting.
Make sure you are subscribed to Nancy Zieman Productions, LLC enews mailing list so you won’t miss a thing. Sign up here . Join us on Facebook , plus a host of other social media channels. Connect With Nancy and Friends today!
September 28, 2019
Nancy Zieman Original Giclée Canvas Landscape Art Prints: FALL
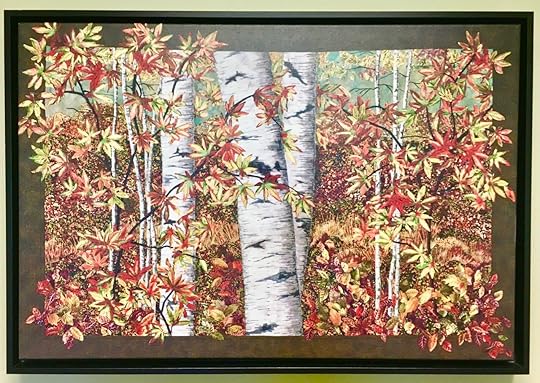
Now Available! Original Framed Giclée Canvas Print Reproduction of Artwork by Nancy Zieman, using only the highest quality Giclée printing techniques.
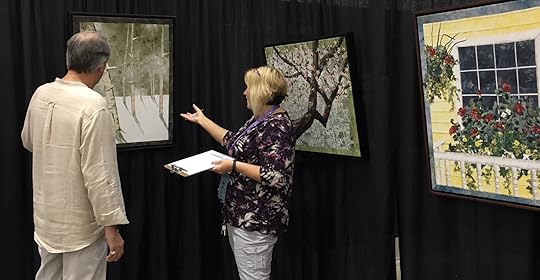
Now you can have your very own Landscape Quilt Art Print by Nancy Zieman—enjoy in your home or give as a gift.
Peak Color – 21″ x 31″ $229
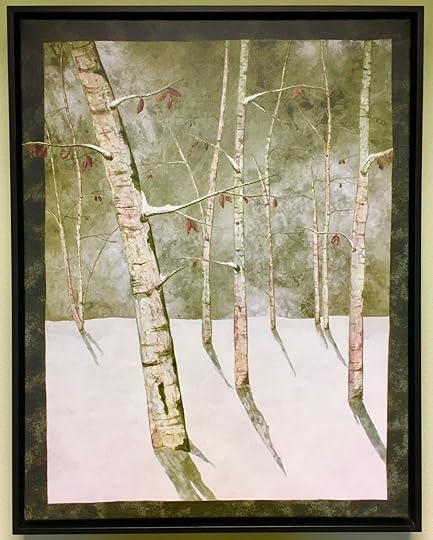
Moon Lit Birches – 31″ x 24″ $239
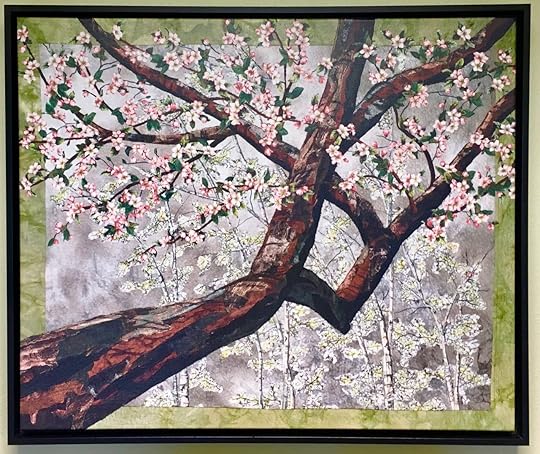
Out on a Limb - 25″ x 30″ $239
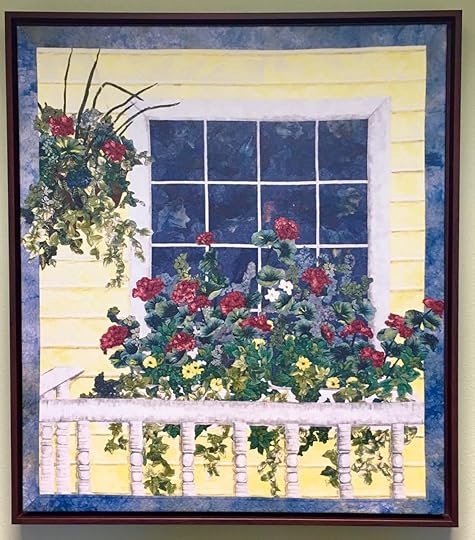
Front Porch - 31″ x 27″ $249
To purchase your Landscape Quilt Canvas Print Reproduction of Landscape Quilt Artwork by Nancy Zieman, order online at the NEW! NZP Shop. Or, mail the completed order form and check or money order to Nancy Zieman Productions, LLC.
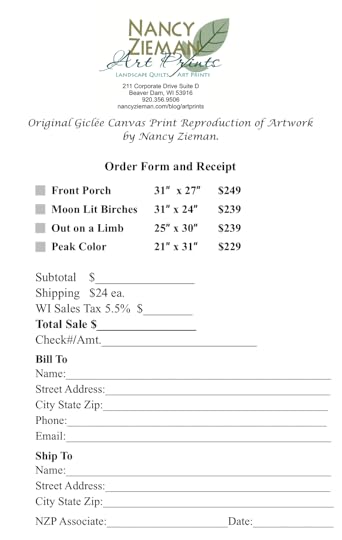
Print the Order Form—and Order Today!
You will receive a certificate of authenticity with each purchase of Original Giclée Canvas Print Reproduction of Artwork by Nancy Zieman.

Each print is made expressly for you. Please allow up to four weeks for delivery.
 For a chance to win a set of eight Landscape Quilt Note Cards by Nancy Zieman, please leave a comment below and tell us which Original Giclée Canvas Print Reproduction of Artwork by Nancy Zieman is your favorite.
 The randomly selected winner of Nancy Zieman’s New! Afternoon Picnic Fat Quarter Pack is Janet.

Her comment is: Thanks for the easy instructions for this quilt square. Looks like fun. Recently, I was going through some old family patterns my mother had. I found lot of old patterns, quilts included, cut from old newspaper. It made me wonder what they would think of all the short cuts and gadgets we have today to help us make quilts. We are so lucky.
All youth, age 15 and under, are invited to participate in the NEW! 2019 I Sew For Fun Kids’ Sewing Challenge! Enter the challenge by purchasing the Official 2019 I Sew For Fun Kids’ Sewing Challenge Cinch Sack Kit, at the NEW! NZP Shop. Quantities are limited! Find challenge details in the September 24 NZP Blog Posting.
Coming Soon: 2019 Nancy Zieman Productions Fall Table Runner Sewing Challenge at the NZP Blog. Watch for details to be announced on October 1!
Show us What You’re Making! We love to hear from you, so whether you’ve tried one of Nancy’s Sewing Patterns, or you’re planning on stitching a project you’ve seen on Sewing With Nancy or on The NZP Blog, share your experiences and photos with us on Facebook or Instagram!
Happy Sewing,
Team Nancy Zieman
Nancy Zieman Productions. LLC.
Content in this feed is © copyright 2019 by Nancy Zieman Productions, LLC and may not be republished without written permission. You’re welcome to forward the email to a friend or colleague but it’s not okay to add the RSS feed automatically as content on a blog or other website.
The FTC requires us to tell you that Nancy Zieman Productions, LLC has provided products by other companies in the course of doing business. The FTC requires us to advise you to take this information into consideration when reading this posting.
Make sure you are subscribed to Nancy Zieman Productions, LLC enews mailing list so you won’t miss a thing. Sign up here . Join us on Facebook , plus a host of other social media channels. Connect With Nancy and Friends today!
September 26, 2019
The Absolute Easiest Way to Sew, Part One

We generally think of two or three different ways to stitch most techniques, yet we generally use just one method. Which one? The absolute easiest way, of course!
This week’s featured online Sewing With Nancy program is the first of a three-part series on The Absolute Easiest Way to Sew.
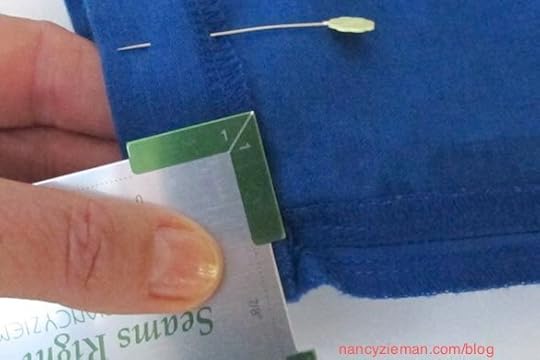
Use just a few pins for pattern layout.
Starting with pattern layout, cutting, and marking, learn ways to streamline and improve your sewing skills.
Do sewing darts have you in a dither?
Learn how to use an index card or sticky notes as the sewing guide for effortless dart stitching, It’s the next Absolute Easiest technique.
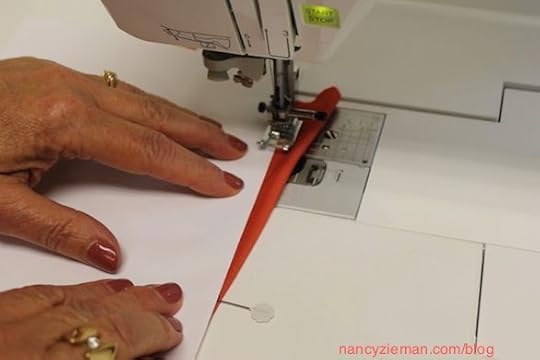 One size does not fit all when it comes to sewing gathers!
The type of fabric, the width of the seam allowances, and the project dictate the absolute easiest way to add gathers to fabrics. Nancy Zieman show’s you four options during this TV episode, plus there are more in the book, The Absolute Easiest Way to Sew.
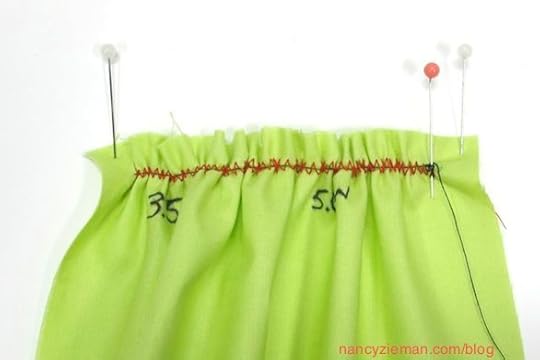 Changing the rules is part of the sewing game.
When adding elastic to knits, you’ll find this, by far, the simplest way to a sew casing. You’ll be stitching less and enjoying it more.
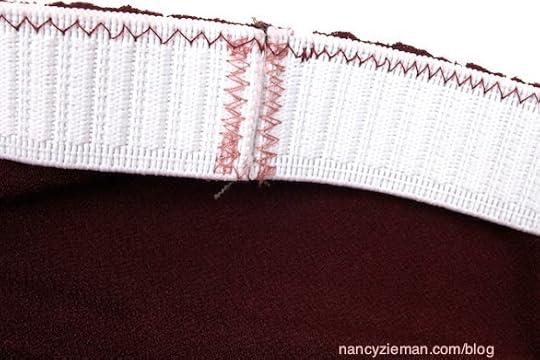
There’s a secret trick when sewing a casing in sportswear.
You’ll think to yourself, “Why didn’t I think of that!” ( Watch online for the trick.)
All of Nancy’s favorite sewing tips are in one book.
The Absolute Easiest Way to Sew chapters include:
Sewing Notions
Sewing Machine Confidence
Serger Spotlight
Patterns
Fabric Facts
Sewing Basics
Beyond the Basics
Watch The Absolute Easiest Way to Sew (Part One, Part Two, and Part Three) on Sewing With Nancy online.
For your chance to win a copy of The Absolute Easiest Way to Sew from Nancy’s Notions, leave a comment sharing your most common sewing challenge.
 The randomly selected winner of an electronic quilt pattern created by Tammie Bowser, plus a video course in her stitched art techniques. Tammie will personally create the winner’s quilt pattern using their random photo, is Jackie Cheek.
Her comment is: I have two thoughts in mind, I would Ike to do one of my family when we were all much younger. My mom’s birthday is in November and it would be such a surprise for her. I think I only have the picture in black and white but I can check on it. I have it electronically and it would need to be enlarged. The other idea is to surprise my brother with his because he’s always been supportive of my creative interests.
All youth, age 15 and under, are invited to participate in the NEW! 2019 I Sew For Fun Kids’ Sewing Challenge! Enter the challenge by purchasing the Official 2019 I Sew For Fun Kids’ Sewing Challenge Cinch Sack Kit, at the NEW! NZP Shop. Quantities are limited! Find challenge details in the September 24 NZP Blog Posting.
Happy Sewing!
Team Nancy Zieman
Nancy Zieman Productions. LLC.
Content in this feed is © copyright 2019 by Nancy Zieman Productions, LLC and may not be republished without written permission. You’re welcome to forward the email to a friend or colleague but it’s not okay to add the RSS feed automatically as content on a blog or other website.
The FTC requires us to tell you that Nancy Zieman Productions, LLC has provided products by other companies in the course of doing business. The FTC requires us to advise you to take this information into consideration when reading this posting.
Make sure you are subscribed to Nancy Zieman Productions, LLC enews mailing list so you won’t miss a thing. Sign up here . Join us on Facebook , plus a host of other social media channels. Connect With Nancy and Friends today!
September 24, 2019
NEW! I Sew For Fun Kids’ Sewing Challenge Kick Off and Order Your Challenge Kit Today
![]()
NEW! I Sew For Fun Kids’ Sewing Challenge sponsored by Nancy Zieman Productions, Clover Needlecraft, and Riley Blake Designs. Youth ages 15 and under are invited to share how they “sew for fun”— while making a cinch sack with Mr. Owl and Friends fabric by Riley Blake Designs, along with an I Sew For Fun sewing tool by Clover.
Youth age 15 and under may participate in the NEW! 2019 I Sew For Fun Kids’ Sewing Challenge by reading and understanding the contest rules listed here, sewing a cinch sack using one of the 2019 I Sew For Fun Kids’ Sewing Challenge Cinch Sack Kits purchased by an adult, and emailing two photos to info@ziemanproductions.com on or before October 28, 2019: One photo showing youth sewing/working on the challenge project using the I Sew For Fun Tool (included in the challenge kit), and a second photo of youth wearing and/or using completed cinch sack. Note: It’s okay if you prefer not to show youth’s face in photos. Be sure to include challenge participant’s first name, city, state, and age–when emailing photos to info@ziemanproductions.com.
To reserve a spot in the NEW! 2019 I Sew For Fun Kids’ Sewing Challenge, an adult parent or guardian must purchase the Official 2019 I Sew For Fun Kids’ Sewing Challenge Cinch Sack Kit. Purchase the challenge kit at the NEW! NZP Shop, as soon as possible. Quantities are limited!
NEW! I Sew For Fun Kids’ Sewing Challenge Kick Off—Part One: Purchase and Prep Your Supplies
Supplies Needed
Official 2019 I Sew For Fun Kids’ Sewing Challenge Cinch Sack Kit includes 1/2 yard Mr. Owl and Friends fabric by Riley Blake Designs, one mystery I Sew For Fun sewing tool by Clover, 3-1/2 yards purple/white or green/white ribbon, and the official Cinch Sack Sewing Pattern by Nancy Zieman Productions.
Sewing Machine, sewing thread, and basic sewing tools.
Helpful Notions
Using the right sewing tools assists with creating a successful sewing project! Above is a photo showing all the I Sew For Fun Tools by Nancy Zieman Productions for Clover. You may use any of the above I Sew For Fun sewing tools while sewing your cinch sack challenge project! Show us What You’re Making! We love to hear from you, so email your photos—anytime—to The NZP Team at info@ziemanproductions.com, and/or share your experiences and photos with us on Facebook or Instagram!
Prep Before You Sew
Gather your sewing supplies and prep your fabric for sewing. Included with the Official 2019 I Sew For Fun Kids’ Sewing Challenge Cinch Sack Kit is the Cinch Sack Sewing Pattern. When you receive your challenge kit, open the package and locate the Cinch Sack Pattern. Read all the pattern directions, before beginning.
Before the sewing process, pressing and starching the fabric adds a bit of stiffness that helps make cutting and sewing easier.
Cutting Directions
Using a scissors, or rotary cutter, ruler, and mat; cut two 17″ x 21″ fabric rectangles for cinch sack front and back.
To easily identify the cinch sack top, during the sewing process, place a piece of painter’s tape—on both fabric rectangles—near the fabric wrong side, near the top 17″ wide edge.
As soon as you receive your 2019 I Sew For Fun Kids’ Sewing Challenge Cinch Sack Kit you may start making your cinch sack! You’re the designer: You may choose to use a different color ribbon for the straps, add a patch pocket from your stash fabric, or decorate your cinch sack as desired. Remember, you must use the Mr. Owl and Friends fabric, the Cinch Sack Sewing Pattern, and one I Sew For Fun sewing tool—all included with the challenge kit!
Coming Next Week on Monday, September 30, here at the NZP Blog: NEW! I Sew For Fun Kids’ Sewing Challenge Kick Part Two: Cinch Sack Sewing Steps!
Sign up for Nancy Zieman Productions enews, then watch your inbox for updates from the NZP Team.
NEW! I Sew For Fun Kids’ Sewing Challenge Guidelines
1. Challenge is open to all youth, ages 15 and under, residing in the continental US.
2. The challenge is limited to the first 24 persons whose parent or guardian purchases the Official 2019 I Sew For Fun Kids’ Sewing Challenge Cinch Sack Kit. Purchase kit as soon as possible to reserve challenge spot.
3. Sew a cinch sack using the official Official 2019 I Sew For Fun Kids’ Sewing Challenge Cinch Sack Kit pattern and fabric, along with any sewing and/or serging techniques. Construction may be done by hand or by machine. Participants may use any type of embellishment, decorations, and may add designer touches, such as adding a pocket made from a different fabric, choosing different colors of ribbon straps, etc. Work may be done exclusively by the participant, and/or with the assistance of an adult. One cinch sack per participant. Challenge participants, and/or an adult parent/guardian must email two photos to info@ziemanproductions.com on or before October 28, 2019: One photo showing youth using Clover’s I Sew For Fun Tool(s) while sewing and/or working on the project, and a second photo of youth wearing and/or using the completed cinch sack. Note: It’s okay if you prefer not to show youth’s face in photos. Be sure to include challenge participant’s first name, city, state, and age when photos to info@ziemanproductions.com.
Participants will be judged on workmanship, creativity, and overall appearance. Participants photos will be shared on sponsoring companies social and web sites to promote the love of sewing.
Prizes will be awarded to those making the top three cinch sacks, along with additional prizes awarded randomly. Winners will be announced on the Nancy Zieman Productions Blog on October 30, 2019.
To reserve a spot in the NEW! 2019 I Sew For Fun Kids’ Sewing Challenge, an adult parent or guardian must purchase the Official 2019 I Sew For Fun Kids’ Sewing Challenge Cinch Sack Kit (above left with green ribbon, above right with purple ribbon). Purchase challenge kit, at the NEW! NZP Shop, as soon as possible. Quantities are limited!
![]()
NEW! I Sew For Fun Kids’ Sewing Challenge Prizes 2019
Thank you to our sponsors!
Clover I Sew For Fun Sewing Notions Bundles, four different. $125 value
Riley Blake Designs Crayola™ Color & Sew Pillowcase Bundle, four bundles. $160 value
Nancy Zieman Productions I Sew For Fun Book with DVD, by Nancy Zieman, five copies. $100 value
For Adults and Sewing Teachers: Tune in and watch Nancy Zieman and her granddaughters, along with friends, take a modern approach to sewing. Nancy shares her team sewing-for-fun experience along with many tips for a big partner, and numerous insights for involving a little sewing partner—all while making simple, easy to sew kid-friendly projects. Watch I Sew For Fun on Sewing With Nancy!
For a listing of all I Sew For Fun Tools by Nancy Zieman Productions for Clover, visit the NEW! NZP Shop.
For a chance to win a NEW! I Sew For Fun Sew-Safe Presser Foot from Clover, please leave a comment below and share if your youth, age 15 and under, is interested in joining us for the NEW! 2019 I Sew For Fun Kids’ Sewing Challenge.
Coming Soon: 2019 Nancy Zieman Productions Fall Table Runner Sewing Challenge at the NZP Blog. Watch for details to be announced on October 1!
Show us What You’re Making! We love to hear from you, so whether you’ve tried one of Nancy’s Sewing Patterns, or you’re planning on stitching a project you’ve seen on Sewing With Nancy or on The Nancy Zieman Productions Blog, share your experiences and photos with us on Facebook or Instagram!
Happy Sewing,
Team Nancy Zieman
Nancy Zieman Productions, LLC.
Content in this feed is © copyright 2019 by Nancy Zieman Productions, LLC and may not be republished without written permission. You’re welcome to forward the email to a friend or colleague but it’s not okay to add the RSS feed automatically as content on a blog or other website.
The FTC requires us to tell you that Nancy Zieman Productions, LLC has provided products by other companies in the course of doing business. The FTC requires us to advise you to take this information into consideration when reading this posting.
Make sure you are subscribed to Nancy Zieman Productions, LLC enews mailing list so you won’t miss a thing. Sign up here . Join us on Facebook , plus a host of other social media channels. Connect With Nancy and Friends today!
September 21, 2019
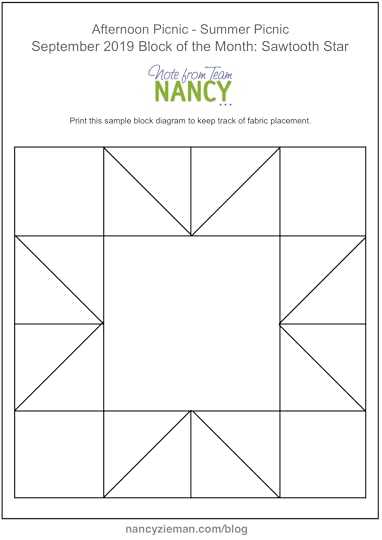
September 2019 Block of the Month: Sawtooth Quilt Block

2019 Block of the Month—September: “Sawtooth Star” Quilt Block
In January, Team Nancy Zieman introduced the first of 12 blocks in the New! Summer Picnic 2019 FREE! Block of the Month Series. Find the January through August Quilt Block Tutorials under Popular Blog Posts: 2019 Block of the Month. Join the New! Summer Picnic 2019 Block of the Month Series, anytime, by viewing the supply listing in the January 5th NZP Blog Posting.
Each month, we’re featuring one quilt block design. The quilt blocks are created using Nancy Zieman’s NEW! Afternoon Picnic Fat Quarter Pack* from Riley Blake Designs (*18″ x 22″ fabric rectangles) plus background, sashing, border, and binding fabrics. Follow along as we demonstrate how to create the September “Sawtooth Star” Quilt Block (below).
Keep your fabric choices sorted using this handy Fabric Planner diagram. Download the planner HERE. Make notes or pin swatches to remind you of the fabric placements.
2019 Block of the Month Afternoon Picnic September PDF
Choose the Fabrics
For the New! Summer Picnic 2019 FREE! Block of the Month Series, “Sawtooth Star” September Quilt Block, select the following fabrics from your Nancy Zieman’s NEW! Afternoon Picnic Fat Quarter Pack from Riley Blake Designs and a Nancy Zieman’s No-Hassle Triangle Gauge by Clover.

Afternoon Picnic Cream Main, Afternoon Picnic Red Gingham and Afternoon Picnic Cream Tonal
September “Sawtooth Star” Block
Instructions: (Each block is a 12″ finished square. Finished quilt measures approximately 44-1/2″ x 57-1/2″)
Cut Fabric for Block
Cut four 3-1/2″ squares of Afternoon Picnic Cream Tonal.
Cut four 3-7/8″ squares of Afternoon Picnic Red Gingham and Afternoon Picnic Cream Tonal.
Cut one 6-1/2″ square of Afternoon Picnic Cream Main.

Construct The Units
All seam allowances are scant 1/4″ unless otherwise stated.
The step-by-step photos illustrate construction of the block.
Half-Square Triangles (HSTs)
Create eight half-square triangle blocks.
Align 3-7/8″ squares cut from Afternoon Picnic Red Gingham, and Afternoon Picnic Cream Tonal right sides together.

Mark blocks using a No-Hassle Triangles Gauge and an erasable gel pen.
Use a No-Hassle Triangles Gauge . The left side of the gauge is designated to create 1/2-square triangle blocks. Depress button on sliding portion of the gauge and move to size of the desired 1/2-square triangle.

Stack two squares, right sides together. Place No-Hassle Triangles Gauge on block set, corner to corner. Match corner marks of gauge with corner of block sets. Mark fabric through center of gauge with an erasable gel pen .

Stitch Blocks
Align presser foot along one side of center mark, stitch.
Kiss the next block set to the stitched block and chain stitch from one block to the other.

Rotate block, stitch along other side of center mark.

Cut blocks apart along center markings with a rotary cutter, ruler, and mat.

Press seams to darker fabric.

Assemble Blocks
Layout block following diagram. Rotate squares as necessary.

Join Squares
Place half-square triangle sets, right sides together, in pairs.
Chain stitch from one square set to the next. Clip threads between. Press seams open or to one side.

Place corner squares onto center set, right sides together, in pairs. Chain stitch from one square set to the next. Clip threads between sets. Press seams open or to one side. Creating top and bottom rows.
Place middle sets onto center square, right sides together, stitch. Press seams open or to one side. Place square sets, right sides together, to form rows. Press seams open or to one side.

Stitch rows together to create complete block. Press seams open or to one side.
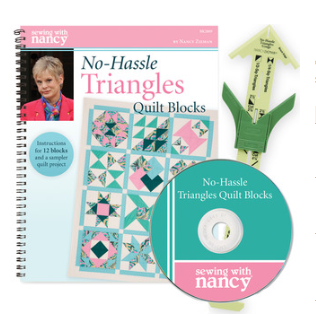
Nancy Zieman’s No-Hassle Triangles Quilt Blocks book shows how to create 12 additional quilt blocks. For best results, use the No-Hassle Triangles Gauge.
Watch No-Hassle Triangles Quilt Blocks (Part One and Part Two) on The Best of Sewing With Nancy online.
 For a chance to win Nancy Zieman’s New! Afternoon Picnic Fat Quarter Pack please leave a comment below.
 The randomly selected winner of a No-Hassle Triangles Gauge from Clover from the September 14 Blog post is, Jennifer Fried
Her comment is: My next project will be making seatbelt buffers for your neck. These are easy to make and protect your neck from the sharp edge of the seatbelt. I am making them for family and friends for Christmas. Love to sew ! The Old sew n sew.
Show us What You’re Making! We love to hear from you, so whether you’ve tried one of Nancy’s Sewing Patterns, or you’re planning on stitching a project you’ve seen on Sewing With Nancy or on The Nancy Zieman Productions Blog, share your experiences and photos with us on Facebook or Instagram!
Happy Quilting,
Team Nancy Zieman
Nancy Zieman Productions, LLC.
Content in this feed is © copyright 2019 by Nancy Zieman Productions, LLC and may not be republished without written permission. You’re welcome to forward the email to a friend or colleague but it’s not okay to add the RSS feed automatically as content on a blog or other website.
The FTC requires us to tell you that Nancy Zieman Productions, LLC has provided products by other companies in the course of doing business. The FTC requires us to advise you to take this information into consideration when reading this posting.
Make sure you are subscribed to Nancy Zieman Productions, LLC enews mailing list so you won’t miss a thing. Sign up here . Join us on Facebook , plus a host of other social media channels. Connect With Nancy and Friends today!
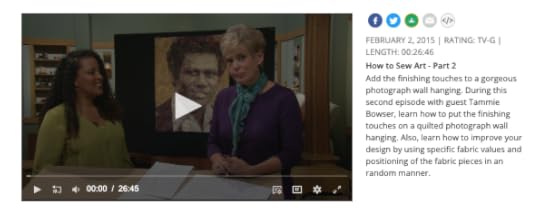
September 19, 2019
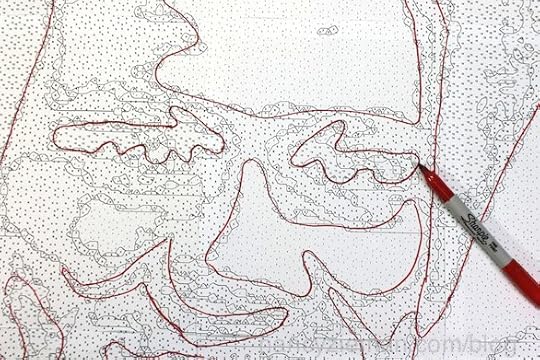
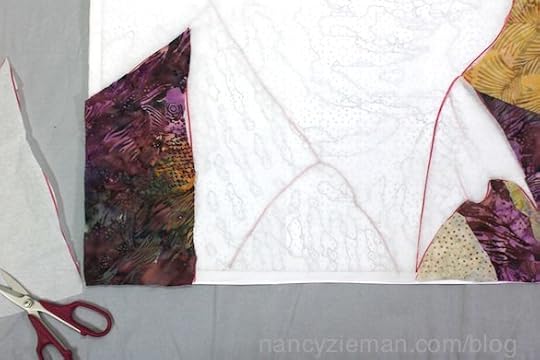
How to Sew Art – Part Two
 On today’s episode of Sewing With Nancy, Nancy Zieman and Tammie Bowser continue with part two of How to Sew Art. Start with a photo, choose fabrics, and then follow steps to turn a common digital image into spectacular wall art. Tammie Bowser, a quilt innovator, will show how to transform ordinary fabric into fine art.
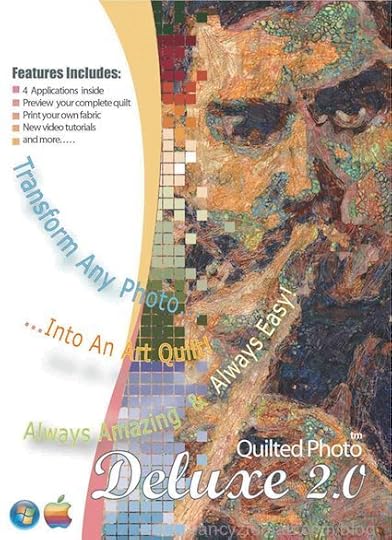
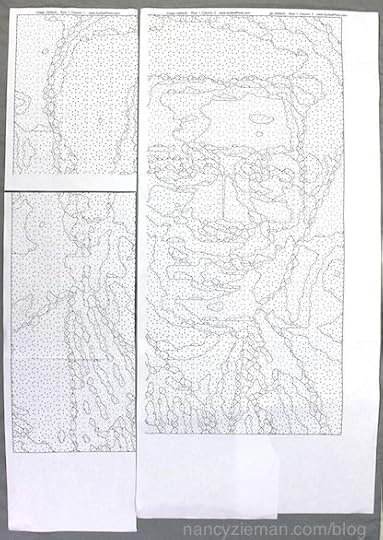
In a recent post, Nancy shared an overview of How to Sew Art part one, including choosing a photo, downloading the software, printing the pattern, creating a fusible web sandwich, and selecting fabrics.
Either of these two software programs will turn your photo into a pattern. Choose from the Stitch-A-Sketch Art Quilt Software or Quilted Photo Deluxe 2.0 Art Quilt Software .


 In
How to Sew Art part two,
the magic happens!
In
How to Sew Art part two,
the magic happens!Learn techniques for cutting the pattern pieces.
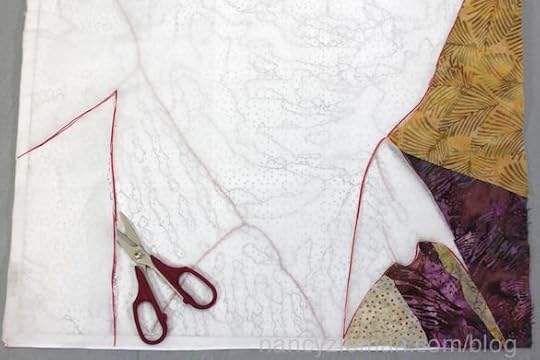
See how to cut and add the fabric pieces.
Watch Tammie demonstrate the stitching/quilting process.
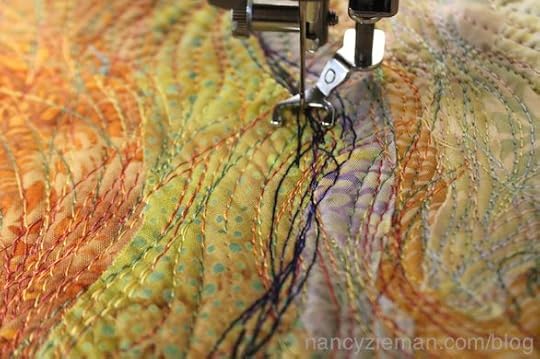
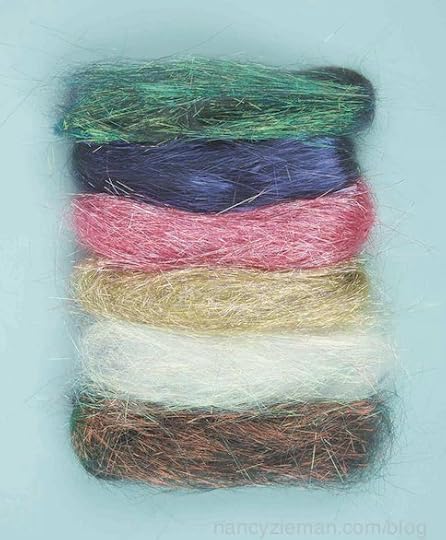
See how to add texture with Cotona thread and Angelina fibers.
 In How to Sew Art part two, you’ll also see an inspirational gallery of Tammie’s quilts!
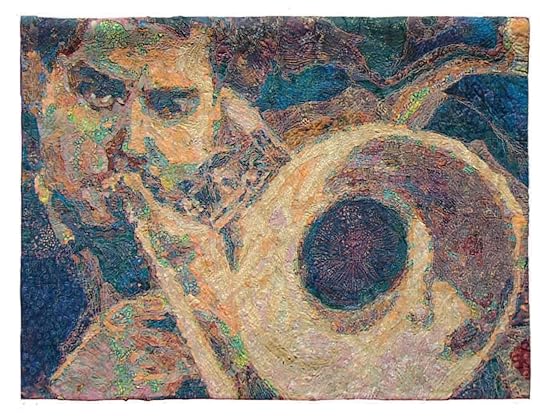
Jazz Trombone
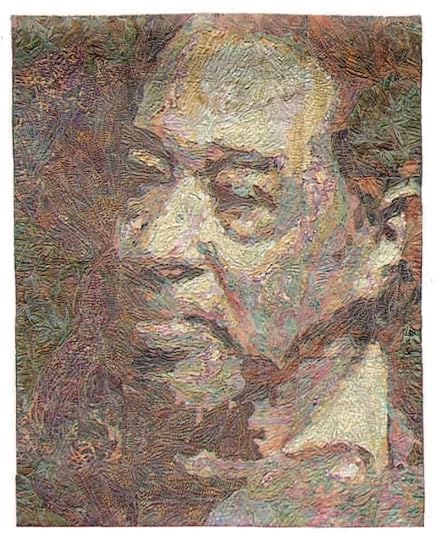
Duke Ellington
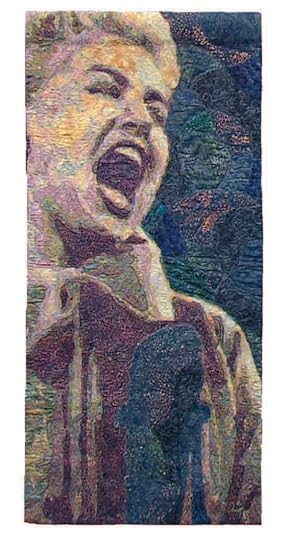 Doris Day
At Tammie’s website, howtosewart.com. you’ll find details on downloading a free software trial. The software turns an image into an art quilt pattern and includes the Gerber Daisy image below!
Watch How to Sew Art (Part One and Part Two) on The Best of Sewing With Nancy .

Tell us who you would choose for a Sew Art photo in a comment below, for a chance to be the winner of an electronic quilt pattern created by Tammie Bowser, plus a video course in her stitched art techniques. Tammie will personally create the winner’s quilt pattern using their random photo.
Happy Sewing!
Team Nancy Zieman
Nancy Zieman Productions. LLC.
Content in this feed is © copyright 2019 by Nancy Zieman Productions, LLC and may not be republished without written permission. You’re welcome to forward the email to a friend or colleague but it’s not okay to add the RSS feed automatically as content on a blog or other website.
The FTC requires us to tell you that Nancy Zieman Productions, LLC has provided products by other companies in the course of doing business. The FTC requires us to advise you to take this information into consideration when reading this posting.
Make sure you are subscribed to Nancy Zieman Productions, LLC enews mailing list so you won’t miss a thing. Sign up here . Join us on Facebook , plus a host of other social media channels. Connect With Nancy and Friends today!
Nancy Zieman's Blog

- Nancy Zieman's profile
- 21 followers

