
Nancy Zieman's Blog, page 145
April 10, 2014
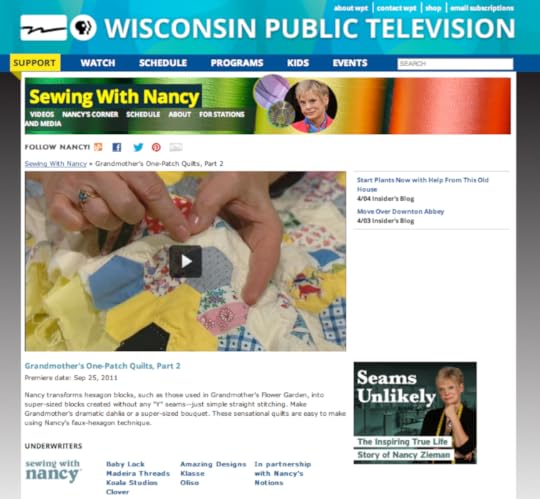
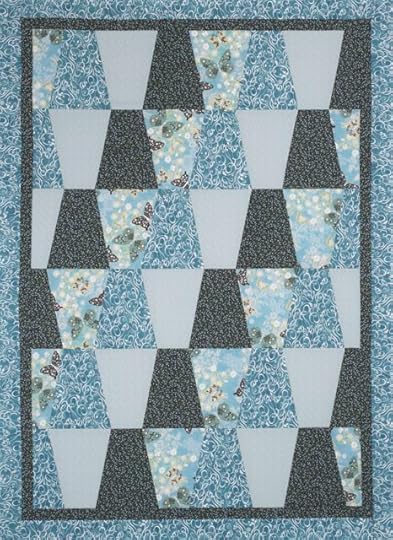
A New Slant on the Grandmother’s Flower Garden Quilt

One of the quilt patterns that I have long admired is the Grandmother’s Flower Garden. It is traditionally made with hundreds of tiny hexagons, which require the dreaded (at least for me) Y-seams, where three seams merge at the same point. I’ve only been able to admire the design. Why? I knew that I’d never have the patience to stitch such a masterpiece.
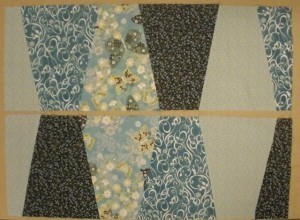
Then came the thought to place a straight seam where the Y-seams would normally intersect. Okay, not approved by quilt judges, but my quilts are functional and I sew for fun, not blue ribbons. Plus, I made the these faux hexagons BIG, up to 8″, not the traditional 1″–2″.
With a few additional tweaks to the design, my staff and I were able to quickly stitch an updated design using straight seams and large half-hexagons. I share this fresh approach to patchwork in my TV episode, Grandmother’s One-Patch Quilts, Part 2. It’s the featured streaming video this week online.
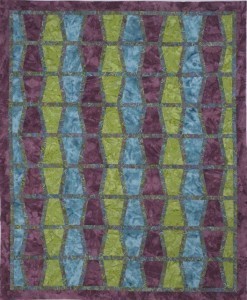
Grandmother’s Dahlia—Supersize Version
Traditional Grandmother’s Flower Garden quilts feature a meadow of blooms. With my supersize technique, one bloom can make the entire quilt! Named after a dramatic flower, Grandmother’s Dahlia was made with 6″ faux hexagons. Again, Y-seams are a thing of the past with straight stitching the only piecing option.
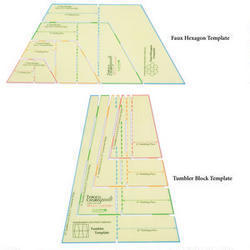
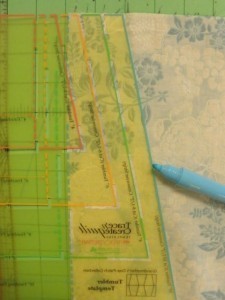
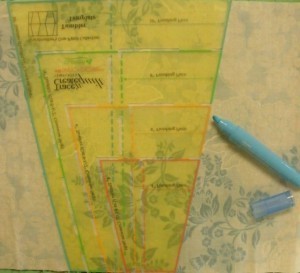
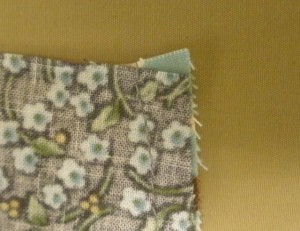
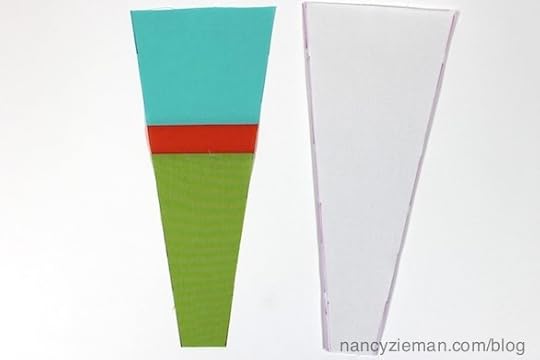
Use the faux hexagon template from the Trace ‘n Create Quilt Template—Grandmother’s One-Patch Collection .

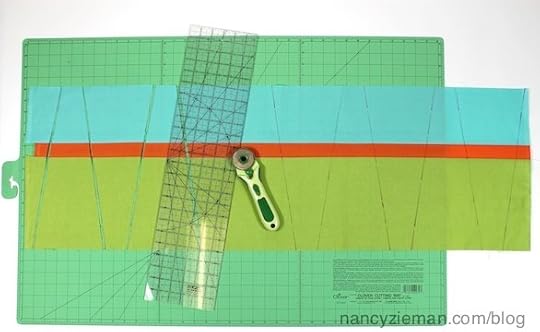
Cut strips of fabric the width printed on the template, trace the edges, rotate the template, and trace some more. There are even finishing pieces to trace, squaring the traditional hexagon-shaped edges. Oh, it’s easy to sew!

After cutting the shapes with a rotary cutter, ruler, and mat, lay out your design in columns.

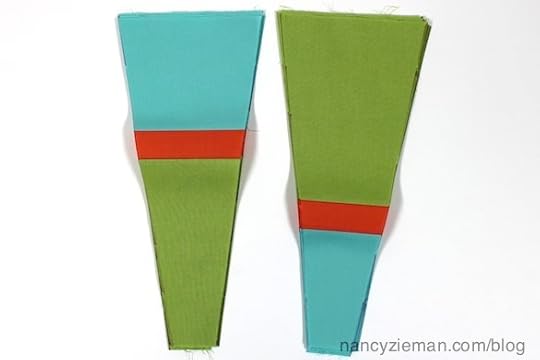
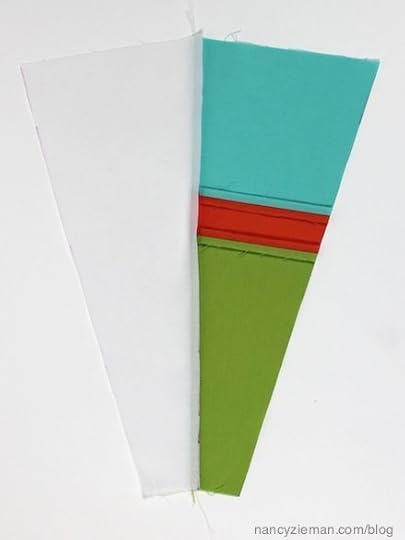
Pin the pieces within one column and stitch the straight seams.

Press the seams and then stitch the columns. It’s fast!

During the TV episode (click here to watch), you’ll see many other design options.
The Trace ‘n Create Quilt Templates—Grandmother’s One-Patch Collection is a versatile tool! You’ll receive the tumbler template as featured in last week’s blog! The instructions for Grandmother’s Dahlia pattern are a free offering when you order the templates from Nancy’s Notions.

Watch Sewing With Nancy online.
Watch this episode on your local PBS station, online, or on your iPad, iPod Touch, or iPhone.
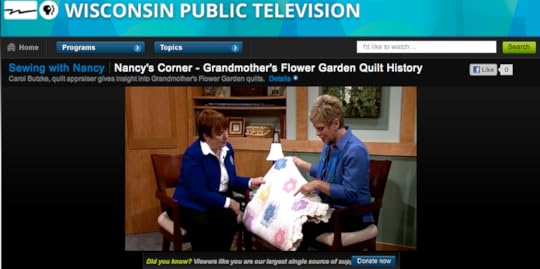
Traditional Grandmother’s Flower Garden Quilt Interview
A person that has made it her job to be a quilt detective was my guest in this program. Carol Butzke, a certified quilt appraiser and quilt historian, gave us some insight into one of her antique Grandmother’s Flower Garden Quilts.
Click here to find more Nancy’s Corner videos (pull down the “select category” box and select “Nancy’s Corner”). Plus, you’ll be able to watch current Sewing With Nancy programs online, read my blog, and basically, you’ll be directed to all things Sewing With Nancy!

For a chance to win a copy of the Trace ‘n Create Grandmother’s One-Patch Quilt Template Collection from Clover, leave a comment below sharing your current quilting project. The winner will be announced on April 17.
Bye for now,

Content in this feed is © copyright 2014 by Nancy Zieman and may not be republished without written permission. You’re welcome to forward the email to a friend or colleague but it’s not okay to add the RSS feed automatically as content on a blog or other website.


April 8, 2014
Serge a Scarf in 30 minutes—Baby Lock’s National Serger Month
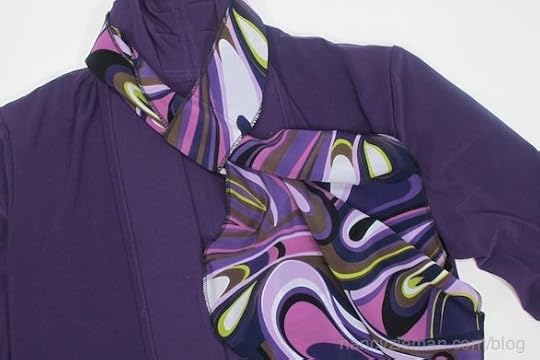
If you’re only using your serger for finishing fabric edges, you’re missing out on a lot of serging fun and creativity! As part of Baby Lock’s National Serger Month, I’d like to show you how the standard overlock stitch you’ve used for clean finishing raw edges, can also be featured as an outer edge finish. Give it a try with my 30-Minute Scarf!
 How to serge a 30-minute scarf
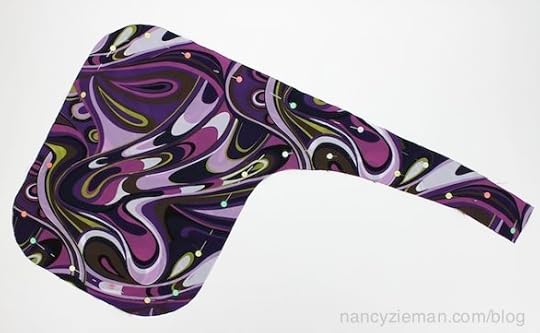
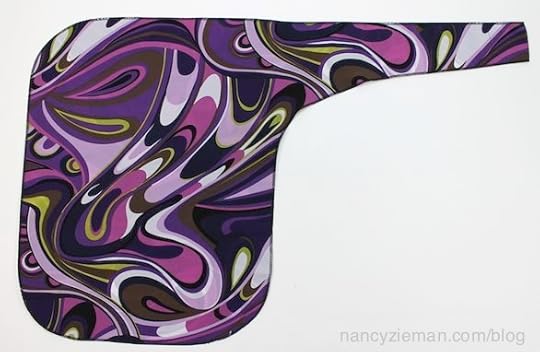
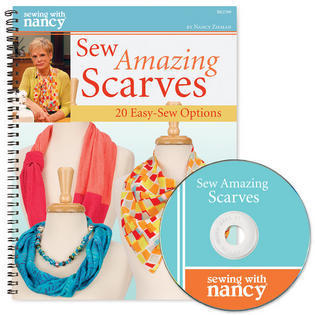
Recently, I produced a 3-part Sewing With Nancy TV series, Sew Amazing Scarves. The Loop and Tuck Scarf was one of my favorite designs. (You can watch the TV series online by clicking here.) The original scarf was sewn with conventional seams, but you can easily serge the edges with just a few modifications. In the book, Sew Amazing Scarves, you’ll find the pattern.
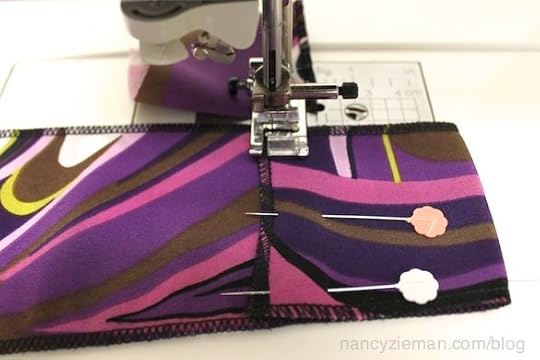
The original pattern started with a 13″ x 19″ rectangle with a 2-1/2″ x 20″ extension added along one short end. For this variation, round the three corners by tracing along a saucer. It is easier to serge around a soft corner instead of turning corners or serging off at the corners.

Fold one yard of fabric wrong sides together and cut out two layers. I used vintage pattern weights that I’ve been using for years and a rotary cutter for a speedy cutting process.
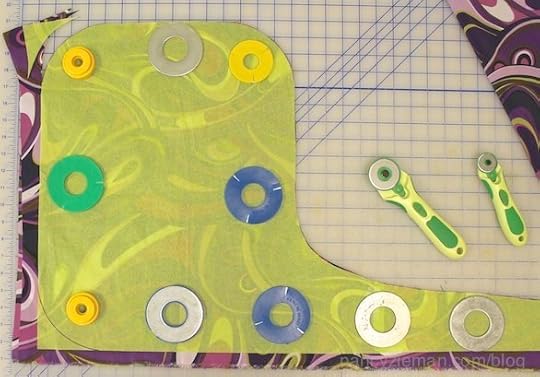
Pin the layers wrong sides together. Place pins parallel to cut edges, when serging.
Set for the serger for a narrow 3-thread overlock stitch. Test various stitch lengths on fabric scraps. A 2.0 mm length was the winner.
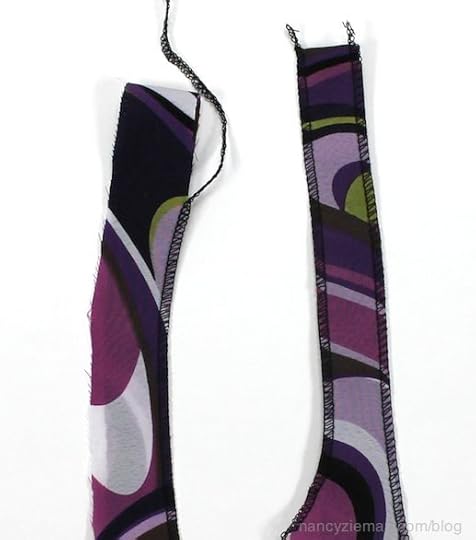
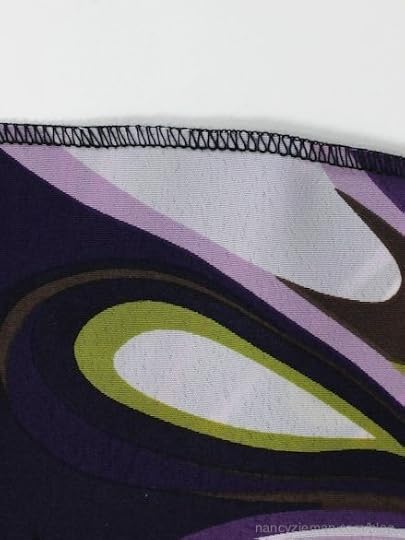
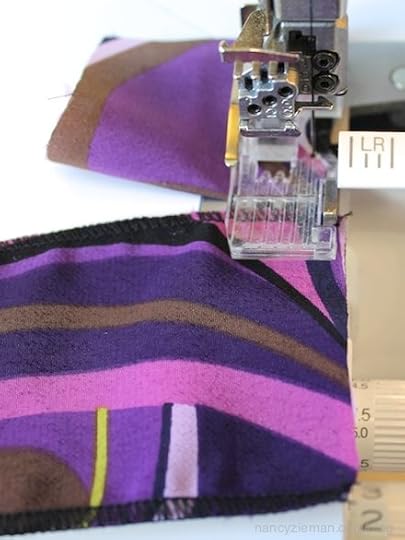
Begin serging at the narrow edge of the scarf extension. Serge, trimming off an 1/8″ to 1/4″ of fabric. Serge from scarf end to scarf end.
Serge the short end. You might need an anchor cloth, a folded scarp of fabric, which allows you to serge smoothly from the anchor to the narrow end.
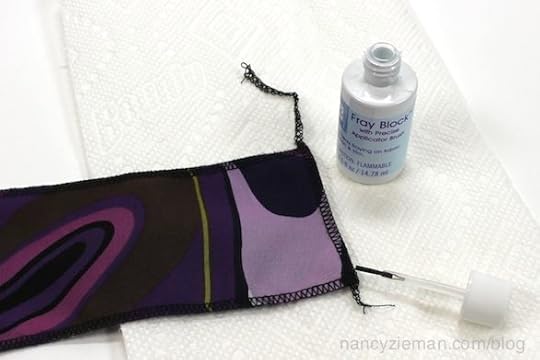
Dab the ends of the thread tails with a seam sealant such as Fray Block . Work on a paper towel, which will absorb all the excess liquid.
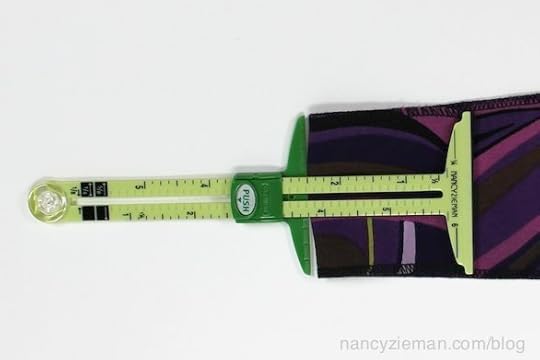
Fold back 2-1/2″ at narrow end and topstitch to the scarf at your sewing machine. I love my 5-in-1 Sliding Gauge for quick measuring.
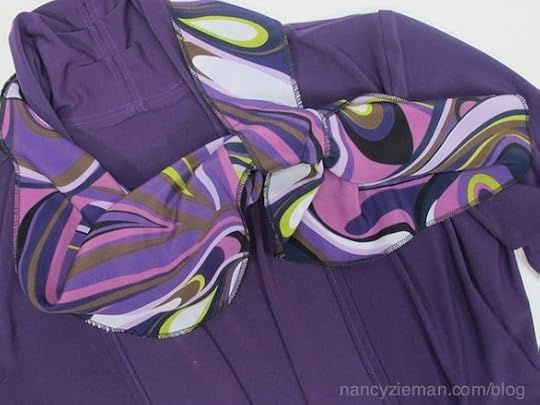
Ta da! The 30-minutes serger scarf is complete.
Tie the scarf by slipping the main body of the scarf through the loop. Loop all or part of the scarf through the opening. This scarf stays in place and is extremely comfy to wear.
For More Baby Lock Serger Ideas
Visit the National Serger Month website, nationalsergermonth.org.
Sew Amazing Scarves —a total of 20 easy-sew options
Check out the book with patterns, Sew Amazing Scarves for other quick, trendy, and stylish scarves.
I hope you enjoy this serging scarves tutorial!
Maria Jene is the random winner of Clover’s Trace ‘n Create Tablet Keeper Template 2.0 from my blog titled How to Sew an iPad Cover with Camera Hole.
Joyce Jensen is the first random winner of a copy of Seams Unlikely from my blog titled A Community of Sewing Connects the Dots.
Barbara Tyne is the second random winner of a copy of Seams Unlikely from my blog titled A Community of Sewing Connects the Dots .
Mary Gant is the random winner of Mary Mulari’s book, Applique—Large & Small , from my blog Stippling for Applique .
Bye for now,
Nancy Zieman—author, pattern designer, businesswomen, producer, and national sewing authority—is the host of the popular show Sewing With Nancy®, which appears exclusively on public television stations across the United States and Canada. Follow Nancy’s Blog at NancyZieman.com/Blog and sign up to receive Nancy’s E-News for the latest news in Sewing, Quilting, & Creating.
Content in this feed is © copyright 2014 by Nancy Zieman and may not be republished without written permission. You’re welcome to forward the email to a friend or colleague but it’s not okay to add the RSS feed automatically as content on a blog or other website.
April 5, 2014
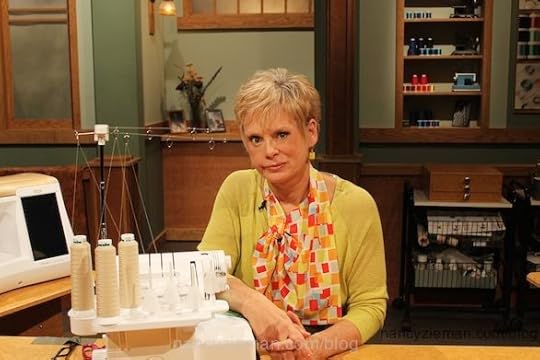
A Live, Online Seminar–My Favorite Handbag Sewing Techniques
I’m a teacher, not in the traditional sense, but one that teaches on TV, You Tube, and at sewing/quilting events. I truly enjoy the personal events, but I can’t possibly fill all the requests. Trying to fill that void, my staff and I decided to present live, online seminars, called webcasts. Our first webcast this year will be held Saturday, April 26th. The topic: My Favorite Handbag Sewing Techniques.
What’s the difference between Sewing With Nancy and a webcast?
Last week, you might have read the blog that introduced Nancy Zieman Live. A question was asked (I’m paraphrasing), “Why would I sign up for an online seminar when I can watch Sewing With Nancy online?” That great question caused me to write this blog.
Beam me up Scottie
Last year four of my live webcasts were beamed to several sewing and quilting events. My favorite part was the interaction. Questions were emailed to me and I answered. The give and take was engaging! One of the participants asked to see the studio, which resulted in a camera operator recording a “360” of the studio and showing the control room. The interaction was my favorite part. Plus, if a webcast viewer didn’t understand a technique, I did it again.

Like an in-person seminar, the 90-minute webcast on April 26 will be live without editing or mulligans (i.e. “take 2”)—just me teaching you.
By the way, the webcast isn’t beamed. It all happens through an internet connection. But, I think you knew that! (Test your viewing ability by clicking here. This test link is a live webcast from the nest of a bald eagle! It may take time to load, but if you can see the eagle and nest, you’ll be able to watch Nancy Zieman Live.)

Learn the latest in techniques
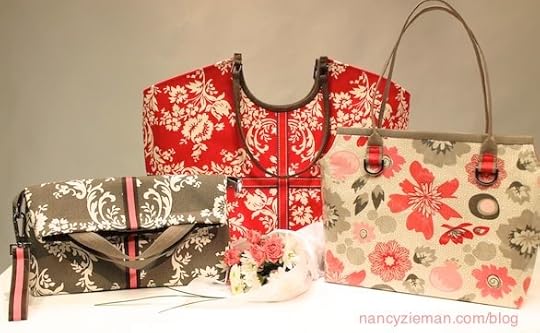
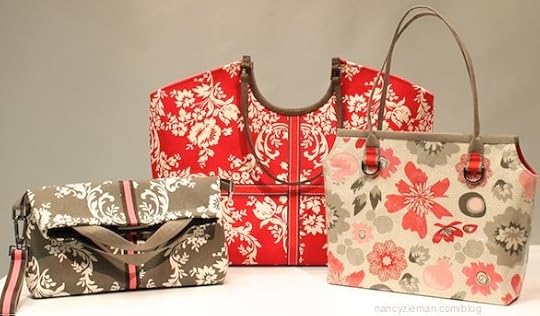
As I’m writing this, my staff in the sewing lab is making samples for My Favorite Handbag Sewing Techniques Webcast. All of the new techniques will be available to participants as a downloadable handout. You’ll have these instructions to refer to immediately. Plus, I’ll share my tried and true quick bag-making methods. Some of the techniques I’ll demonstrate include:
New strap making techniques gleaned from ready-made bags.
Turning ordinary fabric into laminated fabric.
Introducing new fabrics that are ideal for bag making!
Getting the inside scoop—It’s what’s inside that counts! Updated tips on how to construct a bag, and what to add to the inside of your bag to make it look like a wow bag!
One Low Price–Two Time Options—Register Today!
Only $19.95!
The 90 minute webcast on April 26th is only $19.95 if you register on or before April 16, 2014. (Update! Registration fee on or after April 17 is $29.95.) The fee includes:
A link to watch one of the two Nancy Zieman Live webcasts. (Link to the webcast will be sent on April 25.)
The ability to have your question answered during the webcast.
A link to specials offered by Nancy’s Notions.
A free Nancy’s Bag Making Tips Sheet downloadable document.
Direct from Beaver Dam, WI to your home!
Two Time Options
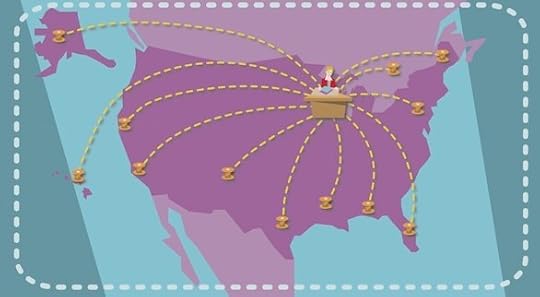
There are two webcast time options for the 90 minute webcast to accommodate North American Time Zones. Both webcasts cover the same topics. Since they’re both live, each will be personalized by the questions or, hmm, my whims! We’ll be broadcasting live from the Central Time Zone. Register for option one or option two, whichever best fits your schedule.
April 26: Times/time zone for Webcast Option One:
11:00 AM—12:30 PM (Eastern Time)
10:00 AM—11:30 AM (Central Time)
9:00 AM—10:30 AM (Mountain Time)
8:00 AM—9:30 AM (Pacific Time)
7:00 AM—8:30 AM (Alaska Daylight Time)
5:00 AM—7:30 AM (Hawaii-Aleutian Standard Time)
April 26: Times/time zone for Webcast Option Two:
2:00 PM—3:30 AM (Eastern Time)
1:00 PM—2:30 PM (Central Time)
12:00 PM—1:30 PM (Mountain Time)
11:00 AM—12:30 PM (Pacific Time)
10:00 AM—11:30 AM (Alaska Daylight Time)
8:00 AM—9:30 AM (Hawaii-Aleutian Standard Time)
Select your preferred time below and click the “buy now” button:
Times
Option One 10:00 AM to 11:30 AM (Central Time) $19.95 USD
Option Two 1:00 PM to 2:30 PM (Central Time) $19.95 USD

Thank you to our sponsors


Hope to see you April 26th!
If you have questions or comments, please leave them below.
Bye for now,
Content in this feed is © copyright 2014 by Nancy Zieman and may not be republished without written permission. You’re welcome to forward the email to a friend or colleague but it’s not okay to add the RSS feed automatically as content on a blog or other website.
April 3, 2014
A Great Beginner’s Quilting Project—The Supersize Tumbler
For nonquilters here’s an excellent beginner’s project. It’s a simple design and the blocks can be supersized—up to 10″ in height. It’s also an ideal project to teach to someone who’d like to quilt but doesn’t know where to start—the stitching is streamlined and the results are fast!
When I introduced the Trace ‘n Create Grandmother’s One-Patch Quilting Templates at the International Quilt Market, the response was extremely positive. It’s a product that I designed for Clover, the third in a series of quilt templates. This template set features two traditional 1930s—1940s template designs sewn in a nontraditional way. Either traditional or supersize, the templates streamline the process.
The Tumbler design can be made in any of the four sizes: 4″, 6″, 8″, or 10″. For speed, I like the 10″. The featured lap quilt was made using the large 10″ Tumbler pieces. I selected the large size since this supersize patchwork can easily showcase fabrics with large prints. Here’s how it works:
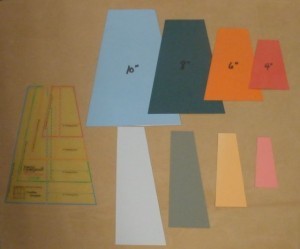
The strip width to cut for each size is printed on the template.
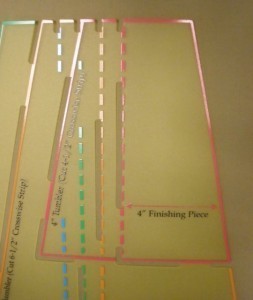
Stack several cut strips of fabric. Begin by aligning the die-cut area of the Finishing Piece at the narrow end of the strip. Trace along the die-cut area; in this case I’m using the largest size so the tracing is at the edge of the template.
Flip the template, align the traced edge with the template side, and trace the other side of the Tumbler shape. Repeat the process until the entire fabric strip has been marked.
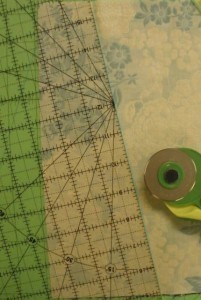
Align a ruler at each traced line; cut with a rotary cutter . Remember, you can cut numerous layers at once.
Lay out the rows, starting and ending with a Finishing Piece.

Pin the coordinating pieces of a row together. Offset the end ¼″—the seam allowance width. Stitch. Repeat for each row.
Finally, stitch the rows into a quilt top. Simple as that!
 In the guide sheet that accompanies the Grandmother’s One-Patch Templates, you’ll find other creative layout options, including my favorite sashed version. View this quilt project, by clicking here.
Watch Sewing With Nancy Online
During the 2-part Grandmother’s One Patch TV mini-series, watch as I demonstrate the supersize tumbler quilt block. Click here to watch the 1/2-hour TV show.
For a chance to win a copy of the Trace ‘n Create Grandmother’s One-Patch Quilt Template Collection from Clover, leave a comment below sharing your current quilting project. The winner will be announced on April 17.
Bye for now,
Content in this feed is © copyright 2014 by Nancy Zieman and may not be republished without written permission. You’re welcome to forward the email to a friend or colleague but it’s not okay to add the RSS feed automatically as content on a blog or other website.
April 1, 2014
Add Embroidery—Perfectly and Precisely!
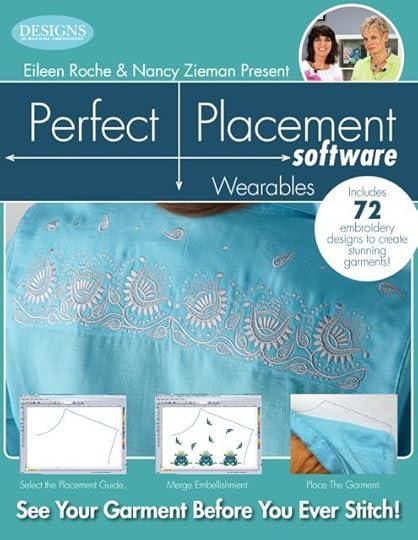
Machine embroidery is easy, it’s the placement that’s tricky! That’s the phrase that I’ve said hundreds of times either on Sewing With Nancy or during seminars. Now I can confidently say, Machine embroidery is easy and now you can have perfect design placement! The reason? Perfect Placement Software—Wearables. The software provides two types of embroideries: Placement guidelines and beautiful embellishments.
This software is a team effort—aren’t most things in life? Eileen Roche of Designs in Machine Embroidery has the software know-how, and I worked on the placement guidelines concept. The software combines Placement Guidelines (embroideries that are outlines) plus ten decorative embroidery collections. Using the Placement Guidelines, you can see the exact design placement on your garment before you ever sit down to sew. Plus, the embroidery designs can be resized, rotated, and perfectly positioned. Let me show you how!
Step 1—Select the Placement Guide—it’s an embroidery
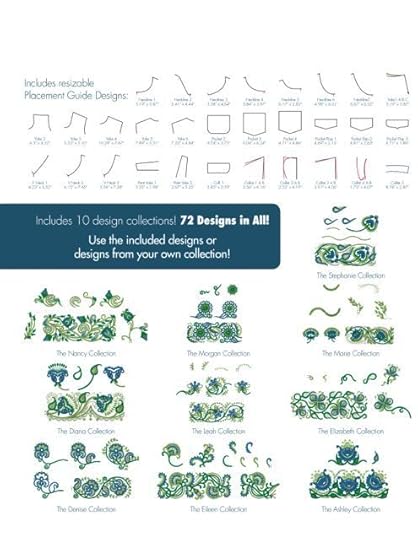
Here are the categories of the Placement Guidelines: pockets, yokes, pocket flaps, V-necklines, pant yokes, cuffs, and collars. Plus, you can see some of the embellishing embroideries.
Select the icon on the menu for the placement outlines.
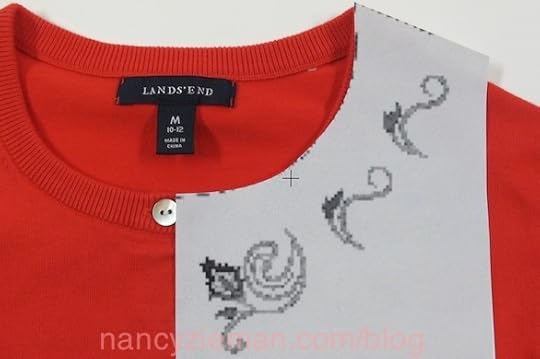
Select the outline that visually resembles your project.
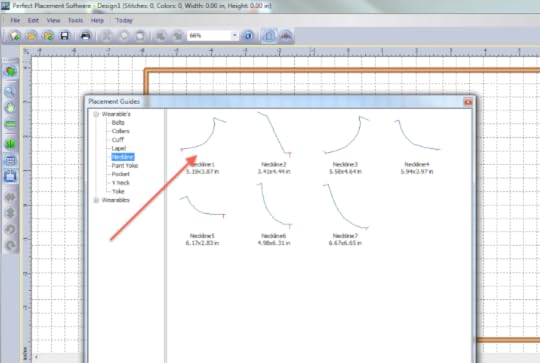
Print out the template.
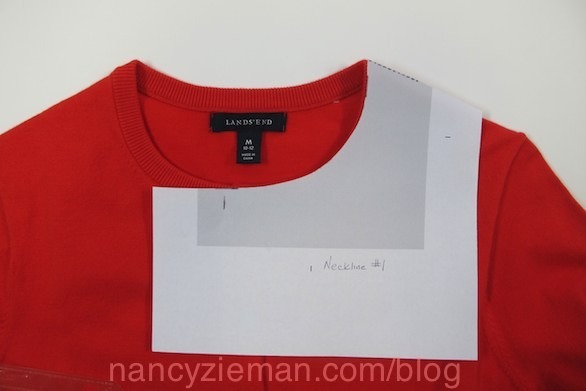
Cut along the lines and position on your project to test if the two shapes are compatible.
Save the template for future projects. (Lands’ End will be getting a lot of free advertising during this blog!)
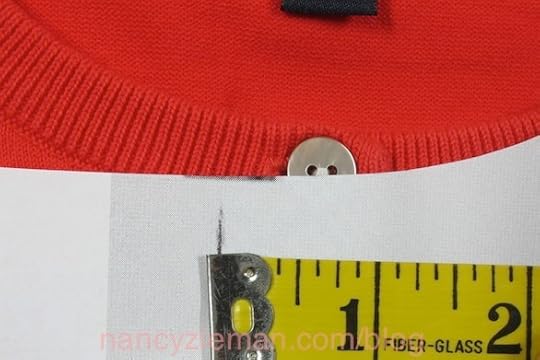
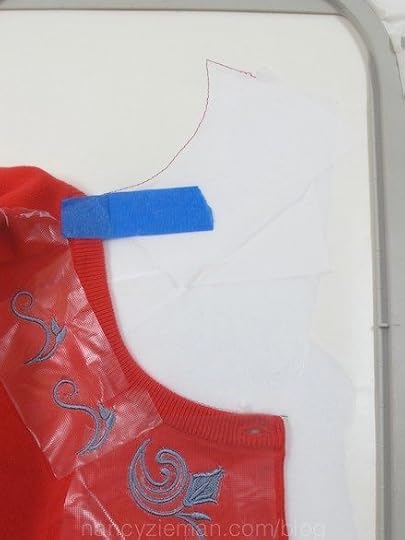
Check if a modification is needed to the outline. The center front line on the outline is too wide for my cardigan. I measured the distance between the marking on the template and the actual center front. The vertical outline should be moved 5/8″. One of the great things about the Perfect Placement Software—Wearables is that the outlines can be customized. (Wow, I need a new tape measure!)
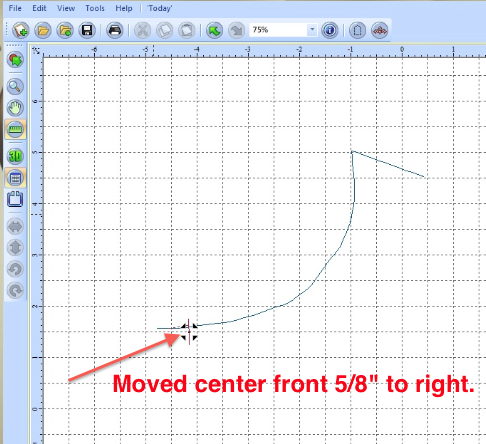
Here’s a screen shot of how I moved the vertical outline, using the inch grids as a guide. (In the software you can choose to work in inches or millimeters.)
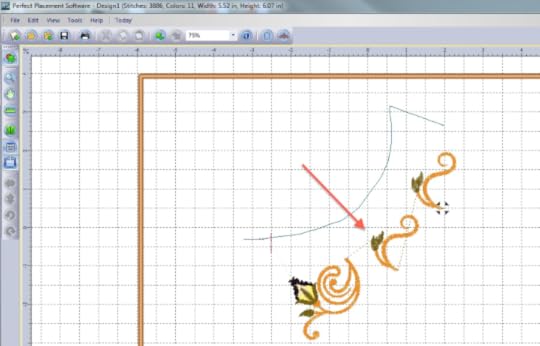
Step 2—Merge your favorite embellishment design
Next, select the Embroidery Icon and choose one of 10 design collections, or import designs that you already own. I selected designs from the Nancy Collection—imagine that!
Position the designs within the outline. The software will allow you to rotate, flip, and perfectly position the designs exactly where you’d like them to be!
Print out a template and double-check your work. If necessary, reposition the decorative embroidery designs.
Next, copy the design in the software and flip it for the right side embroidery.
Add additional embroidery if you’d like.
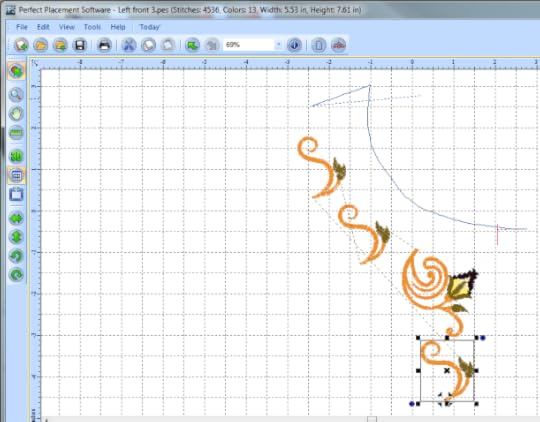
Again, double-check your work.
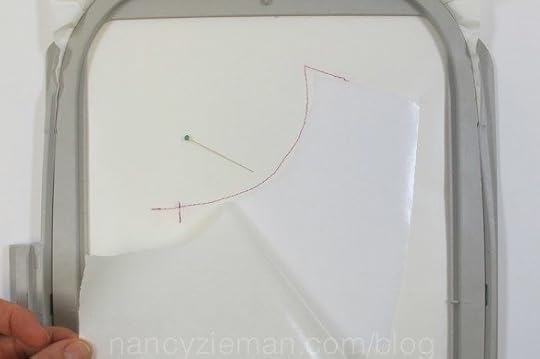
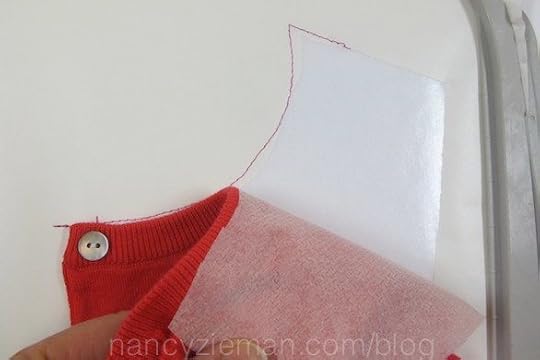
Step 3—Hoop a Sticky Back Tear-Away Stabilizer ; stitch the Placement Guide.
Choose a stabilizer of your choice. I chose a sticky back tear-away stabilizer . Another option would be to hoop a tear-away stabilizer and then use a spray adhesive to make the stabilizer tacky.
Stitch the outline or placement guideline.
Use a pin to perforate the paper covering along the outline stitching and the area that will hold the garment to the stabilizer.
Tear away the paper cover.
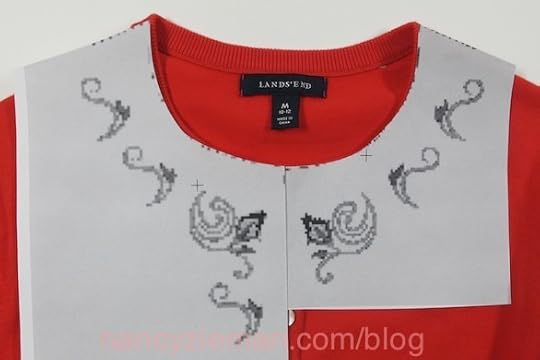
Step 4—Smooth the wearable onto the Placement Guide.
Align the garment to the stitched placement guide.
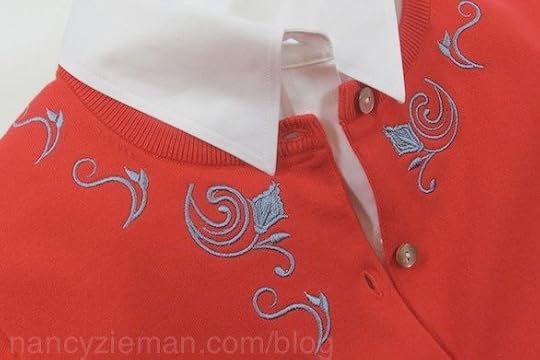
Notice that I pressed a cut-away fusible mesh stabilizer to the underside of the cardigan. The addition of that stabilizer makes it easier to remove the garment from the sticky stabilizer.
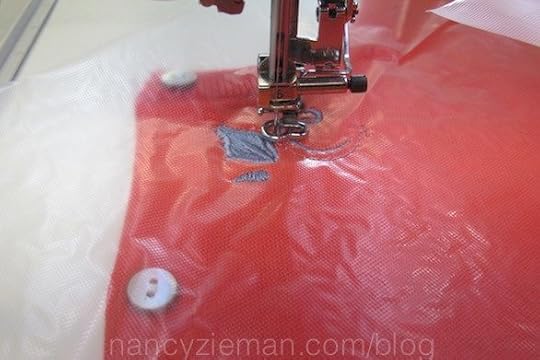
Step 5—Embroider!
Attach the hoop to the machine.
When embroidering knits, add a wash-away top stabilizer.
Then, let the fun begin. Embroider the decorative designs.
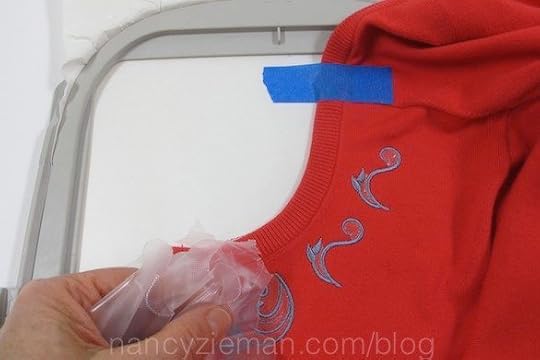
Step 6—Clean up your work!
Remove the top stabilizer, and trim away the underneath stabilizers.
Note: I used a strip of painter’s tape to keep the upper neckline attached to the stabilizer.
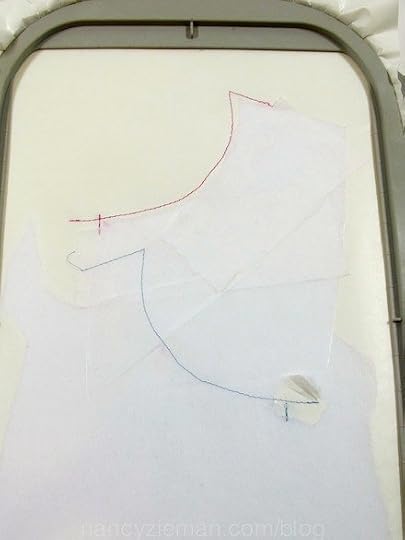
Step 7—Add the embroidery to the other parts of the garment
I used the same hooped stabilizer and patched the openings with scrap pieces of the sticky back stabilizer.
The right front embroidery was moved down in the hoop before I stitched the placement guideline.
It was magical to see that the right side embroidery was a mirror image of the left side—aside from the addition of the fourth embroidery. The placement was perfect due to the alignment with the placement guides!
Special thanks to Eileen Roche of Designs in Machine Embroidery for working with me on Perfect Placement Software—Wearables. Eileen is a great friend, plus extremely creative!

Bye for now,
Content in this feed is © copyright 2014 by Nancy Zieman and may not be republished without written permission. You’re welcome to forward the email to a friend or colleague but it’s not okay to add the RSS feed automatically as content on a blog or other website.
March 29, 2014
Join Nancy Zieman for a Live Webcast on April 26
Learn—Interact—Save—Have Fun!
Live from my studio to your computer on April 26th, join me, Nancy Zieman, for a fun and interactive webcast featuring my Favorite Handbag Sewing Techniques.
If you’ve never participated in a webcast, it’s easy. The day before the event, we’ll send everyone who registered a link to the webcast. A few minutes before your scheduled time, log on. In minutes, you’ll see me live on your computer screen.
Wondering if your internet connection is up to the task? Test your viewing ability by clicking here. This test link is a live webcast from the nest of a bald eagle! It may take a little time to load, but if you can see the eagle and nest, you’ll be able to watch Nancy Zieman Live. (Most of you should not have any issues watching the video.)
Learn
I’ll share my tried and true quick bag making methods along with many all-new never before seen designer bag making tips. You just may become a bag designer after viewing my 90 minute webcast.
Learn new strap making techniques gleaned from ready-made bags.
See how to turn ordinary fabric into laminated fabric.
Be introduced to new fabrics, ideal for bag making!
Get the inside scoop It’s what’s inside that counts! Updated tips on how to construct and what to add to the inside of your bag to make it look like a wow bag!
Interact
During the webcast, email me your questions and I’ll reply during the webcast.*
*If every question cannot be answered during the live webcast, questions will be answered post-webcast via email. Duplicate questions will not be answered.
Save!
Exclusive online specials will be available to you from Nancy’s Notions on the day of the webcast.

One Low Price–Two Time Options—Register Today!
Only $19.95!
The 90 minute webcast on April 26th is only $19.95 if you register on or before April 11, 2014. (Registration fee on or after April 12 is $29.95.) The fee includes:
A link to watch one of the two Nancy Zieman Live webcasts. (Link to webcast will be sent on April 25.)
The ability to have your question answered during the webcast.
A link to specials offered by Nancy’s Notions.
A free Nancy’s Bag Making Tips Sheet downloadable document.
Two Time Options
There are two webcast time options for the 90 minute webcast to accommodate North American Time Zones. Since a webcast is live, what might seem like late morning for those of you living in the Eastern Time Zone, is very early morning for our Hawaiian viewers. Both webcasts will cover the same topics. Since they’re both live, each will be personalized by the questions or, hmm, my whims! (For our followers in other parts of the world, convert your time zone by clicking here). We’ll be broadcasting live from the Central Time zone. Register for a time that best fits your schedule.
April 26: Times/time zone for Webcast Option One:
11:00 AM—12:30 PM (Eastern Time)
10:00 AM—11:30 AM (Central Time)
9:00 AM—10:30 AM (Mountain Time)
8:00 AM—9:30 AM (Pacific Time)
7:00 AM—8:30 AM (Alaska Daylight Time)
5:00 AM—7:30 AM (Hawaii-Aleutian Standard Time)
April 26: Times/time zone for Webcast Option Two:
2:00 PM—3:30 AM (Eastern Time)
1:00 PM—2:30 PM (Central Time)
12:00 PM—1:30 PM (Mountain Time)
11:00 AM—12:30 PM (Pacific Time)
10:00 AM—11:30 AM (Alaska Daylight Time)
8:00 AM—9:30 AM (Hawaii-Aleutian Standard Time)
Select your preferred time below and click the “buy now” button:
Times
Option One 10:00 AM to 11:30 AM (Central Time) $19.95 USD
Option Two 1:00 PM to 2:30 PM (Central Time) $19.95 USD
Thank you to our sponsors
Hope to see you April 26th!
If you have questions or comments, please leave a comment below.
Bye for now,
Content in this feed is © copyright 2014 by Nancy Zieman and may not be republished without written permission. You’re welcome to forward the email to a friend or colleague but it’s not okay to add the RSS feed automatically as content on a blog or other website.
March 27, 2014
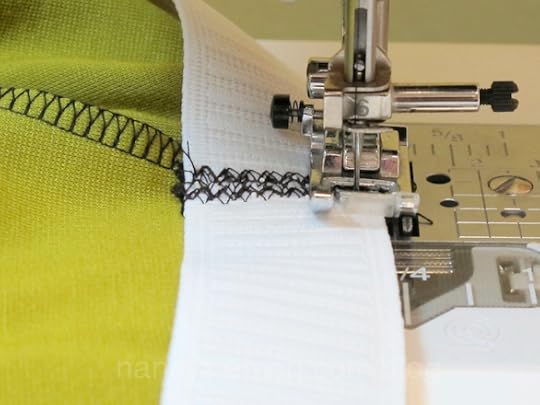
Nancy’s Most Popular Blog Posting—Absolute Easiest Way to Sew Elastic

Okay, the above picture doesn’t look like much. That’s the point! It’s the easiest way to sew elastic to a waistline without the telltale topstitching of an elastic waistline.
Over the years, I’ve tweaked and personalized sewing techniques. My favorites are collated in my book, Nancy Zieman’s Sewing A to Z. Now I’ll share a bonus technique for the letter “E” for inserting Elastic in a waistline. I believe you’ll find this technique to be the absolute easiest way to sew elastic to a waistline.
Prepare the elastic.
Cut the elastic 2″–4″ smaller than your waistline measurement, depending on what you feel is comfortable. (If your waist is quite a bit smaller than your hips, pin the elastic together without trimming off the excess.)
Try on the elastic, pulling it up over your hips. If the elastic is too tight to slide comfortably over your hips, readjust the elastic before sewing it together.
Zigzag the elastic ends to woven fabric without overlapping the ends. (This tip eliminates the bulk that occurs when elastic is connected by overlapping its ends.) Zigzag several times.

Trim away the excess woven fabric.
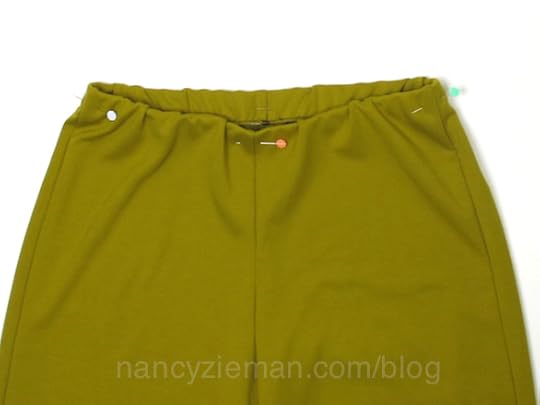
Quarter mark the elastic. Fold it in half and then in half again, placing a pin at each quarter.
Also quarter mark the waistline.
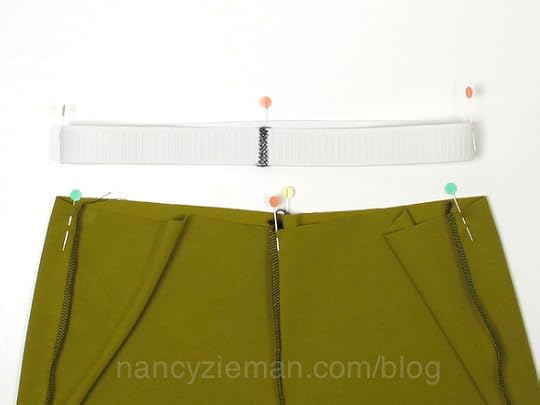
Attach the elastic.
Pin the elastic to the garment at each quarter point, meeting the elastic to the wrong side of the garment.
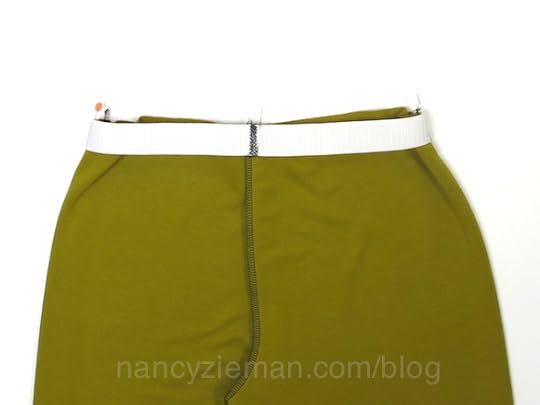
Serge or zigzag the elastic to the cut edge of the waistband, stretching the elastic to fit. (This is what real sewing looks like, sometimes it’s not perfect.)
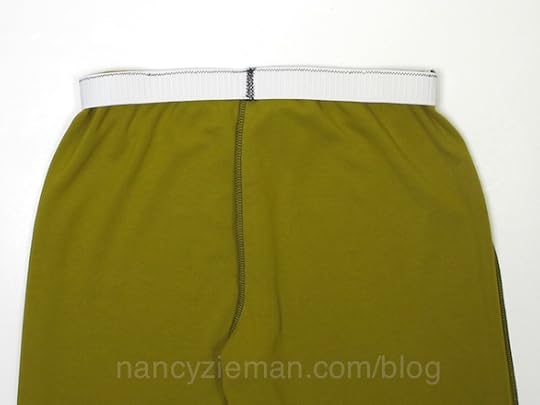
Fold under the elastic for a casing. Check to be sure the fabric is securely wrapped around the elastic.
Stitch through the elastic and garment at each seam. This holds the casing and elastic in position. Don’t stitch the elastic to the waistline along the lower edge. This is enough stitching!

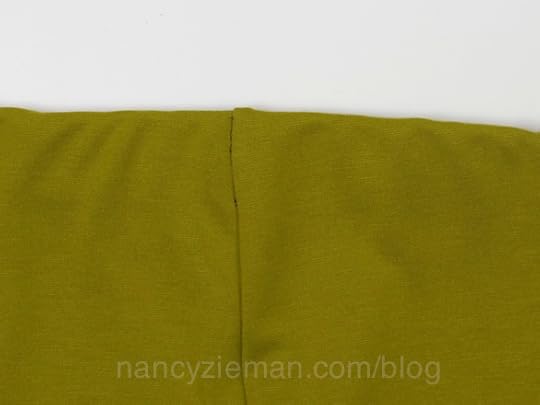
When wearing the skirt or pants, that telltale elastic stitching is gone. The sewing is about as easy as it gets! How about that!
This is a great Go-To Reference Book
I’ve gathered my favorite sewing and quilting tips in the book, Nancy Zieman’s Sewing A to Z.
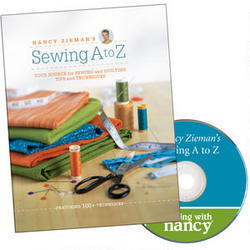
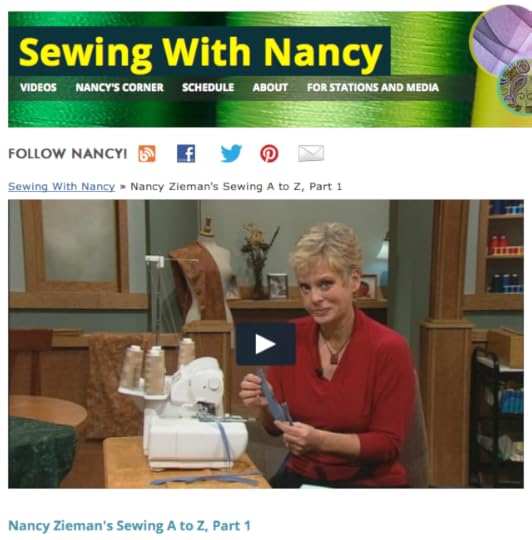
The Sewing With Nancy 3-part TV series of the same name is the available to watch online:
Click here to watch part 1 of the 3-part series, sewing techniques from A to G.
Click here to watch part 2 of the series, sewing techniques from I to P.
Click here to watch part 3 of the series for sewing techniques from S to Z.
Note: If you’re wondering about techniques H and Q, they’re the bonus techniques found only on the Sewing A to Z DVD!
Watch the newest 80 programs online, or on your iPad, iPod Touch, or iPhone. Have you downloaded the app?

And I hope you’ll give my elastic sewing tip a try!
Bye for now,
Content in this feed is © copyright 2014 by Nancy Zieman and may not be republished without written permission. You’re welcome to forward the email to a friend or colleague but it’s not okay to add the RSS feed automatically as content on a blog or other website.
March 25, 2014
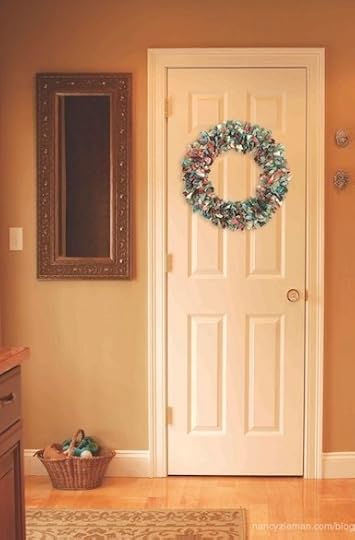
No-Sew Fabric Wreath
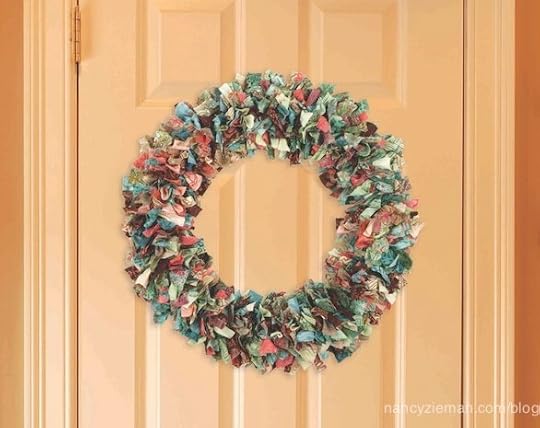
By Donna Fenske, Nancy’s Notions Guest Blogger
Greet your guests with this decorative fabric wreath.
You know you hate to throw good fabric away, no matter what size it is. Put your scrap fabrics to good use by making a fabric wreath to decorate your home. This easy project really packs a color punch when you use fabrics in your favorite shades, or match your colors to the room where it will hang. Change it up by using holiday or seasonal fabrics throughout the year. Or, make it from a fabric strip or fat quarter pack for a more coordinated look. It’s a great project to work on while “listening” to television.
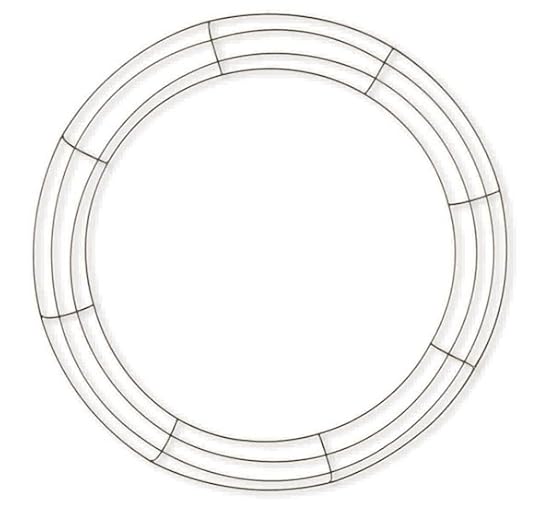
Start with a metal wreath form 14″, 18″, or 24″ in diameter.
For a 14″ wreath, you’ll need 1-1/2 yd. cotton fabric. You can also use 6 fat quarters, 12 fat eighths, OR 30–40, 2-1/2″ crosswise strips cut in half lengthwise for a scrappy look.
For an 18″ wreath, you’ll need 2 yd. cotton fabric. You can also use 8 fat quarters, 16 fat eighths, OR 40, 2-1/2″ crosswise strips cut in half lengthwise for a scrappy look.
For a 24″ wreath, you’ll need 3 yd. cotton fabric. You can also use 12 fat quarters, 24 fat eighths, OR 60, 2-1/2″ crosswise strips cut in half lengthwise for a scrappy look.
This is a great project for clearing out your scrap baskets. Simply cut fabric scraps into 1″ x 6″ pieces for a fabric wreath full of color.
Cut fabric yardage, fat quarters, or fat eighths into 1″ crosswise strips, then subcut every 6″. If using 2-1/2″ fabric strips, cut in half lengthwise (giving you two 1-1/4″ wide pieces from each strip), then subcut every 6″. Trim scrap fabrics into 1″ x 6″ pieces.
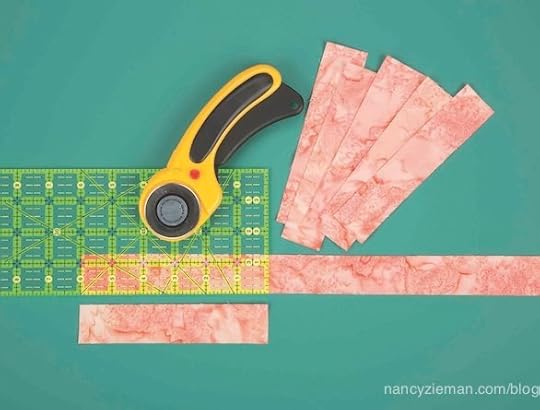
Slide a fabric strip under one of the wire rings on the wreath form, then bring it back to the top. Knot each strip once, then slide to the nearest crossbar on the wreath form. Add another fabric strip, tying once then sliding it next to the previously tied strip.
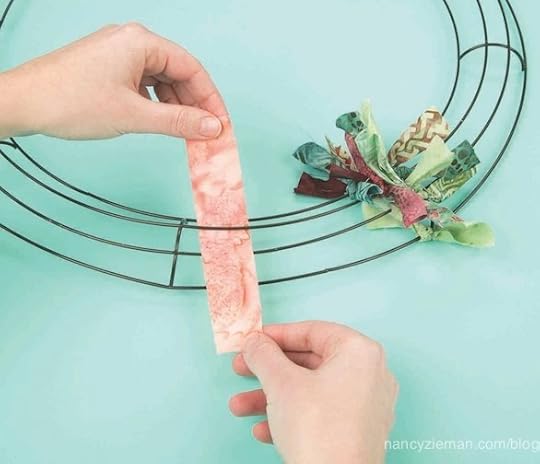
Continue tying fabric strips, alternating between the four wires on the wreath form, until each section is completely filled with tied fabric strips.
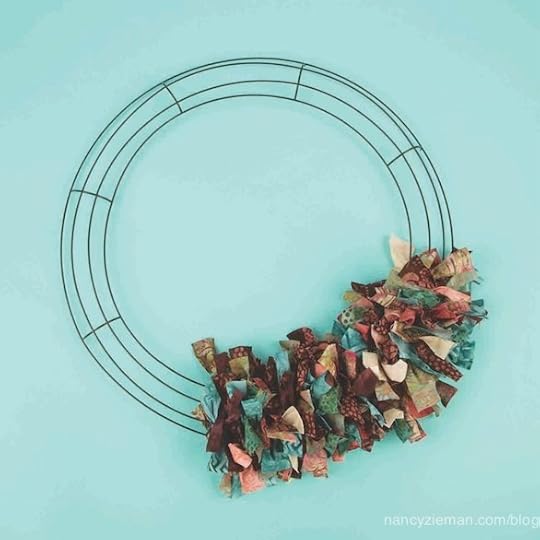
Work in one section of the wreath form at a time, then move on to the next until the entire wreath form is filled with tied fabric strips.
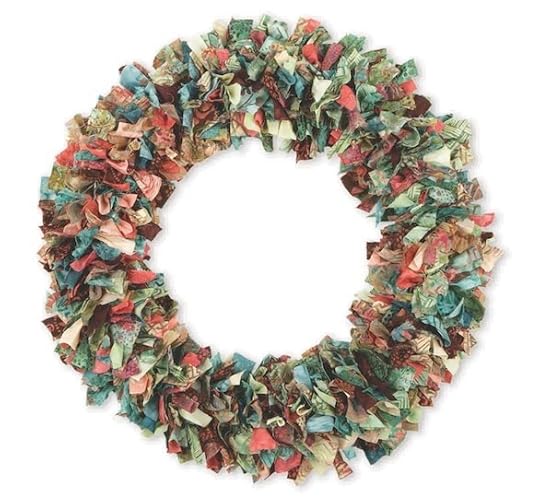
Hang this decorative wreath on your front door to greet guests, hang it above your mantel for a punch of color in your living room or family room, or give it as a gift to a new bride for her home. You’ll have a lovely piece of home décor, and clear out your basket of fabric scraps at the same time. What a great combination of fashion and function.
See how simple this impressive project is to make. Watch this short video to see how it’s done and download the free project instructions.

Thank you, Donna, for your guest blog post.
Bye for now,
Content in this feed is © copyright 2014 by Nancy Zieman and may not be republished without written permission. You’re welcome to forward the email to a friend or colleague but it’s not okay to add the RSS feed automatically as content on a blog or other website.
March 22, 2014
Stippling for Applique by Mary Mulari
By guest blogger, Mary Mulari—designer and author of Applique—Large & Small
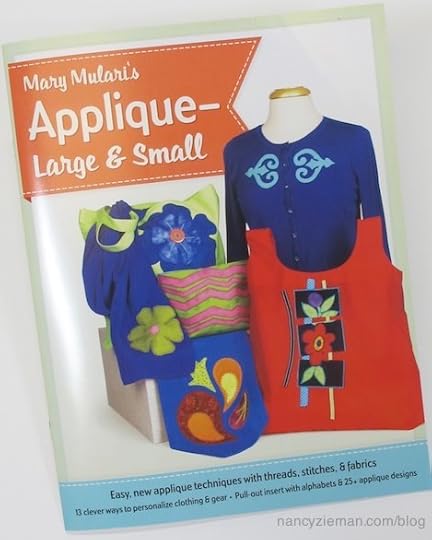
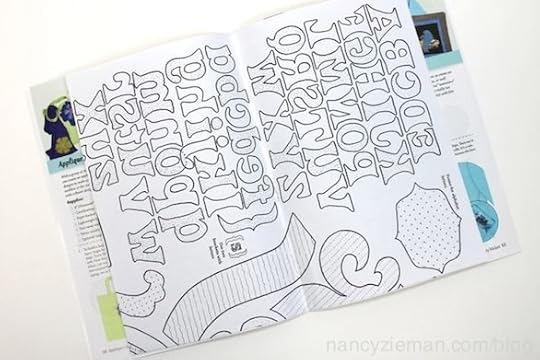
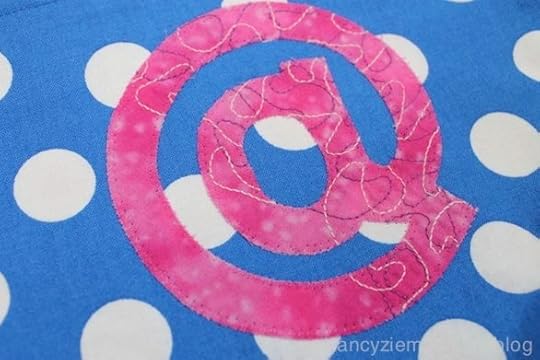
There’s no need to cut applique designs from ordinary fabric when you can make it extraordinary by first adding embroidery machine stippling. Using the designs from my book Applique—Large & Small, I prepared appliques with stitched texture.
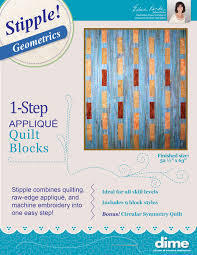
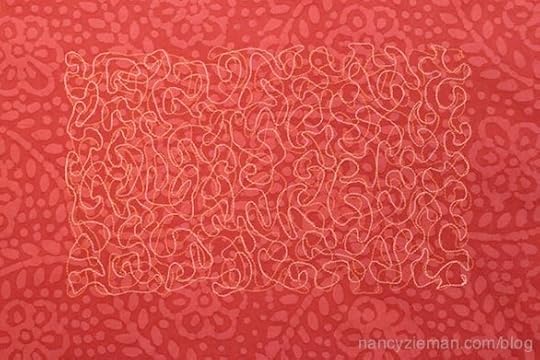
Choose a stippling pattern for an extra large embroidery hoop (30 cm x 20 cm) and stitch a design approximately 10″ x 6″ to use in creating appliqués. The design chosen for these projects is from Stipple Geometrics. If you don’t have an embroidery machine, no worries, simply machine stipple or stitch randomly on the layers below. Depending on the size of each applique you cut from the stippled fabric, you may be able to use one stippled panel for several designs.
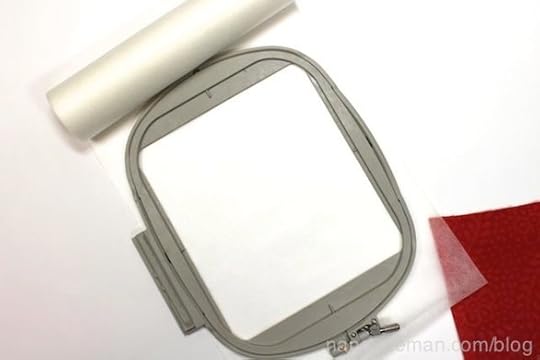
Select a stabilizer keeping in mind whether you want to be able to remove it or keep it in place. Removing a tear-away or cut-away stabilizer after stippling is a tedious job. I preferred to use a water-soluble stabilizer for easy and fast removal. To add body to the stippled fabric after the stabilizer is removed, you can fuse lightweight fusible interfacing to the wrong side.
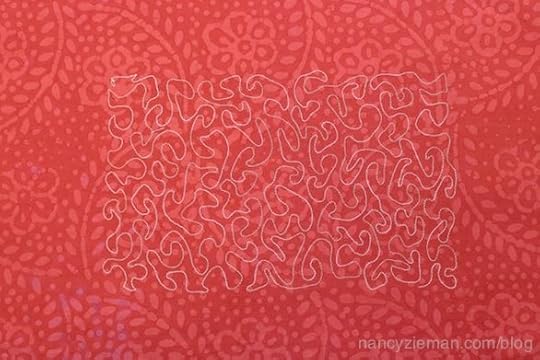
Here’s a comparison of stippling options, with the first red/orange fabric showing the stippling pattern stitched with white thread.
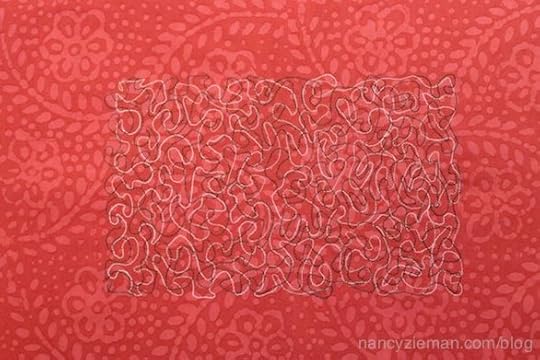
The second fabric shows the same white thread stitch pattern, with a second stitched in black thread—added by flipping the design with the horizontal mirror image key.
The third fabric presents the same two stitch patterns with thread colors that closely match the fabric color, so the stitching addition is more subtle.
I’ll show you ways to use these stitching options, plus one more option too.
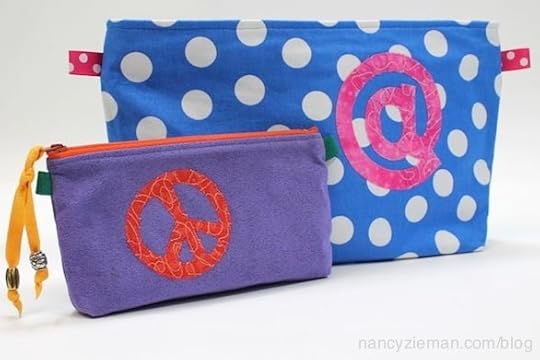
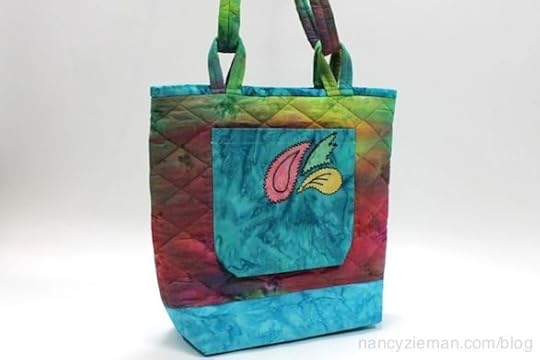
For the two travel bags above, I chose applique designs from Applique—Large & Small book and reduced the sizes to make them fit easily on the bags. The pink “at” sign was placed on the stippling fabric to show both the plain and the stippled areas. The peace sign on the lavender bag was cut from red/orange fabric with two stippling patterns. When sewing these two designs to completed bags, I find it easier to fuse the designs in place and then turn the bags wrong side out to sew the applique edges. That way it’s easier to avoid sewing on the back of the bag.
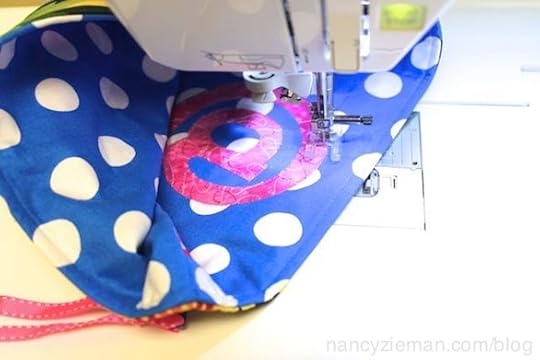
I used clear monofilament thread and a narrow zigzag stitch to sew the pink “@” design and orange thread to sew on the peace sign.
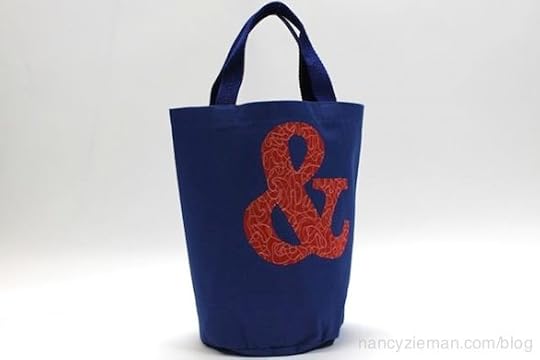
It’s always fun to experiment with changing the sizes of applique designs. So for the tote above, I enlarged the design from the book and cut it from the double stippled orange fabric. It makes a striking statement on the small tote. Clear thread and zigzag stitching around the edges give strength with an invisible stitching line.
I enlarged one version of the flower and stem design (from the book) to make it fit on the Handle Loop Tote from my Totes To Go pattern. As I’m planning to use the tote frequently, I chose the edge stitches for the design to wear well. The stem and leaves are attached with a zigzag variation and the flower with a satin-type stitch and Madeira Cotona 30-weight thread for coverage around the edges. In addition, I cut the flower and bud slightly larger than the pattern pieces so I could form a pleat in the centers. This adds a little more dimension to the design.
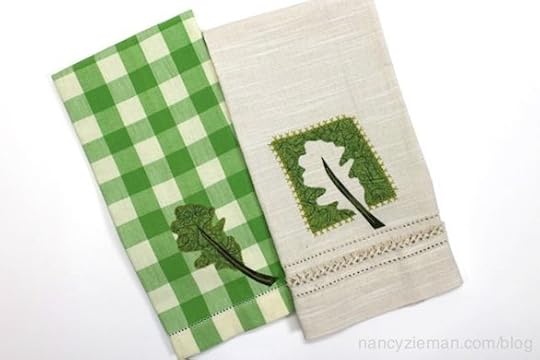
One of my favorite hostess or bridal shower gifts is a towel with an applique. (Often the towel trim matches an apron I’ve also made.) Here I’ve used one design from the book. And in the process of cutting it from fabric, I created a second shape of a maple leaf to stitch to the checked towel. All I had to cut extra was another leaf stem. That’s what I call a bonus! For the first stitching of the design on the ecru towel, I used clear monofilament thread and a zigzag stitch. That didn’t seem like enough, so I chose Madeira Lana wool thread and installed a topstitching needle in my machine to create the wide stitched edging for the design and the stem stitch center line to each of the leaf stems.
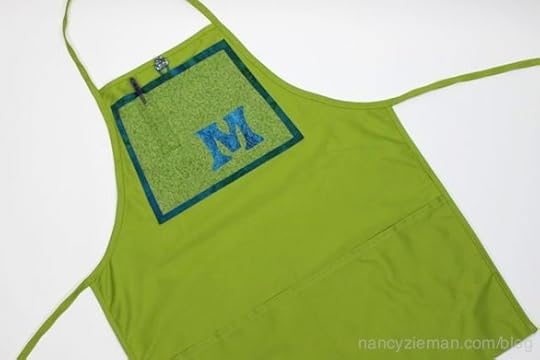
This apron was a find at a thrift shop. I loved the color, but it featured a large product advertisement on the bib. It was easy to cover up by creating a stippled fabric pocket enhanced with both a pen pocket and a monogram cut from texturized, shrunken stippling. The apron pocket is large enough to hold equipment like a cell phone, notebook, and an iPod. Plus, the pocket becomes a decorative element of the apron. The button and elastic loop made from a hairband will help to hold the pocket contents in place if I move around too energetically while doing household chores!
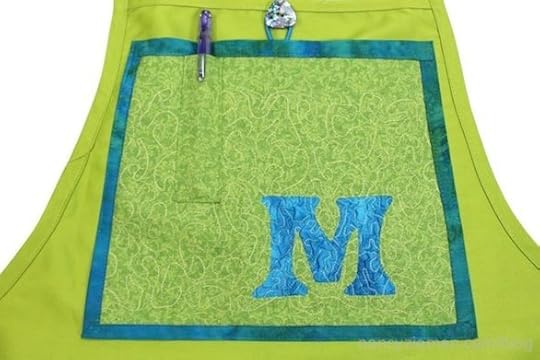
The green stippled pocket base fabric (above) is subtly stitched with matching green thread and the monogram (enlarged in size from the alphabet in the book) shows a contrast color stippling thread.
Just when you thought stippling was only for making quilt blocks, this collection of applique ideas will expand the options for your embroidery machine design collection. Give this new form of applique a try.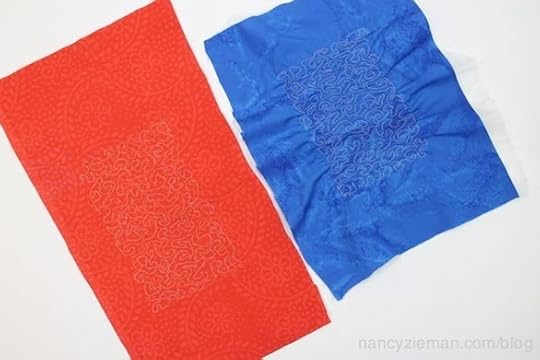 Here’s another technique to try with stippling: Replace the stabilizer in the hoop with a piece of Texture Magic™ or Fabric Magic™. After stitching out one stippling pattern, follow the instructions on the product packaging to steam and shrink the “magic” fabric. Above you’ll see a comparison of the size of the original stitch pattern on the red/orange fabric with the same size stitch pattern on the blue fabric. Talk about cool texture and dimension all created with a steam iron or steamer!
Watch Sewing With Nancy Online!
Thanks, Mary, for joining us this month as a guest blogger! In Applique—Large & Small Mary shows you her easy methods for appliqué, plus she’s included a pull-out insert with alphabets and twenty-five applique designs. You can watch Mary and me online or on PBS. There are 52 programs to watch online, or on your iPad, iPod Touch, or iPhone. Have you downloaded the app?
Explanation: This past summer I was recovering from a rather serious illness and was unable to record at the studio during the month of August. Mary stepped in to the rescue as host and guest of the 2-part series. What a friend!
For a chance to win a copy of Applique—Large & Small, leave a comment below sharing what you’d applique with stippled fabric.

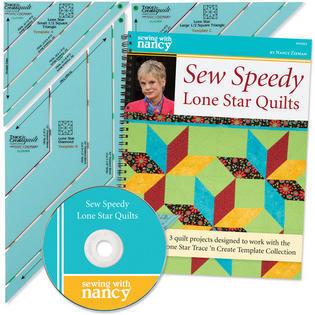
The random winner of the Sew Speedy Lone Star book and templates is Enid who says, I like the traditional Lone Star.
Bye for now,
Content in this feed is © copyright 2014 by Nancy Zieman and may not be republished without written permission. You’re welcome to forward the email to a friend or colleague but it’s not okay to add the RSS feed automatically as content on a blog or other website.
March 20, 2014
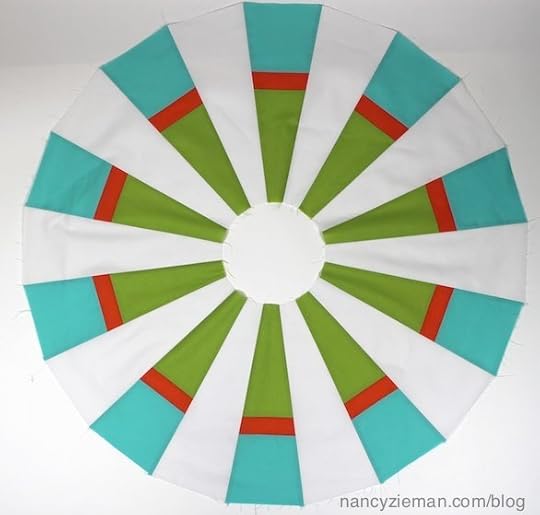
A Dresden Quilt Design Gets a Makeover
Change the fabric, modify the technique, and a traditional Dresden Plate quilt design turns into Twirling Parasols. This is just one of four Dresden quilt design options featured in my Sewing With Nancy TV episode, Sew Grand Dresden Quilts. It’s one of my newest Sewing With Nancy programs, which you can watch online, on Public TV, or on DVD. Click here and watch at your computer!
Traditional Dresden plate designs, as featured in the wall quilt below, have the characteristic points at the end of the wedges. With a little modification, traditional turns modern!
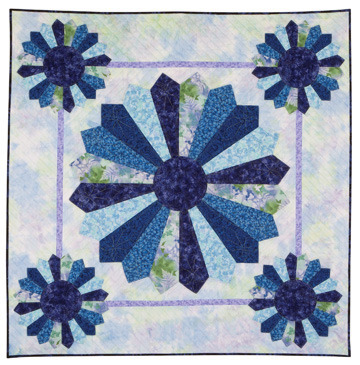
Wall hanging created by Shelli Koehler.
Twirling Parasols
It’s almost too difficult to believe that the two featured quilts were created with almost the same process. Both feature 36″ and 16″ Dresden plate designs.
Here’s a preview of the modern process.
Choose five fabrics plus a white background fabric. The tool that I used to create the quilt is the Trace ‘n Create Quilt Template—Dresden Collection . This unique tool gives 12″ to 40″ Dresden plate options.
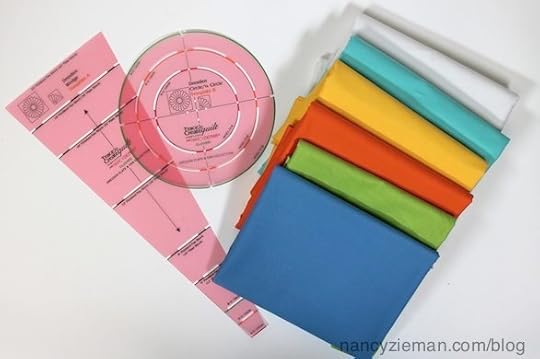
Cut crosswise strips to create all of the parasols and then sew together into a strata. Exact cutting instructions are given in the Sew Grand Dresden Quilts book.
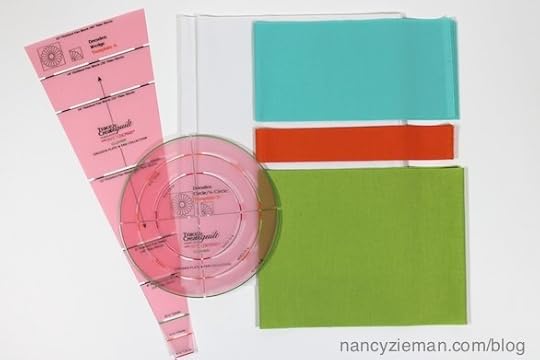
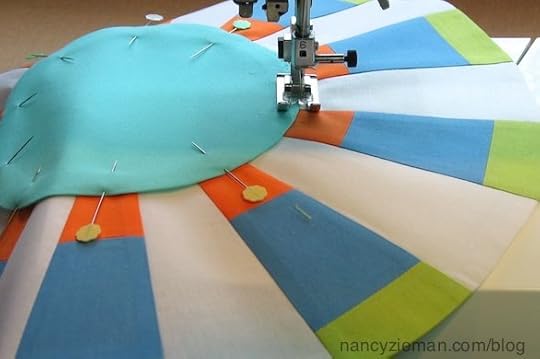
Use Template A to trace the wedge shapes.
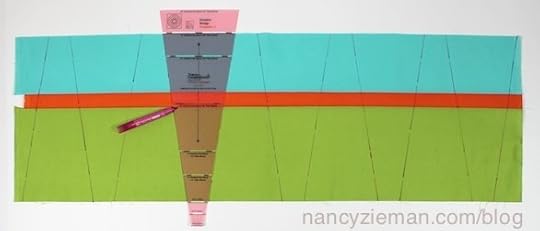
Cut along the traced lines, plus cut an equal number of white wedges.
Separate the wedges into the same color orientation. There will be two options of color—one set of wedges will be inverted.
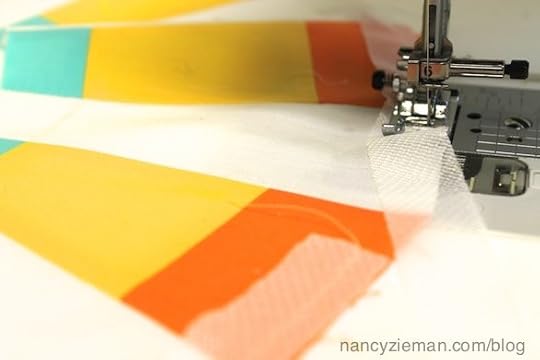
Pair a colorful wedge with a white wedge; stitch 10 pairs for each parasol. Note: Traditional wedges are folded in half and stitched across the top to create the points prior to this step. This is the first of the makeover tips.
Press the seam allowances toward the darker fabric.
Stitch the pairs together to create a complete circle.
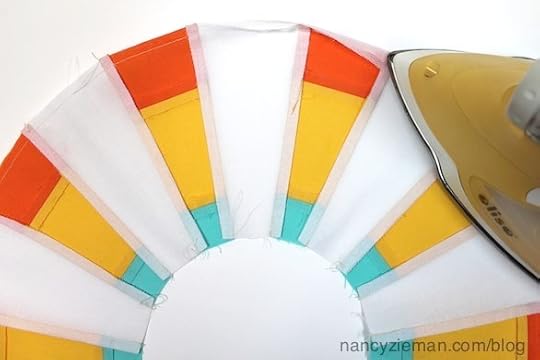
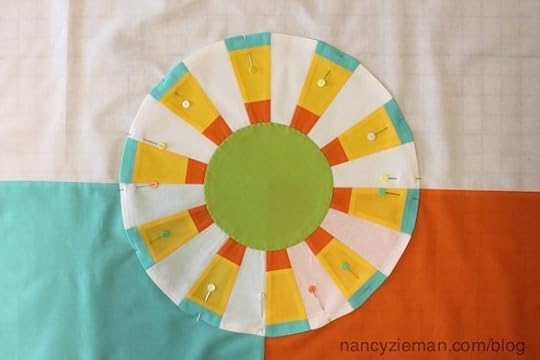
Cut bias strips of knit fusible interfacing .

Align the smooth side of interfacing to the right side of the parasol. Stitch with a 1/4″ seam allowance.
Turn the interfacing to the wrong side and press.
Create the circles using Template B and more fusible interfacing. ( Watch this tip on TV since I forgot to take a photo!)
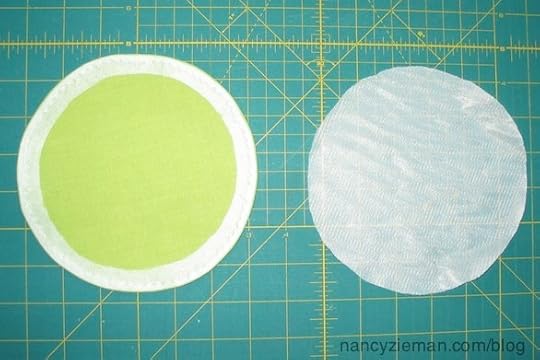
Stitch a circle to the center of each parasol.
Make two 36″ and six 16″ parasols. Position them on the background fabric. You’ll find the background dimensions in the book, yet feel free to personalize the background sizes.
Position the parasols on the background; topstitch with monofilament thread .
Praise for this technique!
Jane Hall, a Sewing With Nancy viewer watched the Sew Grand Dresden Quilts series and had these comments.
. . . right before Christmas I finally made a decision to tackle a much dreaded task that I had put off for TEN YEARS. I was challenged with 50 Dresden plate circles made by my boyfriend’s mother back in the 50s that were something less than perfect in their size and assembly! I plowed my way through “turning under” and sewing down the raw edges—accomplishing nine of those “masterpieces.”
However, I promised to make four more for his children and thought I’ll never get this done! And, then, NANCY TO THE RESCUE! I watched your shows on Sew Grand Dresden Quilts and cried with JOY! I had no idea that the answer was so simple, using fusible lightweight interfacing to turn those raw edges into finished circles! Thank you, Nancy, I’m proud to say I have now completed all of those circles with your magic method.
Book and Template combo
You’ll love this great combo. If you already own the templates, I’m sure you’ll enjoy the book and DVD also.

More inspiration is online!
There are 80 programs to watch online, or on your iPad, iPod Touch, or iPhone. Download an app for Apple products here.
More blog posts on Dresden Quilts:
Sew a Dresden Sunflower from Fabric Scraps
Sew Techie Covers—Be Creative with Odds & Ends
Bye for now,
Content in this feed is © copyright 2014 by Nancy Zieman and may not be republished without written permission. You’re welcome to forward the email to a friend or colleague but it’s not okay to add the RSS feed automatically as content on a blog or other website.
Nancy Zieman's Blog

- Nancy Zieman's profile
- 21 followers

