
Nancy Zieman's Blog, page 143
May 27, 2014
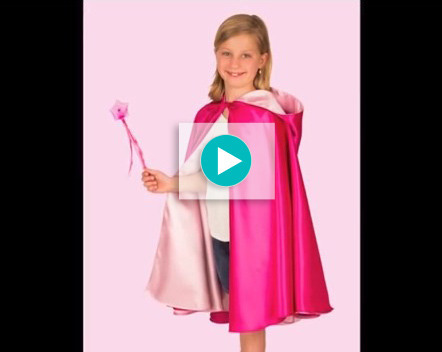
Sew a Royal Cape for Your Little Princess

By Donna Fenske, Nancy’s Notions Guest Blogger
Little girls love to play dress-up, and having the clothes of a royal highness can give her endless hours of playtime fun. Sew a simple, yet elegant, satin cape for your little princess in an afternoon and let her pretend to rule over her kingdom like her favorite cartoon heroines to her heart’s content.
Following these pattern instructions, this cape fits sizes 3T to 12.
Start by gathering your supplies. You’ll need 2 yd. of 60-inch wide fabric for the outer layer of the cape, and 2 yd. of 60-inch wide fabric for the lining, and coordinating all-purpose thread. We made ours with darker and lighter shades of the same colors, with the darker color as the outer layer and the lighter color as the lining, but feel free to make yours however you like—even two completely different colors— because it’s totally reversible!
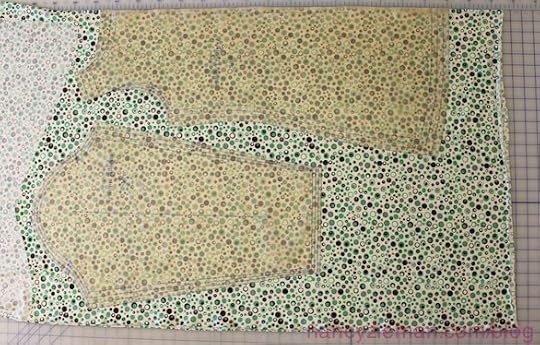
Use the same pattern size as the child’s usual clothing size. Measure the back length measurement of the child starting just below the neck, and continue to the knee/mid-calf. The maximum cut length of the cape is 30″. Select the appropriate size and trace all pattern pieces on fabric using a water-erasable marking pen. Transfer all pattern markings to fabric, including the pivot point of the neckline opening.
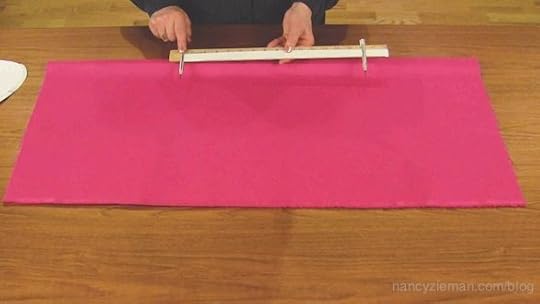
Fold outer cape fabric, right sides together, aligning selvage edges. Attach the metal point end and lead point holder of the Yardstick Compass to a yardstick. Align and tighten the metal point holder at the 1″ marking of the yardstick. Adjust the lead point holder to 1″ longer than the desired finished length of the cape. Place the metal point on the fold of fabric at the proper pivot point, and use the lead point holder to mark a half circle.
You can also use a standard fabric or plastic tape measure to create the bottom hemline for the cape, if you don’t have a Yardstick Compass. Align the starting end of the tape measure with the pivot point on the fabric. Place a mark 1″ longer than the desired finished length of the cape. Continue marking in a half circle.
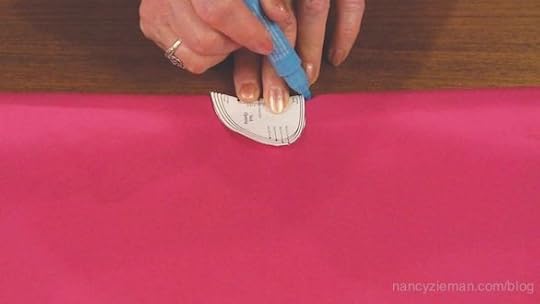
Cut out the marked circle with a scissors. If making the cape from a slippery fabric such as satin, crepe, or other lightweight fabrics, use a micro-serrated scissors to help prevent slipping, which can result in uneven cuts. Align the neck opening pattern piece at the same pivot point used to create the half circle, and pin in place. Cut out the neck opening, marking the center back of the cape.
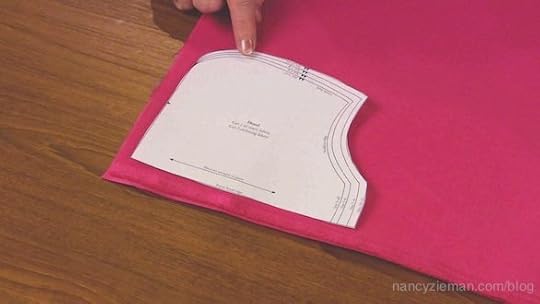
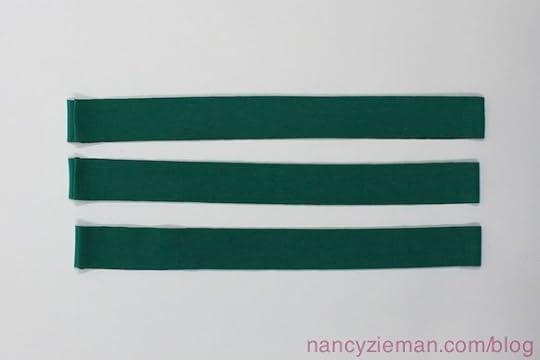
Cut down the center front of the cape to create the center front opening, and cut out the hood following the correct pattern size to match the cape. Cut two 2″ x 18″ strips for the ties.
Repeat all of the above steps for cutting the lining fabric, EXCEPT for the ties. The ties are made only from the outer fabric. If you like, you can clean finish all of the raw edges with a zigzag stitch on your sewing machine, or with a serger.

For all sewing steps, use a 1/2″ seam allowance. To begin construction, first cut a 45-degree angle at one end of each of the 2″ x 18″ fabric strips for the ties. Thread the tapered end through a 1″ Bias Tape Maker, pressing with a warm iron as you pull the fabric strip through the opposite end. Trim the tapered end straight across. Open the pressed tie, matching right sides together, and sew the two short ends. Refold the tie, matching folds together. Pin, then edgestitch closed. Align raw edges of ties 1/2″ down from the top center front edges of cape on both sides. Baste ties in place, then pin the loose end of each tie to the cape front to prevent them being caught in a seam later in the construction process.
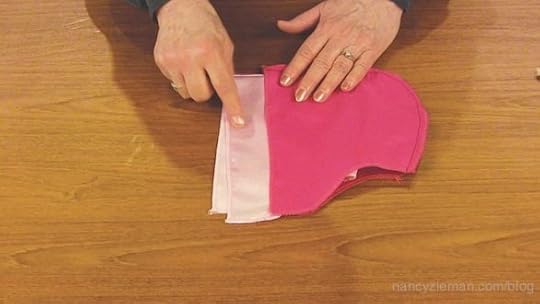
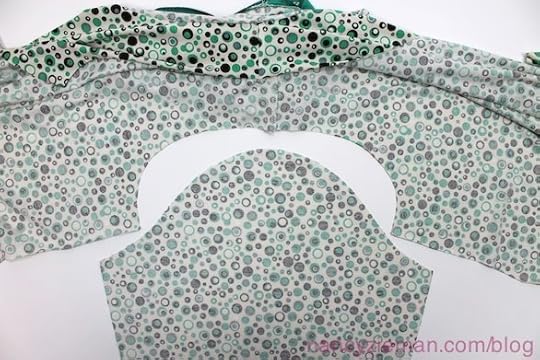
Next, sew the hoods. With right sides together, sew the top/center back notched edges of both the outer and lining hood sections. Press seam flat, then open. Turn one hood right side out, and insert into the other hood so that right sides are together. Align center front edges and sew together. Press seam flat, then open. Turn right side out and edgestitch front hood edge. Baste the neckline edges of both hoods together.
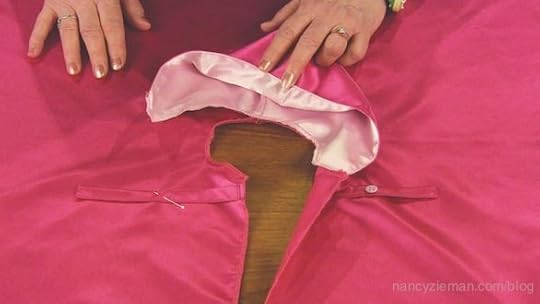
Now that the hood unit is complete, attach it to the cape. Match center back of hood neckline and center back of outer cape neckline, right sides together. Pin the front hood edges 1/2″ in from the center front edges. Ease and pin the hood to the cape. You can also baste the hood to the outer cape fabric for stability if you like. Sandwich the hood between the outer cape and lining fabric, aligning raw neckline edges. Sew through all neckline edges. Press seam flat, then open.
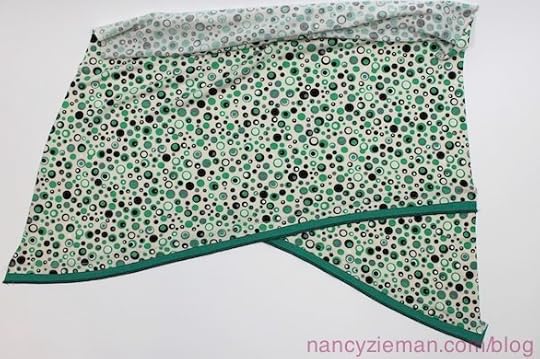
Next, complete the center front edge. Fold the neckline seam down toward the lining and pin in place. Continue pinning the center front edges of the outer cape fabric and lining fabric together. Sew center front edges of cape. Press seam flat, then open. Turn cape right side out.
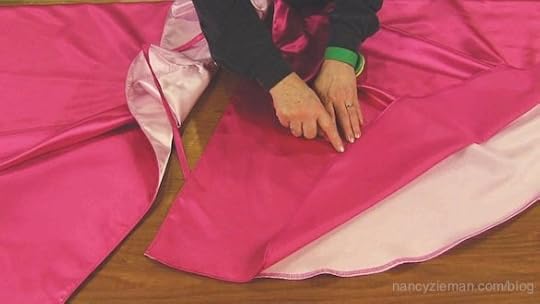
Finally, finish the cape with edgestitching. Press hem under 1/4″ all the way around both the outer fabric and lining fabric, then edgestitch. Edgestitch along center front edges of both sides of cape opening.
Watch a step-by-step demonstration of this project, and download the free pattern instructions.

Content in this feed is © copyright 2014 by Nancy Zieman and may not be republished without written permission. You’re welcome to forward the email to a friend or colleague but it’s not okay to add the RSS feed automatically as content on a blog or other website.


May 24, 2014
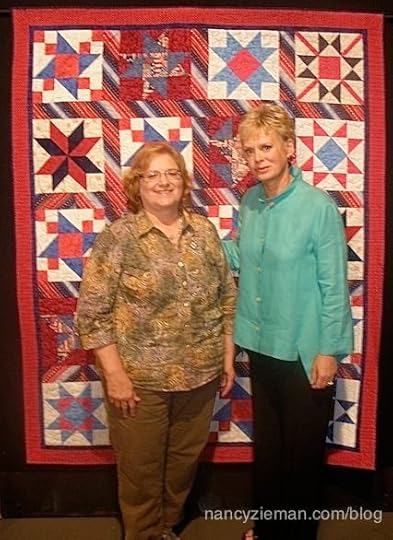
Sew & Quilt for Those Who Serve
Those of us who love working with fabric have been sewing for others in need since the invention of needle and thread. You name it, blankets, quilts, hats, mittens, dresses, and layettes are a sampling of the many types of projects that have been made with love. This Memorial Day weekend, as we celebrate our freedoms and remember those who have served our country, consider giving back by stitching something tangible, something significant to show your gratitude.
During the Nancy’s Corner segment of Sewing With Nancy I often interview volunteers who sew and quilt for others. Listed below are three groups that give to those who serve or who have served. Join me in honoring the many who serve or have served in the military. The gift is in the giving!
Quilts of Valor
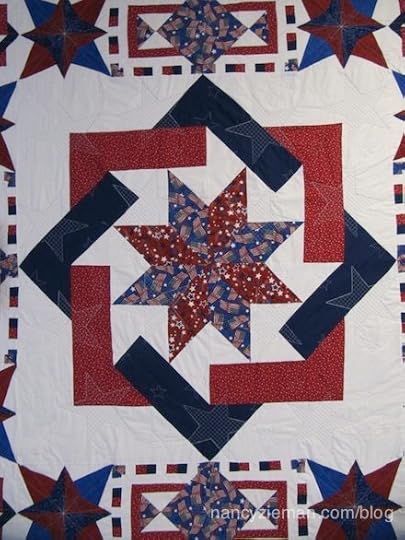
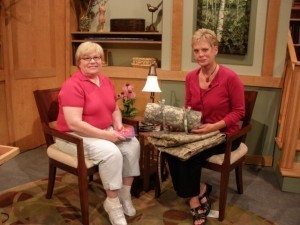
Rock Solid. That’s my impression of the mission and character of the organization Quilts of Valor and the thousands of people who give of their time and talents to help injured Armed Service Members. One of the Quilts of Valor volunteers, Karen Demaree, was my guest during the Nancy’s Corner Segment on Sewing With Nancy. If you don’t already know about Quilts of Valor, here’s an introduction.
This group of thousands of volunteers makes and presents quilts to wounded and injured Armed Service members and their families. Their mission is to present a Quilts of Valor (QOV) quilt to all those service members and veterans touched by war. These quilts measure 55″ x 65″ to 72″ x 87″ and are made of only the best quality fabrics. To date over 66,000 quilts have been presented.
Click here to watch my interview with Karen. It is only five minutes long, yet it’s very telling. After watching, I know you’ll plan a way that you can help the QOV cause.
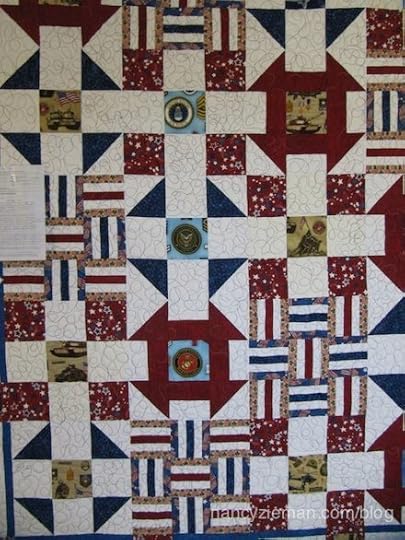
Camo Quilt Project
Linda Wieck is the originator and the creator of the Camo Quilt Project. The camouflage quilt is a small quilt measuring approximately 45″ x 72″. The quilt folds in thirds and rolls up like a sleeping bag. It is lightweight and has cotton batting so it breathes better in the extreme heat. These quilts are slept on and slept under; they protect the soldiers from the harsh elements they face, both cold winter nights and hot daytime sun. They are even used for pillows.

One of our most-asked questions is, “Doesn’t the military provide them with a quilt?” The answer, sadly, is no. Military-issued sleeping bags are bulky and hot and must be carried inside their backpacks. The Camo Quilt is so popular because it’s made from the same camouflage material as the uniforms. That means it can be used in the open, tied to the outside of a soldier’s kit, leaving precious room inside for personal items.
To date, the volunteers have made and sent over 21,00 quilts to our service people overseas!
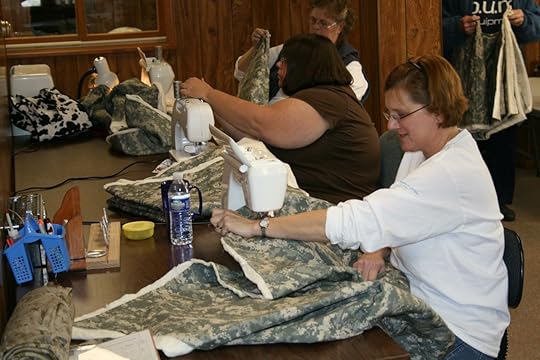
Right now, there is a slow down of orders and the volunteers want to keep on sewing for our troops. If you know of a troop who has recently deployed or will be deploying in the next month, please contact Camo Quilts by clicking here.
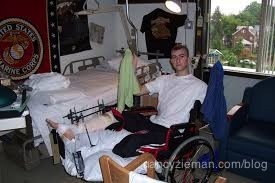
Sew Much Comfort
Sew Much Comfort provides free adaptive (Velcro® closure) clothing to support the unique needs of our wounded service members from all branches of the Military and National Guard serving in current conflicts. These injuries require large fixator, prosthetics and casts that are too bulky to fit under ordinary clothing. Without adaptive clothing, wounded service members are limited to wearing hospital gowns. The adaptive clothing is designed to appear as normal civilian apparel.

By contributing to Sew Much Comfort as a volunteer, donating, or becoming a partner, you can help make a difference in the recovery of our wounded service members.

What’s your favorite volunteer group?
Please post information about the group and their website so that others can add to their volunteer references.
Bye for now,
Content in this feed is © copyright 2014 by Nancy Zieman and may not be republished without written permission. You’re welcome to forward the email to a friend or colleague but it’s not okay to add the RSS feed automatically as content on a blog or other website.
May 22, 2014
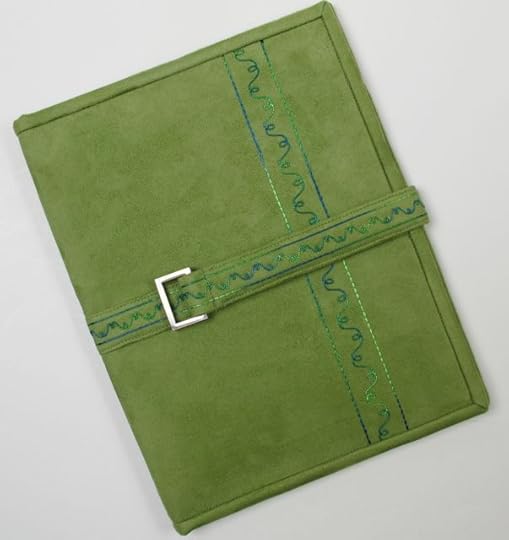
Sew a Snazzy Cover for your Electronic Tablet
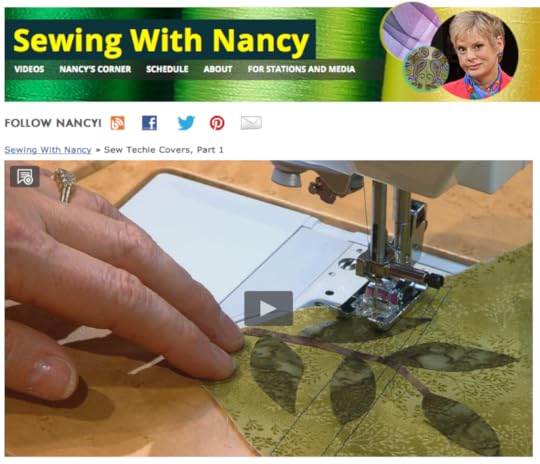
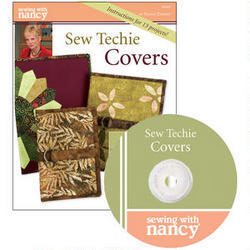
The word snazzy may not be a definition you use too often when referencing sewing, but I think this fun-sounding word describes this creative stitching option. When developing the Sewing With Nancy series on how to create covers for electronic tablets or low-tech paper tablets, it was exciting to see how a small amount of stitching or a creative use of fabric could create a stylish cover. The first of the 2-part series, Sew Techie Covers, is this week’s featured video on Sewing With Nancy’s Online Video Site. Click here to watch the video. The show is also available to all PBS stations.
In this first episode you’ll learn these three easy stitching techniques:
E-appliqué tips
How to Stitch Techie Circles
Undercover Stitching accents
These snazzy stitching techniques are all great ways of personalizing a cover for your iPad, original Kindle, Nook, Kindle Fire, iPad Mini or any other tablet. Just click and watch!
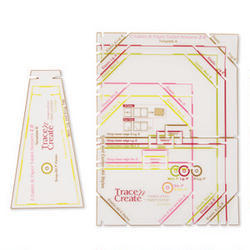
Choose a Tablet Keeper Template
To create these functional, yet fashionable tablet covers, use Clover’s E-Tablet & Paper Tablet Keeper Templates. There are two template offerings. Why you may ask? Good question: After designing and bringing the first template to market, more electronic tablets with different sizes were introduced. So, a second tablet keeper was needed.
Select the original Clover’s Trace ‘n Create Tablet Keeper Template for an iPad, iPad Mini, or the original Kindle. (There are more tablets that fit the original Tablet Keeper.) Click here to view the original Tablet Keeper Template device listing.
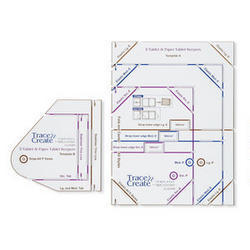
Select the newer Tablet Keeper, Trace ‘n Create Tablet Keeper Template 2.0, for the Kindle Fire, Nook, and many more. Click here to view the Tablet Keeper 2.0 device listing. If you don’t see your tablet listed, email us at info@ziemanproductions.com and we’ll add your electronic device to the listings.
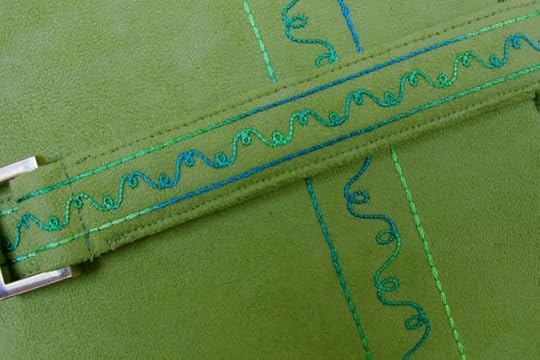
 Undercover Stitching Showcase
I know that not all of you clicked to watch the video . . . sigh. To give you an idea of what you may be missing, here are the highlights of one of the three easy stitching techniques, Undercover Stitching (otherwise known as bobbin work).
Wind 6- or 12-weight thread in a bobbin, using conventional bobbin winding techniques. I selected Madeira’s Decora 6 wt. thread . Note: If your machine has difficulty winding heavier thread, wind the thread by hand. Thread the needle with all-purpose thread.
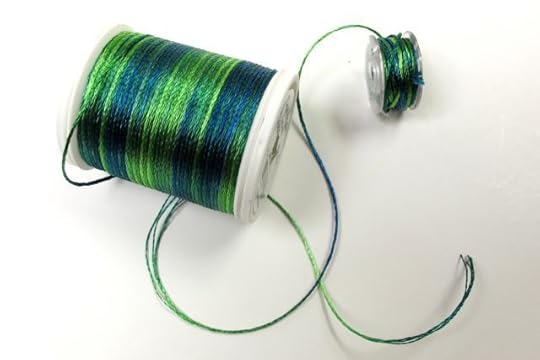
Insert the bobbin into the bobbin case.
Back the fabric with interfacing, and add a second stabilizer and length of interfacing in the stitching area. Then, mark the stitching line on the wrong side of the fabric.
Choose a nonsatin, decorative stitch. An outline or open stitch is best suited for bobbin work. Lengthen the stitch for best results. Test the stitch on sample fabric.
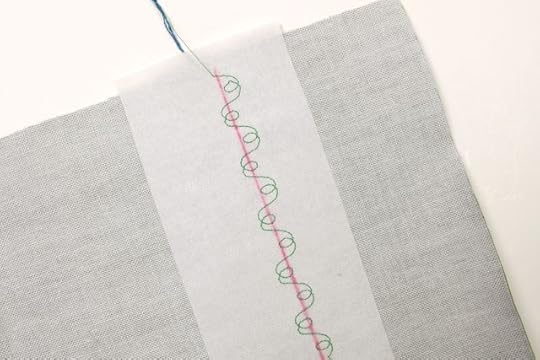
Check the look of the stitch on the right side. My test stitch had a few hiccups! So, I adjusted the settings, lengthening the stitch. It doesn’t always go perfectly for me either!
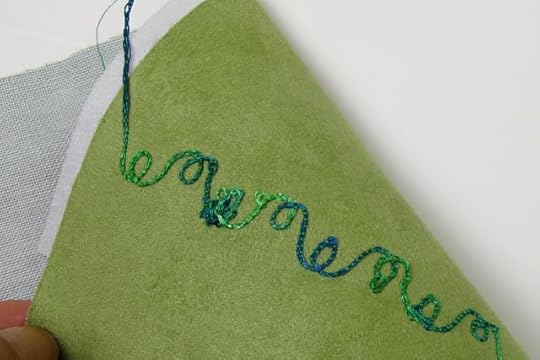
Helpful Hint! Some machines handle heavier thread in the bobbin if you bypass the bobbin case tension. In short, don’t pass the thread through the bobbin case tension guide.
Also, test a variety of stitch settings, lengthening/shortening or narrowing/widening the stitch length and/or width. A straight stitch is also ideal! A narrower stitch width setting was used for the strap.
A book with 12 Sew Techie Cover Ideas
The Undercover Stitching idea is just one of 12 techniques found in Sew Techie Covers! Check out all the options!

For a chance to win a copy of Sew Techie Covers leave a comment sharing your ideas for embellishing your tablet keeper.
Watch Sewing With Nancy on your iPad, iPod, or iPhone!
There are three seasons of Sewing With Nancy programs to watch online, or on your iPad, iPod Touch, or iPhone. Have you downloaded the app?

Bye for now,
Content in this feed is © copyright 2014 by Nancy Zieman and may not be republished without written permission. You’re welcome to forward the email to a friend or colleague but it’s not okay to add the RSS feed automatically as content on a blog or other website.
May 20, 2014
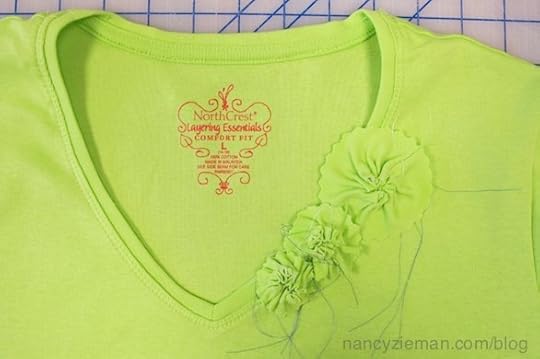
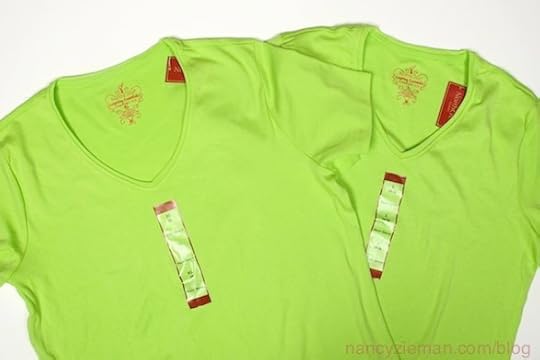
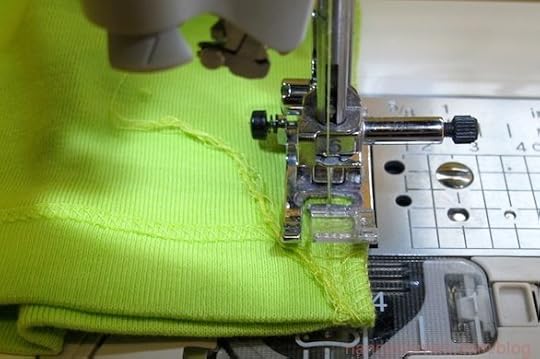
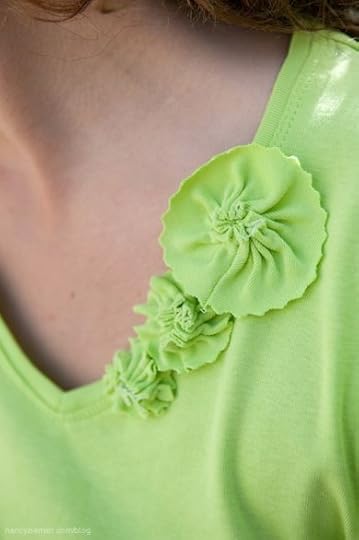
T-Shirt Makeover—An Embellishment Idea
Last week I shared how to makeover two rather boxy styled ready-made T-shirts into a fitted knit top with shape and style. (Click here to read the steps.) My T-shirt makeover also sports rosette embellishments, which were made from the leftovers scraps of fabric. Here’s how to make fabric rosettes a fast and easy way using Fuse ‘n Gather Tape.
How to sew fabric rosettes:
Use leftover knit fabric to make rosettes.
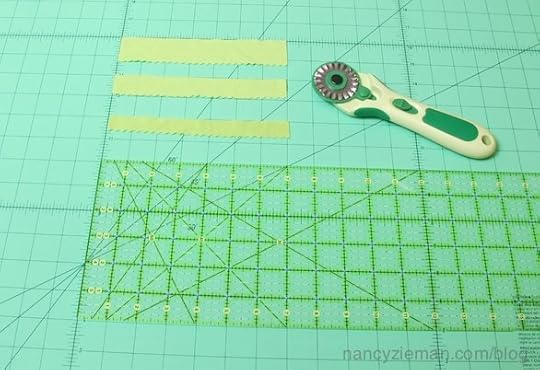
Cut one bias strip each of the following widths: 3/4″, 1″, and 1-1/2″ for three differently sized rosettes.
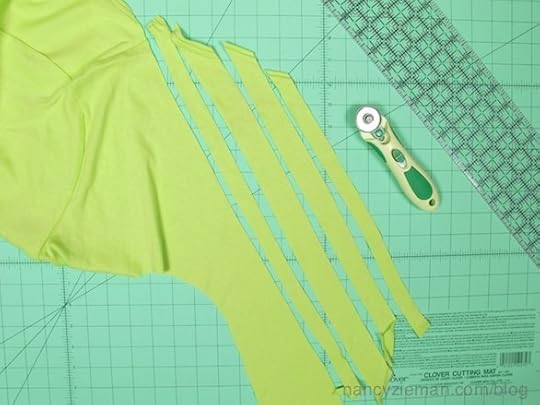
Subcut the strips into 7″–8″ lengths.
Trim one lengthwise edge of each strip with a pinking rotary blade .
Cut 9″ lengths of Fuse ‘n Gather Tape for each rosette.
Center and press the tape to the wrong side of each bias strip with blue threads right side up. Free the blue threads of the tape from each end that extends beyond the fabric and place threads up and out of the way.
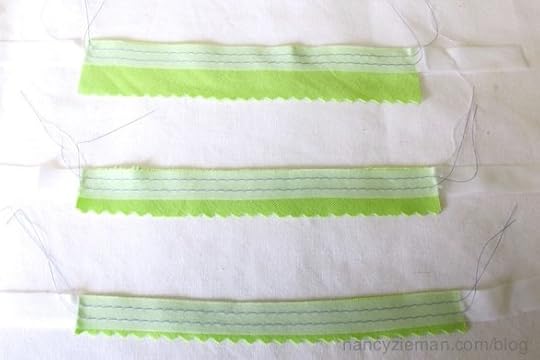
Carefully trim the excess tape from each edge, being careful not to cut the blue threads.
Stitch each strip into a circle, meeting short ends and right sides.
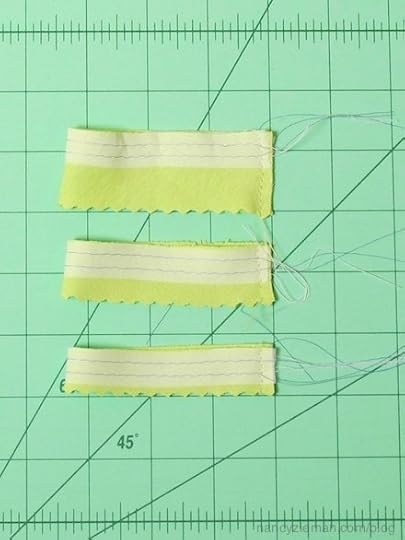
Secure the threads around a pin at one edge of the tape. Pull the free ends of the blue threads on the opposite edge to gather the fabric.
Using the threads from the gathering tape, hand stitch the embellishment into a rosette.
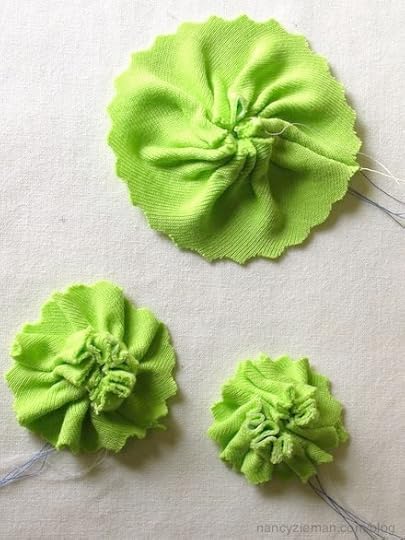
Hand stitch the rosettes to the neckline of a knit top as shown, or embellish a headband, purse, or other project with these fabric blooms.
Tie and trim off the extra thread tails. That’s it!
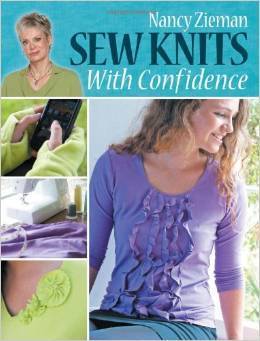
Excerpts from Sew Knits With Confidence
This T-shirt makeover idea is included in my book, Sew Knits With Confidence. There are 128-pages of knit tips and techniques.
Bye for now,
Content in this feed is © copyright 2014 by Nancy Zieman and may not be republished without written permission. You’re welcome to forward the email to a friend or colleague but it’s not okay to add the RSS feed automatically as content on a blog or other website.
May 17, 2014
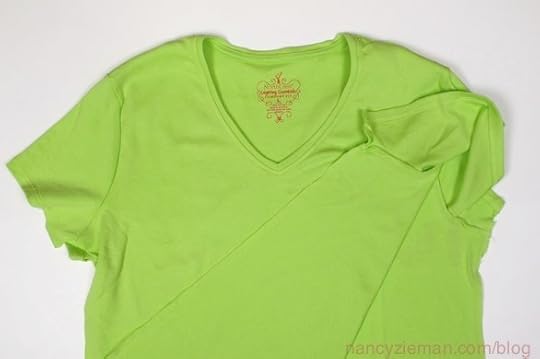
A T-Shirt Makeover in 10 Sewing Steps

Are you looking to make your favorite T-shirt pattern, but can’t find the right fabric or color? Check out “boxy” ready made knit tops or T-shirts that, perhaps, lack style but have a great color or fabric, and give that new fabric a makeover! This T-shirt makeover idea is included in my book, Sew Knits with Confidence. There are 128-pages of knit tips and techniques. The fabric rosettes are another of the makeover options. Learn how to add 3-D embellishments in next Tuesday’s Blog posting.
T-Shirt Makeover
Step #1: Purchase Two Tops
Purchase two tops, one your size and the other the largest size available to provide more yardage. Why? You’ll be able to use the finished neckline and hemline of the ready-made top. That means less sewing time. Plus, you can adjust the pattern in just the right place for a perfect fit or change the length of the sleeves or hem. (I am not fond of short sleeves, so with this makeover the body of the T-shirt is more flattering and the sleeves are 3/4 length.)
Step #2: Cut Apart Top A
Begin with the T-shirt purchased that is your size. Cut apart the top (Top A) along each side and underarm seam.
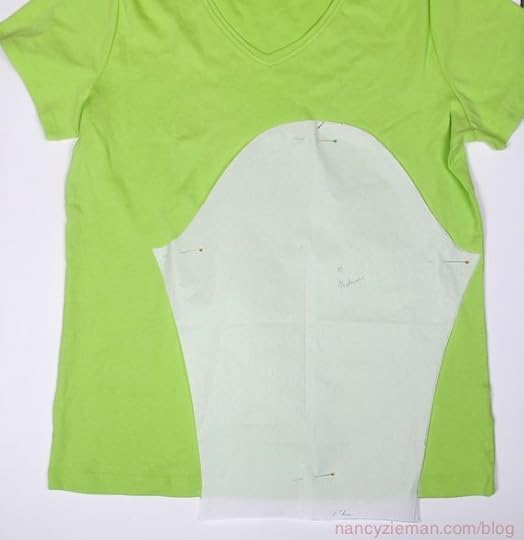
Step #3: Lay Out the T-Shirt Front Pattern
Use your favorite T-shirt pattern to create a new top. If you’re looking for a pattern option, click here .
Fold Top A in half, meeting side edges, shoulder seams, and center front.
Overlay the front T-shirt pattern on Top A, matching center fronts and the shoulder seams.
Pin the pattern to the fabric.
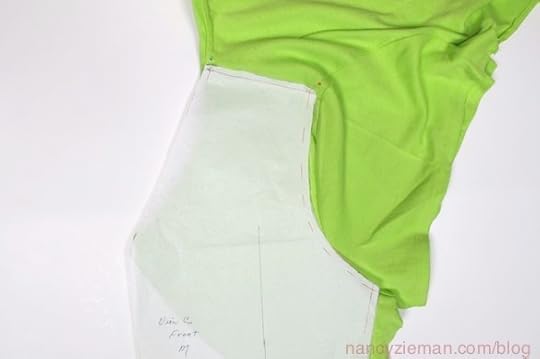
Make certain to align the pattern’s shoulder stitching line (not the cutting line) on the sewn shoulder seam.
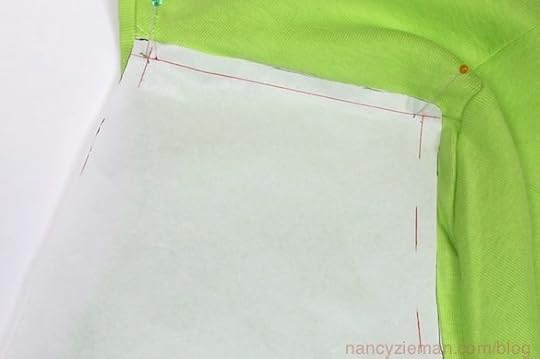
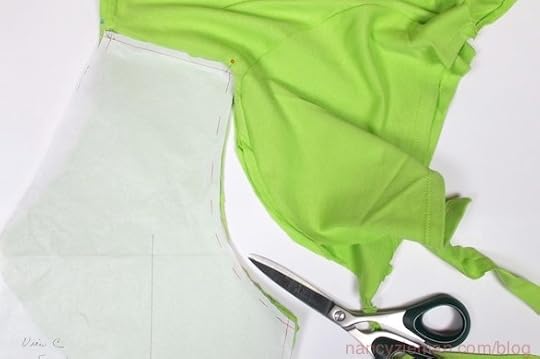
Step #4: Cut Out the T-Shirt Front
Cut along the pattern side seams and armholes; do not cut the shoulder seams or hemline. For a timesaving step, use the hem of the finished top, unless of course, it’s much longer than you like.
Step #5: Lay Out the T-Shirt Back Pattern
Refold Top A aligning side edges, shoulder seams, and center back.
Overlay the T-shirt back pattern piece, matching center back and shoulder seams with Top A. Pin the pattern to the top. If the neckline doesn’t conform exactly with your pattern shape, use the ready-made neckline.
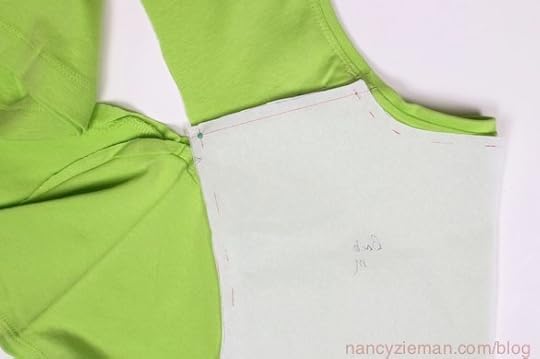
Step #6: Cut Out the Back Pattern
Cut out the fabric, following the shape of the pattern. Do not cut the shoulder seam or the hemline.
Step #7: Mark the Pattern Notches
Mark the pattern notches on the cut-out fabric, using a water-erasable fabric marker.
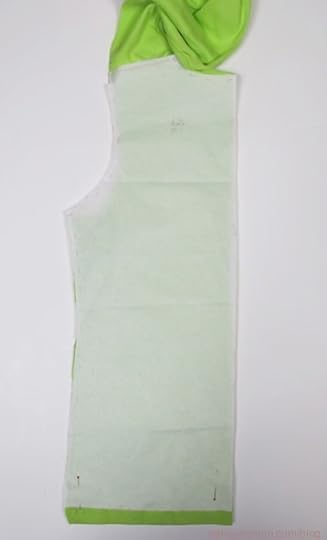
Step #8: Cut Out the Sleeves
Place Top B on a cutting surface, aligning the hem edges.
Place the hemline of the sleeve pattern along the finished hem of Top B.
Cut out the sleeve pattern. Mark the notches.
Save the remaining fabric from Top B for embellishment. (You’ll learn how to create the rosettes in next Tuesday’s blog!)
Step #9: Set in the Sleeves
The shoulder seams and neckline are already finished. The only steps that remain are to set-in the sleeves and stitch the underarm seams. Stitch or serge the sleeves to the armholes, following the instructions in your pattern.
Step #10: Stitch the Underarm Seams
Align edges at both the sleeve and lower hemlines. Pin. Since the hemlines are already finished, take extra time to align the edges of the finished hemlines.
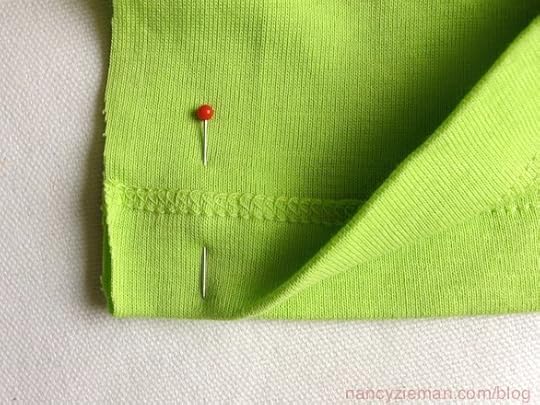
Stitch or serge the underarm seams.
If the seams are serged, stitch the serger thread into the seam with a straight stitch. Clip off the excess thread tails.
Excerpts from Sew Knits with Confidence
This T-shirt makeover idea is included in my book, Sew Knits with Confidence. There are 128-pages of knit tips and techniques.
More T-Shirt Makeover Ideas on Tuesday
Use the leftover fabric from Top B and create rosettes. Learn how by reading next Tuesday’s blog!
Content in this feed is © copyright 2014 by Nancy Zieman and may not be republished without written permission. You’re welcome to forward the email to a friend or colleague but it’s not okay to add the RSS feed automatically as content on a blog or other website.
May 15, 2014
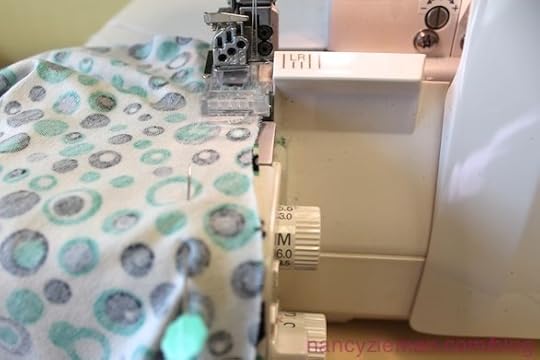
Sewing Knits–The Perfect Spring Sewing Project

Even though I really love to sew, this time of year I’d prefer to be outside during my free time rather than sewing. I’m sure I’m not the only one! To fulfill my sewing fix, I turn to knits for style, comfort, and a fast and easy process. Case in point, the Newport Pullover knit top sewing pattern. I’m found of things asymmetrical—imagine that! Plus the single-layer boat neck collar and trim accents are quick to sew.
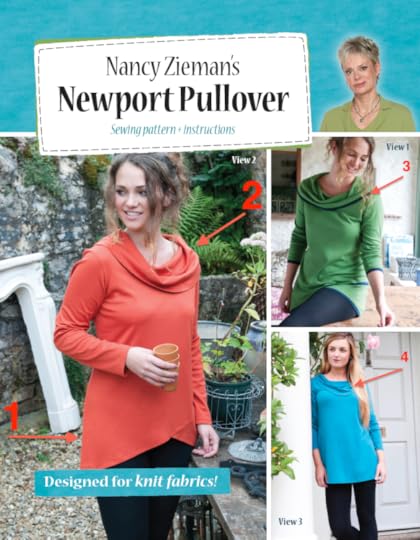
Last year I posted the photo of me wearing the Newport Pullover on Facebook. A viewer commented that she thought it looked like something Judy Jetson might wear! Yah, that Judy from the 1960′s Saturday morning cartoons; others of you might be scratching your heads. Regardless, I took that as a compliment, I hope! Now, I just have to work on the pose!

Newport Pullover Tops
I’d like to share with you some of the style options of the Newport Pullover. I chose to make view 2. While recording Sewing With Nancy, the top was comfy to wear, yet I felt in style. By the way, these photos were taken on the set of Sewing With Nancy during a rehearsal of a segment.
 Sewing Tips
With an asymmetrical hemline, the front and front insert are single pattern pieces.
You’ll find layout guidelines on the pattern guide sheet.
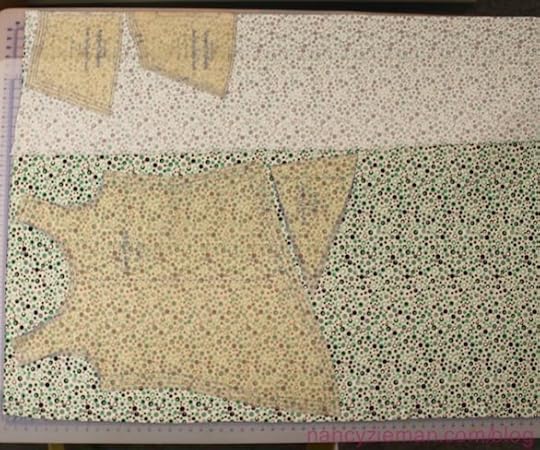
The trim is cut from another knit fabric, 1-1/2″ wide crosswise cuts.
Use a rotary cutter, ruler, and mat for accurate and fast cutting.
Use as is—it’s not necessary to finish the edges—or serge the edges. The trim on my top is finished with a 3-thread overlock stitch.
Hemming is one of the first steps!
You’ll be guided to press up the hem, pin the trim along the hemline, then topstitch.
After sewing the shoulder seam, the sleeve is sewn in before sewing the side seam. It’s so much easier that way.
Pin the fabrics together at the shoulder seam/sleeve cap and at the underarm areas. That’s all that’s needed.
Serge or stitch the sleeve to the armhole with the longer layer, the sleeve, next to the feed dogs.
The feed dogs will automatically ease in the extra ease or fullness in the sleeve. Knits are so easy to sew!
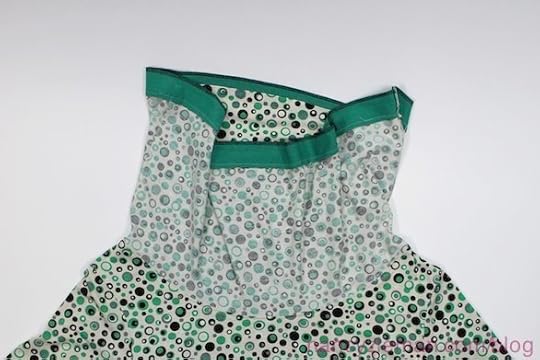
The boat collar is a single layer. In the pattern, I’ll instruct you to pin the right side of the collar to the wrong side of the neckline. Don’t worry, I wouldn’t lead you astray!
After stitching, the collar is brought upward (as shown) and then folded down to create the boat neck.
That’s about it! Those are the major sewing tips. It’s fast to make, and best of all, it’s a fashionable top!
More Sewing Knit Ideas!
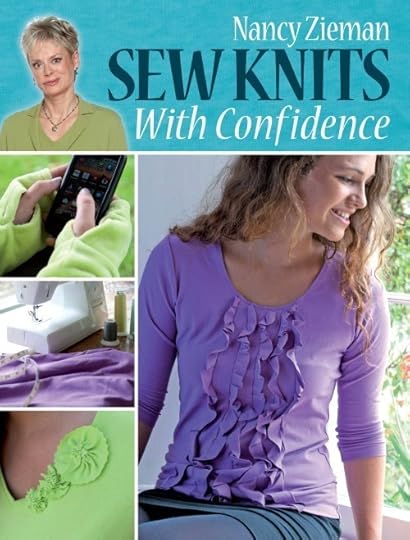
Reference Sew Knits With Confidence (book and DVD) for more knit sewing ideas.
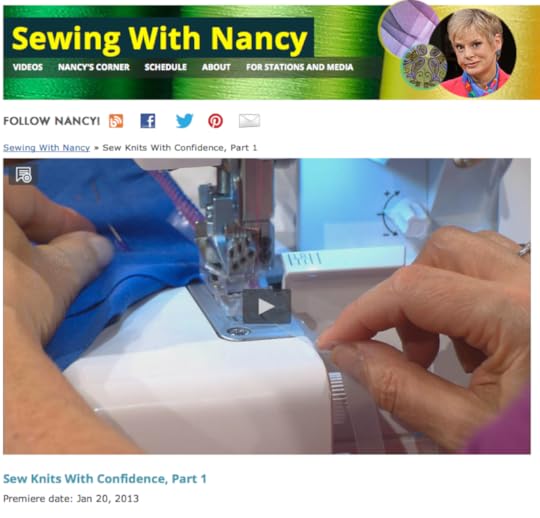
Watch the Sew Knits With Confidence TV Show
You can watch the Sew Knits With Confidence TV show, part 1 and part 2 online. Watch at your convenience! Or view my shows on your iPad, iPod Touch, or iPhone. Remember to download the app.
Bye for now,
Content in this feed is © copyright 2014 by Nancy Zieman and may not be republished without written permission. You’re welcome to forward the email to a friend or colleague but it’s not okay to add the RSS feed automatically as content on a blog or other website.
May 13, 2014
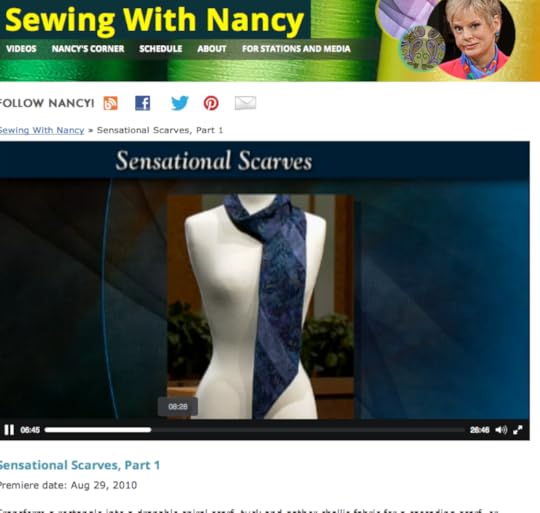
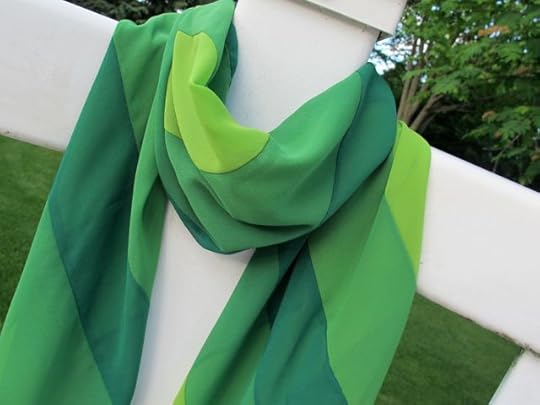
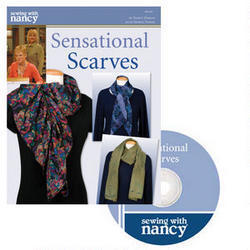
How to Sew a Spiral Scarf Tutorial
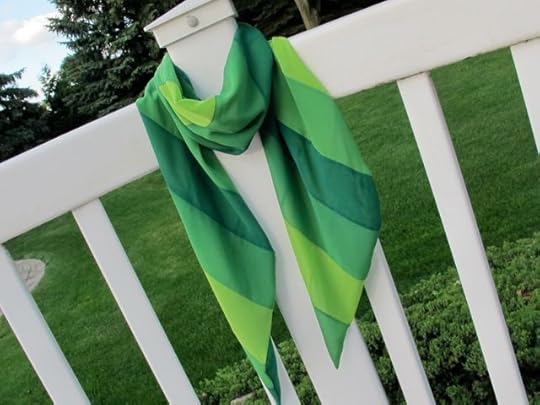
What begins as crosswise fabric strips, ends up in a completely bias scarf. Curious? It’s easy to sew a bias, spiral scarf with a little sewing savvy. My first recommendation is for you to watch or read the original scarf instructions. The book is Sensational Scarves and it features a total of 14 scarf options. You can watch part one, which features the Spiral Scarf, Click here to watch . (Also, consider watching part two of this TV show online, or many other Sewing With Nancy programs, anytime of the day at your convenience.)
Spring Green Scarf Sewing Tips
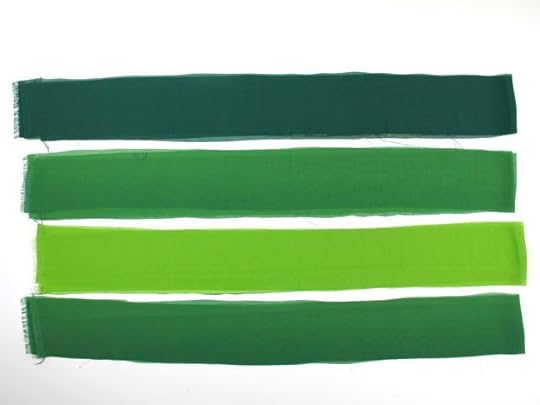
Fabric requirements:
We chose three shades of polyester-chiffon fabric. (Of course, you may select any color range or color combos.)
Light and dark colored fabrics: Purchase 1/4 yd. of 60″ wide fabrics.
Medium colored fabric: Purchase 1/2 yd. of 60″ wide fabric.
Cutting directions:
Cut two 3-1/2″ wide crosswise strips of the light and dark fabrics.
Cut four 3-1/2″ wide crosswise strips of the medium fabric.
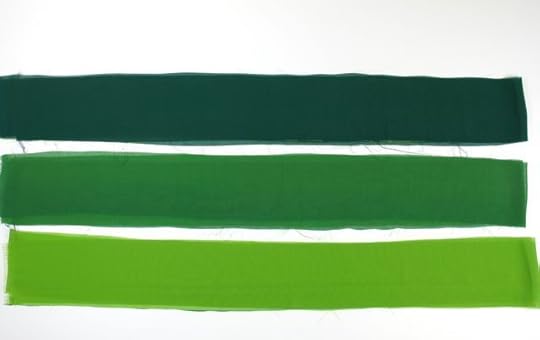
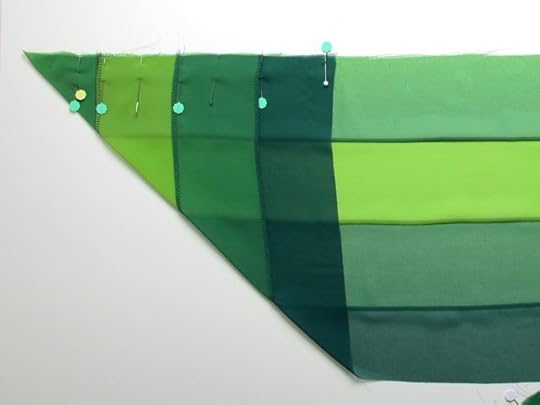
Stitch or serge two strips of the same fabrics together, creating a long 120″ length. You’ll have four strips: one each of the light and dark fabrics and two of the medium fabrics.
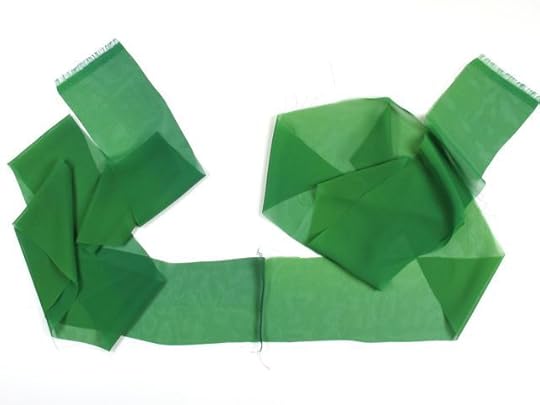
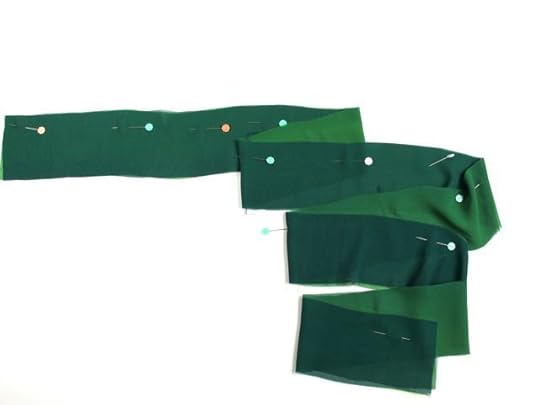
Lay out the fabric strips in the following sequence: dark—medium—light—medium. The sequence will cause the colors to gradate after sewing.
Rotate every other strip before seaming, staggering the seams at either end of the scarf. Serge or stitch the strips together. Note: if you’re serging the seams, pin parallel to the edge of the fabric to avoid serging over a pin. Oops!
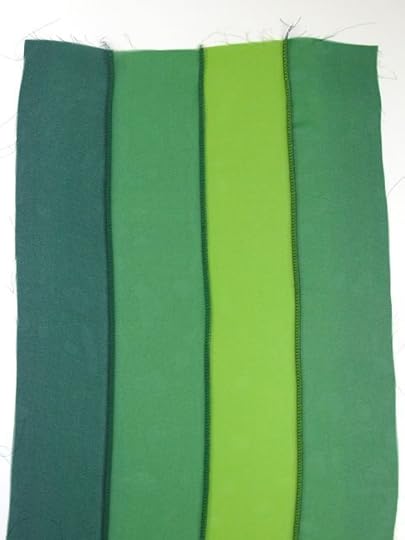
Cut the fabric to a specific length.
In order to achieve the spiral effect, the fabric rectangle must be a specific length. As I tell my TV audience, the length must be divisible by the width. (If your forehead is wrinkled, relax, I’ll give you an ideal size.)
Cut the length to 84″ x 12″. If the width is wider than 12″, trim.
Did you watch the video? If not, now’s the time to watch the segment on the spiral scarf . It’s easier to watch me demonstrate the technique than to show it in photographs!
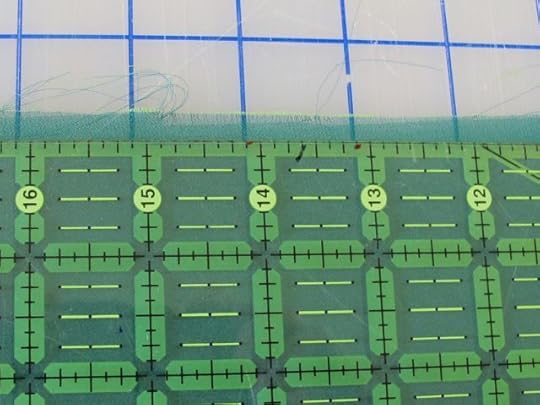
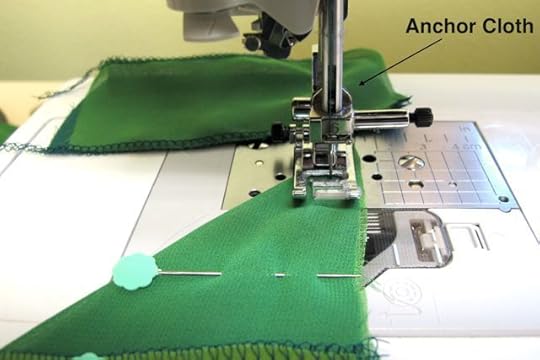
If your fabric is lightweight, use an anchor cloth, which is merely a scrap of fabric. Start sewing on the anchor cloth then proceed to stitch the scarf fabric. After completing the seam, clip off the anchor cloth.
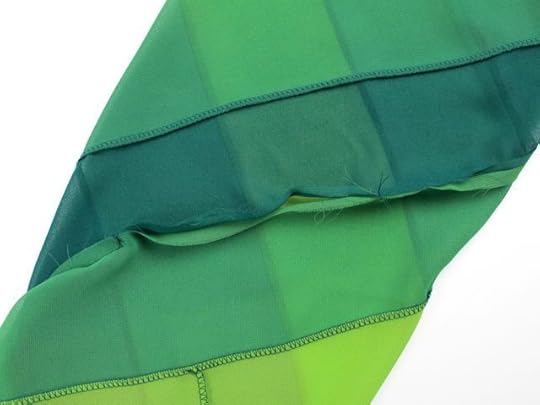
When you’re finished sewing, there will be an opening in the middle of the scarf. Turn the scarf right side out through the opening. Then hand stitch the opening closed.
For more ideas, check out Sensational Scarves and Sew Amazing Scarves from Nancy’s Notions.

 The random winner of one of my laser-cut fusible appliqués, from the May 1 posting, is KarenJo. Here’s her comment: “…DEFinitely the “Fabric Cut Stitch Create” laser cut fusible applique! Those words DO tell my story.The precision of the laser cut letters makes these two projects so doable with a much cleaner cut than with my scissors! And I have an ombre piece of fabric that would be perfect”.
The random winner of Clover’s Rotary Cutter Cradle, from the May 3 posting, is Ester. Here’s her comment: “My Mother was a seamstress and later in her life an award winning quilter. She taught me how to sew, and I am forever grateful. She had a little dresser—waist high—with two narrow drawers at the top and three regular drawers below. The top two drawers always held thread. When I found a similar dresser at a garage sale, I followed her style! On the dresser is a basket with a ruler, some ordinary scissors, and my rotary cutters. My good sewing scissors hang on a little wooden strip by my sewing machine. I seem to always need a pin cushion—I have lots, but of course I have a favorite. Thanks for this article, Nancy. I haven’t figured out how to use a rotary cutter before now!! Thanks everyone for sharing—fun to read how ya’ll handle your sewing supplies.”
Bye for now,
Content in this feed is © copyright 2014 by Nancy Zieman and may not be republished without written permission. You’re welcome to forward the email to a friend or colleague but it’s not okay to add the RSS feed automatically as content on a blog or other website.
May 10, 2014
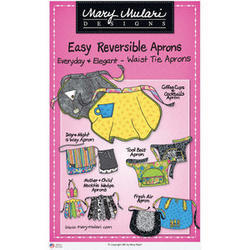
Top Ten Apron Sewing Tips
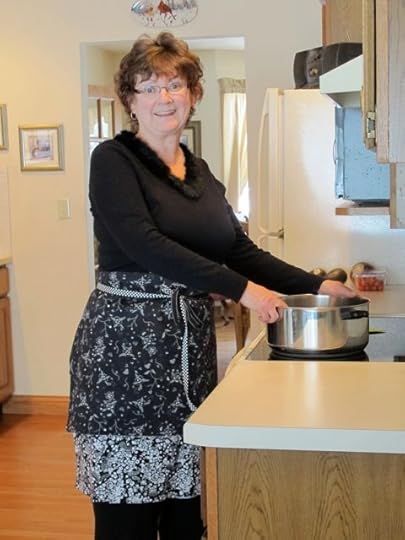
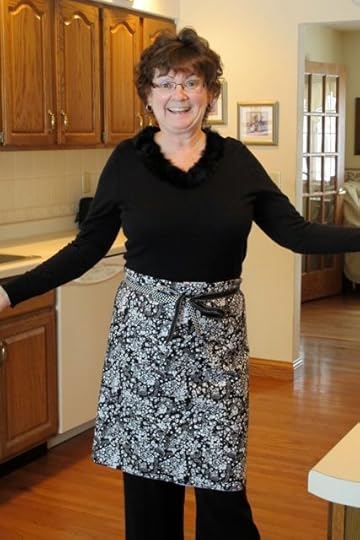
Apron aficionado Mary Mulari wrote a series of blogs, Top Ten Apron Sewing Ideas. In each post, learn an apron sewing technique, tip, pattern, or quite possibly all of the afore listed! As a vintage apron collector, apron pattern designer, and authority on creative sewing, she knows what type and style of aprons we all like to sew. Plus, she’s promised to share a recipe with each apron idea. Sew and eat—two of my favorite pastimes! Welcome Mary.
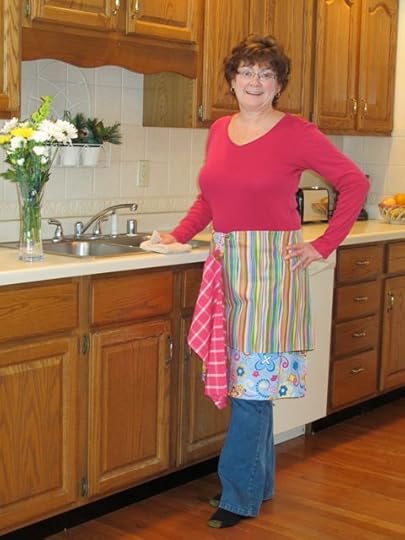
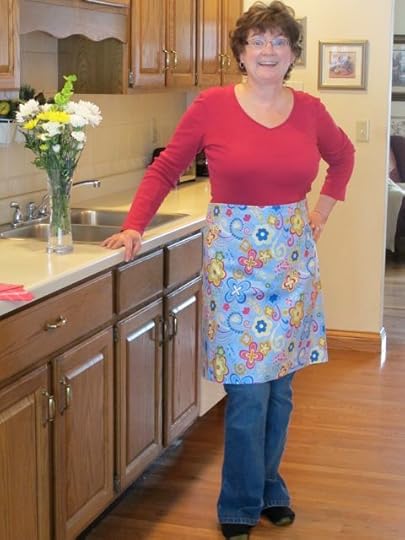
PS: Special thanks to my friend, Jill, for modeling Mary’s aprons in this blog posting. Jill knows her way around an apron. She’s one of the very best cooks I know.

Apron Tip #1—Day & Night 4-Way Apron
By Mary Mulari
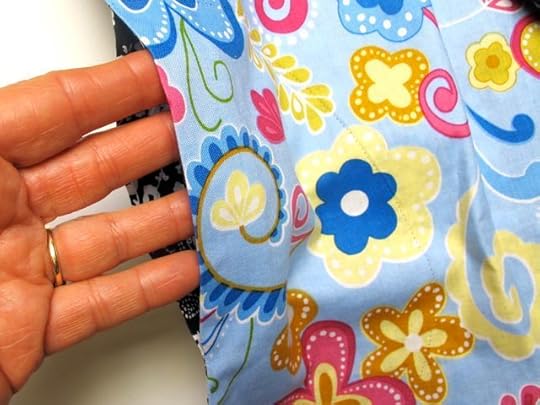
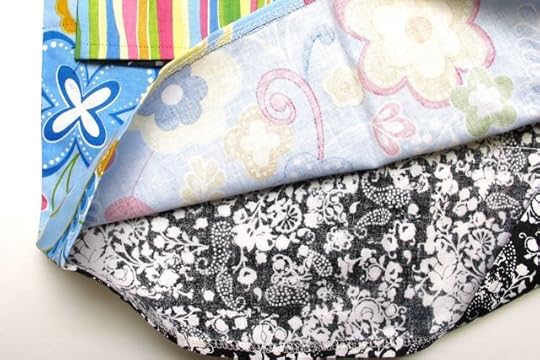
Cut four blocks of fabric to construct this smart, durable, and stylish apron to wear in four different ways. Everyday bright fabrics reverse to high style, elegant black prints for a comfortable coverup to wear over a black hostess outfit.
The inspiration for this apron with many wearing options came from an all white restaurant apron I found at a consignment shop. I wasn’t even sure what it was—a large white rectangle of fabric with strings sewn in the middle on two sides. The idea seemed great because you can wear one side facing out until you spill something, and then you flip the apron over for a clean side out. Mess that one up and you can flip the inside layers of the apron to the outside and get two more chances to show a fresh front!
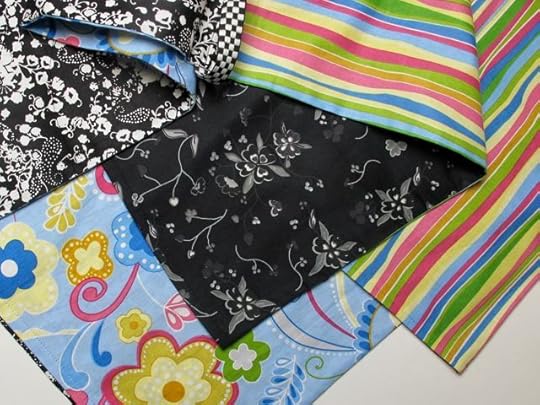
My version of this apron uses four different fabrics, because it’s lots more fun, and a good chance to shop one’s fabric stash/quilting leftovers for possibilities. Instead of using four pieces of fabric of equal size, I chose two 1/2 yard pieces and two more pieces of fabric 2/3 yard in length.
You can see that two of the ways to wear the apron feature the shorter layer over the coordinating longer layer. The featured apron also has two distinct sides, one for daytime wear and the black and white combination for evening wear, with your little black dress or skirt.
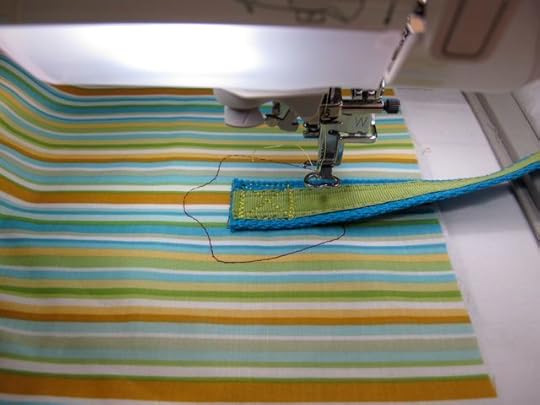
One of the special features of this apron is a fabric tab with a large button for you to secure a towel prepared with a buttonhole. I used a purchased dishtowel, cut it in half, and added a buttonhole to one corner on each half. (The apron instructions page has the details for making the easiest buttonhole with a template to trace and a repeating straight stitch for the buttonhole outline…you should check it out and try it!)

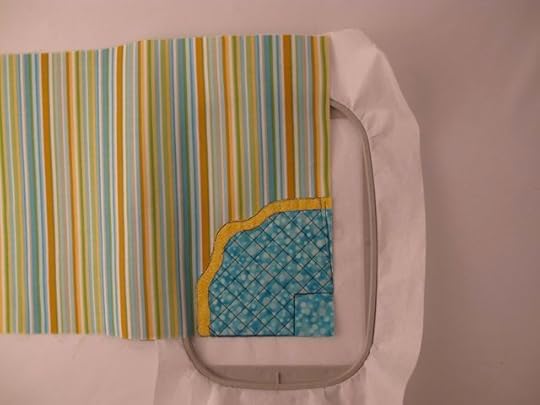
What’s an apron without pockets? For this apron, I designed pockets that are formed by stitching through two layers of the 2/3 yd. fabric section. You’ll cut out the apron fabrics with 1″ extensions on each side. It’s a good idea to zigzag or serge the edges of the pocket extensions before sewing the side seams together. The pocket extensions are fused in place and using the pocket shape template, trace the outline on the right side of the apron fabric and sew through both layers. Now you’ll have hidden in-seam pockets!
The bottom and top edges of the fabrics are left open so it’s easy to turn the fabric tube right side out.
You’ll notice that I chose two different grosgrain ribbons for the apron ties. Why not? You could also use twill tape, decorative braid, or fabric strips. Satin ribbon is too slippery for apron ties, in my opinion. The ties need to be long enough to extend from the back of the body to the front where they’ll be tied together in the center.
The finished width of the apron can be altered to be narrower or wider than the apron instructions suggest. There will be plenty of fabric for a wider apron, and a narrower apron means you’ll have more fabric to add back into your stash. Other options for fabric for this apron include vintage tablecloths or curtains.
Consider this apron for a bridal shower gift. You could select two fabrics for the bride, and two for the groom, if you think they’d like to share the apron.
This apron is smart in both style and practicality. Its reversible feature adds durability and a perfect excuse to shop for cotton fabric coordinates in your favorite colors and patterns. I think you’ll enjoy designing and wearing this apron.
The dimensions and instructions are part of my pattern, Easy Reversible Aprons Waist Tie Pattern. You’ll find five other nifty styles.
Watch Mary and Nancy online!
Want to see other waist tie apron options? Watch online, on DVD, or on PBS. The streaming video version, Easy Reversible Aprons TV Show part 1, is only a click away. You can also watch on your iPad, iPod Touch, or iPhone.
Nine More Apron Blogs:
Top 10 Apron Sewing Ideas: #10—Spoonful of Color Apron
Top 10 Apron Sewing Ideas: #9—Aprons for Kids
Top 10 Apron Sewing Ideas: #8—Chatterbox Apron
Top 10 Apron Sewing Ideas: #7—Wrap Front Apron
Top 10 Apron Sewing Ideas: #6—Apple Cobbler Apron
Top 10 Apron Sewing Ideas: #5—Clothespin Apron
Top 10 Apron Sewing Ideas: #4—Hot Dish Apron
Top 10 Apron Sewing Ideas: #3—Sew Green Aprons
Top 10 Apron Sewing Ideas: #2—Church Ladies’ Apron with New Twists
Recipe
With each of the apron blogs there will be a recipe included. These are tried and true recipes from my recipe box, many with food stains and fingerprints on the cards. Since this is the first apron blog, I’ll start with an hors d’oeuvre recipe so easy that you can spend more time sewing than cooking:
Easy Chipped Beef Cheese Ball—just four ingredients, kind of like the apron!
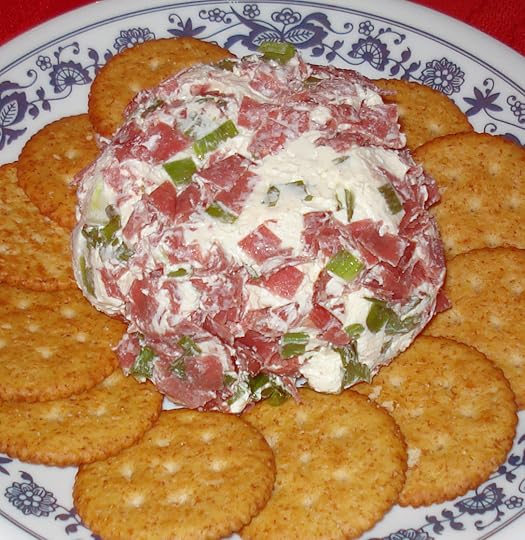
Two 8 oz. packages cream cheese
1 bunch green onions, finely chopped
One 3.5 oz. pkg. chipped beef, coarsely chopped
Box of your favorite crackers
Mix together the first three ingredients and form into a ball. Refrigerate. Serve with your favorite crackers.
The flavors blend and age well, if you have leftovers!
Thanks for the apron idea and recipe, Mary!
The random winner of Clover’s Tablet Keeper Template, from the April 19 posting, is Christine Staton. Here’s her comment: “Both my husband and I have iPad’s, but the first one I would like to make is for the “old school” paper legal pad. It’s my favorite device for note taking at sewing expos. This would be firm enough to serve as a lap desk. And my sew-personality could shine through. Thanks Nancy, another success with so many options. And the opportunity to win one just makes it sew much sweeter”.
The random winner of the Sewing A to Z book, from the April 26 posting, is Lynda A. Here’s her comment: “I use the zigzag stitch over the bobbin thread. It seems to work well every time I do it and my gathers all turn out even. I learned this from Nancy 20+ years ago and have made great gathers since. Thanks for the your instructions and a chance to win your book”.
Bye for now,
Content in this feed is © copyright 2014 by Nancy Zieman and may not be republished without written permission. You’re welcome to forward the email to a friend or colleague but it’s not okay to add the RSS feed automatically as content on a blog or other website.
May 8, 2014
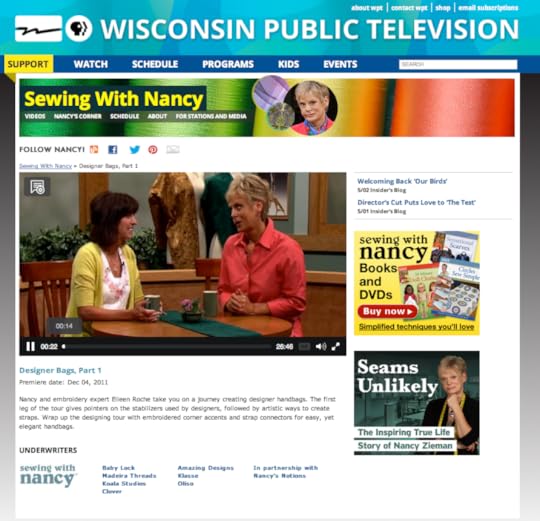
How to Sew Handbags with “Smart Embroideries”

Handbags are one of the most popular projects to sew. Embroidery expert Eileen Roche and I present the 2-part series, Designer Handbags, on Sewing With Nancy. Click here to watch Designer Handbags Episode One and Episode Two.
We designed and stitched literally a hundred or more bags. Through experimenting, lessons were learned and steps streamlined. Here’s a preview of how you, too, will be able to create handbags with ease!

We have taken an “out of the box” approach to making handbags, with Smart Embroidery accents at the corners, novel ways of attaching the straps, and even an embroider-in-the hoop tab closure. The end product is Designer Handbags.
Embroidered Strap Details
Here’s a preview of how the embroidery design helps you create perfect strap placement.
The first thread color stitches the placement stitching line for the appliqué and the strap.

You’ll know exactly where to place the strap—right in the stitched box. The thread color of the design secures the strap in place.
Then comes the decorative part—beautiful appliqués.

Embroidered Corners
Another feature of this first episode is Embroidered Corner Appliqués. The appliqué designs create the shaping plus add style to the bag—another Smart Embroidery!
Placement lines are stitched on the stabilizer and fabric for no-guesswork positioning of the fabric.

Fast forward to the embroidered corner, which also shapes the bag. Notice the stitches at the corner. That’s where you cut and ultimately sew perfect corners. Smart!
Watch Sewing With Nancy Online
I didn’t share all the steps with you, simply because you can watch and learn on PBS or online! All of the embroideries and instructions are found in Designer Handbags . I know you’ll be impressed with the way the embroideries shape the handbags. Speaking of handbags, I used the Trace ’n Create Florida Tote and the City Bag templates to create my bags.

Bye for now,
Content in this feed is © copyright 2014 by Nancy Zieman and may not be republished without written permission. You’re welcome to forward the email to a friend or colleague but it’s not okay to add the RSS feed automatically as content on a blog or other website.
May 6, 2014
Jennifer Chiaverini’s “The Loyal Union Sampler”
Jennifer Chiaverini was one of the presenters at last Fall’s Quilt Expo. Join New York Times best-selling author Jennifer Chiaverini for a trunk show of quilts from her new book, The Loyal Union Sampler from Elm Creek Quilts, featuring the 121 block sampler from her acclaimed Civil War novel, The Union Quilters. You’ll enjoy and appreciate the touching stories Jennifer shares about womens’ roles in American History.
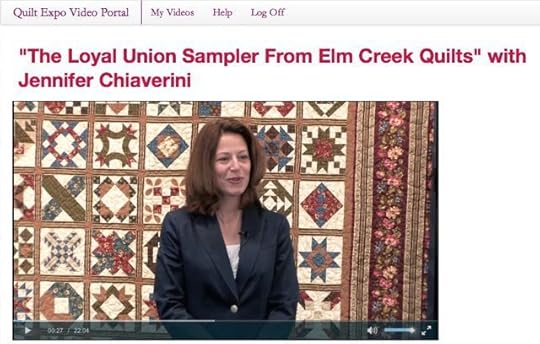
If you missed this lecture at Quilt Expo or you’d like to watch again, view the lectures at your convenience any time, any day! This Tuesday, Wednesday, and Thursday, May 6–7–8, Jennifer’s lecture is 50% off, only $5. What a deal! Plus after you purchase the video, you may watch it as many times as you’d like!
This Week Only—May 6–7–8—Jennifer Chiaverini’s lecture is 50% off!
Receive a 50% discount at check out when you enter the promo code JENNIFER.
More Streaming Video Lectures Online!
If you’d like to see other inspiring classes, click here for more streaming video classes.

I Quilt, Therefore I Am with Laura Wasilowski

Fabric to Dye For with Frieda Anderson

“The Loyal Union Sampler From Elm Creek Quilts” with Jennifer Chiaverini

Amazing Quilt Makeovers with Nancy Zieman
Content in this feed is © copyright 2014 by Nancy Zieman and may not be republished without written permission. You’re welcome to forward the email to a friend or colleague but it’s not okay to add the RSS feed automatically as content on a blog or other website.
Nancy Zieman's Blog

- Nancy Zieman's profile
- 21 followers

