
Nancy Zieman's Blog, page 139
August 26, 2014
15 Reasons to Stitch, Not Buy
By Roxanne Nickolie, Nancy’s Notions Guest Blogger
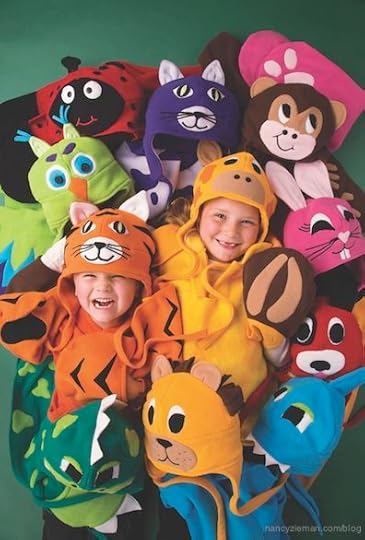
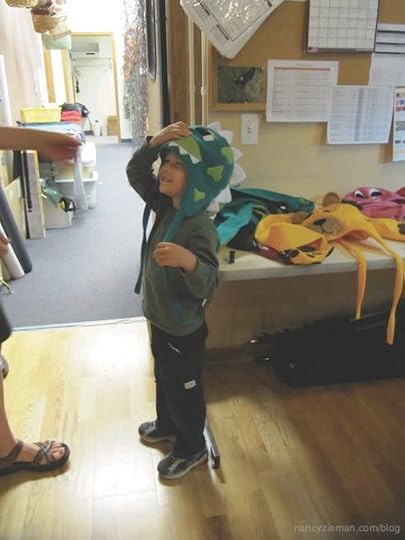
A couple weekends ago I headed to the state fair for a little food and fun. While I was there I was stunned to spot a lineup of critter hats that looked like distant, perhaps slightly deflated relatives of our Cuddle Buddies. They were slung beneath a row of outlandish squids, making them look like a pitiful marine dinner. Their paws lay open exposing feet that could belong to any animal. My sister approached and said, “why wouldn’t you just cut the head off a stuffed animal and sew it to a scarf?” Her disdainful remark brought up a valid question. Why not make it yourself?
In reflection of this question and in honor of our prestigious assemblage of huggable, happy Cuddle Buddies, I’ve come up with 15 reasons why sewing trumps purchasing—every time.
15 Reasons to Stitch, Not Buy
1. Customizing. Adding personal touches makes your projects beyond valuable. Extra bonus: Kids actually want to wear their hats and scarves.
2. Honing your skills. Whether it’s pillowcases or Halloween costumes, practice makes perfect!
3. Fitting. No matter how the little ones squirm and wriggle, you can rest assured they’ll fly back home—all clothing intact.
4. Making One-of-a-kind clothing. When you hone your sewing skills, you hone your style. People will see your creations and say, “I know who made that!”
5. Imitating designer looks at half the price. In a dream world, children’s clothes would be cheaper than adults’ because they use less fabric. If only, if only…
6. Free-styling. Certainly sewing is not the easiest hobby on the market, but mishaps are the bread and butter of mastering the art. Sometimes the worst mistakes can turn into the most innovative results.
7. Saving money. Outgrown clothes don’t have to mean money in the trash. You can refurbish old garments into gorgeous, meaningful projects without ever stepping foot in a store.
8. Satisfying the craving for a craft. Quench your thirst, and end up with a kid-approved gift for your favorite Cuddle Buddy. It’s a win-win!
9. Gaining confidence. It’s an impressive feat, learning how to sew. Never be afraid to say, “I made that!”
10. Having fun. The fun factor skyrockets when the finished product is for someone you love.
11. Slowing down. Maybe it’s the thrumming of the needle, or the quiet time away from responsibility, but anybody who sews knows stitch therapy is real.
12. Inspiring those around you. What a profound feeling to have someone see your finished product and ask, “Could you teach me how to make that?” And, how extraordinary it is when the question is posed by a child.
13. Belonging to a community. Quilting clubs, sewing retreats, or blogs—in the world of sewing, you’re never alone.
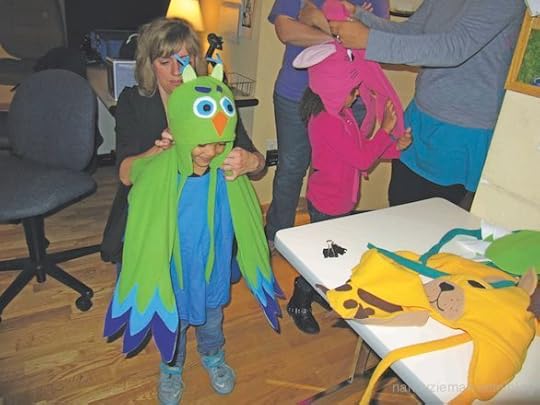
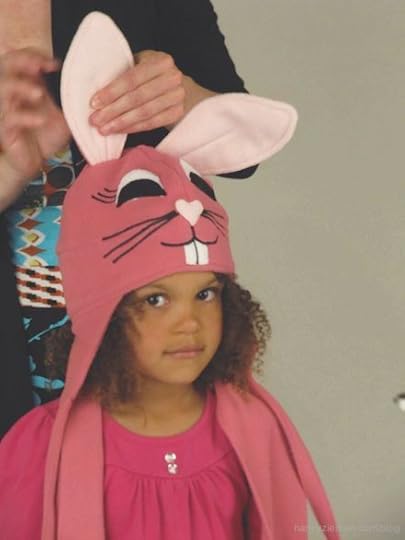
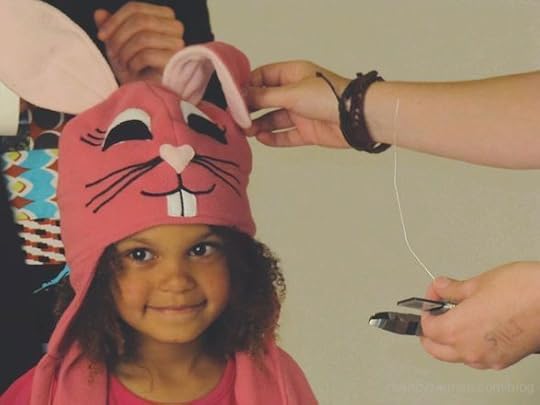
14. Accomplishing a goal. Whether you’re sitting back with a glass of wine inspecting your quilting handiwork or watching your family fawn over your granddaughter in her new perky, pink bunny ears, the kind of fulfillment you get from finishing a project is unparalleled.
15. Creating a legacy. Chances are your projects will stick around a lot longer than you will. For generations your family will refer to you as “the one who sewed.” Knowing how to sew isn’t just a hobby, it’s an identity—one that will win you respect far beyond your years.
What are the reasons you sew? Let us know in the comments below!
Bye for now,

Content in this feed is © copyright 2014 by Nancy Zieman and may not be republished without written permission. You’re welcome to forward the email to a friend or colleague but it’s not okay to add the RSS feed automatically as content on a blog or other website.


August 23, 2014
How to Sew with Laminated Fabrics
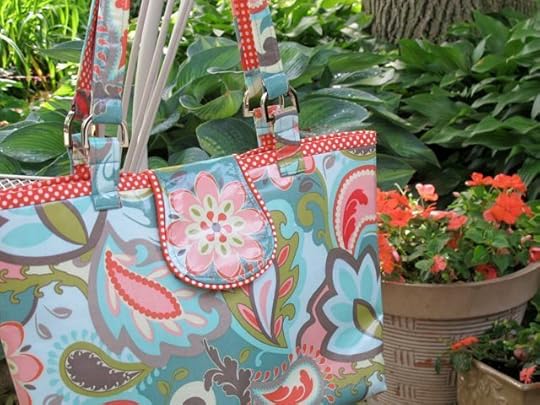
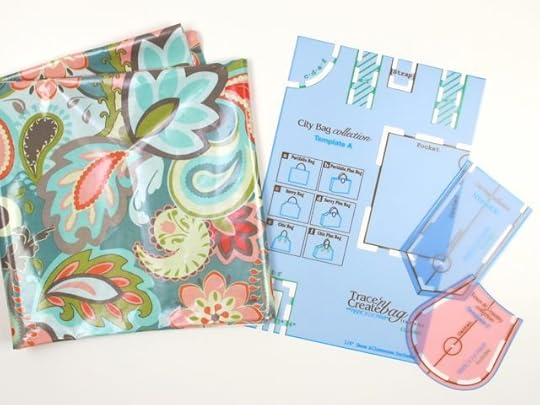
Laminated fabric is all the rage. Lighter weight, softer, and more forgiving than vinyl, it’s 100% cotton quilting fabric with a phthalate free laminated coating. In a nutshell, it’s a dynamite fabric for bags, raincoats, and picnic accessories. Plus, cleaning is a snap. Just wipe with a damp cloth.
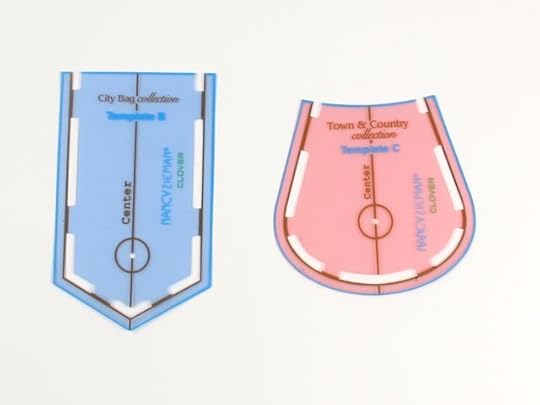
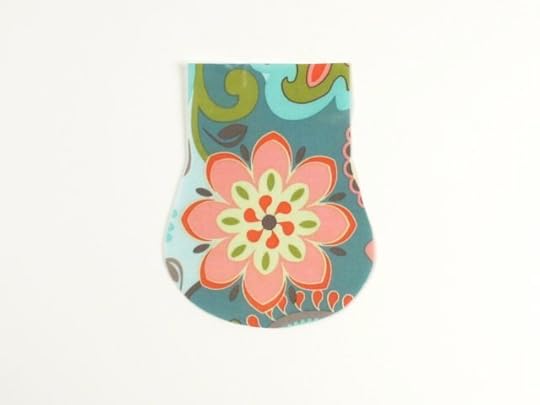
I decided to use a print from Riley Blake Designs along with Clover’s Trace ’n Create Bag Template—The City Bag Collection.
Change is good!
Eliminate topstitching when possible
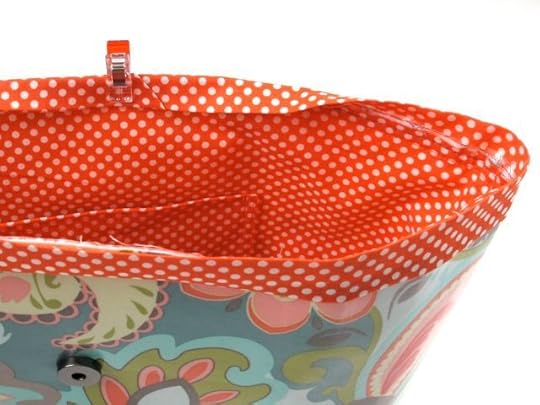
The trickiest part of working with laminates is topstitching. With a sticky top surface, I eliminate topstitching when appropriate. In the original instructions grosgrain ribbon is added to the top edge; it’s then turned under and topstitched to the bag. This time I opted to finish the top edge with a speedy binding technique. One change generally makes two changes!
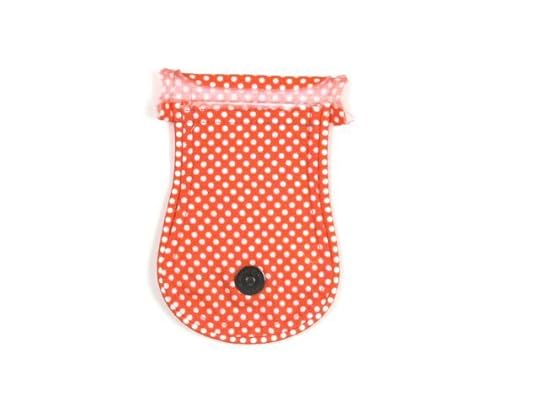
The tab needed to be longer to accommodate a slightly longer bag length. So, I added 1-1/2″ to the top piece. Either extend the top of the tab, or use the tab from the Trace ’n Create Bag Template—Town & Country Collection . (I know this is a little excessive, but since I had both tabs, it seemed like a good idea.)
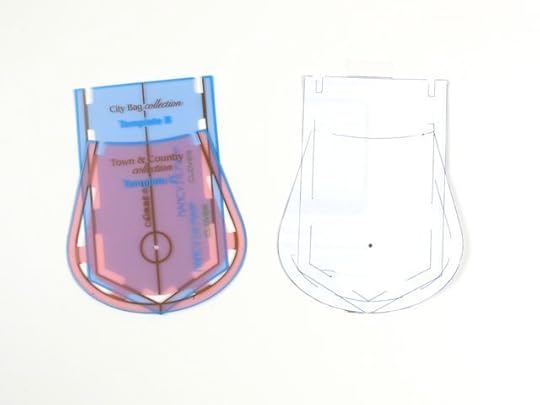
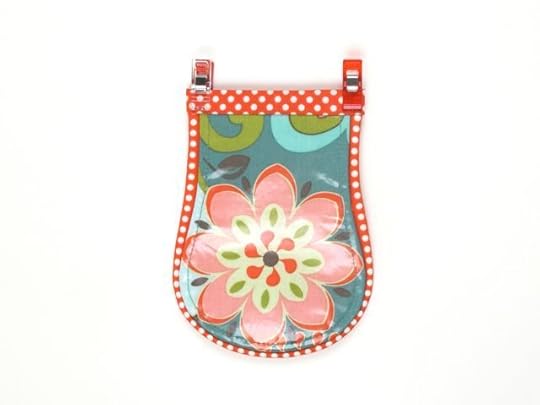
Make a window pattern when working with large prints
With this large print, I wanted a motif to be centered on the tab. Solution? Trace the pattern on tissue paper and cut out the window. I use this technique on a regular basis.

Achieve a crisp edge with piping
Piping around the tab edge looks terrific and is super easy to add. I use Wrap ’n Fuse Piping . Following the directions, just wrap the fabric around the fusible cording and press. Presto! The first “stitching” is complete.
Attach a zipper foot and stitch around the edges of the tab.
Topstitching the tab to the bag seemed less bulky than including it in the seam allowance. So, I stitched fabric to the unfinished edge.
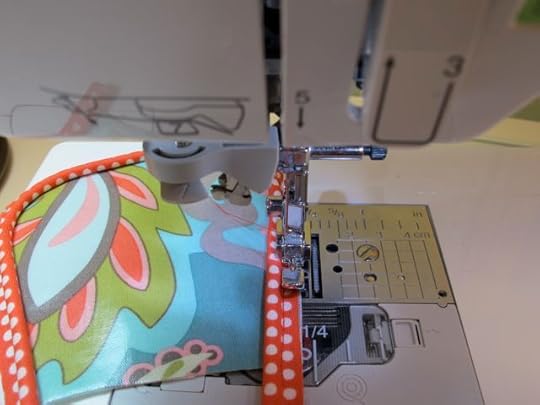
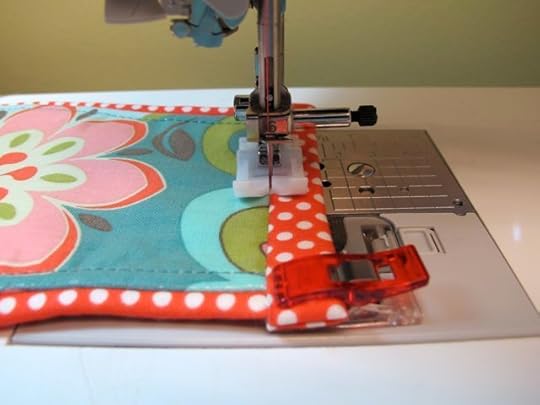
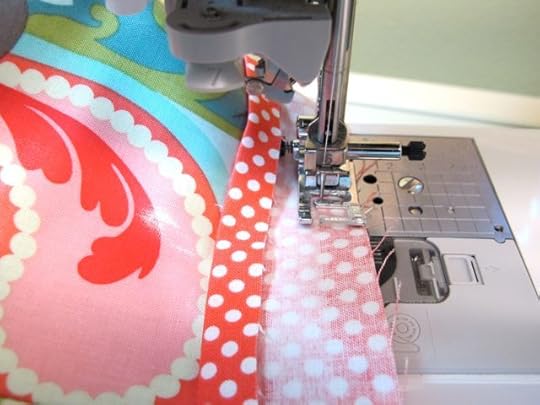
Pinning is a trick with laminates, so Wonder Clips come to the rescue.
When stitching over the laminate, change your presser foot to a Teflon Foot or Roller Foot. Success!
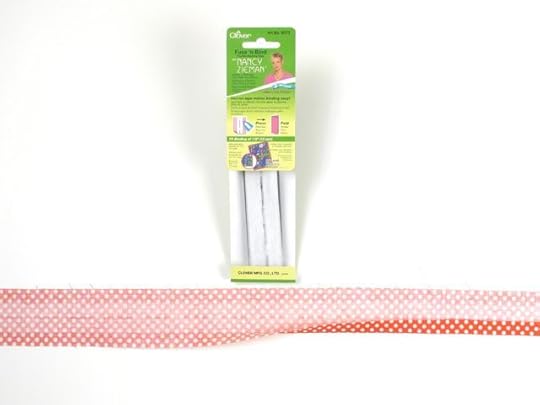
Make a fast finish with Fuse ’n Bind
It’s time for the binding. Have you tried Fuse ’n Bind ? Fuse it to the wrong side of the fabric. You’ll be guaranteed an even width every time, plus you’ll have pressing and stitching lines to follow. I told you it would be speedy.
First step: Press Fuse ‘n Bind to the wrong side of the fabric.
Second step: Meet right sides together.
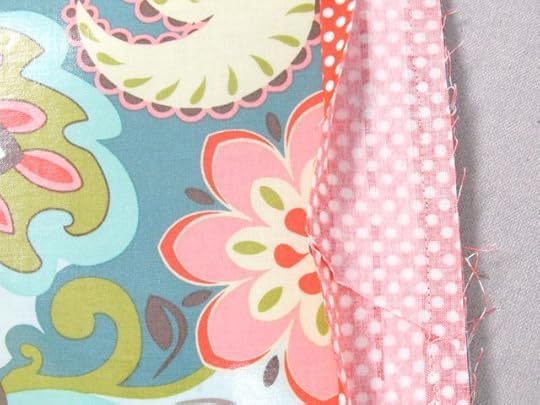
Third step: Stitch along the fusible interfacing.
Fourth step: Fold along the unstitched edge of the fabric.
Finally, stitch in the ditch.
Overlap the tab and stitch in place. Easy!
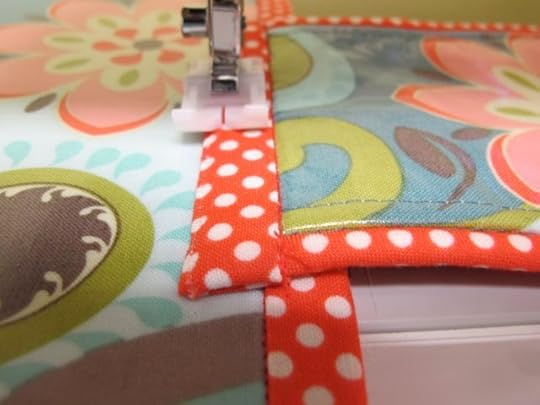
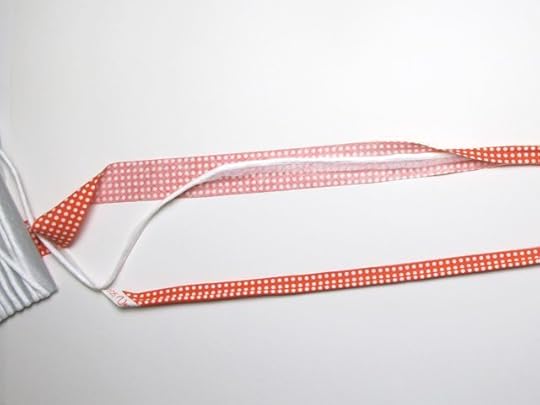
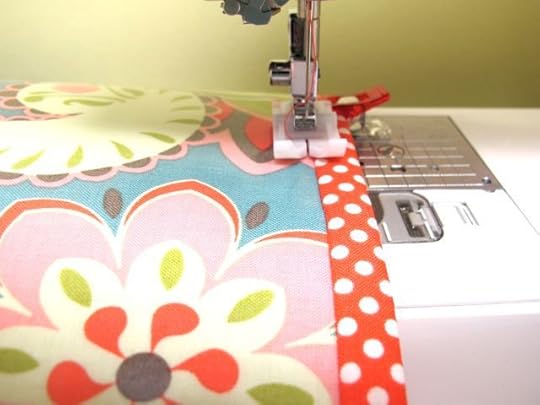
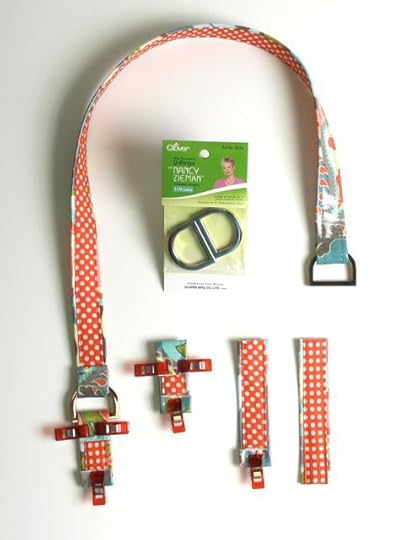
Add the hardware and straps.
The Create-a-Strap instructions quickly detail how easy it is to make straps with any type of fabric.
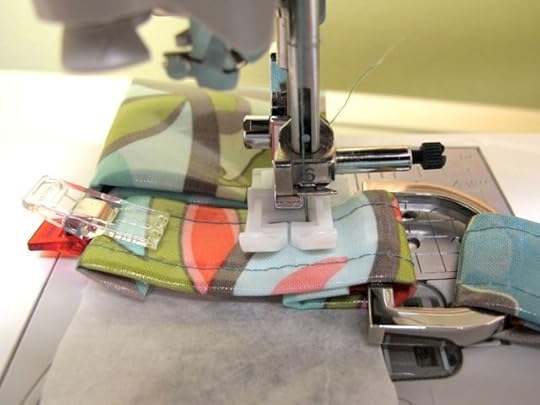
Level out the stitching field
The fabric will be thick due to the multiple layers when attaching the straps to the bag. The presser foot looks like it’s climbing a hill. Fold extra fabric and tuck under the back edge of the presser foot and level the stitching field. Presto! Here’s another laminated sewing tip.
If the feed dogs don’t like the fabric, stitch over paper. Tear away later.
Meet our new photo stylist!
Lucas thought that the angle of the bag needed a little tweaking!

For a chance to win a copy of Clover’s Trace ’n Create Bag Template—The City Bag Collection, please leave a comment below.

The random winner from a previous blog titled, Welcome Pellon to the Sewing With Nancy Team, is Caroline who said, I love it…. I always buy Pellon!
She won one package each of White 300 Count Cotton Fabric, Ivory 300 Count Cotton Fabric and Ultra Weave Stabilizer (20″ x 24″ each).

Watch Sewing With Nancy online.
There are four seasons of programs to watch online, or on your iPad, iPod Touch, or iPhone. Have you downloaded the app?
Bye for now,
Nancy Zieman—author, pattern designer, businesswomen, producer, and national sewing authority—is the host of the popular show Sewing With Nancy®, which appears exclusively on public television stations across the United States and Canada. Follow Nancy’s Blog at NancyZieman.com/Blog and sign up to receive Nancy’s E-News for the latest news in Sewing, Quilting, & Creating.
Content in this feed is © copyright 2014 by Nancy Zieman and may not be republished without written permission. You’re welcome to forward the email to a friend or colleague but it’s not okay to add the RSS feed automatically as content on a blog or other website.
August 21, 2014
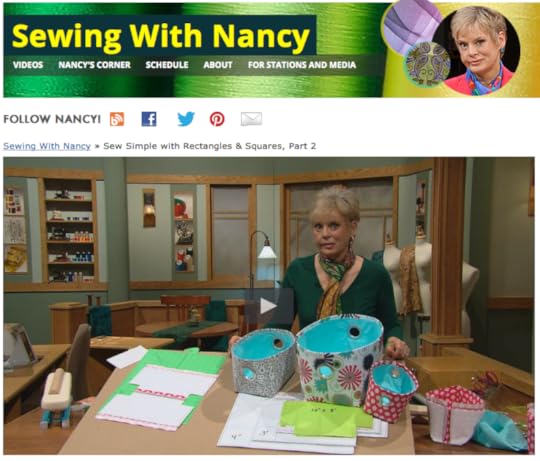
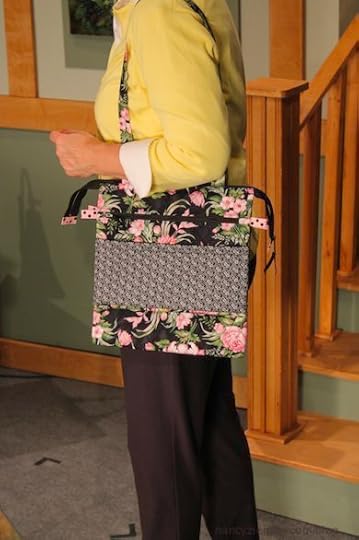
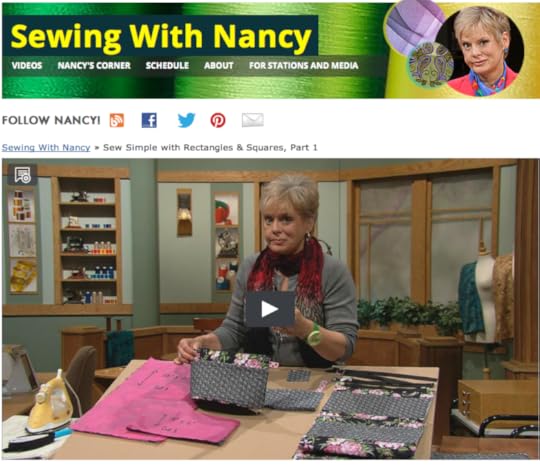
Sew Simple with Rectangles & Squares
This week you can watch another brand new program in the fall lineup of Sewing With Nancy. It’s the second program of the 3-part series, Sew Simple with Rectangles & Squares. Learn to sew modern projects that take one or maybe two hours—no longer—to create.
Hold-it Sacks
The Hold-it Sacks are my first sew-simple projects for this episode. Prop up your cell phone or electronic tablet in the cradle area of a Hold-it Sack. Made from laminated fabric, they’re ideal to use throughout your home or office. The unique finished shapes appear as if they were made from complicated patterns, but not these gadget holders. They’re all made from rectangular shapes.

Mini Fabric Sacks
Toss them in a game or use them to hold down pattern pieces, these mini sacks can be both fun and functional. You can easily make three mini sacks in an hour or less.

Fabric Bins
Don’t settle for tan or black bins for your shelf, customize fabric bins to accent your home décor by selecting coordinating fabrics. Make from, you guessed it, rectangle and square fabric pieces. The sewing is enjoyable and the end result is as fresh in appearance as it is useful. Grommets serve as both handles and a focal point.

Wall Pockets
What’s good for the shelf is good for the wall! With a little tweaking of the instructions, fabric bins turn into wall pockets that provide organization and style to any home or work office.

Watch Sewing With Nancy online.
There are four seasons of programs to watch online, or on your iPad, iPod Touch, or iPhone. Have you downloaded the app?
Sewing With Nancy on Public TV
We have the great fortune of having Sewing With Nancy air on 91% of all Public TV markets. Your local PBS programmer determines when the new season will begin. Often, the new programming begins later on TV. Check your local Public TV and/or Create TV listing for the new season, which begins with Sew Simple with Rectangles & Squares.
12 Complete Projects in Sew Simple with Rectangles & Squares
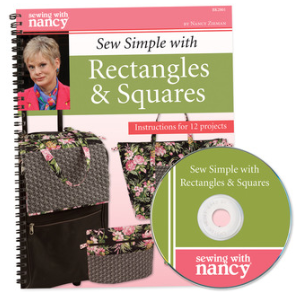
Fabrics by Riley Blake Designs
A special thank you to Riley Blake Designs for providing the fabrics for this program. Look for fabrics by Riley Blake Designs at your favorite retailer.

What’s your favorite project from this series? A random winner will receive a copy of Sew Simple with Rectangles & Squares. The winner will be posted on August 30th.
Bye for now,
Nancy Zieman—author, pattern designer, businesswomen, producer, and national sewing authority—is the host of the popular show Sewing With Nancy®, which appears exclusively on public television stations across the United States and Canada. Follow Nancy’s Blog at NancyZieman.com/Blog and sign up to receive Nancy’s E-News for the latest news in Sewing, Quilting, & Creating.
Content in this feed is © copyright 2014 by Nancy Zieman and may not be republished without written permission. You’re welcome to forward the email to a friend or colleague but it’s not okay to add the RSS feed automatically as content on a blog or other website.
August 19, 2014
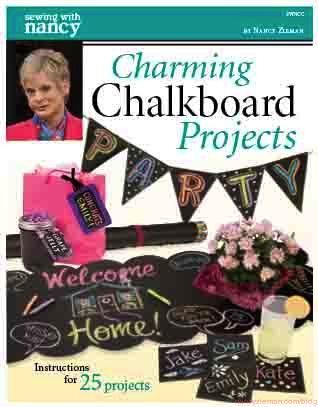
10 Sewing Tips for Using Chalkboard Fabric
Create some quick gifts or accessories with chalkboard fabric. The lightweight black fabric with the trademarked name of Chalkcloth is 47″ wide. You can write on it with chalk, wipe it off with water, and use it again. It is safe for kids of all ages.
10 Sewing Tips for Using Chalkboard Fabric
Cure the chalkboard fabric : Lay the fabric right side up, and rub the entire surface with chalkboard chalk, first in the horizontal and then in the vertical direction. Clean the fabric with a damp cloth; then repeat the process.
Use a wool setting on your iron and a dry press cloth; press from the wrong side to remove wrinkles.
Press seams using a wooden pressing tool, such as the Little Wooden Iron .
Stitch with a Teflon Foot for best results. If you use a standard presser foot, use tissue paper or wax paper between the fabric and the presser foot for a smoother glide.
Use a size 80 Universal Needle.
Pin with Wonder Clips or double-sided basting tape .
Set the sewing machine for a longer stitch length, 3.5 mm. Shorter stitches weaken the fabric.
Select all-purpose thread for both the needle and the bobbin.
Use regular chalkboard chalk or Chalk Markers to write on the chalkboard fabric . (Avoid sidewalk chalk.)
Cut the rectangular shapes for projects using a rotary cutter, ruler, and mat. Cut single layers, not folded fabric as the thickness of the fabric may cause shifting during the cutting process.
Chalkboard Projects
Make message boards, easels, trays, pennants, coasters, placements, tablecloths, runners, children’s portable chalkboards, floor mats, books, game boards . . . whew, there are LOTS of options. Here are a few examples of the 25 chalkboard projects designed by the Sewing With Nancy staff.
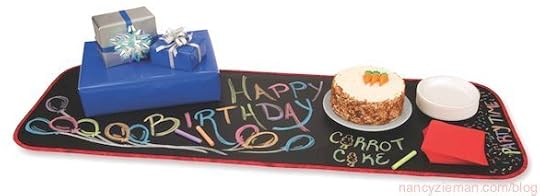
Felt Backed Table Runner
There’s a simple felt backing on the table runner that not only protects the table, but also eliminates the need for batting. The binding on this runner is easy to stitch with rounded corners and not miters!
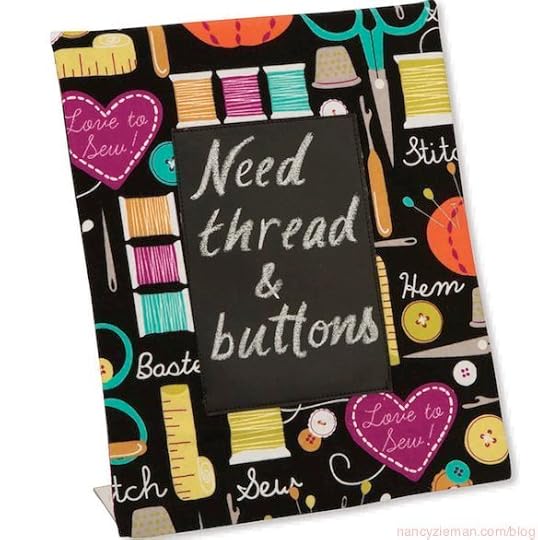
Tabletop Chalkboard
Use an acrylic photo frame for a handy message board. Leave notes and gentle reminders on this portable message board.
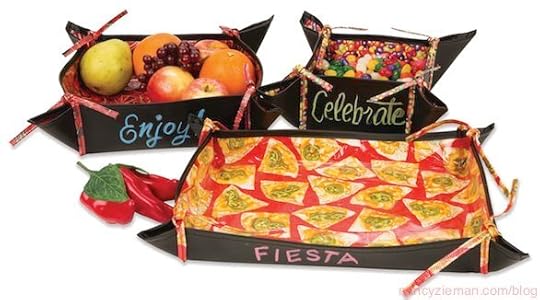
Chalkboard Trays
These handy trays wipe clean, can be personalized or labeled with chalk, plus they store flat!
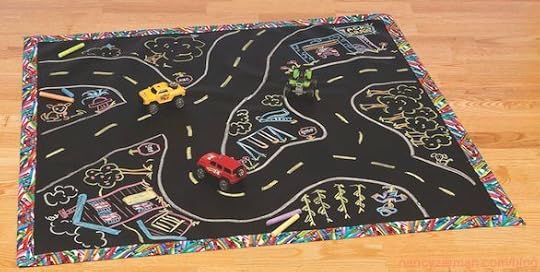
Chalkboard Floor Mat
This mat is for those large artistic projects. Unroll the mat on the floor and kids can draw to their heart’s content.
Instructions for 25 Chalkboard Projects
Looking for a great gift idea, you can’t lose with Charming Chalkboard Projects! There are 25 chalkboard sewing projects with all the needed instructions and featured appliqués. Short and sweet—it’s all there for you!
Bye for now,
Content in this feed is © copyright 2014 by Nancy Zieman and may not be republished without written permission. You’re welcome to forward the email to a friend or colleague but it’s not okay to add the RSS feed automatically as content on a blog or other website.
August 16, 2014
Join Nancy Zieman for a Live Webcast on September 13
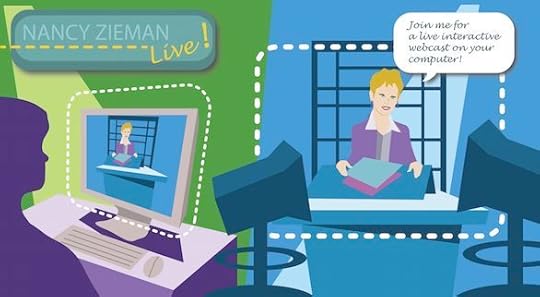
Join me for a live, interactive webcast—Nancy’s 25 Favorite Quilting Techniques
It’s Live—
From my studio to your computer on September 13, 2014, join me, Nancy Zieman, for a fun and interactive webcast featuring my 25 Favorite Quilting Techniques.
If you have never participated in a webcast, it’s a class that comes to your home via computer. Click below to watch the video, which explains, “What’s a webcast?”
http://www.youtube.com/watch?v=JB81ov92OAI
For those who register, we’ll send you a link to the webcast the day before the event, September 12. On the day of the event, September 13, a few minutes before your scheduled time, log on. In minutes, you’ll see me live on your computer screen.
Wondering if your Internet connection is up to the task? Test your viewing ability by clicking here. This test link is live. If you can see a rock ledge and coastal waves, you’ll be able to watch Nancy Zieman Live. (Most of you should not have any issues watching the video.)
Learn
Whether you like traditional or modern quilts, you’ll see 25 Favorite Quilting Techniques demonstrated with close-up detail. I know you’ll be impressed in what you’ll learn in my 90-minute webcast. Here’s a few of the tips I’ll share:
• Learn a New Spin on Quilting Basics—from cutting strips to binding, learn clever ways to update your quilting skill set.
• See how to take the hassle out of quilting—use creative tools to streamline traditional quilting techniques.
• Save those fabric scraps—see how even small pieces of fabric can make a large impact.
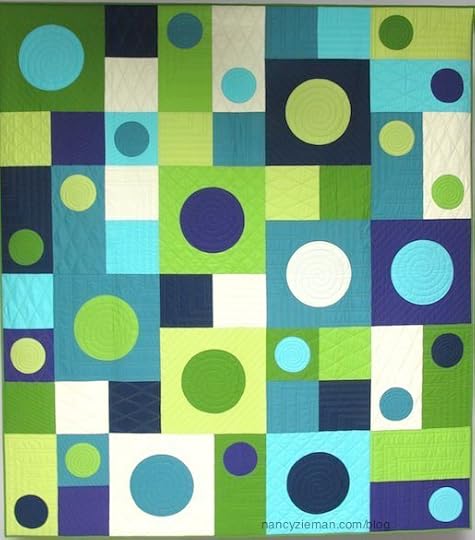
• Create an easy modern quilt—receive a downloadable project sheet for my brand-new quilt, I See Spots. This quilt is truly easy!
During the webcast, email your questions to me, and I’ll reply during the webcast.*
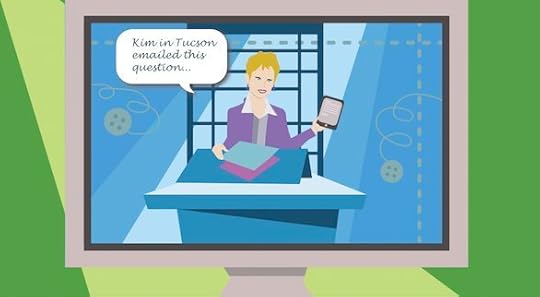
*If every question cannot be answered during the webcast, questions will be answered post-webcast via email. Duplicate questions will not be answered.
Save
Exclusive online specials will be available to you from Nancy’s Notions on the day of the webcast.
Viewer Comments from Past Webcasts
“It was as though I was in a class and could see more detail than actually being there.”
“Thank you for the live webcast and do more of them! It’s refreshing, cutting edge, and very inclusive for those who can’t attend sewing and quilting events in our local neighborhoods.”
“You can see the details on the webcast so much better than being in a shop and having a demonstration. There was great interaction with e-mailing Nancy.”
Early Bird Special—Save $10
One Price—Two Time Options
Register before August 29 and pay only $19.95 for the 90-minute webcast on September 13. (Price after August 29 is $29.95.)
The fee includes:
A link to watch one of the two Nancy Zieman Live webcasts (A link to webcast will be emailed to participants on September 12.)
The ability to have your questions answered during the webcast
A link to specials offered by Nancy’s Notions
A free downloadable quilt project sheet
Two Time Options
There are two webcast time options for the 90-minute webcast to accommodate North American Time Zones.
Both webcasts will cover the same topics. Since they’re both live, each will be personalized by the questions or, hmm, my whims!
We’ll be broadcasting live from the Central Time Zone. Register for a time that best fits your schedule.
September 13: Times/time zone for Webcast Option One:
11:00 AM—12:30 PM (Eastern Time)
10:00 AM—11:30 AM (Central Time)
9:00 AM—10:30 AM (Mountain Time)
8:00 AM—9:30 AM (Pacific Time)
7:00 AM—8:30 AM (Alaska Daylight Time)
5:00 AM—7:30 AM (Hawaii-Aleutian Standard Time)
September 13: Times/time zone for Webcast Option Two:
2:00 PM—3:30 AM (Eastern Time)
1:00 PM—2:30 PM (Central Time)
12:00 PM—1:30 PM (Mountain Time)
11:00 AM—12:30 PM (Pacific Time)
10:00 AM—11:30 AM (Alaska Daylight Time)
8:00 AM—9:30 AM (Hawaii-Aleutian Standard Time)
(For our followers in other parts of the world, convert your time zone by clicking here. We’ll be broadcasting live from Beaver Dam, WI—not far from Madison, WI.)
Select your preferred time below and click the “buy now” button:
Select a time option
Option One 10:00 AM to 11:30 AM (Central Time) $19.95 USD
Option Two 1:00 PM to 2:30 PM (Central Time) $19.95 USD

Thank you to our sponsors

Hope to see you September 13th!
If you have questions or comments, please contact us.
Bye for now,
Nancy Zieman—author, pattern designer, businesswomen, producer, and national sewing authority—is the host of the popular show Sewing With Nancy®, which appears exclusively on public television stations across the United States and Canada. Follow Nancy’s Blog at NancyZieman.com/Blog and sign up to receive Nancy’s E-News for the latest news in Sewing, Quilting, & Creating.
Content in this feed is © copyright 2014 by Nancy Zieman and may not be republished without written permission. You’re welcome to forward the email to a friend or colleague but it’s not okay to add the RSS feed automatically as content on a blog or other website.
August 14, 2014
26 New “Sewing With Nancy” Programs

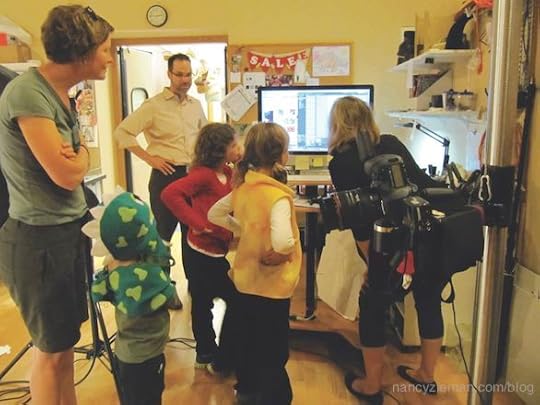
For the next 26 weeks, you’ll be introduced to a new Sewing With Nancy program—one show a week! Since ’82, I’ve had the honor of teaching on Public TV, DVD, and also online.
I begin this season with a 3-part series, Sew Simple with Rectangles & Squares. I address one of the most common comments that I hear from viewers, I like to sew but I really don’t have the time. To change the way you look at the sewing process, I designed projects that are exclusively cut from fabric rectangles and squares.
The Travel Trio
During this first episode, learn how to create a weekender tote, cosmetic bag, and luggage saddlebag. This travel trio is made using comparable sewing steps, straight stitching, and double-sided quilted fabrics.
Cosmetic Bag
Even if you’ve never sewn before, you can stitch this bag!

Weekender Tote
After learning how to make a simple cosmetic bag, apply many of the same sewing steps to create a Weekender Tote. It’s a super-sized cosmetic bag with the addition of sturdy straps and double pockets.

Luggage Saddle Bag
For ease of travel, make a saddlebag for your carry-on luggage or rolling case. Two sizes of bags are attached with connector straps.
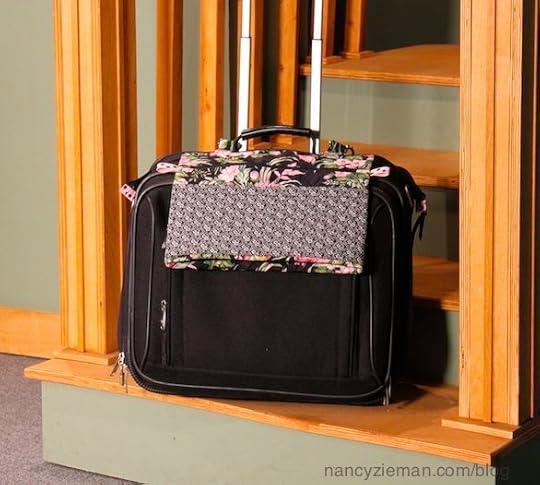
When not using this handy accessory on your luggage, zipper the bags together and it’s a handy shoulder tote.
Sewing With Nancy Trivia—This photo was quickly taken on the Sewing With Nancy set. Notice the tape on the floor? Those are the positioning marks for my chair in the Nancy’s Corner area. We had to move the chair in order to take the photo. Now you see how we keep all our props and furniture in the right place!
Watch Sew Simple with Rectangles & Squares on PBS, Online, or DVD.
There are four seasons of programs to watch online, or on your iPad, iPod Touch, or iPhone. Have you downloaded the app?
Sewing With Nancy on Public TV
We have the great fortune of having Sewing With Nancy air on 91% of all Public TV markets. Your local PBS programmer, determines when the new season will begin. Often, the new programming begins later on TV. Check your local Public TV and/or Create TV listing for the new season, which begins with Sew Simple with Rectangles & Squares.
12 Complete Projects in Sew Simple with Rectangles & Squares
All the projects featured in the 3-part series, plus a bonus, are included in the book, Sew Simple with Rectangles & Squares.
What’s your favorite project from this series? A random winner will receive a copy of Sew Simple with Rectangles & Squares. Winner will be posted on August 30th.
Bye for now,
Nancy Zieman—author, pattern designer, businesswomen, producer, and national sewing authority—is the host of the popular show Sewing With Nancy®, which appears exclusively on public television stations across the United States and Canada. Follow Nancy’s Blog at NancyZieman.com/Blog and sign up to receive Nancy’s E-News for the latest news in Sewing, Quilting, & Creating.
Content in this feed is © copyright 2014 by Nancy Zieman and may not be republished without written permission. You’re welcome to forward the email to a friend or colleague but it’s not okay to add the RSS feed automatically as content on a blog or other website.
August 12, 2014
Welcome Pellon to the “Sewing With Nancy” Team
This week we’re launching the new Sewing With Nancy series! Watch for a new program online and soon on PBS stations for the next 26 weeks! With this new series, I’m welcoming a new sponsor of the Sewing With Nancy program, Pellon Interfacings & Batting. Pellon is graciously sponsoring the Closed Captioning portion of the show.
We tested a few new Pellon products

Pellon was a sponsor of Sewing With Nancy back in the early days when interfacing was their main product line. Fast forward to today and Pellon has expanded into many offerings, including products for machine embroidery. One of my stitchers used Pellon’s Ultra Weave Stabilizer and Ivory 300 Count Cotton Fabric. The combo of the fine-gauge fabric and the woven stabilizer were the best we’ve tried. Now, I know you’re thinking, “She’s just saying that.” Honestly, I couldn’t have been more impressed.
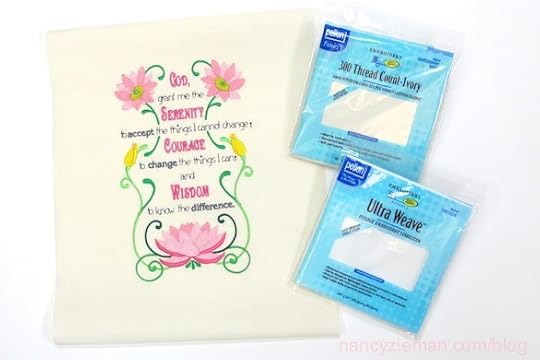
Usually at this point, I’d show you a photo of the fabric and interfacing. We took that image, but laughed at our efforts. Ivory fabric with white interfacing fused to it had about as much contrast as photographing a white-out snow storm. The embroidery designs were purchased at EmbroideryLibrary.com.
The Magic in The Middle
The above saying emphasizes the fact that interfacings and stabilizers are equally as important as the fashion fabric, or in this case the embroidery. Without a good foundation, the finished results usually lack luster. I’m delighted to now have interfacing and fabric, 300 thread count no less, to use for embroidery.
Pellon has products available both in the United States and Canada. They are the industry leader in interfacing, offering both nonwoven and woven products in the areas of apparel, crafts & home décor, quilting, fusible webs & adhesives, and embroidery. They also have a wide range of batting and home goods with a product line that is ever expanding.
Find Pellon online at www.pellonprojects.com—Network with them via Facebook, Pinterest, Instagram, Twitter, or YouTube.
For a chance to win one package each White 300 Count Cotton Fabric, Ivory 300 Count Cotton Fabric and Ultra Weave Stabilizer (20″ x 24″ each) please leave a comment below.
Three appliqué designs were generously donated from Everyday Designs Boutique for giveaways in a previous blog titled Applique Embroidery That Will Make You Smile!
The three random winners are:
Winner of the mermaid design is Cecilia.
Winner of the fish design is Kim M. Harrington.
Winner of the bubble design is Dell.
Watch Sewing With Nancy online.
There are three season, soon to be four, to watch online, or on your iPad, iPod Touch, or iPhone. Have you downloaded the app?
Bye for now,
Nancy Zieman—author, pattern designer, businesswomen, producer, and national sewing authority—is the host of the popular show Sewing With Nancy®, which appears exclusively on public television stations across the United States and Canada. Follow Nancy’s Blog at NancyZieman.com/Blog and sign up to receive Nancy’s E-News for the latest news in Sewing, Quilting, & Creating.
Content in this feed is © copyright 2014 by Nancy Zieman and may not be republished without written permission. You’re welcome to forward the email to a friend or colleague but it’s not okay to add the RSS feed automatically as content on a blog or other website.
August 11, 2014
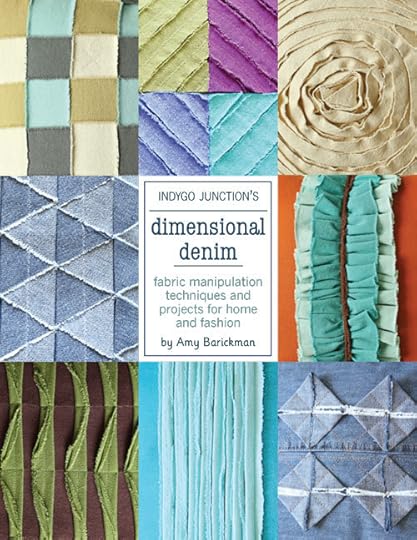
Dimensional Denim—Add Texture With Easy Sewing Steps
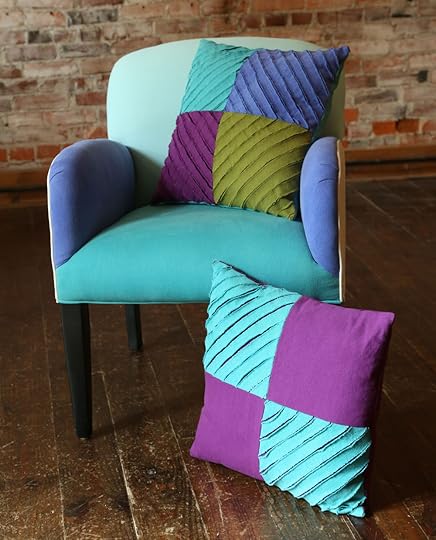
Frequent Sewing With Nancy guest and friend Amy Barickman has taken a new spin on sewing with denim, adding lots of texture by layering, tearing, and manipulating the fabric. In her new book, Dimensional Denim, she features techniques that are applicable for both home décor and fashion.
My Favorite Technique from Dimensional Denim
Amy asked me to be part of her Blog Tour and share my favorite technique from the book, using Crossroads Denim Fabric. The textured pillows really caught my attention. Called the Strip N’ Stitch Technique, it’s an easy process with results that have lots of presence!
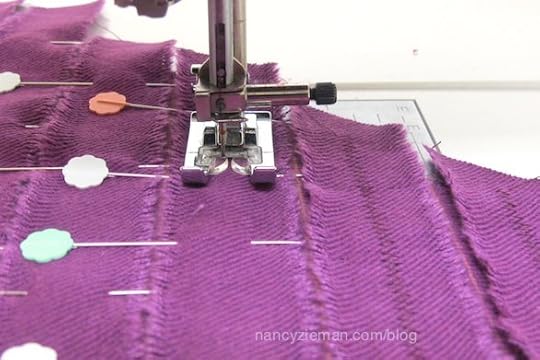
Strip N’ Stitch Technique
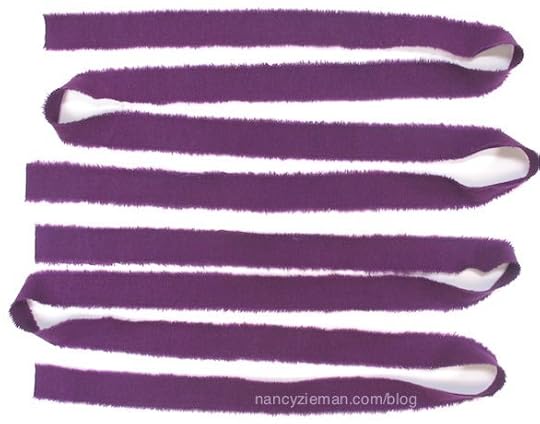
As its name indicates, all you do is tear strips of fabric and then stitch!
Measure and mark at least two 1″ widths on the selvage of the fabric. Make a small cut at each mark through the selvage into the fabric.
Tear the strips the width of the fabric.
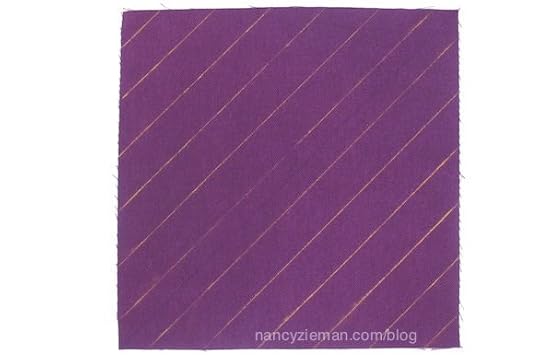
Next, cut a square of background fabric that is used to attach the strips.
On the right side of the background fabric, draw a diagonal line from the lower left corner to the top right corner with a fabric marking pen. Continue to draw diagonal lines on either side of the first line, at least 1″ apart.
Line up the left edge of each strip with the marked lines. Pin the right side of each strip to the right side of the background fabric. Trim each end of the strips 1/2″ longer than the outer edges of the background fabric—they will be trimmed again after stitching.
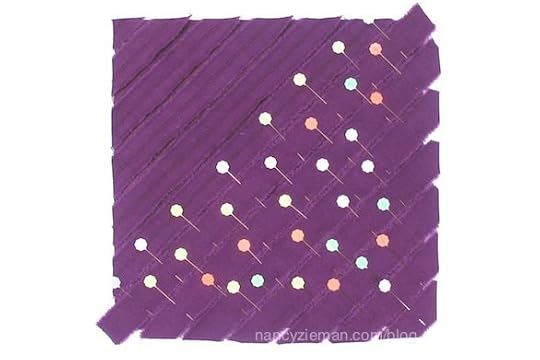
Use a medium width machine zigzag and sew down the center of each strip to secure. Trim the strips to match the outer edges of the background fabric. That’s it!
Dimensional Denim Blog Tour
Amy Barickman and Indygo Junction are sponsoring a blog tour of the book, Dimensional Denim. Make a stop at the other sites to see more insights into sewing with Crossroads Denim Fabric.
August 4 https://www.indygojunction.com
August 4 http://www.kollabora.com
August 5 http://www.amybarickman.com/blog
August 6 http://www.fishsticksdesigns.com/blog/
August 7 http://www.cool2craft.com/
August 8 http://thesewingloftblog.com/
August 11 http://www.nancyzieman.com/blog/
August 12 http://www.skiptomylou.org/
August 13 http://www.inventivedenim.com/blog/
August 14 http://whip-stitch.com/
August 15 http://coatsandclarksewingsecrets.com/
Enter to win one of 10 copies of Dimensional Denim by commenting on the Indygo Junction blog post here. One lucky grand prize winner will receive the book and an assortment of Crossroads Denim Fabric and patterns from Indygo Junction. Click here to Enter by commenting on the Indygo Junction blog post here.
Bye for now,
Nancy Zieman—author, pattern designer, businesswomen, producer, and national sewing authority—is the host of the popular show Sewing With Nancy®, which appears exclusively on public television stations across the United States and Canada. Follow Nancy’s Blog at NancyZieman.com/Blog and sign up to receive Nancy’s E-News for the latest news in Sewing, Quilting, & Creating.
Content in this feed is © copyright 2014 by Nancy Zieman and may not be republished without written permission. You’re welcome to forward the email to a friend or colleague but it’s not okay to add the RSS feed automatically as content on a blog or other website.
August 9, 2014
“Quilt to Give” Week—Simple Stitching
If you’ve been following my blog this week, you’ll know that we’re getting ready for our annual Quilt Expo Event in Madison, WI, September 4–6. The community service project is called Quilt to Give. Last year, 25 bed quilts were sewn and/or donated.
This year, we’re asking for twin-sized quilt donations—that is the size we’ll be making during this year’s expo. Why? The two organizations that will be receiving the finished quilts, Enchanted Makeovers and Domestic Abuse Intervention Services (DAIS) both requested this particular size. Enchanted Makeovers services women’s shelters and Domestic Abuse Intervention Services (DAIS) is a woman’s shelter with twin-sized beds in each room.
Not coming to the Quilt Expo? Make a quilt yourself or with friends. Click here for the free online instructions. It’s an attractive project that can often be made from a fabric stash.
The Easiest Quilt to Give Quilting Project
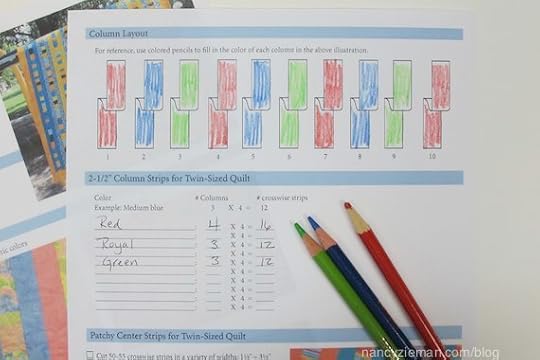
Each year I sew a project or quilt to give away to those in need. This year my goal was to create a quilt top using the Quilt to Give project, making it really simple by selecting a striped fabric for the center section. Click here to read how to sort the fabrics and how to cut the crosswise strips. Here’s a brief explanation of how my staff and I completed the quilt top. (You guessed it; I needed help to get it finished!)
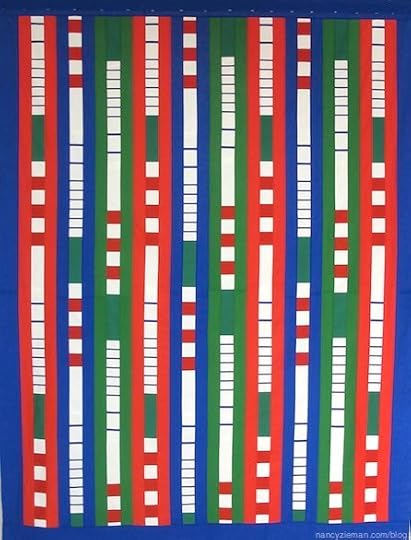
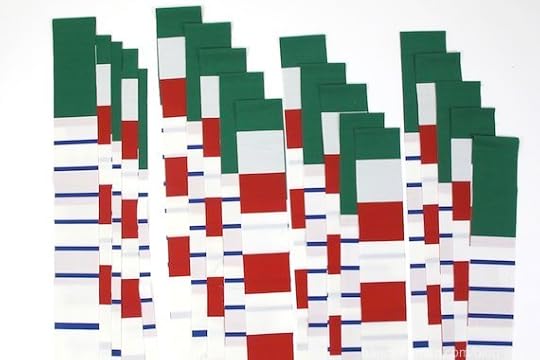
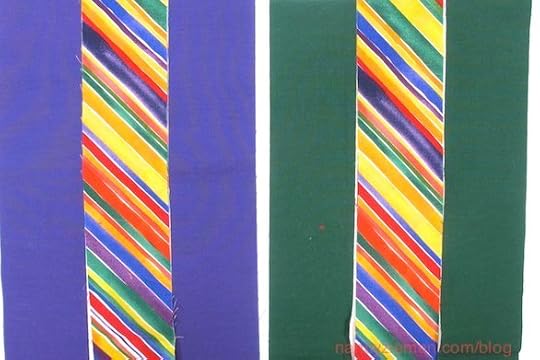
Stitch the column units. The sides of each column unit are made from two solid-colored crosswise strips sewn together end-to-end. The middle striped section is also made from two lengths of the striped fabric.
Note from Nancy: Most striped fabrics have a consistent design—not this fabric! To vary the positioning of the stripes, I stitched two crosswise strips of the striped fabrics together end-to-end, which created a large continuous circle of strips. Then, I cut the circle apart to create a different starting and ending point. Prior to finding this fabric on the donation table at last year’s Quilt Expo, I never saw a striped fabric by the yard with such a unique pattern. I didn’t chronicle the steps since it’s unlikely that you’ll find a fabric like it.
When determining how many crosswise strips of fabric to cut for the twin-sized quilt, download the twin-sized quilt worksheet . I referenced the worksheet again prior to laying out the columns.
Lay out the ten columns required for a twin-sized quilt. The floor is always a great place to check the layout and audition the border fabric.
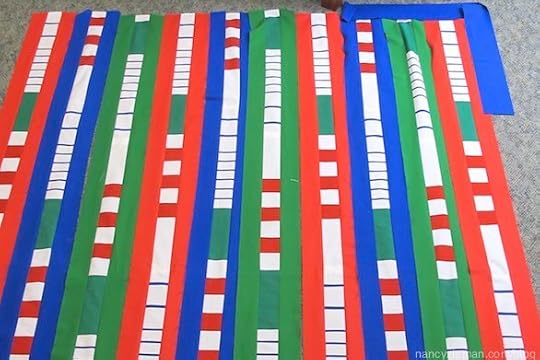
Stitch the 10 columns together and add the border. It’s all simple stitching, using 1/4″ seam allowances. The quilt top is now ready to be layered and quilted. A long-arm quilter at Quilt Expo will be helping me with that step. Then it will be time to give it away. (I love that part!)
Attention Quilt Expo Attendees!
We’re in need of solid fabrics, twin-sized batting, and backing fabrics. If you have any of these fabrics or supplies to donate, we’ll be most grateful!
For links to all 10 Quilt to Give lessons, click here or visit QuiltToGive.com.
The gift is in the giving!
Nancy Zieman—author, pattern designer, businesswomen, producer, and national sewing authority—is the host of the popular show Sewing With Nancy®, which appears exclusively on public television stations across the United States and Canada. Follow Nancy’s Blog at NancyZieman.com/Blog and sign up to receive Nancy’s E-News for the latest news in Sewing, Quilting, & Creating.
Content in this feed is © copyright 2014 by Nancy Zieman and may not be republished without written permission. You’re welcome to forward the email to a friend or colleague but it’s not okay to add the RSS feed automatically as content on a blog or other website.
August 7, 2014
“Quilt to Give” Week—Cut Lots of Crosswise Strips
In preparation for our annual community sewing and quilting project called Quilt to Give, which will be held at the Quilt Expo in Madison, WI September 4–6, I thought that those of you who cannot attend the expo might be interested in creating an easy twin-sized quilt to give away in your local area as a community service project.
The Quilt to Give quilt is created from a combination of fabric stashes. Column units are made (two outside columns with a scrappy middle column), and then the columns are sewn together into a quilt top. Click here for the online lessons and for a downloadable twin-sized quilt worksheet.
This year, we’re making twin-sized quilts to give away for two organizations that will be receiving the finished quilts. Enchanted Makeovers and Domestic Abuse Intervention Services (DAIS) both requested this particular size.
The Easiest Quilt to Give
The design is made even easier if a striped fabric is used in the center of each column unit. With this design, there’s no need to cut and sew scrappy center strips.

I Gave Myself a Challenge!
Each year I challenge myself to sew or quilt a project and give it away to someone I don’t personally know. This year, my project is a twin-sized Quilt to Give design with striped fabric in the center. To read more about selecting and sorting fabrics, check out the previous blog posting. Make sure to download the twin-sized quilt worksheet.
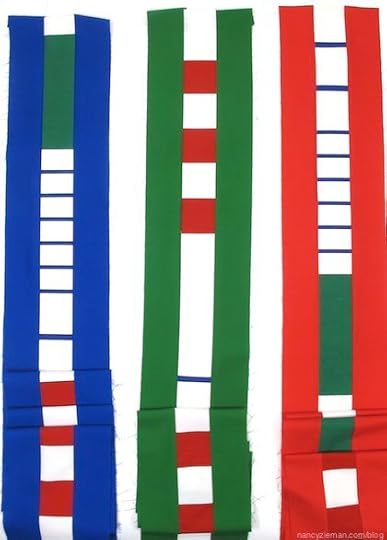
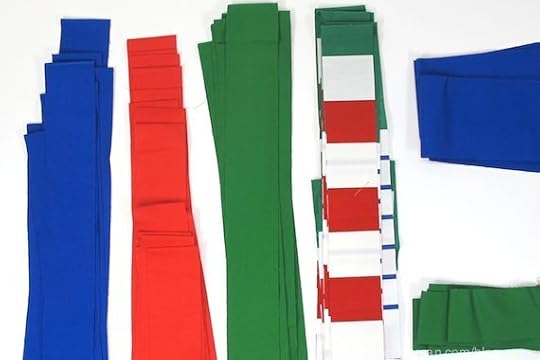
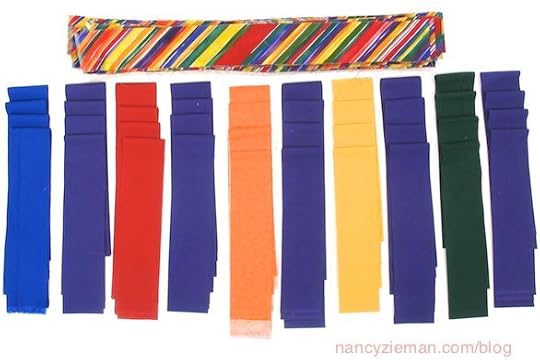
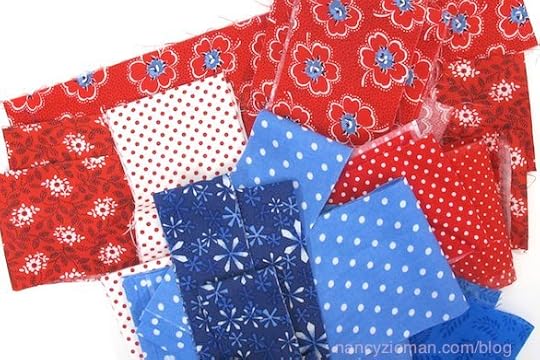
From the last blog , here are the fabrics I choose for the columns and striped center.

Then, I filled-out the worksheet to help in the cutting process.

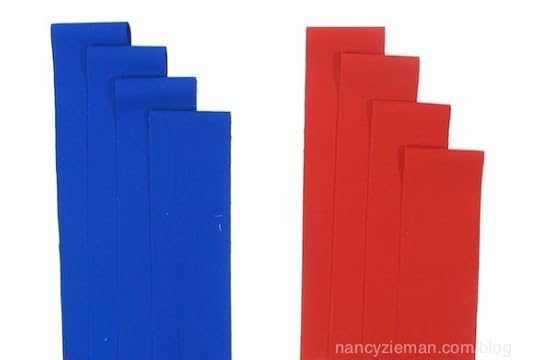
The twin-sized quilt has 10 columns. Each column unit requires four 2-1/2″ crosswise strips.
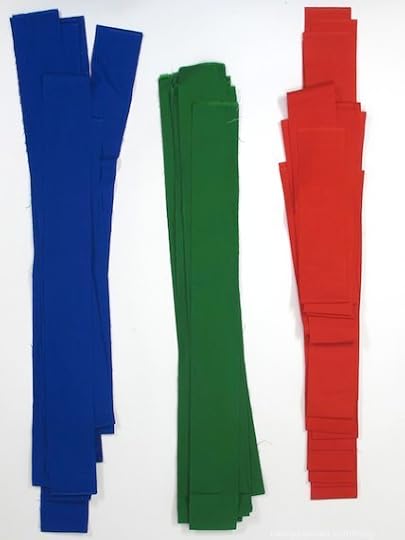
The center of each column unit is made from two striped strips sewn together. Following the worksheet, I cut twenty 2-1/2″ crosswise strips from the striped fabric for the 10 columns.
I also cut the fabric for the borders and the binding—the blue and green fabric along the right side of the photo.
My staff and I also cut crosswise strips for another quilt top.
The cut strips are laid out to show what two of the column units will look like. See how a stripe can expedite the design, cutting, and sewing process!
The Original Quilt to Give
The online instructions feature a scrappy center for each column unit. If you don’t have a striped fabric for the center, cut the fabrics chosen for the scrappy center unit in crosswise strips between 1-1/2″ and 3-1/2″. Read the following online lesson for more tips in Lesson 2—Cut Strips .
Then, cut the solid fabrics for the outside of each column unit.
More Quilt to Give Insights on Saturday
In our next blog, see how far I get in my Quilt to Give project. The pressure is on!
For links to all 10 Quilt to Give lessons, click here or visit QuiltToGive.com.
Attention Quilt Expo Attendees!
We’re in need of solid fabrics, twin-sized batting, and backing fabrics. If you have any of these fabrics or supplies to donate, we’ll be most grateful!
The gift is in the giving!
Nancy Zieman—author, pattern designer, businesswomen, producer, and national sewing authority—is the host of the popular show Sewing With Nancy®, which appears exclusively on public television stations across the United States and Canada. Follow Nancy’s Blog at NancyZieman.com/Blog and sign up to receive Nancy’s E-News for the latest news in Sewing, Quilting, & Creating.
Content in this feed is © copyright 2014 by Nancy Zieman and may not be republished without written permission. You’re welcome to forward the email to a friend or colleague but it’s not okay to add the RSS feed automatically as content on a blog or other website.
Nancy Zieman's Blog

- Nancy Zieman's profile
- 21 followers

