
Nancy Zieman's Blog, page 144
May 3, 2014
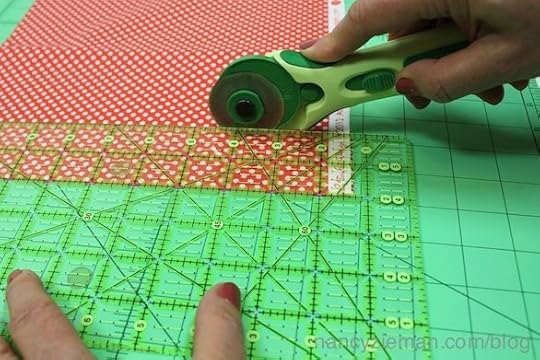
Sharp Tips for Rotary Cutting
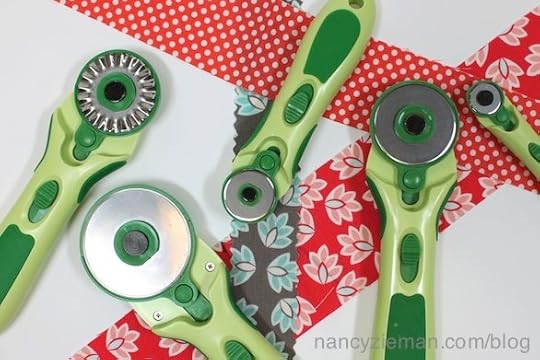
It was in the very early 1980s when rotary cutters made their debut in the sewing and quilting market. The rotary cutters came first; the mats out of necessity—oh boy, shortly thereafter. Interestingly enough, because cutters and mats didn’t launch at the same time, it resulted in many ruined cutting surfaces. Ask me how I know this! Regardless, rotary cutters are used by quilters, sewists, and crafters alike. The blade size has expanded and also the accessories. Gathering all the sizes and shapes of cutters from my sewing lab, I thought I’d share a few rotary cutting tips with you.
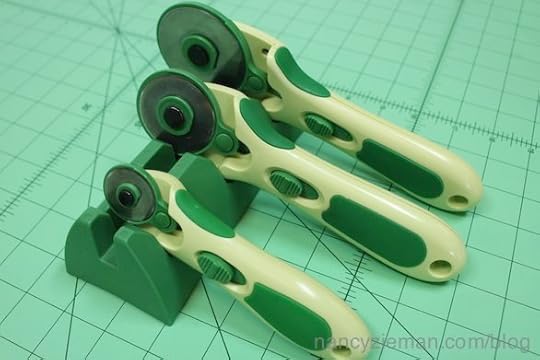
A variety of sizes for different tasks
There are four sizes of rotary cutters: 60 mm, 45 mm, 28 mm, and 18 mm. I use each of my rotary cutters for different applications:
The 18 mm (5-3/4″ long) is great for cutting tight curves on a single layer of fabric and small quilting projects such as paper piecing.
The 28 mm (6″ long) is great for cutting fine lines and curves.
The 45 mm (7-1/2″ long) is the most popular size for everyday cutting and my “go-to” cutter.
The 60 mm (8-1/2″ long) is ideal for cutting many layers at a time, or for cutting through denims and upholstery fabric.
I especially like the rubber padding on the three larger sizes that provide extra comfort and control. Not to worry if you’re left-handed, all of the pictured cutters easily convert for right- or left-handed use.

You’ll notice that I have a fifth cutter; this one has a decorative blade. The decorative blades, sold separately, fit the 45 mm cutters. 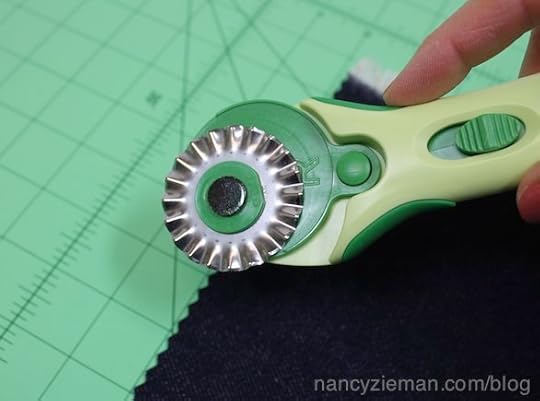
Keep sharp!
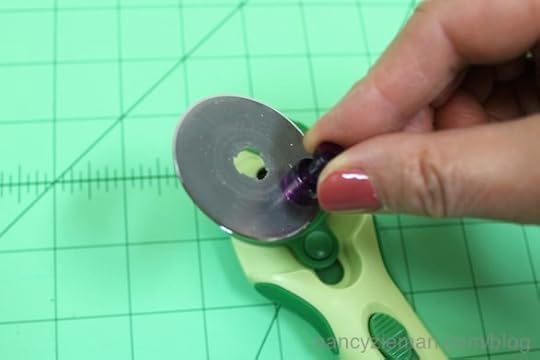
There are a variety of ways to keep rotary blades sharp. The short video below gives details. Always remember when removing the blade for sharpening or for replacing, use a Rotary Cutter Blade Magnet to keep your fingers from touching the sharp edges.
http://www.youtube.com/watch?v=-SLkYFmAT6c
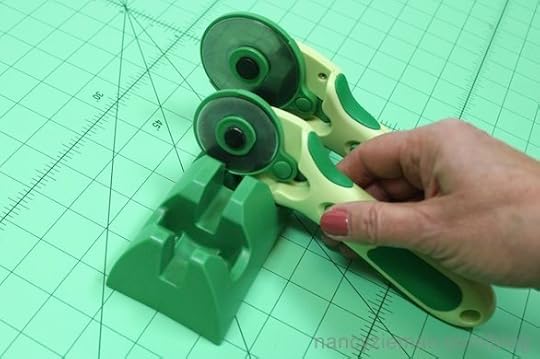
Rock-a-bye rotary cutters
My sewing studio can be rather messy. Okay, sometimes it can be a downright disaster. Often my rotary cutters end up underneath a pile of fabric, nowhere to be found. After several search and rescue missions, the idea came to me to design a cradle for my cutters. With the help of my artist—I sketched, she designed—we made a rotary cutter from poster board and tape. Then, sent it to Clover Needlecraft.
Months later after tweaking and refining, the Rotary Cutter Cradle was manufactured, fitting sizes 28, 45, and 60 mm rotary cutters.
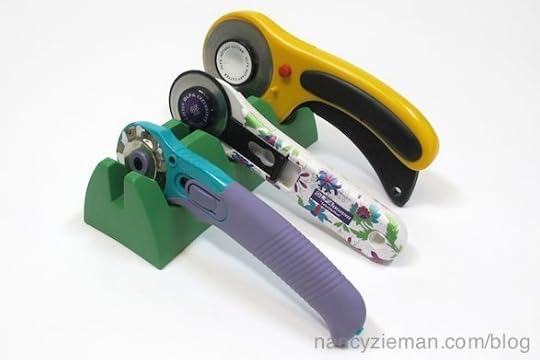
The most popular brands of rotary cutters rest perfectly in the cradle.
One of the tweaking adjustments made by the engineers at Clover was to make the cutters rest in the Rotary Cutter Cradle so that we can easily grasp the cutter and go directly to cutting. No repositioning is needed.
Speaking of cutting . . .
I like the clearance given to the blades in this design. I can cut from my usual standing position when holding the blade at a 45-degree angle.
I can just as easily cut from a seated position. Notice that change in the angle, yet the blade is free to make a clean cut.
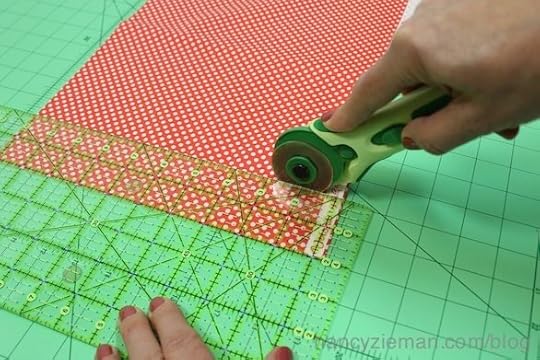
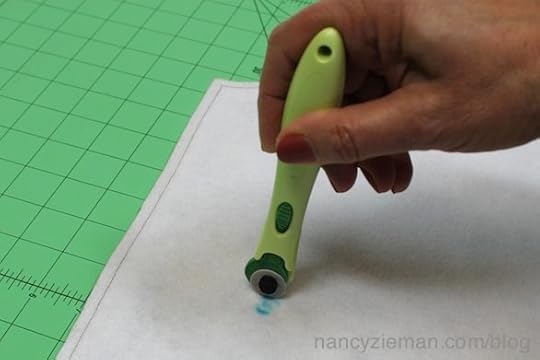
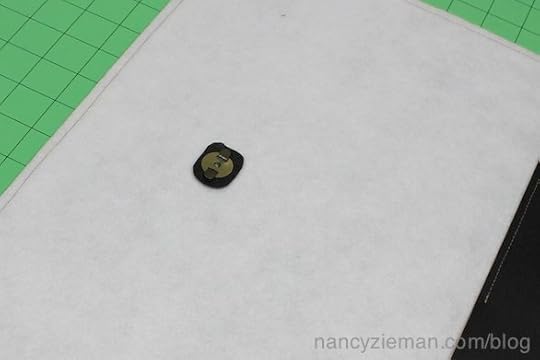
A novel way to use the 18 mm cutter
My staff and I sew and create lots of bags and totes. Adding magnetic snaps and bag feet is a weekly task. Here are the steps:
Using the disk from the snap or foot package, mark the position of the prongs on the interfacing side of the bag.
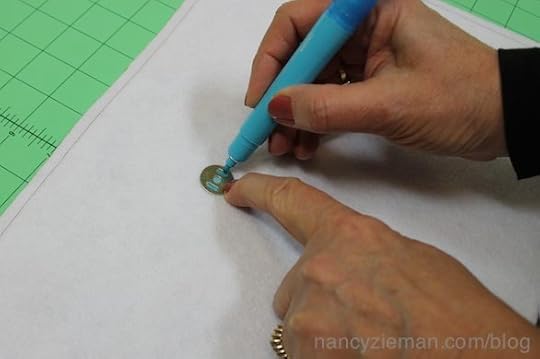
Hold the 18 mm cutter perpendicular to the cutting mat and depress the blade into the fabric at each mark.
Cut a rectangle from a scrap of Shape ‘n Create (plastic support for the bottom of bags and totes) and make the same two cuts. The plastic support gives the snap additional support.
Attach the snaps or bag feet. Ta dah!
 For a chance to win a Rotary Cutter Cradle from Clover Needlecraft, please share a tip of how you stay organized in your sewing room.
Bye for now, 
Content in this feed is © copyright 2014 by Nancy Zieman and may not be republished without written permission. You’re welcome to forward the email to a friend or colleague but it’s not okay to add the RSS feed automatically as content on a blog or other website.


May 1, 2014
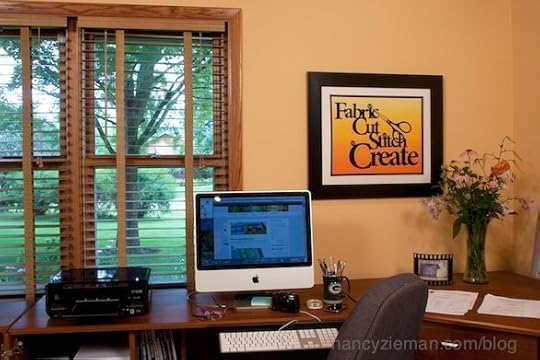
Sew Easy to Decorate with Fusible Appliques
It was time for a new look in my home sewing studio. The room is right off our living room and it was just calling for fresh art work. The laser-cut fusible appliqués were the perfect solution—a quick resolve! I wanted to use the fusible, laser-cut appliqués with the words Sew and Fabric, Cut, Stitch, Create. These appliqués are precisely cut by laser from black Kona cotton fabric. I knew they’d make a statement!
How to use laser-cut appliqués

The packaging lists the size of the stretched canvas used for framing. These frames are available at craft and art stores. You’ll find them in the oil painting supplies section.
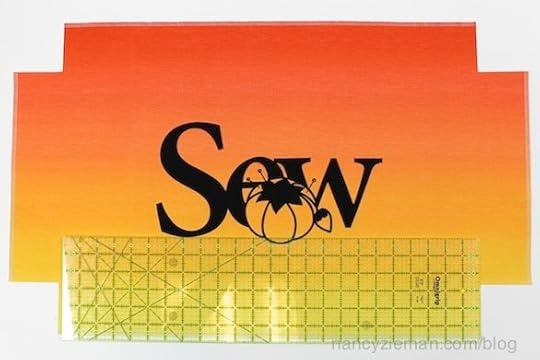
For this example, a 24″ x 12″ canvas is recommended, the perfect size for the Sew laser cut fusible appliqué. The canvas has a 1-1/2″ side depth.

Cut a fabric rectangle 6-1/2″ wider and longer than the size of the canvas. The fabric was cut 30-1/2″ x 18-1/2″.
If your canvas has a narrower depth, 3/4″, scroll down until you see the Simplify framed art photo. Dimensions and instructions given there are the narrower width of canvas.
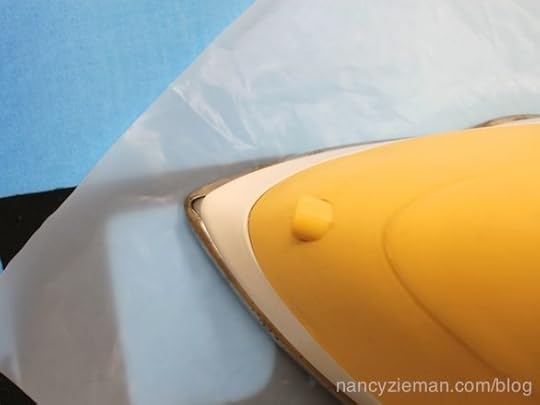
Back the fabric with a fusible interfacing, such as ShirTailor .
Note from Nancy: The extra stability provided by the interfacing gives a crisp, professional look to your framed artwork. Don’t skip this step!
Serge or zigzag the edges of the fabric.
Using a ruler, mark and cut out a 3″ square from each corner. To see more options on framing laser-cut appliqués, click here.
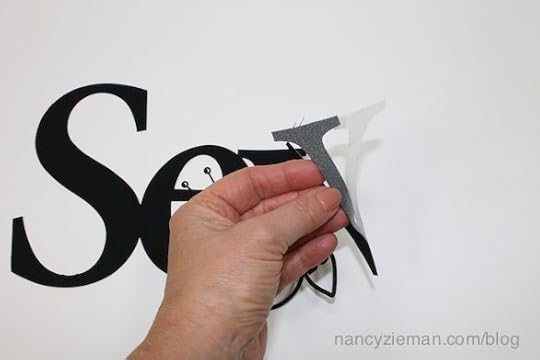
Position the appliqué to the fabric. Take time to be accurate!
Cover the appliqué with a pressing sheet; fuse following the instructions on the packaging. (I know, I forgot to take a photo of fusing the Sew appliqué. Just imagine that the fabric is in yellow tones—not blue!)
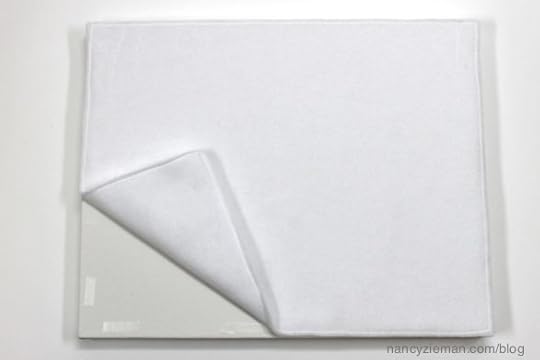
Use double-sided basting tape to attach the fleece sections to the canvas. It’s important to have this padding on top of the stretched canvas.
Fold the fabric at each corner, aligning the cut edges and right sides. Sew or serge with a 1/4″ seam allowance.
Turn the artwork right side out. Press the seams open.

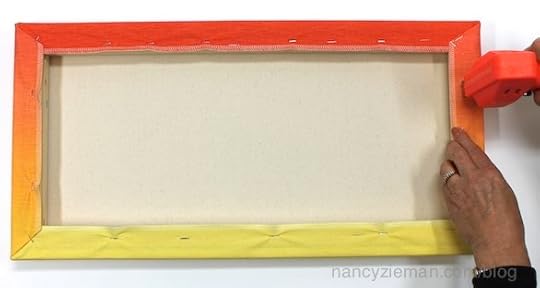
Slip the fabric over the canvas. It will be a snug fit.
Fold the excess fabric to the underside of the canvas frame. Fold miters at the corners; staple.
Note from Nancy: Make sure that you’re slightly stretching the fabric evenly. Take time to check the front image to make sure that the fabric is not distorted.
Picture Frame Option
Whether you sew, quilt, embroider, or decorate with fabric, these four words tell your story!
Here are the quick steps to creating this wall art.
Purchase a picture frame and disassemble the components as adding a picture.
Cover the cardboard with fleece.
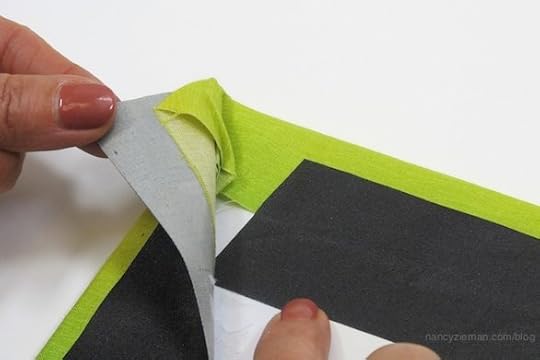
Remove the appliqué from the packaging. Look for “tabs,” extra fabric between the letters that keep the appliqué stable in the packaging. Snip out tab connectors, it will be obvious.

Cut fabric 4″ larger than the cardboard; back with fusible interfacing.
Wrap the fabric around the cardboard. Secure in place with duck tape, then replace the cardboard into the outer frame.
Ta-dah!
For a chance to win one of my laser-cut fusible appliques, tell me which appliqué you’d use to decorate one of your rooms.
The random winner of the Hot and Handy Projects book is Savannagal. Her comment was: What an awesome giveaway. I love all the ideas in this book. Sadly, I’ve looked for quilted fabric in my area and have only found a couple of choices. I’ve never seen the Quilted Iron Quick fabric or anything like it anywhere.
Nancy’s Notions has even put together a great package deal. Check this out!
Bye for now,
Content in this feed is © copyright 2014 by Nancy Zieman and may not be republished without written permission. You’re welcome to forward the email to a friend or colleague but it’s not okay to add the RSS feed automatically as content on a blog or other website.
April 29, 2014
Create an Impressive Quilt Top with Simple, Straight-line Stitching
By Kate Bashynski, Nancy’s Notions Guest Blogger
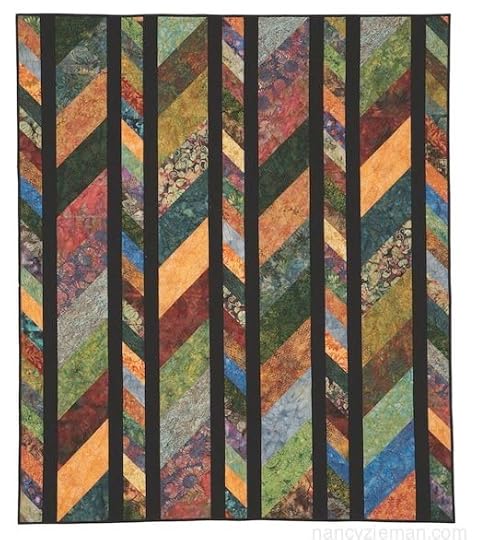
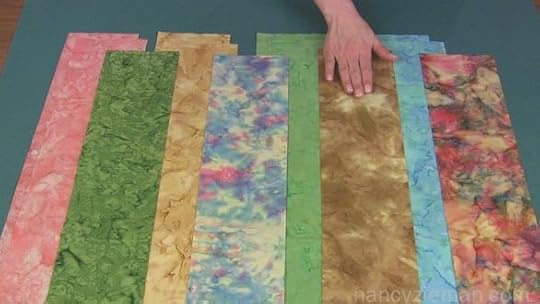
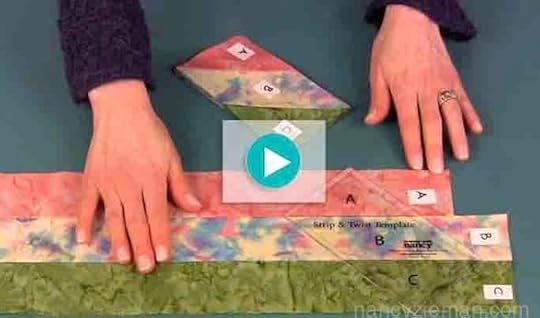
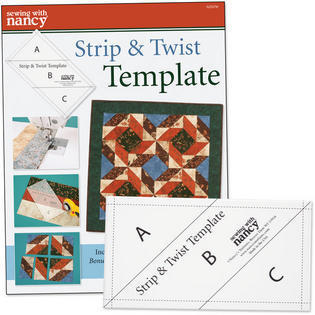
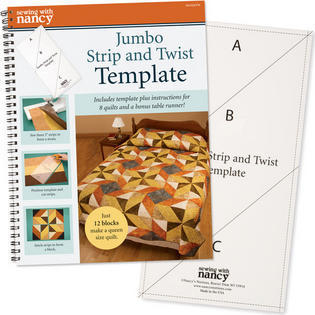
It takes two ropes to jump Double Dutch, and two compatible quilt templates make the perfect pair to create the Double Dutch Twist Quilt. Use the Strip & Twist Template with 2-1/2″ wide fabrics and the Jumbo Strip and Twist Template with 5″ wide strips, to make a pieced top that has artistry in color and movement. This quilt is a lively exercise in design that will begin to unveil the large overall design after the first row. Let’s jump right in!
For a more coordinated look, cut both strip widths from fabric yardage. If you’re a bit more free-spirited, or like a “scrappier” look, combine a 2½” precut strip collection with coordinating fabric yardages.
Note that in some instances the directions call for scant ¼” seam allowances, and at other times the directions simply tell you to use ¼” seam allowances. Although it may seem to be a very minor variation, the two seam allowances are slightly different and they do make a difference. In each case be sure to stitch as indicated. We’ve used bold type to alert you to those areas.
You can refer to the full step-by-step directions for a complete list of supplies and notions needed to complete this project. The directions here are written for using fabric yardage, rather than a fabric strip pack. The instruction sheet gives you alternate steps for using a strip pack.
First, prepare and cut your fabrics. Stabilize all of your fabrics well using spray starch or a starch alternative, such as Mary Ellen’s Best Press . This is especially important for this type of project, because you’ll be cutting on the bias of the fabric. Stabilizing your fabrics helps to reduce stretching and distortion of your blocks.
Cut your fabric strips as described in the directions, and trim selvage ends of all strips. You’ll be cutting groups of 5″ wide strips for the wide columns, and 2-1/2″ strips for the narrow columns.
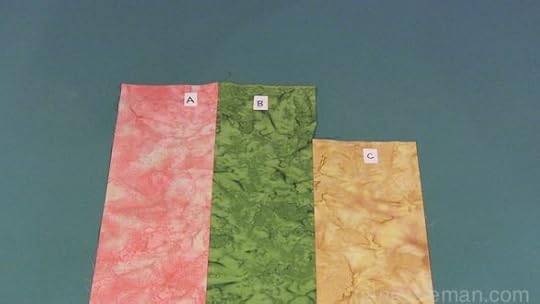
Starting with the 5″ wide strips, arrange your strips for assembling nine strata. Alternate the nine pairs of strips with the nine single strips in a pleasing color arrangement.
Remove one strip from the first pair and place it at the opposite end, next to the last single strip. Label the strips if desired to make it easier to remember which strip goes with which set. Label all single strips as “B”. Label one strip of each pair as “A” and the other as “C.” (The “C” in the last strata is the same fabric as the first strata’s “A” strip.)

Create strip-pieced strata using scant ¼” seam allowances. Stitch the Fabric A strip to the Fabric B strip, right sides together. Off-set the Fabric C strip approximately 4″, then stitch to the opposite edge of the Fabric B strip, right sides together.
It’s important to always keep the B strip between the A and C strips. Press all seams flat, then open. Repeat these steps for the remaining strip sets, creating eight more strata.
Next, cut three Jumbo Strip and Twist blocks from each strata. Place the Jumbo Strip and Twist template right side up over the strata, aligning the diagonal guidelines on the template with the seams of the strata.
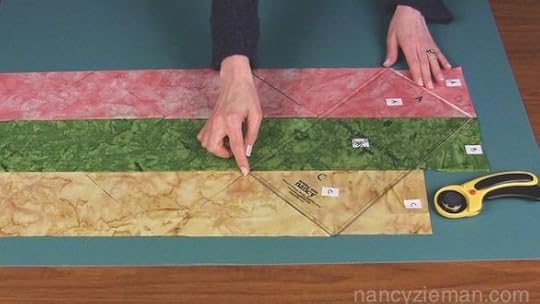
Cut out the block, following outer edges of the template. Slide template down, cutting three Jumbo Strip and Twist blocks from each strata. Stack together, keeping A and C ends on top of one another.
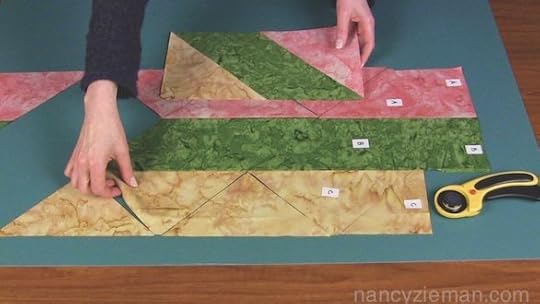
Sew remaining strip sets into strata and repeat the process for cutting the blocks with the Jumbo Strip and Twist Template. Place stacks of cut blocks end to end, forming a long row. The “C” end of one stack should match the “A” end of the next stack.
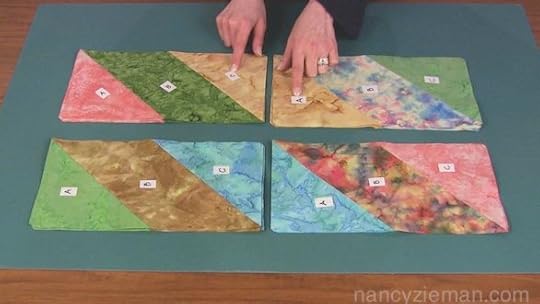
Assemble four Jumbo Double Dutch Twist panels, using ¼” seam allowances. Begin on one end of the aligned stacks, and select the first five consecutive blocks. Label the sixth block—it will be the first block for the next panel.
Stitch the panel of blocks together, keeping “A” and “C” ends matched. Press seam allowances flat, then to one side. Take care not to stretch the blocks as you stitch and press. Set completed panel aside.
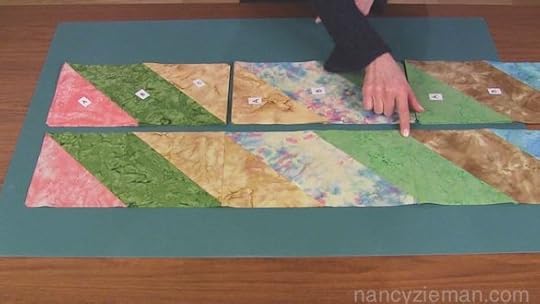
Select the next five consecutive blocks from the aligned stacks, beginning with the labeled sixth block from the previous set. Again, label the sixth block, as it will be the first block for the next panel. Stitch blocks end to end, maintaining proper order. Press seams flat, then to one side. Repeat these steps to complete two more Jumbo Double Dutch Twist panels.
Now you’ll create the five narrow Double Dutch Twist panels. Repeat Steps 2–5 above using the 2½” wide crosswise strips and the Strip & Twist Template. This time, you’ll off-set the A strip approximately 1¾” when assembling each strata.
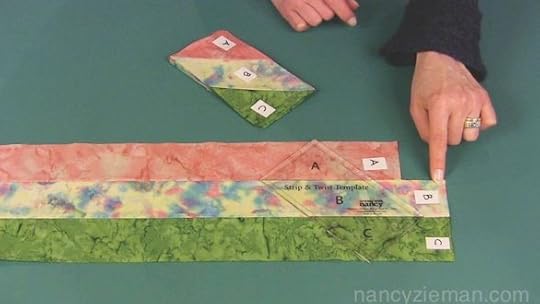
Cut eight Strip & Twist blocks from each of the strip-pieced strata. Select 12 Strip & Twist blocks for each narrow Double Dutch Twist panel.
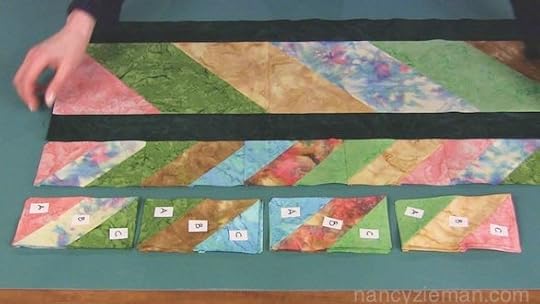
After all of the wide and narrow panels have been completed, add sashing strips between panels using ¼” seam allowances. Join pairs of 2-1/2″ sashing strips, using diagonal seams to reduce bulk. Press seams open. You should have eight seamed strips. Place the Jumbo Double Dutch Twist panels on a flat work surface.
Measure the length of each panel. If there is a difference between the four measurements, use a measurement midway between the shortest and longest measurements. Trim the narrow Double Dutch Twist panels to the same length as the midway measurement of the Jumbo Double Dutch Twist panels. Trim the eight sashing strips to the same midway length.
Align the sashing strips with the long edges of the Jumbo Double Dutch Twist panels, right sides together. Pin and stitch. Press seams flat, then toward sashing.
Align narrow Double Dutch Twist Panels with long edges of the sashed panels, right sides together. Pin and stitch. Press seams flat, then toward sashing. Square both short ends of the quilt top, if needed.
Finally, finish the quilt by layering, quilting, and binding using your favorite methods.
Watch a step-by-step demonstration of these techniques, and download the free pattern instructions:
Strip and Twist Templates
Check out these links for more information on the book and template on the Strip and Twist and the Strip and Twist Jumbo.
Thank you, Kate, for your great quilt design!
Bye for now,
Content in this feed is © copyright 2014 by Nancy Zieman and may not be republished without written permission. You’re welcome to forward the email to a friend or colleague but it’s not okay to add the RSS feed automatically as content on a blog or other website.
April 26, 2014
10 Sewing Tips for Stitching Perfect Gathers
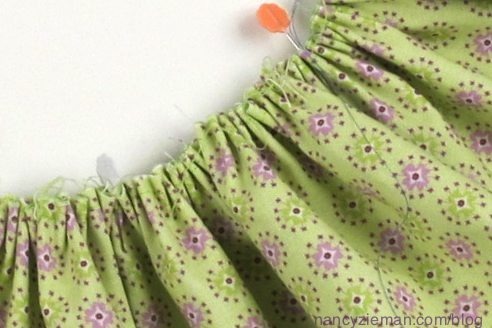
I’m in the process of sewing flower girl dresses. Admittedly, it’s been awhile since I gathered lots of fabric into little spaces! I’m on my second set of dresses; the first option looked old-fashioned. So, I’ve had gathering practice! While sewing these dresses for the cutest little girls I know, I couldn’t help but make notes on some of the gathering techniques I tested and used. One gathering technique does not fit all. So, my weekend of sewing for fun also turned into a blog posting. Here are my favorite tips for sewing gathers.
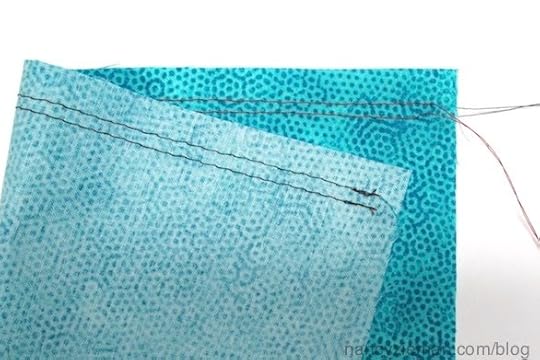
Tip #1—Use a different color thread in the needle and the bobbin
You’ll soon see that there are several ways to gather, and having contrasting thread colors is helpful when trying to distinguish between the needle and bobbin thread. It’s not necessary to use a high contrast as you’ll see in the photos, but I am sure that you figured that out already! (I used red thread in the needle and black thread in the bobbin in the below samples.)
Tip #2—The bobbin thread is easier to pull—sew from the right side
When choosing to gather with two rows of gathering threads, sew from the right side. The bobbin thread is always easier to pull. That feature has to do with how the stitches are formed. The right side of a gathered fabric is aligned to the right side of corresponding fabric. Having the gathering threads on the wrong side, will give you the flexibility to easily adjust the gathers during the pinning process.

Tip #3—Lock the threads at the beginning of the seam
This tip is not widely suggested, yet it saves me lots of time. Generally, it is recommended to wrap the beginning threads figure-eight style around a vertically placed pin to prevent the threads from pulling out during the gathering process. Stitching 2–3 stitches and then back stitching, does the same thing, but faster!
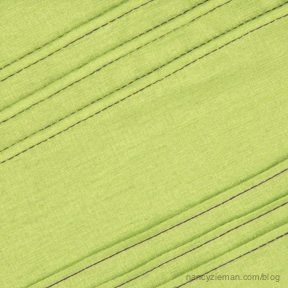
Tip #4—Test the stitch length
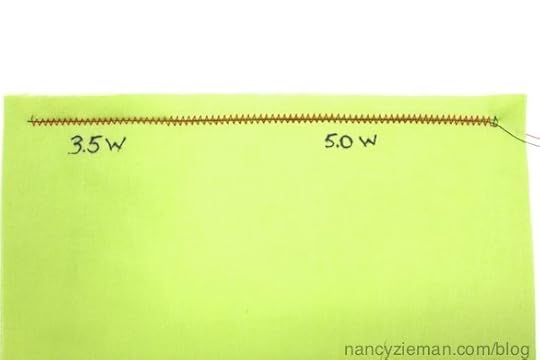
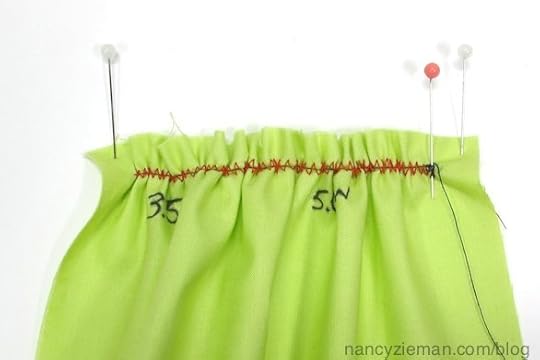
With medium to heavier weight fabrics, stitch two parallel rows of basting stitches within the seam allowance, using a relatively long stitch length, 4.0–5.0. The longest stitch is not always the best since there is too much “play” of the fabric in the long stitch, causing uneven gathers.
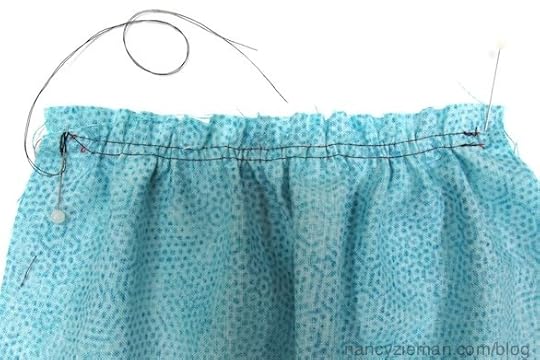
Use a much shorter stitch length with lightweight fabrics. The length used in this sample was a 3.5 stitch length.
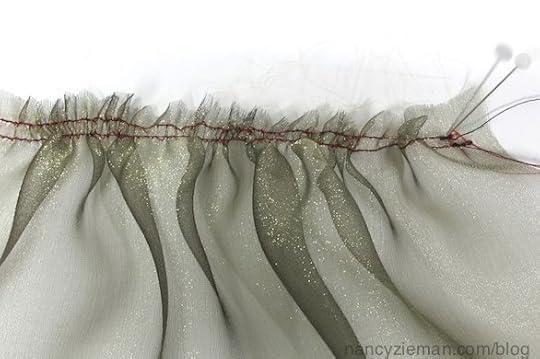
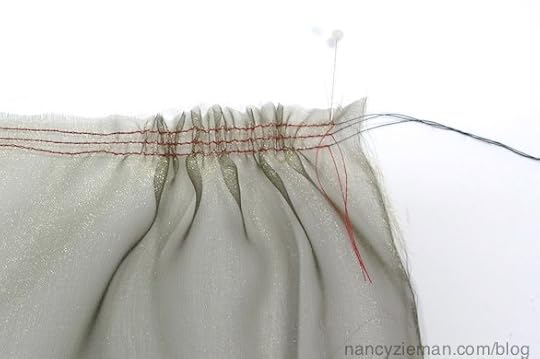
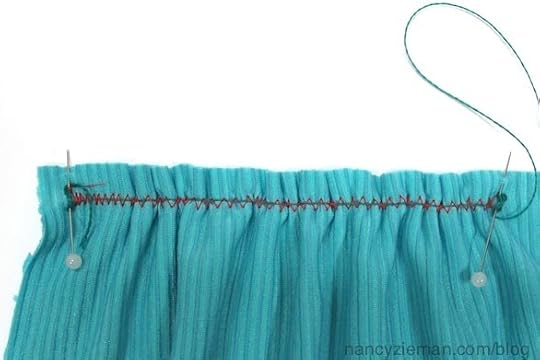
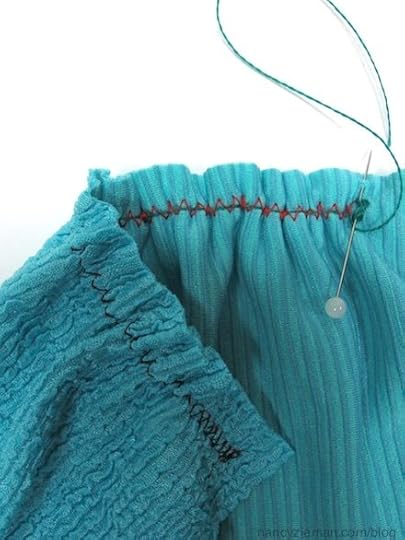
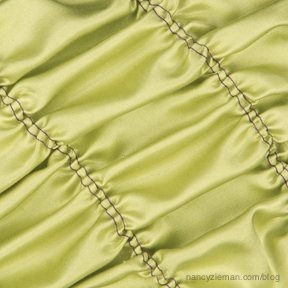
Tip #5—Add three rows of stitching to sheer fabrics
This is an optional tip, yet I find sheer fabrics lie flatter if three rows of stitches are sewn within the seam. It takes a little extra time, but worth it! Compare the smoothness of the gathers in the photo below compared to the photo above.
Tip 6# —Don’t use the machine thread cutter when gathering by pulling the bobbin threads
If you have the thread-cutting feature on your machine, it’s tricky to remember to pull the threads at the end of the seam and cut manually. The automatic thread cutter cuts the threads very close to the fabric—too close to easily find and then pull the threads.
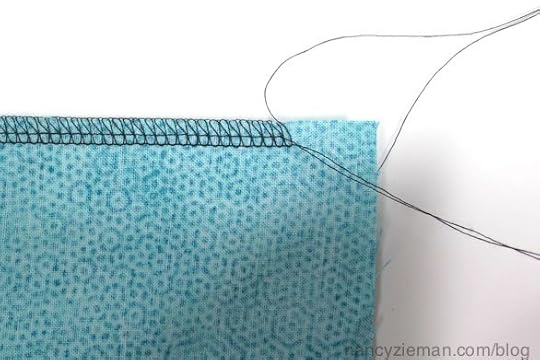
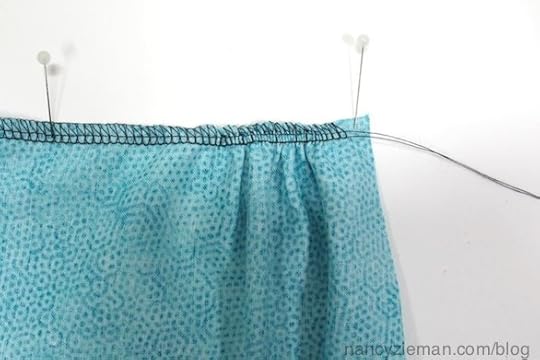
Tip #7—Use a serger for gathering when 1/4″ seams are allowed
Ah, I really like this way of gathering! It’s almost impossible to stitch two rows of basting stitches within a 1/4″ seam allowance. If you have a serger, simply serge from the wrong side of the fabric with a 4-thread overlock stitch and a long stitch length. Separate the needle threads from the looper threads. This time, pull the needle threads. Presto, perfect gathers.
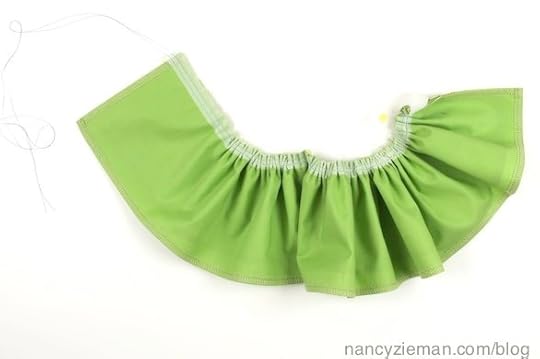
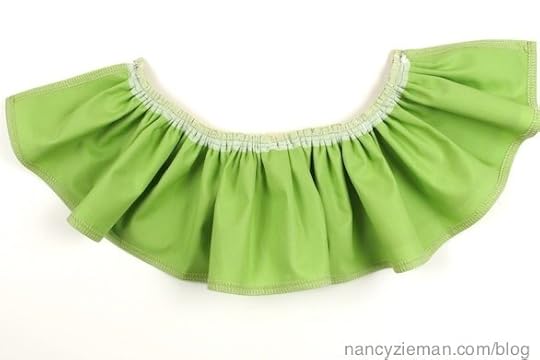
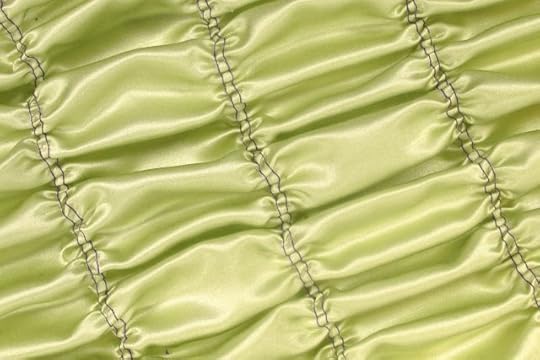
Tip #8—Zigzag over the bobbin thread for a secure gathering technique
This is my go-to gathering technique:
Stitch from the wrong side of the fabric.
Take one stitch, hold on to the thread tail of the needle thread and gently pull upward—the bobbin thread (black thread) will loop up.
Pull up the bobbin thread, pulling the thread as long as the area to be gathered. Lay the thread on top of the fabric.

Set the machine for a zigzag stitch. Test the stitch width and length. I prefer a 4.0–5.0 width and a 2.5 length. (The narrower zigzag width provides control of the gathers.)
Pull the long thread to gather the fabric!
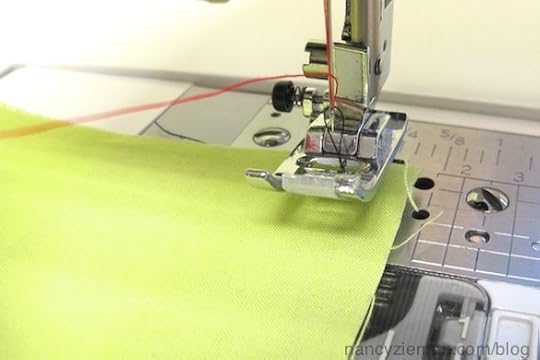
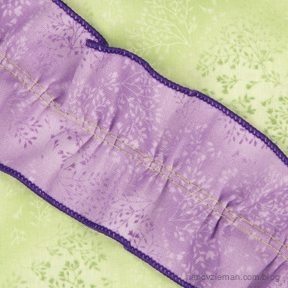
Tip #9—Zigzag over a cord when gathering heavier fabrics
Stitch from the wrong side of the fabric.
Set the machine for a zigzag stitch. Test out the stitch width and length. I prefer to 4.0–5.0 width and a 2.5 length. The narrower zigzag width provides more control of the gathers.
Rather than zigzagging over the pulled-up bobbin thread, place a heavy cord on top of the fabric. Zigzag over the cord.
After stitching, anchor the beginning and ending of the cord by wrapping figure-eight style around a vertically placed pin.
Pull the free end of the cord and gather.
Tip #10—Gather using the no-stitching technique
Talk about easy! I use this technique when stitching doll clothes, lightweight fabrics, and other small projects.
Press Fuse ‘n Gather (a fusible gathering tape) to the wrong side of a strip of fabric along the top of the fabric. (Follow the iron setting as detailed on the package.) The stitches are tinted blue on the side of the tape that must face upward.
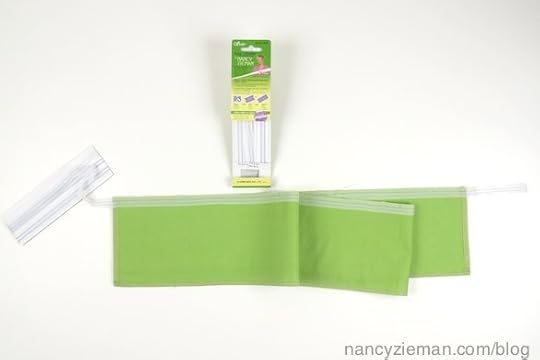
Pull the blue gathering threads at both ends, creating a 2″–3″ thread tail.
At one end secure the threads by wrapping them in figure-eight style around a pin.
On the other end, pull the blue gathering threads to create the gathers.
Ta da!
I’ve written and demonstrated each of these gathering techniques. This is the first time that I’ve put then all in the same place. Enjoy!
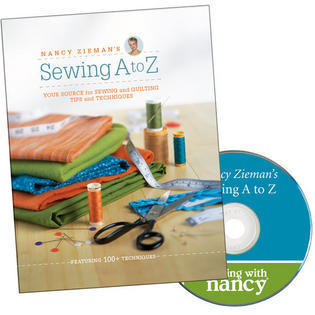
You can watch Tip #8 being demonstrated in Sewing A to Z, part 1.
For a chance to win a copy of Sewing A to Z, please share your favorite gathering technique.
Bye for now,
Nancy Zieman—author, pattern designer, businesswomen, producer, and national sewing authority—is the host of the popular show Sewing With Nancy®, which appears exclusively on public television stations across the United States and Canada. Follow Nancy’s Blog at NancyZieman.com/Blog and sign up to receive Nancy’s E-News for the latest news in Sewing, Quilting, & Creating.
Content in this feed is © copyright 2014 by Nancy Zieman and may not be republished without written permission. You’re welcome to forward the email to a friend or colleague but it’s not okay to add the RSS feed automatically as content on a blog or other website.
April 24, 2014
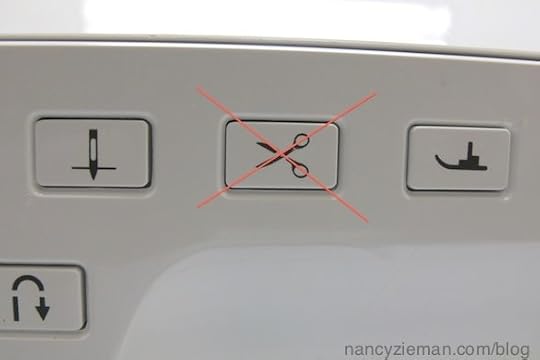
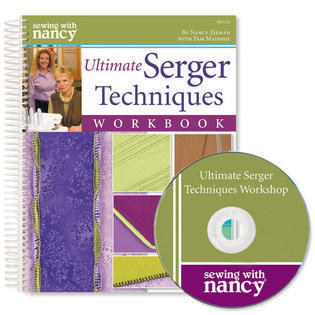
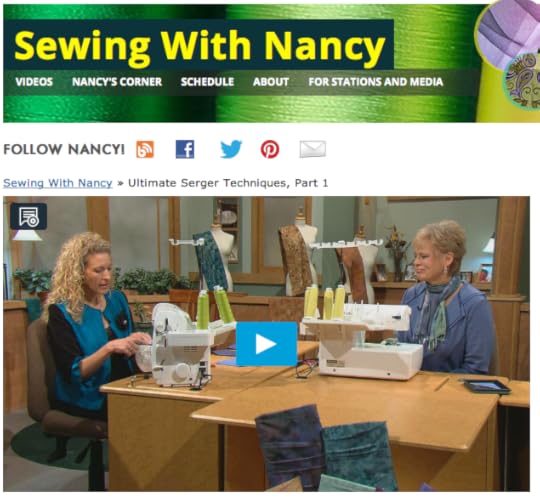
Take a Serger Workshop Online!
Each time I attend a workshop, I’m amazed at what I learn. But the drawback is finding the time to attend an event. Speculating that many of you have the same time constraints, I decided to bring a workshop to you, featuring serger techniques. Baby Lock’s National Sewing Ambassador Pam Mahshie provides the updated serging education!
Quilt Binding using a 4-thread overlock stitch
With just a few changes, the basic overlock stitch can be modified to stitch binding on a quilted project. Learn how fusible thread streamlines the sewing process, producing professional results.
Gathering with a Cover Stitch
If you’ve gathered fabric before, you’ve probably stitched a row or two of basting stitches and then pulled the threads to gather the fabric. Gathering on a serger with a cover stitch can be automatic—stitch and gather at the same time. Curious? Learn now by watching online!
Creating Pintucks
Create texture with pintucks, again using the cover stitch setting. Light to medium weight fabric can easily take on dimension once you know how to set up your serger.
Embellishing with Decorative Threads
Decorative threads and your serger are prime for embellishing. The amazing part of this technique is that the stitching is done from the wrong side of the fabric—the pretty part only shows once the stitching is complete.
Watch Ultimate Serger Techniques online!
Watch the first episode of this Sewing With Nancy series at your convenience. Watch online, on PBS, or DVD. If you missed seeing the first episode of this series, click here to watch Ultimate Serger Techniques, part one. Have you downloaded the app?
A Serger Workbook with 33 Serger Techniques!
Several seasons ago, Pam and I presented a 3-part Sewing With Nancy series simply called the Serger Workshop. The Ultimate Serger Techniques Workbook is a spiral bound book that combines the information from both series. Learn 33 techniques using 10 different serger stitches! Click here to learn more about the Ultimate Serger Techniques Workbook.
Bye for now,
Content in this feed is © copyright 2014 by Nancy Zieman and may not be republished without written permission. You’re welcome to forward the email to a friend or colleague but it’s not okay to add the RSS feed automatically as content on a blog or other website.
April 22, 2014
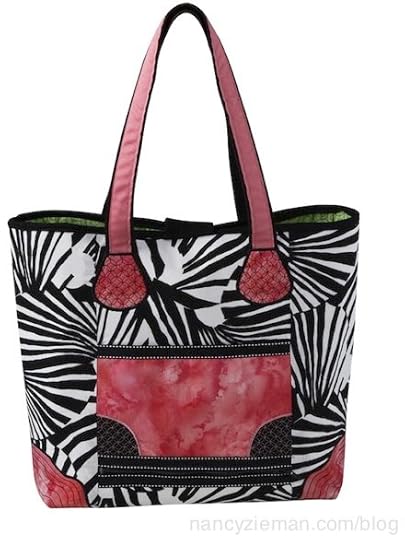
Clever Designer Handbags Caught My Eye
Earlier this month I was a speaker at Baby Lock’s Love of Sewing Retreat in Nashua, NH. Presenting my favorite sewing and quilting techniques to an auditorium filled with enthusiastic Sewing With Nancy followers is a joy. The side benefit is seeing the clever sewing and quilting creations made by others.
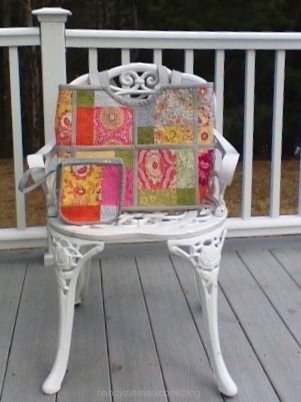
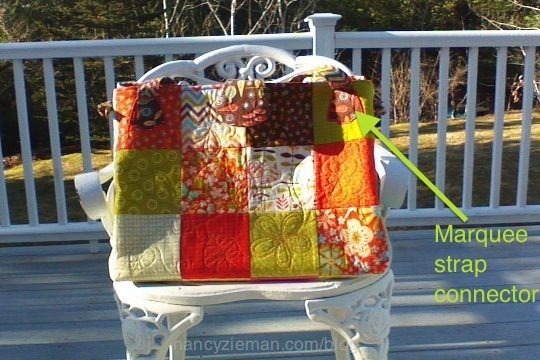
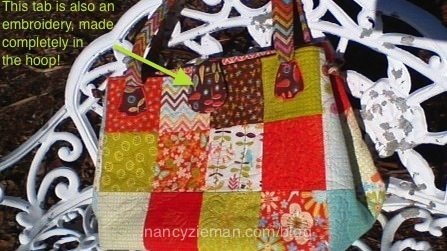
After I demonstrated the Designer Handbags technique (embroidery designs for strap connectors, corners, and tabs) an attendee, Kim Blanchard, caught my attention and shared her handbags made with the same embroideries. The handbag looked nothing like my bag. I was intrigued!
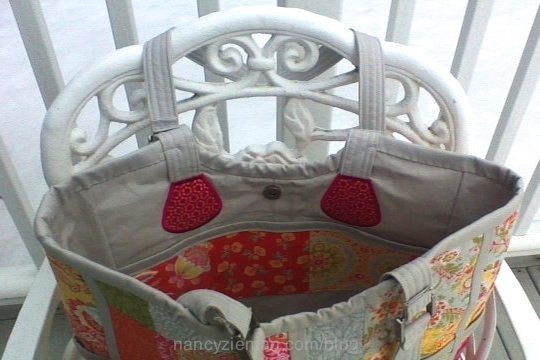
Kim shared how she embroidered the strap connectors to the inside/lining of the bag as not to interfere with her patchwork design on the outside of the bag. What a great idea! Her bags are equally as artistic on the inside as the outside. (The inside of this bag features the Scalloped Strap connector.)
She shared several bags, including a dramatic black and white tote.
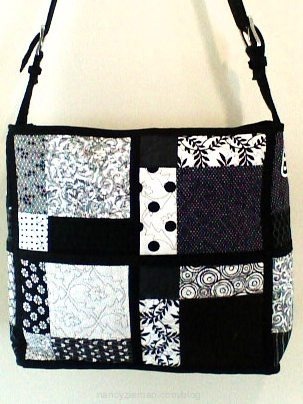
Inside you’ll find the embroidered strap connectors, the Marguee Strap Connector Embroidery, one of the 28 embroideries in the Designer Handbags book/DVD. This bag makes quite a statement.
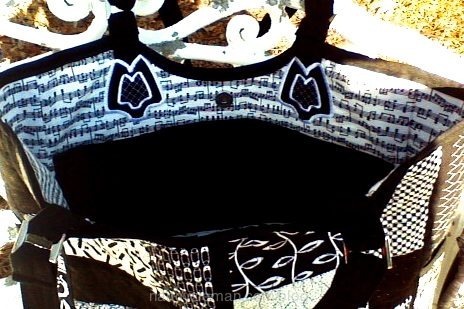
She also used the strap connector embroidery on the outside of the bag—that’s the more traditional way.
Why So Many Bags?
Kim and her friends at the North Parrish Quilter’s Guild have been making handbags for a good share of the past year for an upcoming event. The “Purse-N-Ality” auction and fashion show will take place May 14 in North Reading, MA. Click here for more information. I only wish that I lived closer so that I could go!
This is an extremely prolific and generous group of quilters! Besides their annual auction, they make 100 quilts a year for Hole In The Wall Gang , 25 quilts for the Yawkey Center/ Childrens Hospital, and 50 smaller quilts for dog and cat beds, which are donated to the SPCA.
Special thanks to Kim for sharing her handbags with personality!
Be Creative With Your Bags!
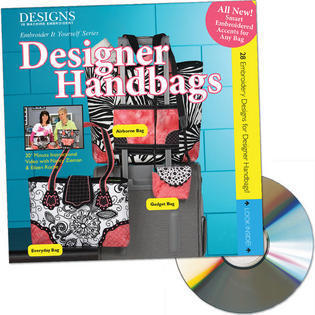
There are 28 embroidery designs for handbags in the book with companion CD, Designer Handbags. (Click here to read more about the book and CD.) Eileen Roche and I designed the projects and truly enjoy seeing what you create using the embroideries and sewing tips. Truthfully, I would have never thought of using the strap connectors as part of the lining of the bag as interpreted by Kim, our featured stitcher!
Click here to watch Designer Handbags, Part One Online!
There are three seasons of Sewing With Nancy Videos to watch at your convenience!
Here’s two of the original Designer Handbags.

Share your Creative Sewing or Quilting Projects
Each month, I’d like to feature sewing or quilting projects from a guild, sewing or quilting group, or individual. Send your submissions to info@ziemanproductions.com. Attach a photo or two!
The two random winners of a copy of my autobiography, Seams Unlikely, are Rhonda True and Teresa Faile.

Bye for now,
Content in this feed is © copyright 2014 by Nancy Zieman and may not be republished without written permission. You’re welcome to forward the email to a friend or colleague but it’s not okay to add the RSS feed automatically as content on a blog or other website.
April 19, 2014
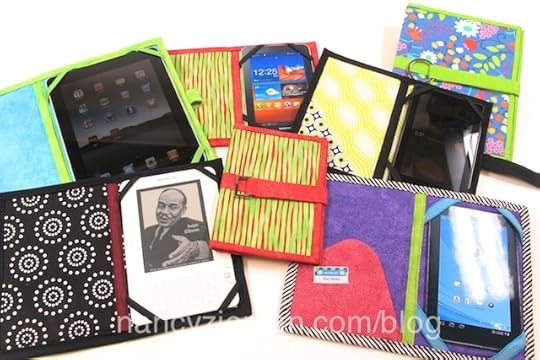
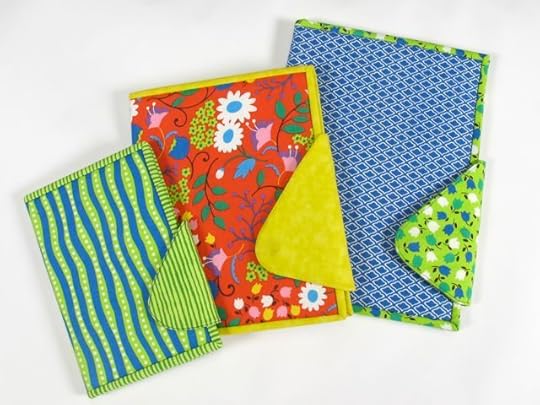
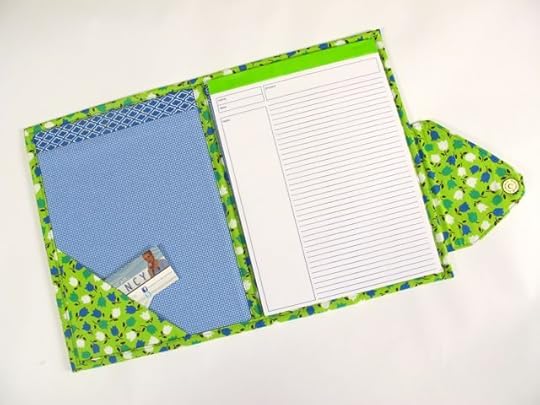
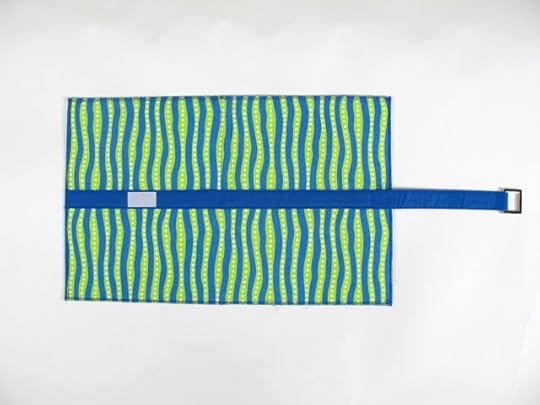
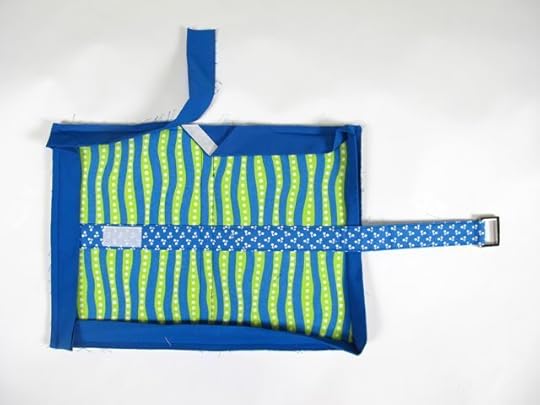
Sew a Designer Cover for your Tablet
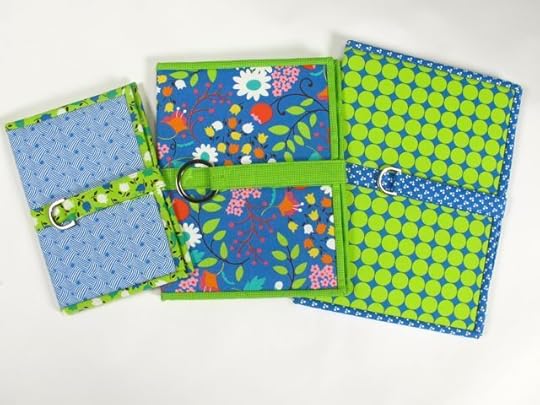
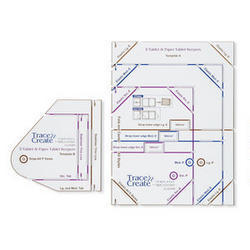
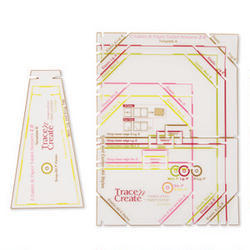
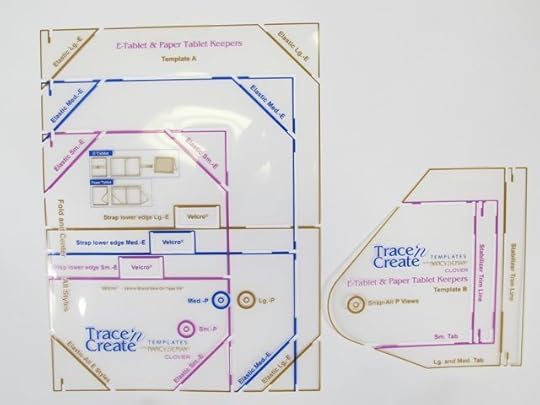
My iPad travels with me to work, to meetings, and back home each day. Introduced four years ago, the slim and smart electronic tablet has replaced my bulky daily planner/calendar, laptop, and so much more. Because my tablet is my daily commuter companion, I like to protect it with one of several different designer Tablet Keepers I’ve made with the Trace ‘n Create Templates – E-Tablet and Paper Tablet Keepers.
It’s a treat for me to demonstrate the easy steps of sewing a Tablet Keeper and feature the opportunities for creativity, such as adding embroidery or embellishments. Warning: You may find yourself stitching up a new Tablet Keeper for each season or to coordinate with your favorite handbags.
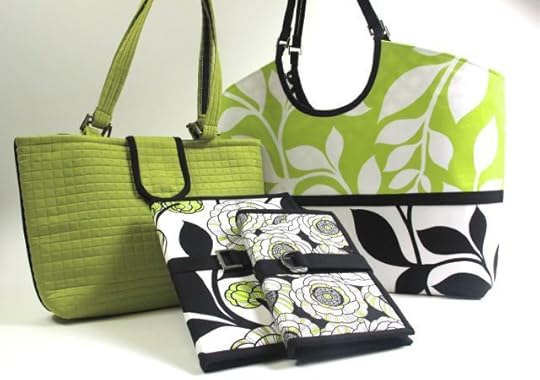
As the designer of the template set, I’d like to show you first hand how easy they are to create. Perhaps you’ll make one for yourself or give as gifts! First let’s look at the options.
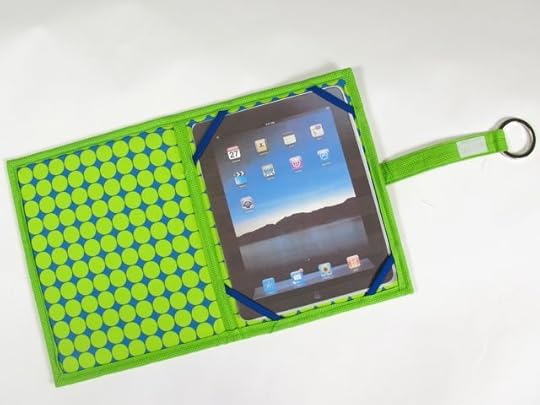
E-Tablet Keepers
Make in three sizes to fit the Kindle, Nook, iPad, Kindle Fire, and other Slates/Tablets.
Paper Tablet Keepers
A $2.95 paper tablet can look just as smart as a $499.00 electronic tablet!
Choose Clover’s Trace ‘n Create Tablet Keeper Template or Trace ‘n Create Tablet Keeper Template 2.0 . Depending on your electronic device make and model, you’ll select the template that fits your electronic tablet. For the iPad, select Clover’s Trace ‘n Create Tablet Keeper Template .
Click here to view the original Tablet Keeper Template device listing .
Click here to view the Tablet Keeper 2.0 device listing. If you don’t see your tablet listed, email us at info@ziemanproductions.com and we’ll add your electronic device to the listings.
Here are the steps to create an E-Tablet Keeper
Trace, Cut, and Interface—50 Minutes
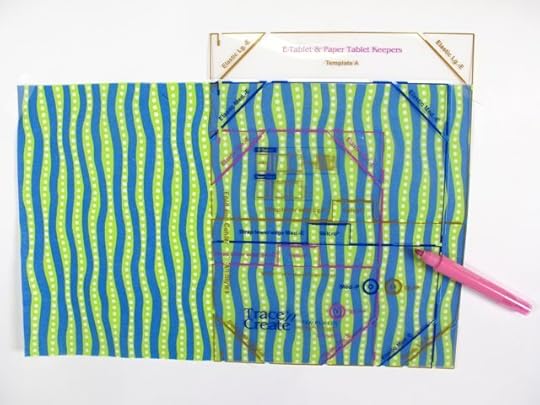
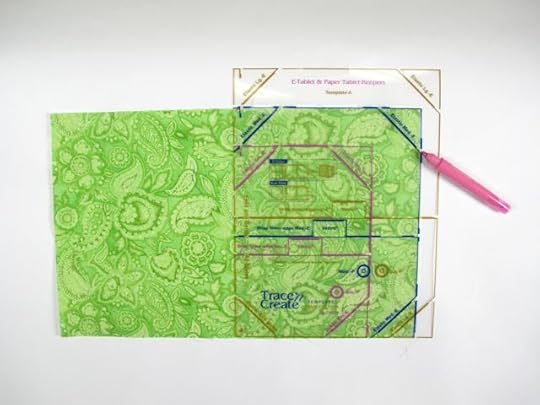
Find a great fabric selection. A Fat Quarter Bundle of coordinating prints make an ideal palette.
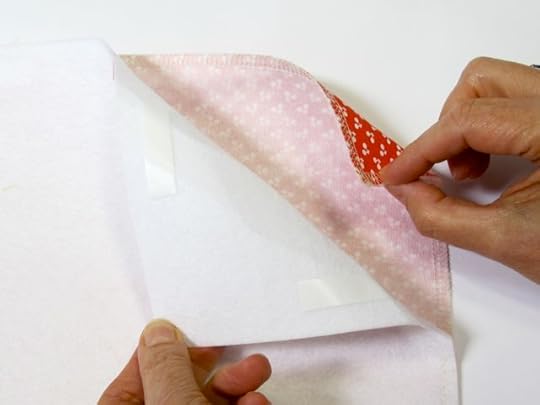
Fold the outer fabric, align the template along the fold, and trace through the die-cut areas of the size on the template that you’d like to create.
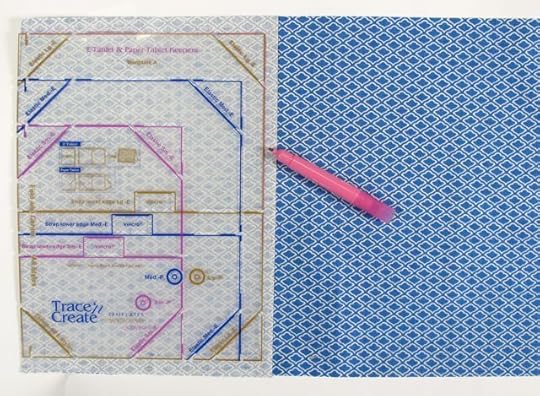
Cut out one for the outer tablet keeper and a second for the inner layer.
Add fusible shirtailor interfacing to the wrong side of each. Also cut one layer of Pellon’s Peltex .
Note from Nancy: If you haven’t noticed, you’ll see various fabrics in the photos. We took the step-by-step photos of a variety of Tablet Keepers — not all the same fabric. You know what they say about variety!
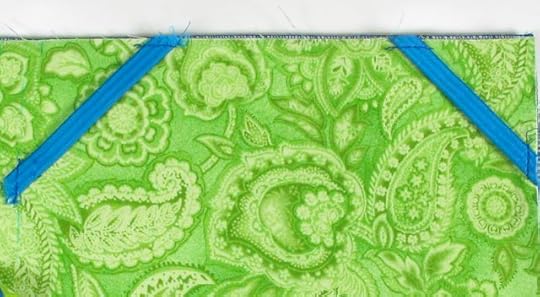
Create and Add the Strap—40 Minutes
In the instructions, I’ll give you guidelines on the length of the straps. You’ll find that you can quickly and easily make them with 1″ Create-a-Strap .
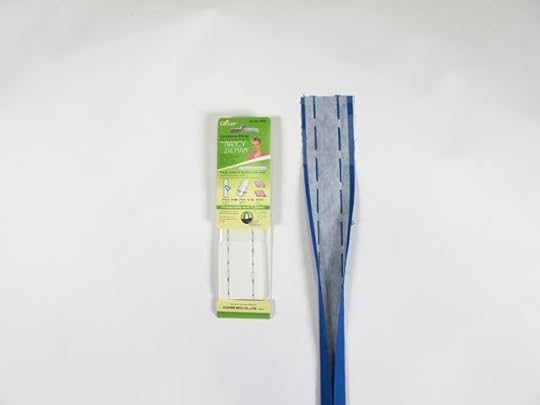
You’ll also be instructed where to add hook and loop tape and one O-Ring , D-Ring , or Rectangular Hardware .
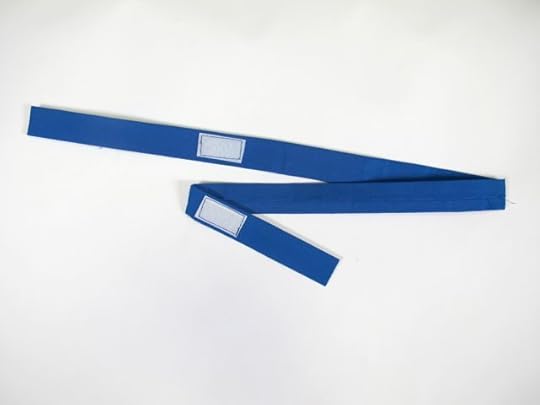
There’s no guess-work where the strap should be placed, align the template on top of the outer fabric. Draw the lower strap placement through the die-cut areas.
Align the strap along the marking.
Stitch three sides, ending the stitch 1″ from the right edge. The outer E-Tablet Keeper is almost finished!
Create the Interior of the E-Tablet Keeper—30 Minutes
Place the template on the fabric. Mark the placement for the elastic at all four corners.
Cut the elastic the noted length and stitch to the interior fabric.
Note from Nancy: Are you wondering where we purchased bright blue elastic? It’s a cut up stretchy headband! Never having enough hair to wear a headband, I didn’t know that they existed. Staff members gave the suggestion—what a great idea. Not to worry, regular white or black elastic works too!
Create an Inner Spine—30 Minutes
Using the smallest 5/8″ Create-a-Strap , make an inner spine.

Layer the outer and inner fabrics wrong sides together with the Peltex sandwiched in the middle.
Stitch along each side of the spine. There’s a die-cut area on the template to mark the spine placement – you’ll have no worries about centering this important piece!

Stitch along three edges; each side and the lower edge.
Insert the appropriate size Pre-Cut Tablet Keeper Shapers . The Shapers are very firm, thick plastic.
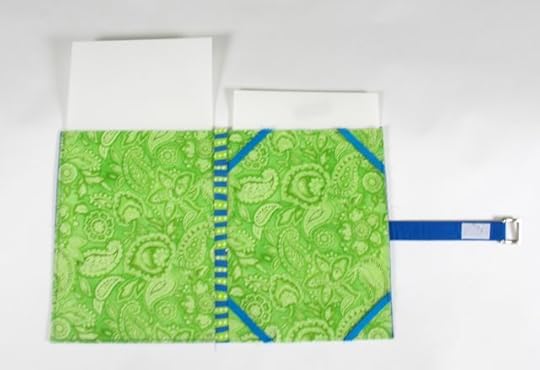
Note from Nancy: The shapers are the key to creating a safe, firm, and professional keeper for your tablet. Don’t skimp on this step. Someone thought they would substitute poster board. Hmm, just think about a $500 electronic tablet protected by poster board! Not such a good idea.
Add Binding—60 Minutes
Use your favorite binding technique to finish off your E-Tablet Keeper.
Ta Da!
Insert your Electronic Tablet. Enjoy!

Note from Nancy: These times are estimates. Some of you will stitch faster, others, well you know! Regardless, this is a project that you can accomplish in just a few hours with lasting results!
Personalize your Tablet Keeper, Watch Sewing With Nancy Online!

For a chance to win a Tablet Keeper Template, leave a comment below sharing if you have a tablet, and what kind? An iPad, Kindle, or ?
Bye for now,
Content in this feed is © copyright 2014 by Nancy Zieman and may not be republished without written permission. You’re welcome to forward the email to a friend or colleague but it’s not okay to add the RSS feed automatically as content on a blog or other website.
April 17, 2014
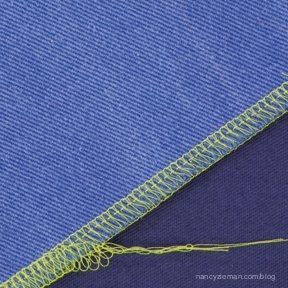
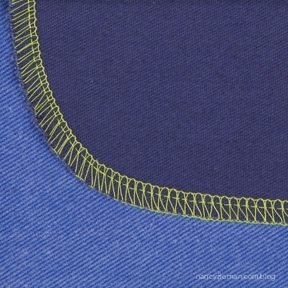
Learn to Get the Most Value from Your Serger
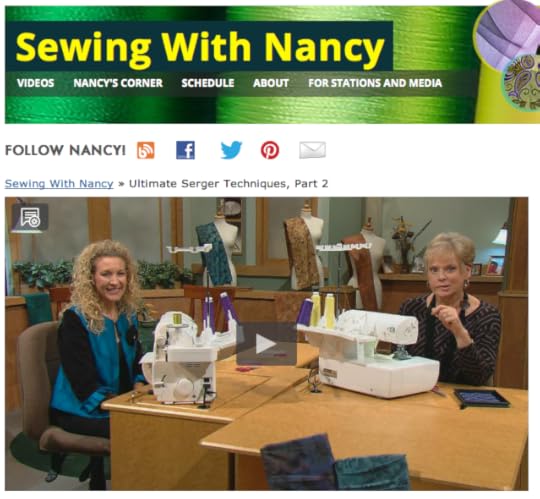
Using a serger sewing machine to only clean finish edges is comparable to using only a microwave to warm water for tea! You’re not getting the full value from your purchase. To solve this dilemma, I invited serging specialist, Pam Mahshie National Baby Lock Ambassador, to be my guest on Sewing With Nancy.
Pam can just about make a serger sing! If you need a rehearsal before making your serger sing, take a look at our Sewing With Nancy online video. Click here to watch Ultimate Serger Techniques, episode one. We go through basic to creative serger techniques, making small samples. If you do the same, you’ll learn many techniques in a short period of time!
Here’s a review of what you’ll see on the first episode of Ultimate Serger Techniques.
Beginning and Ending Seams
You can’t go in reverse on your serger to lock the stitches, but you can stitch over the thread tails. Learn Pam’s clever ways to lock the thread tails at both the beginning and end of the seams.
Serge a Curve
Sometimes it is difficult to serge around curved edges without getting loopy threads hanging off the edge. This technique will give you smooth results every time.
Piecing Options
Piecing a quilt top with your serger might have never crossed your mind. Yet, for simple quilt designs, the serger is a fast and accurate way to make a quilt top. Seam traditionally or . . . with decorative threads and the seams exposed. Either way, your serger can be a go-to quilting machine.
Piping
Home décor, wearable art, or kids’ clothes—those are all categories where piping accents add interest and texture. With a serger, piping is easier than ever to include in a seam or along the outer edge of your next project.
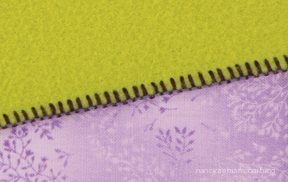
Adding a Blanket Stitch
A blanket stitch is an ideal way to finish the edges of fleece. Why?—The stitches will always be even and the process extra easy. Learn how to add a blanket stitch with a 3-thread flatlock setting.
Click here to watch the first episode of Ultimate Serger Techniques online. Then, click here to watch the second episode.
There are three seasons of programming to watch online, or on your iPad, iPod Touch, or iPhone. Have you downloaded the app?
A Serger Workbook with 33 Serger Techniques!
Several seasons ago, Pam and I presented a 3-part Sewing With Nancy series simply called the Serger Workshop. The Ultimate Serger Techniques Workshop spiral bound book combines the information from both series. Learn 33 techniques using 10 different serger stitches! Click here to learn more about the Ultimate Serger Techniques Workbook.

The random winner of a copy of the Trace ‘n Create Grandmother’s One-Patch Quilt Template Collection from Clover, is Pamelyn. Here’s her comment:
Hi Nancy! This is a great pattern! I just finished an Anita’s Arrowhead block quilt to give to my MIL. She’s has cancer and needs lots of rest. I plan to surprise her with it on Easter Day. Thank you for sharing your sewing talents with us. You are inspiring!
Bye for now,
Content in this feed is © copyright 2014 by Nancy Zieman and may not be republished without written permission. You’re welcome to forward the email to a friend or colleague but it’s not okay to add the RSS feed automatically as content on a blog or other website.
April 15, 2014
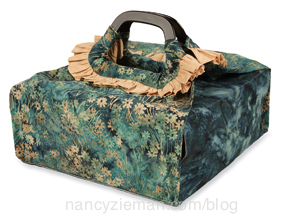
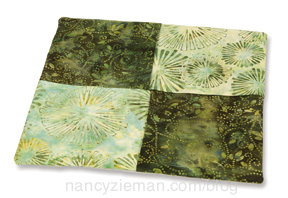
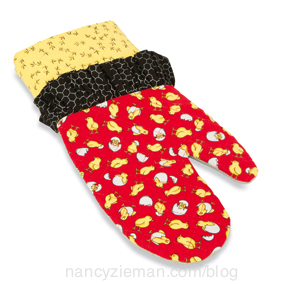
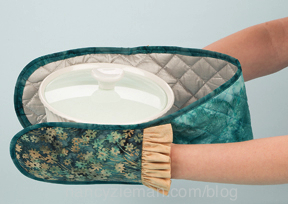
Hot and Handy Projects to Sew

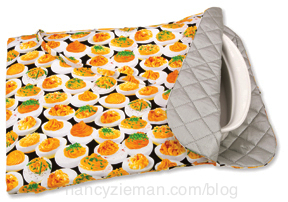
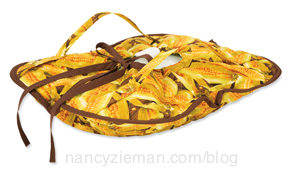
Whip up one of twenty different insulated kitchen-themed projects in as little as an evening. Start with the Hot and Handy Projects book. Slice up some fun fabrics into simple shapes, add a dash of insulating fabric, and you’ll have the perfect recipe to stitch up pot holders, oven mitts, casserole carriers, trivets and more!
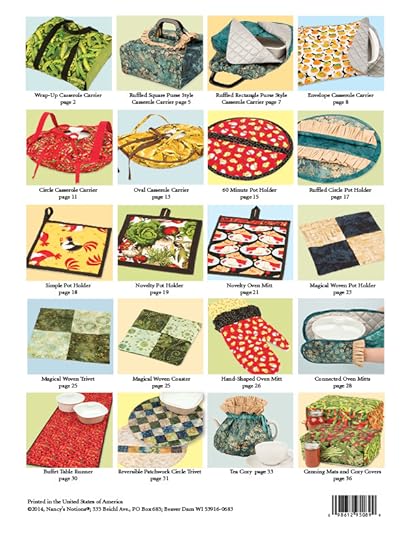
Here’s a little peek into the twenty projects featured in the Hot and Handy Projects book:
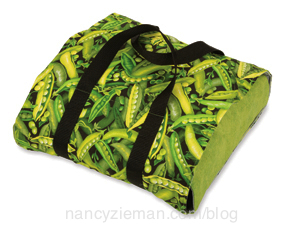
Ruffled Square Purse Style Casserole Carrier
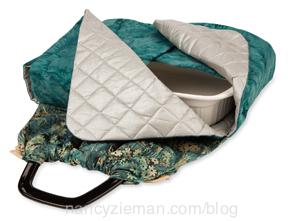
Ruffled Rectangle Purse Style Casserole Carrier
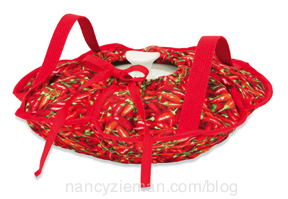
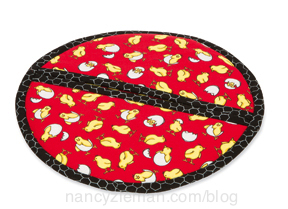
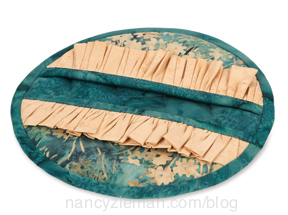
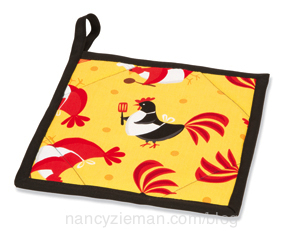


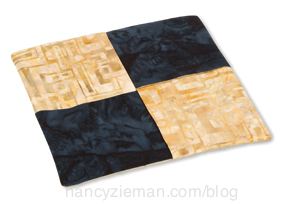
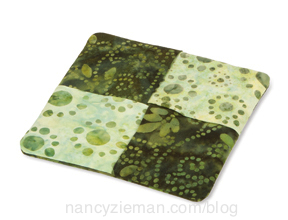
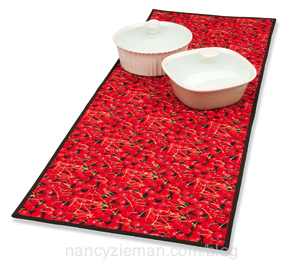
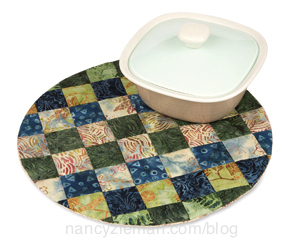
Reversible Patchwork Circle Trivet
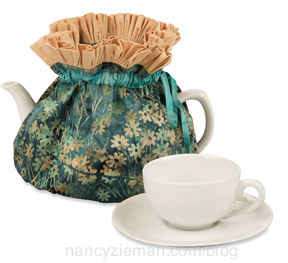
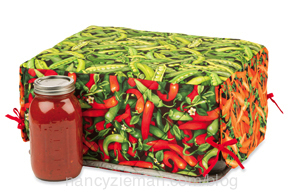
Each of the projects above use a different combination of cotton fabric, cotton batting, polyester batting, Insul-Bright, and Quilted Iron Quick.
The Hot and Handy Projects book includes:
Full color photographs and illustrations
Step-by-step instructions
Book features double-wire binding so pages lay flat when open—no more struggling to keep your page from turning or bending; plus it’s now easier to keep your book right next to you as you work
Soft cover, 44 page book by Nancy Zieman, Sewing With Nancy
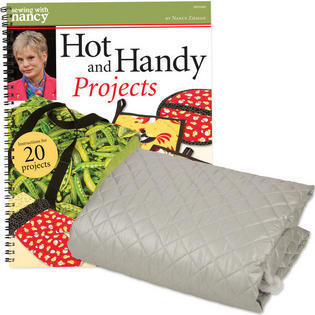
Nancy’s Notions has put together a special offering that includes the Hot and Handy Projects book and 3 yards Quilted Iron Quick fabric. It’s like receiving the book for free!
For a chance to win a copy of the New! Hot and Handy Projects book, please leave a comment below sharing what you like to sew for your home.
 Join me for Nancy Zieman Live on April 26. Early registration special ends tomorrow.
Bye for now,
Content in this feed is © copyright 2014 by Nancy Zieman and may not be republished without written permission. You’re welcome to forward the email to a friend or colleague but it’s not okay to add the RSS feed automatically as content on a blog or other website.
April 12, 2014
Meet Nancy Zieman on the Seams Unlikely Book Tour

Google made me do it! That’s the reason I wrote my autobiography, Seams Unlikely! It all started after searching Google to see what was listed under my name. “Nancy Zieman Stroke, Nancy Zieman Face, Nancy Zieman Smile” were some of the top searched hits. After picking my ego up from the floor, I realized that Sewing With Nancy viewers had every right to be curious as to why my face is asymmetrical! So to tell the story of my unique journey, Seams Unlikely was pieced together.
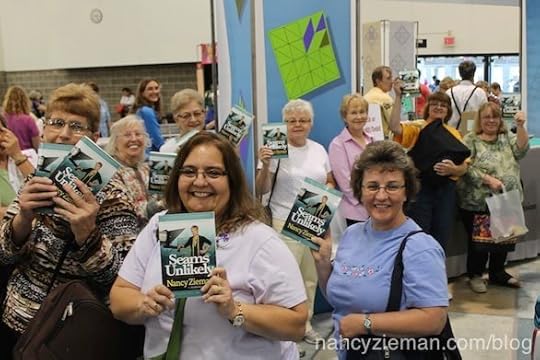
Join me at one of the Seams Unlikely Book Tour Events
I’m enjoying sharing stories from my life and newly released autobiography, Seams Unlikely. The events are informal get-togethers where I share a timeline, of sorts, on how Bell’s palsy came into my life as a toddler, my struggles through grade school, the role that 4-H played in my life, how I started a business, Nancy’s Notions, and what it’s like to produce and host Sewing With Nancy.

Be part of a Seams Unlikely book tour event. Here’s a list of upcoming events:
Lakeside Quilters Guild
Seams Unlikely Presentation and Book Signing
Wednesday, April 16, 2014
Oshkosh, WI
Beaver Dam Area Arts Association (BDAAA)
Seams Unlikely Presentation and Book Signing
Sunday, April 27, 2014
Beaver Dam, WI
Sewing Weekend 2014
May 1, 2, & 3, 2014
Beaver Dam, WI
The Original Creative Festival
Friday, June 13, 2014
Sharonville, OH
American Sewing Guild Annual Conference
July 24–28, 2014
St. Louis, MO
Sending Hope Conference
Seams Unlikely Presentation and Book Signing
Saturday, August 8 & 9, 2014
Shipshewana, IN
Quilt Expo 2014
September 4, 5, & 6, 2014
Madison, WI
Kiel Public Library
Seams Unlikely Presentation and Book Signing
Wednesday, September 10, 2014
Kiel, WI
Mad City Quilt Guild
Seams Unlikely Presentation and Book Signing
Monday, November 24, 2014
Madison, WI
Click the links above to learn more about each event, or visit Seams Unlikely.com
Can’t make it to one of the events?
You may purchase Seams Unlikely at Nancy’s Notions.

Now Available in eBook Formats
Seams Unlikely is now available at Amazon for Kindle readers, on Google Play for Android devices, at Barnes and Noble for the Nook and from Apple in iBook formats. Enter search words, “Seams Unlikely”.
Read an online article from Book Fun Magazine, see page 52.
Read a recent newspaper article from the Wisconsin State Journal .
A portion of the proceeds from book sales will be donated to adoption services.


We’re giving away two copies of Seams Unlikely. Please leave a comment below to qualify for book giveaways.
Join me for the Nancy Zieman Live Webcast on Saturday, April 26.
Bye for now,
Content in this feed is © copyright 2014 by Nancy Zieman and may not be republished without written permission. You’re welcome to forward the email to a friend or colleague but it’s not okay to add the RSS feed automatically as content on a blog or other website.
Nancy Zieman's Blog

- Nancy Zieman's profile
- 21 followers

