
Nancy Zieman's Blog, page 142
June 19, 2014
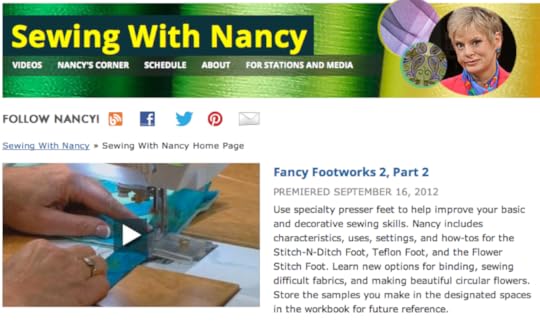
Tips on Free-Motion Quilting
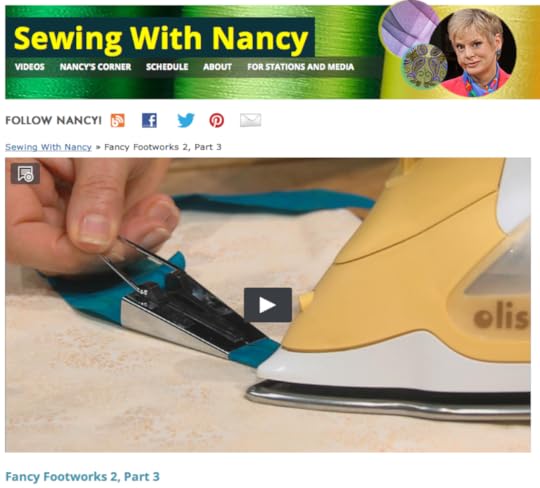
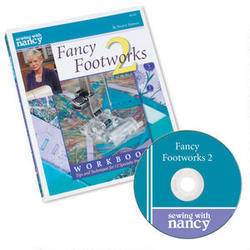
Almost every sewing machine is sold with at least four to five presser feet. Yet many sewists or quilters use an average of two feet for almost all their stitching. With the presser feet hidden away in an accessory box, we tend to forget about them. Welcome to Fancy Footworks 2, a Sewing With Nancy sequel, showcasing the uses of presser feet. This week part three, of the 3-part series, is the Sewing With Nancy Online Featured Video.
A Close-up Look at the Free-Motion Quilting Foot
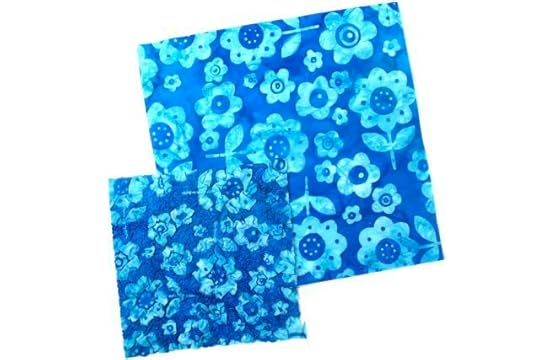
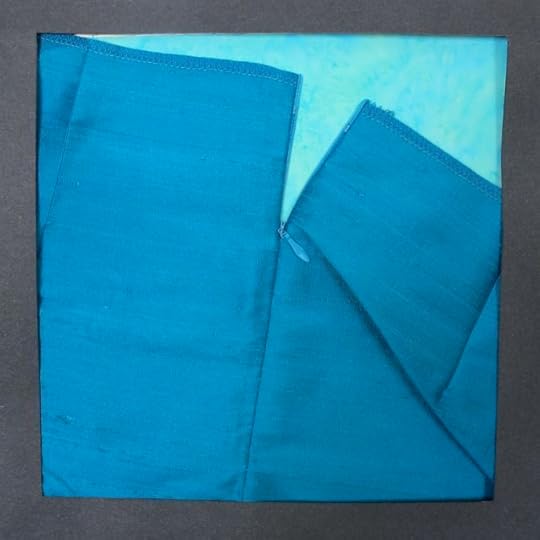
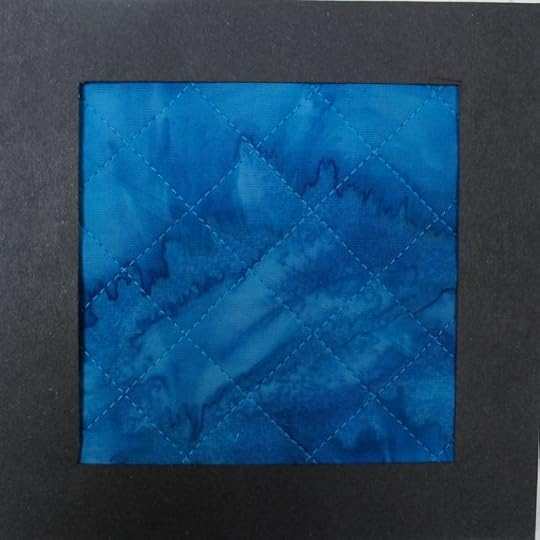
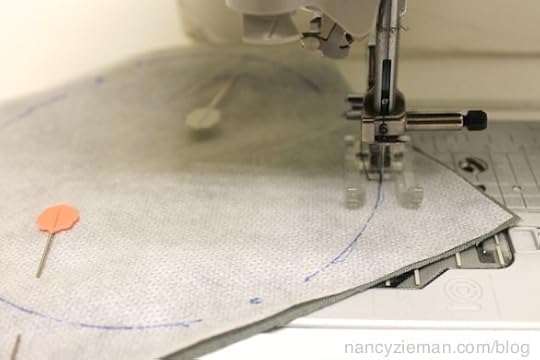
One of the most common requests on my blog is how to get the courage to attempt free-motion machine quilting. Trust me, you don’t need courage, just practice! Here’s a no-fear way to practice where the stitches are completely camouflaged by textured fabric. It’s the perfect testing ground for this specialty technique, using a quilting foot.
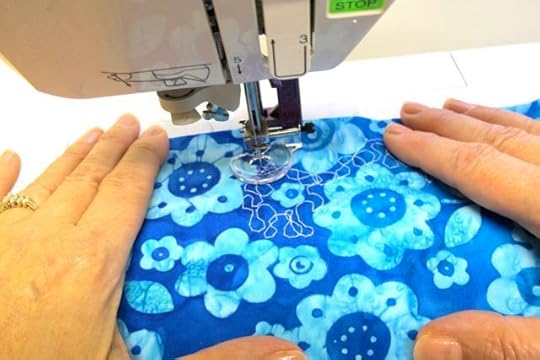
The Free-Motion Quilting Foot Characteristics (I’m showing the Big Foot):
• A shorter shank allows the foot to ride slightly above the fabric.
• The large opening in the needle area gives a clearer view of the stitching.
• Big Foot, a transparent saucer-like foot, easily glides over several thickness of fabric.

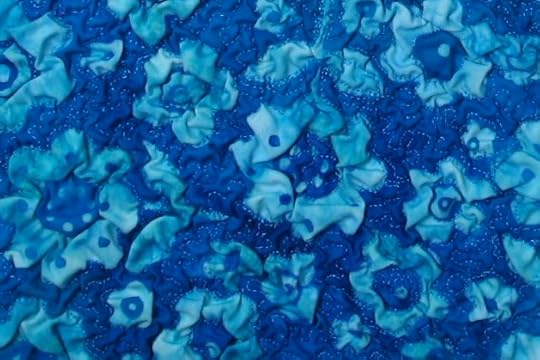
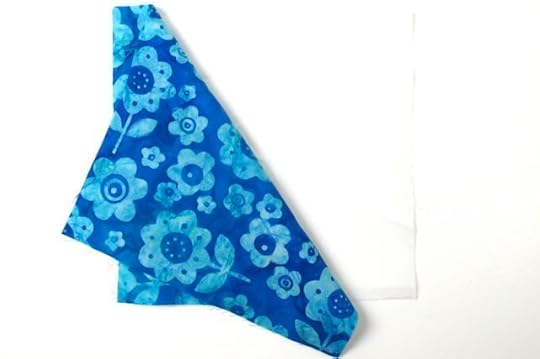
Choose a fun cotton fabric print with spaces between the print images.
Place a layer of Texture Magic behind the fabric and pin the two fabrics together. (Texture magic shrinks up to 30%—it’s the key element in no-fear free-motion quilting!)
Set your sewing machine for a straight stitch and lower your feed dogs.
Guide fabric with your hands, stitching squiggles or shapes comparable to traditional “puzzle-pieces.” Use matching thread. (We chose contrasting thread for demonstration purposes.)
When finished, apply steam using a steam iron, and the fabric magically shrinks creating a beautiful permanent texture.
There’s more on the TV show!
Three additional presser feet are featured in Fancy Footworks 2 Part Three. Tune in and see the Bias Binding Foot—designed to assist in stitching bias tape on the edge of fabric, Sequins’ N Ribbon Foot—tames unruly trims like sequin tape, ribbon, or even rick rack, and the Buttonhole Foot.
Click here to watch Part One, Part Two, and Part Three of Fancy Footworks 2.
Then, check out the Fancy Footworks 2 Workbook and DVD.
There are three seasons of Sewing With Nancy to watch online, or on your iPad, iPod Touch, or iPhone. Have you downloaded the app?
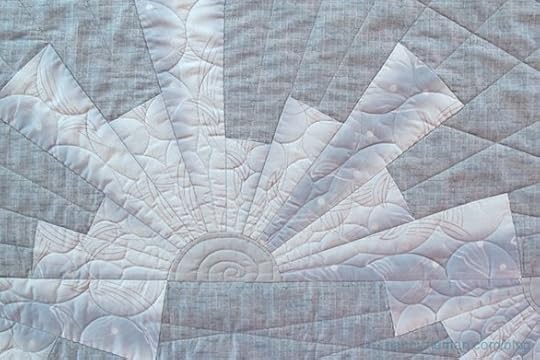
The random winner from my blog titled, New Project to Sew—Modern Dresden Table Runner, is Valerie Brown who won a Trace ‘n Create Quilt Template—Dresden Collection from Clover. She shared what she would create with this template collection. “I think one of these would look great as a sunrise or a sunset in orange and yellow tones on a pillow or a pillow sham. I like the idea of the interfacing to hide the raw edges, too. Thanks for sharing that tip.”

Bye for now,

Content in this feed is © copyright 2014 by Nancy Zieman and may not be republished without written permission. You’re welcome to forward the email to a friend or colleague but it’s not okay to add the RSS feed automatically as content on a blog or other website.


June 17, 2014
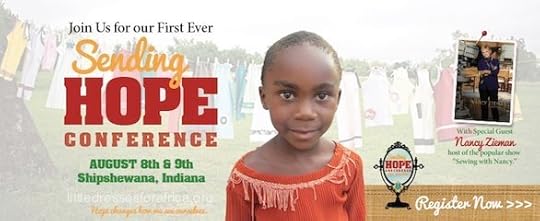
Join “Little Dresses For Africa” for the “Sending Hope Conference”

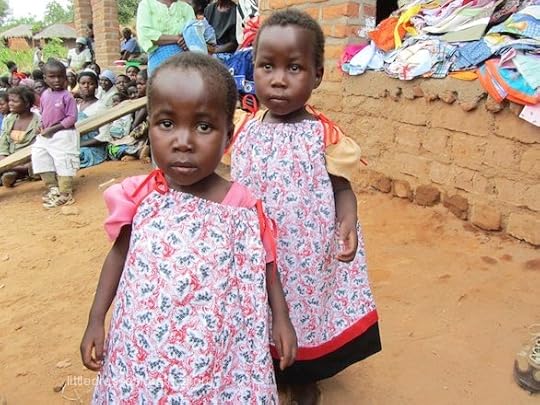
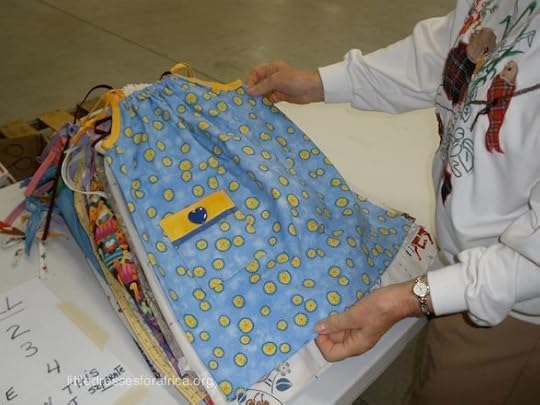
Little Dresses for Africa is an amazing organization with an equally fascinating story. The brainchild of Rachel O’Neill, Little Dresses for Africa, is a nonprofit 501c3 Christian organization, which provides relief to children of Africa. Simple dresses are made out of pillowcases and distributed through the orphanages, churches, and schools in Africa to plant in the hearts of little girls that they are worthy! Reaching the milestone of providing TWO MILLION dresses to little girls, Rachel and other volunteers are organizing the first annual Sending Hope Conference August 8–9, 2014 in Shipshewana, IN. I’ll be joining the Little Dresses for Africa team for this special conference.
I first interviewed Rachel on Sewing With Nancy in ’09 and later in ’12. Partly because of those interviews and other media coverage given to this worthy cause, many of you have been inspired to sew and give. Thank you!
Get to Know Little Dresses for Africa
In a recent interview with Rachel, I found out the history of Little Dresses for Africa and her vision for the future.
Nancy: What was the impetus for starting Little Dresses for Africa?
Rachel: Little Dresses for Africa began after my first trip to Africa for my 50th birthday. My husband and I thought we were going for a vacation. More than that, we were deeply touched by the people of Africa and began looking for a way to get back there.
I was invited to join a mission team to Malawi and it was there that I interacted with the children. It was quickly apparent to me that the girls/women did the majority of the work and yet they seemed to always come last. I wanted to do something to show these little girls that we love them and that they are valued as an individual. It was in conversation with two of my friends, sitting in the red dirt of Malawi, that we said, “Let’s bring back little dresses when we return to show them that we love them.”
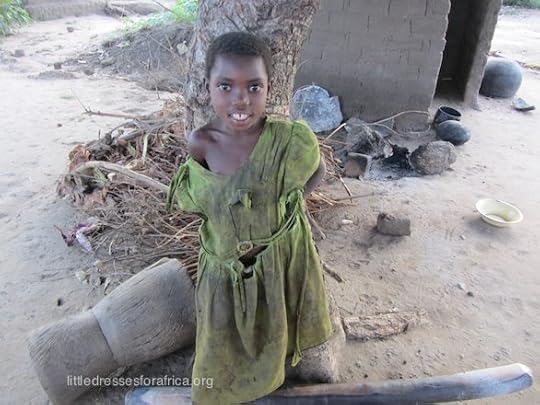
We are not looking to change their culture or society. We just want to plant a seed in the hearts of little girls to show them they are worthy. So that’s exactly what we did. We looked for a simple pattern. The pillowcase dress pattern has been around since pioneer women made them out of feed sacks. It wasn’t original but it was easy for even a novice seamstress. After that it just seemed to catch on all over the country and beyond.

Sewing enthusiasts from all 50 US states, United Kingdom, Ireland, Canada, Mexico, and Australia are sewing for Little Dresses for Africa and Little Britches for Boys. Click here for the Little Dresses Pattern and the Britches Pattern. Volunteers cross age, gender, and denominational lines.

Nancy: Why do you think Little Dresses for Africa strikes a cord in so many people?
Rachel: Little Dresses for Africa addresses a need in the most vulnerable of God’s children—little girls. Your readers and TV viewers realize that feeling valued is important to each of us and that sewing talent can make the difference in a life. Little Dresses for Africa gives sewing enthusiasts an outlet—a way to help. Our organization is a Christian nonprofit, run by all volunteers, assuring them that their generosity is getting directly to the kids and not to some big corporate machine.
The sewn dresses and also britches are sent out weekly with mission teams, mailed, or sent with our team on our annual trip.

Nancy: Since I first interviewed you on Sewing With Nancy in ’09 and now five years later, how has your organization grown?
Rachel: Little Dresses for Africa continues to grow but I have to say I can tell every time an interview with you is shown on Sewing With Nancy. We get some of the most beautiful work from your viewers. The little dresses are sturdy, well sewn, and creative. During my first interview with you, I reported that 20,000 dresses were sewn; I thought, “Wow! That’s a lot of kids!” But now, with your help, our exposure through other media, and the help of many churches and community groups, what started out as a desire to send 1,000 dresses to one little Village has grown exponentially!
We’ve been able to send little dresses to 48 countries in Africa as well as 29 other countries outside of Africa, such as Honduras, Haiti, Guatemala, India, Viet Nam, and Puerto Rico. We are approaching the milestone of sewing and giving away 2,000,000 dresses (actually 1,765,000 but we receive 15–20 boxes a day delivered to our house)! We are amazed and delighted!
With all those amazing numbers, we need to also stop and take note that we are not going to run out of children to dress. As our mission spreads, the requests for help continue to increase.
Nancy: What keeps you motivated to further expand this cause?
Rachel: I see the difference that the little dresses make here (United States) as well as across the ocean. We increase an awareness of the plight of others and address the real physical and emotional needs of others. We embrace other cultures. We break down barriers.
I see women and communities working together to help others. I hear from women who are homebound or who have lost their husbands who have again found a sense of purpose. I see grandmothers teaching their grandchildren, both boys and girls, to sew and at the same time help others. I see sewing groups forming and a sense of support and community existing.
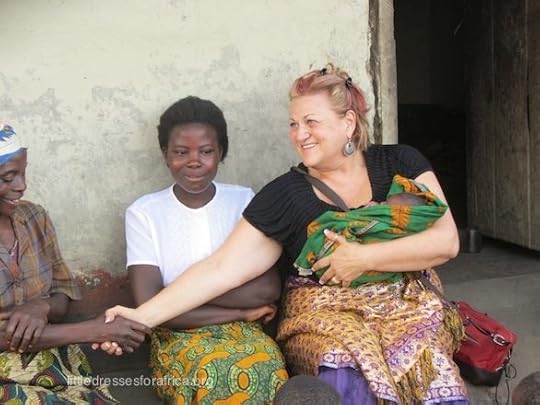
Once a year I lead a team to Africa and never tire of seeing the faces of those beautiful children. The pride in their eyes as they show each other what they are now wearing is motivating. They dance in circles as they leave us with their new dresses. I see the light in their eyes as they realize there’s no catch to receive this gift.

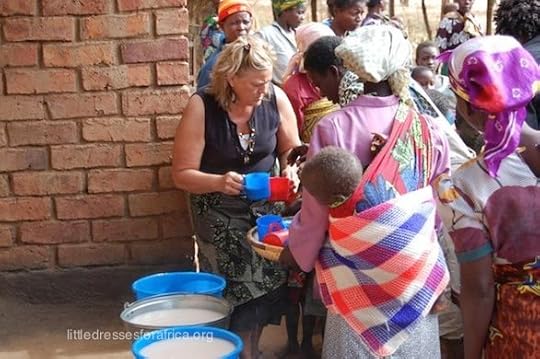
When we go into communities, we teach simple lessons about nutrition, clean water, and sanitation. We address their needs as best we can. We feed them. We love them, never knowing what child will be encouraged as a result of our efforts. Our favorite saying is, “We’re not just sending dresses, we’re sending hope.” The truth is, they also give us hope. Hope that we can make a difference in a child’s life.
Nancy: I will be joining you in August at your first, and hopefully annual event, Sending Hope Conference. Please tell our readers more about the conference.
Rachel: The conference will take place in Shipshewana, Indiana August 8–9, 2014 at the beautiful Farmstead Inn and Conference Center. It begins on Friday night August 8, at 5 pm, and goes till Saturday at 4 pm; we’ll have vendors, and there will be baskets to raffle. On Saturday we’ll have several outstanding speakers on subjects that are dear to the hearts of all of us regardless of your level of involvement in Little Dresses for Africa. And, I’ll be quite honest; many are coming to meet you, Nancy, so the VIP registration includes a Meet and Greet and a chance to get their copy of your book signed on Friday night. Also that night is a dinner and a late night pajama party with prizes and raffles, and a great chance to share ideas and network with friends met through Facebook.
We’ll have a lot of fun! Plus, it makes a great getaway in the Amish-quilting hub, with great shopping as well. Of course we are very grateful that you’ll be our featured speaker on Saturday, as we start things off. We have other very high energy, talented speakers coming to share their thoughts on topics of interest to all of us, like “Turning Success to Significance” and “Life in Africa” with our special Guest from Malawi, Mike Mchawa Banda. The list goes on and on. We’ll also have breakout sessions to learn how the sani-panti pattern works, which is a new project, based out of need in Africa; we’ll have a professional scrapper help us make “Gratitude Books” and “Brave Girl Truth Cards.” Plus, learn about Essential Oils. It’s quite a line up!
Nancy: What are your goals for the Sending Hope Conference?
Rachel: The conference will be a great way to network with others of like interests. It will be a wonderful way to exchange ideas, recharge our batteries, and find out what other projects like clean water and education have grown out of Little Dresses for Africa.

All of the profits from the registration will go 100% toward shipping dresses to the children, which continues to be our greatest challenge. Our job is not complete until we get these dresses on the backs of these children that need them most. We’re just so grateful and so humbled by the group effort.
Please Join Us at the Sending Hope Conference!
Bye for now,
Content in this feed is © copyright 2014 by Nancy Zieman and may not be republished without written permission. You’re welcome to forward the email to a friend or colleague but it’s not okay to add the RSS feed automatically as content on a blog or other website.
June 14, 2014
How Did You Learn To Sew?

Last week during an interview, I was asked, How did you learn to sew? The answer was simple—through 4-H. Surprisingly, several people in the room were not aware of the organization. Without a second thought, I decided to devote this blog to the organization that I credit to nurturing my sewing skills, developing leadership characteristics, and encouraging self-esteem. With the motto, “To make the best better,” and a slogan “Learn by doing,” today there are approximately 6.5 million members in the US in approximately 90,000 clubs. What started out in 1902 as “The Tomato Club” or the “Corn Growing Club,” in Clark County, Ohio founded by A. B. Graham, has expanded into the largest youth program in North America. To learn more about 4-H history, click here.

“Programs range from the arts and computers to rocketry, environmental education, and animal sciences. While 4-H clubs abound, 4-H programs also exist in schools, special interest groups, camps, and child care centers. The program also has spread internationally, with 4-H members and alumni participating in international educational exchanges in Europe, Mexico, Australia, and Japan,” writes Mary Ellen Bell, Public Information Specialist at UW-Extension.
4-H Memories
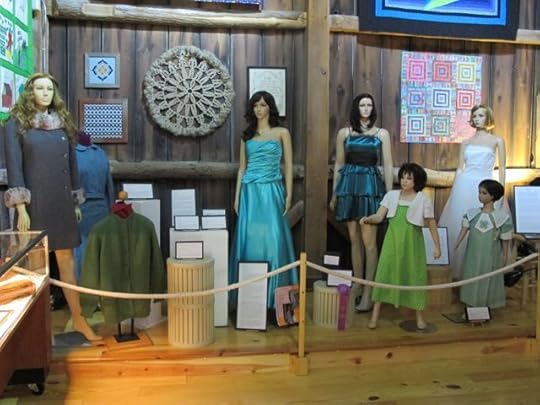
This year marks Wisconsin’s 100 year 4-H Anniversary. To commemorate this milestone, the Wisconsin Museum of Quilts and Fiber Arts curated a collection of photos and 4-H projects. The photos tell the story!

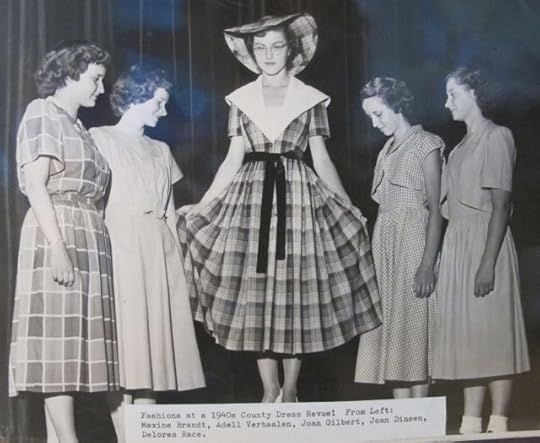
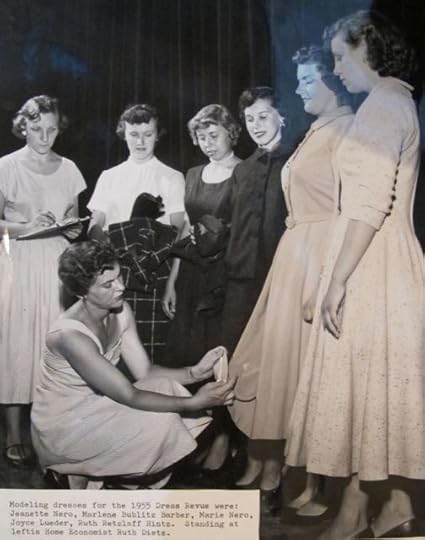
The exhibit included three of my 4-H clothing projects. Thanks mom for saving my early sewing projects!

In the gallery of the Wisconsin Museum of Quilts and Fiber Arts, great displays featured styles through many decades.
This dress was made in the 1930s by Vernelle Johnson of the Wilson School 4-H Club in Door County, WI. The linen fabric looks like new and the appliqué is sewn with perfection! I bet Vernelle got a blue ribbon!

My 4-H story
Many of my 4-H stories are recorded in Seams Unlikely, my autobiography. Little did I know that some of the photos that I literally taped to the pages of my 4-H record book would be included in my autobiography many decades later! Note: Seams Unlikely is available in both book and ebook formats. Seams Unlikely is available at Amazon for Kindle readers, on Google Play for Android devices, at Barnes and Noble for the Nook and from Apple in iBook formats. Enter search words, Seams Unlikely.

 A giveaway to give away! Please share your sewing or quilting story, explaining how you learned to sew. A random comment will be chosen to receive a copy of Seams Unlikely and Nancy Zieman’s Sewing A to Z. Our request is that you’ll give away the Nancy Zieman’s Sewing A to Z book to someone you know who would like to learn to sew or quilt. Perhaps you could be their sewing mentor. Each one teach one! Consider the possibility of volunteering to teach your sewing skills at 4-H groups in your area.

Hat’s off to 4-H and to all the volunteers who guide and teach. Job well done! For more information on the 4-H organization, click here.

The random winner of a fusible appliqué from a previous blog is Ruth Ferraro. She said, I would like to try this project and hang it outside by using my Iron-On Flexible Vinyl which I purchased many years ago.

Bye for now,
Content in this feed is © copyright 2014 by Nancy Zieman and may not be republished without written permission. You’re welcome to forward the email to a friend or colleague but it’s not okay to add the RSS feed automatically as content on a blog or other website.
June 12, 2014
Are You Presser-Foot Challenged?
I learned to sew using two presser feet—the all-purpose sewing foot and a zipper foot. Little did I know that I was presser-foot challenged! Soon I discovered that specialty presser feet could improve specific techniques. Much later I passed this information along in a series titled, Fancy Footworks. Not all sewing machine feet were featured in that series, so you guessed it, it’s time for a sequel,Fancy Footworks 2. This week, part two of the 3-part series is the Sewing With Nancy Online Featured Video.
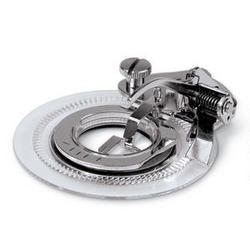
A Close-up Look at the Flower Stitch Foot
What could be called the high heels of sewing machine feet, the Flower Stitch Presser Foot is a fancy occasion presser foot. It is an ideal creative option for mid-range sewing machines.
The Flower Stitch Foot Characteristics:
• Rotating disk.
• Pattern settings: Plus to minus settings to create S—M—L flower sizes.
• Attachment lever that fits over the needle clamp.
Attach the Flower Stitch Foot to your machine, grab a fabric scrap and a piece of stabilizer, and start experimenting with different built-in utility stitches. No fancy embroidery machine needed here.
Prepare the fabric and test
Whether testing or sewing the actual project, always back the fabric with a fusible interfacing and also a stabilizer. I used Pellon Sof-Shape Interfacing and a Tear-away Hydro-stick Stabilizer.
To create the flower stitches, I started with a basic zigzag stitch or satin stitch. When I found a design I liked, I wrote down my sewing machine settings and stitch number next to the flower stitchout.
When watching the Sewing With Nancy TV show, you’ll see exactly how to use this presser foot.
See, my testing work looks just like yours!
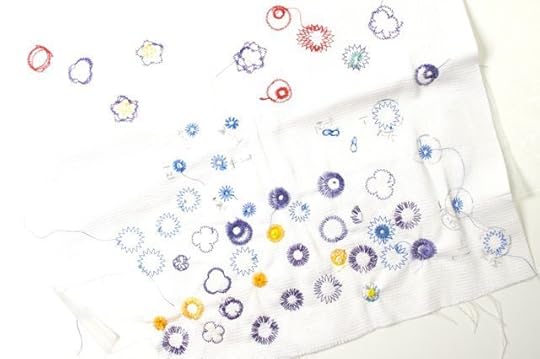
When it’s time to sew on your featured fabric, be sure to add the interfacing and stabilizer mentioned above.
There’s more on the TV show!
Two additional presser feet are featured in Fancy Footworks 2, Part Two. Tune in and see the Stitch-N-Ditch Foot—for easy work of quilt binding, and the Teflon Foot—ideal for hard-to-sew fabrics.
Watch Part One and Part Two of Fancy Footworks 2 on your local PBS station or online at NancyZieman.com.
Then, check out the all-new Fancy Footworks 2 Workbook and DVD now available at Nancy’s Notions.
There are 52 programs to watch online, or on your iPad, iPod Touch, or iPhone. Have you downloaded the app?
Bye for now,
Content in this feed is © copyright 2014 by Nancy Zieman and may not be republished without written permission. You’re welcome to forward the email to a friend or colleague but it’s not okay to add the RSS feed automatically as content on a blog or other website.
June 10, 2014
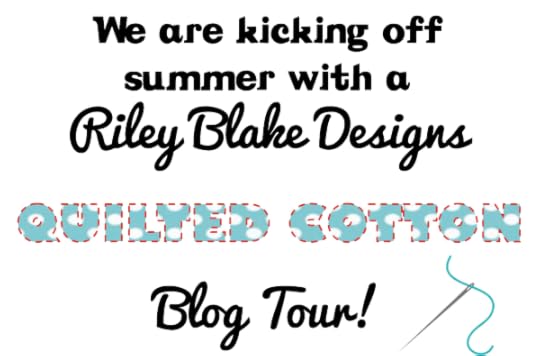
Easy-to-Sew Trio of Pillows with Riley Blake Quilted Fabrics

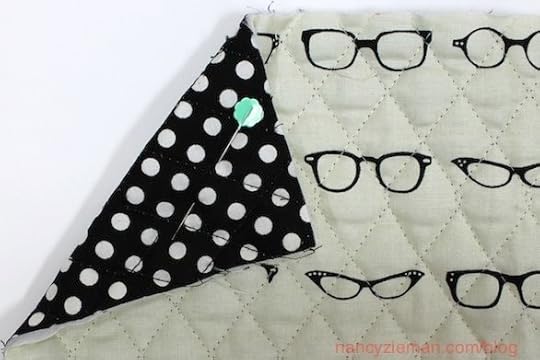
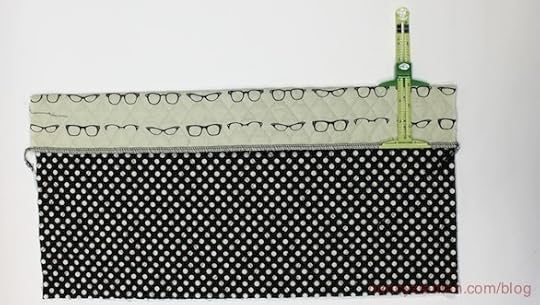
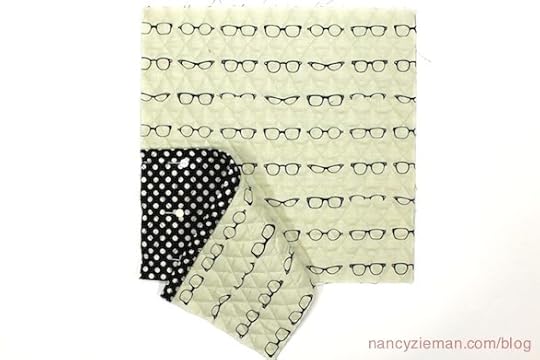
After being asked to be part of the Riley Blake Quilted Cotton Blog Tour, it didn’t take me long to determine what I’d make with one of the double-sided prequilted fabrics. I was smitten with the quilted eyeglass frames and polka dot duo, knowing that a trio of pillows were destined for this playful fabric.
Quilted Fabric and Pillows—the Perfect Combo
When sewing pillows, I find that cotton fabrics always required a backing or interfacing to prevent the fabric from sagging or looking wimpy. Using a double-sided quilted fabric which has a layer of beefy batting between the layers, automatically gives the pillows a plump look. (Here’s one time when the adjective plump is a positive!) Plus, the two coordinating fabrics provide great design options. (Note: The large appliqué is a free download.)
Pillow Supplies
Two yards of quilted fabric. Cotton Glasses Off White Collection by Riley Blake Designs is the featured print.
Three pillow forms: 20″, 16″, and 12″
Free Download of Eyeglasses appliqué, click here
Madeira’s Monofilament Thread
18″ of Velcro
Pellon’s Wonder-Under
Optional: fusible interfacing
Pillow-Sewing Basics
Note: All seam allowances are 1/2″.
Cut squares for each pillow front: To make a basic quilted fabric pillow, cut a square the pillow size plus 1″ for seam allowances.
20″ Pillow Form: Cut one 21″ square
16″ Pillow Form: Cut one 17″ square
12″ Pillow Form: Cut one 13″ square
Cut two rectangles for each pillow back: Divide the size of the front square in half, then add 3″ to the shorter measurement for the overlap.
20″ Pillow Form: Cut two rectangles 21″ x 13-1/2″
16″ Pillow Form: Cut two rectangles 17″ x 11-1/2″
12″ Pillow Form: Cut two rectangles 13″ x 9-1/2″
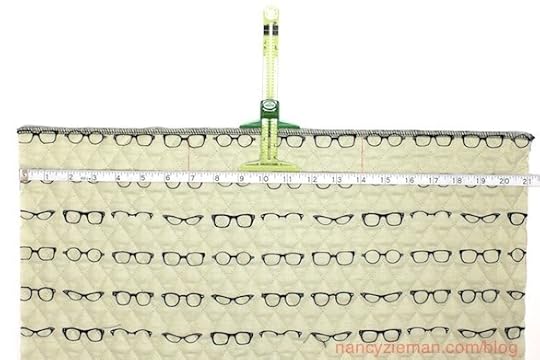
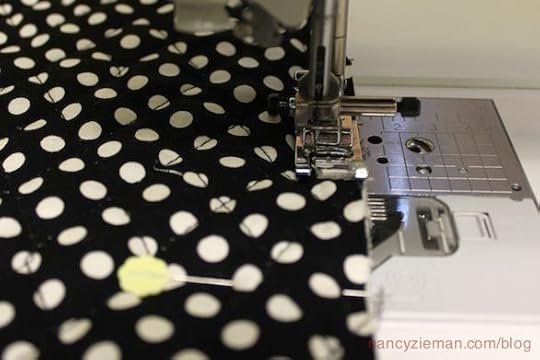
Serge or zigzag one long edge of each rectangle.
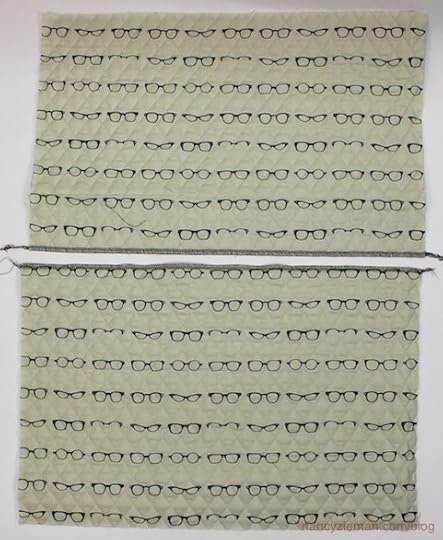
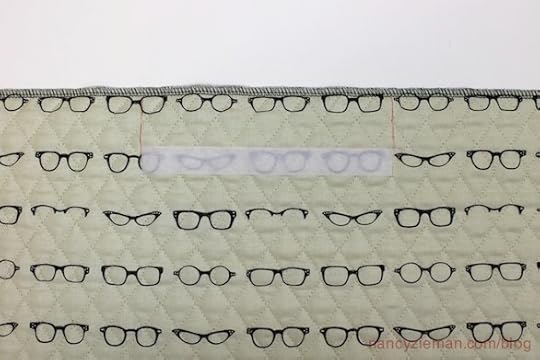
Cut a 7″ strip of Velcro for the large and medium pillows and a 4″ strip for the smallest, 12″ pillow.
Separate the two lengths.
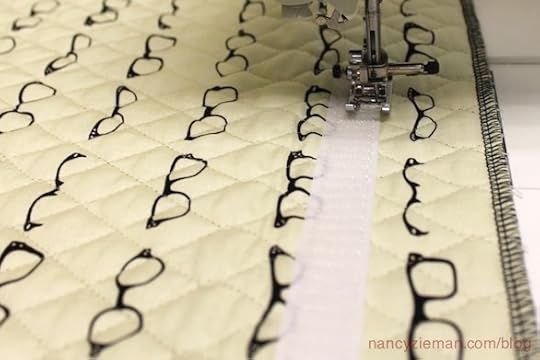
Center the top edge of the Velcro strips to each rectangle 1-1/2″ from the serged or zigzagged edge.
Topstitch the Velcro to the fabric.

Fold under a 3″ hem along one Velcro edge.
Topstitch the hem.

Overlap the rectangles, matching the Velcro strips. The pillow back is now the same size as the pillow front.
Stack the front and back pillow pieces, right sides together.
Shape the corners of the front and back pieces to prevent pokey corners.
Measure in 1/2″ along both sides of the corners.
Measure down and across 4″ (Note: On the smallest pillow size, 12″, the measurement was decreased to 3″.)
Place rulers at 4″ measurement along cut edge and taper to 1/2″ mark; trim.
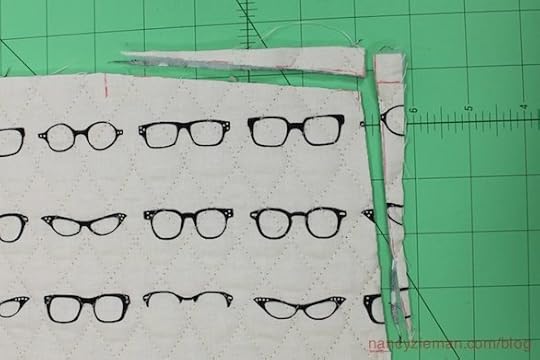

Repeat on all four corners.
Note from Nancy: Consider making a template of the size of the shaped corners from poster board to quickly mark the pillow corners.
Stitch front and back pillow pieces, using 1/2″ seam allowance. Pivot at corners.
Trim away batting at corner to achieve a sharp corner. It may be necessary to clip a few of the fabric quilting stitches.
Release Velcro, turn right side out. Insert the pillow form. Ta da!
Geekly Specs Pillow Wrap

Measurements for the pillow wrap are designed for a 20″ pillow.
Cut a length of fabric for the wrap 11″ x 40″. Optional: Press fusible interfacing to the wrong side of the fabric to give the finished wrap additional support.
Align right sides and long edge together. Stitch leaving a 3–4″ opening near one end. Press open the seam allowance.

Reach through one end and pull up the opposite end, meeting right sides.

Stitch the ends together.
Pull out the fabric through the opening. A tube shape will appear. Press.
Hand stitch the opening closed.
Click here to download the eyeglass appliqué .
Trace appliqué shape on the paper side of Pellon’s Wonder-Under .
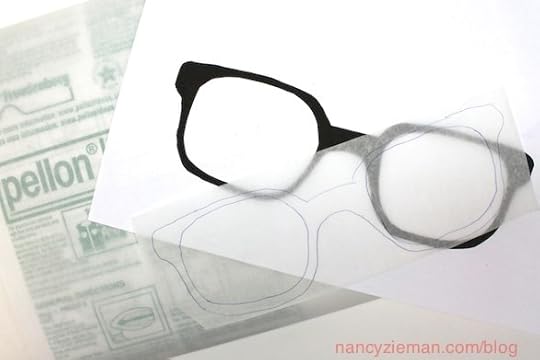
Roughly cut out the shape.
Fuse the Wonder-Under to the wrong side of the appliqué fabric.

Note from Nancy: To prevent show-through of the black fabric, fusible interfacing was pressed to the wrong side of the off-white fabric before fusing the Wonder-Under in place.
Cut along the traced line. Remove the paper backing.
Center the appliqué on the wrap; press.

Stitch around the edges of the appliqué with a narrow zigzag or satin stitch. Use clear monofilament thread for ease of stitching.

Place the wrap on the pillow. That’s it!
Button Chic

In this pillow design, the back becomes the front as the pillow overlap is part of the feature. Three large covered buttons provide the focal point.
Option: cut the rectangles different sizes to divide the design in thirds instead of in half. Using a 16″ pillow form, the rectangles were cut:
17″ x 14″
17″ x 9″
Stitch the pillow, following the pillow-sewing basics section. Feature both sides of the quilted fabric, selecting one side of the fabric for the larger rectangle and other side of the fabric for the smaller rectangle.
Cut fabric for the buttons as detailed on the covered button package. Separate the quilted fabrics; snip the quilting threads.
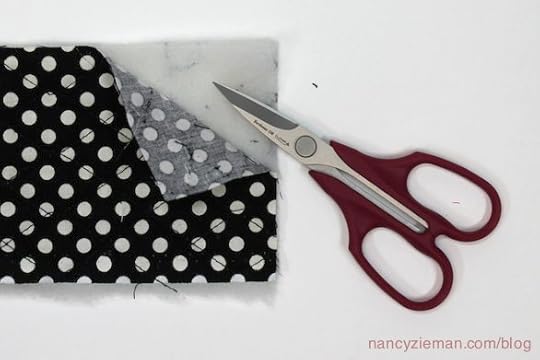
Fuse interfacing to the wrong side of the squares and cover the buttons as directed on the package.
Hand stitch the buttons to the overlap. Easy!
Curl Up with a Good Book & Pillow

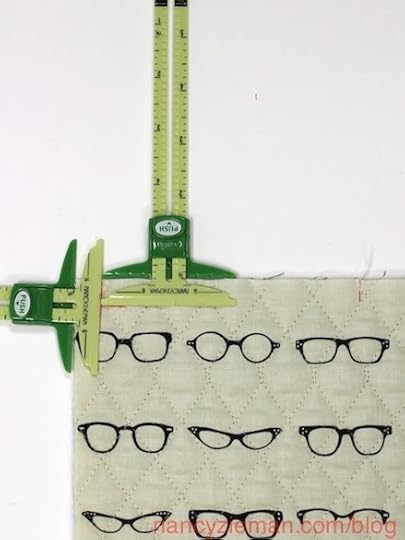
A 12″ pillow form is the perfect size for a reading pillow. Adding a pocket and ribbons to the front are all that’s needed to upgrade this third pillow into a chic pillow!
Cut a pocket 13″ x 7″. Turn under 1/2″ along one 13″ edge; topstitch.
Position the pocket on the pillow front and baste along the sides.
Measure in 3-1/2″ from each side of the pillow. The 5-in-1 Sliding Gauge is my must-have measuring tool.

Cut two 13″ lengths of 1/2″ wide ribbon . Pin and machine baste at each end.

Note from Nancy: Riley Blake Designs has matching ribbon for many of their fabrics. How wonderful is that!
Reference the Pillow-Sewing Basics (above) to complete the pillow.
A special thank you to Riley Blake Designs for inviting me to be part of their blog tour. But that’s not all, click here to connect to the other stops on this fascinating tour.
Bye for now,
Content in this feed is © copyright 2014 by Nancy Zieman and may not be republished without written permission. You’re welcome to forward the email to a friend or colleague but it’s not okay to add the RSS feed automatically as content on a blog or other website.
June 7, 2014
Dream Sewing Room Sweepstakes from Baby Lock

Baby Lock is giving away Your Dream Sewing Room! Click the image above or click here for more information on how to enter the Sweepstakes. Enter Sweepstakes for a chance to win One Sewlebrity Prize Package of Your Dreams.
One Grand Prize Winner will receive One Prize Package Valued up to $16,750!
Click the image above or click here to enter the Sweepstakes.
Bye for now,
Nancy Zieman—author, pattern designer, businesswomen, producer, and national sewing authority—is the host of the popular show Sewing With Nancy®, which appears exclusively on public television stations across the United States and Canada. Follow Nancy’s Blog at NancyZieman.com/Blog and sign up to receive Nancy’s E-News for the latest news in Sewing, Quilting, & Creating.
Content in this feed is © copyright 2014 by Nancy Zieman and may not be republished without written permission. You’re welcome to forward the email to a friend or colleague but it’s not okay to add the RSS feed automatically as content on a blog or other website.
June 5, 2014
Nancy Answers: “Just How Do I Use All Those Presser Feet?”
An Invisible Zipper Foot, a Walking Foot, a Roller Foot, a Satinedge™ Foot, a Teflon Foot . . . when to use/how to use? Ever have those questions? You’re not alone. During the 3-part Sewing With Nancy series on Fancy Footworks 2, I take you through the process of identifying feet and how to use them.
For the next three weeks, the episodes from this 3-part series will be the featured Sewing With Nancy online videos. Click here to watch the first, second, and third episodes.

First, the Invisible Zipper Foot
It was designed to do one thing and do that process well, namely to use when inserting an invisible zipper. In this TV show, I break down the process in a few simple steps.

The Roller Foot
For smooth sailing over varied thicknesses of fabric, stitching napped fabrics, and sewing on tacky surfaces, use the Roller Foot. See it in action gliding over fabric, alleviating the “pushing” on the underside of the foot as the feed dogs “bite” the fabric. The Roller Foot also works great when making Thread & Trim Pizza. Tune in to learn the recipe.


The Walking Foot
My third featured foot makes the edges of a seam meet perfectly. Or, quilt multiple layers of fabric without shifting when using a Walking Foot. It’s a hard-working presser foot that most sewing and quilting enthusiasts shouldn’t be without.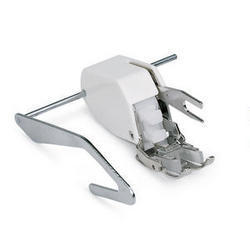
The Satinedge™ Foot
When a satin edge or appliquéd edge is next on your sewing agenda, use the Satinedge™ Foot. Designed with an even zigzag stitch in mind, this specialty foot provides a uniform stitch, ideal for finishing edges.

Then, check out the Fancy Footworks 2 Workbook and DVD now available at Nancy’s Notions. There are 12 specialty feet featured in a workbook fashion.
The random winner, from my blogs on Part 1 and Part 2 regarding Sew Techie Covers, is Patty Foster. Her comment was: I need to design a cover for my Nook. Since my passion is reading, maybe books or words. So many options.

Have you downloaded the Sewing With Nancy app?

Bye for now,
Content in this feed is © copyright 2014 by Nancy Zieman and may not be republished without written permission. You’re welcome to forward the email to a friend or colleague but it’s not okay to add the RSS feed automatically as content on a blog or other website.
June 3, 2014
New Project to Sew—Modern Dresden Table Runner

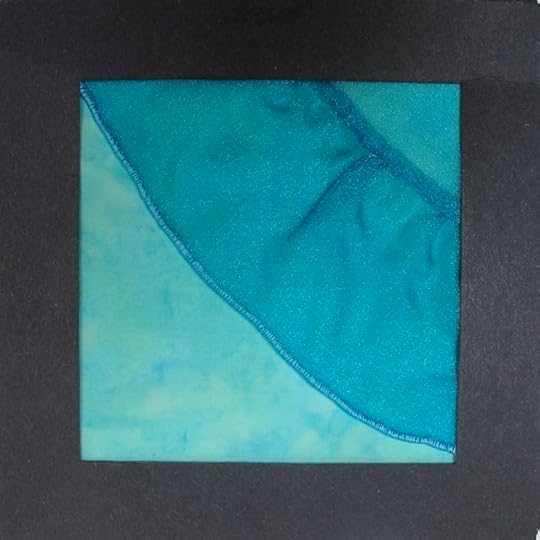
Think outside the traditional patchwork world and use a multi-sized Dresden Template to add a modern twist to a tried ‘n true design. I call it the Dresden Melody with five half-Dresden Plate Designs that seem to flow melodically together. This blog is more like a mini-sewing book. There are lots of photos along with the accompanying instructions. Enjoy this patchwork tutorial!

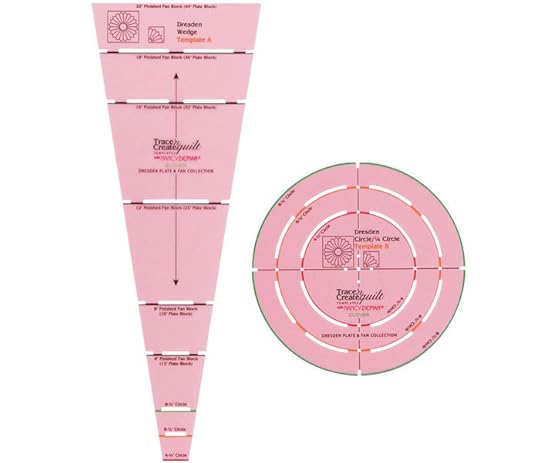
Trace ‘n Create Quilt Template—Dresden Collection
Three fabrics: 1 yard for the Dresden Wedges, 2-1/2 yards for the background and binding, and 2-1/2 yards for the backing
1/2 yard fusible interfacing such as ShirTailor
Trace ‘n Mark Water Erasable Marking Pen
Cutting Instructions:
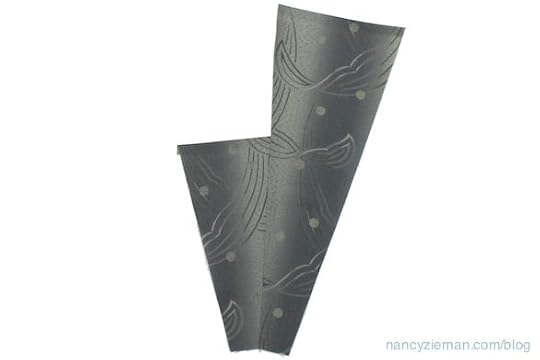
Cut three crosswise strips from the fabric designated for the wedges: 4-1/4″, 6-1/4″, and 10-1/4″.
For best results, spray the fabric with Mary Ellen’s Best Press Starch Alternative, and press before cutting.
Trace and cut 15 wedges from the widest width strip:
Begin with the widest fabric strip, 10-1/4″ crosswise strip. Place the template on the fabric, aligning the marking for the 24″ Dresden Plate along the top edge of the fabric. Trace along the sides of the template.
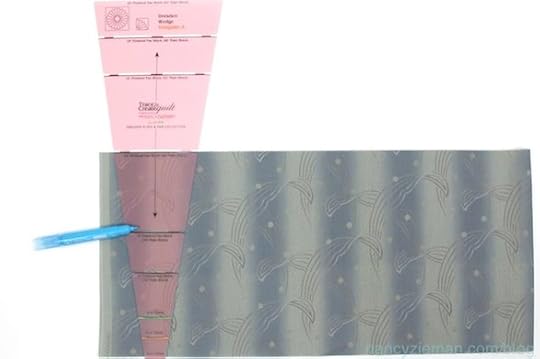
Rotate the template 180-degrees, align the template with the previously traced edge. Also align the 24″ marking and lower edge with the cut edge of the fabric. Trace along the side of the template. Repeat until 15 wedges have been traced.
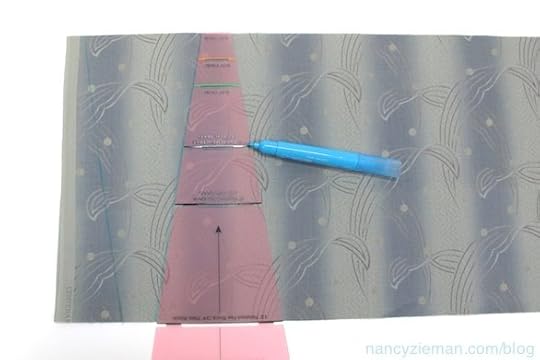
Place the fabric on a rotary cutting mat, align a rotary cutting ruler along the traced lines; cut with a rotary cutter. Save the leftover fabric.
Note from Nancy: The Trace ‘n Create Templates are designing tools. They are not fabricated to be used with a rotary cutter.
Trace and cut 19 wedges from the medium width strip:
Repeat the process as detailed above, tracing 19 wedges. Use the 6-1/4″ crosswise strip and the 16″ finished Dresden Plate markings.
Trace and cut 23 wedges from the narrowest width strip:
Use the leftover fabric from the widest crosswise strip. Recut the fabric into a 4-1/4″ strip.
Repeat the process as detailed above, tracing 23 wedges. Use the 4-1/4″ crosswise strips and the 12″ finished Dresden Plate markings.

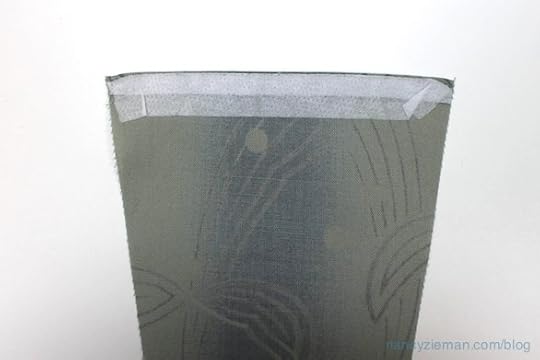
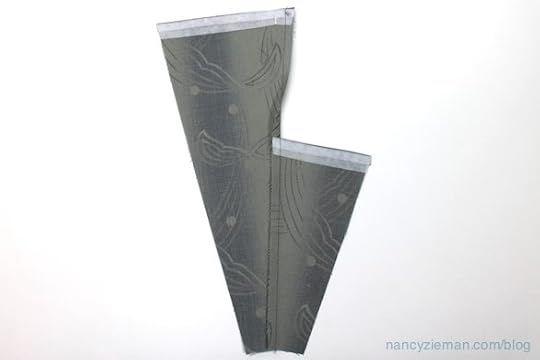
Finish the top edge of all wedges
Cut six 3/4″ wide crosswise strips of ShirTailor or other medium-weight fusible interfacing.
Align right sides and top edge of wedges to the smooth (non-fusible side) of the interfacing. Chain stitch the wedges to the fusible interfacing strip.

Cut the interfacing between the wedges. Trim off the extra interfacing from the sides of the wedges.
Begin with the small wedges. Fold the interfacing to the wrong side of the wedges; press.
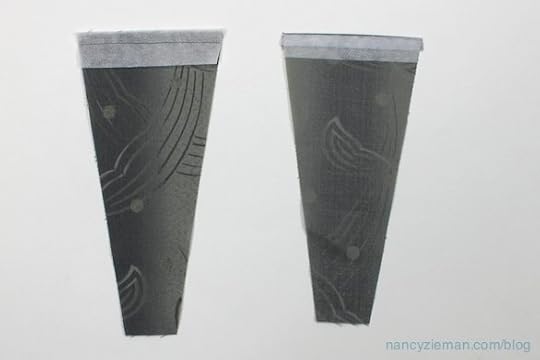
For the medium and larger wedges, fold the interfacing to the wrong sides. At each corner, create a slight tuck in the interfacing. This step will keep the seam allowances from peeking to the right side after the wedges have been seamed.
Press the interfacing to the fabric.
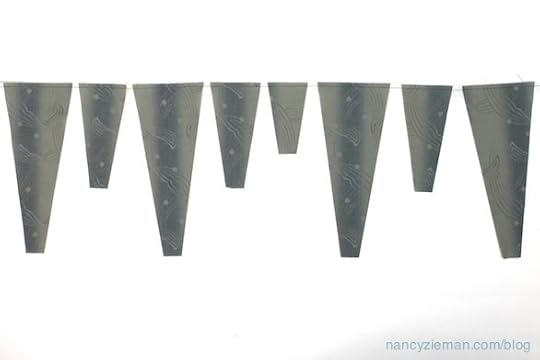
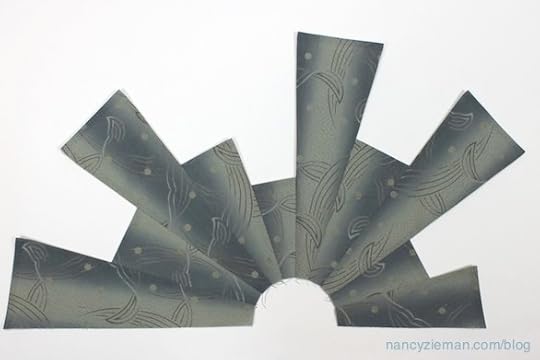
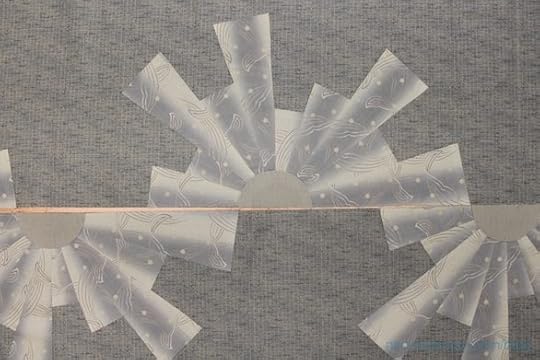
Separate the wedges into five groupings:
Create two groups as pictured below.
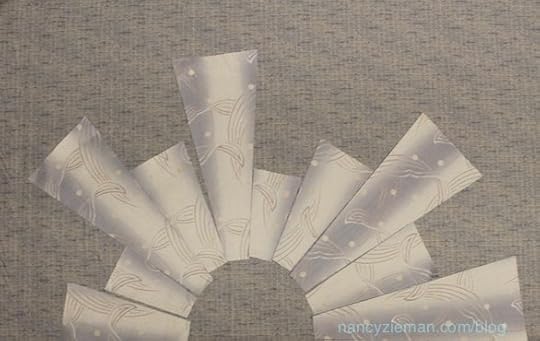
Then, create three groups as in this photo.
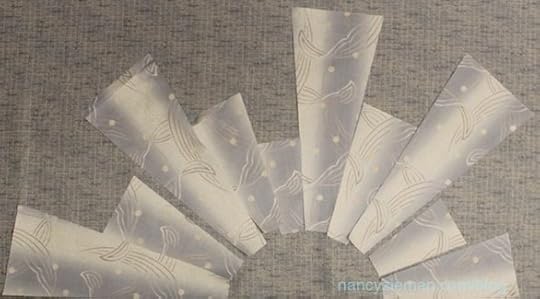
Later, the five total groupings will be arranged in a flowing style.

Stitch the wedges together
Following the layout, pin, and stitch wedges together, aligning right sides.
Begin stitching from the narrow ends.
Press the seam toward the larger wedge. Press under a 1/4″ along the unseen top side of the wedge.
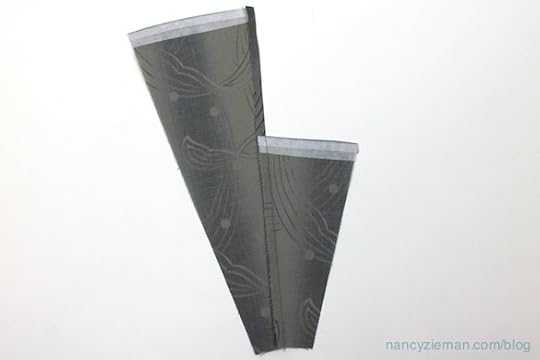
The reason for creating a slight tuck at each end of the medium and large wedges becomes evident at this point. The tuck will prevent the cut edge from peeking through to the right side.

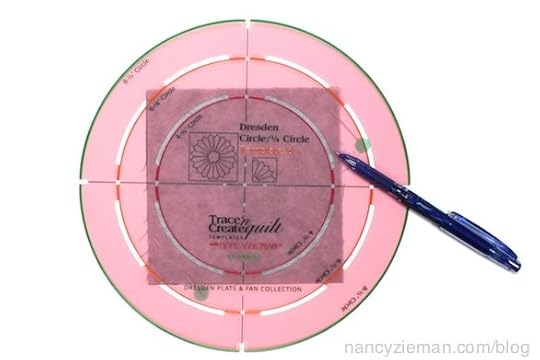
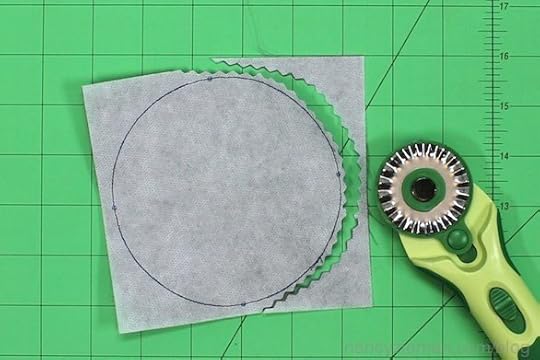
Create the half-circles
Cut three 5″ squares of fabric and three 5″ squares of the fusible interfacing for the half-circles. Hint: I couldn’t find a third color of fabric that blended with the two fabrics I chose. Then, I looked at the other right side of the fabric and used that for the wedges. It was the perfect coordinate!
Stack pairs of squares, right side of fabric to smooth side of interfacing.
Place Template B (Circle) on the squares, trace the 4-1/2″ circle markings.
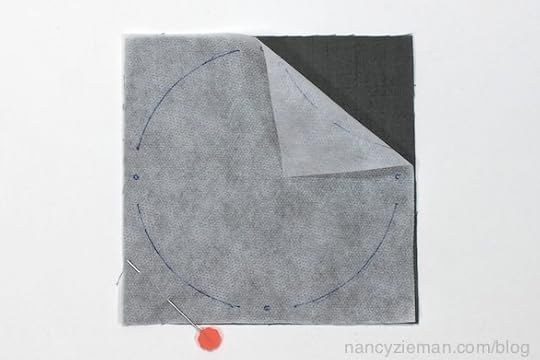
Stitch along the traced lines with a short stitch length, which creates a smoother curved edge when turned right side out.
Trim the excess fabric. For best results, use a 45 mm pinking blade in the 45 mm rotary cutter , which trims and grades the edge in one step.
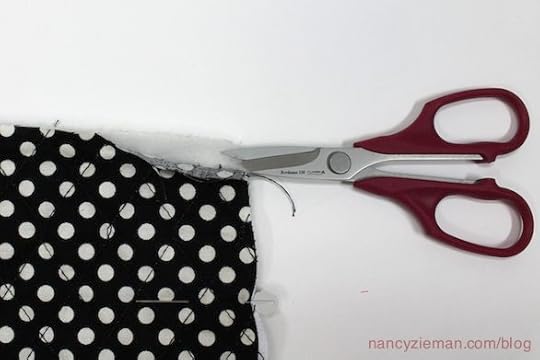
Trim a donut hole from the center of the interfacing using a scissors , leaving approximately 1″ of fusible interfacing.
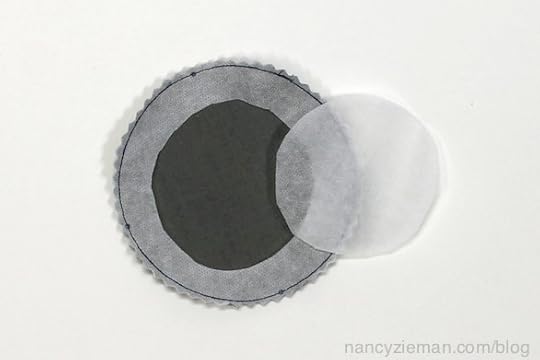
Turn the circle right side out. The interfacing is now on the wrong side of the fabric. Glide the beveled edges of a Point 2 Point Turner to smooth out the fabric and create a sharp outer edge.
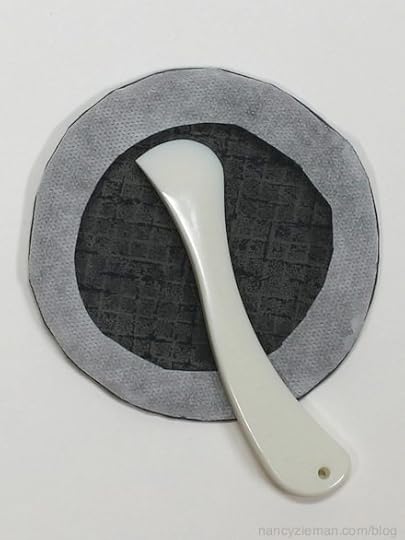
Press. The fusible interfacing will hold the crisp edge.
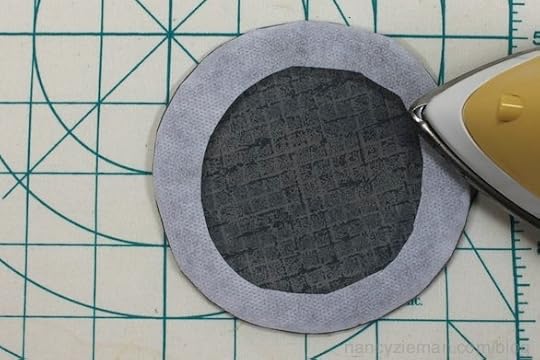
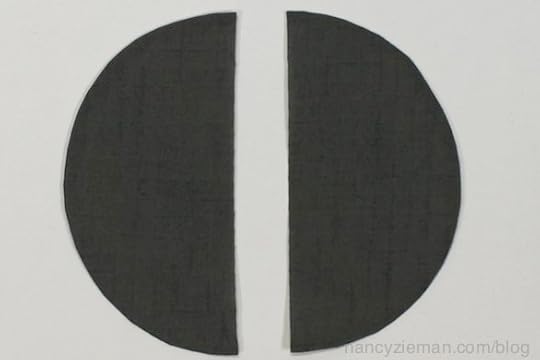
Cut the circles in half. Five half-circles are needed for this table runner project.
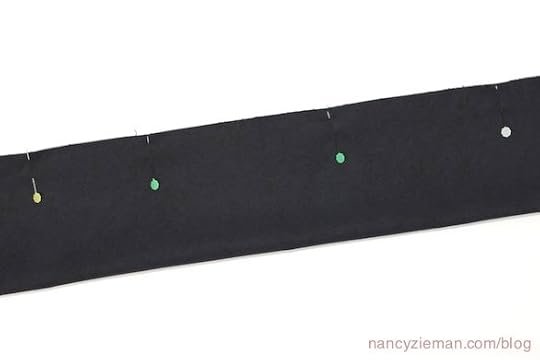
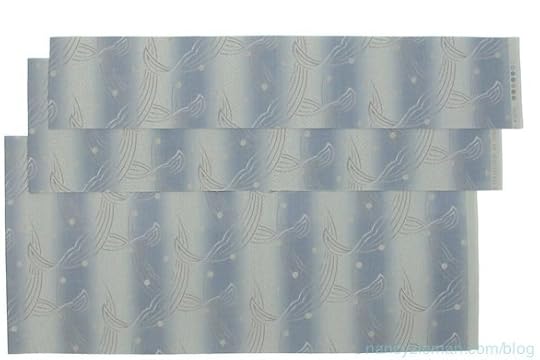
Cut the background fabric, two lengths that are 16″ x 84″.
Place the lengths on a table or on the floor. Match the lengths and tape together.
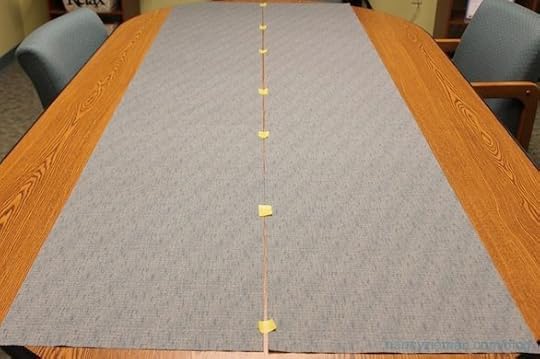
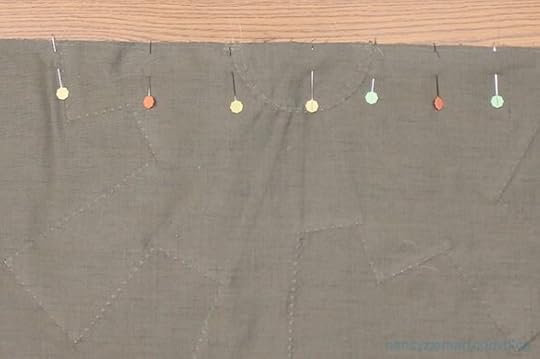
Begin with one of the three Dresden groups that are alike. Center one group in the middle of the length, 42″ from each short end; pin.
Pin a half-circle over the open area.
Align and pin the two remaining Dresden groups, that are alike, on the opposite half of the table runner. Align the tips of the long wedge to the half-circle as pictured.
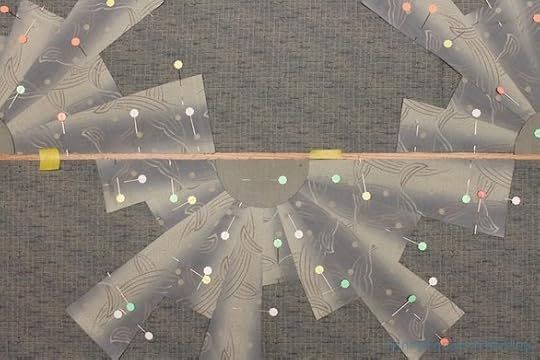
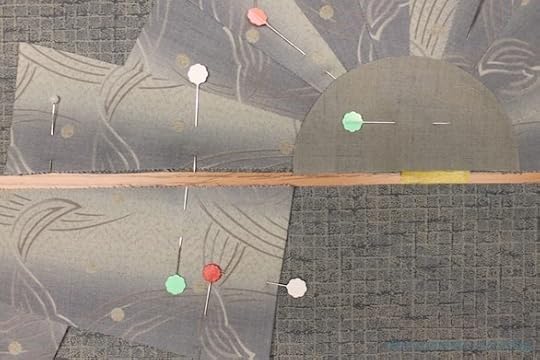
Pin the remaining two Dresden groups to the background fabric, using the same positioning guidelines.

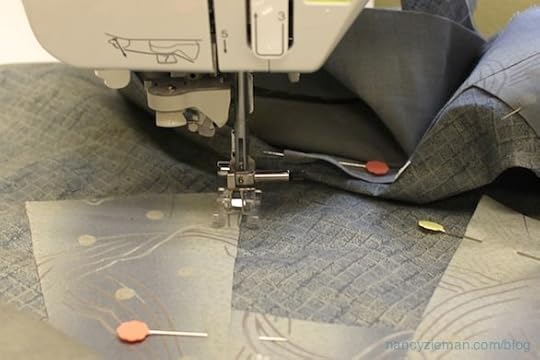
Set the machine for a blind hem or straight stitch. Edgestitch each Dresden group, including the half-circle, to the background fabric.
Pin the center seam strategically to insure the designs will align as planned.
Stitch with a 1/4″ seam.
Finish the table runner
Layer the table runner, batting, and backing fabric.
Machine or hand stitch the layers together. The featured table runner was professionally quilted by a long-arm quilter—Pleasant Valley Farm Longarm Quilting in Markesan, WI.
Cut and piece 2-1/2″ strips of leftover background fabric to yield approximately 210″ of binding. Bind the edges of the table runner.
More Dresden Ideas
The Dresden Plate is one of the most versatile and creative patchwork designs available. For more ideas check out these blog postings:
Sew a Dresden Sunflower from Fabric Scraps
A Dresden Quilt Design Gets a Makeover
A Handbag idea using a Dresden Template
For a chance to win a Trace ‘n Create Quilt Template—Dresden Collection from Clover, please leave a comment describing what you’d like to create with this template.
Bye for now,
Content in this feed is © copyright 2014 by Nancy Zieman and may not be republished without written permission. You’re welcome to forward the email to a friend or colleague but it’s not okay to add the RSS feed automatically as content on a blog or other website.
May 31, 2014
If You Love to Sew, Do You Also Like to Garden?

Chances are rather high that if you like quilting and sewing, you also like to work with your hands to dig in the soil, plant flowers or seeds, and pull the weeds. Well, maybe not the last part! I call it garden therapy.
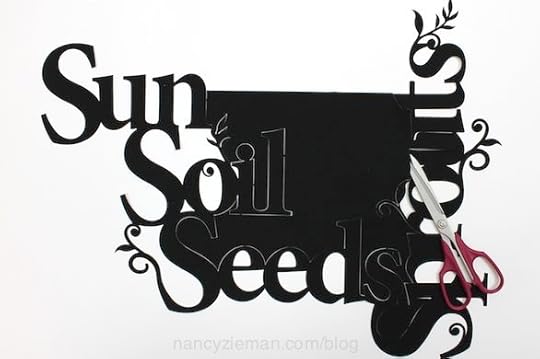
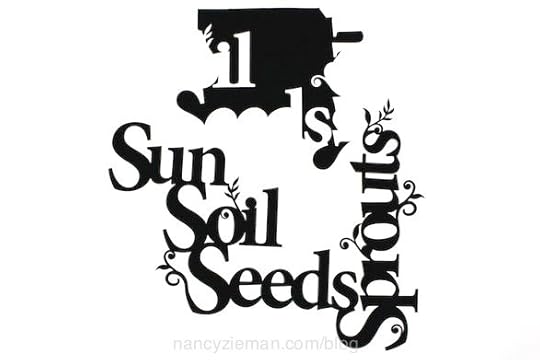
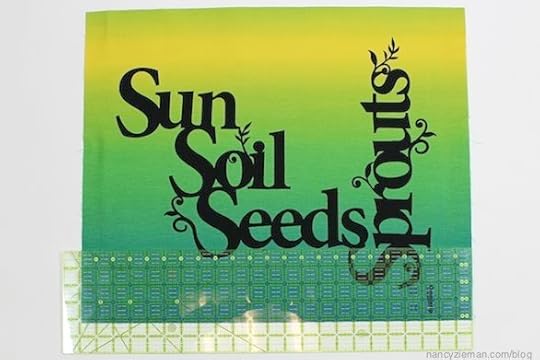
To combine both of your hobbies in one project, why not make a wall hanging or framed fabric appliqué of Sun, Soil, Seeds, Sprouts! Forget intricate cutting and fussy application, this design is laser cut and fusible web is already applied to the wrong side of the fabric.
Here’s how easy it is to create fusible fabric art!
The appliqués are laser-cut with fusible backing already applied to the wrong side of the fabric. Since these designs are intricate, some of the portions of the appliqués are tabbed together to keep the design intact while in the package. (The appliqué measures 15″ x 19-1/4″.)
Cut the small tabs to remove the excess fabric.
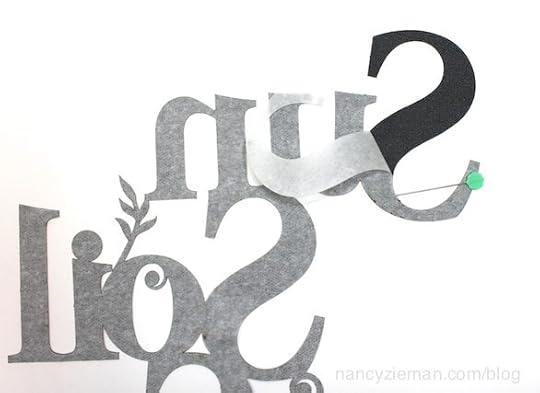
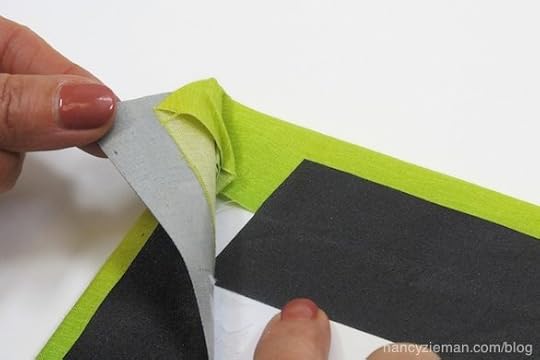
Remove the Paper Backing
Peel off the paper backing by folding down an edge with paper side up and gently rolling the appliqué between your fingers. The paper backing will pop free.
Or, use a straight pin. Carefully slide the pin between the paper and the web along an edge to begin the separation process.
After the paper has begun to separate, carefully peel away the remaining paper without stretching the fabric. The less the appliqué is handled before fusing the less the edges will fray.
Prepare the Fabric:
Fuse interfacing to the wrong side of the fabric. My favorite fusible to use for this project is ShirTailor by Pellon.
Position the Appliqué
Cut fabric 4″ longer and wider than the finished artwork.
Position the appliqué on the right side of the fabric.
Use rulers to check both the horizontal and vertical placement.
Smooth out any ripples or bumps.
Test Fuse
Test fuse prior to fusing the actual appliqué to determine proper pressing time and iron temperature. Once fused, the bond of the appliqué is permanent.
Designs include a scrap background fabric or a separate piece of fused fabric.
Use this scrap piece and test with a scrap from the background fabric.
Follow the steps below for fusing. If the test fabric does not bond properly, prewash the background fabric.
Testing will also determine exactly how much time is needed to press each side of the fabric to get a firm bond.
Fuse the Appliqué
Set the iron to the cotton setting and without steam.
Cover the design with a Teflon Pressing Sheet.
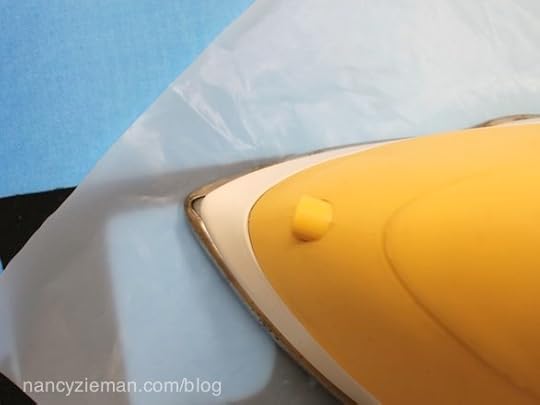
Press—not iron—in an up and down motion and hold for 10–12 seconds in each location. (Sliding the iron could cause the appliqué to shift.)
Turn the fabric over and without a pressing sheet, press, with steam, the entire appliqué. Do not skimp on pressing since this step will form the permanent bond.
When cool, check that all edges are tightly attached.
Frame the Artwork
Wrap the fabric around cardboard or Foam Core that has been padded with Pellon Fleece, using heavy-duty tape to hold the fabric in place. I used the cardboard from the purchased 16″ x 20″ frame.
Simple!
Insert the fused appliqué in the frame. Ta da!

Click here for other framing details.
For a chance to win one of these appliqués. Post your comment sharing your favorite type of gardening? (I have a small veggie garden plot, but working in my perennial flower bed is my ultimate therapy.)
More Laser-Cut Appliques
To view my entire product line of easy-to-use appliqués, click here.
Greetings from my garden along with my pal, Lucas!

Thanks to Brehm’s Nursery for letting me use their nursery for a photo shoot. If you’re ever in Beaver Dam, WI and want to get lost in lovely flowers, stop by at Carl and Lori’s beautiful nursery.


Bye for now,
Content in this feed is © copyright 2014 by Nancy Zieman and may not be republished without written permission. You’re welcome to forward the email to my friend or colleague but it’s not okay to add the RSS feed automatically as content on a blog or other website.
May 29, 2014
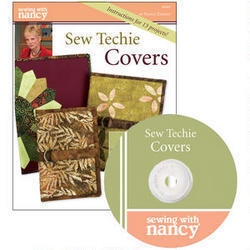
Now It’s Time to Sew “Spiffy” Tablet Keepers!

I have a new word to describe this week’s Tablet Keeper sewing technique options—spiffy! Last week I used the word snazzy—many of you liked my word choice. Carol B., a Facebook fan, suggested the option of spiffy! It works, thank you Carol.
Back to the topic at hand. During the Sewing With Nancy 2-part TV series of Sew Techie Covers, I featured 12 different creative ways to sew covers for your electronic or paper tablets. Click here to watch the second episode of Sew Techie Covers. You can also watch the first episode by clicking here.

Hi-Tech Patchwork
Here’s a preview of two of the covers you’ll see during this episode. First, the Hi-Tech Patchwork cover!
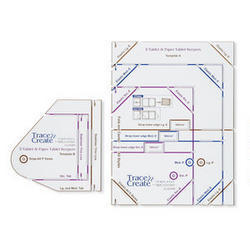
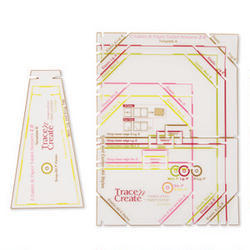
Using the largest size on the Trace ‘n Create Template–E-Tablet & Paper Tablet Keeper , trace and cut out the background fabric.
Then, use a leftover block such as a 12″ Dresden appliqué. My staff and I created the appliqué using the Trace ‘n Create Quilt Template—Dresden Collection and topstitched the design in the center of the rectangle.
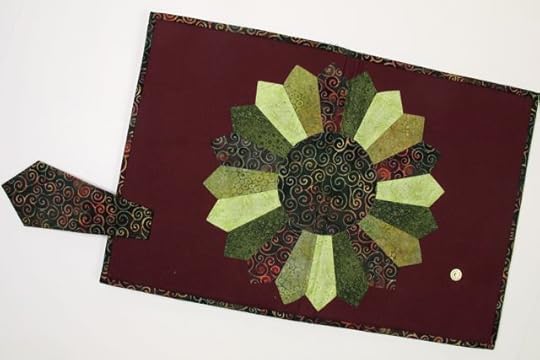
A partial Dresden Fan block was ideal for the inside pocket of my Paper Tablet Keeper.
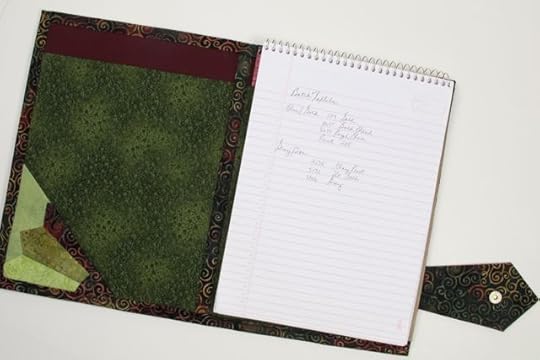
Watch the Sew Techie Covers episode to see exactly how to create the Dresden appliqué and then, apply it to the tablet keeper. The details are also in the companion book.
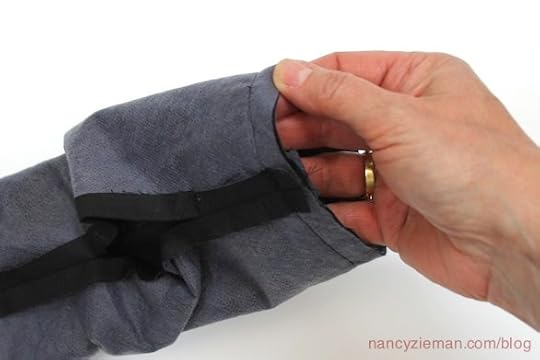
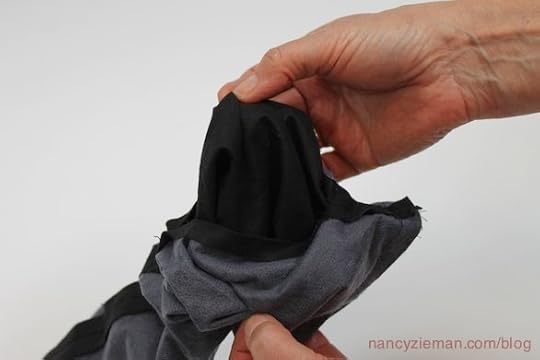
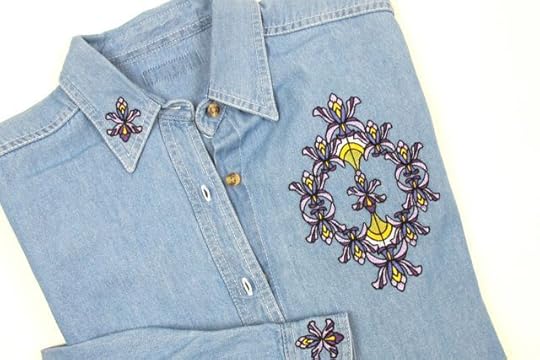
E-Cycled Cover
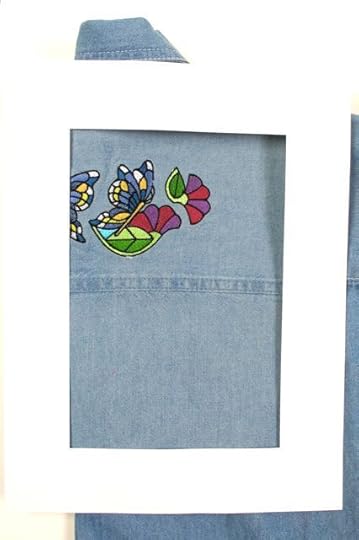
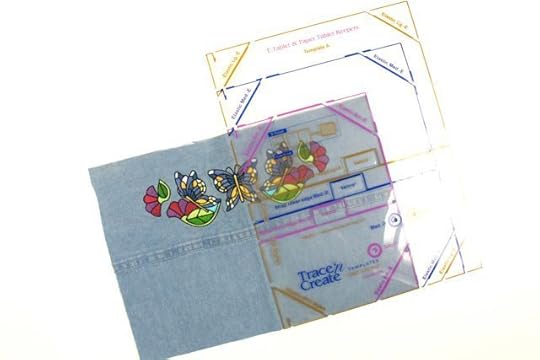
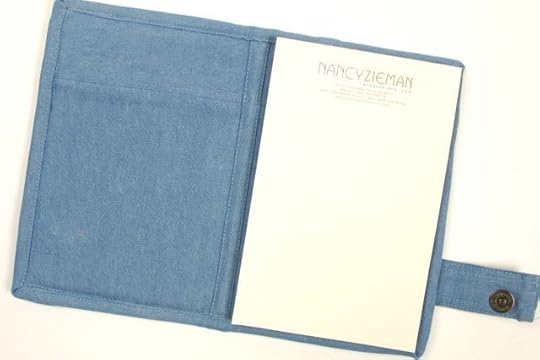
Do you have an embroidered shirt that’s just hanging in the back of your closet? Give it a new life as a tablet keeper cover. I called this Sew Techie technique an E-Cycled Cover—embroidery that’s recycled!
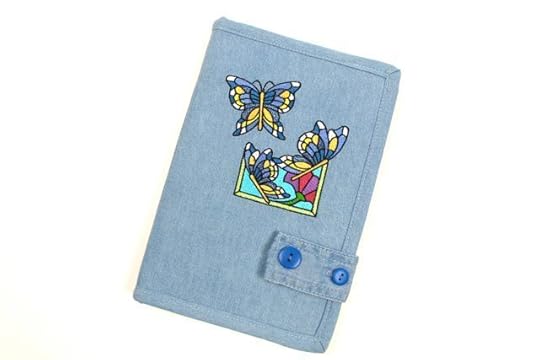
Select an embroidered shirt (or other embroidered project) that’s been hiding in the back of your closet.
Select the original Clover’s Trace ‘n Create Tablet Keeper Template for an iPad, iPad Mini, or the original Kindle. (There are more tablets that fit the original Tablet Keeper.) Click here to view the original Tablet Keeper Template device listing .

Select the newer Tablet Keeper, Trace ‘n Create Tablet Keeper Template 2.0, for the Kindle Fire, Nook, and many more. Click here to view the Tablet Keeper 2.0 device listing. If you don’t see your tablet listed, email us at info@ziemanproductions.com and we’ll add your electronic device to the listings.
Trace tablet keeper size on paper and cut out a “window.”

Audition the placement. In this example, the embroidery is across the center back. In the above photo, there would not be enough embroidery for the front and back, necessitating a seam at the spine.
Trace the template size on the shirt and then cut it out. Then, follow the instruction for stitching the pieces together.
Use other odds and ends from the recycled shirt as the closure and in the interior of the tablet keeper.
There’s more on TV and in the Book!
This is just a sneak preview of some of the Sew Techie Covers you can create. All the specifics can be found in the Sewing With Nancy companion book.
As in last week’s blog, here’s another chance to win a copy of Sew Techie Covers. Please leave a comment below.
Watch Sewing With Nancy on your iPad, iPod, or iPhone!
There are three seasons of Sewing With Nancy programs to watch online, or on your iPad, iPod Touch, or iPhone. Have you downloaded the app?
Bye for now,
Content in this feed is © copyright 2014 by Nancy Zieman and may not be republished without written permission. You’re welcome to forward the email to a friend or colleague but it’s not okay to add the RSS feed automatically as content on a blog or other website.
Nancy Zieman's Blog

- Nancy Zieman's profile
- 21 followers

