
Nancy Zieman's Blog, page 138
September 18, 2014
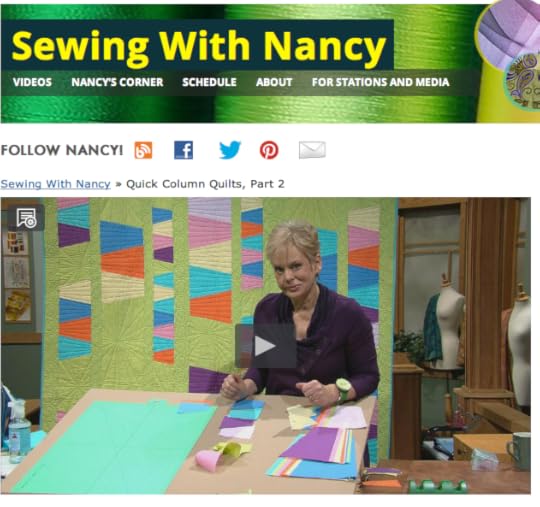
Create A Wind Chime Quilt and Two Other Quilt Patterns

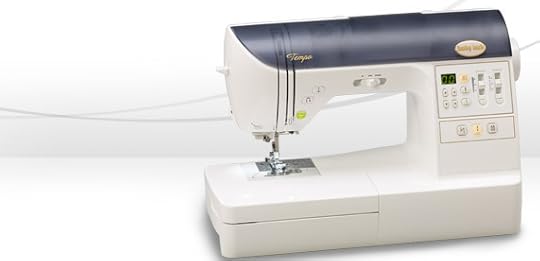
I really like to sew, but I am not patient enough to spend months on a project. Quite by accident, I started to design a quilt with columns instead of blocks. Then, my mind spun with ideas. Welcome to the third blog of my new book on Quick Column Quilts. Today wraps up the blog tour where we’ve made 27 stops! At the end of the day tomorrow is also the end of our giveaway, including a Baby Lock Tempo Sewing Machine. (See the details below.)
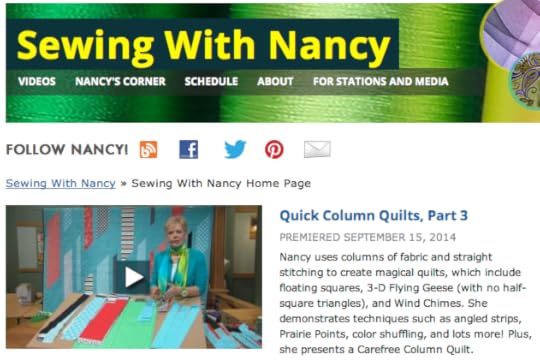
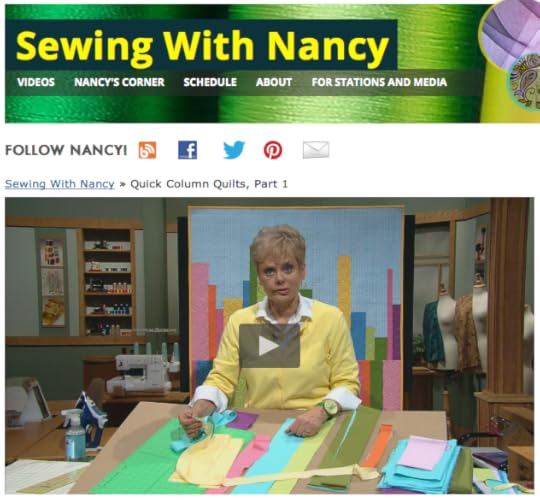
The third episode of Quick Column Quilts is now available to PBS stations around the country and the show is online. Watch at your convenience by clicking here! Listed below are three of the 13 quilts featured during the 3-episodes. By the way, all of the instructions for the quilts are found in the book, Quick Column Quilts.
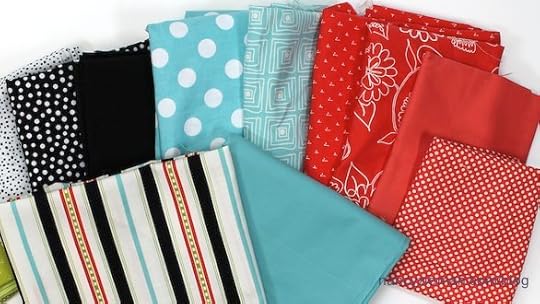
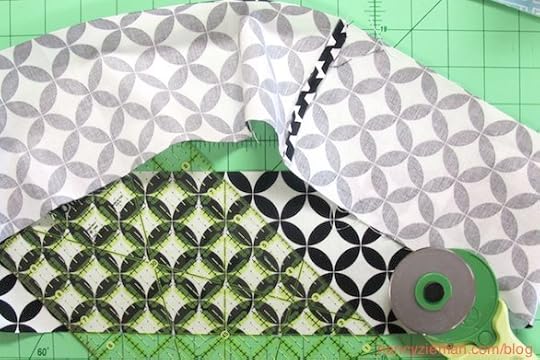
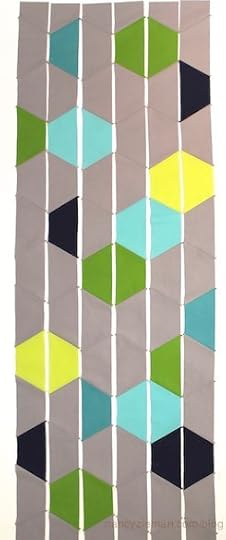
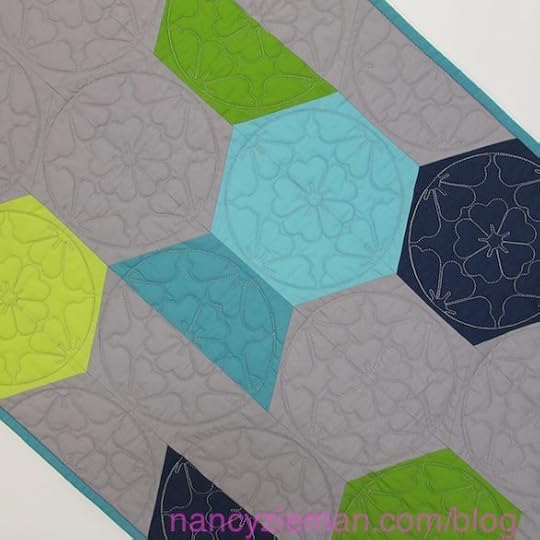
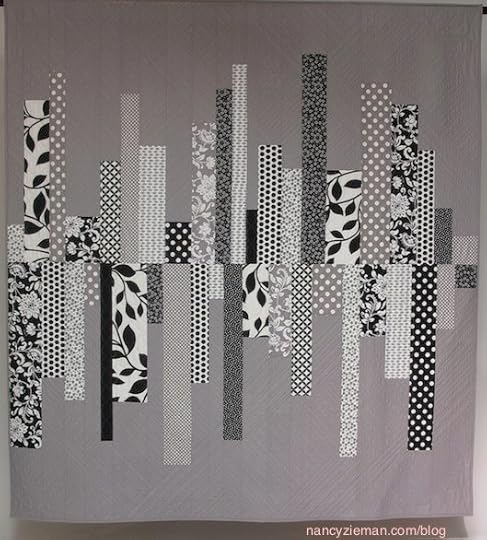
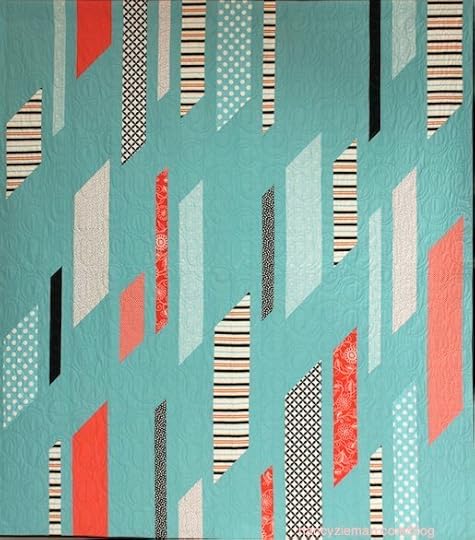
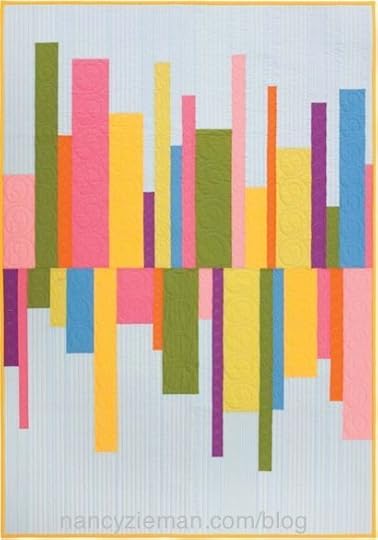
Wind Chime Column Quilt

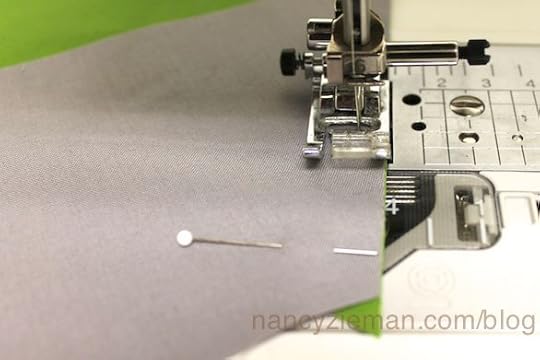
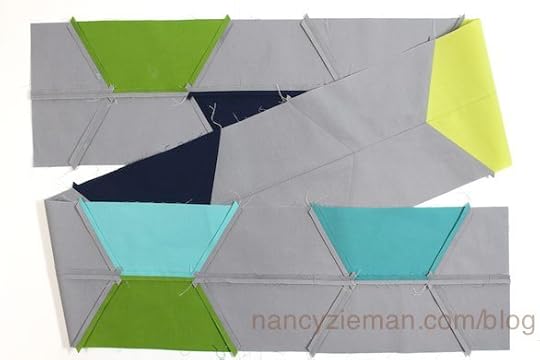
The wind chimes hanging from our deck served as the inspiration for this Wind Chime Column Quilt. Just like real wind chimes, the angled accent pieces, seem to move as if gently nudged by the wind. Here’s a little preview of how I designed this column quilt.
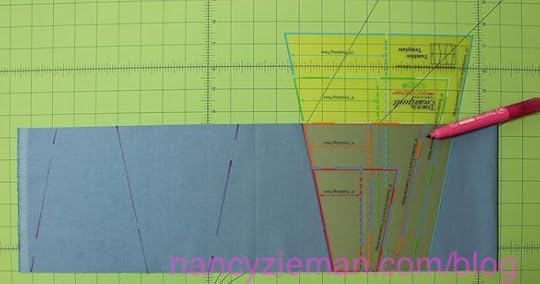
Auditioning fabrics: You’ll learn how to use a print fabric to audition other fabrics to see if they’re compatible. The striped fabric served as the color inspiration for this quilt. All of the “wind chime fabrics” came from my stash.
Waste not want not: Since some of the fabrics were short on yardage, I designed a way to use every inch of a strip. You’ll have to tune into the show to learn this technique. It’s easier to see it demonstrated than to write about it. Just call me lazy!
Folded Flying Geese Wall Hanging
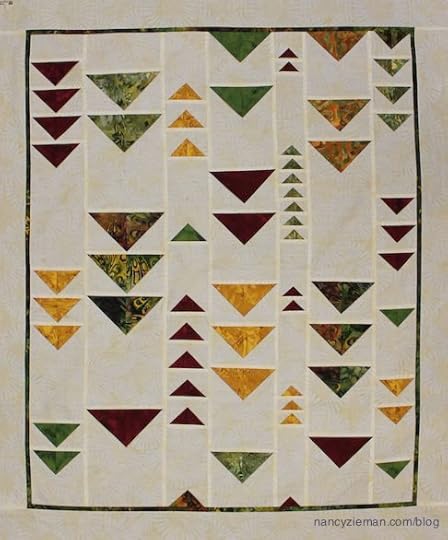
No half-square triangles are needed to make these artistic Flying Geese. Start with squares, fold three times, and presto the folded triangles create 3-dimensional Flying Geese. Plus, the background columns are not cut, but rather one piece of fabric. Hmm, it’s kinda interesting.
Floating Squares Column Quilt

This double-sized quilt looks difficult to make, but not so! The darker squares float on the light background of the quilt top, made with some creative cutting and sewing of crosswise strips. Not to worry; you will not be required to cut squares. I’ve opted for a quick-to-make column quilt!
See how the quilts are created while watching Sewing With Nancy.
To watch the third episode, which features the above quilts, click here.
To watch the second episode, click here.
To watch the first episode, click here.
13 Quilt patterns are detailed in the book, Quick Column Quilts .

Blog Tour Hosts
To showcase my new book, Quick Column Quilts, and the companion TV series, you are able to take a tour through the book via a Blog Tour. I’m pleased to announce that the 27 bloggers featured various projects and techniques through September 17th. You can still follow the links below!
Date and Link
09/04/14 Nancy Zieman
09/05/14 Quilt Taffy and Simple Simon & Co.
09/06/14 Diary of a Quilter and Stitchin Jenny
09/07/14 A Woman a Day
09/08/14 Jina Barney Designz, Lilac Lane Patterns, and Totally Stitchin’
09/09/14 Esch House Quilts and The Cottage Mama
09/10/14 Designs in Machine Embroidery and Pat Sloan
09/12/14 Happy Valley Primitives, Doohikey Designs, and Quilt in a Day
09/13/14 Quilt Dad and Just Arting Around
09/14/14 Lazy Girl Designs and Marie-Madeline Studio
09/15/14 Always Expect Moore and Polka Dot Chair
09/16/14 Amy Lou Who Sews and Riley Blake Designs
09/17/14 Indygo Junction and Amy’s Creative Side
We’re having a Super Giveaway, including a Baby Lock Tempo Sewing Machine!
Post a comment below about quilting and you’ll be eligible to be part of the random drawing for the prizes listed below. Perhaps you’re a beginner quilter, a seasoned stitcher, or someone who would like to learn to quilt. Share “Why I quilt,” or “Why I want to learn to quilt.”
The 15 lucky winners will be announced on September 20, 2014.
Baby Lock Tempo Sewing Machine , value $1,399
Six autographed copies of Quick Column Quilts by me, Nancy Zieman. Giveaway is sponsored by F & W Media.
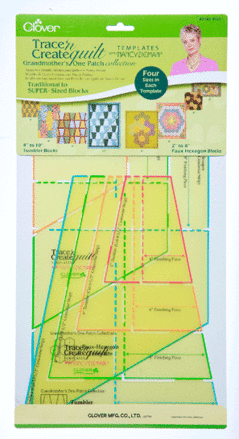
Three Trace ‘n Create Grandmothers One-Patch Quilt Templates from Clover
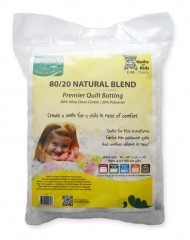
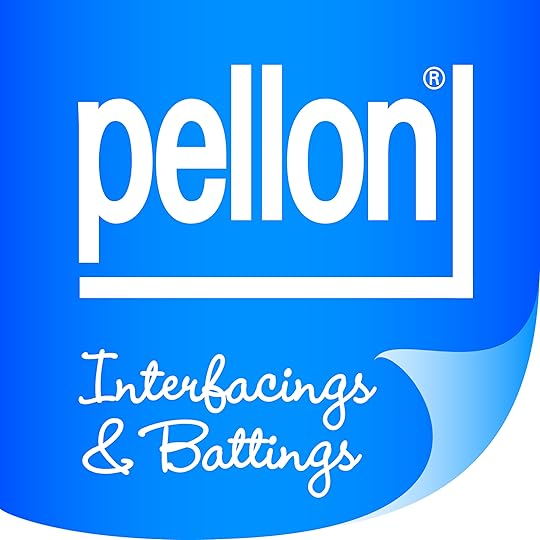
One Pellon Legacy Natural Blend 80/20 Batting with Scrim—Queen Size
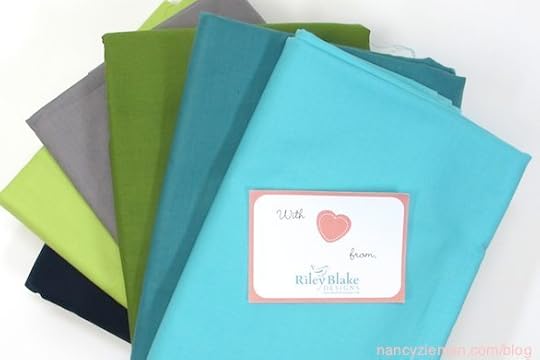
One Riley Blake Fabric pack for the Hit and Miss Table Runner (featured above)
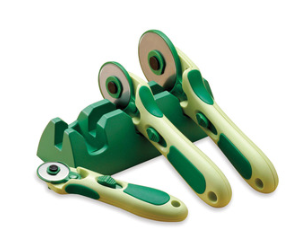
One Clover Rotary Cradle and Cutters
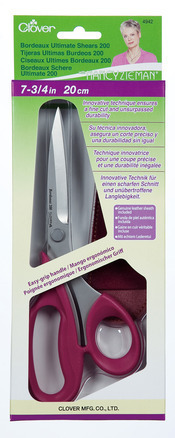
One Clover Bordeaux Shears
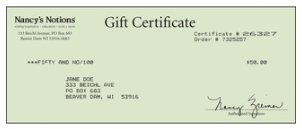
One $50 Nancy’s Notions Gift Certificate
Thank you to our generous sponsors!


Bye for now,

Nancy Zieman—author, pattern designer, businesswoman, producer, and national sewing authority—is the host of the popular show Sewing With Nancy®, which appears exclusively on public television stations across the United States and Canada. Follow Nancy’s blog at nancyzieman.com/blog and sign up to receive Nancy’s E-News for the latest news in sewing, quilting, & creating.
Content in this feed is © copyright 2014 by Nancy Zieman and may not be republished without written permission. You’re welcome to forward the email to a friend or colleague but it’s not okay to add the RSS feed automatically as content on a blog or other website.


September 16, 2014
A Designer Handbag Exclusive—Cinched Tote
After designing and completing a new pattern or product, I often think of variations of the theme! That’s what happened after Eileen Roche and I designed Handbags 2—Designer Knockoffs. Rather than keeping the idea in my head, I decided to share it with you!
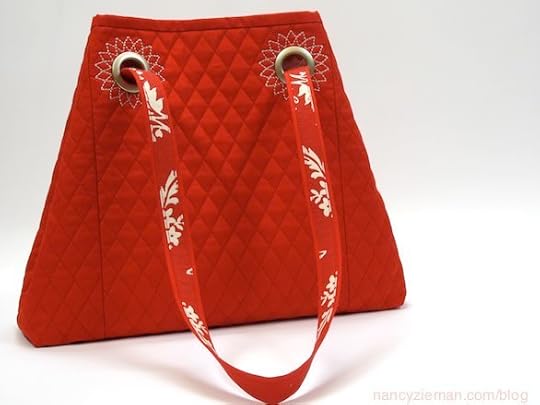
The Bag

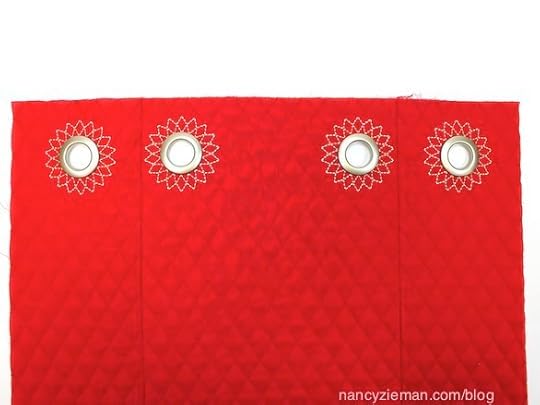
Create a cinched tote bag with the help of eight unique embroideries that give placement for designer grommets. A continuous strap weaves in and out of the grommets providing flexibility around the tote top. Handbags 2—Designer Knockoffs embroideries give both placement and embellishment. Instead of stitching four embroideries that provide placement plus design, add a total of eight embroideries for grommets.
Supplies
Handbags 2–Designer Knockoffs
Double-sided quilted fabric
Eight 1″ Grommets
Trace ‘n Create Florida Bag Template
Tear-away stabilizer
1 pkg. 1″ Create a Strap
2 yds. 5/8″ grosgrain ribbon
Painter’s tape
Add embroideries:
Trace, then cut out the pieces for the tote bag from the double-sided quilted fabric, using the Florida Tote template . (For additional information on making a tote bag using quilted fabric, reference Hobo Totes—Casual to Classic .)
Transfer the StarburstGromSmJumbo grommet design from the CD found in Handbags 2—Designer Knockoffs .
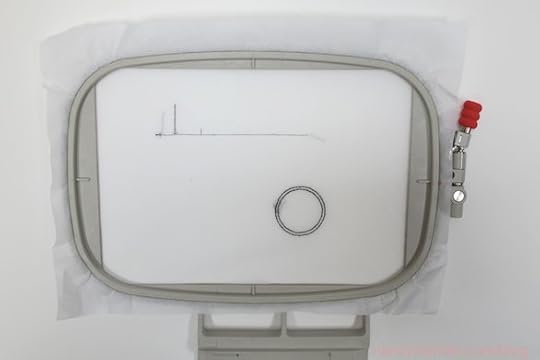
Hoop tear-away stabilizer in an 8″ x 12″ hoop or any extra large hoop.
Stitch the first thread color, the placement line, directly onto the stabilizer.
Mark the center along the top of the front and back center panels with a pin.
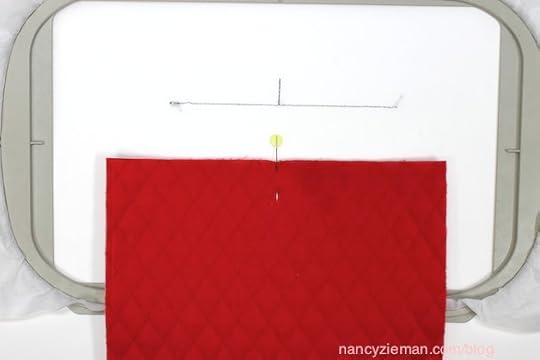
Align the fabric and center pin mark with the markings stitched on the stabilizer.
Use painter’s tape to position fabric to the stabilizer.
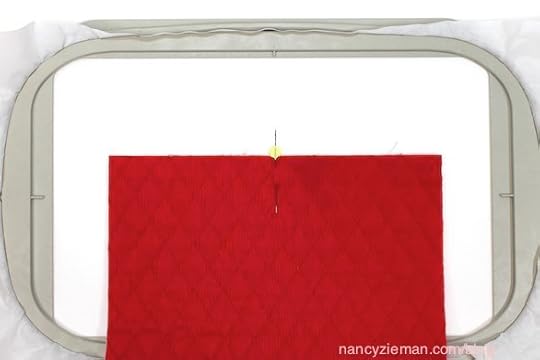
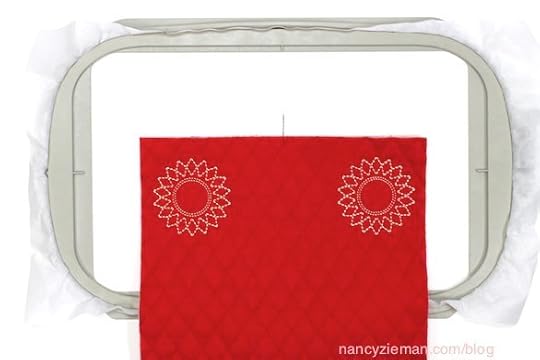
Embroider the design. The same thread color was used for all the embroidery elements.
Tear the fabric away from the stabilizer.
After embroidering the front piece, repeat by adding the same embroidery to the back.
Add side grommet embroideries:
Select and transfer the StarburstGromSm embroidery design to the sewing machine.
Hoop tear-away stabilizer in a 5″ x 7″ hoop. Stitch the placement line and the circular grommet lines on the stabilizer.
Important note: The vertical center stitching is not applicable for this unique application. This embroidery was designed as a grommet placement for straps when using a 5″ x 7″ hoop. This time, the embroidery is added to each side of the handbag as part of the cinching design.
To center the grommet on the side panel of the tote bag, place the fabric under the stabilizer. Center the circle. Place a mark on the stabilizer at the left edge of the fabric.
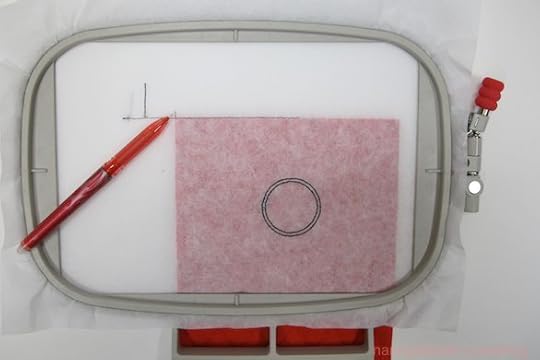
Remove the fabric from underneath the stabilizer and place it on top of the stabilizer. Align the fabric along the marking to the left and the top placement line. Secure fabric to the stabilizer.
Before embroidering the design, back up one thread color so that the circle embroideries are restitched on the fabric.
Embroider the design. Carefully remove the fabric from the stabilizer.
Repeat the embroidery technique on the remaining side panels.
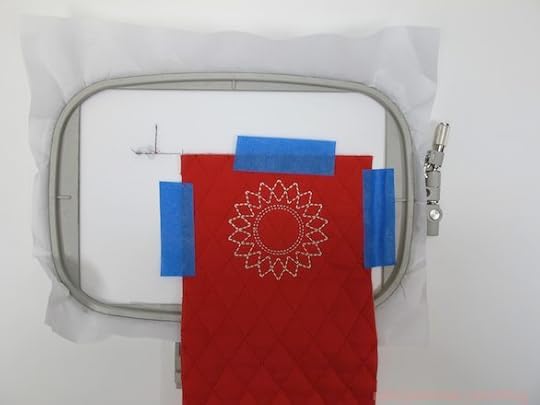
Following the instructions in Handbags 2—Designer Knockoffs , trim out the center of the fabric, cutting between the two embroidered circles. Apply the grommets following the instructions included in the grommet packaging.
Stitch the side seams.
Hanging Snaps
I generally add magnetic snaps to the lining of the bag. But, when working with double-sided quilted fabric, there isn’t any lining fabric, and the snaps would show from the right side of the bag. What’s the solution? Create hanging snaps. More tips on working with double-sided quilted fabric are included in the Trace ‘n Create Hobo Tote Template.
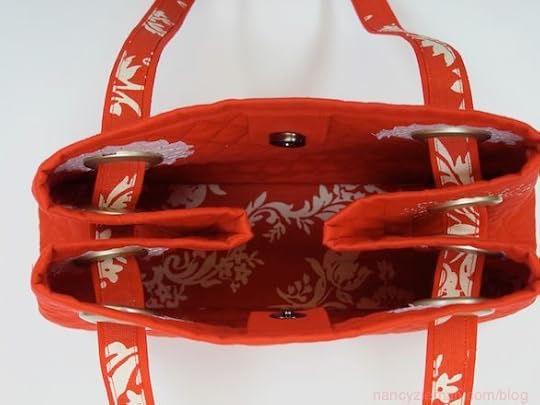
Side Note: Before taking this photo, we did not remove the stabilizer. Hmm, that white stabilizer doesn’t look too great. After removing the excess stabilizer, the finished handbag looks better!
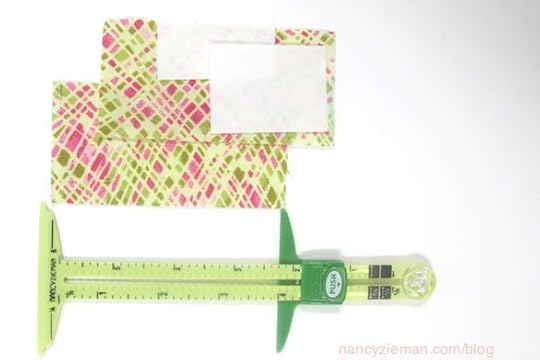
Cut two 1″ x 2″ rectangles of Shape ‘n Create .
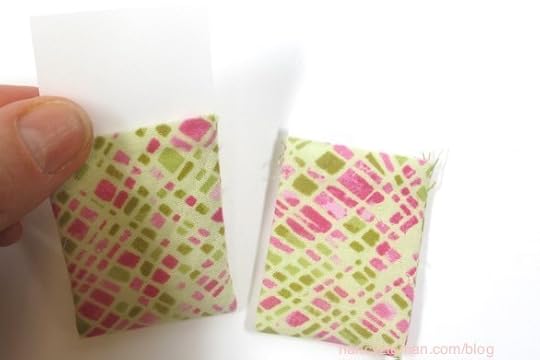
Cut two fabric rectangles 1-1/2″ x 4″. Fold rectangles in half, meeting short edges and wrong sides. (Photography is from a previously created bag.)
Stitch sides with 1/4″ seams. Turn right side out.
Insert Shape ‘n Create rectangles into fabric pockets.
Attach snaps.
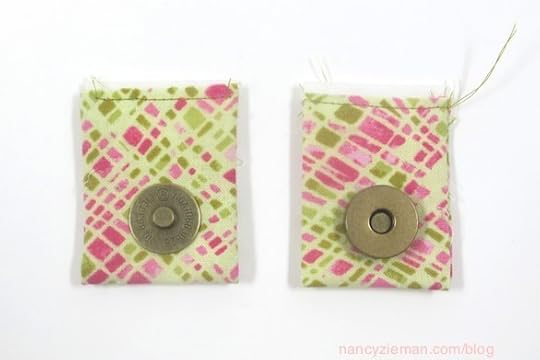
Center hanging snaps on inside of tote, meeting raw edges, with snaps meeting each other. Baste to upper edge.

Finish the Bag
Finish the top edge of the handbag with binding.
Add a bag-bottom insert of Create ‘n Shape (plastic bag bottom) to the bottom of the tote. Cut the plastic the size of the tote base and insert in a fabric pocket .
Position the bag-bottom insert in the base of the bag.
Create a Continuous Strap
Cut two 2″ x 45″ lengths of fabric. If using quilted fabric, separate the layers after cutting the strips. The narrow fabric will quickly separate after clipping a few threads.
Seam the short ends; trim to a 70″ length.
Cut a 70″ length of ribbon. Or, cut two 1-1/2″ crosswise strips of contrasting fabric. Sew short ends; trim to 70″. Thread strip through a 3/4″ Bias Tape Maker ; press.
Press Create-a-Strap to the wrong side of the 2″ wide strip.
Fold strip along perforations; press.
Place ribbon or trim over raw edges of the strip.
Topstitch along both sides of ribbon or trim, leaving the first and last 3″ unstitched.
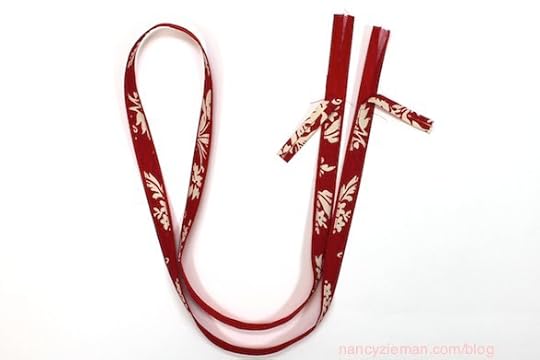
Weave strap through grommets as pictured.
Connect straps by meeting short ends, right sides together. Stitch with 1/4″ seam allowances; press. Repeat for ribbon.
Finish topstitching the ribbon to the strap. Ta da!
Three Handbag Styles and Embroideries in One Convenient Book

Eileen and I included the instructions and embroideries for the featured bags in Handbags 2-Designer Knockoff. Click here to order and preview what’s inside the book.
Watch Sewing With Nancy online.
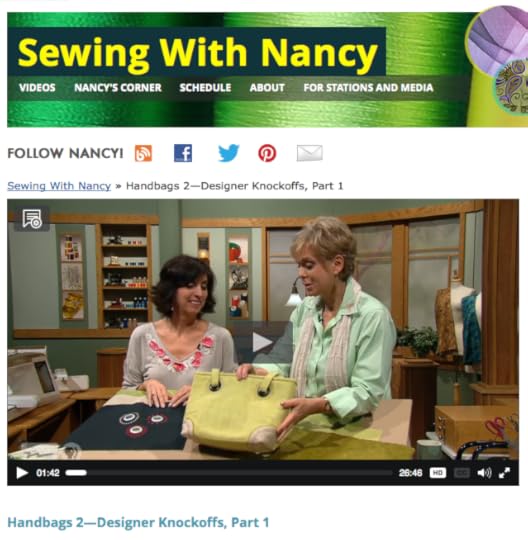
Watch Handbags 2–Designer Knockoffs, Part One with my guest Eileen Roche.
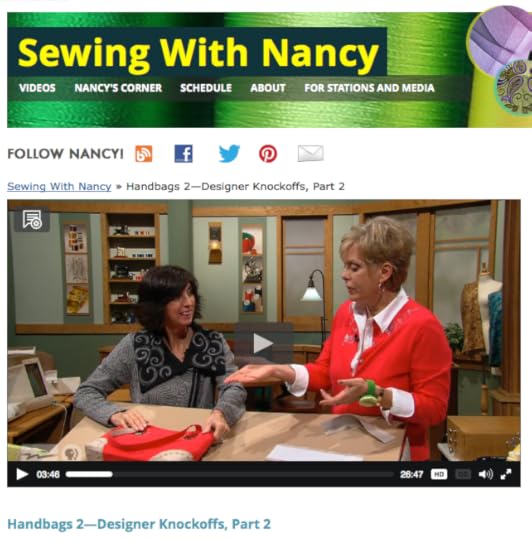
Watch Handbags 2–Designer Knockoffs, Part Two with my guest Eileen Roche:
There are four seasons of programs to watch online, or on your iPad, iPod Touch, or iPhone. Have you downloaded the app?
Bye for now,
Content in this feed is © copyright 2014 by Nancy Zieman and may not be republished without written permission. You’re welcome to forward the email to a friend or colleague but it’s not okay to add the RSS feed automatically as content on a blog or other website.
September 13, 2014
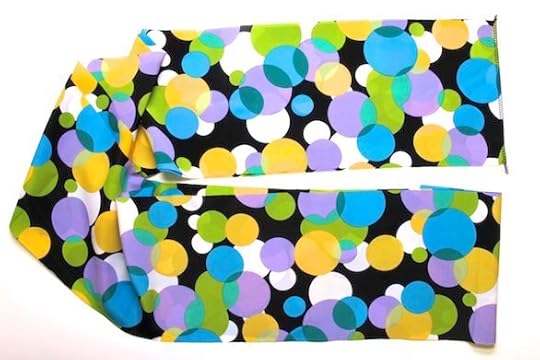
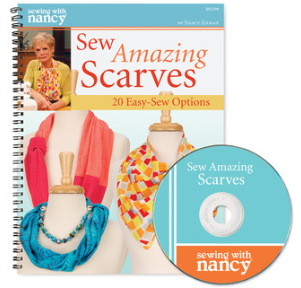
My Most Popular Scarf Tutorial
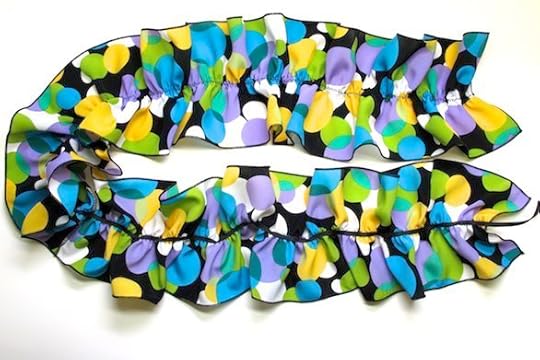
It’s almost scarf season, which reminds me to share our most popular scarf-sewing blog posting! With a serger, a 1/4 yard of fabric, and a little elastic, you’ll soon be wearing a new scarf.
If you’re a Sewing With Nancy viewer, you know that sewing scarves is not a new topic for me. During my miniseries on “Sensational Scarves,” I detailed the Cascading Scarf, an 18″ wide scarf with a casing and elastic added to the center of the scarf. Here’s a variation where the scarf is finished with a serged edge, and the cascading is created with a unique elastic technique.
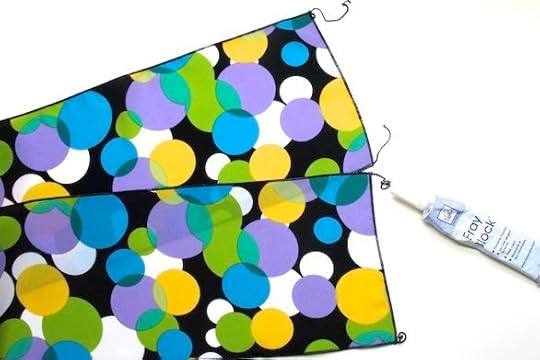
Cut two crosswise strips of fabric 7″ wide, and seam the short ends. If the length is longer than 90″, trim off the excess.
Select a rolled edge stitch on your serger. Test the stitching and adjust the stitch length if necessary. If you don’t have a serger, turn under the edges and stitch. More detailed instructions can be found in the Sensational Scarves book.
Serge all the edges.
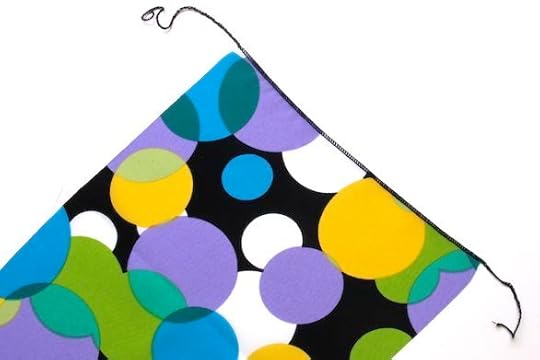
Place a tiny drop of a seam sealant at the corners.
After the seam sealant has fully dried, clip off the excess thread tails.
Press mark the center. Fold the long edges in half, then press.
Use 1/4″ wide elastic or cut Fantastic Elastic (Yes, you can cut this elastic.) to 1/4″ wide. The length of the elastic needed is half the length of the scarf, plus 5″.
Measure down 2-1/2″ from each end of the elastic. Pin the elastic to the top and bottom of the scarf, the extra 2-1/2″ should extend beyond the scarf—it serves as a handle, something to grasp onto while stretching and stitching.
Stretch the elastic to meet the fabric, centering the elastic over the press mark.
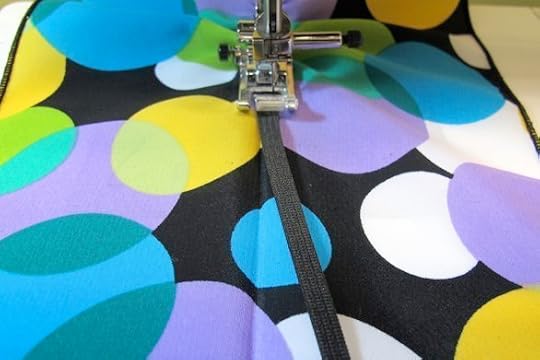
Set your machine for a wide zigzag and stitch over the elastic.
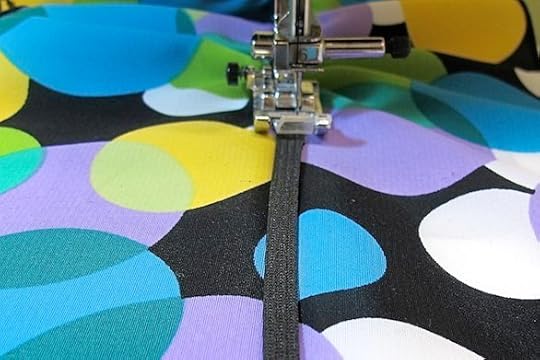
When you finish stitching the elastic to the fabric, reinforce the stitching at each end of the scarf.
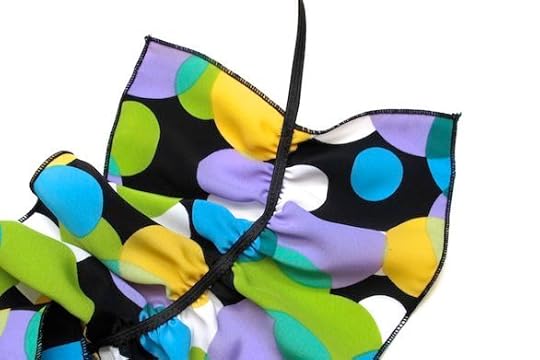
Clip off the second elastic tail and you’re finished!
Watch Sewing With Nancy online, anytime, any day! Click below and enjoy!
Sew Amazing Scarves part three
Books and DVDs
The original scarf instructions, plus 12 other great ideas, are featured in the book, Sensational Scarves. Then, my staff and I developed more scarf ideas in Sew Amazing Scarves. Options! Options!
Bye for now,
Content in this feed is © copyright 2014 by Nancy Zieman and may not be republished without written permission. You’re welcome to forward the email to a friend or colleague but it’s not okay to add the RSS feed automatically as content on a blog or other website.
September 11, 2014
Easy Quilt Designs That Get Rave Reviews!

It’s time for our second Sewing With Nancy TV episode of Quilt Column Quilts. If you missed the first episode, watch online by clicking here. During this show, see two quilt concepts that cast aside traditional quilting methods, while receiving rave reviews!
Don’t neglect to read the entire blog posting. The Quick Column Quilts blog tour and the super giveaways are listed below.
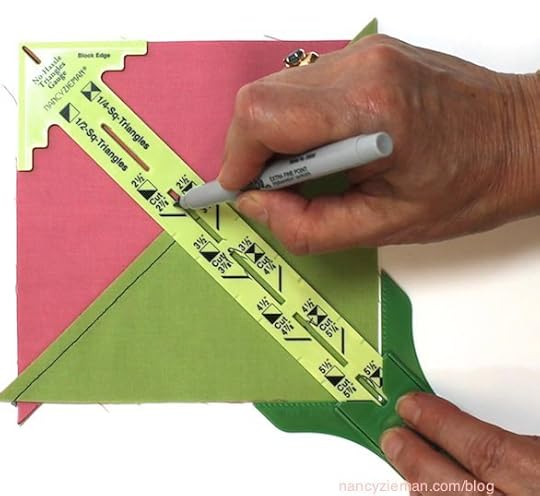
Tumbling Tumblers Quilt
The first quilt of this episode is called Tumbling Tumblers. Generally, tumbler shapes are sewn in rows. Not this time! Rotate the shapes 90 degrees to create columns, not rows. Turn what was a traditional quilt pattern into a modern design.
The tumbler template from the Trace ‘n Create Grandmother’s One Patch Template is used to create this quilt design. There are four sizes of tumbler shapes—4″, 6″, 8″, and 10″ in one template. All four sizes are traced on the fabric and then cut, using a ruler, rotary cutter, and mat.
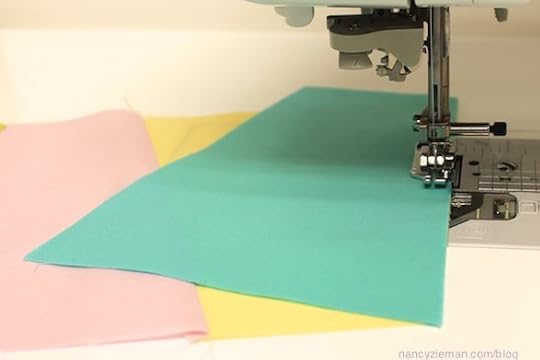
The tumbler shapes are stitched together using traditional quilting techniques.
Multiple background colored tumbler shapes are sewn together to add negative space to the design. Negative space is the new buzz word in quilting, and it references the space around the quilt design, not the design itself, which forms an interesting or artistic look.
You can see how the rest of the quilt is created while watching the TV show or see all the dimensions detailed in the book, Quick Column Quilts.
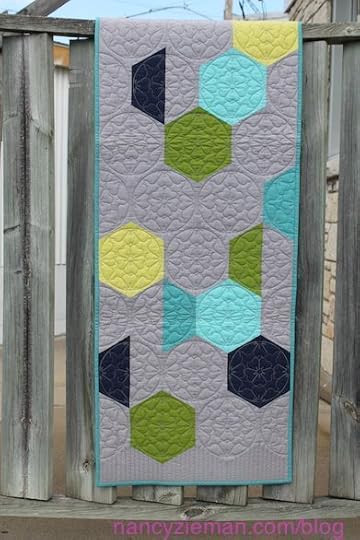
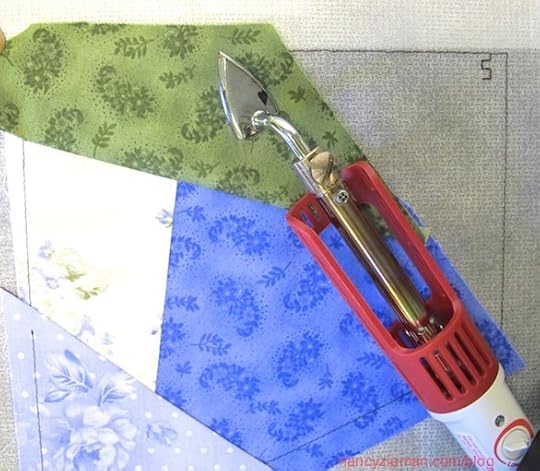
Hit and Miss Table Runner
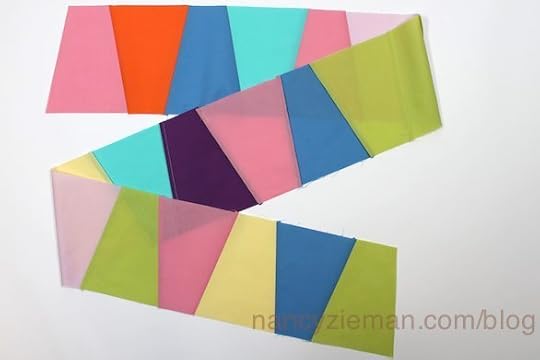
At first glance, hexagon shapes cause many quilters to think, Oh no, the dreaded Y-seam! Not so with this speedy column quilt design. The hexagon shapes are created with two halves, eliminating the intersection of three seams, otherwise known as Y-seams. With this technique, faux hexagon halves are stitched in columns with relative speed and ease. Plus, the results are dramatic.
The second template in the Grandmother’s One-Patch Template set, the faux hexagon, is used for this project.
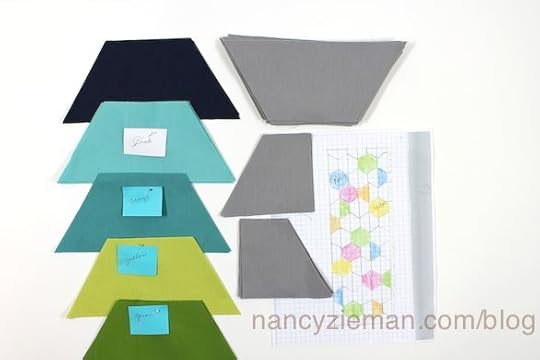
Only the 4″ shape is traced and cut from the fabric, including the end pieces. ( Watch me demo this online , it’s a lot easier to show in action than to write about!)
Four fabrics are traced and cut from the faux hexagons, plus the background fabric, which again creates the negative space design element. This photo was taken during my design process. Notice my design sketch—elementary!
The faux hexagons are sewn together with straight seams. No Y-seams in this column quilt project.
Columns are created.
Then, the columns are sewn together. That’s it—all straight seaming.
Full details, including the yardage, are in Quick Column Quilts.
Blog Tour Hosts
To showcase my new book, Quick Column Quilts, and the companion TV series, you’ll be able to take a tour through the book via a Blog Tour. I’m pleased to announce that 27 bloggers will feature various projects or techniques through September 17th. Please follow along!
Date Link
09/04/14 Nancy Zieman
09/05/14 Quilt Taffy and Simple Simon & Co.
09/06/14 Diary of a Quilter and Stitchin Jenny
09/07/14 A Woman a Day
09/08/14 Jina Barney Designz, Lilac Lane Patterns, and Totally Stitchin’
09/09/14 Esch House Quilts and The Cottage Mama
09/10/14 Designs in Machine Embroidery and Pat Sloan
09/12/14 Happy Valley Primitives, Doohikey Designs, and Quilt in a Day
09/13/14 Quilt Dad and Just Arting Around
09/14/14 Lazy Girl Designs and Marie-Madeline Studio
09/15/14 Always Expect Moore and Polka Dot Chair
09/16/14 Amy Lou Who Sews and Riley Blake Designs
09/17/14 Indygo Junction and Amy’s Creative Side
We’re having a Super Giveaway, including a Baby Lock Tempo Sewing Machine!
Post a comment below about quilting and you’ll be eligible to be part of the random drawing for the prizes listed below. Perhaps you’re a beginner quilter, a seasoned stitcher, or someone who would like to learn to quilt. Share “Why I quilt,” or “Why I want to learn to quilt.”
The 15 lucky winners will be announced on September 20, 2014.
Baby Lock Tempo Sewing Machine , value $1,399
Six autographed copies of Quick Column Quilts by me, Nancy Zieman. Giveaway is sponsored by F & W Media.
Three Trace ‘n Create Grandmothers One-Patch Quilt Templates from Clover
One Pellon Legacy Natural Blend 80/20 Batting with Scrim—Queen Size
One Riley Blake Fabric pack for the Hit and Miss Table Runner (featured above)
One Clover Rotary Cradle and Cutters
One Clover Bordeaux Shears
One $50 Nancy’s Notions Gift Certificate
Thank you to our generous sponsors!
Watch Sewing With Nancy online
There are four seasons of programs to watch online, or on your iPad, iPod Touch, or iPhone. Have you downloaded the app?
Sewing With Nancy on Public TV
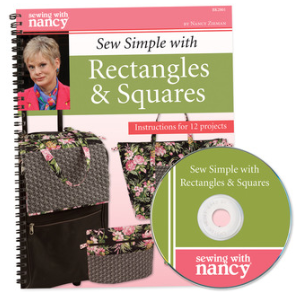
We have the great fortune of having Sewing With Nancy air on 93% of all Public TV markets. Your local PBS programmer determines when the new season will begin. Often, the new programming begins later on TV. Check your local Public TV and/or Create TV listing for the new season, which begins with Sew Simple with Rectangles & Squares.
Bye for now,
Nancy Zieman—author, pattern designer, businesswoman, producer, and national sewing authority—is the host of the popular show Sewing With Nancy®, which appears exclusively on public television stations across the United States and Canada. Follow Nancy’s blog at nancyzieman.com/blog and sign up to receive Nancy’s E-News for the latest news in sewing, quilting, & creating.
Content in this feed is © copyright 2014 by Nancy Zieman and may not be republished without written permission. You’re welcome to forward the email to a friend or colleague but it’s not okay to add the RSS feed automatically as content on a blog or other website.
September 9, 2014
Sew Creative Quilt Backs
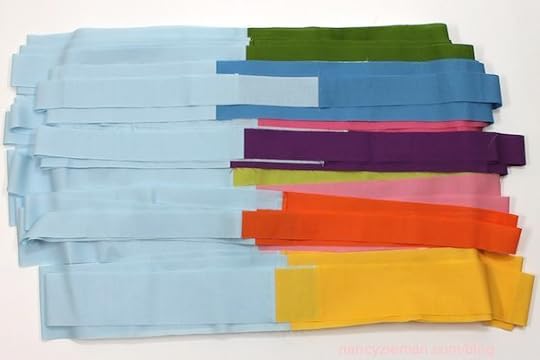
Add creativity to the back of your pieced quilt with a scrappy, patchy backing. The customary way of creating a quilt back is to cut two or sometimes three lengths of fabric and piece them together. Not only ho-hum, but at times it’s expensive.
Lately, my staff and I have been randomly piecing together quilt backing from the leftover quilt top fabric. I’m sure many of you have done the same. For those of you who haven’t, give it a try!
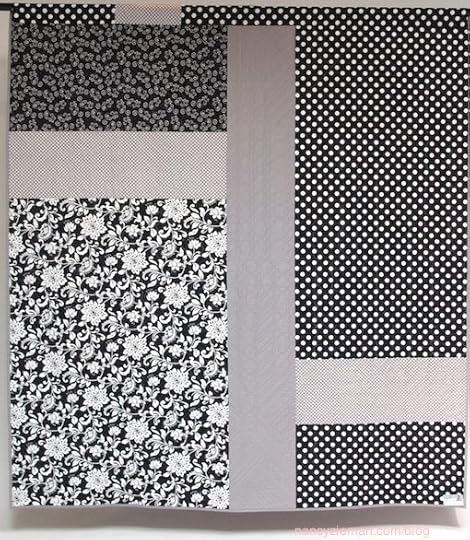
Back of the Quilt—Front of the Quilt
I only purchased one length of fabric, the print, the remaining pieces were leftovers. It took a little time, but worth the effort.
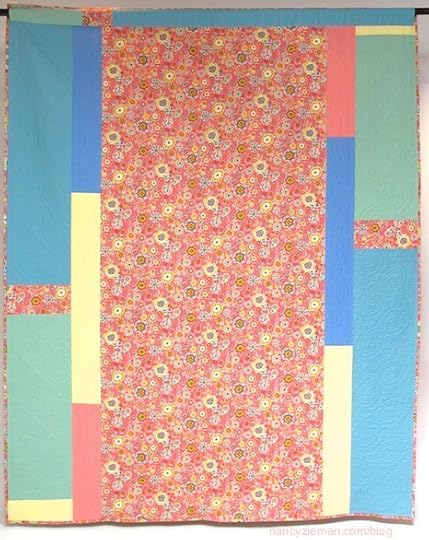
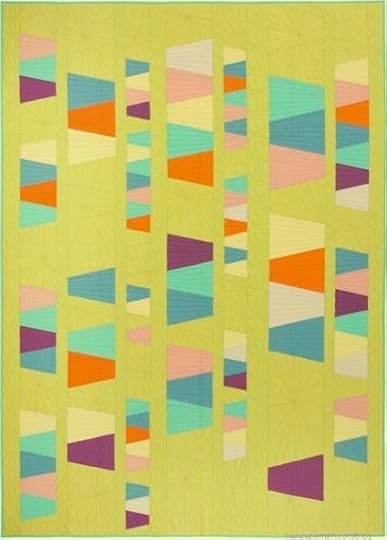
This quilt top is called the Happy-Go-Lucky Chevron Column Quilt from the Quick Column Quilts book.
Look at the Back, Then the Front!
A queen-sized quilt, which this is, would normally require three lengths of fabric. Not so with this creative option.
The front view is a version of the Heartbeat quilt from Quick Column Quilts.
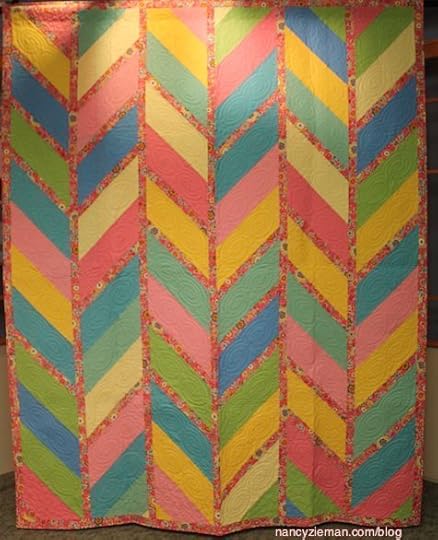
The Back Can Be as Interesting as the Front
A leftover column from the quilt front serves as the focal point for the quilt back. Notice how the quilting stitches really add to the design of the quilt back.
The face of the quilt is called Wind Chimes, another of the projects from Quick Column Quilts.
Make 12+ Bold & Beautiful Designs
The instructions for these three featured quilts, plus 10 more are all found in Quilt Column Quilts.

Bye for now,
Content in this feed is © copyright 2014 by Nancy Zieman and may not be republished without written permission. You’re welcome to forward the email to a friend or colleague but it’s not okay to add the RSS feed automatically as content on a blog or other website.
September 6, 2014
How to Embroider a Scarf that Makes a Difference

September is Ovarian Cancer Awareness Month. Usually I begin a blog posting with sewing, quilting, or embroidery techniques and tips. This time I thought it would be appropriate to begin by passing along the early symptoms of ovarian cancer.
Be Aware
In some cases, ovarian cancer may cause early symptoms. The most common symptoms of ovarian cancer as reported by Mount Sinai Hospital include:
Abdominal Bloating
Feeling full quickly while eating
Pelvic or abdominal pain or pressure
Urinary urgency or frequency
Changes in bowel habits
Abnormal vaginal bleeding or discharge
Back pain
Unexplained weight gain or loss
If you have one or more of these symptoms, and it occurs almost daily for more than two or three weeks, talk with your doctor.
Be The Difference
The Be The Difference Organization supports ovarian cancer research. One of its fundraising programs includes the Embroider a Cure embroidery collection with 20 support-ribbon embroidery designs. A portion of the proceeds from the Embroider a Cure embroidery collection goes to the Be The Difference Organization,
Be Creative!
Use the embroidery designs to add awareness. Here’s how I embellished a scarf.
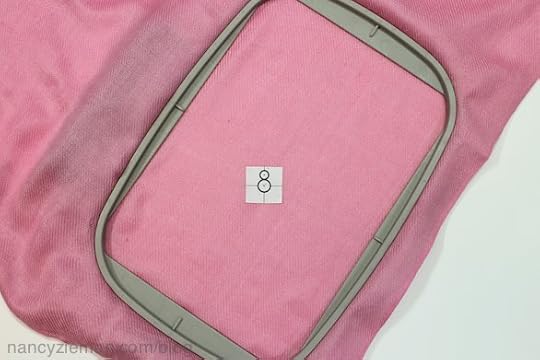
First, I hooped the scarf with a wash-away stabilizer behind the fabric. (You can’t see the stabilizer in this photo, but you’ll see it in a later photo.)
After printing out the template of the embroidery design, I positioned it at an angle on my scarf.
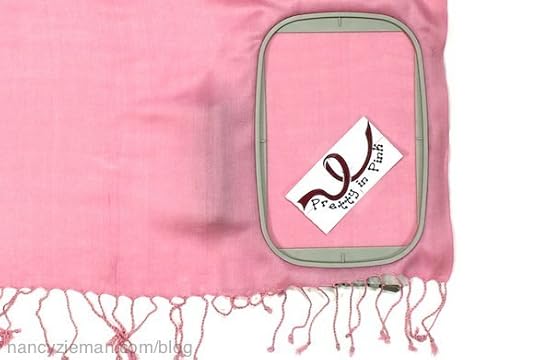
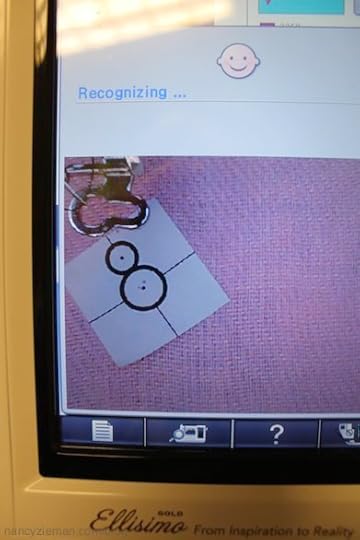
I placed a positioning sticker on the fabric directly underneath the crossmark on the template. This is Baby Lock’s positioning sticker, but you can use other versions.
After attaching the hoop to my machine’s embroidery unit, I depressed the scanning feature. The camera in my Baby Lock Ellisimo Gold looked for the positioning sticker and aligned the embroidery at the same angle. When the machine embroidered the design, it was just where I wanted it—a pretty amazing feature!
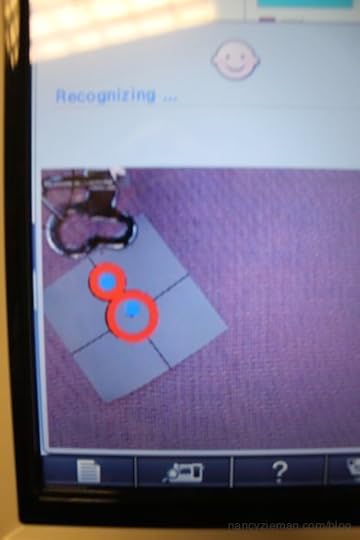
At this point, the machine was ready to stitch the embroidery at the same angle that I determined.
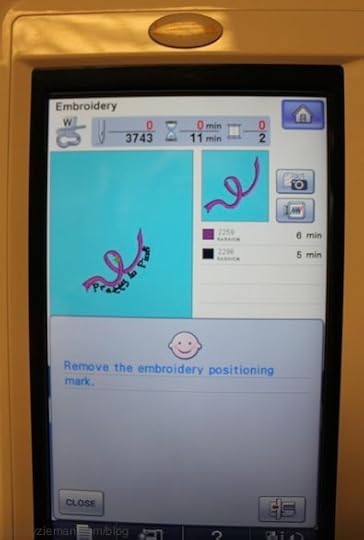
I added a topping stabilizer, a water-soluble stabilizer. Office tape is how I kept it in place!
All that was left was to depress the Start button.
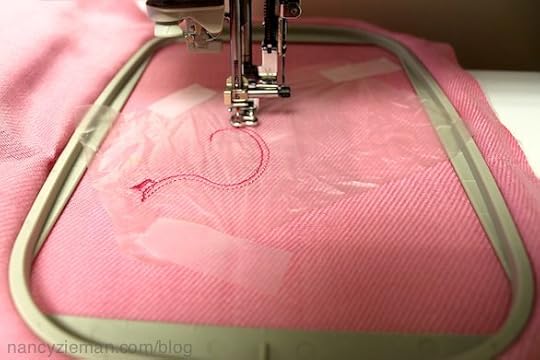
After the embroidery was complete, I tore away the water-soluble topping stabilizer and spritzed the remaining stabilizer with water to remove the excess.
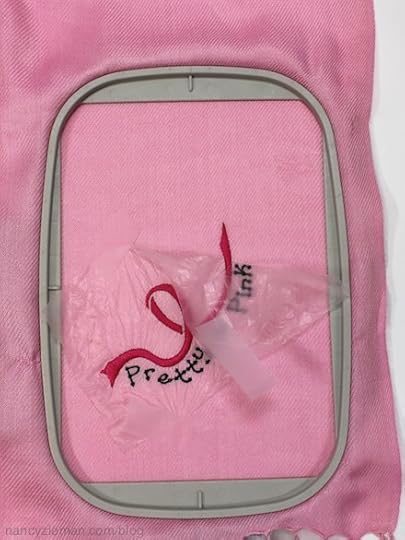
I removed the fabric from the hoop and cut away the excess stabilizer on the back of the design. Note: You can immerse the fabric in water to remove the excess water-soluble stabilizer, providing the scarf fabric is washable!


For more ideas on using the Embroider a Cure Design Pack view my earlier post, Sew A Makeup Bag that makes a Difference.
In Memory
Helen Gardner founded the Be the Difference Foundation. In three years, the foundation has raised over one million dollars for ovarian cancer research and awareness. Very sadly, Helen passed away on August 20, 2014. Click here to read a touching tribute to Helen, a valiant crusader of ovarian cancer research and awareness, by her friend and mine Eileen Roche.
Bye for now,
Content in this feed is © copyright 2014 by Nancy Zieman and may not be republished without written permission. You’re welcome to forward the email to a friend or colleague but it’s not okay to add the RSS feed automatically as content on a blog or other website.
September 4, 2014
Quick Column Quilts—New Book, TV Series, & Blog Tour!
It’s an exciting day! Today I am announcing a new book, Quick Column Quilts, a Blog Tour, and a new 3-part Sewing With Nancy miniseries to watch online (click here) or on PBS. Plus, we’re sponsoring a super giveaway, including a Baby Lock Tempo Sewing Machine. There’s a lot going on!
First, The Sewing With Nancy TV Miniseries on Quick Column Quilts
The Quick Column Quilts miniseries is coming soon to PBS, or watch online by clicking here. Column quilts are ideal projects for quilting newbies and fresh concepts for quilting enthusiasts. During this 3-part series and in the book, I’ll show you how to replace traditional quilt blocks with sleek columns of fabric.
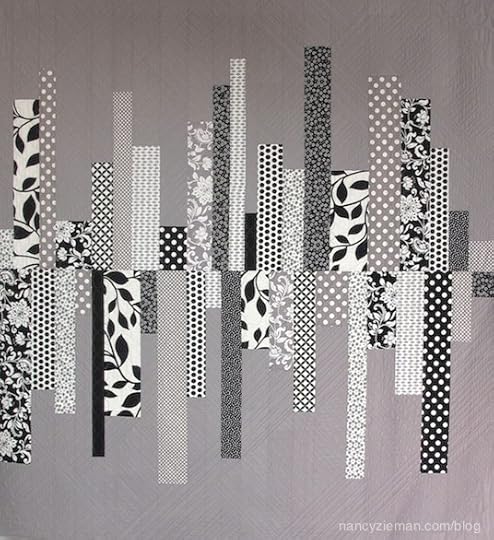
The Heartbeat Column Quilt
The design bears only a vague similarity to an echocardiogram, yet I think you can see why I chose that name! Like the rhythms of the heart, the peaks and valleys of the fabric provide a pleasing and a rhythmic movement. The stitching may be quick, yet the pleasing result is long-lasting. This is a great beginner quilting project.
Heartbeat Column Quilt—Double, Queen, or King-sized
Not limited to a baby or lap quilt, the Heartbeat Column Quilt is ideal for larger quilts. Using gray, white, and black prints with a neutral background, the quilt design takes on a modern look. To adjust to the large bed-quilt sizes, just vary the number, width, and length of the columns.
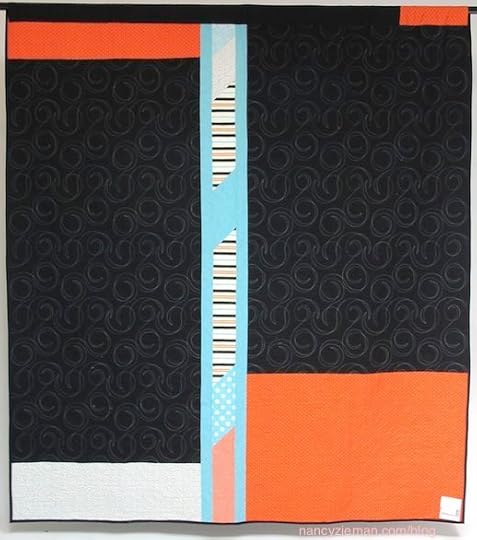
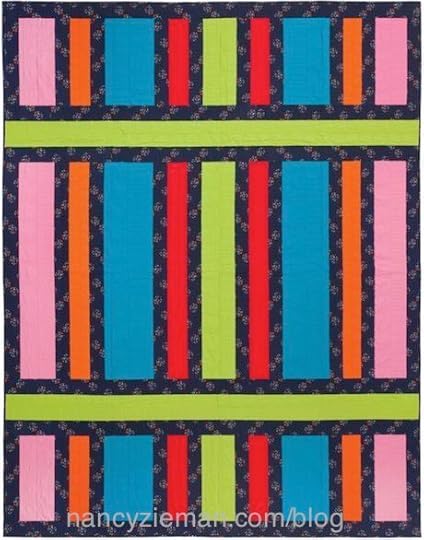
Interrupted Column Quilt
This speedy queen-sized quilt is designed with a very easy lesson in color coordination. Simply find a print you love for the narrow columns, and choose five colors from the print to use for the column colors. The interruptions—horizontal strips—stop the lengthwise movement while creating an artistic design.
Blog Tour Stops
To showcase my new book, Quick Column Quilts, and the companion TV series, you’ll be able to take a tour through the book via a Blog Tour. I’m pleased to announce that 27 bloggers will feature various projects or techniques, starting tomorrow and ending September 17th. Please follow along!
Date Link
09/04/14 Nancy Zieman
09/05/14 Quilt Taffy and Simple Simon & Co.
09/06/14 Diary of a Quilter and Stitchin Jenny
09/07/14 A Woman a Day and Craizee Corner
09/08/14 Jina Barney Designz, Lilac Lane Patterns, and Totally Stitchin’
09/09/14 Esch House Quilts and The Cottage Mama
09/10/14 Designs in Machine Embroidery and Pat Sloan
09/12/14 Happy Valley Primitives, Doohikey Designs, and Quilt in a Day
09/13/14 Quilt Dad and Just Arting Around
09/14/14 Lazy Girl Designs and Marie-Madeline Studio
09/15/14 Always Expect Moore and Polka Dot Chair
09/16/14 Amy Lou Who Sews and Riley Blake Designs
09/17/14 Indygo Junction and Amy’s Creative Side
We’re having a Super Giveaway, including a Baby Lock Tempo Sewing Machine!
Post a comment below about quilting and you’ll be eligible to be part of the random drawing for the prizes listed below. Perhaps you’re a beginner quilter, a seasoned stitcher, or someone who would like to learn to quilt. Share “Why I quilt,” or “Why I want to learn to quilt.”
The 15 lucky winners will be announced on September 20, 2014.
Baby Lock Tempo Sewing Machine , value $1,399
Six autographed copies of Quick Column Quilts by me, Nancy Zieman. Giveaway is sponsored by F & W Media.
Three Trace ‘n Create Grandmothers One-Patch Quilt Templates from Clover
One Pellon Legacy Natural Blend 80/20 Batting with Scrim—Queen Size
One Riley Blake Fabric pack for the Hit and Miss Table Runner. You’ll see that column quilt project featured in my September 11 blog.
One Clover Rotary Cradle and Cutters
One Clover Bordeaux Shears
One $50 Nancy’s Notions Gift Certificate
Thank you to our generous sponsors!
Watch Sewing With Nancy online
There are four seasons of programs to watch online, or on your iPad, iPod Touch, or iPhone. Have you downloaded the app?
Sewing With Nancy on Public TV
We have the great fortune of having Sewing With Nancy air on 91% of all Public TV markets. Your local PBS programmer determines when the new season will begin. Often, the new programming begins later on TV. Check your local Public TV and/or Create TV listing for the new season, which begins with Sew Simple with Rectangles & Squares.
Bye for now,
Nancy Zieman—author, pattern designer, businesswomen, producer, and national sewing authority—is the host of the popular show Sewing With Nancy®, which appears exclusively on public television stations across the United States and Canada. Follow Nancy’s Blog at NancyZieman.com/Blog and sign up to receive Nancy’s E-News for the latest news in Sewing, Quilting, & Creating.
Content in this feed is © copyright 2014 by Nancy Zieman and may not be republished without written permission. You’re welcome to forward the email to a friend or colleague but it’s not okay to add the RSS feed automatically as content on a blog or other website.
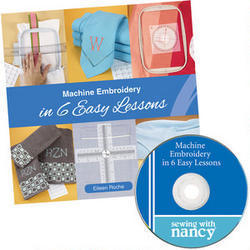
September 2, 2014
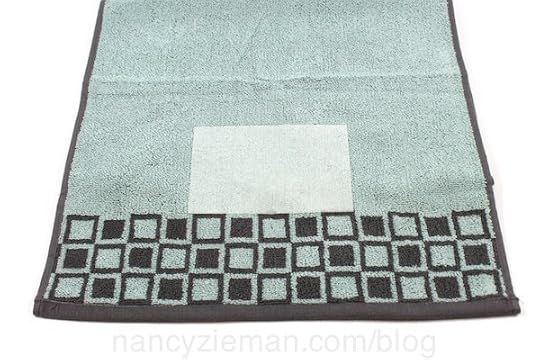
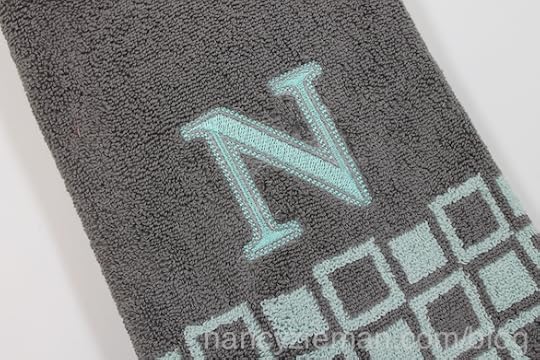
The Easiest Way to Embroider Towels
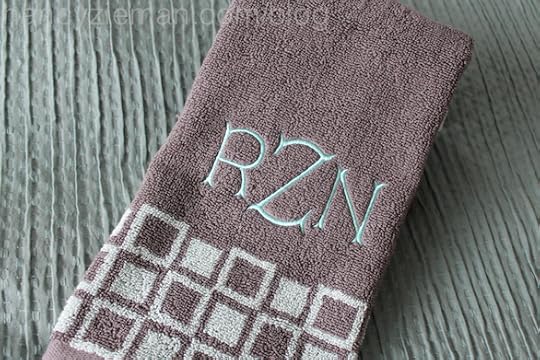
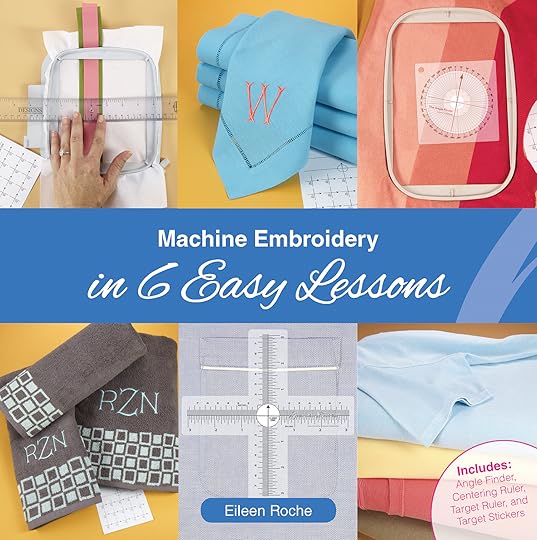
You may have seen the above towel on Sewing With Nancy when Eileen Roche and I presented a two-part series, Machine Embroidery in 6 Easy Lessons. You can watch the 2-part Sewing With Nancy TV series online: Click here to watch episode one and episode two. I use Eileen’s tips on embroidering towels over and over. Since I wanted to refresh my memory on the process, I thought you’d might like a refresher, too. Here is The Easiest Way to Embroider Towels.
Begin by Organizing the Supplies
Gather towels, fusible mesh stabilizer, wash-away stabilizer, sticky-back stabilizer, the Perfect Placement Kit with placement stickers, and a Madeira Rayon Thread.
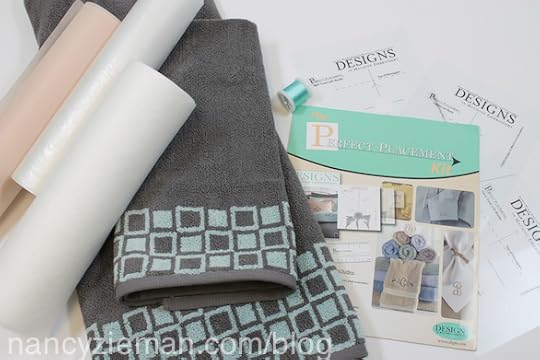
Side note: After presenting the TV series, the greatest topic of concern posted by embroiderers was, How do I choose stabilizers? The simplest recommendation is to own one stabilizer from each of the main categories: a tear-away, cut-away, wash-away, film-type water-soluble, and a water-soluble. I have a medium weight stabilizer on hand from each category—that collection of five stabilizers serves me well! (See pages 12 and 13 of Eileen’s book for more details.)
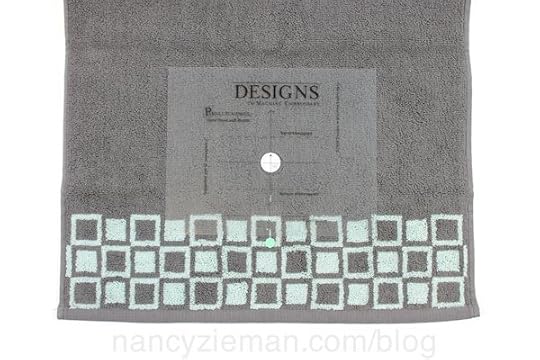
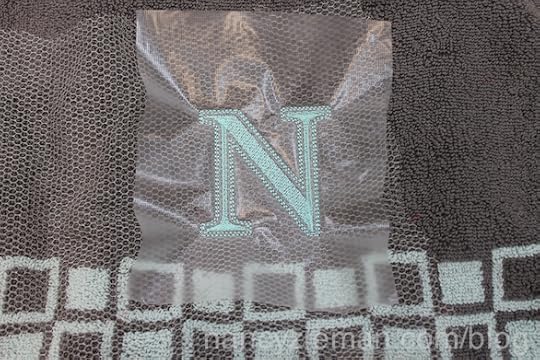
Choose Embroidery Designs
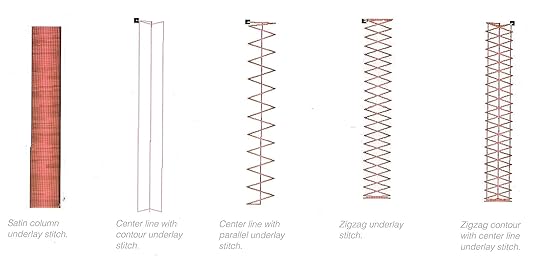
Look for monograms that have an underlay, a foundation of stitches that are stitched down prior to the satin stitches. The monograms that I chose are from the book with embroidery designs, Machine Monograms for the Home. Here’s what underlay stitches look like—big zigzag stitches! (Image is a scan from Eileen’s book.)
Bonus Tip!
If your monograms do not have underlay stitches incorporated in the digitizing, no fear! Eileen shared her tip with me on creating a faux underlay using tulle or netting. See the Bonus Tip below.
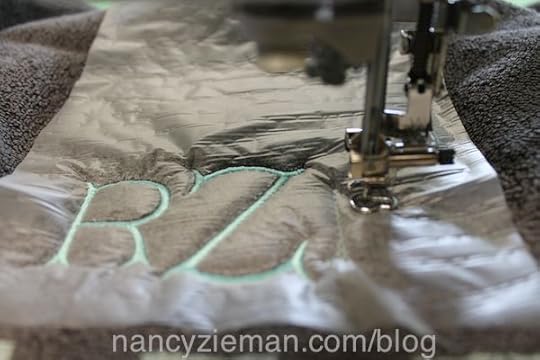
Place the Design
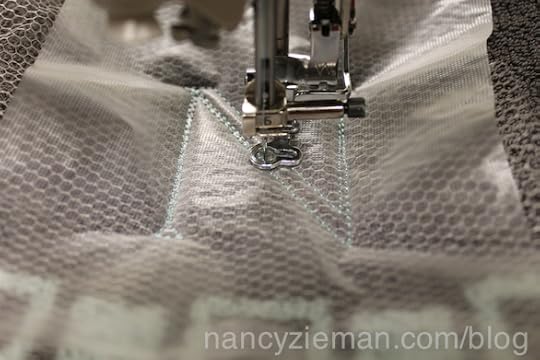
One of the keys to embroidering with terry cloth is to fuse the fusible mesh stabilizer to the wrong side of the towel in the area that will be embroidered.
Then, choose a method of positioning the design. I used one of the templates from the Perfect Placement Kit and added a placement sticker in the opening.
Hoop the Stabilizer
Using Eileen’s Hooping Stabilizer technique, page 40 in her book, I hooped an adhesive stabilizer, scored the paper cover, and removed the paper within the hooped area.
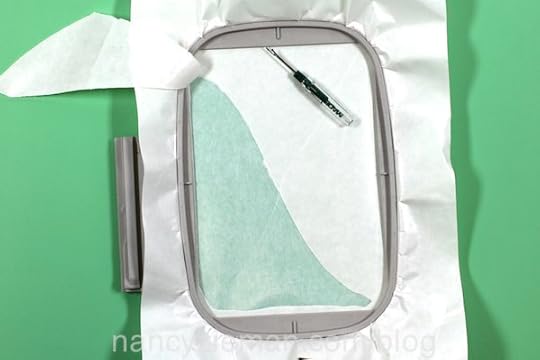
Place the towel over the adhesive stabilizer, aligning the arrows of the target sticker as squarely as possible in the hoop.

Stitch!
Place a top stabilizer, wash-away , when monogramming towels. More is better when it comes to stabilizers and embroidering.
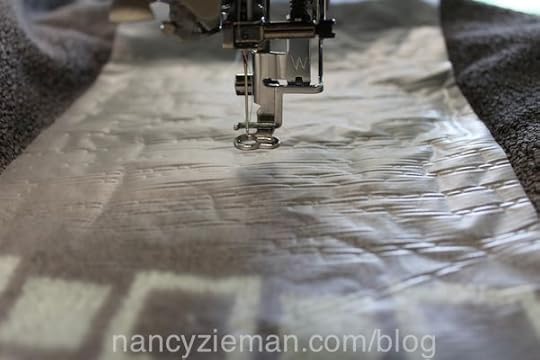
Hit “start” and watch the magic begin.
Just like that!
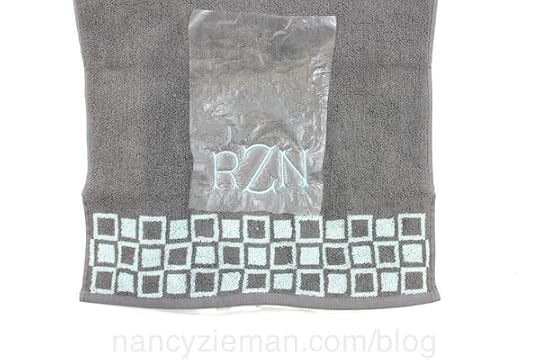
Finish the process
Remove the top and underneath stabilizers.
Bonus Tip
I chose an embroidery design that didn’t have underlay stitches to show you how to make any monogram stitches workable on napped fabrics.
Place a layer of tulle or netting on top of the towel.
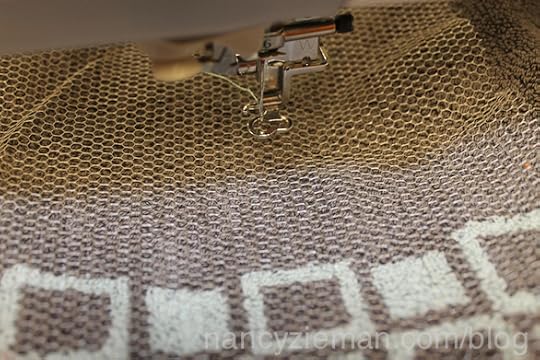
Add the wash-away top stabilizer on top of the netting.
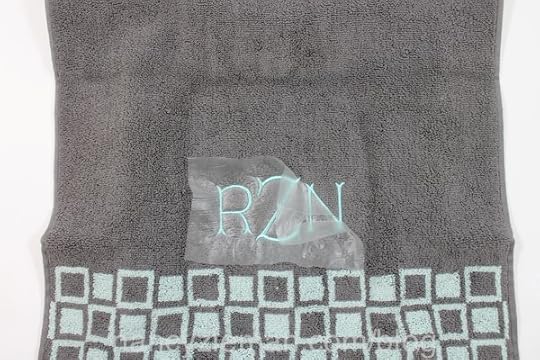
Embroidery is complete, but the finishing touch is next.
Tear away the wash-away stabilizer and the tulle or netting ! The stitching perforates both layers.
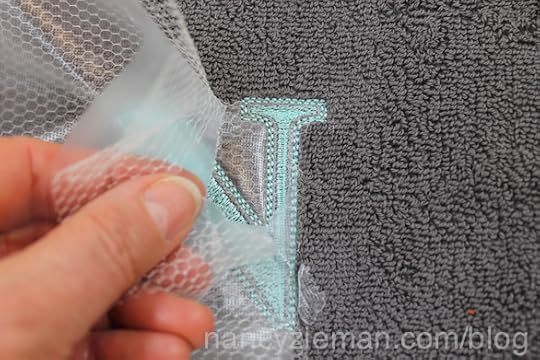
Ta da!
Here’s a Handy Reference Book
Machine Embroidery in 6 Easy Lessons book and DVD is what I use when needing an embroidery refresher course.
Bye for now,
Content in this feed is © copyright 2014 by Nancy Zieman and may not be republished without written permission. You’re welcome to forward the email to a friend or colleague but it’s not okay to add the RSS feed automatically as content on a blog or other website.
August 30, 2014
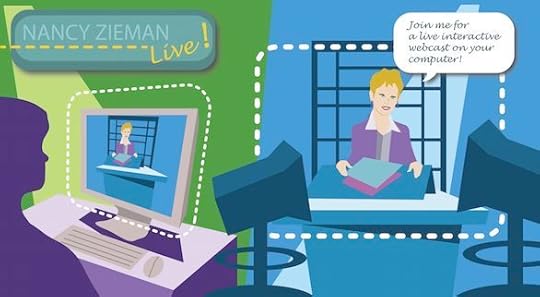
Learn “Nancy Zieman’s 25 Favorite Quilting Techniques” in a Webcast
Join me for a live, interactive webcast on September 13
Whether you like traditional or modern quilts, you’ll love this webcast! You’ll learn 25 of my favorite quilting techniques, demonstrated with close-up details during the live webcast on Saturday, September 13. If you’re wondering, What is a webcast?, I’ll get to that. First, here are just a few of the techniques and tips you’ll learn.
• Learn a New Spin on Quilting Basics—from cutting strips to binding, learn clever ways to update your quilting skills.
• See how to take the hassle out of quilting—use creative tools to streamline traditional quilting techniques.
• Save those fabric scraps—see how even small pieces of fabric can make a large impact.
• Create an easy modern quilt—receive a downloadable project sheet for my brand-new quilt, I See Spots. This quilt is truly easy!

What’s a Webcast?
If that’s a question you’re asking, here’s the answer!
First of all, it’s a live 90-minute online class that comes to your home via computer. Click below to watch the video, which explains, What’s a webcast?
http://www.youtube.com/watch?v=JB81ov92OAI
For those who register, we’ll send you a link to the webcast the day before the event, September 12. On the day of the event, September 13, a few minutes before your scheduled time, log on. In minutes, you’ll see me live on your computer screen.
Wondering if your Internet connection is up to the task? Test your viewing ability by clicking here. This test link is live. If you can see a rock ledge and coastal waves, you’ll be able to watch Nancy Zieman Live. (Most of you should not have any issues watching the video.)
It’s Interactive
During the webcast, email your questions to me, and I’ll answer them right then and there! *
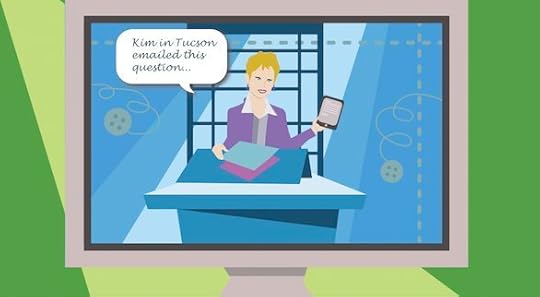
*If every question cannot be answered during the webcast, questions will be answered post-webcast via email. Duplicate questions will not be answered.
View the Webcast after September 13
For those of you who register, you’ll be able to rewatch the 90-minute presentation as often as you’d like for 30 days after the live webcast.
Save
Exclusive online specials will be available to you from Nancy’s Notions on the day of the webcast.
Viewer Comments from Past Webcasts
“It was as though I was in a class and could see more detail than actually being there.”
“Thank you for the live webcast and do more of them! It’s refreshing, cutting edge, and very inclusive for those who can’t attend sewing and quilting events in our local neighborhoods.”
“You can see the details on the webcast so much better than being in a shop and having a demonstration. There was great interaction with e-mailing Nancy.”
Register today! Early Bird Special—Save $10
One Price—Two Time Options
Register before September 7 and pay only $19.95 for the 90-minute webcast on September 13. (Price after September 7 is $29.95.)
The fee includes:
A link to watch one of the two Nancy Zieman Live webcasts (A link to webcast will be emailed to participants on September 12.)
The ability to have your questions answered during the webcast
A link to specials offered by Nancy’s Notions
A free downloadable quilt project sheet
The ability to rewatch the webcast as often as you’d like for 30 days after the initial presentation.
Two Time Options
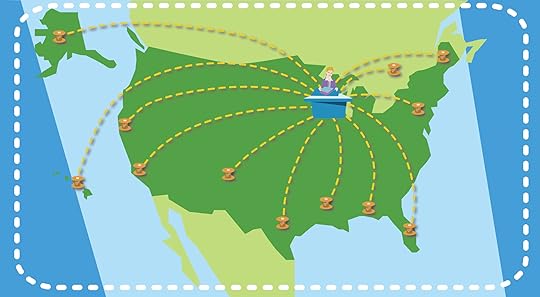
There are two time options for the 90-minute webcast to accommodate North American Time Zones.
Both webcasts will cover the same topics. Since they’re both live, each will be personalized by the questions or, hmm, my whims! The webcast will be recorded and made available to registered attendees. The link to rewatch the webcast will be emailed to registered attendees in the days following the webcast.
We’ll be broadcasting live from the Central Time Zone. Register for a time that best fits your schedule.
September 13: Times/time zone for Webcast Option One:
11:00 AM—12:30 PM (Eastern Time)
10:00 AM—11:30 AM (Central Time)
9:00 AM—10:30 AM (Mountain Time)
8:00 AM—9:30 AM (Pacific Time)
7:00 AM—8:30 AM (Alaska Daylight Time)
5:00 AM—7:30 AM (Hawaii-Aleutian Standard Time)
September 13: Times/time zone for Webcast Option Two:
2:00 PM—3:30 AM (Eastern Time)
1:00 PM—2:30 PM (Central Time)
12:00 PM—1:30 PM (Mountain Time)
11:00 AM—12:30 PM (Pacific Time)
10:00 AM—11:30 AM (Alaska Daylight Time)
8:00 AM—9:30 AM (Hawaii-Aleutian Standard Time)
(For our followers in other parts of the world, convert your time zone by clicking here. We’ll be broadcasting live from Beaver Dam, WI—not far from Madison, WI.)
Select your preferred time below and click the “buy now” button:
Select a time option
Option One 10:00 AM to 11:30 AM (Central Time) $19.95 USD
Option Two 1:00 PM to 2:30 PM (Central Time) $19.95 USD

Thank you to our sponsors
Hope to see you September 13th!
If you have questions or comments, please contact us.

Thank you for all your comments regarding my new Sewing With Nancy 3-part series, Sew Simple with Rectangles & Squares. If you missed the blogs about this topic, here are links to see the 12 easy-to-sew project ideas. The blog titles were: 26 New Sewing With Nancy Programs, Sew Simple with Rectangles & Squares, and How to Sew with Clear Vinyl—A Noticeable Difference!
The random winner of a copy of Sew Simple with Rectangles & Squares book is Chris Andrew. She says, “I would make the fabric bins. We live in a motor home 7 months of the year, and the fabric bins are lightweight and beautiful to look at.”
Bye for now,
Nancy Zieman—author, pattern designer, businesswomen, producer, and national sewing authority—is the host of the popular show Sewing With Nancy®, which appears exclusively on public television stations across the United States and Canada. Follow Nancy’s Blog at NancyZieman.com/Blog and sign up to receive Nancy’s E-News for the latest news in Sewing, Quilting, & Creating.
Content in this feed is © copyright 2014 by Nancy Zieman and may not be republished without written permission. You’re welcome to forward the email to a friend or colleague but it’s not okay to add the RSS feed automatically as content on a blog or other website.
August 28, 2014
How to Sew with Clear Vinyl—A Noticeable Difference!
Incorporating specialty fabrics can add functionality when sewing gifts and projects. For example, try clear vinyl. This unique fabric is the star of the Sewing With Nancy program, Sew Simple with Rectangles & Squares—the third episode. Watch online by clicking here. Here’s a preview of the projects that you’ll see demonstrated during the show.
Jewelry Caddies
I began this episode with a Jewelry Caddy duo, which fits all of the standards set for this show. The caddies use two sizes of fabric rectangles, specialty fabric (clear vinyl with a ribbon accent trim), and all the sewing is done with straight stitches. Best of all, the projects are attractive and very practical!
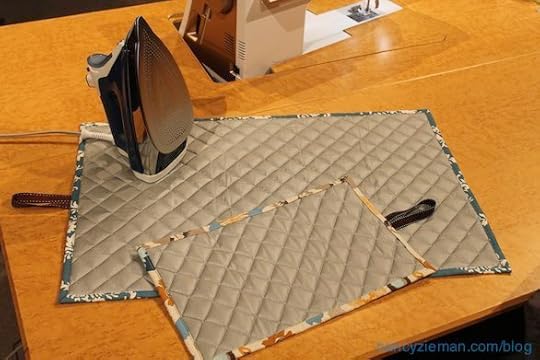
Portable Ironing Blanket
Use the same dimensions and many of the same fabrics as the jewelry caddies to make a portable mini-ironing blanket. Use it next to your sewing machine for quick presses. Or, create a larger ironing blanket, any size of your choice, with the same transportability. It could easily be used as an ironing board substitute or for travel. Either way, you can custom-make these projects easily with my sew simple techniques.
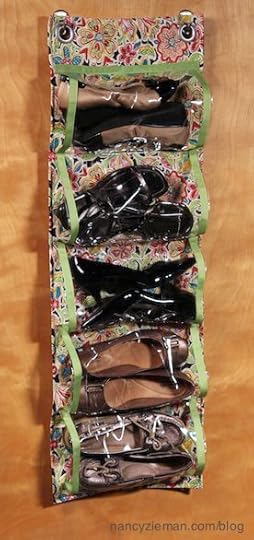
Closet Organizer
How about adding extra storage to your home without assembling knock-down furniture or remodeling a closet? Create portable, compact closet organizers with double-sided quilted fabric, clear vinyl, and ribbon trim. It’s another straight-stitched project that can hang in full sight or hidden behind a closet door.
Watch Sewing With Nancy online.
There are four seasons of programs to watch online, or on your iPad, iPod Touch, or iPhone. Have you downloaded the app?
Sewing With Nancy on Public TV
We have the great fortune of having Sewing With Nancy air on 91% of all Public TV markets. Your local PBS programmer determines when the new season will begin. Often, the new programming begins later on TV. Check your local Public TV and/or Create TV listing for the new season. Watch the three episodes of Sew Simple with Rectangles & Squares online.
Watch episode one, click here.
Watch episode two, click here.
Watch episode three, click here.
12 Complete Projects are featured in Sew Simple with Rectangles & Squares
Fabrics by Riley Blake Designs
A special thank you to Riley Blake Designs for providing the fabrics for this program. Look for fabrics by Riley Blake Designs at your favorite retailer.


What’s your favorite project from this series? A random winner will receive a copy of Sew Simple with Rectangles & Squares. The winner will be posted on August 30th.
Bye for now,
Content in this feed is © copyright 2014 by Nancy Zieman and may not be republished without written permission. You’re welcome to forward the email to a friend or colleague but it’s not okay to add the RSS feed automatically as content on a blog or other website.
Nancy Zieman's Blog

- Nancy Zieman's profile
- 21 followers

