
Nancy Zieman's Blog, page 134
December 18, 2014
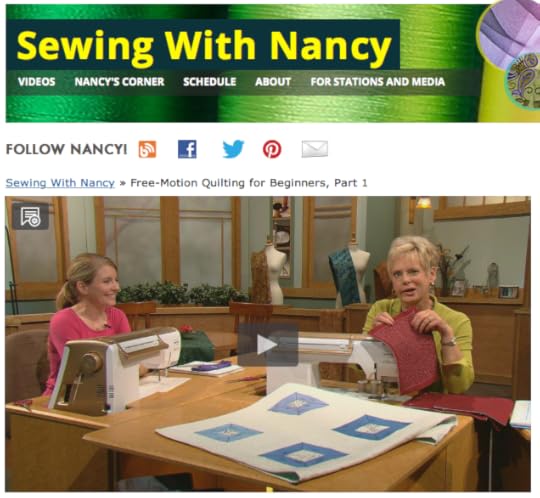
Free-Motion Quilting for Beginners
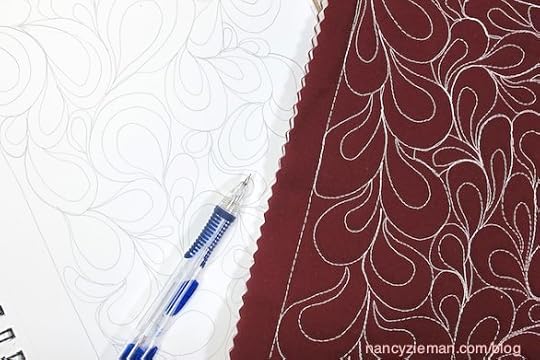
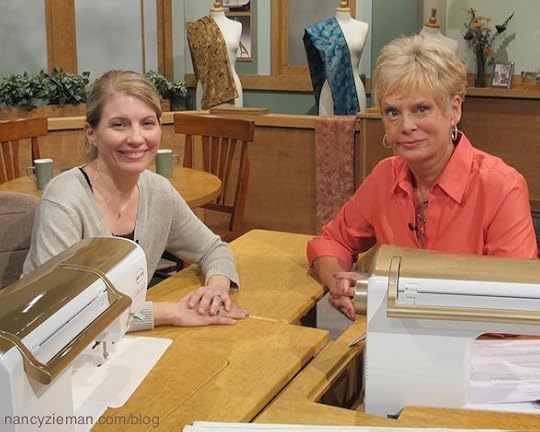
Free-motion quilting—that’s a technique that most beginner quilters wouldn’t consider learning. Not so according to Sewing With Nancy guest, Molly Hanson, who taught herself free-motion quilting early in her sewing career. Molly’s goal is to instill confidence in new quilters.
Free-Motion Quilting for Beginners is this week’s online Sewing With Nancy feature. Watching Molly free-motion quilt is the best way to learn her techniques. Watch online, on Public TV, or on DVD.
Stippling
The most common free-motion quilting technique is stippling. Its versatility, light texture, and ability to blend and not compete with the piecing make it a favorite among quilters. If you’ve been hesitant to learn this technique, fear not! Learn and use Molly’s muscle memory technique to master this first of many free-motion quilting options.
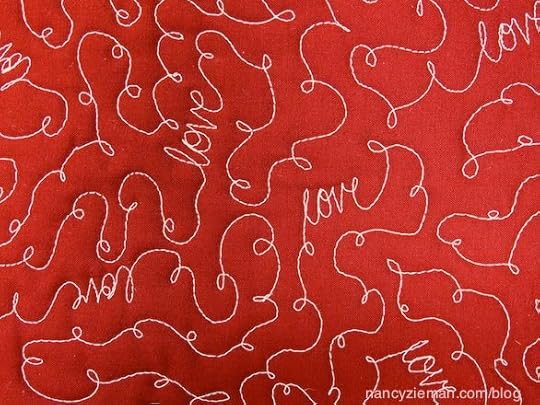
Loop de Loops and Handwriting
What free-motion design should I stitch first? Where should I start? These are questions that you might ask. Molly’s answer is, “Start by stitching your name or a favorite word!” The basic loop de loop design—just like cursive—allows you the freedom to incorporate words into free-motion quilting designs.
Pebbles and Chains
Pebbles and Chains consist of a space filled with as many touching circles as possible. Pebbles can fit just about anywhere. Even a single row of pebbles, called a chain of pearls, can be beautiful in small spaces.
10 Free-Motion Quilting Techniques, Plus 15 Projects
In Molly’s book, Free-Motion Quilting for Beginners, learn how to:
Set up your machine for free-motion quilting, no technique is left out
Begin by learning how to quilt your name, because soon you’ll be signing unique works of art
Master all the fundamentals of free-motion quilting by working on manageable fat-quarter-sized fabric pieces
Confidently stitch 10 different quilting designs, including stippling variations, pebbles, square meander, swirls, and woodgrain
Take your skill to new heights as you quilt 15 practical projects to enhance your daily life, such as a table-top organizer, table runner, tote bag, weekender bag, and laptop sleeve


For a chance to win a copy of Free-Motion Quilting for Beginners, let us know which free-motion style is your favorite. A random winner will be announced on January 1.

The random winner of The Absolute Easiest Way to Sew is Clara who said, At one time I made all my clothes and did not have to alter the pattern. It has been a few years since I have sewn apparel. Now that my body has changed I find that using the pattern without altering is not possible and is a problem for me. So, an easy pattern altering and fitting would be extremely helpful. Thank you for all you do for us.
Watch Sewing With Nancy online.
There are four seasons of programs to watch online, or on your iPad, iPod Touch, or iPhone. Have you downloaded the app?
Bye for now,

Content in this feed is © copyright 2014 by Nancy Zieman and may not be republished without written permission. You’re welcome to forward the email to a friend or colleague but it’s not okay to add the RSS feed automatically as content on a blog or other website.


December 16, 2014
How to Sew Simple Christmas Tree Napkins
With two coordinating fabric prints and a little serging savvy, you’re on your way to creating functional as well as festive napkins. Give a set as a gift, or make a set for your holiday entertaining. It’s a fun, easy project.
Here’s a preview of the process.
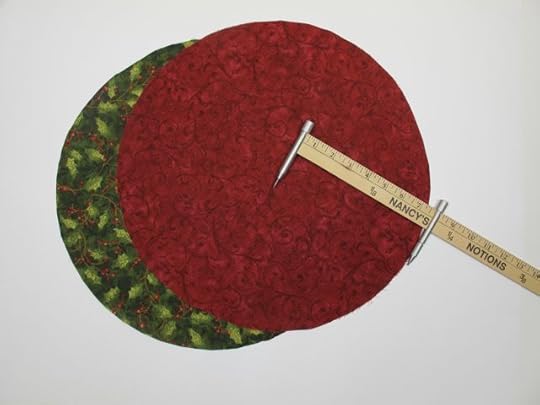
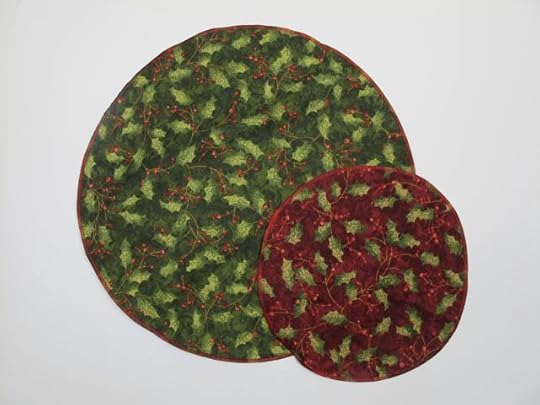
Cut 16″ circles for dinner napkins or 10″ circles for dessert napkins. Place wrong sides together. Use the Yardstick Compass to draw accurate circles.
Serge edges with a 3-thread narrow overlock stitch.
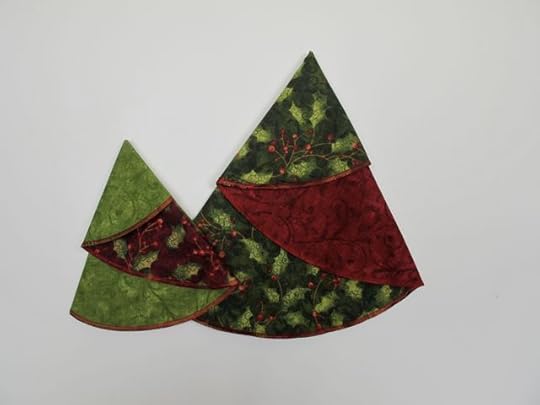
Creatively fold the napkins. Fold top of napkin to back about 1/3 of the way down. Fold one edge 1/3 to front. Fold remaining edge to back.
Watch the video to see detailed instructions on how to make and fold the napkins!
http://www.youtube.com/watch?v=KUYXTN36tHU
Bye for now,
Content in this feed is © copyright 2014 by Nancy Zieman and may not be republished without written permission. You’re welcome to forward the email to a friend or colleague but it’s not okay to add the RSS feed automatically as content on a blog or other website.
December 13, 2014
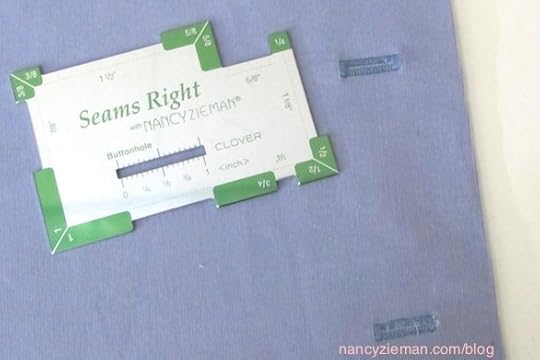
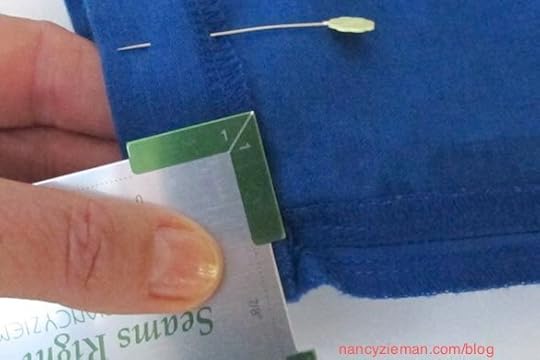
Seams Right—One of the Handiest Sewing Notions
I was recently asked what I like about the Seams Right sewing and quilting notion. I like it when I’m asked easy questions! Here’s my list.
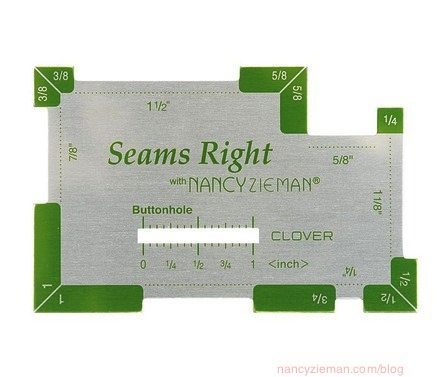
13 Measurements—The Size of a Credit Card
We purposely designed this tool to be the size of a credit card. Why? It’s a convenient size that comfortably fits in our hand. (The credit card companies did that research for us!)
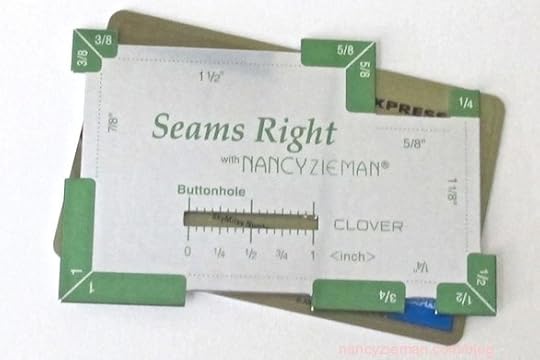
Within the compact size, there are six extended green tabs. These are the most common seam measurements for quick and easy reference.
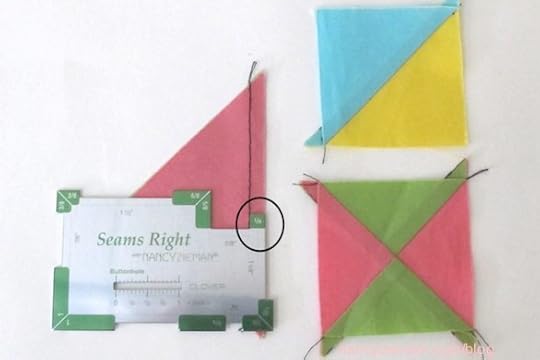
I frequently use the 1/4″ for quilting, especially when checking the accuracy of my seam allowance. Note: When making 1/2- and 1/4-square triangles that are used within the same block, it’s imperative that the seams are exactly 1/4″; otherwise, the finished components of the block will not be the same size. For more details on creating triangles, read my blog on Create No-Hassle 1/2-Square Triangles and No-Hassle 1/4-Square Triangles.
Hems frequently are 1″ wide. Need I say more?

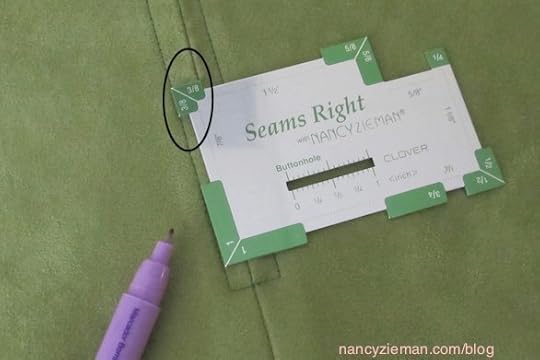
It’s curious how many times a 3/8″ seam is needed. Before topstitching the zipper, a stitching line was marked. Handy!
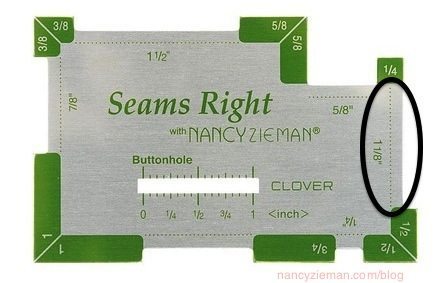
Also notice the six interior measurements. I’m surprised how often I reference the 1-1/8″ measurement!
Then, there’s the buttonhole guide. After I determine the distance from the centerfold, I mark the starting and ending point for all the buttonholes. Presto—uniform sizes.
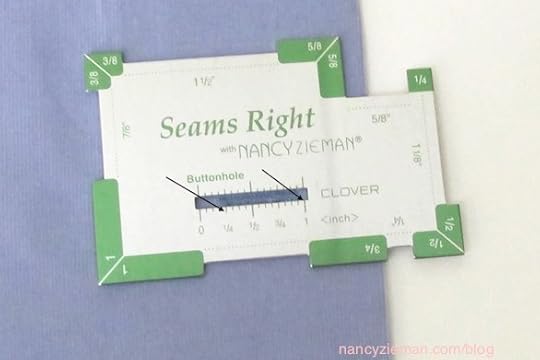
Why do I use the Seams Right sewing and quilting gauge? The simple answer— it’s handy!
For a chance to win a Seams Right tool compliments of Clover, let me know how you use this handy gauge.
Bye for now,
Nancy Zieman—author, pattern designer, businesswoman, producer, and national sewing authority—is the host of the popular show Sewing With Nancy®, which appears exclusively on public television stations across the United States and Canada. Follow Nancy’s Blog at NancyZieman.com/blog and sign up to receive Nancy’s E-News for the latest news in Sewing, Quilting, & Creating.
Content in this feed is © copyright 2014 by Nancy Zieman and may not be republished without written permission. You’re welcome to forward the email to a friend or colleague but it’s not okay to add the RSS feed automatically as content on a blog or other website.
December 11, 2014
The Absolute Easiest Way to Sew Invisible Zippers

Sew it simple. Sew to have fun. How? It’s straightforward after you learn The Absolute Easiest Way to Sew! This time, learn how to insert an invisible zipper. To seamlessly—pun intended—insert an invisible zipper into the seam use this modified approach, attaching the facing before sewing the zipper. It’s a new approach and one of my absolute easiest sewing tips.
How to Insert an Invisible Zipper
Stitch the shoulder seams and underarm seams of the top or dress.
Fuse interfacing to the front and back neckline facing fabrics.
Stitch the shoulder seams of the facing pieces.
Do not stitch the center back seam at this point.
Align the facing to the garment, right sides together, matching notches.
Stitch the facing to the neckline.

Grade the seam allowances, using a pinking blade with a rotary cutter for the fastest and easiest results.

Press the seam allowances toward the facing.
Understitch, stitching the seam allowances to the facing. Use a multizigzag.

Flatten out the zipper tape, pressing the teeth to the outside.
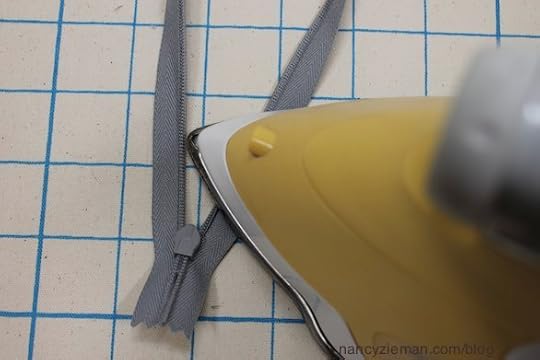
Place a piece of tape or a pin above the zipper stop on one side of the zipper.
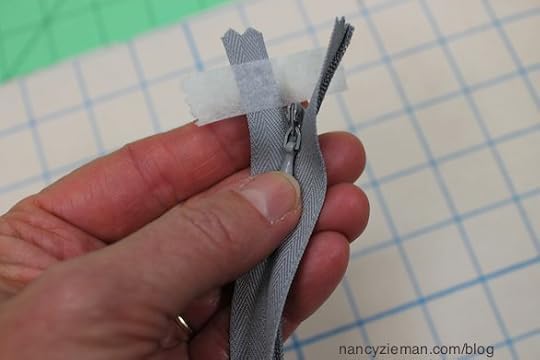
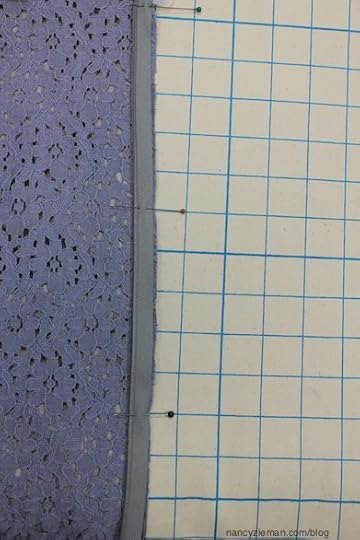
Mark the 5/8″ seam allowances along both sides of the center back seam. Begin marking at the neckline seam, and continue marking the length of the zipper opening.
Align one side of the zipper tape to the corresponding side of the dress, meeting the zipper teeth to the 5/8″ marking and placing the zipper top slightly below the neckline seam.
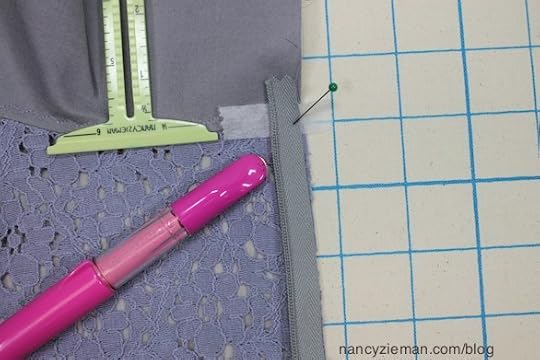
Pin one side of the zipper to the fabric.
Attach the I nvisible Zipper Foot . Starting at the neckline seam, position the presser foot on top of the zipper tape with the needle stitching along side of the zipper teeth.
After stitching, close the zipper to check that the zipper stop is directly below the neckline seam.
Align the second half of the zipper at the top of the neckline, placing the remaining side of the zipper at the same distance from the top of the neckline.
Align the zipper teeth to the marking; pin. Then, stitch the zipper to the remaining side of the dress/top.

After stitching, check to make certain the neckline edges align.
Fold the facing over the zipper tape; hand stitch.

Pin the lower portion of the seam from the hem to the end of the zipper.
Move the invisible zipper foot completely to the left of the needle. Stitch from the zipper stopping point to the hem.

Ta da!

The Invisible Zipper technique, plus much more is printed in The Absolute Easiest Way to Sew.

Kudos to Diane Dhein, the editor, and Laure Noe, the illustrator, for making this book possible.
The Absolute Easiest Way to Sew chapters include:
Sewing Notions
Sewing Machine Confidence
Serger Spotlight
Patterns
Fabric Facts
Sewing Basics
Beyond the Basics

Watch Sewing With Nancy online.
There are four seasons of programs to watch online, or on your iPad, iPod Touch, or iPhone. Have you downloaded the app?
For a chance to win a copy of The Absolute Easiest Way to Sew book, let me know what sewing tip/technique you like the most or would like help fine-tuning.
Bye for now,
Content in this feed is © copyright 2014 by Nancy Zieman and may not be republished without written permission. You’re welcome to forward the email to a friend or colleague but it’s not okay to add the RSS feed automatically as content on a blog or other website.
December 9, 2014
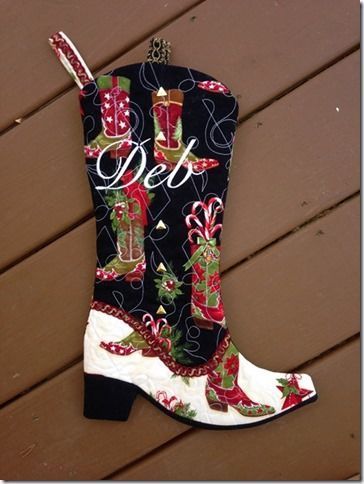
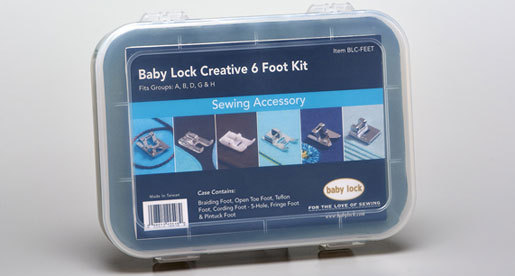
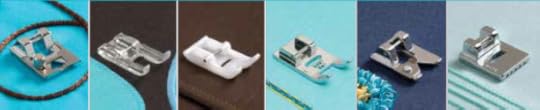
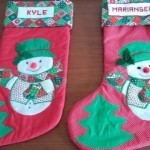
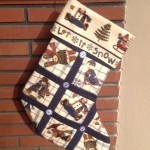
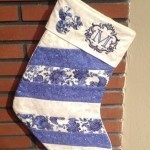
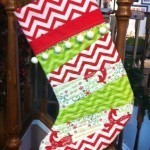
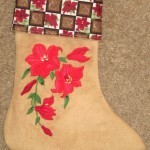
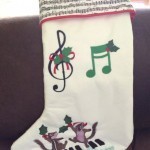
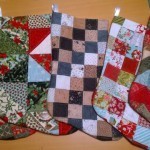
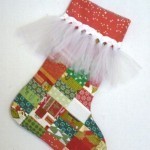
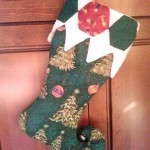
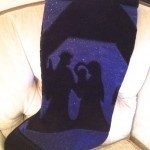
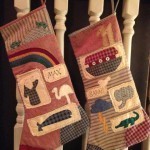
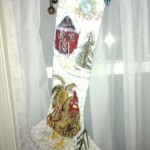
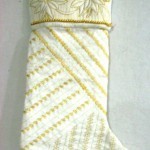
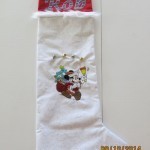
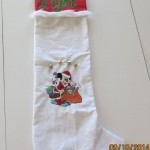
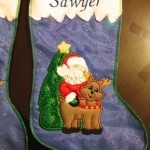
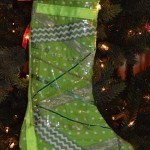
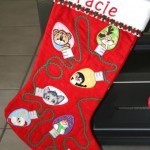
Christmas Stocking Challenge Winners Announced
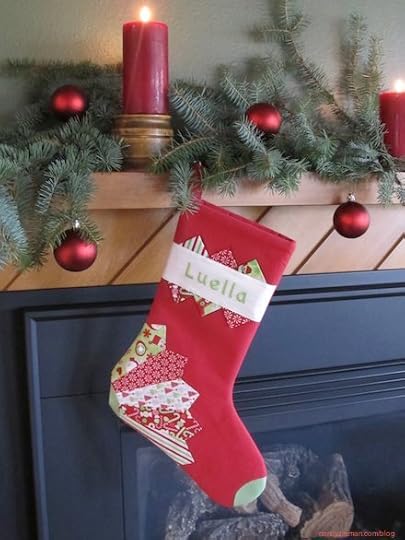
Christmas Stocking Challenge Winners Announced!
In my November 4 Blog Posting, readers were invited to participate in our Christmas Stocking Sewing Challenge. Each participant used a pattern from one of the stocking projects on Pellon’s website or Baby Lock’s website.
To celebrate the start of the Christmas Season, I challenged readers to sew up to three Christmas stockings—using as much creativity as they’d like. 48 amazing stocking entries were received. Readers cast their votes for their favorite Christmas Stocking, December 2–8.
Congratulations to everyone who accepted my challenge to stitch and submit a stocking. Your sewing creativity is impressive! Be sure to view all 48 Christmas Stocking Entries in my December 2 blog posting.
Here’s a listing of the prizes and Winning Stockings:
Baby Lock Creative 6-Foot Kit, $99 value from Baby Lock, goes to Carole D. for her Cowboy Boot Stocking:
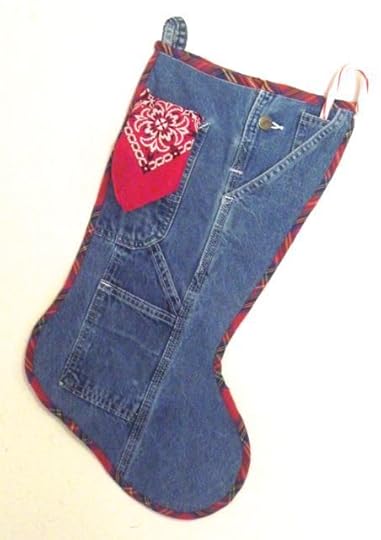
A Bundle of Products from Pellon , $75 value, goes to Jan C. for her Denim Stocking:
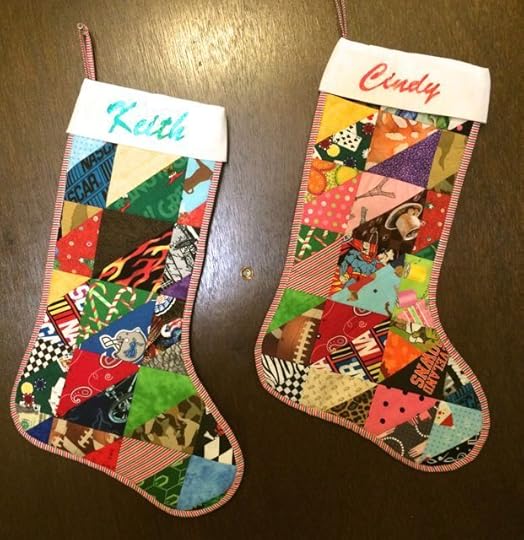
Bordeaux Scissors from Clover, $54.00 value, goes to Cynthia C. for her Patchwork Stockings:

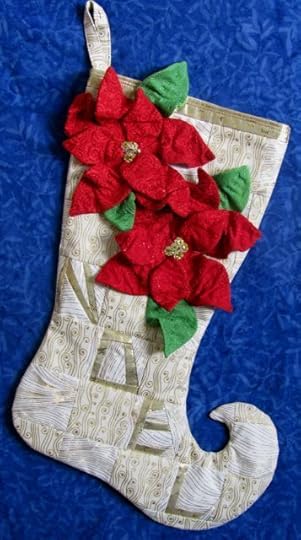
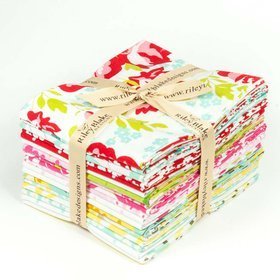
A Fat Quarter Fabric Bundle from Riley Blake Designs goes to Marjory P. for her Noel Stocking:
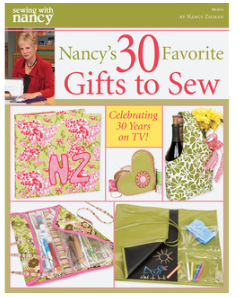
Nancy Zieman Books: Seams Unlikely and Nancy’s 30 Favorite Gifts to Sew, $31.98 value from Nancy’s Notions, goes to Sandy for her Patchwork Stocking:


Thank you to our sponsors!

Bye for now,
Nancy Zieman—author, pattern designer, businesswoman, producer, and national sewing authority—is the host of the popular show Sewing With Nancy®, which appears exclusively on public television stations across the United States and Canada. Follow Nancy’s Blog at NancyZieman.com/Blog and sign up to receive Nancy’s E-News for the latest news in Sewing, Quilting, & Creating.
Content in this feed is © copyright 2014 by Nancy Zieman and may not be republished without written permission. You’re welcome to forward the email to a friend or colleague but it’s not okay to add the RSS feed automatically as content on a blog or other website.
December 6, 2014
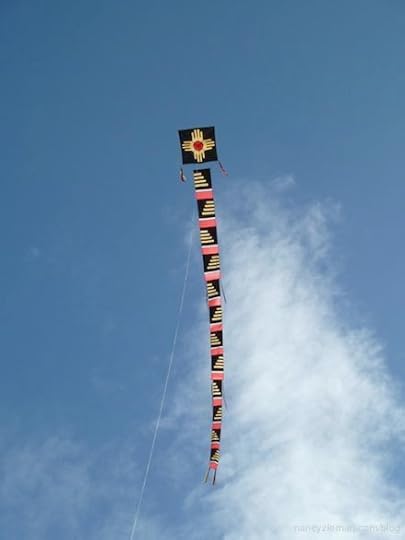
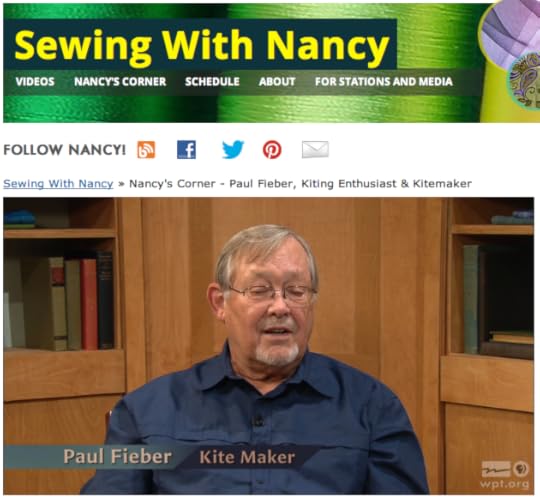
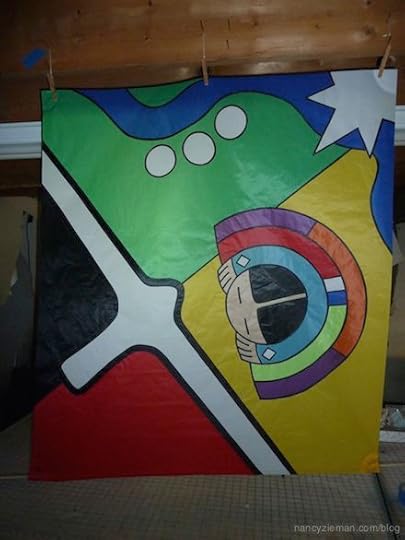
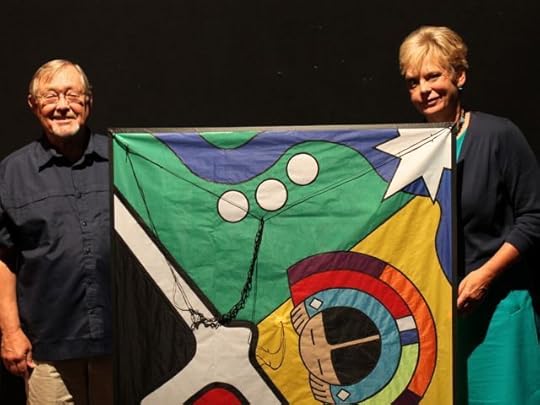
How to Sew a Kite!
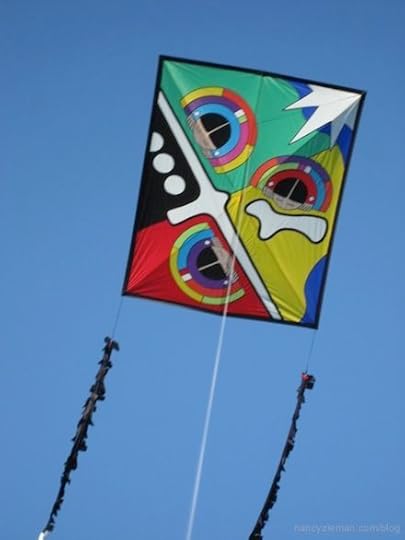
Ever consider sewing a kite? Paul Fieber, a recent Nancy’s Corner Guest on Sewing With Nancy, shares his love of kite flying and sewing. I know you’ll be impressed with his technique.
Watch my Sewing With Nancy interview with Paul Fieber
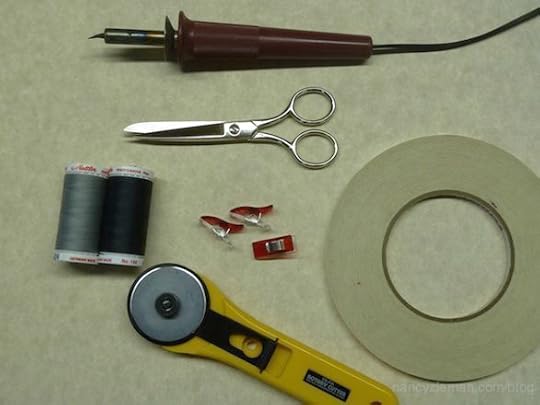
Fabrics and Supplies:
Fabric: Rip Stop nylon sailcloth (not the ripstop fabric sold as clothing)
Hot tacker: Wood burner with very fine point
Sewing Machine: Only a zigzag and straight stitch are typically needed
Thread: All-purpose polyester thread
Needles: Microtex (sharp) 11/12
Scissors : Good quality with narrow, sharp tips
Tape: Double-sided for holding fabric where necessary
Light table : Very useful for laying fabric on the working pattern
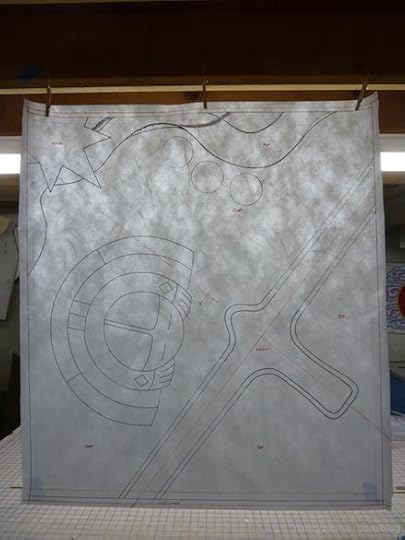
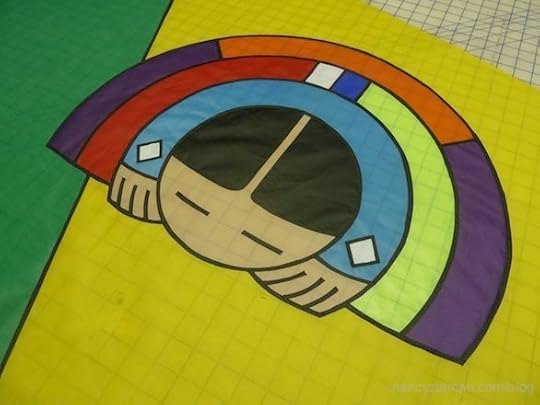
Kitemaking Techniques by Paul Fieber
The kite design is based on a Mound Builder’s theme by Giambattista della Porta. The finished kite shown in the photos is 41″ x 46″.
Step 1 Create a full-sized pattern
Decide on the kite’s style and draw out a full-size shape on paper. Since you’ll be stitching from the back of the kite, the kite image will be the reverse image of the drawing.
Or, draw the design or a traced shape onto light-colored paper and attach to a smooth wall.
Use a fine-point black Sharpie to darken the lines for your final working pattern. Take your time on this step since the lines become your stitching lines and fabric layout.
Option: If you have a way to enlarge your design by the use of a projector, tape a large sheet of paper to a smooth wall and trace the larger design on the paper.
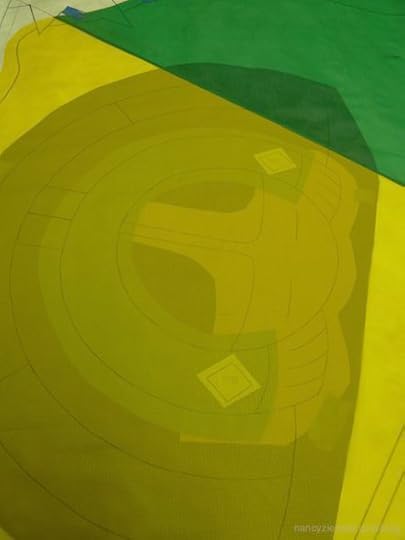
Step 2 Trace stitch lines and layer fabric
Select fabric colors based on the design.
Find the “lightest” color and cut a rectangle or square slightly larger than the full pattern size. This is the base of your kite.
Trace the lines on this “light” colored base fabric. These will be your stitching lines. Then, begin layering the other fabrics under this piece to introduce the color scheme.
Finish the layering process with black fabric at the front (face of the kite).
Step 3 Hot tack layers together
Hot tack layers every couple of inches on the lines to “pin” all the pieces together. Tack carefully and quickly. Avoid large holes but tap just enough to connect all layers together. (If available, a light table makes this step much easier.)
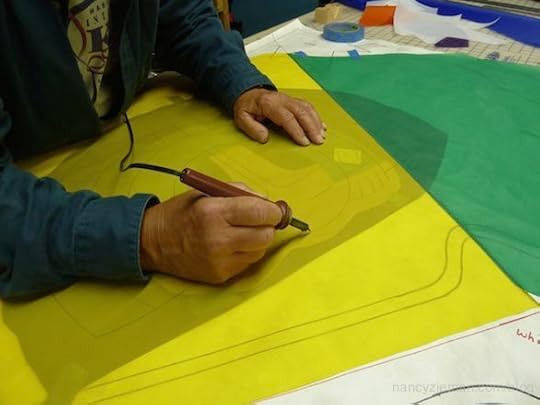
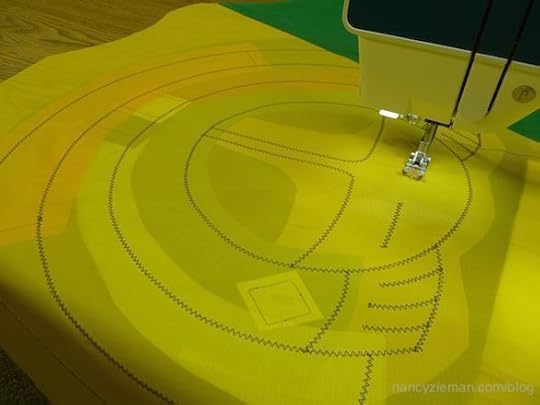
Step 4 Stitch from the back
Stitch using a zigzag stitch. I usually use a 3.3 mm wide by 4.0 mm long zigzag for this step. It helps to begin sewing where two or more lines meet. And, if the design permits, stitch the longest continuous and more centered lines first to avoid shifting fabric as much as possible.
Backstitch at the beginning and ending of a stitching line to strengthen the kite for heavier winds. Backstitching is also helpful where lines meet or severe direction change occurs.
Step 5 Cut away fabric to reveal design
Now the fun part. Removing fabric to reveal colors is the next process. I generally complete the back of the sail first, then finish up on the face of the kite. Make sure you work on a smooth surface. Practice on some scraps before moving on to your precious kite sail.
To get the working point of your scissors into the right layer, cut a small slit (very, very carefully!) with a #16 X-acto blade held backwards. Or, you might be more comfortable using a sharp pin to lift the fabric before cutting a slit.
If you have to go through more than one layer to find the color you seek, open up the first opening a bit and cut another slit to get at the next layer. Then, run your scissors to the beginning of the stitch, snip and turn left. Always cut from the left of the stitch and open the scissors only a 1/4″ or so. The idea of this technique is to put some tension on the layer (or layers) being removed with your non-scissors hand, then run the scissors along the stitch but not too close. If you hear or feel your scissors rubbing along the stitch, you are too close! A single layer is cut easily. Multiple layers are more difficult. But if you feel the scissors grab, make sure you are not hung up in a stitch, and if not, make a snip or two rather than forcing the cut.
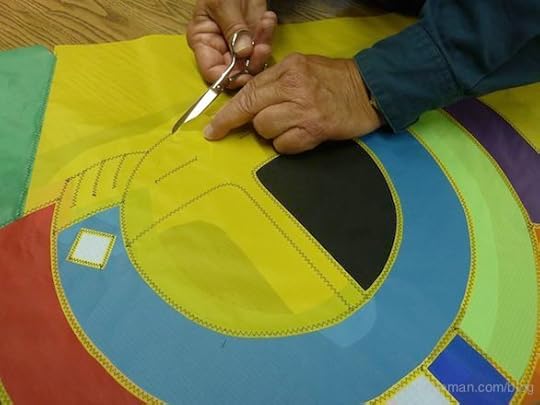
Step 6 Finish module from the front
After removing all the unwanted fabric at the back, and removing (and wasting) a lot of black fabric at the front, you’ll achieve the desired “stained glass” effect.
It is helpful if the design permits working in modules or sections. This is a good way to proceed, because it limits the number of times you have to push the entire sail material back and forth through the sewing machine arm.
Step 7 Finish raw kit
Since the gold and green right side of the sail was joined earlier, I was able to add in (again by layering) the blue river, the North Star and a few round burial mounds. This was also done without the lower left side fabric being in place. I then added the black and red background with the white eagle effigy mound using the same layering technique to essentially finish the sail.
This is how the kite looks before the 5/8″ black hem was added on the edges.
For questions or comments, please contact Pau Fieber. His email address is bethewind@yahoo.com for you to copy and paste in an email.
Thank you, Paul!
Thanks for leaving comments to my blog titled Seams Unlikely—Book Club Ideas. The random winner of my autobiography Seams Unlikey is Erin M. Her comment is: Dear Nancy, I must purchase your book to read your inspiring life story. You have been a part of my life for many years and even my husband knows your name and business! I just finished reading Joni Eareckson Tada’s autobiography called “Joni, An Unforgettable Story.” Her diving accident at age 17 left her a quadriplegic, she suffered from depression and tremendous struggles, but God brought her through all of this to lead a ministry to disabled persons and their family members as well as wheelchair distribution across the world. I would love to read your story, because no doubt God has been using you in wonderful ways to touch many of us through the years. Each one of us is precious to the Lord and He wants to use the full potential in each of us. Thank you for what you have meant to me!

Bye for now,
Nancy Zieman—author, pattern designer, businesswoman, producer, and national sewing authority—is the host of the popular show Sewing With Nancy®, which appears exclusively on public television stations across the United States and Canada. Follow Nancy’s Blog at NancyZieman.com/blog and sign up to receive Nancy’s E-News for the latest news in Sewing, Quilting, & Creating.
Content in this feed is © copyright 2014 by Nancy Zieman and may not be republished without written permission. You’re welcome to forward the email to a friend or colleague but it’s not okay to add the RSS feed automatically as content on a blog or other website.
December 4, 2014
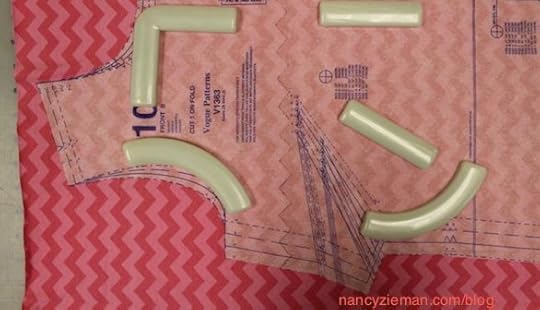
The Absolute Easiest Way to Sew Collars
I’m going to make a rather bold statement: Collars are so easy to sew that even a first time stitcher will have success. I know, that kind of statement is out of character for me, but it’s true. Let me show you . . .
The Absolute Easiest Way to Sew Collars
In my newest Sewing With Nancy series and companion book, I share my favorite absolute easiest way to sew techniques. The collar being my signature speedy sewing tip. Here goes!
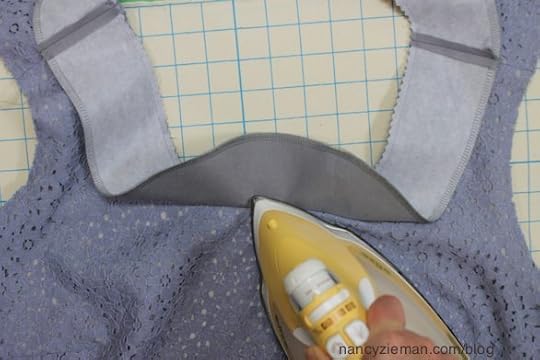
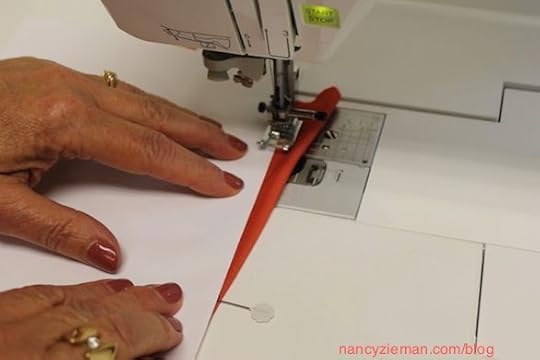
Interface the collars. Cut out two collar shapes from lightweight fusible interfacing and fuse one to the wrong side of each collar. One of my favorite fusible interfacings is Pellon’s Sof Shape .
Meet collars right sides together. Stitch the outer collar seam.
Grade the seam, trimming the under collar seam allowance narrower than the upper collar.

Press the seam flat; then press toward the under collar.
Understitch, stitching the seam allowance to the under collar. I like to use a multizigzag. Or, you could use a straight stitch.
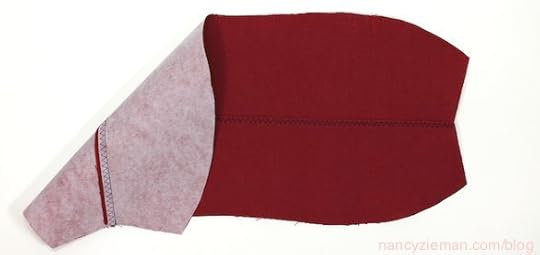
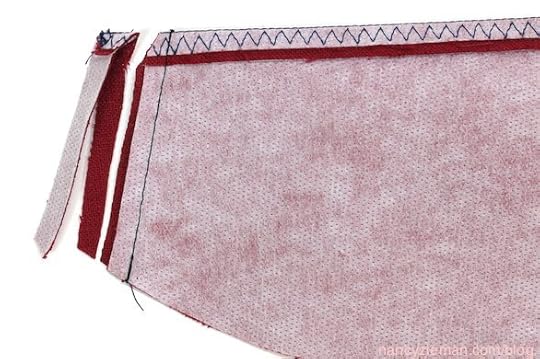
Fold the collar along the first stitching line, right sides together. Meet the collar front edges. Notice the outer collar seam allowance is already graded (trimmed) and completely understitched. This wrapped-corner sewing technique is what makes it the absolute easiest way to sew collars!

Stitch both collar front seams.
Grade the seam allowances, and angle cut the corners.
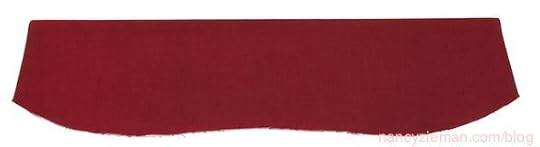
Turn the collar right side out and press. That’s it!
There’s more to learn; watch Sewing With Nancy online.
During this second episode of The Absolute Easiest Way to Sew, I show several other rather nifty sewing techniques. You’re going to have to watch to see what’s waiting for you there!
Did you watch the first episode of The Absolute Easiest Way to Sew?
There are four seasons of programs to watch online, or on your iPad, iPod Touch, or iPhone. Have you downloaded the app?
My favorite sewing tips in one book
The Absolute Easiest Way to Sew chapters include:
Sewing Notions
Sewing Machine Confidence
Serger Spotlight
Patterns
Fabric Facts
Sewing Basics
Beyond the Basics
For a chance to win a copy of The Absolute Easiest Way to Sew book, let me know what sewing tip/technique you like the most or would like help fine-tuning.
Bye for now,
Content in this feed is © copyright 2014 by Nancy Zieman and may not be republished without written permission. You’re welcome to forward the email to a friend or colleague but it’s not okay to add the RSS feed automatically as content on a blog or other website.
December 2, 2014
Christmas Stocking Sewing Challenge–Voting Begins
The Christmas Stocking Challenge Voting Day is Here!
In my November 4 Blog Posting, readers were invited to participate in our Christmas Stocking Sewing Challenge. Each participant used a pattern from one of the stocking projects on Pellon’s website or Baby Lock’s website.
To celebrate the start of the Christmas Season, I challenged readers to sew up to three Christmas stockings—using as much creativity as they’d like. As you can see, the sewing creativity is impressive!
Vote for Your Favorite Christmas Stocking
Cast a vote for your favorite Christmas Stocking (one vote per person). Voting is open December 2–8. Let your friends know that you’re a contestant! Click on images to view larger photos.


Note: There is a poll embedded within this post, please visit the site to participate in this post’s poll.
Here’s a listing of the prizes that will be awarded to the top five vote contenders:
Baby Lock Creative 6-Foot Kit, $99 value from Baby Lock.
A Bundle of Products from Pellon , $75 value
Bordeaux Scissors from Clover, $54.00 value
A Fat Quarter Fabric Bundle from Riley Blake Designs
Nancy Zieman Books: Seams Unlikely and Nancy’s 30 Favorite Gifts to Sew, $31.98 value from Nancy’s Notions
Thank you to our sponsors!
2014 Christmas Stocking Sewing Challenge Schedule
December 2: Vote for your favorite Christmas stocking December 2–8 (one vote per person). Let your friends know that you’re a contestant!
December 9: Check our blog for the list of winners.
The random winner of a copy of Quiltmaker’s 100 Blocks Vol. 10 is Janet Frank who said, Such a unique block! I can see a quilt of 4 blocks, 1 for each season. Can’t wait to try my hand at it!
Bye for now,
Email challenge questions to info@ziemanproductions.com. Challenge not open to Sponsors, employees, and immediate family members. Photos and techniques may be featured in future promotions, blog posts, videos, and/or TV shows.
Nancy Zieman—author, pattern designer, businesswomen, producer, and national sewing authority—is the host of the popular show Sewing With Nancy®, which appears exclusively on public television stations across the United States and Canada. Follow Nancy’s Blog at NancyZieman.com/Blog and sign up to receive Nancy’s E-News for the latest news in Sewing, Quilting, & Creating.
Content in this feed is © copyright 2014 by Nancy Zieman and may not be republished without written permission. You’re welcome to forward the email to a friend or colleague but it’s not okay to add the RSS feed automatically as content on a blog or other website.
November 29, 2014
The Absolute Easiest Way to Sew
I can think of about two to three different ways to stitch most techniques, yet I generally use just one method. What do I choose? The absolute easiest way, of course!
This week’s featured online Sewing With Nancy program is the first of a 3-part series on The Absolute Easiest Way to Sew.
Use just a few pins for pattern layout
Starting with pattern layout, cutting, and marking, learn ways to streamline and improve your sewing skills.
Do sewing darts have you in a dither?
Learn how to use an index card or sticky notes as the sewing guide for effortless dart stitching, It’s the next Absolute Easiest technique.
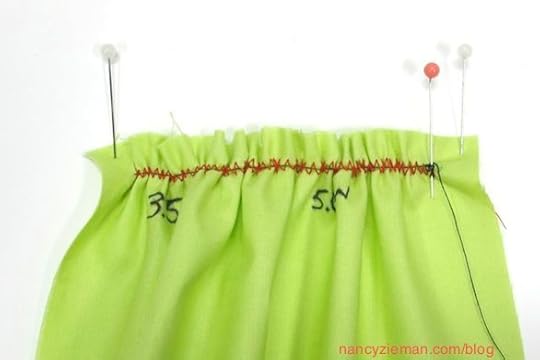
One size does not fit all when it comes to sewing gathers!
Type of fabric, the width of the seam allowances, and the project dictate the absolute easiest way to add gathers to fabrics. I show you four options during this TV episode, plus there are more in the book, The Absolute Easiest Way to Sew.
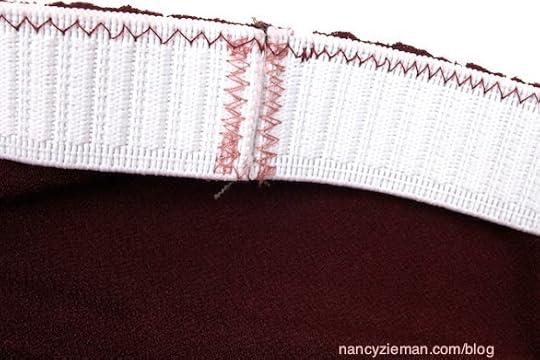
Changing the rules is part of the sewing game
When adding elastic to knits, you’ll find this, by far, the simplest way to a sew casing. You’ll be stitching less and enjoying it more.
There’s a secret trick when sewing a casing in sportswear
You’ll think to yourself, Why didn’t I think of that!” (Watch online for the trick.)
My favorite sewing tips in one book
The Absolute Easiest Way to Sew chapters include:
Sewing Notions
Sewing Machine Confidence
Serger Spotlight
Patterns
Fabric Facts
Sewing Basics
Beyond the Basics
Watch Sewing With Nancy online.
For a chance to win a copy of The Absolute Easiest Way to Sew book, let me know what sewing tip/technique you like the most or would like help fine-tuning.
The random winner of Mary Mulari’s All Occasion Fabric Wraps is Sandi who said, I love the Go-Two Wrap as it looks so versatile!
Bye for now,
Content in this feed is © copyright 2014 by Nancy Zieman and may not be republished without written permission. You’re welcome to forward the email to a friend or colleague but it’s not okay to add the RSS feed automatically as content on a blog or other website.
November 28, 2014
Seams Unlikely—Book Club Ideas
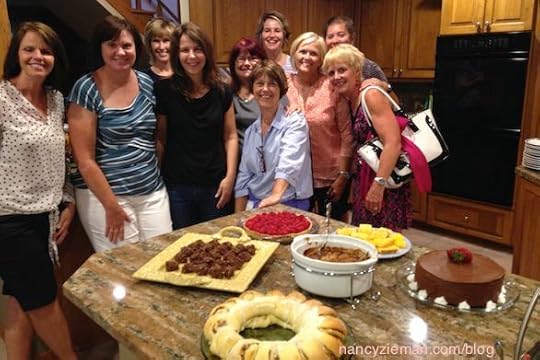
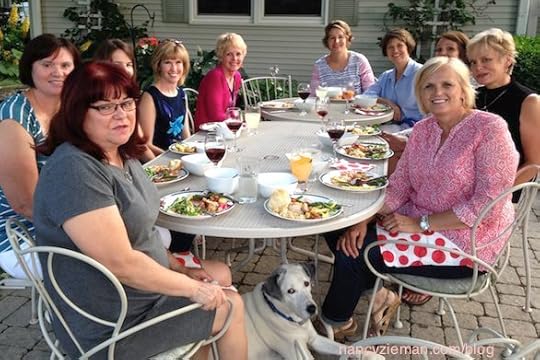
When Cheryl from our book club asked me on the side what I thought about choosing my autobiography, Seams Unlikely, as the next book choice, I quickly said, I don’t think so! Having my friends and acquaintance discuss my life in my presence would be comparable to wearing a skimpy swimming suit on a public beach. Regardless, the majority ruled and Seams Unlikely became our July book club topic.
Like many book clubs, our group meets once a month, rotates between homes, and gathers at the designated date at 7:00 for a potluck meal. The challenge is to bring a dish to pass that is referenced in the book or a food that is associated with the region or country. We had lots of desserts for the Seams Unlikely potluck. Hmmm, does that give you any indication of my life!
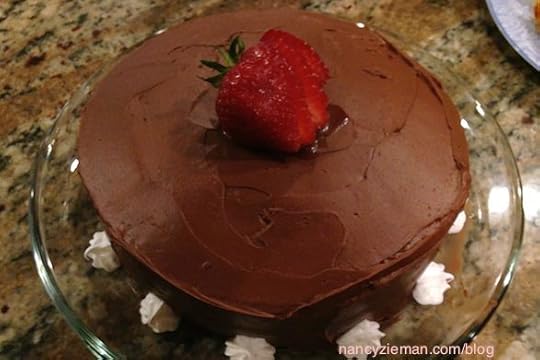
From Seams Unlikely page 90 — It may seem like a small thing, but I’ll never forget that cake and the welcome relief her visit brought us. Our moods lifted—mother’s and my own–while we savored Betty’s cake and company. That experience taught me a lot about the gift of food. When you don’t know how to help someone, get into the kitchen and bake!
Why I Wrote an Autobiography
I feel compelled to explain that writing an autobiography was not on my bucket list! But I often say, Google made me do it!
http://www.youtube.com/watch?v=VdPAsdOJ21I
Book Discussion Fostered Sharing
I live a low-key life in our little town, so being the focal point of our book club was slightly disconcerting. After lively discussion, people sharing where they laughed—where they cried, I asked each fellow book club member to share something about their lives that most people around the table wouldn’t know. The next hour of discussion was engaging, insightful, and created a tighter bond.
Seams Unlikely Book Club Questions
Not having prepared a list of questions for Seams Unlikely, I searched and found a generic list of questions applicable for an autobiography prepared by Bellingham Public Library. Here is a short list of the questions that you might consider.
What did you know about the subject prior to reading this book?
Did you learn anything new about this person?
If you knew of the subject before, did anything you read change your opinion?
Is this someone you would want to know or have known?
What did you find to be the most interesting events in this book?
What, if anything, surprised you?
If this person impacted history, discuss what may have been different without his or her presence.
Compare this book to others your group has read. Is it similar to any of them?
What did you like or dislike about the book that hasn’t been discussed already?
Would you recommend it to a friend?
What Books Have You Been Reading?
Our book club is always looking for book suggestions from the classics to current. For a chance to win a copy of Seams Unlikely, share what you’ve been reading and why you would or would not recommend the book.
Bye for now,
Nancy Zieman—author, pattern designer, businesswoman, producer, and national sewing authority—is the host of the popular show Sewing With Nancy®, which appears exclusively on public television stations across the United States and Canada. Follow Nancy’s Blog at NancyZieman.com/Blog and sign up to receive Nancy’s E-News for the latest news in Sewing, Quilting, & Creating.
Content in this feed is © copyright 2014 by Nancy Zieman and may not be republished without written permission. You’re welcome to forward the email to a friend or colleague but it’s not okay to add the RSS feed automatically as content on a blog or other website.
Nancy Zieman's Blog

- Nancy Zieman's profile
- 21 followers

