
Nancy Zieman's Blog, page 62
June 20, 2019
Sew Simple with Rectangles & Squares – Part Two

From gift giving to personal sewing, Nancy Zieman found many projects could be stitched from the simplest shapes. We’ve already shared the first episode of the three-part series, Sew Simple with Rectangles & Squares, on Sewing With Nancy. This blog focuses on part two of the series, sharing useful, yet clever items such as: Hold-it Sacks, Mini Fabric Sacks, Fabric Bins, and Wall Pockets. With 12 complete projects in all, you won’t want to miss this collection. 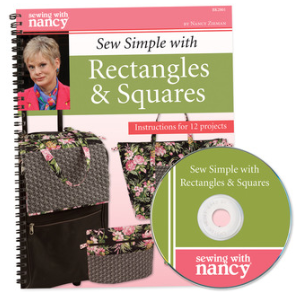
Hold-it Sacks
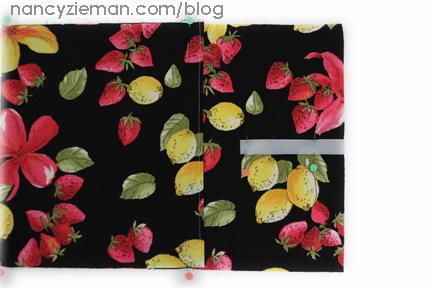
The Hold-it Sacks were Nancy’s first sew-simple projects in this episode. Prop up your cell phone or electronic tablet in the cradle area of a Hold-it Sack. Made from laminated fabric, they’re ideal to use throughout your home or office. The unique finished shapes appear as if they were made from complicated patterns, but not these gadget holders. They’re all made from rectangular shapes.

Mini Fabric Sacks
Toss them in a game or use them to hold down pattern pieces, these Mini Fabric Sacks can be both fun and functional. You can easily make three mini sacks in an hour or less.

Fabric Bins
Don’t settle for tan or black bins for your shelf, customize fabric bins to accent your home décor by selecting coordinating fabrics. Make from, you guessed it, rectangle and square fabric pieces. The sewing is enjoyable and the end result is as fresh in appearance as it is useful. Grommets serve as both handles and a focal point.
Wall Pockets
What’s good for the shelf is good for the wall! With a little tweaking of the instructions, fabric bins turn into wall pockets that provide organization and style to any home or work office.

12 Complete Projects in Sew Simple with Rectangles & Squares
Watch Sew Simple with Rectangles & Squares (Part One, Part Two, and Part Three) on Sewing With Nancy online.


For a chance to win a copy of Sew Simple with Rectangles & Squares Book and DVD from Nancy’s Notions, simply leave a comment sharing your dream travel destination.


Happy Sewing!
Team Nancy Zieman
Nancy Zieman Productions. LLC.

Content in this feed is © copyright 2019 by Nancy Zieman Productions, LLC and may not be republished without written permission. You’re welcome to forward the email to a friend or colleague but it’s not okay to add the RSS feed automatically as content on a blog or other website.
The FTC requires us to tell you that Nancy Zieman Productions, LLC has provided products by other companies in the course of doing business. The FTC requires us to advise you to take this information into consideration when reading this posting.
Make sure you are subscribed to Nancy Zieman Productions, LLC enews mailing list so you won’t miss a thing. Sign up here . Join us on Facebook , plus a host of other social media channels. Connect With Nancy and Friends today!


June 18, 2019
Magic Inch Quilts – Part One
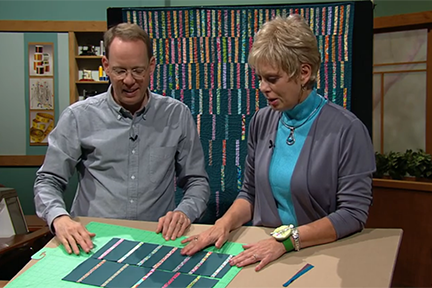
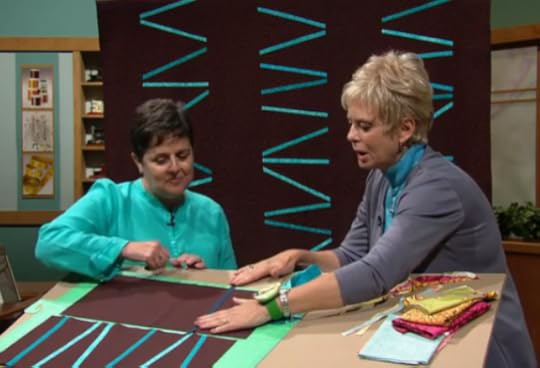
 It’s common to watch improvisational comedy or be involved in a spontaneous game of softball, but have you ever thought that quilting could be equally spur-of-the moment? Please welcome Nancy Zieman’s guests Weeks Ringle and Bill Kerr, masters at improvisational piecing with one inch strips. Bill and Weeks of Modern Quilt Studio will share their technique from their book Magic Inch Quilts on Sewing With Nancy.
 In part one of the Sewing With Nancy series, Magic Inch Quilts, Bill will share how he and wife, Weeks, like to begin a quilting project with an overall plan but make individual design decisions as they go along, as opposed to having a specific design that they follow inch by inch.

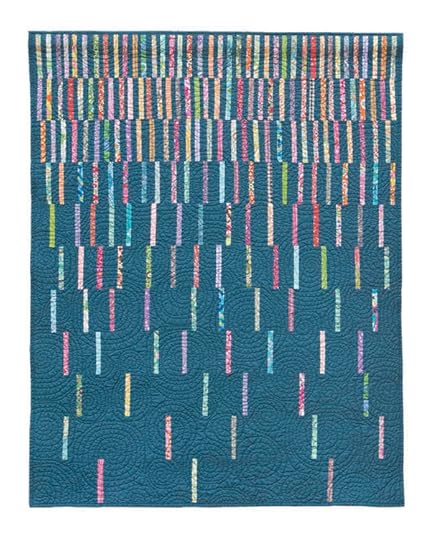
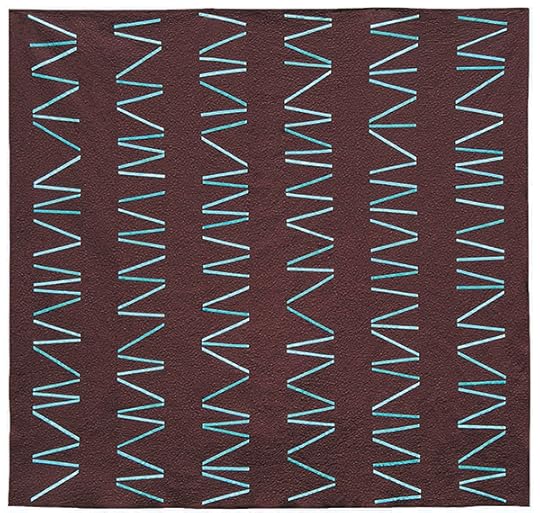
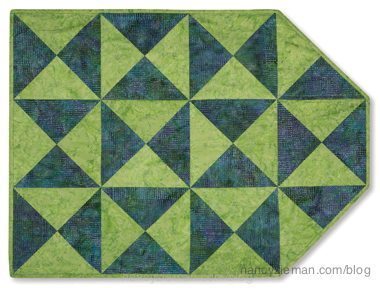
Chorus Line Quilt
Their quilt, Chorus Line, is the ideal quilt to begin this series. The rows of 1″ strips gradate from numerous to few and give the impression of a Broadway musical’s grand finale. Bill will show you how to create this modern quilt design.
Splice of Life Quilt
Working in columns is a fun and fast way to tackle our next quilt, Splice of Life, in any size. You’ll love the freedom of choosing the number of splices and the spacing of them to make this quilt your own. Choose two colors for a graphic quilt similar to the one shown here or dig into your stash for a scrappy version.
See how we create these quilts with sewing demonstrations on Sewing With Nancy. Watch it online, today. Find your copy of Magic Inch Quilts at Nancy’s Notions.
Watch Magic Inch Quilts (Part One and Part Two)on Sewing With Nancy online.

 For a chance to win a copy of Magic Inch Quilts from Nancy’s Notions, leave a comment sharing your answer to: What is smallest fabric scrap you save?

The randomly selected winner of a copy of the Second Chance T-Shirt Gifts pattern from Mary Mulari from the June 4 and 11 blog posts, is Mary Dunden-Smith.
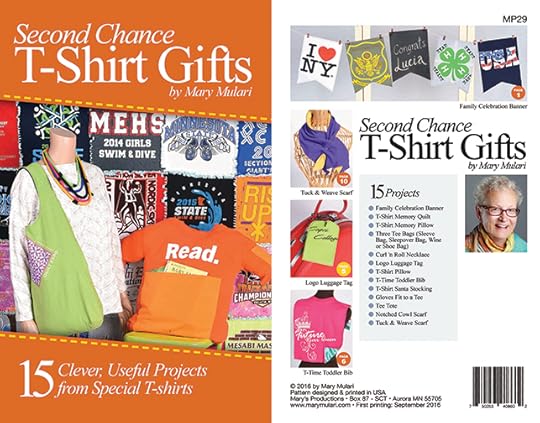
Her comment is: I volunteer at a thrift store, and I’ve been gathering T-shirts that can’t be sold due to small holes, etc. I plan to use the T-shirts to make tote bags, bibs, and other items as gifts for friends and family. I also plan to display some of my T-shirt creations at the thrift store to give customers ideas for reusing their old T-shirts.
Happy Quilting!
Team Nancy Zieman
Nancy Zieman Productions. LLC.
Content in this feed is © copyright 2019 by Nancy Zieman Productions, LLC and may not be republished without written permission. You’re welcome to forward the email to a friend or colleague but it’s not okay to add the RSS feed automatically as content on a blog or other website.
The FTC requires us to tell you that Nancy Zieman Productions, LLC has provided products by other companies in the course of doing business. The FTC requires us to advise you to take this information into consideration when reading this posting.
Make sure you are subscribed to Nancy Zieman Productions, LLC enews mailing list so you won’t miss a thing. Sign up here . Join us on Facebook , plus a host of other social media channels. Connect With Nancy and Friends today!
June 15, 2019
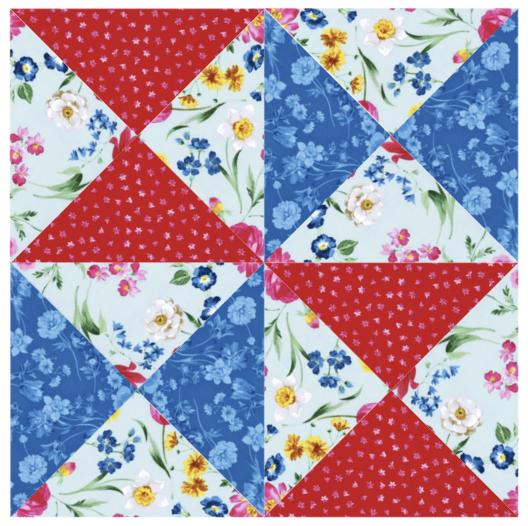
June 2019 Block of the Month: Square Dance Quilt Block
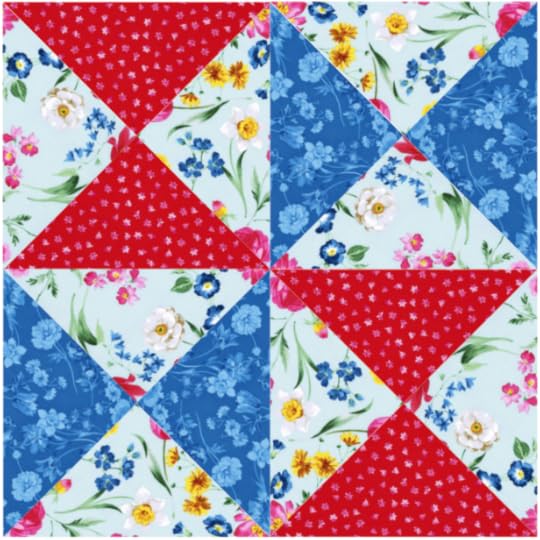
2019 Block of the Month—June: “Square Dance” Quilt Block
In January, Team Nancy Zieman introduced the first of 12 blocks in the New! Summer Picnic 2019 FREE! Block of the Month Series. Find the January through May Quilt Block Tutorials under Popular Blog Posts: 2019 Block of the Month. Join the New! Summer Picnic 2019 Block of the Month Series, anytime, by viewing the supply listing in the January 5th NZP Blog Posting.
Each month, we’re featuring one quilt block design. The quilt blocks are created using Nancy Zieman’s NEW! Afternoon Picnic Fat Quarter Pack* from Riley Blake Designs (*18″ x 22″ fabric rectangles) plus background, sashing, border, and binding fabrics. Follow along as we demonstrate how to create this Month’s “May Basket” Quilt Block (below).

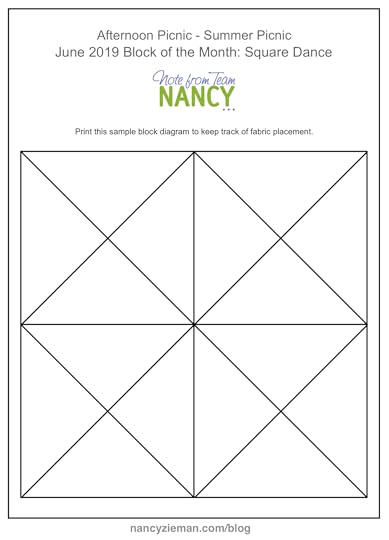
Keep your fabric choices sorted using this handy Fabric Planner diagram. Download the planner HERE. Make notes or pin swatches to remind you of the fabric placements.
2019 Block of the Month Afternoon Picnic June PDF
Choose the Fabrics
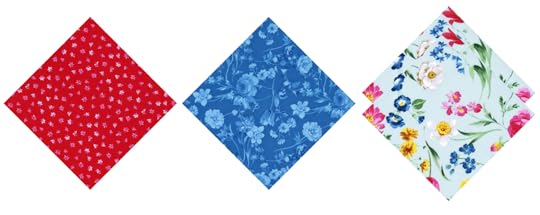
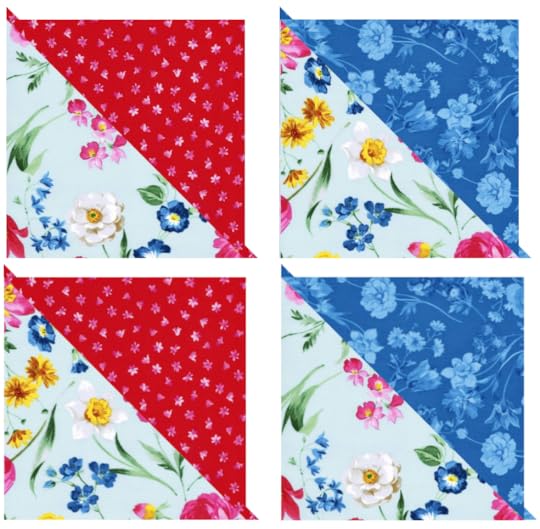
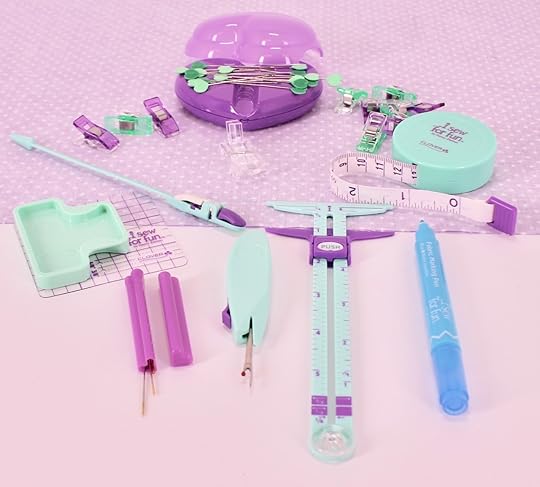
For the New! Summer Picnic 2019 FREE! Block of the Month Series, “Square Dance” Quilt Block, select the following fabrics from your Nancy Zieman’s NEW! Afternoon Picnic Fat Quarter Pack from Riley Blake Designs and a Nancy Zieman’s No-Hassle Triangle Gauge by Clover.
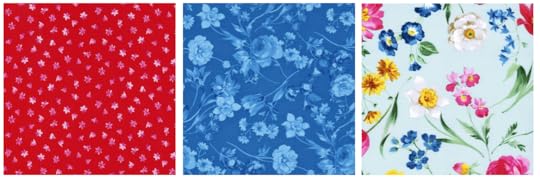
Afternoon Picnic Red Flower, Afternoon Picnic Blue Tonal, Afternoon Picnic Blue Main
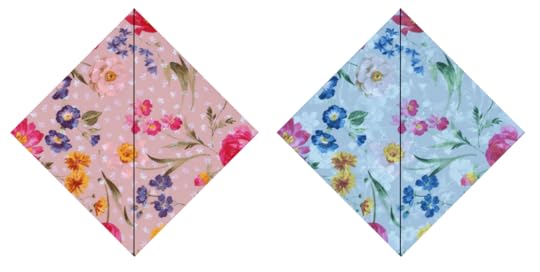
“Square Dance” Block
Some quilt block names have a long history; others are simply made up on the fly. You decide the authenticity of the block named the 1/4-Square Dance! A great quilt block for our busy summer schedules.
Instructions: (Each block is a 12″ finished square. Finished quilt measures approximately 44-1/2″ x 57-1/2″)
Cut Fabric for Block
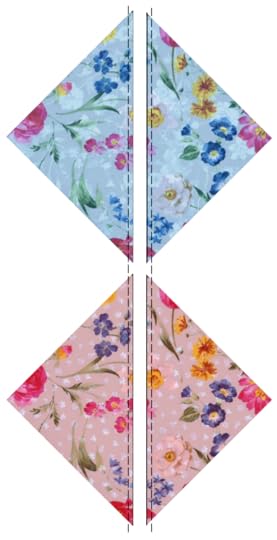
1. Create four 1/4-square triangle block sets
Cut one 7-1/4″ square of Afternoon Picnic Red Flower.
Cut one 7-1/4″ square of Afternoon Picnic Afternoon Picnic Blue Tonal.
Cut two 7-1/4″ squares of Afternoon Picnic Afternoon Picnic Blue Main.
Construct The Units
All seam allowances are scant 1/4″ unless otherwise stated.
The step-by-step photos illustrate construction of the block.
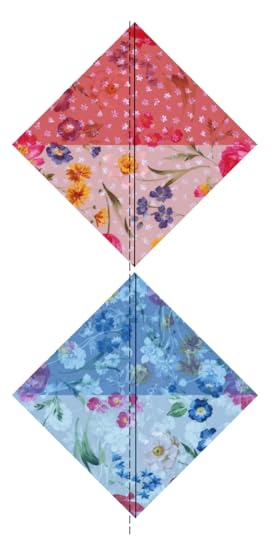
Half Square Triangles (HSTs)
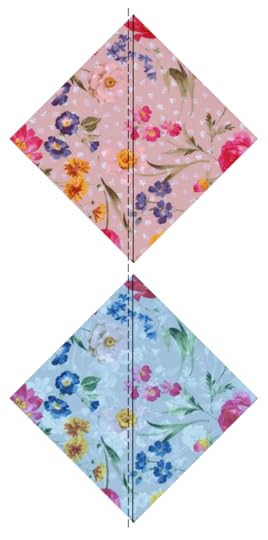
1. Create two each 1/2-square triangle blocks of Afternoon Picnic Red Flower and Afternoon Picnic Blue Main and Afternoon Picnic Blue Tonal and Afternoon Picnic Blue Main.
Align 7-1/4″ squares cut from Afternoon Picnic Red Flower and Afternoon Picnic Blue Main; and Afternoon Picnic Blue Tonal and Afternoon Picnic Blue Main right sides together to create block sets.
Mark blocks using a No-Hassle Triangles Gauge and an erasable gel pen.
Use a No-Hassle Triangles Gauge . The left side of the gauge is designated to create 1/2-square triangle blocks. Depress button on sliding portion of the gauge and move to size of the desired 1/2-square triangle.
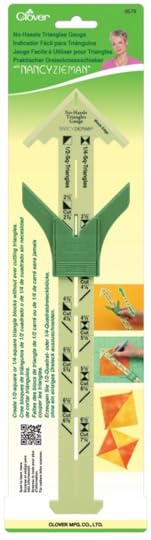
 The advantage of using the No-Hassle Triangle Gauge is accuracy. It’s easy to double check that the block set fits within the confines of the gauge. If the block set extends beyond or is shorter, trim or cut another block.
With block sets right sides together, place No-Hassle Triangles Gauge corner to corner. Match corner marks of gauge with corner of block sets. Mark fabric through center of gauge with an erasable gel pen .
Stitch Blocks
Align presser foot along one side of center mark, stitch.
Kiss the next block set to the stitched block and chain stitch from one block to the other.
Rotate block, stitch along other side of center mark.
Cut blocks apart along center markings with a rotary cutter, ruler, and mat.
Press seams to darker fabric.
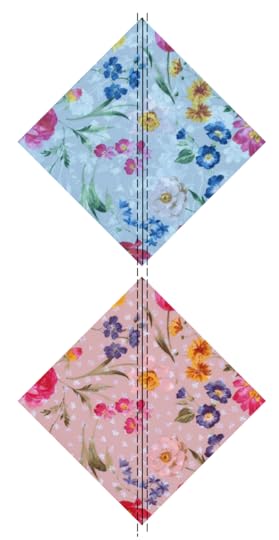
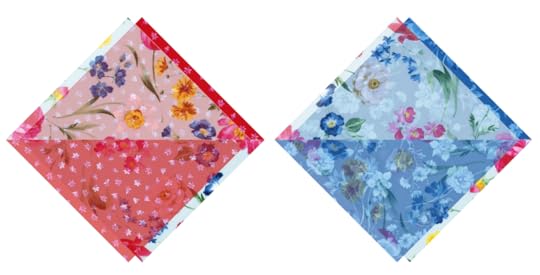
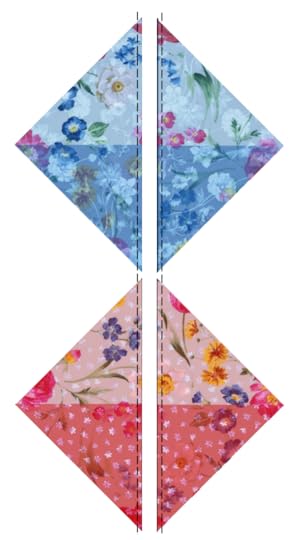
Quarter Square Triangles (QSTs)
Create two 1/4-square triangle blocks of each color combo.
Stitch Quarter Square Triangles
Meet right sides of fabric 1/2-square triangle blocks, with print opposing sides, as you match centers.
Create 1/4-square triangle blocks from two 1/2-square triangle blocks.
Use a No-Hassle Triangles Gauge . The right side of the gauge is designated to create 1/4-square triangle blocks. Depress button on sliding portion of the gauge and move to size of the desired 1/4-square triangle.
Draw a line from corner to corner across the 1/2-square triangle blocks.
Align presser foot along one side of center mark, stitch.
Kiss the next block set to the stitched block and chain stitch from one block to the other.
Rotate block, stitch along other side of center mark.

Clip threads between chain stitched blocks.
With a rotary cutter, mat, and ruler, cut the blocks apart along centerline markings.
Press seams to one side.
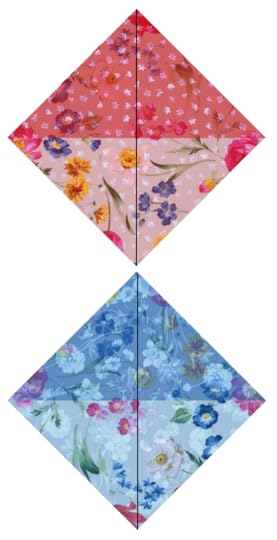
Assemble Blocks
2. Lay out Square Dance block, rotate squares as necessary
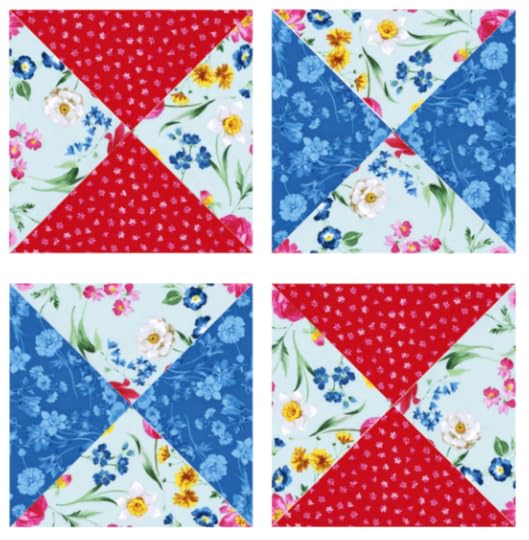
Join Squares
3. Stitch the Square Dance block together.
Place squares from second column onto first column, right sides together.
Chain stitch from one block set to the next. Clip threads between blocks.
Press seams open, or press seams to alternate sides.
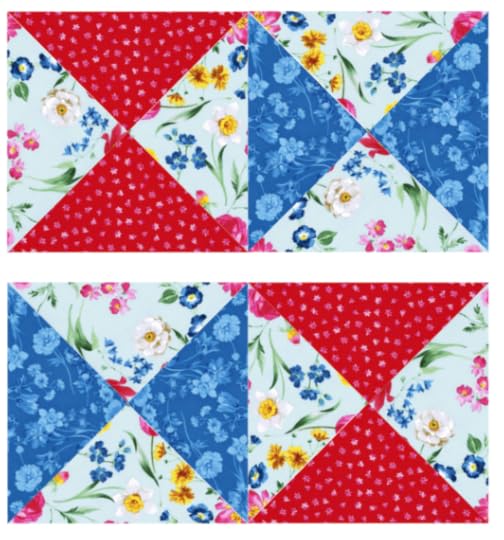
Stitch top row to bottom row, right sides together to create the complete Square Dance block.
Press.
Nancy Zieman’s No-Hassle Triangles Quilt Blocks book shows how to create 12 additional quit blocks. For best results, use the No-Hassle Triangles Gauge.
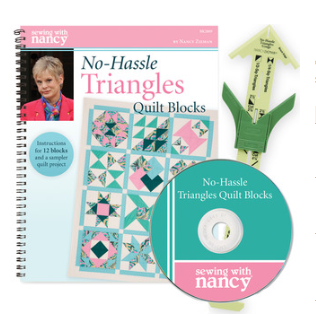
Watch No-Hassle Triangles Quilt Blocks (Part One and Part Two) on The Best of Sewing With Nancy online.

For a chance to win Nancy Zieman’s New! Afternoon Picnic Fat Quarter Pack please leave a comment below.

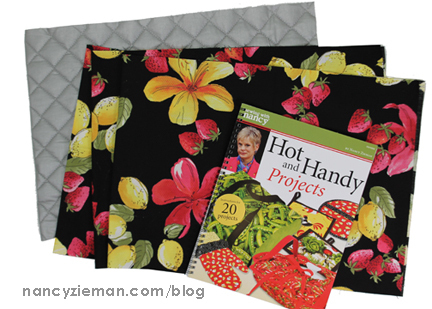
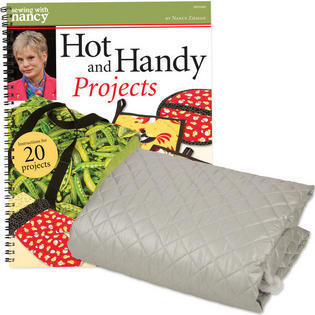
The randomly selected winner of a copy of the Hot and Handy Projects book from Nancy’s Notions, from the June 8 blog post is Kelly Sas.
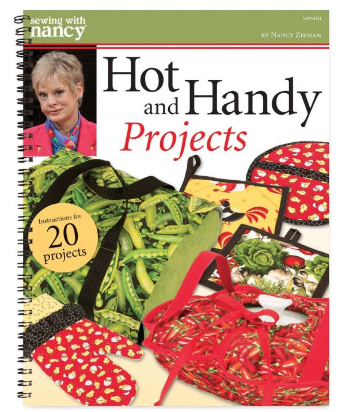
Her comment is: I would definitely make new casserole holders using this method! I have one I made that was so much more complicated to sew, took hours on end, and is way too bulky. Of course Nancy would come up with a much simpler way, yet lovely and very handy!

Happy Quilting!
Team Nancy Zieman
Nancy Zieman Productions. LLC.
Content in this feed is © copyright 2019 by Nancy Zieman Productions, LLC and may not be republished without written permission. You’re welcome to forward the email to a friend or colleague but it’s not okay to add the RSS feed automatically as content on a blog or other website.
The FTC requires us to tell you that Nancy Zieman Productions, LLC has provided products by other companies in the course of doing business. The FTC requires us to advise you to take this information into consideration when reading this posting.
Make sure you are subscribed to Nancy Zieman Productions, LLC enews mailing list so you won’t miss a thing. Sign up here . Join us on Facebook , plus a host of other social media channels. Connect With Nancy and Friends today!
June 13, 2019
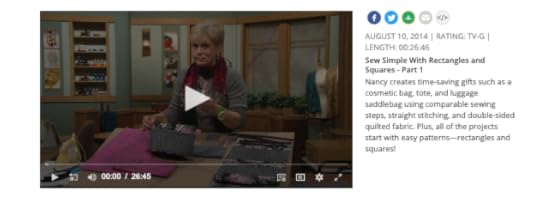
Sew Simple with Rectangles & Squares – Part One
 Streamline the sewing process to make fun projects in no time at all.“I like to sew but I really don’t have the time.” Sound familiar? Nancy Zieman’s three-part series, Sew Simple with Rectangles & Squares, will change the way you think about projects and patterns. Everything demonstrated is simply cut from rectangles and squares!
The Travel Trio
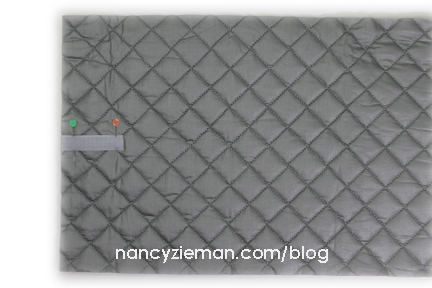
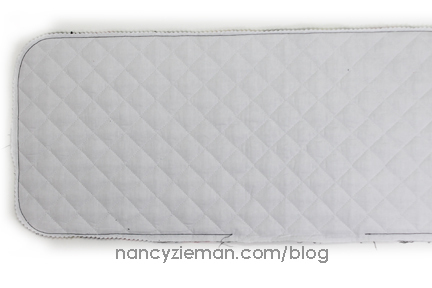
During this first episode, learn how to create a weekender tote, cosmetic bag, and luggage saddlebag. This travel trio is made using comparable sewing steps, straight stitching, and double-sided quilted fabrics.
Cosmetic Bag
Even if you’ve never sewn before, you can stitch this bag!

Weekender Tote
After learning how to make a simple cosmetic bag, apply many of the same sewing steps to create a Weekender Tote. It’s a super-sized cosmetic bag with the addition of sturdy straps and double pockets.

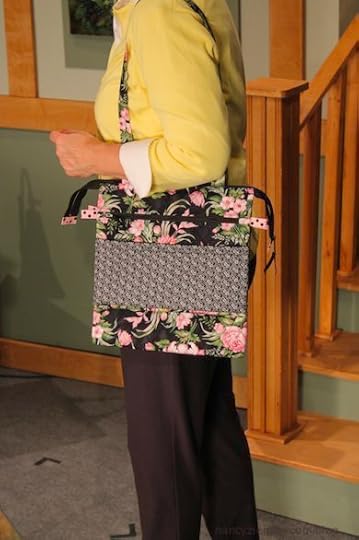
Luggage Saddle Bag
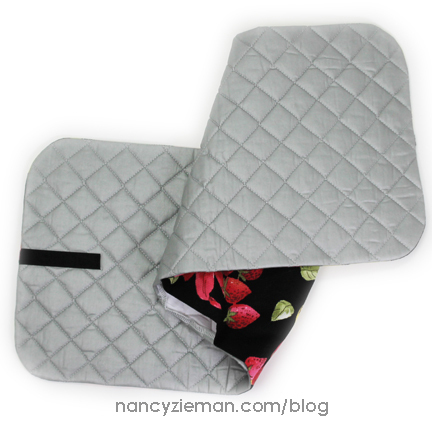
For ease of travel, make a saddlebag for your carry-on luggage or rolling case. Two sizes of bags are attached with connector straps.
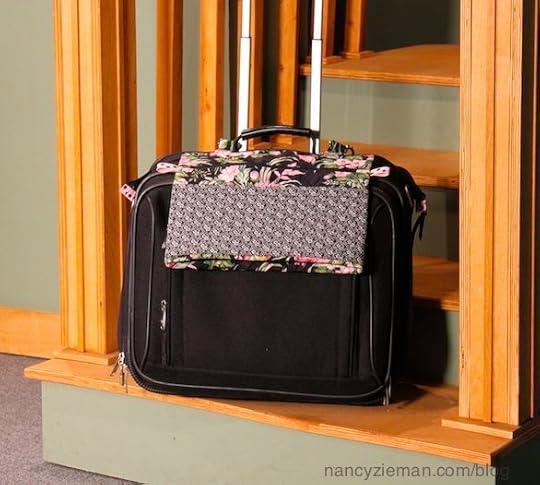
When not using this handy accessory on your luggage, zip the bags together and it’s a handy shoulder tote.
Sewing With Nancy Trivia—This photo was quickly taken on the Sewing With Nancy set. Notice the tape on the floor? Those were the positioning marks for Nancy’s chair in the Nancy’s Corner area. The chair had to be moved in order to take the photo. Now you see how they kept the props and furniture in the right place!
12 Complete Projects in the Sew Simple with Rectangles & Squares book.
All the projects featured in the three-part series, plus a bonus, are included in the book, Sew Simple with Rectangles & Squares.
Watch Sew Simple with Rectangles & Squares (Part One, Part Two, and Part Three) on Sewing With Nancy .
For a chance to win a copy of Sew Simple with Rectangles & Squares Book and DVD from Nancy’s Notions, simply leave a comment sharing your dream travel destination.

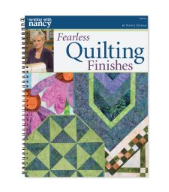
The randomly selected winner of a copy of the Fearless Quilting Finishes book from Nancy’s Notions, from the May 23, 30 and June 6 blog posts is Regina Harris.

Her comment is: The checkerboard idea is great as it would allow me to use up some of the leftover scraps from the quilt.
Happy Sewing!
Team Nancy Zieman
Nancy Zieman Productions. LLC.
Content in this feed is © copyright 2019 by Nancy Zieman Productions, LLC and may not be republished without written permission. You’re welcome to forward the email to a friend or colleague but it’s not okay to add the RSS feed automatically as content on a blog or other website.
The FTC requires us to tell you that Nancy Zieman Productions, LLC has provided products by other companies in the course of doing business. The FTC requires us to advise you to take this information into consideration when reading this posting.
Make sure you are subscribed to Nancy Zieman Productions, LLC enews mailing list so you won’t miss a thing. Sign up here . Join us on Facebook , plus a host of other social media channels. Connect With Nancy and Friends today!
June 11, 2019
Second Chance T-Shirt Gifts – Part Two
 Make a Christmas Stocking from a T-shirt and more! T-shirts, we all have them. Whether from schools, vacations, concerts, sport events, or charitable causes, T-shirts hold memories usually stored in a drawer. Mary Mulari, our recycling expert, is here to encourage you to give those T-shirts a second chance and create unique gifts while renewing memories.
On today’s episode of Sewing With Nancy, Mary shares a few fantastic projects that preserve memories and recycle treasured souvenirs. This is part-two of the series. Watch Second Chance T-Shirt Gifts Part One online today or purchase Mary’s Second Chance T-Shirt Gifts Pattern and DVD at Nancy’s Notions.
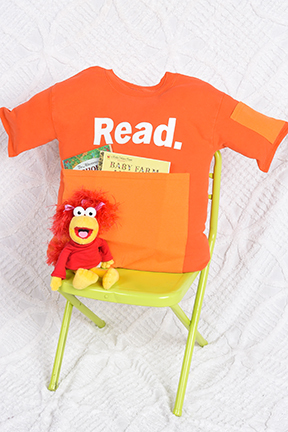
T-Shirt Pillow
On Second Chance T-Shirts Part Two, we’ll create personalized gifts from special T-shirts, which is easier than you might think. For example, turn a favorite T-shirt into a pillow with a few easy steps. Add pockets to hold a child’s favorite storybook or small toy. Then stuff and enjoy.
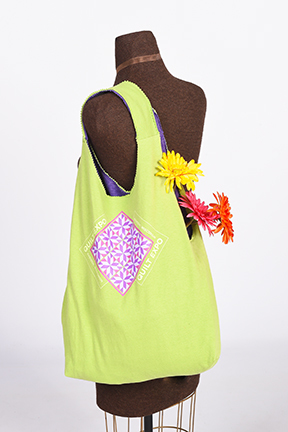
T-Tote
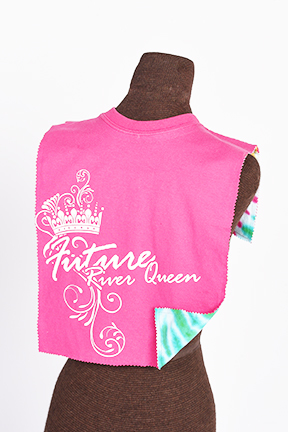
Give a favorite T-shirt a second chance by transforming it into a tote. This easy project takes advantage of the features of knit fabrics—no-fray edges—so the simplest of sewing techniques are used. Parts of another T-shirt give the handle area extra support plus a splash of color. Watch this Sewing With Nancy program online, now.
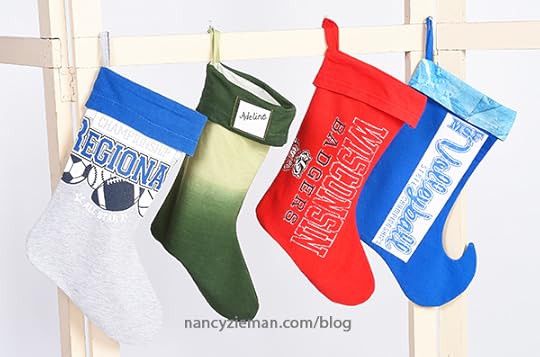
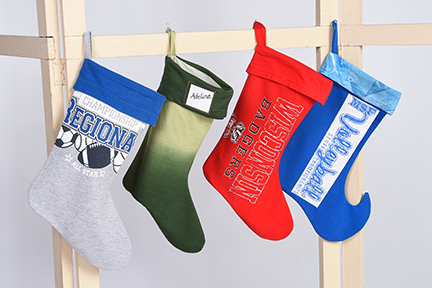
T-Shirt Santa Stocking
Make Christmas stockings from T-shirts to display in December from notable T-shirts. Choose T-shirt designs that relate to each member of the family or guests. The creative stocking collection is sure to spark conversations. See how easy they are to make on today’s episode.
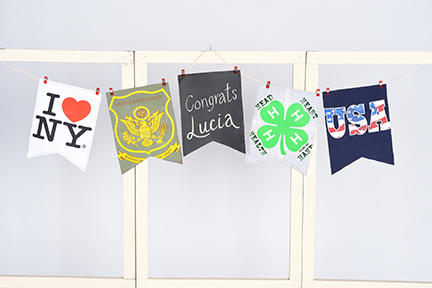
 Here’s another idea—Add a festive highlight to family gatherings with a banner of reversible pennants. Choose T-shirt designs for each occasion or to represent family members. The back of each pennant is chalkboard fabric, providing space for a message.
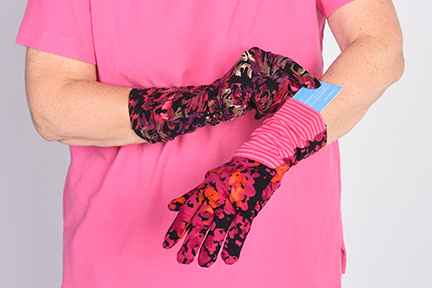
Gloves Fit to a Tee
With a two-way stretch T-shirt knit, you can make your own gloves for special occasions, costumes, or lightweight warmth. Add a pocket for your phone or other essentials and your gloves will have flair and practicality at the same time.
T-Time Toddler Bib
Take a colorful pair of T-shirts and make a practical, useful gift for a toddler. Maybe the T-shirts represent the mom or dad’s favorite sport, college, or hobby. The two-sided bib is a popular gift that can showcase the family legacy. Watch online.
Watch Second Chance T-Shirt Makeovers (Part One and Part Two) on The Best of Sewing With Nancy online.

Tell us your favorite project to make using re-cycled T-shirts, for a chance to win a copy of the Second Chance T-Shirt Gifts pattern from Mary Mulari. A random winner will be chosen and posted on June 18.
Happy Sewing!
Team Nancy Zieman
Nancy Zieman Productions. LLC.
Content in this feed is © copyright 2019 by Nancy Zieman Productions, LLC and may not be republished without written permission. You’re welcome to forward the email to a friend or colleague but it’s not okay to add the RSS feed automatically as content on a blog or other website.
The FTC requires us to tell you that Nancy Zieman Productions, LLC has provided products by other companies in the course of doing business. The FTC requires us to advise you to take this information into consideration when reading this posting.
Make sure you are subscribed to Nancy Zieman Productions, LLC enews mailing list so you won’t miss a thing. Sign up here .
Join us on Facebook , plus a host of other social media channels. Connect With Nancy and Friends today!
June 8, 2019
Sew An Insulated Casserole Carrier
 Stitch this Casserole Carrier, from the Hot and Handy Projects book. Then, let your tasteful carrier help you get a handle on things. Place your hot dish (or cold dish) in the center, wrap and GO! An insulated carrier is perfect for picnics and potluck dinners. The inner insulated pocket lets you store a hot or cold pack to keep the temperature of your dish just right. The carrier folds flat when not in use and can be laundered.
 Supplies:
7/8 yard Fabric A (carrier body)
1/2 yard Fabric B (pocket)
2 yards 1″ wide black webbing/strapping
Optional: 1/3 yard Fabric C (instead of webbing/strapping handles) and 1″ Create A Strap Interfacing
7/8 yard Quilted Iron Quick
1/4 yard hook and loop tape
Matching thread
 For the casserole carrier we’re creating today, we’re using the same fabric for the body and pocket—instead of using Fabric A and Fabric B. Contrasting fabrics work great, too!
 Construction:
Cut fabrics:
Fabric A: Cut two 13″ x 36″ rectangles (pocket base and handle base).
Fabric B: Cut one 13″ x 44″ rectangle (pocket).
Fabric C: Cut two 4″ x 36″ rectangles (handles).
Quilted Iron Quick : Cut two 13″ x 36″ rectangles (carrier lining)
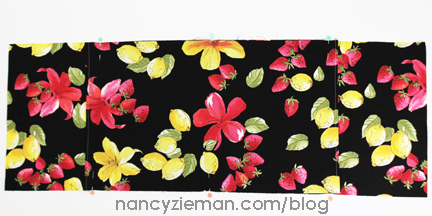
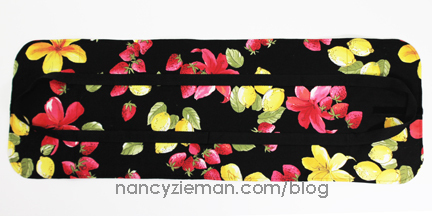
Make the pocket by folding the 13″ x 44″ rectangle in half, meeting the 13″ ends.
Stitch a 1/4″ seam along the 13″ edges.
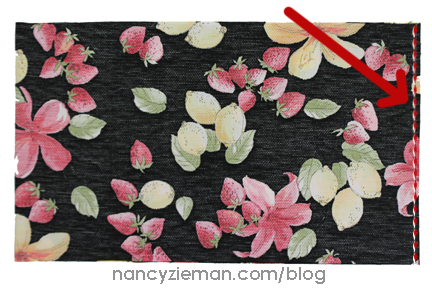
Press seam open; turn the pocket tube right side out, centering the seam. Press.
Edgestitch the 13″ edges.
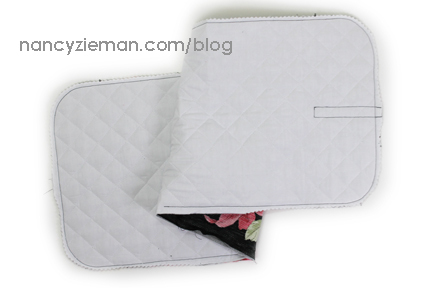
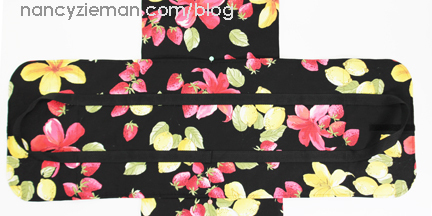
 Complete the Pocket Panel
Fold Fabric A pocket base in half, meeting 13″ ends. Pin at fold to mark center. Repeat, to mark center of the pocket.

Position and pin the pocket to the right side of Fabric A. Baste pocket to Fabric A along the length close to the cut edges.
Center and stitch a 5-1/2″ loop side section of the hook and loop tape to the right side of one short edge of the base.
Center and stitch a 3″ hook side of the hook and loop tape to the reflective/silver side of one short edge of one Quilted Iron Quick section.
Meet and pin completed pocket base to Quilted Iron Quick , right sides together, checking to ensure hook and loop tape sections are on opposite ends.
Round the corners using a template included in Hot and Handy Projects .
Stitch 1/2″ seam around the outer edge, leaving a 6″–8″ opening at the center of one long edge for turning.
 To reduce bulk when trimming, use pinking shears or a rotary pinking blade. It’s a great time saver, since the zigzag edge of pinking shears/blade removes excess fabric as it trims.
Turn the pocket panel right side out. Press edge. Edgestitch around outer edge, stitching the opening closed.
Stitch between lengthwise edges, 6″ from each short edge of the panel.
Prepare the Handle Panel
Center and stitch the 3″ loop side of the hook and loop tape to the right side of one short edge of the Fabric A handle base.
Center and stitch a 5-1/2″ hook side of the hook and loop tape to the silver side of one short edge of the remaining Quilted Iron Quick section.
Join the handle base and Quilted Iron Quick section, right sides together with a 1/2″ seam, ensuring hook and loop sections are at opposite ends. Trim, press, turn and edgestitch as for the pocketed panel.
Using the 1″ webbing, stitch the short ends together with a 1/2″ seam allowance. Press seam open.
Attach Handles to Handle Panel
Fold handle base in half, meeting short ends. Mark center with a pin.
Position handle on handle base, 3″ from each lengthwise edge, meeting handle seams to base center marks. Pin in place.
Measure 6″ from each short edge. Mark from lengthwise edge to lengthwise edge. This indicates the starting and stopping points for stitching the handle strapping.
Edgestitch each side of both handles between the 6″ markings.
Join the Casserole Panels
Place the pocket panel fabric side up. Mark the center of the pocket.
Meet short ends of the handle panel: Mark the center.
Place the handle panel at a right angle to the pocket panel, fabric side up, meeting center marks. The handle panel will be approximately 11-1/2″ from ends of the pocket panel. Pin in place.
Stitch along three sides to secure the layers, leaving the fourth side open for inserting a hot or cold pack.

A complete supply list and detailed directions are included in Hot and Handy Projects.
The Hot and Handy Projects book includes:
Full color photographs and illustrations
Step-by-step instructions
Double-wire binding so pages lay flat when open—no more struggling to keep your page from turning or bending; plus it’s easier to keep your book right next to you as you work
Soft cover with 44 pages

For a chance to win a copy of the Hot and Handy Projects book from Nancy’s Notions, please leave a comment below sharing where you’d use Quilted Iron Quick fabric.
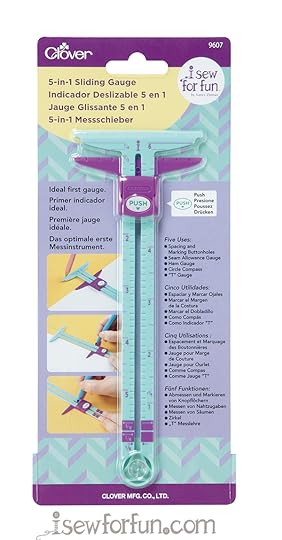
The randomly selected winner of an I Sew For Fun 5-in-1 Sliding Gauge from Clover on the June 8 blog post is, Shirley Clark .
Her comment is: You can never have too many super hero capes! I’m hoping the next great grand baby will be a boy! Due in December! My little great granddaughter loves for me to sew for her too!
Happy Sewing!
Team Nancy Zieman
Nancy Zieman Productions. LLC.
Content in this feed is © copyright 2019 by Nancy Zieman Productions, LLC and may not be republished without written permission. You’re welcome to forward the email to a friend or colleague but it’s not okay to add the RSS feed automatically as content on a blog or other website.
The FTC requires us to tell you that Nancy Zieman Productions, LLC has provided products by other companies in the course of doing business. The FTC requires us to advise you to take this information into consideration when reading this posting.
Make sure you are subscribed to Nancy Zieman Productions, LLC enews mailing list so you won’t miss a thing. Sign up here . Join us on Facebook , plus a host of other social media channels. Connect With Nancy and Friends today!
June 6, 2019
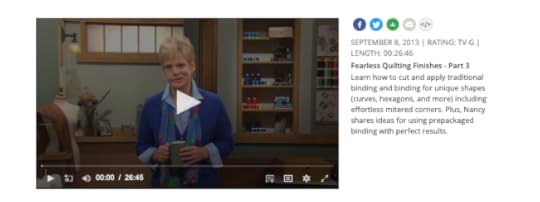
Fearless Quilting Finishes – Part Three
Joining quilt binding ends together with ease can be a tricky task. The goal is to stitch the beginning of the quilt binding and the end together with a bias seam. The solution—use a strip of fusible web!
Sewing With Nancy team member, Donna Fenske came up with this idea and the technique was incorporated in this week’s featured Sewing With Nancy video. It’s the third part of the three-part series, Fearless Quilting Finishes. During this 30-minute show you’ll learn all sorts of quilt binding finishes. Watch the process online for all the details.
Watch Fearless Quilting Finishes (Part 1, Part 2 and Part 3) on The Best of Sewing With Nancy.
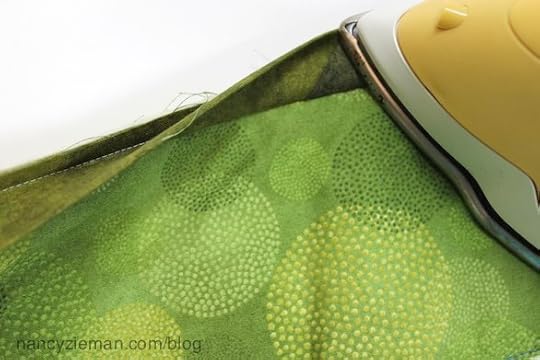
Here’s how to join the ends of quilt binding.
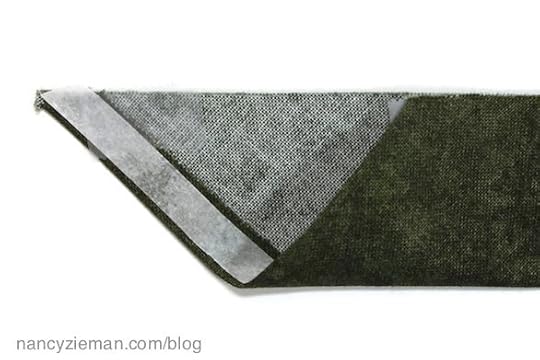
Cut one end of the binding with a 45-degree angle. Press in 1/4″ at the beginning angled edge.
Press a 1/4″ wide strip of paper-backed fusible web on top of the folded inner edge.
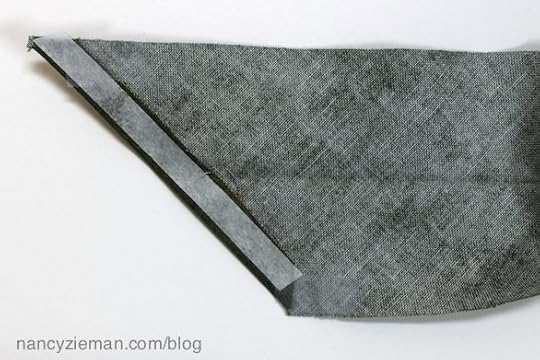
Fold and press the binding in half, wrong sides together, meeting lengthwise edges.
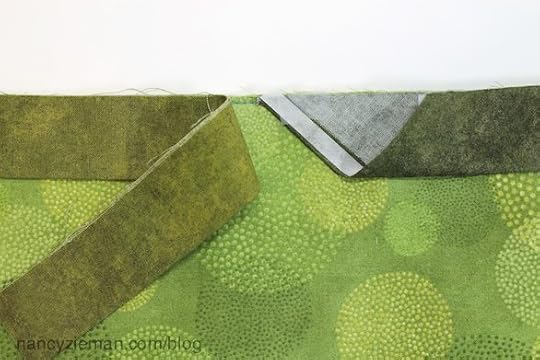
Stitch the binding to the quilt with a 1/4″ seam, starting about 4″ from the end of the binding. (See the white thread at the far right of the photo!)

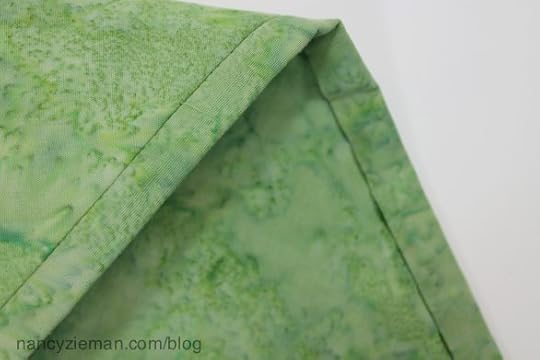
Nancy Zieman details how to fold and stitch the binding at the corners. Watch online !
Remove the paper backing from the fusible web.

When the binding reaches the starting point, tuck the end of the binding into the beginning.
Trim off the excess binding, if there is any.
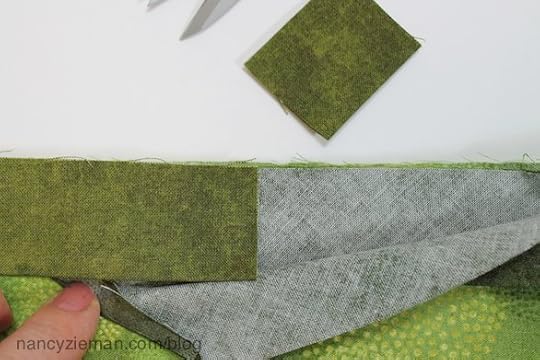
With the binding end sandwiched between the starting point, press. The bias seam is secured without stitching.
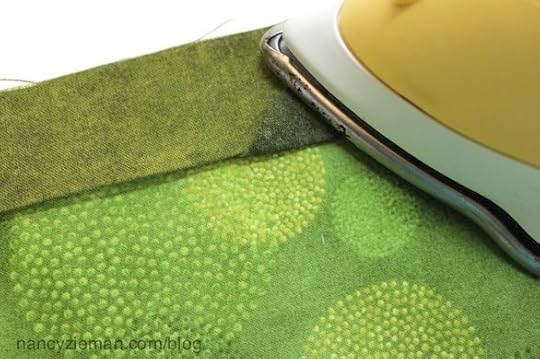
Next, continue to stitch the remaining 1/4″ seam.

Press the binding up.
Wrap and pin the binding to the wrong side, covering the stitching line.

Stitch in the ditch, sewing in the well of the seam.

Or, hand stitch the folded edges, stitching on the wrong side of the fabric. (We’ve obviously used another sample!)
There’s more to learn online or read in the Fearless Quilting Finishes book!
If the corners of your quilting project are hexagon or octagon shaped, learn the tips on how to add binding to easily finish those edges. Also, learn how to add binding to curves.
 Did you catch the first two episodes of Fearless Quilting Finishes?
Watch episode one and episode two online. Or, check out our blog posting on borders and stippling!
Here’s a reference to have close at hand.
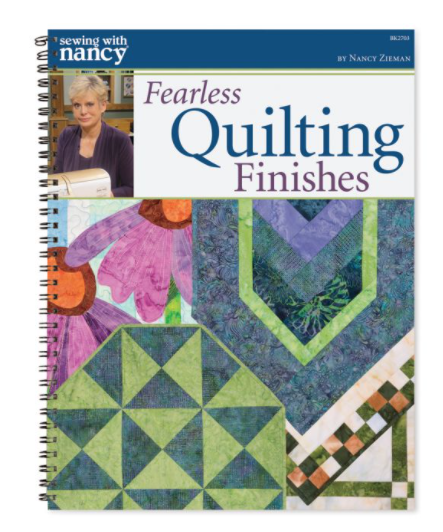
All the information shown in the 3-part series is written and illustrated in Nancy’s book, Fearless Quilting Finishes. The Sewing With Nancy staff made certain that all the steps were carefully written and illustrated. Presenting sewing and quilting techniques is a team effort!
For a chance to win a copy of Nancy Zieman’s Fearless Quilting Finishes book from Nancy’s Notions, please tell us your favorite quilt finishing technique.
Happy Quilting,
Team Nancy Zieman
Nancy Zieman Productions. LLC.
Content in this feed is © copyright 2019 by Nancy Zieman Productions, LLC and may not be republished without written permission. You’re welcome to forward the email to a friend or colleague but it’s not okay to add the RSS feed automatically as content on a blog or other website.
The FTC requires us to tell you that Nancy Zieman Productions, LLC has provided products by other companies in the course of doing business. The FTC requires us to advise you to take this information into consideration when reading this posting.
Make sure you are subscribed to Nancy Zieman Productions, LLC enews mailing list so you won’t miss a thing. Sign up here . Join us on
June 4, 2019
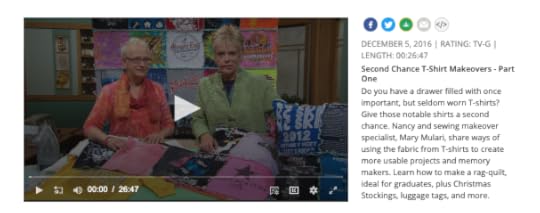
Second Chance T-Shirt Gifts – Part One
Make T-shirts into a quilt, pillow, scarf, and more! We can say with confidence that most families have a collection of T-shirts. Some may be meaningful, so they’re difficult to give away. To give these memory-making shirts a second chance is Mary Mulari, our makeover specialist.
On this episode of Sewing With Nancy, Mary will share some fantastic projects that preserve memories and recycle treasured souvenirs. Watch part one of Second Chance T-Shirt Gifts online today or purchase Mary’s Second Chance T-Shirt Gifts pattern and DVD at Nancy’s Notions.
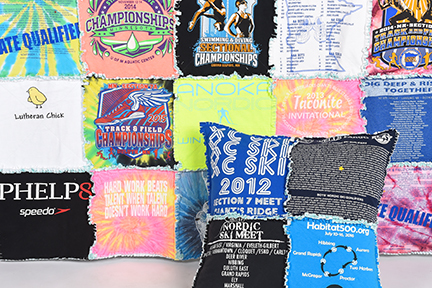
Rag-Style Memory Quilt
During this two-part series, we’ll share ideas from Mary’s pattern that make clever, personalized gifts. Beginning with the T-Shirt Memory Quilt, you’ll soon see it’s an economical and streamline way to sew a commemorative graduation or life-achievement gift. This rag-style T-Shirt Quilt is perfect for a dormitory bed cover or blanket.
Sleeve-Bag Style
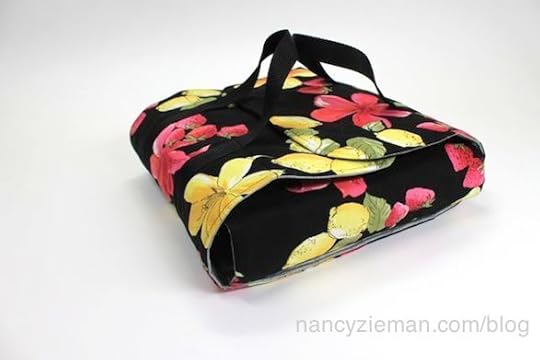
After making a T-shirt Memory quilt, you’ll have leftovers from the shirts that are just begging to be sewn into other gift projects. Create a collection of Tee Bags from the sleeve areas of T-shirt remnants. Watch how easy they are to create on this first episode of Second Chance T-Shirt Gifts on Sewing With Nancy.
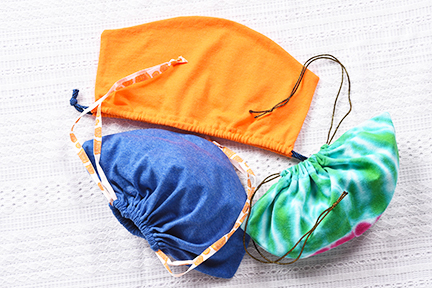
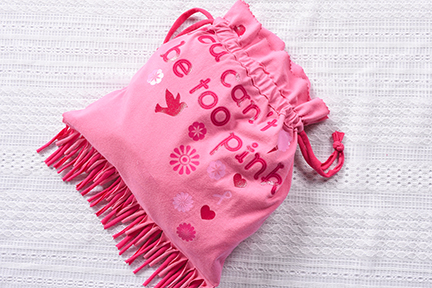
Sleepover Bag
Combine scraps from two or more T-shirts to create a Sleepover Bag. The unique fringe accents and drawcord closure make this a welcome gift for tweens.
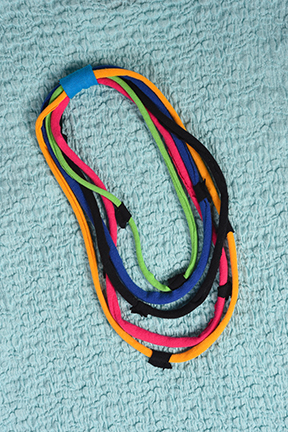
Curl ‘n Roll Necklace
Take advantage of the nature of knit fabrics to curl and roll. Cut T-shirts into strips, then pull. Create a fabric necklace from one or more T-shirts. Add extra pieces of wrapped trim for interesting dimension. Watch it online.
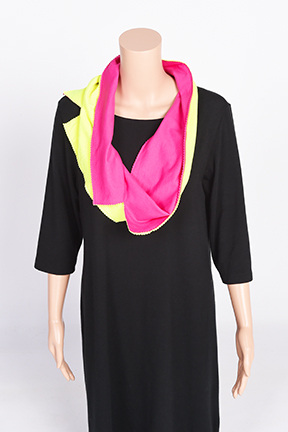
Reversible T-Scarves
Notched Cowl Scarf
Take advantage of the tubular construction of T-shirts to make a reversible cowl scarf. The notched accents provide an ingenious detail allowing both sides of the fabric to be showcased.
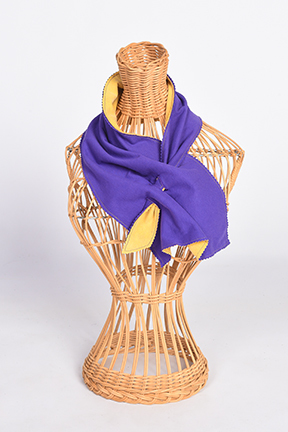
Tuck and Weave Scarf
Use two T-shirt backs to create another reversible scarf that tucks and weaves unto itself for a cool weather accessory. Watch as Mary shares her fast and easy sewing tips on this first episode of Second Chance T-Shirt Gifts
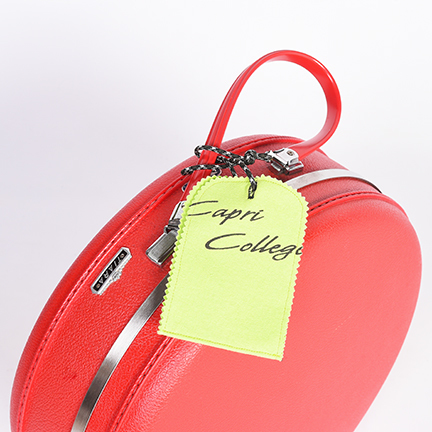
Logo Luggage Tags
Here’s a great way to use the small chest logos found on many T-shirts, and turn them into decorated luggage tags. The bag owner identification is hidden inside the tag. Learn how to create this personal gift on this episode of Second Chance T-Shirt Giftsand all of Mary’s projects are included in her new Second Chance T-Shirt Gifts pattern, too!
Watch Second Chance T-Shirt Makeovers (Part One) on Sewing With Nancy online.
Tell us your favorite project to make using re-cycled T-shirts, for a chance to win a copy of the Second Chance T-Shirt Gifts pattern from Mary Mulari. A random winner will be chosen and posted on June 18.
The randomly selected winner of a McCall’s Pattern 7331 by Nancy Zieman from the May 21 blog post is, Juanita Iwamoto.

Her comment is: My closet is filled with different shades of turquoise-from aqua to teal.
Happy Sewing and Quilting,
Team Nancy Zieman
Nancy Zieman Productions, LLC.
Content in this feed is © copyright 2019 by Nancy Zieman Productions, LLC and may not be republished without written permission. You’re welcome to forward the email to a friend or colleague but it’s not okay to add the RSS feed automatically as content on a blog or other website.
The FTC requires us to tell you that Nancy Zieman Productions, LLC has provided products by other companies in the course of doing business. The FTC requires us to advise you to take this information into consideration when reading this posting.
Make sure you are subscribed to Nancy Zieman Productions, LLC enews mailing list so you won’t miss a thing. Sign up here . Join us on
June 1, 2019
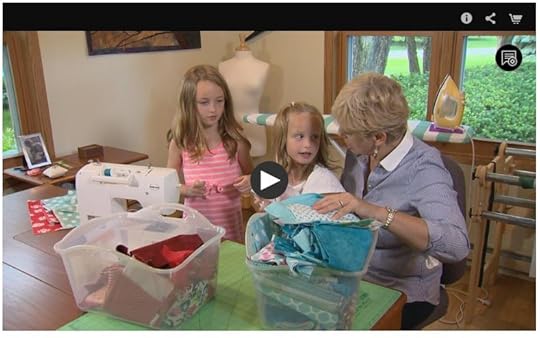
I Sew For Fun Project Tutorial: Superhero Cape
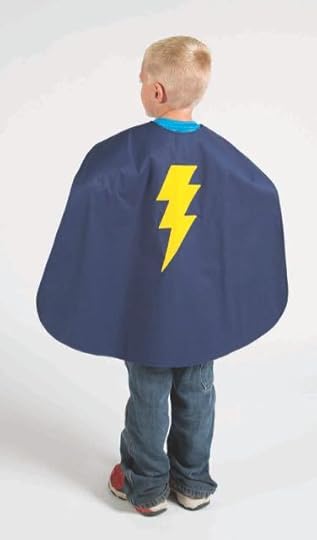
You’ve got the sewing power to help your little partner create their favorite superhero cape. Dress–up time and imagination time are so much fun, with this FREE! I Sew For Fun Superhero Cape Sewing Tutorial by Nancy Zieman.

You’ll find this super fun sewing project, plus 19 additional I Sew For Fun projects, in Nancy Zieman’s 72-page book, I Sew For Fun. Nancy shares her step-by-step directions for 20 super-easy sewing projects.
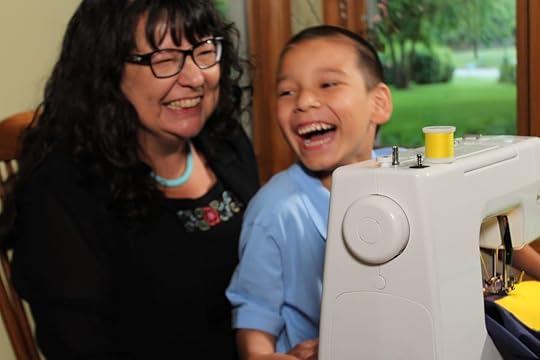
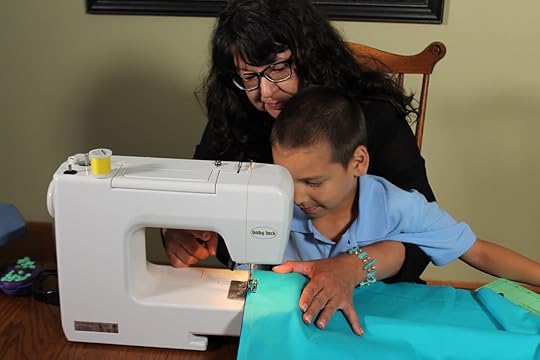
Tune in and watch Nancy and her granddaughters, along with friends, take a modern approach to sewing. Nancy shares her team sewing-for-fun experience along with many tips for a big partner, and numerous insights for involving a little sewing partner—all while making simple, easy to sew kid-friendly projects. Watch I Sew For Fun on Sewing With Nancy!
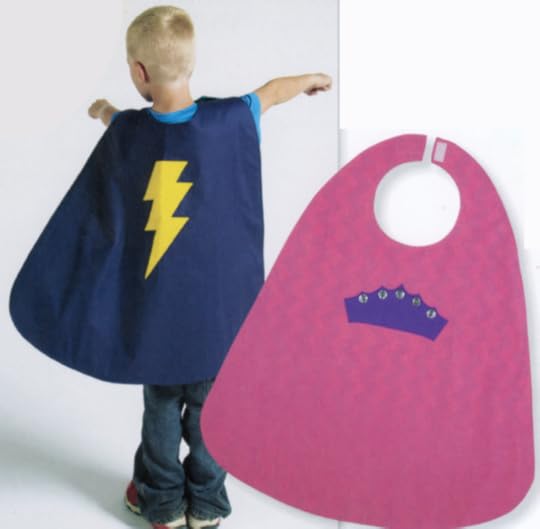
Superhero Cape Sewing Tutorial
Approximate Finished Size: 34″ x 35″
Supplies Needed:
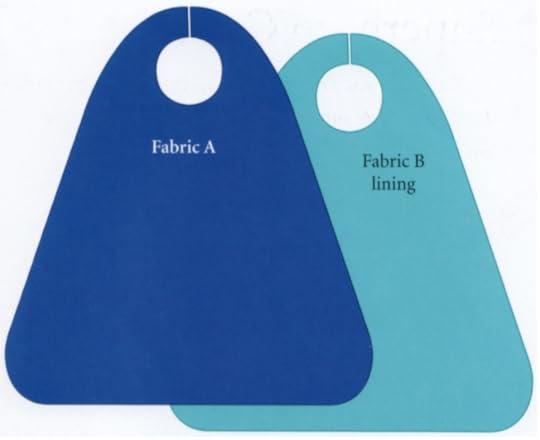
1 yd. Fabric A (solid-colored or novelty fabric—outside cape)
1 yd. Fabric B (coordinating fabric—lining)
Ultimate Felt Pack for appliqués—Choose colors to correspond to design.
Pellon’s Lite EZ Steam II fusible web
2″ hook and loop tape
Pattern Tracing Paper
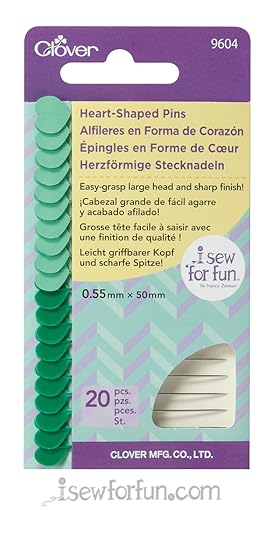
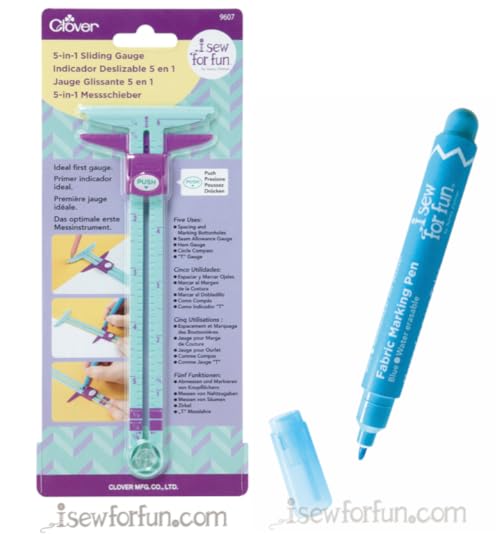
Optional Notions: buttons, rhinestones, glitter, and I Sew For Fun Heart Shapped Straight Pins, I Sew For Fun 5-in-1 Sliding Gauge, and I Sew For fun Fabric Marking Pen.
Instructions:
Please read all instructions before beginning. Use the width of the presser foot as the depth of the seam allowances.
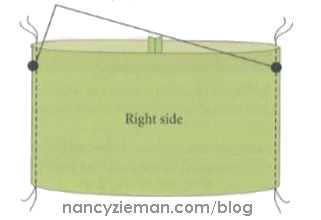
1. Create a pattern for the cape on pattern tracing paper:
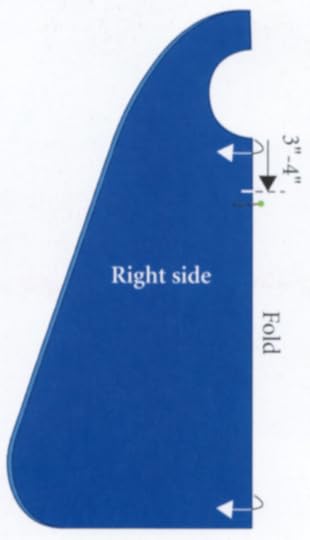
Draw an 18″ x 35″ rectangle on pattern tracing paper. Mark one 35″ edge as a foldline.
Measure and fold 9″ from the top of the pattern paper. Unfold, and mark along the fold.
Trace cape neckline pattern from page 68 of Nancy Ziemans’s book, I Sew For Fun . Cut out pattern piece.
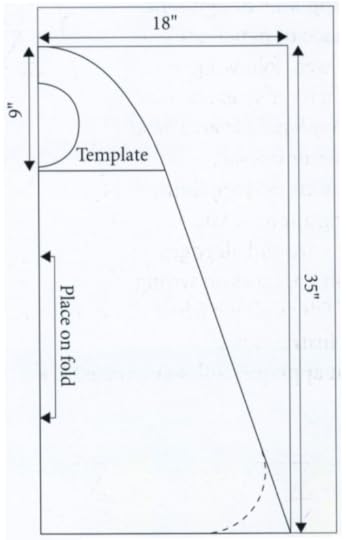
Place the cape neckline pattern along the left edge of the 9″ solid line. Tape in position. Or, create your own neckline pattern by tracing one half of a 6-inch saucer plate.
Draw a diagonal line from the side edge of the neckline pattern to the lower right corner of the pattern paper.
Place a dinner plate at lower cape corner and mark a curved hem.
 Show your little partner how to round corners with the dinner plate. It’s a fun experience for them to round off the corners!
Cut out the paper pattern.
2. Use paper pattern created above to cut out cape and lining.
Place pattern on fold of Fabric A; pin. Cut out front of cape; remove pins .
Place pattern on fold of Fabric B; pin . Cut out lining of cape; remove pins .
3. Select and prepare appliqué:
Skip to step 5 if you are not adding an appliqué.
Choose either the lightning bolt or the tiara appliqué pattern on pages 69–70 of Nancy Ziemans’s book I Sew For Fun , or use your own design to place on the back of the cape.
Have your little partner choose an appliqué pattern, the color of appliqué felt, and any buttons, rhinestones, or glitter that they would like to add. Time for a little BLING!
Trace appliqué design onto paper side of Pellon’s Lite EZ Steam II , following manufacturer’s instructions.
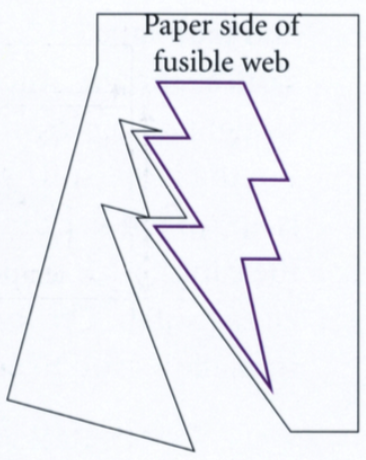
Appliqué patterns have been mirror imaged.
Roughly cut out appliqué, allowing approximate 1/8″ margins around all edges.
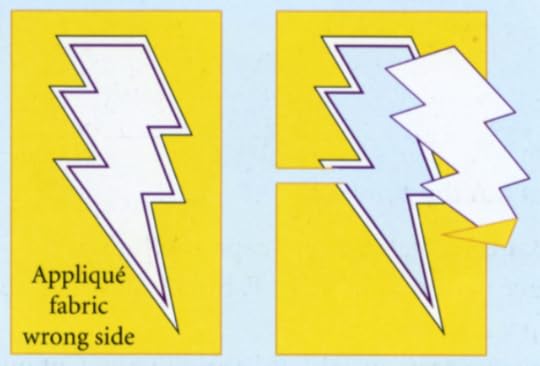
Position appliqué on wrong side of felt appliqué fabric. Press, following manufacturer’s instructions.
Cut out appliqué, following traced lines.
4. Position appliqué on back of cape and press into place:
Fold Fabric A cape lengthwise and mark center fold with a pin .
Use an I Sew For Fun 5-in-1 Sliding Gauge to measure 3″–4″ from neck edge of cape. Mark with an erasable I Sew For fun Fabric Marking Pen or pencil.
Remove paper backing and center appliqué on back of cape with top edge at marking.
Show your little partner how to take a pin and make a scratch mark on the paper backing. Use edge of scratch mark to remove paper from the appliqué. Position appliqué at mark on cape.
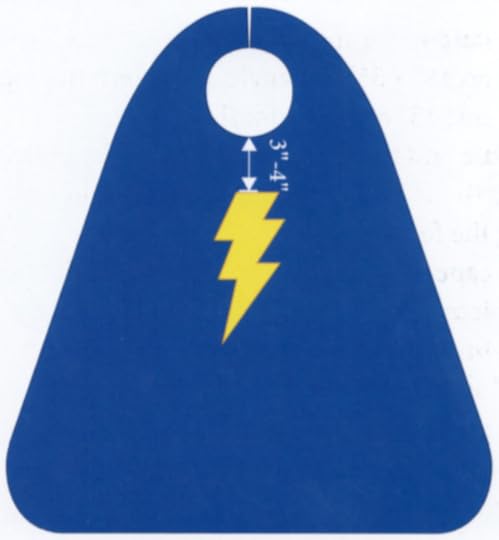
Cover appliqué with a press cloth and press to fuse, following manufacturer’s instructions.
5. Complete cape:
Press cape and lining.
Optional: Add some buttons or other bling to the appliqué.
Pin cape and lining, right sides together, aligning cut edges.
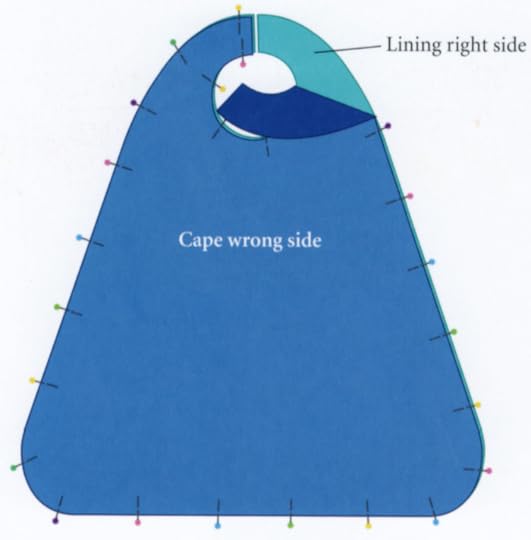
Stitch outer edges of cape, leaving a 4″–5″ seam opening on the lower hemline edge for turning.
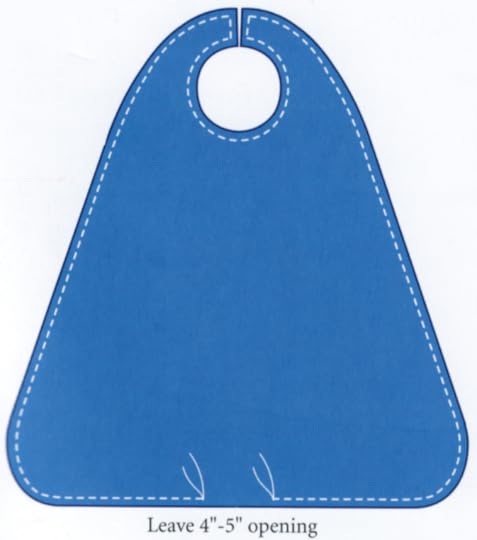
Trim seam allowances around the neckline and body of the cape, using a pinking shears or rotary cutter with a pinking blade.
Don’t trim 4″–5″ seam opening at lower hemline edge.
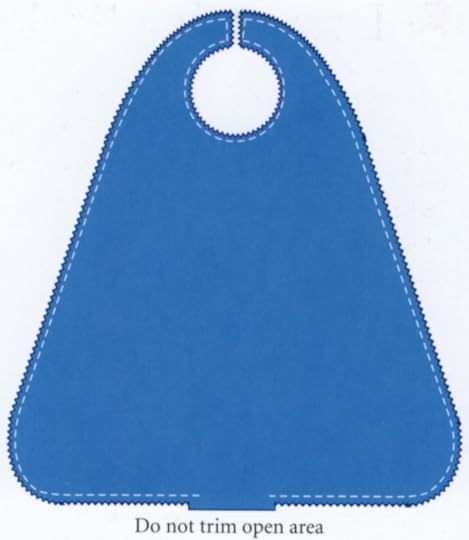
Turn cape right side out, through opening at lower hem edge. Use a point turning tool to push out seams at neckline extensions. Press.
Press seam allowance to inside at opening in hemline.
Complete cape by topstitching around outer cape and neckline edges.
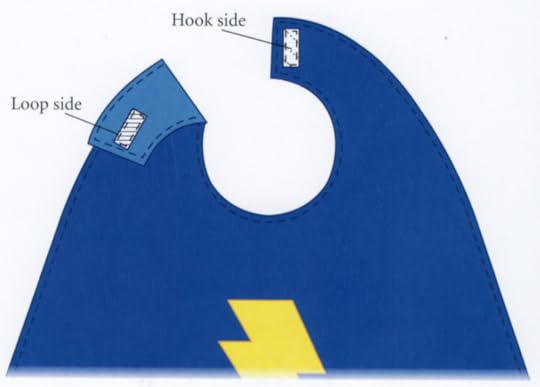
6. Prepare and stitch hook and loop tape closure:
Lay cape right side up and pin the hook side of hook and loop tape (1–1/2″ strip) to right neckline extension, as shown. Stitch through both layers using a straight or zigzag stitch.
Pin the loop (soft) side of hook and loop tape (2″ strip) to left neckline extension on the lining side of the cape. Stitch through both layers using a straight or zigzag stitch. The longer tape on the left neck extension allows you to adjust finished neckline.
It’s time for your little partner to put on the cape and show off his/her super powers! Voila!
You’ll find this super fun sewing project, plus 19 additional I Sew For Fun projects, in Nancy Zieman’s 72-page book, I Sew For Fun. Nancy shares her step-by-step directions for 20 super-easy sewing projects.
Tune in and watch Nancy and her granddaughters, along with friends, take a modern approach to sewing. Nancy shares her team sewing-for-fun experience along with many tips for a big partner, and numerous insights for involving a little sewing partner—all while making simple, easy to sew kid-friendly projects. Watch I Sew For Fun on Sewing With Nancy!
Watch I Sew For Fun on Sewing With Nancy online at NancyZieman.com.
For a complete listing of all I Sew For Fun companion products by Nancy Zieman, visit isewforfun.com
To win an I Sew For Fun 5-in-1 Sliding Gauge from Clover, please leave a comment below sharing a sewing project you’ll be stitching with your little sewing partner.
The randomly selected winner of a Carefree Curves Template Set from Nancy’s Notions, from the May 25 blog post is, Karen Gulotta.

Her comment is: What a cheerful, colorful quilt. It would be perfect for a little boy or girl who enjoys the beach. In winter, it would be a great reminder of summer, swimming, and sun!
Happy Sewing,
Team Nancy Zieman
Nancy Zieman Productions, LLC.
Content in this feed is © copyright 2019 by Nancy Zieman Productions, LLC and may not be republished without written permission. You’re welcome to forward the email to a friend or colleague but it’s not okay to add the RSS feed automatically as content on a blog or other website.
The FTC requires us to tell you that Nancy Zieman Productions, LLC has provided products by other companies in the course of doing business. The FTC requires us to advise you to take this information into consideration when reading this posting.
Make sure you are subscribed to Nancy Zieman Productions, LLC enews mailing list so you won’t miss a thing. Sign up here . Join us on Facebook , plus a host of other social media channels. Connect With Nancy and Friends today!
May 30, 2019
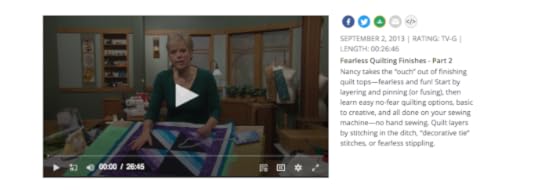
Fearless Quilting Finishes – Part Two
 Today’s Sewing With Nancy online featured video is Fearless Quilting Finishes, Part 2. During this 30-minute show you’ll learn three quilting options: stitching in the ditch, decorative “tie” stitching, and stippling.

It’s easy to show stippling, but not as effective to write about it. After all, it’s the action that causes many to shy away from this particular quilting process. So, what better way to teach the technique than to click here and watch Fearless Quilting Finishes! Plus, you can find all the details written in the book that accompanies this 3-part series, Fearless Quilting Finishes.
Stippling Review
Setting up your sewing machine is the first step in learning stippling.
Lower the feed dogs.
Attach a quilting foot.
Set the machine for a straight stitch.
Choose a thread that matches the background, or use a variegated thread as featured in the quilted project.
Use a needle compatible with the thread. With the thicker variegated thread , We suggest a topstitching needle —the large eye accommodates the thread.
Helpful notions
With the feed dogs lowered, you’ll be guiding and moving the quilt layers underneath the needle area. This is the motion or process that makes many people leery! Consider using a Supreme Slider on the bed of the machine. We use it since it helps the fabric move effortlessly under the needle. It has a Teflon top and a tacky underside that sticks to the machine.
To help control the fabric, comparable to the steering wheel on a car, use a Quilt Halo . Position the halo on top of the basted quilt and slide it under the foot of the machine. Then, hold the sides of the notion using gentle pressure. The tacky underside of the Quilt Halo grips the fabric while giving you a sense of control.
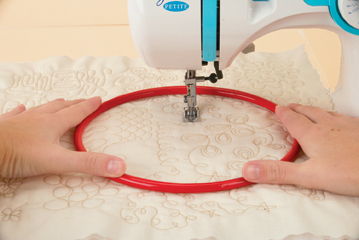 Begin by stippling a small project
Choose a small quilting project for your first stippling adventure such as a placemat or small wall hanging, Then, move the fabric under the needle to create medium to even large “puzzle-end” shapes. Big shapes are okay, in fact that’s the best way to learn. Just be consistent in size.
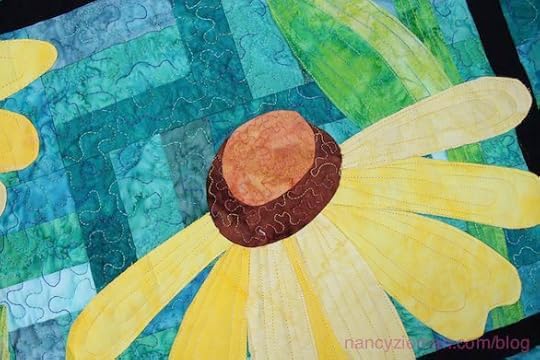
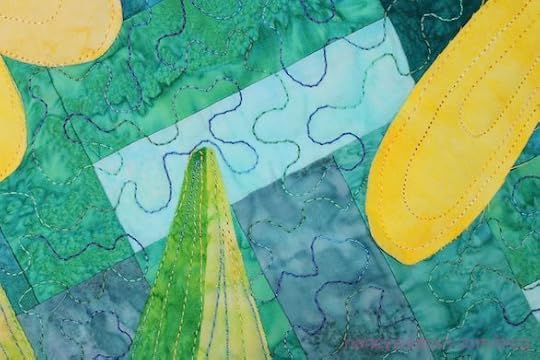
Or, stipple following the shape of the design as featured in the petals and leaves of the coneflower. It’s best to watch the process online!
Here’s a reference to have close at hand
All the information shown in this 3-part series is written and illustrated in Nancy Zieman’s book, Fearless Quilting Finishes.
Watch Fearless Quilting Finishes (Part 1, Part 2 and Part 3) on The Best of Sewing With Nancy.
For a chance to win a copy of the Fearless Quilting Finishes book from Nancy’s Notions, please tell us your favorite quilt finishing technique.
Happy Quilting,
Team Nancy Zieman
Nancy Zieman Productions. LLC.
Content in this feed is © copyright 2019 by Nancy Zieman Productions, LLC and may not be republished without written permission. You’re welcome to forward the email to a friend or colleague but it’s not okay to add the RSS feed automatically as content on a blog or other website.
The FTC requires us to tell you that Nancy Zieman Productions, LLC has provided products by other companies in the course of doing business. The FTC requires us to advise you to take this information into consideration when reading this posting.
Make sure you are subscribed to Nancy Zieman Productions, LLC enews mailing list so you won’t miss a thing. Sign up here . Join us on
Nancy Zieman's Blog

- Nancy Zieman's profile
- 21 followers

