
Nancy Zieman's Blog, page 63
May 28, 2019
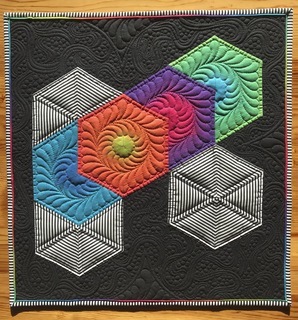
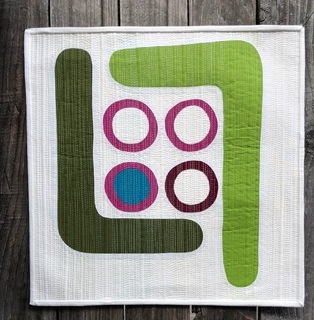
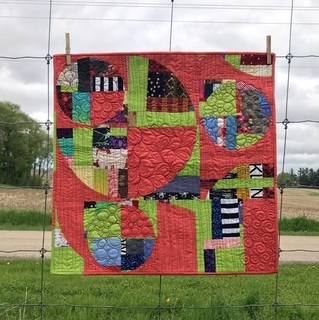
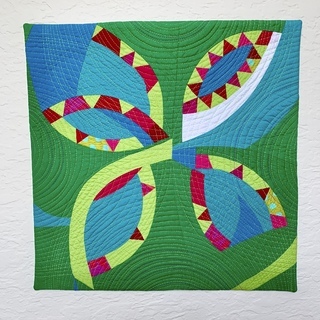
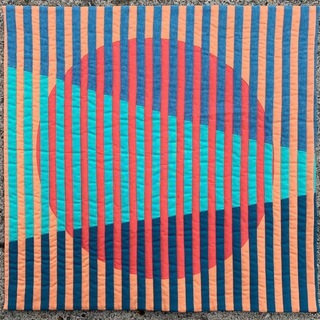
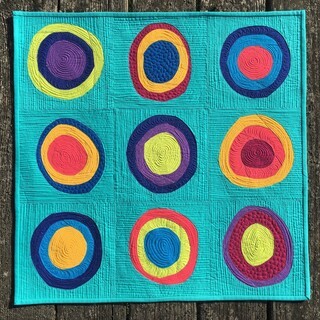
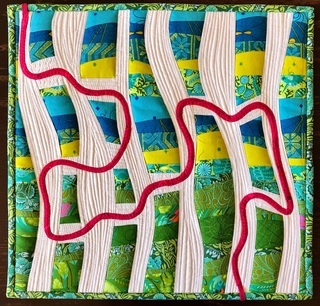
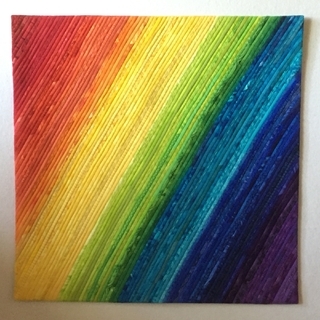
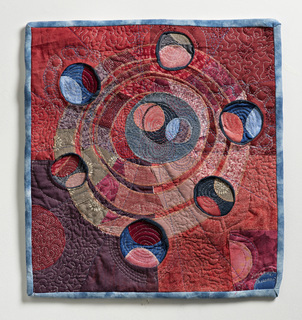
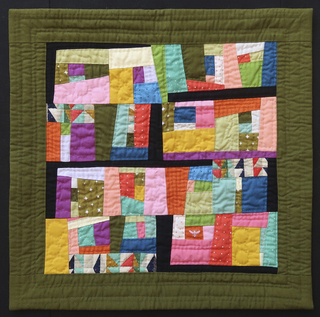
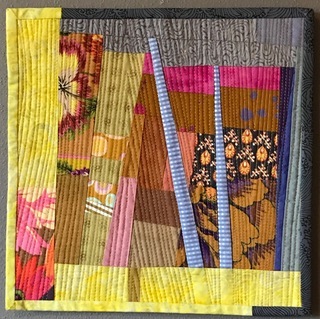
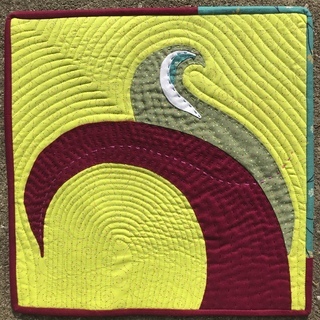
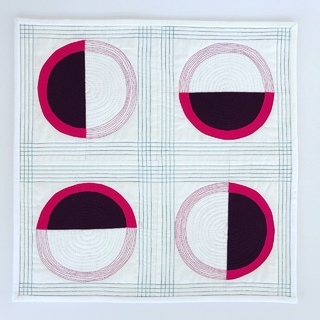
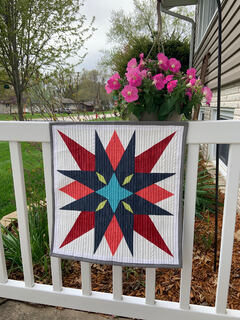
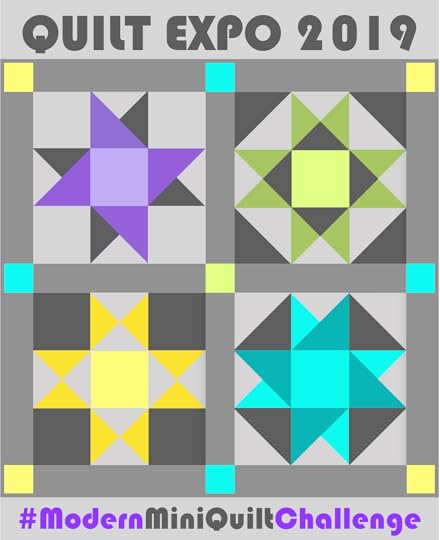
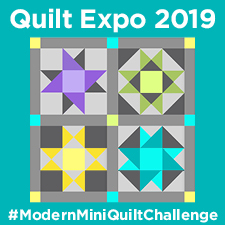
2019 Quilt Expo Modern Mini Quilt Challenge Winners
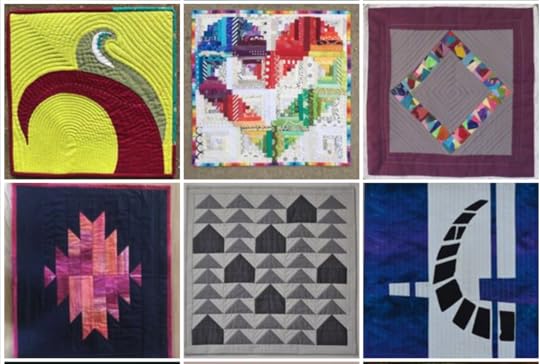
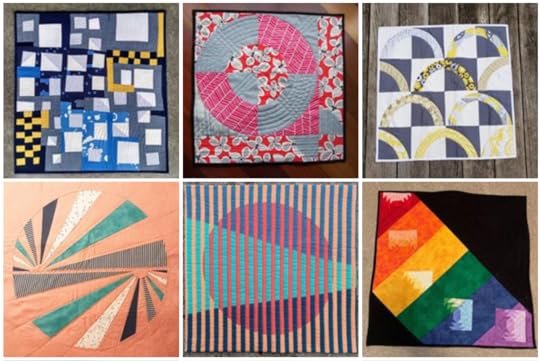
Thank you to everyone who helped make this years’ Quilt Expo Modern Mini Quilt Challenge a success! View all the mini quilt entries at facebook.com/QuiltExpo.
Here’s a quick review of the 2019 Quilt Expo Modern Mini Quilt Challenge Complete Entry Rules:
Entrants were to sew a mini modern quilt to showcase their quilting talents. Entries were to be submitted by emailing a high-resolution image of quilt to qechallenge@gmail.com by 5 p.m. CST on Tuesday, May 21, 2019.
Mini Quilts must be no more than 24-inches square, and may be pieced, appliquéd, mixed, or other.
Mini Quilts must be made from fabrics in a modern color palette and design.
Mini Quilts must be quilted through three layers by hand, by machine, or both.
You may enter ONE modern mini quilt that is completed within the last year.
Entries must be sent to qechallenge@gmail.com ; participants are encouraged to share progress and quilt photos on social media using hashtag #ModernMiniQuiltChallenge .
Submitted entries will be shared on Quilt Expo’s Facebook page throughout the month of May at facebook.com/QuiltExpo.
Winners selected by a panel of judges, plus five randomly drawn winners, will be announced on Tuesday May 28, 2019.
Judging takes place May 23–24, 2019.
Open to US residents only.

Congratulations to our winners!
Visit QuiltExpo.com/ModernMiniQuiltChallenge for complete details and prize package listing.
1st Place—Susan Bolte
CraftOptics —One set of CraftOptics Magnifying Eyeglasses (including prescription or reader installed). Value $524
2nd Place—Stephanie Zacharer Ruyle
Linda Z’s Sewing Center —Gift certificate for a two-day hands-on quilting retreat with Kaye England on Friday and Saturday, November 22 and 23, 2019. Also included is an evening meetup with Kaye on Thursday, November 21. Value $300
3rd Place—Kim Lapacek
Modern Quilt Studio —A complete set of Modern Quilts Illustrated Magazines (Volumes 1–13) along with the latest publication from modern quilting pioneers Weeks Ringle and Bill Kerr—Rediscovering Your Stash. Value $235
4th Place—Nicole Kaplan
Woodland Ridge Retreat —$200 gift certificates for Woodland Ridge Retreat. Value $200
5th Place—Cassandra Ireland Beaver
Pellon —Product bundle with batting, loft fiber, embroidery stabilizer, fusible web, embroidery stabilizer, batting and seam tape, cotton interfacing, flex-foam and fusible seam tape. Value $165
6th Place—Katherine Dossman
Clover —Flower head pins, snag repair needle, wonder clips, rotary cutter, cutting mat, roll & press, 5-in-1 sliding gauge, 6-in-1 Stick ’n Stitch guide, The Ultimate Quilt ’n Stitch Presser Foot. Value 155

7th Place—Gretchen Wylegala
Coats & Clark —Quilt+ Piecing and Quilting Thread—24 mini-king spool assortment and Sew Happy Wooden gift box Coats & Clark Dual Duty XP All-purpose thread 32 spools. Value $143
8th Place—Vasudha Govindan
Blue Bar Quilts —Kit to make the Chocolatier Block of the Month Quilt designed by AnneMarie Chany of Gen X Quilters, kit is the solid Skittles full spectrum colorway, finished size is 72″x 72″ www.annemariechany.com/chocolatier Value $130
9th Place—Charlotte Noll
Primitive Gatherings —Flannel Gatherings book, wool project pattern, wool project kit, Valdani threads, chenille needles, and wool bundle. Value $115
10th Place—Suzanne Neusner
The Electric Needle —“We’ve Gone to Plaid” kit in the neutral colorway. Value $95
11th Place—Emily Williams
108″ Quilt Backings —Two three-yard fabric backings. Value $90
12th Place—Kris Dohm
Siesta Silver Jewelry —Mini Glitzy Sister on an 18″ Espiga Necklace. Sterling Silver and nickel free. Value $73
13th Place—Beth Formica
Nancy Zieman Productions —Nancy Zieman’s NEW! Afternoon Picnic Fat Quarter Pack and Afternoon Picnic Pattern. Value $72
14th Place—Sarah Lefebvre
Thread Cutterz —Sampler box with bedazzled ring cutter, ring travel case, bedazzled flat mount cutter and retractable snippers. Value $62
15th Place—Jill Dow
Heirloom Quilting Designs —Can You Spare a Square? DVD workshop for refined free-motion quilting and Background Bonanza Sampler DVD that teaches wonderful background fill patterns. Value v$60
16th Place—Katherine May
Rita’s Racques —36″ Ruler Rack. Value $57
17th Place—Melody H. Baker
Snuggles Quilts —Three patterns and a small wool appliqué wall hanging kit. Value $55
The judges certainly had their work cut out again this year! The entries were wonderful. View all the mini quilt entries at facebook.com/QuiltExpo.
Join us at Quilt Expo, September 5–7, 2019. Visit QuiltExpo.com for more information, and to sign up and receive the 2019 Quilt Expo Advance Registration Guide in July.
Happy Quilting,
Team Nancy Zieman
Nancy Zieman Productions, LLC.

Content in this feed is © copyright 2019 by Nancy Zieman Productions, LLC and may not be republished without written permission. You’re welcome to forward the email to a friend or colleague but it’s not okay to add the RSS feed automatically as content on a blog or other website.
The FTC requires us to tell you that Nancy Zieman Productions, LLC has provided products by other companies in the course of doing business. The FTC requires us to advise you to take this information into consideration when reading this posting.
Make sure you are subscribed to Nancy Zieman Productions, LLC enews mailing list so you won’t miss a thing. Sign up here . Join us on Facebook , plus a host of other social media channels. Connect With Nancy and Friends today!


May 25, 2019
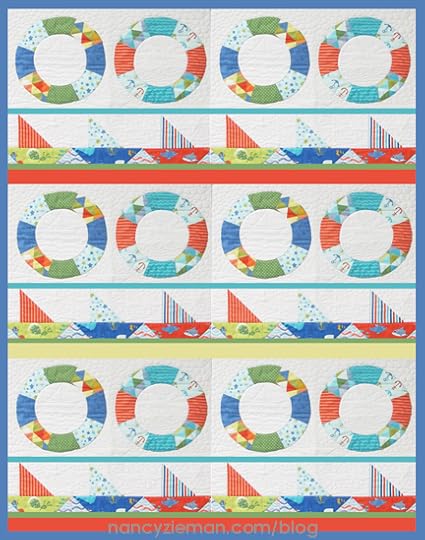
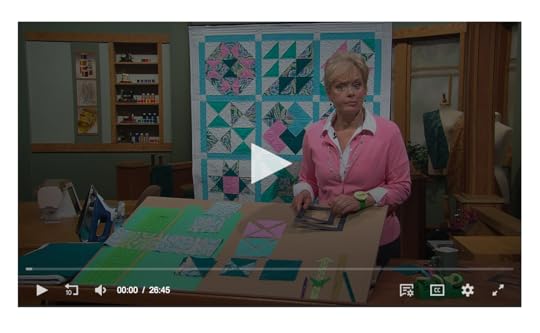
Make a Carefree Curves Sailing Quilt
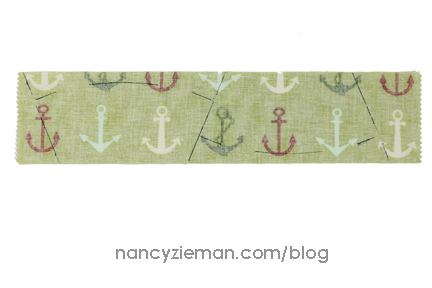
 Nautical-themed nursery? No problem. Lake or beach house wall hanging? No problem. Here’s an easy quilting tutorial that details how to sew a water-loving quilt project in just a few hours. Designed by Nancy Zieman’s friend Carol Porter, Education Director for Clover Needlecraft, Inc. The quilt is called Carefree Curves Sailing Quilt—the design made Nancy smile!
The quilting project finishes at 24″ x 32″, a great wall hanging size. With the Carefree Curves Template set and No-Hassle Triangles Gauge, the construction method can easily be adapted to any size. Take a look at how the quilt was created, making two different sections: machine pieced sailboats and machine appliquéd rings.
Supplies, Notions, and Fabric
Trace ‘n Create Carefree Curves Template Set
No-Hassle Triangles Gauge
Fine tip non-permanent marking pen
Lightweight fusible interfacing
Point Turner
Background Fabric
Assorted coordinating fabric scraps OR a Fat Quarter bundle
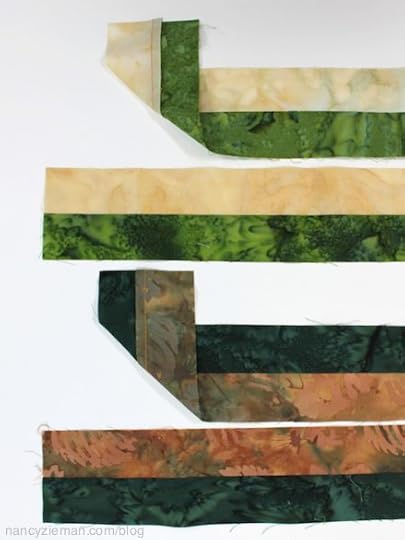
Create the Sailboats
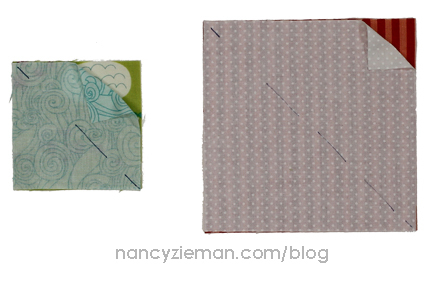
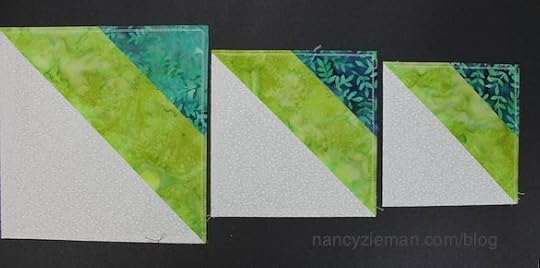
For each of the three boats, cut the following pieces:
Cut two 2-7/8″ squares: one blue water background and one foreground (for smaller half-square triangles used on the boat).
Cut two 4-7/8″ squares: one white background and one foreground (for larger half-square triangles used as the boat’s sail).
Cut two 2-1/2″ x 4-1/2″ background rectangles.
Cut one 2-1/2″ x 4-1/2″ foreground rectangle (used on the boat).
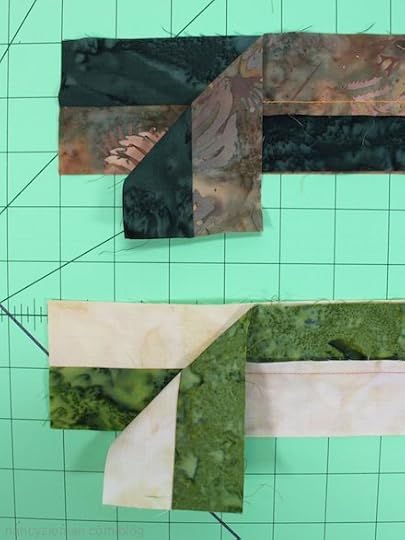
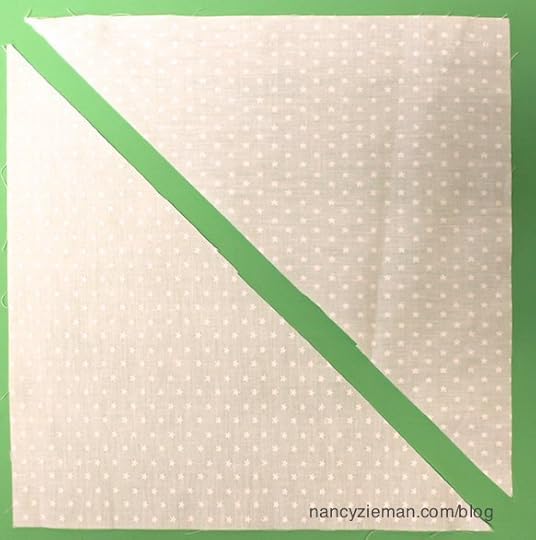
Layer one background fabric onto one foreground fabric square, matching right sides.
Using the No-Hassle Triangle Gauge , carefully mark a diagonal line on each pair of squares.
Straight stitch a scant 1/4″ from each marked line.
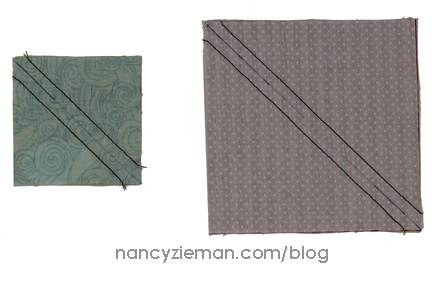
Cut along the center marked line.
Open each set of half-square triangles.
Press seam allowances in one direction, towards the darker fabric.
 A leftover larger half-square triangle will be created for each boat color-way. Save this extra piece to incorporate into the quilt back or into a future scrap quilt project.
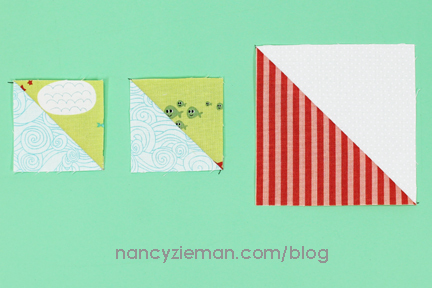
Arrange the boat block by adding in the remaining cut rectangles.

Use 1/4″ seam allowances to join the pieces and create the sailboat.
Repeat for the remaining two boats.
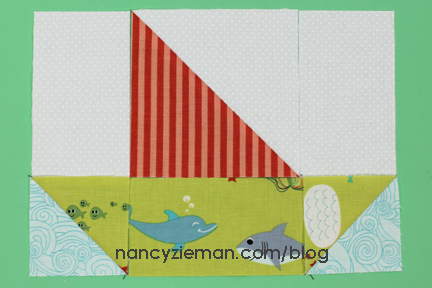
Join the three boat blocks to form the lower row of the quilt.
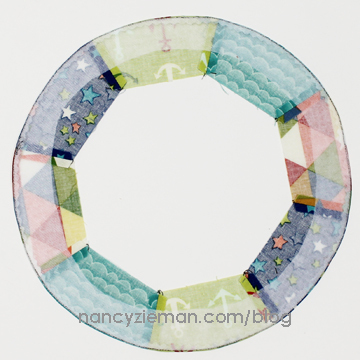
Create the Rings
Cut eight 2-1/4″ x 11″ strips from the remaining fabric scraps or fat quarters.
Use the Carefree Curves Template Wagon Wheel to trace wedge shapes and curves with a non-permanent pen onto the wrong side of the fabric strips.
Use eight wedges per ring. This quilt requires a total of 32 wedges.

Cut the wedges using a rotary cutter, mat, and ruler.

Arrange the fabric wedges into a circle.
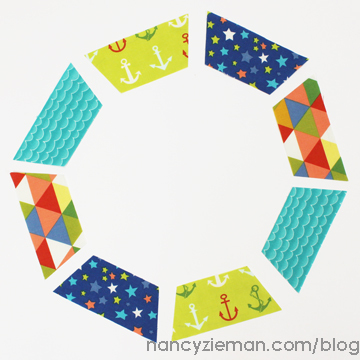
Join the wedges using 1/4″ seam allowances, along the diagonal edges.
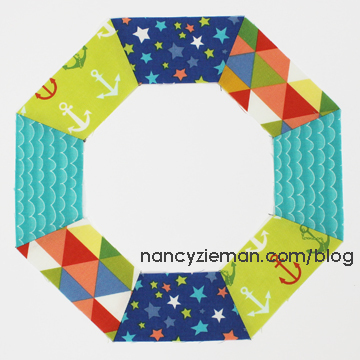
Press seam allowances open.
Pin the ring to lightweight fusible interfacing, right sides together.
Use a straight stitch to sew 1/4″ from the outer edge, curving stitching gently at each seam.

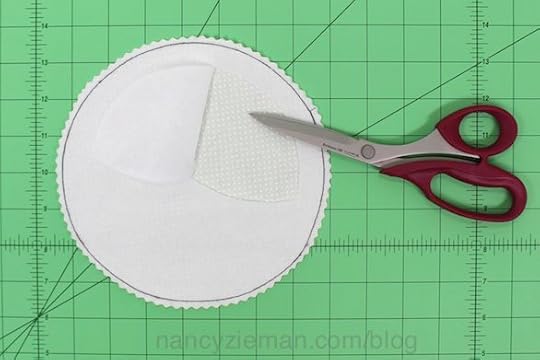
Use a rotary cutter with a pinking blade to remove the excess fabric, as shown.
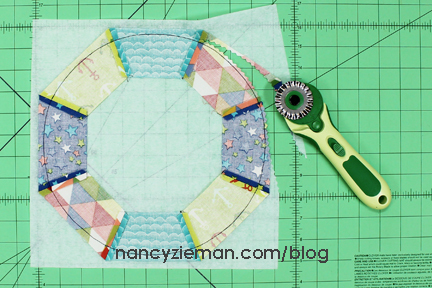
Carefully remove the interfacing from the center, leaving roughly 1″.
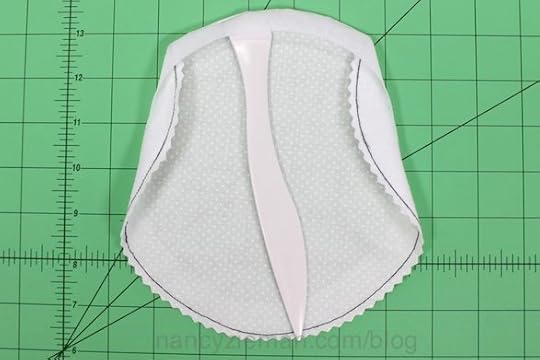
Turn the ring right side out using a turning tool.

Press.
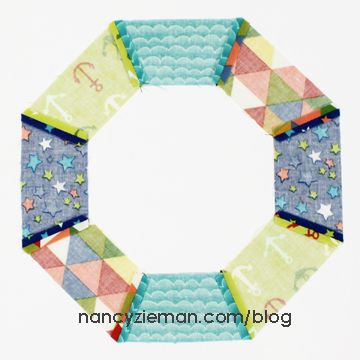
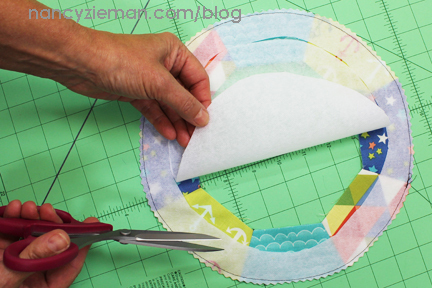
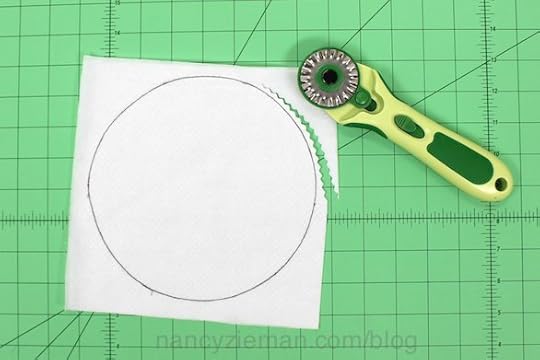
A 7″ circle is needed to create the inner ring. Cut four 8″ squares of background fabric and four 8″ squares of lightweight fusible interfacing .
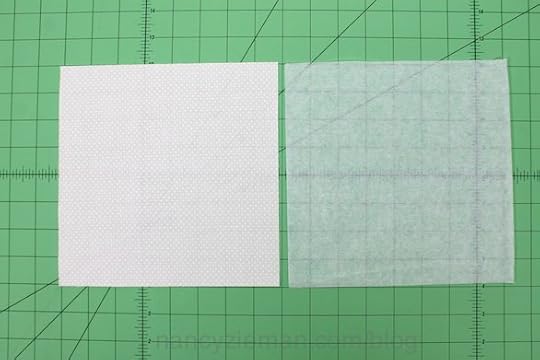
Lay the background fabric onto fusible interfacing, right sides together. Trace a 7″ plate on the wrong side of the background fabric. Or use a Yardstick Compass and set the distance between the points at 3-1/2″ (half of 7″).

Sew along the marked line and use a rotary cutter with a pinking blade to remove the excess fabric.
Trim the interfacing from the center, leaving roughly 1″.
Turn the background circle right side out using a turning tool, such as the Point Turner .
Press.
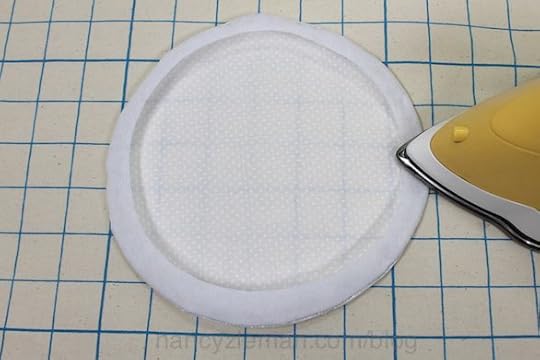
Use a straight stitch to machine appliqué the background circle over the ring center, concealing the cut edges.
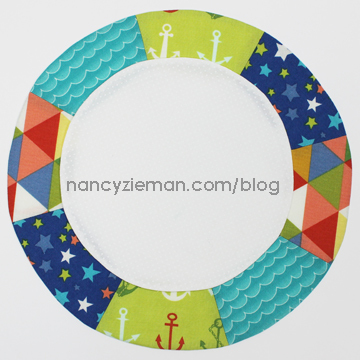
Each ring will finish at 11″ in diameter.
Create the Quilt
 With the size of this small wall hanging, you have several options for the background fabric. Choose to simply cut a square 24-1/2″ x 24-1/2″ and evenly distribute the ring shapes for machine appliqué. Or, you can do as we did. Cut four squares each measuring 12-1/2″ x 12-1/2″. Using the individual blocks allows you to accurately center each ring.
Cut background fabric.
Arrange the rings.
Edgestitch around each shape. Press.
Join the row of sailboats to the lower edge.
Create Any Size Quilt
Using the Carefree Curves Templates and the easy-to-follow techniques, you can create this quilt in a variety of designs. The key to remember is: Two ring blocks fit above three sailboat blocks. In this digital sample below, I’ve simply eliminated a row of rings and added horizontal borders. The possibilities are endless.
Thank you to Carol for this lovely Carefree Curves Sailing quilt. Carol’s quilting talents are impressive!
Watch Carefree Curves (Part One and Part Two) on The Best of Sewing With Nancy online.


 For a chance to win a Carefree Curves Template Set from Nancy’s Notions, make a comment below telling us who you might make this Carefree Curves Sailing Quilt for.


The randomly selected winner of Nancy Zieman’s New! Afternoon Picnic Fat Quarter Pack from the May 18 blog post is Pat.

Her comment is: I just love the May basket block. The Afternoon Picnic fabrics selected really make the basket pop. Thanks so much for the clear instructions on block construction. Nancy’s legacy lives on through projects like this.
Happy Quilting,
Team Nancy Zieman
Nancy Zieman Productions, LLC.
Content in this feed is © copyright 2019 by Nancy Zieman Productions, LLC and may not be republished without written permission. You’re welcome to forward the email to a friend or colleague but it’s not okay to add the RSS feed automatically as content on a blog or other website.
The FTC requires us to tell you that Nancy Zieman Productions, LLC has provided products by other companies in the course of doing business. The FTC requires us to advise you to take this information into consideration when reading this posting.
Make sure you are subscribed to Nancy Zieman Productions, LLC enews mailing list so you won’t miss a thing. Sign up here . Join us on Facebook , plus a host of other social media channels. Connect With Nancy and Friends today!
May 23, 2019
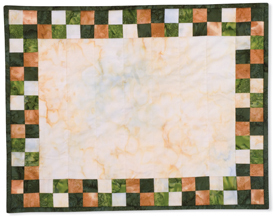
Fearless Quilting Finishes – Part One

Nancy Zieman was often asked, “How do you determine topics for your TV show, Sewing With Nancy?” Good question! There are many answers to that question—what she wanted you to learn, what she thought you’d like to know, what’s trendy in sewing, quilting, or embroidering . . . and the basics, there are always newcomers or those of us who need refresher courses.
The basics, that’s what drove Sewing With Nancy’s 3-part series, Fearless Quilting Finishes, teaching the basics of quilting borders, quilting, and binding.
During the first online Sewing With Nancy streaming video, you’ll learn eight, yes eight, techniques in one 30-minute show! From the most simple border to some artsy options!
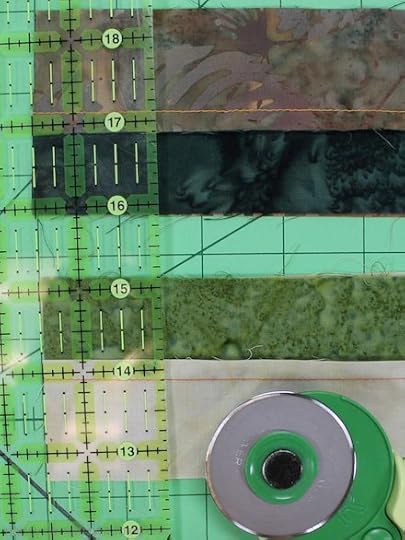
Checkerboard Border Preview
Cut crosswise strips of light and dark fabrics to use in the main quilt design. (Nancy used 1-1/2″ strips in this small wall quilt or table topper.)
Stitch together a light and a dark strip, right sides together. Press seam toward the dark fabric. Cut strips in half.
Stack two of the half-strips, right sides together, positioning the light coloration of one strip over the dark section of the second strip.
Subcut strips into sections the same width as the strip.
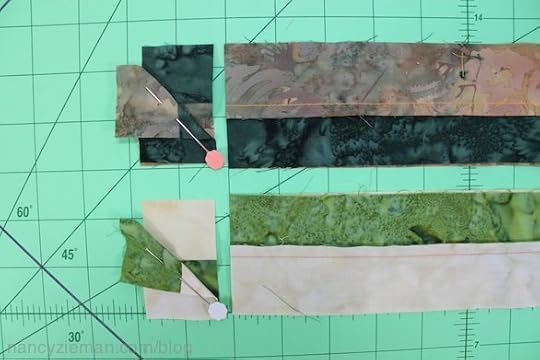
Join subcut pairs, right sides together, to form the 4-patch. Chain stitch pairs, one after the other.
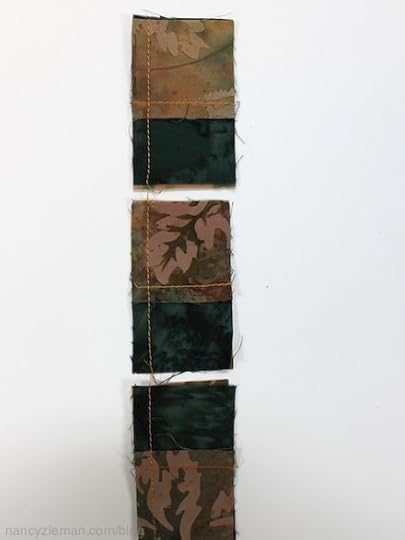
Press the seams open and lay out the 4-patch blocks to create a checkerboard border.
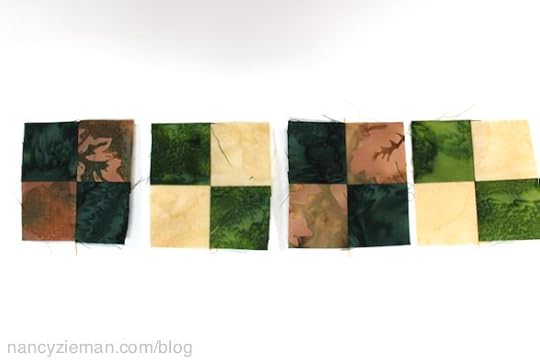
Simple, but creative, don’t you think? This border shines by itself!
Seven more ideas during the show!

All the details are in one place!
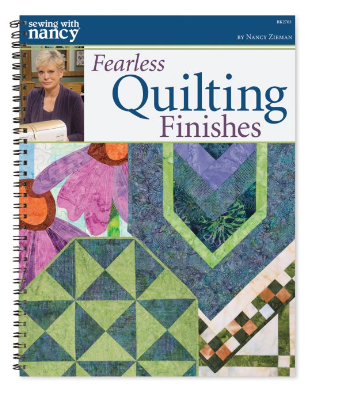
You’ll find all the details in the Fearless Quilting Finishes book.

For a chance to win a copy of the Fearless Quilting Finishes book from Nancy’s Notions, please tell us your favorite quilt finishing technique.
The randomly selected winner of a copy of Stress-Free Quilting with Machine Embroidery is Amelia.
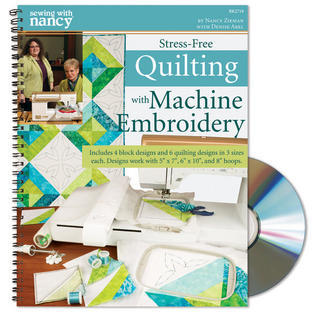
Her comment is: Picking a design and getting it centered on my blocks is always a little stressful. I struggle sometimes with getting all my layers to stay smooth also.
Happy Quilting,
Team Nancy Zieman
Nancy Zieman Productions. LLC.
Content in this feed is © copyright 2019 by Nancy Zieman Productions, LLC and may not be republished without written permission. You’re welcome to forward the email to a friend or colleague but it’s not okay to add the RSS feed automatically as content on a blog or other website.
The FTC requires us to tell you that Nancy Zieman Productions, LLC has provided products by other companies in the course of doing business. The FTC requires us to advise you to take this information into consideration when reading this posting.
Make sure you are subscribed to Nancy Zieman Productions, LLC enews mailing list so you won’t miss a thing. Sign up here . Join us on Facebook , plus a host of other social media channels. Connect With Nancy and Friends today!
May 21, 2019
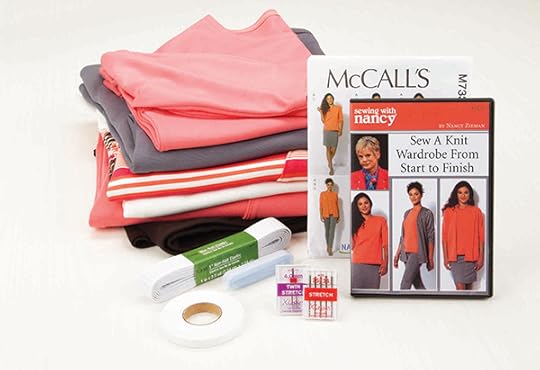
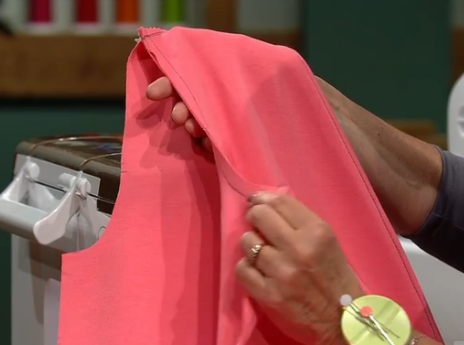
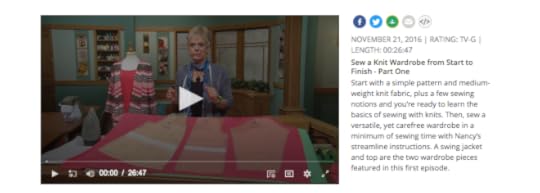
Learn to Sew a Knit Wardrobe from Start to Finish
 While Nancy Zieman liked trying new sewing and quilting techniques, there’s something she found irresistible about sewing the basics. Going back to her sewing roots, these next two episodes are all about sewing knits. You’ll get a chance to sew, then mix and match four classic wardrobe pieces in her two-part series, Sew a Knit Wardrobe from Start to Finish on Sewing With Nancy.

Whether you’re looking for comfortable nine-to-five wear or an easy evening staple, Nancy shows you how to easily stitch or serge a swing jacket, top, pants, and skirt. We’ll be using McCall’s pattern M7331. Now it’s your chance to brush up on knit sewing basics, starting with the wardrobe focal point—the jacket.
Learn to sew a knit wardrobe from start to finish on the two-part series of Sewing With Nancy.
Supplies
Note from Nancy: Refer to the pattern envelope for sizing and fabric yardage.

Knit Fabrics
Twin Stretch Needles by Klasse
Stretch Needles by Klasse
McCall Pattern 7331 by Nancy Zieman
Elastic
Stabilizer
In the first part of the two-part series, we’ll also stabilize the knit fabric along the shoulder seam, back neckline, sleeve hems, and back hems. You won’t want to miss this week’s episode. Watch it online.
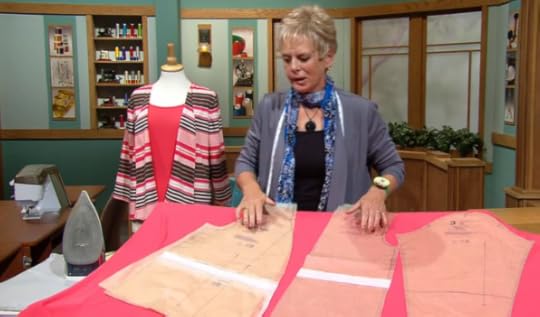
Lay Out, Cut, Mark and Stabilize
See how easy it is to match directional knit nap fabrics when Nancy shows the layout of the pattern tissue. Use a rotary cutter to cut out the pattern pieces once they are secure. Nancy shares tips for marking the nips/notches in the pattern and share details for marking the right side of the fabric. In some cases, the right and wrong sides of knits are virtually identical.
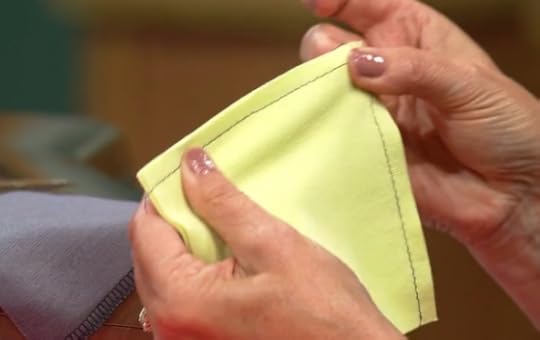
Stitch/Serger Jacket Front
Start sewing this versatile jacket by first sewing the jacket front. In Sew Knit Wardrobe from Start to Finish—part one, you’ll see how to use a serger for these construction steps or simply use a special wobble stitch on your sewing machine. Learn how to grade seam allowances with a rotary cutter with pinking blade.
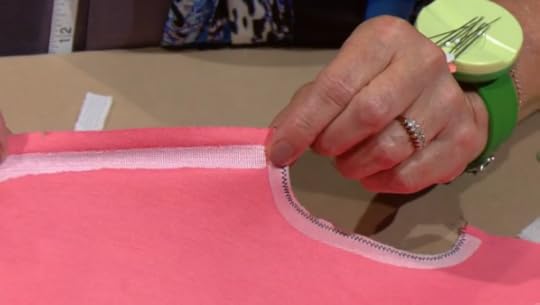
Stitch/Serge Shoulder and Neckline
Next, we’ll address the shoulder and neckline area of the jacket. A few tried and true techniques will allow easy construction of this wardrobe piece.
Stitch/Serge Sleeves
Sleeves are often a hurdle for seamstresses but they needn’t be. Setting in knit sleeves can be achieved accurately and quickly as demonstrated in this week’s episode of Sewing With Nancy.
Watch Sew a Knit Wardrobe from Start to Finish (Part One and Part Two) on The Best of Sewing With Nancy online.
 For a chance to win the Sew a Knit Wardrobe from Start to Finish Kit and DVD, leave a comment sharing your answer to: What color do you find most in your own personal wardrobe?
 The randomly selected winner of Patchwork Inspired Patterns by Antique Quilts, from the May 7 and 14 blog posts is Christi.
Her comment is: I would say Snowball Crossing is a wonderful quilt. My real antique favorite block is a plain old 9 patch. Just can’t beat it.

Be sure to check out the 2019 Modern Mini Quilt Challenge!
Happy Sewing,
Team Nancy Zieman
Nancy Zieman Productions. LLC.
Content in this feed is © copyright 2019 by Nancy Zieman Productions, LLC and may not be republished without written permission. You’re welcome to forward the email to a friend or colleague but it’s not okay to add the RSS feed automatically as content on a blog or other website.
The FTC requires us to tell you that Nancy Zieman Productions, LLC has provided products by other companies in the course of doing business. The FTC requires us to advise you to take this information into consideration when reading this posting.
Make sure you are subscribed to Nancy Zieman Productions, LLC enews mailing list so you won’t miss a thing. Sign up here . Join us on Facebook , plus a host of other social media channels. Connect With Nancy and Friends today!
May 18, 2019
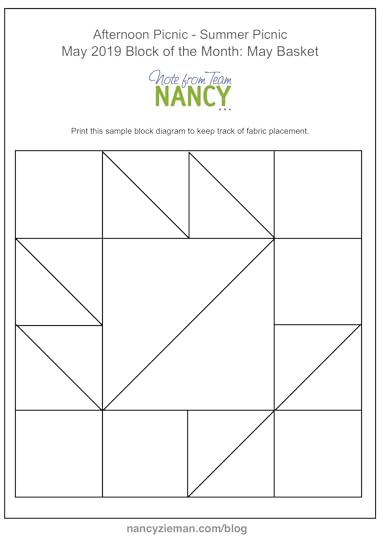
May 2019 Block of the Month: May Basket Block

2019 Block of the Month—May: “May Basket” Quilt Block
In January, Team Nancy Zieman introduced the first of 12 blocks in the New! Summer Picnic 2019 FREE! Block of the Month Series. Find the January through April Quilt Block Tutorials under Popular Blog Posts: 2019 Block of the Month. Join the New! Summer Picnic 2019 Block of the Month Series, anytime, by viewing the supply listing in the January 5th NZP Blog Posting.
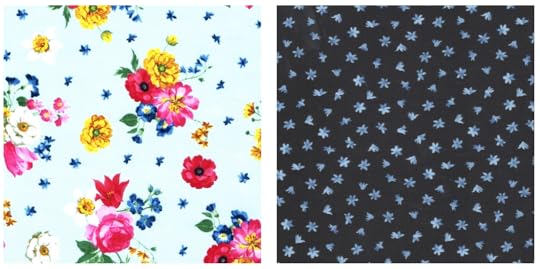
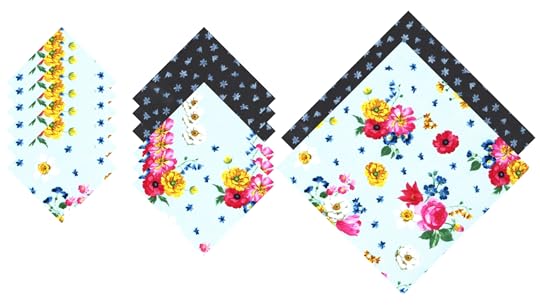
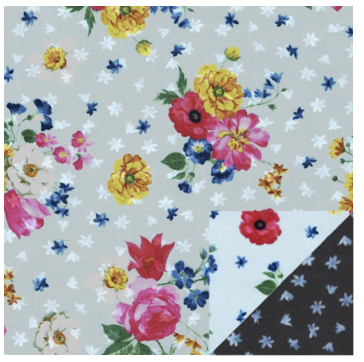
Each month, we’re featuring one quilt block design. The quilt blocks are created using Nancy Zieman’s NEW! Afternoon Picnic Fat Quarter Pack* from Riley Blake Designs (*18″ x 22″ fabric rectangles) plus background, sashing, border, and binding fabrics. Follow along as we demonstrate how to create this Month’s “May Basket” Quilt Block (below).
Keep your fabric choices sorted using this handy Fabric Planner diagram. Download the planner HERE. Make notes or pin swatches to remind you of the fabric placements.
2019 Block of the Month Afternoon Picnic May PDF
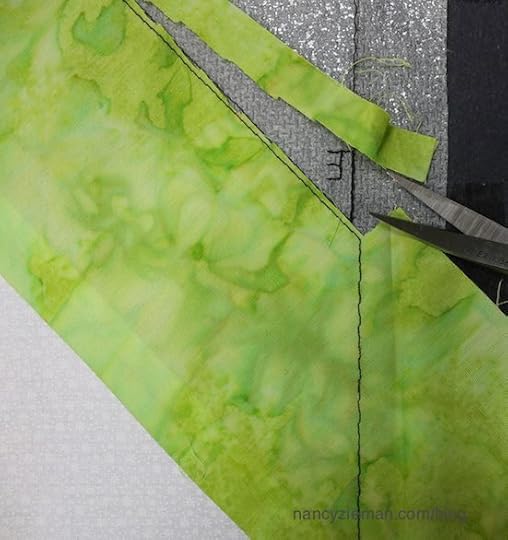
Choose the Fabrics
For the New! Summer Picnic 2019 FREE! Block of the Month Series, “May Basket” Quilt Block, select the following fabrics from your Nancy Zieman’s NEW! Afternoon Picnic Fat Quarter Pack from Riley Blake Designs and a Nancy Zieman’s No-Hassle Triangle Gauge by Clover.
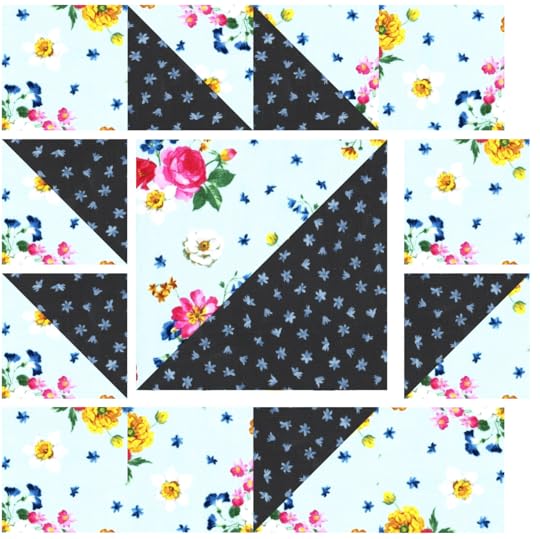
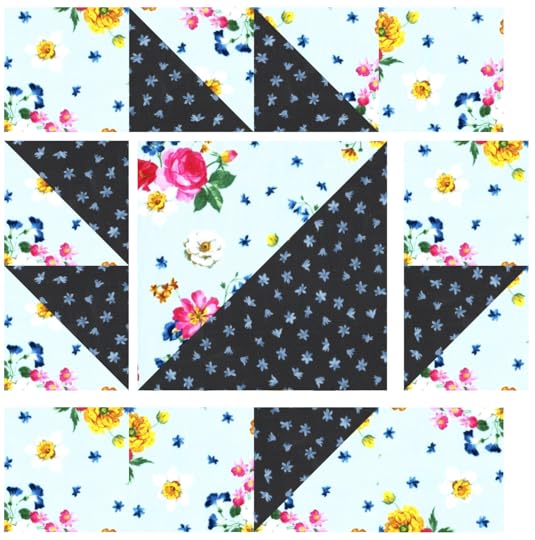
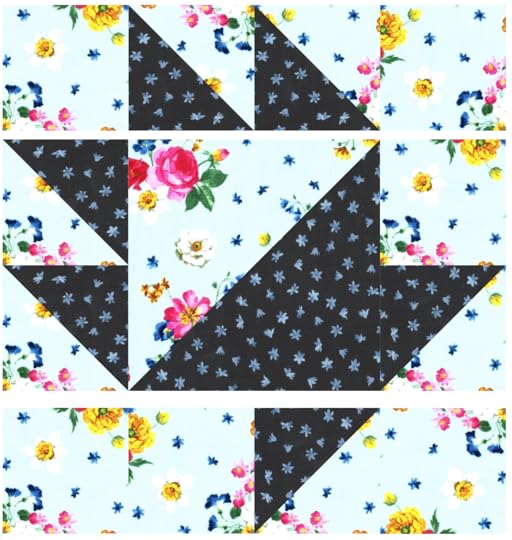
“May Basket” Block
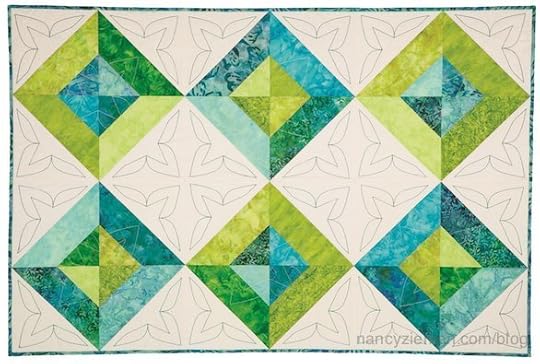
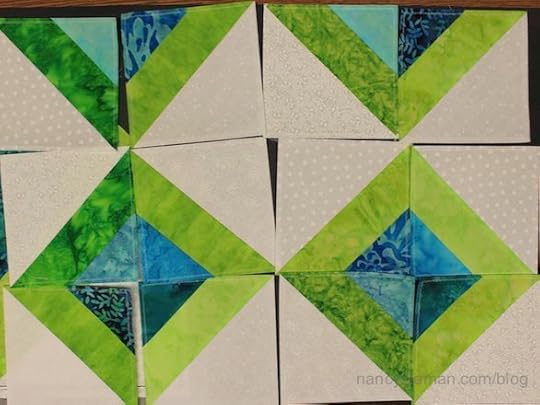
May basket is another frequently used name for a quilt block. This version combines two sizes of finished triangle blocks: 3-1/2″ and 6-1/2″, giving the block a center focal point.
Instructions: (Each block is a 12″ finished square. Finished quilt measures approximately 44-1/2″ x 57-1/2″)
Cut Fabric for Block
Create a modified 16-patch block with two different sizes of 1/2-square triangle fabric combinations: 3-1/2″ and 6-1/2″.
Cut six 3-1/2″ squares of Afternoon Picnic Blue Floral
Cut three 3-7/8″ squares of Afternoon Picnic Blue Floral
Cut three 3-7/8″ squares of Afternoon Picnic Black Flower
Cut one 6-7/8″ square of Afternoon Picnic Blue Floral
Cut one 6-7/8″ square of Afternoon Picnic Black Flower
Construct The Units
All seam allowances are scant 1/4″ unless otherwise stated.
The step-by-step photos illustrate construction of the block.
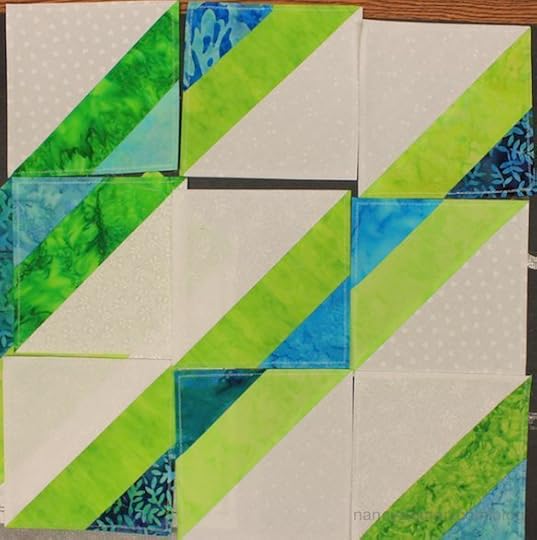
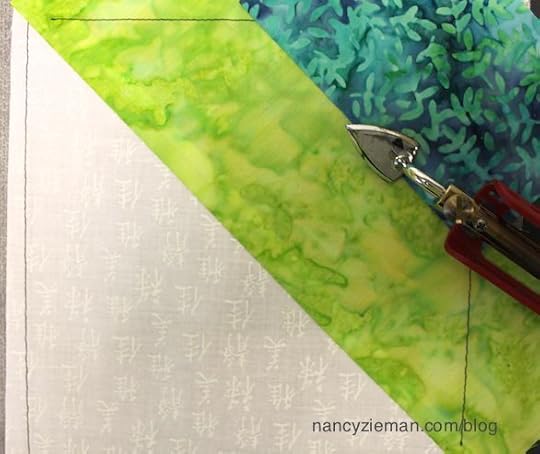
Half Square Triangles (HSTs)
1. Create six 1/2-square triangle blocks of Blue Floral and Black Flower and two 1/2-square triangles from Blue Floral and Black Flower. Make three block sets of the 3-7/8″ Blue Floral and Black Flower and one 6-7/8″ block set of Blue Floral and Black Flower
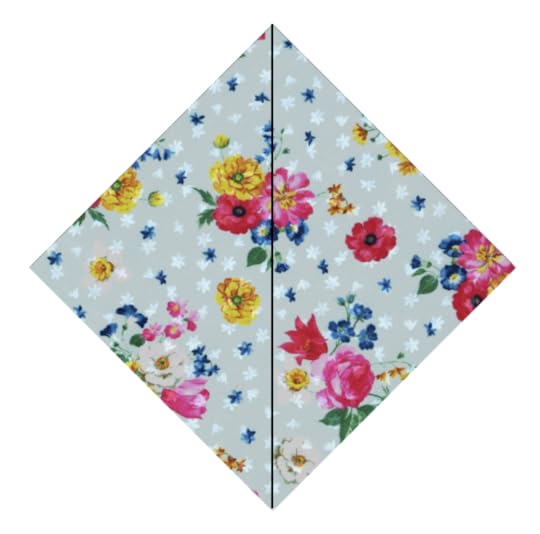
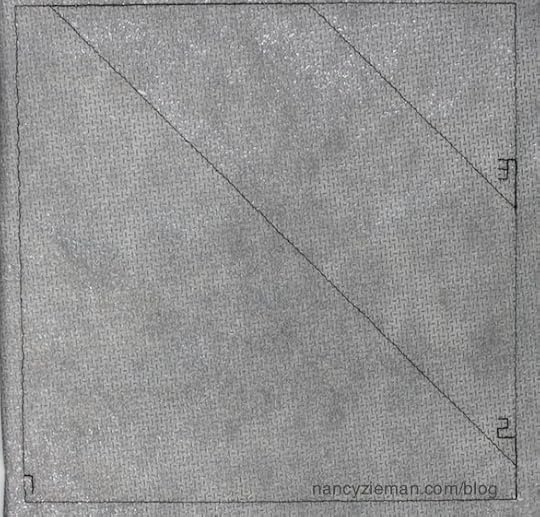
Align 3-7/8″ squares and the 6-7/8″ squares cut from Afternoon Picnic Blue Floral , and Afternoon Picnic Black Flower right sides together.
Mark blocks using a No-Hassle Triangles Gauge and an erasable gel pen.
Use a No-Hassle Triangles Gauge . The left side of the gauge is designated to create 1/2-square triangle blocks. Depress button on sliding portion of the gauge and move to size of the desired 1/2-square triangle.
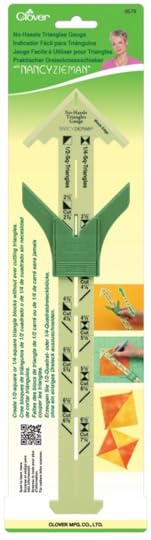
Stack two squares, right sides together. Place No-Hassle Triangles Gauge on block set, corner to corner. Match corner marks of gauge with corner of block sets. Mark fabric through center of gauge with an erasable gel pen .
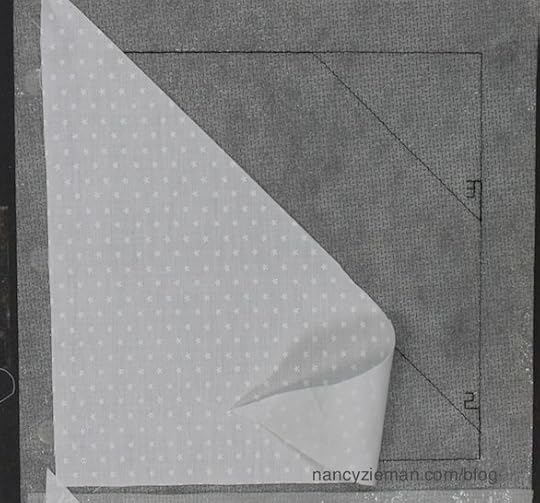
Stitch Blocks
Align presser foot along one side of center mark, stitch.
Kiss the next block set to the stitched block and chain stitch from one block to the other.
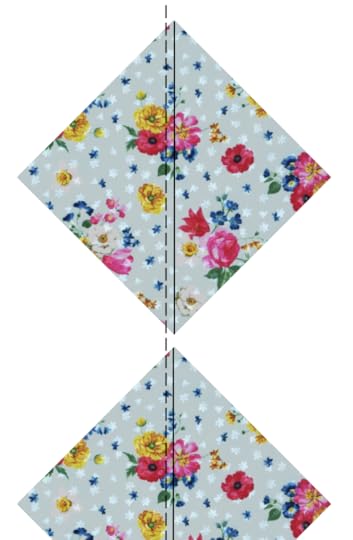
Rotate block, stitch along other side of center mark.

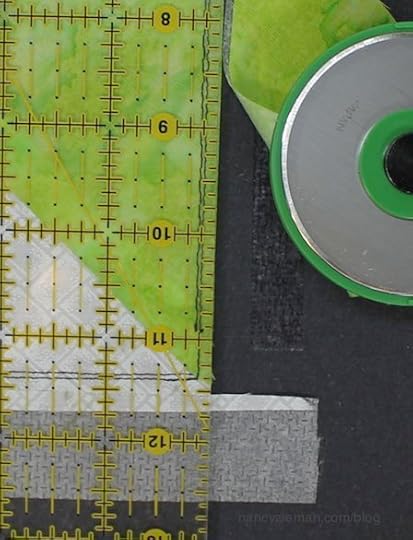
Cut blocks apart along center markings with a rotary cutter, ruler, and mat.
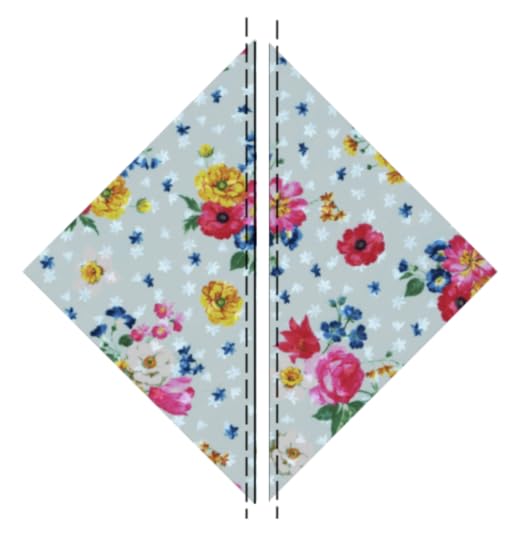
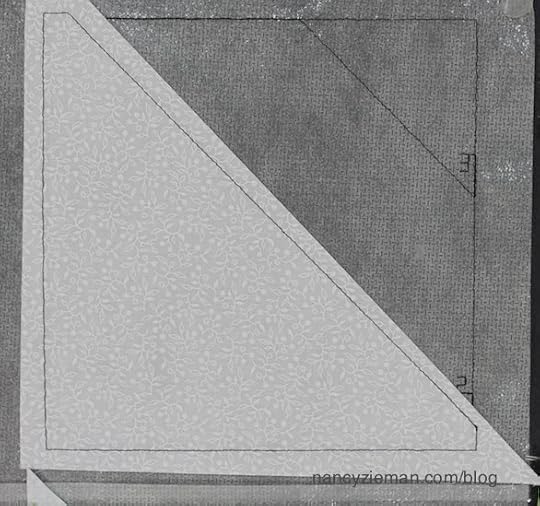
Press seams to darker fabric.

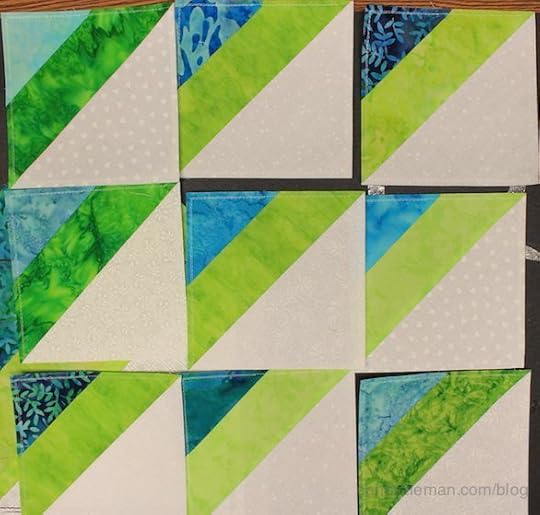
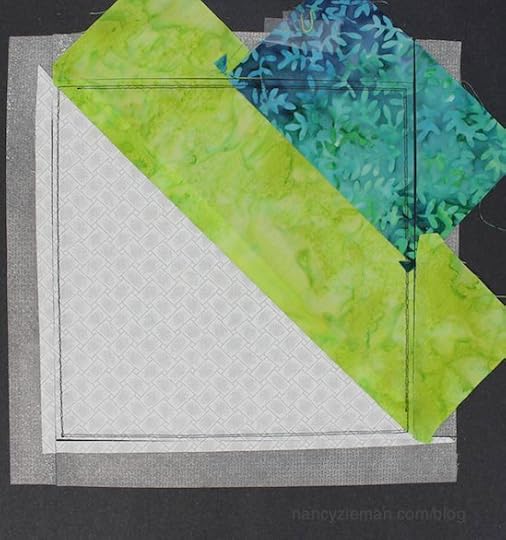
Assemble Blocks
Layout block following diagram. Rotate squares as necessary.
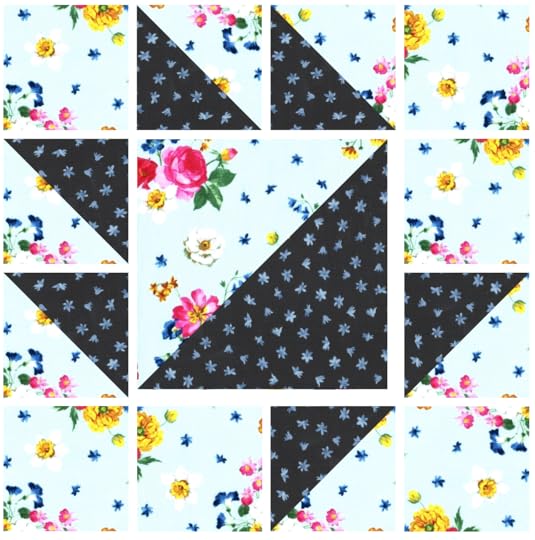

Only one 1/2-square triangle from the 6-7/8″ combination is needed for the May Basket block.
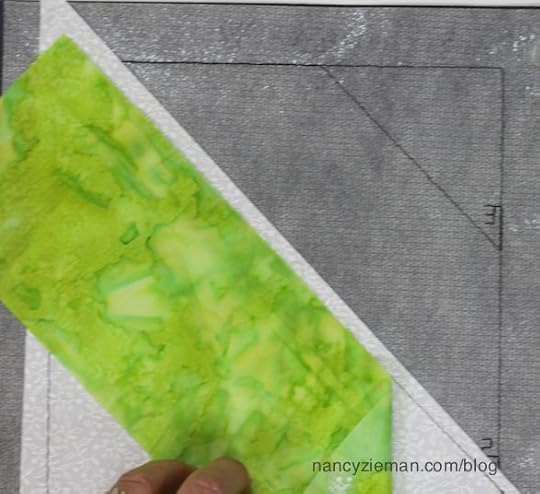
Join Squares
For the top and bottom rows, place squares from the second column onto the first column, right sides together repeat.
Clip threads between blocks.
When stitching the elements together, first seam the top and bottom rows. Then stitch the remaining blocks in the middle row to make a larger row.
Stitch smaller blocks, then add to the center block.
Press seams open, or press seams to alternate sides.
Stitch rows together.
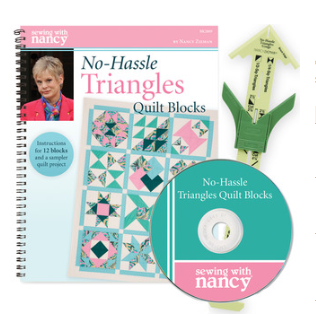
Nancy Zieman’s No-Hassle Triangles Quilt Blocks book shows how to create 12 additional quit blocks. For best results, use the No-Hassle Triangles Gauge.
Watch No-Hassle Triangles Quilt Blocks (Part One and Part Two) on The Best of Sewing With Nancy online.

For a chance to win Nancy Zieman’s New! Afternoon Picnic Fat Quarter Pack please leave a comment below.

The randomly selected winner of a copy of the book Beginning Landscape Quilting from the May 11 blog post is, LoAnn Trowbridge.

Her comment is: I have almost finished a landscape wall hanging–it’s of the Fall. I would like to make “Four Seasons”!! I think I would make spring, summer, fall, then winter! I would love to win this book! Thank you for the opportunity!
Be sure to check out the 2019 Modern Mini Quilt Challenge!
Happy Quilting,
Team Nancy Zieman
Nancy Zieman Productions, LLC.
Content in this feed is © copyright 2019 by Nancy Zieman Productions, LLC and may not be republished without written permission. You’re welcome to forward the email to a friend or colleague but it’s not okay to add the RSS feed automatically as content on a blog or other website.
The FTC requires us to tell you that Nancy Zieman Productions, LLC has provided products by other companies in the course of doing business. The FTC requires us to advise you to take this information into consideration when reading this posting.
Make sure you are subscribed to Nancy Zieman Productions, LLC enews mailing list so you won’t miss a thing. Sign up here . Join us on Facebook , plus a host of other social media channels. Connect With Nancy and Friends today!
May 16, 2019
More Stress Free Quilting Using Your Embroidery Machine
Sometimes the quilting step is the most perplexing and stressful. Your goal is for a stress-free process, but where to begin? Denise Abel, Nancy Zieman’s guest on Sewing With Nancy, has a solution—use an embroidery machine and turn it into a quilting machine. Denise joins Nancy for the second part of this series, Stress-Free Quilting with Machine Embroidery. Watch the second part on Sewing With Nancy, online.
First Episode Highlights
During the first program of this series, Denise and Nancy showcase piecing simple blocks using an embroidery machine. If you missed that episode, watch Stress-Free Quilting with Machine Embroidery Part One, today! Programming the design into the embroidery machine yields precisely stitched blocks with unbelievable accuracy.
Highlights from the Second Episode
Determine the layout of the blocks. For the Simple Shadow blocks, there are a few design options.
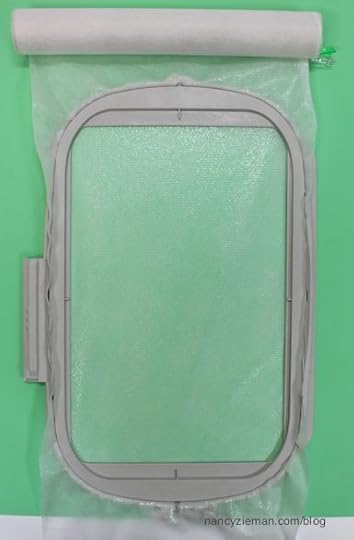
Stress-Free Hooping
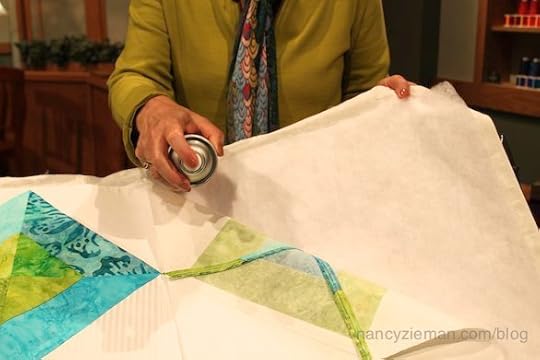
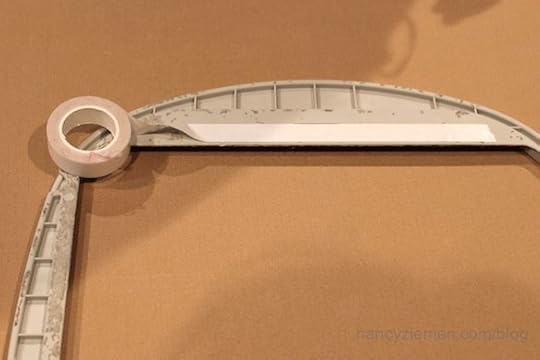
Positioning the three layers of a quilting sandwich—backing, batting, and pieced top—evenly into a hoop might seem tricky at first glance! Not so, with these techniques.
First option: Spray baste the layers together
Tape backing to tabletop, wrong side up.
Lightly spray baste the backing fabric with Quilt Basting Spray .
Position batting.
Lightly spray baste the batting.
Position pieced top; right side up.
The quilt sandwich is ready to hoop.
Second option: Fuse-tack the layers together.
Cut 1/2″ wide strips of EZ-Steam II .
Press 1/2″ wide strips of EZ-Steam II to the wrong side of backing and quilt top.
Press 1/2″ squares in place, a fist width apart.
Remove paper backing.
Press layers together.
The quilt sandwich is ready to hoop.

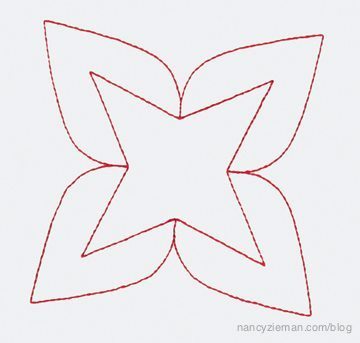
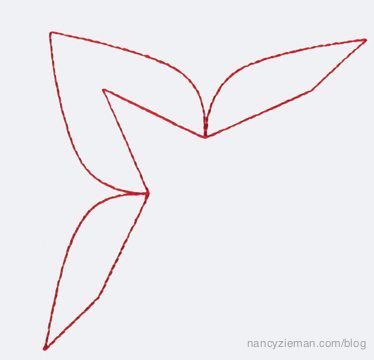
Choose a quilting embroidery design
There are 24 quilting designs available with the book purchase. The two designs that were used to quilt the layers of this lap quilt are featured below.
 There are other embroidery designs that are digitized for machine quilting. Look for designs that have compatible components such as a square, a 1/2-square triangle, or borders.
Attach embroidery hoop
Mark center of each block with a wash-away marking pen . This block has a seam at the center, which eliminates this step.
Add double-sided basting tape to the underneath side of the inner hoop.
Position hoop on fabric, aligning crossmarks of hoop with wash-away marks on fabric or crossmarks on template.
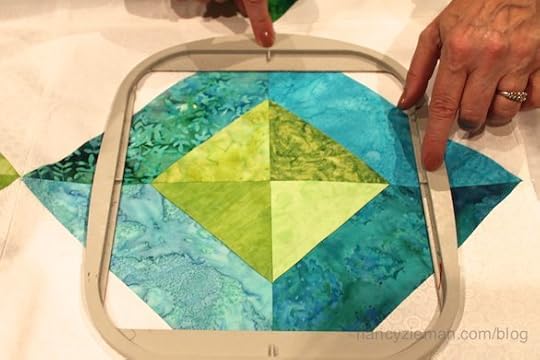
Place outer hoop underneath the quilt sandwich; loosen the screw. Insert inner hoop into the fabric. Tighten screws.
Remove template if a template was used.
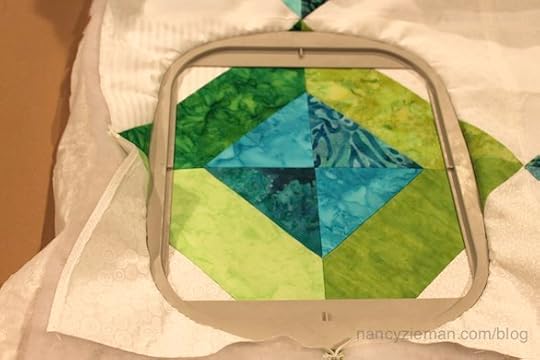
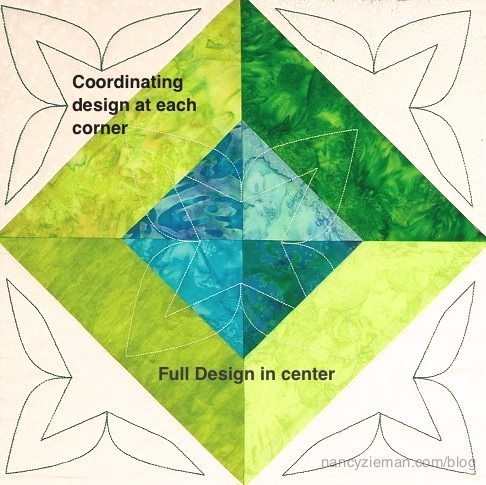
Close-up of the quilting stitches
Denise used white thread to stitch the full embroidery design in the center of the pieced blocks and the design that fills a 1/2-square block in the corner of each white triangle.
Watch Stress Free Quilting with Machine Embroidery ( Part One and Part Two ) on Sewing With Nancy online.


Leave us a comment sharing your most stressful step in the quilting process, and you’ll to be entered to win a copy of the Stress-Free Quilting with Machine Embroidery book and DVD from Nancy’s Notions. A winner will be chosen randomly and announced on May 23.


Be sure to check out the 2019 Modern Mini Quilt Challenge!
Happy Quilting with Machine Embroidery,
Team Nancy Zieman
Nancy Zieman Productions. LLC.
Content in this feed is © copyright 2019 by Nancy Zieman Productions, LLC and may not be republished without written permission. You’re welcome to forward the email to a friend or colleague but it’s not okay to add the RSS feed automatically as content on a blog or other website.
The FTC requires us to tell you that Nancy Zieman Productions, LLC has provided products by other companies in the course of doing business. The FTC requires us to advise you to take this information into consideration when reading this posting.
Make sure you are subscribed to Nancy Zieman Productions, LLC enews mailing list so you won’t miss a thing. Sign up here . Join us on Facebook , plus a host of other social media channels. Connect With Nancy and Friends today!
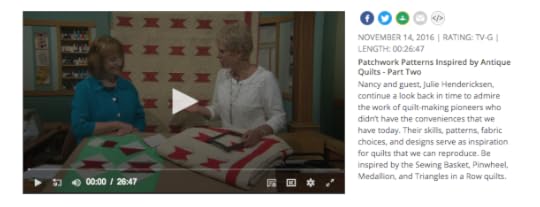
May 14, 2019
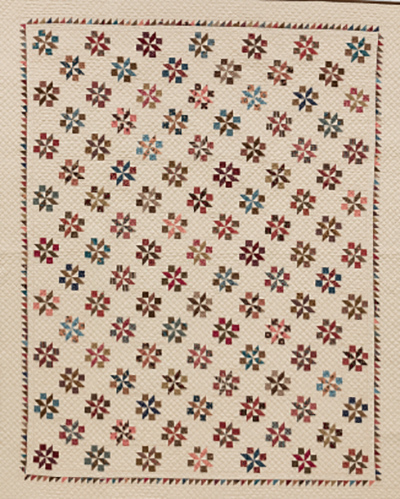
Patchwork Patterns Inspired by Antique Quilts – Part Two
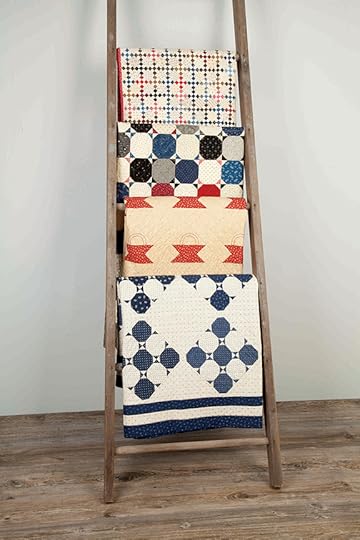 On this week’s episode of Sewing With Nancy, we continue a look back in time to admire the work of quiltmaking pioneers who certainly didn’t have the conveniences that we have today. Yet, their skills were amazing and serve as an inspiration to us. Julie Hendricksen, author and quilt collector, is back to show us quilts from her antique collection plus give hints on how we can preserve quilt history for ourselves. Take a look at Patchwork Patterns Inspired by Antique Quilts (Part One). Watch today’s second part in the series online.
The Patchwork Inspired Patterns by Antique Quilts book and DVD are available from Nancy’s Notions.

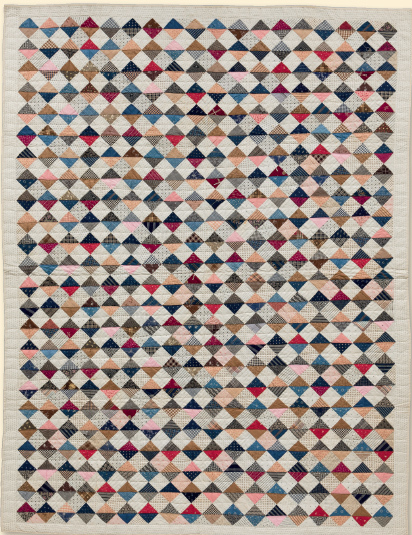
Triangles in a Row
The first quilt featured in Patchwork Patterns Inspired by Antique Quilts (Part Two) is the Triangles in a Row Quilt. Early quilt maker’s skills were amazing and a testimony to their ingenuity. The Triangles in a Row is a great example. Would you ever think that a quilt made entirely of 1/2″ square triangles could create so much visual interest? Julie purchased this quilt simply because of the sheer numbers of fabrics it contains. It’s an excellent study in color and fabric combinations.
Reproduction Windmills
Reproduction Windmills is an antique quilt that is heavily damaged and not really usable. However, the block is quite interesting and totally worthy of preserving for future generations of quiltmakers. Notice the fascinating pattern with colored squares alternating with windmill blades. Join Julie and Nancy Zieman for Patchwork Patterns Inspired by Antique Quilts (Part Two) as they take a look at how to reproduce this design.
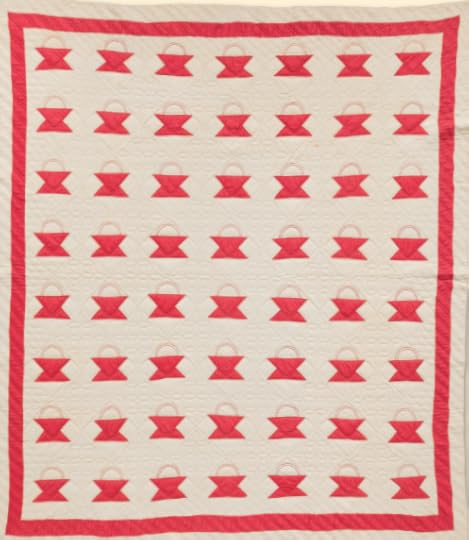
Sewing Baskets
Sewing Basket blocks, where the feet are as large as the basket itself, look rather like an anvil. Pieced entirely in solids with embroidered handles, this antique quilt is hard to date since there aren’t any prints to help discern its age. Based on the hand-quilting designs used, a certified quilt appraiser felt it was from the late 1800s to early 1900s.

Fast-forward a century; the newly made version also uses just two fabrics. A print was incorporated to give it an authentic late-nineteenth-century look. Regardless of the era, the basket block quilt block is a time-honored design, worthy to be re-created. Watch along online as Nancy and Julie demonstrate how to re-create the Sewing Baskets block.
Watch Patchwork Patterns Inspired by Antique Quilts ( Part one and Part Two ) on The Best of Sewing With Nancy online.
Share your favorite vintage inspired quilt pattern in the comments for a chance to win a copy of Patchwork Inspired Patterns by Antique Quilts. Thank you to our gift sponsor, Nancy’s Notions.
Be sure to check out the 2019 Modern Mini Quilt Challenge!
Happy Quilting,
Team Nancy Zieman
Nancy Zieman Productions. LLC.
Content in this feed is © copyright 2019 by Nancy Zieman Productions, LLC and may not be republished without written permission. You’re welcome to forward the email to a friend or colleague but it’s not okay to add the RSS feed automatically as content on a blog or other website.
The FTC requires us to tell you that Nancy Zieman Productions, LLC has provided products by other companies in the course of doing business. The FTC requires us to advise you to take this information into consideration when reading this posting.
Make sure you are subscribed to Nancy Zieman Productions, LLC enews mailing list so you won’t miss a thing. Sign up here . Join us on Facebook , plus a host of other social media channels. Connect With Nancy and Friends today!
May 11, 2019
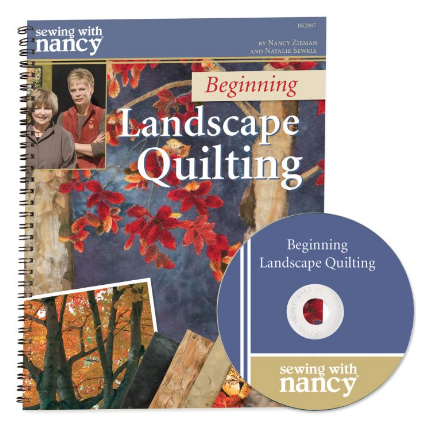
Beginning Landscape Quilting
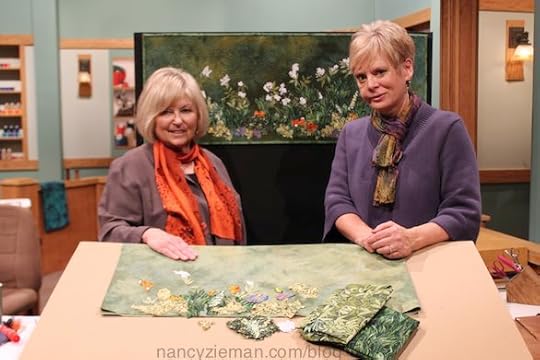
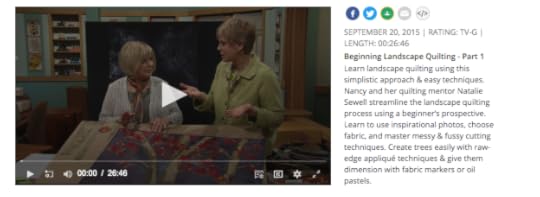
 Two of Nancy Zieman’s favorite hobbies were gardening and sewing. A little over 20 years ago, she was introduced to a quilting technique by Natalie Sewell, nationally known landscape quilt artist. Natalie and Nancy became fast friends and scheduled two to three quilting dates each year. During this three-part series on Sewing With Nancy, Nancy and Natalie simplify the Landscape Quilting process so that everyone interested can enjoy the pleasure of creating outdoor scenes in fabric.
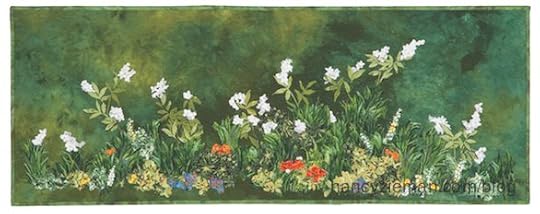
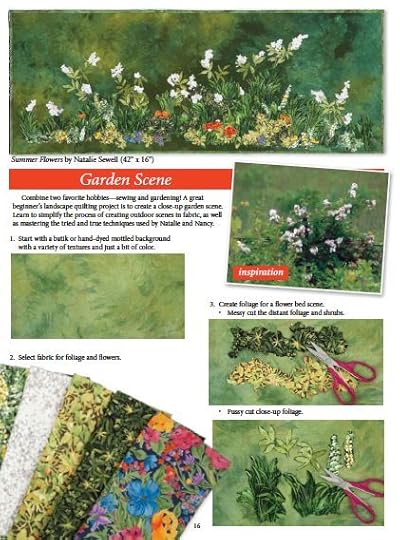
How to Create a Garden Scene with Fabric
A great beginner’s project is to create a close-up garden scene from fabric. Natalie’s design, Summer Flowers, is the featured quilt during the TV program. It was used as an example for choosing fabric, messy and fussy cutting, as well as designing with raw-edge appliqué.
The book and DVD, Beginning Landscape Quilting, are step-by-step guides for designing simple scenes. We’re confident that you’ll have great success.
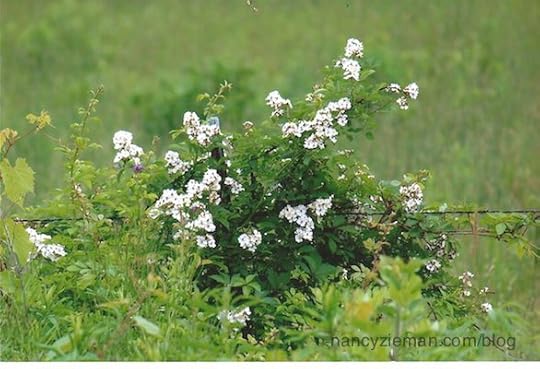
First, start with an inspirational photo. Nancy and Natalie show how to study the photo, which will help in the fabric selection process.
Watch online and follow along in the book and see exactly how to create a garden scene. Below are pages from Beginning Landscape Quilting featuring the steps to create a garden scene. It’s a direct step-by-step guide, leaving no question about what to do.
 .
.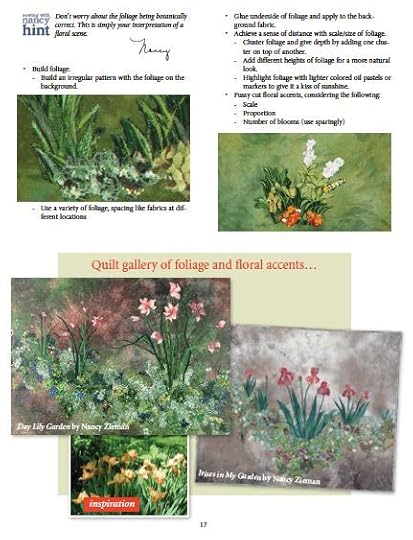
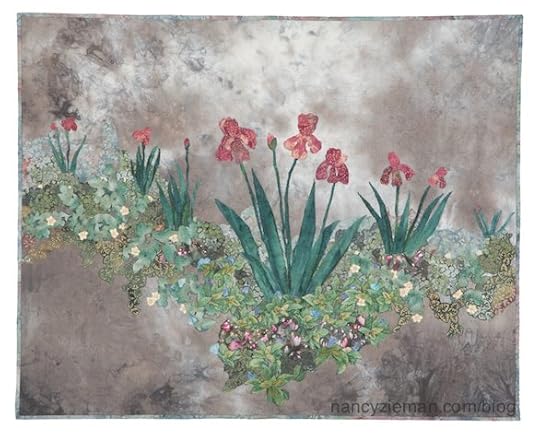
We will share a few of Nancy’s and Natalie’s Landscape quilts. Irises in my Garden is one of Nancy’s early landscape quilts.
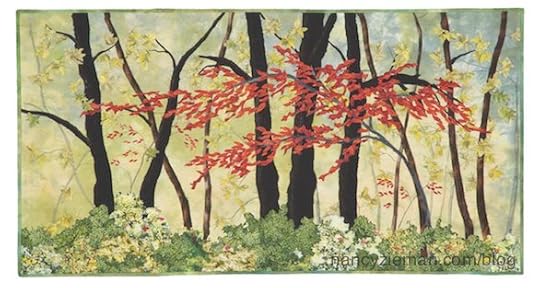
How to Create Ground Cover
The next landscape quilting topic focuses on ground cover. We’re certain your eye focuses on the Dancing Maple in Natalie’s quilt by the same name. The lively and spirited tree is the star of the design. Yet, without the interesting ground cover, the depth and dimension in the quilt would not be as impactful. If your inspiration photo features ground cover, Nancy and Natalie share the tricks of choosing fabric and designing that all-important landscape quilt element.
You’ll learn that the inspirational photo is a starting point. Nancy’s and Natalie’s quilts rarely, if ever, look like the inspiration. That’s not the point!

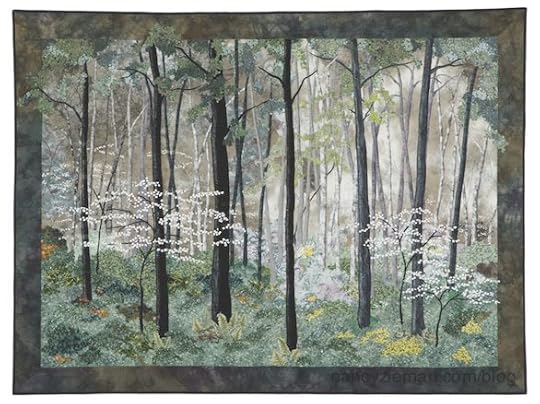
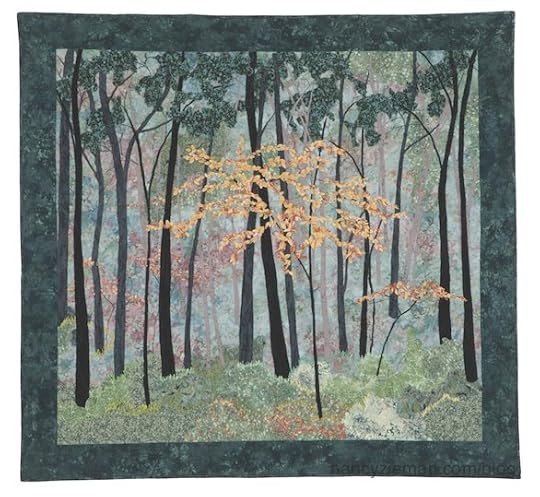
Dogwood by Natalie is another showcase quilt. You almost feel as if you could walk right into the woods!
Nancy’s design, If Trees Were Teal, is more impressionist than realistic.
How to Create Background Tree Foliage
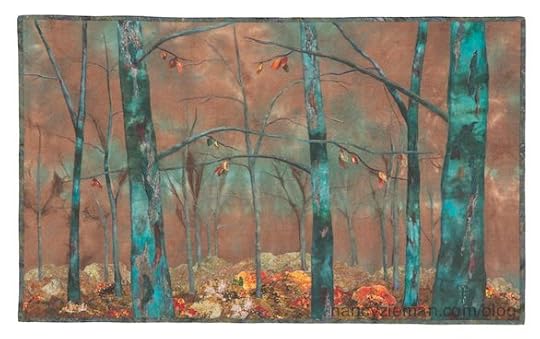
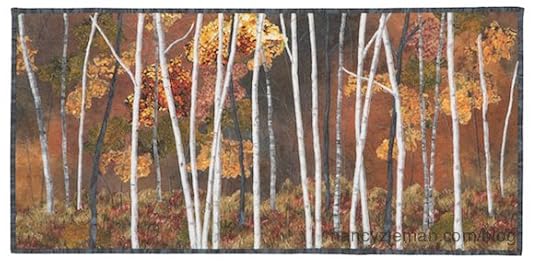
By now you should realize that you’re learning to use fabric as paint and scissors as your paintbrush to capture nature in a wall hanging. Natalie’s Autumn Birches design combines many techniques already explained, with the exception of background tree foliage. Next learn the importance of the scale of fabric prints and the importance of really bad messy cutting to give the impression of distant trees. (Learn how to do really bad messy cutting when watching online.)
This inspirational photo gave Natalie an idea of what fabric to choose.

Here’s another showcase, September by Natalie:
Watch Beginning Landscape Quilting (Part One, Part Two and Part Three) on Sewing With Nancy online.
Be sure to check out the blogs for Beginning Landscape Quilting—Part Two, and Beginning Landscape Quilting—Part Three.
Now that you’ve seen how easy it is to create a landscape in fabric, which season would you most like to capture in landscape quilt imagery? Leave your answer in the comment section below for a chance to win a copy of the book Beginning Landscape Quilting from Nancy’s Notions. One winner will be randomly selected.
The randomly selected winner of a NEW! I Sew For Fun Clip ’n Glide Bodkin from Clover, from the May 4 blog post is Rosie.
Her comment is: I have four grand Daughters who are at the perfect age to begin sewing. Making each a skirt would be a fabulous project together.
Be sure to check out the 2019 Modern Mini Quilt Challenge!
Enjoy Landscape Quilting!
Team Nancy Zieman
Nancy Zieman Productions. LLC.
Content in this feed is © copyright 2019 by Nancy Zieman Productions, LLC and may not be republished without written permission. You’re welcome to forward the email to a friend or colleague but it’s not okay to add the RSS feed automatically as content on a blog or other website.
The FTC requires us to tell you that Nancy Zieman Productions, LLC has provided products by other companies in the course of doing business. The FTC requires us to advise you to take this information into consideration when reading this posting.
Make sure you are subscribed to Nancy Zieman Productions, LLC enews mailing list so you won’t miss a thing. Sign up here . Join us on Facebook , plus a host of other social media channels. Connect With Nancy and Friends today!
May 9, 2019
Use your Embroidery Machine for Stress Free Quilting

Do you love quilting and not love quilting at the same time? Quilting for non-quilters, that’s what this Sewing With Nancy program is all about. Denise Abel and Nancy Zieman show you how to turn your computerized embroidery machine into a quilting machine. Denise is the embroidery and quilting expert at Nancy’s Notions.
Here’s a preview of what you’ll learn on TV!
The piecing of the Simple Shadow Block was stitched on a stabilizer, assuring precise piecing without precise cutting of strips. You can piece a quilt without being a quilter! Denise and Nancy developed a book with 30 embroideries, some of the embroideries are for piecing, the others for quilting! The embroideries are found on the companion CD that is included with the Stress-Free Quilting with Machine Embroidery book. Here are the specifics—it’s quite a deal!
Four piecing quilt block designs: Simple Shadow blocks, Quilt Charm blocks, Fancy Squares blocks, and Crazy Quilting blocks.
Six quilting designs: Leaves block, Leaves border, Flower block, Flower half, Modern Star block, and Modern Star half.
Includes 10 designs in three sizes each for a total of 30 designs:
30 designs: 10 (5″ x 7″), 10 (6″ x 10″), 10 (8″ x 8″).
Includes:
Thread color sequence charts for each design.
10 embroidery formats: ART, BLF, DST, EXP, HUS, JEF, PES, SHV, VIP, VP3
Amazing Designs Edit Xpress software to re-size, re-color, preview and print Amazing Designs collections.
How to piece a quilt block in an embroidery hoopListed below is an overview of the technique. There’s more detail shown on the TV show and in the book. Each quilt block design is available in three sizes. Obviously, the larger the block, the larger the embroidery hoop size is needed:
8″ block requires an 8″ x 8″ or larger hoop
6″ block requires a 6″ x 10″ or larger hoop
5″ block requires a 5″ x 7″ hoop or larger
Hoop a Fusible Mesh Cut-Away Stabilizer , fusible side up. (The photos feature a 5″ block.)
Select three fabrics: a light, medium, and dark. Cut 6-1/2″ squares of the light (white) color; then cut them in half, point to point, to create 1/2-square triangles.
Set up the sewing machine with the embroidery unit and appropriate foot.
Import and select the embroidery design for the Simple Shadow Blocks. (There are four other blocks to choose from!)
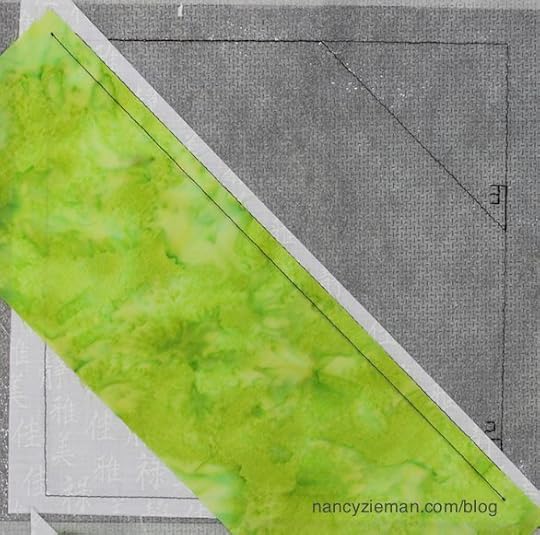
Select all-purpose poly or poly/cotton thread; wind the bobbin with the same thread as used in the needle. A slightly contrasting color works best. (Now this is different! Rayon thread is usually used for embroidery but they’re piecing quilt blocks!)
Stitch the first thread color directly on the stabilizer, the outline of the quilt block plus the numbers 1–3.
Place the ½-square triangle of color #1 over the section marked #1—right side up. The fabric must extend beyond the stitching lines.
Stitch the second thread color, which bastes down fabric #1.
Align fabric strip #2 along the diagonally stitched line, right sides together. Make certain that the fabric is extending ½″ beyond the outline on the stabilizer at the upper left corner.
Stitch the third thread color.
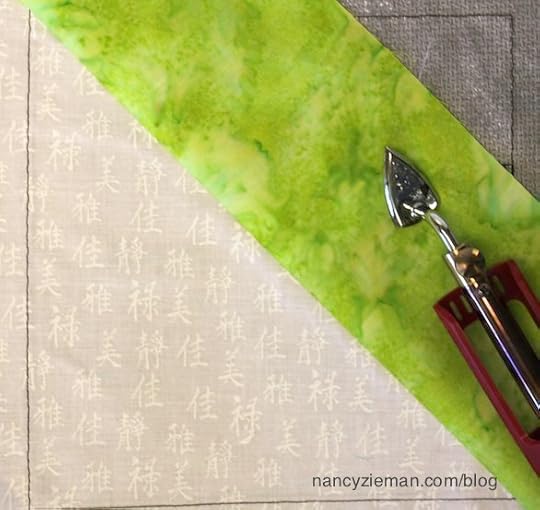
Trim away the excess fabric along the previously stitched line.
Fold up Color #2.
Press from the folded edge and work to the opposite corner so there are no wrinkles. (Watch how to press while the hoop is still attached to the machine. Click here to view .)
Align fabric strip #3 along the previously stitched diagonal line, right sides together. Make certain that the fabric is extending ½″ beyond the outline on the stabilizer at the upper left corner.
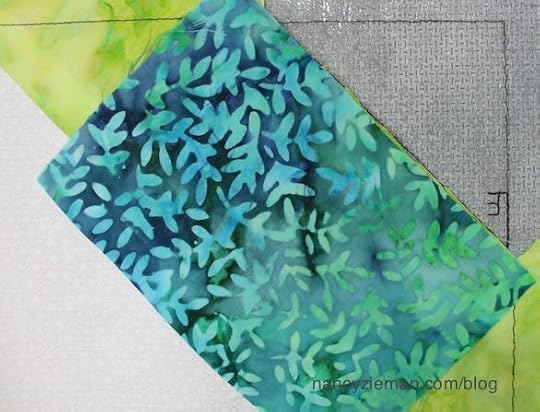
Stitch the next thread color, which attaches the fabric to the stabilizer
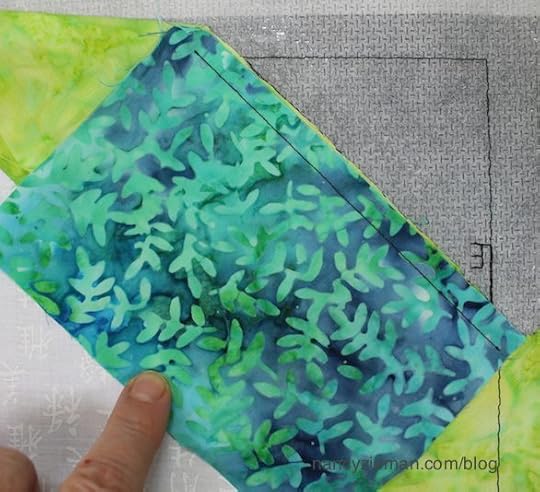
Trim away the excess fabric along the previously stitched line.
Fold up fabric #3. Press from the folded edge, and work to the opposite corner.
Then, stitch the next thread color, which attaches the fabric to the stabilizer along the outer edges.
Stitch the final thread color. This stitching gives a cutting guideline.
Trim the block. It’s the perfect size!
There are more design options to piece with your embroidery unit. The best part is that each block is perfect in size!
Watch Stress Free Quilting with Machine Embroidery ( Part One and Part Two ) on Sewing With Nancy online.


Leave us a comment sharing your most stressful step in the quilting process, and you’ll to be entered to win a copy of the Stress-Free Quilting with Machine Embroidery book and DVD from Nancy’s Notions. A winner will be chosen randomly and announced on May 23.

The randomly selected winner of The Ultimate Serger Techniques Workbook is Dee Engleking.
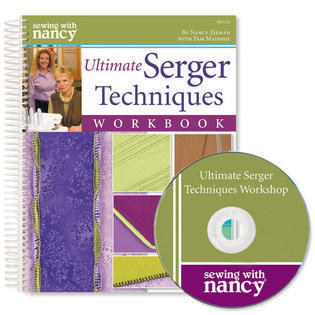
Her comment is: Would love this book to unlock more secrets for my serger. Would love the pintuck technique and better knowledge of cover stitch.

Be sure to check out the 2019 Modern Mini Quilt Challenge!
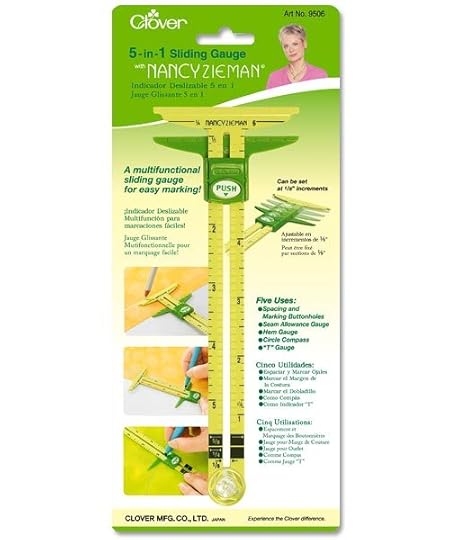
SALE ALERT! Select Clover Products, including the The 5-in-1 Sliding Gauge are on SALE for 30% OFF May 8-10, 2019, at Nancy’s Notions!
Happy Quilting with Machine Embroidery,
Team Nancy Zieman
Nancy Zieman Productions. LLC.
Content in this feed is © copyright 2019 by Nancy Zieman Productions, LLC and may not be republished without written permission. You’re welcome to forward the email to a friend or colleague but it’s not okay to add the RSS feed automatically as content on a blog or other website.
The FTC requires us to tell you that Nancy Zieman Productions, LLC has provided products by other companies in the course of doing business. The FTC requires us to advise you to take this information into consideration when reading this posting.
Make sure you are subscribed to Nancy Zieman Productions, LLC enews mailing list so you won’t miss a thing. Sign up here . Join us on Facebook , plus a host of other social media channels. Connect With Nancy and Friends today!
May 7, 2019
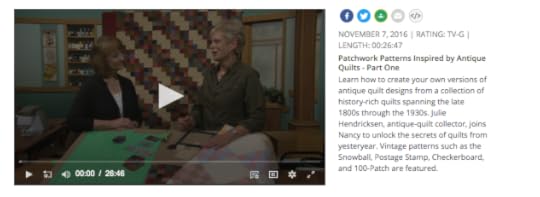
Patchwork Patterns Inspired by Antique Quilts – Part One
 Learn how to create your own versions of antique quilt designs from a collection of history-rich quilts spanning the late 1800s through the 1930s.
In a two-part Sewing With Nancy series titled, Patchwork Inspired Patterns by Antique Quilts, we unlock the secrets of quilts from yesteryear with guest Julie Hendricksen. Julie and Nancy Zieman show antique quilts from her collection and teach you how to construct your own reproduction quilts in part one of Patchwork Inspired Patterns by Antique Quilts. Watch today’s episode online.
The Patchwork Inspired Patterns by Antique Quilts book and DVD are available from Nancy’s Notions.
Snowball Crossing
Let’s begin with the vintage Snowball Crossing quilt design. Alternating light and dark Snowball blocks with tiny corners make this quilt look like it’s pieced from circles, but in fact it’s very easy to assemble.
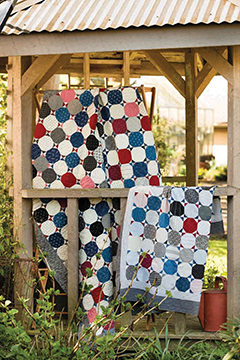
Now for a variation of the theme, a second Snowball quilt, shown on this first episode, features a Snowball pattern too. But here, the snowballs are arranged in a 9-patch formation and then set on point with alternate squares cut from shirting fabrics. This is a classic 2-color quilt, yet it uses more than just two fabrics.
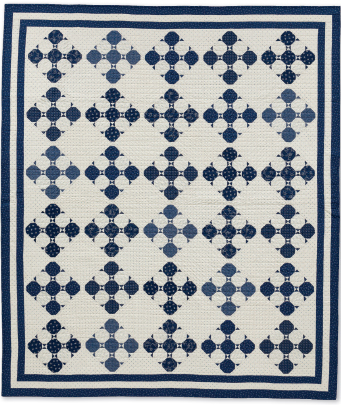
Reproduction Chain
Julie shares her Reproduction Chain quilt on Patchwork Patterns Inspired by Antique Quilts, which is based on a quilt that was made in the 1930s. Julie thought it would be fun to see how it looked in an even older palette of 1890s fabric. The patchwork design is simple to make, and the perfect reason to not let your scraps to go waste!
 1930s Checkerboard Charm
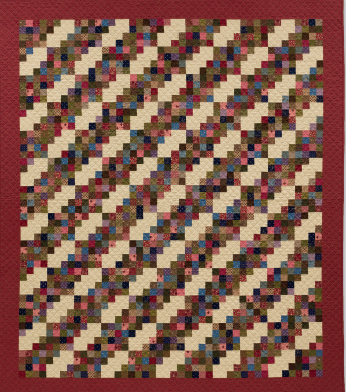
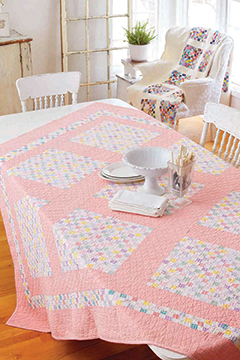
Use this 1930s Checkerboard quilt as an inspiration. In part one of Patchwork Inspired Patterns by Antique Quilts, you’ll see the quiltmaker—most likely a saver of every inch of fabric—hand pieced one hundred 1-1/2″ pieces into each 100-patch block. We are in awe of this quilt.
Not to be outdone by a 100-patch quilt, the next quiltmaker, again from the 1930s created another Checkerboard Charm quilt with 289 tiny squares, alternating between prints and muslin. The whole look is tied together with solid-pink sashing.
Birthday Quilt
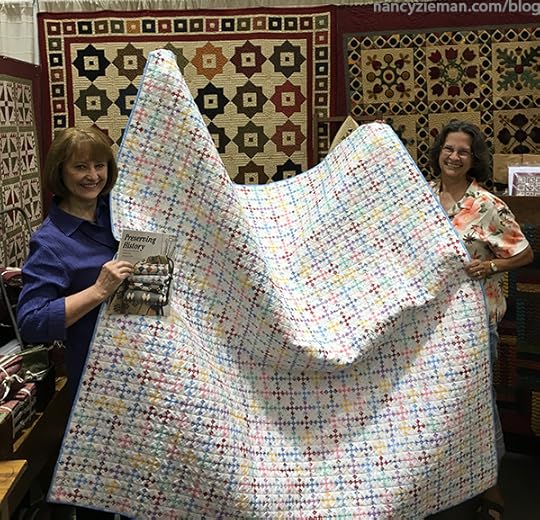
Julie told Nancy that she had spied the most compelling 9-patch quilt on display at a quilt show; the price tag was $25,000! She didn’t buy that quilt but couldn’t stop telling her friends about it. To her surprise, each time she wasn’t in her shop, Julie’s staff cut a 1″ strip from each reproduction fabric they cut for customers, then pieced all 1,024 blocks and honored Julie with what she calls her Birthday Quilt.

The vintage-inspired quilt featured below—pieced and quilted by Susan Petruske of Pleasant Valley Farm Longarm Quilting—features Julie’s Birthday Quilt instructions as seen in part one of Patchwork Inspired Patterns by Antique Quilts!

Here’s a photo of Susan (right) revealing her vintage-inspired 9-patch quilt—with Julie (left) at the 2016 Quilt Expo!
Watch Patchwork Patterns Inspired by Antique Quilts ( Part one and Part Two ) on The Best of Sewing With Nancy online.
Share your favorite vintage inspired quilt pattern in the comments for a chance to win a copy of Patchwork Inspired Patterns by Antique Quilts. Thank you to our gift sponsor, Nancy’s Notions.
The random winner of a copy of the Doodle Stitching Book, from Nancy’s Notions, from the April 16, 23 and 30 blog posts is Nancy Sherman.
 Her comment is: This is such an inspiring idea. I am going to try making something just out of my imagination. I am excited to see the result. I have an old machine with limited stitches, but I bet I can still create my own work of art. A new outlet!!

Be sure to check out the 2019 Modern Mini Quilt Challenge!
Happy Quilting,
Team Nancy Zieman
Nancy Zieman Productions. LLC.
Content in this feed is © copyright 2019 by Nancy Zieman Productions, LLC and may not be republished without written permission. You’re welcome to forward the email to a friend or colleague but it’s not okay to add the RSS feed automatically as content on a blog or other website.
The FTC requires us to tell you that Nancy Zieman Productions, LLC has provided products by other companies in the course of doing business. The FTC requires us to advise you to take this information into consideration when reading this posting.
Make sure you are subscribed to Nancy Zieman Productions, LLC enews mailing list so you won’t miss a thing. Sign up here . Join us on Facebook , plus a host of other social media channels. Connect With Nancy and Friends today!
Nancy Zieman's Blog

- Nancy Zieman's profile
- 21 followers

