
Nancy Zieman's Blog, page 44
July 25, 2020
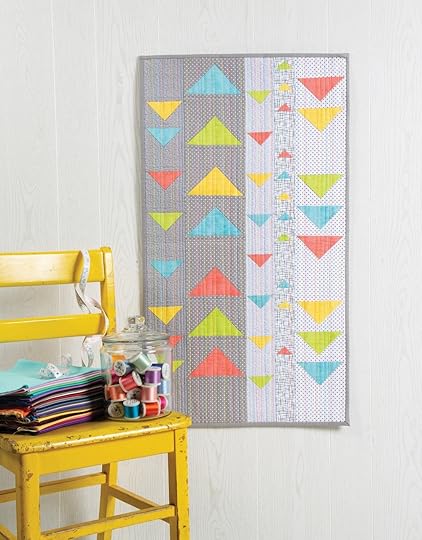
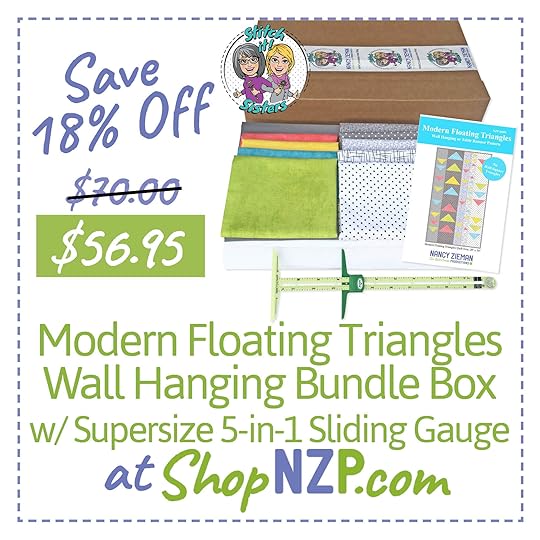
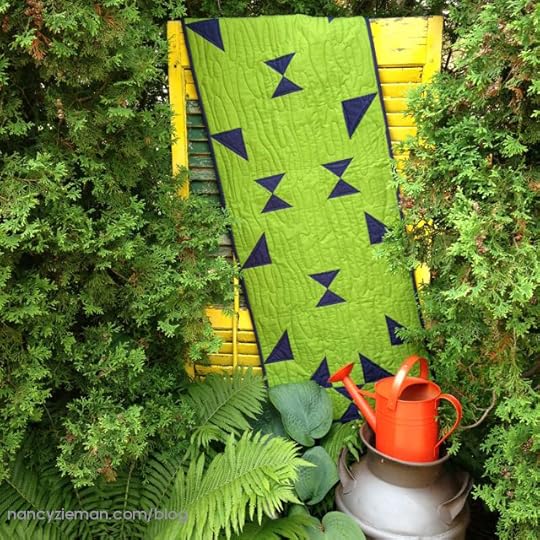
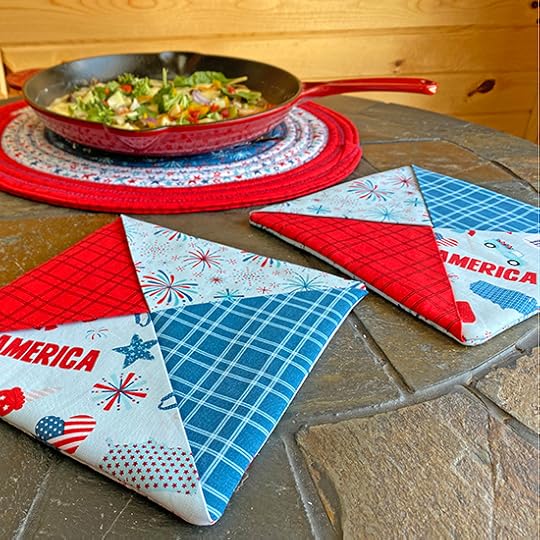
Modern Floating Triangles Wall Hanging Tutorial
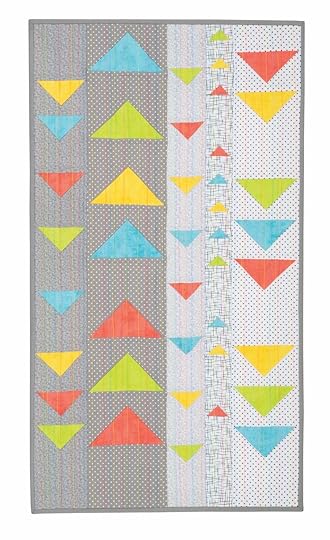
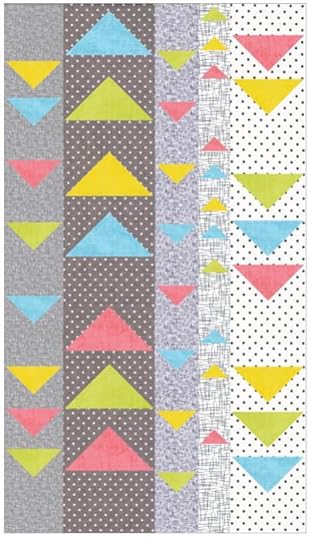
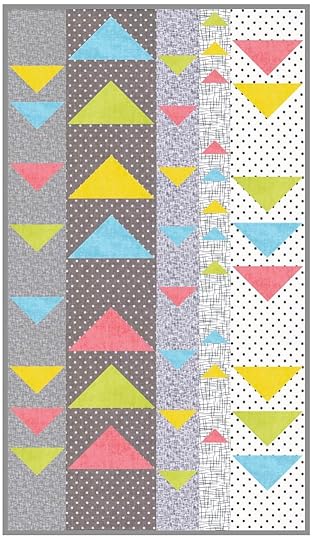
Stitch a quick column quilt with a modern twist. No half-square triangles are needed to make Modern Floating Triangles Wall Hanging. Dimensional folded triangles and crosswise fabric strips make this easy piecing project–even for beginners! The 20″ x 34″ quilt size is ideal for display on a wall or table–you decide!
Watch Stitch it! Sisters Program 101: Modern Floating Triangles Wall Hanging Tutorial Video by The Stitch it! Sisters
Watch Stitch it! Sisters Program 101: Modern Floating Triangles Wall Hanging video with hosts Deanna Springer and Dana Casey. In this video, the Stitch it! Sisters share step-by-step fabric cutting and sewing techniques for making NZP’s NEW! Modern Floating Triangles Wall Hanging and Table Runner Project.
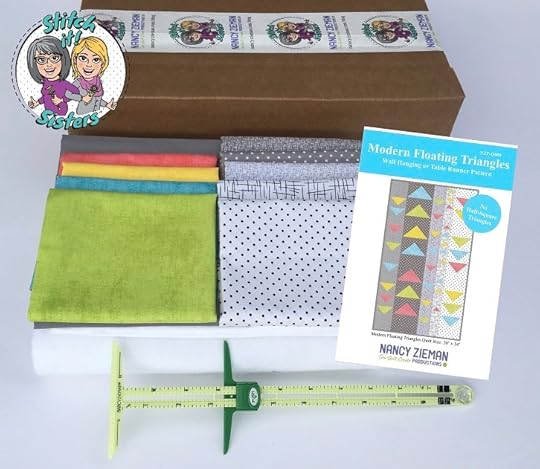
 Then, head over to ShopNZP.com and purchase our NEW! Exclusive Modern Floating Triangles Wall Hanging and Table Runner Bundle Box! This NEW! Bundle Box features an array of light, medium, and dark fabrics for amazing contrast: Modern fabric prints in white, gray, black and bright colorful Shades by Riley Blake Designs. The Bundle Box also includes backing and binding fabric, plus batting and pattern–with full-color step-by-step instructions! You’ll supply the thread.

Modern Floating Triangles Wall or Hanging Table Runner Sewing Tutorial
Approximate finished size: 20″ W x 34″ H
Modern Floating Triangles Wall or Hanging Table Runner Tools & Supplies
NEW! Exclusive Modern Floating Triangles Wall Hanging and Table Runner Bundle Box
60 I Sew For Fun Heart Shaped Straight Pins
Clover’s Pin ‘n Stow Magnetic Wrist Pin Cushion and/or I Sew For Fun Heart-Shaped Magnetic Covered Pin Caddy
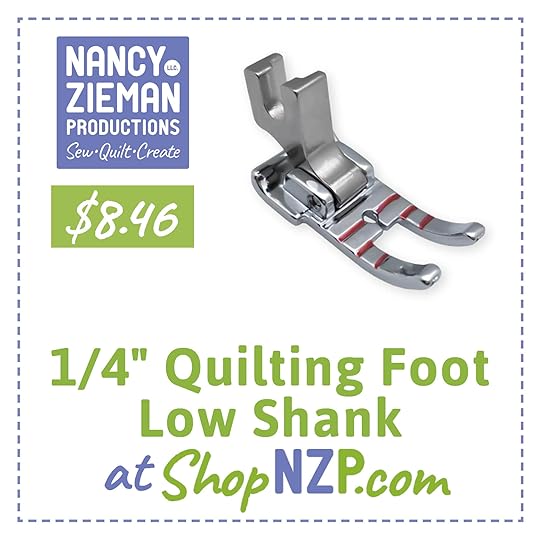
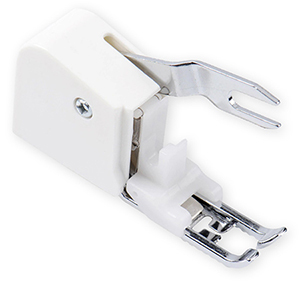
1/4″ Quilting Presser Foot
Clover’s Straight Tailor’s Awl/Stiletto
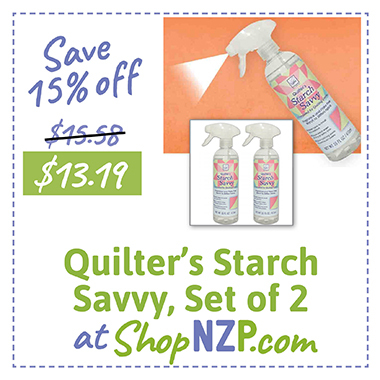
Quilter’s Starch Savvy
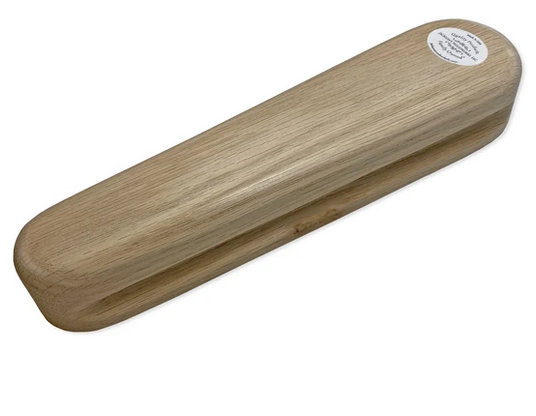
Tailor’s Clapper
Clover’s Rotary Cutter and Mat, & Ruler
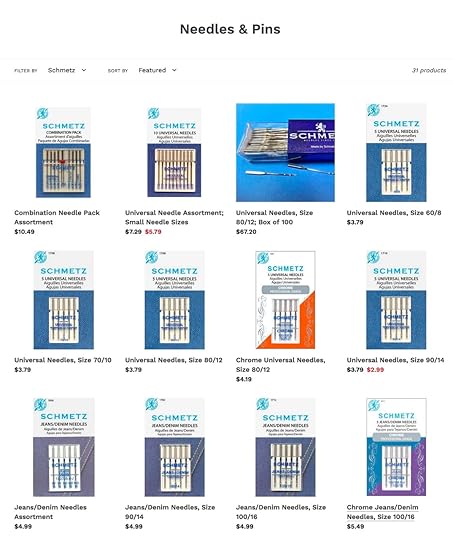
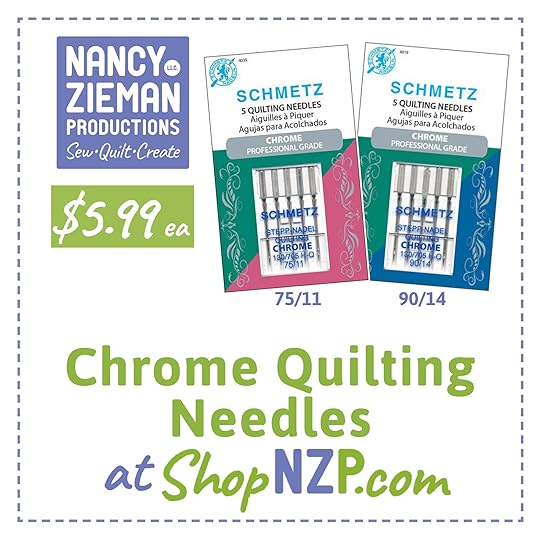
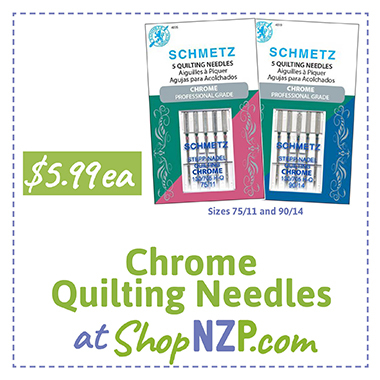
Schmetz Size 90/11 Chrome Quilting Needles
Optional: Quilt Basting Spray
Optional: Schmetz Size 90/14 Super Nonstick Sewing Machine Needles
Optional: The Ultimate Quilt ‘N Stitch Presser Foot
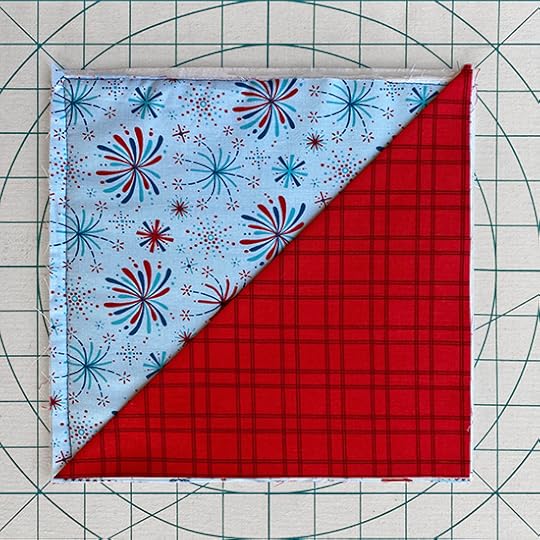
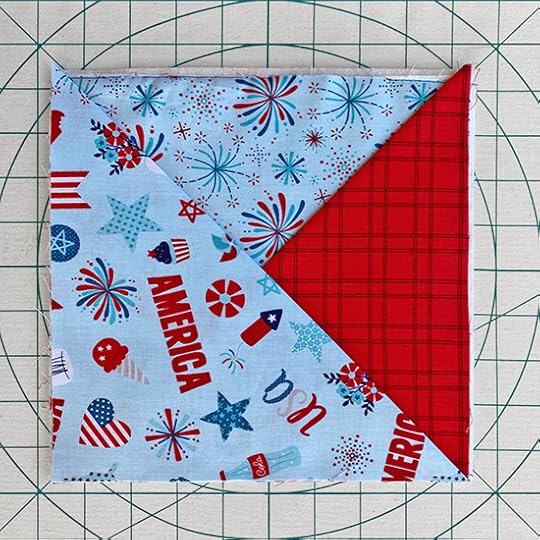
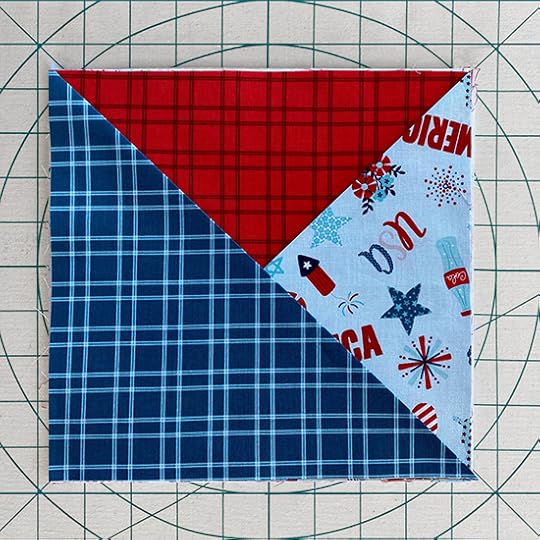
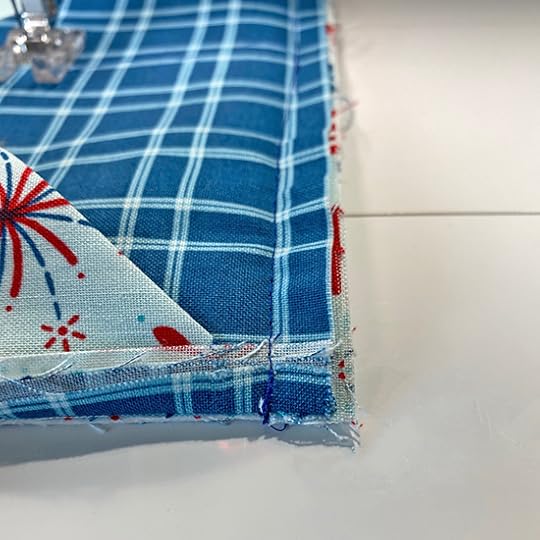
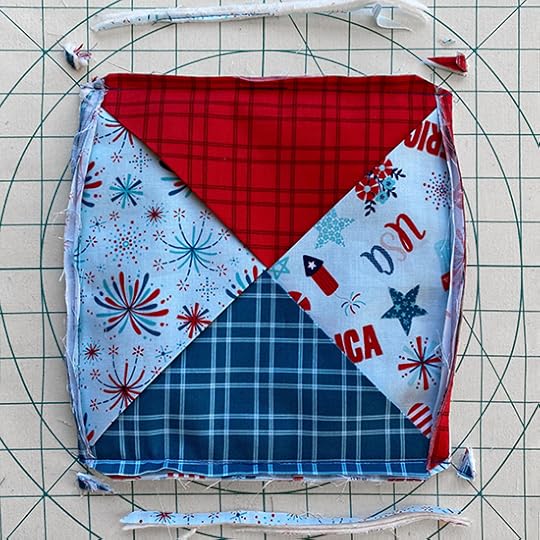
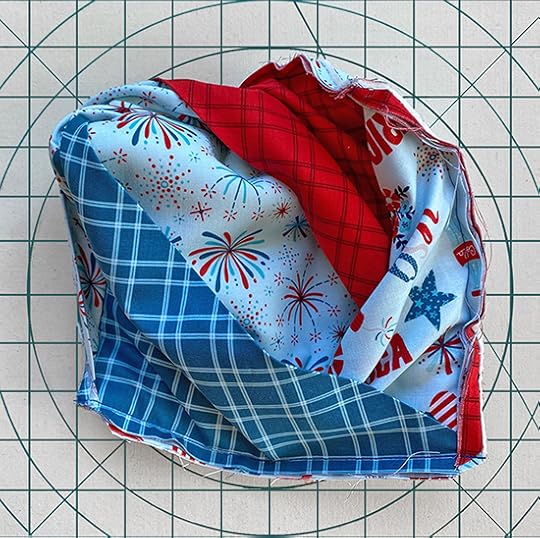
Create Modern Floating Triangles Squares
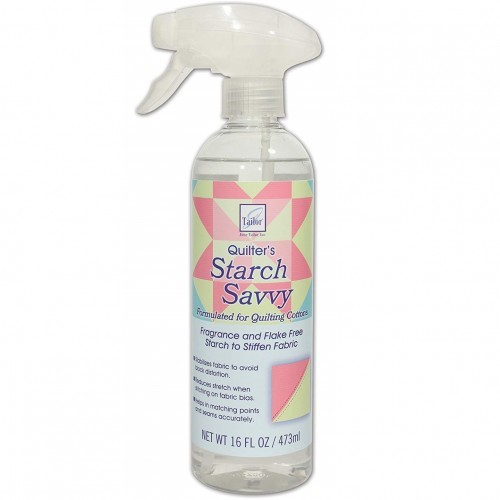
 Pre-shrink fabrics by steaming and pressing, and steaming and pressing a second time, and then spray press and starch fabric with June Tailor’s Quilter’s Starch Savvy — press and starch, press and starch.
All seam allowances are scant 1/4″ unless otherwise stated. Read all instructions prior to beginning project.
Cut Modern Floating Triangles Squares A-D
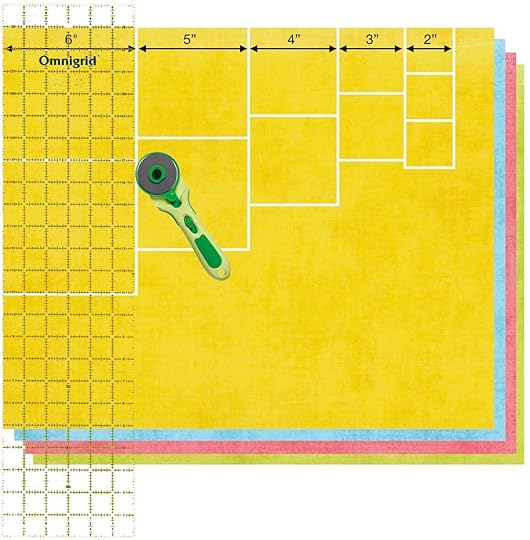
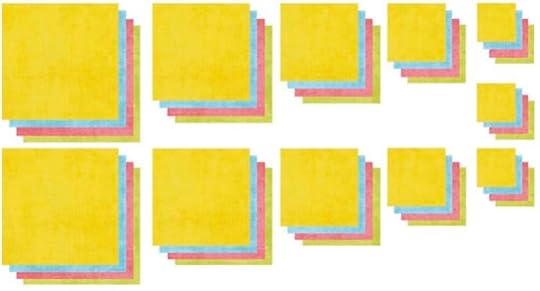
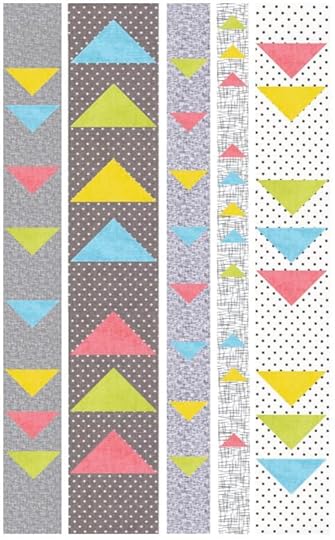
Stack the four fat quarter fabrics: A-Citrus Cotton Shades(Bright Yellow), B- Peacock Cotton Shades(Aqua), C-Shell Cotton Shades(Coral) and D- Apple Cotton Shades(Lime Green).
Using a rotary cutter, mat and ruler, cut two sets of 6″ squares, cut two sets of 5″ squares, cut two sets of 4″ squares, cut two sets of 3″ squares, and cut three sets of 2″ squares.
If you’re using fat quarters for the background fabric strips, cut two each crosswise fabric strips and later stitch folded triangles in center seams (see step 6) when joining strips.
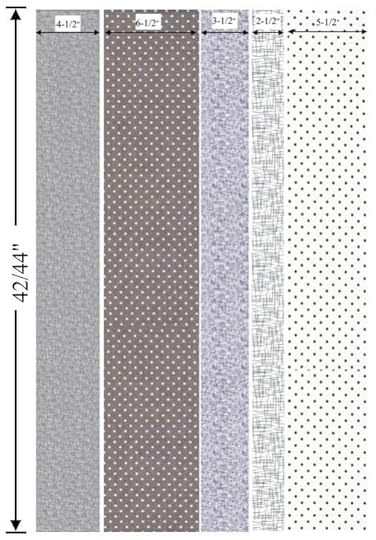
Cut Modern Floating Triangles Background Fabrics E-I
Using a rotary cutter, mat and ruler, cut crosswise fabric strips.
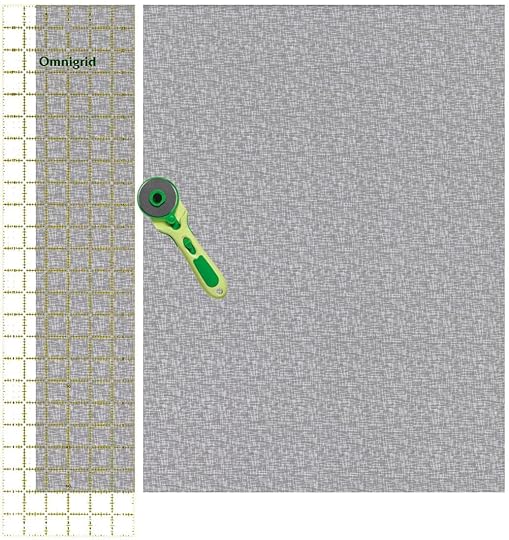
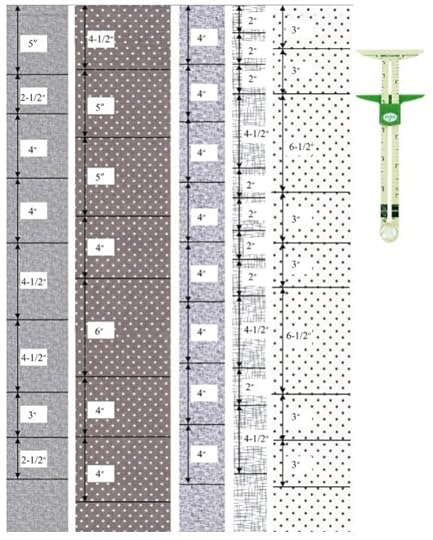
Cut One 4-1/2″ crosswise strip E-Gray Mini Hashtag (Dark Gray), cut One 6-1/2″ crosswise strip F-Gray Swiss Dot (Dark Gray), cut One 3-1/2″ crosswise strip G-Gray Mini Hashtag Reversed (Medium Gray), cut One 2-1/2″ crosswise strip H-Black Large Hashtag Reversed (Light Gray), and cut One 5-1/2″ crosswise strip I-Black Swiss Dot Reversed (Light Gray).
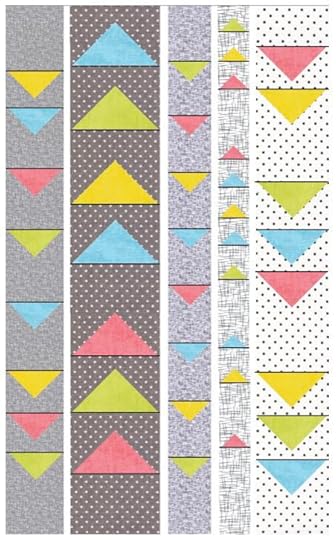
To make the following step easier, randomly place the Floating Triangles on the columns. The illustrations depict the featured wall hanging, but you are welcome to personalize the design.
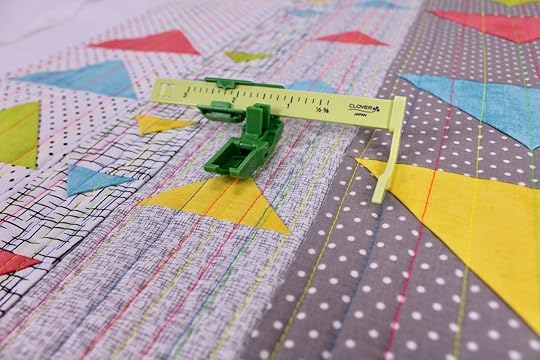
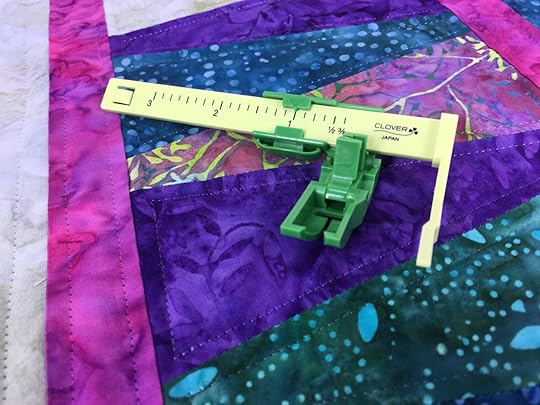
Arrange strips and mark placement lines on them with a marking pen and Clover’s Supersize 5-in-1 Sliding Gauge as shown in illustration.
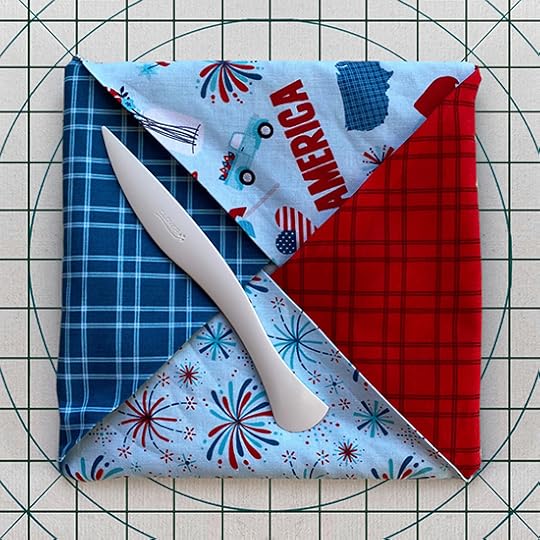
Make the Floating Triangles
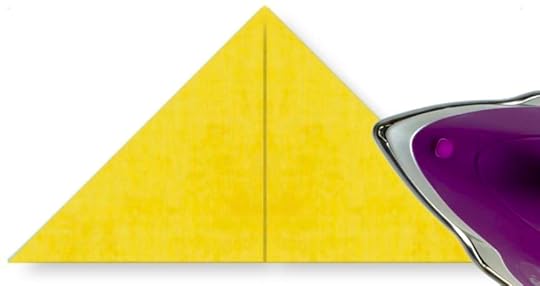
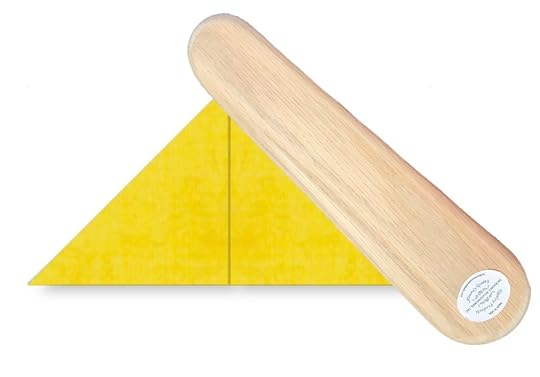
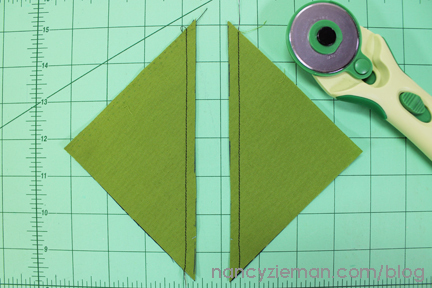
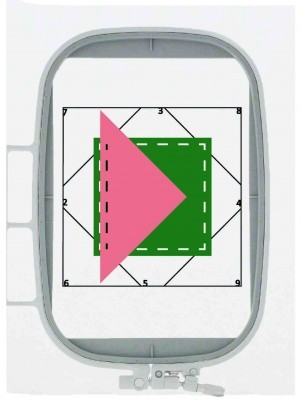
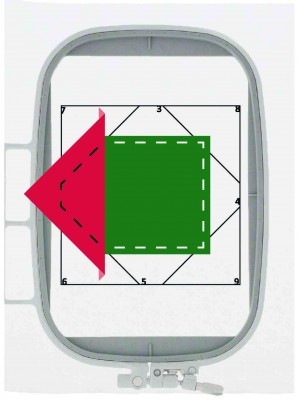
Press all cut squares of Fabrics A-D in half on the grain line, wrong sides together.
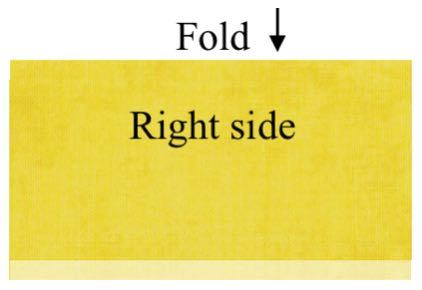
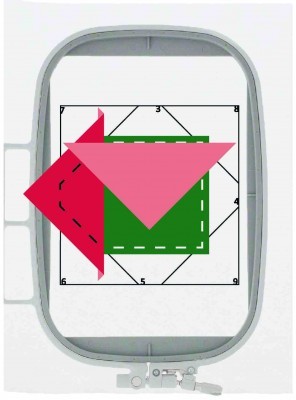
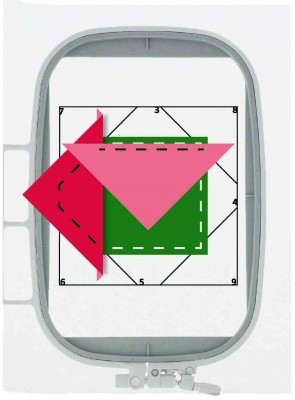
Meet one corner of the folded edge to the cut edge and form a point.
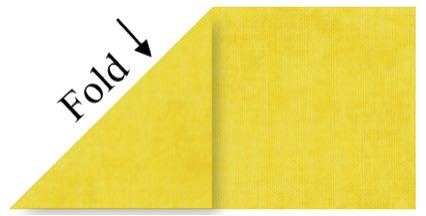
Meet the second corner of the folded edge to the cut edge.
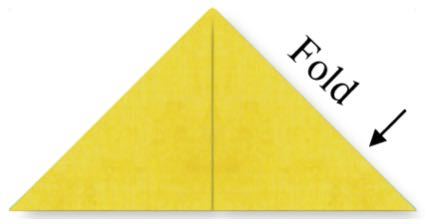
Repeat for all Floating Triangles with Fabrics A-D
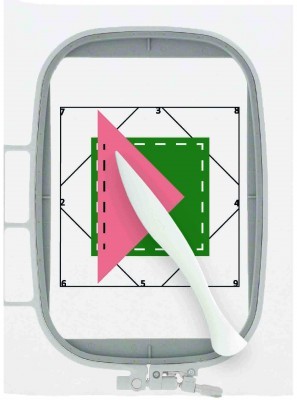
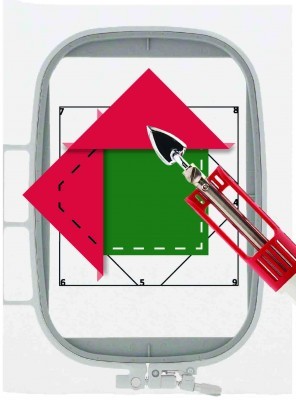
To set folds, press squares (above) with a steam iron, then press folds with Tailor’s Clapper, and hold for just a few seconds, it will leave a nice flat crisp professional looking edge.
Prepare Columns for the Quilt
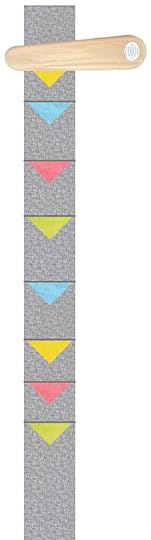
Column 1: Center and pin the 4″ Folded Triangles facing down on the 4-1/2″ background strip, as shown. Insert two each fabrics A-D folded triangles.
Column 2: Center and pin the 6″ Folded Triangles facing up on the 6-1/2″ background strip, as shown. Insert one fabric A folded triangle. Insert two each fabrics B-D folded triangles.
Column 3: Center and pin the 3″ Folded Triangles facing down on the 3-1/2″ background strip, as shown. Insert two each fabrics A-D folded triangles.
Column 4: Center and pin the 2″ Folded Triangles facing up on the 2-1/2″ background strip, as shown. Insert three each fabrics A-C folded triangles. Insert two fabric D folded triangles.
Column 5: Center and pin the 5″ Folded Triangles facing down on the 5-1/2″ background strip, as shown. Insert two each fabrics A-D folded triangles.
Stitch the Folded Triangles to the Column Background Strips
For best results, assemble one column at a time.
Fold the strip right sides together at each Floating Triangle. The Floating Triangle is sandwiched between the fabric.

Stitch 1/4″ from the fold. Repeat at each Floating Triangle; press the strip.

Press

Trim each column strip to 34″ in length.
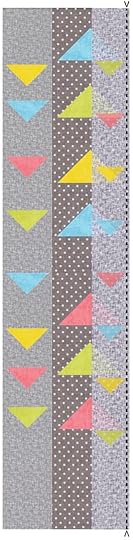
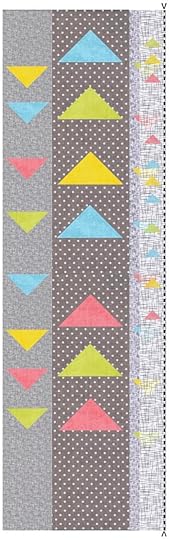
Arrange and Join Columns for the Quilt
Using the layout guide join Columns 1–5 to finish the center of the wall hanging. Press seams flat, then to one side.


Layer, Quilt, and Bind
Layer finished quilt top on batting and backing fabric. Quilt Layers using your favorite quilting techniques.
Finish your quilt, using your favorite binding technique or use Nancy Zieman’s Favorite Quilt Binding Method!
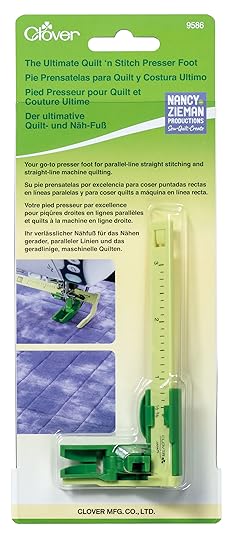
Stop back here Tuesday, to see how we used The Ultimate Quilt ‘N Stitch Presser Foot to straight-line machine quilt our Modern Floating Triangles Quilt! Easily Stitch multiple parallel rows of quilting –on a domestic sewing machine– without ever marking lines.
Modern Floating Triangles Wall or Hanging Table Runner Tools & Supplies
NEW! Exclusive Modern Floating Triangles Wall Hanging and Table Runner Bundle Box
60 I Sew For Fun Heart Shaped Straight Pins
Clover’s Pin ‘n Stow Magnetic Wrist Pin Cushion and/or I Sew For Fun Heart-Shaped Magnetic Covered Pin Caddy
1/4″ Quilting Presser Foot
Clover’s Straight Tailor’s Awl/Stiletto
Quilter’s Starch Savvy
Tailor’s Clapper
Clover’s Rotary Cutter and Mat, & Ruler
Schmetz Size 90/11 Chrome Quilting Needles
Optional: Quilt Basting Spray
Optional: Schmetz Size 90/14 Super Nonstick Sewing Machine Needles
Optional: The Ultimate Quilt ‘N Stitch Presser Foot


SHOP our NEW! Patterns and Exclusive Bundle Boxes at ShopNZP.com
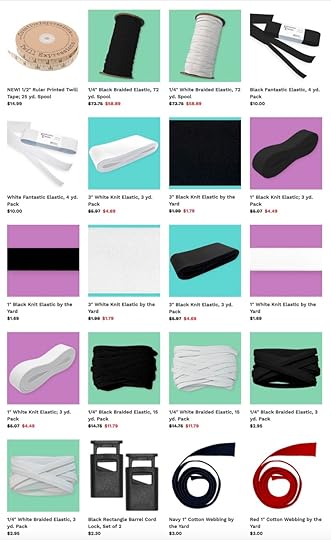
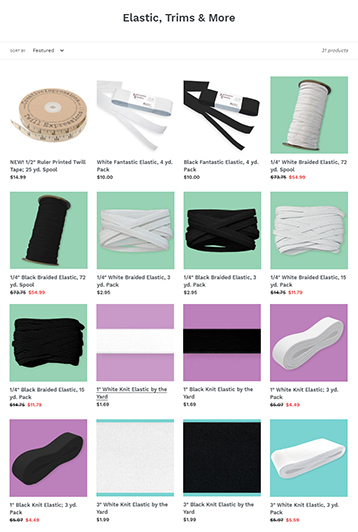
Shop NEW! Elastics, Cotton Webbing, Zippers & More at ShopNZP.com
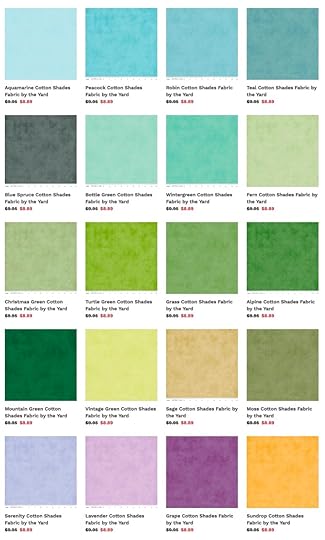
Shop NEW! Fabrics including 60 NEW! Quilt Basics Shades at ShopNZP.com!
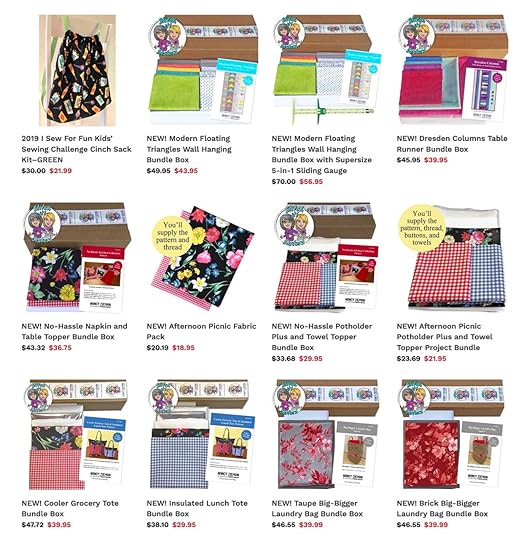
Shop Pattern Sewing Suppies & Bundle Boxes at ShopNZP.com!
Shop Clover Tools & Sewing Supplies at ShopNZP.com!

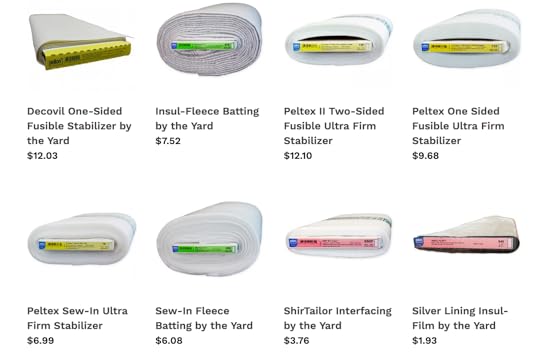
Shop Pellon Interfacing & Supplies at ShopNZP.com!
Shop Schmetz Sewing Machine Needles at ShopNZP.com!

[image error]
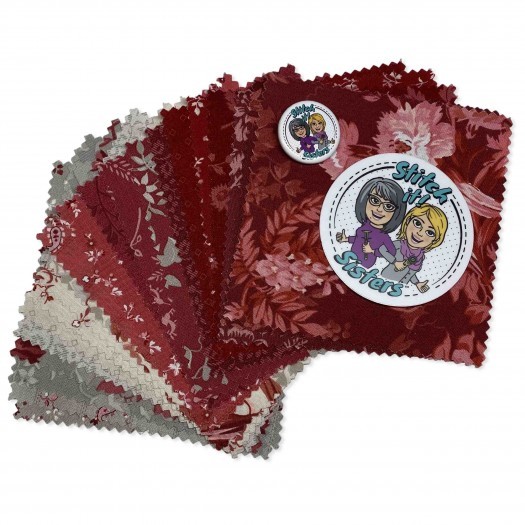
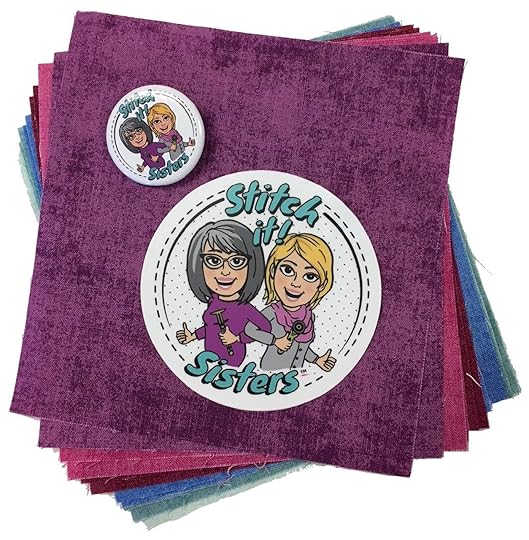
For a chance to be the random winner of a Stitch it! Sisters 5″ Fabric Short Stack with exclusive S!S button & sticker, please leave a comment below sharing your thoughts about our Modern Floating Triangles Wall Hanging and Table Runner and/or where you’d use your Modern Floating Triangles Wall Hanging and Table Runner.
Nancy Zieman Productions will give away one Stitch it! Sisters 5″ Fabric Short Stack to one US resident in the 48 contiguous states. Winner must reply within 30 days to the official giveaway announcement email message – sent from Nancy Zieman Productions. Email Team NZP at info@ziemanproductions.com.

The randomly selected winner of a Stitch it! Sisters 5″ Fabric Short Stack with S!S button & sticker, from the July 18 Blog Post, July 2020 NZP Block of the Month: Corner Curves Block, is Teresa Williams.
Her comment is: I want to try this. The directions are easy to follow.
Celebrate Summer Sewing!
Team Nancy Zieman
Nancy Zieman Productions. LLC.
[image error]
Stitch it! Sisters is a production of NZ Productions LLC. Content in this feed is © copyright 2020 by Nancy Zieman Productions, LLC and may not be republished without written permission. You’re welcome to forward the email to a friend or colleague but it’s not okay to add the RSS feed automatically as content on a blog or other website. The FTC requires us to tell you that Nancy Zieman Productions, LLC has provided products by other companies in the course of doing business. The FTC requires us to advise you to take this information into consideration when reading this posting.
Make sure you are subscribed to Nancy Zieman Productions, LLC enews mailing list so you won’t miss a thing. Sign up at nancyzieman.com/blog/enews. And join us on YouTube, Facebook, Instagram and Pinterest!


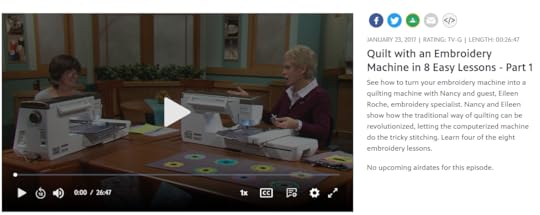
July 23, 2020
Quilt With an Embroidery Machine in 8 Easy Lessons Part One on The Best of Sewing With Nancy

The art of quilting often combines techniques. Traditional quilts are frequently appliquéd, then pieced, and finally all the layers are quilted. If you have an embroidery machine, you can streamline the processes with the touch of a button—the brainchild of Nancy Zieman’s guest Eileen Roche. The quilting technique is practically hands free! Watch as Eileen shares the magic in quilting on part-one of Quilt with an Embroidery Machine in 8 Easy Lessons on this Sewing With Nancy series.
Easily learn the machine embroidery quilting process. There’s no reason to be intimidated. This easy process is presented from a beginner’s perspective and is broken down into eight easy lessons, including many useful tips and techniques for professional results.

A machine that’s commonly used to create embroidery designs, is equally a quilting machine. Let’s start with a simple table topper, which features what at first glance is a complicated appliqué. You’ll soon see that the process is perfect for the novice quilter.
Prepare Quilt Sandwich
Like any method of quilting, we first must prepare a quilt sandwich. The quilt sandwich refers to the top, batting, and backing layers of the project. Eileen will show us how easy it is to prepare your sandwich for in-the-hoop quilting on this episode.
Embroidered Appliqué Designs
In the traditional appliquéd quilt process, you’ll create your project using these steps (in order):
Appliqué
Piece
Quilt
In this Sewing With Nancy featured program, Eileen shares the embroidered appliqué quilt process and explains how the steps are similar to traditional quilting, yet are executed quite differently. It’s easy once you watch Eileen’s methods on Quilt with an Embroidery Machine in 8 Easy Lessons Part One.
Size and Variety
On the design CD included in the new Quilt with an Embroidery Machine in 8 Easy Lessons book, you’ll have the option to create projects in a variety of sizes including 6″, 7″, or 8″ quilt blocks. Choose a size that best suits your project dimensions.
Piecing Techniques
The next step is to join the quilted blocks. Eileen walks us through this process with ease! Here’s a sneak preview. See the complete piecing demonstration on Sewing With Nancy.
Give it a try and join us next week for part two of Quilt with an Embroidery Machine in 8 Easy Lessons!
Watch Quilt with an Embroidery Machine in 8 Easy Lessons (Part One and Part Two) on Sewing With Nancy online.

Sewing With Nancy: Nancy’s Corner Spotlight!
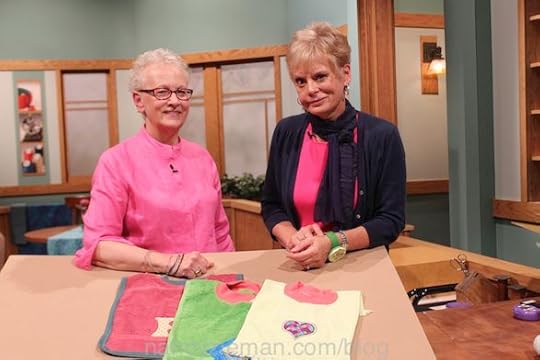
Nancy’s Corner Spotlight! Today watch Nancy Zieman’s 5 minute Nancy’s Corner Interview on Sewing With Nancy. Sandy Schweitzer reassures viewers that it’s OK to repair damaged quilts and give them new life. A worn patch can be replaced by new fabric, simply by folding a small hem, positioning the edge right next to the original embroidered stitching, and carefully hand stitching the patch in place.


SHOP our NEW! Books & Patterns and Exclusive Bundle Boxes at ShopNZP.com

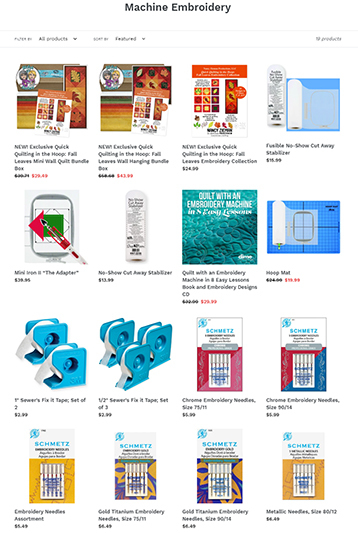
SHOP Machine Embroidery Notions and Tools at ShopNZP.com
Shop Elastic, Cotton Webbing, Zippers & More at ShopNZP.com
Shop Clover Tools & Sewing Supplies at ShopNZP.com!
Shop Pellon Interfacing & Supplies at ShopNZP.com!
Shop Schmetz Sewing Machine Needles at ShopNZP.com!

For a chance to win a copy of the book, Quilt with an Embroidery Machine in 8 Easy Lessons from dime. Please leave a comment below.
Eileen Roche and dime will give away one Quilt with an Embroidery Machine in 8 Easy Lessons book to one US resident in the 48 contiguous states. Winner must reply within 30 days to the official giveaway announcement email message – sent from Nancy Zieman Productions.


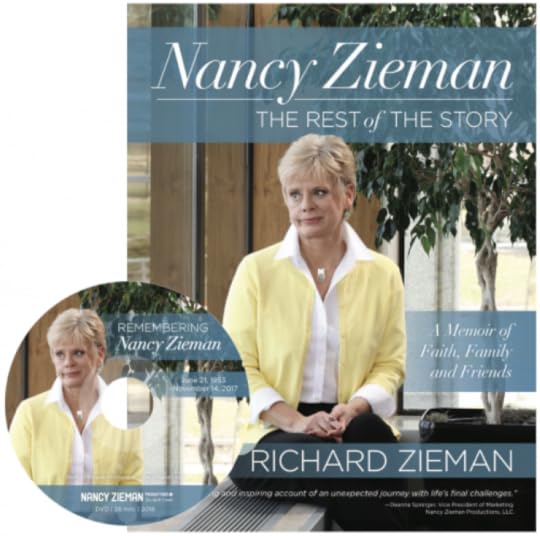
The randomly selected winner of a copy of the book, Nancy Zieman, The Rest of the Story by Richard Zieman, from the January 16 Blog Post, A Modern Quilting Bee on The Best of Sewing With Nancy, is Barbara Gearin.

Her comment is: I have always enjoyed watching sewing with Nancy. I used her landscaping technique to design a Santa quilt, that came out beautiful. I display the quilt during the holidays.
Happy Stitching!
Team Nancy Zieman
Nancy Zieman Productions. LLC.
[image error]
Stitch it! Sisters is a production of NZ Productions LLC. Content in this feed is © copyright 2020 by Nancy Zieman Productions, LLC and may not be republished without written permission. You’re welcome to forward the email to a friend or colleague but it’s not okay to add the RSS feed automatically as content on a blog or other website. The FTC requires us to tell you that Nancy Zieman Productions, LLC has provided products by other companies in the course of doing business. The FTC requires us to advise you to take this information into consideration when reading this posting.
Make sure you are subscribed to Nancy Zieman Productions, LLC enews mailing list so you won’t miss a thing. Sign up at nancyzieman.com/blog/enews . And join us on YouTube, Facebook, Instagram and Pinterest!
July 21, 2020
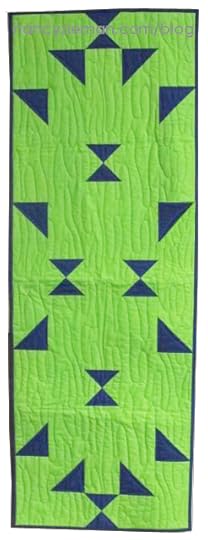
No-Hassle Triangles Summer Table Runner Sewing Tutorial
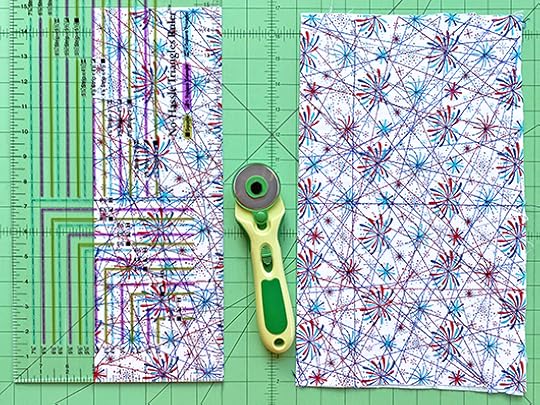
Make an easy-to-sew table runner (or wall hanging!) with a few fabric rectangles & squares, half-square triangles, quarter-square triangles, and Team NZP’s FREE! No-Hassles Triangles Summer Table Runner Sewing Tutorial – below. With our step-by-step directions, and timesaving sewing tools, we’re confident you’ll add the No-Hassle Triangles Summer Table Runner to your stitching projects to-do list.
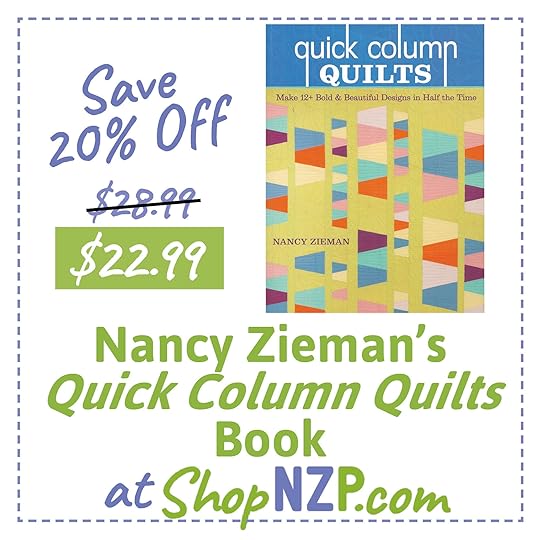
Made in the same style as the quilt projects featured in Nancy Zieman’s Quick Column Quilts book, the triangle blocks and column strips(fabric rectangles & squares) make for a fast, easy, and no-hassle assembly of this 21″ x 56-1/2″ table runner.
Tools, Fabrics, and Supplies:
2-1/4″ yards solid green fabric (background & backing)
2/3 yard solid navy blue fabric (triangles & binding)
Mechanical pencil or other fine-point marking pen
Pellon’s Sew-In Fleece Batting , 22″ x 58″
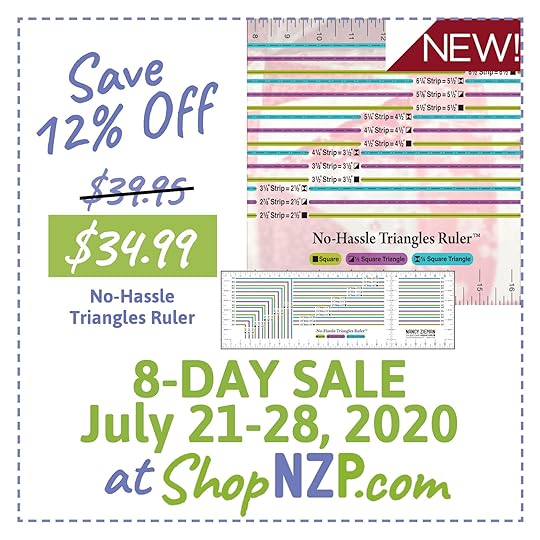
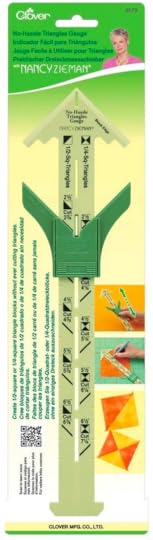
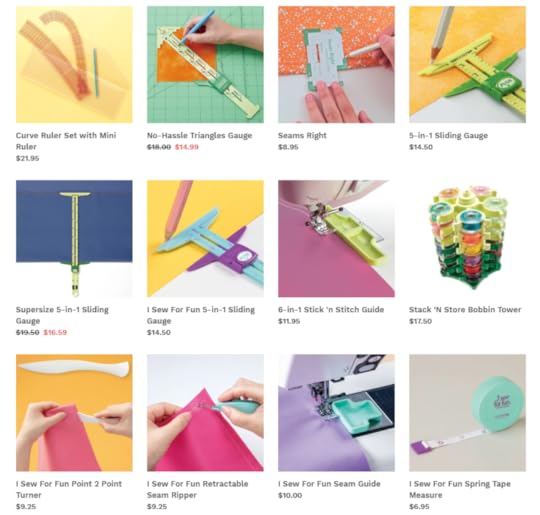
Clover’s No-Hassle Triangles Gauge by Nancy Zieman
NEW! Exclusive No-Hassle Triangles Ruler by Team NZP
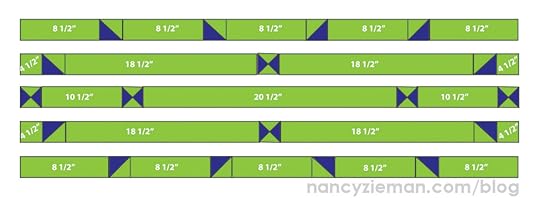
Cutting Directions:
Green Fabric:
Cut one 21″ crosswise strip (backing).
Cut one 10″ crosswise strip (backing).
Cut one 5-1/4″ crosswise strip (triangles).
Cut one 4-7/8″ crosswise strip (triangles).
Cut six 4-1/2″ crosswise strips (background).
Subcut the following from the six green 4-1/2″ background strips:
Subcut four 4-1/2″ x 4-1/2″ squares.
Subcut ten 4-1/2″ x 8-1/2″ rectangles.
Subcut two 4-1/2″ x 10-1/2″ rectangles.
Subcut four 4-1/2″ x 18-1/2″ rectangles.
Subcut one 4-1/2″ x 20-1/2″ rectangles.
See green fabric Cutting Diagram Below:

Navy Blue Fabric:
Cut one 4-7/8″ crosswise strip (triangles).
Cut one 5-1/4″ crosswise strip (triangles).
Cut four 2-1/2″ crosswise strips (binding).
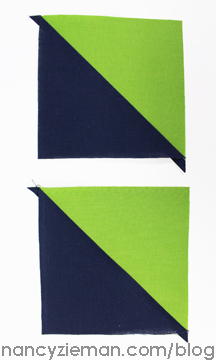
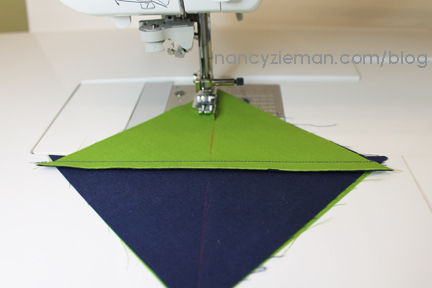
First Step, Building the Half-Square Triangle Units
Create 12 Half-Square Triangle Units using the No-Hassle Triangles Gauge.
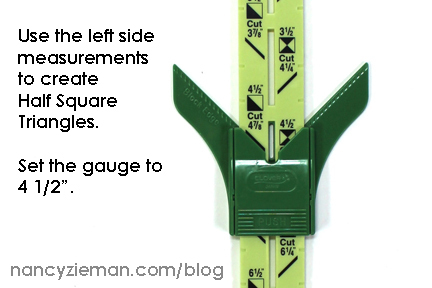
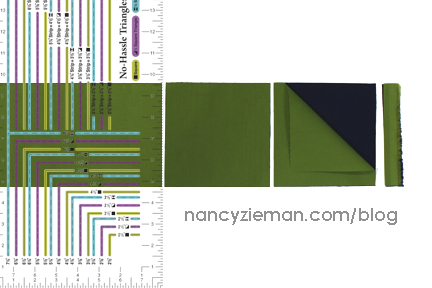
Set theNo-Hassle Triangles Gauge to 4-1/2″ block size on the left side of the gauge. The left side notes Half-Square Triangle sizes. The gauge tells you what size blocks to cut, 4-7/8″.
Cut 4-7/8″ crosswise strips of green and blue. Layer a 4-7/8″ green strip on a 4-7/8″ blue strip and cut six square pairs, measuring 4-7/8″ x 4-7/8″.
Position the No-Hassle Triangles Gauge on a pair of squares.
Use the fine point marking tool to draw a diagonal line.

Use a 1/4″ presser foot as a guide to stitch 1/4″ from the right and the left sides of the marked line.
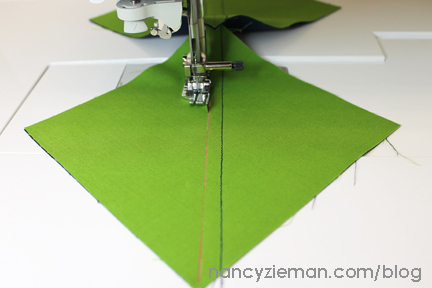
Chain piece these half-square triangle shapes. Stitch one set of squares right after another. After creating a long “chain,” simply clip the threads to separate the units.
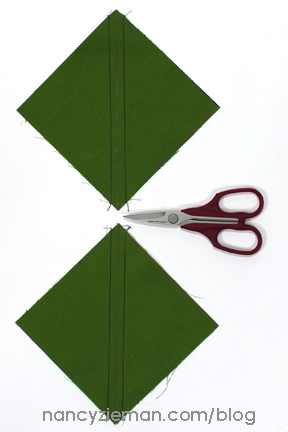
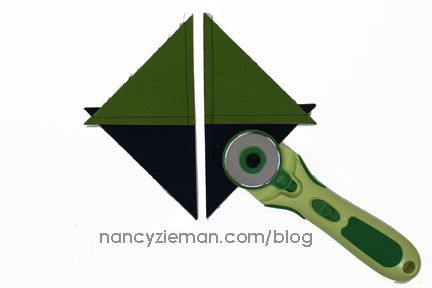
Take the stitched units to the rotary cutting mat and cut the two halves apart along the marked line.
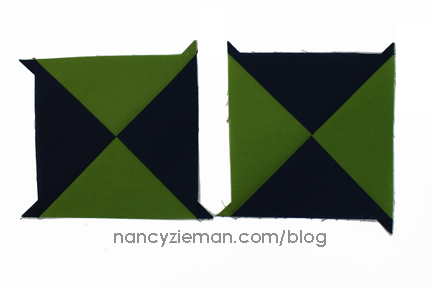
Open and press the seam allowances to the darker blue side.
Second, Create Six Quarter-Square Triangle Units

Set the No-Hassle Triangles Gauge to 4-1/2″ block size on the right side of the gauge. The right side notes Quarter-Square Triangle sizes. The gauge tells you what size blocks to cut, 5-1/4″.
Cut 5-1/4″ crosswise strips of green and blue. Layer a 5-1/4″ green strip on a 5-1/4″ blue strip and cut square pairs, measuring 5-1/4″ x 5-1/4″.
Place a blue and green square under the gauge and mark the diagonal line.
Stitch 1/4″ from the marked line, following the guidelines for the Half-Square Triangle Units, in the first step, above. Cut the units apart and press. These blocks should measure 4-7/8″ x 4-7/8″.
Lay one Half-Square Triangle block on another, matching right sides. It is important that the diagonal lines lock. You’ll feel this “lock” as the seams meet.

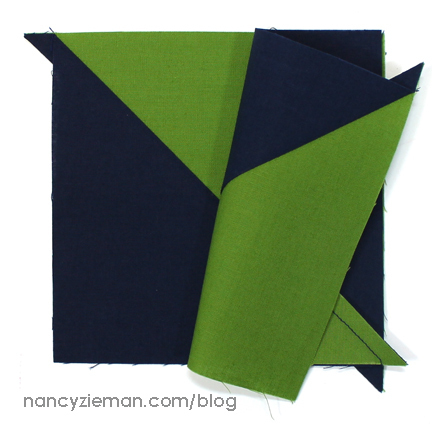
Set the No-Hassle Triangles Gauge to 4-1/2″ on the left side of the gauge.
Mark a diagonal line, perpendicular to the seamline.
Use a 1/4″ presser foot as a guide to stitch 1/4″ from the right and left sides of the marked line.
Chain piece the three units, stitching one right after another.
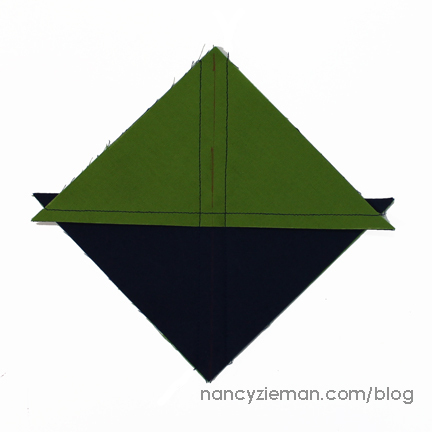
Use rotary cutting tools to cut the units apart.
Press the Quarter-Square Triangle Units.
Third, Arrange Table Runner Rows
Arrange the table runner into rows as detailed below.
Stitch the pieces using 1/4″ seam allowances.
Assemble the runner by joining the rows to each other, using 1/4″ seam allowances.
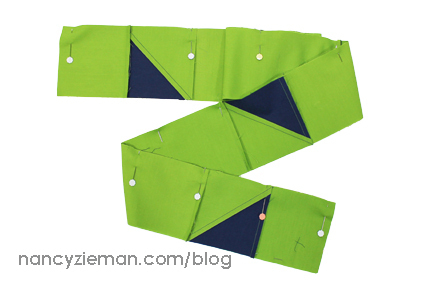
Press the row seam allowances in one direction.
After all five rows are stitched, the No-Hassle Triangles Table Runner top is complete.
Create Backing
Cut the backing piece measuring 10″ x 42″ into two pieces measuring 10″ x 21″ each. Use those two pieces and the larger piece, 21″ x 42″ to assemble the table runner back as described below, using 1/4″ seam allowances.

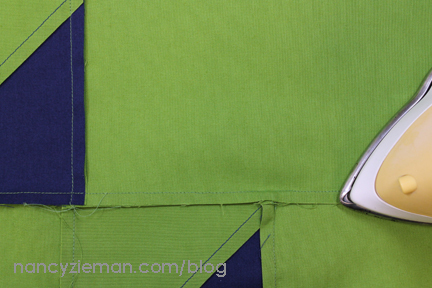
Quilt and Finish the No-Hassle Triangles Summer Table Runner
Layer the quilt backing, seam-side-up, Sew-In Fleece Batting , and the table runner quilt top – to create a quilt sandwich. Pin.
Machine quilt the table runner layers together with straight line machine quilt the table runner with The Ultimate Quilt ‘n Stitch Presser Foot.
New! The Ultimate Quilt ‘n Stitch Presser Foot designed by Nancy Zieman Productions, LLC for Clover! An all-new presser foot with a built in stitch alignment ruler for guiding rows of parallel stitching. The New! Ultimate Quilt ‘n Stitch Presser Foot is ideal for parallel-line straight stitching, topstitching, and straight-line machine quilting! Premiering today at the NZP Blog!
Or, use free-motion quilting to machine quilt the table runner layers together.
Trim away excess batting and backing fabric.
Join the 2-1/2″ crosswise strips of blue binding fabric, end-to-end, using 1/4″ seam allowances.
Press the binding strip in half, lengthwise.
Bind the table runner, using your favorite technique. Or, use Nancy Zieman’s Easy quilt binding instructions.
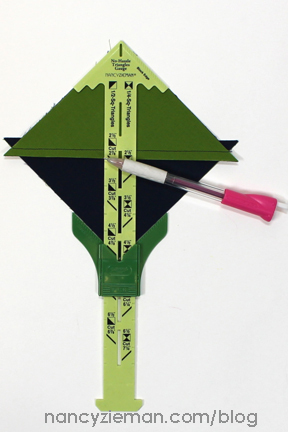
NEW! Make our No-Hassle Triangles Summer Table Runner, with our NEW! Exclusive No-Hassle Triangles Ruler!
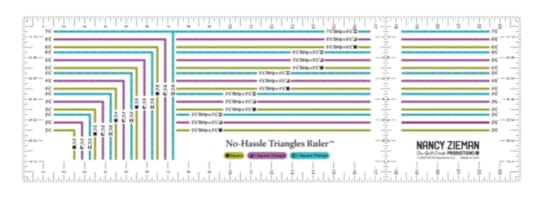
NEW! Create solid square quilt blocks, 1/2 -square quilt blocks, and ¼-square triangle quilt blocks from easy fabric squares – cut with a rotary cutter and our NEW! Exclusive No-Hassle Triangles Ruler!
Team NZP’s NEW! No-Hassle Triangles Ruler makes five different block sizes – for both 1/2- & 1/4-square triangles: 2-1/2″, 3-1/2″, 4-1/2″, 5-1/2″, and 6-1/2″.
Reference the convenient markings on the NEW! No-Hassle Triangles Ruler for cutting solid square quilt blocks, 1/2-square triangles, and 1/4-square triangles.
Solid Square Quilt Block Cutting Lines are marked on Ruler in GREEN.
1/2-Square Quilt Block Cutting Lines are marked on Ruler in PURPLE.
1/4-Square Quilt Block Cutting Lines are marked on Ruler in AQUA.

The brand-new No-Hassle Triangles Ruler is available exclusively at ShopNZP.com!
NEW! No-Hassle Triangles Ruler and at ShopNZP.com!
SHOP our NEW! Books & Patterns and Exclusive Bundle Boxes at ShopNZP.com
SHOP Machine Embroidery Notions and Tools at ShopNZP.com
Shop Elastic, Cotton Webbing, Zippers & More at ShopNZP.com
Shop Clover Tools & Sewing Supplies at ShopNZP.com!
Shop Pellon Interfacing & Supplies at ShopNZP.com!
Shop Schmetz Sewing Machine Needles at ShopNZP.com!
NEW! Watch Stitch it! Sisters Program 118 No-Hassle Triangles in Quilts
NEW! Watch Stitch it! Sisters Program 118 No-Hassle Triangles in Quilts! Join Deanna as she demonstrates Nancy Zieman’s No-Hassle methods of cutting, marking, and stitching 1/2-square or 1/4-square triangles – without ever cutting a triangle, or guessing at the sizes! Plus see a gallery of quilt blocks and find inspiration for your next quilting project.
For a chance to be the random winner of a Stitch it! Sisters 5″ Fabric Squares Short Stack with S!S Button & Sticker, please leave a comment below sharing plans for your next/current quilting project. Nancy Zieman Productions will give away one Stitch it! Sisters 5″ Fabric Short Stack to one US resident in the 48 contiguous states. Winner must reply within 30 days to the official giveaway announcement email message – sent from Nancy Zieman Productions.
Celebrate Summer Sewing!
Team Nancy Zieman
Nancy Zieman Productions. LLC.
[image error]
Stitch it! Sisters is a production of NZ Productions LLC. Content in this feed is © copyright 2020 by Nancy Zieman Productions, LLC and may not be republished without written permission. You’re welcome to forward the email to a friend or colleague but it’s not okay to add the RSS feed automatically as content on a blog or other website. The FTC requires us to tell you that Nancy Zieman Productions, LLC has provided products by other companies in the course of doing business. The FTC requires us to advise you to take this information into consideration when reading this posting.
Make sure you are subscribed to Nancy Zieman Productions, LLC enews mailing list so you won’t miss a thing. Sign up at nancyzieman.com/blog/enews. And join us on YouTube, Facebook, Instagram and Pinterest!
July 18, 2020
July 2020 NZP Block of the Month: Corner Curves Block
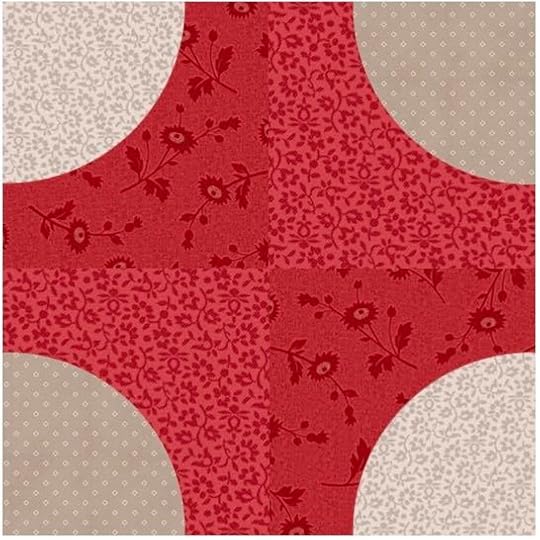
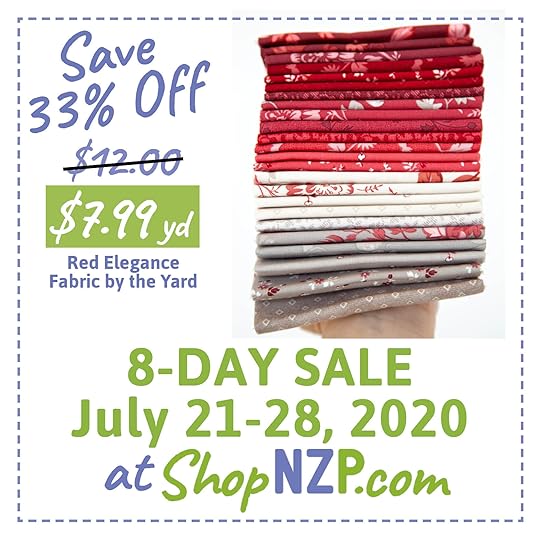
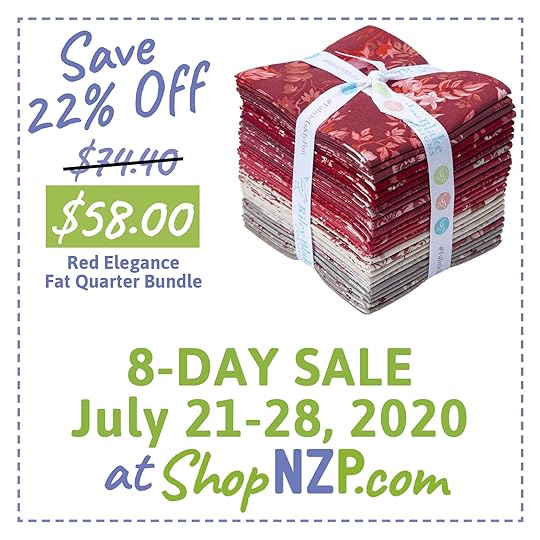
Nancy’s Red Elegance
2020 Block of the Month July: Corner Curves Block
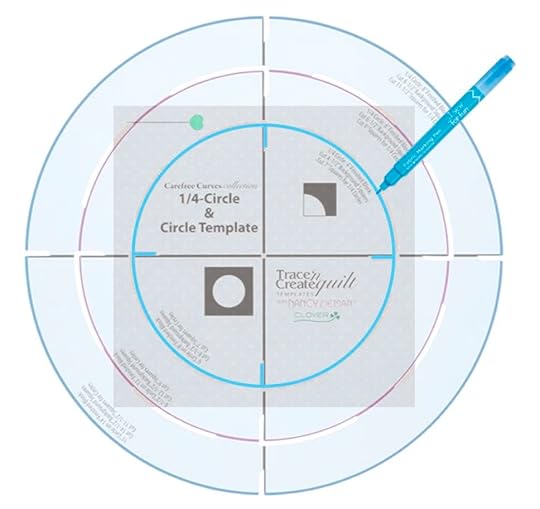
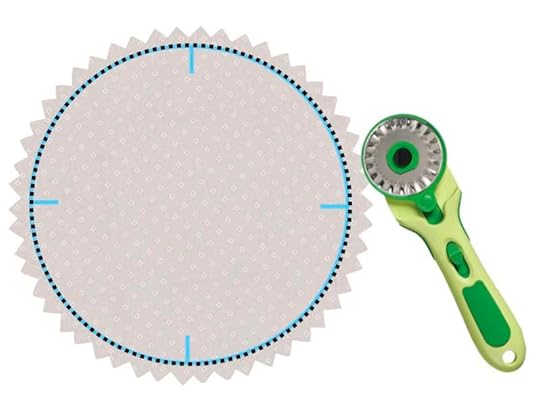
Introducing the seventh of 12 FREE! Quit Block Tutorials in the NEW! 2020 Nancy Zieman Productions Nancy’s Red Elegance Block of the Month Mystery Quilt Series! The Corner Curves Block, also known as a Drunkard’s Path Block variation, is quickly made in multiples when cutting our Circle Blocks into quarters!
In January, Team Nancy Zieman introduced the NEW! 2020 Nancy Zieman Productions Nancy’s Red Elegance Block of the Month Mystery Quilt Series. Join the NEW! 2020 Nancy Zieman Productions Nancy’s Red Elegance Block of the Month Mystery Quilt Series, anytime, by viewing the Basic Supplies and Tools Listing in the January 1, 2020 NZP BoM20 Kick Off Blog Posting.
On the third Saturday of each month, we’ll feature one block design, and we’ll be stitching one or more blocks of the same design each month. The blocks are created using Our NEW! Red Elegance Fabric Collection by Riley Blake and the Carefree Curves Trace ‘n Create Template Set by Nancy Zieman for Clover. Follow along as we show step-by-step how to create the July Corner Curves Block.
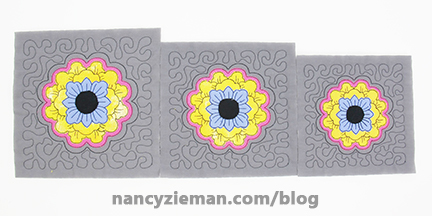
July Corner Curves Block
NOTE: This block is 8-1/2″ square; 8″ finished square – when sewn into finished quilt.
Block Fabrics
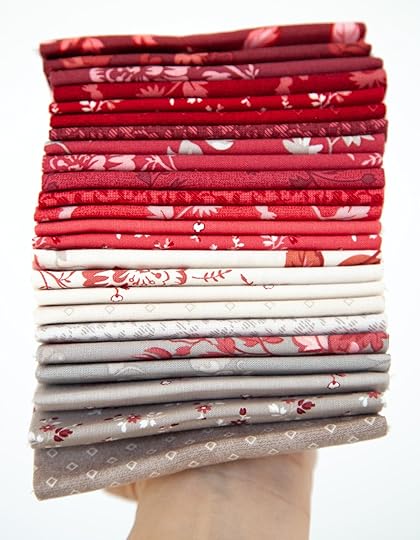
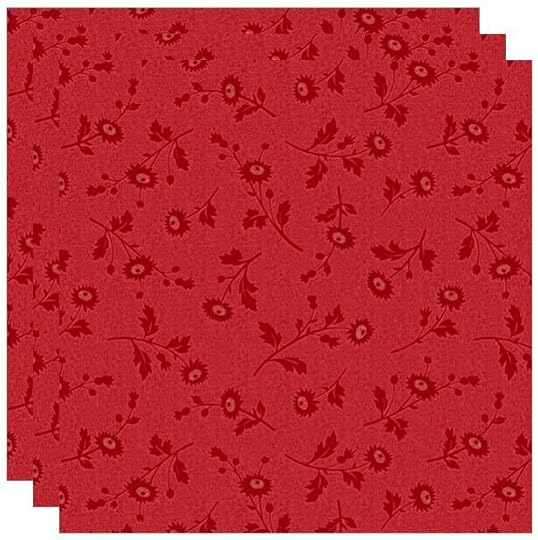
For the Nancy’s Red Elegance July Corner Curves Block, select the following four fat quarter fabrics from the NEW! Red Elegance Fat Quarter Bundle along with the “Circle” Template from the Carefree Curves Template Set.
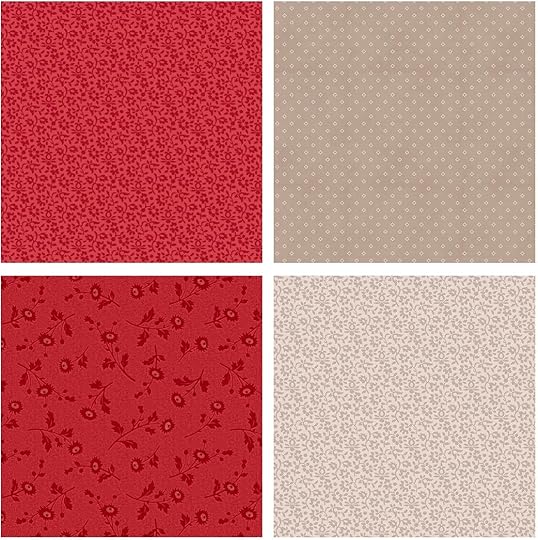
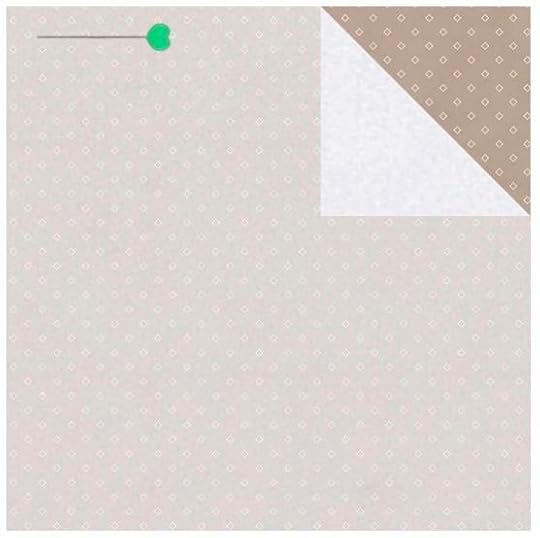
Red Elegance Lace Berry, Red Elegance Diamonds Taupe, Red Elegance Textured Red and Red Elegance Lace Taupe
Prepare your fabrics! Pre-shrink fabrics by steaming and pressing, and steaming and pressing a second time. Then, stabilize fabrics for the sewing process by pressing and starching fabrics with June Tailor’s Starch Savvy. Press and starch, press and starch.
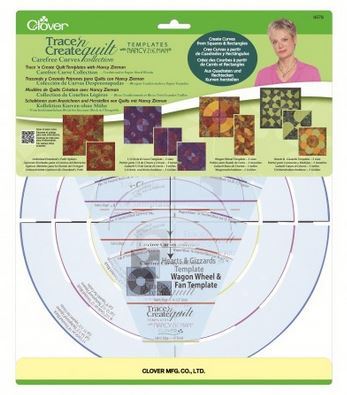
Carefree Curves Trace ‘n Create Template by Nancy Zieman for Clover
View the complete Basic Supplies and Tools Listing in the January 1, 2020 NZP BoM20 Kick Off Blog Posting , .
Cut Fabrics for the Block
Create super-simple 1/4–Circle Blocks with simple fabric squares and Pellon Sof-Shape squares!
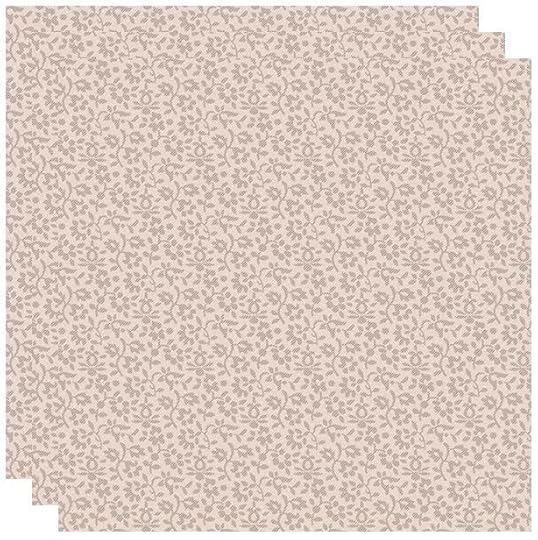
Cut three 9″ background squares of Red Elegance Lace Berry.
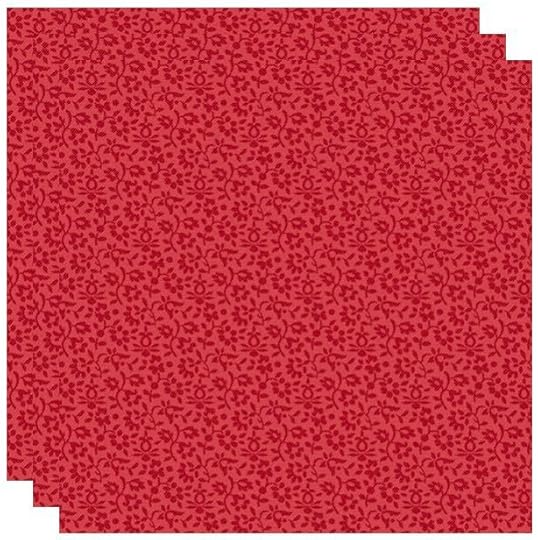
Cut three 9″ background squares of Red Elegance Textured Red .
Cut three 7″ square of Red Elegance Diamonds Taupe – for center circles.
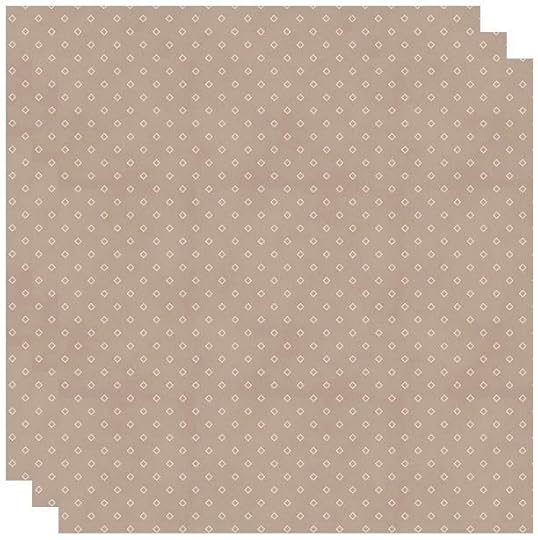
Cut three 7″ square of Red Elegance Lace Taupe – for center circles.
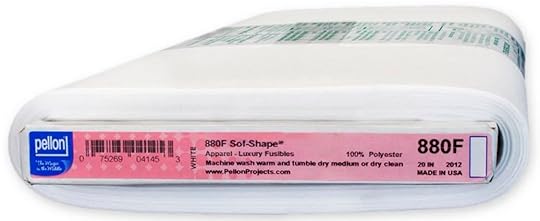
Cut six 7″ square Pellon Sof-Shape Fusible Interfacing
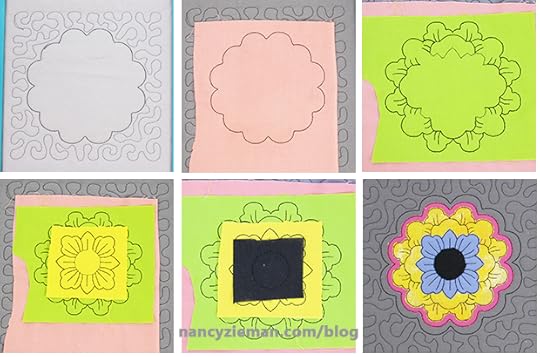
For the NEW! 2020 Nancy Zieman Productions Nancy’s Red Elegance Block of the Month Mystery Quilt Series, we’re sharing Nancy Zieman’s techniques for creating perfect circles – without ever cutting a circle!
Construct the Blocks
Create Center Circle Appliqués
Place one 7″ background square of Red Elegance Diamonds Taupe to one 7″ square Pellon Sof-Shape Fusible Interfacing – matching smooth side of fusible interfacing to right side of fabric. Pin .
Position the Circle Template on the glue-dot side of the interfacing , centering the template on the interfacing square.
With a fabric marking pen and Circle Template, trace a 6″ circle on the interfacing – tracing along the yellow lines at the die cut openings.
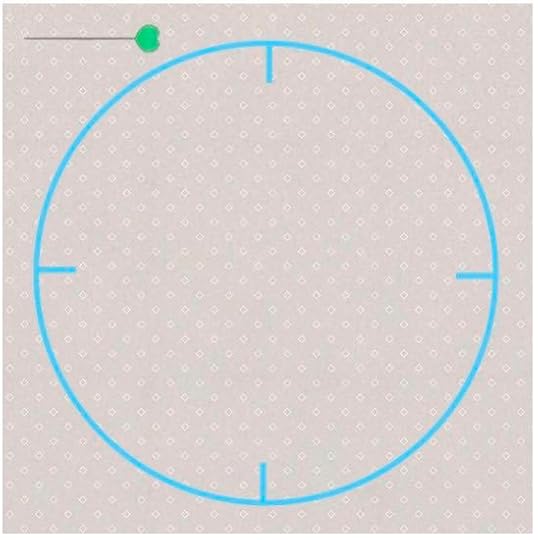
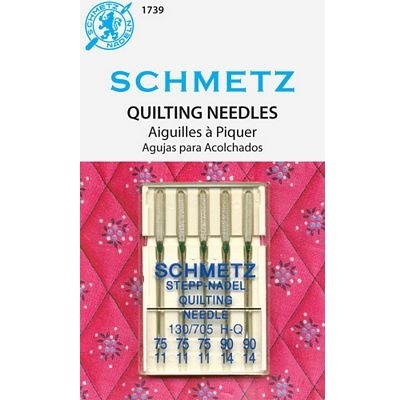
Using a Size 75 Schmetz Quilting Needle, stitch directly on the marked line – using a slightly shorter stitch length.
It’s always easier to stitch smooth curves with a shorter stitch length – such as a 2.0 mm setting.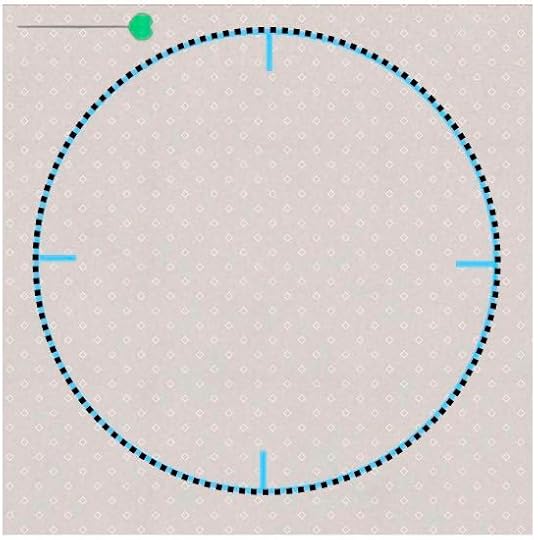
With a 45mm Rotary Cutting and Pinking Blade, trim away excess fabric, leaving about a 1/4″ seam allowance on the outside of stitching line.
Using a
July 16, 2020
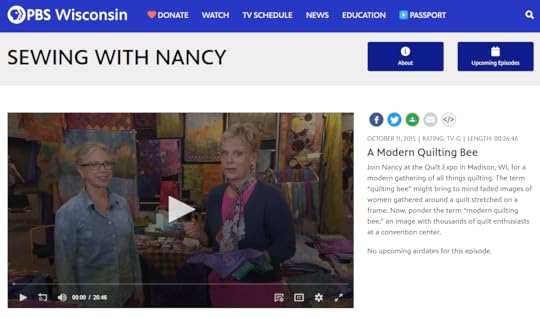
A Modern Quilting Bee on The Best of Sewing With Nancy
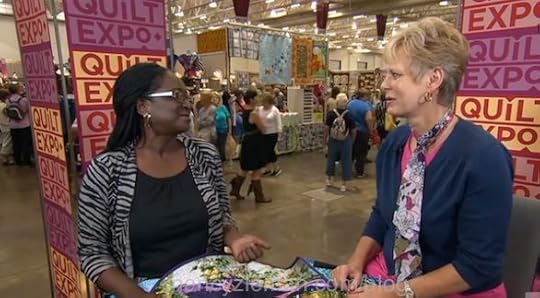
Often you hear the phrase, “Quilting Bee”. We’re sure your mind pictures images of old: Friends, family, fabric, and fun. The Modern Quilting Bee has all those elements plus more. Join Nancy Zieman as she journeys outside the Sewing With Nancy studio to celebrate the art of quilting at the The Great Wisconsin Quilt Show in Madison, Wisconsin, and watch A Modern Quilting Bee on The Best Of Sewing With Nancy online.
Modern quilting is a buzz word in the quilting community. Weeks Ringle, author, publisher, designer, teacher, lecturer, and fabric designer joins Nancy for a chat on modern quilting—quilting as a reflection of today.
One of Nancy’s favorite fabrics to work with – when making her Landscape Quilts - was hand-dyed fabric. Wendy Richardson is a master at dying fabric. Wendy joins Nancy and shares some of the processes she uses when hand-dying fabrics.

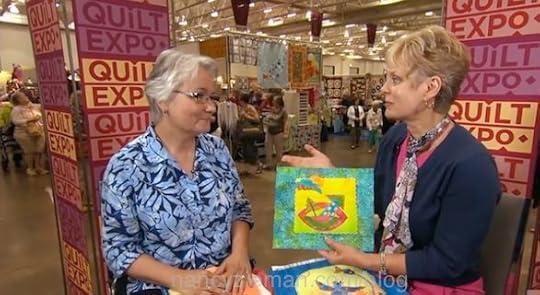
Nancy often said that she had the best job in the world, because she got to interview and learn from leaders and innovators in the sewing and quilting world. Lola Jenkins, quilter and lecturer, joins Nancy to share her quilting journey inspired by her life and heritage.
Nancy’s next guest and friend, Laura Wasilowski, shares her art quilting methods for combining slow-quilting and quick-quilting.
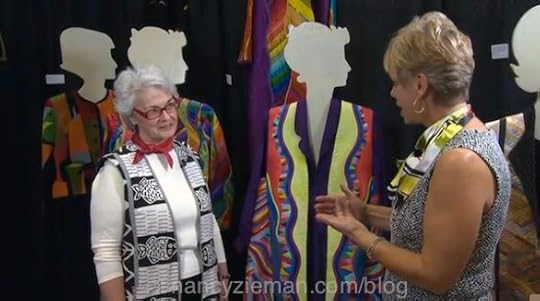
When most of us think of quilts, we generally think of bed quilts or wall quilts. In addition to two-dimensional, quilting is also three-dimensional. Lorraine Torrence, author, designer, and educator, joins Nancy to share her legacy exhibit of quilted garments.
Watch A Modern Quilting Bee on The Best of Sewing With Nancy online.
To watch Sewing With Nancy on your iPad, iPod Touch, or iPhone, download the app .
For a chance to win a copy of the book, Nancy Zieman, The Rest of the Story by Richard Zieman Please leave a comment below.
The randomly selected winner of the book, Sew Gifts–Make Memories from Mary Mulari, from the July 2 and 9 Blog Posts: Sew Gifts–Make Memories Part One on The Best of Sewing With Nancy & Sew Gifts–Make Memories Part Two on The Best of Sewing With Nancy is, Robin Quade.
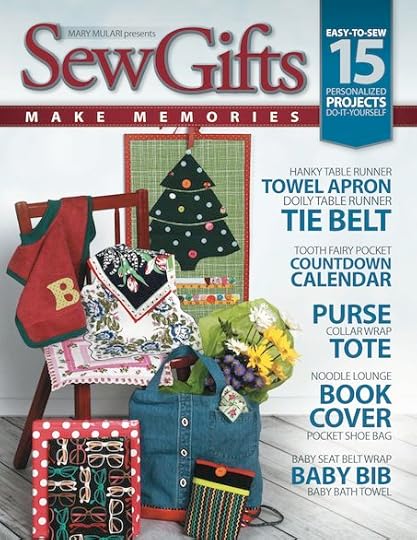
Her comment is: What lovely gifts, I like everything about bags so will probably make the girlfriend’s shopping purse. I also love the idea of a hooded towel so that will be on my to do list as well.


SHOP our NEW! Books & Patterns and Exclusive Bundle Boxes at ShopNZP.com
SHOP Machine Embroidery Notions and Tools at ShopNZP.com
Shop Elastic, Cotton Webbing, Zippers & More at ShopNZP.com
Shop Clover Tools & Sewing Supplies at ShopNZP.com!
Shop Pellon Interfacing & Supplies at ShopNZP.com!
Shop Schmetz Sewing Machine Needles at ShopNZP.com!
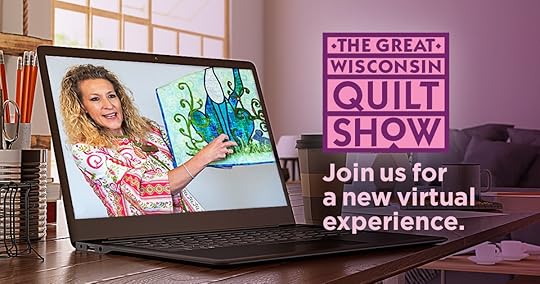
Mark your calendar, and join us for The Great Wisconsin Quilt Show, September 10-12, 2020 at QuiltShow.com! Sign up for e-news reminders, today at QuiltShow.com!
Visit QuiltShow.com/QuiltContest.
Happy Quilting!
Team Nancy Zieman
Nancy Zieman Productions. LLC.
[image error]
Stitch it! Sisters is a production of NZ Productions LLC. Content in this feed is © copyright 2020 by Nancy Zieman Productions, LLC and may not be republished without written permission. You’re welcome to forward the email to a friend or colleague but it’s not okay to add the RSS feed automatically as content on a blog or other website. The FTC requires us to tell you that Nancy Zieman Productions, LLC has provided products by other companies in the course of doing business. The FTC requires us to advise you to take this information into consideration when reading this posting.
Make sure you are subscribed to Nancy Zieman Productions, LLC enews mailing list so you won’t miss a thing. Sign up at nancyzieman.com/blog/enews . And join us on YouTube, Facebook, Instagram and Pinterest!
July 14, 2020
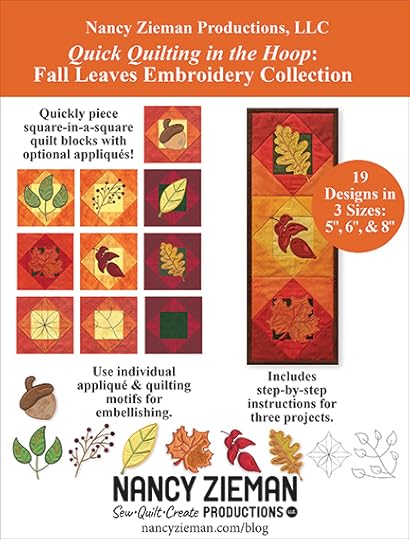
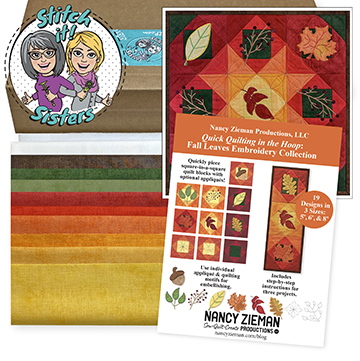
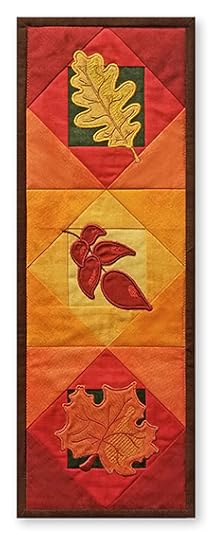
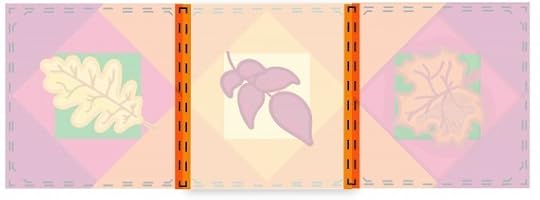
Quick Quilting in the Hoop: Fall Leaves Mini Table Runner and Wall Hanging
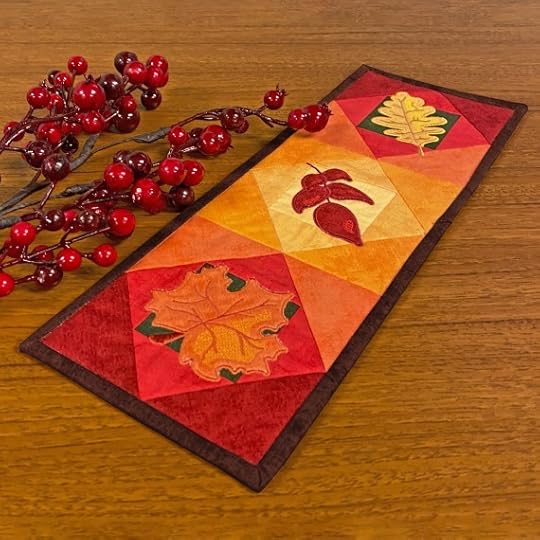
Make a New! Fall Leaves Mini Wall Hanging or Table Runner – all within the hoop of an embroidery machine! Below find our step-by-step instructions for preparing and cutting fabrics, piecing quilt blocks in the hoop, and how we added “automated” fall leaves appliques – with our new NEW! Exclusive Quick Quilting in the Hoop: Fall Leaves Embroidery Collection Book and Embroidery Designs.
NEW! Watch Stitch it! Sisters Program 115, Quick Quilting in the Hoop: Fall Leaves!
NEW! Watch the NEW! Stitch it! Sisters Program 115, Quick Quilting in the Hoop: Fall Leaves with hosts Deanna Springer and Dana Casey, and now introducing Denise Abel – three real-life sisters from Team Nancy Zieman Productions! In this video, the Stitch it! Sisters share how to turn your embroidery sewing machine into a quilting machine – with quilt making techniques borrowed from traditional paper piecing.
Creating accurate and consistent quilt blocks, in multiple sizes, is easier than ever with an embroidery machine. First-time quilters and seasoned quilters alike will enjoy precise piecing — with every quilt block — when combining embroidery and block piecing with our NEW! Exclusive Quick Quilting in the Hoop: Fall Leaves Embroidery Collection Book and Embroidery Design Files.
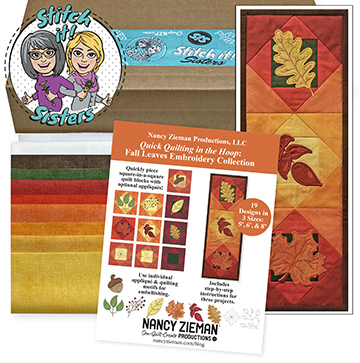
Then, head over to ShopNZP.com and purchase our NEW! Exclusive Quick Quilting in the Hoop: Fall Leaves Mini Wall Quilt Bundle Box by the Stitch it! Sisters! Each Quick Quilting in the Hoop Bundle Box includes our NEW! Exclusive Quick Quilting in the Hoop — Fall Leaves Embroidery Collection Book with full-color step-by-step instructions for three projects, complete with downloadable embroidery design files, quilting cotton Shades fabric cuts by Riley Blake Designs, quilt backing, binding, and Pellon® Fleece Batting – to make our Mini Fall Leaves Wall Quilt using 5″, 6″, or 8″ quilt blocks – available exclusively at ShopNZP.com!
.
SHOP our NEW! Books & Patterns and Exclusive Bundle Boxes at shopnzp.com
Find additional projects – to piece with your embroidery machine – in NZP’s NEW! Exclusive Quick Quilting in the Hoop: Fall Leaves Embroidery Collection Book available exclusively at ShopNZP.com!
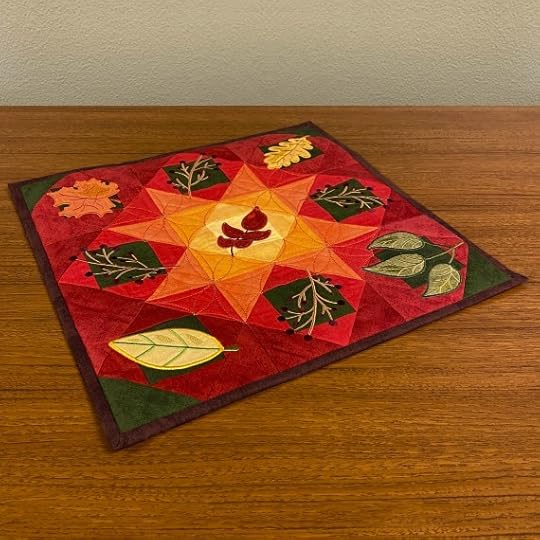
Fall Leaves Wall Quilt or Table Topper
NEW! Exclusive Quick Quilting in the Hoop Fall Leaves Wall Quilt/Table Topper Bundle Box
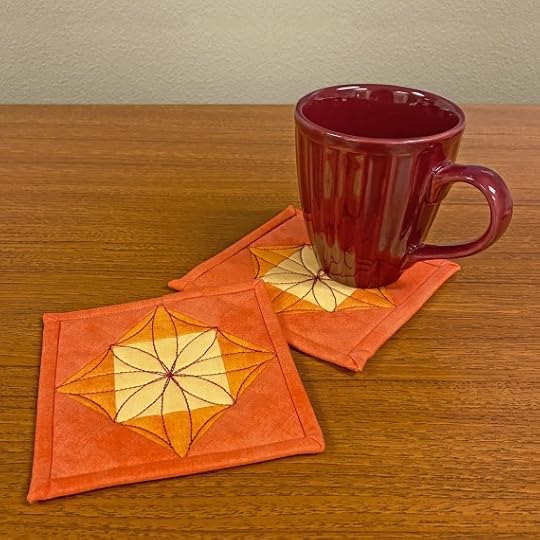
Machine Quilted Beverage Coasters
NEW! Stitch it! Sisters Quick Quilting in the Hoop: Fall Leaves Mini Wall Hanging/Table Runner Tutorial
Tools & Supplies:
NEW! Exclusive Quick Quilting in the Hoop: Fall Leaves Mini Wall Quilt Bundle Box
Quilter’s Starch Savvy
Fusible No-Show Cut Away Stabilizer
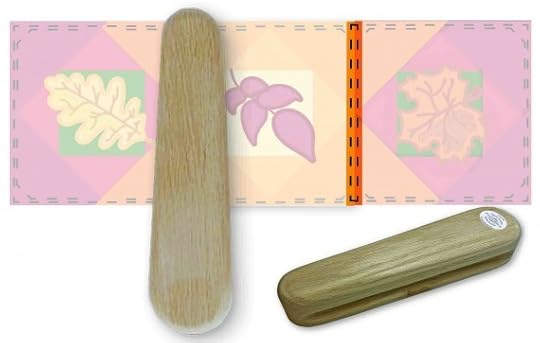
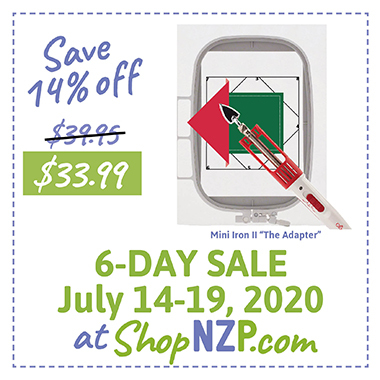
Mini Iron II “The Adapter”
Chrome Embroidery Needles, Size 90/14
Chrome Quilting Needles, Size 90/14
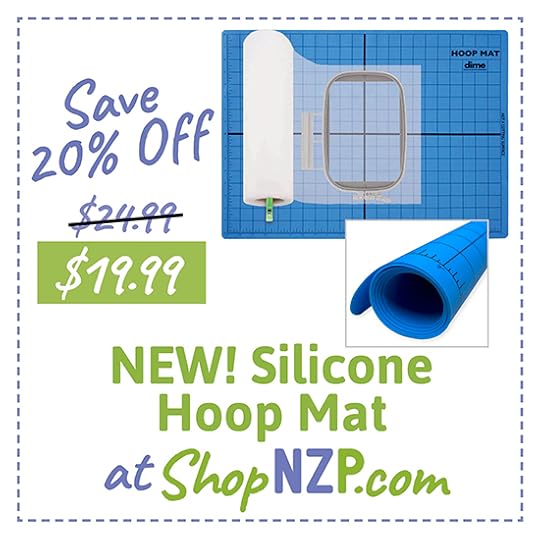
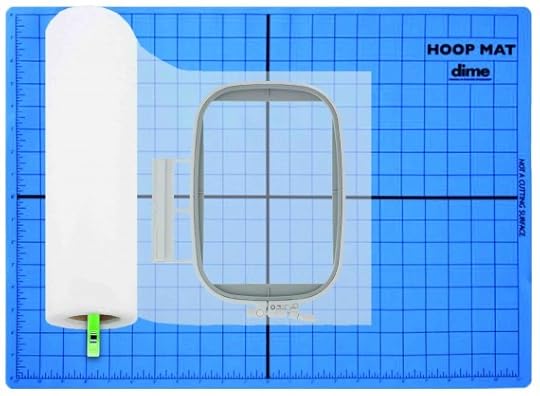
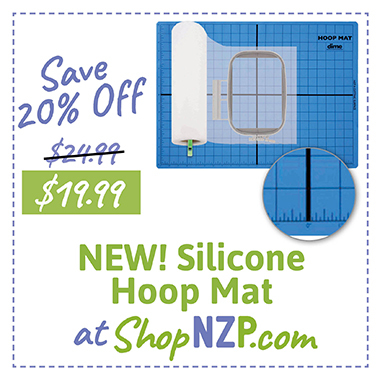
Hoop Mat
I Sew for Fun Point 2 Point Turner
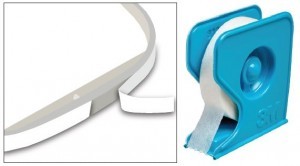
1″ Sewer’s Fix it Tape
6-1/2″ x 6-1/2″ Square Omnigrid Ruler
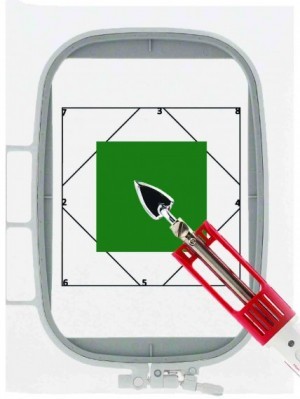
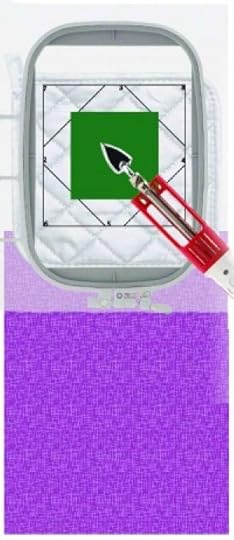
Hoop a section of Fusible No-Show Cut Away Stabilizer; fusible side up.
 Use the New! dime Hoop Mat to help hold hoop while hooping. Silicone mat with printed grid provides a non-skid hooping surface for successful hooping – on any table surface!
.
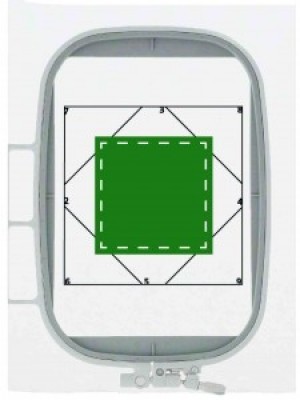
Embroider first stitching sequence, the numbered “Map stitching”, directly on hooped stabilizer … the outline and sections of quilt block plus numbers 1-9.
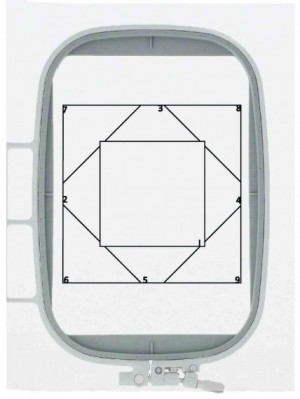
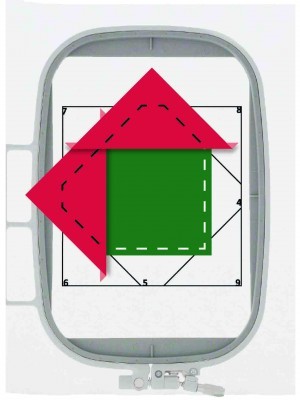
Section #1 — Place block center square, Fabric Color #1 (Mountain Green), over section marked #1, right side up, with fabric square extending equally beyond stitched lines.
Fuse fabric to stabilizer with Clover’s Mini Iron.

Add an ironing surface under hooped stabilizer by slipping a potholder under the hoop. Slip potholder under hoop and press. Stitch a long length of fabric to the potholder … as a reminder to remove potholder before resuming stitching!
Embroider next stitching sequence, which stitches down Fabric Color #1.
Section #2 — Align one inner triangle, Fabric Color #2 (Fire Engine), right sides together, along stitched line facing section #2; center fabric triangle.
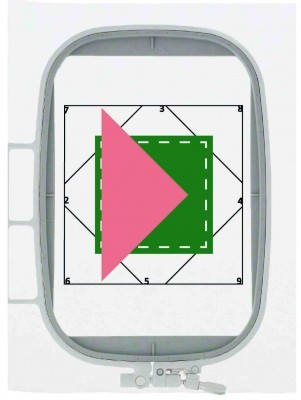
Embroider next stitching sequence, stitching fabric triangle to block.
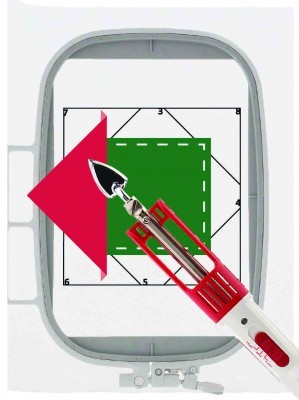
Use pointed end of Clover’s Point 2 Point Turner to lightly hold fabric triangle in place while stitching.
Fold fabric triangle right side up and finger press.
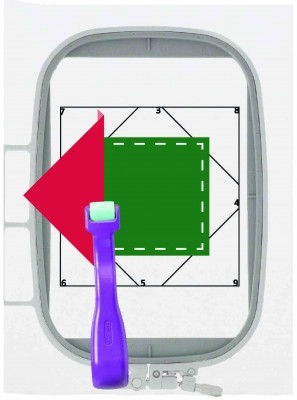
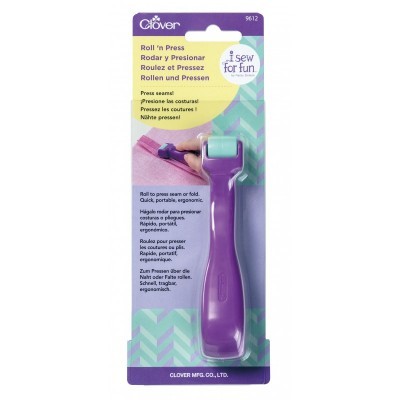
Finger press, or use Clover’s Roll ‘n Press to quickly and easily press fabric fold.
Press with Mini Iron from triangle’s folded edge and continue to press towards triangle’s point to eliminate wrinkles.
Embroider next stitching sequence, stitching down fabric triangle.
Section #3 — Align one inner triangle, Fabric Color #2 (Fire Engine), right sides together, along stitched line facing section #3; center fabric triangle.
Embroider next stitching sequence, stitching fabric triangle to block.
Fold fabric triangle right side up and finger press.
Press with Mini Iron from triangle’s folded edge and continue to press towards triangle’s point.
Embroider next stitching sequence, stitching down fabric triangle.
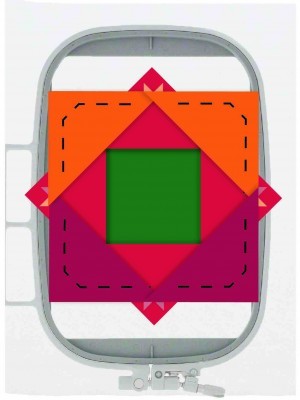
Section’s #4 and #5 — Repeat above process, following numbered “Map Stitching” piecing sequence on stabilizer until all inner triangle fabric pieces (Fabric Color #2 (Fire Engine) have been stitched in place.
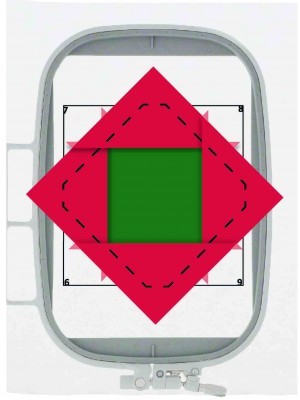
Section’s #6 through #9 — Repeat above process, following numbered “Map Stitching” piecing sequence on stabilizer until all inner triangle fabric pieces have been stitched in place; Section #6 Fabric Color #3 (Wagon Red) Section #7 — Fabric Color #4 (Tangerine), Section #8 (Fabric Color #4 (Tangerine ), and Section #9 (Fabric Color #2 (Fire Engine) .
Using 1/4″ Quilting Foot, a Patchwork Foot, or set needle for 1/4″ seam allowance.
Align block pairs, right sides together, stitch with a 1/4″ seam.

With iron at a steam setting, press seams closed, and then press seams open.
Use a Tailor’s Clapper along seams — the moisture in the fabric will wick into the wooden pressing tool, creating a sharp seam. It is not necessary to pound the seam, just hold the wooden block firmly. against the area after pressing.
Bind the table runner using Nancy Zieman’s Easy quilt binding instructions.
There are more design options – to piece with your sewing machine embroidery unit – in our NEW! Exclusive Quick Quilting in the Hoop: Fall Leaves Embroidery Collection Book.


SHOP our NEW! Books & Patterns and Exclusive Bundle Boxes at shopnzp.com
SHOP Machine Embroidery Notions and Tools at shopnzp.com
Shop Elastic, Cotton Webbing, Zippers & More at shopnzp.com
Shop Clover Tools & Sewing Supplies at shopnzp.com!
Shop Pellon Interfacing & Supplies at shopnzp.com!
Shop Schmetz Sewing Machine Needles at shopnzp.com!
For a chance to be the random winner of a Roll ‘n Press from Clover, please leave a comment below about our NEW! Fall Leaves Embroidery Collection, and/or share your ideas for our next embroidery collection.
Clover will give away one Roll ‘n Press to one US resident in the 48 contiguous states. Winner must reply within 30 days to the official giveaway announcement email message – sent from Nancy Zieman Productions. Email Team NZP at info@ziemanproductions.com.
Happy Machine Embroidering!
Team Nancy Zieman
Nancy Zieman Productions. LLC.
[image error]
Stitch it! Sisters is a production of NZ Productions LLC. Content in this feed is © copyright 2020 by Nancy Zieman Productions, LLC and may not be republished without written permission. You’re welcome to forward the email to a friend or colleague but it’s not okay to add the RSS feed automatically as content on a blog or other website. The FTC requires us to tell you that Nancy Zieman Productions, LLC has provided products by other companies in the course of doing business. The FTC requires us to advise you to take this information into consideration when reading this posting.
Make sure you are subscribed to Nancy Zieman Productions, LLC enews mailing list so you won’t miss a thing. Sign up at nancyzieman.com/blog/enews. And join us on YouTube, Facebook, Instagram and Pinterest!
July 9, 2020
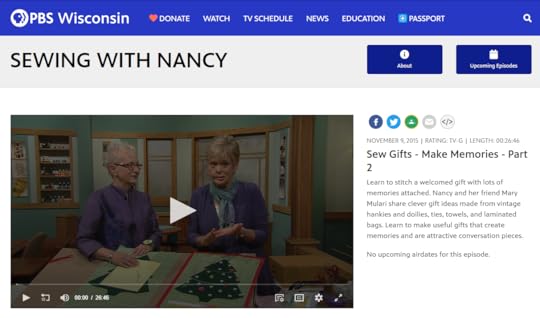
Sew Gifts Make Memories Part Two on The Best of Sewing With Nancy
Sewing gifts ranks as the number one reason why most of us sew. During this Sewing With Nancy series, Sew Gifts–Make Memories, we feature gifts to sew that don’t always start with fabric yardage. When guest Mary Mulari proposed the idea of sewing gift-giving solutions, Nancy knew it was the perfect TV topic. Mary’s projects are clever, useful, and enjoyable to create.
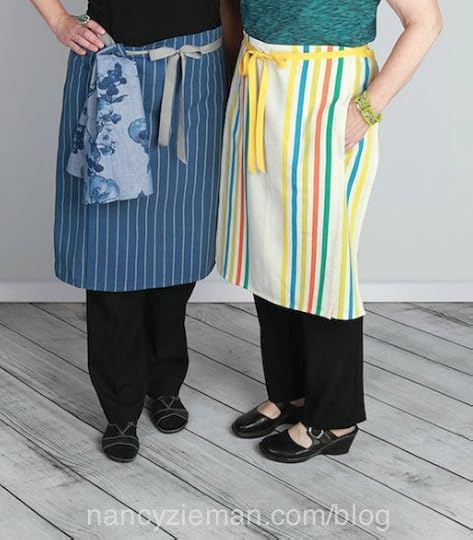
Our first gift project, in Sew Gifts–Make Memories Part Two, is a Hanky and Doily Table Runner made from items that might be tucked away in a drawer. A collection of vintage handkerchiefs are usually stored away and seldom seen. Choose several handkerchiefs and with just a few sewing steps, you’ll have a table runner that’s an attractive conversation piece.
 Next Nancy and Mary show how to sew a Two-Tie Belt. Is there a bag full of men’s neckties in one of your closets, waiting for an inspirational project? Here’s one way to use two at a time and wear the results. The obi-style belt features a hidden pocket to store a credit card, money, or other treasures. If the ties formerly belonged to a family member, your new belt has additional memories attached.
 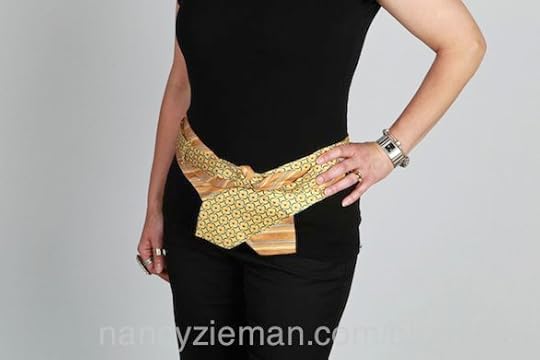 The third gift project, in Sew Gifts–Make Memories Part Two, is a Speedy Towel Apron. This unisex style apron is a speedy gift project sewn from ready-made towels. All you need are two canvas-weight or vintage towels, grosgrain ribbon, and a little sewing savvy and you’ll be able to stitch up a welcomed gift.
Tune in and watch Sew Gifts–Make Memories Part Two to learn how to make Mary’s Upcycled Notebook Wraps. Make a classy new cover for a notebook, recipe book, journal, or photo album. These notebook covers started out as laminated shopping bags. Adjustable, upcycled book wraps are the perfect way to preserve the good memories stored inside.
The third gift project, in Sew Gifts–Make Memories Part Two, is a Speedy Towel Apron. This unisex style apron is a speedy gift project sewn from ready-made towels. All you need are two canvas-weight or vintage towels, grosgrain ribbon, and a little sewing savvy and you’ll be able to stitch up a welcomed gift.
Tune in and watch Sew Gifts–Make Memories Part Two to learn how to make Mary’s Upcycled Notebook Wraps. Make a classy new cover for a notebook, recipe book, journal, or photo album. These notebook covers started out as laminated shopping bags. Adjustable, upcycled book wraps are the perfect way to preserve the good memories stored inside. 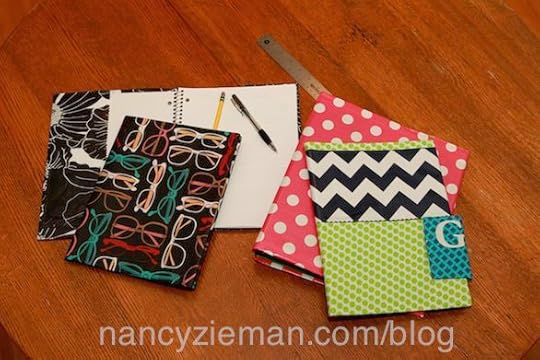 Mary and Nancy wrap up this new series with Everyone’s Favorite Baby Bib. You’ll soon learn that guest and hand towels are easy choices for durable baby bibs. Mom, dad, grandmother, and caregiver will all appreciate having bibs on hand; so, make several.
 Thanks, Mary, for sharing your gift sewing ideas on Sewing With Nancy! Tune in to see more of Mary’s gift ideas in Sew Gifts–Make Memories Part One.
Watch Sew Gifts–Make Memories (Part One and Part Two) on Sewing With Nancy online.
Sewing With Nancy: Nancy’s Corner Spotlight!
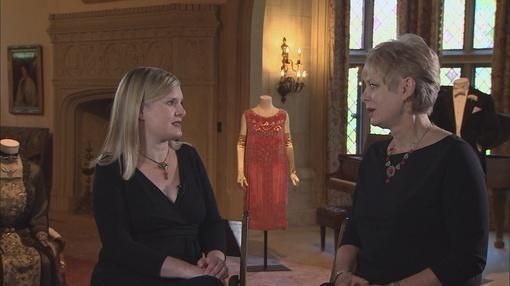
Nancy’s Corner Spotlight! Today watch Nancy Zieman’s 5 minute Nancy’s Corner Interview on Sewing With Nancy. Revisit a period in history through the fashions of Downton Abbey. Nancy and Laura Fiser, curator of collections and exhibitions at the Paine Art Center in Oshkosh WI, take a close-up look at eveningwear fashions worn during the PBS drama, Downton Abbey. The gorgeous gowns from the 1910s–1920s feature beading, embroidered lace, opulent fabrics, and beautiful jewelry.
For a chance to win a copy of the book, Sew Gifts–Make Memories from Mary Mulari, please leave a comment below and let us know what gifts you’re making.
Shop Available Books and Patterns by Mary Mulari at shopnzp.com!
Shop Helpful Notions and Tools at shopnzp.com!
Shop Available Elastic, Trims and More at shopnzp.com!
Happy Sewing!
Team Nancy Zieman
Nancy Zieman Productions. LLC.
[image error]
Stitch it! Sisters is a production of NZ Productions LLC. Content in this feed is © copyright 2020 by Nancy Zieman Productions, LLC and may not be republished without written permission. You’re welcome to forward the email to a friend or colleague but it’s not okay to add the RSS feed automatically as content on a blog or other website. The FTC requires us to tell you that Nancy Zieman Productions, LLC has provided products by other companies in the course of doing business. The FTC requires us to advise you to take this information into consideration when reading this posting.
Make sure you are subscribed to Nancy Zieman Productions, LLC enews mailing list so you won’t miss a thing. Sign up at nancyzieman.com/blog/enews . And join us on YouTube, Facebook, Instagram and Pinterest!
July 7, 2020
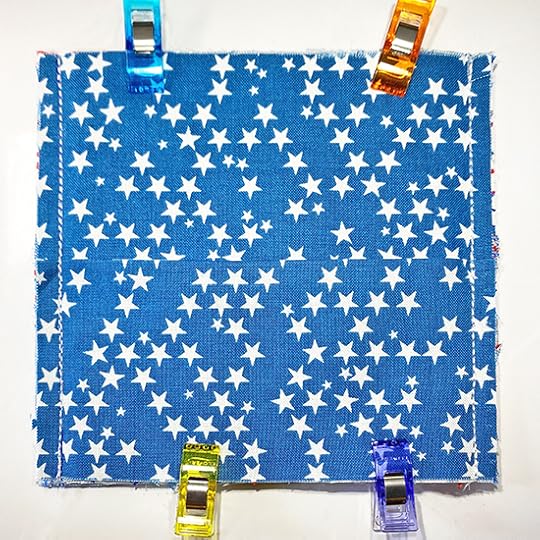
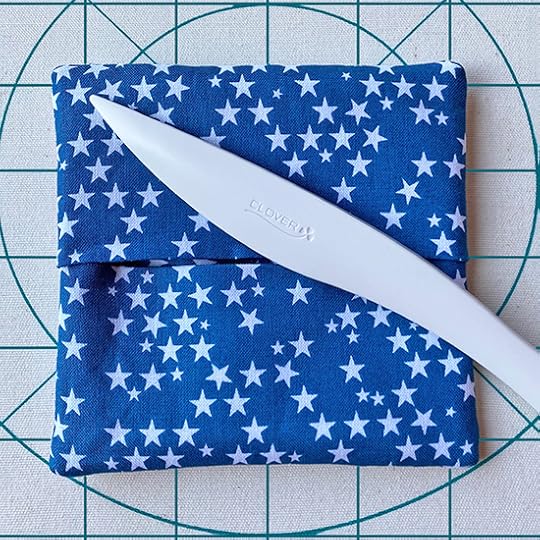
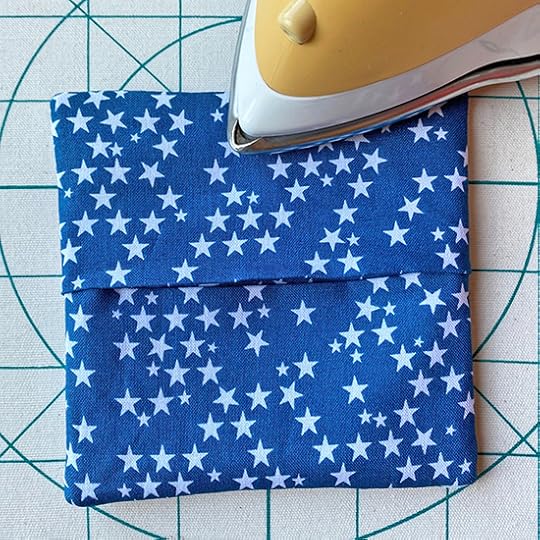
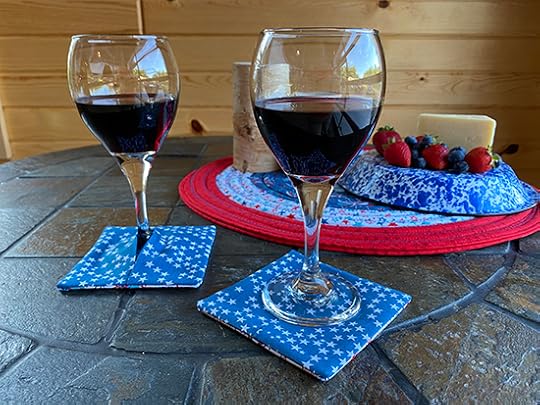
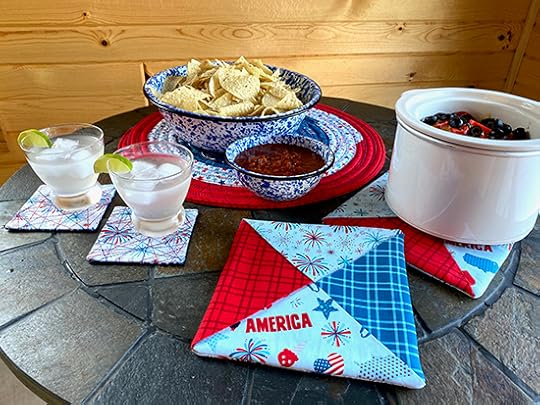
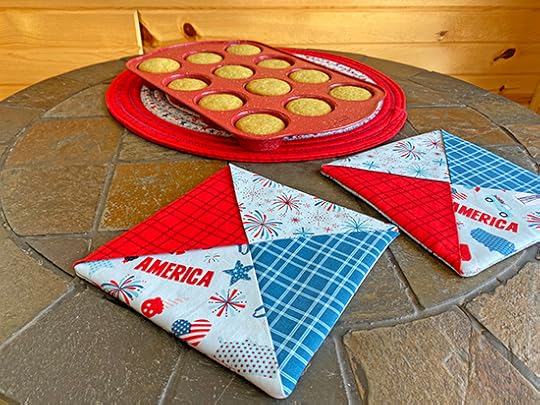
NEW! Reversible Palette Coaster Sewing Tutorial
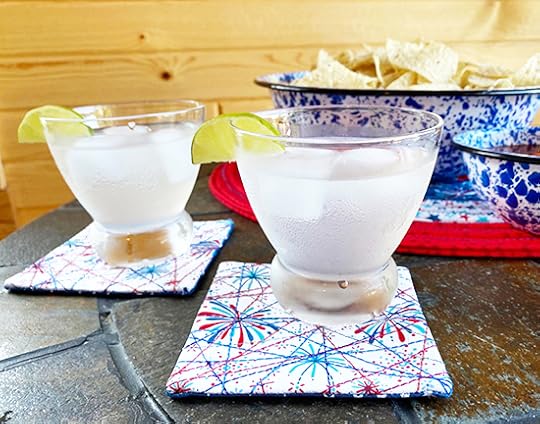
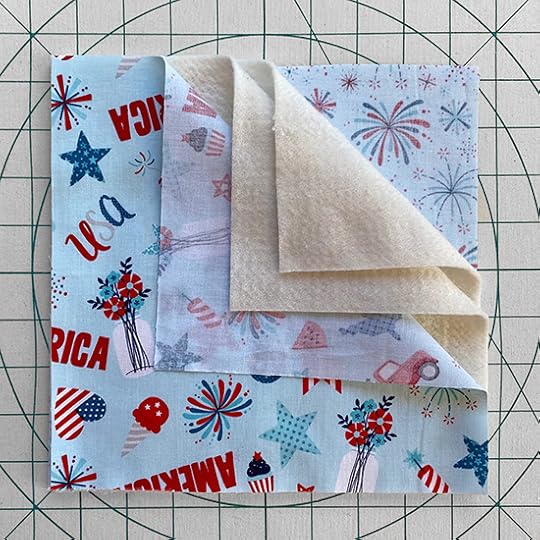
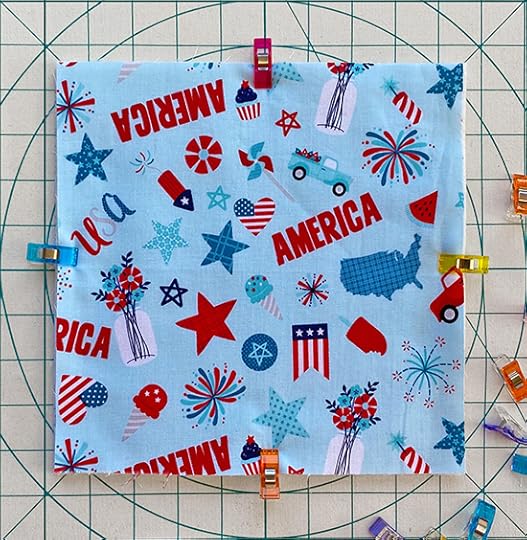
Celebrate Summer Sewing and stitch a set of Reversible Palette Coasters! This red, white, and blue sewing project is stitched with two fat quarters, Pellon’s ShirTailor Interfacing, and metallic thread! Our reversible coasters feature an envelope back and a front flat surface — an ideal “palette” for showcasing thread embellishment! The reverse side opens to wrap around the base of a stemmed-glass.
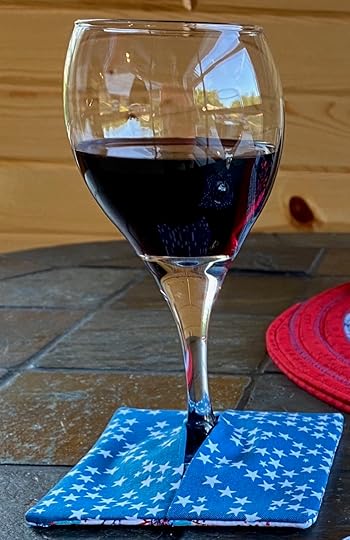
 What is a Palette Coaster? Team NZP named our NEW! Reversible Palette Coasters for the coaster’s front surface, which is an ideal area — or palette — to showcase a variety of fabrics or techniques. Simply feature thread embellishment – as we did here, or choose a beautiful fabric print, fun novelty fabric, or a leftover quilt block. Try a new technique when making your next Palette Coasters! Prior to seaming your coasters together, decorate the front fabric “palette” with ribbons, trims, appliqué, machine embroidery, and/or nearly any embellishments you’d like – you’re the designer!
Reversible Palette Coaster Supply Listing
Two coordinating cotton quilting fabric Fat Quarters
Quilter’s Starch Savvy
Pellon’s® ShirTailor Interfacing by the Yard
Eze-View Pressing Cloth
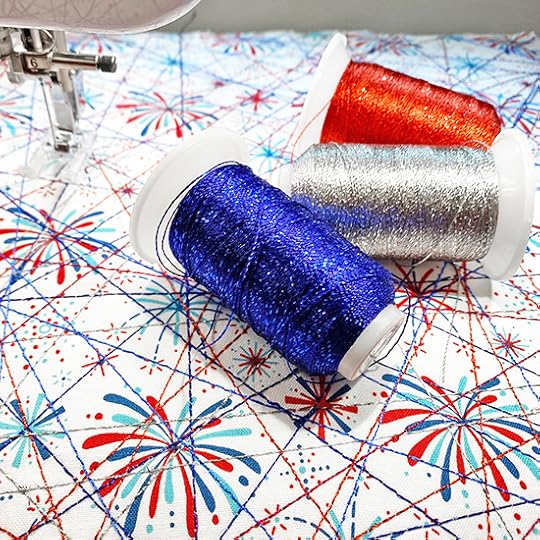
Patriotic GlaMore Metallic Rayon Thread Pack
Schmetz Super Nonstick Needles, Size 100/16
Schmetz Universal Needles, Size 90/14
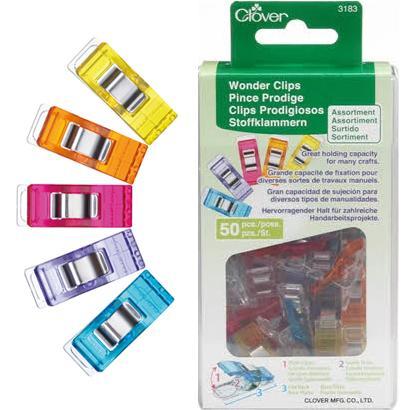
Clover’s Wonder Clips
Clover’s Bordeaux Scissors
Clover’s Point 2 Point Turner
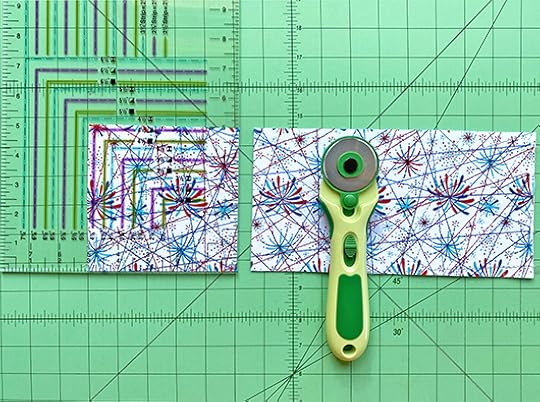
Rotary Cutter, mat, and ruler
Straight Tailor’s Awl Stiletto
Iron
Standard Sewing Thread
Reversible Palette Coaster Sewing Tutorial
Approximate finished size: 4-1/2″ x 4-1/2″
Preshrink fabric by steaming and pressing, and steaming and pressing a second time, and then spray press and starch fabric with June Tailor’s Quilter’s Starch Savvy — press and starch, press and starch.
Thread Embellishment
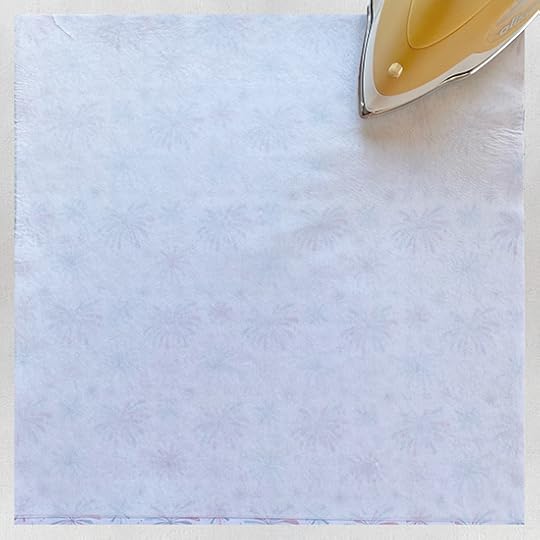
Cut one 16″ square front “palette” fabric.
Cut two 16″ square ShirTailor Interfacing.
Using a Eze-View Pressing Cloth , press one 16″ square ShirTailor Interfacing to the wrong side of 16″ square front “palette” fabric. Press the second 16″ square ShirTailor Interfacing to the previously pressed interfacing.
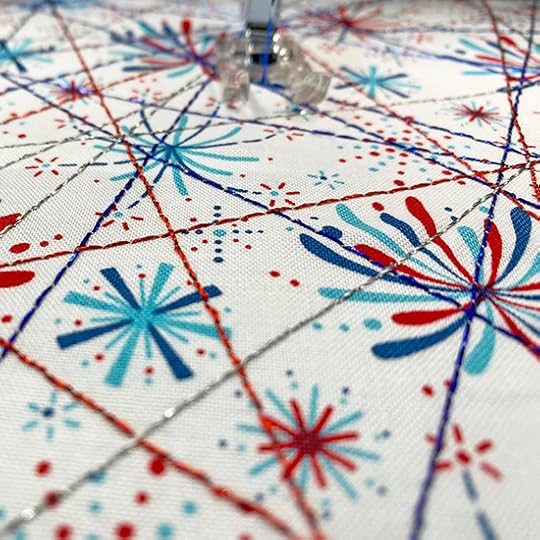
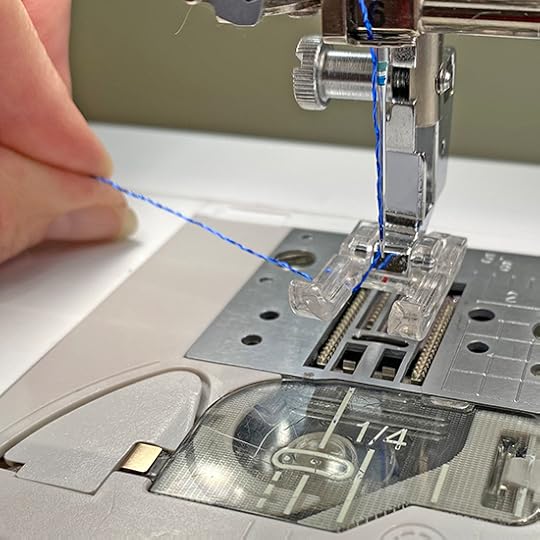
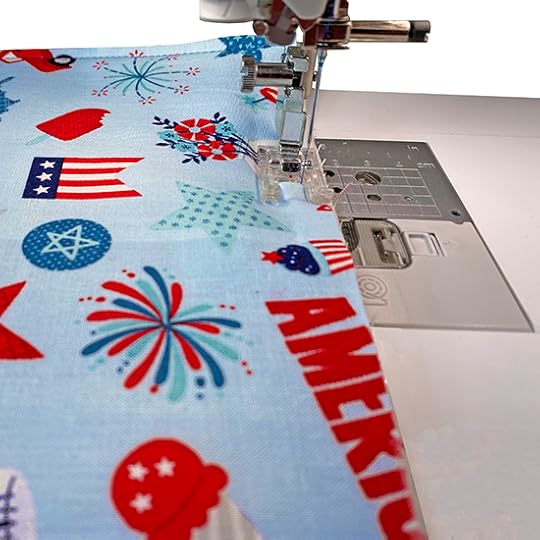
Insert a new Schmetz Super Nonstick Needles, Size 100/16 , and stitch a few random straight lines across the stabilized fabric with a spool of thread from Patriotic GlaMore Metallic Rayon Thread Pack.
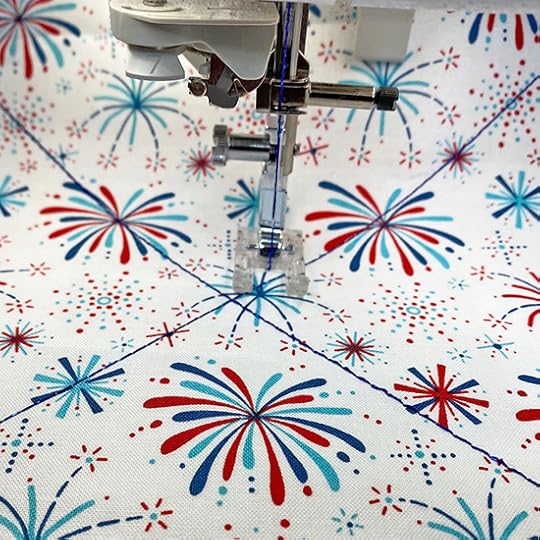
Continue stitching random straight lines across the stabilized fabric, changing thread colors as desired.
.
When changing threads, cut decorative threads at the spool, and pull thread from machine — at presser foot.
.
.
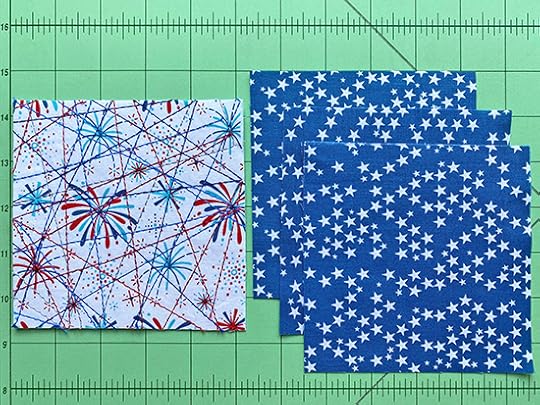
Cut 5″ crosswise fabric strips from thread-embellished fabric.
Subcut fabric strips into 5″ squares.
To Make One Reversible Palette Coaster:
Cut three 5″ fabric squares from a coordinating fabric – for the reverse “envelope” side of the coaster.
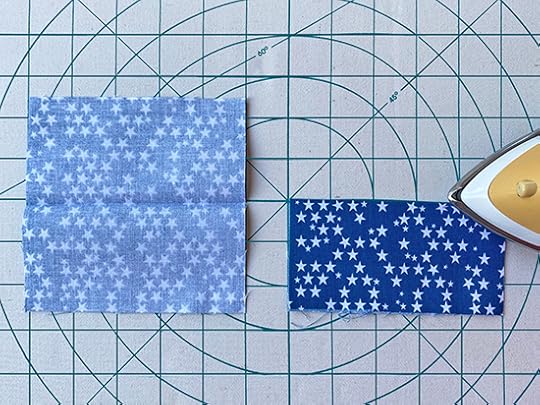
Press two coordinating 5″ fabric squares in half, creating 2-1/2″ x 5″ folded fabric rectangles.
Layer thread-embellished square to one 5″ coordinating fabric square, with wrong sides together and thread-embellished square facing up. Position two 2-1/2″ x 5″ fold fabric rectangles over thread-embellished square – with folded edges meeting at middle, and raw edges aligning to outer edges.
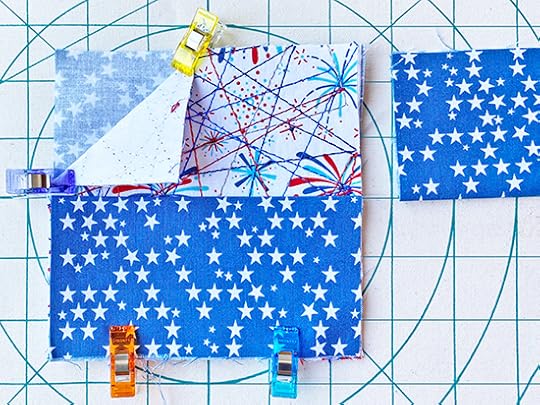
Wonder Clip edges.

Insert a new Schmetz Universal Needles, Size 90/14 and thread sewing machine with standard sewing thread. Stitch just one side seam with 1/4″ seam allowance. Stitch seam twice, for durability!
Use Clover’s Straight Tailor’s Awl Stiletto to assist feeding fabric layers under presser foot.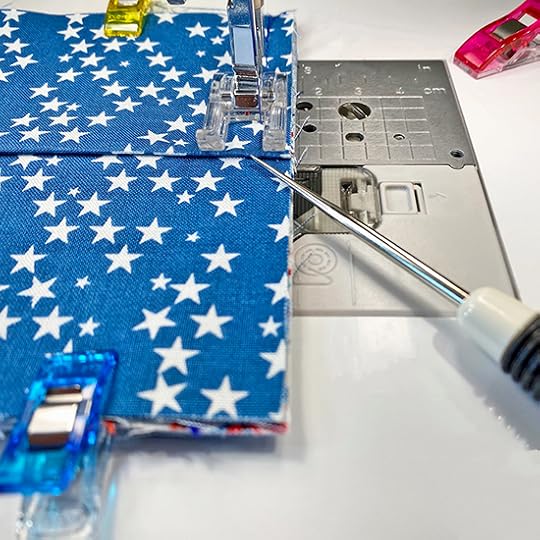
Stitch opposite side seam. Stitch seam twice, for durability!
Use Nancy Zieman’s “Wrapped Corner” technique to “wrap” to seam toward center – folding along previous stitching line. Stitch seam twice, for durability!

.
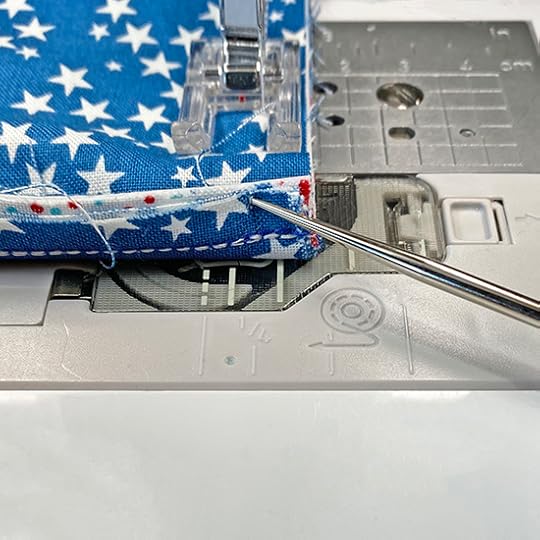
Stitch the fourth seam with Nancy’s Wrapped Corner Technique. Stitch seam twice, for durability!
Use Clover’s Bordeaux Scissors to clip away all four corners – to reduce bulk.
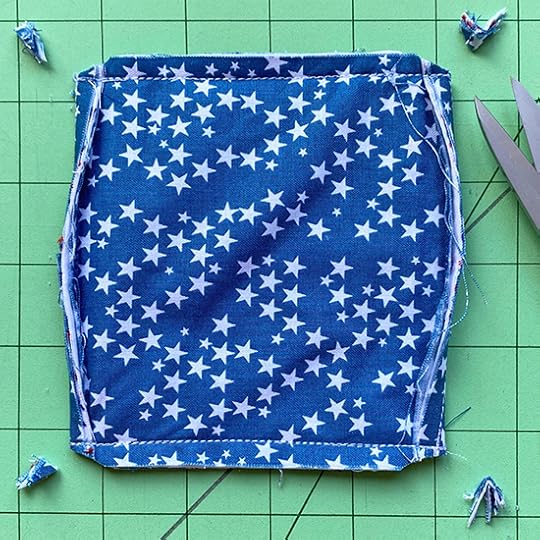
Turn Reversible Palette Coaster right side out.
Use Point 2 Point Turner to push out corners.
Press.
Repeat steps above and complete additional coaster(s).
Our Reversible Palette Coasters are so fun to make, you’ll be stitching new coasters for every occasion! And, they make a great addition to a gift basket!
Related Posts
Celebrate Summer Sewing and stitch a Folded Hot Pad. This red, white, and blue sewing project is stitched with four fat quarters and Pellon’s Insul-Fleece Batting. Make our Folded Hot Pad in 30 Minutes with our super-easy step-by step sewing instructions!
Patriotic Folded Hot Pad Supply Listing
Four coordinating cotton quilting fabrics — four Fat Quarters from the Fireworks and Freedom Fat Quarter Bundle. Note: Four Fat Quarters makes two Hot Pads!
1/4 yd. Pellon® Insul-Fleece Batting
Quilter’s Starch Savvy
Clover’s Wonder Clips
Schmetz Size 90 Jeans/Denim Needle
Clover’s Point 2 Point Turner
Clover’s Bordeaux Scissors
Rotary Cutter, mat, and ruler
Iron
Standard Sewing Thread
Optional: Walking Foot
Optional: The Big Jig
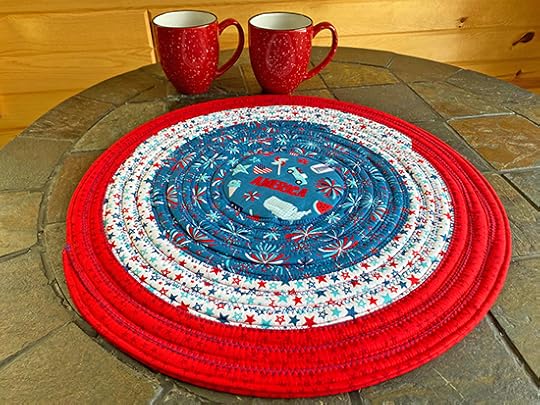
Celebrate Summer Sewing and stitch a Patriotic Table Topper! This red, white, and blue table topper is created with 2-1/2″ Fabric Strips and Pellon’s convenient 2-1/2″ Precut Cotton Batting Strips! The sewing is fun and the finished table topper provides a festive table centerpiece.
Patriotic Table Topper Supply Listing
Four Fat Quarters from the Fireworks and Freedom Fat Quarter Bundle : One for inner circle, one for under circle, and three for surrounding strips.
July 4, 2020
NEW! Patriotic Folded Hot Pad Sewing Tutorial
Celebrate Summer Sewing and stitch a Folded Hot Pad. This red, white, and blue sewing project is stitched with four fat quarters and Pellon’s Insul-Fleece Batting. Make our Folded Hot Pad in 30 Minutes with our super-easy step-by step sewing instructions!

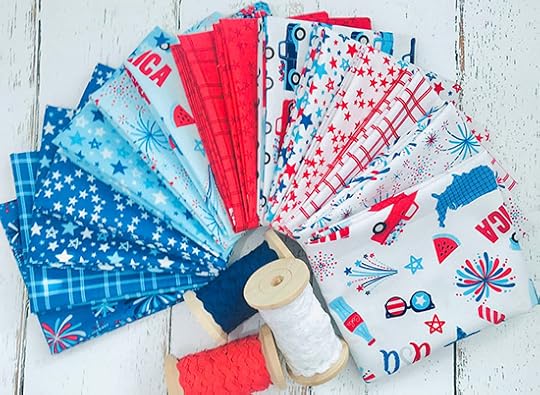
Patriotic Folded Hot Pad Supply Listing
Four coordinating cotton quilting fabrics — four Fat Quarters from the Fireworks and Freedom Fat Quarter Bundle. Note: Four Fat Quarters makes two Hot Pads!
1/4 yd. Pellon® Insul-Fleece Batting
Quilter’s Starch Savvy
Clover’s Wonder Clips
Schmetz Size 90 Jeans/Denim Needle
Clover’s Point 2 Point Turner
Clover’s Bordeaux Scissors
Rotary Cutter, mat, and ruler
Iron
Standard Sewing Thread
Optional: Walking Foot
Optional: The Big Jig
Patriotic Folded Hot Pad Sewing Tutorial
Approximate finished size: 8″ x 8″
Preshrink fabric by steaming and pressing, and steaming and pressing a second time, and then spray press and starch fabric with June Tailor’s Quilter’s Starch Savvy — press and starch, press and starch.
To make one Folded Hot Pad:
Cut six 9″ fabric squares from four fabrics.
Cut cut one 9″ square Pellon® Insul-Fleece Batting , or cut two 9″ cotton batting squares.

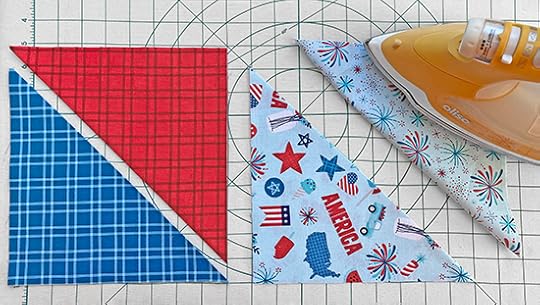
Press four squares in half, diagonally corner to corner, wrong sides together, and aligning raw edges. Press.
Place remaining two fabric squares wrong sides together, with Insul-Fleece or batting squares sandwiched between fabrics.
Wonder Clip edges.
Insert a new Schmetz Size 90 Jeans/Denim Needle , and stitch through all layers using scant 1/4″ seam allowance – and baste around all four edges.

Wonder Clips are ideal for our Folded Hot Pad! The multiple layers are not so pin-friendly and pinning layers may bend straight pins.
Now’s the time to use a Walking Foot – to prevent layers from shifting.
Place one folded fabric triangle to hot pad back, aligning left and lower edges.
Stack a second folded fabric triangle over the first triangle, and align lower and right edges.
Stack a fourth folded fabric triangle over the previous triangles, aligning right and upper edges.
Stack the fourth folded fabric triangle over the previous triangles, aligning upper and left edges.
Weave final triangle by lifting upper right corner of the last triangle, lifting upper corner of the first triangle, and tucking the fourth triangle under the first triangle. Meet and align all cut edges.

Pin or Wonder Clip edges in place.
Stitch one side seam with 1/4″-3/8″ seam allowance–or use the width of the presser foot for seam allowance. Stitch this seam twice for durability! Then, double-stitch the opposite side seam.
Using Clover’s Bordeaux Scissors to trim or grade batting seam allowance to approximately 1/8″, and cut away batting from within the seams.

Use Nancy Ziemans “Wrapped Corner” technique to “wrap” to seam toward center, folding along previous stitching line. Use The Big Jig or and “anchor cloth” and stitch the this third seam – from folded edge to folded edge.
Stitch the fourth side seam with Nancy’s Wrapped Corner Technique.
Grade batting seam allowances to 1/8″, and clip away all four corners to reduce bulk.
Turn Folded Hot Pad right side out – through woven triangle opening.
Use Clover’s Point 2 Point Turner to push out corners.
Press.

Our Folded Hot Pads are so fast and fun to make, you’ll be stitching new hot pads for every occasion! And, they make great gifts – when you need a last-minute gift in minutes!
Related Posts
Celebrate Summer Sewing and stitch a Patriotic Table Topper! This red, white, and blue table topper is created with 2-1/2″ Fabric Strips and Pellon’s convenient 2-1/2″ Precut Cotton Batting Strips! The sewing is fun and the finished table topper provides a festive table centerpiece.
Patriotic Table Topper Supply Listing
Four Fat Quarters from the Fireworks and Freedom Fat Quarter Bundle : One for inner circle, one for under circle, and three for surrounding strips.
July 2, 2020
Sew Gifts Make Memories Part One on The Best of Sewing With Nancy

Shop outside the big box stores and make your own gifts from new or upcycled fabrics. In the Sewing With Nancy series, Sew Gifts–Make Memories, you’ll learn how to sew gifts that will be appreciated by kids and adults – and the projects are enjoyable to make. Mary Mulari is Nancy Zieman’s guest for this favorite series—Mary always amazes us with her clever approach to sewing.
In Sew Gifts–Make Memories Part One, Nancy and Mary start with Mary’s December Countdown Calendar. Mark the days of December by moving vintage or contemporary buttons from the strip to a dot on the tree. The pockets at the bottom of the calendar can be used for letters to Santa or for small notes promoting acts of kindness for others.
Next in Sew Gifts–Make Memories Part One , Nancy and Mary show how to sew a Two-Pocket Shoe Bag. Carrying shoes to the gym, school, travel, and work is an everyday event. Why not make these clever bags just for that purpose? Choose new fabric, or recycle a shirt and tie. Either way, this is a useful gift to make and offers many opportunities for personalization.
Mary’s third gift idea is a Noodle Lounger! Using mesh fabric and grosgrain ribbon, create a lounge-style seat that fits over a swimming noodle. Make one for yourself and another for a friend, and then share lazy afternoons seated and relaxed in the water—making more memories. Tune in and watch Sew Gifts–Make Memories, and learn Mary’s convenient way to fold and store your lounger. 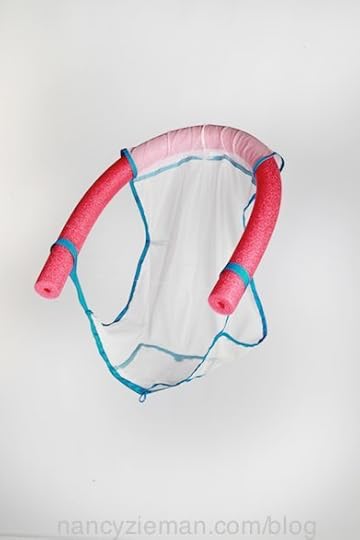
Next up in Sew Gifts–Make Memories Part One, Mary shows how to make Seat Belt Wrappers. Add comfort to children’s car seats with plush wraps that pad the straps near the neck. A little bit of stitching, small strips of hook and loop tape, a touch of ribbon and lightweight quilt batting are all you’ll need.

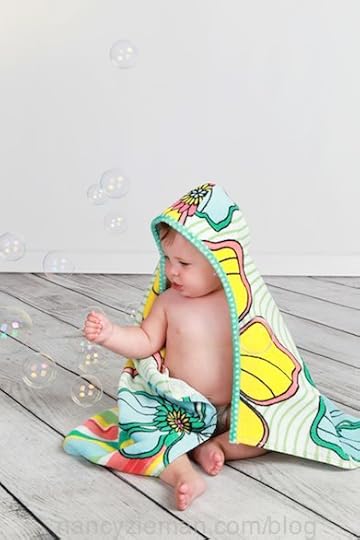
Then, watch as we turn one beach towel into two hooded bath towels for babies or toddlers. This practical, quick-to-sew gift easily wraps around little ones with ease—it’s sure to be a welcomed gift and a wonderful surprise.
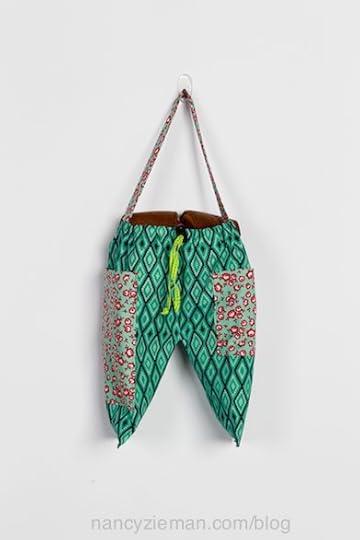
Mary’s sixth gift idea is a Girlfriend’s Shopping Purse. Celebrate your friendship by making a purse for your girlfriend or sister. These bags are perfectly sized for a day of shopping, lunch, and travel. All the essentials—phone, keys, credit cards, cash, and tissues—fit in this compact and lightweight bag.
Thanks Mary, for sharing your gift sewing ideas on Sewing With Nancy! Tune in next week to see more of Mary’s gift ideas in Sew Gifts–Make Memories Part Two.
Watch Sew Gifts–Make Memories (Part One and Part Two) on Sewing With Nancy online.
For a chance to win a copy of the book, Sew Gifts–Make Memories from Mary Mulari, please leave a comment below and let us know what gifts you’re making.
Shop more Books and Patterns by Mary Mulari at shopnzp.com!
Shop more Cotton Fabrics at shopnzp.com!
Shop more Helpful Notions and Tools at shopnzp.com!
Happy Sewing!
Team Nancy Zieman
Nancy Zieman Productions. LLC.
[image error]
Stitch it! Sisters is a production of NZ Productions LLC. Content in this feed is © copyright 2020 by Nancy Zieman Productions, LLC and may not be republished without written permission. You’re welcome to forward the email to a friend or colleague but it’s not okay to add the RSS feed automatically as content on a blog or other website. The FTC requires us to tell you that Nancy Zieman Productions, LLC has provided products by other companies in the course of doing business. The FTC requires us to advise you to take this information into consideration when reading this posting.
Make sure you are subscribed to Nancy Zieman Productions, LLC enews mailing list so you won’t miss a thing. Sign up at nancyzieman.com/blog/enews . And join us on YouTube, Facebook, Instagram and Pinterest!
Nancy Zieman's Blog

- Nancy Zieman's profile
- 21 followers

