
Nancy Zieman's Blog, page 43
August 15, 2020
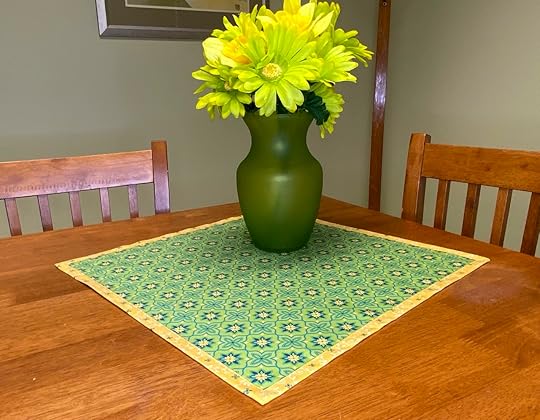
August 2020 NZP Block of the Month: Chainlink Block

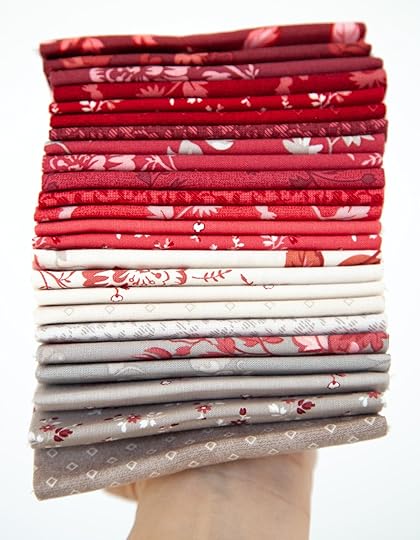
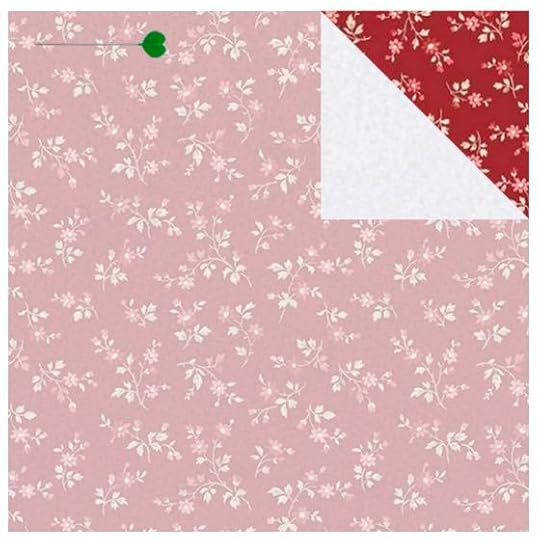
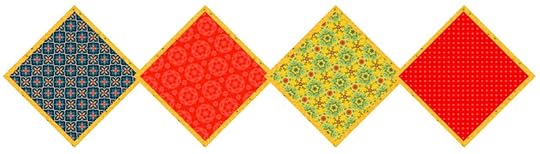
Nancy’s Red Elegance
2020 Block of the Month August: Chainlink Block
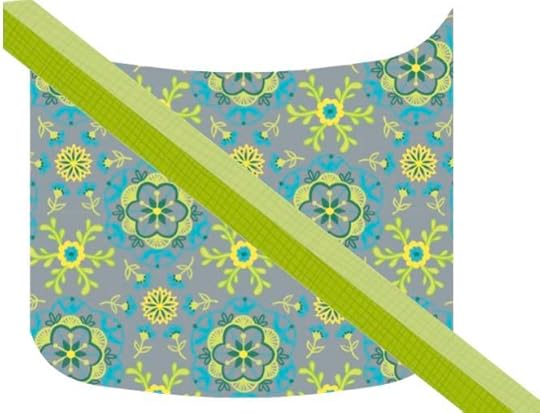
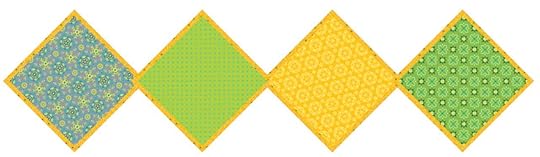
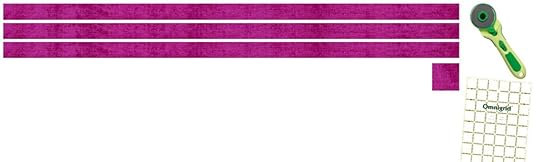
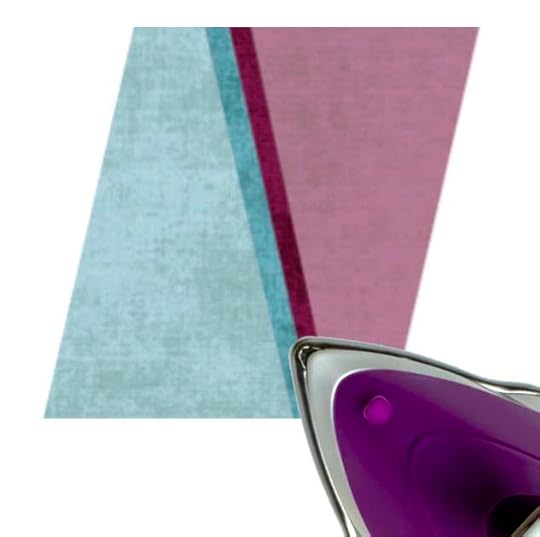
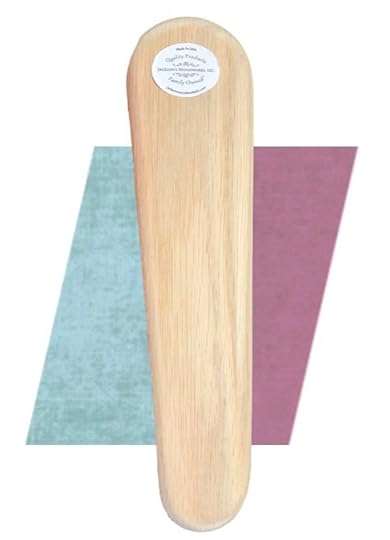
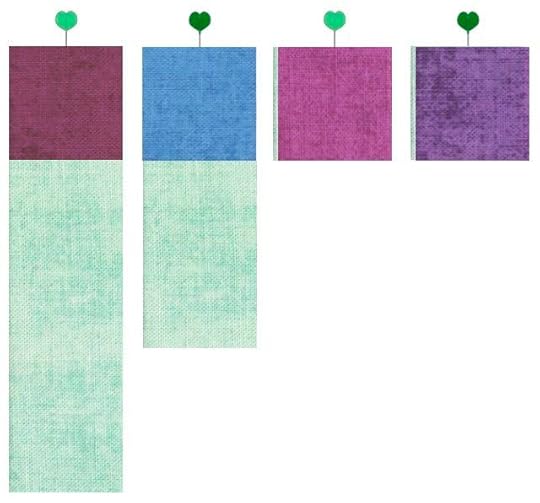
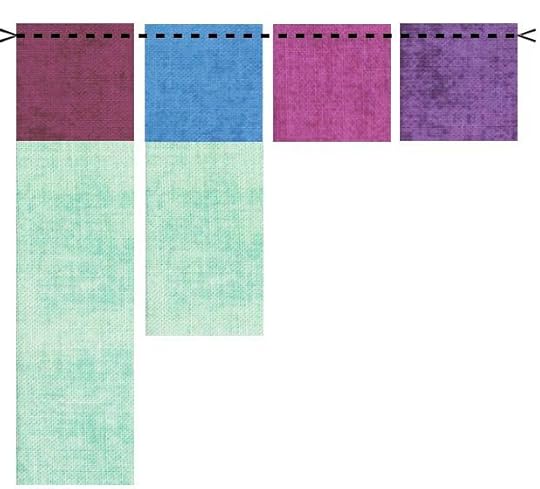
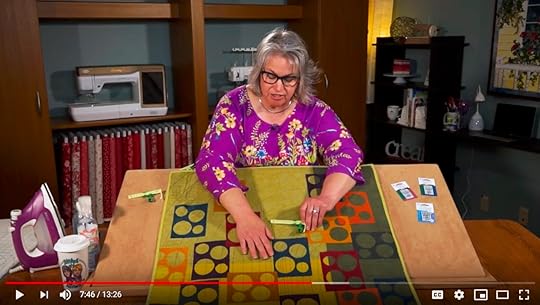
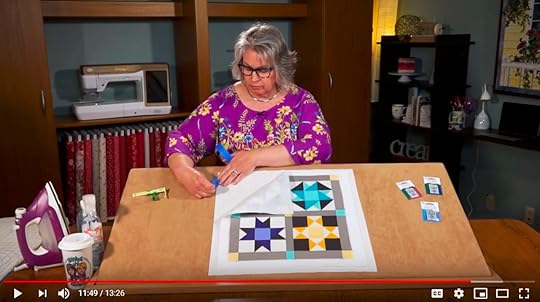
Introducing the eighth of 12 FREE! Quit Block Tutorials in the NEW! 2020 Nancy Zieman Productions Nancy’s Red Elegance Block of the Month Mystery Quilt Series! The Chainlink Block, also known as a Drunkard’s Path Block variation, is quickly made in multiples when cutting our Circle Blocks into quarters!
In January, Team Nancy Zieman introduced the NEW! 2020 Nancy Zieman Productions Nancy’s Red Elegance Block of the Month Mystery Quilt Series. Join the NEW! 2020 Nancy Zieman Productions Nancy’s Red Elegance Block of the Month Mystery Quilt Series, anytime, by viewing the Basic Supplies and Tools Listing in the January 1, 2020 NZP BoM20 Kick Off Blog Posting.
On the third Saturday of each month, we’ll feature one block design, and we’ll be stitching one or more blocks of the same design each month. The blocks are created using Our NEW! Red Elegance Fabric Collection by Riley Blake and the Carefree Curves Trace ‘n Create Template Set by Nancy Zieman for Clover. Follow along as we show step-by-step how to create the August Chainlink Block.
August Chainlink Block
NOTE: This block is 8-1/2″ square; 8″ finished square – when sewn into finished quilt.
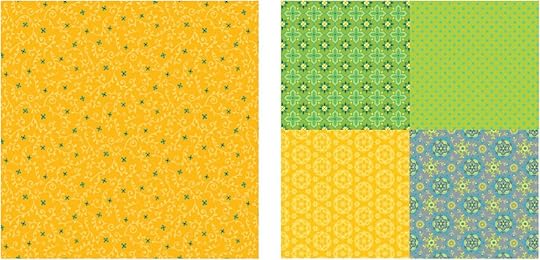
Block Fabrics
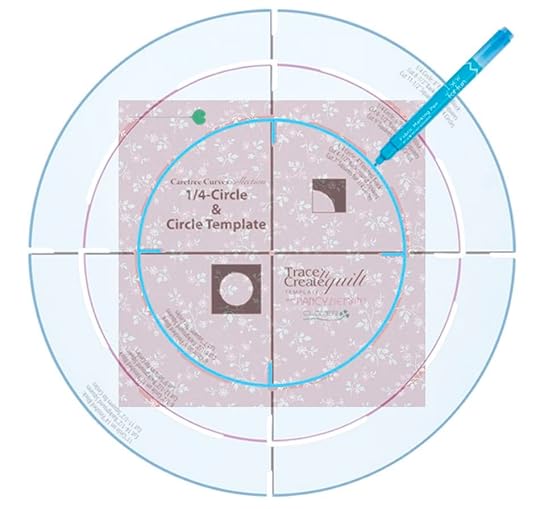
For the Nancy’s Red Elegance August Chainlink Block, select the “Circle” Template from the Carefree Curves Template Set, along with the following fat quarter fabrics from the NEW! Red Elegance Fat Quarter Bundle.
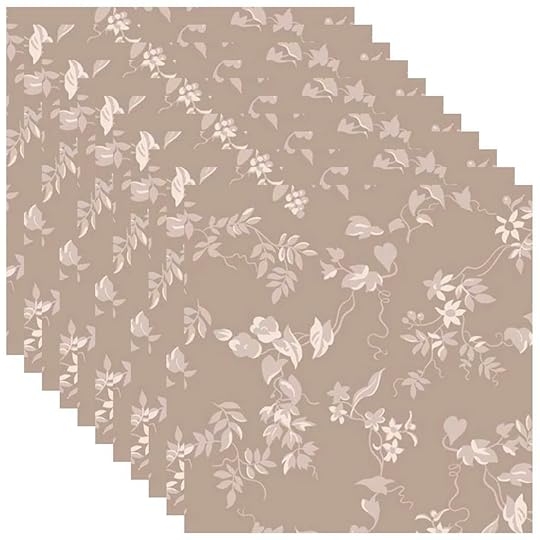
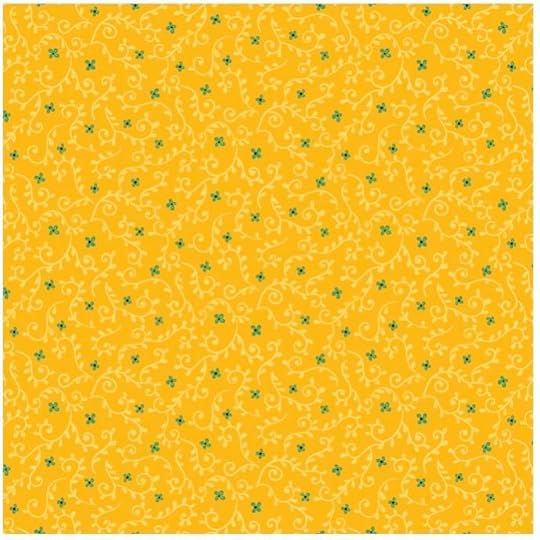
 This month you’ll begin cutting into your “light” one-yard fabric cut. Team NZP chose the Red Elegance – Tonal Taupe as our “light” fabric choice.
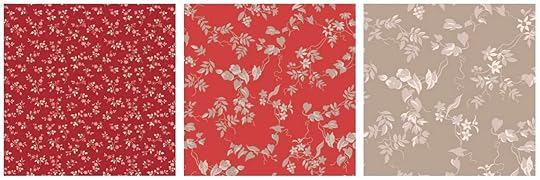
Red Elegance Stems Brick, Red Elegance Tonal Red, and Red Elegance Tonal Taupe (or other).
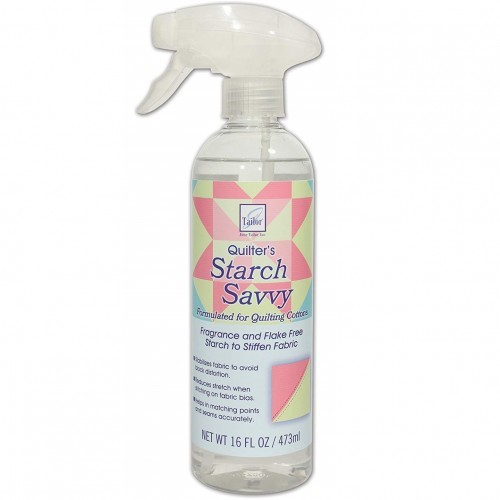
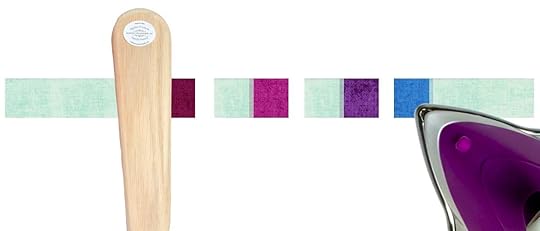
Prepare your fabrics! Pre-shrink fabrics by steaming and pressing, and steaming and pressing a second time. Then, stabilize fabrics for the sewing process by pressing and starching fabrics with June Tailor’s Starch Savvy. Press and starch, press and starch.
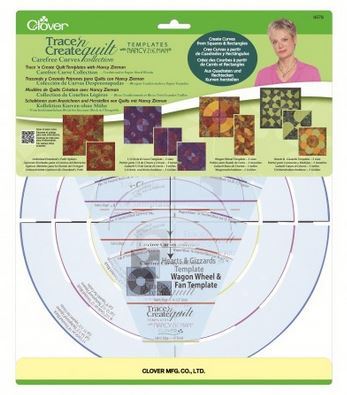
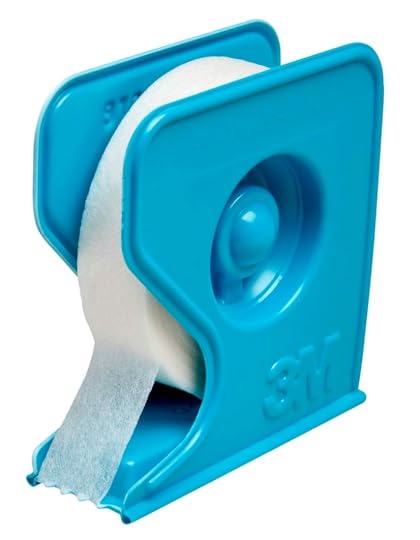
Carefree Curves Trace ‘n Create Template by Nancy Zieman for Clover
View the complete Basic Supplies and Tools Listing in the January 1, 2020 NZP BoM20 Kick Off Blog Posting , .
Cut Fabrics for the Block
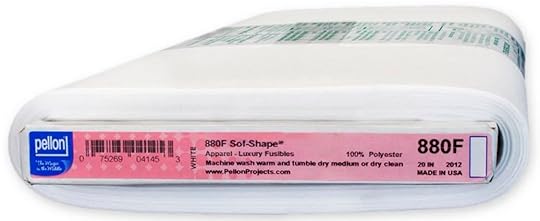
Create super-simple 1/4–Circle Blocks with simple fabric squares and Pellon Sof-Shape squares!
Cut ten 9″ background squares of Red Elegance – Tonal Taupe/”light” background fabric
Cut five 7″ square of Red Elegance Stems Brick – for center circles.
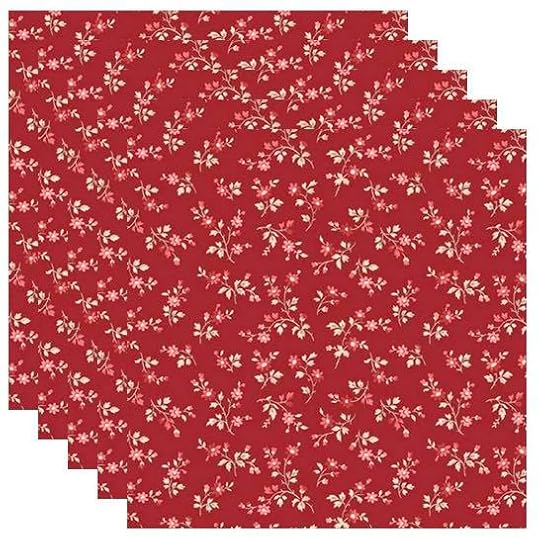
Cut five 7″ square of Red Elegance Tonal Red – for center circles.

Cut ten 7″ square Pellon Sof-Shape Fusible Interfacing
For the NEW! 2020 Nancy Zieman Productions Nancy’s Red Elegance Block of the Month Mystery Quilt Series, we’re sharing Nancy Zieman’s techniques for creating perfect circles – without ever cutting a circle!
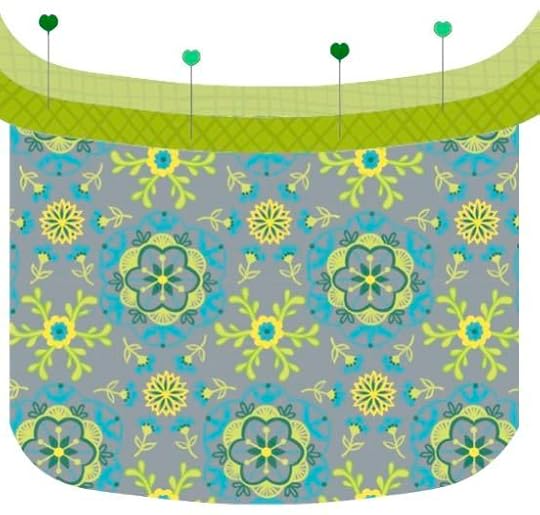
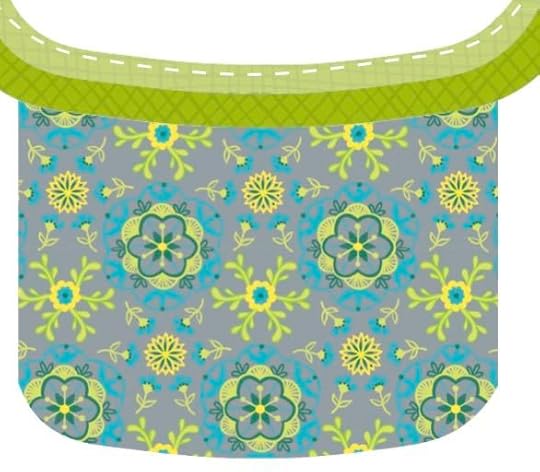
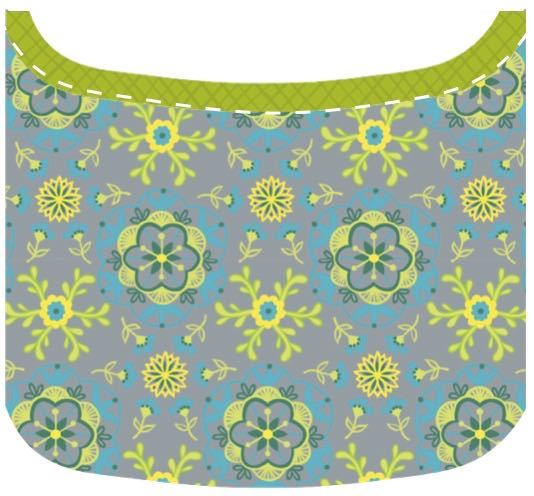
Construct the Blocks
Create Center Circle Appliqués
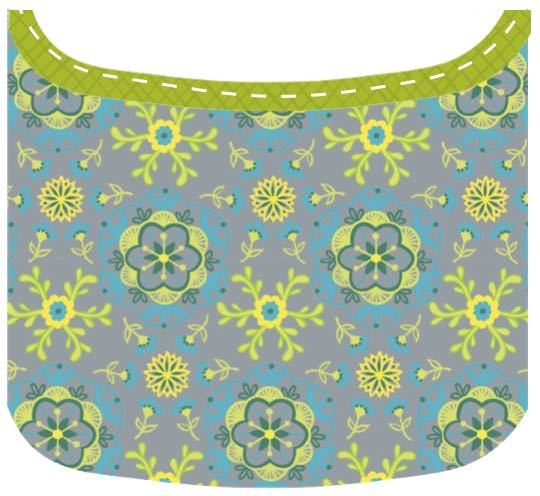
Place one 7″ background square of Red Elegance Stems Brick to one 7″ square Pellon Sof-Shape Fusible Interfacing – matching smooth side of fusible interfacing to right side of fabric. Pin .
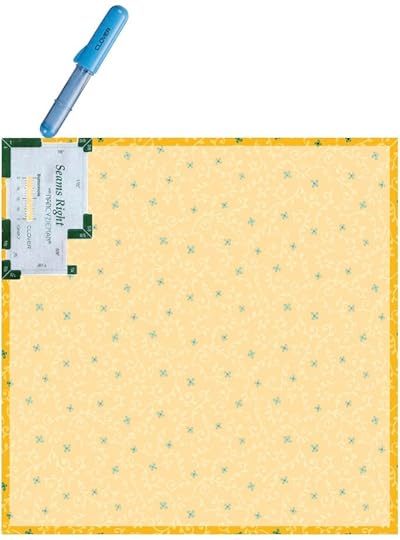
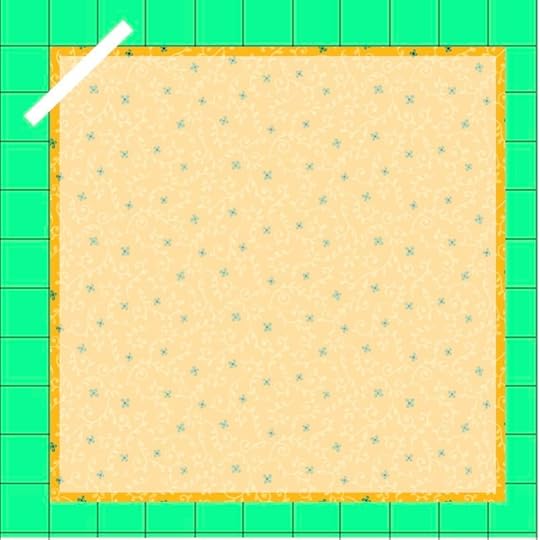
Position the Circle Template on the glue-dot side of the interfacing , centering the template on the interfacing square.
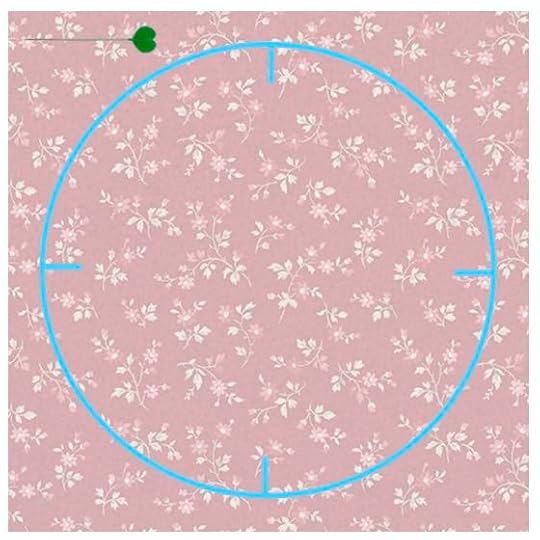
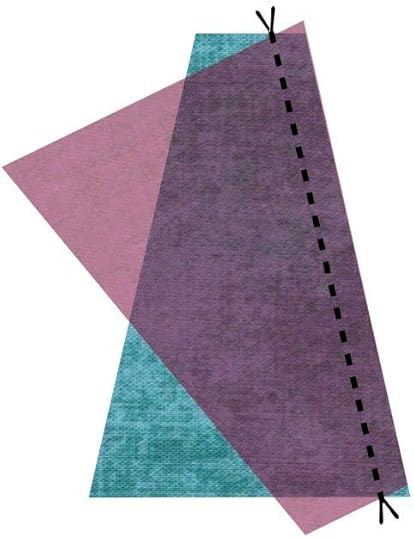
With a fabric marking pen and Circle Template, trace a 6″ circle on the interfacing – tracing along the yellow lines at the die cut openings.
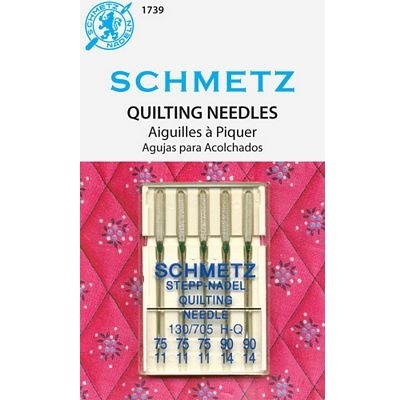
Using a Size 75 Schmetz Quilting Needle, stitch directly on the marked line – using a slightly shorter stitch length.
It’s always easier to stitch smooth curves with a shorter stitch length – such as a 2.0 mm setting.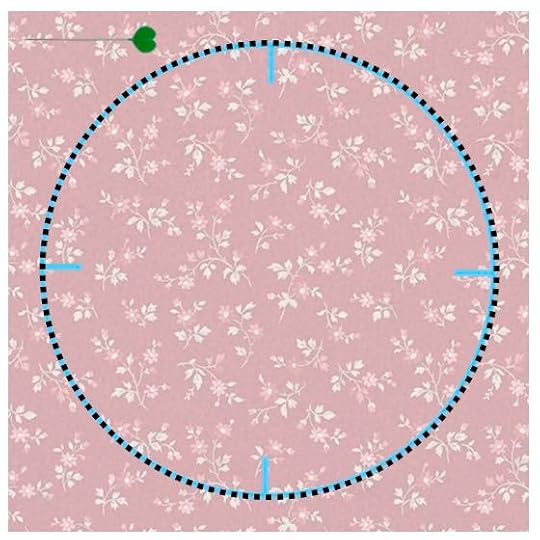
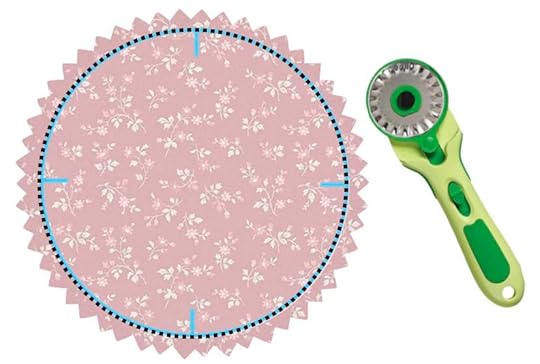
With a 45mm Rotary Cutting and Pinking Blade, trim away excess fabric, leaving about a 1/4″ seam allowance on the outside of stitching line.
Using a


August 13, 2020
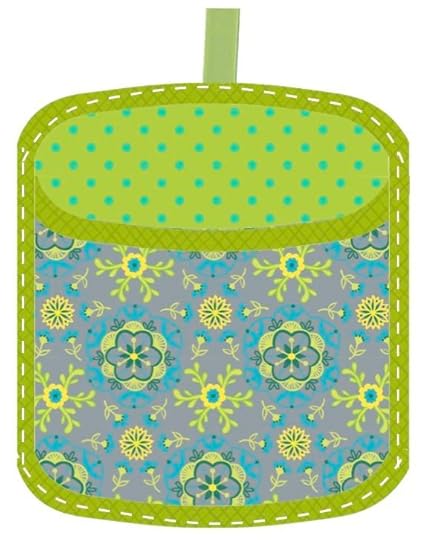
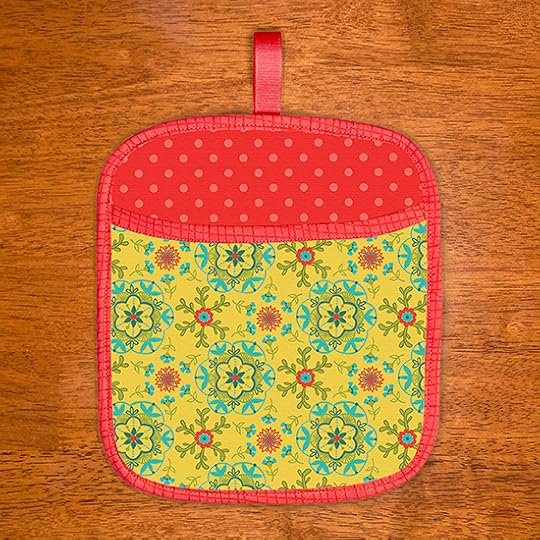
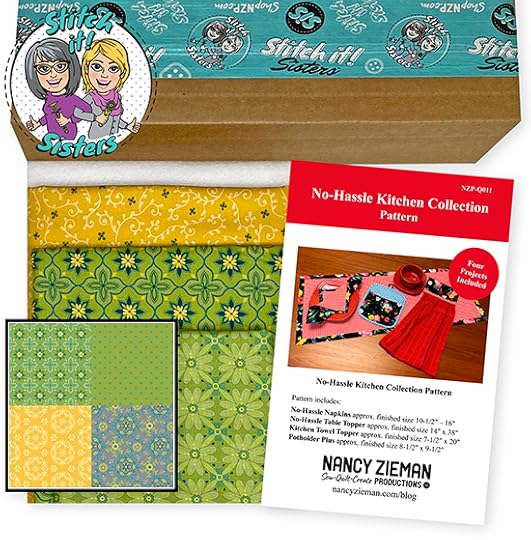
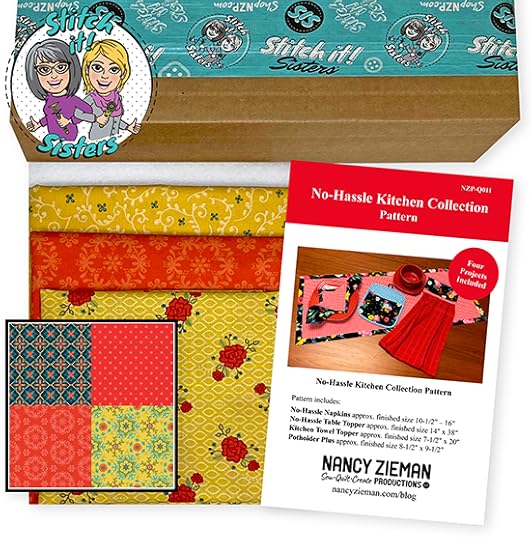
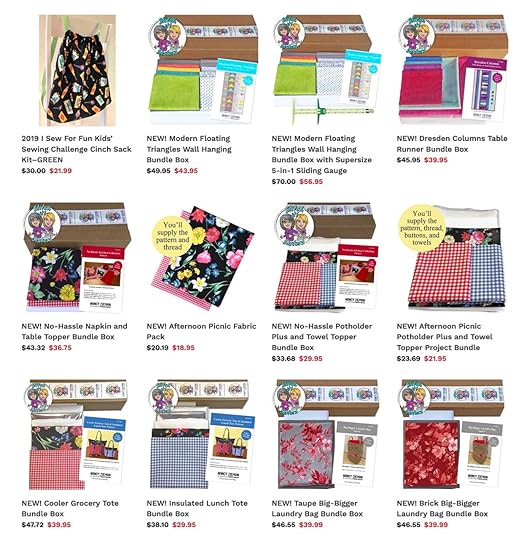
Potholder Plus Sewing Tutorial and NEW! Boutique Wildflower Fabrics

Make our Potholder Plus in just two hours with our step-by-step sewing tutorial–below! Finished Potholder Plus measures approximately 8-1/2″ x 9-1/2″. Sew this super-quick Potholder Plus with one-half yard of fabric and two fat quarters and coordinating binding fabric! We’re using NEW! Wildflower Boutique Fabrics!

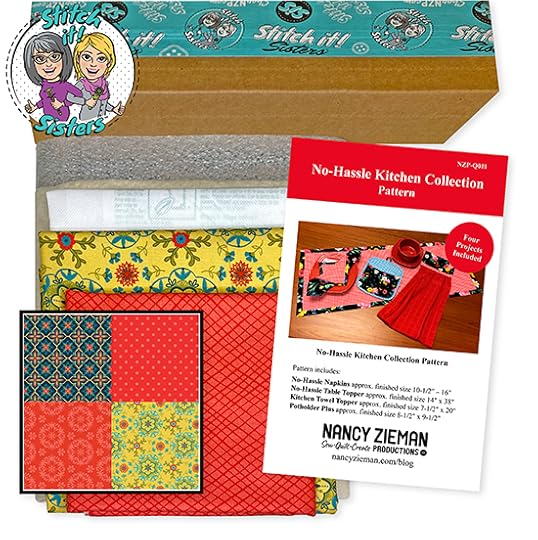
Make Team NZP’s No-Hassle Kitchen Collection Pattern sewing projects for your home. The sewing is streamlined with our easiest-ever sewing steps, and simple pattern shapes made from rectangles and squares.
Watch Stitch it! Sisters Program 104: Potholder Plus
Watch the Stitch it! Sisters Program 104: Potholder Plus video with hosts Deanna Springer and Dana Casey. In this video, the Stitch it! Sisters share step-by-step fabric cutting and sewing techniques for making NZP’s Potholder Plus. Plus Timesaving Binding Tips by Nancy Zieman!


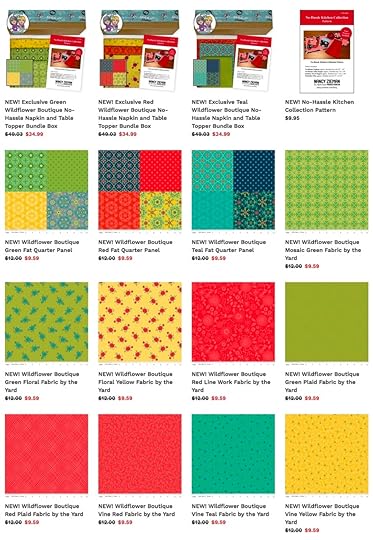
Then, head over to ShopNZP.com and purchase our exclusive NEW! Potholder Plus Bundle Boxes! The NEW! Potholder Plus Bundle Boxes! feature NEW! Wildflower Boutique Fabrics by Riley Blake Designs, and our No-Hassle Kitchen Collection Pattern – with Classic Timesaving Tips by Nancy Zieman. The NEW! Potholder Plus Bundle Boxes! includes everything you’ll need to make two assorted Potholder Plus’ and four coordinating towel toppers—you’ll supply the thread, buttons, and towels.
Potholder Plus Sewing Tutorial
Approximate finished size: 8-1/2″ x 9-1/2″
Potholder Plus Tools & Supplies
Exclusive NEW! Potholder Plus Bundle Box – Pattern included
I Sew For Fun Heart Shaped Straight Pins
Clover’s Pin ‘n Stow Magnetic Wrist Pin Cushion and/or I Sew For Fun Heart-Shaped Magnetic Covered Pin Caddy
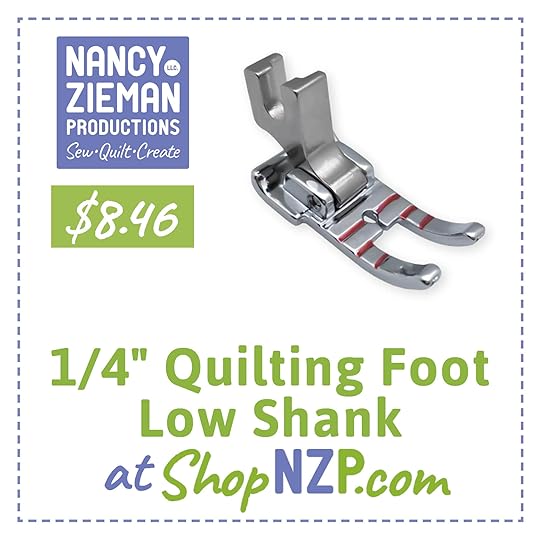
1/4″ Quilting Presser Foot
Quilter’s Starch Savvy
Clover’s Rotary Cutter and Mat, & Ruler
Schmetz Universal Needle
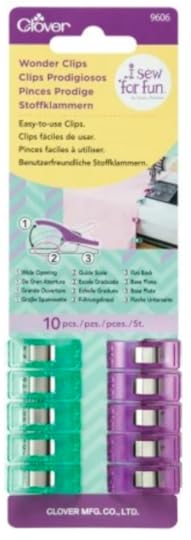
Clover’s I Sew For Fun Wonder Clips, Clover’s Wrist Cushion for Wonder Clips
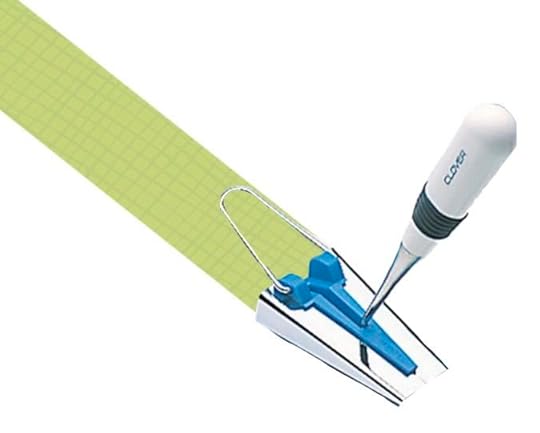
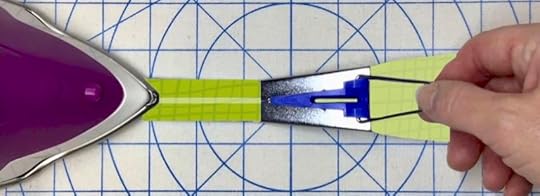
Clover’s 1″ Bias Tape Maker using Clover’s Straight Tailor’s Awl , to persuade fabric strip into maker.
Press 1″ bias tape, as it exits the
For one Potholder Plus, you’ll need about 48″ of 1″ Bias Tape.
Unfold one edge of the bias strip and align the raw edge with the edge of the pocket top.
Pin in place.
Stitching slightly to the right of the fold in the tape, stitch the bias strip to the pocket top with scant 1/4″ seam.
Use Clover’s Wonder Clips to hold bias tape in place! Sewing binding is the original use for Wonder Clips!
Press bias strip to the backside of the potholder pocket, covering the stitching line. Press bias strip to the backside of the potholder pocket, covering the stitching line.

Stitch binding in place with a Schmetz Needle, stitching “in the ditch” (where the binding meets the fabric). Or, stitch near the bias tape edge – and you’ll be sure to catch the back of the binding in your stitching line!
Layer pocket onto previously sewn potholder. Wonder Clip edges together.
Turn over potholder, and add an optional 6″ ribbon hanging loop!

Baste optional 6″ ribbon hanging loop to top of potholder. Keep this loop out-of-the-way of all future stitching! Use Clover’s Straight Tailor’s Awl to hold loop in place.
Baste pocked edges to potholder.
Press under 1/2″ at end of bias trim. Beginning at side, place right side of bias trim to right side of potholder. Use Wonder Clips to hold bias trim in place.
Press bias trim to potholder back, covering the stitching line. Wonder Clip bias trim in place. Stitch, overlapping bias end over folded end.
Attach bias trim using NZP’s Bias Binding Technique.
Stitch bias binding in place with a Schmetz Needle, stitching “in the ditch” (where the binding meets the fabric). Or, stitch near the bias tape edge – and you’ll be sure to catch the back of the binding in your stitching line!
Tadah!
Customize Your Potholder Plus Color Palette:
Green Wildflower Boutique Fat Quarter Panel
.
Red Wildflower Boutique Fat Quarter Panel

Shop NEW! Exclusive Bundle Boxes and Wildflower Boutique Fabrics at ShopNZP.com
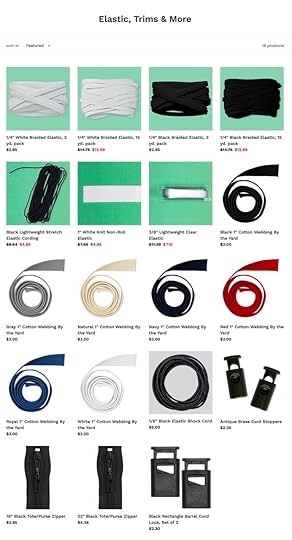
Shop Elastic, Cotton Webbing, Zippers & More at shopnzp.com
Shop Clover Tools & Sewing Supplies at shopnzp.com!

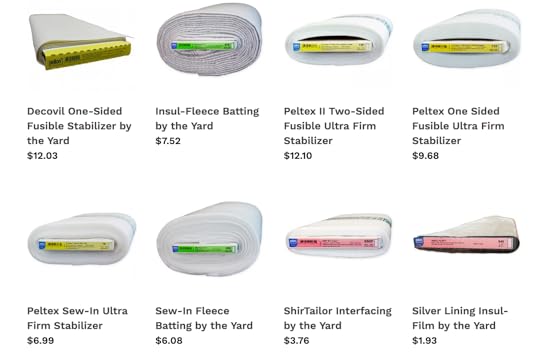
Shop Pellon Interfacing & Supplies at shopnzp.com!
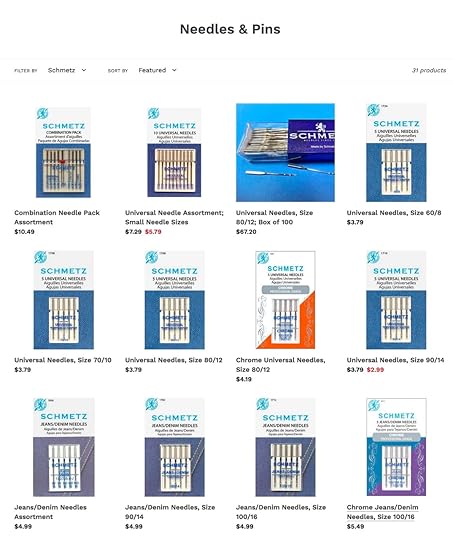
Shop Schmetz Sewing Machine Needles at shopnzp.com!

For a chance to be the random winner of a 10 pack of I Sew For Fun Wonder Clips from Clover, please leave a comment below sharing which Potholder Plus colors you’d like to make – Green or Red?
Clover will give away one 10 pack of I Sew For Fun Wonder Clips to one US resident in the 48 contiguous states. Winner must reply within 30 days to the official giveaway announcement email message sent from Nancy Zieman Productions.
Happy Stitching!
Team Nancy Zieman
Nancy Zieman Productions. LLC.
[image error]
Stitch it! Sisters is a production of NZ Productions LLC. Content in this feed is © copyright 2020 by Nancy Zieman Productions, LLC and may not be republished without written permission. You’re welcome to forward the email to a friend or colleague but it’s not okay to add the RSS feed automatically as content on a blog or other website. The FTC requires us to tell you that Nancy Zieman Productions, LLC has provided products by other companies in the course of doing business. The FTC requires us to advise you to take this information into consideration when reading this posting.
Make sure you are subscribed to Nancy Zieman Productions, LLC enews mailing list so you won’t miss a thing. Sign up at nancyzieman.com/blog/enews. And join us on YouTube, Facebook, Instagram and Pinterest!

Pot Holder Plus Sewing Tutorial
Make our Pot Holder Plus in just two hours with our step-by-step sewing tutorial–below! Finished Pot Holder Plus measures approximately 8-1/2″ x 9-1/2″. Sew this super-quick Pot Holder Plus with one-half yard of fabric and a fat quarter of coordinating fabric! We’re using NEW! Wildflower Boutique Fabrics!
Make Team NZP’s No-Hassle Kitchen Collection Pattern sewing projects for your home. The sewing is streamlined with our easiest-ever sewing steps, and simple pattern shapes made from rectangles and squares.
Watch Stitch it! Sisters Program 104: Potholder Plus
Watch the Stitch it! Sisters Program 104: Potholder Plus video with hosts Deanna Springer and Dana Casey. In this video, the Stitch it! Sisters share step-by-step fabric cutting and sewing techniques for making NZP’s Potholder Plus. Plus Timesaving Binding Tips by Nancy Zieman!
Then, head over to ShopNZP.com and purchase our exclusive NEW! Pot Holder Plus Bundle Boxes! The NEW! Pot Holder Plus Bundle Boxes! feature NEW! Wildflower Boutique Fabrics by Riley Blake Designs, and our No-Hassle Kitchen Collection Pattern – with Classic Timesaving Tips by Nancy Zieman. The NEW! Pot Holder Plus Bundle Boxes! includes everything you’ll need to make two assorted Potholder Plus’ and four coordinating towel toppers—you’ll supply the thread, buttons, and towels.
Pot Holder Plus Sewing Tutorial
Approximate finished size: 8-1/2″ x 9-1/2″
Pot Holder Plus Tools & Supplies
Exclusive NEW! Pot Holder Plus Bundle Box – Pattern included
I Sew For Fun Heart Shaped Straight Pins
Clover’s Pin ‘n Stow Magnetic Wrist Pin Cushion and/or I Sew For Fun Heart-Shaped Magnetic Covered Pin Caddy
1/4″ Quilting Presser Foot
Quilter’s Starch Savvy
Clover’s Rotary Cutter and Mat, & Ruler
Schmetz Universal Needle
Clover’s I Sew For Fun Wonder Clips, Clover’s Wrist Cushion for Wonder Clips
Clover’s 1″ Bias Tape Maker using Clover’s Straight Tailor’s Awl , to persuade fabric strip into maker.
Press 1″ bias tape, as it exits the
For one Pot Holder Plus, you’ll need about 48″ of 1″ Bias Tape.
Unfold one edge of the bias strip and align the raw edge with the edge of the pocket top.
Pin in place.
Stitching slightly to the right of the fold in the tape, stitch the bias strip to the pocket top with scant 1/4″ seam.
Use Clover’s Wonder Clips to hold bias tape in place! Sewing binding is the original use for Wonder Clips!
Press bias strip to the backside of the potholder pocket, covering the stitching line. Press bias strip to the backside of the potholder pocket, covering the stitching line.
Stitch binding in place with a Schmetz Needle, stitching “in the ditch” (where the binding meets the fabric). Or, stitch near the bias tape edge – and you’ll be sure to catch the back of the binding in your stitching line!
Layer pocket onto previously sewn pot holder. Wonder Clip edges together.
Turn over pot holder, and add an optional 6″ ribbon hanging loop!
Baste optional 6″ ribbon hanging loop to top of pot holder. Keep this loop out-of-the-way of all future stitching! Use Clover’s Straight Tailor’s Awl to hold loop in place.
Wonder Clip pocket to pot holder.

Baste pocked edges to pot holder.
Press under 1/2″ at end of bias trim. Beginning at side, place right side of bias trim to right side of potholder. Use Wonder Clips to hold bias trim in place.
Press bias trim to potholder back, covering the stitching line. Wonder Clip bias trim in place. Stitch, overlapping bias end over folded end.
Stitch bias binding in place with a Schmetz Needle, stitching “in the ditch” (where the binding meets the fabric). Or, stitch near the bias tape edge – and you’ll be sure to catch the back of the binding in your stitching line!
Tadah!
Customize Your No-Hassle Napkin Color Palette:
Green Wildflower Boutique Fat Quarter Panel
.
Red Wildflower Boutique Fat Quarter Panel
Shop NEW! Exclusive Bundle Boxes and Wildflower Boutique Fabrics at ShopNZP.com
Shop Elastic, Cotton Webbing, Zippers & More at shopnzp.com
Shop Clover Tools & Sewing Supplies at shopnzp.com!
Shop Pellon Interfacing & Supplies at shopnzp.com!
Shop Schmetz Sewing Machine Needles at shopnzp.com!
Happy Stitching!
Team Nancy Zieman
Nancy Zieman Productions. LLC.
[image error]
Stitch it! Sisters is a production of NZ Productions LLC. Content in this feed is © copyright 2020 by Nancy Zieman Productions, LLC and may not be republished without written permission. You’re welcome to forward the email to a friend or colleague but it’s not okay to add the RSS feed automatically as content on a blog or other website. The FTC requires us to tell you that Nancy Zieman Productions, LLC has provided products by other companies in the course of doing business. The FTC requires us to advise you to take this information into consideration when reading this posting.
Make sure you are subscribed to Nancy Zieman Productions, LLC enews mailing list so you won’t miss a thing. Sign up at nancyzieman.com/blog/enews. And join us on YouTube, Facebook, Instagram and Pinterest!
August 11, 2020
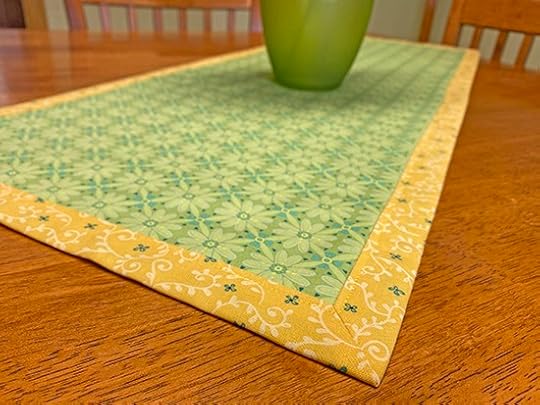
No-Hassle Table Topper Sewing Tutorial and NEW! Wildflower Boutique Fabrics
Make our No-Hassle Table Topper in just two hours with our step-by-step sewing tutorial–below! Finished Table Topper measures approximately 14″ x 38″. Sew this super-quick Table Topper with one-half yard each of two coordinating fabrics! We’re using NEW! Wildflower Boutique Fabrics!
No-Hassle Kitchen Collection Pattern Available at ShopNZP.com
Make Team NZP’s No-Hassle Kitchen Collection Pattern sewing projects for your home. The sewing is streamlined with our easiest-ever sewing steps, and simple pattern shapes made from rectangles and squares. Our reversible Table Topper features Nancy Zieman’s signature mitered corners!
Watch Stitch it! Sisters Program 105: No-Hassle Table Topper
Watch Stitch it! Sisters Program 105: No-Hassle Table Topper video with hosts Deanna Springer and Dana Casey. In this video, the Stitch it! Sisters share step-by-step fabric cutting and sewing techniques for making NZP’s No-Hassle Table Topper. Plus Classic Timesaving Mitered Corner Tips by Nancy Zieman!
Then, head over to ShopNZP.com and purchase our exclusive NEW! No-Hassle Table Topper Bundle Boxes! The NEW! No-Hassle Table Topper Bundle Boxes feature NEW! Wildflower Boutique Fabrics by Riley Blake Designs – 1/2 yd. Pellon Fleece Batting, and our No-Hassle Kitchen Collection Pattern – with Classic Timesaving Tips by Nancy Zieman. The NEW! No-Hassle Table Topper Bundle Boxes include everything you’ll need to make this table topper Plus four different coordinating napkins!
No-Hassle Table Topper Sewing Tutorial
Approximate finished size: 14″ x 38″
No-Hassle Table Topper Tools & Supplies
Exclusive NEW! No-Hassle Napkins Bundle Box – Pattern included
I Sew For Fun Heart Shaped Straight Pins
Clover’s Pin ‘n Stow Magnetic Wrist Pin Cushion and/or I Sew For Fun Heart-Shaped Magnetic Covered Pin Caddy
1/4″ Quilting Presser Foot
Quilter’s Starch Savvy
Clover’s Rotary Cutter and Mat, & Ruler
Schmetz Universal Needle
Clover’s I Sew For Fun Point 2 Point Turner
1/2″ Sewer’s Fix it Tape
Blue Pen Style Chaco Liner
Clover’s Hot Ruler or Hot Hemmer
Clover’s 5-in-1 Sliding Gauge
Clover’s 3/8″ Fusible Tape to wrong side of all four edges of outer fabric rectangle/ Wildflower Boutique Vine – Yellow.
 Clover’s 7-3/4″ Bordeaux Ultimate Shears
I Sew For Fun Sew Safe Presser Foot
or
August 8, 2020
No-Hassle Napkins Sewing Tutorial and NEW! Boutique Wildflower Fabrics
Celebrate Summer Sewing and stitch our No-Hassle Napkins from NEW! Wildflower Boutique fabrics. Make four different coordinating 16″ Dinner Napkins with just two yards of Fabric! Wait! What? “Four different napkins” from “two yards of fabric?” You may be thinking, “how’d they do that?” We share our secret sewing tips in today’s tutorial.
No-Hassle Kitchen Collection Pattern Available at ShopNZP.com
Make Team NZP’s No-Hassle Kitchen Collection sewing projects for your home. The sewing is streamlined with our easiest-ever sewing steps, and simple pattern shapes made from rectangles and squares. Our reversible napkins feature Nancy Zieman’s signature mitered corners!
Watch Stitch it! Sisters Program 103: No-Hassle Napkins
Watch Sisters Program 103: No-Hassle Napkins video, with Stitch it! Sisters Deanna Springer and Dana Casey, and learn step-by-step fabric cutting and sewing techniques for making NZP’s No-Hassle Napkins. Plus Classic Timesaving Mitering Tips by Nancy Zieman!

Then, head over to ShopNZP.com and purchase our exclusive NEW! No-Hassle Napkins Bundle Boxes! The NEW! No-Hassle Napkins Bundle Boxes feature NEW! Wildflower Boutique Fabrics by Riley Blake Designs – 1/2 yd. Pellon Fleece Batting, and our No-Hassle Kitchen Collection Pattern – with Classic Timesaving Tips by Nancy Zieman. The NEW! No-Hassle Napkins Bundle Boxes includes everything you’ll need to make four different coordinating napkins PLUS a coordinating table topper!
16″ No-Hassle Dinner Napkin Sewing Tutorial
16″ No-Hassle Dinner Napkin Tools & Supplies
Exclusive NEW! No-Hassle Napkins Bundle Box – Pattern included
I Sew For Fun Heart Shaped Straight Pins
Clover’s Pin ‘n Stow Magnetic Wrist Pin Cushion and/or I Sew For Fun Heart-Shaped Magnetic Covered Pin Caddy
1/4″ Quilting Presser Foot
Quilter’s Starch Savvy
Clover’s Rotary Cutter and Mat, & Ruler
Schmetz Universal Needle
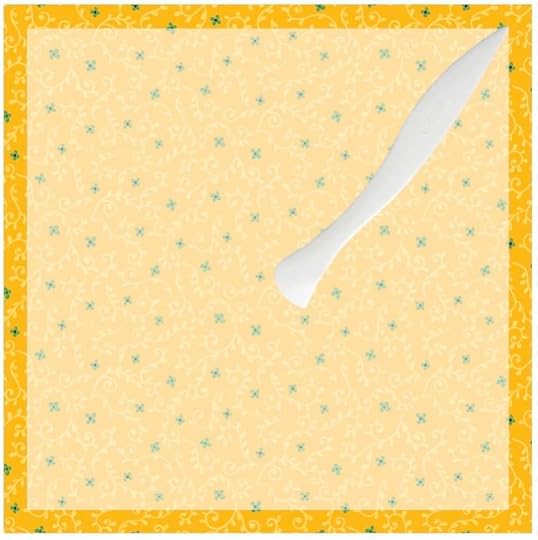
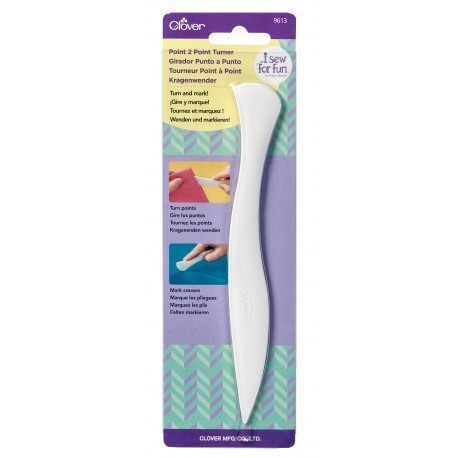
Clover’s I Sew For Fun Point 2 Point Turner
1/2″ Sewer’s Fix it Tape
Blue Pen Style Chaco Liner
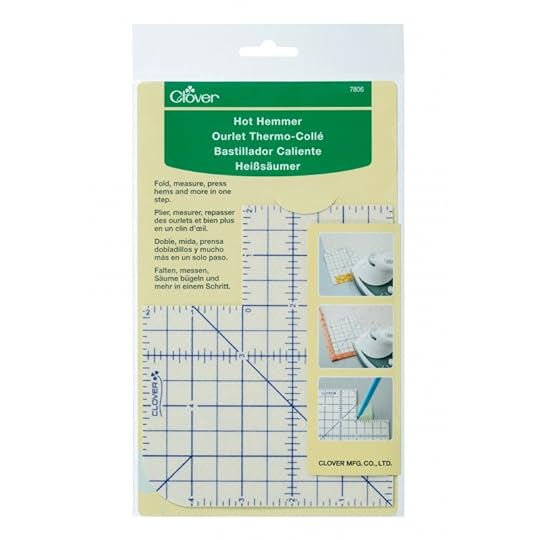
Clover’s Hot Hemmer
1/4″ Fusible Web Tape
Pre-shrink two yards of coordinating fabrics by steaming and pressing, and steaming and pressing a second time, and then spray press and starch fabric with June Tailor’s Quilter’s Starch Savvy — press and starch, press and starch.
Cut four 18″ x 18″ Wildflower Boutique Vine – Yellow fabric squares for the napkin back/mitered corner borders.
Cut four 16″ x 16″ inner napkin fabric squares from Wildflower Boutique Green Fat Quarter Panel .
Sewing Secret REVEALED! We’re making “four different napkins” from “two yards of fabric” with the NEW! Wildflower Boutique Green Fat Quarter Panel. One yard, one panel, of our NEW! Wildflower Boutique Fat Quarter Panel is printed with four different “fat quarter” fabrics!
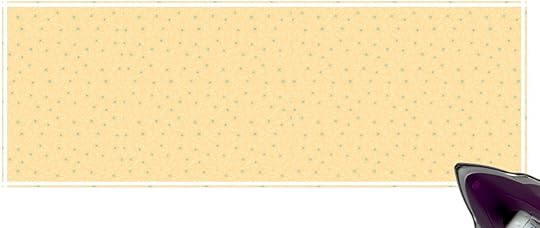
Press Clover’s 1/4″ Fusible Tape to wrong side of all four edges of outer fabric, only.
Remove paper backing, and press under 1/4″ around all four napkin edges.
Using the Seams Right, place a mark 1″ in from corner – along top, and along side. Repeat on all four corners.
Connect 1″ markings with Sewers Fix It Tape.
Fold outer napkin right sides together, meeting tape edges.
Stitch along outer edge of Sewers Fix It Tape using a Schmetz Universal Needle, Size 80 or 90.
Cut away excess seam allowance. Remove Sewers Fix It Tape.
Using Clover’s Point 2 Point Tuner , turn corners right side out.
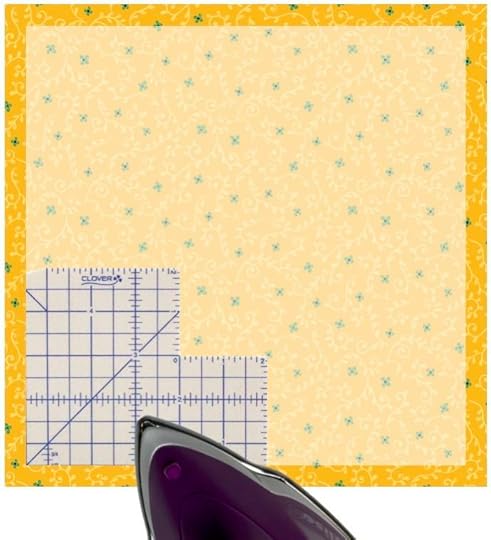
With Clover’s Hot Hemmer , press over 1/2″ hem around all napkin edges.
Insert inner fabric under mitered corner borders, wrong sides together, and pin .
Topstitch outer fabric near inner edge.
Watch Stitch it! Sisters Program 103: No-Hassle Napkins video , and repeat steps above to create four different coordinating 16″ Dinner Napkins.
 Customize Your No-Hassle Napkin Color Palette:
Green Wildflower Boutique Fat Quarter Panel
Teal Wildflower Boutique Fat Quarter Panel
Red Wildflower Boutique Fat Quarter Panel
Shop Elastic, Cotton Webbing, Zippers & More at shopnzp.com
Shop Clover Tools & Sewing Supplies at shopnzp.com!
Shop Pellon Interfacing & Supplies at shopnzp.com!
Shop Schmetz Sewing Machine Needles at shopnzp.com!

For a chance to be the random winner of a Seams Right from Clover, please leave a comment below sharing which No-Hassle Napkins colors you’d like to make – Green, Teal, or Red?
Clover will give away one Stitch it! Sisters 5″ Fabric Short Stack to one US resident in the 48 contiguous states. Winner must reply within 30 days to the official giveaway announcement email message sent from Nancy Zieman Productions.
 For a chance to be the random winner of a Stitch it! Sisters 5″ Fabric Short Stack with S!S button & sticker, please leave a comment below sharing which size No-Hassle Napkins you’d like to make: Cocktail, Brunch, or Dinner?
Nancy Zieman Productions will give away one Stitch it! Sisters 5″ Fabric Short Stack to one US resident in the 48 contiguous states. Winner must reply within 30 days to the official giveaway announcement email message – sent from Nancy Zieman Productions.

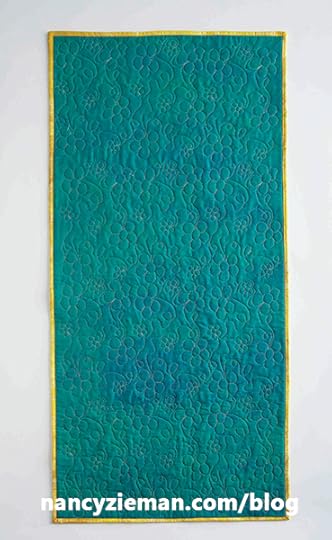
The randomly selected winner of a Stitch it! Sisters 5″ Fabric Short Stackwith S!S button & sticker, from the August 1 Blog Post, Dresden Columns Table Runner Sewing Tutorial, is Clovis.
Her comment is: I have never worked with Dresden templates before. Would be nice to have.
Happy Stitching!
Team Nancy Zieman
Nancy Zieman Productions. LLC.
[image error]
Stitch it! Sisters is a production of NZ Productions LLC. Content in this feed is © copyright 2020 by Nancy Zieman Productions, LLC and may not be republished without written permission. You’re welcome to forward the email to a friend or colleague but it’s not okay to add the RSS feed automatically as content on a blog or other website. The FTC requires us to tell you that Nancy Zieman Productions, LLC has provided products by other companies in the course of doing business. The FTC requires us to advise you to take this information into consideration when reading this posting.
Make sure you are subscribed to Nancy Zieman Productions, LLC enews mailing list so you won’t miss a thing. Sign up at nancyzieman.com/blog/enews. And join us on YouTube, Facebook, Instagram and Pinterest!
August 6, 2020
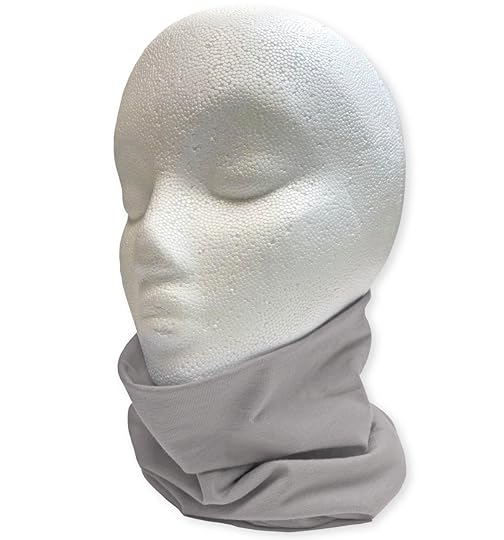
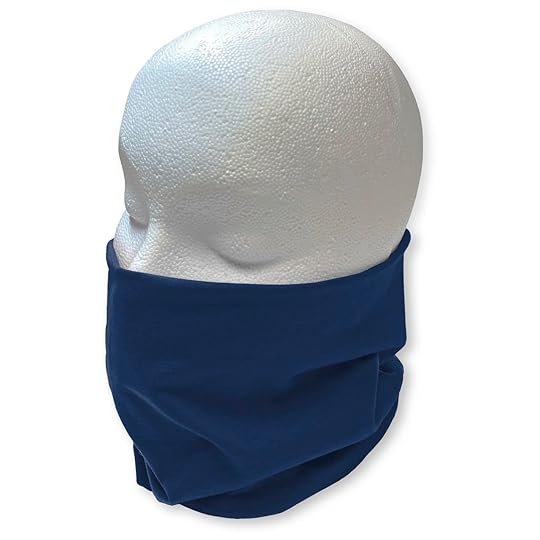
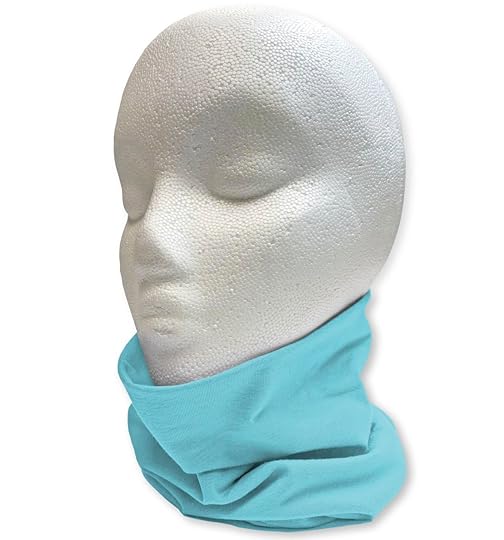
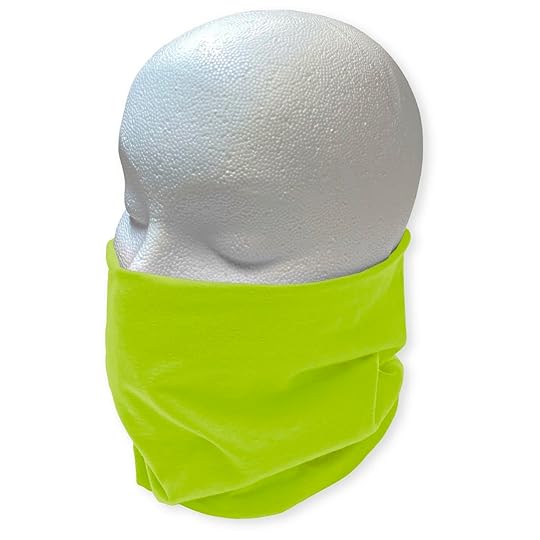
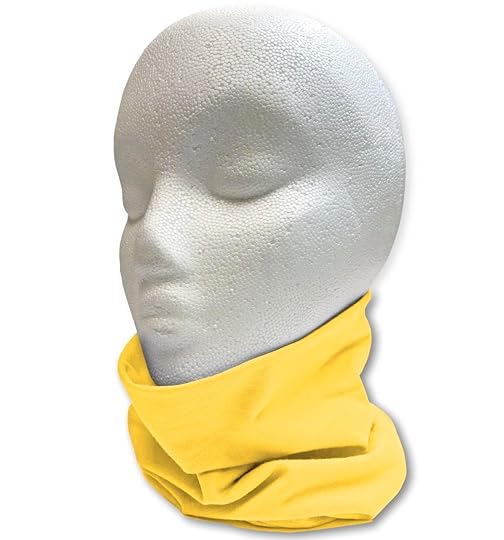
NEW! Turtleneck Scarf Sewing Tutorial Video
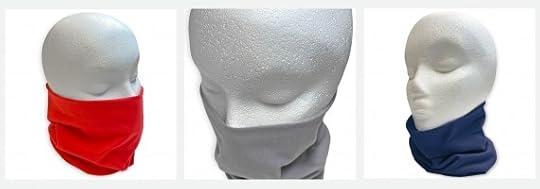
NEW! Turtleneck Scarf Sewing Tutorial Video. Sew our Turtleneck Scarf for chilly fall days, and have built-in convenience for pulling scarf up over nose and mouth – during brisk morning walks or when cir circumstances arise during times of social-distancing.
NEW! Watch our Stitch it! Sisters Stitch it! in Minutes: S!S Turtleneck Scarf Sewing Tutorial Video
NEW! Watch our Stitch it! Sisters Stitch it! in Minutes: S!S Turtleneck Scarf Sewing Tutorial Video
Watch our NEW! 4-minute Stitch it! Sisters Stitch it! in Minutes video – and see how Deanna quickly makes our Turtleneck Scarf with a serger. Our Turtleneck Scarf can be sewn in just 30-minutes, from just one easy fabric rectangle, and our easiest-ever sewing techniques!
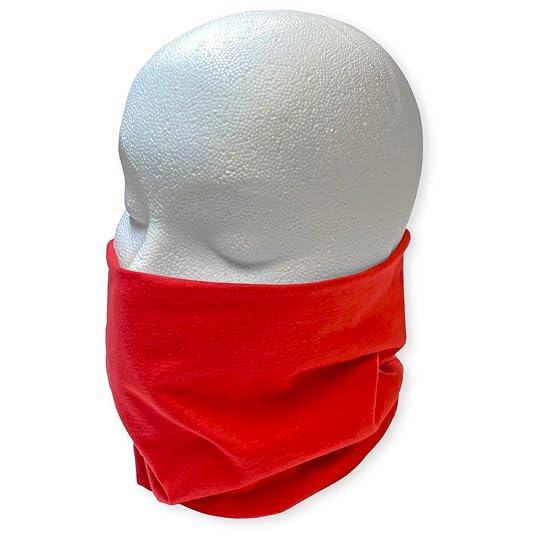
Be sure to choose a Stretch Jersey Knit Fabric with 5% Spandex for your Turtleneck Scarf sewing project. This lightweight stretch cotton knit fabric provides a smooth hand, stylish drape, and about a 50% four-way stretch — for added comfort. Or, choose to make a scarf from a cotton t-shirt or knit top with 5% Spandex.
Turtleneck Scarf Sewing Tutorial by Nancy Zieman Productions
Approximate Finished Size 9-1/2″ Wide x 8-1/2 Long.
The NZP Team is designing projects and patterns to be sewn with Nancy Zieman’s innovative sewing techniques. Within each of our blog sewing tutorial and patterns, we give you construction tips and specific sewing hints, along with tool tips to make sewing fun and enjoyable – even for beginners. You’ll find that in a matter of minutes, you can sew fashion accessories – like our NEW Turtle Neck Scarf!
Visit ShopNZP.com for timesaving tools and sewing supplies to complete your sewing projects!
Fabric, Tools & Supplies:
1/2 yd. Stretch Jersey Knit Fabric (makes two to three Turtleneck Scarves)
Clover’s I Sew For Fun Spring Tape Measure
Clover’s 5-in-1 Sliding Gauge
Clover’s I Sew For Fun Heart-Shaped Pins
Clover’s 1/4″ Fusible Web Tape to one inner seam allowance, at seam opening. Clover’s 1/4″ Fusible Web Tape and fuse/press seam closed. And/Or using a hand sewing needle and thread, hand stitch seam opening closed.
[image error]
Wear your new Turtleneck Scarf as a fashion scarf, a fabric face covering, and even wear as a headband accessory. Our New! Turtleneck Scarf is such a fast and fun sewing project, you’ll be sewing several Turtleneck Scarves in as little as one-hour! 1/2 yard Stretch Jersey Knit Fabric makes two Turtleneck Scarves.
NEW! Watch our Stitch it! Sisters Stitch it! in Minutes: S!S Turtleneck Scarf Sewing Tutorial Video
NEW! Watch our Stitch it! Sisters Stitch it! in Minutes: S!S Turtleneck Scarf Sewing Tutorial Video
Watch our NEW! 4-minute Stitch it! Sisters Stitch it! in Minutes video – and see how Deanna quickly makes our Turtleneck Scarf with a serger. Our Turtleneck Scarf can be sewn in just 30-minutes, from just one easy fabric rectangle, and our easiest-ever sewing techniques!
NEW! Turtleneck Scarf Sewing Tutorial – Tools & Supplies:
1/2 yd. Stretch Jersey Knit Fabric
Clover’s I Sew For Fun Spring Tape Measure
Clover’s 5-in-1 Sliding Gauge
Clover’s I Sew For Fun Heart-Shaped Pins
August 4, 2020
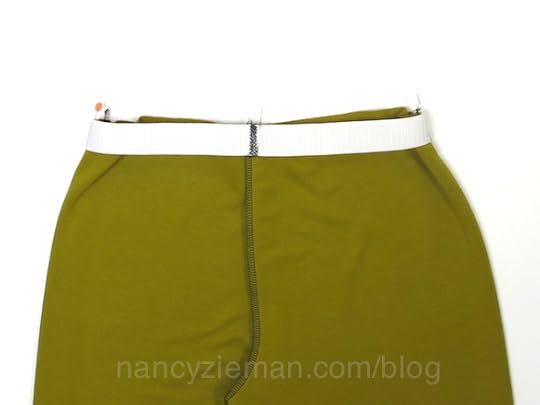
Nancy Zieman’s Absolute Easiest Way to Sew an Elastic Waistline

Okay, the above picture may not look like much. That’s the point! The photo shows Nancy Zieman’s Absolute Easiest Way to Sew an Elastic Waistline – without the telltale topstitching of an elastic waistband!
Over the years, Nancy fine-tuned and personalized traditional sewing techniques. We believe you’ll find this technique to be the absolute easiest way to sew elastic to the waistline of pants, skirts, and even shorts!
Prepare the elastic.
Cut elastic length 2″–4″ smaller than your actual waistline measurement, depending on what you feel is comfortable. (If your waist is quite a bit smaller than your hips, pin the elastic together without yet trimming off the excess.)
Try on the elastic, pulling it up over your hips. If the elastic is too tight to slide comfortably over your hips, readjust the elastic before sewing it together.
Zigzag the elastic ends to a square of woven fabric – without overlapping elastic ends. (This tip eliminates the bulky layers that occur when elastic is connected by overlapping the ends. Zigzag several times to secure elastic to fabric square.
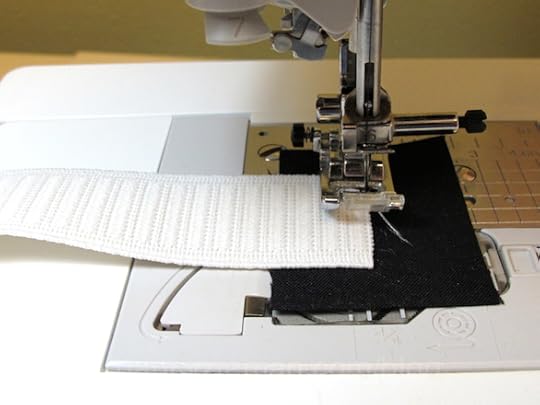

Trim away excess woven fabric.
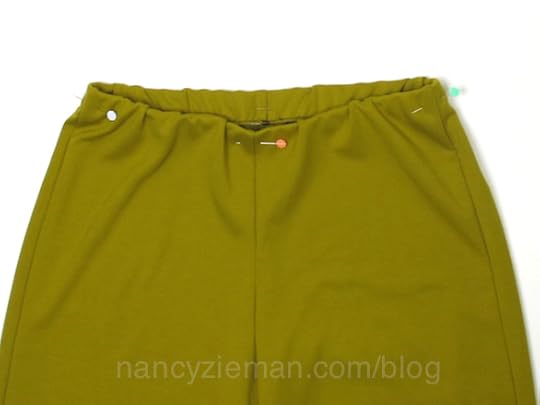
Quarter mark elastic. Fold it in half and then in half again, placing a pin at each quarter.
Also quarter mark the waistline.
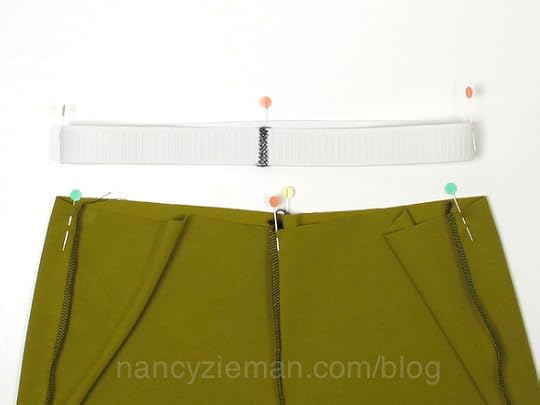
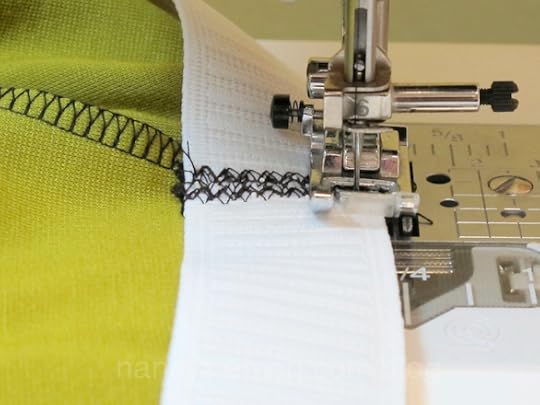
Attach the elastic.
Pin elastic to wrong side of garment top edge, matching each quarter point.
Serge or zigzag elastic to the cut edge of the waistband, stretching the elastic to fit. (This is what real sewing looks like, many times it’s not perfect.)
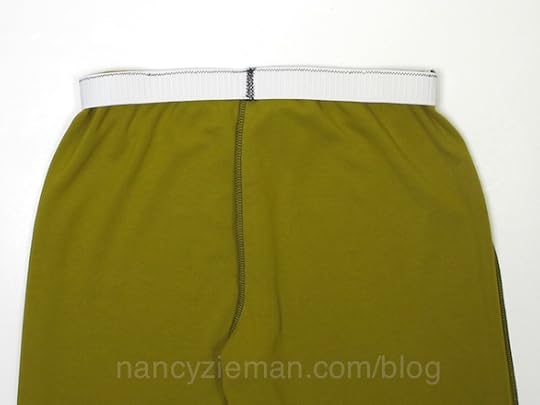
Fold elastic to wrong side. Check to be sure fabric is securely wrapped around elastic.
Topstitch through elastic and garment at each seam. This holds the elastic in position with no need to stitch the elastic to the waistline along the lower elastic edge. This is it for stitching!

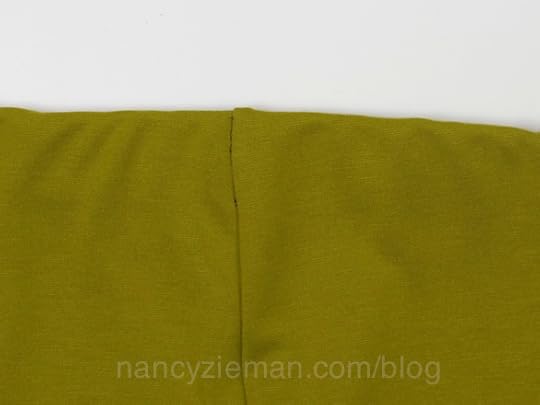
When wearing the skirt, pants, or shorts that telltale elastic stitching is nonexistent. The sewing is about as easy as it gets! How about that?
Celebrating 200 Years of Elastic!
Did you know that 80 years ago in the 1940s, elastic began replacing drawstring clothing closures?Explore our elastic selections – including our Friend Pamela’s Fantastic Elastic – that may be cut to width! at ShopNZP.com.
Celebrating 200 Years of Elastic!
Did you know that 180 years ago in 1839, Charles Goodyear invented the vulcanization process that improved rubber’s elasticity? Explore our elastic selections – including our 1″ wide & 3″ wide Knit Elastics at 1/8″ Black Elastic Shock Cord –Now Back in Stock at
Her comment is: The straight line quilting makes everyone a machine quilter! You can finish the quilt all by yourself.
Happy Stitching!
Team Nancy Zieman
Nancy Zieman Productions. LLC.
[image error]
Stitch it! Sisters is a production of NZ Productions LLC. Content in this feed is © copyright 2020 by Nancy Zieman Productions, LLC and may not be republished without written permission. You’re welcome to forward the email to a friend or colleague but it’s not okay to add the RSS feed automatically as content on a blog or other website. The FTC requires us to tell you that Nancy Zieman Productions, LLC has provided products by other companies in the course of doing business. The FTC requires us to advise you to take this information into consideration when reading this posting.
Make sure you are subscribed to Nancy Zieman Productions, LLC enews mailing list so you won’t miss a thing. Sign up at nancyzieman.com/blog/enews. And join us on YouTube, Facebook, Instagram and Pinterest!
August 1, 2020
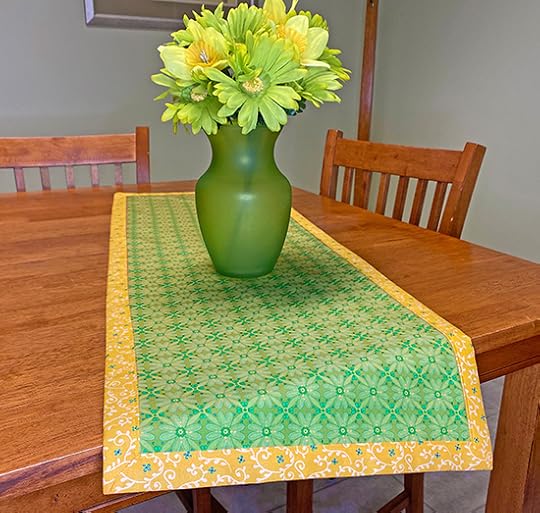
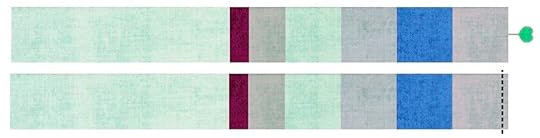
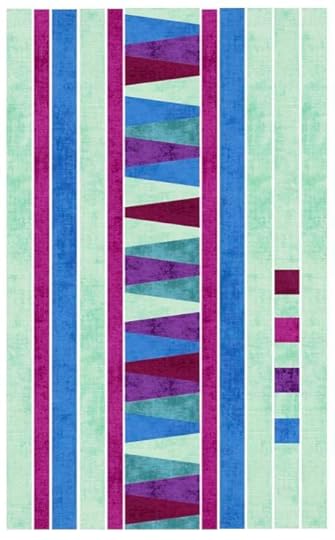
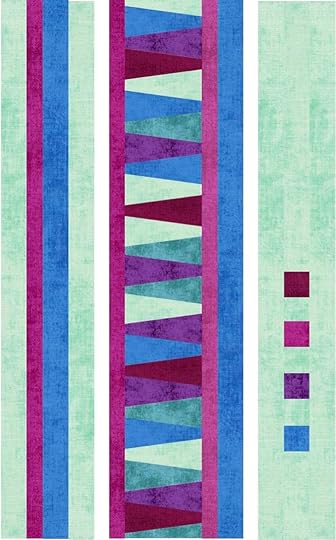
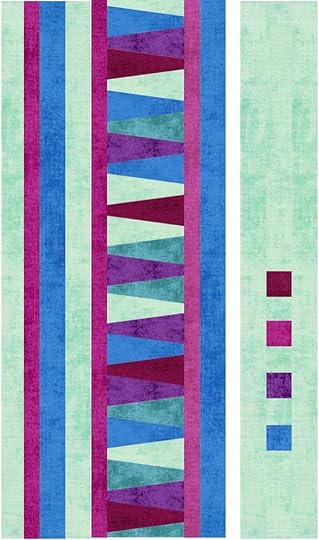
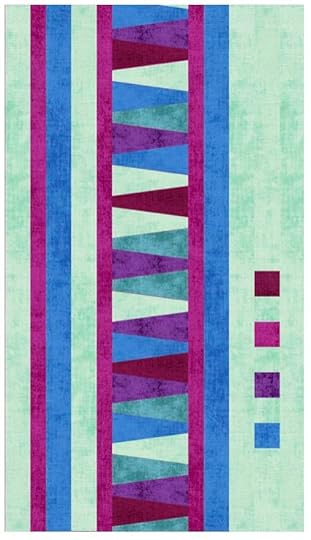
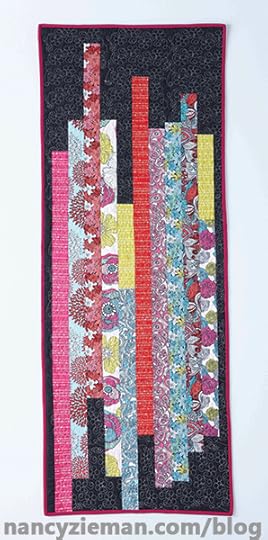
Dresden Columns Table Runner Sewing Tutorial

NEW! Dresden Columns Quilt Sewing Tutorial! Learn how easy it is to stitch our quick column quilt with a modern twist. Crosswise fabric strips, Dresden wedges, and a few fabric squares make this an easy piecing project–even for beginners! The 23″ x 39″ quilt size is ideal for display on a table or wall—you decide!
Watch Stitch it! Sisters Program 102: Dresden Columns Table Runner
Watch Stitch it! Sisters Program 102: Dresden Columns Table Runner video with hosts Deanna Springer and Dana Casey. In this video, the Stitch it! Sisters share step-by-step fabric cutting and sewing techniques for making NZP’s NEW! Dresden Columns Table Runner or Wall Hanging Project.
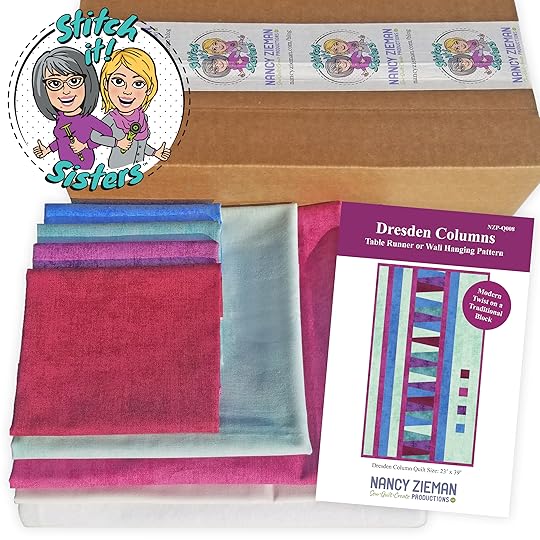
Then, head over to ShopNZP.com and purchase our exclusive Dresden Columns Table Runner or Wall Hanging Bundle Box! This NEW! Bundle Box features an array of jewel-toned light, medium, and dark fabrics for amazing contrast: Dramatic colorful Shades by Riley Blake Designs. The Bundle Box also includes backing and binding fabric, plus batting and pattern–with full-color step-by-step instructions! You’ll supply the thread.
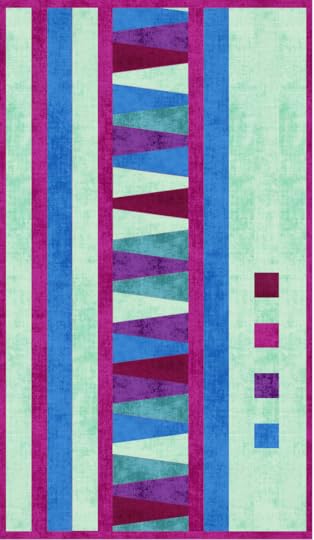
Dresden Columns Table Runner or Wall Hanging Sewing Tutorial
Approximate finished size: 23″ x 39″
Dresden Columns Table Runner or Wall Hanging Tools & Supplies
Exclusive Dresden Columns Table Runner or Wall Hanging Bundle Box
I Sew For Fun Heart Shaped Straight Pins
Clover’s Pin ‘n Stow Magnetic Wrist Pin Cushion and/or I Sew For Fun Heart-Shaped Magnetic Covered Pin Caddy
1/4″ Quilting Presser Foot
Clover’s Straight Tailor’s Awl/Stiletto
Quilter’s Starch Savvy
Tailor’s Clapper
Clover’s Rotary Cutter and Mat, & Ruler
Schmetz Size 90/11 Chrome Quilting Needles
Optional: Quilt Basting Spray
Optional: Schmetz Size 90/14 Super Nonstick Sewing Machine Needles
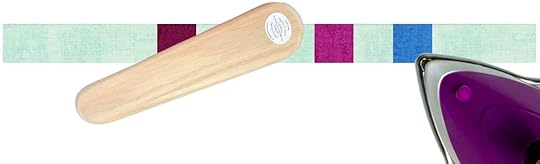
Create Column Strips
Pre-shrink fabrics by steaming and pressing, and steaming and pressing a second time, and then spray press and starch fabric with June Tailor’s Quilter’s Starch Savvy — press and starch, press and starch.
All seam allowances are scant 1/4″ unless otherwise stated. Read all instructions prior to beginning project.
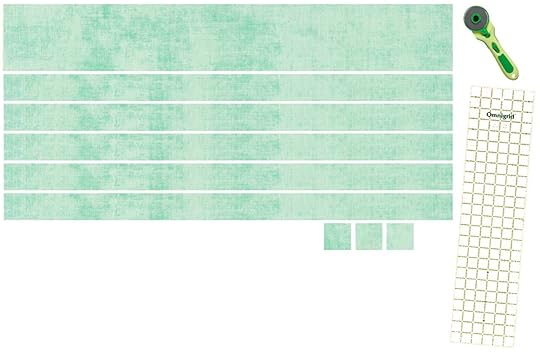
Cut Column Strips
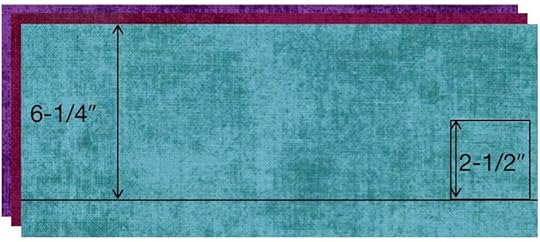
Bottlegreen Cotton Shades: Cut one 6-1/4″ crosswise strip, cut five 2-1/2″ crosswise strips, cut three 2-1/2″ squares.
The following illustrations show 42″ wide fabrics.

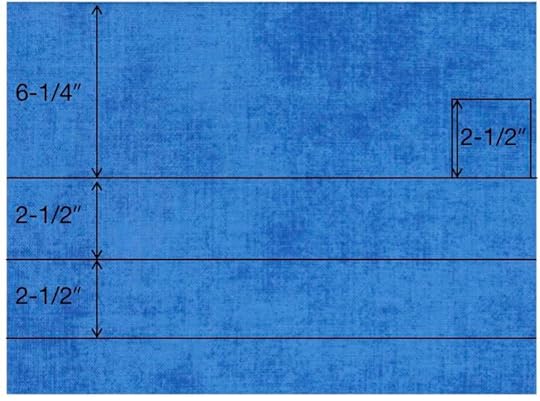
Cobalt Cotton Shades: Cut one 6-1/4″ crosswise strip, cut two 2-1/2″ crosswise strips, subcut one 2-1/2″ square from end of 6-1/4″ one crosswise strip.
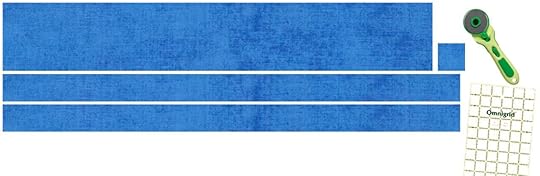
If using fat quarters for the column fabric strips, cut double crosswise fabric strips to create 40/41″ column strips. Place strips right sides together, in pairs. Pin at one short edge. Stitch. Press seams to one side.
Fuschia Cotton Shades: Cut three 1-1/2″ crosswise strips, cut one 2-1/2″ square.
Reserve remaining Fuschia Cotton Shades fabric for binding.

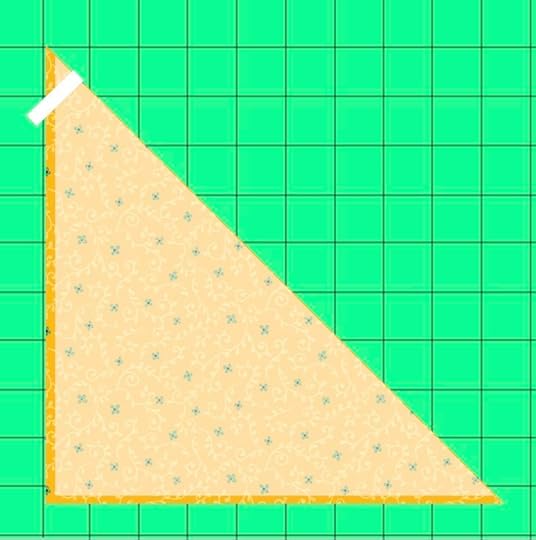
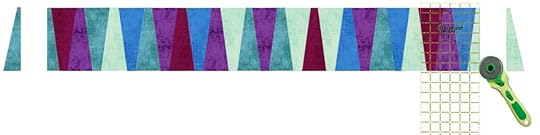
Cut Dresden Column Wedges and Squares
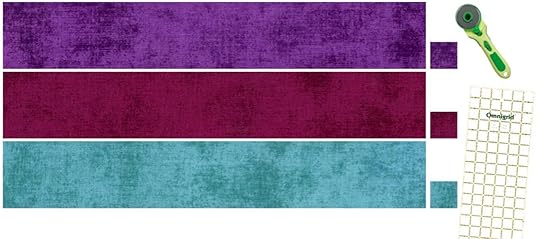
Stack three fabrics: D-Teal Cotton Shades, E-Burgundy Cotton Shades and F-Grape Cotton Shades.
Cut one 6-1/4″ crosswise strip from each fabric.
Subcut one 2-1/2″ square from end of each of the three crosswise fabric strips.
Make the Dresden Wedges
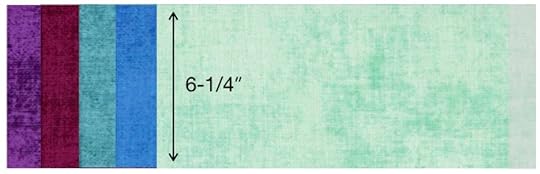
Stack random pairs of the 6-1/4″ crosswise fabric strips; A-Bottlegreen Cotton Shades, B-Cobalt Cotton Shades, D-Teal Cotton Shades, E-Burgundy Cotton Shades and F-Grape Cotton Shades.
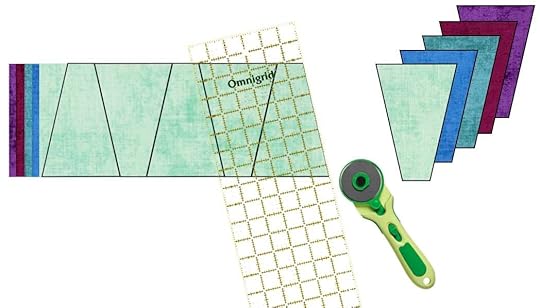
Trace Dresden wedge template (page 6 of the pattern) on paper. Cut out paper template.
With fabric marking pen, trace Dresden wedge template on crosswise fabric strip pairs, rotating template 180º as needed to trace six Dresden wedges from each fabric.
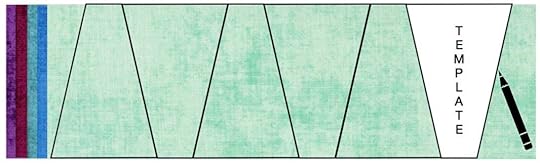
Using a rotary cutter and ruler, cut six Dresden wedges from each of the five fabrics, cutting on traced lines.
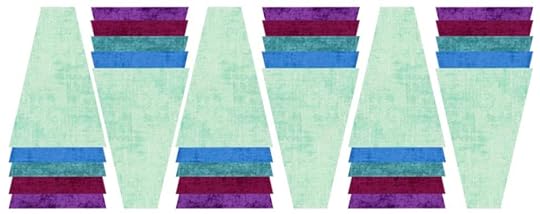
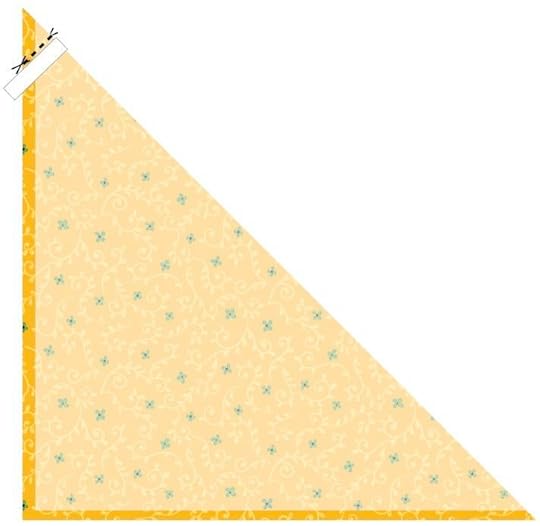
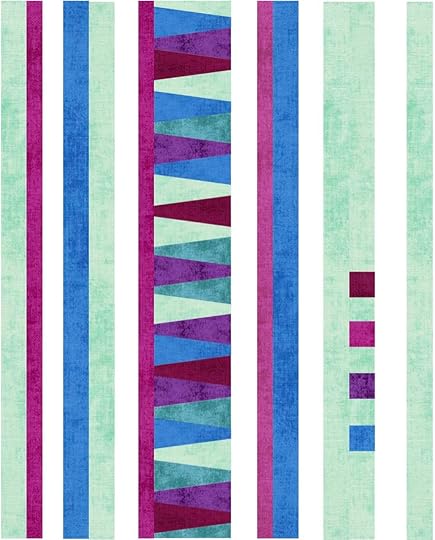
To make the following step easier, randomly place the Dresden Wedges within the column. The illustrations depict the featured Table Runner but you are welcome to personalize the design.
Prepare Dresden Wedge Column for Quilt
Lay out, assemble and stitch the Dresden wedges according to diagram for the column.
Alternate Dresden shape to create a parallelogram shaped column.

Stitch Dresden wedges together in pairs.
Align the right sides and edges of the Dresden wedges, creating a slight V shape.
Pin.
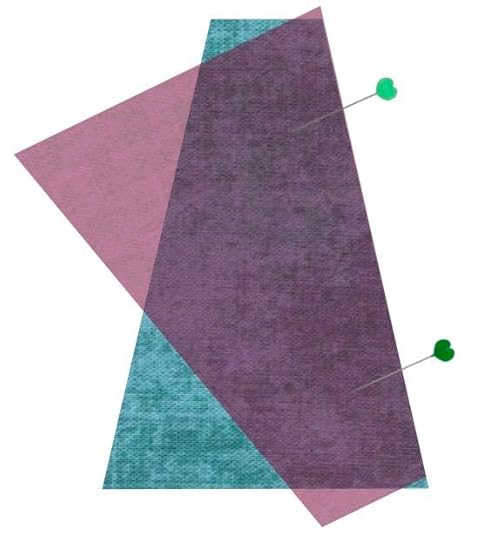
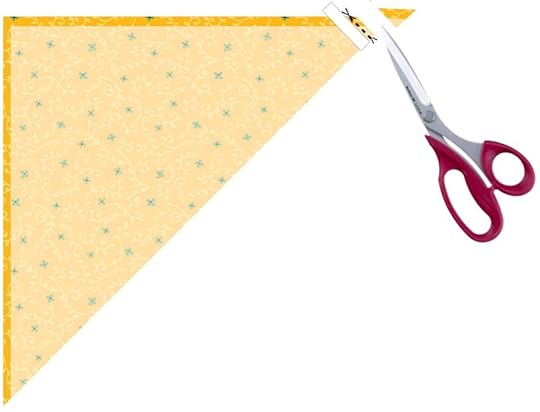
Align the edge of the sewing machine’s presser foot with the edge of the fabric. Stitch the seam. The first and last stitches should land at the V shapes created by the overlapping seam allowances.
Press seams open.
To set seams, press with a steam iron. After pressing, place a Tailor’s Clapper over the pressed area and apply even pressure.
Continue adding Dresden wedges until column is complete.

Using a rotary cutter and ruler, trim column length to 39″.

Prepare Floating Squares Column for Quilt
Subcut one 2-1/2″ crosswise fabric strip A-Bottlegreen Cotton Shades into: One 2-1/2″ x 20″ and one 2-1/2″ x 7″
Create Subsets:
Place Fabric A-Bottlegreen Cotton Shades 20″ strip to Fabric E-Burgundy Cotton Shades 2-1/2″ square, right sides together.
Pin at one short end.
Place Fabric A-Bottlegreen Cotton Shades 7″ strip to Fabric B-Cobalt Cotton Shades 2-1/2″ square, right sides together.
Pin at one short end.
Place one Fabric A-Bottlegreen Cotton Shades 2-1/2″ square to Fabric C-Fuchsia Cotton Shades 2-1/2″ square, right sides together.
Pin.
Place one Fabric A-Bottlegreen Cotton Shades 2-1/2″ square to Fabric F-Grape Cotton Shades 2-1/2″ square, right sides together.
Pin.
Stitch subsets:
Stitch one short edge, of each subset pair.
Kiss one subset pair to the other and chain stitch from one subset pair to the next. Clip threads between subset pairs.

Press seams to darker fabric.
Following diagram, place four subsets, and one remaining Fabric A-Bottlegreen Cotton Shades 2-1/2″ square, end to end to create column.

Place subsets right sides together, in pairs, pin.
Stitch the short edges.


Press seams toward dark fabric.

Arrange and Join Columns for the Quilt
Using the diagram, join Columns 1–11 to finish piecing the table runner top.
Trim each column strip to 39″ in length.
Place column strips right sides together, in pairs. Pin.
Stitch.
Press seams flat, then to one side.
Layer, Quilt, and Bind
Layer finished quilt top on batting and backing fabric. Quilt Layers using your favorite quilting techniques.
Finish your quilt, using your favorite binding technique or use Nancy Zieman’s Favorite Quilt Binding Method!
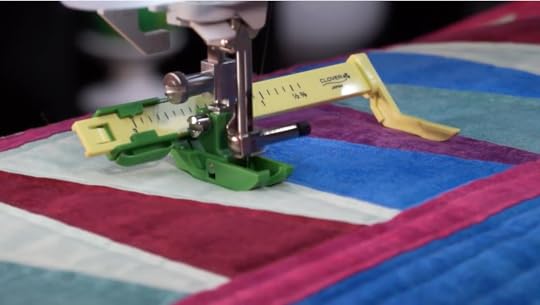
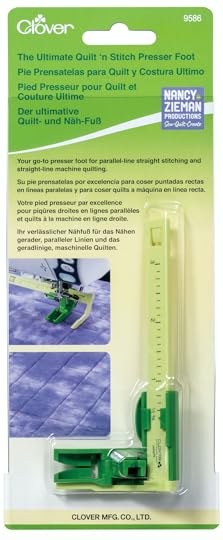
 Use the Ultimate Quilt ’n Stitch Presser Foot to straight-line machine quilt your Dresden Columns Quilt. Easily Stitch multiple parallel rows of quilting – without marking lines, and echo stitch inside floating squares.
Dresden Columns Table Runner or Wall Hanging Tools & Supplies
Exclusive Modern Floating Triangles Wall Hanging and Table Runner Bundle Box
I Sew For Fun Heart Shaped Straight Pins
Clover’s Pin ‘n Stow Magnetic Wrist Pin Cushion and/or I Sew For Fun Heart-Shaped Magnetic Covered Pin Caddy
1/4″ Quilting Presser Foot
Clover’s Straight Tailor’s Awl/Stiletto
Quilter’s Starch Savvy
Tailor’s Clapper
Clover’s Rotary Cutter and Mat, & Ruler
Schmetz Size 90/11 Chrome Quilting Needles
Optional: Quilt Basting Spray
Optional: Schmetz Size 90/14 Super Nonstick Sewing Machine Needles
Shop NEW! Elastics, Cotton Webbing, Zippers & More at ShopNZP.com
Shop NEW! Fabrics including 60 NEW! Quilt Basics Shades at ShopNZP.com!
Shop Pattern Sewing Suppies & Bundle Boxes at ShopNZP.com!
Shop Clover Tools & Sewing Supplies at ShopNZP.com!
Shop Pellon Interfacing & Supplies at ShopNZP.com!
Shop Schmetz Sewing Machine Needles at ShopNZP.com!
For a chance to be the random winner of a Stitch it! Sisters 5″ Fabric Short Stackwith S!S button & sticker, please leave a comment below about the Dresden Columns Table Runner.
Nancy Zieman Productions will give away one Stitch it! Sisters 5″ Fabric Short Stack to one US resident in the 48 contiguous states. Winner must reply within 30 days to the official giveaway announcement email message – sent from Nancy Zieman Productions.

The randomly selected winner of a Stitch it! Sisters 5″ Fabric Short Stack with exclusive S!S button & sticker, from the July 25 Blog Post, Modern Floating Triangles Wall Hanging Tutorial, is Hannah W.
[image error]
Her comment is: This project is well named as it has the modern look. I love the technique used for the triangles, very clever.
Happy Stitching!
Team Nancy Zieman
Nancy Zieman Productions. LLC.
[image error]
Stitch it! Sisters is a production of NZ Productions LLC. Content in this feed is © copyright 2020 by Nancy Zieman Productions, LLC and may not be republished without written permission. You’re welcome to forward the email to a friend or colleague but it’s not okay to add the RSS feed automatically as content on a blog or other website. The FTC requires us to tell you that Nancy Zieman Productions, LLC has provided products by other companies in the course of doing business. The FTC requires us to advise you to take this information into consideration when reading this posting.
Make sure you are subscribed to Nancy Zieman Productions, LLC enews mailing list so you won’t miss a thing. Sign up at nancyzieman.com/blog/enews. And join us on YouTube, Facebook, Instagram and Pinterest!
July 30, 2020
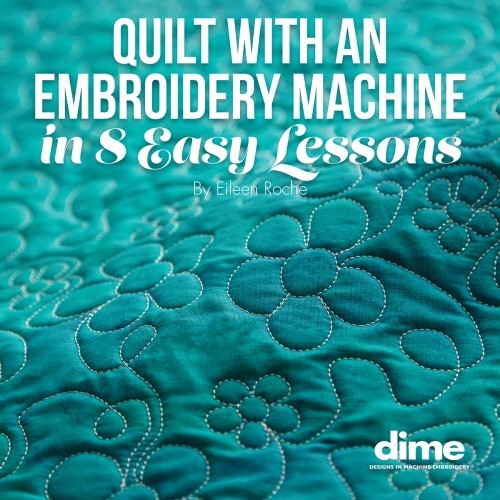
Quilt With an Embroidery Machine in 8 Easy Lessons Part Two on The Best of Sewing With Nancy

If you own an embroidery machine, most likely you’ve added monograms to towels or a cute design to baby clothes. But, did you ever think that your embroidery machine’s hidden talent was to quilt layers of fabric with remarkable finesse? Welcome back Nancy’s friend, and quilting expert Eileen Roche, who will show how to double the use of your embroidery machine.
Watch as Eileen shares the magic in quilting on part two of Quilt with an Embroidery Machine in 8 Easy Lessons on Sewing With Nancy. If you missed part one, last week, you can always watch it online at NancyZieman.com.
Quilted Shapes
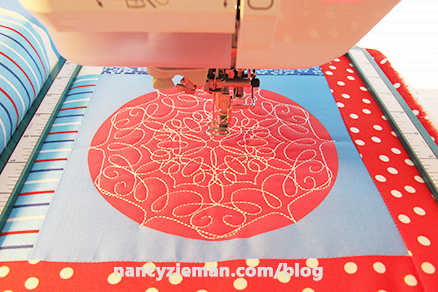
Embroidery isn’t limited to a design created by thread-dense stitches. Swirls or geometric shapes can also be embroidered. For example, the squares, circles, and hexagons as featured in Eileen’s sampler pillow, can easily be quilted with an embroidery machine. The end result is the appearance of stitching that was done by hand or with a long-arm quilting machine.
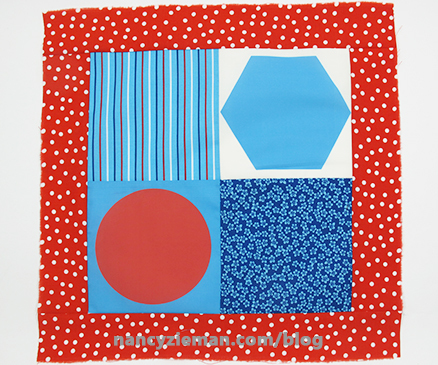
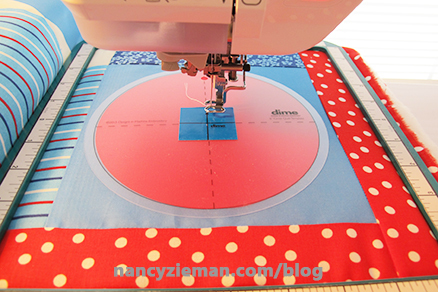
Use the DIME (Designs in Machine Embroidery) template to align shapes under the embroidery machine. See how on today’s featured episode of Sewing With Nancy.
Select a design to fit the shape and let your embroidery machine do the work of a computerized longarm. You’ll be amazed with the simplicity and thrilled with the results.
All-Over Quilting Designs
If you’ve pieced a quilt top but have never taken the time to quilt all the layers together, Eileen’s all-over quilting with an embroidery machine technique is for you. The quilt sandwich is hooped section by section. Templates are used for perfect placement and then the stitching begins with the touch of a button.
Start by drawing a grid over the quilt top using a water-soluble pen. Eileen Roche and Nancy Zieman demonstrate how easy it is to quilt in-the-hoop: one shape at a time, one row at a time. They then nestle the subsequent row, stitch, and finish. Watch all the steps to finishing this quilt on Quilt with an Embroidery Machine in 8 Easy Lessons—Part Two.
. .
Continuous Line Quilting
If you’re a quilter first, embroiderer second, you’ll no-doubt appreciate the look of quilts that have been stitched with a continuous design. If your machine has an embroidery unit, you can accomplish the same look that is generally reserved for long-arm quilters. It’s rather magical.
Use templates to determine placement within the hoop. Eileen shares how on today’s Sewing With Nancy episode.
 The result is a stunning quilting line that appears continuous.
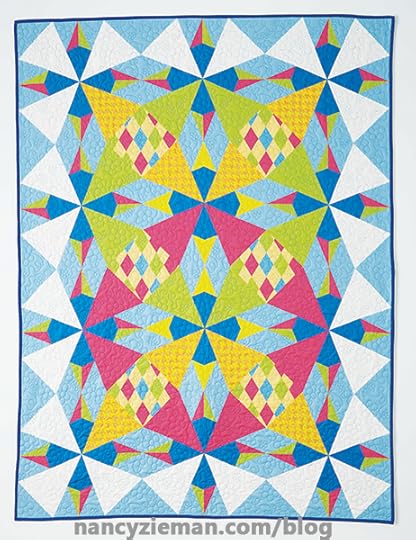
Eileen and Nancy showcase how this continuous line quilting design can work on a variety of different sized projects.
Easily learn the machine embroidery quilting process. There’s no reason to be intimidated. This easy process is presented from a beginner’s perspective and is broken down into eight easy lessons, including many useful tips and techniques for professional results, all can be found in Quilt With an Embroidery Machine in 8 Easy Lessons at ShopNZP.com.
Watch Quilt with an Embroidery Machine in 8 Easy Lessons (Part One and Part Two) on Sewing With Nancy online

Sewing With Nancy: Nancy’s Corner Spotlight!
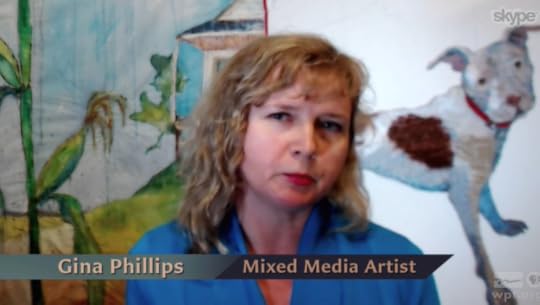
Nancy’s Corner Spotlight! Today watch Nancy Zieman’s 5 minute Nancy’s Corner Interview on Sewing With Nancy. A life-long artist, Gina Phillips explains how she uses a long arm quilting machine as a “paint with thread machine” while creating art. She prepares an under-drawing and under-painting, then appliques fabric and other materials to the canvas using the long arm quilter.


SHOP our NEW! Books & Patterns and Exclusive Bundle Boxes at ShopNZP.com

SHOP Machine Embroidery Notions and Tools at ShopNZP.com
Shop Elastic, Cotton Webbing, Zippers & More at ShopNZP.com
Shop Clover Tools & Sewing Supplies at ShopNZP.com!
Shop Pellon Interfacing & Supplies at ShopNZP.com!
Shop Schmetz Sewing Machine Needles at ShopNZP.com!
For a chance to win a copy of the book, Quilt with an Embroidery Machine in 8 Easy Lessons from Eileen Roche and dime. Please leave a comment below.
Eileen Roche and dime will give away one Quilt with an Embroidery Machine in 8 Easy Lessons book to one US resident in the 48 contiguous states. Winner must reply within 30 days to the official giveaway announcement email message – sent from Nancy Zieman Productions.

Happy Quilting!
Team Nancy Zieman
Nancy Zieman Productions. LLC.
[image error]
Stitch it! Sisters is a production of NZ Productions LLC. Content in this feed is © copyright 2020 by Nancy Zieman Productions, LLC and may not be republished without written permission. You’re welcome to forward the email to a friend or colleague but it’s not okay to add the RSS feed automatically as content on a blog or other website. The FTC requires us to tell you that Nancy Zieman Productions, LLC has provided products by other companies in the course of doing business. The FTC requires us to advise you to take this information into consideration when reading this posting.
Make sure you are subscribed to Nancy Zieman Productions, LLC enews mailing list so you won’t miss a thing. Sign up at nancyzieman.com/blog/enews . And join us on YouTube, Facebook, Instagram and Pinterest!
July 28, 2020
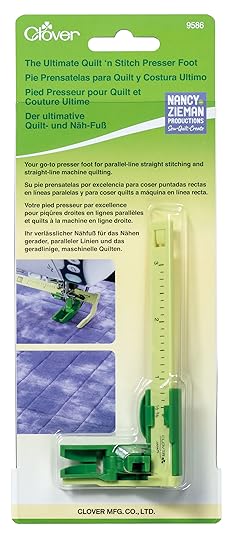
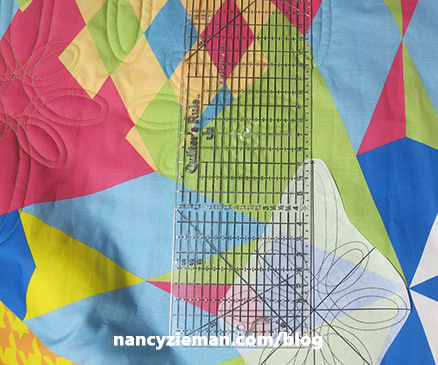
Straight Line Machine Quilting with The Ultimate Quilt ‘n Stitch Presser Foot
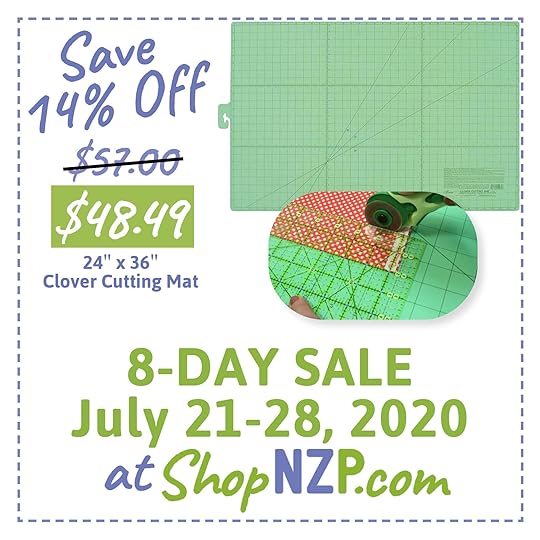
Straight Line Machine Quilting with The Ultimate Quilt ‘n Stitch Presser Foot! Learn straight line machine quilting techniques and see how to easily stitch multiple rows of stitching – with just one marked line, or no marked lines! Plus Gallery of Quilts and 8-Day Sale ends TODAY at ShopNZP.com!
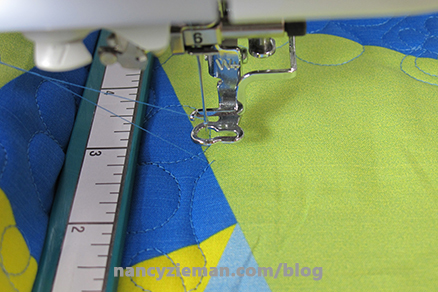
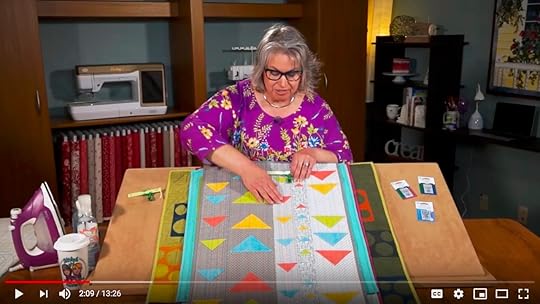
Watch Stitch it! Sisters Program 116, Straight Line Machine Quilting with The Ultimate Quilt ‘n Stitch Presser Foot and learn Deanna’s straight line machine quilting techniques featuring The Ultimate Quilt ‘n Stitch Presser Foot.
 Then, head over to ShopNZP.com and purchase The Ultimate Quilt ‘n Stitch Presser Foot along with our limited edition quilting project Bundle Boxes by the Stitch it! Sisters – available exclusively at ShopNZP.com!

SHOP our NEW! Books & Patterns and Exclusive Bundle Boxes at ShopNZP.com
NEW! Watch Stitch it! Sisters Program 116, Straight Line Machine Quilting with The Ultimate Quilt ‘n Stitch Presser Foot!
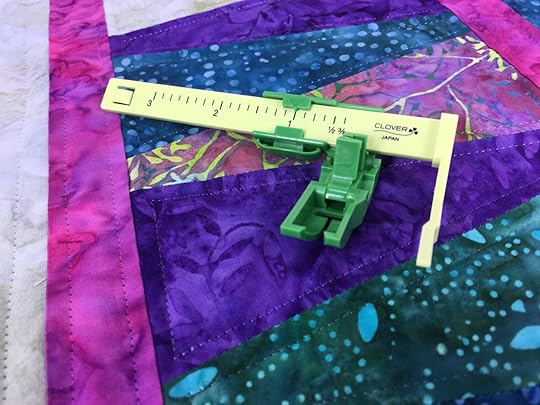
Watch Stitch it! Sisters Program 116, Straight Line Machine Quilting with The Ultimate Quilt ‘n Stitch Presser Foot. See a gallery of quilts while learning the many different straight stitching options for machine quilting wall hangings, table runners and quilts! The Ultimate Quilt ‘n Stitch Presser Foot is your go-to presser foot for parallel-line straight stitching and straight-line machine quilting. Achieve parallel-line straight stitching with the adjustable guide that locks in place. Set adjustable guide from 3/8″–3″, in 1/8″ increments.
Gallery of Quilts – featuring Straight Line Machine Quilting with The Ultimate Quilt ‘n Stitch Presser Foot
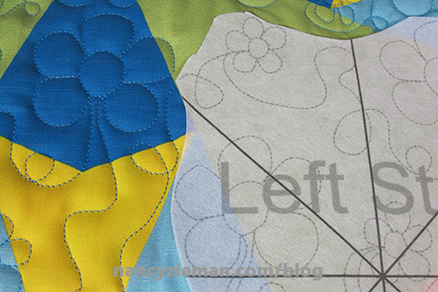
Modern Floating Triangles Wall Hanging features parallel line machine quilting with The Ultimate Quilt ‘n Stitch Presser Foot.
Folded Flying Geese Wall Hanging shows straight line machine quilting – in alternating directions – in each column.
Modified 1/4-Square Table Runner features diagonal line machine quilting with The Ultimate Quilt ‘n Stitch Presser Foot.
Fall Table Runner features “stitching in the ditch” with The Ultimate Quilt ‘n Stitch Presser Foot.
Dresden Columns Table Runner features echo quilting with The Ultimate Quilt ‘n Stitch Presser Foot.

Half-Hexi Mod Mini Quilt features sashiko stitching, and echo quilting with The Ultimate Quilt ‘n Stitch Presser Foot.
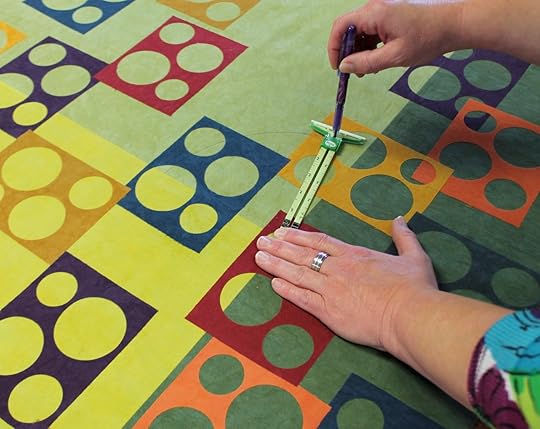
Reverse Die-Cut Circle Wall Quilt features inward and outward curves stitch with The Ultimate Quilt ‘n Stitch Presser Foot.
 Easily mark circles and curves with Clover’s 5-in-1 Sliding Gauge!
Nancy’s Stash Wall Quilt features straight line machine quilting – from one marked line – with The Ultimate Quilt ‘n Stitch Presser Foot.

Deanna’s Bob Ross Challenge Quilt features custom straight line machine quilting with The Ultimate Quilt ‘n Stitch Presser Foot.

Before straight line machine quilting with The Ultimate Quilt ‘n Stitch Presser Foot , first prepare quilt layers – for the quilting process.
Cut quilt backing and Pellon Fleece/quilt batting 4″-8″ larger than quit top.
Tape quilt backing to cutting table, to prevent wrinkles during the quilt basting steps.

Secure, or “baste”, quilt laters together with safety pins, or spray June Tailor’s Quilt Basting Spray to back side of Pellon Fleece, then turn fleece over and hand-press to wrong side of quilt backing.
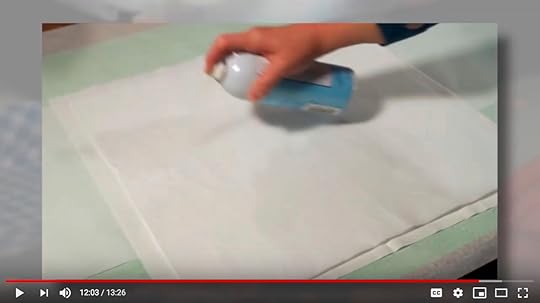
Spray June Tailor’s Quilt Basting Spray to top side of Pellon Fleeceand hand-press wrong side of quilt top to fleece.
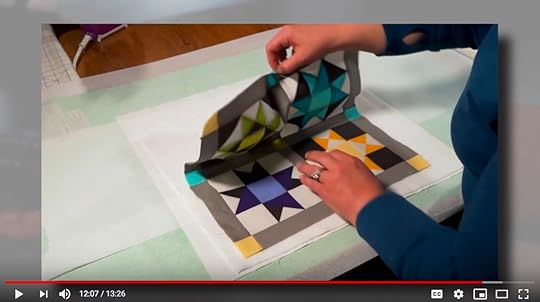
Quilt is now ready for straight line machine quilting, with The Ultimate Quilt ‘n Stitch Presser Foot!
Attach The Ultimate Quilt ‘n Stitch Presser Foot to your sewing machine. NOTE: Some machines, including our Baby Lock, require a shank adapter – available from your local dealer.
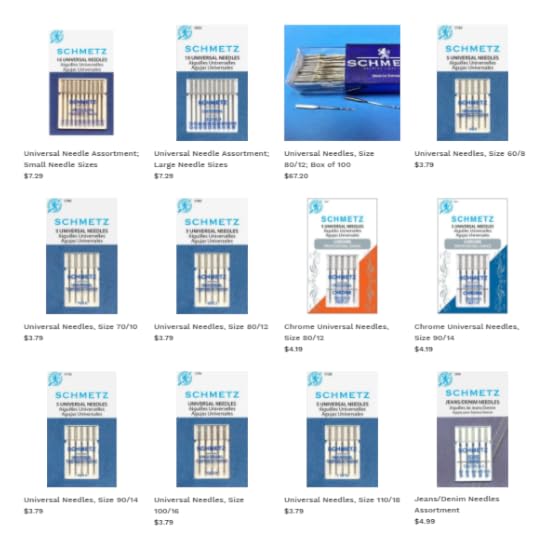
Set machine for a straight stitch (2.5-3.0 mm stitch length), and insert a new Schmetz Size 75-90 Quilting Needle.
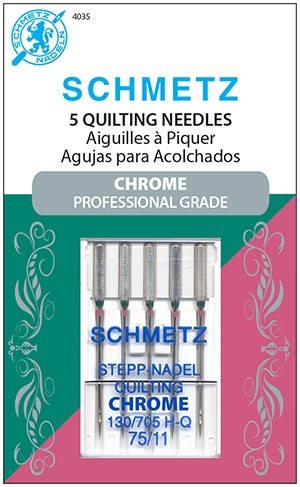
If you’ve opted to “spray-baste” quilt layers together using June Tailor’s Quilt Basting Spray, choose a new Schmetz Size 75-90 Super Nonstick Needle!


SHOP our NEW! Patterns and Exclusive Bundle Boxes at ShopNZP.com
Shop NEW! Elastics, Cotton Webbing, Zippers & More at ShopNZP.com
Shop NEW! Fabrics including 60 NEW! Quilt Basics Shades at ShopNZP.com!
Shop Pattern Sewing Suppies & Bundle Boxes at ShopNZP.com!
Shop Clover Tools & Sewing Supplies at ShopNZP.com!
Shop Pellon Interfacing & Supplies at ShopNZP.com!
Shop Schmetz Sewing Machine Needles at ShopNZP.com!
[image error]
For a chance to be the random winner of a Stitch it! Sisters 5″ Fabric Short Stack with exclusive S!S button & sticker, please leave a comment below letting us know if you have a wall hanging, table runner, or unfinished quilt in mind for Straight Line Machine Quilting with The Ultimate Quilt ‘n Stitch Presser Foot.
Nancy Zieman Productions will give away one Stitch it! Sisters 5″ Fabric Short Stack to one US resident in the 48 contiguous states. Winner must reply within 30 days to the official giveaway announcement email message – sent from Nancy Zieman Productions. Email Team NZP at info@ziemanproductions.com.
The randomly selected winner of a Stitch it! Sisters 5″ Fabric Short Stack with S!S button & sticker, from the July 21 No-Hassle Triangles Summer Table Runner Blog Posting, is Mary.
Their comment is, I have been going through “stash ” material and just finished an apron and table runner. Plan to continue with a fall table runner. Also want to do some coasters and hot pads that you showed recently.
Happy Quilting!
Team Nancy Zieman
Nancy Zieman Productions. LLC.
[image error]
Stitch it! Sisters is a production of NZ Productions LLC. Content in this feed is © copyright 2020 by Nancy Zieman Productions, LLC and may not be republished without written permission. You’re welcome to forward the email to a friend or colleague but it’s not okay to add the RSS feed automatically as content on a blog or other website. The FTC requires us to tell you that Nancy Zieman Productions, LLC has provided products by other companies in the course of doing business. The FTC requires us to advise you to take this information into consideration when reading this posting.
Make sure you are subscribed to Nancy Zieman Productions, LLC enews mailing list so you won’t miss a thing. Sign up at nancyzieman.com/blog/enews. And join us on YouTube, Facebook, Instagram and Pinterest!
Nancy Zieman's Blog

- Nancy Zieman's profile
- 21 followers

