
Nancy Zieman's Blog, page 129
April 18, 2015
2015 Adventure Quilt—Block of the Month #4
We are one-third of the way through the 2015 Adventure Quilt—my first Block of the Month journey. I’m planning my finished quilt to include 24 total blocks, making two scrap blocks each month from the same pattern with different fabrics.
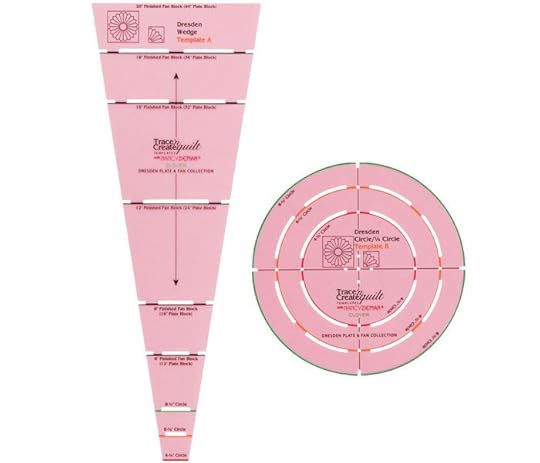
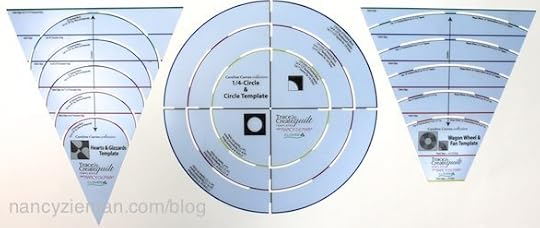
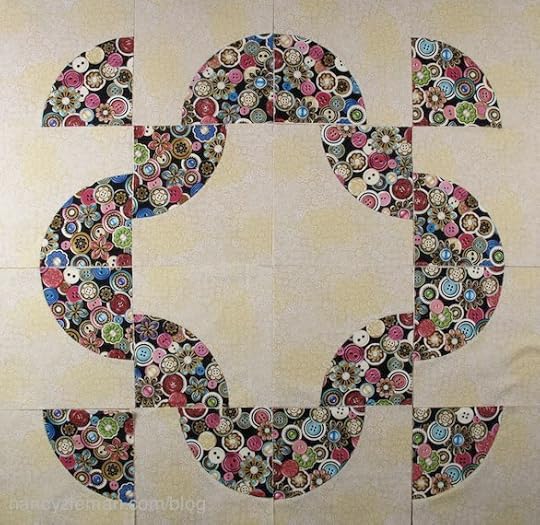
Our fourth Block of the Month pattern is the The Ferris Wheel Block. The Trace ‘n Create Quilt Template— Dresden collection is the quilting tool that helps you create this scrap-friendly block.
Remember, this quilt will be a scrap adventure for you and me. Total yardage for the entire quilt is not provided; rather we are working in a color palette of scraps (or Fat Quarters).
If you’d like this block pattern as a downloadable PDF, please click the “Print Post as PDF” button at the lower right of this post.
Notions, Fabrics and Supplies:
Assorted fabric scraps or fat quarters
Solid white fabric
Clover’s Trace ‘n Create Quilt Template—Dresden Collection
SofShape Fusible Interfacing
45 mm Pinking Rotary Cutter Blade by Clover
Fine Tip Water Soluble Marking Pen
Optional: Clover’s Point 2 Point Turner
Getting Started:
Throughout this adventure, I am working in a scrappy palette of three colors. As I rummaged through my quilting fabric scraps, I found that I had the most of these colors on hand.
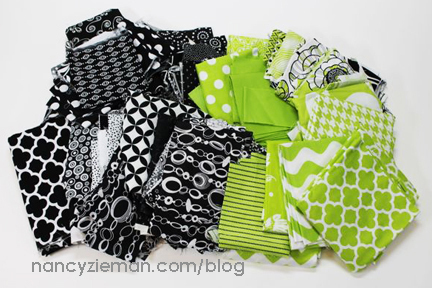
Keep in mind that you may need to add interchangeable pieces as the months progress. I found out last month that some of my go-to fabrics were now gone. As this quilt adventure progresses, you too may need to buy additional fabrics during the process. How’s that for an excuse to buy fabric?
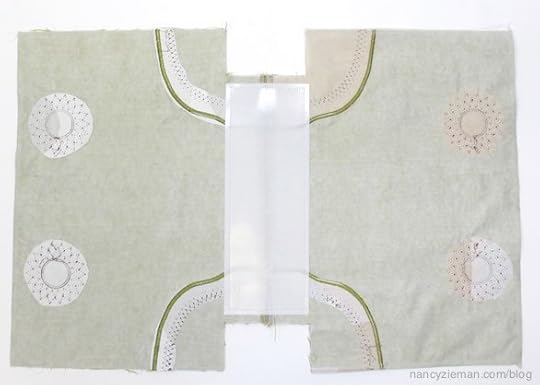
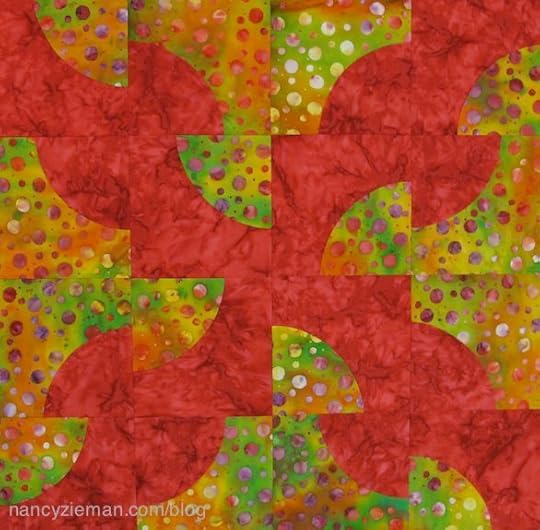
The Ferris Wheel Block
The block this month measures 12-1/2″ x 12-1/2″, and it measures 12″x 12″ once it is stitched into a final project. A 1/4″ seam allowance is included.
Create the Wedges:
Choose fabric strips and cut to these widths:
White print—2-1/2″ wide x 22″ long
Green print—1-3/4″ wide x 22″ long
Black print—1″ wide x 22″ long

Stitch strips together to form a row, as we did in January’s Block of the Month to create a strip set 6-1/4″ wide x 22″ long.
Press seam allowances in one direction.
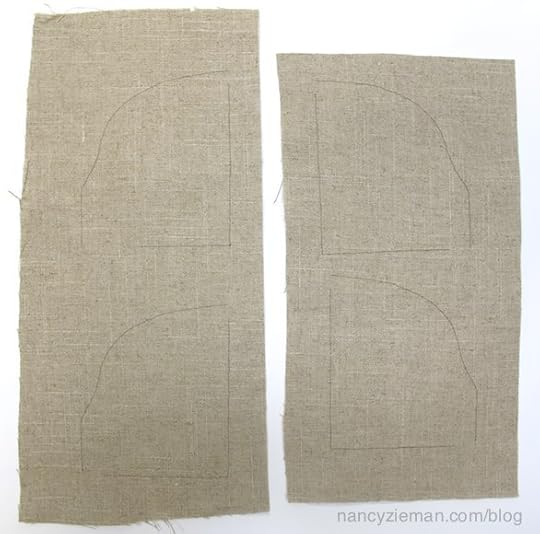
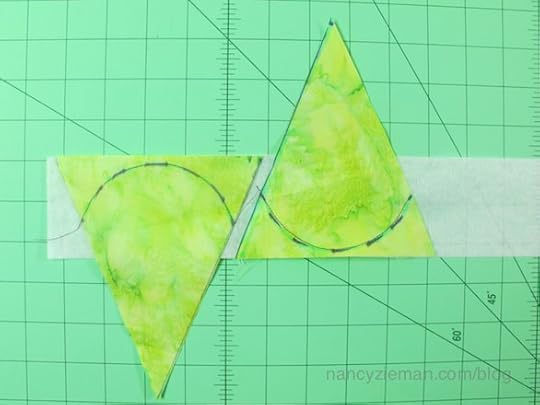
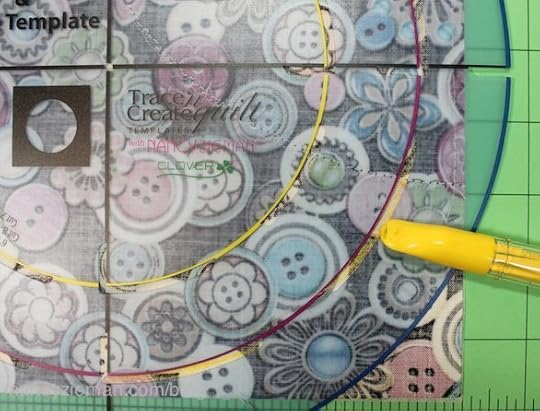
Align wedge template on strip set. Trace along each side of template. Rotate template, align along previously marked line. Trace along opposite side of template.

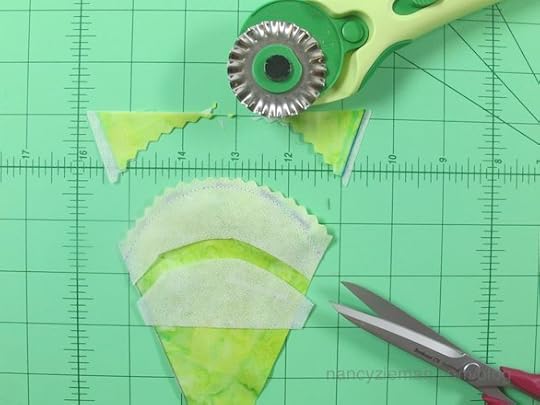
Rotary cut on the marked lines.

Cut solid white fabric strips 4-1/4″ wide x 22″ long
Use the Dresden collection Wedge Template and fine-tip pen to trace wedge shapes on the strip set and white fabric.

Rotary cut on the marked lines.

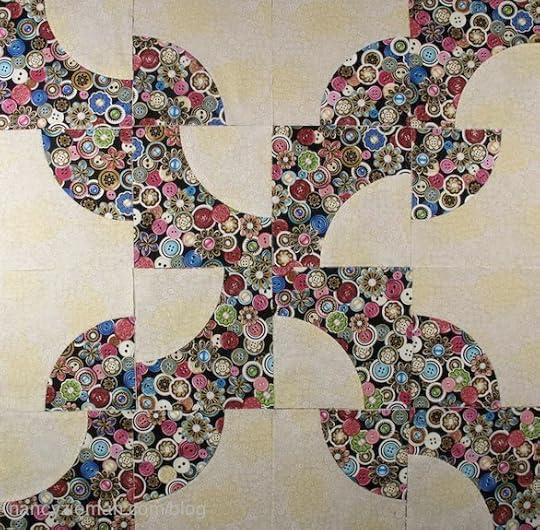
Create the Ferris Wheel:
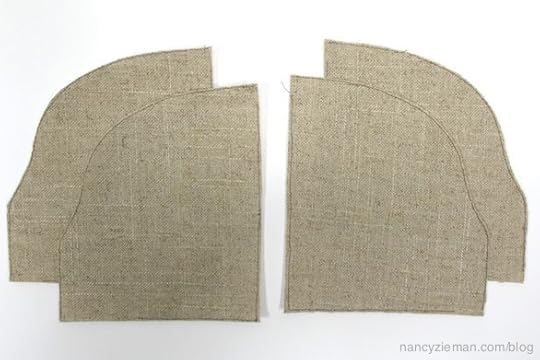
Separate the wedges into the two color/strip orientations. In the featured blocks, one group of wedges will have a polka dot strip along the top or wide end; the second group of wedges will have the polka dot strip along the lower/narrow end.
Ten strip set wedges are needed for each Ferris Wheel block.
Pair a colorful wedge with a white wedge; stitch ten pairs for each ferris wheel.
Press the seam allowances toward the darker fabric.
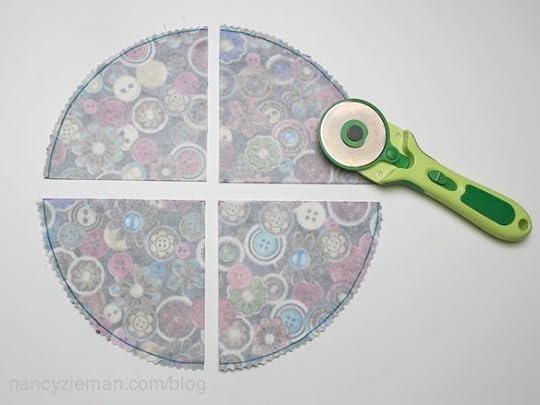
Stitch the pairs together to create a complete circle.

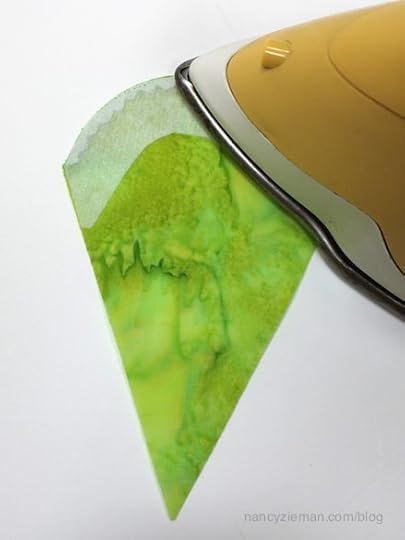
Lay the block right side down on the smooth side of the interfacing. Pin.

Use a 1/4″ seam allowance to stitch around the Ferris Wheel.

Trim 1/4″ past the stitching line using a pinking rotary blade .

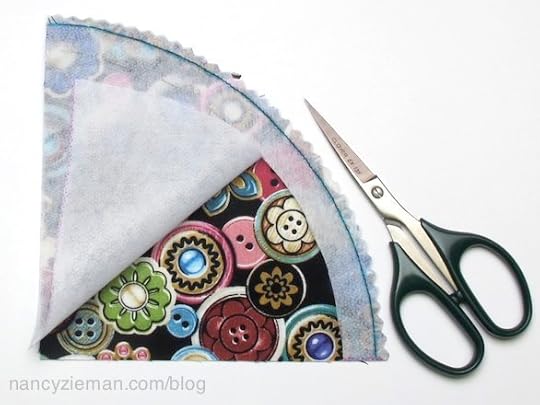
Carefully trim away the center of the interfacing, leaving about 1″.

Note from Nancy: Save the interfacing for making a smaller Ferris Wheel Block design. Or, use it to create the center circle, which happens in a few steps.
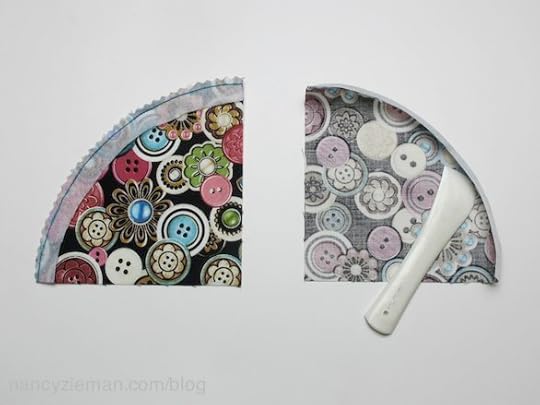
Use a point turner to smooth the curved edge as the interfacing is turned to the wrong side.

Press.

Audition the Background and Center Circle Fabrics:
Audition background fabrics for the quilt block.
See the alternate wedges used in both fabric audition photos below.


Create the Center Circle:
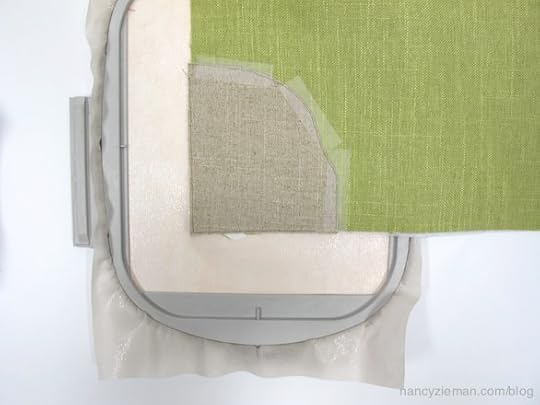
For the center block circles, layer and pin a 4-1/2″ square of interfacing onto a 4-1/2″ square of fabric, matching smooth side of the interfacing and right side of the fabric.
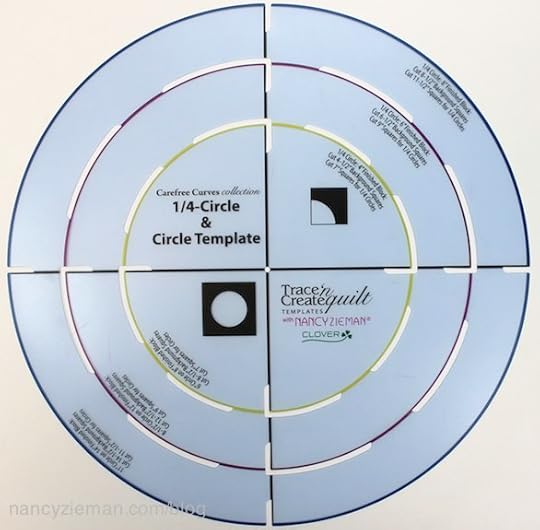
Use the Circle Template from the Dresden Collection to trace the smallest circle on the fusible, bumpy side, of the Sof Shape interfacing .


Stitch directly on the marked line using a slightly smaller stitch length.
Trim 1/4″ past the stitching line using a
pinking rotary blade.

Carefully remove the center of the interfacing, leaving about 1″.

Use a
point turner to smooth the curved edge as the interfacing is turned to the wrong side.

Press.

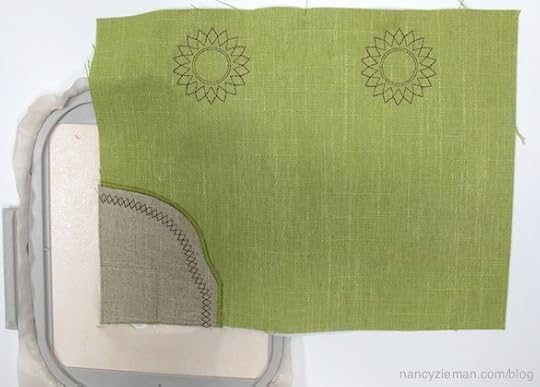
Pin the finished circle to the center of the Ferris Wheel block.

Note from Nancy: You may find the circle template is too large for the block center, covering up the narrow fabric strips. Simply use a glass or cup to trace a smaller circle size. If you choose a see-through glass, you’ll also be able to fussy-cut your centers.

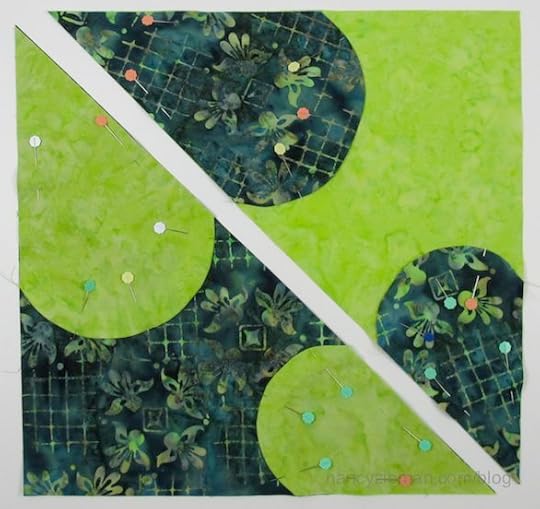
Center the Circles on the Background Fabric
Center the Ferris Wheel Quilt Block on the 12-1/2″ x 12-1/2″ background. Pin.
Also center and pin the center circle to the block.
Edgestitch or zigzag stitch both circles—the Ferris Wheel design and the center circle block to the background fabric with monofilament thread.

Press.

Stitch a second block from the remaining wedges.

Share your 2015 Adventure Quilt Blocks Socially
If you have a blog site, website, or online social sewing group, feel free to grab the code and share this button.

If you are on social sites like Instagram, Twitter, Flickr or Facebook, let all your friends know you are working on The 2015 Adventure Quilt Blocks by tagging your post with the hashtag: #NZBoM.
The hashtag is a searchable “word” associated with an event or activity, which, when searched on popular social websites, like Instagram, Twitter, Flickr, and Facebook, shows every single post using that hashtag. Even if you don’t personally know that quilter, you’ll see her/his progress and a photo. Hashtags are a fun way to network and connect with people who share similar interests.
What would a quilt look like?
As part of this Block of the Month series, I’ve included ideas of what a quilt might look like if you made it with only this month’s block. Some of the concepts have sashing and others do not. I hope you like this brainstorming session!
This table runner is constructed using five total blocks in the two featured color variations. The first white border gives a peaceful break in the overall bold green and black design.

The following quilt uses 49 Ferris Wheel blocks set in an altered “Trip Around The World” quilt layout and framed with a large border. This quilt will be called Trip Around the Ferris Wheel.

With white tone-on-tone cotton sashing, this traditional quilt setting is bright and fresh. The cornerstones are created using the circle template, using the instructions (above) for the Ferris Wheel appliquéd circle centers.

For more Dresden quilt ideas, watch
Sew Grand Dresden Quilts on Sewing With Nancy:

To watch Sewing With Nancy on your iPad, iPod Touch, or iPhone, download the app .
Link to all the 2015 Adventure Quilt Block of the Month Series
(In the 2015 Adventure Quilt Block of the Month series, we’ll be making twelve fun blocks from five different templates/tools: Carefree Curves Template, Dresden Template, Grandmother’s One-Patch Template, Lone Star Template, and the No-Hassle Triangles Gauge.)
See the previous three 2015 Adventure Quilt Blocks HERE.
An InLinkz Link-up
Watch for the next block to arrive on the third Saturday of each month!
Bye for now,

Content in this feed is © copyright 2015 by Nancy Zieman and may not be republished without written permission. You’re welcome to forward the email to a friend or colleague but it’s not okay to add the RSS feed automatically as content on a blog or other website.
Nancy Zieman—author, pattern designer, businesswoman, producer, and national sewing authority—is the host of the popular show Sewing With Nancy®, which appears exclusively on public television stations across the United States and Canada. Follow Nancy’s blog at NancyZieman.com/blog and sign up to receive Nancy’s E-News for the latest news in sewing, quilting, and creating.


April 16, 2015
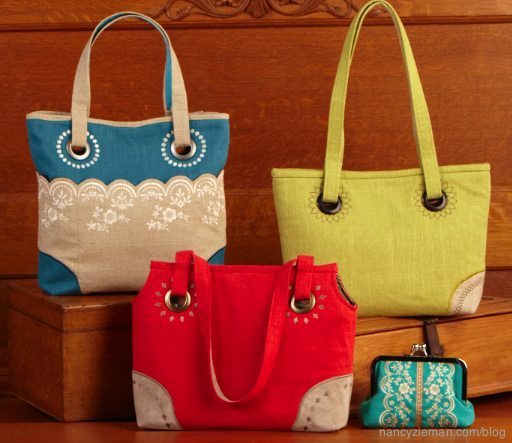
Handbags 2 – Designer Knockoffs
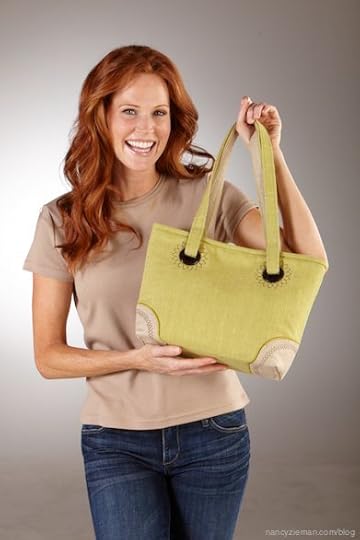
Eileen Roche and I teamed up to create Designer Handbags, using an embroidery machine to add high-end designer details. Many of you asked for more options to embroider on your handbags. We set forth and developed more embroidery designs, which incorporate trendy over-sized grommet accents. Handbags 2—Designer Knockoffs is this week’s online Sewing With Nancy online streaming video. We also have a companion book with 28 embroidery designs.
Here’s a preview of what you’ll see on TV and in the book!
All of the embroidery designs start with the first thread color stitching on the stabilizer. The vertical and horizontal stitching lines provide perfect placement for the fabric.

The remaining embroidery stitches the design, plus guidelines for later cutting and placing the grommets.

Corner accents are also embroidered with coordinating appliqués. The placement line is the first thread color of the embroidery design.

Then, a placement line for the appliqué is automatically stitched.

Even the appliqué shapes are an embroidery design! Simply embroider.
Cut
Position. And yes, I used office tape.
Then comes the fun part, stitching the designer details.
There are even embroidered lines for trimming the corners.

The lining, which is backed with headliner , an ideal spongy-type stabilizer for handbags, is embroidered with the grommet placement circles.

Then the snap placement is embroidered. First a rectangle is stitched to show what size plastic stabilizer, Create ‘n Shape , to cut. The following stitches secure the plastic stabilizer. The last step of this embroidery stitches the vertical markings to show exactly where to cut the fabric for the snap placement!
Both the outer handbag and the lining are assembled, starting with sewing the lower seam. On the outer bag, Create ‘n Shape , the plastic bag bottom stabilizer, is also added.

After the side and corner seams of the outer and lining bags have been sewn, the two bags are nested together and the grommets are added. No measuring needed—perfect alignment!


Watch Handbags 2 – Designer Knockoffs on Sewing With Nancy online.
To watch Sewing With Nancy on your iPad, iPod Touch, or iPhone, download the app.


Included with this 80-page book is a CD of all of the embroidered designs you’ll need to complete three bags and a clutch—a total of 28 designs. Eileen and I would like to give away a copy. Simply leave a comment telling us your favorite of the four bags pictured below. A random winner will be announced April 30.


The random winner of a copy of the Quilt with Carefree Curves book and a set of the Carefree Curves Template is Linda G. who said, I really like the Mohawk Trail for its elegance and window-like options and the Drunkard’s Path for its graphic energy. Thanks for an interesting method to make sewing curved shapes easier and more consistent.
Bye for now,
Content in this feed is © copyright 2015 by Nancy Zieman and may not be republished without written permission. You’re welcome to forward the email to a friend or colleague but it’s not okay to add the RSS feed automatically as content on a blog or other website.
April 14, 2015
Sew a Casserole Carrier in Time for Your Next Potluck
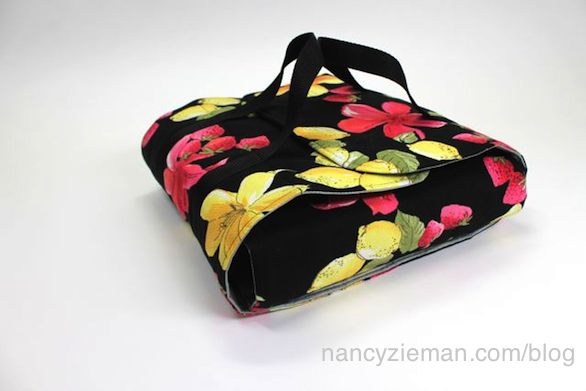
Stitch this Casserole Carrier project in an evening or two. Then, let your tasteful carrier help you get a handle on things. Cook, place a casserole in the center, wrap and GO! An insulated carrier is perfect for picnics and potluck dinners. The inner insulated pocket lets you store a hot or cold pack to keep the temperature of your dish just right. The carrier folds flat when not in use and can be laundered.

Supplies:
7/8 yard Fabric A (carrier body)
1/2 yard Fabric B (pocket)
2 yards 1″ wide black webbing/strapping
Optional: 1/3 yard Fabric C (instead of webbing/strapping handles) and 1″ Create A Strap Interfacing
7/8 yard Quilted Iron Quick
1/4 yard hook and loop tape
Matching thread
Note from Nancy: For the casserole carrier I’m creating today, I’m using the same fabric for the body and pocket instead of using Fabric A and Fabric B. Contrasting fabrics work great, too.

Construction:
Cut fabrics:
Fabric A: Cut two 13″ x 16″ rectangles (pocket base and handle base)
Fabric B: Cut one 13″ x 44″ rectangle (pocket)
Fabric C: Cut two 4″ x 36″ rectangles (handles)
Quilted Iron Quick : Cut two 13″ x 36″ rectangles (carrier lining)
Make the pocket by folding the 13″ x 44″ rectangle in half, meeting the 13″ ends.
Stitch a 1/4″ seam along the 13″ edges.
Press seam open; turn the pocket tube right side out, centering the seam. Press.
Edgestitch the 13″ edges.

Complete the Pocket Panel
Fold Fabric A pocket base in half, meeting 13″ ends. Pin at fold to mark center. Repeat, to mark center of the pocket.

Position and pin the pocket to the right side of Fabric A. Baste pocket to Fabric A along the length close to the cut edges.

Center and stitch a 5-1/2″ loop side section of the hook and loop tape to the right side of one short edge of the base.

Center and stitch a 3″ hook side of the hook and loop tape to the reflective/silver side of one short edge of one Quilted Iron Quick section.

Meet and pin completed pocket base to Quilted Iron Quick , right sides together, checking to ensure hook and loop tape sections are on opposite ends.
Round the corners using a template included in Hot and Handy Projects .
Stitch 1/2″ seam around the outer edge, leaving a 6″-8″ opening at the center of one long edge for turning.

Note from Nancy: To reduce bulk when trimming, use pinking shears or a rotary pinking blade. It is a great time saver, since the zigzag edge of pinking shears/blade removes excess fabric as it trims.
Turn the pocket panel right side out. Press edge. Edgestitch around outer edge, stitching the opening closed.

Stitch between lengthwise edges, 6″ from each short edge of the panel.
Prepare the Handle Panel
Center and stitch the 3″ loop side of the hook and loop tape to the right side of one short edge of the Fabric A handle base.
Center and stitch a 5-1/2″ hook side of the hook and loop tape to the silver side of one short edge of the remaining Quilted Iron Quick section.
Join the handle base and Quilted Iron Quick section, right sides together with a 1/2″ seam, ensuring hook and loop sections are at opposite ends. Trim, press, turn and edgestitch as for the pocketed panel.

Using the strapping handles, stitch the short ends together with a 1/2″ seam allowance. Press seams open. (See Hot and Handy Projects for details on creating fabric handles.)
Attach Handles to Handle Panel
Fold handle base in half, meeting short ends. Mark center with a pin.
Position handle on handle base, 3″ from each lengthwise edge, meeting handle seams to base center marks. Pin in place.

Measure 6″ from each short edge. Mark from lengthwise edge to lengthwise edge. This indicates the starting and stopping points for stitching the handle strapping.
Edgestitch each side of both handle strips between the 6″ markings.
Join the Casserole Panels
Place the pocket panel fabric side up. Mark the center of the pocket.
Meet short ends of the handle panel: Mark the center.
Place the handle panel at a right angle to the pocket panel, fabric side up, meeting center marks. The handle panel will be approximately 11-1/2″ from ends of the pocket panel. Pin in place.
Stitch along three sides to secure the layers, leaving the fourth side open for inserting a hot or cold pack.


A complete supply list and detailed directions are included in Hot and Handy Projects.

For a chance to win a copy of Hot and Handy Projects, leave a comment letting us know what fabric theme you’ll be using to create your Wrap ‘n Go Casserole Carrier. Maybe a floral carrier, or a food or kitchen themed novelty print, how about a sports team theme? Let us know in the comments. A random winner will be announced on April 21.
The Hot and Handy Projects book includes:
Full color photographs and illustrations
Step-by-step instructions
Double-wire binding so pages lay flat when open—no more struggling to keep your page from turning or bending; plus it’s easier to keep your book right next to you as you work
Soft cover with 44 pages
Bye for now,
Content in this feed is © copyright 2015 by Nancy Zieman and may not be republished without written permission. You’re welcome to forward the email to a friend or colleague but it’s not okay to add the RSS feed automatically as content on a blog or other website.
April 11, 2015
Add Nancy Zieman to Your Smart Phone

There is a good chance you own a smart phone. You may be reading this blog post on your smart phone right now. The technology has really changed the way we operate and has become quite a time saver. In an effort to save you more time, we want you to have the Nancy Zieman Blog button on your smart phone. When you tap that button, which will look like a regular app, you go straight to the blog. Keep your smart phone or tablet right by the sewing machine to have all the sewing tutorials and project directions at your fingertips.
Note from Nancy: You will be able to WOW your family and friends because this trick can be done to any website. If the site has a special app image, it will show up on your home screen. If the app doesn’t have a special image, it will simply make a tiny square picture of the website homepage for your home screen.
![]()
I have put together a few easy steps for you to add the home screen button to your device:
Click this link to see directions for Android phones and devices.
Click this link to see directions for iPhone and Apple devices.
Watch Sewing With Nancy online.
To watch Sewing With Nancy on your iPad, iPod Touch, or iPhone, download the app.
Bye for now,
Content in this feed is © copyright 2015 by Nancy Zieman and may not be republished without written permission. You’re welcome to forward the email to a friend or colleague but it’s not okay to add the RSS feed automatically as content on a blog or other website.
April 9, 2015
Quilt Easily with Carefree Curves Templates
Looking for a quilt block on the internet or in a reference book? Have you noticed the unusual names given to quilt blocks? One of the most unique monikers, Hearts and Gizzards, dates back to the late 1800s. The gizzard shape, opposite the recognizable heart motif is not something many modern-day people will recognize. The unique block is the focus of this Sewing With Nancy online program, Quilt with Carefree Curves. Watch online, on PBS, or DVD.
Learn a carefree approach for constructing this once-difficult block using Trace ‘n Create Quilt Templates—Carefree Curves.
Carefree Hearts & Gizzards
In last Thursday’s blog posting I previewed the first program of this 2-part TV series. If you didn’t see the traditional way of seaming opposing curves, you might want to click and read. It isn’t an easy technique! But there’s a solution, take the carefree approach using fusible interfacing.
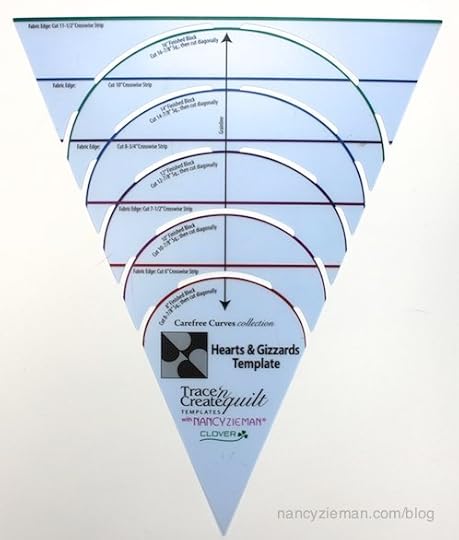
Select the Hearts & Gizzards Template. You can create five quilt-block sizes from super-sized to traditional: 16-1/2″, 14-1/2″, 12-1/2″, 10-1/2″, and 8-1/2″ blocks.
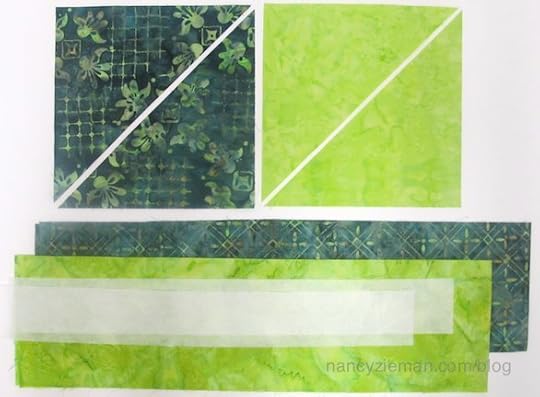
Select two fabrics, contrasting in color.
For every two blocks, cut one background square from each fabric. (See template for sizes.)
Cut background squares in half diagonally.
Cut crosswise strips from both fabric colors for Hearts & Gizzards shapes. For every two blocks, cut four Heart & Gizzard shapes from each fabric. (Even the strip sizes are printed right on the template—how easy is that!)
Cut crosswise strips of lightweight fusible interfacing, such as Sof Shape —2-1/2″ to 3-1/2” crosswise strips depending upon size of heart. (Packaging contains full instructions.)
Align the template on the wrong side of the crosswise strip, placing the template “fabric edge” marking of selected size along the top edge of the fabric.
Use a fine-point fabric marker to trace along the template. (I used a Sharpie so you could see the markings.)
Starting at one edge, trace both sides of template with a fabric marking pen/pencil.
Trace curve within die-cut areas of template.
Rotate template 180-degrees; align template “fabric edge” with fabric lower edge and side of template with previously traced line. Trace untraced side of template and curve within die-cut areas.
Repeat tracing and rotating process until desired quantity is achieved.
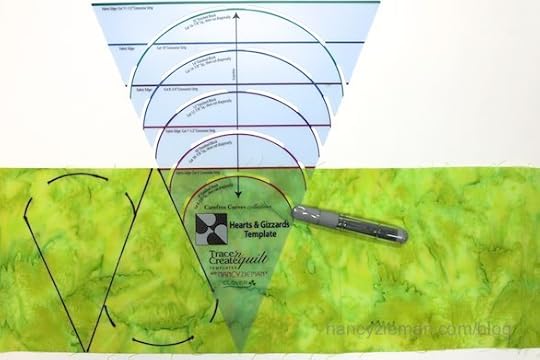
Cut along straight trace lines, using a rotary cutter, ruler, and mat.
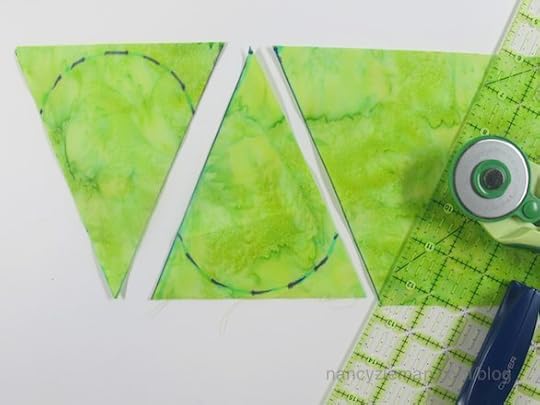
Align top edges of fabric and interfacing, right side of fabric to fusible side of interfacing; pin. Position top of next wedge along the lower edge of the interfacing; pin.
Stitch along the curved markings with a short stitch length.
Cut apart.
Trim away excess fabric. For best results, use a pinking shears or pinking rotary cutter blade .
Trim away excess interior interfacing, leaving 1″ of interfacing.
Turn interfacing to wrong side.
Press curved edge, making certain seam is at the edge.
Pin two Hearts & Gizzards shapes to a contrasting background triangle as illustrated.
Machine stitch shapes to background, using a straight stitch, zigzag, or blind hem stitch.
Repeat process for a reversed color option.
Stitch triangles of opposite color combinations together, using a 1/4″ seam allowance. Press seam allowance open.
Use two sizes of hearts within one block for a design variation.
Place four block sections together to see how the design unfolds.
There’s More!
When you watch online, you’ll also see the Wagon Wheel option, using the third template of the Carefree Curves Template Set. I think that I’ll save that technique for another blog!
Watch Quilt with Carefree Curves, two-part Sewing With Nancy online.
To watch Sewing With Nancy on your iPad, iPod Touch, or iPhone, download the app.


For a chance to win a copy of the Quilt with Carefree Curves book and a set of the Carefree Curves Template, tell me which Carefree Curve Design from the show is your favorite. Now, I didn’t show you all of them, there are more to see on the TV show! A random winner will be announced April 16.
Bye for now,
Content in this feed is © copyright 2015 by Nancy Zieman and may not be republished without written permission. You’re welcome to forward the email to a friend or colleague but it’s not okay to add the RSS feed automatically as content on a blog or other website.
April 7, 2015
Sew Comfy Tablet Keeper

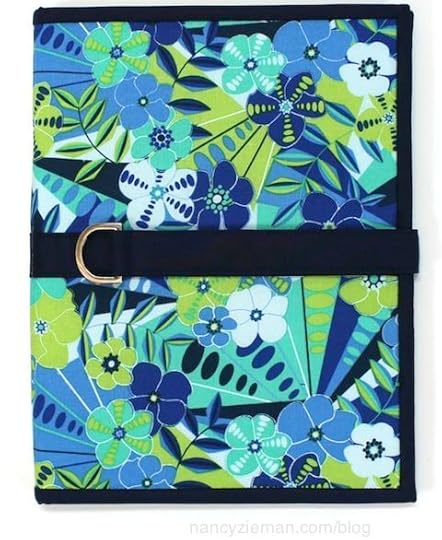
The Trace ‘n Create Tablet Keeper Template, a die-cut template that allows you to create personalized covers for electronic tablets, can now be customized for reading comfort! Today’s tutorial shows how to add elastic reading bands to your tablet keeper. Hands slip under the stretchy bands for comfortable reading.

Notions, fabrics, and supplies
The Original Trace ‘n Create Tablet Keeper Template
Or Clover’s Trace ‘n Create Templates–Tablet Keeper 2.0 Click here to view the Tablet Keeper 2.0 device listing . If you don’t see your tablet listed, email us at info@ziemanproductions.com and we’ll add your electronic device to the listings.
3/8 yd. 44″/54″ wide outer fabric
3/8 yd. 44″/54″ wide lining fabric
3/8 yd. 44″/54″ wide accent fabric for straps, binding, etc.
1-1/4 yd. interfacing, such as Pellon’s ShirTailor
3/8 yd. ultra firm stabilizer such as Pellon’s Peltex Ultra Firm Sew-in Stabilizer
Clover’s 1″ Create-a-Strap
Clover’s 5/8″ Create-a-Strap
Clover’s Precut Tablet Keeper Shapers, Large or Assortment
Clover’s Bags & Totes Hardware 1″ or 1-1/4″ D Ring , O Ring , or Rectangle Ring
Velcro Brand Sew-On Tape 5/8″, 1-1/2″
Elastic, 1/2″ wide polyurethane rubber or nonslip hair bands, 1/2 yd.
Elastic, 1″ to 2″ wide decorative elastic for reading bands, 2/3 yd.
Clover’s Fuse ‘n Bind (optional)
Clover’s Double-sided Basting Tape (optional)
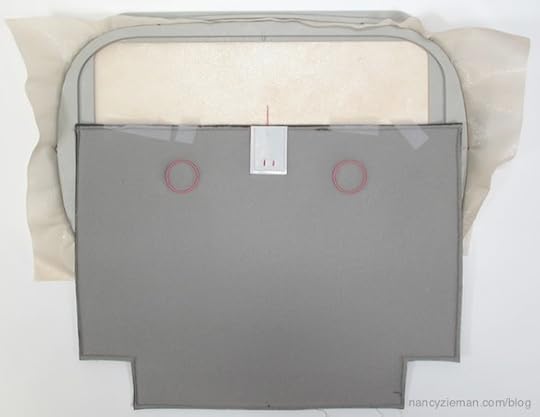
Here’s how to add Elastic Reading Bands to a Tablet Keeper
These customized instructions are abbreviated since the instructions within the Trace ‘n Create Tablet Keeper Template packaging show all the steps. I just wanted you to see the main points of creating a Tablet Keeper and how to customize it by adding stretchy bands.

After tracing and then cutting out the size that fits your electronic tablet, press-on fusible interfacing to the outer and inside rectangles. For the iPad, we traced the medium-sized die-cut areas of the Original Trace ‘n Create Tablet Keeper Template .

Create the strap as detailed in the instructions.

Place the strap on the fabric; stitch. Using the zipper foot, as photographed, provides for very accurate edgestitching. The foot glides along the side of the strap and the needle stitches along the edge. Taking time to test the position of the needle is important!

Use the Tablet Keeper Template, again, to mark the placement of the elastic straps. Mark on the inner fabric rectangle. Also, mark along the left edge of the template, marking the center. Not to worry, your markings are covered with a strip of fabric.

Position and baste elastic along the marked lines. We use headband elastic. I love the thickness of the elastic and the fact that it has a silicone under coating to prevent slipping. Not usually used for sewing, this hair care product is ideal for Tablet Keepers. Plus, there are so many great color options.

Layer inner fabric, Peltex, and outer fabric. Sew along the sides and lower edge, leaving the top open.

Measure 1″ from the outer edges of the inside-front cover. Position and “pin” a length of 1″ or 2″ decorative elastic. Aren’t these elastics fun? My staff and I like to use Clover’s Wonder Clips when “pinning” through multiple layers of fabric.

In the Tablet Keeper instructions I explain how to create an inner spine using Clover’s 5/8″ Create-a-Strap . Position and edge stitch the inner spine in place.

The Tablet Keeper Shapers are inserted between the layers to add stability to the project. It’s our secret ingredient to keep your iPad or other electronic reader safe and secure!

Add binding using your favorite technique. Again, the details are in the instructions.

We use Fuse ‘n Bind and Clover’s Clover’s Wonder Clips for a quick and even binding.
Here you can see the look of the Tablet Keeper from the inside.

Ta-dah! This is how the Tablet Keeper looks from the outside.
Tuck your hands under the elastic for comfortable reading.
I hope you’ve enjoyed this customized version of the Tablet Keeper. If you’ve made creative changes to the design, let me know in the comments!
Watch Sew Techie Covers on Sewing With Nancy, Part One and Part Two online.
To watch Sewing With Nancy on your iPad, iPod Touch, or iPhone, download the app.


Bye for now,
Content in this feed is © copyright 2015 by Nancy Zieman and may not be republished without written permission. You’re welcome to forward the email to a friend or colleague but it’s not okay to add the RSS feed automatically as content on a blog or other website.
April 4, 2015
Sew a So-Cool Picnic Tote
It’s that perfect time of year for toting food to picnics and cookouts. Whether you are planning a family outing for the day or packing the car for a road trip, this modified Weekender Tote will keep hot foods warm or chilled foods cool. Here’s how to make a personalized insulated tote. Simply modify my instructions found in Sew Simple with Rectangles & Squares by using double-quilted fabric lined with Insul-Film. In an afternoon, sew a So-Cool Picnic Tote. The large bag holds everything you’ll need and still stores flat when you are finished.

Modifying the Weekender Tote Instructions
The Weekender Tote instructions are based on a simple rectangle design, featuring double-sided quilted fabric. The dimensions for the tote are listed in the book, Sew Simple with Rectangles & Squares.
Cut out the rectangles from the quilted fabric, using a rotary cutter, ruler, and mat.
Assemble and attach the pocket and straps, following the instructions in the book .
Now, it’s time to modify the instructions.

Seam the Insul-Film. The Insul-Film will not be wide enough for the Weekender Tote’s required sizes.

Use Wonder Clips , instead of pins, to hold the Insul-Film together.

Stitch a 1/4″ seam through the Insul-Film using a Teflon Presser Foot , which will allow the foot to slide over the film.
Note from Nancy: I recommend a size 70 Klasse sewing machine needle when sewing through the Insul-Film. The small-sized needle will not create large holes in the Insul-Film.

Lay the Insul-Film on the inside of the bag base.
Use Wonder Clips to hold the film in place around the outer edges.


Baste around the bag base perimeter to secure the Insul-Film.

Continue to follow the Weekender Tote instructions to complete the bag, making sure to use Wonder Clips when applying the zipper.

Once the bag is finished, the lining is reflective and functional.

Watch Sewing With Nancy online
Learn how to create the original Weekender Tote. Watch Sew Simple with Rectangles & Squares online.

Watch Sewing With Nancy on your iPad, iPod Touch, or iPhone; download the app .

The random winner of a Hot and Handy Projects book was Joyce who said, Pot holders and placemats make nice gifts. I enjoyed reading the comments about your favorite sewn kitchen accessory after last week’s blog, How To Sew a Quick Pot Holder.
Bye for now,
Content in this feed is © copyright 2015 by Nancy Zieman and may not be republished without written permission. You’re welcome to forward the email to a friend or colleague, but it’s not okay to add the RSS feed automatically as content on a blog or other website.
April 2, 2015
Traditional Quilts with Carefree Curves Templates
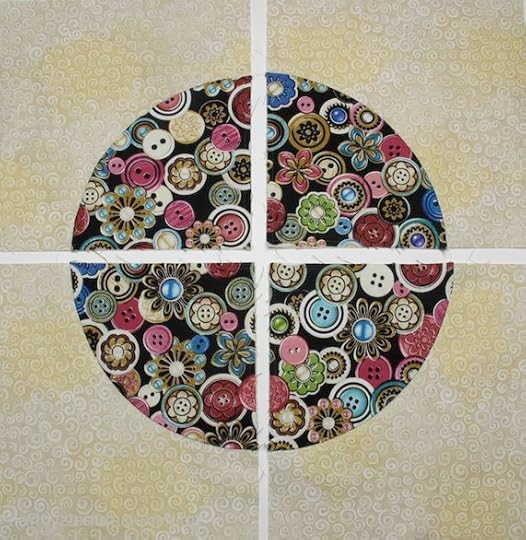
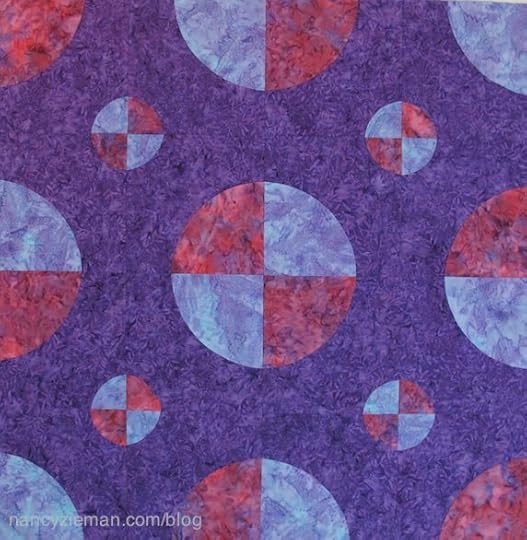
Curved seams have been in traditional quilt blocks for years. Unfortunately, curved seams are not necessarily fun or fast to sew, until now. Using two squares, yes squares, you can create a 1/4-circle block, similar to the well-known Drunkard’s Path design, without matching any opposing curved seams.
Watch and learn as I demonstrate the simple machine appliqué technique in this two-part Sewing With Nancy series, Quilt with Carefree Curves. It is the featured online Sewing With Nancy video.
Traditional Curved Piecing Technique
Let’s take a look at the traditionally cut pieces used to make a curved seam block. To sew the seam, opposing curves must be joined. Whenever I tried to sew this seam, I was quite unhappy with the results. I generally avoided all quilt patterns with curved seams, and I’m not alone.


Templates Come to the Rescue
Liking the looks of curved-seamed blocks, but totally not liking the technique, I thought about enlisting the help of a sewing product, fusible interfacing and some unconventional quilting techniques.
I found it easier to trace the curve shape and then sew those curves, rather than working with opposing seams. So, I developed a set of templates, Carefree Curves Quilting Templates. These templates assist you in making traditional to super-sized blocks.
To create the 1/4-Circle blocks, I use the circle template, which makes three sizes of blocks: 4-1/2″, 6-1/2″, and 8-1/2″. You’ll see how the other two templates are used next week!
How to Create Carefree 1/4-Circle Blocks
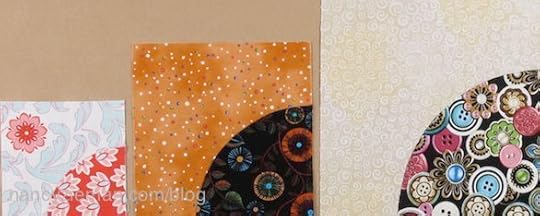
For every four blocks cut four background squares, and cut one square to create four 1/4-Circles. The sizes are printed on the template.
Cut a square of lightweight fusible interfacing the same size as the 1/4-Circles.
Layer the squares (fabric and interfacing), right side of fabric to the smooth side of the interfacing.
Place the template on fabric/interfacing squares. Trace circle and quarter markings.

Stitch along the traced line.

Trim away excess fabric. For best results, use a pinking shears or pinking rotary cutter blade .

Align ruler along quarter markings. Cut, using rotary cutter, ruler, and mat.
Trim away excess interfacing from the interior, leaving 1″ of interfacing.
Turn interfacing to wrong side. For best results, run a smooth edge Hera Marker along the stitching line to define the curve.
Press curved edge, making certain seam is at the edge.
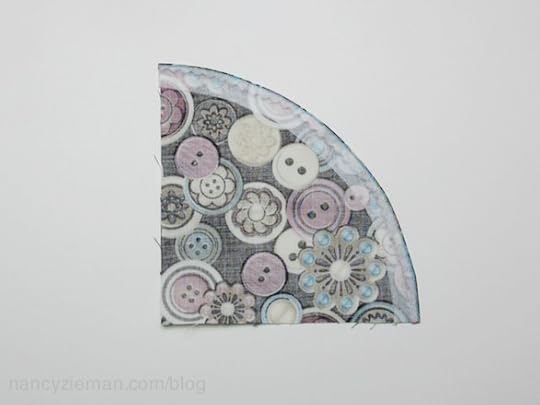
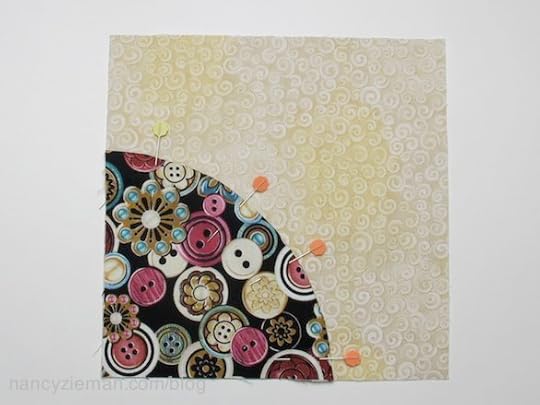
Pin 1/4-Circle to one corner of the background square. Each sewn/cut circle creates four blocks.
Machine stitch 1/4-Circle to block, using a straight stitch, blind hem, or zigzag stitch.
Design Options:
When you watch the Sewing With Nancy series, you’ll see all of these steps in motion! Plus, I’ll show how easy it is to create a variety of designs.
1/4-Circle—you’re not limited to one size of circle. Here I placed the larger 1/4-Circle in one corner of the block and the smallest 1/4-Circle in the opposite corner.
Propeller
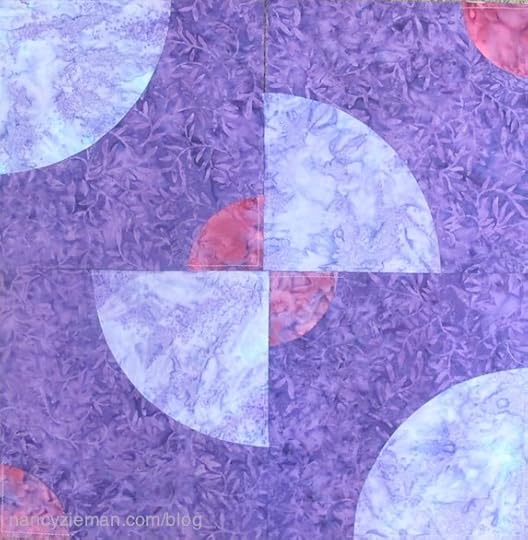
Mohawk Trail
Drunkard’s Path
Watch Quilt with Carefree Curves, the two-part Sewing With Nancy series online.
To watch Sewing With Nancy on your iPad, iPod Touch, or iPhone, download the app.

For a chance to win a copy of the Quilt with Carefree Curves book and a set of the Carefree Curves Templates, tell me which Carefree Curve Design from the show is your favorite. Now, I didn’t show you all of them, there are more to see on the TV show! A random winner will be announced April 16.
The random winner of the book, Sew Amazing Scarves is Gail Beam. She said, I really like the shirred scarf and the date night scarf.
 Bye for now,
Content in this feed is © copyright 2015 by Nancy Zieman and may not be republished without written permission. You’re welcome to forward the email to a friend or colleague but it’s not okay to add the RSS feed automatically as content on a blog or other website.
March 31, 2015
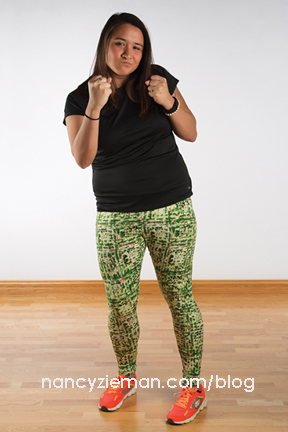
Leggings: Easy To Sew For Any Shape or Size
“I could never pull that off.”
When it comes to fashion trends, nearly everyone is guilty of thinking it. You see a woman in stylish, unique clothes, and you say, “You look wonderful! I would never look good in that.” This, friends, is the language of defeatist thinking! Particularly with a trend like patterned leggings, which look great on any body type, the fear of trying something new is truly unwarranted.
So in an effort to expand a few horizons, we grabbed a bushel of knit fabrics, a few brave employees, and went to work sewing up our own patterned leggings.

Brightly colored leggings with graphic prints are perfect for any style, any age, and any figure. With simple patterns often times involving only one or two pieces per pair of leggings, the sewing process is super simple, too.
Our first model is Lynn, Store Manager. For you local gals, you may have spotted her bustling about Nancy’s Notions, arms usually brimming with fabric and notions, laughing with customers in her signature cheerful way. The warm, vibrant colors in her leggings really let her spirit shine. For a woman always on the move like Lynn, leggings are a perfect solution for comfortable, yet work-appropriate bottoms that let her bounce around the store uninhibited.

Graphic designer, Aileen, is known around the office as being a sweet, even-tempered kind of girl. Get her on the volleyball court, however, and you’ve got a whole different animal. In the gym, the quiet, creative designer transforms into Coach with a capital C. Competitive, passionate, and aggressive, she takes command of any court she crosses (take that, Pirates!). For sporty women like Aileen, patterned leggings are a way to pump up practices. Athletes need a lot of elasticity in their garments, and leggings are the perfect choice to bring personality to workout time.
Up next is Donna, Director of Creative Services. Confident, fierce, no-frills Donna takes command in the creative marketing department. Even for a professional powerhouse, wild patterned leggings are not out of the question. When paired with the right top and accessories, leggings can add a little rock-n-roll to the daily grind. The key to making leggings work in the workplace is to remember to cover up the caboose with a long tunic-style top or a comfy sweater, as Donna has done here.

Model # 4: Roxanne (that would be me). I’m the copywriter for Nancy’s Notions, a position that takes full advantage of my creative spark and quirky, offbeat personality. I try not to take anything too seriously, and I like my clothes to reflect that. When I wear patterned leggings to work or going out with friends, it lets people know they’re not dealing with a run-of-the-mill kind of girl. In order to avoid looking like a crazy cat lady, however, I always pair offbeat leggings with a neutral (usually black) top or dress.

Our final gorgeous model is Kathy, VP of Digital and Print Production. This year marks 30 years working at Nancy’s Notions for Kathy. She and Nancy are close friends, and she carries a distinguished air that intermingles with a cheeky sense of humor and killer sense of style. For Kathy, leopard print is an extension of her personality, calling to mind the clever, independent spirit of a jungle cat. She makes no apologies for accomplishing all that she has, and these sassy leggings are a testament to that.

We hope our little employee fashion show has inspired you to create your own pair of ferocious patterned leggings. For a deluxe, silky feel you can use ITY knits like we did. If you prefer something that’s a bit easier to sew, cotton blends might be more up your alley.
Still wary of sewing with knits? Watch Sewing With Nancy’s: Sew Knits with Confidence Part One and Part Two online Or, reference her book, Sew Knits with Confidence to master this skill in no time. All that’s left is to pick your favorite legging pattern and don’t forget to customize it to your shape —that will prevent fabric gathers in unflattering places.
Good luck and best stitches!
-The Nancy’s Notions team

Bye for now,
Content in this feed is © copyright 2015 by Nancy Zieman and may not be republished without written permission. You’re welcome to forward the email to a friend or colleague but it’s not okay to add the RSS feed automatically as content on a blog or other website.
March 28, 2015
How To Sew a Quick Pot Holder
By Donna Fenske, Nancy’s Notions Guest Blogger
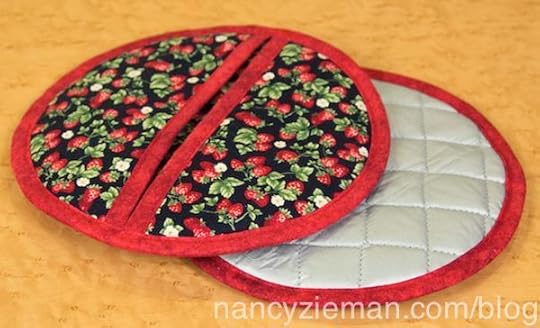
Add a pop of color to your kitchen, BBQ or holiday event, match your next party theme, or create a fun hostess gift with these quilted pot holders. The pot holders are created in minutes using a few simple tricks.
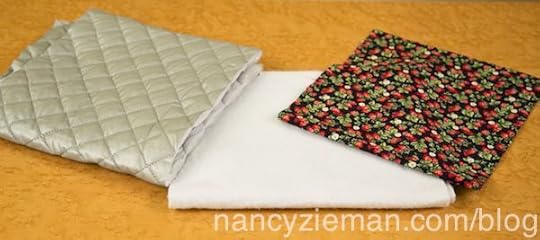
Supplies:
You’ll need four different fabrics for this project: 1/4 yard cotton quilting fabric ; 1/4 yard coordinating cotton quilting fabric for binding; 1/4 yard of Insul-Bright ; and 1/4 yard of Quilted Iron Quick Fabric .
Construction:
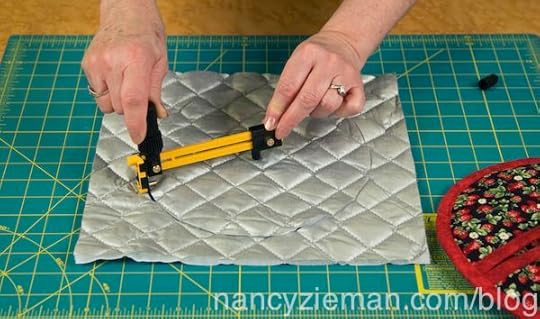
Using the Olfa Rotary Circle Cutter , cut two 8-1/2″ circles from both your cotton print fabric and the Quilted Iron Quick Fabric .
Cut one 8-1/2″ circle from the Insul-Bright .
Create pockets for your fingers by cutting one of the cotton print fabric circles and one of the Quilted Iron Quick Fabric circles in half.
Place the wrong sides of your cotton fabric on the shiny side of the Quilted Iron Quick Fabrics and zigzag the layers of each half together.

Make the base for the pot holder by layering the remaining circles of fabric— Quilted Iron Quick , shiny side down; Insul-Bright; and cotton fabric, wrong side down.
Zigzag the three layers together around the outer edge.
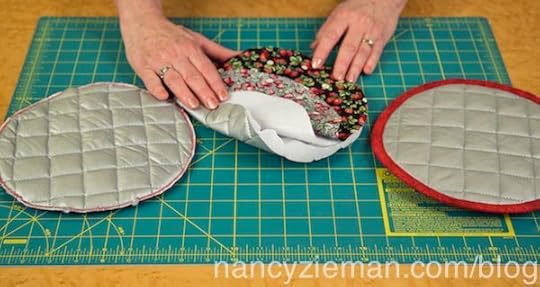
Select a cotton fabric that coordinates with your cotton print to make bias trim strips.
Cut 2″ wide bias strips from yardage or a fat quarter. Join short ends of bias strips, right sides together, with diagonal seams if cut from a fat quarter. You’ll need approximately 1-1/2 yards of continuous binding for the project.
Use a
Nancy Zieman's Blog

- Nancy Zieman's profile
- 21 followers

