
Nancy Zieman's Blog, page 125
July 18, 2015
2015 Adventure Quilt: Block of the Month #7

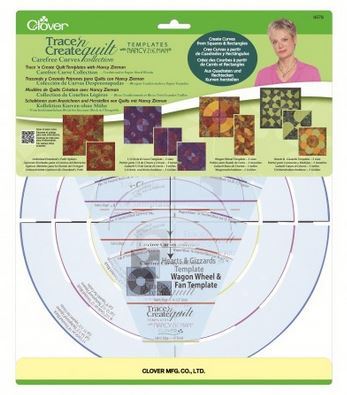
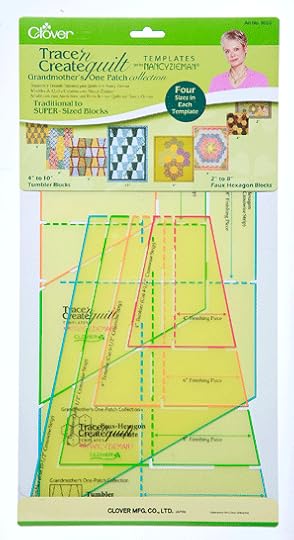
The seventh Block of the Month in The 2015 Adventure Quilt is the Modern Lady’s Fan. Using the Wagon Wheel & Fan Template from The Carefree Curves Template Collection, create a simplified version of a quilting classic.
If you’ve been following along, you know that this Block of the Month series is a scrap fabric adventure.
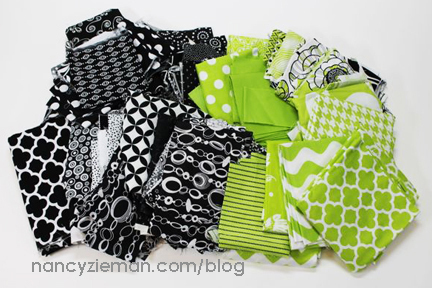
Notions, Fabrics, and Supplies:
Get started by choosing fabrics. Any three-color combinations will work. I had a surplus of black, white, and chartreuse green in my quilting fabric scraps.
Month: Lady’s Fan
All blocks in The 2015 Adventure Quilt measure 12-1/2″ x 12-1/2″, creating a 12″x 12″ finished block. 1/4″ seam allowances are included.
Supplies:
Assorted Fabric Scraps
Wagon Wheel & Fan Template from The Carefree Curves Template Collection
3/8″ Clover Bias Tape Maker
EZ-Steam II by Pellon
Fine Tip Non-Permanent Marking Pen
Maderia’s Monofilament Thread
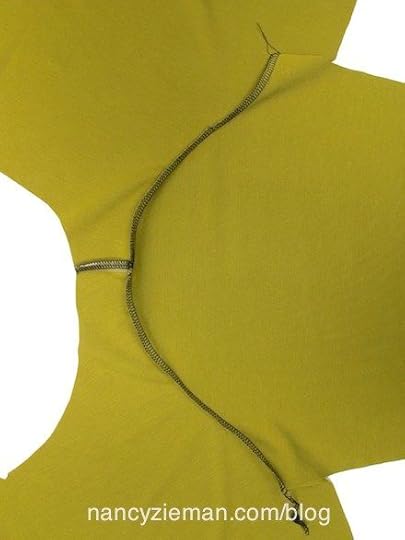
Build the Appliqué
Cut strips of fabric 7-1/2″ wide.
Align the lower Wagon Wheel & Fan Template along the 8-1/2″ circle marking and the upper edge along the second marking (blue line) from the top edge.

Trace the side edges and the curve.
Trace the fan shape on two different strips of fabric.
Each block will use two fan wedges.

Cut along straight lines with a rotary cutter.
Use scissors to cut along the curved lines.

Matching right sides and using a 1/4″ seam allowance, join the pair of shapes along one straight side.

Press seam allowance open.
Lay the shape on a 12-1/2″ x 12-1/2″ cut background square, matching the cut edges.
Pin.

Baste along the lower and left sides within the 1/4″ seam allowance to secure the shape to the background.
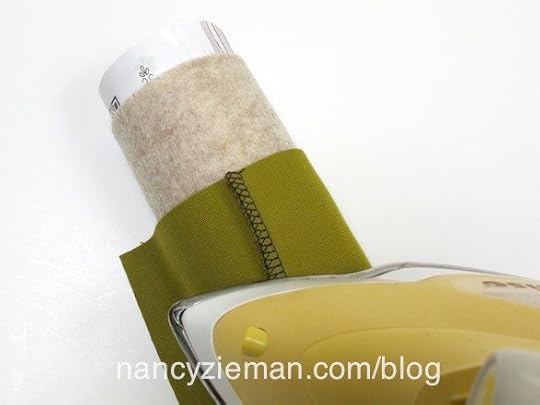
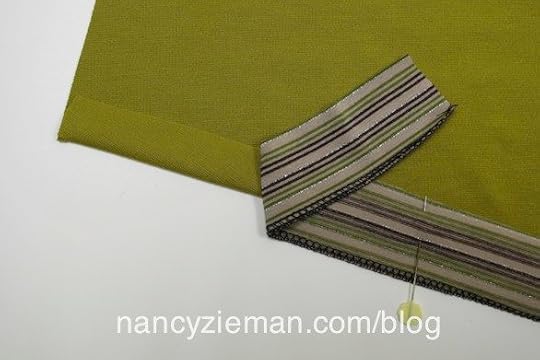
Create the Bias Tape
Cut bias strips of fabric 3/4″ wide.

Following the directions on the 3/8″ Clover Bias Tape Maker , feed the bias cut strip into the back of the tape maker.
Press the strip as it comes out the narrow end; edges folded toward center.

Apply the EZ-Steam II , a two-sided, pressure-sensitive fusible tape, to the wrong side of the bias tape.
With your fingers, press it in place.

Remove the paper backing from the EZ-Steam II.

Finish the Block
Position the bias tape over the curves to conceal the cut edges of the appliqué.
Press the tape in place.

Edgestitch each edge of the bias tape with monofilament thread .


Repeat these steps to cover the remaining cut edges of the appliqué shape.

Note from Nancy: If you are creating many Lady’s Fan blocks to be used in a single quilt, make sure the bias tape intersects the block’s edge at the same point on all the blocks. This will guarantee smooth circle shapes once the blocks are joined. See the Bull’s Eye Quilt idea at the end of this post.

Click the “Print Post as PDF” button at the lower right of this post to print out these instructions.
Share your 2015 Adventure Quilt Blocks Socially
If you have a blog site, website, or online social sewing group, feel free to grab the code and share this button.

If you are on social sites, let all your friends know you are working on The 2015 Adventure Quilt Blocks by tagging your post with the hashtag: #NZBoM.
The hashtag is a searchable “word” associated with an event or activity, which when searched on popular social websites, like Instagram, Twitter, Flickr, and Facebook, will show every single post using that hashtag. Hashtags are a fun way to network and connect with people who share similar interests.
What would a Quilt Look Like?
As part of this Block of the Month series, included are ideas of what a quilt might look like if you made it with only this month’s block. Some of the concepts have sashing and others do not.
Consider alternating the colors and the direction of this block to create a chain look in this contemporary design.

This quilt uses a traditional fan block setting to showcase the Modern Lady’s Fan blocks. Sashing and cornerstones have been added to the 48 blocks.

Like the quilt at the end of last month’s blog post , this block is ideal for creating “bull’s eyes” by grouping four blocks together.

Carefree Curve Ideas on Sewing With Nancy
Quilt With Carefree Curves (Part Two) on Sewing With Nancy, features a variety of ways to create traditional, curved quilt designs without the hassle. Watch online at your convenience!
The three templates in the Trace ‘n Create Quilt Templates—Carefree Curves Collection will provide you will variety of versatility.
To watch Sewing With Nancy on your iPad, iPod Touch, or iPhone, download the app.

Don’t Miss the Other 2015 Adventure Quilt Block of the Month Features
In the 2015 Adventure Quilt Block of the Month series, we’ll be making twelve fun blocks from five different templates/tools: Carefree Curves Template , Dresden Template , Grandmother’s One Patch Template , Lone Star Template , and the No-Hassle Triangles Gauge .
See all the 2015 Adventure Quilt Blocks HERE.
An InLinkz Link-up
Bye for now,

Content in this feed is © copyright 2015 by Nancy Zieman and may not be republished without written permission. You’re welcome to forward the email to a friend or colleague but it’s not okay to add the RSS feed automatically as content on a blog or other website.
Nancy Zieman—author, pattern designer, businesswoman, producer, and national sewing authority—is the host of the popular show Sewing With Nancy®, which appears exclusively on public television stations across the United States and Canada. Follow Nancy’s blog at NancyZieman.com/blog and sign up to receive Nancy’s E-News for the latest news in sewing, quilting, and creating.


July 16, 2015
Update Your Knit Sewing Skills
Knit fabrics and knit sewing patterns are ere enjoying a resurgence in popularity. The fashions are easy to wear and require minimal care, plus there are so many fabric options! If you’re new to sewing, or if it has been awhile since you’ve sewn with knits, update your skills by watching the Sewing With Nancy TV series, Sew Knits With Confidence, online.
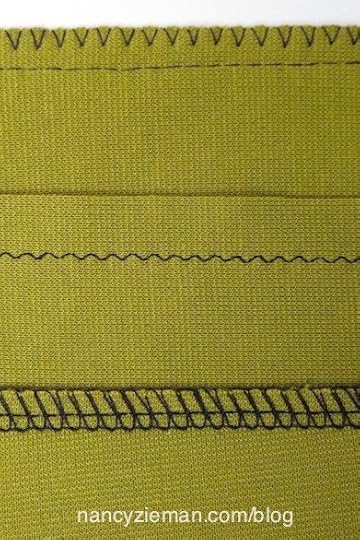
Knit Fabrics & Seams
Learn streamlined ways to stitch or serge seams. You’ll see that I don’t like to “over sew” the fabric; less is more when it comes to sewing knits.
Use your serger to effectively ease layers together. Sergers and knits are best buddies.
Learn pressing tips for knits.
Edge Finishes
Add a quick, yet clean finish to the neckline, sleeve, or any other outer edge. Since knits are the ultimate no-ravel fabric, you’ll quickly build your sewing skills and gain stitching confidence.

Flat construction
You’ll never feel like your stitching in circles when you adapt the flat construction way of assembling knits. Set the sleeve in flat, stitch the underarm and side seams in one step—what a speedy way to sew!
Hem options
Knit hems don’t have to be boring! Use a double needle, cover stitch, or even fusible web for trendy hem finishes.
Now for another color way!
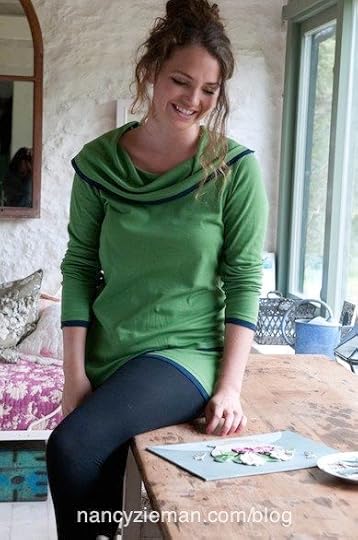
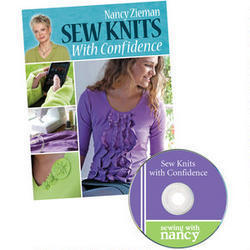
All the techniques featured on TV, plus many more, are in my book, Sew Knits with Confidence.
Watch Sew Knits with Confidence on Sewing With Nancy online.
To watch Sewing With Nancy on your iPad, iPod Touch, or iPhone, download the app.

For a chance to win a copy of Sew Knits with Confidence, leave a comment telling me which knit sewing technique you’ll try first. A winner will be randomly selected on July 30.

The random winner of Fancy Footworks 2 is Karen Kampen. She said, I have so much enjoyed learning more about the presser feet on Sewing With Nancy. I am amazed at how useful they are for all my sewing projects. I would love to try the Satinedge Foot, as I do a lot of appliqué. The Teflon foot has been on my wish list for a while now, too, and I am intrigued by the Roller Foot. I always learn a lot from your videos and demos.
Bye for now,
Content in this feed is © copyright 2015 by Nancy Zieman and may not be republished without written permission. You’re welcome to forward the email to a friend or colleague but it’s not okay to add the RSS feed automatically as content on a blog or other website.
July 14, 2015
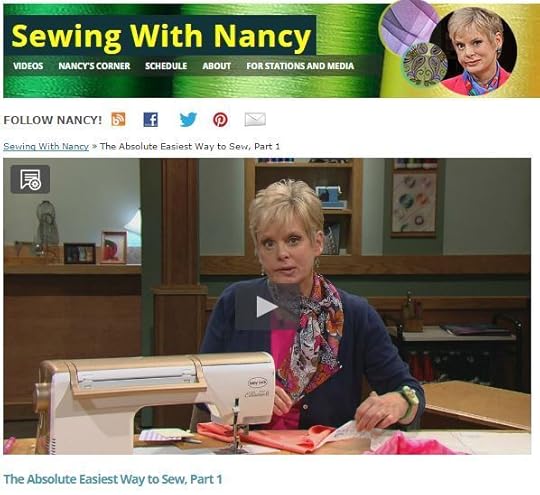
Absolute Easiest Way to Sew Mitered Patch Pockets

Sew it simple. Sew to have fun. How? It’s rather straightforward after you learn The Absolute Easiest Way to Sew! Pockets are my focus for this blog tutorial. Clever use of household tape will give you the guide to sew the outright simplest mitered corners.

The Absolute Easiest Way to Sew Mitered Patch Pockets
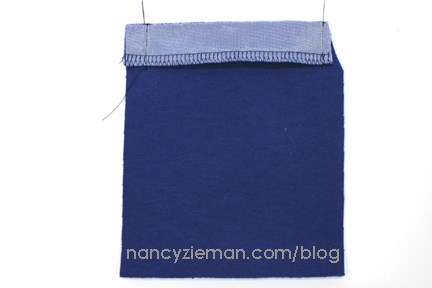
1. Interface Pockets
Cut lightweight fusible interfacing to hemline of the pocket.
Note From Nancy: Notice in this sample I’m sewing with a jersey knit. My interfacing is tricot knit, specific to knit fabrics. If you are using a woven, you will want to choose the interfacing suited for your fabric type.
Cut the interfacing along the hemline and trim off a scant 1/8″ of the interfacing on each pocket.
Position the interfacing as pictured, leaving space between the two interfacing pieces. Fuse interfacing to the wrong side of each pocket, following manufacturer’s instructions.

2. Finish the edge of the pocket hem by zigzagging, serging, or turning under 1/4″ and stitching.
3. Fold the hem to the outside of the pocket along the foldline.
4. Stitch the side seams.
5. Trim/grade the seam allowances. Trim the pocket allowance to 3/8″ and the hem allowance to 1/4″. Trim the upper corners diagonally.
6. Turn the hem to the inside of the pocket.

7. Prepare the pocket corners.
Use the 5-in-1 Sliding Gauge to measure, and mark twice the seam width from each side of the corner. (For example, with 5/8″ seams, mark 1-1/4″ on each side of the corner. For 1/4″ seams, mark 1/2″ on each side of the corner.)
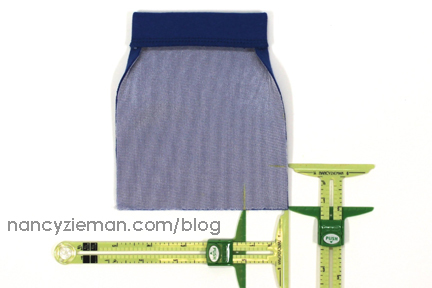
Place a strip of household tape or Sewer’s Fix-It Tape, on the wrong side of the fabric between the two marks, extending tape to each edge.

Fold the corner to a point, right sides together, aligning the marks and the tape.
Stitch from mark to mark, following along the tape edge.

Remove tape; trim the seam to 1/4″.

Turn corner right side out. Press. Repeat as needed to miter all corners.

The mitered corner pocket is now ready to topstitch to your project. Easy!
The Absolute Easiest Way to Sew Book
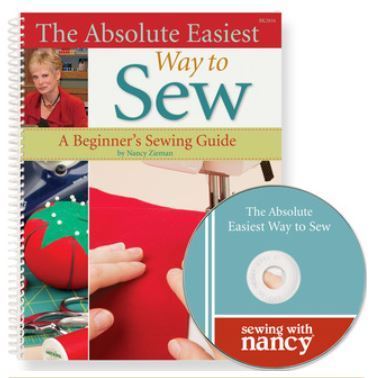
This book is a lifetime compilation of techniques that make sewing fun and easy for all skill levels. You’ll learn about sewing tools, easy sewing techniques, how to use a sewing machine and serger, how to select and use fabrics and patterns, and how easy it is to sew simple projects.
Chapters include:
Sewing Notions
Sewing Machine Confidence
Serger Spotlight
Patterns
Fabric Facts
Sewing Basics
Beyond the Basics
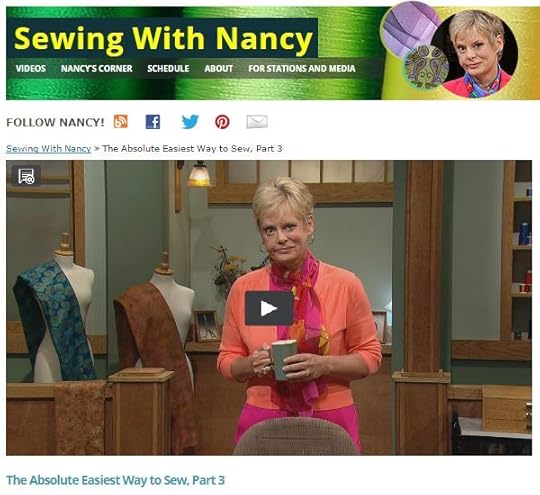
Watch me demonstrate this pocket technique online
The mitered-corner pocket is featured in the third episode of The Absolute Easiest Way to Sew. Watch online to learn more techniques
To watch Sewing With Nancy on your iPad, iPod Touch, or iPhone, download the app.
For your chance to win a copy of The Absolute Easiest Way to Sew book, please leave a comment telling me where you’ll be adding your newly stitched mitered patch pocket. A winner will be randomly selected on July 21.
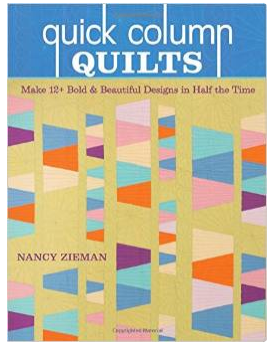
The random winner of Quick Column Quilts book is Brenda Ackerman. She said, As always, I just love watching your show! I had really never considered a column quilt, yet after reading the post and watching the episode; I will be creating one of these quilts and most likely many more. They are wonderful. Thank you for sharing everything that you do! Have a great day!
Bye for now,
Content in this feed is © copyright 2015 by Nancy Zieman and may not be republished without written permission. You’re welcome to forward the email to a friend or colleague but it’s not okay to add the RSS feed automatically as content on a blog or other website.
July 11, 2015
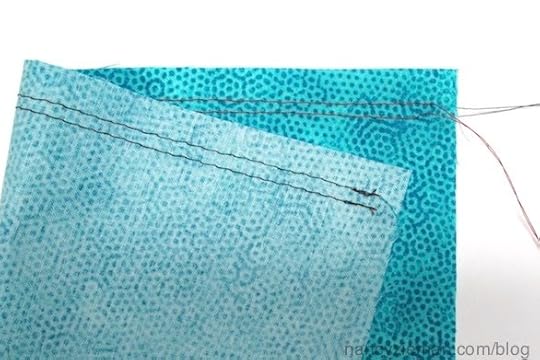
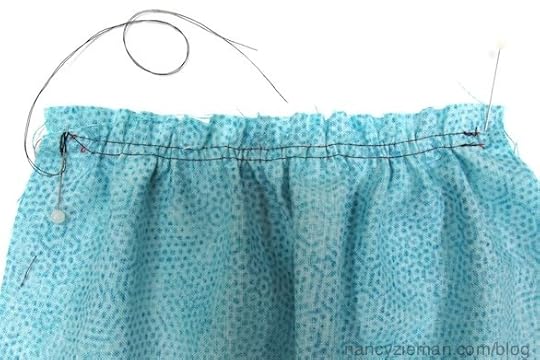
Ten Tips to Stitch Perfect Gathers
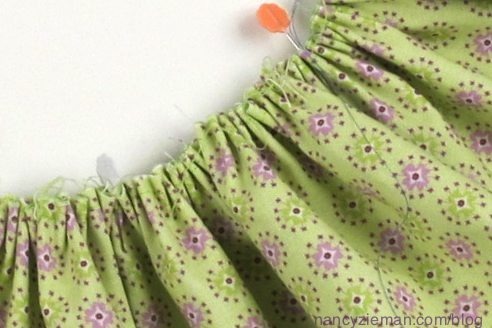
Let’s all gather ’round. I have collected and compiled 10 tips for gathering fabrics. Whether you are working with thick cotton to lightweight sheers, there’s a technique for you. Tips #3, #5, and #7 are included in the online episode of Sewing With Nancy. My go-to favorite tip is #8.
Tip #1—Use a different color thread in the needle and the bobbin
You’ll soon see that there are several ways to gather, and having contrasting thread colors is helpful when trying to distinguish between the needle and bobbin thread. It’s not necessary to use a high contrast as you’ll see in the photos, but I am sure that you figured that out already! (I used red thread in the needle and black thread in the bobbin in the below samples.)
Tip #2—The bobbin thread is easier to pull—sew from the right side
When choosing to gather with two rows of gathering threads, sew from the right side. The bobbin thread is always easier to pull. That feature has to do with how the stitches are formed. The right side of a gathered fabric is aligned to the right side of corresponding fabric. Having the gathering threads on the wrong side, will give you the flexibility to easily adjust the gathers during the pinning process.

Tip #3—Lock the threads at the beginning of the seam
This tip is not widely suggested, yet it saves me lots of time. Generally, it is recommended to wrap the beginning threads figure-eight style around a vertically placed pin to prevent the threads from pulling out during the gathering process. Stitching 2–3 stitches and then back stitching, does the same thing, but faster!
Tip #4—Test the stitch length
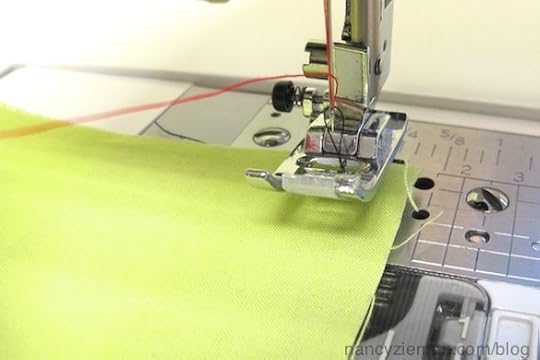
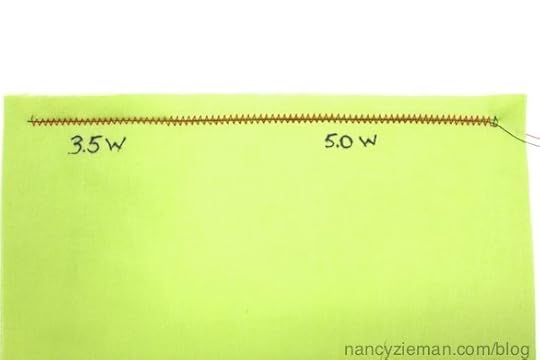
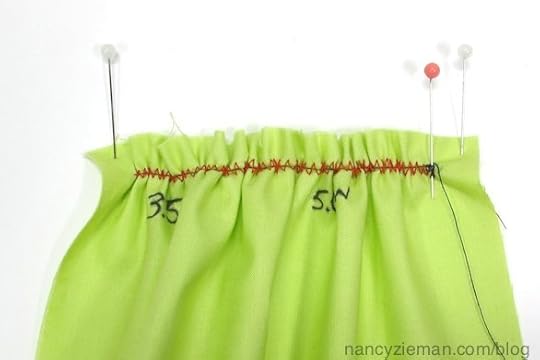
With medium to heavier weight fabrics, stitch two parallel rows of basting stitches within the seam allowance, using a relatively long stitch length, 4.0–5.0. The longest stitch is not always the best since there is too much “play” of the fabric in the long stitch, causing uneven gathers.
Use a much shorter stitch length with lightweight fabrics. The length used in this sample was a 3.5 stitch length.
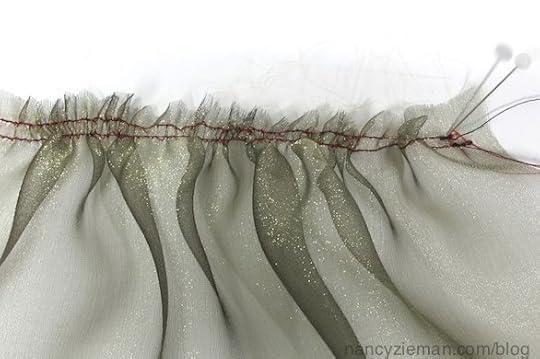
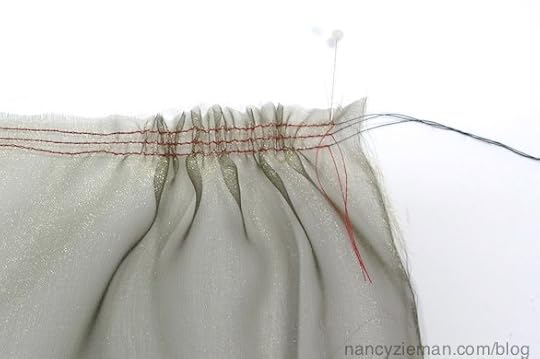
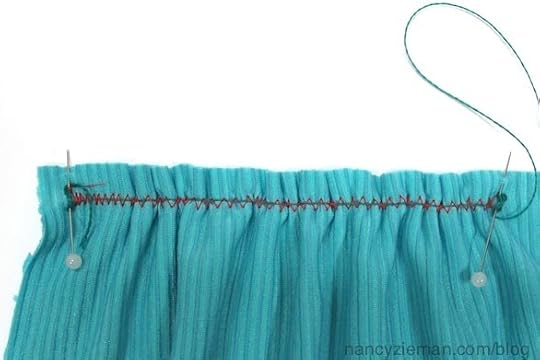
Tip #5—Add three rows of stitching to sheer fabrics
This is an optional tip, yet I find sheer fabrics lie flatter if three rows of stitches are sewn within the seam. It takes a little extra time, but worth it! Compare the smoothness of the gathers in the photo below compared to the photo above.
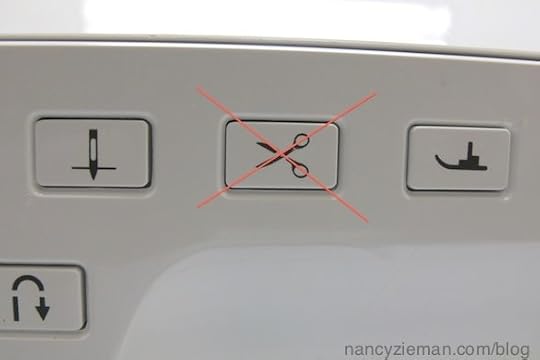
Tip 6# —Don’t use the machine thread cutter when gathering by pulling the bobbin threads
If you have the thread-cutting feature on your machine, it’s tricky to remember to pull the threads at the end of the seam and cut manually. The automatic thread cutter cuts the threads very close to the fabric—too close to easily find and then pull the threads.
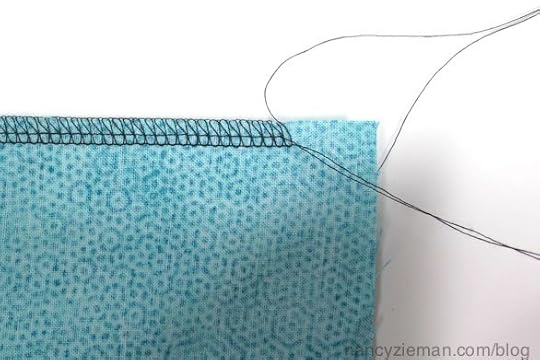
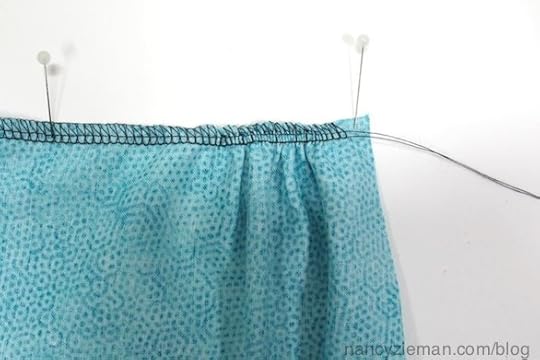
Tip #7—Use a serger for gathering when 1/4″ seams are allowed
Ah, I really like this way of gathering! It’s almost impossible to stitch two rows of basting stitches within a 1/4″ seam allowance. If you have a serger, simply serge from the wrong side of the fabric with a 4-thread overlock stitch and a long stitch length. Separate the needle threads from the looper threads. This time, pull the needle threads. Presto, perfect gathers.
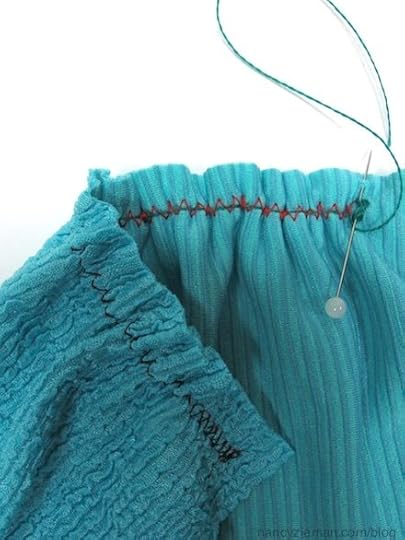
Tip #8—Zigzag over the bobbin thread for a secure gathering technique
This is my go-to gathering technique:
Stitch from the wrong side of the fabric.
Take one stitch, hold on to the thread tail of the needle thread and gently pull upward—the bobbin thread (black thread) will loop up.
Pull up the bobbin thread, pulling the thread as long as the area to be gathered. Lay the thread on top of the fabric.

Set the machine for a zigzag stitch. Test the stitch width and length. I prefer a 4.0–5.0 width and a 2.5 length. (The narrower zigzag width provides control of the gathers.)
Pull the long thread to gather the fabric!
Tip #9—Zigzag over a cord when gathering heavier fabrics
Stitch from the wrong side of the fabric.
Set the machine for a zigzag stitch. Test out the stitch width and length. I prefer to 4.0–5.0 width and a 2.5 length. The narrower zigzag width provides more control of the gathers.
Rather than zigzagging over the pulled-up bobbin thread, place a heavy cord on top of the fabric. Zigzag over the cord.
After stitching, anchor the beginning and ending of the cord by wrapping figure-eight style around a vertically placed pin.
Pull the free end of the cord and gather.
Tip #10—Gather using the no-stitching technique
Talk about easy! I use this technique when stitching doll clothes, lightweight fabrics, and other small projects.
Press Fuse ‘n Gather (a fusible gathering tape) to the wrong side of a strip of fabric along the top of the fabric. (Follow the iron setting as detailed on the package.) The stitches are tinted blue on the side of the tape that must face upward.
Pull the blue gathering threads at both ends, creating a 2″–3″ thread tail.
At one end secure the threads by wrapping them in figure-eight style around a pin.
On the other end, pull the blue gathering threads to create the gathers.
Ta dah!
I’ve written and demonstrated each of these gathering techniques. This is the first time that I’ve put them
all in one place. They are in my book, The Absolute Easiest Way to Sew.
Watch the 3-part series of The Absolute Easiest Way to Sew on Sewing With Nancy online.
To watch Sewing With Nancy on your iPad, iPod Touch, or iPhone, download the app.
What is your go-to gathering method? Leave your answer in the comments for a chance to win a package of Fuse ‘n Gather from Clover. A winner will be randomly selected on July 18.
It was heartwarming to read all of your wonderful comments sharing your favorite charity at the end of my blog titled, Patriotic Tumbler Flag Quilt Tutorial. The random winner of Trace’n Create Grandmother’s One Patch: Tumbler Block is Rosalind Gutierrez. She said: I support Arizona Blankets 4 Kids, which serves ill and traumatized children.
May you all continue to Bless the lives of others in need.
Bye for now,
Content in this feed is © copyright 2015 by Nancy Zieman and may not be republished without written permission. You’re welcome to forward the email to a friend or colleague but it’s not okay to add the RSS feed automatically as content on a blog or other website.
July 9, 2015
Free Motion Quilting—The Perfect Testing Ground
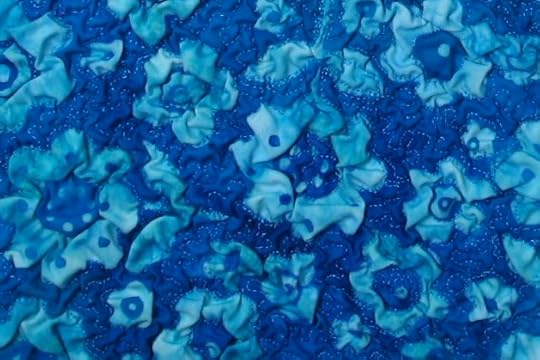
Free-motion quilting is a technique that often is intimidating to beginning quilters. Trust me, you don’t need courage to attempt free-motion quilting, only practice! Here’s the best way to practice; the stitches are completely camouflaged by textured fabric. It’s the perfect testing ground for this specialty technique, using a quilting foot.
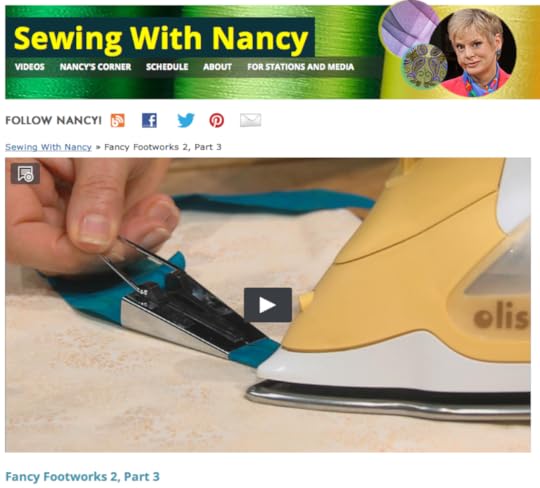
Watch me demonstrate this technique plus others during the final episode of Fancy Footworks 2, this week’s Sewing With Nancy Online Featured Video.
A Close-up Look at the Free-Motion Quilting Foot
The Free-Motion Quilting Foot Characteristics (I’m showing the Big Foot):
A shorter shank allows the foot to ride slightly above the fabric.
The large opening in the needle area gives a clearer view of the stitching.
Big Foot, a transparent saucer-like foot, easily glides over several thickness of fabric.

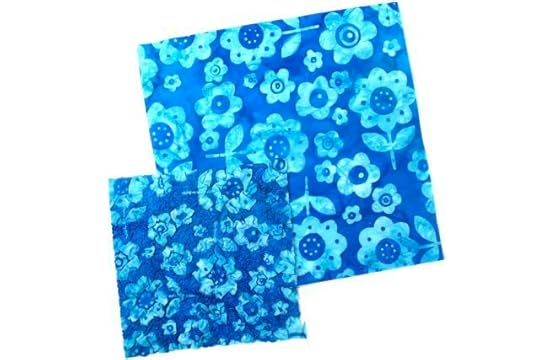
Choose a fun cotton fabric print with spaces between the print images.
Place a layer of Texture Magic behind the fabric and pin the two fabrics together. (Texture magic shrinks up to 30%—it’s the key element in no-fear free-motion quilting!)
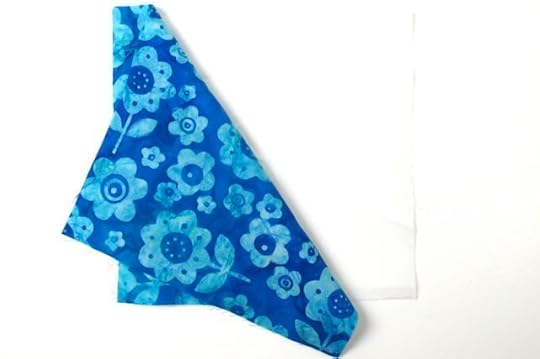
Set your sewing machine for a straight stitch and lower your feed dogs.
Guide fabric with your hands, stitching squiggles or shapes comparable to traditional “puzzle-pieces.” Use matching thread. (We chose contrasting thread for demonstration purposes.)
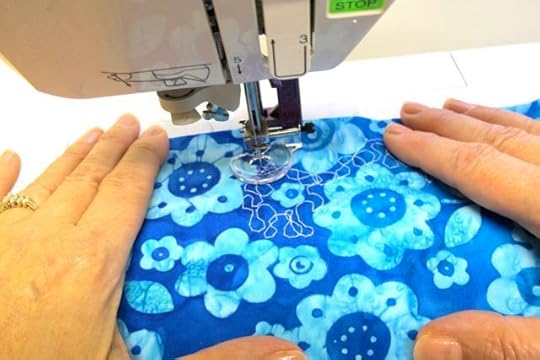
When finished, apply steam using a steam iron, and the fabric magically shrinks creating a beautiful permanent texture.
There’s more on the TV show!
Three additional presser feet are featured in Fancy Footworks 2 Part Three. Tune in and see the Bias Binding Foot—designed to assist in stitching bias tape on the edge of fabric, Sequins’ N Ribbon Foot—tames unruly trims like sequin tape, ribbon, or even rick rack, and the Buttonhole Foot.
If you missed the first two episodes, watch online: Part One, and Part Two.
To watch Sewing With Nancy on your iPad, iPod Touch, or iPhone, download the app.
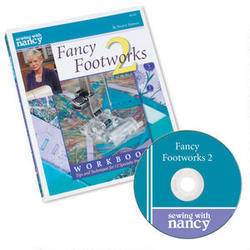
Now that you are acquainted with these assorted presser feet, which one will you try first? Let us know in the comments for a chance to win a Fancy Footworks 2 Workbook. A randomly selected winner will be announced on July 16.
Bye for now,
Content in this feed is © copyright 2015 by Nancy Zieman and may not be republished without written permission. You’re welcome to forward the email to a friend or colleague but it’s not okay to add the RSS feed automatically as content on a blog or other website.
July 7, 2015
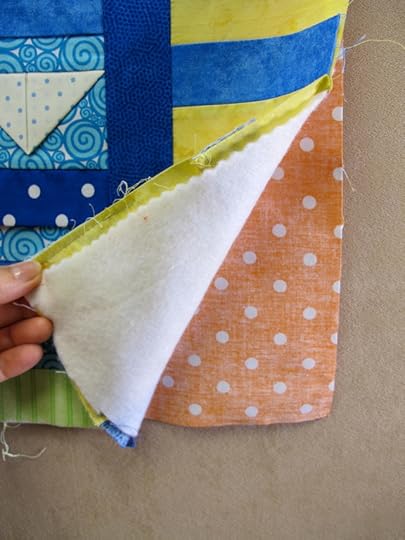
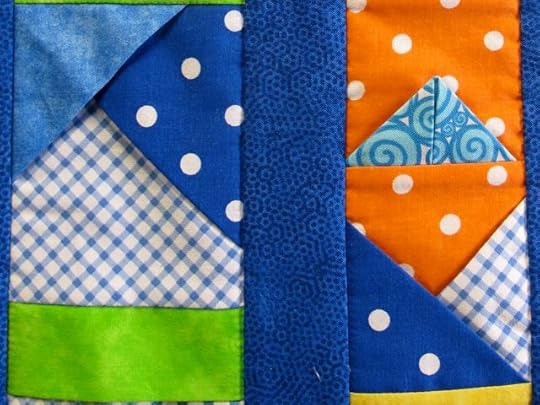
Scrap-Buster Folded Column Quilt
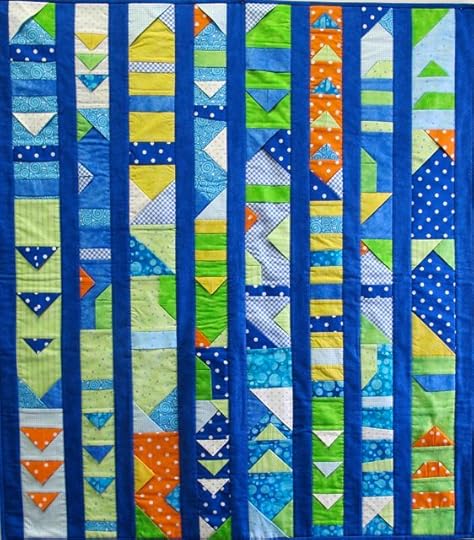
Are you looking for a stash buster for a scrap quilt project? This folded column quilt is the answer! The steps are simple: fold, then quilt. There are no pieced triangles and zero bias cut edges. This three-dimensional project has guidelines, rather than an exact pattern, so it is perfect for every size fabric scrap in your stash. Talk about easy!
In the book/DVD and Sewing With Nancy TV Series Quick Column Quilts, you’ll learn how to cut 4″ to 5″ widths of fabric for the columns, plus use up your scraps as the dimensional folded pieces. If you’re like me, you’ll find plenty of scraps in your stash!
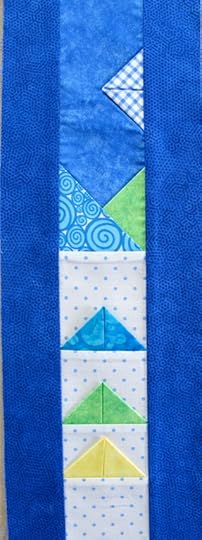
Fold 2″, 3″, or 4″ squares or rectangles of fabric into geometric shapes such as half-square triangles, trapezoids, right-square triangles, or rectangles.


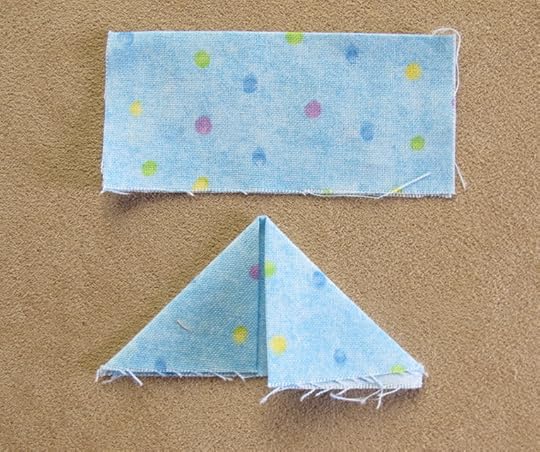
Place the shapes on the column strips. Then, stitch a seam in the column to enclose the raw edge of the geometric shape. Add as many shapes per column as you’d like—you’re the quilt designer!
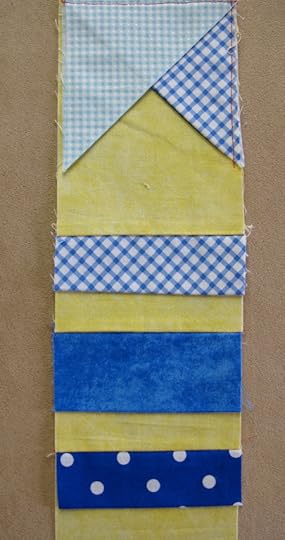
Sashing strips frame each column—choose a dark color for the most dramatic results. Cut strips 1-1/2″ or 2″ wide. Stitch to each side of the column.
In the book, you’ll find details on how to “quilt-as-you-go,” sewing the batting and backing to each column section. It’s a speedy quilting option!
The end result has great texture and dimension. It’s a great child’s Tummy Time Quilt.
Note from Nancy: If you have more than a couple fabric scraps, consider making this quilt larger. You are the designer, simply make the columns longer or wider and continue to add folded fabric shapes.
Watch Quick Column Quilts online to see all the steps of making this column quilt with dimension!
So let’s get going! Sort out fabrics that complement each other, cut into strips, fold into shapes, and do a little stitching! As you’re surmising, there are no rules—just guidelines with this Column Quilt.
Watch Quick Column Quilts on Sewing With Nancy online.
To watch Sewing With Nancy on your iPad, iPod Touch, or iPhone, download the app.

 For a chance to win a Quick Column Quilts book, please let me know what you do with your scraps. Post your comment below. Next week, we’ll announce the winner on July 14.
Bye for now,
Content in this feed is © copyright 2015 by Nancy Zieman and may not be republished without written permission. You’re welcome to forward the email to a friend or colleague but it’s not okay to add the RSS feed automatically as content on a blog or other website.
July 4, 2015
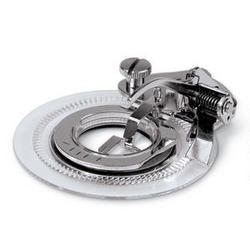
A Close-up Look at the Flower Stitch Presser Foot
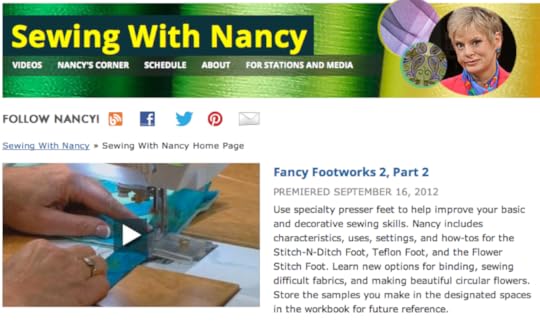
I learned to sew using two presser feet—the all-purpose sewing foot and a zipper foot. Soon I discovered that specialty presser feet could improve my sewing skills. Much later I passed this information along in a series titled, Fancy Footworks. Not all sewing machine feet were featured in that series, so you guessed it—a sequel, Fancy Footworks 2. This week, part two of the three-part series is the Sewing With Nancy online featured video.
A Close-up Look at the Flower Stitch Foot
What could be called the high heels of sewing machine feet, the Flower Stitch Presser Foot is a fancy-occasion presser foot. It is an ideal creative option for mid-range sewing machines.
The Flower Stitch Presser Foot Characteristics:
Rotating disk
Pattern settings: Plus to minus settings to create S—M—L flower sizes
Attachment lever that fits over the needle clamp
 Attach the Flower Stitch Foot to your machine, grab a fabric scrap and a piece of stabilizer, and start experimenting with different built-in utility stitches. No fancy embroidery machine needed here.
Prepare the fabric and test
Whether testing or sewing the actual project, always back the fabric with a fusible interfacing and also a stabilizer. I used Pellon Sof-Shape Interfacing and a Tear-away Hydro-stick Stabilizer.
To create the flower stitches, I started with a basic zigzag stitch or satin stitch. When I found a design I liked, I wrote down my sewing machine settings and stitch number next to the flower stitchout.
When watching the Sewing With Nancy TV show, you’ll see exactly how to use this presser foot.
My guess is your testing sample will look a lot like mine!
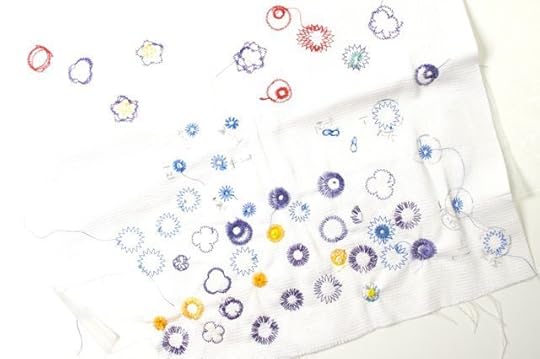
When it’s time to sew on your featured fabric, be sure to add the interfacing and stabilizer mentioned above.
There’s more on the TV show!
Two additional presser feet are featured in Fancy Footworks 2, Part Two. Tune in and see the Stitch-N-Ditch Foot—for easy work of quilt binding, and the Teflon Foot—ideal for hard-to-sew fabrics.
Watch F ancy Footworks 2 ( Part One , Part Two and Part Three) on Sewing With Nancy online.
To watch Sewing With Nancy on your iPad, iPod Touch, or iPhone, download the app.
Now that you are acquainted with these assorted presser feet, which one will you try first? Let us know in the comments for a chance to win a Fancy Footworks 2 Workbook. A randomly selected winner will be announced on July 16.
Bye for now,
Content in this feed is © copyright 2015 by Nancy Zieman and may not be republished without written permission. You’re welcome to forward the email to a friend or colleague but it’s not okay to add the RSS feed automatically as content on a blog or other website.
July 2, 2015
What’s New with Nancy Zieman

After posting a video message on my most recent health adventure, I decided to give you an update. This time I’m sharing better news. It’s been 12-weeks since my surgery, and I’m learning to adjust to the implant in my left leg—a partially new femur and a mechanical knee. The only post-surgery treatment is physical therapy, which can be challenging at times! I’m up and about with the help of crutches or a walker.
Back in the Saddle
Last week, I got back to the business of recording TV shows. We started slowly, recording three Nancy’s Corner segments—the ending segment of each Sewing With Nancy show. These segments feature the actual fashions from the Dressing Downton exhibit, which is currently on display at The Paine Art Center and Gardens in Oshkosh, WI. The segments will air late fall ’15.

If you are a fan, as I am, of Downton Abbey, the highly rated PBS drama, you know that it is worth watching the series just to catch a glimpse of the costumes worn by the actors who either portray the aristocrats or the servants at the abbey.
My interview with Laura Fiser, curator at the art center, highlights a segment on each of the following wardrobe changes: day fashions, evening wear, and activewear such as riding and hunting fashions.

Some of the costumes are vintage and others were made for the series. A fascinating tidbit is that if the fashions were made for the series, they were sewn according to the sewing skills of that era. Embroidery was done by hand during the 1910–1920s—subsequently if embroidery was featured in the costumes, it was hand sewn. If you have the opportunity to see the exhibit, which is on display through September 20, you are sure to be impressed!
Exhibition produced by Exhibits Development Group in cooperation with Cosprop Ltd., London. Downton™ and Downton Abbey®. ©2015 Carnival Film & Television Limited. A Carnival Films/Masterpiece Co-Production. Carnival logo ©2005 Carnival Film & Television Limited. Masterpiece is a trademark of the WGBH Educational Foundation. All Rights Reserved.
Watch for the New Sewing With Nancy Series
Starting August 11, 2015, the new Sewing With Nancy series will be available to Public TV stations and to view online—it will be our 34th season! During one mini-series, friends shared their favorite techniques, which allowed time for me to heal and recover. If all goes as planned, I’ll finish recording this series just in the nick of time. My gratitude goes out to the staff at Wisconsin Public TV, who co-produce the show with me, and my staff who have accommodated my schedule.
By the way, each Public TV station determines their own program line-up. The sewing or quilting topic that’s broadcast locally, may not coincide with what I feature on this blog. Remember, you can always watch online.
Thank you!
I have been showered with well-wishes, cards, and prayers for which I am totally grateful. Through the grace of God, with the guidance of a knowledgable medical team, and with the help and support of family/friends, my plan is to fully recover. So far—so good!
Bye for now,

Content in this feed is © copyright 2015 by Nancy Zieman and may not be republished without written permission. You’re welcome to forward the email to a friend or colleague but it’s not okay to add the RSS feed automatically as content on a blog or other website.
June 30, 2015
Green Sewing Ideas for Your Kitchen

By Emily Jansson, Nancy’s Notions Guest Blogger
Cut down on your disposable plastic bag use by sewing breathable bags that prolong the life of produce. The creative green projects make perfect gifts, and they’re a fun fashion statement at farmers’ markets, too!
Porthole Mesh Bag
Make this pretty bag with a fat-quarter and Porthole Mesh.
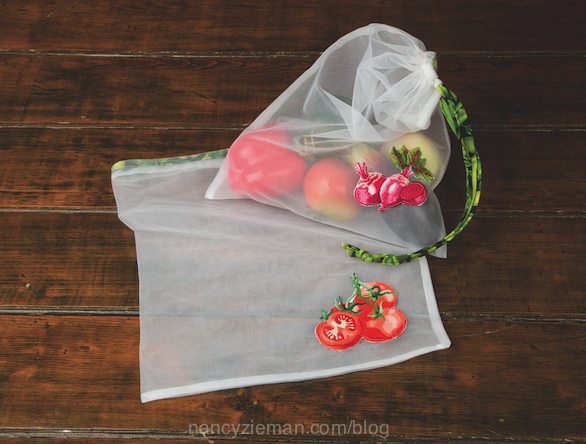
These mesh bags are super-duper EASY to make. It’s just a drawstring bag made out of mini mesh fabric, with 3/8″ double-fold bias pulls. Add a pretty label or a touch of embroidery to make it your own. Trust me, everyone will be totally jealous of your fashionable “eco-prowess.”
I made a couple bags with French seams and the new Garden of Plenty embroidery designs, just for fun.
Place a bunch of veggies and fruits in your mesh bag, and you’re ready to go.
Want to crisp up your greens? Try soaking the cotton mesh bag in water, wringing it out, and stuffing it with some lettuce or kale. Place it in the fridge an hour or two before you eat and watch it crisp up as if it were freshly picked. No kidding!
Generally, vegetables stored in a breathable bag, such as a cotton bag, will keep fresh longer in the refrigerator. Washing your produce only as you use it also prolongs its freshness and quality.
Vegetable Drying Mat
Speaking of washing your veggies, how about sewing a fruit and vegetable drying mat? Use preshrunk waffle cloth and cotton batting for the mat. It’s a tree-saving alternative to paper towels, which also saves produce from bruising as it dries.

Simply stack a sandwich of fabrics like this:
Waffle cloth
Cotton batting
Waffle cloth
Baste fabrics together, bind the edge with a pretty cotton fabric, and you’ve got a machine-washable, eco-friendly drying mat. It’s great for drying hand-washed dishes, too!
Plastic Wrap Alternative
Use a nontoxic alternative to plastic wrap—try wrapping your sandwiches in a natural cotton that has been waterproofed in all-natural beeswax. It’s very easy to make!

These water-resistant wraps work well to wrap over bowls, fold around sandwiches, or roll up cheese and bread in. The heat from your hands helps to conform them to any shape—and they are seriously fun to make!
Wash cotton fabric on hot (dry hot) to preshrink and remove sizing/fabric treatments.
Press fabric flat and cut out squares that are 14″ x 14″ (or any size you choose) with a pinking shears or pinking rotary blade.
Cover a large, flat baking sheet (must be larger than your fabric square) with parchment paper, and lay the fabric on it.
Sprinkle beeswax pellets sparingly on top of the fabric. You don’t need to cover the fabric completely with beeswax—the pellets will spread out quite a bit as they melt. Place the baking sheet in the oven at 175 degrees. Bake fabric for approximately 5 minutes, until the wax pellets have melted.
Use a clean piece of cardboard to spread the melted wax around so that the whole piece of cotton is covered. If the wax cools too quickly, place it back in the oven for another minute or two, and repeat process.
Keep your waxed fabric sheets clean by sponging them off with mild dish soap, and rinsing in lukewarm water. Hang or towel dry the wraps, and they can be used over and over again.
That’s it!
Reusable Snack Bags
Stitch up a few reusable snack bags, too. I used a layer of PUL fabric for the inside of the bag, and then a fun, colorful cotton for the outside.

You can find a tutorial for snack bags at this link.
To clean, turn them inside out and place them on the top rack in the dishwasher (gentle cycle is best).
Handy-Dandy Bowl Covers
Store your meals (and spare them from flies for an outdoor table) with these handy-dandy bowl covers.

Use a compass (like the Yardstick Compass ) to draw a circle with a radius that’s 2-1/2″ wider than half the diameter of your bowl onto a piece of pattern paper. Example: 10″ bowl: 1/2 diameter= 5″ + 2-1/2″= 7-1/2″ radius to set on the compass.
Follow this simple formula to determine the amount of elastic needed: (Diameter of your bowl) x 2.25 = the length of elastic to cut.
Cut one circle from a cotton print, and the other from PUL fabric . Match right sides together, and stitch ¼″ from the edge—leaving a hole to turn right side out. Turn to the right side.
Stitch a scant 3/8″ casing around the edge of the circle. Thread elastic through the casing with a safety pin or bodkin. Stitch ends of elastic together, and topstitch the casing closed. Voila! Perfect for fridge storage, picnics, and barbecues.
For more green ideas for your kitchen, check out this Pinterest board.
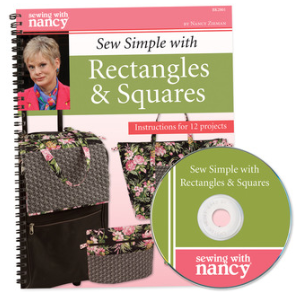
The random winner, from last week’s blog, that will receive a copy of the Sew Simple with Rectangles & Squares book is Karen B. Her comment was: The closet organizer. It would help to organize a lot of things in my closet, but also, I would make one for my sewing room to put stabilizers in. Thanks so much.
Bye for now,
Content in this feed is © copyright 2015 by Nancy Zieman and may not be republished without written permission. You’re welcome to forward the email to a friend or colleague but it’s not okay to add the RSS feed automatically as content on a blog or other website.
June 27, 2015
Patriotic Tumbler Flag Quilt Tutorial

It’s a banner day when a Sewing With Nancy viewer sends me a photo of a sewing or quilting project that they’ve made. The image of the Tumbler Flag Quilt caught my attention and I knew you’d like to see it too. It was designed and made by Linda Coon from Louisiana, who caught the quilting bug about five years ago and hasn’t stop quilting. Linda agreed to share her quilting tutorial. But first, let’s me introduce you to Linda.
Nancy: How long have you been quilting?
Linda: I didn’t become a true quilter until five years ago and then became an obsessed quilter about a year ago. My sister was visiting when we saw a quilt in Quilter’s World Magazine called Battle Warfare. We decided we would each make a quilt for an upcoming quilt retreat. A year later, I finished a king-sized version and gave it as a birthday present.
Nancy: Why did you make this patriotic quilt?
Linda: While shopping at my local shop, Bright Hopes Quilting in Mandeville, LA, I learned of their effort to make quilts for the returning National Guard Unit from Slidell. That’s what started my quilting passion!
Nancy: How did you get the idea for the design?
Linda: I thought a great use of fabric scraps would be to cut out tumbling blocks. (The fabrics leftover from my first quilt were used for part of this quilt.) My idea was to create a flag and the rows of tumbling blocks would appear as a true flag, blowing in the wind. It was magic! And the best part was that it was so easy.
Not only was this Tumbler Flag Quilt Linda’s fourth donation to returning soldiers; she has graciously shared the design and the quilting tutorial with all of us!
Tumbler Flag Quilt Tutorial designed by Linda Coon

Supplies, Fabrics, and Notions:
Assorted red, off-white, and blue fabrics
Chaco Liner Yellow Pen
Grandmother’s One Patch Template: Tumbler Block

Note from Nancy: Consider using all the red, white, and blue scraps to bust your fabric stash. I think you’ll be pleased with the color-coordinated, scrappy results.
Cutting Tumblers:
Red: Cut 131 tumblers and 23 finishing pieces from 4-1/2″ crosswise strips.
Off-White: Cut 138 tumblers from 4-1/2″ crosswise strips.
Navy: Cut 55 tumblers and seven finishing pieces from 4-1/2″ crosswise strips.
For each solid fabric tumbler, the cutting directions are the same.
Stack several cut strips of fabric.

Align the template as close to the cut end as possible.
Trace along each edge.
Flip the template , align the traced edge with the template side, and trace the other side of the Tumbler shape. Repeat the process until the entire fabric strip has been marked.

Use a rotary cutter and ruler to cut on each marked line.

Trace and cut the Finishing Pieces.
Begin by aligning the template area of the Finishing Piece at the narrow end of the strip. Trace along the template area.

Flip the template, align the traced edge with the template, and trace the center Tumbler shape. Repeat the process until the entire fabric strip has been marked with half-tumbler shapes.

Use a rotary cutter and ruler to cut on each marked line.

Create the pieced blue and off-white strips.
Use a 1/4″ seam to stitch together the 1-3/4″ wide off-white fabric strip and the 3-1/4″ wide navy fabric strip.
Press the seam allowance towards the navy blue fabric.

Cut 36 tumblers from 4-1/2″ strata strips.

Note From Nancy: For the red and white fabrics, simply rotate the tumbler template 180° to nest the shapes next to each other.
For the pieced strip, in order to keep the white at the top of the tumbler shape, cut pieces in the same direction. Always place the widest part of the template along the blue fabric strip. There will be a slight waste of fabric.

Use a rotary cutter and ruler to cut on each marked line.

Construction:
Lay out the rows, starting and ending with a Finishing Piece.
Make:
Three columns of #1
Three columns of #2
One column of #3
Four columns of #4
Four columns of #5

Pin the coordinating pieces of each column together.
Offset the end ¼″—the seam allowance width. Stitch. Repeat for each column.


Join the block pairs with a 1/4″ seam allowance.

Finally, stitch the columns into a quilt top. Simple as that!
Linda finished her patriotic tumbler quilt with in-the-ditch style quilting.

Watch Grandmother’s One Patch (Part One and Part Two) on Sewing With Nancy online.
To watch Sewing With Nancy on your iPad, iPod Touch, or iPhone, download the app.
For a chance to win the Grandmother’s One Patch Template: Tumbler Block, simply leave a comment sharing your favorite charity, where you donate quilted items. A randomly selected winner will be announced on July 11.
Bye for now
Content in this feed is © copyright 2015 by Nancy Zieman and may not be republished without written permission. You’re welcome to forward the email to a friend or colleague but it’s not okay to add the RSS feed automatically as content on a blog or other website.
Nancy Zieman's Blog

- Nancy Zieman's profile
- 21 followers

