
Nancy Zieman's Blog, page 122
September 24, 2015
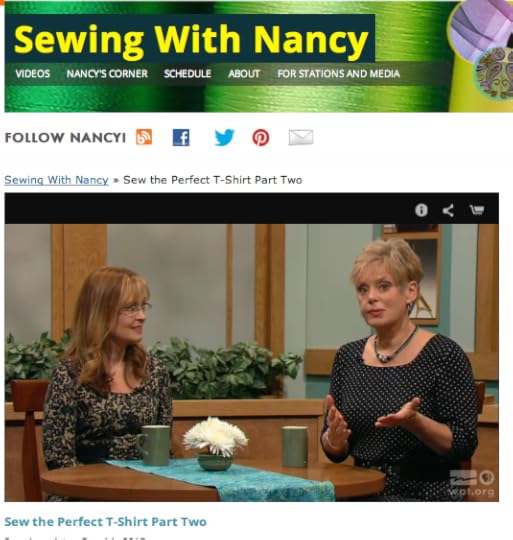
Sew a Comfy, Classic T-Dress
It’s all about sewing the perfect tee during this Sewing With Nancy mini-series. Whether a tee top or a classic tee dress, the same fitting, sewing, and designing techniques apply. Pattern designer Pamela Leggett joins me for the second episode of Sewing The Perfect T-Shirt, this time concentrating on making a dress. Watch online, on DVD, or on PBS.
Once you know how to fit a tee top, as featured in the first episode, applying that knowledge to a classic tee shirt dress is a natural progression.

Just a Few Tips on What You’ll Learn
See how easy it is to modify the neckline.

Sew or serge the sleeve to the armhole with a fast flat construction technique.

Check side seams for fitting. You’ll learn how to custom-fit your T-shirt dress during the sewing process. Plus, you’ll trim the pattern tissue and fabric at the same time so your pattern will be fine-tuned for sewing your next T-shirt dress.


Learn hem options; fuse first, stitch second is the key for the perfect blind hem.

Add a designer touch by color-blocking your dress pattern.

Info on the pattern:
The Classic T-Shirt Dress pattern by Pamela Leggett is available at Nancy’s Notions. Read more about the pattern, fit, style variations and sizes on Pamela’s website, here.

Watch Sew t he Perfect T-Shirt (Part One and Part Two) on Sewing With Nancy online.
To watch Sewing With Nancy on your iPad, iPod Touch, or iPhone, download the app.
Bye for now,

Content in this feed is © copyright 2015 by Nancy Zieman and may not be republished without written permission. You’re welcome to forward the email to a friend or colleague but it’s not okay to add the RSS feed automatically as content on a blog or other website.
Make sure you are subscribed to my enews mailing list so you won’t miss a thing. Sign up here.


September 22, 2015
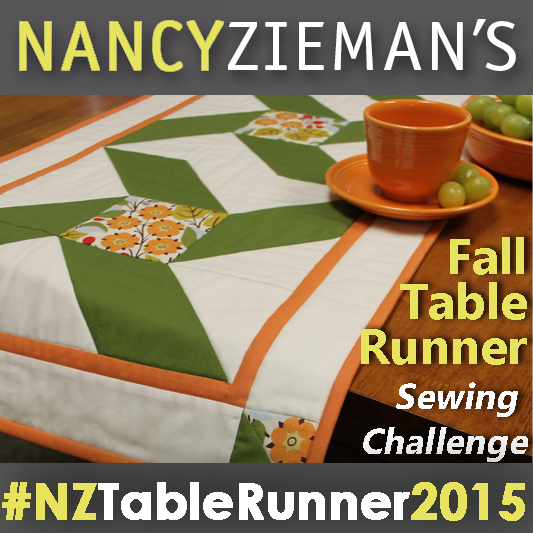
Table Runner Winners Announced
The Fall Table Runner Challenge was so much fun to host. I enjoyed seeing all the entries and the talent showcased in the event. You can still view the virtual table runner quilt show online in this post. As may know, voting came to a close over the weekend and it is now time to announce the winners. Thank you to everyone who participated and thank you to all the friends, family, and sewing enthusiasts who voted!
Of course, this event would not have been possible without the generous support of our sponsors. Thank you! Please take a moment to see all the prize donors listed below.

If your table runner is featured here, you will receive an email from my team requesting contact information. Congratulations!
Sunflower Sunset
Charmingly Fall
Autumn’s Finest Table Runner
Falling Leaves tablerunner
Flowery Night
Fall Hexie Table Mat
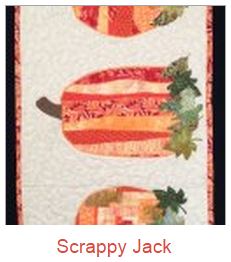
Scrappy Jack
Swirl Fall Runner
Top Ten Winners: F+W Media will provide a copy of 50 Fat Quarter Makes, a $250 value


First Place: Bundle of Nancy Zieman Products and Notions from Clover, a $200 value


Second Place: Create With Nancy Five Book Collection, valued at $177.94


Third Place: Quilter’s Package from June Tailor, a $107 value


Fourth Place: Pellon Bundle Package, a $105 value


Fifth Place: Autumn Array Cotona Thread Pack from Maderia, a $76 value


Sixth Place: Nancy’s Notions Tool and Notion Bundle, a $63 value


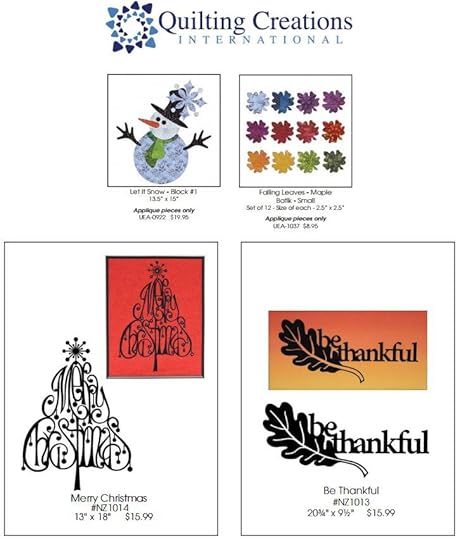
Seventh Place: A pattern collection from Quilting Creations International, a $60 value
Eighth Place: Klasse Needle Pack from Klasse Needles, a $32 value


Share your comments below about the Fall Table Runner Sewing Challenge and let us know if you plan to join in the next challenge event!
Bye for now,
Email challenge questions to info@ziemanproductions.com. Challenge not open to sponsors, employees, and immediate family members. Photos and techniques may be featured in future promotions, blog posts, videos, and/or TV shows.
Nancy Zieman—author, pattern designer, businesswoman, producer, and national sewing authority—is the host of the popular show Sewing With Nancy, which appears exclusively on public television stations across the United States and Canada. Follow Nancy’s blog at NancyZieman.com/blog and sign up to receive Nancy’s E-News for the latest news in sewing, quilting, creating, and block of the month updates.
Content in this feed is © copyright 2015 by Nancy Zieman and may not be republished without written permission. You’re welcome to forward the email to a friend or colleague but it’s not okay to add the RSS feed automatically as content on a blog or other website.
September 19, 2015
2015 Adventure Quilt: Block of the Month #9

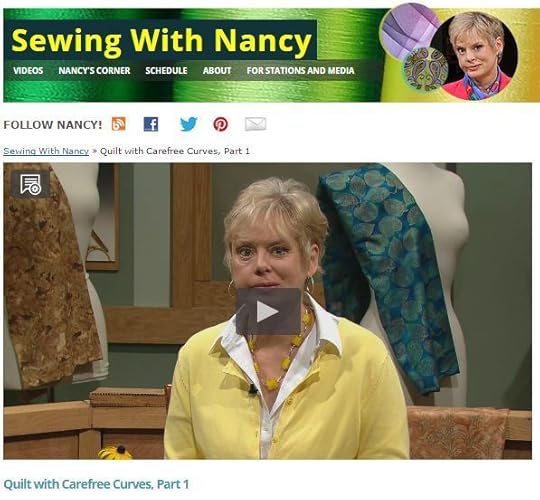
During this Block of the Month lesson, learn the secret to stitching perfect circle shapes. Not to worry, you will not be cutting curved shapes; the magic happens with rectangles, fusible interfacing, and a short stitch length. My quilting tip of using fusible interfacing is the key, which practically guarantees a smooth, gradual curve. September’s Block of the Month in The 2015 Adventure Quilt is the Celestial Circle. To create the Celestial Circle, use the Trace ‘n Create Carefree Curves Template Set. Here’s how:
Block #9: Celestial Circle Quilt Block
All blocks in The 2015 Adventure Quilt measure 12-1/2″ x 12-1/2″, creating a 12″x 12″ finished block. 1/4″ seam allowances are included.
Notions, Fabrics, and Supplies:
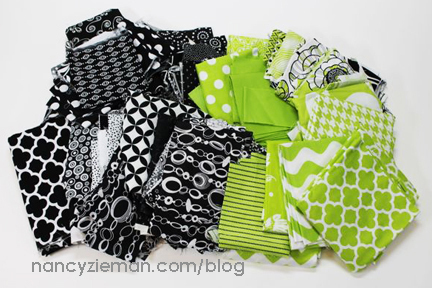
Get started by choosing fabrics. Any three color combinations will work. I had a surplus of black, white, and chartreuse green in my quilting fabric scraps. If you’ve been following along, you know that this Block of the Month series is a scrap fabric adventure.
Assorted Fabric Scraps
Lightweight fusible interfacing
Point 2 Point Turner
Trace ‘n Create Carefree Curves Template Set
Monofilament thread
Fine Tip Non-Permanent Marking Pen
Cut Fabrics
Cut the following fabric and interfacing pieces:
Cut two 6-1/14″ x 12-1/2″ fabric rectangles (background).
Cut two 5″ x 9″ fabric rectangles (for circles).
Cut one 1″ x 12-1/2″ fabric rectangle (dividing strip).
Cut two 5″ x 9″ interfacing rectangles (for circles).

Create the Semi-Circles
Using the 5″ x 9″ fabric and interfacing rectangles, pin the smooth side of the interfacing on the right side of the fabric. Make two pair.
Align the Carefree Curves circle template centerline with the cut edge of the fabric/interfacing pair.
Using a fine tip marking pen to trace the 8-1/2″ semi-circle onto the interfacing. (This is the pink ring on the template.)

Straight stitch, using a short stitch length, 2.0—2.5, directly on the marked curve.
Note from Nancy
Use a short stitch length to ensure a smooth stitching line when sewing a curve. I often compare using a short stitch length to driving in the mountains. To maneuver the curvy road, a slower speed ensures that you’ll stay on course.

Use a rotary pinking blade to remove excess fabric.

Remove the excess interfacing from within the circle, leaving approximately 1″ of interfacing.

Turn the interfacing to the wrong side with a turning tool .

Press.

Build the Block
Fold the background fabric in half to find the center. Lightly finger press.
Fold the semi-circles in half to find the center. Lightly finger press.
Align the centers and cut edges of each semi-circle and background fabric.
Pin semi-circles to the backgrounds.

Edgestitch with monofilament thread .

Lay out the block with the center dividing strip.

Use a 1/4″ seam allowance to join the center dividing strip to the left side of the block.
Note from Nancy
Here’s where accuracy is important. If the seam allowance is wider or narrower than 1/4″, the finished block will not be square.
Press seam allowances towards the center dividing strip.

Use a 1/4″ seam allowance to add the right side.

Note from Nancy: Notice in the picture I used a narrow blanket stitch to stitch the circle to the background. Each point takes a small dip into the circle itself. Choose a blanket stitch, decorative stitch, or straight stitch to apply the shapes.
Ta-dah! Another block is complete.

Share your 2015 Adventure Quilt Blocks Socially
If you have a blog site, website, or online social sewing group, feel free to grab the code and share this button.

<img src="http://www.nancyzieman.com/blog/wp-content/uploads/2015/01/Nancy_Zieman_Block_of_the_Month.jpeg" alt="Nancy Zieman Block of the Month" style="border:none;" />
————–
If you are on social sites, let all your friends know you are working on The 2015 Adventure Quilt Blocks by tagging your post with the hashtag: #NZBoM.
The hashtag is a searchable “word” associated with an event or activity, which when searched on popular social websites, like Instagram, Twitter, Flickr, and Facebook, will show every single post using that hashtag. Hashtags are a fun way to network and connect with people who share similar interests.
What would a Quilt Look Like?
As part of this Block of the Month series, included are ideas of what a quilt might look like if you made it with only this month’s block. This block inspired me; I have four digital concepts rather than three. To my surprise, I did not use sashing in any of these designs.
This Celestial Circle is arranged in an alternating traditional grid pattern. The result is anything but traditional.

I wanted to include a small design of only nine blocks. This concept lends itself to featuring the small, but bold, center dividing strip. Notice that the center block is a square without patchwork.

Sometimes quilts can be completely organized, symmetrical, and create great rhythm in repetition. The following quilt is one of those designs.

I took a bit of liberty with the block when creating this last concept quilt. For the second row, I omitted the circle appliqué on four blocks and simply created a feature-bar element in the design.

Watch Carefree Curves (Part One and Part Two) on Sewing With Nancy online.
To watch Sewing With Nancy on your iPad, iPod Touch, or iPhone, download the app.
Don’t Miss the Other 2015 Adventure Quilt Block of the Month Features
In the 2015 Adventure Quilt Block of the Month series, we’ll be making twelve fun blocks from five different templates/tools: Carefree Curves Template , Dresden Template , Grandmother’s One Patch Template , Lone Star Template , and the No-Hassle Triangles Gauge .
See all the 2015 Adventure Quilt Blocks HERE.
An InLinkz Link-up
Bye for now,
Content in this feed is © copyright 2015 by Nancy Zieman and may not be republished without written permission. You’re welcome to forward the email to a friend or colleague but it’s not okay to add the RSS feed automatically as content on a blog or other website.
September 17, 2015
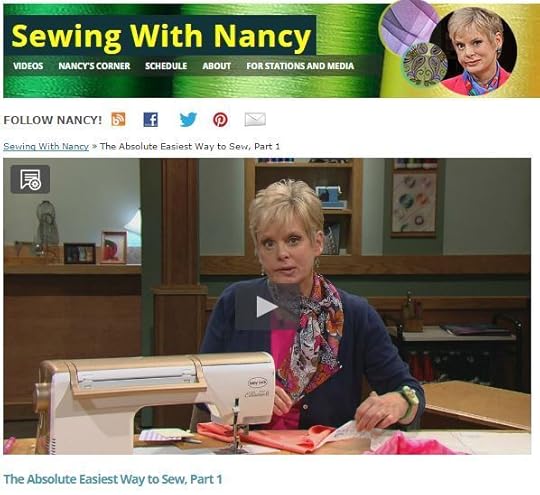
Our Most Popular Blog Post—It’s on How to Sew Elastic!

I try to keep a pulse on what sewing, quilting, and embroidery topics you enjoy the most. For over the past two years, The Absolute Easiest Way to Sew Elastics is in the top five viewed blogs—every day! So in case you haven’t used this technique before, I thought I’d let you in on this sewing secret too.
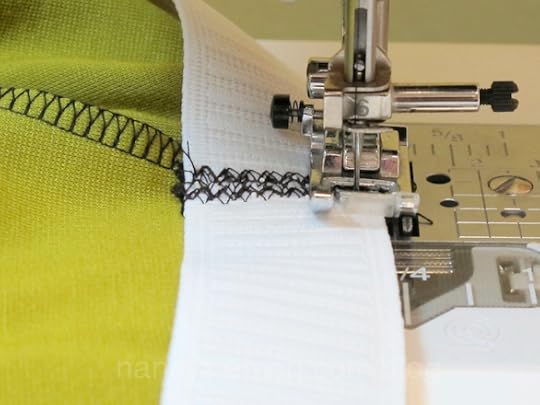
The Absolute Easiest Way to Sew Elastic
The above picture doesn’t look like much. That’s the point! It’s the easiest way to sew elastic to a waistline without the telltale topstitching of an elastic waistline.
Over the years, I’ve tweaked and personalized sewing techniques. My favorites are collated in my book, The Absolute Easiest Way to Sew. Now I’ll share a bonus technique for the letter “E” for inserting Elastic in a waistline. I believe you’ll find this technique to be the absolute easiest way to sew elastic to a waistline.
Prepare the elastic.
Cut the elastic 2″–4″ smaller than your waistline measurement, depending on what you feel is comfortable. (If your waist is quite a bit smaller than your hips, pin the elastic together without trimming off the excess.)
Try on the elastic, pulling it up over your hips. If the elastic is too tight to slide comfortably over your hips, readjust the elastic before sewing it together.
Zigzag the elastic ends to woven fabric without overlapping the ends. (This tip eliminates the bulk that occurs when elastic is connected by overlapping its ends.) Zigzag several times.
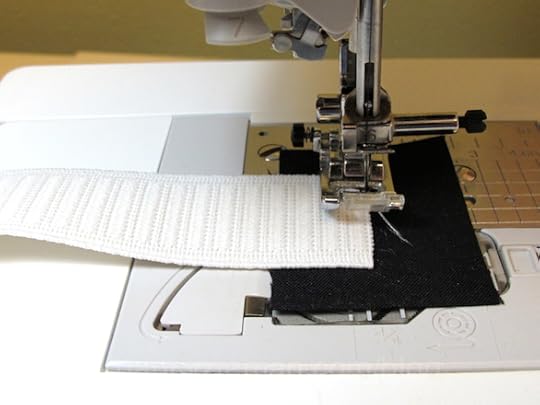

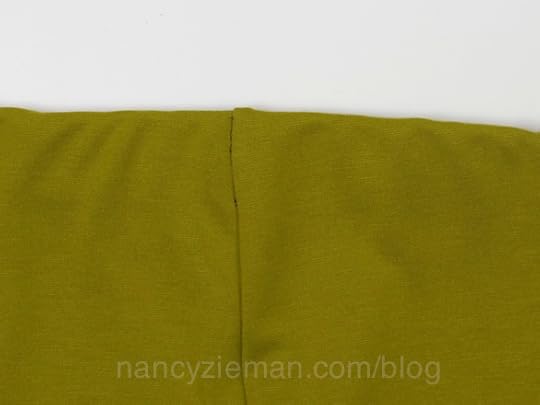
Trim away the excess woven fabric.
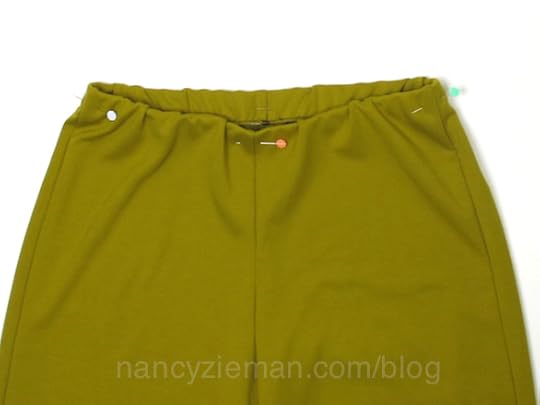
Quarter mark the elastic. Fold it in half and then in half again, placing a pin at each quarter.
Also quarter mark the waistline.
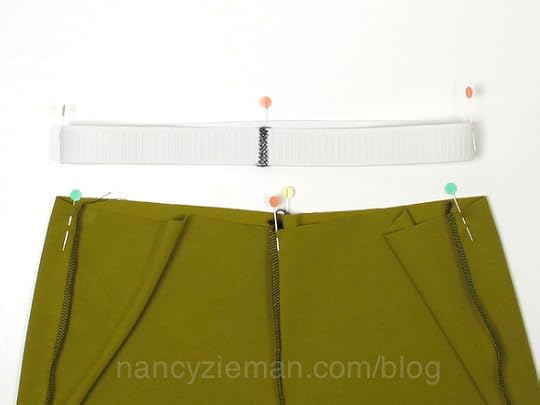
Attach the elastic.
Pin the elastic to the garment at each quarter point, meeting the elastic to the wrong side of the garment.
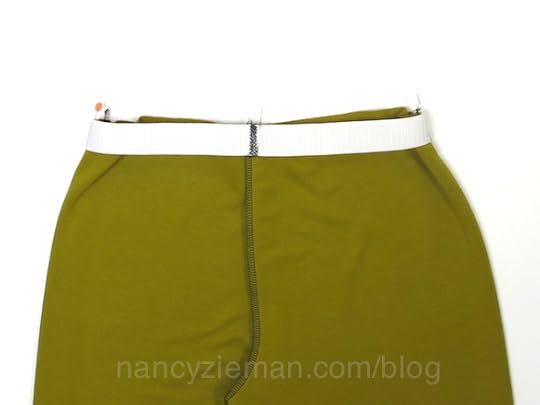
Serge or zigzag the elastic to the cut edge of the waistband, stretching the elastic to fit. (This is what real sewing looks like, sometimes it’s not perfect.)
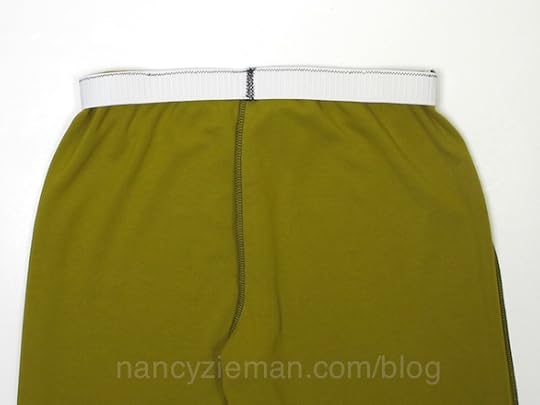
Fold under the elastic for a casing. Check to be sure the fabric is securely wrapped around the elastic.
Stitch through the elastic and garment at each seam. This holds the casing and elastic in position. Don’t stitch the elastic to the waistline along the lower edge. This is enough stitching!

When wearing the skirt or pants, that telltale elastic stitching is gone. The sewing is about as easy as it gets! How about that!
All my favorite sewing tips are in one book.
The Absolute Easiest Way to Sew chapters include:
Sewing Notions
Sewing Machine Confidence
Serger Spotlight
Patterns
Fabric Facts
Sewing Basics
Beyond the Basics

Watch the 3-part series of The Absolute Easiest Way to Sew on Sewing With Nancy online.
To watch Sewing With Nancy on your iPad, iPod Touch, or iPhone, download the app.
Nancy’s Top Viewed Sewing and Quilting Blogs:
The Absolute Easiest Way to Sew in a Zipper
The Absolute Easiest Way to Sew Binding
2015 Adventure Quilt: Block of the Month
Top Creative Designer Bag Sewing Tips
Quilt to Give
And I hope you’ll give my elastic sewing tip a try!
Bye for now,
Nancy Zieman—author, pattern designer, businesswoman, producer, and national sewing authority—is the host of the popular show Sewing With Nancy, which appears exclusively on public television stations across the United States and Canada. Follow Nancy’s blog at nancyzieman.com/blog and sign up to receive Nancy’s E-News for the latest news in sewing, quilting, and creating.
Content in this feed is © copyright 2015 by Nancy Zieman and may not be republished without written permission. You’re welcome to forward the email to a friend or colleague but it’s not okay to add the RSS feed automatically as content on a blog or other website.
September 15, 2015
Table Runner Challenge Voting Begins
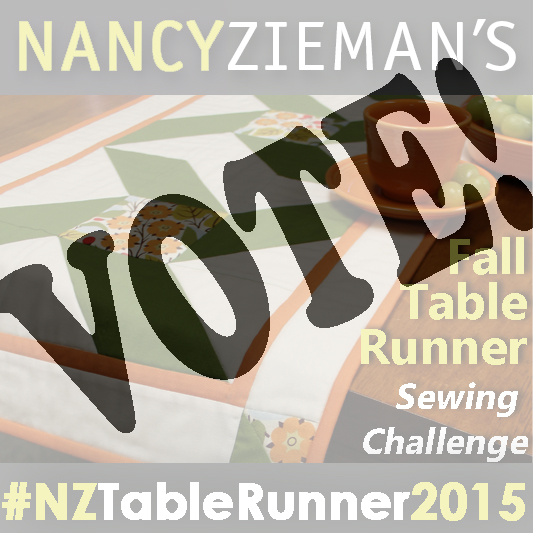
It’s time to cast your votes in the 2015 Fall Table Runner Sewing Challenge. There are over 70 table runners to review and admire. You’ll be inspired by the creativity!
Each participant was asked to sew a fall-themed table runner with a maximum of four projects per person. Prize winners will be selected based on YOUR votes. Good news—you can cast up to five votes during your voting selection process.
If you are a contestant, ask friends to vote. Plus, share this blog post to show off your entry.
Voting will close on Saturday, September 19, 2015. We’ll announce the winners at my blog on Tuesday, September 22, 2015. Good luck to all participants.
Nancy Zieman’s Fall Table Runner Sewing Challenge
Voting opens today, September 15.
Cast up to five votes during your selection process.
Share this link (by copy and pasting) http://www.nancyzieman.com/blog/?p=33933
Encourage friends to vote.
Voting closes Saturday, September 19.
Winners announced on Tuesday, September 22.
Sign up for my enewsletter so you won’t miss a thing!
Tech Tip from Nancy: If the images are small on your computer screen, use Ctrl + to increase the images on the screen. Use Ctrl – to reduce the size when finished.
An InLinkz Link-up
Go Social with Your Fall Table Runner Sewing Challenge

If you have a website, copy the code above and paste it into your website editor to have the Fall Table Runner Sewing Challenge badge on your site. Or, add the link to your social sites such as Instagram, Twitter, Flickr, or Facebook. Let all your friends know you are working on the Fall Table Runner Sewing Challenge by tagging your post with the hashtag: #NZTableRunner2015
A Total of $1000 in Prizes for the top vote contenders:
Top Ten Winners: F+W Media will provide a copy of 50 Fat Quarter Makes, a $250 value
First Place: Bundle of Nancy Zieman Products and Notions from Clover, a $200 value
Second Place: Create With Nancy Five Book Collection, valued at $177.94
Third Place: Quilter’s Package from June Tailor, a $107 value
Fourth Place: Pellon Bundle Package, a $105 value
Fifth Place: Autumn Array Cotona Thread Pack from Maderia, a $76 value
Sixth Place: Nancy’s Notions Tool and Notion Bundle, a $63 value
Seventh Place: A pattern collection from Quilting Creations International, a $60 value

Seventh Place: Klasse Needle Pack from Klasse Needles, a $32 value
Thank you for voting!
Email challenge questions to info@ziemanproductions.com. Challenge not open to sponsors, employees, and immediate family members. Photos and techniques may be featured in future promotions, blog posts, videos, and/or TV shows.
Nancy Zieman—author, pattern designer, businesswoman, producer, and national sewing authority—is the host of the popular show Sewing With Nancy®, which appears exclusively on public television stations across the United States and Canada. Follow Nancy’s blog at NancyZieman.com/blog and sign up to receive Nancy’s E-News for the latest news in Sewing, Quilting, Creating, and Block of the Month updates.
Content in this feed is © copyright 2015 by Nancy Zieman and may not be republished without written permission. You’re welcome to forward the email to a friend or colleague but it’s not okay to add the RSS feed automatically as content on a blog or other website.
September 12, 2015
Quilting Magic with Your Embroidery Machine

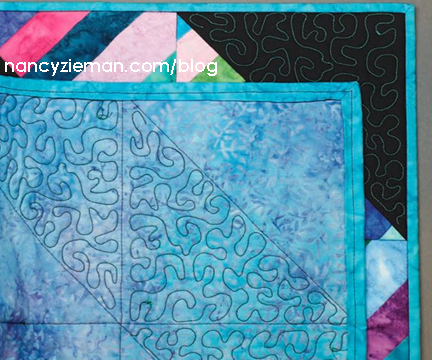
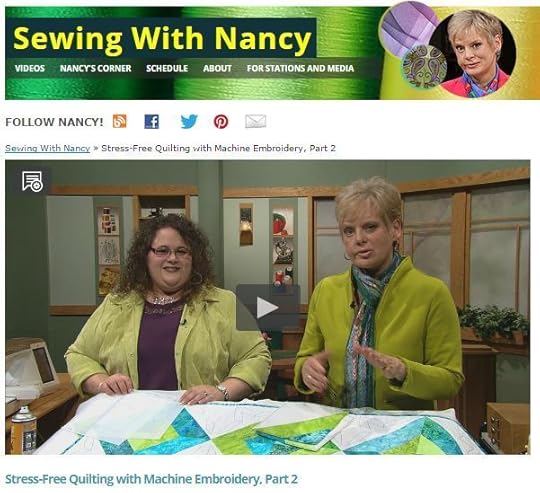
Whether you’re a first time quilter or a seasoned veteran, this method of block piecing and quilting creates professional looking results, every time. The secret is using your embroidery machine. The blocks are skillfully pieced and the quilt is quilted with the precision of a long-arm, all in the hoop. This vibrant Diamond Spectrum Quilt pattern features several techniques—from piecing to layering, and on to final quilting. Let me show you this fast and fun method of quilting with your machine.
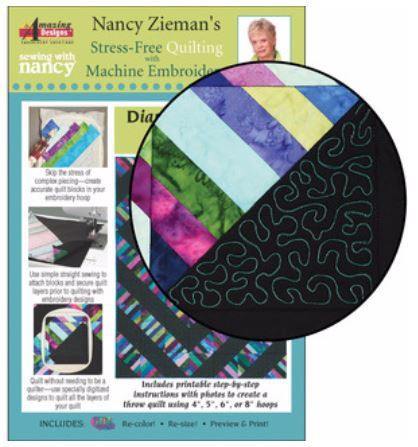
Machine embroidery designs included in the package come in two designs and in four different sizes each. This gives you versatility in your own quilt design and finished project sizes.
Note from Nancy: The blocks used in this demonstration are 8″ x 8″, the largest size.
Supplies
Stress-Free Machine Embroidery: Diamond Spectrum Quilt
Embroidery Software for printing templates, such as Amazing Designs® Exit Express™
Fusible Mesh Cut-Away Stabilizer
2-1/2″ fabric strip pack (40 strips per pack) These precut packs are commonly called Jelly Rolls.
2-1/4 yard background fabric (We used black.)
Coordinating all-purpose thread, such as Madeira Aerofil
50 Weight Quilting Thread
Make a Block
Use the embroidery software program to print the template for, in this case, the 8″ x 8″ block.
Notice the different sections of the block and the numbers within. These numbers indicate the piecing sequence.
Cut the fabric strips to the following lengths, per block. A project sheet is included with the product for complete quilt requirements.
-One piece: 2-1/2″ x 12-1/2″
-Two pieces: 2-1/2″ x 11-1/2″
-Two pieces: 2-1/2″ x 8-1/2″
-Two pieces: 2-1/2″x 6″
-Two pieces: 2-1/2″ x 3-1/2″
-One contrast/background square: 9-1/4″ x 9-1/4″


Hoop a Fusible Mesh Cut-Away Stabilizer , fusible side up.
Set up the sewing machine with the embroidery unit and appropriate foot.
Import and select the embroidery design for the block.
Select all-purpose poly or poly/cotton thread; wind the bobbin with the same thread as used in the needle. A slightly contrasting color works best. (Now this is different! Rayon thread is usually used for embroidery but we’re piecing quilt blocks!)
Stitch the first thread color directly on the stabilizer.

Pre-select fabric strip arrangements, keeping a mix of colors in light, medium, and dark values.
Start with the center strip, section one. Place the 12-1/2″ fabric strip over that section making sure the fabric covers the stitching lines and extends equally in all directions.
Fuse the fabric strip to the stabilizer with a mini iron .

Stitch the thread Color 2, which bastes down fabric #1.
Align the 11-1/2″ strips along the diagonal fabric edge matching right sides together. Make certain fabric is extended equally beyond the outline on the stabilizer at opposite corners.

Embroider thread Color 3 to stitch the section to the block.
Fold the second fabric strip over the stabilizer.
Start pressing from the folded edge, working to the opposite corner to eliminate wrinkles. “Pre-pressing” with your fingertips is ideal—you can feel any wrinkles.
Press and fuse the fabric strip to the stabilizer.
Embroider thread Color 4 to baste the pressed section to stabilizer.
Trim away excess fabric along the previously stitched basting line.

Align the 8-1/2″ strips along the diagonal fabric edge matching right sides together. Make certain fabric is extended equally beyond the outline on the stabilizer at opposite corners.

Embroider thread Color 5 to stitch the section to the block.
Fold the second fabric strip over the stabilizer.
Start pressing from the folded edge, working to the opposite corner to eliminate wrinkles. “Pre-pressing” with your fingertips is ideal—you can feel any wrinkles.

Press and fuse the fabric strip to the stabilizer.
Embroider thread Color 6 to baste the pressed section to stabilizer.
Trim away excess fabric along the previously stitched basting line.

Repeat these steps to complete the remaining sections with the remaining cut strips.

Before stitching Color 19, tape the seam edges with Sewer’s Fix-It Tape . This prevents the embroidery foot from catching on the fabric folds as your embroider the outer block perimeter.
Place the tape 1/8″–1/4″ away from the stitched basting lines.
Trim the fabric ends approximately 1/2″ from the perimeter stitching lines.

Position the contrast/background square over the pieced block in the hoop.
Align the squares’ edges to extend equally beyond the Color 19 stitching line. Optional: Lightly apply tape to the corners.
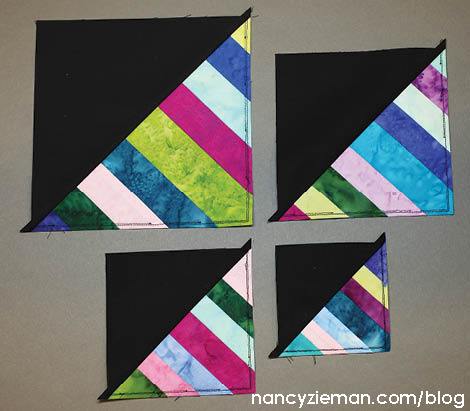
Embroider Color 20, which sews two perfectly diagonal rows of stitches.

Remove the block.
Turn the block over to trim the seam allowances past the Color 19 stitching line to 1/4″.
Cut between the diagonal stitched lines.

Each embroidered block produces a set of two finished Diamond Spectrum blocks.

Design a Quilt Top
Once the blocks are created, arrange this high-contrast block in any of these traditional settings:
Diamond Spectrum (on the cover)
Amish Rainbows and Shadows: Place blocks with contrast fabric in the upper left corners for each block.

Spectrum in Diagonal: Place blocks with contrast fabric in the lower right corner first, then upper left corner; repeat across the row. Alternate the block arrangement in the remaining rows.

Rainbow Spectrum on Point: Place four blocks with rainbow pieced sections meeting.

Machine Embroider to Quilt
Choose a quilting embroidery design. The Diamond Spectrum Quilt Collection includes the featured stippling pattern, specially sized for each size block.
Print a template using an embroidery software program such as Amazing Designs® Exit Express™.
Note from Nancy: Print embroidery templates on Translucent Foundation Paper for better visibility and alignment of the designs on your quilt.
Trim excess paper.
Position the template over the quilt and tape in the desired location.
Align the quilting embroidery design, hoop quilt, and quilt. Details covering hooping options and specific steps can be found in the complete directions.

Remove the paper template, once the hoop and quilt are aligned.
Change thread and bobbin to 50 weight machine quilting thread, if desired.
Embroider.

Add embroidered quilting to all desired areas of the quilt repeating the previous steps.
Finish the quilt with your favorite binding method. You can find my absolute easiest binding tutorial here.
Watch Stress Free Quilting with Machine Embroidery Part Two on Sewing With Nancy online.
To watch Sewing With Nancy on your iPad, iPod Touch, or iPhone, download the app.

Leave us a comment sharing the most stressful step in the quilting process to be entered to win a CD of Stress-Free Machine Embroidery: Diamond Spectrum Quilt.
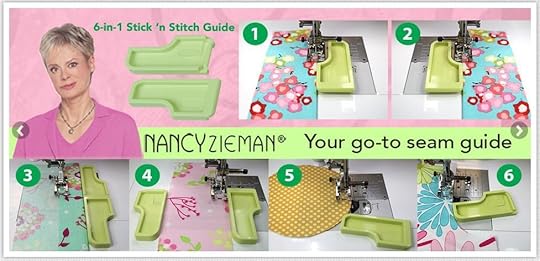
 The random winner of a 6-in-1 Stick ‘n Stitch Guide from Clover is Ruth Meek. She said: I would love to own this handy gadget!! I’m getting back into sewing, & this would be invaluable for perfect seam allowances.
Don’t forget to submit your table runner in my Fall Table Runner Challenge! The deadline to enter is MONDAY, September 14. Click here to see how to enter. Make sure you are subscribed to my enews mailing list so you won’t miss a thing. Sign up here.
Bye for now,
Content in this feed is © copyright 2015 by Nancy Zieman and may not be republished without written permission. You’re welcome to forward the email to a friend or colleague but it’s not okay to add the RSS feed automatically as content on a blog or other website.
September 10, 2015
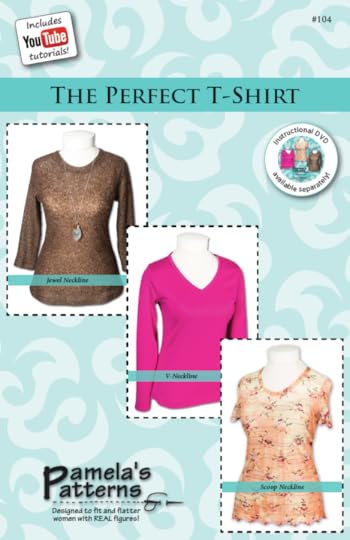
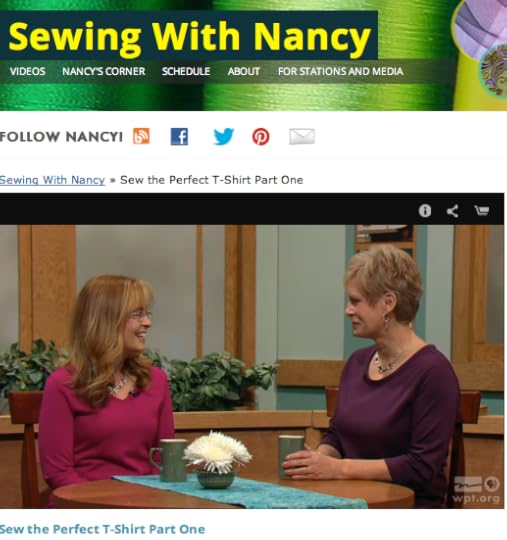
Ten Tips I Learned About Sewing the Perfect T-Shirt
When working with Pamela Leggett, whose patterns focus on knit and fit, I thought I’d learn a few tips, but I was wrong, I learned many tips!

Sew the Perfect T-Shirt
This tip works ideally with Pamela’s, The Perfect T-Shirt Pattern.
1. Test the fabric for retention, not just stretch. Most T-shirt patterns require at least 25% crosswise stretch. That’s easy. But does the fabric retract without coaxing? Quality is important!
2. Choose the pattern for T-shirts by measuring high bustline. Choose the size by that measurement. Then, measure full bustline. If the difference is 3” or greater, choose a T-Shirt pattern with a dart.
Note from Nancy: Armholes on my fitted knit tops are usually low. Using this technique, I was pleased with the fit of the shirt in the upper body.
3. Fit while you sew. Yes, we know that, but with Pamela’s process, she guides us through the exact process.
Note from Nancy: I admit, I like to skips steps, but following the process was totally worthwhile.
4. Stabilize the front shoulder seam with a woven, fusible stay tape. You’re going to like this idea!
5. Stabilize neckline of front and back with knit, fusible stay tape.
Note from Nancy: I usually cut knit interfacing strips from fusible knit interfacing. Using the woven and knit stay tapes, as used in the industry, really saves time!
6. Use a stretch needle as opposed to a ball point needle. The stretch needle has a more defined point.
7. Do not use a stretch stitch, you know, the ones with lots of stitches. Less is best. Serge the seams or use a wobble stitch, .5 width x 2.5 length.
8. During the sewing/fitting process, make changes to the fabric and pattern at the same time. You’ll learn how while watching the first episode of Sew the Perfect T-Shirt.
9. Stitch the dart, try on the knit shirt, then, check the fit. If the dart position is too high or low, you’ll learn how to change the pattern and the knit fabric at once. Knits are forgiving, changes are easy to make.
10. After making one style, don’t stop there—this pattern has three neckline options: Jewel, V-neck, and Scooped. The second shirt will go together effortlessly.
Watch Sew the Perfect T-Shirt on Sewing With Nancy online.
To watch Sewing With Nancy on your iPad, iPod Touch, or iPhone, download the app.
About the Pattern
The busy woman needs a modern wardrobe that can keep up: using jet-set knits is a comfortable and easy solution. Make a variety of styles and diversify your closet with one pattern. Learn techniques you can use over and over again to create beautiful, custom fit clothing you’ll love wearing.
The random winner of the Quick Stitch to Wear Again book is Lillian K. She said: I would love to win the Quick Stitch to Wear Again book. I am always having to make a repair AND I always dread it. This looks like repairing would be less “dreadful”. Thanks.

Don’t forget to submit your table runner in my Fall Table Runner Challenge! Click here to see how to enter. Make sure you are subscribed to my enews mailing list so you won’t miss a thing. Sign up here.
Bye for now,
Content in this feed is © copyright 2015 by Nancy Zieman and may not be republished without written permission. You’re welcome to forward the email to a friend or colleague but it’s not okay to add the RSS feed automatically as content on a blog or other website.
September 8, 2015
Pattern Ease: The Wiggle Room You Need
September is National Sewing Month and I thought it would be fitting to celebrate by mentioning some tips and tricks to address pattern ease when reading a pattern and constructing the garment.
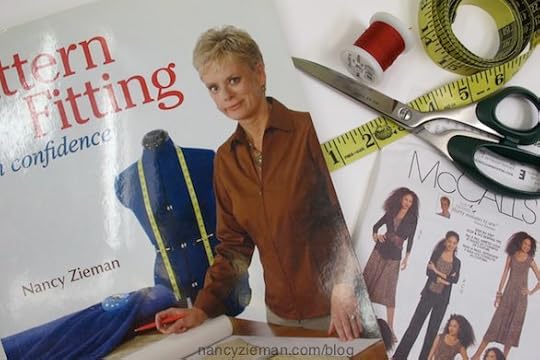
How do you find out the amount of ease in a pattern? (Ease is the difference between the measurement that the pattern was designed to fit and the actual measurement of the pattern.) In tailored clothes pattern ease gives us wiggle room; in casual clothes pattern ease gives us comfort. In other designs, pattern ease gives the style. Knowing how to determine the pattern ease allowed in any pattern is one of the first steps in learning how to fit patterns. This is not going to be a post with pretty pictures—just basic pattern know-how.
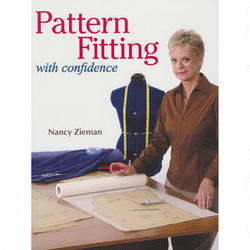
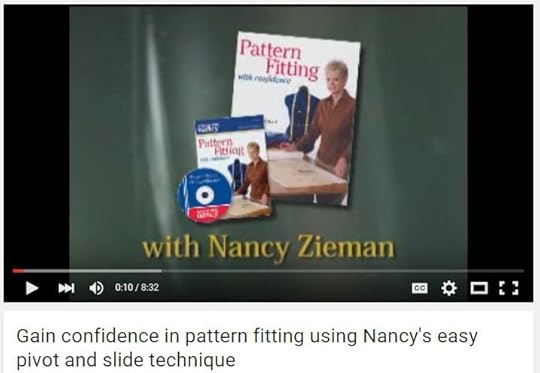
You’ll be able to find more information on ease in my book, Pattern Fitting With Confidence or on the Nancy’s Notions online video. The video details my pivot and slide technique to adjust patterns once the amount of ease and fit measurements are determined.
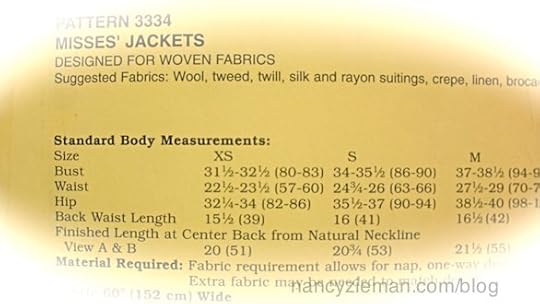
Most commercial patterns help us out, listing the actual measurement of the pattern on the tissue pattern.
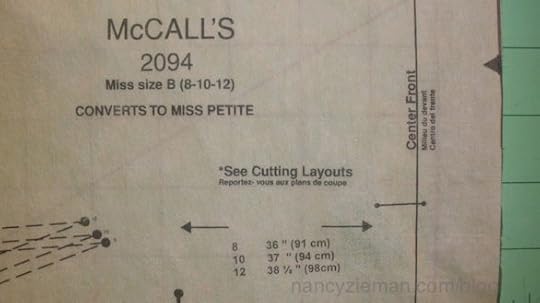
In many cases, the actual measurement of the pattern (size + ease) is printed on the back of the pattern envelope.

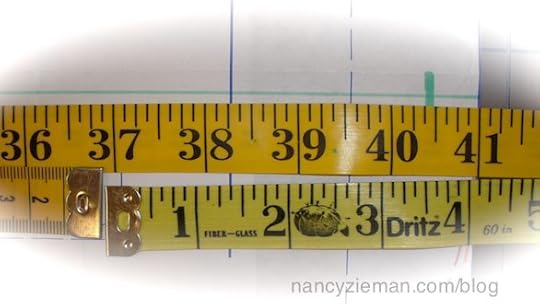
Comparing either of these numbers with the size chart gives you the ease amount. Note: If the size chart is not printed on the back of the pattern envelope or within the guide sheet of the pattern, you’ll be able to find it online at the respective pattern company site. (The screen shots are courtesy of The McCall Pattern Company.)
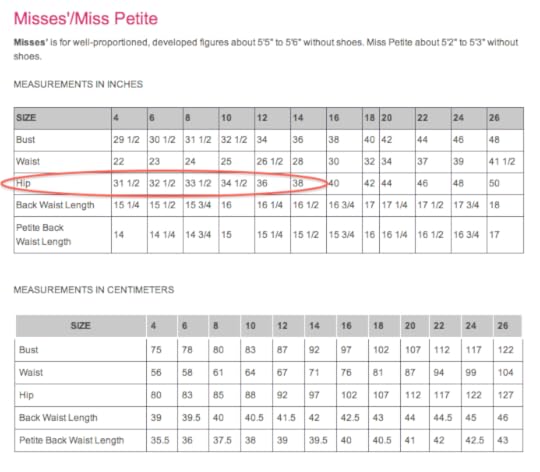
In this size 14 example, the ease is the difference between the two numbers: 43-1/2″−38″ = 5-1/2″. (It may seem like a lot, but it isn’t! Minimum ease in the hipline is 4″, which will give a very tailored fit.)
If the pattern you’re using doesn’t include any of these comparison options, especially when using vintage patterns, here’s how to measure to determine the pattern’s ease.
Locate the size chart.
Note the sizing measurements.
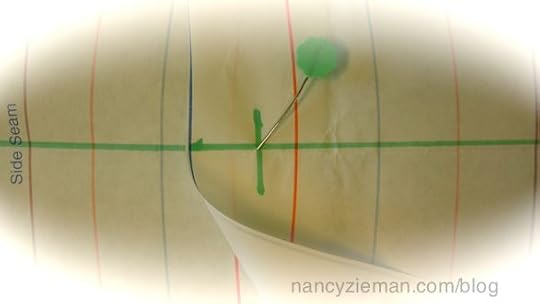
The example shows how to determine the waistline ease.
If the pattern has a waistline dart, pin the dart closed only at the waistline.
Extend the waistline marking across all pattern pieces.
If the pattern is multisized, mark the stitching line at the waistline of the pattern. This pattern has 5/8″ seam allowance. The 5-in-1 Sliding Gauge is 5/8″ wide—how convenient! Use the width of the tool to quickly mark the stitching lines.
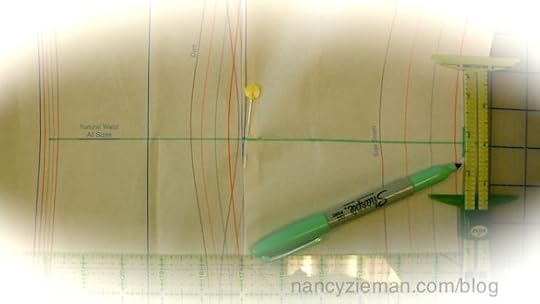
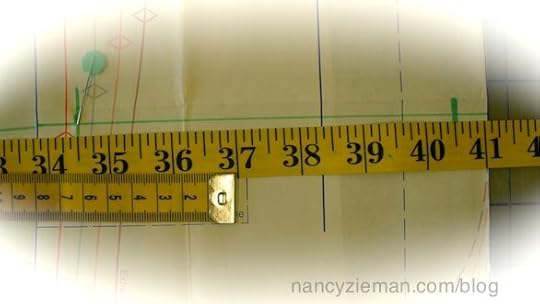
Overlap the pattern pieces
Pin together at the respective stitching lines.
When all pieces are pinned together, you’ll be looking at half of the garment.

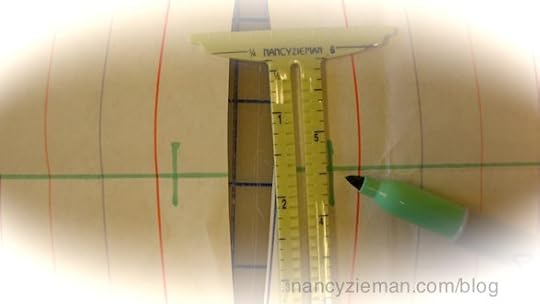
Measure the pattern
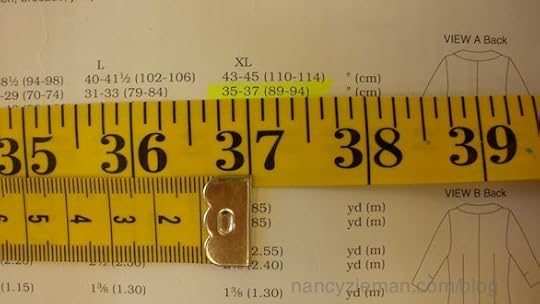
Fold the end of the tape measure to the waistline measurement in this example to 37″ for the XL size.
Place the fold of the tape measure at the back stitching line; lay the tape measure along the waistline marking.
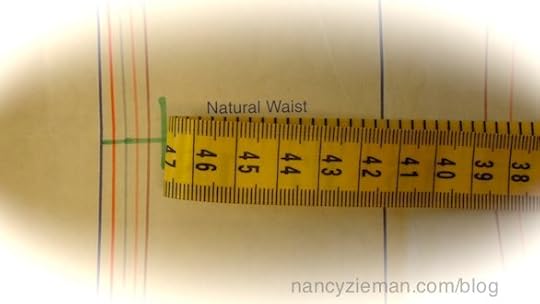
The pattern ease is double the distance between the end of the tape measure and the front stitching line; the ease is 7″.
Measure the distance with a second tape measure—double the measurement. In this instance, the ease is 7″.
It’s certainly not necessary to always know or determine the amount of pattern ease. Yet, understanding the wiggle or style room added in your pattern is one of the first steps in understanding how your pattern will fit. You can find more information in Pattern Fitting With Confidence, my book and DVD on fitting tops, skirts, and pants.
Watch Pattern Fitting with Confidence online.
The video details my pivot and slide technique to adjust patterns once the amount of ease and fit measurements are determined.
Don’t forget to submit your table runner in my Fall Table Runner Challenge! The deadline to enter is only SIX days away. Click here to see how to enter. Make sure you are subscribed to my enews mailing list so you won’t miss a thing. Sign up here.
Bye for now,
Content in this feed is © copyright 2015 by Nancy Zieman and may not be republished without written permission. You’re welcome to forward the email to a friend or colleague but it’s not okay to add the RSS feed automatically as content on a blog or other website.
September 5, 2015
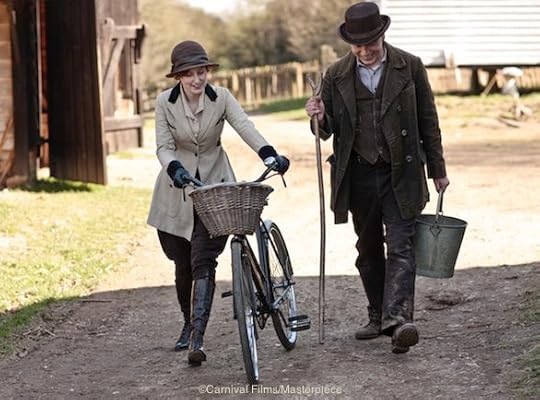
Dressing Downton—Close-up Look at Fashions from the Popular PBS Drama

Combine an award-winning drama, spectacular costumes, and an appreciation of all things made with needle and thread and you’re sure to enjoy watching my three interviews on Dressing Downton. Laura Fiser, curator of The Paine Art Center and Gardens, Oshkosh, WI, joins me as we showcase costumes from the PBS Masterpiece series Downton Abbey®.

Daywear at the Abbey
The first interview centers on daywear at the abbey. If you’re a faithful viewer of this popular series, these fashions are iconic to the series. Watch the interview online.

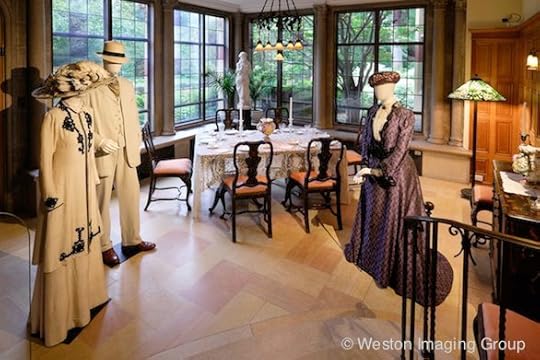
Dressing Like an Aristocrat
If you’re a Downton Abbey® fan, you may watch the series for more than the drama. Get a close-up look at some of the stunning evening wear worn during the first three series of the Masterpiece drama. I know you’ll enjoy watching this fascinating segment.

Activewear for the Gentry
Activewear had a totally different meaning in the 1920s, especially if you were an aristocrat living in Highclere Castle, a fantastical country estate, Downton Abbey® as seen in the US on Public TV. Highlights include riding, hunting, and farming costumes. Click to watch my interview with curator Laura Fiser.
Watch all three of my interviews with curator Laura Fiser online.
Simply click on the highlighted titles.
Daywear at the Abbey
Dreaming of Dressing Like an Aristocrat
Activewear for the Gentry
Dressing Downton Traveling Exhibit
Now through September 20, 2015: The Paine Art Center and Gardens in Oshkosh, WI
October 15, 2015—January 10, 2016: Virginia Historical Society, Richmond, VA
February 11, 2016—May 8, 2016: The Richard H. Driehaus Museum, Chicago, IL
July 1, 2016—September 25, 2016: Taft Museum of Art, Cincinnati, OH
October 13, 2016—January 8, 2017: Northern Indiana Center for History, South Bend, IN
The exhibition credit is:
Exhibition produced by Exhibits Development Group in cooperation with Cosprop Ltd., London. Downton™ and Downton Abbey®. ©2015 Carnival Film & Television Limited. A Carnival Films/Masterpiece Co-Production. Carnival logo ©2005 Carnival Film & Television Limited. Masterpiece is a trademark of the WGBH Educational Foundation. All Rights Reserved.
The Film still credit is:
©Carnival Films/Masterpiece
Bye for now,
Content in this feed is © copyright 2015 by Nancy Zieman and may not be republished without written permission. You’re welcome to forward the email to a friend or colleague but it’s not okay to add the RSS feed automatically as content on a blog or other website.
September 3, 2015
Sewing Prescription for a Broken Zipper
In this new 2-part Sewing With Nancy series, I’m taking a lighter approach to fixing what’s broken, while breaking most of the sewing rules.
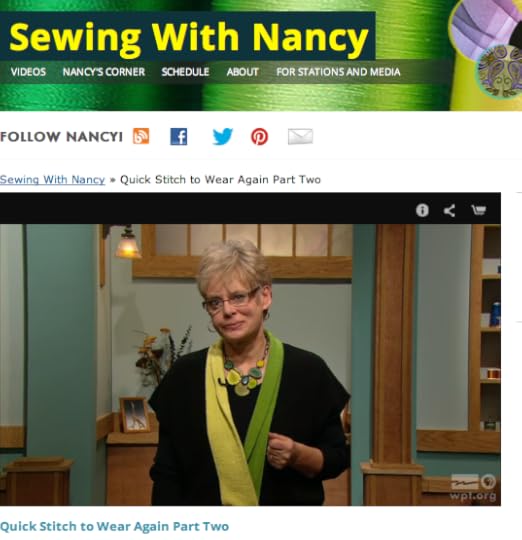
You’ll find five common mending repairs in the second episode of Quick Stitch to Wear Again, a new Sewing With Nancy program. Watch online, on Public TV, or on DVD. Or, follow all the details in the book. Here’s what you’ll learn!
Cutaway-Zipper Remedy
The Cutaway-Zipper Remedy is my prescription for replacing a broken zipper in a jacket or coat. Unlike traditional solutions, this zipper cure does not involve opening seams.

Holes to Art Patches
A tear in pants or jeans can easily turn from an unwanted hole to art. This next Quick Stitch to Wear Again technique is one way of fixing a problem with unconventional, yet clever sewing steps.

Lumberjack Patches
If you are faced with a lumberjack-sized hole in your jeans, which needs immediate attention, I’d like to show you how to take the easy way out. But don’t think that this quick fix is temporary. No sir-ree, it’s meant to withstand the riggers of any want-to-be logger.

Too Much Cake Fix
Indulging in an extra cookie or a piece of chocolate cake may seem like poor choices. After time those extra treats can turn into a permanent fixture around our middles. Rather than discarding or never wearing your favorite pair of jeans, I’d like to show you how to make them wearable again, using my Too Much Cake Fix.

No-Fuss Repairs
The next time someone asks you to sew on a button, suggest that they watch this Sewing With Nancy segment online! I’m a firm believer that everyone should know how to sew this basic fix. The process is a no-brainer, when using no-fuss steps.

Two-thumbs up to Philip Ashby, graphic artist at Wisconsin Public TV, for his spot-on illustrations!

For a chance to win a copy of Quick Stitch to Wear Again, simply leave me a comment sharing which of these mending tips you need the most. A winner will be randomly selected and announced on September 10.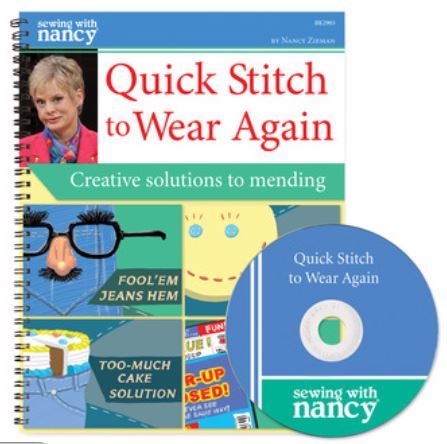
Watch Quick Stitch to Wear Again on Sewing With Nancy online.
To watch Sewing With Nancy on your iPad, iPod Touch, or iPhone, download the app.
Don’t forget to submit your table runner in my Fall Table Runner Challenge! Click here to see how to enter. Make sure you are subscribed to my enews mailing list so you won’t miss a thing. Sign up here.

As many of you know, I recently had a hiccup on my Facebook page. I’m happy to report that the problem has been fixed! You can continue to connect with Sewing With Nancy, other fans, and myself on the page. Thank you for your patience.
Bye for now,
Content in this feed is © copyright 2015 by Nancy Zieman and may not be republished without written permission. You’re welcome to forward the email to a friend or colleague but it’s not okay to add the RSS feed automatically as content on a blog or other website.
Nancy Zieman's Blog

- Nancy Zieman's profile
- 21 followers

