
Ree Drummond's Blog, page 53
August 15, 2012
Yummy Slice-and-Bake Cookies
 I love slice-and-bake cookie dough because it reminds me of the times during my freshman year in college that my dorm friends and I would buy tubes of the storebought stuff and eat it straight out of the tubes with plastic spoons. I have no idea why I put on fifteen pounds that year.
Good news, though! I lost my freshman fifteen, only to later get married, have children and gain it back. Wait. Is that good news? Or is that bad news? Or is that neutral news?
Let me start again: Good news! You can make slice-and-bake cookie dough at home. Most of your cookie dough recipes can be spooned onto plastic wrap or waxed paper, rolled tight, then refrigerated and used as you need it. I love the approach because you can just slice off as many cookies as you need and they bake up really neat and tidy. And in most cases, you can freeze the rolls of dough if they’re wrapped/protected enough.
This is the yummy batch I made last night. I added a couple of yummy ingredients that really made the cookies yummy. Make them soon!
(Soon = Today. Just in case you were wondering.)
 Here’s what you need. I basically went into my pantry, closed my eyes, and removed as many items as I could.
 Start by throwing 2 1/4 cups all-purpose flour into a bowl.
 Then grab a teaspoon of instant coffee…
 And throw that into the flour.
 Add a teaspoon of baking soda…
 A teaspoon of salt…
 And stir it together using the measuring spoon because you don’t want to walk over to the drawer and get a regular spoon.
A spoon is a spoon is a spoon, yes?
Yes.
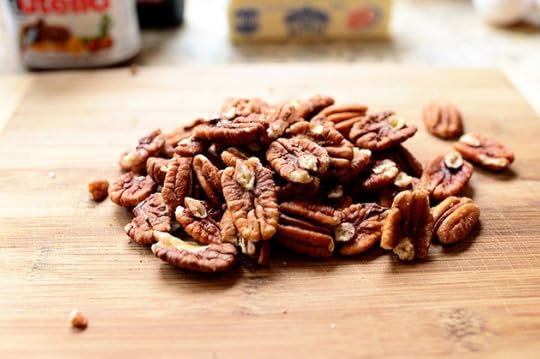 Now, grab some pecans…
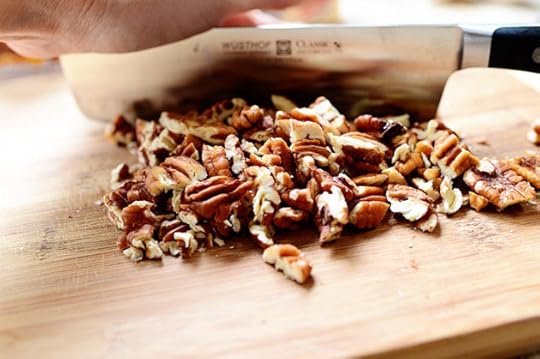 And chop them up.
But here’s the thing about my preference for pecans in baked goods.
 I like ‘em really, really fine. Especially in slice-and-bake cookies. If there’s a huge chunk of pecan, when you’re slicing them the pecan can sort of tear the dough and ruin your life.
Don’t let that happen to you.
 Along those same lines, grab some M&M’s…
 And chop them up a bit, just so the whole pieces are broken up.
Have you ever chopped M&M’s before? It’s an exercise in hilarity, but if you have a very sharp knife it helps keep the M&M’s from shooting across the room, ricocheting off the wall, and hitting you in the Adam’s Apple.
I hate it when that happens!
 It’s Wednesday, and you know what that means: It’s dough time! Add two sticks of softened butter to the bowl of a mixer.
I have no idea what Wednesday has to do with any of this.
 Measure 1 1/4 cups brown sugar…
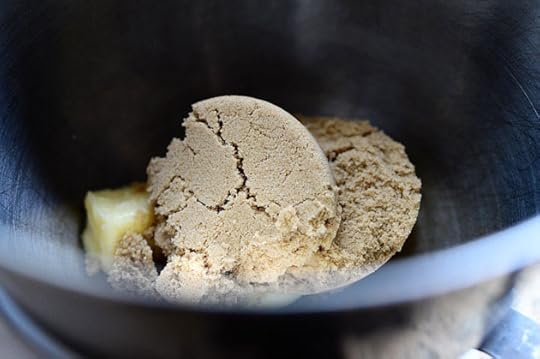 And throw that on in.
 Then measure 1/4 cup of regular sugar and pour it in, too!
Oops. I just used an exclamation point!
Oops. I just did it again!
Ugh!
Stop, Ree!
 Cream together the butter with the sugars, scraping the sides once along the way.
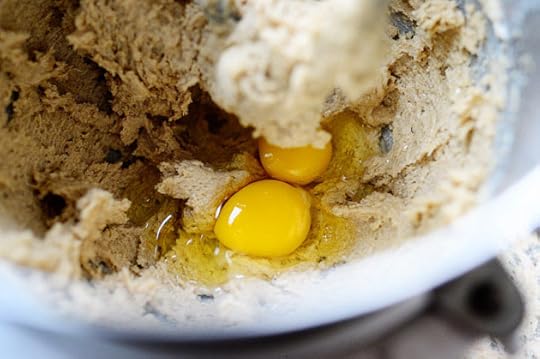 Crack in two eggs…
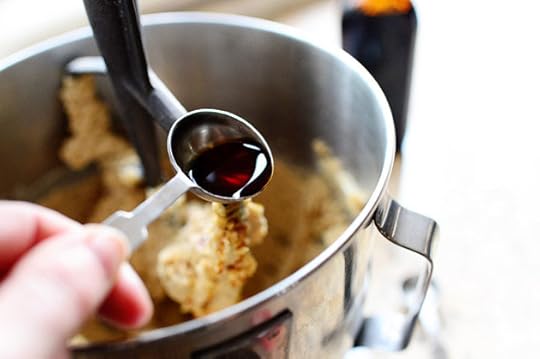 Add a tablespoon of vanilla…
 And mix it up well, scraping the sides again.
 Now, this is where things get weird. Add two tablespoons of peanut butter. This doesn’t add an overwhelming peanut butter flavor! It just adds a tiny bit of…well, something. Adds depth and dimension to the cookie dough without turning it into a peanut butter cookie.
You must trust Pioneer Woman.
 Now, you must trust Pioneer Woman again and add 2 tablespoons of Nutella!
You’ll be glad you did, Maynard.
Sorry I called you Maynard. Sometimes I just can’t stop myself.
 Now mix, scrape, and mix again.
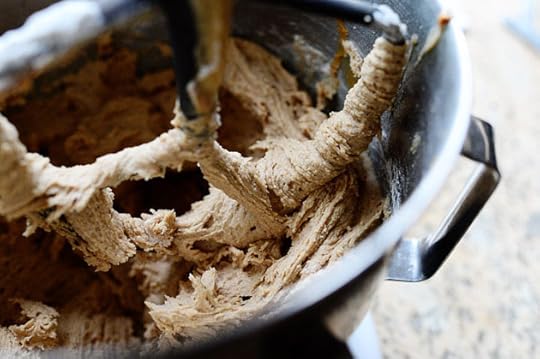
 Next, add the flour mixture in four increments, mixing gently after each addition. Don’t beat the heck out of the dough; just stir lightly.
Sorry to be bossy.
 I love life. My gosh.
 Now, add in the chopped pecans…
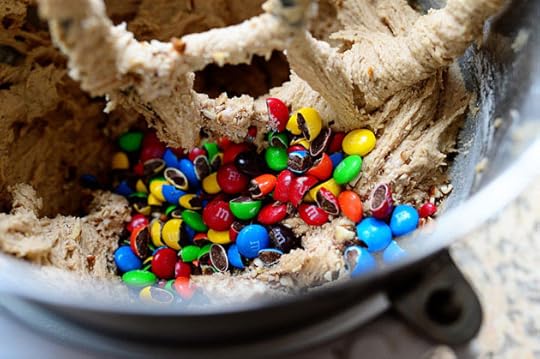 And the sorta-chopped M&M’s.
 And mix it together until it’s just combined.
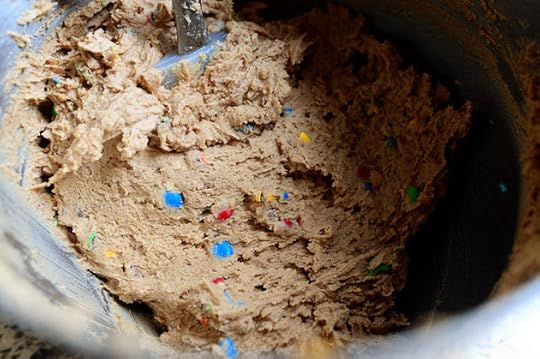 Divine!
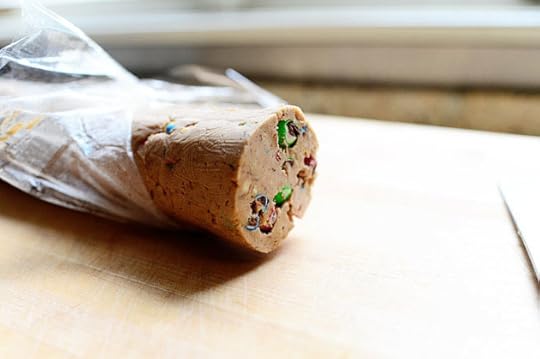
 Now, stretch out one long (or two shorter, which will fit more easily in your fridge) piece of plastic wrap and spoon the dough into a line.
 Try with all your might not to eat this dough with a spoon.
Thank you for your attention to this matter.
 Carefully roll up the dough inside the plastic wrap (and by the way, waxed paper also works wonderfully. I was just out of waxed paper)…
 And try to pull the wrap tight so that the dough is packed and firm in there.
 Okay, so I should have gone with two shorter pieces. I got overly excited.
In any event, wrap the ends tightly and refrigerate the dough till you need it! After about 20-30 minutes in the fridge, reach in and roll it over/form it a bit to make sure it stays in a nice cylindrical shape as it chills. Chill the dough for at least three or four hours, until it’s nice and firm.
You can also do what I did and stick it in the freezer for about 20 minutes.
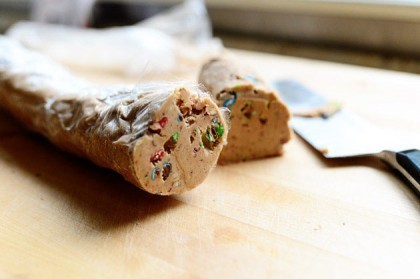
 When you’re ready to bake ‘em, preheat the oven to 375 degrees and slice up the dough.
 Oh, yum.
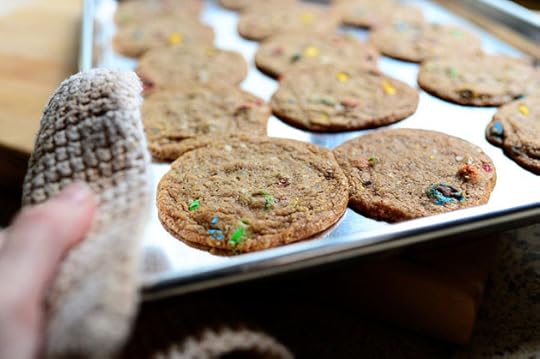
 Lay the slices of dough on a cookie sheet, giving them a little space between them. These will bake up pretty flat, so they’ll spread out quite a bit.
Or is it: These will spread out quite a bit, so they’ll bake up pretty flat.
 Keep going till you’ve sliced off as many cookies as you want, then wrap up the dough and stick it in the fridge again until you need it. Note that this could very well be in the middle of the night. The cookies are that good.
 Mmmm. Good!
 Great flavor to the dough: basic cookie flavor, but the increased brown sugar, the Nutella, and the peanut butter give it a real yumminess. The finely chopped nuts give ‘em a nice flavor and crunch…and of course, the M&M’s make life worth living.
Here. I’ll show you.
 Ta-Da!
Enjoy these, my friends.
Recipe: Yummy Slice-and-Bake Cookies
Prep Time: 15 Minutes
|
Cook Time: 10 Minutes
|
Difficulty: Easy
|
Servings: 30
Print Recipe
3"x5" Cards
4"x6" Cards
Full Page
Ingredients
2-1/2 cups All-purpose Flour1 teaspoon Instant Coffee Granules1 teaspoon Baking Soda1 teaspoon Salt1 cup (2 Sticks) Salted Butter, Softened1-1/4 cup Packed Brown Sugar1/4 cup Granulated Sugar2 whole Eggs1 Tablespoon Vanilla2 Tablespoons Creamy Peanut Butter2 Tablespoons Nutella1/2 cup Very Finely Chopped Pecans3/4 cups M&M's, Roughly Chopped Preparation Instructions
Combine flour, instant coffee, baking soda, and salt in a bowl. Stir together and set aside.
Cream together the butter with the sugars, scraping the bowl once while mixing. Add peanut butter and Nutella and mix. Add dry ingredients in increments, mixing gently after each addition. Scrape the bowl once and mix again.
Add chopped pecans and M&M's and mix gently to combine. Add more of either ingredient if needed.
Spoon dough on a long piece (or two shorter pieces) of waxed paper or plastic wrap. Carefully roll the dough inside the wrap, pressing gently to get it to form into a firm cylinder. Refrigerate for at least 3 to 4 hours or place into the freezer for 20-30 minutes.
Preheat oven to 375 degrees. Slice off as many cookies as you'd like and lay the slices on a baking sheet. (The thicker the slices, the farther apart the cookies will need to be. They bake up flat.)
Bake for 10 minutes, or until nice and golden brown.
Delicious!
Posted by Ree on August 15 2012


August 13, 2012
Roast Chicken
There’s nothing simpler than roast chicken.
And there are few things more delicious.
You can use this basic recipe and change it up however you like: different herbs, different citrus fruits, different seasonings. You can even have a different attitude and see how that affects the flavor of the meat!
Just kidding. But you can change what you’re wearing each time. That’s always a fun variation.
 The Cast of Characters: A whole chicken, butter, lemons, rosemary, and salt and pepper.
And the will to make roast chicken.
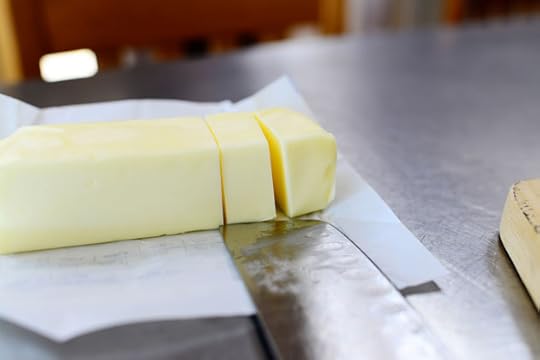
 Throw the buttah into a bowl. Make sure it’s nice and soft.
 Zest up at least two of the lemons…
 And throw the zest into the bowl with the butter.
My question of the day: Where would the world be without lemon zest? I can’t imagine it. I don’t want to imagine it. So I won’t imagine it.
I’m so glad we had this talk.
 Strip off a bunch of rosemary leaves…
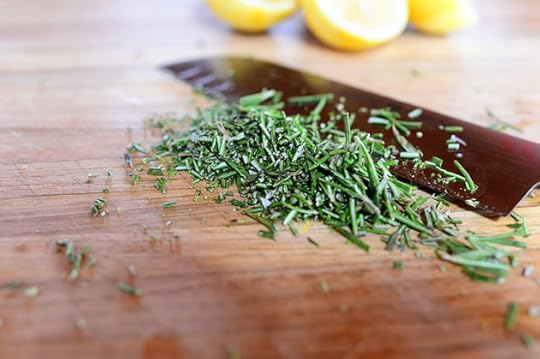 And chop them really finely.
Finer than this. I was in a hurry to eat.
Don’t be like me.
 Throw the rosemary into the bowl, too.
 Add some salt and pepper (I didn’t do this. Don’t be like me.)
 Line a rimmed baking sheet with heavy aluminum foil and plop the chicken right in the middle. You can truss it if you want. But that’s not how we do things around here. You can also do pieces, which I do with great frequency, which is another way of saying “I do that a lot.”
In other news: Whole chickens crack me up. I don’t know why.
And I don’t want to know why.
 Throw the butter mixture on the top…
 And smear it all over the bird.
 Be sure to get in all the crevices.
Tee hee! That tickles.
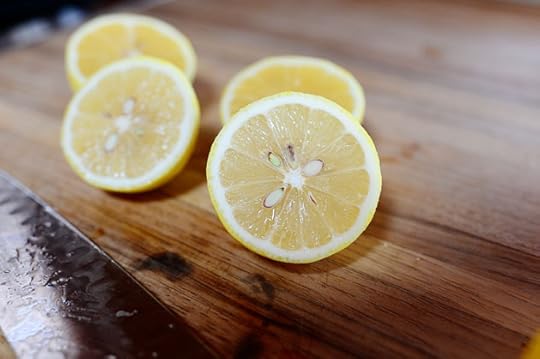 Now, cut the lemons in half…
 Squeeze the juice of one lemon over the top…
 Then stuff as many lemon halves as you can into the…cavity.
I’m so immature.
 Next, wedge two or three of the rosemary sprigs in there too.
I’d just like to take this opportunity to say that lemon and rosemary are so pretty together.
 Then give the chicken one final schmear…
And roast it in the oven for about an hour and fifteen minutes to an hour-and-a-half. Ish. I do 400 degrees on convection, so if you’re using a standard oven you could do 425 or so. Basically, you want it cooked through, skin a deep golden brown, juices sizzling in the bottom of the pan…but still moist in the middle.
After you take it out of the oven, cover it loosely with foil and let it sit for 10 minutes or so.
And by all means do not take photos of the perfectly roasted chicken coming out of the oven. That would be way too helpful and instructive.
 Next, remove the legs, thighs, and breast. And wings.
And again, by all means, when you do this do not take photos of the process.
I need some ginkgo biloba.
 And yum! Roast chicken! Nothing like it in the world.
 Serve it on a plate with a wedge salad and a lemon half.
Back to carving, you probably don’t want to learn how to perfectly carve a chicken from me. I do it differently every time. Sometimes I just hack off pieces of chicken until there’s nothing left but the carcass. Sometimes I carve it meticulously and surprise myself by doing a somewhat decent job.
 Sometimes I do this. (This is a different roast turkey recipe I made the same day. Will post soon.)
And sometimes I just rip off the leg and eat it in the kitchen before dinner is served.
(Again, see “Don’t be like me” notes above.)
Enjoy, guys! Roast chicken is easy and yummy.
Here’s the recipe:
Recipe: Roast Chicken
Prep Time: 10 Minutes
|
Cook Time: 1 Hour15 Minutes
|
Difficulty: Easy
|
Servings: 4

Print Recipe
3"x5" Cards
4"x6" Cards
Full Page
Ingredients
1 whole Chicken, Rinsed And Patted Dry3/4 cups Butter, Softened3 whole Lemons4 sprigs Rosemary Salt And Pepper, to taste Preparation Instructions
Preheat oven to 400 degrees (convection bake. If you're using a standard oven, you can do 425.)
Zest two of the lemons. Strip the leaves off of one of the rosemary sprigs and chop it up finely.
In a bowl, combine softened butter, lemon zest, rosemary, and salt and pepper to taste.
Line a baking sheet with heavy duty aluminum foil and lay the patted-dry chicken on the foil, breast side up.
Use your fingers to smear the butter mixture all over the chicken, under the skin, and inside the cavity. Cut the lemons in half and squeeze the juice of one lemon all over the chicken. Place the six lemon halves (if they'll fit!) and the three remaining rosemary leaves into the cavity of the bird.
Place the chicken into the oven and roast it for 1 hour, 15 minutes or until done. Skin should be deep golden brown and juices should be sizzling.
Carve/cut up to your heart's content and dig in!
Posted by Ree on August 13 2012

August 10, 2012
Yum. Doughnuts!
 Note from PW: On tomorrow’s Food Network episode, I make homemade glazed doughnuts for Marlboro Man, the kids, Josh, and Pete. To make it easy, I’m bringing the doughnut recipe up to the front. These are delicious, guys! Give ‘em a try sometime.
On the episode, I make the doughnuts a little smaller than these, circumference-wise. I also roll the dough a little thinner, which results in a smaller doughnuts. I tend to like smaller doughnuts because then I can eat more, but you can make them whatever size you’d like!
Originally posted February 2010.
Keep in mind that this might take a time or two of making them before the process feels totally comfortable. I tried to keep the instructions below as specific and precise as I could. The printable recipe at the bottom of the page has numeric instructions so as to leave no doubt. But yeast, as we all know, can have a mind of its own sometimes—so can the weather, with its humidity or dryness. So if at first you don’t fricassee, fry fry a hen…okay?
But do give them a try sometime. Doughnuts are fun to make!
 Begin by measuring 1 1/8 cup of whole milk. Just go between the 1 cup and 1 1/4 cup lines.
Yes, I’m aware you didn’t need me to explain that to you.
Warm up the milk so that it’s warm to the touch, but not hot. If you have a thermometer, make sure the milk is between 105 and 115 degrees F. I usually err on the side of too warm, but that can be a little dangerous.
 Add 1/4 cup sugar to the milk. Stir it around a few times.
 Now, you can certainly use active dry or rapid rise yeast…but I have had great success with this SAF Instant Yeast, which is sold at my local smalltown grocery store. It’s good stuff, guys. And this one-pound bag, which could make around 90 to 100 loaves of bread, costs about six dollars.
Again, though, if you’d like to use whatever yeast you have in your house, feel free to substitute active dry or rapid rise.
 Measure 2 1/4 teaspoons of the yeast granules into a bowl. This is the same quantity that comes in one individual packet of yeast, so the two can be easily interchangeable.
 Pour the warm milk/sugar mixture into the bowl with the yeast.
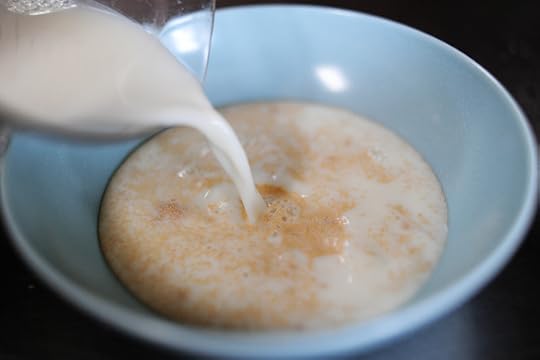
 Stir it around just a couple of times, then let it sit for several minutes while you prepare the other ingredients.
NOTE: It is NOT necessary to dissolve instant yeast before adding it to the dry ingredients. I like to do it in this recipe, just to maintain a consistent process should I ever have to use a different variety of yeast…and the recipe simply works this way.
 Next, add 1 1/4 sticks of unsalted butter to a separate bowl.
*This is one of the rare cases I use unsalted butter. It just seems to work better in this recipe.
 Melt the butter in the microwave until it’s just barely melted, then stir the butter to finish the melting process. The reason I do it this way is that I don’t want the melted butter to be too hot. I’m going to add it to beaten eggs in a sec.
 Crack a couple of eggs into a separate bowl…
 Then beat them senseless with a fork.
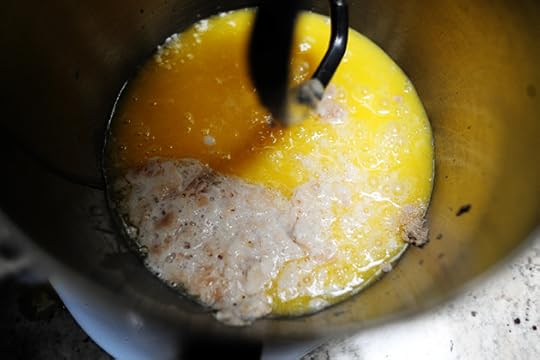
 Next, making sure the butter’s not overly warm first, pour the beaten eggs into the butter.
 Stir the mixture with the fork until it’s all combined.
 Now, pour the egg/butter mixture into the bowl of an electric mixer, with the mixer fitted with the dough hook attachment. Turn the mixer on speed 3 (if it’s KitchenAid), or medium-low.
*NOTE: If you do not have an electric mixer/dough hook attachment, just pour this into a regular large mixing bowl.
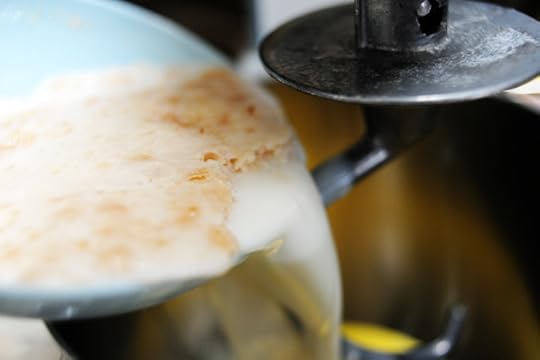
 With the mixer running, grab the yeast/milk mixture, which, eight minutes later, is now totally freaky and bubbly and weird looking.
Freaky, bubbly, and weird: when it comes to yeast, these are all very desirable attributes.
 Carefully pour the mixture into the bowl of the mixer…
 Plop.
Plop.
 Allow the mixer to gently stir the ingredients together.
*NOTE: If you aren’t using a mixer, just stir the wet ingredients gently with a whisk for about a minute.
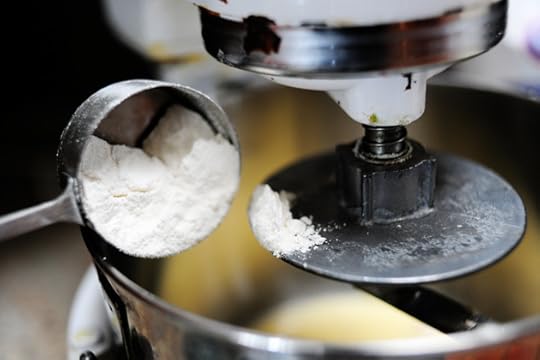
 Let the mixer run and keep stirring up the wet ingredients while you measure out 4 cups all-purpose flour. This is where I’ve really done some experimenting (with cake flour, self-rising flour, etc.) and wound up coming back to the regular stuff. Sometimes simple is best, baby.
 Add 1/4 teaspoon salt to the flour and stir to combine.
I seriously can not explain the freaky pink alien hand in this photo. It’s the lens…or the lighting…or maybe I really am just a freaky pink alien and I’ve tried to deny it to myself all these years. Either way, try not to be disturbed. Focus on the doughnuts.
 Make sure the wet mixture looks nice and combined, then begin adding the flour mixture in 1/4 to 1/2-cup increments…
 Mixing for several seconds after each addition.
 Keep this up…
 Until all the flour has been added.
*NOTE: If you’re not using a mixer, just add flour to the wet ingredients in increments, stirring and/or kneading after each addition.
 Next, just let the mixer go for a good 8 to 10 minutes. You’ll hear the satisfying sound of the dough slapping against the sides of the metal bowl…ahhh. There’s not a more satisfying sound in all the world.
Except maybe those grunting sounds a newborn baby makes for the first two or three weeks of his life.
But I can’t let myself go there. That’s more dangerous than a doughnut.
 Stop the mixer, then scrape the bottom of the bowl and turn the mixer back on for one more minute. Then turn off the mixer and remove the hook attachment…
 …Leaving the dough in the bowl for a few minutes.
*NOTE: If you’re not using a mixer, just knead the dough gently for about 5 to 8 minutes, then let it sit and rest.
And THAT’S IT for the dough. All you do now is put the dough into a lightly greased (with a little canola oil or butter) bowl, toss it around to coat the surface of the dough, then cover with plastic wrap (not foil; important!) and keep in the refrigerator for several hours or overnight.
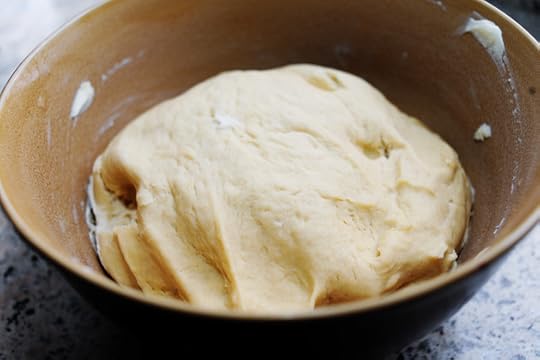 This is the next morning.
 Now, right away, while the dough is still cold (so it can easily be rolled and handled), lightly flour your rolling surface…
 Then plop the dough upside down onto the surface.
 Then flour the top and roll out the dough to between a 1/4 and 1/2 inch thickness, lightly flouring as you go along if the pin starts to stick.
 Now, lightly flour a baking pan. You can line it with waxed paper or a baking mat first, but you don’t have to.
 Now, ideally you would now use a 3-inch (maximum) doughnut cutter, which is a single cutter that also cuts a hole in the middle of each round. I used to have one, but I’m afraid it’s now living at the bottom of our pond, right along with my favorite slotted spoon and about a hundred other household items my boys have used in their various attempts to catch sea monsters.
I don’t want to talk about it.
 Next, finding that I was also missing my smaller (1.5 inch) biscuit cutter, I had to choose between these two little fluted numbers.
Buttheads.
My boys, not the cutters.
**I’m missing a couple of sequence shots here because…well, because I’m a freak, but basically here’s what went on:
1. Cut a center hole in the larger rounds using a 1 to 1.5-inch cutter.
2. Transfer the doughnuts and the doughnut holes to the floured baking sheet
3. Repeat with the dough scraps until all/most of the dough has been used.
4. Cover the doughnuts and holes with a large tea towel and LET RISE IN A WARM PLACE FOR AN HOUR-PLUS.
IMPORTANT
I can not emphasize enough the importance of providing the doughnuts with a warm, draft free place to rise. The dough has started out cold, so you really need to aggressively make sure they have the proper environment for rising. My kitchen is extremely drafty—I have four large windows that have seen better days—so I have to go on the offense by heating up my large griddle, then turning it off, then placing my pans of doughnuts on the warm griddle. Now, you don’t want the pan on which the doughnuts are sitting to actually heat up at all—that would mess up the bottoms of the doughnuts. But you do need to really create a warm environment so the doughnuts will rise adequately. How much the doughnuts rise over the next hour is directly related to how light and fluffy they’ll be…so do what you can!
 This is after one hour of rising in a nice, warm place.
Compare the difference:
Risen, the doughnuts should not appear “solid”, but should really look light—as if they’d collapse if you breathed on them. Feel free to let them rise an additional 15 minutes or so if you think they need it. Just always keep them covered with a light towel so the tops don’t dry out.
 Once the doughnuts are risen, heat a pot of canola oil until it reaches 375 degrees. You’ve really gotta have a deep fry thermometer for this, as the temperature of the oil is extremely important.
Ideally, the oil will remain between 375 and 380, 380 being a little on the hot side.
 While the oil is heating, make a quick glaze of powdered sugar, salt, vanilla, and cold water or milk—or a combination of both. Whisk it together until totally smooth.
NEXT: Make a nice, big bed of several paper towels stacked on top of one another. We’ll need to use these to quickly absorb the oil after we cook the doughnuts.
 When the oil has reach its temperature and evened out (i.e. isn’t getting hotter by the second) drop in one doughnut first, just to get comfortable with the process. Notice the little “smushed” area: this is where I very gently looped my finger through the hole of the doughnut to drop it into the oil—you can see how light and fragile the dough is. That’s good!
 Let it fry and bubble for about 45 seconds…
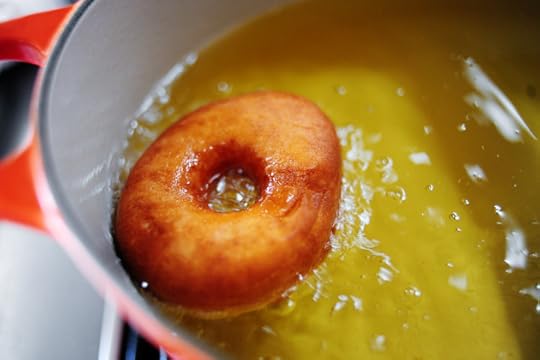 Then use a slotted spoon to flip it over. See how brown it got in a very short time? That’s why it’s best to start out cooking one at a time. And keep monitoring your oil temp!
I’m bossy when it comes to doughnuts. I should go into business with our doughnut guy in town. I think we’d be very happy together.
 45 seconds into the second side, remove the doughnut with a slotted spoon, allowing as much oil to drip off as you can.
 Place it on the stack of paper towels. Count to five, then flip it over onto a clean part of the paper towels.
 Continue doing this over the first 30 seconds or so of the doughnut’s life, trying to get as much oil onto the paper towels—and off of the doughnut—as you can.
 Think of it this way: whatever oil winds up on the paper towel does not wind up on/in the doughnut. It’s a mathematical certainty.
 Continue this process, frying one to three doughnuts at a time…
 Until they’re nice and golden brown.
Drain them on the paper towels immediately after removing them from the oil.
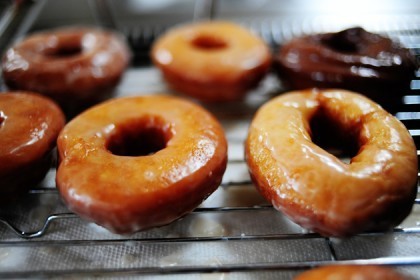
 Then, after the doughnuts have been drained, drop them one by one into the glaze. Submerge them a little more than halfway deep, then remove them and turn them over. (Note: you may dip the doughnuts twice if you like; see examples below.)
 Let them sit on a cooling rack for a little bit. The glaze will drip down and start to set a bit, and the doughnuts will just get more delicious by the second.
The “chocolate” doughnut you see in the back row is actually a regular doughnut that cooked a little too long because I let the oil get too hot. It happens.
 Next, after all the doughnuts are cooked, throw in several doughnut holes at a time, turning them over after about 25 to 30 seconds.
 Okay, that’s it. I’m officially hungry.
 Now that is one yummy-looking doughnut.
 But doughnuts are not about looks.
 Ahhh. Behold the beauty of a plate of doughnuts.
 And back to the glaze: this doughnut was dipped once.
 This doughnut was dipped twice. A little gloopier and messier, but very sticky and delicious. Whether you single- or double-dip the doughnuts is strictly a personal preference.
 And whether you eat one doughnut or seven is matter to discuss with your maker.
And your doctor.
Enjoy these!
Recipe: Homemade Glazed Doughnuts
Prep Time: 25 Minutes
|
Cook Time: 2 Minutes
|
Difficulty: Intermediate
|
Servings: 18
Print Recipe
3"x5" Cards
4"x6" Cards
Full Page
Ingredients
Doughnuts1-1/8 cup Whole Milk, Warm1/4 cup Sugar2-1/4 teaspoons (one Package) Instant Or Active Dry Yeast2 whole Large Eggs, Beaten1-1/4 stick Unsalted Butter, melted4 cups All-purpose Flour1/4 teaspoon Salt Shortening GLAZE3 cups Powdered Sugar1/2 teaspoon Salt1/2 teaspoon Vanilla1/2 cup Cold Water Or Milk Preparation Instructions
To Make the Dough:
1. Make sure milk is nice and warm, but not overly hot.
2. Add sugar to milk. Stir to dissolve.
3. Add yeast into a small bowl.
4. Pour milk/sugar mixture over yeast. Stir gently, then let sit for 10 minutes.
5. Melt butter in separate bowl until butter is almost melted. Stir to finish melting so butter won't be overly hot.
6. Add beaten eggs to melted butter, stirring constantly to make sure the butter's not too hot for the eggs.
7. Add the egg/butter mixture to the bowl of an electric mixer fitted with the dough hook.
8. With the mixer on 3 or medium-low speed, pour in the yeast mixture.
9. Allow the dough hook to stir this mixture for a couple of minutes, making sure it's thoroughly combined.
10. With the mixer still going, add helpings of the flour mixture in 1/4 to 1/2 cup increments until all the flour is gone.
11. Stop the mixer, scrape the bowl, then turn the mixer on the same speed for five whole minutes.
12. After five minutes, stop the mixer and scrape the bottom of the bowl.
13. Turn on the mixer for 30 seconds.
14. Turn off the mixer and allow the dough to sit in the bowl undisturbed for 10 minutes.
15. After 10 minutes, transfer dough to a lightly oiled bowl. Toss the dough to coat, then cover the bowl with plastic wrap and place straight in the fridge.
16. Refrigerate dough for at least 8 hours, or overnight.
To Make the Doughnuts:
1. Remove bowl from fridge and turn out dough onto a lightly floured surface.
2. Roll out to 1/4 to 1/3-inch thickness.
3. Using a 3-inch cutter, cut as many rounds as you can, then roll out remaining dough and cut as much as you can, etc.
4. Cut holes out of each round using a 1 1/2-inch cutter.
5. Place both doughnuts and holes on a floured baking sheet.
6. Cover with large tea towel and place in a warm place in your kitchen; my kitchen is very drafty, so I have to briefly warm the griddle, then turn it off and set the sheets on top to keep warm.
7. Allow doughnuts to rise undisturbed for at least 1 hour; 1 hour 15 minutes if necessary. Doughuts should be visibly puffier and appear to be airy.
To Fry the Dougnuts
1. Heat plenty of vegetable shortening in a large pot until the temperature reaches 375 to 380 degrees---do not let it get hotter than 380 degrees! 375 is ideal; keep the thermometer in the pan to continually monitor.
2. One to two at a time, gently grab doughnuts and ease them into the hot oil. Allow them to cook 1 minute on each side; they will brown very quickly.
3. Remove doughnuts from the oil with a slotted spoon, allowing all oil to drip off.
4. Place doughnut immediately on several layers of paper towels. Count to five, then flip it over onto a clean part of the paper towels. Count to five, then flip it over again; the purpose, obviously, is to drain as much grease as possible before it soaks into the doughnut.
5. Repeat with remaining doughnuts and holes. The holes will cook more quickly than the doughnuts; about 30 seconds per side.
6. Allow doughnuts to slightly cool.
To Glaze
1. Mix all glaze ingredients in a bowl until completely smooth.
2. One by one, dip doughnuts into the glaze until halfway submerged. (Note: completely submerge doughnut holes, then remove with slotted spoon.)
4. Remove from glaze, then turn right side up on a cooling rack over a cookie sheet (to catch dripping glaze.)
5. Serve warm if possible, or room temperature.
Posted by Ree on February 7 2010

August 8, 2012
What’s Your Favorite Baked Good? (Winners Announced)
The winners of the gawgeous blue KitchenAids are:
#4441 Sherry Taylor: “My baked good of choice would have to be Blackberry Cobbler (that’s a baked good, right?) Spent all my summers picking (mostly eating) wild blackberries for my Mama to make cobblers – loved them hot out of the oven the best! Then would spend the next few days trying to not scratch all the chigger bites that came along with picking all those blackberries!”
#20352 Brigitte: “Moravian Sugar Cookie — nothing like it in this world.”
#39663 JA ELLA: “A cool real Key Lime Pie to beat this Oklahoma heat & make my tummy happy!”
Congrats to the winners! Contact prizes@thepioneerwoman.com to claim your mixers.
 Today, because it’s Wednesday…
Because there’s a chance of rain in Oklahoma today…
Because Charlie is snoring on the couch…
And because I love ya…
I’m giving away three (3) of these gorgeous KitchenAid stand mixers in this beautiful “Crystal Blue” color.
Why did I not know about this color before? What gives? I love it!
TO ENTER
To enter this giveaway, just answer the following questions in the Comments section of this post:
“What is your favorite variety of baked good?”
If you could have any baked good in your hands right now, what would it be?
Would you grab a brownie? A chocolate chip cookie? A scone to go with your coffee? A slice of apple pie?
Just shout out your favorite baked dessert/sweet and you’re automatically entered to win a mixer.
THE RULES
One entry per person, please.
Winners will be selected and announced Thursday night.
Good luck!

What’s Your Favorite Baked Good?
Today, because it’s Wednesday…
Because there’s a chance of rain in Oklahoma today…
Because Charlie is snoring on the couch…
And because I love ya…
I’m giving away three (3) of these gorgeous KitchenAid stand mixers in this beautiful “Crystal Blue” color.
Why did I not know about this color before? What gives? I love it!
TO ENTER
To enter this giveaway, just answer the following questions in the Comments section of this post:
“What is your favorite variety of baked good?”
If you could have any baked good in your hands right now, what would it be?
Would you grab a brownie? A chocolate chip cookie? A scone to go with your coffee? A slice of apple pie?
Just shout out your favorite baked dessert/sweet and you’re automatically entered to win a mixer.
THE RULES
One entry per person, please.
Winners will be selected and announced Thursday night.
Good luck!
August 6, 2012
Patty Melts
 Who doesn’t love a patty melt?
Well, besides vegetarians, people who don’t like rye bread, people who don’t eat onions, or anyone observing a low-fat diet.
Which begs the question: Why can I never begin a cooking post like a normal person?
Okay, I’ll just put it a different way: I love patty melts. In case you don’t know the strict definition, a patty melt is a beautiful, luscious, delicious cross between a grilled cheese and a hamburger. Cooked, golden brown onions are a signature ingredient and while any bread can be used, rye is the classic choice.
Absolutely, positively to die for.
 To start, violently grab an onion.
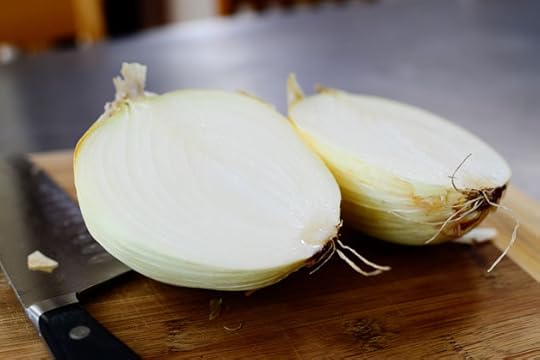 Whack it in half…
 Then cut off one end, peel off the skin…
 And slice them up! Not too thick, not too thin.
 Grab a tablespoon of butter…
 Throw it into a skillet over medium-low heat…
 And throw in the onions, honey baby!
 Stir them around, then let them cook slowly while you get everything else ready. Just remember to stir them from time to time so they won’t get all oogie.
(Name that movie.)
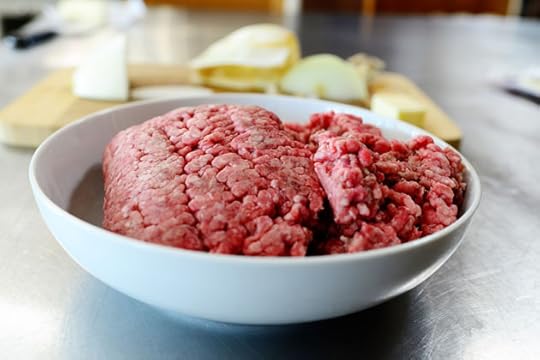 Grab some ground beef.
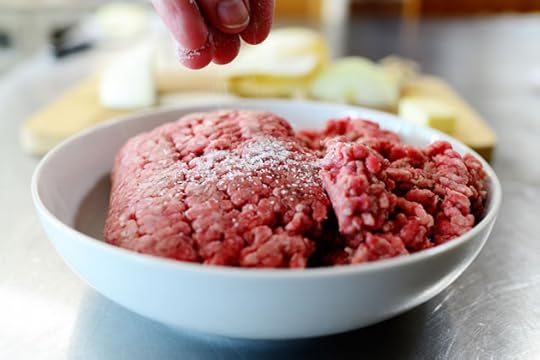 Sprinkle in salt…
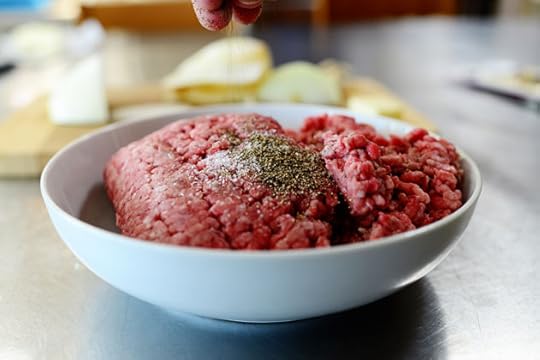 Pepper…
 And several dashes of Worcestershire sauce!
 Smush it all together with your hands until it’s all combined…
 Then form the meat into patties.
 Real quick-like: stir the onions! They’re looking pretty.
 Then throw another tablespoon of butter into a separate skillet…
 And cook the patties over medium to medium-high heat.
 Meanwhile, back at the onions…
 Give ‘em a quick stir, and mmmm. They’re looking great.
 Flip the burger, then let it go until it’s done!
How do you like your burgers, by the way? We’re a medium well household.
Medium rare steaks. Medium well burgers.
Amen.
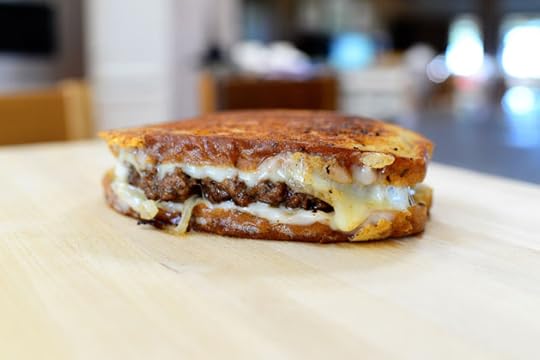
 Okay, to make the patty melt, melt butter in a clean skillet and throw in a piece of rye bread. Swirl it around so the outside surface really soaks up the butter. Then (not pictured because I’m an airhead) lay a piece of Swiss cheese on the bread.
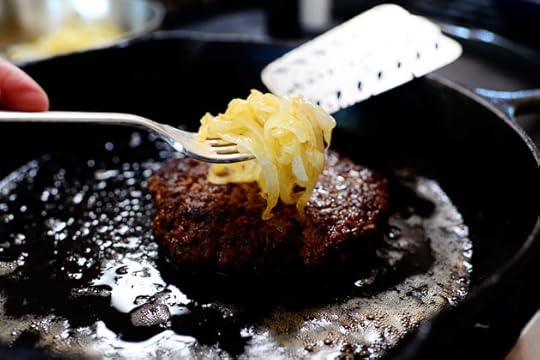 Grab a good amount of onions…
 And lay them on the patty.
 Then lay the patty on the cheese…
 And add a second slice of Swiss.
 Let the first side get nice and golden brown and crisp…
 Then flip it to the other side. (Psst. Add a little more butter to the pan before you flip it to make sure the other side gets nice and crisp, too!
 Yummy, yumalicious, yummy. Now all you have to do is let the other side get crisp and make sure all the cheese is totally melted and divine.
 Important note: This is not something you’ll want to eat if you’re on a diet.
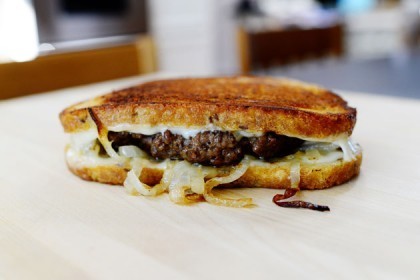
 But the good news is…
 You can easily share it with someone you love. Half a patty melt is usually all you need!
Here’s the recipe, guys. Make one (or two) this week!
Recipe: Patty Melts
Prep Time: 10 Minutes
|
Cook Time: 25 Minutes
|
Difficulty: Easy
|
Servings: 4
Print Recipe
3"x5" Cards
4"x6" Cards
Full Page
Ingredients
1 stick Butter1 whole Large Onion, Halved And Sliced1-1/2 pound Ground Beef Salt And Pepper, to taste5 dashes Worcestershire Sauce8 slices Swiss Cheese8 slices Rye Bread Preparation Instructions
In a medium skillet, melt 2 tablespoons of butter over medium-low heat. Throw in the sliced onions and cook slowly for 20 to 25 minutes, stirring occasionally, until the onions are golden brown and soft.
In a medium bowl, mix together the ground beef, salt & pepper, and Worcestershire. Form into 4 patties.
Melt 2 tablespoons butter in a separate skillet over medium heat. Cook the patties on both sides until totally done in the middle.
Assemble patty melts this way: Slice of bread, slice of cheese, hamburger patty, 1/4 of the cooked onions, another slice of cheese, and another slice of bread. On a clean griddle or in a skillet, melt 2 tablespoons butter and grill the sandwiches over medium heat until golden brown. Remove the sandwiches and add the remaining 2 tablespoons of butter to the skillet. Turn the sandwiches to the skillet, flipping them to the other side. Cook until golden brown and crisp, and until cheese is melted.
Slice in half and serve immediately!
Posted by Ree on August 5 2012

August 3, 2012
My Baking Daughter
 I snapped these photos a few weeks ago when my girl was making a cake for the Fourth.
She loves baking. Loves it, loves it, loves it, loves it. Anything having to do with putting some kind of baked good in the oven, then icing and decorating it, makes her happy.
It’s her life.
 What I love about it is that she just comes into the kitchen and bakes alongside me, no matter what I’m doing. And she doesn’t need any help. In fact, she doesn’t want any help. She just hops in and goes for it.
She wants to be a pastry chef.
We’re in New York right now and she went to a palm reader yesterday.
“Mom, you wouldn’t believe it,” she said. “The palm reader told me I was going to be a pastry chef!”
“You’re kidding!” I said. “Did she ask you any questions beforehand?”
“Yes, she asked me what my interests were,” she replied.
“Oh,” I said. “Well, what did you tell her?”
“I said I loved baking and decorating cakes and cupcakes,” she said.
Ha.
 She made these cupcakes a couple of weeks ago, and I’m sorry only to have cell phone photos to share. They’re just plain vanilla cupcakes with vanilla icing, but then she topped the cupcakes with a mixture of crushed up cookies, candy bars, and crackers. And little marshmallows. Then she alternated drizzles of chocolate sauce and caramel sauce, then refrigerated them till they were cool and set.
I ate one.
Okay, two.
 I love having a daughter who bakes.

August 1, 2012
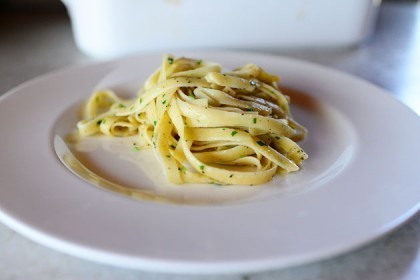
Buttery Lemon Parsley Noodles
 This is just a quick, easy side dish that is clean and fresh and knocks my ballet flats off. These noodles were actually part of a larger dish I made last week, but they’re so simple and delicious I wanted to share them as a separate recipe.
I repeat: They’re simple. And delicious.
Make these and serve ‘em with chicken or fish, or with some delicious sauteed veggies…or unabashedly on their own!
You’ll love ‘em.
First, pretend I am now showing you a photo of some cooked fettuccine that’s been drained.
I done forgotted to take that pic. Happens sometime.
 Now, melt some butter in a big ol’ skillet.
This was a stick of butter, but I poured off half of it.
So, you know. Use half a stick.
 When the butter is melted and hot, throw in the cooked noodles.
 Next, throw in a bunch of really finely minced parsley. (You can do some basil, too! But my basil is shriveled and gone! Because it’s forty thousand degrees outside!)
Sorry to vent.
 Stir the noodles around and pan-fry them in the butter a bit so that the noodles get a little texture on them, then squeeze in the juice of a lemon. You can add a little lemon juice, too, if you’re feeling feisty.
Or citrusy.
Never mind.
 Toss them around…
 Then serve them in a pile on a plate.
Mmm, mmm, mmm. This is love in its simplest form.
 This was the chicken I served it with. I’ll post it soon.
But today, it’s all about the noodles.
Let’s face it: It’s always about the noodles.
Enjoy this quick little side dish, my friends!
Recipe: Buttery Lemon Parsley Noodles
Prep Time: 5 Minutes
|
Cook Time: 15 Minutes
|
Difficulty: Easy
|
Servings: 8
Print Recipe
3"x5" Cards
4"x6" Cards
Full Page
Ingredients
1 pound Pasta (fettuccine, Linguine, Angel Hair)4 Tablespoons Butter1/4 cup Finely Minced Parsley1 whole Lemon Salt And Pepper, to taste Preparation Instructions
Cook the noodles according to package instructions. (If using angel hair, stop just short of the al dente stage.) Drain and set aside.
Melt butter in a large skillet over medium-high heat. Throw in the cooked pasta and cook it around in the butter for a couple of minutes so that a few of the noodles get a little bit of a panfried texture to them, whatever that means.
Zest the lemon. Squeeze in the juice, then add the zest of half the lemon.
Add salt and pepper to taste, then toss around and serve. Yum!
Posted by Ree on August 1 2012

July 30, 2012
Low-Carb Burgers
 A few years ago, I went on a low-carb kick in an attempt to shed some baby weight, some back fat, some jiggle, and some rotundity. Is rotundity a word? If so, that’s part of what I was trying to shed. I wound up being successful in my attempt because guess what? When you don’t eat bread all the time, you tend to be less round!
I’m sorry to be such a buzz kill on a Monday morning. I’m just sharing my journey.
In the big city one day, I was ravenous. So I stopped at Carl’s Jr. to get a cup of ice to munch on when lo and behold, I saw something called a “low carb burger” on their menu. I was intrigued.
The low-carb burger, it turned out, was a regular hamburger. Except instead of being sandwiched between two halves of a bun, it was expertly wrapped inside a bunch of lettuce.
I ordered it.
I ate it.
Then I lost ten pounds. Well, it happened gradually. Took me about six weeks or so. But that low-carb burger is what started it all.
Oh, and I’ve since gained it back.
Wasn’t that a beautiful story?
Here’s my own version of the low-carb burger that helped me lose ten pounds several years ago that I’ve since gained back and then some.
Sorry I talk so much.
 The Cast of Characters: Ground beef, salt, pepper, Worcestershire sauce, tomatoes, avocados, red onion, mayonnaise, Dijon mustard, and (optional) pickles!
 Throw the ground beef in a bowl and sprinkle in some salt…
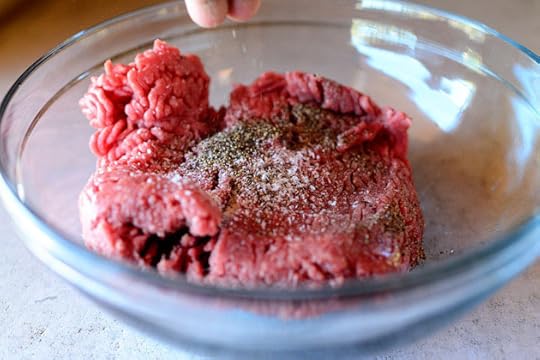 And pepper…
 Then add several dashes of Worcestershire sauce.
 Knead it all together with your hands…
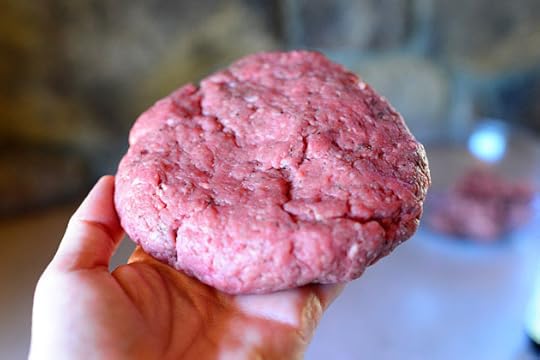 Form the beef into patties…
 And cook them in a skillet over medium-high heat…
 Until they’re totally done in the middle.
 Make the sauce by throwing the mayo into a bowl.
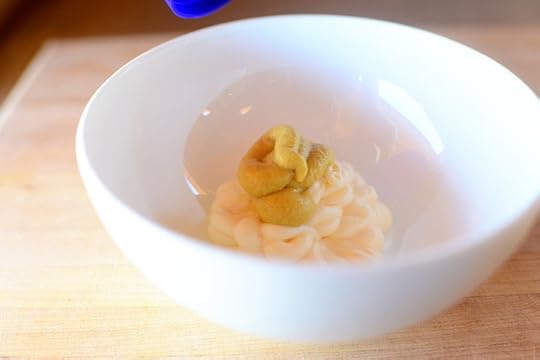 Add the Dijon…
 And a few dashes of Worcestershire, then stir it together to combine.
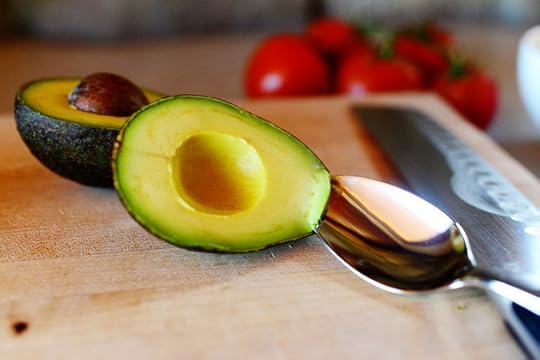 Cut an avocado in half…
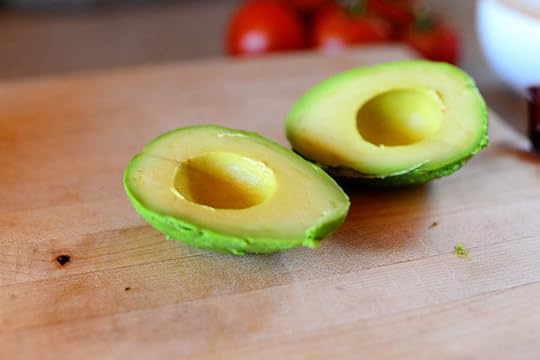 And scoop out the good stuff.
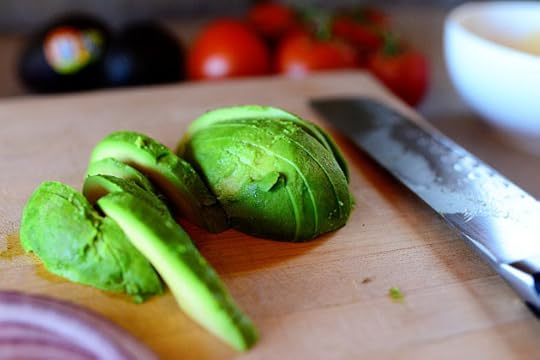 Then slice the halves.
 Very thinly slice some red onion…
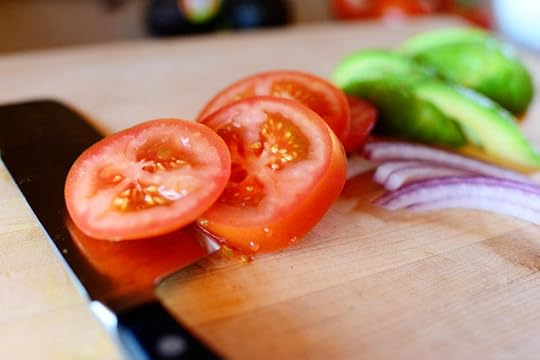 And slice up a tomato.
 Now for the fun part! Peel off the outer couple of leaves of lettuce if they’re bruised or unsightly, then use a knife to cut each leaf loose at the base.
 Very carefully peel off individual leaves of lettuce, leaving them as intact as you can.
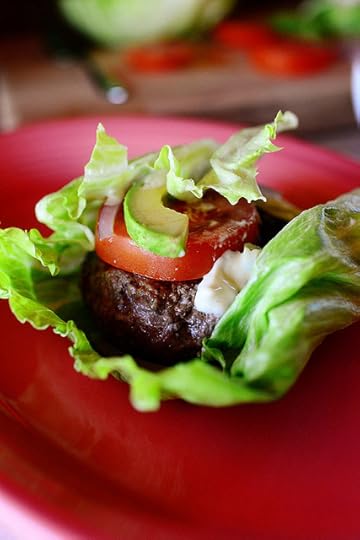
 Place a patty on top of a leaf…
 Then throw on some tomatoes, avocado, and onions.
Drizzle on some of the sauce…
 Oh, yum!
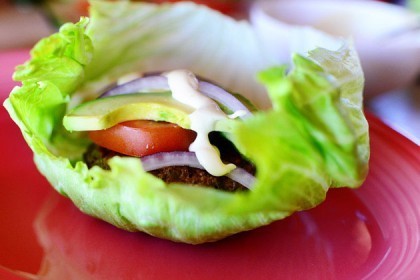
 Then tuck in the sides and wrap a second leaf around the burger.
You can even wrap a third lettuce leaf around the burger if you’re feeling decadent and naughty!
Just kidding. It’s lettuce. I’m glad we had this talk.
 Then just pick it up and dig in as you would any ol’ burger! It’s best if the lettuce is super cold and crisp when you begin. And if you want even more cool-crispness, pile on some lettuce before you wrap it with more lettuce! Or you can pile on cilantro leaves, pico de gallo—anything that floats your boat.
Either way, enjoy. You can’t go wrong with this one.
Here’s the handy dandy printable:
Recipe: Low-Carb Burgers
Prep Time: 10 Minutes
|
Cook Time: 15 Minutes
|
Difficulty: Easy
|
Servings: 4
Print Recipe
3"x5" Cards
4"x6" Cards
Full Page
Ingredients
2 pounds Ground Chuck1 teaspoon Kosher Salt1/2 teaspoon Black Pepper5 dashes Worcestershire Sauce2 Tablespoons Butter1/4 cup Mayonnaise1 Tablespoon Dijon Mustard2 dashes Worcestershire Sauce2 whole Avocados, Sliced1 whole Tomatoes, Sliced1/4 whole Thinly Sliced Red Onion1 head Iceberg, Green Leaf, Or Butter Lettuce Optional Toppings: Chopped Pickles, Feta Cheese, Cilantro, Pico De Gallo Preparation Instructions
Make the sauce: Mix together mayonnaise, Dijon, and Worcestershire. Set aside.
In a bowl, combine ground chuck, salt, black pepper, and 5 dashes Worcestershire sauce. Form four patties and set aside.
Heat butter in a skillet over medium-high heat. Fry patties until done in the middle.
Top patties with tomato slices, avocado slices, and red onion slices. Drizzle with the sauce to taste.
Cut the base of each lettuce leaf on the head and carefully peel it away so that it stays as intact as possible. Use 2 or 3 leaves per burger patty and wrap them around the patty as tightly as you can.
Slice in half and serve immediately!
Posted by Ree on July 29 2012

July 26, 2012
Huevo in the Hole
 I made mini tacos last night. Making mini tacos, at least the way I do it, starts with using a biscuit cutter and cutting circles out of corn tortillas, then using the tortilla circles to get into all kinds of delicious taco-related mischief. I use the larger size of corn tortilla (which is still relatively small, but larger than the smallest size of corn tortilla. I’m glad we had this talk.) and a biscuit cutter that allows for three perfect circles per tortilla. This leaves very little tortilla “waste” and means everything is right with the world.
 Enter last night. Everything went haywire. Not only did I discover that I only had the smaller size of tortilla, but I also discovered that my smaller biscuit cutter was nowhere to be found. This probably means the boys took it outside and used it as part of some new imaginary Iron Man vehicle, which probably means I’ll never see it again.
In Heaven, I’ll be reunited with all of these things.
 Short of any other brilliant plan, I went ahead and cut circles in the center of each tortilla, as cutting over toward the edge of the circle would have left me with a tortilla that not only looked weird, it would really serve no purpose.
 I kept cutting away circles for my mini tacos…but then I looked back over at the tortillas with holes.
I knew there was only one thing that could be done.
 I stacked three of the tortillas on top of each other, melted on some butter, and laid them on the griddle in a stack.
 Then I put a little more butter in the center hold before cracking in a huevo…I mean an egg.
 A minute and a half later, once I determined the egg was cooked on the other side, I scooted it over and added more butter to the skillet.
 Then I carefully flipped it over so the other side could cook.
 I wasn’t careful enough, though—look at the oozing yolk!
But the truth is, I love oozing yolk.
Oozing yolk is my life.
I love oozing yolk so much, I want to marry it.
Oozing yolk for president!
Okay, this is getting weird.
 What a lovely sight. The two outer tortillas got nice and crisp and golden while cooking on the buttery griddle…and the egg was just perfect.
 I happen to love corn tortillas with eggs for breakfast, whether it’s Huevos Rancheros or Migas or breakfast tacos. And those settings always require salsa…
 And some sour cream and cilantro.
 Yum!
Yum!
If I’d had an avocado, I would have thrown on a slice or four, and pico de gallo would be just heavenly.
 What a treat this was. The two outer tortillas are crisp, but the middle one is still soft, so you get all different kinds of corn tortilla and texture.
It’s everything that’s delicious about an egg-in-the-hole…but with a little zip.
Here’s the handy dandy printable!
Recipe: Huevo in the Hole
Prep Time: 2 Minutes
|
Cook Time: 3 Minutes
|
Difficulty: Easy
|
Servings: 1

Print Recipe
3"x5" Cards
4"x6" Cards
Full Page
Ingredients
3 whole Corn Tortillas2 Tablespoons Butter1 whole Egg Salt And Pepper, to taste Salsa Sour Cream Pico De Gallo (optional) Avocado Slices (optional) Preparation Instructions
Stack the three tortillas on top of one another and use a circular cutter to cut a circle out of the middle. Save center circles for another use (nachos or mini tacos, anyone?)
Heat a griddle or skillet over medium heat and melt half the butter. Place the tortillas, still stacked, on the skillet so that the tortilla on the bottom soaks up some of the butter. Put a little butter in the center hole, then carefully crack in the egg. Sprinkle with salt and pepper and let it cook for 1 1/2 to 2 minutes.
Move the tortilla/egg away from the cooking area for a second, then melt on the rest of the butter. Carefully flip the tortilla/egg to the other side so that the tortilla on that side will soak up some of the butter.
Continue cooking until egg is at the doneness you like; a little softness is good!
Serve with salsa, sour cream, and other fixins.
Posted by Ree on July 26 2012

Ree Drummond's Blog

- Ree Drummond's profile
- 2032 followers

