
Ree Drummond's Blog, page 55
June 22, 2012
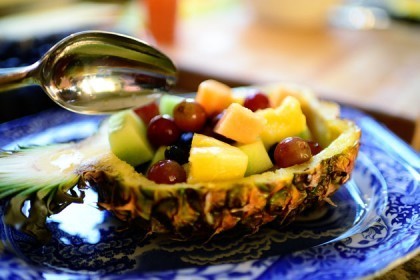
Pineapple Fruit Bowls
 I just realized something. Several of my recipes over the past month or so have been cold ones.
What does it all mean?
Oh. I remember now. It’s summer!
This is actually less of a recipe and more of a fun way to serve a fruit salad to your family, at a luncheon, or at a summer barbecue. The “dressing” is simple, sweet, and lovely.
 Grab a pineapple!
Then say your goodbyes.
 Aaaaaaaaaarrrgh!
You had to do it. There was no other way.
 Turn the pineapple on its side and slice horizontally, trying as much as possible to go right down the middle of the crown.
A sharp knife will make this much easier!
 Now you have two equal pineapple halves! Note that you could lop off just about 1/3 of the pineapple if you want to have only one large fruit cup and if you want the crown to remain intact. I find it more difficult to remove the fruit in that instance, and I think the halved crowns look funky and fine. Personal preference!
 With a sharp knife, cut around the perimeter of the fruit, leaving a little bit of a rim around the edge for support.
 Make vertical slices, then horizontal slices, then use a big spoon to dig the pineapple chunks outta there.
This is sometimes a little bit of a juicy, messy job.
 But look at what’s left! Yum, yum.
 Pour all the juice into a bowl, then scrape out the excess fruit and eat it right there on the spot.
(A grapefruit spoon comes in handy for this.)
 Next, prepare your other fruit. Honeydew is my boyfriend.
 Is there anyone on earth who doesn’t love it?
 Same with cantaloupe.
 Did you know I misspelled cantaloupe my entire life until about a month ago?
True story.
 So we’ve got honeydew, cantaloupe, and I threw some blueberries in, too.
 And grapes…
 And the pineapple.
 Now, to the pineapple juice…
 Squeeze in some honey.
 Then whisk it all together and give it a taste. If you want more honey, squeeze it in!
 Then pour the concoction over the fruit.
Oops. I needed to whisk it more.
 Then toss it all together…
 And fill up the pineapple shell.
 Purty! And you can garnish with mint leaves if you have ‘em.
 If you don’t need it right away, just cover it with plastic wrap and keep in the fridge. You can reserve a little of the dressing to pour over at the very last minute, just to give the fruit a little gloss.
Enjoy this easy, fun way to serve fruit!
And stay cool, guys.
Love,
PW
Here’s the handy dandy printable:
Recipe: Pineapple Fruit Bowl
Prep Time: 15 Minutes
|
Cook Time:
|
Difficulty: Easy
|
Servings: 8
Print Recipe
3"x5" Cards
4"x6" Cards
Full Page
Ingredients
1 whole Pineapple, Cut In Half Lengthwise, Juice Reserved1/2 cup Honeydew Melon Chunks1/2 cup Cantaloupe Chunks1/3 cup Blueberries1/3 cup Red Grapes1/2 cup Pineapple, Chunks1 Tablespoon Honey, More Or Less To Taste Mint Leaves, For Garnish (optional) Preparation Instructions
Make slices in the pineapple halves, scooping out chunks of the fruit. Pour the juice into a bowl. Stir in honey and whisk until it's combined.
Cut melons into chunks.
Put melon, blueberries, grapes, and pineapple into a separate bowl. Pour the dressing over the fruit and toss it to combine.
Spoon the fruit into both of the pineapple shells, pouring on a little more dressing if there's some left in the bowl. Garnish with mint leaves and serve!
Posted by Ree on June 22 2012


June 19, 2012
The Best Macaroni Salad Ever
 I love, love, love, adore, and love macaroni salad. I’m also picky, picky, picky, particular, and picky about macaroni salad. No joke. Macaroni salad is a religion to me.
I have issues, is what I’m saying.
Here’s what I don’t like: Macaroni salad that’s gloopy.
Here’s what I do like: Macaroni salad that’s creamy but still light.
Here’s what I don’t like: Macaroni salad that’s overly vinegary.
Here’s what I do like: Macaroni salad with a sweet/tangy/spicy kick.
Here’s what I don’t like: Macaroni salad that’s mostly macaroni.
Here’s what I do like: Macaroni salad with a confetti of wonderfulness coloring the whole mix with flavor, spice, and texture.
Here’s what I don’t like: Tea.
Here’s what I do like: Diet Dr Pepper.
Now that that’s all settled, let’s make Macaroni Salad!
 The Cast of Characters: Macaroni, mayonnaise, vinegar, sugar, salt, pepper, milk, spicy/sweet pickles, black olives, roasted red peppers (you can use pimentos instead!), and green onions. Easy stuff!
 Start by bawlin’ the macaroni till it’s done.
 Then drain it…
 Then rinse it under cold water until it’s totally cooled down.
 Next, chop up some black olives! The good ol’ canned, ripe, nothing-exotic-about-them black olives.
 Slice up three whole green onions pretty thinly…
 Then grab some roasted red peppers! You can roast your own, of course, but in this dish it’s really not necessary.
You can also use diced or chopped pimentos instead.
 Grab three or four of ‘em…
 Then slice ‘em up…
 And chop ‘em.
 Now, grab some good, good, yummy, great, good, awesome pickles. These are made here in Oklahoma, and I love them. They’re pretty sweet, but also very spicy—you need both for macaroni salad. Any sweet/spicy pickles will do!
 Grab a few slices, then eat one. Then grab another one from the jar to replace it and act like nothing ever happened.
Now set the veggies aside and make the dressing!
 Start with half a cup of mayonnaise. The real stuff. Not the grody stuff.
 Add some vinegar. I used red wine vinegar, but you can use regular distilled/white/clear/plain/unadorned. Just a slight bite is all you’re looking for!
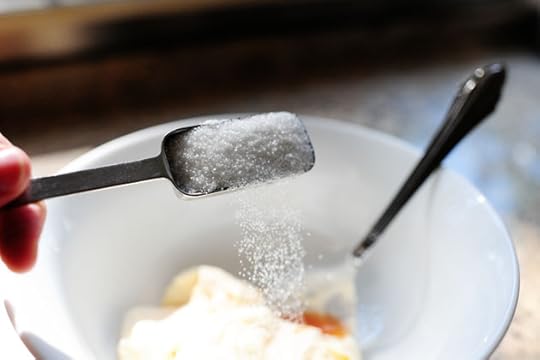 Add in some sugar…
 Because I can’t be in the presence of vinegar unless sugar is also involved.
 Stir that around, then splash in a little milk—just enough to make the dressing pourable.
 Use your incredibly awesome and beautiful hand to sprinkle in salt…
 Then use your foot to sprinkle in a little black pepper.
Not really on the foot part.
I honestly have no idea why I said that.
 Finally, splash in a little of the pickle juice. Adds a little more sweetness, a little more bite, and—if the pickles are nice and spicy—a little kick.
Spicy Pickles = Good.
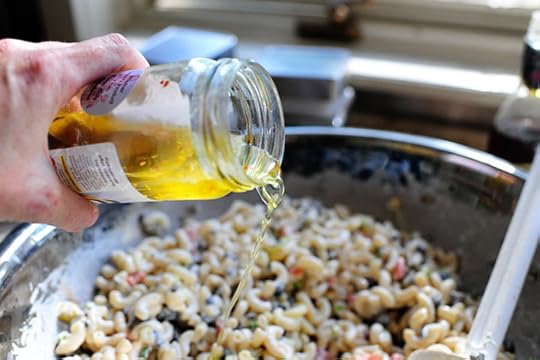
 Now the fun really begins! Throw the macaroni into a big ol’ bowl.
 Then drizzle in 3/4 of the dressing (save the rest for later!)…
 And mix it around. The dressing will seem thin at this point, but as it chills later, it’ll thicken up a bit!
 Now add the olives, red peppers, pickles, and green onions…
 And toss it all together. Add more of the olives, peppers, pickles, and onions if you think the salad needs more stuff! The point here is not to have any macaroni that isn’t decorated with at least one of the ingredients. If you see even one macaroni noodle without something on it, the entire macaroni salad will be totally ruined!
 At the end, taste the whole thing and add more of what it needs, which will probably include another good splash of pickle juice!
Then—this is important—chill the macaroni salad for at least a couple of hours.
Because you’re worth it.
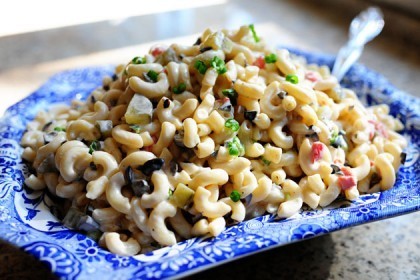
Pile it into a bowl and serve it at your next barbecued/picnic/cookout/grilling party!
 Or just have it for lunch today, by itself or with a piece of grilled chicken.
It’s the best macaroni salad ever!
Here’s the handy printable.
Recipe: The Best Macaroni Salad Ever
Prep Time: 10 Minutes
|
Cook Time: 15 Minutes
|
Difficulty: Easy
|
Servings: 12
Print Recipe
3"x5" Cards
4"x6" Cards
Full Page
Ingredients
4 cups Elbow Macaroni3 whole Roasted Red Peppers, Chopped (more To Taste, Can Also Use Pimentos)1/2 cup Black Olives, Chopped Fine6 whole Sweet/spicy Pickle Slices, Diced (about 1/2 Cup Diced)3 whole Green Onions, Sliced (white And Dark Green Parts)1/2 cup Mayonnaise1 Tablespoon Red Wine Or Distilled Vinegar3 teaspoons Sugar, More Or Less To Taste1/4 teaspoon Salt, More To Taste Plenty Of Black Pepper1/4 cup Milk (more If Needed) Splash Of Pickle Juice (spicy Sweet Pickles) Extra Pickle Juice To Taste Preparation Instructions
Cook the macaroni in lightly salted water according to package directions. Drain and rinse under cold water to cool. Set aside.
Mix together mayo, vinegar, sugar, salt, and pepper. Splash in enough milk to make it pourable. Splash in pickle juice for extra flavor. Taste and adjust seasonings as needed. Set aside.
Place cooled macaroni in a large bowl and pour 3/4 of the dressing. Toss and add more dressing if you'd like. (Dressing will seem a little thin, but it will thicken up as salad chills.)
Stir in olives, roasted red peppers (or pimentos), pickles, and green onions. Add more of any ingredient if you'd like more stuff going on! At the end, splash in a little more pickle juice and stir.
Chill for at least 2 hours before serving. Sprinkle with sliced green onion to serve!
Posted by Ree on June 19 2012

June 18, 2012
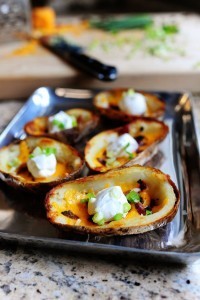
Potato Skins
 I love potato skins because they remind me of 1983. Or was that 1984? Or was that 1982? Or was that 1985? Or was that…
Stop, Ree! STOP! You’re rambling again!
Anyway, potato skins are a nostalgic snack for me. And nostalgic snacks, I think I’ve established, are the very best kind of snacks. And they never, ever go out of style.
Unless you’re talking about deviled ham balls.
These potato skins are in my first cookbook, and I’ve made them forever. I made ‘em a few weeks ago, then I made ‘em again last night in anticipation of the Thunder game. They’re the perfect basketball food!
(Go, Thunder! Beat the heat!)
 Start witha sacka potatoes. Russets will do just fine! It’s best if they’re on the smallish to mediumish side.
 Thoroughly scrub the potatoes, then let them dry. Preheat the oven to approximately 401.3764293327266 degrees.
Okay, fine. 400 will do.
 Use a paper towel or just your grubby (or, preferably, clean) hands to rub canola oil all over the skins until they’re nice and moist and wonderful.
 Stick ‘em on a baking sheet and bake ‘em until the skins are crisp and the taters are tender, about 30 to 40 minutes or so.
 While the taters are baking, grab some bacon. I like the thick cut, peppered kind, but you can use any ol’ bacon you have on hand.
 I like to cut bacon slices in half before frying them…
 Because they cook more evenly that way, and they also fit more neatly in the skillet.
 Fry ‘em till they’re just barely crisp but mostly chewy, then throw ‘em on a cutting board.
 Then chop ‘em up pretty finely and set them aside for a bit.
 While you’re at it, grate up some sharp cheddar. Or mild cheddar. Or medium mild sharp in-between ambiguous noncommittal cheddar.
 Then slice/chop up some green onions.
Sorry to be so bossy today.
 Okay, the potatoes are done by now! Let them cool just a bit, then slice ‘em down the middle.
 Then use a spoon or scoop to scoop out the insides.
Look. You can see me. Freaky!
 Leave a little rim around the edges so the potato skins will have a little support and so the potato skins will also have some potato in them.
My logic is sound. My logic is very, very sound.
 Just throw the innards into a bowl. Use it for whatever you’d like! I smashed mine up with softened butter, sprinkled in salt and pepper, and saved it for dinner.
But that’s just me.
 Keep going till all the taters are scooped out!
 Throw ‘em back on the baking sheet…
 Then melt together a little butter and canola oil.
 Then grab a brush…
 And brush the inside of the potatoes.
 Next, flip ‘em over and brush the skins.
Then throw ‘em back into the oven for 5 to 8 minutes, or until the skin starts to really crisp up.
 Then flip the taters over and leave ‘em in for another 3 to 5 minutes, or until they start to get nice and golden brown around the edges.
 After you take ‘em out, sprinkle cheese on the inside of the skins.
 Then sprinkle on plenty of bacon!
Then stick the taters BACK into the oven just long enough to totally melt the cheese and sizzle the bacon.
 Yum!
Yum!
 Add a little sour cream…
 This is my nephew from Dallas. He and his brother are visiting the ranch for the next couple of weeks and he likes to photobomb my food.
His name is Stu. I call him Tooie. And I will still call him Tooie when he’s forty years old.
 Okay, Tooie left the room for a few minutes. I’d better hurry!
Green onions come next! Yum, yum…and YUM.
 We ate these over the course of the first half of the game and loved them lots and lots.
You’ll love them lots and lots, too!
Here’s the handy printable:
Recipe: Potato Skins
Prep Time: 5 Minutes
|
Cook Time: 45 Minutes
|
Difficulty: Easy
|
Servings: 12
Print Recipe
3"x5" Cards
4"x6" Cards
Full Page
Ingredients
8 whole Russet Potatoes4 Tablespoons Canola Oil2 Tablespoons Butter Salt To Taste1-1/2 cup Grated Cheddar Cheese8 slices Thick Cut Peppered Bacon, Fried Until Almost Crisp And Chopped2 whole Green Onions, Sliced1/2 cup Sour Cream Preparation Instructions
Preheat oven to 400 degrees.
Scrub potatoes clean and allow them to dry. With a paper towel (or just with your hands) rub the skin of the potatoes with 2 tablespoons canola oil so that they're nice and moist.
Place potatoes on a baking sheet and bake until skin is crisp and potatoes are tender, about 30 to 40 minutes. Remove the pan and allow to cool until you can handle the potatoes.
Cut potatoes in half lengthwise. Scoop out the insides, leaving a little bit of potato in the skins. Melt the butter with 2 tablespoons canola oil, then brush both the outside and the inside of the potatoes. Sprinkle the inside lightly with salt. Place potato halves face-down and return to the oven for 5 to 8 minutes. Using tongs, turn the potatoes over and continue to bake until the edges of the potatoes start to turn golden brown.
Remove from oven. Sprinkle the insides of the potato skins with cheddar, then sprinkle on the chopped bacon. Return to the oven long enough for the cheese to melt, about 3 to 4 minutes.
Serve immediately with sour cream and green onions. Yum!
Posted by Ree on June 17 2012

June 13, 2012
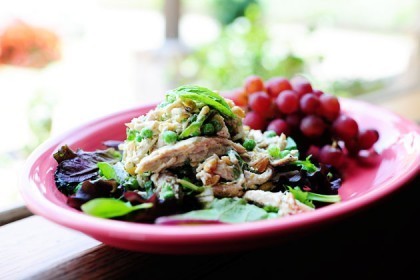
Lemon Basil Chicken Salad
 So this is how I often cook: I make one thing, then the next thing includes a component or two of the first thing. This is how many home cooks cook, for that matter. It just makes sense, Maynard.
Sorry I called you Maynard.
I’m even more sorry that I have no idea why I called you Maynard.
Last week I made Creamy Lemon Basil Potato Salad, but had made too much dressing for the amount of potatoes. I had some shredded cooked chicken in a ziploc in the fridge, so I decided to make a chicken salad since I was clearly on a cold food kick.
And she lived happily ever after.
 This was the dressing I made for the potato salad, so I’ll post those photos here again: squeeze lemon juice into a bowl.
 Then add a little olive oil, salt, and pepper…
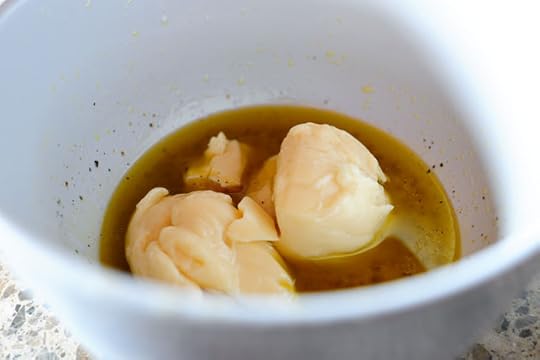 Add some mayo…
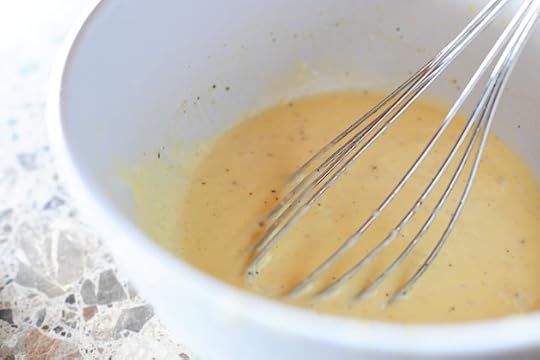 Then whisk it together.
 Finally, add a tablespoon or so of pesto.
Then make this potato salad!
Then realize you have leftover dressing and go forward from there.
 I put about 2 cups of shredded chicken in a bowl and threw in some frozen peas that I thawed under the faucet for a bit.
 Then pour in the dressing and toss it around.
 Then chiffonade the basil…
 And throw it in.
 Next, zest some lemon…
 And add it to the mix.
 Then throw in some toasted pine nuts! (I’d toasted them for the potato salad but had a few extra.)
 Toss it all around, season with salt and pepper, and squeeze in a little more lemon juice for a little more moisture and flavor. Zing!
 Serve it over greens and next to a cluster of pretty grapes. Lovely!
 I really, really loved this. Had such a nice kick, and all the basil was so delicious. The peas and pine nuts just gave it some extra texture and yumminess.
Great for a ladies’ luncheon…or just a lady’s lunch if you’re flying solo!
(Or a dude’s lunch if you’re a guy.)
Enjoy, guys!
Recipe: Lemon Basil Chicken Salad
Prep Time: 15 Minutes
|
Cook Time:
|
Difficulty: Easy
|
Servings: 6
Print Recipe
3"x5" Cards
4"x6" Cards
Full Page
Ingredients
3 cups Cooked Chicken2 whole Lemons, Juiced And Zested3 Tablespoons Olive Oil1/2 cup Mayonnaise Salt And Pepper, to taste1 Tablespoon Prepared Pesto1/2 cup Green Peas12 whole Basil Leaves, Chiffonade (more To Taste)1/4 cup Pine Nuts, Toasted Salt And Pepper, to taste Preparation Instructions
Mix together lemon juice, olive oil, mayonnaise, salt & pepper, and pesto until creamy and smooth. Taste and adjust seasonings as you’d like.
Combine chicken, peas, basil, and pine nuts in a bowl and stir together. Pour on dressing to taste and toss to combine. Add 1 tablespoon lemon zest and squeeze in lemon juice. Add salt and pepper to taste.
Toss to combine and refrigerate for at least 1 hour before serving. Serve over lettuce with grapes on the side!
Posted by Ree on June 13 2012

June 11, 2012
The Best Spinach Artichoke Dip Ever
 I made this last week. Boy, was it ever good.
I love spinach artichoke dip. Call me Ms. 1994, okay? But I can’t help it. It’s so darn good.
Every time I make spinach artichoke dip, it’s different.
But this one was definitely the best.
No, really. It was.
WHAT YOU’LL NEED
I didn’t take a Cast of Characters photo because I really didn’t know I was going to make this until I started making it. But here’s what you need:
Canned artichokes
Baby spinach
Butter
Garlic
Flour
Milk
Salt & pepper
Cream cheese
Crumbled feta
Grated Parmesan
Grated Pepper Jack
Cayenne
Pita wedges, tortilla chips, or crackers
 Drain the artichokes, then rinse them under cool water and set them aside for approximately 254 seconds.
 Slice up three or four cloves of garlic…
 Then mince it…
 Then throw the garlic into the skillet with the butter. Cook it around for a couple of minutes over medium-low heat, just to get the oil really infused with the heavenly garlic flavor.
You know, I never thought of this. Garlic is heavenly in more ways than one. It smells and tastes delicious, of course. But also…vampires don’t like it.
I’m glad we had this talk.
 Crank up the heat to medium-high and t throw a bag of spinach into the skillet with the butter and garlic.
 Sprinkle in a little salt and pepper…
 Then cook it for a couple of minutes until it shrinks and wilts.
 Pull the spinach out of the skillet and put it into a small strainer, applying a little pressure to squeeze out as much of the yumminess as possible.
 Now the skillet is filled with a spinachy, buttery, garlicy liquid.
 Next, throw in the artichoke hearts!
 Cook the hearts around for several minutes, until most of the liquid cooks off and the artichokes develop a little color on the outside.
 Then transfer the artichokes to a plate. Try not to eat them. This will be difficult.
Okay!
We’ve got the spinach.
We’ve got the artichokes.
Now we’re-a-gonna make the dip.
 Melt three tablespoons of butter in a pot or skillet, then sprinkle in an equal amount of flour.
 Whisk this together to make a paste and cook it for a minute or two over medium-low heat.
 Pour in 1 1/2 cups (give or take) of whole milk.
 Stir it around and cook it for two or three minutes, or until the sauce is slightly thickened. Splash in more milk if it gets too thick!
And now. Avert your eyes.
Actually, don’t. If you avert your eyes you won’t how to make the best spinach artichoke dip ever.
 Throw in a ding dang package of softened cream cheese and stir it around until it’s all melted and combined.
 Then grab some feta! It’s sharp and miraculous.
 Crumble it up and throw it in, too.
 You’ll want to eat this with a spoon. This is normal.
But wait.
There’s more.
 Throw in Parmesan! Because…why not?
 Cayenne would be nice.
 So would grated Pepper Jack! Then you’ll get spice from two different places.
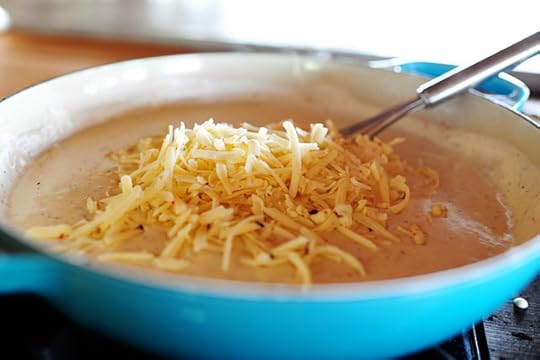 Throw it in and stir it all around until it’s totally melted. At this point, give the sauce a taste and add more of whatever you think it needs!
 Chop up the artichokes and throw them into the sauce…
 Then chop up the spinach…
 And throw it in. Then stir it all around, give it a taste, and make sure it has your blessing.
 Pour the luscious mixture into a buttered casserole dish (or you could do small gratin dishes if you’d like to spread it around a bit.
 Top the casserole with a little more grated Pepper Jack.
Forgive me.
 Then throw it in a 375 degree oven and let the cheese get melted and slightly bubbly.
 I didn’t let the top get too brown, but you can let it go farther if you like that golden brown cheese thing.
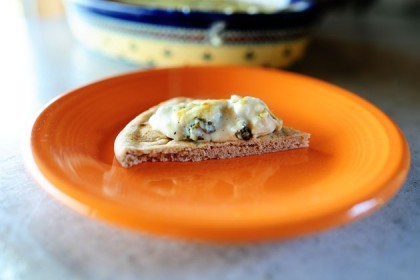
 To serve ‘em up, slice up some flatbread or pita bread into wedges.

 Then throw the wedges on a baking sheet and warm ‘em up for a few minutes if you want. Or you could just leave them as is!
(You can also do crackers, tortilla chips…)
(A spoon…)
(Ahem.)
 I have a question for you: Could my hand be any less photogenic?
 I have another question for you.
 Could this dip be any more delicious?
I have an answer for ya: No. No, it couldn’t.
Enjoy this, guys! It’s heaven on a flatbread wedge.
Here’s the handy printable:
Recipe: The Best Spinach Artichoke Dip Ever
Prep Time: 5 Minutes
|
Cook Time: 25 Minutes
|
Difficulty: Easy
|
Servings: 16
Print Recipe
3"x5" Cards
4"x6" Cards
Full Page
Ingredients
3 Tablespoons Butter4 Tablespoons Garlic, Minced1 bag Spinach Salt And Pepper, to taste2 cans Artichoke Hearts, Rinsed And Drained3 Tablespoons Butter (additional)3 Tablespoons Flour1-1/2 cup Whole Milk (more If Needed)1 package (8 Ounce) Softened Cream Cheese1/2 cup Crumbled Feta1/2 cup Grated Parmesan3/4 cups Grated Pepper Jack Cheese1/4 teaspoon Cayenne Extra Grated Pepper Jack Pita Wedges, Tortilla Chips, Crackers Preparation Instructions
Melt 3 tablespoons butter in a skillet over medium heat. Add the minced garlic and cook for a couple of minutes. Crank up the heat a bit and throw in the spinach. Stir around and cook for a couple of minutes until the spinach wilts. Remove the spinach from the skillet and put it in a small strainer. Squeeze the excess juice back into the skillet. Set the spinach aside.
Throw in the artichokes and cook over medium high heat for several minutes, until liquid is cooked off and artichokes start to get a little color. Remove the artichokes.
In the same skillet or a different pot, melt 3 additional tablespoons of butter and whisk in 3 tablespoons of flour until it makes a paste. Cook over medium-low heat for a minute or two, then pour in milk. Stir and cook until slightly thickened; splash in more milk if needed.
Add cream cheese, feta, Parmesan, pepper jack, and cayenne and stir until cheese are melted and sauce is smooth. Chop artichokes and spinach and add to the sauce. Stir to combine.
Pour into buttered baking dish. Top with extra grated pepper jack and bake at 375 for 15 minutes, or until cheese is melted and bubbly.
Serve with pita wedges, chips, or crackers!
Posted by Ree on June 10 2012

June 8, 2012
Creamy Lemon Basil Potato Salad
 I cooked most of the day yesterday, and here’s how I started the experience: Pulled approximately forty things out of the fridge, pantry, and freezer. After that, I decided what I was going to cook.
I wound up making some very yummy things, and before the whole ordeal was over I’d taken no fewer than 18,028 bites to taste what I was making along the way.
I have no idea why my jeans won’t button this morning.
Here’s one of the sides I made—a really tasty, fresh potato salad full of lemon and basil flavor. I sort of winged it on the dressing, but wound up with something so yummy, I used the extra to make chicken salad. Divine.
To make the potato salad, you’ll need:
Small potatoes
Juice of two lemons
3 tablespoons olive oil
1/2 cup mayonnaise
salt
pepper
1 tablespoon prepared pesto (from a jar)
pine nuts
small basil leaves
 You need potatoes.
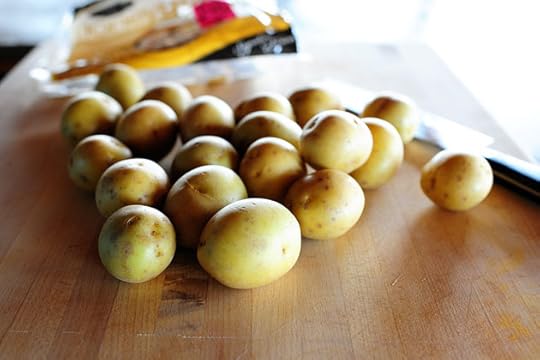 I love these. They’re “two-bite” potatoes—Honey Gold variety—but you could use Yukon Gold cut into chunks or smaller new potatoes.
 Carefully place the potatoes in a pot.
 Use your extremely attractive (not!) hand to sprinkle in some salt.
 Then cover the pot and cook the potatoes for about 15 minutes, or until they’re are fork-tender.
 When they’re tender, drain and transfer them to a big bowl…
 And let ‘em sit and slightly cool down.
I actually started out with a non-creamy dressing in mind: Squeeze the juice of two lemons into a bowl…
Then add a little olive oil, salt, and pepper…
Once I got that far, I realized I could never be happy without a little creaminess, so I added some mayonnaise.
Real mayonnaise, please.
PLEASE.
Thank you.
Then I whisked it together until it was creamy and smooth and miraculous.
This is a really grody picture, but bear with me: I added about a tablespoon of jarred pesto. Please don’t let the fork confuse you. I’d explain, but I don’t even know the explanation myself.
 Drizzle about half the dressing over the potatoes, then you can toss and check if that’s enough before adding more.
 You’ll notice I started out with the potatoes whole…
 But after I tossed in the dressing, I began to regret that decision so I sliced ‘em all in half and tossed again. Much better!
Cooking is a process for me.
 Oh, yes! Along the way I toasted some pine nuts. Another pantry item!
 Then I threw them on into the bowl.
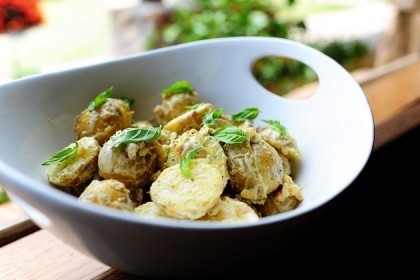
 Then I put it in a bowl and peppered the top with lots of tiny basil leaves. Of course, you’d want to cover the bowl and chill it for a few hours before serving it so it would be nice and cool and the flavors have a chance to meld.
Gawgeous.
 This would be delicious with roasted chicken, or just as a potluck picnic item. It’s a nice change from the typical mustardy potato salad; the basil and lemon just sing.
Enjoy, everyone. Hope your summer is lovely so far!
Here’s the handy printable:
Recipe: Creamy Lemon Basil Potato Salad
Prep Time: 10 Minutes
|
Cook Time: 15 Minutes
|
Difficulty: Easy
|
Servings: 8
Print Recipe
3"x5" Cards
4"x6" Cards
Full Page
Ingredients
1 bag (24-28 Ounce) Small Potatoes (I Used Honey Gold)2 whole Lemons, Juiced3 Tablespoons Olive Oil1/2 cup Mayonnaise Salt And Pepper, to taste1 Tablespoon Prepared Pesto1/4 cup Pine Nuts Small Basil Leaves Preparation Instructions
Boil potatoes until fork tender. Drain cut in half, then place in a bowl.
Toast pine nuts in a skillet over low heat until just lightly golden. Remove from heat.
Mix together lemon juice, olive oil, mayonnaise, salt & pepper, and pesto until creamy and smooth. Taste and adjust seasonings as you'd like.
Pour half the dressing over the potatoes and toss to combine. Add more dressing to taste.
Cover and refrigerate the potato salad for a few hours. To serve, sprinkle lots of small basil leaves over the top. Yum!
Posted by Ree on June 8 2012

June 7, 2012
My Very Favorite Summer Desserts
I’m catching up on some cooking, both for my household and this ol’ website o’ mine, so while I organize photos and write posts, I wanted to provide a list of some of my favorite desserts for summertime. These have all appeared here on PW Cooks through the years.
Not that I wouldn’t eat every single one of these in the dead of winter, too.
These are in no particular order…but the first on the list is probably my fave.
Just click on the photos (or links) to see each individual recipe!
 Peach Crisp with Maple Cream Sauce. Every bit as good now as it was when my mom made it years ago. It will make you close your eyes and savor the moment.
 Blackberry Cobbler. Crisp on top, soft and yummy in the middle. Just the way I like my cobbler!
 Quick & Easy Apple Tart. Couldn’t be easier…or deliciouser. (Deliciouser?)
 Ice Cream Pie with Easy Caramel Sauce. A nutty meringue crust makes this treat extra wonderful.
 Raspberry Crisp. Serve it with ice cream. Serve it with whipped cream. Can’t lose either way. Tart, sweet, and so, so good.
 Raspberry Cream Pie. Ridonkulously fresh and decadent.
 Key Lime Pie. Sort of. Okay, it isn’t Key Lime Pie. It’s Lime Pie. Either way, it’s delish.
 Fruit Pizza. C’mon—look at all that fruit. It’s healthy!
Har.
Happy Summer, everyone. Hope you’re having a good one!
Love,
PW

June 4, 2012
What Age Would You Be? (Winners Announced!)
Statistician Don has compiled the results of the “What Age Would You Be?” question. Here’s his explanation:
Unsurprisingly, most people want to be in their 20s or 30s (see
attached chart for full spread). Apparently, I’m just the right age; I
turn 32 next week and that was the average response! Go figure.
 Thank you for the results, Statistician Don. And Happy Birthday next week!
THE WINNERS
#2817 Christina: “That’s a hard question to answer. I think I would choose 19 – the age I married my husband. We had just bought a house and life was filled with such promise!”
#5331 Tracey K: “48. I like my age now. Things are great! Note I said great. Not perfect.”
#15534 Susan G: “The age I am right now…31. Not too young to be considered a “kid” and not too old where I begin to have a mid-life crisis.”
Congratulations, winners! Contact prizes@thepioneerwoman.com to claim your prizes!
It’s Monday! Good morning!
Zzzzzzz…
Today…
Because it’s Monday…
Because I like this pot…
(Please note that I did not say I like pot…)
And because I love ya…
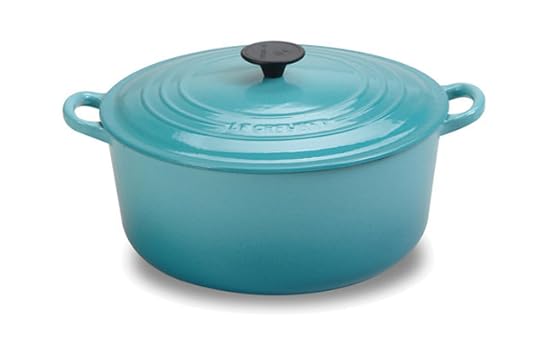 I’m giving away three (3) Le Creuset 7 1/2-Quart Round French Ovens, in this gawgeous “Caribbean” color.
TO ENTER
To enter the contest, just answer the following question in the Comments section of this post. I asked this same question a year or so ago and the questions were really interesting.
If you could be one age for the rest of your life, what age would you be?
Would you be a thirteen-year-old, living free of responsibilities in mom and dad’s house? Or would you be a good, solid fifty: wise with experience but still strong in body? Or would you go for the cliche twenty-nine? Or would you be a centenarian, with all the knowledge and wisdom that comes with that? Or would you be the age you are now, whatever that is?
Just shout out your ideal age and you’re automatically entered to win the pot.
THE RULES
One entry per person, please. Strictly enforced with a wooden spoon, a whisk, and can opener. (Wait…huh?)
*Note* Sometimes comments will not be visible immediately. Please give it a little time; it’ll show up eventually!
No entries after noon Tuesday.
Winners will be announced Tuesday night.
Good luck!
____________________________________
Contest sponsored by Pioneer Woman, with cooperation from CHEFS Catalog.

What Age Would You Be?
It’s Monday! Good morning!
Zzzzzzz…
Today…
Because it’s Monday…
Because I like this pot…
(Please note that I did not say I like pot…)
And because I love ya…
I’m giving away three (3) Le Creuset 7 1/2-Quart Round French Ovens, in this gawgeous “Caribbean” color.
TO ENTER
To enter the contest, just answer the following question in the Comments section of this post. I asked this same question a year or so ago and the questions were really interesting.
If you could be one age for the rest of your life, what age would you be?
Would you be a thirteen-year-old, living free of responsibilities in mom and dad’s house? Or would you be a good, solid fifty: wise with experience but still strong in body? Or would you go for the cliche twenty-nine? Or would you be a centenarian, with all the knowledge and wisdom that comes with that? Or would you be the age you are now, whatever that is?
Just shout out your ideal age and you’re automatically entered to win the pot.
THE RULES
One entry per person, please. Strictly enforced with a wooden spoon, a whisk, and can opener. (Wait…huh?)
*Note* Sometimes comments will not be visible immediately. Please give it a little time; it’ll show up eventually!
No entries after noon Tuesday.
Winners will be announced Tuesday night.
Good luck!
____________________________________
Contest sponsored by Pioneer Woman, with cooperation from CHEFS Catalog.
May 31, 2012
Easy Green Chile Enchiladas
 When I was in Albuquerque with Marlboro Man and the boys a month ago, I had a really fun book signing. Such incredibly nice and lovely people. (Hi, ABQ!) However, I didn’t eat much the day of the signing, and by the time the signing was over that night I was ravenous. But the thought of eating a late-night burger just wasn’t cutting it, considering I was in Albuquerque, New Mexico. I wanted something with flavor! With spice! Never mind that my boys were clamoring for McNuggets! I was not going to be thwarted!
Sorry about the exclamation points. Won’t happen again!
Oops.
The late hour was a consideration, and after asking around a bit, Marlboro Man, the boys, and I landed at Flying Star Cafe, where I picked up an order of Green Chile Enchiladas and hurried back to my hotel room to snarf it down.
It was to die for.
Here’s my super-easy version below. Flying Star’s enchiladas were actually “open faced” enchilada stacks—super simple to make, and they look mahvelous. Flying Star used blue corn tortillas, and if you have those available to you, go for it! They’re mighty purty.
 Start with a can of green chile enchilada sauce. This is Hatch brand, but any kind will do.
 Throw in two small cans of diced green chiles.
 I used a combo of sauce and chiles because I wanted the sauce to be saucy, and also because the sauce has some spices and other things going on. But really, I only gave it about 18 seconds of thought. You could just heat up a few cans of chopped green chiles if you wanted to. The sauce will be thicker, but thicker never hurt anyone.
I’m rambling this morning.
Anyway, just heat the sauce over medium-low heat until it’s nice and piping warm.
Piping warm?
Never mind.
 Now, in a skillet, saute a chopped onion with a couple of tablespoons of butter.
 Until they’re starting to turn golden brown. Set these aside for a sec.
 Grab some corn tortillas…
 Top ‘em with grated cheddar-jack cheese…
(Or any grated cheese.)
 Melt them either in the oven or microwave (I nuked these because I was impatient), then spoon a generous amount of onions all over the top.
 Then grab a good helping of this yumminess…
 And spoon it all over the top.
 This is a conservative portion of sauce. Really lay it on thick if you want!
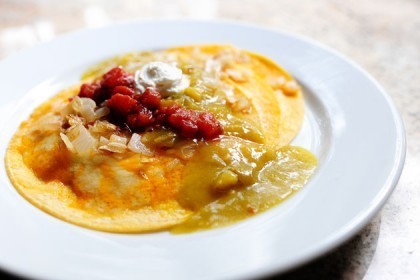
 Next, add some salsa (or pico de gallo if you have it). I actually got both green and red sauce with my Flying Star enchilada stack, and it was the best of both worlds.
I love plates of food with different things going on.
And different colors.
 Sour cream is good, too!
 Divine. And so ridonkulously easy. And note: this is a very generous portion! Back it down to two or even one tortilla if you’re not that hungry. The green chile is the star of the show here anyway.
Enjoy!
Recipe: Easy Green Chile Enchiladas
Prep Time: 5 Minutes
|
Cook Time: 10 Minutes
|
Difficulty: Easy
|
Servings: 4
Print Recipe
3"x5" Cards
4"x6" Cards
Full Page
Ingredients
1 whole Onion, Diced2 Tablespoons Butter1 can (15 Ounce) Green Enchilada Sauce2 cans (4 Ounce) Chopped Green Chilies12 whole Corn Tortillas2 cups Freshly Grated Cheddar (or Cheddar-jack) Cheese (or Any Cheese You'd Like) Sour Cream Salsa Pico De Gallo (optional) Guacamole (optional) Cilantro Leaves, Optional Preparation Instructions
In a small skillet, saute onions with the butter over medium-low heat until the onions are nice and golden brown.
In a small saucepan, combine green enchilada sauce with green chilies and heat until very warm.
In the oven (on a baking sheet) or microwave, melt cheese all over the top of each tortilla so that it covers most of the surface area.
To serve, stack three cheesy tortillas on top of one another. Spoon green sauce over the top and add salsa, sour cream, pico de gallo, and cilantro as needed.
Delish and so, so easy!
(Save extra sauce for use on nachos, quesadillas, chicken, etc.)
Posted by Ree on May 31 2012

Ree Drummond's Blog

- Ree Drummond's profile
- 2032 followers

