
Ree Drummond's Blog, page 57
May 11, 2012
Design Your Own Mixer!
 Many of you might remember this, the fun orange floral mixer I’ve given away periodically throughout the past year.
 I love this mixer. It was designed and created by my friend Nicole at Un Amore, who is nothing short of amazing at what she does.
Check out some of the beauties she’s designed:
Un Amore Mixers
I drool over every single one—love the yellow and white one!
 She paints them all herself.
 And her details are beautiful.
 I loved this scalloped edge. Lovely!
Today, because I love ya, I’m giving away one custom-painted Kitchen Aid mixer—and the design is entirely your choice! Match your favorite china patters, match your favorite wallpaper—make it all yours!
TO ENTER
To enter this extra special giveaway, just answer the following question in the Comments section of this post:
“How would you design your mixer?”
Would you match your favorite plate? Would you cover it with dalmatian spots? Would you deck it out with zebra stripes? Or would you dress it up with a gnarly skull and crossbones? Just shout out how you’d design your new mixer and you’re automatically entered to win!
(If you have no idea how you’d design your mixer, no problem! Just say so in your comment.)
Note: If you’d prefer to have an orange mixer like the one pictured here, that would be fine, too!
THE RULES
One entry per person, please.
Winners will be selected at random and announced Sunday night.
Good luck!
___________________________
Giveaway sponsored by Pioneer Woman. Beautiful, custom mixer designed by Nicole at Un Amore.


May 9, 2012
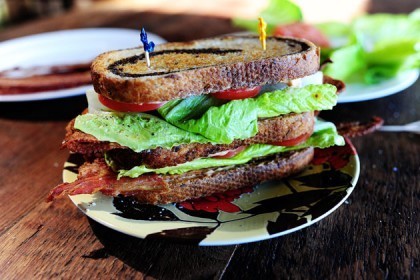
Monster BLT
 I made this a couple of weeks ago. And suddenly, everything in my life made sense again.
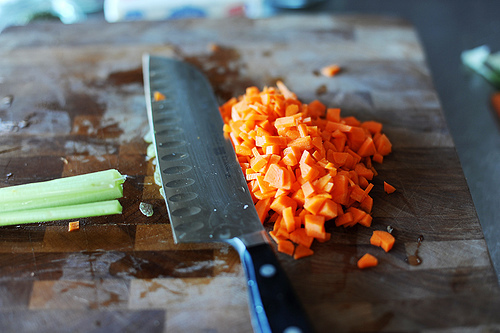
Who doesn’t love a BLT?
See? Not one person raised his hand. Told ya.
Here’s how I made mine.
 The Cast of Characters: Bacon, bread, mayo, chipotle peppers, Roma tomatoes, green leaf lettuce, and (optional) cheese and avocado.
Let’s do this thing.
 I decided to do bacon the easy way: Put it on a drip pan and stick it in a 375 or 400 degree oven for 15-20 minutes, until it gets to the crispness you want.
I didn’t take a photo of the pan with the cooked bacon on it.
I’m disorganized that way.
 Mix together some mayo with some of the adobo sauce from the can of chipotles, and you can chop up one of the peppers if you want the mayo mixture to be a little chunkier and spicier.
Chipotle mayo. Seriously one of my favorite things on earth.
Use it as a sandwich spread.
Use it as a veggie dip.
Use it as a salad dressing.
Use it as a moisturizer.
Actually, please don’t use it as a moisturizer.
 I toasted the marble rye because I wanted to, and spread on some chipotle mayo.
I went back and forth on whether or not to toast the bread, and imagined that a big monster BLT would be easier to eat if the bread was really soft. But one of my very favorite hobbies is not taking my own suggestions, so I went ahead and toasted it.
I’m a rebel that way.
 Then I laid on the bacon…
 The L and the T…
 And this was important! Salt and pepper on the tomatoes.
 Then I spread another piece of toasted bread with the chipotle mayo…
 Put the mayo side face down, then spread a little more on the top.
 Then came the lettuce and (not shown) the tomato again…
 Salt and pepper on the tomato, and another slice of chipotle mayo-smeared bread.
 Come. To. Mama!
 As you can see, I left off the avocado and the cheese, but you can surely add them and whatever else you want. I just didn’t want this to veer into the territory of a club sandwich, so I kept it pure and holy and unadulterated.
Except for that dang chipotle mayo, which really sent this sandwich into the stratosphere.
Enjoy, guys!
Here’s the handy dandy printable.
Recipe: Monster BLT
Prep Time: 5 Minutes
|
Cook Time: 20 Minutes
|
Difficulty: Easy
|
Servings: 2
Print Recipe
3"x5" Cards
4"x6" Cards
Full Page
Ingredients
8 slices Thick-cut Bacon, Cooked Till Slightly Crisp3 slices Marbled Rye Bread, Toasted3 Tablespoons Mayonnaise2 teaspoons Adobo Sauce From Chipotle Peppers, More To Taste2 whole Roma Tomatoes, Sliced Thick4 whole Green Leaf Lettuce Leaves, Washed Salt And Pepper Optional Ingredients: Cheese Slices, Avocado, Red Onion Slices Preparation Instructions
Mix together the mayo and the adobo sauce, adding more to get the spiciness you want.
Spread some of the chipotle mayo on one piece of bread. Lay on four slices of bacon, then top with lettuce and tomato slices. Sprinkle salt and pepper on the tomatoes.
Spread chipotle mayo on another slice of bread and lay it face down on top of the tomatoes. Spread more chipotle mayo on top, then repeat the bacon, lettuce, tomato, and salt and pepper. Spread chipotle mayo on another piece of toast and lay it face down on top of the tomatoes.
Slice in half and split the sandwich with someone you love!
Posted by Ree on May 9 2012

May 7, 2012
Chocolate Chip Caramel Ice Cream Sundae
 A few weeks ago, after an away soccer game, my daughter and her best friend, who happens to be my best friend Hyacinth’s daughter (confused yet?), launched a full-on begging fest regarding their post-soccer dinner.
“Can we go to Chili’s?” they cried.
“No,” both Hyacinth and I replied. It was getting dark, and we wanted to go home.
“Please!” they cried.
“No,” we replied.
“Please!”
“No.”
“Please!”
“No.”
“Please!”
“No.”
“Please!”
“Okay.”
So we went to Chili’s. As mothers, Hyacinth and I believe in sticking to our guns.
This dessert is inspired by one of the gooey, drippy desserts on their menu—a dessert we didn’t let the girls order no matter how much they begged!
We got the molten lava cake instead.
So we got the last word!
 I whipped this up using my favorite basic chocolate chip cookie recipe. Throw some softened butter into the bowl of a mixer. (This is a little over-softened, but I’ll live with those consequences.)
 Then add brown sugar…
 And white sugar…
 And blend it all together until it’s nice and combined.
 Crack in a couple of eggs, one at a time…
 Beating them after each addition.
 Then add vanilla and mix it in.
 In a separate bowl, add flour…
 Then add in a heaping teaspoon of instant coffee granules.
 You just have to trust me on this.
 Then add some baking soda…
 A leetle salt…
 And mix it all together.
 Gradually add the flour mixture until it’s all combined…
 Then stick your finger in the bowl, retrieve a nice amount of dough, and place your finger in your mouth.
Important: Please turn off the mixer before you do this.
Ahem.
 Next, add in chocolate chips or (in my case) chocolate chunks…
 And mix them in until they’re all combined.
Repeat the stick-your-finger-in-the-bowl trick.
But repeat the turn-the-mixer-off trick first.
Thank you for your cooperation.
 Next, thoroughly grease and flour (or spray with baking spray if you’re lazy like me) a quarter-sheet pan like this one…or just a regular 9 x 13-inch baking pan.
 Throw in the dough…
 Spread it out to flatten the surface…
 And stick it in the oven.
 Bake it until it’s nice and golden and perfect.
Then grab a fork and dig in!
Just kidding. But you’ll definitely want to.
Just let ‘em cool for a bit in the pan.
 To serve up the masterpieces, cut square pieces.
 And grab your very, very favorite flavor of ice cream. This is caramel macchiato flavor, which is ridiculous and ridonkulous and rickonkulous. But you can use anything! Vanilla, chocolate, coffee, strawberry, rocky road…or match the cookie itself and throw on a scoop of regular chocolate chip.
 Pile on the ice cream….
 But wait. There’s more.
 Drizzle zig-zags of hot fudge…
 And caramel sauce in the opposite direction.
 Then comes whipped cream.
Mine came from a can.
Try not to be jealous.
 Then…blip! A bright red cherry.
You can’t know the fun. You can’t know the deliciousness.
Make it for birthdays, slumber parties…or Monday night to reward yourself.
Here’s the handy dandy printable!
Recipe: Chocolate Chip Caramel Ice Cream Sundae
Prep Time: 10 Minutes
|
Cook Time: 18 Minutes
|
Difficulty: Easy
|
Servings: 12
Print Recipe
3"x5" Cards
4"x6" Cards
Full Page
Ingredients
2 sticks Butter, Softened1 cup Brown Sugar1/2 cup Sugar2 whole Eggs2 teaspoons Vanilla2-1/4 cups Flour1 teaspoon (heaping) Instant Coffee Granules1 teaspoon Baking Soda1-1/2 teaspoon Salt8 ounces, weight Chocolate Chips Or Chocolate Chunks (more To Taste!) Ice Cream, Flavor Of Your Choice Hot Fudge, For Drizzling Caramel Sauce, For Drizzling Whipped Cream Maraschino Cherries Preparation Instructions
Preheat oven to 375 degrees.
Mix butter, brown sugar, and white sugar until combined. Add eggs and vanilla and mix together.
In a separate bowl, stir together flour, instant coffee, baking soda, and salt. Add to wet ingredients in batches, mixing gently after each addition. Gently mix in chocolate chips or chunks.
Thoroughly grease and flour a quarter sheet pan or a 9 x 13-inch baking pan. Spread cookie dough into the pan, spreading out the surface.
Bake for 15-18 minutes until done (longer if needed to make sure it's set.) Allow to cool slightly in the pan.
To serve, warm the hot fudge and caramel sauces. Place a square of cookie on a plate. Top with a scoop of ice cream, followed by drizzles of both hot fudge and caramel sauces. Finish with whipped cream and a cherry.
Posted by Ree on May 5 2012

May 4, 2012
Cinco de Mayo Smorgasbord
 (Recipe: Easy Crispy Shell Tacos by Tasty Kitchen member Nancy @ Coupon Clipping Cook.)
My goodness.
Wow.
And this is only the beginning.
Erika at Tasty Kitchen Blog has posted what has got to be the most beautiful, user-friendly, and comprehensive smorgasbord of Tex-Mex/Mexican recipes in existence. There are drinks, appetizers, tacos of every shape, size, and variety, soups, enchiladas, desserts…you name it.
 Erika does this groovy thing where she makes collages of recipes…but the collages are actually clickable and lead to the individual recipes. (Note: the collage above isn’t clickable—the ones on TK Blog are.)
Whether you celebrate Cinco de Mayo, or just plain love this kind of food, you will not believe the bounty of ridiculously delicious recipes submitted by Tasty Kitchen members, who I contend are among the most talented cooks in the universe.
Check it out here, and be sure to take your appetite with you.
Cinco de Mayo Smorgasbord on Tasty Kitchen Blog
It’s official: I’m hungry.

May 3, 2012
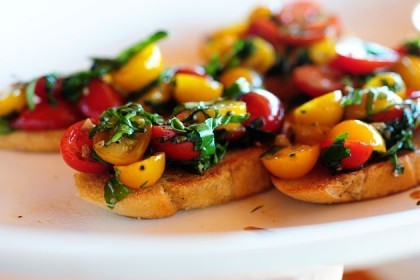
Bruschetta Panini (and More!)
 Here are a couple more things you can do with leftover bruschetta topping, also known as One of the Best Things on Earth.
Making too much bruschetta topping a couple of weeks ago turned out to be one of the best things that’s ever happened to me.
BRUSCHETTA SALAD
 Grab the leftover bruschetta topping. (Recipe at the bottom.)
 Spoon some topping into some Romaine leaves and sprinkle on some Parmesan shavings.
 Drizzle on a little (or oops! a lot) balsamic.
 Serve it as a salad or appetizer! I actually just picked up the leave by the end and ate it bite by bite.
CHICKEN BRUSCHETTA PANINI
 Grill up some chicken breasts…
 Mix together some mayonnaise with a little prepared pesto.
 Presto change-o, pesto mayo!
I crack myself up.
 Spread a piece of crusty bread generously with the pesto mayo…
 Lay on the chicken…
 And top the chicken with plenty of the bruschetta topping.
 Lay on some mozzarella…
 Then spread some pesto mayo on another piece of the bread…
 And lay on some thin slices of red onions.
 Then top the sandwich with this piece of bread.
 Spread both sides of the bread with softened butter, then put it in a panini maker or on a grill pan.
 If you go the grill pan route, lay a piece of aluminum foil on the sandwich and lightly press it around the sandwich.
 Then carefully set a heavy pot on top of the sandwich and let it grill away.
You can also just smash it with a big spatula. But where’s the fun in that?
 Halfway through, take of the pot, remove the foil, and (carefully) flip over the sandwich, replacing the foil and setting the pot back on top.
 This is just about done, but I let it go a little longer on both sides to crisp up a bit. And take note: because of the liquid in the tomatoes, this sandwich is in danger of getting a little soggy, so a double-sided panini press will work a little better because it’ll cook both sides at a time.
CHICKEN BRUSCHETTA SANDWICH
 You can also just make a regular sandwich and forget the whole panini nonsense.
 I really love my hand in this photo.
On Opposite Day.
Here’s the recipe for the topping, then you can just have fun from there!
Recipe: Bruschetta
Prep Time: 20 Minutes
|
Cook Time: 10 Minutes
|
Difficulty: Easy
|
Servings: 12
Print Recipe
3"x5" Cards
4"x6" Cards
Full Page
Ingredients
2 Tablespoons Olive Oil5 cloves Garlic, Finely Minced1 pint Red Grape Tomatoes, Halved Lengthwise1 pint Yellow Grape Tomatoes, Halved Lengthwise1 Tablespoon Balsamic Vinegar16 whole Basil Leaves (chiffonade) Salt And Pepper To Taste (don't Oversalt!)1 whole Baguette8 Tablespoons Butter Preparation Instructions
In a small skillet, heat olive oil over medium-high heat. Add garlic and stir, lightly frying for about a minute, removing before the garlic gets too brown (it can be golden.) Pour into a mixing bowl and allow to cool slightly.
Add tomatoes, balsamic, basil, and salt and pepper to the bowl. Toss to combine, then taste and add more basil if needed, and more salt if needed (don't oversalt, though!) Cover and refrigerate for an hour or two if you have the time.
Cut the baguette into diagonal slices to allow for the most surface area possible. Melt half the butter in a large skillet and grill half the bread on both sides, making sure they're nice and buttery. Cook till golden brown on both sides. Repeat with the other half of the butter and the other half of the bread.
To serve, give the tomato mixture a final stir, the spoon generously over the slices of bread. Serve on a big platter as a first course or appetizer.
Posted by Ree on January 9 2012

May 2, 2012
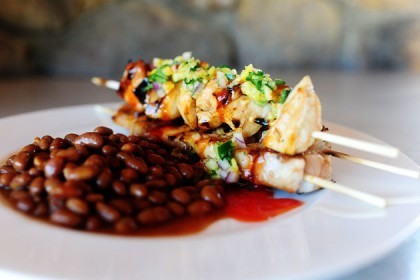
Maple Glazed Chicken Kabobs with Sweet Jalapeno Salsa
 The Bush’s Grillin’ Beans/Pioneer Woman Recipe Contest is nearly closed. I’m getting tremendously excited for the big cookout next month, when the recipe contest winners (and their guests) will travel to the ranch, cook their winning dishes on camera (I’ll share the videos here), and enjoy a cookout on the ranch—Oklahoma style. The recipes submitted so far are ridiculously scrumptious-sounding. If I’m even remotely hungry while I’m reading them…well, it gets a little dicey around here.
You have until May 4th (two more days) to enter your own recipe! Here are the details in case you missed them:
DETAILS
Submit your very best recipe for grilled chicken, steak, chops, shrimp… you name it! Recipes need to be relatively easy to prepare, use accessible, widely-available ingredients, served with one of the seven flavors of Bush’s Grillin’ Beans, and— most of all—taste delicious. Four winners will be chosen to travel to the ranch in June with a guest of their choice, prepare their recipes on camera and enjoy a country cookout. And remember: I’ll do the dishes!
To submit, enter your grilling recipe served with your favorite flavor of Bush’s Grillin’ Beans in the Comments section of this post.
Here’s my third grilling recipe!
Maple Glazed Chicken Kabobs with Sweet Jalapeno Salsa
 This dish will be served with Bush’s Bourbon and Brown Sugar Grillin’ Beans. I love this flavor!
If you’re using wooden skewers, be sure to soak the skewers in water for several hours first.
If you’re using metal skewers, you can soak them, too. But it won’t do anything.
Ha. I crack myself up. But only 1/10th of the time.
 Slice the chicken breasts into small pieces, then thread each piece onto a separate skewer.
 Combine maple syrup, soy sauce, and pineapple juice in a small saucepan. I spy pulp!
 Bring it to a boil, then reduce the heat. Let it bubble up and reduce it by about one-fourth, then set aside to cool.
 Chop up some fresh pineapple, jalapeno, and red onion really finely.
 Throw it into a small bowl and add some rice wine vinegar, sugar, salt, and pepper. Set this aside, and try not to eat it all with a bag of blue corn chips!
I speak from experience here.
 Grill the chicken kabobs until they’re done…
 Then baste the maple sauce over the kabobs toward the end of the grilling time. Remove them from heat and place them on a platter.
 To serve, top the kabobs with the jalapeno salsa. Gorgeousness!
Serve kabobs with Bush’s Bourbon and Brown Sugar Grillin’ Beans.
Divine! Just divine. I made this weeks ago, and I need it again. Now.
Be sure to submit your recipes in the next 48 hours!
Check out my last two recipes here:
Simple Scrumptious Grilled Chicken
Cuban Pork Chops
(Here are the Official Rules. Be sure to read them before )
And here’s the handy dandy printable for today’s recipe:
Recipe: Maple Glazed Chicken Kabobs with Sweet Jalapeno Salsa
Prep Time: 15 Minutes
|
Cook Time: 15 Minutes
|
Difficulty: Easy
|
Servings: 8
Print Recipe
3"x5" Cards
4"x6" Cards
Full Page
Ingredients
6 whole 6-7 Ounce Chicken Breasts1/2 cup Maple Syrup1/4 cup Soy Sauce1/4 cup Pineapple Juice1/2 whole Pineapple, Finely Diced2 whole Jalapeno, Minced1 bunch (small) Cilantro, Roughly Chopped1 whole Small Red Onion, Diced1 teaspoon Rice Wine Vinegar (or White Vinegar)1 Tablespoon Sugar1/2 teaspoon Salt Black Pepper To Taste2 cans Bush's Bourbon And Brown Sugar Grillin' Beans Preparation Instructions
If you're using wooden skewers, be sure to soak the skewers in water for several hours first.
Slice the chicken breasts into six even pieces, then thread each piece onto a separate skewer.
Combine maple syrup, soy sauce, and pineapple juice in a small saucepan.
Bring it to a boil, then reduce the heat to medium and let it bubble up and reduce by about one-fourth. Set aside to cool.
In a small bowl, combine chopped pineapple, jalapeno, cilantro, red onion, vinegar, sugar, salt, and pepper. Set this aside, and try not to eat it all with a bag of blue corn chips! I speak from experience here.
Grill the chicken kabobs until they're done, then baste the maple reduction over the kabobs toward the end of the grilling time. Remove them from heat and place them on a platter.
To serve, top the kabobs with the jalapeno salsa. They look gorgeous on a serving platter!
Serve individual kabobs with Bush's Bourbon and Brown Sugar Grillin' Beans.
Posted by Ree on May 2 2012

April 30, 2012
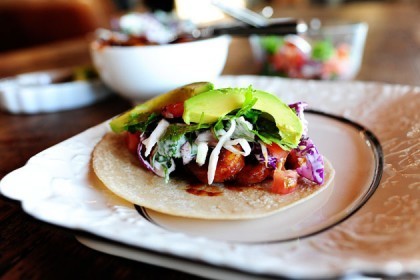
Shrimp Tacos
 I made these a couple of weeks ago because I had a wicked craving for fish tacos and all I had on hand was shrimp. So I made a command decision: I made shrimp tacos.
It’s called troubleshooting! I’m good at it, but only if it involves food.
Put me in the desert and tell me I have to find my way out using my awesome sense of direction? Goodbye forever. Ain’t happening.
Did you know I can spin Marlboro Man around a thousand times with his eyes closed and with his eyes still closed he can point in any direction and determine whether it’s north, south, east, or west simply because it’s so embedded in his being?
Did you know I can spin around a thousand times with my eyes closed and throw up?
I digress. Let’s move ahead with the tacos, okay?
 Because you can’t have shrimp tacos without slaw, you’ll want to make the slaw first. Slice up some regular and purple cabbage really thinly…
 Then give a bunch of cilantro a rough chop…
 And mince up a jalapeno, seeds and all if you can handle the heat, man.
 Then whip up the dressing: It’s just milk, mayonnaise, salt, sugar, vinegar, and a little bit of cayenne.
All the good things in life.
 Throw the cabbage and jalapenos into a bowl…
 Drizzle in the dressing…
 Then toss in the cilantro until it’s all combined. Divine! I love this stuff and make it all the time. Goes with everything.
Except maybe Belgian waffles.
It’s best if you can make the slaw a couple of hours ahead of time at least so it can fall in love and get married.
Sometimes if I make it more than a few hours ahead of time, I’ll wait to the end to stir in the cilantro so it doesn’t get grody.
You’ll also want to make some pico de gallo (or grab some storebought if it’s fresh and wonderful.)
 When you’re ready to make the tacos, heat a little vegetable oil in a large skillet over high heat. Throw in the shrimp…
 And toss them around, trying to get as much color on them as you can.
 Once they’re opaque, reduce the heat to low and pour in some Mexican tomato sauce. I get mine in the Hispanic aisle of my small grocery store and I absolutely love it. El Pato’s the brand, but not all stores have it. If yours doesn’t, any Mexican red sauce (even enchilada sauce) will do.
 Stir it around and let it bubble up…
 Then add a little cumin or other seasoning if you want to increase that flavor a bit.
 At the very end, after cooking for a couple of minutes, throw in a tablespoon or so of butter and let it melt into the sauce.
 Use your freaky pink alien hand to remove the shrimp to a plate or bowl and set them aside.
 To serve it all up, throw some corn tortillas onto a plate and warm them in the microwave for a bit.
 Then let everyone build their own tacos as their hearts, souls, minds, bodies, and appetites lead them. I did shrimp, otherwise known as shuh-ree-yump…
 Then I piled on the slaw, making sure to get a little of the cool, creamy dressing so it could run down on the spicy shrimp.
I love it when cool things drip over hot things.
 Next, spoon on some cool, spicy pico de gallo…
 Lay on some slices of creamy, heavenly avocado…
 And the very, very essential part: a squeeze of lime. I can not express to you how important this element is. It’s so important, in fact, that if you leave it out, your life will begin to spiral downward into a series of mishaps and disappointments and forty years from now you’ll knock yourself over the head and say “WHY didn’t I add that squeeze of lime to my shrimp taco that one day? WHY?”
Don’t let this happen to you.
 The fun part is to see if it’s even remotely possible to fold it up enough to get it in your mouth.
I love those kinds of challenges in life.
Enjoy, guys!
Recipe: Shrimp Tacos
Prep Time: 15 Minutes
|
Cook Time: 10 Minutes
|
Difficulty: Easy
|
Servings: 8
Print Recipe
3"x5" Cards
4"x6" Cards
Full Page
Ingredients
Shrimp2 Tablespoons Canola Oil1-1/2 pound Shrimp, Peeled And Deveined, Tails Removed1 can (6 Ounces Approx) Mexican Tomato Sauce Or Enchilada Sauce1/2 teaspoon Cumin Slaw:1/2 head Cabbage, Sliced Thin1/2 head Purple Cabbage, Sliced Thin1 whole Jalapeno, Chopped1/2 cup Whole Milk1/2 cup Mayonnnaise1 teaspoon White Vinegar1 Tablespoon Sugar1/4 teaspoon Salt1/4 teaspoon Cayenne Pepper1/2 bunch Cilantro, Roughly Chopped EXTRAS:16 whole Corn Tortillas, Warmed Pico De Gallo Avocado Slices Lime Wedges Preparation Instructions
SLAW
Combine shredded cabbage and sliced jalapenos in a bowl. In a separate bowl mix milk, mayonnaise, vinegar, sugar, salt, and cayenne. Pour over cabbage. Toss to combine. Cover and refrigerate for a couple of hours if you have the time.
Before serving, toss in cilantro leaves.
SHRIMP
Heat canola oil in a heavy skillet over high heat. Throw in shrimp and toss around, cooking until opaque. Reduce heat to low and pour in the red sauce, stirring to combine. Stir in cumin and cook for another minute or two, then remove from heat.
TO SERVE
Serve the warm tortillas with the shrimp, slaw, pico de gallo, avocado slices, and lime wedges and let everyone build their own tacos. Be sure to squeeze lime juice over the top at the end!
Posted by Ree on April 29 2012
Recipe: Pico de Gallo
Prep Time: 15 Minutes
|
Cook Time:
|
Difficulty: Easy
|
Servings: 8

Print Recipe
3"x5" Cards
4"x6" Cards
Full Page
Ingredients
5 whole Roma Tomatoes1/2 whole Large Onion2 whole Jalapenos Lots Of Cilantro Lime Juice Salt To Taste Preparation Instructions
Chop jalapenos, tomatoes and onions into a very small dice. (Leave seeds in your jalapenos for a hotter pico). Adjust amount of jalapenos to your preferred temperature. Next, chop up a nice-sized bunch of cilantro. Just remove and discard the long leafless stems before chopping. No need to remove the leaves from the stems completely. Place all of these ingredients together in a bowl and give it a good stir.
Squeeze the juice of half of one lime into the bowl. Add salt to taste and stir again.
Posted by Ree on April 29 2012

April 25, 2012
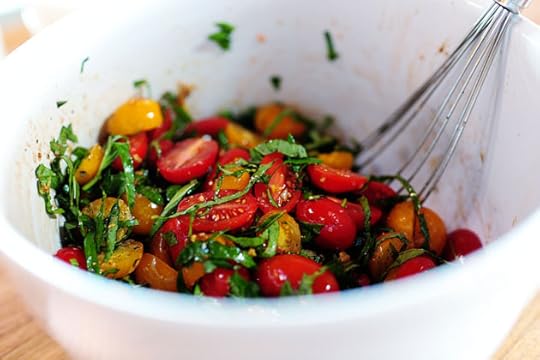
Bruschetta Chicken
 I had a group of people over for dinner last week, and I made an enormous amount of bruschetta for them to munch on when they first arrived at the Lodge. So enormous was the amount of bruschetta I made, in fact, that the guests barely scratched the surface…and the next day I found myself with a big bowlful of glorious bruschetta topping.
I had to think. I had to act. I had to find a way to honor the beautiful bowl of wonderfulness and not let a single smidgen of it go to waste.
I wound up going a little bit crazy and making three different dishes using the topping.
Before I show you the first one, here is the original recipe for bruschetta, which I posted back in January:
THE ORIGINAL BRUSCHETTA RECIPE
 The Cast of Characters: Red grape (or cherry) tomatoes, yellow grape (or cherry) tomatoes, garlic, olive oil, balsamic vinegar, fresh basil, baguette, and (not pictured) salt, pepper, and butter.
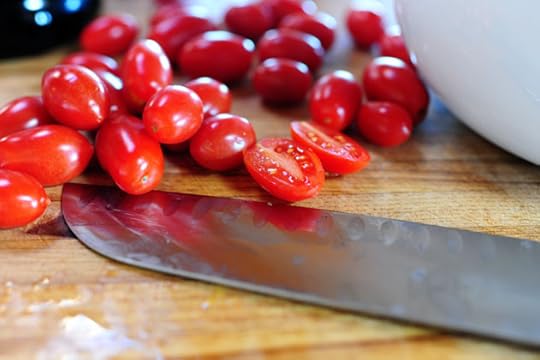 Slice the tomatoes in half lengthwise…
 Then do the same with the yellow.
 Chop up a bunch of pre-peeled garlic cloves using this chopper contraption, because if you’re like me, this is your new favorite way to quickly chop a bunch of garlic…
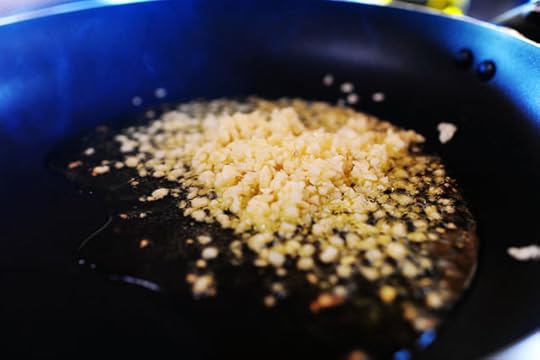 Then heat some olive oil in a small skillet over medium-high heat and throw in the garlic.
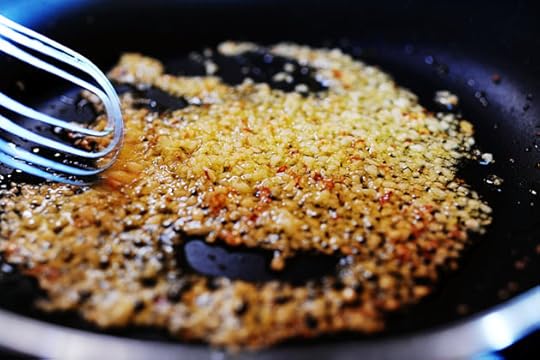 Stir it around for less than a minute, just to get the flavors going and to brown it just a bit…but don’t let it burn!
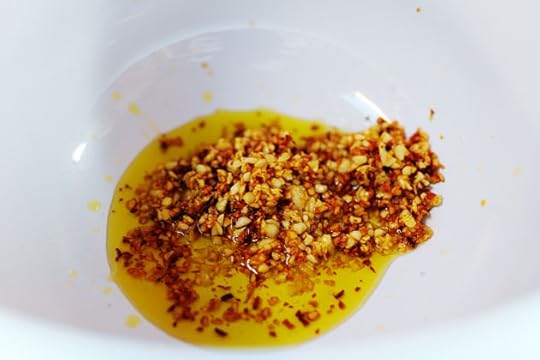 Then throw it—olive oil and all—into a bowl and let it cool for just a bit.
You might stop a few seconds earlier than I did so it’s a little more “golden” than “golden brown.”
Don’t be like me, is what I’m saying.
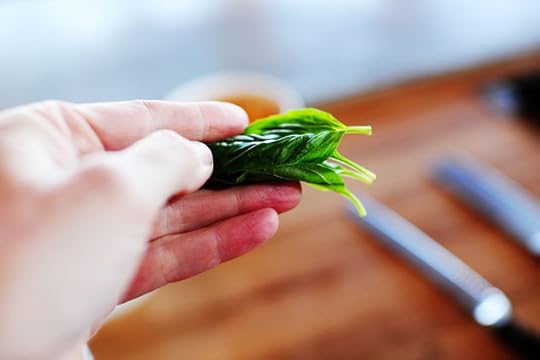 Meanwhile, grab some basil leaves and stack them on top of one another…
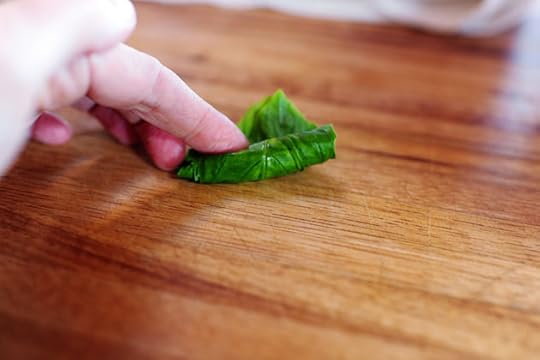 Then roll them up tightly…
 And slice them into strips. You’ll need a whole bunch more than this. I’m just demonstrating.
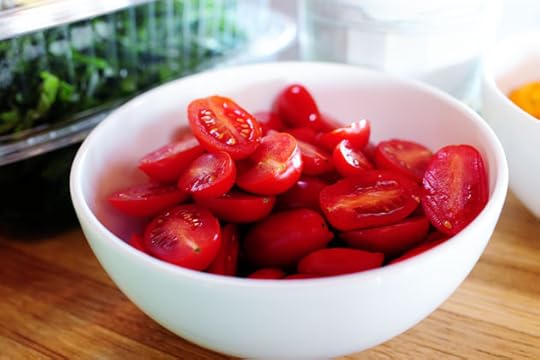
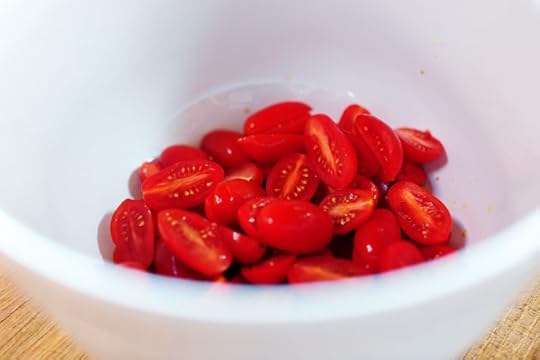 Next, throw the red tomatoes into the bowl…
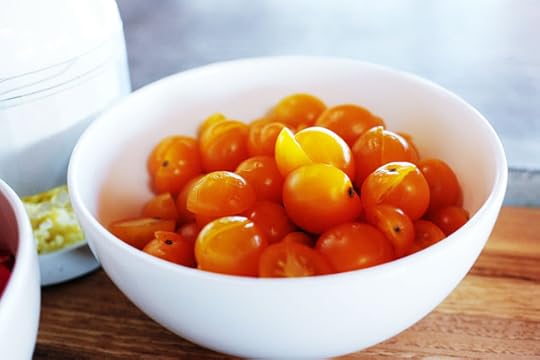
 Followed by the yellow tomatoes…
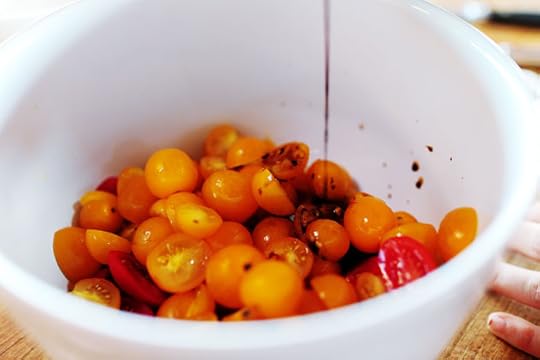 A little balsamic…
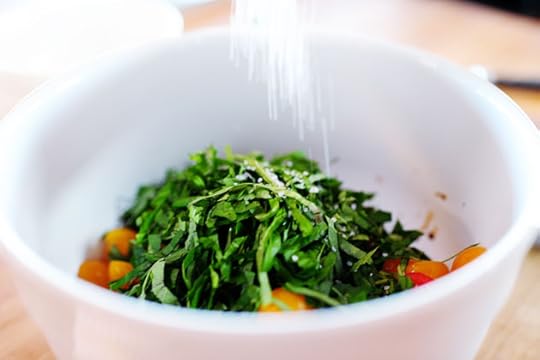 The basil…
 And a little salt and pepper. Not too much salt! Start light and work your way up if necessary.
 Next, stir it to combine and give it a taste, adding more of whatever you think it needs. I added a bunch more basil…
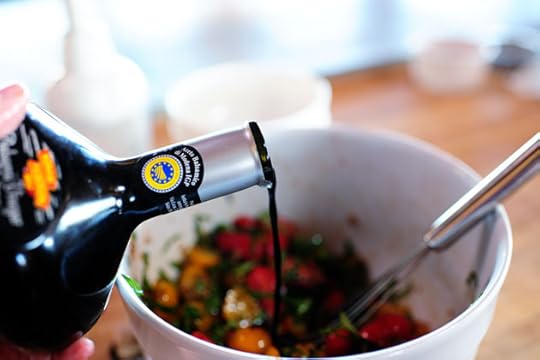 And a tiny splash of more balsamic.
Now, you can use this right away, but I think it’s better if you can let it sit (either on the countertop or in the fridge) for at least an hour or so. Good things will happen.
 Now, for the familiar appetizer you see in restaurants: You can cut straight, round-ish slices of the bread if you’d like the pieces to be on the small side. Or you can cut extreme diagonal pieces like this, to allow for more surface area.
 You can toast the pieces of bread in the oven, dry. But why in the world would you want to do that when you can brown them in butter in a skillet?
 Mmmmm, baby. This is what makes bruschetta divine. Well, this and the tomatoes, basil, garlic, and balsamic.
Never mind.
Oh, and another note about the bread: Sometimes I grill the bread on a grill pan so it has nice grill marks. This is pretty, too. But it just never seems to have the crisp, buttery, flavorful quality that this skillet stuff has.
 To serve, arrange the bread pieces on a large platter and heap the tomato mixture onto each piece.

 Then serve it as an appetizer, a first course…or just a snack on a Wednesday afternoon.
 This is a seriously wonderful treat, and I’ve been known to spoil my dinner on this stuff several times.
And now. Back to present day!
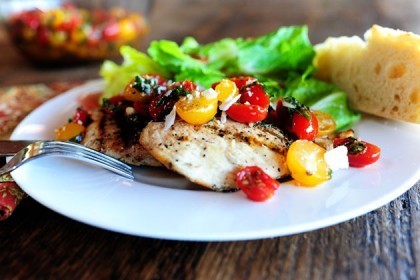
BRUSCHETTA CHICKEN
This was the bowl of bruschetta topping I had leftover after the dinner. Quite a bit!
Cut some boneless, skinless chicken breasts in half to create two thinner breast pieces. Season them with salt and pepper and grill them up…(or you can saute them if that’s easier.)
 Then serve them with a nice green salad…
 And pile the bruschetta topping on the side! How pretty is this?
 I added a chunk of bread and a sprinkling of fresh Parmesan to finish it off…then I dug in!
And oh, was I ever glad. It was divine. So flavorful, nice and light. I loved it.
Here are the handy printables, both for the chicken dish and the original appetizer.
Enjoy, guys! Oh, and this isn’t the only dish I whipped up using the leftover bruschetta topping. (More later…)
Recipe: Bruschetta Chicken
Prep Time: 1 Hour
|
Cook Time: 10 Minutes
|
Difficulty: Easy
|
Servings: 8
Print Recipe
3"x5" Cards
4"x6" Cards
Full Page
Ingredients
1 Tablespoon Olive Oil5 cloves Garlic, Finely Minced1 pint Red Grape Tomatoes, Halved Lengthwise1 pint Yellow Grape Tomatoes, Halved Lengthwise1 Tablespoon Balsamic Vinegar16 whole Basil Leaves (chiffonade) Salt And Black Pepper To Taste (don't Oversalt)8 whole Boneless, Skinless Chicken Breasts, Cut In Half To Create Two Thin Breasts Salt And Pepper, to taste Freshly Grated Or Shaved Parmesan Preparation Instructions
In a small skillet, heat olive oil over medium-high heat. Add garlic and stir, lightly frying for about a minute, removing before the garlic gets too brown (it can be golden.) Pour into a mixing bowl and allow to cool slightly.
Add tomatoes, balsamic, basil, and salt and pepper to the bowl. Toss to combine, then taste and add more basil if needed, and more salt if needed (don’t oversalt, though!) Cover and refrigerate for an hour or two if you have the time.
Season chicken breasts with salt and pepper, then grill or saute them until done in the middle.
To serve, give the tomato mixture a final stir. Arrange chicken breasts on a plate (2 at a time) then spoon a generous amount of bruschetta topping over the top.
Use extra topping on slices of grilled baguette!
Posted by Ree on April 25 2012
Recipe: Bruschetta
Prep Time: 20 Minutes
|
Cook Time: 10 Minutes
|
Difficulty: Easy
|
Servings: 12
Print Recipe
3"x5" Cards
4"x6" Cards
Full Page
Ingredients
2 Tablespoons Olive Oil5 cloves Garlic, Finely Minced1 pint Red Grape Tomatoes, Halved Lengthwise1 pint Yellow Grape Tomatoes, Halved Lengthwise1 Tablespoon Balsamic Vinegar16 whole Basil Leaves (chiffonade) Salt And Pepper To Taste (don't Oversalt!)1 whole Baguette8 Tablespoons Butter Preparation Instructions
In a small skillet, heat olive oil over medium-high heat. Add garlic and stir, lightly frying for about a minute, removing before the garlic gets too brown (it can be golden.) Pour into a mixing bowl and allow to cool slightly.
Add tomatoes, balsamic, basil, and salt and pepper to the bowl. Toss to combine, then taste and add more basil if needed, and more salt if needed (don't oversalt, though!) Cover and refrigerate for an hour or two if you have the time.
Cut the baguette into diagonal slices to allow for the most surface area possible. Melt half the butter in a large skillet and grill half the bread on both sides, making sure they're nice and buttery. Cook till golden brown on both sides. Repeat with the other half of the butter and the other half of the bread.
To serve, give the tomato mixture a final stir, the spoon generously over the slices of bread. Serve on a big platter as a first course or appetizer.
Posted by Ree on January 9 2012

April 23, 2012
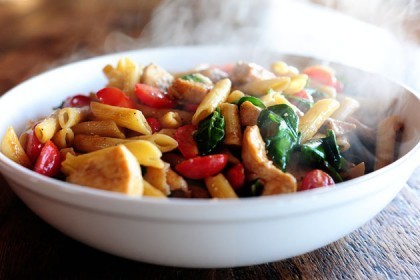
Chicken Florentine Pasta
 I made this for a late lunch Saturday, and it absolutely completed me. It also absolutely completed my fourteen-year-old daughter, whose love of pasta is surpassed only by that of her mother, otherwise known as me. She and I took turns filling our little bowls and wolfing down helpings of the spinach-and-tomato packed pasta deliciousness, our contentment level increasing with each cylinder of penne.
It was a mother-daughter pasta moment, is what I’m saying. And it was beautiful.
I can sure talk something to death, can’t I?
Never mind. Don’t answer that. Let’s just move on to the pasta, and I would like to point out that for the purposes of this post and the rest of the cooking posts I’ll post this week, when I cooked on Saturday I decided to—brace yourself—move my dining table to another window in order to avail myself of some different light than I’m used to using. So if the photos look a little different, furniture rearranging is the reason. If you’re a weirdo like me and like to take photos of the food you cook and eat, try moving to a totally different spot sometime!
If you’re not and if you don’t, just skip forward to the “make this pasta dish as soon as humanly possible’ part.
In fact, let’s just do that right now.
INGREDIENTS YOU NEED
penne
boneless, skinless chicken breasts
salt and pepper
butter
olive oil
garlic
white wine
low-sodium chicken broth
baby spinach
grape tomatoes
Parmesan
EQUIPMENT YOU NEED
pasta pot (or any large pot for boiling pasta)
collander
knife
large skillet
cooking spoon or tongs
vegetable peeler
HOW TO MAKE IT
 Cut up the chicken into chunks—large or small, depending on your preference. Or depending on your family’s preference. Or your Orkin man’s preference. Depends on who you’re cooking for.
Salt and pepper the chicken…
 Throw the chicken chunks into a large skillet with butter and olive oil over really high heat.
 Spread it into a single layer and let it sit for a minute or two, undisturbed, while it gets nice and brown on one side.
 Turn the chicken to the other side and keep cooking it until it’s really brown and done in the middle.
 Remove the chicken to a plate and set it aside for a bit.
 Turn down the heat to medium, then throw in the garlic and stir it around quickly to keep it from burning.
 Then pour in white wine…
 And chicken broth.
(Note: If you don’t use alcohol in your cooking, you can use double the amount of broth and just leave out the wine altogether.)
 Then stir it all around, scraping the bottom of the pan. Then just let the liquid cook and bubble up for a good 3-4 minutes. You want the liquid to reduce by at least half and get nice and rich…without disappearing! This is what’s going to ultimately coat and moisten the pasta, so don’t let it go completely away. (Incidentally, if that happens just splash in a little more broth as needed. Amen.)
 While the sauce is reducing, sprinkle a little salt and pepper on the halved grape tomatoes.
And why are grape tomatoes so darn delicious? They complete me.
 Now comes the fun part! When the liquid’s nice and reduced, turn off the heat and throw in the spinach…
 The tomatoes…
 The chicken (and any juice that might be on the plate)…
 And the cooked, drained pasta.
 Immediately begin tossing the pasta—the spinach will wilt as you do, and this is what I love about this pasta: you don’t even have to cook the spinach and tomatoes. They just heat up/wilt as you toss them with the hot pasta.
Poifect!
 And…yum. My soul rejoices.
 Next, throw in a bunch of Parmesan shavings…
 And toss them around as they melt and become part of the whole mix.
 Immediately pour it into a big serving bowl.
Then stand back, admire your handiwork, and get really excited about the carb rush you’re about to experience.
But there’s spinach in there, too. And spinach has been known to eradicate the detrimental effects of carbs.
Not really. But wouldn’t that be nice?
 Then top with plenty of Parmesan shavings! (Basil would be lovely, too—I just didn’t have any.)
Then, this is the most important part: Dig in. Dig in with all your might.
You’ll be so glad you did.
Enjoy!
Recipe: Chicken Florentine Pasta
Prep Time: 10 Minutes
|
Cook Time: 20 Minutes
|
Difficulty: Easy
|
Servings: 10
Print Recipe
3"x5" Cards
4"x6" Cards
Full Page
Ingredients
1 pound Penne4 whole Boneless, Skinless Chicken Breasts Salt And Pepper, to taste2 Tablespoons Butter2 Tablespoons Olive Oil4 cloves Garlic, Minced3/4 cups Dry White Wine3/4 cups Low-sodium Broth, More If Needed1 bag Baby Spinach2 cups Grape Tomatoes, Halved Lengthwise4 ounces, weight Parmesan Cheese, Shaved With Vegetable Peeler Preparation Instructions
Cook pasta according to package directions in lightly salted water. Drain and set aside.
Cut chicken breasts into chunks and sprinkle on salt and pepper.
Heat butter and olive oil over high heat in a large skillet. Add chicken chunks in a single layer and do not stir for a minute or two in order to allow the chicken to brown on the first side. Turn the chicken and brown on the other side. Cook until done, then remove chicken from the skillet.
Turn heat to medium. Add garlic and quickly stir to avoid burning. After about 30 seconds, pour in wine and broth, stirring to deglaze the pan. Allow the liquid to bubble up, then continue cooking until it's reduced by at least half (most of the surface of the liquid should be bubbling at this point.)
Turn off the heat. Add spinach, tomatoes, chicken, and cooked pasta to the skillet. Toss to combine; the spinach will wilt as you toss everything. Add plenty of Parmesan shavings and toss to combine.
Serve with extra Parmesan shavings.
Posted by Ree on April 22 2012

April 20, 2012
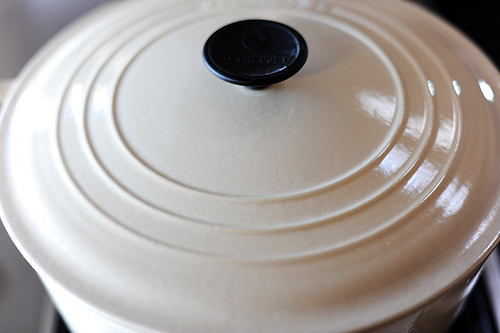
Cauliflower Soup
 I’m getting ready to spend the weekend cooking, and will have a whole crop of new recipes to post next week. I’m going to try not to eat today in anticipation of the total eat-fest I shall experience. And okay, I’ll most likely eat today.
Because it was published here way, way back in the dark ages of the internet (approximately 2009) today I’m bringing this dish out of the archives and up to the front of the pack where it belongs. This soup is in my new cookbook, my mom made it for years and years, and I will never, ever, ever grow tired of it. It’s hearty like a soup should be, but it’s also light (well…light being a relative term) enough to eat all spring and summer. You can leave the cauliflower in chunks or you can puree the soup at the end to get a more smooth consistency.
This soup will basically change the world, is what I’m saying. If you haven’t tried it yet, make it part of your weekend menu!
(Note: even though I re-photographed the soup for my cookbook, I’m posting the old photos as they appeared way back in the dark ages of 2009. I’m nostalgic that way.)
Originally published January 2009.
I’m going to let you in on a little secret. Come closer now…come closer. Lean in. Are you ready? I’m going to whisper. (I like soup.) Don’t tell anyone!
Okay, so I just made a big deal out of nothing. But the fact remains that I love soup, and out of all the soups in my repertoire, the one that most says “Comfort Food” to me is my mom’s time-tested Cauliflower Soup. It’s brothy. Savory. Creamy. Filled with tender chunks of cauliflower and all the comforts of home. I’ve made it in my own household for years…and today I share it with you.
Keep in mind that while this soup may appear to have a lot of steps, there’s nothing difficult about it. Just get your ingredients ready ahead of time and it’ll be a cinch.
Here’s what you’ll need:
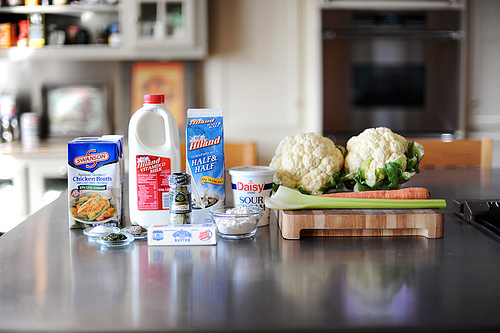 The Cast of Characters: Cauliflower, Carrot, Onion, Celery, Chicken Broth or Stock, Milk, Half & Half, Butter, Flour, Salt, Pepper, Sour Cream, and Parsley (fresh or dried).
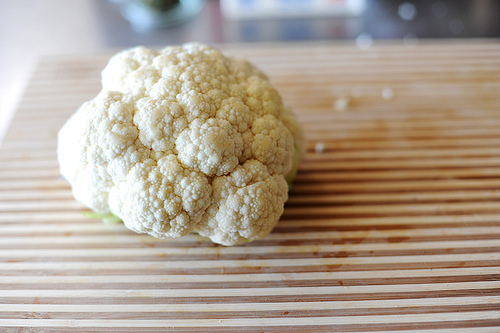 Wash 1 to 2 heads of cauliflower, depending on how chunky you’d like the soup to be. I use about a head and 1/3 of another head.
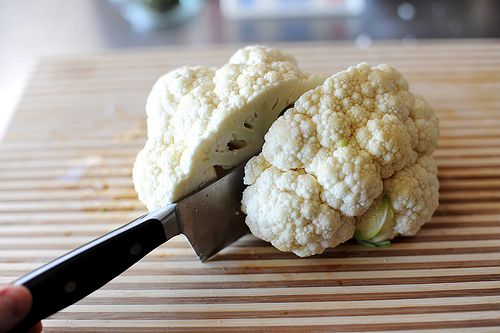 Just whack the head in half and get rid of the hard inner core and green parts.
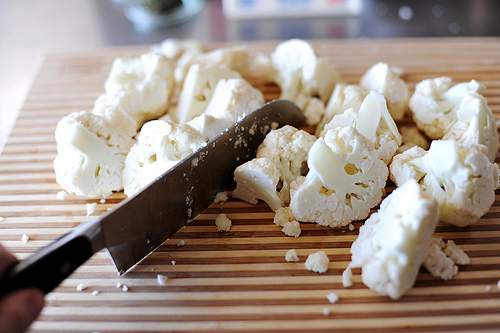 Then just roughly chop the cauliflower.
 You could be meticulous and cut the cauliflower into neat little florets…but why?
 Next, finely dice one carrot. I just cut strips in the carrot, then rotate the strips 90 degrees and finely dice.
 I do the same to the celery: just cut it into strips, then dice.
 Same goes with the onion: first cut lines/strips…
< Then dice away!
Then say the following word: Mirepoix, pronounced “mi-reh-pwah.” That’s what this is.
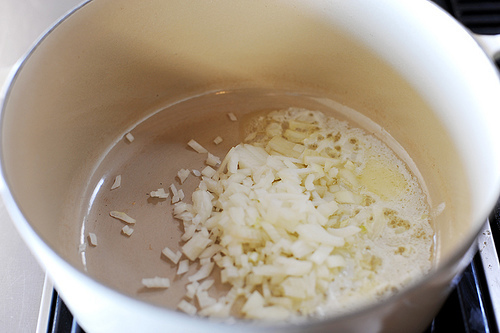 Place a stock pot or dutch oven over medium high heat and melt 4 tablespoons butter in the pan. When the butter’s melted, throw in the onions.
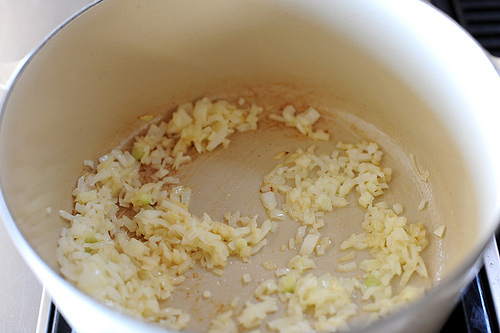 Stir them around for 2 to 3 minutes, or until they get a little color.
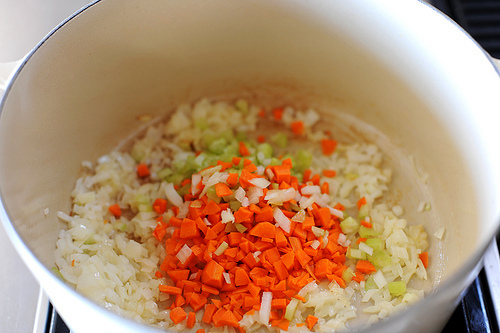 Throw in the carrots and celery…
 And stir it around for a minute or so.
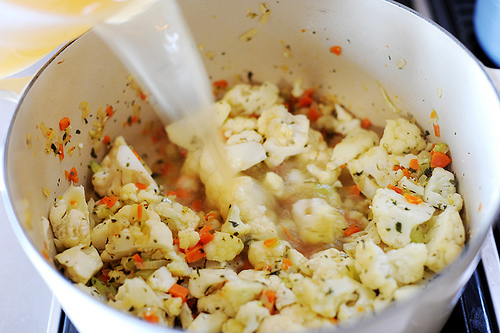
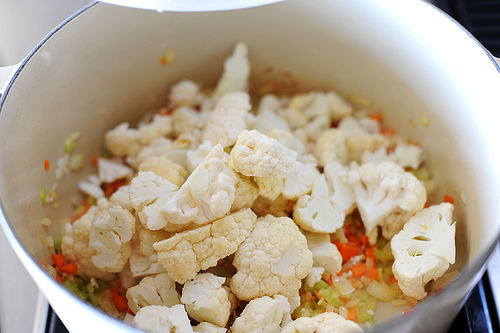 Now just throw in the cauliflower. If it’s finely diced, it should measure to about 2 quarts. If it’s large and weird like mine, more like 3 quarts.
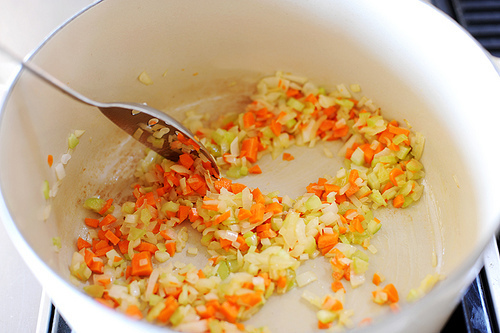
 Stir it around to combine…
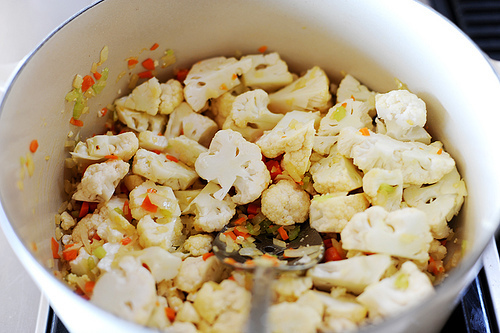
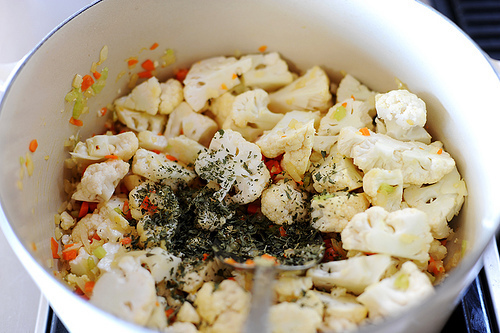 Next, and please don’t hate me, add 2 tablespoons fresh parsley, if you have it.
If you don’t, however, use dried parsley flakes. In the end, you won’t even be able to tell.
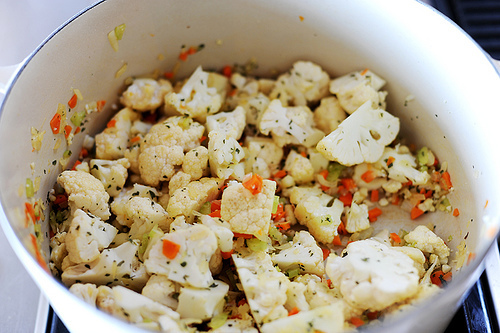 Give it a good stir, reduce the heat to low…
 And cover the pot. Simmer on low heat for 15 minutes, stirring once or twice during the process.
 When 15 minutes is over, pour in 2 quarts of chicken broth. If you have homemade stock in your freezer, go for it. If you don’t, but it in the store. Just be sure to buy the low sodium variety so you’ll be able to control the salt content of the soup.
It’s all about control, people. Cauliflower and control.
 Bring to a boil over medium heat, then reduce heat and let the soup simmer.
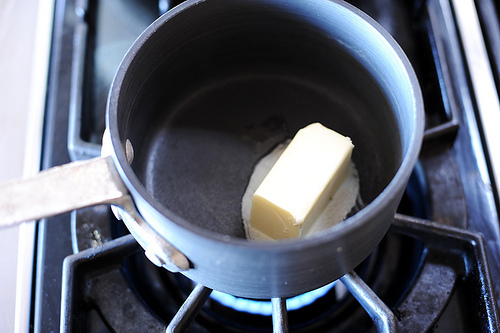 While it’s simmering, melt 4 tablespoons butter in a medium saucepan over medium-low heat.
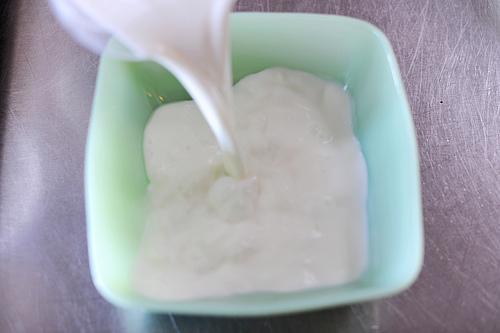 In a separate bowl, pour 2 cups whole milk. I always use whole milk in soups because…well, because.
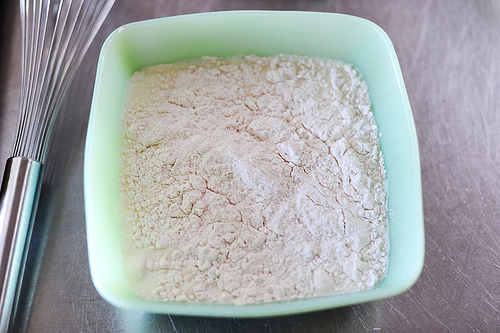 Add 6 tablespons flour to the milk…
Mix together with a whisk.
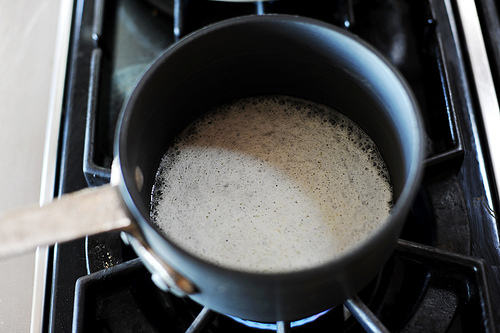 As soon as the butter in melted…
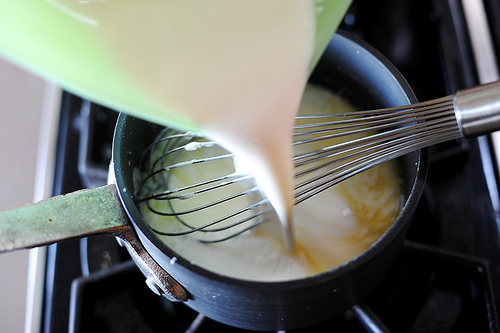 Pour the milk/flour mixture into the saucepan.
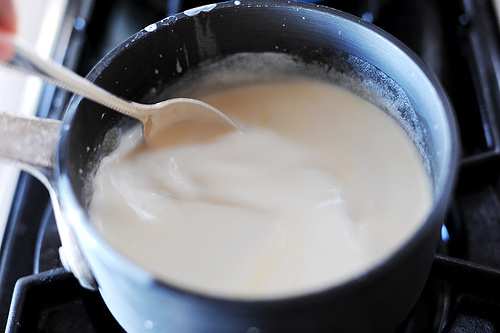 Stir to combine. Almost immediately, it’ll thicken into a nice white sauce.
Did you know you just made a white sauce? It’s true!
Well, I made it for you, but still. Your heart was in it.
 Next, because the world is a crazy place, add 1 cup of half & half to the white sauce.
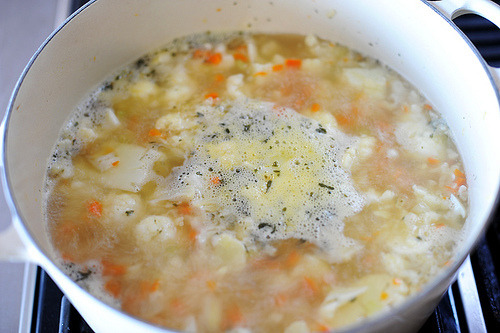
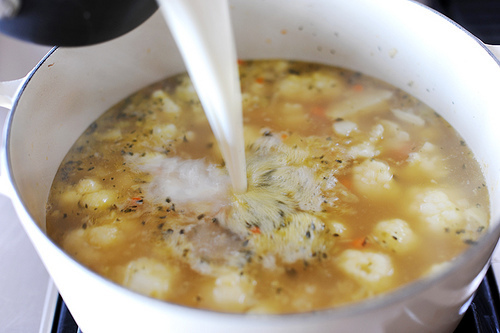 And now for the fun part: Pour the white sauce into the simmering soup mixture.
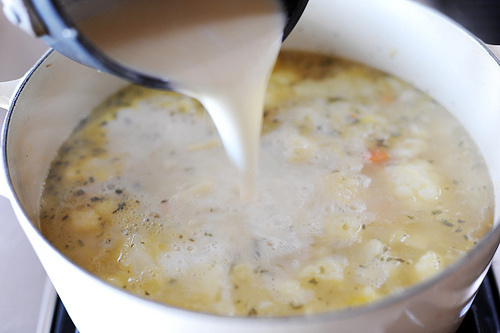 Yum. This SHORE smells good.
 Now, just throw in a bay leaf or two.
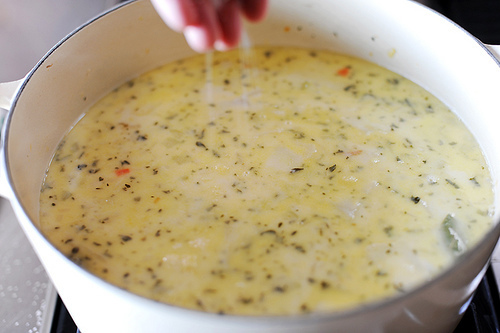 And a little bit of salt. We’ll want to taste the soup before adding much salt.
Now just let the soup simmer for 15 to 20 minutes. It’ll fill your house with fanciful aromas and feelings.
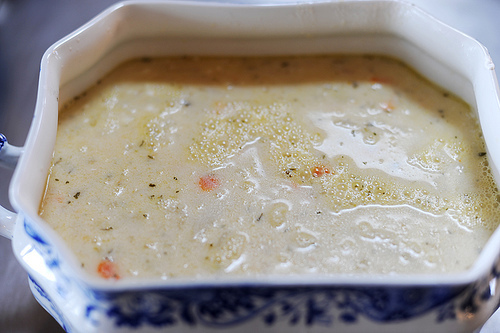
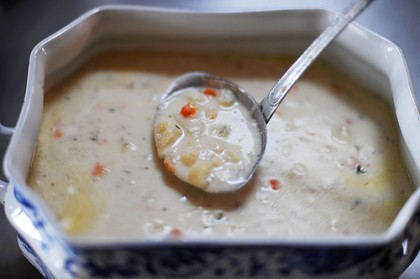
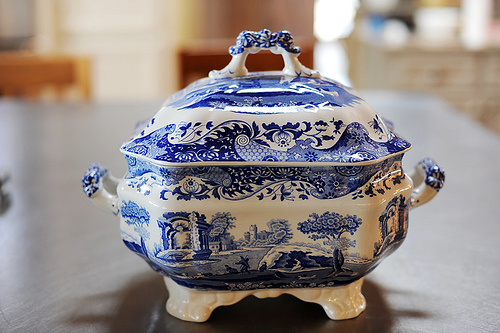 Here’s my soup tureen. My old friend, Sissy, gave it to me when I got married and it made my heart go pitter-pat.
I love you, Sissy. Thank you for my soup tureen. It always make me think of you.
China check: Spode “Blue Italian”
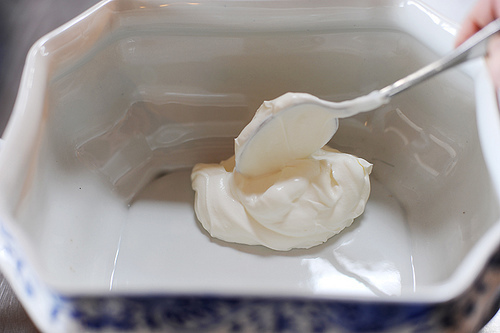 Now, here’s the kicker: just before serving, throw 1 generous cup of sour cream into the serving bowl or tureen.
 Add 2 to 3 ladles of hot soup into the serving bowl…
 Give it a good stir, just to get the sour cream used to the soup.
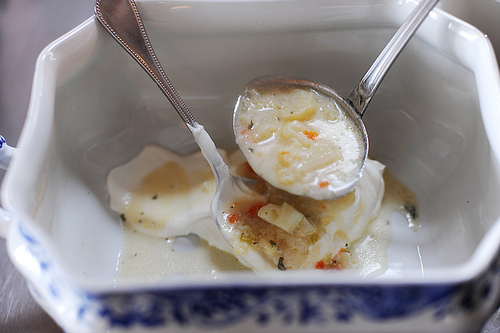
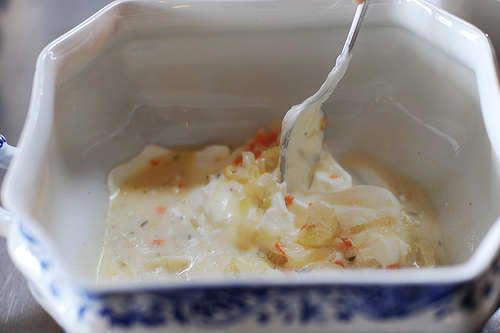
 Pour the rest of the soup into the serving bowl.
 And let me tell you, if you don’t think this stuff is beyond yummy, you’ve got another thing comin’.
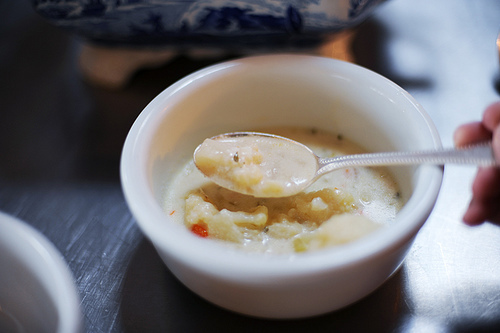 It makes me tingle. In a really, really good way.
And YOU can tingle, TOO! Just make this soup today.
Oh! And one more thing:
Have a wonderful day!
Love,
Pioneer Woman
Recipe: Cauliflower Soup
Prep Time: 30 Minutes
|
Cook Time: 30 Minutes
|
Difficulty: Easy
|
Servings: 6
Print Recipe
3"x5" Cards
4"x6" Cards
Full Page
Ingredients
1 stick Butter, Divided1/2 whole Onion, Finely Diced1 whole Carrot Finely Diced1 stalk Celery, Finely Diced1 whole (to 2 Whole) Cauliflower Heads (roughly Chopped)2 Tablespoons Fresh Or Dried Parsley (chopped)2 quarts Low-sodium Chicken Broth Or Stock6 Tablespoons All-purpose Flour2 cups Whole Milk1 cup Half-and-half2 teaspoons To 4 Teaspoons Salt, To Taste1 cup (heaping) Sour Cream, Room Temperature Preparation Instructions
In a large soup pot or dutch oven, melt 4 tablespoons butter. Add the onion and cook for a few minutes, or until it starts to turn brown.
Add the carrots and celery and cook an additional couple of minutes. Add cauliflower and parsley and stir to combine.
Cover and cook over very low heat for 15 minutes. After 15 minutes, pour in chicken stock or broth. Bring to a boil, then reduce heat and allow to simmer.
In a medium saucepan, melt 4 tablespoons butter. Mix the flour with the milk and whisk to combine. Add flour-milk mixture slowly to the butter, whisking constantly.
Remove from heat and stir in 1 cup half-and-half. Add mixture to the simmering soup. Allow to simmer for 15 to 20 minutes. Check seasoning and add more salt or pepper if necessary.
Just before serving, place the sour cream in a serving bowl or soup tureen. Add two to three ladles of hot soup into the tureen and stir to combine with the sour cream. Pour in remaining soup and stir.
Serve immediately.
Posted by Ree on August 3 2009

Ree Drummond's Blog

- Ree Drummond's profile
- 2032 followers

