
Ree Drummond's Blog, page 56
May 29, 2012
Pasta Carbonara
 I can’t eat, think about, dream about, or even remotely consider Pasta Carbonara without thinking of Heartburn, the Meryl Streep/Jack Nicholson movie from the eighties that I both love and hate. Love, because it’s incredibly written by Norah Ephron and incredibly acted by Meryl and Jack. And Stockard. And because Carly Simon sings the songs. And because Meryl and Jack feast on Pasta Carbonara on the night of their first date.
Hate, because man, does their relationship get hit by a train. It makes my heart burn.
Hence the title.
I made Pasta Carbonara Sunday evening.
And the girl was happy.
First off, cook the pasta. Long noodles are best.
 Next, grab some thick-cut bacon and slice the pieces in half down the middle…
 Then dice it up into pretty small pieces…
 And throw it into a skillet over medium heat.
 Cook it until it’s just starting to crisp…
 And remove it to a plate lined with a paper towel.
 Pour out most of the grease in the pan and set it back on the stove over low heat.
 Dice up an onion pretty finely…
 And mince up 2 to 3 cloves of garlic.
 Throw the onion and garlic into the skillet and cook ‘em low and slow over several minutes.
 Like this!
 Okay! Now is where the fun begins. Crack three eggs in a bowl…
 And throw in 3/4 cup grated Parmesan.
 Whisk this together so that the Parmesan is all combined with the eggs.
 Next, because it’s a free country, pour in 3/4 cup heavy cream. If you’re trying to make healthy choices, just pour in 1/2 a cup.
I’m kidding on that last part, of course.
 Whisk this together…
 Then add in 1/2 teaspoon of salt and plenty of black pepper and stir it all up.
 Next up, drain the pasta…
 And save some of the hot pasta water in case you need it later.
 Pour the very hot pasta into a large bowl and immediately begin drizzling in the egg/Parmesan/cream mixture.
 IMPORTANT: Stir the entire time! This will allow the eggs to very slowly cook when it hits the hot pasta…but it’ll (hopefully) prevent the eggs from scrambling.
 Halfway through, throw in some peas because I like Carbonara with peas.
I’m pretty sure Meryl did not like Carbonara with peas. But we can’t all be Meryl!
 And the cooked bacon…
 And finish tossing it around until it’s all coated.
 Glory Hallelujah, this is it. That thick egg mixture coats the pasta and gives it a glorious glossiness.
 Oh, and I forgot to add the onions and garlic when I added the peas and bacon, so I’m adding them now.
Don’t be like me.
 Oh, and if the pasta seems overly gloopy, just splash in some of the hot pasta water. Not too much, just a little.
 Help. You can’t know how much this hit the spot Sunday evening.
 Try it the next time you need a pasta fix!
Or a bacon fix.
Or a cream fix.
Or a Parmesan fix.
(You get the picture.)
Here’s the handy dandy printable:
Recipe: Pasta Carbonara
Prep Time: 5 Minutes
|
Cook Time: 20 Minutes
|
Difficulty: Easy
|
Servings: 6

Print Recipe
3"x5" Cards
4"x6" Cards
Full Page
Ingredients
12 ounces, weight Pasta, Any Variety8 pieces Thick Cut Bacon (diced Small)1/2 whole Medium Onion, Diced Small2 cloves Garlic, Minced3 whole Eggs3/4 cups Finely Grated Parmesan3/4 cups Heavy Cream Salt & Plenty Of Black Pepper1/2 cup Peas Preparation Instructions
Cook pasta according to package directions.
While the pasta is cooking, fry the bacon until just barely crisp. Remove from the pan and drain on paper towels. Pour off all of the bacon grease, but don't clean the pan. Return the pan to the stove over medium-low heat and throw in the onions and garlic. Cook until golden brown. Set aside.
In a bowl, mix together eggs, Parmesan, cream, and salt and pepper until smooth.
When the pasta is done, reserve a cup or two of the pasta water. Drain the pasta and place it in a bowl. While the pasta is still really hot, slowly drizzle in the egg mixture, stirring the pasta the whole time. The sauce will become thick and should coat the pasta. Splash in a little hot pasta water if needed for consistency.
Halfway through, add the peas, bacon, and sauteed onion/garlic. Finish adding the sauce, stirring until it's all combined.
Serve immediately with extra Parmesan. Delish!
Posted by Ree on May 27 2012


May 28, 2012
Memorial Day Grub!
In case you’re having folks over (or are going to a friend’s house) today and you have no ideas whatsoever about what grub to take along, here are some Memorial Day-worthy ideas for you!
Click on the individual recipe titles to access the printables for the ones you want.
 Restaurant Style Salsa. Addictive. Perfect. Life-changing.
 Grilled Corn Guacamole. All the blessed deliciousness of guacamole with delicious corn throughout.
 Mexican Layer Dip. Use the Pico de Gallo (and Guacamole!) to make this circa 1984 appetizer/dip.
 BBQ Chicken Sandwiches with Cilantro Slaw. Oh, yes.
 Caprese Salad. A beautifully cool complement to all the burgers and barbecue. Divine.
 Spicy Pasta Salad with Smoked Gouda, Tomatoes, and Basil. So good, you’ll cry. And go back for seconds.
 Barbecue Chicken Legs. The secret’s in the sauce!

 Raspberry Crisp. Serve with vanilla ice cream or whipped cream. or both.
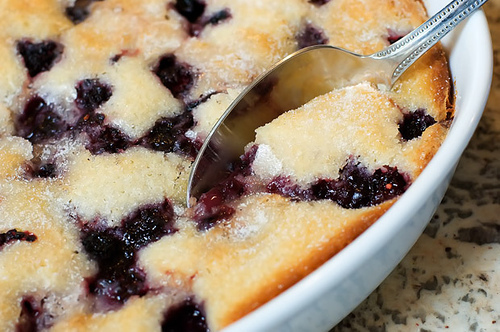 And finally, Blackberry Cobbler.
Have a wonderfully delicious Memorial Day, everyone!
Love,
P-Dub

May 21, 2012
Tortilla Rollups
 The first time I ever had a tortilla rollup was in the nineties. My new-friend-at-the-time Hyacinth had made a bunch of the little numbers and brought them to a get-together to which I’d been invited. I didn’t know very many people at the get-together and I was so shy and nervous that I just stood in the kitchen next to Hyacinth’s Tupperware container and ate her tortilla rollups till I bloated.
Wasn’t that a beautiful story?
Even now, years later, I still love tortilla rollups. I can’t help it. You can fill them with whatever you want—lunch meats, lettuces, vegetables—and they’re ridiculously easy to make, not to mention highly portable.
I still eat them till I bloat, is what I’m trying to tell you.
 First, I’ll make some yummy cream cheese spread because I want to, and because I want to. Slice up some green onions (or chop some chives if you have them)…
 Then grab some parsley…
 And mince it up.
 Then grab some basil…
 Roll it up tightly, then slice it into thin strips.
Zees ees called “cheefonawd.”
 Throw it all in a bowl with a block of softened cream cheese.
 Add some salt and pepper…
 Squeeze in some lemon juice…
 And stir it all together. Hyacinth used to stir chopped black olives and drained pimentos into her cream cheese, which positively rocked my world. Throw those in too, if you’d like!
 Now set aside the cream cheese mixture and grab a carrot and a cucumber. I’m julienning the veggies, and I would like to take this opportunity to encourage you to obtain a japanese mandolin at the earliest possible convenience. Ask for one for your birthday if you have one coming up, or ask for one for Father’s Day if you’re a member of the male species and have children. Or ask for one for Christmas, but tell your gift-givers that Christmas has been changed to May this year.
Oh, and if you get one…watch your fangers, okay?
 Cut the carrots into matchsticks.
And if you don’t have a mandolin, just use a good knife and cut really thin sticks.
 I julienned a cucumber, too. But I scooped out the seedy area because it was…
Well, it was seedy.
 Purdy!
 To make the rollups, plop a little herbed cream cheese onto a taco-sized flour tortilla.
 Then spread it out…
 Until it covers the entire surface.
I’ll tell you why later.
 Next, lay a line of shaved chicken, turkey, ham, or roast beef: whatever your lunchmeat poison!
It’s best if you use shaved meat rather than neat, flat slices, because when you roll up the…well, the rollups, there won’t be big gaps inside. The shaved meat fills up more space.
 Next, lay on plenty of julienned carrots, making sure they extend beyond both ends.
I’ll tell you why later.
 Do the same with the julienned cucumber.
 Then roll up the tortilla as tightly as you can…
 And remember when I told you how important it was to spread the cream cheese all the way to the edge?
 This is why. It holds the rollup together like glue.
 Next, wrap the rollup in plastic wrap and stick it in the fridge for about an hour. This’ll allow the tortilla to slightly soften and will help the rollups stay together a little more.
 Then just keep on making more rollups! I decided to do a veggie version: Grab some green leaf lettuce and slice away the spine.
 Lay the lettuce down the middle…
 Followed by carrots and cucumber.
 Then slice an avocado in half, scoop it out with a spoon, and slice it into pieces.
 Lay it down the middle…
 Then roll it up as tightly as you can, wrap it in plastic wrap, and stick it in the fridge.
 While you’re chillin’ the rollups, spread some of the cream cheese on a whole wheat saltine cracker and eat it in 1.4 bites.
Repeat eleventy times.
 When you’re ready to scarf down the rollups, remove them from the fridge and slice each one in half.
 Then line up the two halves…
 And cut them in half, too.
 Lovely.
 Here’s the veggie one.
 Now, the old school method for tortilla rollups told you to cut off the two ends of the rollups first before you ever slice the rest of them up. But I love the way the ends look like sushi rolls.
 Cute!
Cute!
 Some other ideas for fillings:
Blanched, cooled asparagus
Spinach leaves
Shaved ham, shaved roast beef
Red, green, or yellow bell pepper, cut into strips
Peeled, cooked shrimp
Chopped black olives (stir it into the cream cheese mixture)
Enjoy these, guys! They’re a great, easy summer treat.
Recipe: Tortilla Rollups
Prep Time: 20 Minutes
|
Cook Time:
|
Difficulty: Easy
|
Servings: 6

Print Recipe
3"x5" Cards
4"x6" Cards
Full Page
Ingredients
8 ounces, weight Cream Cheese, Softened1 Tablespoon Chopped Green Onions Or Chives1 Tablespoon Minced Fresh Parsley8 whole Basil Leaves, Chopped (or Chiffonade) Salt And Pepper, to taste1 teaspoon Fresh Lemon Juice6 whole Taco Sized Flour Tortillas1/2 pound Shaved Turkey3 whole Carrots, Peeled And Jullienned1 whole Cucumber, Seeds Scraped Out And Julienned3 leaves Green Leaf Lettuce, Spine Removed2 whole Avocados, Sliced Preparation Instructions
Make the herbed cream cheese by combining the softened cream cheese with the chives, parsley, basil, salt and pepper, and lemon juice. Stir to combine.
Spread cream cheese in a thin layer over the tortillas. Lay ingredients down the middle of the tortilla: for the turkey rollup, use turkey, carrots, and cucumber. For a "salad" rollup, use lettuce, carrots, cucumber, and avocado. Let the veggies extend past the edges on either side.
Roll up the tortillas as tightly as they'll go, then wrap each rollup in plastic wrap and refrigerate for one hour.
To slice, cut each rollup exactly in half, then line up the two halves and cut them in half again. Stand the end pieces up so that the veggies stick out the top.
Posted by Ree on May 21 2012

May 18, 2012
Happy Weekend! (Winners Announced!)
The winners of the iPad and e-cookbook are:
#1736 Sarah T. “Painting and cleaning!”
#4659 Laura T. “We might go to the beach, but then again, we might just stay home!”
#17112 Roxanne: “Date night with hubby, trying a newly opened Mexican restaurant, and to finish it off with some summer cleaning.”
Congratulations, winners! Contact prizes@thepioneerwoman.com to claim your loot!
Note from PW: I continue to receive good feeback on the Apple version of my new cookbook, so by popular demand, I’m repeating the giveaway first held the week it launched!
THE CONTEST
 If you are an iPad user, or are a soon-to-be iPad user, or you’re thinking of one day becoming an iPad user, or your mom’s sister’s husband’s brother’s wife is an iPad user, I am very happy to show you my new cookbook in ebook form.
Here are some features:
* You can easily swipe through the whole cookbook section by section, or page by page.
* The step-by-step photographic tutorials are included in a widget, which you can flip through with a simple swipe of your finger.
* You can also choose to enlarge the steps in the tutorial and see them each as a full-screen photo with the text for the step written below.
* You can tap on any photo in the book (food, family, cow, dog, or otherwise) and enlarge it to full screen mode.
* There are five cooking videos in the book.
* I also include a video of my favorite cooking tools.
* And a playlist of songs I like to listen to while I’m cooking. It’s weird, I’ll warn you.
* I also include a playlist of movies I like to watch while I’m cooking.
Here are some brief peeks.
 Here’s the main recipe page. If you were to tap on the photo of the quiche, it would expand to full screen mode.
 On the next page are the step-by-step photos, with the instructions below each one.
 You just use your finger to swipe through each step.
 You can keep the step-by-steps this size, which is definitely nice and readable.
 Or you can tap it once to enlarge, then swipe through the full-screen photos and text one by one.
 Here’s a screenshot of the full-screen mode with the instructions below.
 And another…
 And another. To flip through the steps, just swipe through the photos. Easy!
I am so excited about how the cookbook looks (and acts!) on the iBooks format. It’s totally interactive, incredibly user friendly, and I really do think it’ll make cooking fun for those of you who either prefer electronic devices to hardcover cookbooks OR who want to try your hand at the whole digital device realm.
Today, because it’s been a busy week on the ranch, and I love ya, I’m giving away three (3) new iPads (winner’s choice of black or white), along with the new ebook version of The Pioneer Woman Cooks: Food From My Frontier.
 I’ll also include a Smart Cover (color of winner’s choice), which not only protects the screen, but also doubles as a stand (it folds backwards into a triangle–awesome) so that you can pop the iPad right on your counter and start cooking.
TO ENTER
To enter the iPad and PW eCookbook giveaway, just answer the following questions in the Comments section of this post:
“What are your plans this weekend?”
Are you going over the river and through the woods to granmother’s house? Are you going to the beach? Are you gardening? Cleaning? Watching movies?
Just shout out your weekend plans and you’re automatically entered to win the iPad and ebook!
THE RULES
One entry per person, please.
Winners will be selected at random and posted Sunday night.
Good luck!
THE EBOOK
The Apple/ibook version of the cookbook (shown above) can be found here: Pioneer Woman on iTunes
Giveaway sponsored by Pioneer Woman.

Happy Weekend!
Note from PW: I continue to receive good feeback on the Apple version of my new cookbook, so by popular demand, I’m repeating the giveaway first held the week it launched!
THE CONTEST
If you are an iPad user, or are a soon-to-be iPad user, or you’re thinking of one day becoming an iPad user, or your mom’s sister’s husband’s brother’s wife is an iPad user, I am very happy to show you my new cookbook in ebook form.
Here are some features:
* You can easily swipe through the whole cookbook section by section, or page by page.
* The step-by-step photographic tutorials are included in a widget, which you can flip through with a simple swipe of your finger.
* You can also choose to enlarge the steps in the tutorial and see them each as a full-screen photo with the text for the step written below.
* You can tap on any photo in the book (food, family, cow, dog, or otherwise) and enlarge it to full screen mode.
* There are five cooking videos in the book.
* I also include a video of my favorite cooking tools.
* And a playlist of songs I like to listen to while I’m cooking. It’s weird, I’ll warn you.
* I also include a playlist of movies I like to watch while I’m cooking.
Here are some brief peeks.
Here’s the main recipe page. If you were to tap on the photo of the quiche, it would expand to full screen mode.
On the next page are the step-by-step photos, with the instructions below each one.
You just use your finger to swipe through each step.
You can keep the step-by-steps this size, which is definitely nice and readable.
Or you can tap it once to enlarge, then swipe through the full-screen photos and text one by one.
Here’s a screenshot of the full-screen mode with the instructions below.
And another…
And another. To flip through the steps, just swipe through the photos. Easy!
I am so excited about how the cookbook looks (and acts!) on the iBooks format. It’s totally interactive, incredibly user friendly, and I really do think it’ll make cooking fun for those of you who either prefer electronic devices to hardcover cookbooks OR who want to try your hand at the whole digital device realm.
Today, because it’s been a busy week on the ranch, and I love ya, I’m giving away three (3) new iPads (winner’s choice of black or white), along with the new ebook version of The Pioneer Woman Cooks: Food From My Frontier.
I’ll also include a Smart Cover (color of winner’s choice), which not only protects the screen, but also doubles as a stand (it folds backwards into a triangle–awesome) so that you can pop the iPad right on your counter and start cooking.
TO ENTER
To enter the iPad and PW eCookbook giveaway, just answer the following questions in the Comments section of this post:
“What are your plans this weekend?”
Are you going over the river and through the woods to granmother’s house? Are you going to the beach? Are you gardening? Cleaning? Watching movies?
Just shout out your weekend plans and you’re automatically entered to win the iPad and ebook!
THE RULES
One entry per person, please.
Winners will be selected at random and posted Sunday night.
Good luck!
THE EBOOK
The Apple/ibook version of the cookbook (shown above) can be found here: Pioneer Woman on iTunes
Giveaway sponsored by Pioneer Woman.
May 17, 2012
Grillin’ Recipe Contest Winners!
Before I share my fourth and final grilling recipe, I’m busting at the seams to announce the winners of the Bush’s Grillin’ Beans/Pioneer Woman Recipe Contest! The following four winners and their guests will travel to the ranch next month for a big, bad cookout!
First, though, let me say that I was absolutely blown away by the recipe submissions.
Blown away.
Let me also say that I, Ree Drummond, being of sound mind and body (relatively speaking), read every single recipe. I’m not sure what the exact final tally was, but it was somewhere in the 1,300 or 1,400 range. I kept taking note of the recipes that caught my eye…and by the time I narrowed them down, I had no fewer than 250 more to go through.
The winners’ recipes were incredible, but I loved so many others. Wow. Such creativity! I can’t even begin to list all the ones that made me drool. Thank you to everyone who entered.
Here are the four winners!
BEEF WINNER: RenataSummer Solstice T-bone Steaks with Peppercorn Butter and Strawberries
Served with Bush’s Grillin’ Beans Steakhouse Recipe6 T-bone beef steaks (about 1-inch thick)
6 teaspoons kosher salt
2 teaspoons ground black pepper
3 cups strawberries
1 tablespoon balsamic vinegar
2 tablespoons sugar
1/4 cup chopped basil plus 6 small sprigs of basil for garnish
1/2 cup salted butter, room temperature
1 tablespoons pickled green peppercorns
1 teaspoon coarse cracked black pepperPreheat gas grill or prepare charcoal grill for direct heat grilling. Season steaks with salt and pepper
Grill steaks for 4-6 minutes per side or to your preferred doneness.
Meanwhile set 6 strawberries to the side for garnish and slice the rest. Combine sliced strawberries with balsamic vinegar, sugar and basil. Combine butter with green peppercorns and cracked black pepper.
Serve steaks hot from the grill. Top with peppercorn butter and strawberries. Garnish with reserved strawberry and basil.
Serve with Bush’s Best Grillin’Beans Steakhouse Recipe!
CHICKEN WINNER: Brian MurraySouthwestern Grilled Chicken with Chipotle Cream Sauce
Served with Bush’s Black Bean Fiesta Grillin’ Beans.4 medium boneless, skinless chicken breasts
4 Tablespoons taco seasoning
4 Tablespoons butter
1 medium onion, cut into large pieces
1 red bell pepper, cut into large pieces
4 cloves garlic, peeled
1 chipotle pepper in adobo sauce
1/4 pound chorizo sausage, without casing
2 cups heavy creamPound the chicken breasts until approximately 1/2 inch thick. Sprinkle on 2 Tablespoons of the taco seasoning and rub into the meat. Melt 2 Tablespoons of the butter, pour on chicken breasts, and mix together. Place in refrigerator to marinate for 1 hour. Grill chicken for 4 minutes on each side over high heat. Remove from grill and let rest.
Brown chorizo over medium heat and break into pieces. Remove chorizo from pan, but leave any remaining grease. Reduce heat to medium low and add 2 Tablespoons of butter. Add onion, bell pepper, and garlic to pan. Saute until translucent. Add chipotle pepper and 1 Tablespoon of adobo sauce to pan. Cook 5 minutes, stirring frequently. Add cream and 2 Tablespoons taco seasoning to mixture and cook for another 5 minutes. Pour mixture into blender (or with immersion blender), blend until smooth. Transfer contents back into pan, add chorizo to mixture, and cook for additional 5 minutes.
Slice chicken into strips and pour 1/4 of sauce on each breast. Pair with Bush’s Black Bean Fiesta Grillin’ Beans. Serve and enjoy!
PORK WINNER: Naylet LaRochelleOn the Ranch Coffee-Rubbed Blueberry Thyme Pork Chops
Serve with Bush’s Grillin Beans Sweet Mesquite
2 tablespoons ground coffee beans (preferably a dark roast)
2 teaspoons thyme leaves
1 teaspoon unsweetened cocoa powder
1 teaspoon ground coriander
1/2 teaspoon kosher salt, or to taste
4 boneless pork loin chops, cut about 3/4 inch thick
3/4 cup blueberry preserves
1/4 cup hoisin sauce
1/2 teaspoon crushed red pepper flakes, or to taste
2 tablespoons finely chopped chives
In a small bowl, combine coffee, thyme, cocoa powder, coriander, and salt. Place pork chops on a work surface. Rub coffee mixture on both sides of pork chops. Transfer to a plate; cover until ready to grill.
In a medium bowl, stir together blueberry preserves, hoisin sauce, and red pepper. Reserve half of blueberry glaze for spooning over chops when serving.
Prepare a medium-high gas or charcoal grill. Grill chops until slightly pink in center (160 F), about 11-14 minutes. During last minutes of grilling, brush blueberry glaze over both sides of chops.
To serve, spoon reserved blueberry glaze over chops. Top with chives; serve with Bush’s Grillin Beans Sweet Mesquite.
WILD CARD WINNER: Jerilyn K!Orange-Chipotle Salmon with Grilled Onions & Cilantro
Served with Bush’s Texas Ranchero Grillin’ BeansSweet, fresh orange juice and honey mixed with smoky chipotle, over a beautiful salmon filet – a main dish that’s sure to be a crowd pleaser. Topped with a sliced grilled onion and fresh cilantro, this orange-chipotle salmon perfectly pairs with the kick from Bush’s Texas Ranchero Grillin’ Beans.
8 oz salmon filet (2-4 oz portions)
Juice of 2 oranges & zest of 1 orage
1 chipotle in adobo (canned) and 2 tsp chipotle adobo sauce
2 tbsp pure honey
3 garlic cloves, chopped
1/2 tsp sea salt
1/4 tsp black pepper, chopped
2 slices of onion, 1/4” thick
2 tbsp extra virgin olive oil
2 tbsp fresh cilantro1. For the marinade, combine fresh orange juice, orange zest, chipotle and adobo sauce, honey and garlic in a small food processor or blender; process until smooth.
2. Add salt, pepper and marinade (reserving 1-2 tablespoons of marinade to brush on salmon while grilling) into a plastic zip top bag with salmon filets. Marinate salmon in refrigerator for about 2 hours (or your preference of time).
3. Preheat grill to medium high.
4. Remove salmon from marinade and slice two, 1/4-inch thick pieces of onion. Brush salmon and whole onion slices with olive oil and extra sprinkle of salt and pepper, on both sides. Place salmon and onion on the grill and cook 5-6 minutes per side, depending on thickness of salmon. As the salmon cooks, brush with reserved marinade.
5. To serve, top grilled salmon with 1 cooked onion slice and fresh cilantro. Salmon pairs great with Bush’s Texas Ranchero Grillin’ Beans.
Serves 2 – but easily doubled or tripled for a party
Wish we could have posted pics ~ I have a beautiful mug shot of this delicious dish!
Congratulations to all winners! Can’t wait to meet you…and I can’t wait to sink my teeth into your amazing recipes. I’ll be in touch right away to plan your trip to the ranch for an Oklahoma-style cookout on June 2nd!
Warning: there may be horses involved. Bring shoes that you don’t mind getting dirty.
I’ll be sure to post photos of the event and share the behind-the-scenes fun. And of course, I’ll post videos of each winner cooking his/her winning recipes on camera.
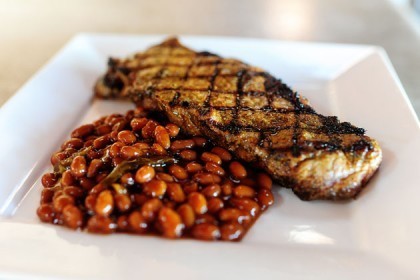
Here’s my fourth and final contribution:
MY GRILLING RECIPE #4: Tremendously Delicious Marinated Steak
 This is a delicious, flavorful marinated steak that works great with ribeye, flank steak, skirt steak or hanger steak if you can find it. The flavors are a little off the beaten path. Love!
 I’m serving it with these.
 To make the marinade, combine the nutmeg, cumin, cinnamon, ginger, chili powder, turmeric and garlic salt in a large plastic bag.
 Drizzle in the olive oil, smooshing to combine.
 Throw the steaks into the bag…
 And smoosh it around to coat the steaks.
Throw these in the fridge and marinate for at least three hours; overnight is better!
 When you’re ready to grill the steaks, remove them from the bag and grill them until they’re medium rare, just about 2 to 3 minutes per side.
 Serve them with Bush’s Steakhouse Recipe Grillin’ Beans.
Here’s the recipe. Enjoy!
Recipe: Tremendously Delicious Marinated Steak
Prep Time: 10 Minutes
|
Cook Time: 5 Minutes
|
Difficulty: Easy
|
Servings: 4
Print Recipe
3"x5" Cards
4"x6" Cards
Full Page
Ingredients
4 whole Ribeye, Hanger, Flat Iron, Or Strip Steaks1/2 teaspoon Ground Nutmeg1/2 teaspoon Ground Cumin1 teaspoon Ground Cinnamon1 teaspoon Ground Ginger2 Tablespoons Chili Powder1/2 teaspoon Ground Turmeric2 Tablespoons Garlic Salt1 cup Olive Oil2 cans Bush's Grillin Beans Steakhouse Recipe Preparation Instructions
Mix all ingredients (except steak) in a large plastic bag and smoosh to combine. Add steaks to bag, seal tightly and marinate a few hours.
Grill until medium rare. Serve with Bush's Grillin' Beans Steakhouse Recipe!
Posted by Ree on May 17 2012

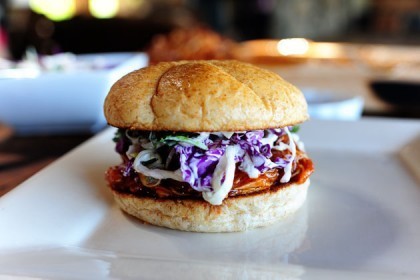
Barbecue Chicken Sandwiches
 This is an unusual recipe on The Pioneer Woman Cooks, in that the detailed step-by-step photos don’t begin until halfway through the recipe. But I have a very valid reason for this! A very, very, very valid reason. And here it is.
I didn’t start taking photos until halfway through the recipe.
I’m awesome that way.
Anyway, that doesn’t take away from the fact that these sandwiches were out-of-this-world good.
So I’ll catch you up on what happened before I decided to turn on my brain and take photos:
1. Heat a little vegetable oil in a heavy ovenproof pot over medium-high heat.
2. Season a whole cut up chicken (I usually buy the chickens already cut into pieces) with salt and pepper.
3. Throw the chicken into the pot and sear it on all sides, trying to get the skin as brown (and to render as much fat) as possible.
4. Remove the chicken from the pot and set on a plate for a minute.
5. Carefully pour off excess fat and oil into a metal bowl. Discard the fat once it cools.
6. Return the pot to the heat and add 1 whole sliced onion and 8-12 whole cloves of garlic. Don’t chop the garlic!
7. Pour in a large bottle of your favorite barbecue sauce.
8. Return the chicken to the sauce and mix in the chicken until it’s all coated.
9. Place the lid on the pot and put it in a 300 degree oven for 1 1/2 hours or so, until the chicken is falling off the bone and the sauce is crazy flavorful and bubbly.
 And that’s where we are now! Basically, I seared the chicken, poured off the fat, sauteed onion and garlic, poured in barbecue sauce, submerged the chicken, and cooked it low and slow in the oven. Because of the lighting, this looks a little dark, but it was absolutely perfect. Lots of lovely caramelization going on.
 The first thing I did was remove the garlic cloves, which were still intact, and which were almost like candy at this point.
Goodness gracious.
 Set the garlic cloves into a separate dish as you remove them.
 Remove the chicken from the pot and set it on a board.
 Then it’s all about removing the chicken from the bone, which is the fun part! You can use two forks to kind of pick away at it…or you can use a pair of latex kitchen cloves, which makes it really easy to do by hand. You’ll just need to let it cool enough to be able to handle it.
 After that, just shred away! Go as fine as you want.
 It’s amazing how much chicken (or pork…or beef) expands as you shred it. Goodness gracious.
 Now, in the time it will take you to let the chicken cool, remove the chicken from the bone, and shred it up, enough fat will have risen to the top of the sauce for you to be able to easily skim it off.
fter that, you can throw in the chicken!
 Then just stir it up, heat it up a bit if needed…and it’s ready to serve.
 I used whole grain Kaiser rolls, because I’m all about healthy choices.
Ha.
Oh, and I spread butter on the rolls and grilled them before I added the chicken.
Okay, never mind.
 Then I was extra naughty and added a couple of the whole garlic cloves, which by now were soft and flavorful and perfect.
 Next came a big helping of cilantro slaw, which I use on everything these days.
 And this was pretty much the perfect sandwich. So flavorful, so yummy, and the slaw gave it a nice coolness and crunch.
You’ll love this one, guys!
Here’s the handy dandy printable:
Recipe: Barbecue Chicken Sandwiches
Prep Time: 10 Minutes
|
Cook Time: 2 Hours
|
Difficulty: Easy
|
Servings: 8
Print Recipe
3"x5" Cards
4"x6" Cards
Full Page
Ingredients
1 whole Cut Up Fryer Chicken Salt And Pepper, to taste2 Tablespoons Canola Oil1 bottle (large) Barbecue Sauce1 whole Onion, Sliced8 whole Cloves Garlic (more To Taste) Slaw:1/2 head Cabbage, Sliced Thin1/2 head Purple Cabbage, Sliced Thin1/2 cup Whole Milk1/2 cup Mayonnaise1 teaspoon White Vinegar1 Tablespoon Sugar1/4 teaspoon Salt1/4 teaspoon Cayenne Pepper1 bunch Cilantro, Roughly Chopped Preparation Instructions
SLAW
Combine shredded cabbage and sliced jalapenos in a bowl. In a separate bowl mix milk, mayonnaise, vinegar, sugar, salt, and cayenne. Pour over cabbage. Toss to combine. Cover and refrigerate two hours.
Before serving, toss in cilantro leaves.
CHICKEN
Heat canola oil in a heavy pot over medium high heat. Season chicken, then sear on all sides until skin is golden brown and some fat is rendered. Remove chicken from pot and pour off excess grease.
Add sliced onions and whole garlic cloves to pot and stir around to cook for 2 minutes. Pour in barbecue sauce, add chicken to the sauce, and place lid on the pot.
Place in a 300 degree oven for 1 1/2 hours, or until chicken is falling off the bone.
Remove the whole garlic cloves from the pot and set it aside. Remove chicken from pot and allow to cool enough to handle. Using hands or two forks, remove the meat from the bones. Finely shred the chicken using your hands or two forks.
Carefully skim off the excess fat that has risen on top of the sauce. Return shredded chicken to the pot and stir into the sauce. Reheat so that it's warm.
Spread butter on kaiser rolls and toast on the griddle.
To serve, place a good amount of chicken on the bottom half of the roll. Top with one or two garlic cloves, then a good helping of slaw. Top with the other half of the bun and dig in!
Posted by Ree on May 17 2012

May 16, 2012
New Butter Friends
I love butter. This is a fact that is well established, well known, well proven, and well demonstrated. My fridge is filled with not sticks of butter, but pounds. As an ingredient, I believe in butter. Butter is a church of which I am a member. If butter ran for president, I would vote for it. It adds color, flavor, beauty, and joy to absolutely everything I cook.
It adds meaning to my days.
Purpose to my life.
What I’m trying to tell you is this, ladies and gentlemen: I wouldn’t want to live in a world in which butter didn’t exist.
Have I mentioned lately that I love butter?
 Today I’m happy to announce that I have joined up with Land O’Lakes to help sing the praises of a brand new product they’re putting on the market, one that is currently rocking my world.
 It’s called Butter with Olive Oil & Sea Salt.
I’ve tried it. I’ve cooked with it. I’ve smeared it on warm, crusty bread. And I can tell you without hesitation that I absolutely love it. It has a slightly lighter quality than regular butter, there’s just a hint of olive oil flavor…and the saltiness is just delish and really sets it apart.
 Over the next few months, I’ll be sharing brand new recipes using this luscious new butter in cooking posts and videos over on landolakes.com. And if you watch Food Network and the Cooking Channel, you’ll see occasional spots featuring me, the new butter, and all the deliciously neato things you can do with it (as well as some wild floral shirt, my unruly cowlick, and a pair of large earrings. And my unruly cowlick. Wait, I already said that. Never mind.)
 My fun with Land O’Lakes will begin later this month, and I’ll let you know whenever I post new recipes over on landolakes.com. TV spots will begin showing this fall, featuring back-to-school recipes and easy dishes made with fall ingredients.
 As for me and Land O’Lakes, there’s hardly a more fitting partner for me to team up with. I’m proud to say that their butter has bulged out of my fridge for years and years, and I love them as a company. Land O’Lakes is a member-owned agricultural cooperative based in Minnesota with 3,200 producer-members, 1,000 member-cooperatives, and 9,000 employees. Though we’re on totally different ends of the bovine spectrum (ahem), I consider us to be agricultural friends.
I’m excited! We’re going to have lots of fun.
Love,
PW
 (Oh, and one last thing: Yum.)
Disclosure: I’ve partnered with Land O’Lakes for an exclusive endorsement of new LAND O LAKES® Butter with Olive Oil & Sea Salt. This blog post is sponsored by Land O’Lakes.
Be sure to follow Land O’Lakes on Facebook and Twitter (@landolakesktchn) as they’ll be sharing all the up-to-date scoop.
Read more about Butter with Olive Oil & Sea Salt here.

May 14, 2012
Cornmeal Pancakes (with Blackberry Syrup)
 There’s not much in the world that isn’t made better by cornmeal. It adds graininess to muffins and breads, it adds flavor and thickness to soups (just dissolve in a little water and pour into the pot, then simmer 10-15 more minutes), and it takes ordinary pancakes and turns them into beautiful yellow little miracles.
I made some cornmeal pancakes last night. And I made some quick blackberry syrup, which sent it into the stratosphere of deliciousness. And I also used regular pancake syrup, because I have a hard time eating pancakes without the flavor of maple.
Best of all worlds!
Now let’s make pancakes.
 The Cast of Characters: Flour, cornmeal, salt, baking powder, sugar, milk,, eggs, vanilla, and butter. And for the syrup: Blackberries, sugar, and cornstarch.
Yahoo yippety.
 Add a heaping cup-and-a-half of yellow cornmeal…
 To a scant cup-and-a-half of flour.
In my world, heaping means a little more than, and scant means a little less than.
 Add some salt…
 Some baking powder…
 A good amount of sugar…
 And mix it all together.
 Then in a separate bowl, add some milk…
 Eggs…
Eggs…
 Vanilla…
 And mix it together until all combined and happy and joyful.
 Pour the wet ingredients into the dry ingredients…
 Stirring or whisking gently as you pour.
 It’ll all be pretty thick at this stage.
 Then grab half a stick of butter…
 Melt it in the microwave…
 And pour it into the bowl.
 Fold it in gently, then set this aside for a minute. And don’t be alarmed when you realize how different it begins to look from regular pancake batter. That’s the beauty and uniqueness of the cornmeal!
 The batter should be very thick, but if it seems overly gloopy, feel free to splash in a little milk right before you cook the pancakes.
 Take a fourth a cup at a time…
 Drop it into a buttered skillet over medium-low heat…
 And slightly smooth it out so that the surface is level.
 Then cook away until they’re nice and golden on both sides! Repeat with the rest of the dough, adding a little butter to the pan with each batch so they’ll get this lovely griddle look on the surface.
 Mmmm. Just lovely. Like regular pancakes…but still different.
 So this is what you do first.
 This is what you do second.
(By the way, this is an example of what the surface looks like if you do not add butter to the pan. This was the last one in the batch.)
(I like the butter/griddle look better myself.)
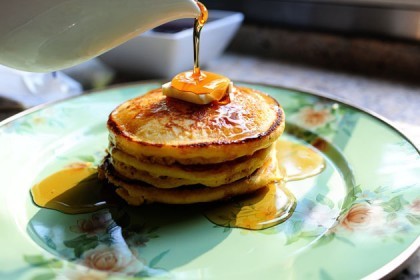
 And then you do this!
 Drizzle them with warm syrup, and begin to get very excited.
 Keep on going, and begin to get very, very, very excited.
Pancakes are just exciting. Everyone knows that.
But wait! There’s more!
Earlier, I had made some quick, easy blackberry syrup.
 I added blackberries and sugar to a medium saucepan…
 Then I poured in a little water.
 Then I brought it to a gentle boil and allowed it to cook for a few minutes…
(Hard water. Please pray for me.)
 Then I added in some cornstarch to help along the thickening process.
I’m in a hurry here! I want pancakes.
 Yum!
Yum!
 At the end, I just spooned some over the top of the whole thing, and here’s why: I have a hard time eating pancakes without maple syrup. I like flavored fruit syrups…but only as an adornment.
 As I said above: Best of both worlds!
Here’s the handy printable:
Recipe: Cornmeal Pancakes (with Blackberry Syrup)
Prep Time: 15 Minutes
|
Cook Time: 15 Minutes
|
Difficulty: Easy
|
Servings: 4
Print Recipe
3"x5" Cards
4"x6" Cards
Full Page
Ingredients
Pancakes1-1/2 cup (scant) All-purpose Flour1-1/2 cup Heaping Yellow Cornmeal1/2 teaspoon Salt3 Tablespoons Baking Powder4 Tablespoons Sugar2-1/4 cups Whole Milk (more If Needed)2 whole Large Eggs3 teaspoons Vanilla4 Tablespoons Butter, Melted Blackberry Syrup1 pint Blackberries1 cup Sugar1/2 cup Water2 Tablespoons Cornstarch Extra Butter For Serving Maple Or Pancake Syrup For Serving (optional) Preparation Instructions
Mix together flour, cornmeal, salt, baking powder, and sugar in a bowl. Set aside.
In a separate bowl, mix milk, eggs, and vanilla. Pour into the dry ingredients, stirring gently.
Stir in melted butter. Set batter aside. If batter is overly thick, splash in a small amount of milk.
In a saucepan, combine blackberries, sugar, and water. Bring to a gentle boil and cook for 5 minutes on low. Stir in cornstarch, then continue cooking, using a whisk or spoon to mash the larger pieces of blackberries. Remove from heat when it's nice and thick.
Heat 1 tablespoon butter in a skillet over medium-low heat. When heated, drop 1/4 cup batter per pancake and cook until golden brown on both sides. Remove from skillet and set aside.
Stack three pancakes, placing a pat of butter between each pancake. Drizzle with warm maple syrup, then spoon blackberry syrup over the top. Dig in!
Posted by Ree on May 13 2012

May 11, 2012
Design Your Own Mixer! (Winner Announced)
The winner of the custom mixer is:
#6057 Sharrieboberry “I’m thinking apple green with orange/yellow flames.”
Oh my. Sounds cute, Sharrieboberry! I hope you’ll send me a pic when Nicole has the mixer done. Contact prizes@thepioneerwoman.com to claim your prize.
And thank you all for entering—I peeked at some more of your entries and there were some amazing ideas.
This could be dangerous!
 Many of you might remember this, the fun orange floral mixer I’ve given away periodically throughout the past year.
 I love this mixer. It was designed and created by my friend Nicole at Un Amore, who is nothing short of amazing at what she does.
Check out some of the beauties she’s designed:
Un Amore Mixers
I drool over every single one—love the yellow and white one!
 She paints them all herself.
 And her details are beautiful.
 I loved this scalloped edge. Lovely!
Today, because I love ya, I’m giving away one custom-painted Kitchen Aid mixer—and the design is entirely your choice! Match your favorite china patters, match your favorite wallpaper—make it all yours!
TO ENTER
To enter this extra special giveaway, just answer the following question in the Comments section of this post:
“How would you design your mixer?”
Would you match your favorite plate? Would you cover it with dalmatian spots? Would you deck it out with zebra stripes? Or would you dress it up with a gnarly skull and crossbones? Just shout out how you’d design your new mixer and you’re automatically entered to win!
(If you have no idea how you’d design your mixer, no problem! Just say so in your comment.)
Note: If you’d prefer to have an orange mixer like the one pictured here, that would be fine, too!
THE RULES
One entry per person, please.
Winners will be selected at random and announced Sunday night.
Good luck!
___________________________
Giveaway sponsored by Pioneer Woman. Beautiful, custom mixer designed by Nicole at Un Amore.
***NOTE: Contest has ended, so comments will be closed.

Ree Drummond's Blog

- Ree Drummond's profile
- 2032 followers

