
Ree Drummond's Blog, page 54
July 24, 2012
Making Fresh Mozzarella!
 My foodblogging friends and I had so much fun making cheese together Saturday. Cheese unites people!
Making mozzarella at home seems very intimidating, but if you have two or three specific products, you really wouldn’t believe how easy it is! And once you give it a try, you’ll want to make mozzarella like crazy for everything from appetizers to pizzas to panini to…well, to just slicing off chunks and scarfing it down.
(That final item would apply to me.)
Rebecca from Foodie With Family was our fearless leader Saturday. She’s a mozzarella makin’ mama of five boys and is such a wonderful girl. Most of the instructions to follow are straight from her. I’m just the messenger.
The Mozzarella Messenger.
I see a comic book series in my future.
WHAT YOU’LL NEED
A gallon of whole milk. We were able to get raw (unpasteurized) milk at a local dairy, but procuring raw milk commercially can be difficult in some states. Pasteurized milk does work, it just doesn’t come together smoothly and perfectly like raw milk does. Raw/fresh milk mozzarella is definitely more smooth and delicious, but if you’re pregnant or immunocompromised or otherwise need to avoid raw milk, go ahead and use the pasteurized stuff.
 1 1/2 teaspoons of citric acid powder. This can be in the form of loose powder or tablets like these.
 1/4 teaspoon liquid vegetable rennet combined with 1 cup of water. You can also use 1/4 of a vegetable rennet tablet; just crush it and dissolve it in a cup of water.
And 1 to 2 teaspoons of kosher salt, according to taste.
HOW TO MAKE IT
1. Sprinkle the citric acid powder (crush tablets if using) into a cool, empty, large non-reactive stockpot. Pour 1/4 water over it and stir it to dissolve.
 2. Pour the milk into the citric acid solution and stir it to combine.
 3. Put the pot over medium-low heat and heat it to 90 degrees (use an instant read thermometer!) You may notice the milk beginning to curdle, but this is a good thing!
 4. When the milk reaches 90 degrees, remove the pan from the burner and pour in the rennet mixed with water.
 5. Stir the mixture with a gentle, circular up and down motion for about 30 seconds, then use the spoon to stop the motion of the milk so it will “be still.”
 6. Place the lid on the pot and walk away and live your life for exactly five minutes. Don’t touch the pan!
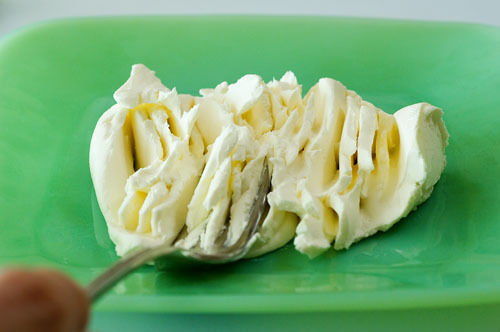
 After five minutes, the mixture should resemble a very soft custard.
 It really was fun to stick our (very clean; don’t worry) hands in there and feel the consistency. A lot happened in those five minutes!
 7. With a long spatula long enough to reach the bottom of the pot, cut the curd into a 1-inch checkerboard pattern, making lines across, then lines in the other direction.
It was at this time that an array of “cut the cheese” jokes broke out among all of us very mature women.
I’m still laughing.
 8. Return the pot to the the burner over medium heat and stir it gently until the temperature of the whey (the liquid that separates from the curd) reaches 105 degrees.
 9. Use a slotted spoon to transfer the curd to a colander set over a bowl.
And yum! I sneaked a bite. It was so darn delicious. Stringy and fresh and delightful.
 Everyone was fascinated with the texture.
 And it all begs the question: Who in the world first figured out this process?
It’s a brilliant, beautiful thing.
 10. Slowly spin around the colander to allow the whey to drain from the curd.
 That’s mozzarella in there!
 11. Remove the cheese and gently squeeze it a few times to drain off more excess whey.
 12. Then transfer the cheese to a microwave-save bowl and microwave the curd on high for 1 minute.
 13. Remove the bowl from the microwave and pour off as much whey as you can.
 14. Press the curd together with your hands and again drain off the whey that comes out.
15. Microwave it again on high for 35 seconds, the press the curd together again to drain the whey.
Have you gotten the picture that you want to drain off as much whey as you can?
 16. Knead and stretch the curd a bit to drain more whey, then microwave it one last time for 35 seconds.
 17. Knead in the salt and roll it under itself until it forms a neat ball.
 18. Then set the ball into an ice water bath and let it rest in there until totally cool.
 Then it’s ready to eat! Rebecca set it on a plate and sprinkled a million different herbs, as well as salt, pepper, and crushed red pepper over the top.
 Then came the olive oil and (later) the balsamic.
 Then came the bliss. Oh. My. Goodness.
It was gone within minutes!
 Then we made another one and it was gone within seconds!
 Oh, and here’s a neat variation.
(Hi, Shari! I see your hands!)
 Bocconcini! Just squeeze them in between your thumb and forefinger and drop them into ice water as you go.
Now go forth and make fresh mozzarella! It’s truly delicious and so much fun.
Thanks, Rebecca, for your awesome tutorial!
Note: It’s best to eat the mozzarella within a day, or it can be kept in a brine (salt water) for up to a week.
Note: You can get citric acid tablets and liquid vegetable rennet on Amazon or in many different places!
Not: Regarding the milk, check in your area to see if raw milk is available; if not, pasteurized milk works fine, too. It just won’t quite come together and have the wonderful, stringy texture as you’re making it. But if you stick with it and knead, squeeze, knead…eventually it will come together and be really nice.


July 23, 2012
Chocolate Mint Brownie Bites
 I didn’t know what to call these things.
Mint Brownie Bites didn’t seem descriptive enough.
Chocolate Mint Brownie Bites seemed to fit, but isn’t “chocolate” and “brownie” redundant?
Mini Mint Chocolate Brownie Bites?
Chocolate Mint Mini Brownies?
Ethel Myrtle Herman Walter Mabel?
So I risked redundancy and went with Chocolate Mint Brownie Bites.
I’m so glad I could share my journey with you.
 The Cast of Characters: Unsweetened chocolate, butter, sugar, flour, mint extract, Andes mints, MINT EXTRACT (not vanilla. don’t be like me) and (not pictured) bittersweet chocolate.
I repeat: Don’t be like me.
 First make the brownies! Throw 2 ounces of unsweetened chocolate into a bowl. (Note that I doubled this yesterday, but the quantities I’m giving you are for one batch. Sometimes I confuse even myself.)
 Melt it in the microwave…
 Stir it around a bit…
 Then peel the Andes mints…
 Add eight of them to the chocolate…
 And stir them around until they melt, which will happen really quickly.
That may have been the longest run-on sentence I’ve written all week.
And yes, I realize it’s only Monday. But still!
 Next up, throw a stick of butter into the bowl of a mixer with the paddle attachment. Not two sticks! One stick!
Unless you want to double the recipe. Then use two sticks. Also, stand on one leg and recite the Gettysburg Address while you do it. Simon Says!
I have no idea what that meant.
 Add a cuppa sugar…
 And mix it together until it’s really well combined. Spread some on a piece of bread, fold the bread in half, and enjoy yourself a butter and sugar sandwich.
Don’t really do that sandwich part. That would be excessive and wrong. We’ll wait and do that on Tuesday.
 Next, beat in two eggs one at a time.
 Then, if it’s totally cooled, slowly drizzle in the unsweetened/Andes mixture, scraping the bowl to get all the goodness in there.
 After it’s initially mixed in, scrape the bowl, then add in 1/4 teaspoon of mint extract…
 And mix it to combine.
 Add 3/4 a cup of flour. Not 1 1/2 cups as shown here.
 And mix it together until it’s nice and fluffy and irresistible.
 Grab some baking spray. Pam, Baker’s Joy, Crisco—any spray that also contains flour.
 Thoroughly spray a mini muffin pan—and I mean thoroughly. Then use a tablespoon or cookie scoop to scoop the batter into the tins.
 Bake them in a preheated 325 degree oven for about 13-15 minutes, or until they’re done!
 Invert them onto a cooling rack and let them cool completely. Now, when I filled the muffin pan, I used a scoop that was a little too big and the brownie bites baked over the surface of the pan a bit, which meant they had little wide ridges around the bottom. Ideally, the bites would not have this—they’d be nice and neat and uniform.
But a brownie is a brownie, no matter how misshapen it is.
Who said that? Freud?
 While the brownies are cooling, throw a bunch (25-30) of Andes mints into a bowl…
 With a tablespoon of butter. Microwave this for about 45 seconds, or until the mints are melted.
 Chop up an ounce of bittersweet chocolate really finely…
 Then throw it into the bowl…
 And stir it around till it’s smooth. The bittersweet chocolate gives the melted mints a little bit of structure and keep the whole thing from being way too sweet.
 Spoon the chocolate mixture over each brownie bite…
 Or dunk the bottom (which is now the top) of the brownie bites straight into the chocolate.
 Either way, you want ‘em coated.
 Chop up some more mints (you’ll need them finer than this.)
 And sprinkle them over the top after the chocolate cools and starts to set (don’t do it right away or the pieces will slide right off.)
 Stick the pan in the freezer for ten minutes, just to set the chocolate a bit and make them easy to handle.
 Sweet little two-bite wonders! Visually, they’re sort of a cross between a mini-cake and a truffle.
 I’ve made a version of these before, by the way, using a simple ganache and topping them with lots of pretty sprinkles.
 But these mint ones. Wow. As cute as they are…
 They’re a thousand times more delicious. The brownie’s really soft and moist, the mint candy coating is totally yummy, and the pieces of Andes on top are the icing on the cake.
I mean the sprinkles on the brownies.
You know what I mean.
Enjoy, guys!
***NOTE: I am unable to include the printable recipe at this time, as Tasty Kitchen (which I use to generate my printables) is down. It should be up and running soon, and the recipe will be visible then. Sorry for the inconvenience!***

July 19, 2012
Eggs Norwegian
 My friend Hyacinth and I went to NYC earlier this week. I had some work things to do, so she explored Chinatown and the Meatpacking District and the Garment District, then we’d get together in the middle and eat. I think my very favorite thing the whole trip was this beautiful plate of Eggs Norwegian at Pastis.
Eggs Norwegian is nothing but Eggs Benedict, except you sub smoked salmon for the Canadian bacon. In the plate at Pastis above, they also slid some breakfast potatoes under the whole thing. This made my day, by the way. But as for the Norwegian, the beautiful thing about it is the saltiness of the smoked salmon, and how wonderfully it complements the creamy (read: Heavenly) hollandaise sauce. It really should be illegal. It was so, so, so, so delicious.
I’m providing a printable recipe of an Eggs Norwegian you can make at home, adapted from my standby Eggs Benedict recipe. Whip this up next time you have friends over for brunch! I promise you they’ll never leave your house.
Recipe: Eggs Norwegian
Prep Time: 5 Minutes
|
Cook Time: 10 Minutes
|
Difficulty: Easy
|
Servings: 2

Print Recipe
3"x5" Cards
4"x6" Cards
Full Page
Ingredients
2 whole English Muffins, Halved Softened Butter Thinly Sliced Smoked Salmon4 whole Eggs3 whole Egg Yolks1-1/2 stick Butter1 whole Lemon, Juiced Cayenne Pepper To Taste Black Pepper To Taste Preparation Instructions
(This plate from Pastis restaurant in NYC.)
First, bring a pot of water to a boil. While the water’s boiling, place a few English muffins halves on a baking sheet. Lightly butter the English muffins and place them under the broiler for just a few minutes, or until the English muffins are very lightly golden.
Next, poach the eggs. With a spoon, begin stirring the boiling water in a large, circular motion. When the tornado’s really twisting, crack in an egg. Or two. Or three. The reason for the swirling is so the egg will wrap around itself as it cook, keeping it together. Cook for about 2 ½ to 3 minutes.
In a small saucepan, melt 1 1/2 sticks of butter until sizzling. Place the yolks into a blender. Turn the blender on low to allow the yolks to combine, then begin pouring the very hot butter in a then stream into the blender. The blender should remain on the whole time, and you should be careful to pour in the butter very slowly. Keep pouring butter until it’s all gone, then immediately begin squeezing lemon juice into the blender. Add cayenne pepper.
Place the English muffins on the plate, face up. Next, place a slice of smoked salmon on each half. Place the egg on top of the salmon and top with a generous helping of Hollandaise sauce followed by a sprinkling of black pepper
Note: To ensure that everything is hot at the time when it’s ready to serve plunge the poached eggs back into the hot water just before serving, and make the Hollandaise at the very last minute.
Posted by Ree on July 19 2012

July 17, 2012
Red and Shiny (Winners Announced!)
First, the results of the movie question from our friend Statistician Don. Here are the most recent movies the majority of you have seen:
 Thank you, Don, for your always-interesting results!
THE WINNERS
The winners of the Kitchen Aid mixers are:
#7524 Sheila: “Sabrina with Harrison Ford. Loved it!”
#41061 Judy: “McClintock — best movie ever.”
#50292 JimNotMike: “The Lorax in my hotel room in Atlanta.”
Congrats to the winners! Contact prizes@thepioneerwoman.com to claim your loot.
 Today, because it’s Tuesday, because I’m in NYC with Hyacinth, because it’s July 17, and because I love ya, I’m giving away three (3) of these gorgeous candy apple red KitchenAid stand mixers.
I love this mixer.
It’s red.
It’s shiny.
Amen.
TO ENTER
To enter this giveaway, just answer the following questions in the Comments section of this post:
“What is the last movie you saw/watched?”
Did you go see the new Spider Man movie last weekend? Or did you watch an old western on the teevee? Just shout out the last movie you saw and you’re automatically entered to win the mixer! (If you can’t remember the last movie you saw, just say so in the Comments and you’re entered!)
THE RULES
One entry per person, please.
Winners will be selected and announced Wednesday night.
Good luck!

Red and Shiny
Today, because it’s Tuesday, because I’m in NYC with Hyacinth, because it’s July 17, and because I love ya, I’m giving away three (3) of these gorgeous candy apple red KitchenAid stand mixers.
I love this mixer.
It’s red.
It’s shiny.
Amen.
TO ENTER
To enter this giveaway, just answer the following questions in the Comments section of this post:
“What is the last movie you saw/watched?”
Did you go see the new Spider Man movie last weekend? Or did you watch an old western on the teevee? Just shout out the last movie you saw and you’re automatically entered to win the mixer! (If you can’t remember the last movie you saw, just say so in the Comments and you’re entered!)
THE RULES
One entry per person, please.
Winners will be selected and announced Wednesday night.
Good luck!
July 16, 2012
Veggie & Cheese Bagel
Note: I’m in New York City with Hyacinth for the next 36 hours, so I decided to bring up an oldie (but goodie) from the archives. This is one of my older posts here, all the way back from the dark ages of 2008. A perfect recipe for hot summer!
Note: My photos are also from back in 2008. Ahem.
Original Post:
It…is…SO hot here. I mean, HOT. It’s hot, too. Have I mentioned it’s hot? And I’ll tell you one other thing: it’s HOT! I’m melting. I’m dying. I’m a pool of salty perspiration. With red hair.
Gosh, have you lost your appetite yet? Sorry. I have a tendency to do that to people.
What I was trying to tell you was, I had a long grocery list of things to pick up after church yesterday, as that’s usually when I pick up what I need to cook during the following week. I had grand plans for many suppers: stews, casseroles, and other savory dinners…but there was only one problem: I’d worn a black suit to church. I’d worn a black suit to church because my muscular, cut, sexy, tan arms have been on vacation for the past 39 years and I’m beginning to think they’re never coming back. They’re over in Brazil, on some tiny Brazilian woman, enjoying their day in the sun.
So. Black suit. Long sleeves. “All Season Wool”, which, in my part of the country, means that if you wear it after July 4th, you’d better carry along a bottle of water, an ice pack and an oxygen tank because you’ll spend all your time sweltering, which is precisely what I did all during church. And after I prayed for muscular, cut, sexy, tan arms, I left church and went to the store, and by that time I couldn’t even THINK about cooking hot, steamy food in a hot, steamy kitchen. Psychologically, emotionally, gastrointestinally, there was only one thing on earth I could think of to eat.
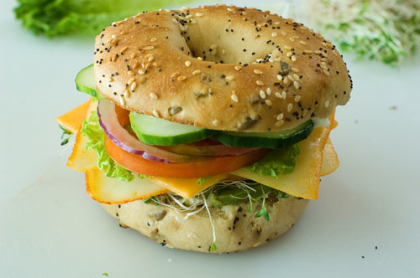
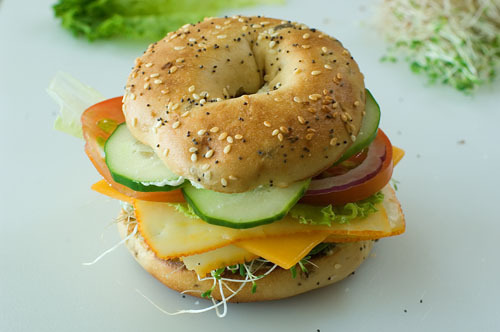 It was this delicious bagel sandwich, piled high with cool, crisp vegetables and plenty of flavorful cheese. I once made one kinda like it for my mother-in-law, sister-in-law, and our friend, Lindy, when the four of us took it upon ourselves five or so years ago to transform an old cowboy house next to my house into our ranch office. We were scraping and painting and doing all sorts of other things women should never be required to do, and when lunchtime came around I darted across the driveway to my house to make everyone a bite. Marlboro Man was at the farm that week and I had NOTHING in my kitchen—nothing, save for some bagels and a little cheese in my fridge. But I also had veggies in my garden—cucumbers and tomatoes, along with some chives. It was a stifling hot day, so the coolness of the sandwich was just the ticket for us desperate, hungry women. The other three ladies sainted me instantly. It was a real kick!
Okay, I’m done talking now. I’m not going to talk anymore. I have now stopped talking. See? I’m not talking anymore. I am now, instead, going to prepare this (a slightly more storebought) version of the sandwich I made five years ago. So I’m going to have to talk, I guess.
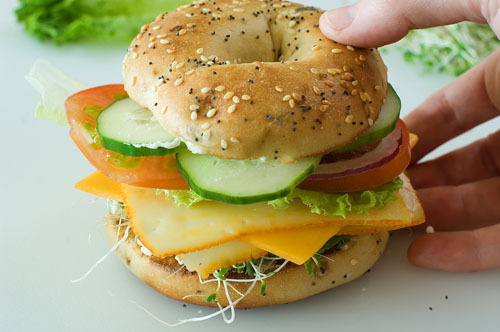
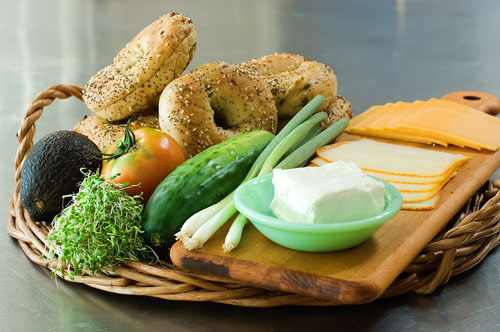 The Cast of Characters: Everything (or any) bagels, Cream Cheese, Green Onions (you can use chives if you have them), Cucumbers, Tomatoes, Avocado, Red Onion (not pictured because I’m scatterbrained), Alfalfa Sprouts, Muenster Cheese, and Cheddar Cheese. And whatever other cheese or veggies make your skirt fly up.
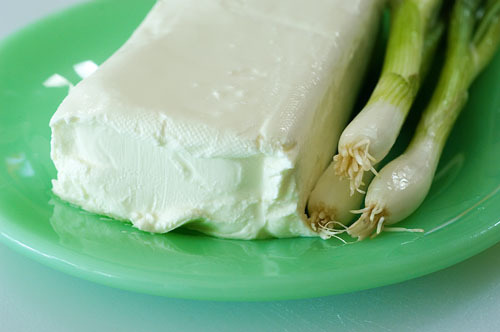 First thing we’re going to do is make the special sauce. Special spread. Special…oh, whatever. It’s special, okay?
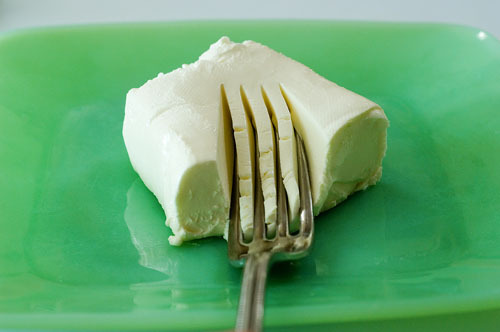 Place 1/2 block cream cheese on a plate and mash it a bit with a fork.
 We’re just doing this to make it a little more spreadable.
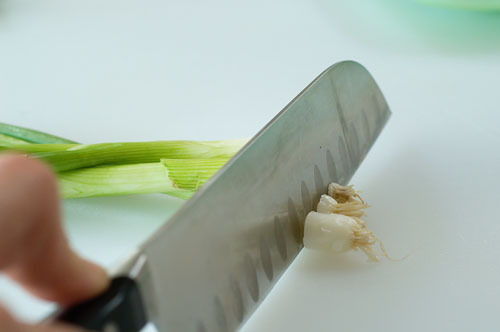 Now grab two or three scallions/green onions and lop off the tops.
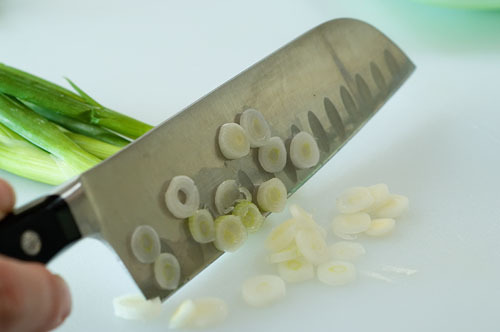 Slice up some of the white part…
 Then turn it around and slice up some of the green part. How much green onion you use is entirely up to you.
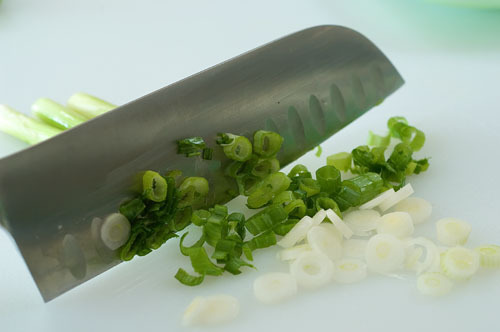
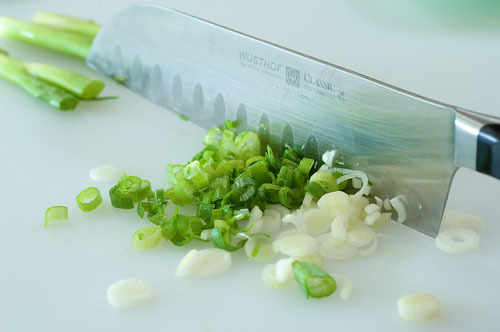 After that, give the onions a quick chop to break up the pieces at bit.
 Now just throw the onions on top of the cream cheese…
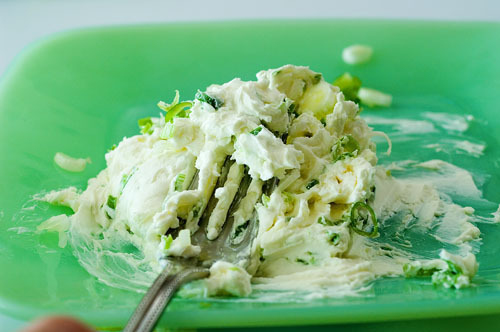 And mash it together until it’s thoroughly combined. Keep in mind that green onions are pretty dadgum strong. But I like ‘em that way. Just like I like my men. Man. Whatever.
Next, let’s slice all our veggies.
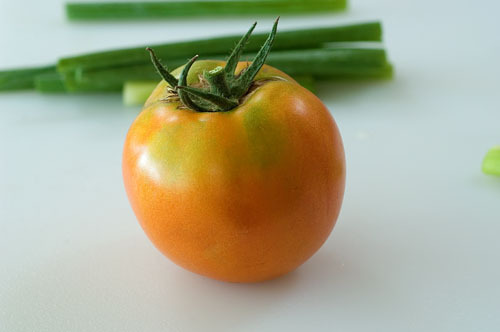 This is one of the first ripe tomatoes I’ve had this year. And it makes me want to write a sonnet.
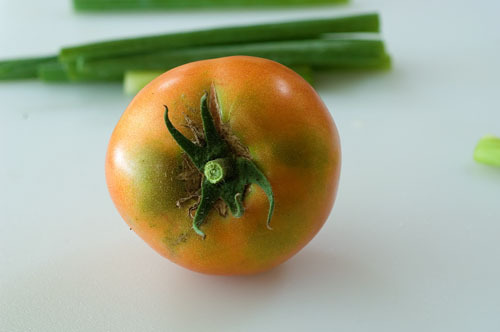 And next year, people, let me warn you: You are all going to plant at least one tomato plant. You WILL do it—I shall see to it. Because a tomato straight off the vine? Well, it’s…it’s…it’s a tomato straight off the vine. I want you all to experience it at least once.
 The thing about homegrown tomatoes is, you never know what you’re gonna get once you slice it open. It’s like opening a present.
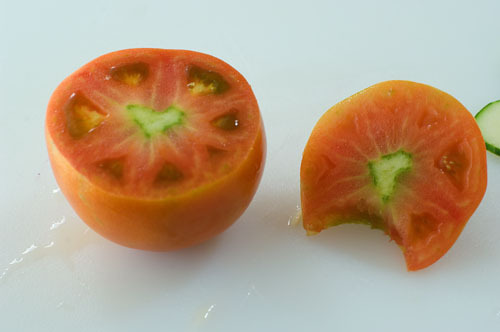 And believe me, you won’t want any of it to go to waste, as my tooth marks will demonstrate.
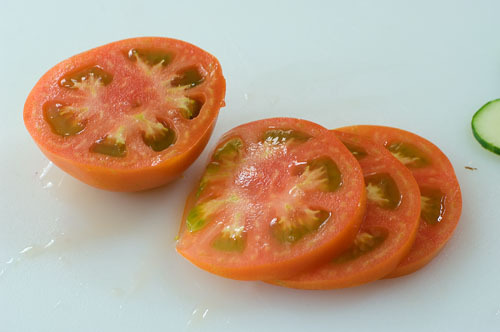 Go ahead and slice it up and set it aside.
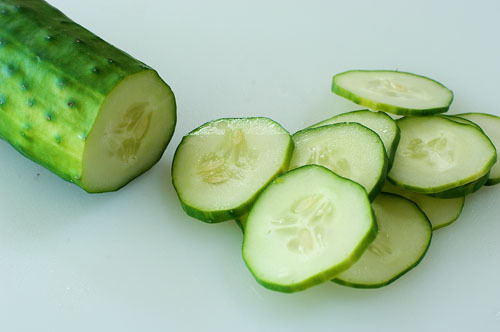
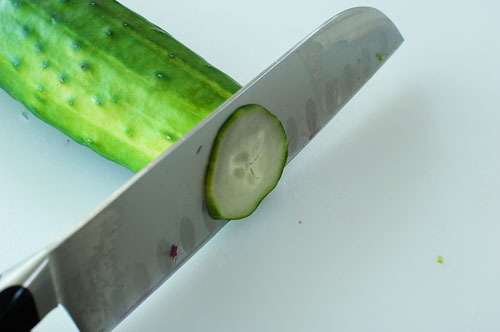 Now grab a cucumber and slice it pretty thinly.
 Guess what? I didn’t get this from my garden. I got it from the store.
 Now lop off the top of a red onion. Stop for a moment and wonder why they don’t call them PURPLE onions. Scratch your head. Look at the ceiling.
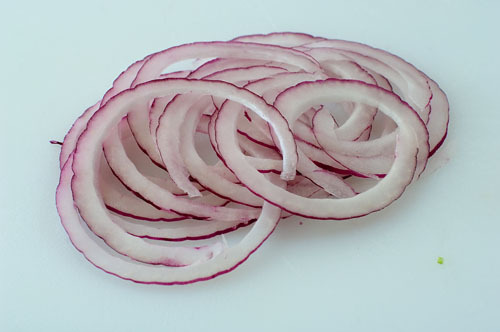 Then slice the onion, purple or red or whatever, as thinly as you can. Call me a wuss, but I just can’t handle thick slices of raw onions. They make me want to hurl and chew a whole pack of Doublemint gum.
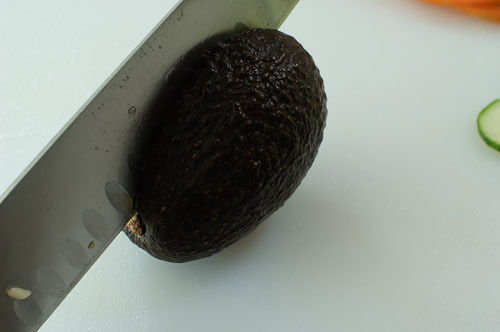 Now grab the avocado and cut it in half lengthwise.
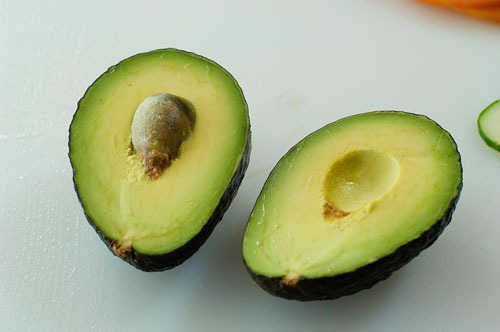 Then twist it to open it up.
 Now take a spoon and run it inside along the flesh and the hard skin. Remove the flesh in one piece.
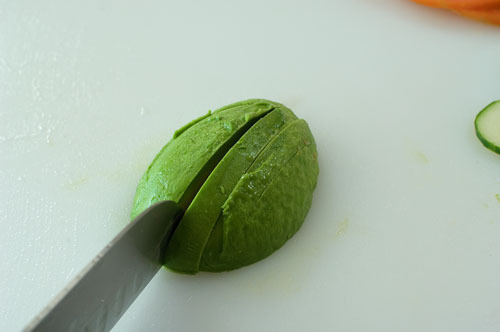 Now make thin slices. And try not to eat them all.
 Hello, my beautiful lovers. You are cool and crisp and delightful.
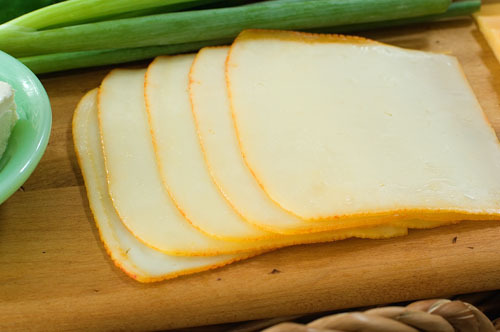 And now for the first secret ingredient: Muenster Cheese. Oh dear, oh my, oh wow. If you haven’t yet become obsessed with Muenster Cheese, it’s time to start today. It’s readily available in the normal, non-fancy cheese section of the grocery store. This is Sargento brand. Not that I’m a namedropper or anything—I’m just trying to share the love.
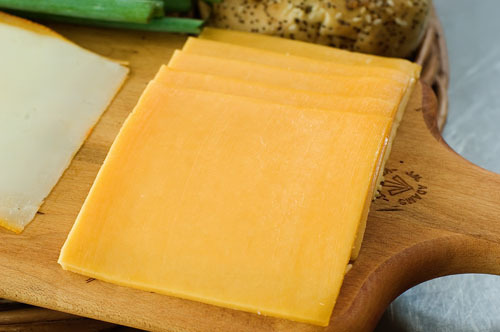 And now for the second secret ingredient: Cheddar Cheese. Oh wow, oh my, oh dear. I don’t know what it is, but the Cheddar and the Muenster together? I think it’s a combination created by angels.
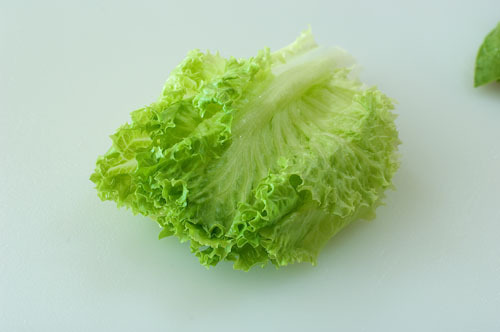 Back to the veggies, wash and pat dry a few pieces of lettuce. Any variety is fine.
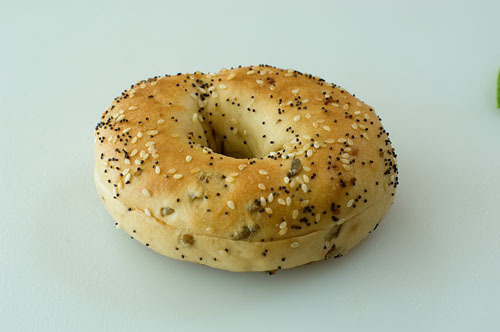 Now go split one of the bagels. Any bagel is fine, but I love the grainy nuttiness of the Everything Bagel.
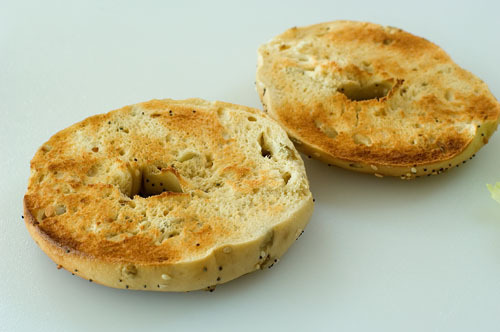 Split it. Then toast it. Then let it cool completely. Toasting it gives it the perfect crunch, flavor, and texture.
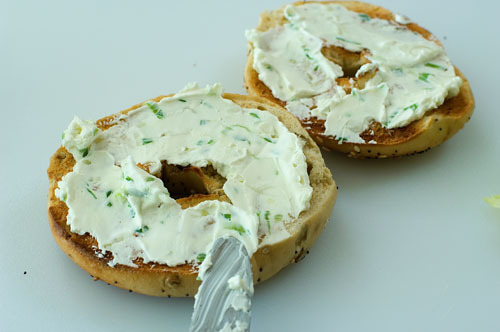
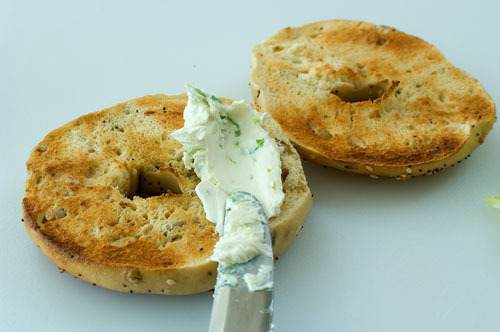 Once the bagel is totally cool, generously spread on the cream cheese.
 This’ll add a real burst of flavor to the vegetables.
Now it’s time to get serious!
 Lay a few hundred slices of avocado right along the cream cheese.
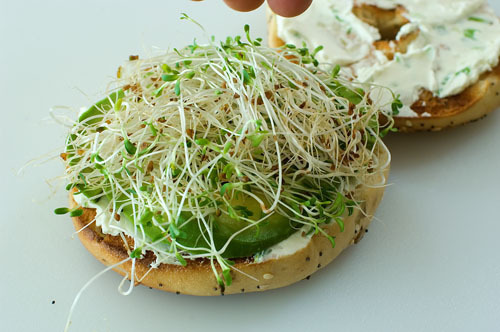 Now set some alfalfa sprouts on top. And gosh, let’s talk about alfalfa sprouts for a second. I used to be afraid of them because my mom and all her country club friends ate them all the time in their pita bread sandwiches and I thought they tasted like grass. But now? Well, they still taste like grass. But in a really good way!
And it amazes me that these tiny little sprouts will eventually wind up in our hay barn. I’ll let you think about that for a minute.
 And now for the CHEESE, baby. Lay on a slice of Muenster.
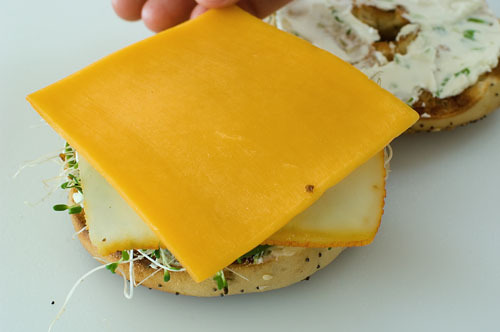 Next, lay on a slice of cheddar. I like to turn it 45 degrees so it’s not laying directly on top of the Muenster. It looks prettier, less symmetrical, and as a result, your mind tricks you into thinking it tastes better. I LOVE it when my mind does that!
 Now grab the other half of the bagel and arrange the cucumber slices in a circle.
I’ve got a method to this madness. See, the cucumbers and the avocado always slip and slide out of sandwiches the easiest. So by placing them directly against the cream cheese, you’re cementing them to the sandwich.
See? I know what I’m talking about at least 1/1000897th of the time.
 Next, because cucumbers don’t come salted, I usually sprinkle them with just a tiny bit of salt. But you don’t have to if you don’t want to.
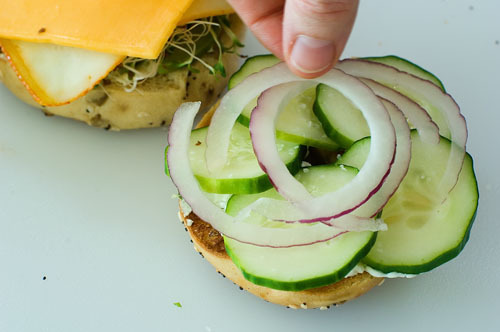 Now, place some red onion slices on top of the cucumbers. I go pretty light on the raw onion, but you can lay it on thick if you want.
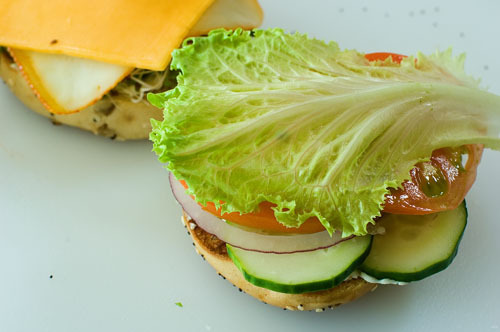 Next come two tomato slices, followed by a piece of lettuce.
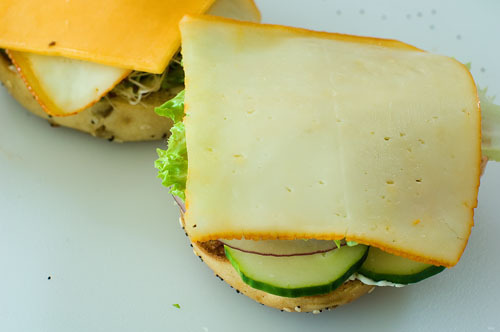 And okay, another piece of Muenster. Trust me—you’d miss that second piece of Muenster.
 Put the halves together. Now stop and look at what you have created.
 Here, let me turn it around and show you a different view. Beautiful, isn’t it? There’s just not much about this sandwich that I don’t want to marry.
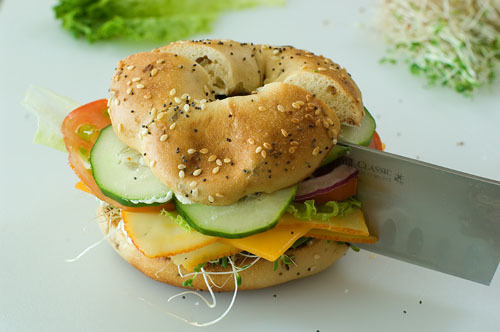 Cutting it in half requires a wicked-sharp knife. I would normally use my long, serrated bread knife, but someone stole mine recently. And okay, nobody stole it but that’s a lot better than acknowledging that I misplaced it myself. I mean, where does one misplace a fourteen-inch serrated knife? How many different possible locations could it be?
 Oh good land of our great mother of perpetual motion…will you take a look at THIS?
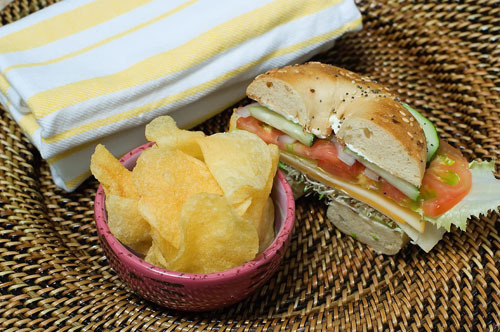 Oh, and here’s a tip: one half of this baby is plenty.
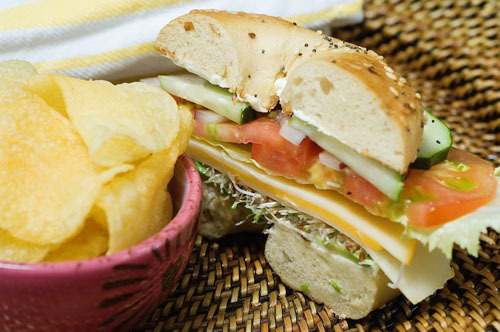 And here’s another tip: Don’t be fixing it for your first date with someone. It’s rather tall, and requires you to open your mouth really wide to fit it all in. And you never know when the wayward sprout will drop out.
I’m just trying to save you some embarrassment here.
Just stick close to me, and you’ll never be embarrassed about another thing in your life.
It’s what I’m here for.
Love,
Pioneer Woman
Recipe: Veggie and Cheese Bagel Sandwich
Prep Time: 15 Minutes
|
Cook Time:
|
Difficulty: Easy
|
Servings: 1
Print Recipe
3"x5" Cards
4"x6" Cards
Full Page
Ingredients
1/2 block Of Cream Cheese2 whole (to 3) Green Onions Tomatoes Cucumbers Avocado Red Onion1 whole Everything Bagel (or Any Kind Of Bagel) Alfalfa Sprouts 1 Or 2 Slices Of Muenster Cheese Slice Of Cheddar Cheese Lettuce Preparation Instructions
Place ½ a block of cream cheese on a plate and mash it a bit with a fork. Next, chop up 2-3 green onions and mix them with the cream cheese until thoroughly combined.
Slice all veggies (tomatoes, cucumbers, avocados, red onions) thinly.
Slice bagel in half. Spread the cream cheese generously on both sides of the bagel.
Layer the vegetables. First lay the avocados right along the cream cheese to help them stay put. Next the alfalfa sprouts and then one slice of each kind of cheese. On the other half of the bagel arrange the cucumber slices in a circle.
Sprinkle the cucumbers with a pinch of salt if you would like.
Next lay the onion slices on top of the cucumbers, then the tomatoes, followed by a slice of lettuce, and if you’re feeling naughty, another slice of Muenster cheese.
Put the whole thing together and Voila! A cool, crisp, and deliciously fabulous Veggie and Cheese Bagel Sandwich.
Posted by Ree on August 11 2009

July 9, 2012
Steak Fingers with Gravy
 When my nephews Nic and Stu came to the ranch to visit a few weeks ago, they worked cattle, built fence, hauled hay, mowed, weedeated, and passed out from exhaustion by seven every evening. They also got poison ivy, a few hundred chigger bites, and lots of scratches from the barbed wire. Marlboro Man and I love building happy memories for them every summer!
Ahem.
Nic and Stu also ate my cooking, and on the night before they went back to Dallas I made steak fingers and gravy—quite possibly the most fitting meal to feed two teenage boys after a long two weeks of hard labor.
They ate it. They loved it. Then they hugged me and said they’d be back soon.
It was music to this crazy ol’ auntie’s ears.
 Here’s what you need: Tenderized round steak or cube steak cut into strips, flour, seasoned salt, pepper, cayenne pepper, ground thyme, milk, and egg.
And canola oil and butter for frying.
And a great big appetite.
 It cracks me up that you use finger steak to make steak fingers.
I think we should just take the word “finger” out of there and call it a day.
 In any event, melt some butter with some canola oil in a skillet over medium to medium-high heat.
 Add some flour to a baking dish or pie pan…
 And sprinkle in some seasoned salt…
 Some pepper and ground thyme…
 And some cayenne pepper for a little spice, baby.
Can I call you baby?
 Stir together the flour mixture, schnookums.
Can I call you schnookums?
 Next, pour some milk into a dish…
 With some aigs.
I mean eggs.
 Whip the milk and aigs together and set this aside.
 Throw the strips one by one into cube steak into the flour…
 And turn ‘em over to coat ‘em.
 After that, quickly dip the strips in the egg/milk mixture.
 Finally, throw ‘em back into the flour mixture and turn it over to coat them.
 Lay the strips on a plate as you bread them and continue until all the strips are breaded.
 Heat some canola oil and a little butter in a skillet over medium-high heat and fry them until golden brown on one side…
 Then flip them over and fry them until they’re done.
 Remove them to a paper towel-lined plate as you fry them. Keep going till they’re all done!
To make the gravy, pour off all the grease in the skillet, then add back in about 1/4 cup and turn the heat to medium-low.
 Sprinkle on a few tablespoons of the flour mixture.
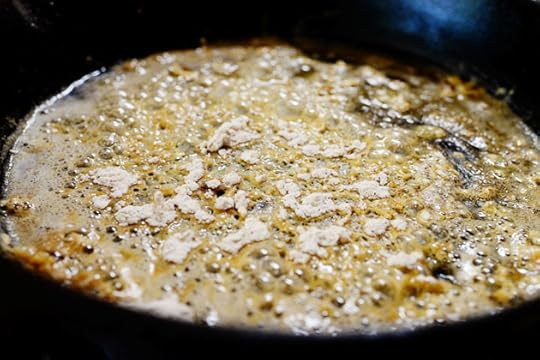
 Whisk it together until it’s a smooth paste (add more flour if it’s too greasy) and let the paste brown just a bit. (Those bits in the roux are pieces of the breading from the steak fingers. They’ll be yummy in the gravy!)
 Pour in a couple of cups of milk, whisking together the whole time.
 Let the gravy cook for a few minutes, adding in more salt and pepper (taste as you go!) If it gets too thick/grainy looking, just splash in a little more milk.
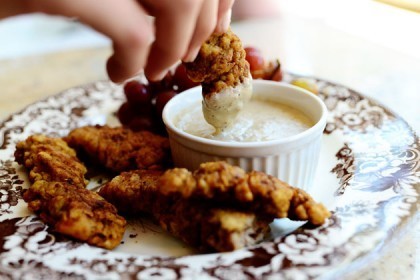
 Steak fingers and gravy are yummy with mashed potatoes or biscuits, of course. But in the hot summertime, cold grapes are pretty much the perfect pairing.
Enjoy this simple meal, guys! Kids and grownups love it.
Here’s the handy printable:
Recipe: Steak Fingers & Gravy
Prep Time: 20 Minutes
|
Cook Time: 20 Minutes
|
Difficulty: Easy
|
Servings: 6
Print Recipe
3"x5" Cards
4"x6" Cards
Full Page
Ingredients
2 pounds Tenderized Round Steak Or Cube Steak, Cut Into 1-inch Strips1 cup Flour1 teaspoon Seasoned Salt1/2 teaspoon Black Pepper1/4 teaspoon Cayenne3 whole Eggs1 cup Milk Canola Oil And Butter For Frying2 cups Milk (additional) Salt And Pepper, to taste Preparation Instructions
Combine flour, seasoned salt, pepper, and cayenne in a dish.
Whisk together milk and eggs in a separate dish.
To bread the meat, first dredge in flour, then dip quickly in egg mixture, then put back into the flour to coat on both sides. Continue until all the meat is breaded.
Heat canola oil with 2 tablespoons butter in a large skillet over medium to medium-high heat. Fry steak strips 4 or 5 at a time, turning midway through. When golden brown, remove from the pan to a paper towel-lined plate. Continue until all the meat is done. Cover loosely with foil to keep warm.
To make the gravy, pour off all the grease from the pan. Add 1/4 cup of the grease back in, then sprinkle on 2 to 4 tablespoons of the flour mixture (or you can use fresh flour.) Whisk mixture till it becomes a paste (add more flour if you need to) and cook the paste over medium-low heat until it's deep golden brown. Pour in milk, whisking constantly. Allow the gravy to cook and thicken, whisking regularly and adding more milk if it seems too thick right off the bat.
Season gravy with salt and pepper.
Serve steak fingers with gravy and a salad. Yum!
Posted by Ree on June 29 2012

July 2, 2012
Strawberry Sparkle Cake
 Get ready to have some fun!
I made this cake yesterday for the first time, after having flirted with it for weeks. My father-in-law had brought it to my attention after noticing it in a collection of his great grandmother’s recipes, and when my father-in-law brings a recipe to my attention, it’s the same as him saying “Will you make this for me sometime?” My father-in-law loves sweets, you see, and he also knows that I have a soft spot where he’s concerned. Delivering him sweets is one of my favorite things to do.
Different versions of Strawberry Sparkle Cake exist throughout the land, and I actually wound up changing this one a bit when I made a trial run of it yesterday. It turned out really delicious, and I’ll be whipping one up on the Fourth, too. That’ll give me a chance to give my father-in-law a piece…and if he likes it, I’ll make him another one the next morning so he can eat it for breakfast. Then I’ll make him another one the next day so he can eat it for dessert.
I repeat: I have a soft spot where he’s concerned.
No matter what precise version of Sparkle Cake you wind up making, it always begins with a good angel food cake. You can use a storebought on or make one from a mix…but if you make your own angel food cake, you’ll feel like you can do most things in life.
 To make the angel food cake, you need egg whites, cake flour, sugar, cream of tartar, salt, and vanilla. Simple stuff, Maynard!
Sorry I called you Maynard.
 Now, one of the most important things is that eggs need to be room temperature, so set them out a good hour or two before you need them. Then separate them one by one…
 Until you have a whole buncha whites. I’ve made this cake using everywhere from 10 to 15 egg whites, and 15 has turned out to be the best number.
 Oh, and don’t let these beauties go to waste! Whip up Cinnamon Baked French Toast using only yolks. Ta die fer.
Or make Crème Brûlée. Oh, yes.
Or Vanilla Bean Ice Cream would do just fine, too.
 Then, before you start whipping the whites, sift the sugar three times.
 Everything with angel food cake has to be light and not clunky…so sifting is the name of the game.
 Now, pour the whites into a mixer and whip them on high until they’re frothy. This basically means they’re bubbly and foamy…but still quite liquidy.
 At that point, turn off the mixer and measure 1 teaspoon of cream of tartar…
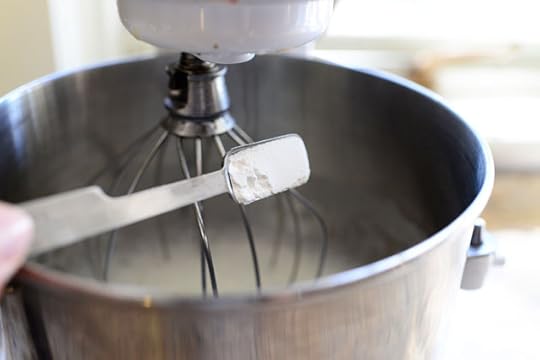 And add it to the bowl.
 Then turn the mixer to high again and beat the heck out of the whites…
 Until they’re light and fluffy and stiff. Like a cloud!
 Now, turn the mixer to low and very slowly sprinkle in the sugar so that it’s really gently and gradually incorporated.
 After the sugar’s mixed in, the whites take on a slightly different appearance (gorgeous!) but the volume should be pretty unaffected.
 Next up, sift together the cake flour (essential!) and the salt five times! Not four times. Not six times. Five times.
Did I mention five times?
 Then remove the bowl from the mixer and add the flour mixture a spoonful at a time…
 Very gently folding it in.
 After the flour is mixed in, sprinkle on a little vanilla and mix that in, too.
 Plop the batter right into the angel food (also known as tube) pan.
Important: Make sure the pan is absolutely, positively clean and free of any oil, butter, grease, suntan lotion, and WD-40. Any hint of grease on the pan will cause massive problemas for the cake!
 Smooth out the top of the cake and bake it in a 350 degree oven for about 40 minutes. You can stick a wooden skewer in the cake to test it; it should come out completely clean.
 Then, the very second you remove it from the oven, invert the pan on a wine or vinegar bottle and let it cool completely upside down.
 While the cake is cooling, make the filling! Pour 2 1/2 cups of water in a saucepan and bring it to a boil.
 Then add a 3-ounce package of strawberry jello to a bowl.
(This is a larger package; I just used half.)
 Then pour the boiling water over the powder…
 And stir it together to dissolve.
 Next, grab a bag of frozen strawberries…
 And pour them right into the liquid.
 Stir them around for a minute or so. Adding the cold strawberries to the hot jello is akin to adding the cold water: as you stir the strawberries, the liquid will start to thicken. Ultimately, you want a sort of thick (but still pourable) jello consistency. Set this aside a bit, and note that it will continue to thicken as it sits.
 Once the cake is totally, completely cooled (should take at least an hour; don’t rush it!) use a small, sharp knife to carefully loosen the cake from the pan.
 Take it out of the pan…
 Then remove it from the bottom piece and turn the cake upside down.
 Next, use a sharp knife to cut a slice 1-inch from the top.
 Cut all the way around until it’s cut all the way through, then remove the top piece, laying it next to the cake.
 Now, with a small sharp knife, cut a circle 1-inch from the outer edge of the cake, making sure not to cut all the way to the bottom (leave at least an inch of cake at the bottom). Can you see the cut?
 Make another cut 1-inch from the inner edge of the cake. You now have two concentric circles cut into the cake.
 Next, carefully remove the cake between the two circles, creating a “trench” throughout the center of the cake.
 As you tear out the cake, try to keep the bottom of the trench at generally the same level. You don’t have to be perfectly precise, but try to be as uniform as possible.
 Next—you guessed it!—spoon the strawberry filling right into the trench. Note that you probably won’t have the space to use every last drop of the strawberry mixture…but just keep filling until it’s just barely above the level of the cake (to allow for a little settling.)
If you have extra strawberry stuff, spoon it over ice cream!
And that’s an order.
(Note that the original recipe called for stirring the angel food chunks into the strawberry mixture…but I didn’t really like the sound of that so I decided to leave them out.)
 Next, place the cake “lid” right back on the top, making sure to match up the cut so that it sits just right.
 Score. A direct hit.
Now, at this point you can refrigerate the cake for a couple of hours and ice it later…or you can ice it first, then refrigerate it. Either way, it’s best to chill it for at least a couple of hours before you serve it just to make sure it’s all set up. When it’s ready, the jello will be set and should stay put once you cut into the cake.
 The icing is nothing but heavy cream and sugar whipped together.
 Just plop the cream over the top…
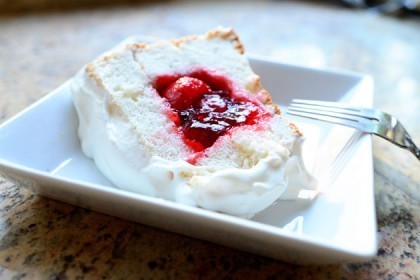
 And schmear it all over the cake!
 I went ahead and sliced into it because I couldn’t wait to give it a try…but don’t be like me. Be sure to chill it first.
And you can decorate the top with strawberry slices, of course!
 Hello, beautiful!
I’m so glad to have you in my life.
I probably don’t need to tell you how many different things you could do with this basic method. I was actually tempted to whip the topping with cream so that the filling would be more of a whipped pink concoction. But you could also just do whipped cream and berries in the middle. Or you could change it up and do peaches. So many combinations!
A fun cake for the Fourth—give it a try!
Love,
P-Widdy
Recipe: Strawberry Sparkle Cake
Prep Time: 25 Minutes
|
Cook Time: 40 Minutes
|
Difficulty: Intermediate
|
Servings: 12
Print Recipe
3"x5" Cards
4"x6" Cards
Full Page
Ingredients
Angle Food Cake15 whole Egg Whites, At Room Temperature1 teaspoon Cream Of Tartar1-1/2 cup Plus 2 Tablespoons Sugar, Sifted Three Times1 cup Cake Flour1/4 teaspoon Salt1 teaspoon Vanilla Filling1 package (3 Oz.) Strawberry Jello2-1/2 cups Boiling Water1 package (1 Pound) Frozen Sliced Strawberries Icing1-1/2 cup Heavy Cream2 Tablespoons Sugar Preparation Instructions
Preheat oven to 350 degrees.
Combine cake flour and salt and sift together five times. Set aside.
Beat egg whites until frothy (lots of bubbles but still liquidy and loose.) Add cream of tartar and beat on high until stiff.
With mixer on medium-low, slowly sprinkle in sifted sugar as it mixes in.
Remove bowl from mixer and fold in sifted flour gently until it's all combine. Sprinkle vanilla into the bowl and fold gently.
Spoon batter into tube pan---make sure there's no grease or butter in there! Smooth the top and bake for 35-45 minutes, or until a wooden skewer stuck all the way to the bottom comes out clean. (Don't open the oven while it's baking!)
Carefully remove the cake from the oven and immediately invert it on a wine or vinegar bottle. Let it cool completely while hanging upside down. Once totally cool, remove it from the pan.
To make the filling, sprinkle the jello powder into a bowl and pour in 2 1/2 cups of boiling water. Stir to dissolve, then add the bag of frozen sliced strawberries. Stir to cool the mixture and set it aside.
Turn the cake upside down so that the end that was stuck to the bottom of the pan is now facing up. With a serrated knife, carefully cut the top 1-inch of cake from the top. Remove it and lay it beside the cake. Next, with a small paring knife, make two concentric cuts in the cake: one cut is 1 inch from the outside rim, the other cut is 1 inch from the inside rim. (Be careful not to cut all the way through to the bottom of the cake! Leave about an inch from the bottom.)
Tear out a trench in between the two cuts and save the torn cake pieces for another use.
By now, the strawberry mixture should be cool and somewhat gelatinous. Carefully spoon the mixture into the trench in the cake, filling it all the way to the top and ever-so-slightly above to allow for a little settling. Place the top of the cake back on top, lining it up just right.
Refrigerate cake for a couple of hours (or you can stick it in the freezer for an hour or so if you're in a hurry!)
To serve, whip together the cream and sugar until stiff. Spread all over the cake. Cut into slices and serve! Note that once you make a cut, the filling will slightly seep out of the remaining cake, but not overly so.
This is a fun, festive, fresh, fabulous cake!
Posted by Ree on July 1 2012

June 27, 2012
Grillin’ Recipe Contest: Winner Videos!
 The second annual Bush’s Grillin’ Beans Recipe Contest has been so much fun. The recipe winners traveled to the ranch at the first of June for the big video shoot and cookout, and we all went away having made new friends. It always amazes me that a group of strangers can come together for a weekend and wind up having such a blast together.
Here are the four videos of the winners preparing their scrumptiousness on camera. Please pay attention to the winners and not to me, as it appears I did not select a wildly flattering top. At all. Forget you know me and the floral tunic I rode in on.
The Fourth of July is coming up! Try one of these beauties below. They were all so, so good.
BEEF WINNER: Renata
Renata brought her husband Henry along and I loved every second I spent with them.
 She made this gorgeous, thick t-bone steak with a strawberry-balsamic-basil mixture and a nice dollop of butter spiked with green peppercorns. It was gorgeous and so flavorful and fresh. (And purty, if you ask me.) Here’s Renata’s video, and the full recipe below!
Summer Solstice T-bone Steaks with Peppercorn Butter and Strawberries
Served with Bush’s Grillin’ Beans Steakhouse Recipe
6 T-bone beef steaks (about 1-inch thick)
6 teaspoons kosher salt
2 teaspoons ground black pepper
3 cups strawberries
1 tablespoon balsamic vinegar
2 tablespoons sugar
1/4 cup chopped basil plus 6 small sprigs of basil for garnish
1/2 cup salted butter, room temperature
1 tablespoons pickled green peppercorns
1 teaspoon coarse cracked black pepper
Preheat gas grill or prepare charcoal grill for direct heat grilling. Season steaks with salt and pepper
Grill steaks for 4-6 minutes per side or to your preferred doneness.
Meanwhile set 6 strawberries to the side for garnish and slice the rest. Combine sliced strawberries with balsamic vinegar, sugar and basil. Combine butter with green peppercorns and cracked black pepper.
Serve steaks hot from the grill. Top with peppercorn butter and strawberries. Garnish with reserved strawberry and basil.
Serve with Bush’s Best Grillin’Beans Steakhouse Recipe!
CHICKEN WINNER: Brian Murray
Brian traveled from Tennessee with his wife Michelle and they were so much fun. Brian is a complete natural in the kitchen and I’m going to ask him to take over my cooking show. I hope he likes crazy floral blouses.
 Brian made the most sinfully delicious chorizo cream sauce to be spooned over his grilled chicken…my goodness. I honestly could have eaten the sauce right out of the pan.
Wait. I did eat the sauce right out of the pan.
To die for, to die for, to die for.
 To serve the whole party, we wound up just submerging the dang chicken right in the sauce just to make it easy. Talk about cutting to the chase.
Here’s Brian’s video. Such a fun, sweet guy!
Southwestern Grilled Chicken with Chipotle Cream Sauce
Served with Bush’s Black Bean Fiesta Grillin’ Beans.
4 medium boneless, skinless chicken breasts
4 Tablespoons taco seasoning
4 Tablespoons butter
1 medium onion, cut into large pieces
1 red bell pepper, cut into large pieces
4 cloves garlic, peeled
1 chipotle pepper in adobo sauce
1/4 pound chorizo sausage, without casing
2 cups heavy cream
Pound the chicken breasts until approximately 1/2 inch thick. Sprinkle on 2 Tablespoons of the taco seasoning and rub into the meat. Melt 2 Tablespoons of the butter, pour on chicken breasts, and mix together. Place in refrigerator to marinate for 1 hour. Grill chicken for 4 minutes on each side over high heat. Remove from grill and let rest.
Brown chorizo over medium heat and break into pieces. Remove chorizo from pan, but leave any remaining grease. Reduce heat to medium low and add 2 Tablespoons of butter. Add onion, bell pepper, and garlic to pan. Saute until translucent. Add chipotle pepper and 1 Tablespoon of adobo sauce to pan. Cook 5 minutes, stirring frequently. Add cream and 2 Tablespoons taco seasoning to mixture and cook for another 5 minutes. Pour mixture into blender (or with immersion blender), blend until smooth. Transfer contents back into pan, add chorizo to mixture, and cook for additional 5 minutes.
Slice chicken into strips and pour 1/4 of sauce on each breast. Pair with Bush’s Black Bean Fiesta Grillin’ Beans. Serve and enjoy!
PORK WINNER: Naylet LaRochelle
Naylet is a beautiful mom from Florida who brought along her very cool police officer husband named Greg. I loved getting to know them. We compared notes on living in the country vs. living in exciting Miami. Pretty much exactly the same experience!
Not really.
 I loved Naylet’s recipe because there were so many interesting things going on: pork chops rubbed in a coffee-cocoa-thyme mixture, then brushed with a blueberry-hoisin combo after they’re grilled. Such a deep, dark color and so divine! Here’s Naylet’s video.
On the Ranch Coffee-Rubbed Blueberry Thyme Pork Chops
Serve with Bush’s Grillin Beans Sweet Mesquite
2 tablespoons ground coffee beans (preferably a dark roast)
2 teaspoons thyme leaves
1 teaspoon unsweetened cocoa powder
1 teaspoon ground coriander
1/2 teaspoon kosher salt, or to taste
4 boneless pork loin chops, cut about 3/4 inch thick
3/4 cup blueberry preserves
1/4 cup hoisin sauce
1/2 teaspoon crushed red pepper flakes, or to taste
2 tablespoons finely chopped chives
In a small bowl, combine coffee, thyme, cocoa powder, coriander, and salt. Place pork chops on a work surface. Rub coffee mixture on both sides of pork chops. Transfer to a plate; cover until ready to grill.
In a medium bowl, stir together blueberry preserves, hoisin sauce, and red pepper. Reserve half of blueberry glaze for spooning over chops when serving.
Prepare a medium-high gas or charcoal grill. Grill chops until slightly pink in center (160 F), about 11-14 minutes. During last minutes of grilling, brush blueberry glaze over both sides of chops.
To serve, spoon reserved blueberry glaze over chops. Top with chives; serve with Bush’s Grillin Beans Sweet Mesquite.
WILD CARD WINNER: Jerilyn K!
The sweet, lovely, and talented Jerilyn traveled from Des Moines with her mom and made a glorious orange-flavored salmon with big grilled onions over the top.
 Last year’s Wild Card winner was a shrimp recipe, so it was nice for salmon to make an appearance.
Here’s Jerilyn’s video and recipe.
Orange-Chipotle Salmon with Grilled Onions & Cilantro
Served with Bush’s Texas Ranchero Grillin’ Beans
Sweet, fresh orange juice and honey mixed with smoky chipotle, over a beautiful salmon filet – a main dish that’s sure to be a crowd pleaser. Topped with a sliced grilled onion and fresh cilantro, this orange-chipotle salmon perfectly pairs with the kick from Bush’s Texas Ranchero Grillin’ Beans.
8 oz salmon filet (2-4 oz portions)
Juice of 2 oranges & zest of 1 orage
1 chipotle in adobo (canned) and 2 tsp chipotle adobo sauce
2 tbsp pure honey
3 garlic cloves, chopped
1/2 tsp sea salt
1/4 tsp black pepper, chopped
2 slices of onion, 1/4” thick
2 tbsp extra virgin olive oil
2 tbsp fresh cilantro
1. For the marinade, combine fresh orange juice, orange zest, chipotle and adobo sauce, honey and garlic in a small food processor or blender; process until smooth.
2. Add salt, pepper and marinade (reserving 1-2 tablespoons of marinade to brush on salmon while grilling) into a plastic zip top bag with salmon filets. Marinate salmon in refrigerator for about 2 hours (or your preference of time).
3. Preheat grill to medium high.
4. Remove salmon from marinade and slice two, 1/4-inch thick pieces of onion. Brush salmon and whole onion slices with olive oil and extra sprinkle of salt and pepper, on both sides. Place salmon and onion on the grill and cook 5-6 minutes per side, depending on thickness of salmon. As the salmon cooks, brush with reserved marinade.
5. To serve, top grilled salmon with 1 cooked onion slice and fresh cilantro. Salmon pairs great with Bush’s Texas Ranchero Grillin’ Beans.
Serves 2 – but easily doubled or tripled for a party
Wish we could have posted pics ~ I have a beautiful mug shot of this delicious dish!
Note from PW: Thanks to Bush’s Grillin’ Beans and all the winners of the recipe contest. It was another really fun experience!

June 25, 2012
Easy Calzones
 What’s the difference between a calzone and a pizza pocket? This is one of the mysteries of life I hope to one day know the answer to.
We love calzones in our house! Always have, always will. They’re easy to eat, and you can fill them with whatever ol’ pizza-friendly ingredients you like. You can serve them with marinara as a dipping sauce or you can pour marinara sauce over the calzones after they’re baked.
And you can make them with your favorite homemade pizza crust, which I’m happy to do…OR you can do what I did last night and take this easy, just-as-delicious road.
 Here’s what you need: Frozen (unrisen) dinner rolls or bread dough, ricotta cheese, Parmesan, mozzarella, sausage, onion, Italian seasoning (not pictured because I’m a dork), parsley, salt and pepper (not pictured because I’m an airhead), and pepperoni if you’re into that sort of thing.
 Remove several rolls from the bag and place them on a baking sheet. Then just cover them with a towel and let them thaw and rise for two or three hours.
 When the rolls are close, preheat the oven to 400 degrees, then dice up an onion.
 Throw in the sausage and cook it with the onions…
 Until the sausage is brown.
 Then throw in the Italian seasoning…
 And the red pepper flakes. Then just remove the sausage from the skillet and set it aside to cool.
 Now, throw the ricotta into a bowl.
 Then add some Parmesan cheese.
 Grate up some mozzarella…
 Then add it to the bowl.
 Then have your thirteen-year-old nephew Stu crack in a couple of eggs for you.
Note: If you do not have a thirteen-year-old nephew named Stu, you may have a hard time executing this important step.
 Add in some salt…
 And some pepper.
 The rolls are risen!
 Grab one of the rolls…
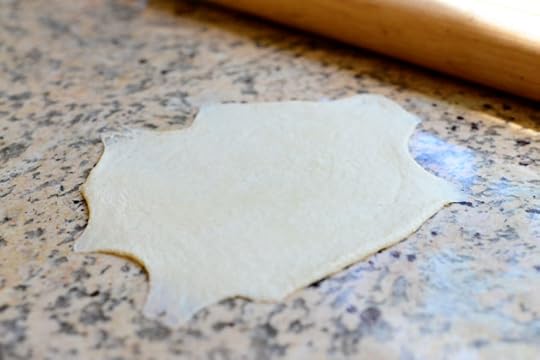 And roll it as thinly as you can. You’ll have to press pretty hard and work it over a few times, but just keep at it.
 Spoon on some topping…
 Lay on some pepperoni…
 Then fold the other edge over…
 And place it on a baking sheet. (A baking mat, parchment, or cooking spray is wise. As you can see, I was not wise in this photo.)
 Here’s the sausage version.
 The bread dough is awesomely stretchy, so it allows you to pull a bit when and if you need to!
 To seal the edges, press them with a fork…
 Then beat an egg…
 And generously brush the surface of the calzones.
 Oh! And I forgot the parsley earlier.
 It goes into the cheese mixture.
 If you just want one variety of calzone, here’s the way I usually do it: Just throw the cooled sausage right into the cheese mixture and stir it around.
 If you want more generously-sized calzones, grab the thawed bread loaf and tear off 1/4 to 1/3 of the loaf.
 Form a circle of the dough…
(See that wound on my finger? Airsoft.)
 And roll it out. Because you have a little more dough to work with, you don’t have to get it quite as thin as you did the bread rolls.
 Lay a good portion of the sausage on the dough, then lay pepperoni slices on top.
 Fold it over…
 And brush on the beaten egg.
Now it’s time to bake ‘em! 400 degrees for 8-12 minutes, until they’re nice and golden brown.
 Like dees! These are the babies.
 And dees! This is the monster-sized one.
 This is definitely a portion size Marlboro Man can wrap his appetite around, but the smaller calzones make more sense for kids or anyone who might be frightened by a calzone this monstrous.
I serve my calzone with marinara sauce for dipping. It’s more of a fun experience that way and everyone can control the amount of sauce he prefers. But you can also smother the calzone with marinara if you like things messy.
Enjoy, everyone!
Here’s the handy dandy printable:
Recipe: Calzones
Prep Time: 3 Hours
|
Cook Time: 20 Minutes
|
Difficulty: Easy
|
Servings: 8

Print Recipe
3"x5" Cards
4"x6" Cards
Full Page
Ingredients
16 whole Frozen, Unrisen Dinner Rolls (I Use Rhodes) Note: Can Also Use Frozen Bread Loaves.1 Tablespoon Butter1 whole Medium Onion, Diced1 pound Breakfast Or Italian Sausage1/2 teaspoon Italian Seasoning1/4 teaspoon Red Pepper Flakes15 ounces, fluid Whole Milk Ricotta Cheese1/2 cup Grated Parmesan Cheese1-1/2 cup Grated Mozzarella Cheese2 whole Eggs1/2 teaspoon Salt Black Pepper To Taste2 Tablespoons Chopped Fresh Parsley Marinara Sauce, For Serving1 whole Egg Beaten Preparation Instructions
Place frozen rolls (or frozen bread loaves) on a baking sheet to thaw. Cover with a tea towel and let thaw and rise for 2 to 3 hours.
Preheat oven to 400 degrees.
Melt butter in a large skillet over medium-high heat. Add onion and allow to cook for a couple of minutes. Add sausage and cook until brown, crumbling the sausage as you stir. Add Italian seasoning and red pepper flakes. Remove from pan and allow to cool on a plate.
In a separate bowl, combine ricotta, Parmesan, mozzarella, eggs, salt, pepper, and parsley. When sausage is cool, stir it in. Set aside.
When rolls are thawed and risen, roll them out on a lightly floured surface until paper thin. Spoon 3-4 tablespoons (approximately) filling onto half of the dough circle. Fold half of the dough over itself, then press edges to seal.
*Note: If you want a larger calzone, use frozen bread loaves and use about 1/4 to 1/3 of the loaf for each calzone.
Brush surface of calzone with beaten egg, then bake for 10-13 minutes, or until nice and golden brown. Serve with warm marinara sauce.
Posted by Ree on June 24 2012

Ree Drummond's Blog

- Ree Drummond's profile
- 2032 followers

