
Ree Drummond's Blog, page 51
October 1, 2012
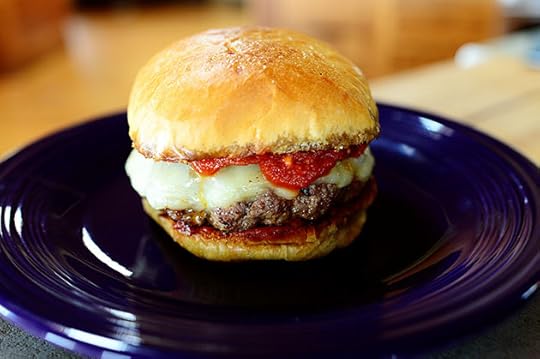
Pepperoni Pizza Burgers
 I made pizza burgers last week and all I can say is that I’ve never been more violently struck with the need to go to food-related confession than I was the moment I took my first bite.
My…goodness.
And I wasn’t the only one. Cowboy Josh happened to drop by just as I was finishing up, and he devoured one in two minutes flat just before passionately declaring that it was one of the best things he’d ever eaten.
So, seeing that it’s all sinful and cowboy-approved and all…I thought I’d share it with you.
 The Cast of Characters: Ground beef, Italian sausage, mozzarella cheese, marinara sauce, pepperoni, and Kaiser rolls. Also (not pictured, because I’m an airhead) Italian seasoning!
(Ignore the other ingredients such as the onion, pepper, etc. I used them for a variation I’ll share with you soon.)
 Start by throwing some ground beef and Italian sausage into a bowl.
 Use your hands to knead the meat together, saying “Ew” a couple of times as you hear the squishy sounds.
 Add in some Italian seasoning and knead it around until it’s all combined. Don’t say “Ew” this time, because you’re desensitized to the squish.
Hey, I have a fun idea! Go up to someone on the street tomorrow and say, “Are you desensitized to the squish?” just for kicks. See what they say.
 Form the meat mixture into patties…
 Then cook ‘em in a skillet over medium-high heat until they’re totally cooked in the middle. Rare burgers are a no-no anyway…but rare burgers containing pork sausage are a no-no-no-no-no infinity.
Unless you’re my father-in-law, who will eat a rare burger no matter what it’s made of.
But that’s another story for another time.
 Cook it for several minutes on the first side, then flip it over to the other side.
 Next, lay a couple of slices of cheese on top. This is Provolone, and I love how neatly the round slices fit the patty. Satisfies my sense of order and make me feel like I’m a total winner for the first time in all my 43 years.
Cheese. It’s a powerful thing.
 Immediately lay a circle of pepperoni slices right on top.
 Meanwhile, grill the rolls in a separate skillet with a good amount of melted butter.
 Then just let the cheese melt on the patty, which will also warm up the pepperoni!
I am now hungry.
 As soon as both halves of the roll are nice and toasted…
 Spoon a generous amount of marinara sauce on both the bottom and top half.
 Remove the lusciousness from the skillet…
 And lay it on the bottom bun. Just look at the oils from the pepperoni cascading down the sides of the patty.
Help.
 Sprinkle some Parmesan on the marinara sauce on the top bun…
 And plop it right on top.
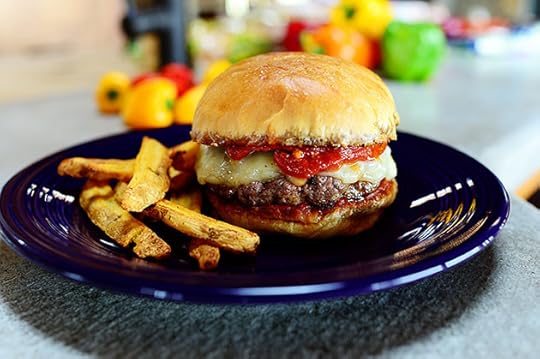 Serve it with fries!
Baked fries, of course. Because we’re trying to make healthy choices here.
Ahem.
Mmmmm. Delicious!
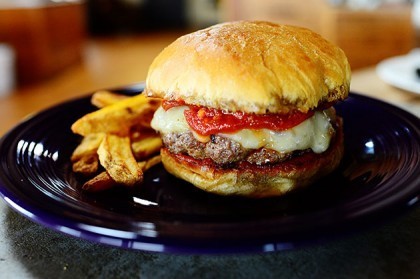
 Here’s a cross-section. The meat is so delicious with the addition of the sausage—and very, very juicy, too. And the layer of pepperoni, the melted cheese, and the marinara is just a to-die-fer combination.
 Enjoy, guys!
(I’ll share the variation with you soon. It’s even better’n this one!)
Here’s the handy printable:
Recipe: Pepperoni Pizza Burgers
Prep Time: 5 Minutes
|
Cook Time: 10 Minutes
|
Difficulty: Easy
|
Servings: 4
Print Recipe
3"x5" Cards
4"x6" Cards
Full Page
Ingredients
1-1/2 pound Ground Beef1/2 pound Italian Sausage ( A Little More Is Fine!)1/2 teaspoon Italian Seasoning8 slices Mozzarella Or Provolone Cheese Pepperoni Slices8 Tablespoons Jarred Marinara Sauce Grated Parmesan Cheese4 whole Kaiser Rolls Or Good Hamburger Buns Preparation Instructions
Combine ground beef, Italian sausage, and Italian seasoning in a bowl. Knead it together and form it into four large/thick patties. Fry the burgers on one side for several minutes, then turn the burgers. Lay 2 slices of cheese on each patty, followed by several slices of pepperoni. Allow burger to cook all the way through while the cheese melts and the pepperoni warms.
Split the rolls and toast them in butter in a skillet until nice and golden and crisp. Spread both halves with marinara sauce and sprinkle the sauce with Parmesan.
Lay the patties on the bottom buns, then top with the top buns. Serve immediately; hearty appetites are recommended!
Posted by Ree on September 30 2012


September 28, 2012
Recipes from Tomorrow’s Show
 On tomorrow’s Food Network Episode, my oldest child turns fifteen and has her three best buddies over for dinner. I do the cooking, and by the end of the evening, I’m convinced I’m also a fifteen-year-old.
Denial. It’s a powerful beast.
For your convenience, here are the recipes I’m cooking on tomorrow’s show! Just click on the photos or the links to get to the step-by-steps and printables. (Note that some of the photos are older, from the dark ages of 2007/2008. Forgive the quality!)
Prune Cake
 For her birthday, I make my daughter this luscious Prune Cake for breakfast after she helps Marlboro Man on the ranch. This cake is truly one of the most delectable things on earth, and I recommend not telling your family it has prunes in it until after they’ve taken their first bite.
Here’s the step-by-step:
Prune Cake
Make this cake. Because you’re worth it.
New York Style Chopped Salad
 Later, my girl’s friends come over and I make them this New York Style Chopped Salad for dinner.
 This is truly one of the most fun salads to make, particularly if you’re having friends over. Everyone just picks the ingredients they want, and it all winds up being delicious!
Here’s the link to the step-by-step:
New York Style Chopped Salad Bar
Chopped salad. There is no substitute.
Olive Focaccia
 To go with the salad, I make focaccia—one of my favorite things on earth. The version in the photo above is packed with olives (olive focaccia is my favorite) but for the girls I kept it simple and just mixed in a little chopped rosemary, then sprinkled the top with kosher salt.
The recipe is the same no matter what you knead into it. Here it is!
Olive (or whatever variety you want!) Focaccia
Carbs for president!
Ice Cream Flower Pot Desserts
 And finally, for her birthday dessert I made these adorable Flower Pot Desserts, which are so cute it should be a crime.
 You can use different flowers…
 And you can throw in some gummy worms for fun.
Here’s the printable for these:
Ice Cream Flower Pot Desserts
Darling.
Hope you enjoy the episode! It was really fun to shoot.
Lots of love,
P-Widdy

September 27, 2012
Where in the World Would You Go? (Winners Announced!)
The winners of the red mixers are:
#3215 Shon P. “A cottage in the countryside of England – by the water!”
#15290 Michelle Ford…”Ireland!!! Castles and just pure beauty!”
#15365 Jessie W. “Definitely Australia! The travel would be exhausting, but I’m sure worth every bit of it!”
Congrats, winners! Contact prizes@thepioneerwoman.com to claim your mixers. Today, because it’s Thursday, because I’m cooking new recipes all day, because it’s September 27, and (most of all) because I love ya, I’m giving away three (3) of these gorgeous, shiny candy apple red KitchenAid stand mixers.
I love this mixer.
It’s kinda red.
TO ENTER
To enter this giveaway, just answer the following question in the Comments section of this post:
“If you could visit anywhere in the world on vacation, where would you go?”
Are you dying to go relax on the beach in Hawaii? Or are England, Ireland, or Scotland more your speed? Would you rather see Spain and/or Portugal? Italy or Greece? Germany or Swizerland? Or would you like to go Down Under and see Australia or New Zealand? Africa? India? China? Or are there still lots of places in the U.S. you’d like to see?
Just shout out your #1 choice for a vacation and you’re automatically entered to win a mixer.
THE RULES
One entry per person, please.
Winners will be selected and announced Friday.
Good luck!
NOTE: Contest time has ended and comments are closed. Winners will be announced on this post later this afternoon!

Where in the World Would You Go?
Today, because it’s Thursday, because I’m cooking new recipes all day, because it’s September 27, and (most of all) because I love ya, I’m giving away three (3) of these gorgeous, shiny candy apple red KitchenAid stand mixers.
I love this mixer.
It’s kinda red.
TO ENTER
To enter this giveaway, just answer the following question in the Comments section of this post:
“If you could visit anywhere in the world on vacation, where would you go?”
Are you dying to go relax on the beach in Hawaii? Or are England, Ireland, or Scotland more your speed? Would you rather see Spain and/or Portugal? Italy or Greece? Germany or Swizerland? Or would you like to go Down Under and see Australia or New Zealand? Africa? India? China? Or are there still lots of places in the U.S. you’d like to see?
Just shout out your #1 choice for a vacation and you’re automatically entered to win a mixer.
THE RULES
One entry per person, please.
Winners will be selected and announced Friday.
Good luck!
September 24, 2012
Granola Bars
 Granola bars are my life. I never knew that until just now.
It’s fun to make granola bars. It’s so fun, I made them on one of my recent Food Network episodes. It’s so fun, I could make granola bars every week for the rest of my life. It’s so fun, I’d rather make granola bars than go to Disneyland!
Of course, my not wanting to leave my house probably contributes to this somewhat.
Here’s the basic recipe, but note that you can change it up however you’d like! Add different nuts, different grains, different cereals. This is the beauty of making your own granola bars: You can totally customize them according to what you like.
Let’s DO this thang.
 The Cast of Characters: Oats, canola oil (not pictured because I’m an airhead), butter, salt, brown sugar, honey, apple juice, molasses, vanilla, Rice Krispies, wheat germ, pecans, and almonds.
 Throw some butter into a bowl…
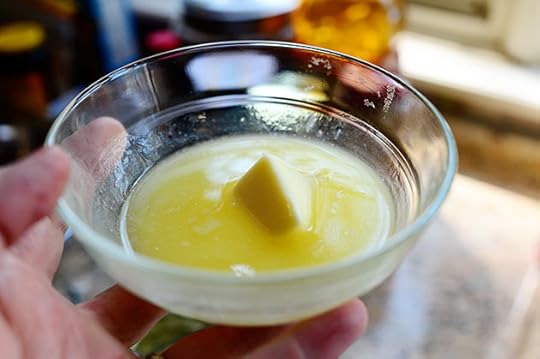 And nuke it in the microwave.
 Measure some oats, spilling them all over your countertop in the process.
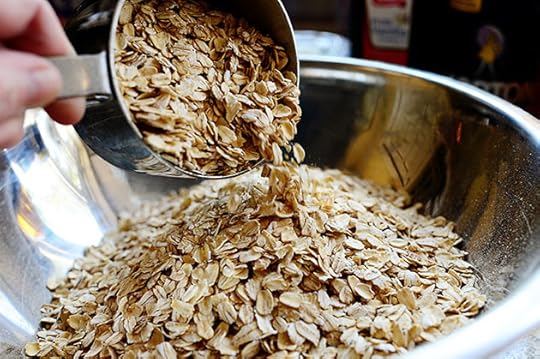 Pour the oats into a bowl.
 Next, grab the spottiest measuring cup you can find because you’re impressive that way, and measure a little bit of canola oil…
 And pour in the melted buttah.
 Stir it together and drizzle it into the bowl of oats…
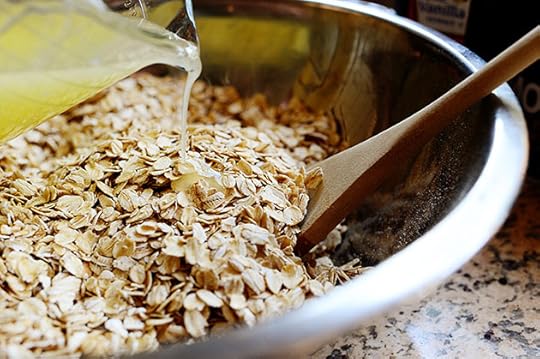 And stir it as you drizzle.
 Then just toss it around until the oats are all coated.
 Sprinkle in a good teaspoon of salt. You’ll be glad you did.
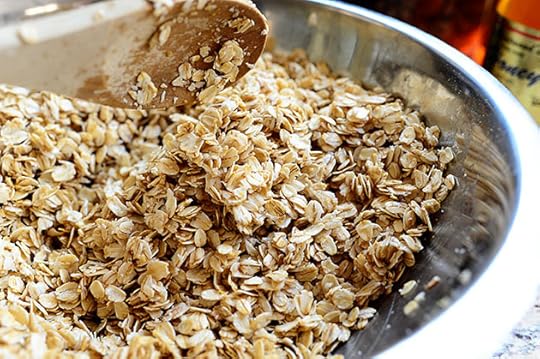 Then stir it around…
 And pour the oats onto two rimmed baking sheets.
 Shake ‘em to evenly distribute them in the pans, then throw ‘em into a 350 degree oven for about 15 to 20 minutes—and reach in and shake the pan two or three times while they toast.
 After they’re toasted, let ‘em cool for a bit then throw ‘em into a big bowl.
 Then measure some brown sugar…
 And throw it into a medium saucepan.
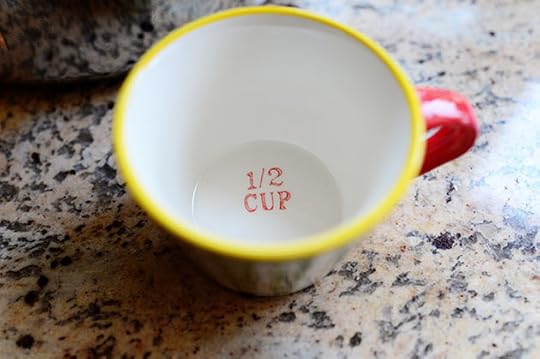 Grab a half-cup measure…
 And drizzle in some honey, baby.
 Sorry I called you honey baby. I get carried away sometimes.
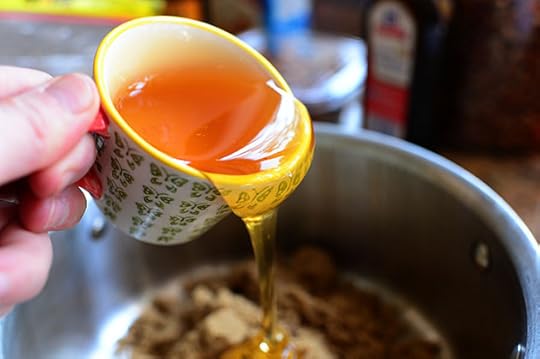 Then pour it into the pan.
 I want to take a bath in this and use it as a body scrub.
Would that be weird?
 Then grab a fourth-cup measure…
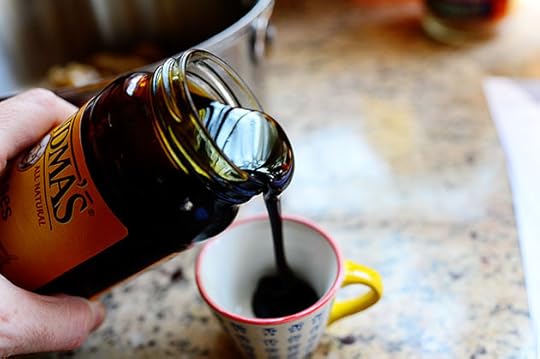 And pour in some molasses.
 Ooooh. Talk about tempting fate! I like to walk on the edge. I like to walk on the wild side. I like to play with fire.
I like to worry so much about taking a photo of molasses going into a measuring cup that I almost pour too much molasses into the measuring cup.
 Pour it into the saucepan with all the other goodness.
 I want to publish a coffee table book filled with nothing but photos of molasses being poured.
 I’m going to call the book “Molasses.”
Look for it on bookshelves in the year 2079.
 Finally, measure some apple juice…
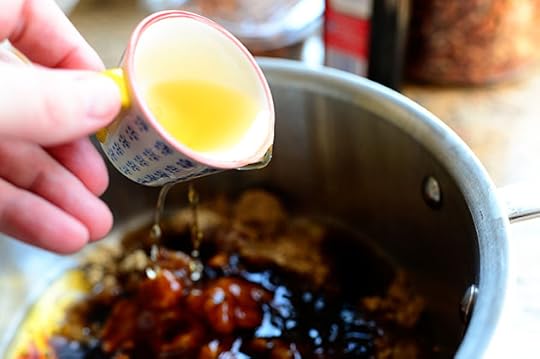 And pour that in.
Basically, I’m looking to create as sticky a substance as I can.
 Stir it around over medium heat…
 Let it heat until it just barely starts to bubble, then turn off the heat.
 Stir in plenty of vanilla extract, then set the mixture aside for a minute.
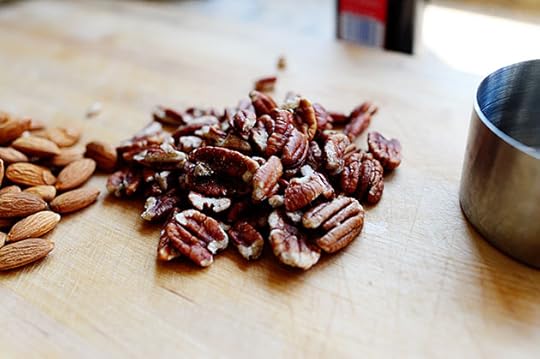 Grab some pecans…
 And some almonds.
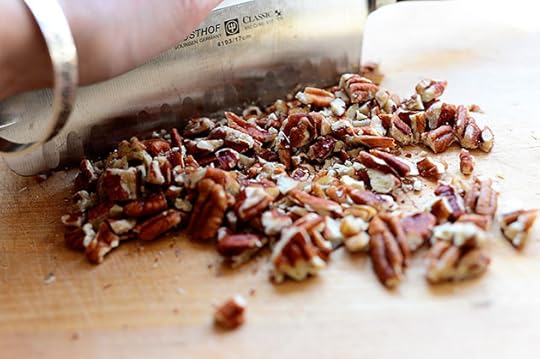 Then chop up the pecans…
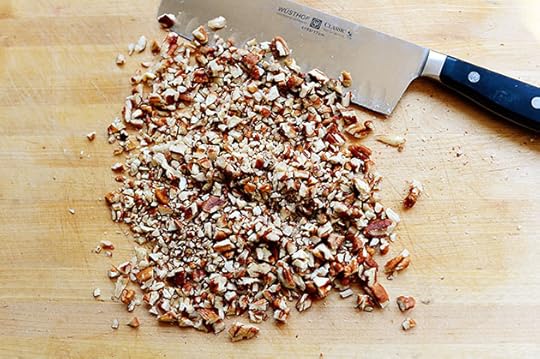 Until they’re nice and fine.
 Then chop the pecans until they’re…well, not so fine. Big, crunchy chunks of almonds make the granola bars worth living for. Worth fighting for, worth DYING for! Because it’s the only thing that lasts.
Wait. Sorry. That was land. Gone with the Wind. Tara. Mr. O’Hara.
Ignore me, please.
 Now add the chopped pecans to the toasted oats.
Your kitchen smells really good right now, by the way.
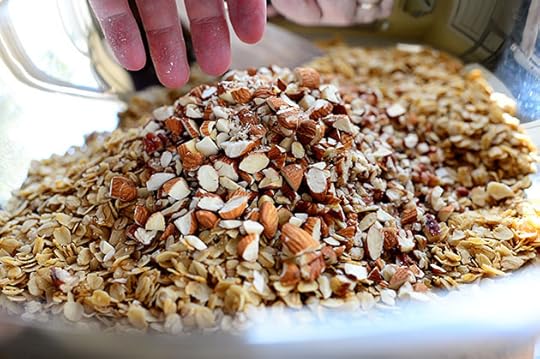 Then add the almonds…
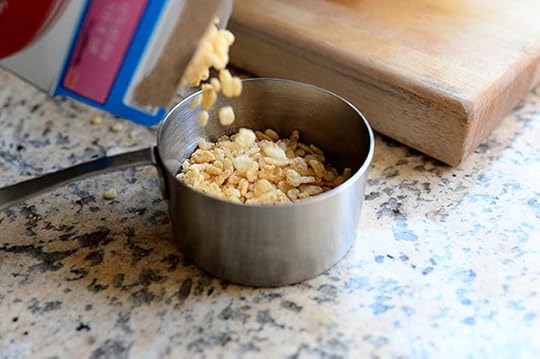 Measure some Rice Krispies…
 And pour them in. This won’t cause your granola bars to snap, crackle, and pop…but it will give them extra flavor and crunch.
 Then grab this weird, yummy substance.
Growing up, my mom always had wheat germ in the cabinet. I’m glad we had this talk.
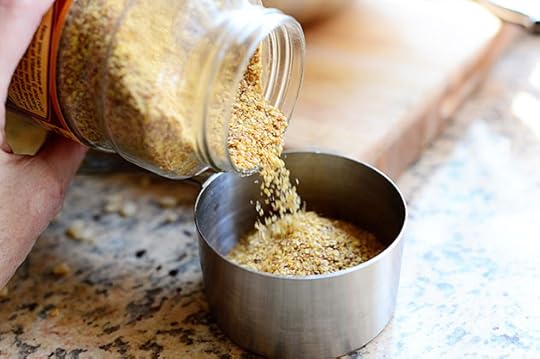 Measure a nice, big cupful…
 Then pour it right on in.
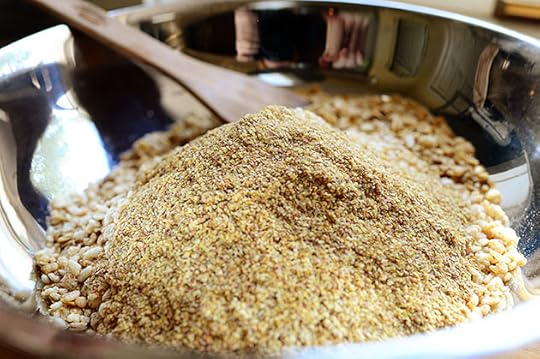
 Stir all these crunchy, crispy dry ingredients together…
 Then grab the saucepan of sweet, warm liquid…
 And pour it right on in! Drizzle it slowly, though, so that you can slowly stir it the whole time.
 Yummy!
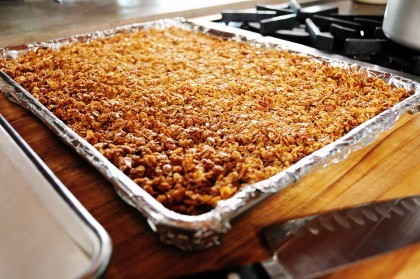
 Grab a foil-lined baking sheet (it’s best if you can do this ahead of time so that it’s ready when the mixture is…well, mixed.)
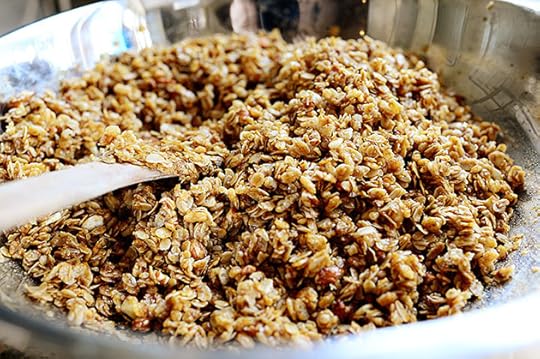
 And pour on the the mixture.
 Get it all into a uniform layer…
 Then you can spray your hands with cooking spray…
 And pat it gently so that it’s lightly pressed into the pan.
Speaking of which: In my haste, I completely neglected to spray the foil with cooking spray, which is an important step.
You’ll find out why in a minute.
Don’t be like me.
 Next up, just bake it in a 325 degree oven for about 20-25 minutes until it’s nice and golden brown and your kitchen smells like home.
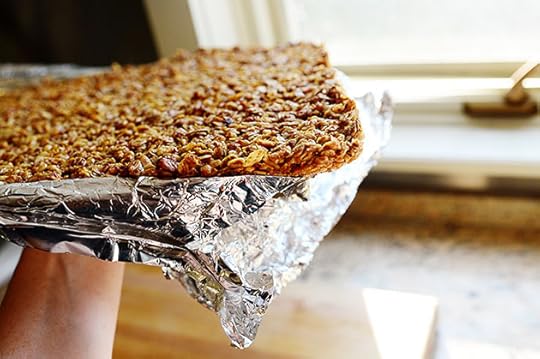 Let it cool completely (the granola will seem soft when you first pull it out of the oven, but will crisp up as it cools) then carefully lift the foil out of the pan in one piece.
 If you sprayed the foil with cooking spray, the granola should easily separate from the foil. If you did not, you’ll have to do some careful peeling.
I repeat: Don’t be like me. This has been a public service announcement.
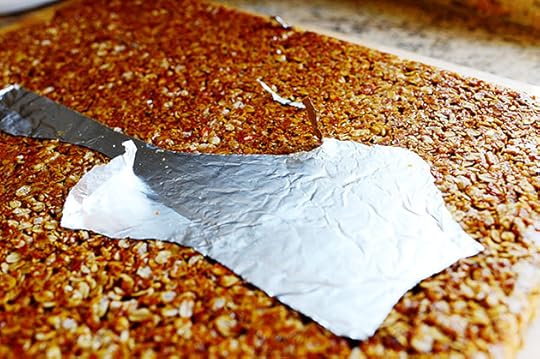 Got most of it…
 Got all of it!
 Then I flipped it over so that the top was on top again…
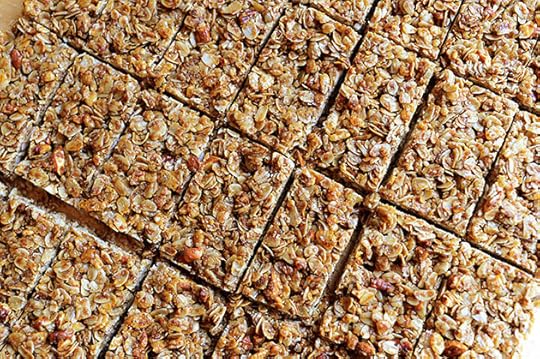
 And with a very sharp knife, I cut the granola into large strips.
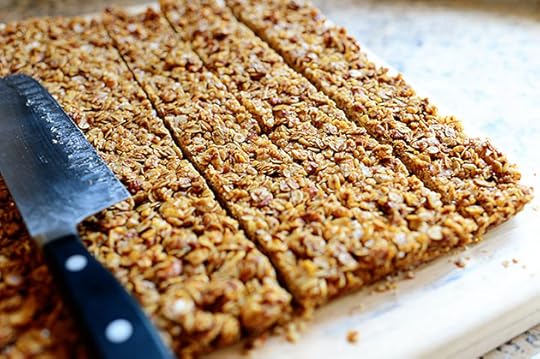 From there…
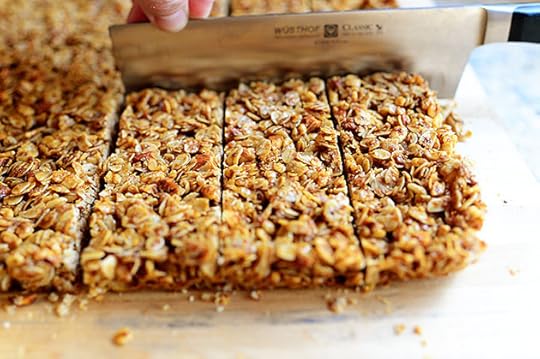 You can cut them into bars…
 Or squares! Sometimes I like the more bite-sized pieces, because then you’re not committing to a whole bar.
Also, then you can eat twenty. Ha.
 I kinda like this size.
 Yum, yum. These are really so good. And what I love about making granola bars is, you can change up the things you add: sunflower seeds, walnuts, Grape Nuts, different cereals, different grains.
 You can also break them into clusters. And if, when you break them up, they don’t seem quite as crazy crisp as you’d like, just pop ‘em on the baking sheet and throw ‘em back into the oven for five to ten minutes. Then let ‘em cool and they’re good to go.
 And here’s another thing you can do.
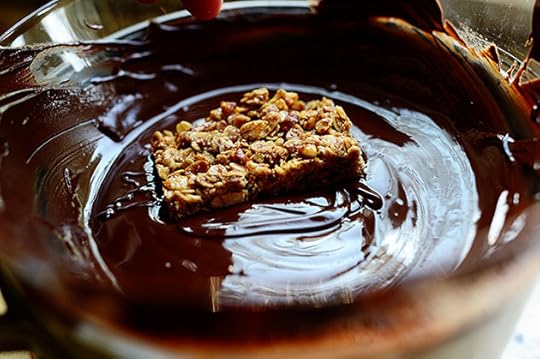 Dunk ‘em in chocolate.
 Then just set ‘em aside on parchment (or a baking mat) till the chocolate sets.
I could go on and on, but I need to go have a granola bar for breakfast!
Here’s the handy dandy printable. Makes a bunch!
Recipe: Granola Bars
Prep Time: 15 Minutes
|
Cook Time: 1 Hour
|
Difficulty: Easy
|
Servings: 16
Print Recipe
3"x5" Cards
4"x6" Cards
Full Page
Ingredients
6 cups Rolled Oats (not Quick Oats)4 Tablespoons Butter, Melted, Plus More For Greasing1/4 cup Vegetable Or Canola Oil1 teaspoon Salt1 cup Brown Sugar1/2 cup Honey1/4 cup Apple Juice1/4 cup Molasses3 teaspoons Vanilla Extract1-1/2 cup Rice Krispies1 cup Wheat Germ1/2 cup Finely Chopped Pecans1/4 cup Roughly Chopped Almonds8 ounces, weight Milk Chocolate Or Chocolate Almond Bark, Melted (optional) Preparation Instructions
Preheat the oven to 350 degrees F.
In a bowl, toss the oats with the canola oil, melted butter and salt. Spread the mixture out on 2 baking sheets and toast in the oven for 15 to 20 minutes, shaking the pan twice and making sure they don't burn. Remove from the oven and set aside.
Reduce the heat to 325 degrees F.
In a medium saucepan, combine the brown sugar, honey, apple juice and molasses. Heat the mixture slowly, stirring until all combined. Stir in the vanilla.
Toss together the toasted oats, rice cereal, wheat germ, pecans and almonds. Pour in the sugar mixture, stirring as you pour. Toss to combine; it will be sticky!
Press into 1 baking sheet (thoroughly greased with butter, or line pan with foil and grease foil) and bake until golden, about 20-25 minutes. Remove from oven and let cool. Cut pieces with a sharp knife and remove from the pan.
OPTIONAL
Dip the cooled granola bars straight into the melted chocolate so that the top is plain and the bottom is chocolate-covered. Set on parchment until set, sticking in the fridge to hasten this along if necessary.
Yum yum!
Posted by Ree on September 14 2012

September 19, 2012
Italian Sloppy Joes
 I promise my next cooking post will have nothing to do with spaghetti sauce. But for now, because I presented my spaghetti sauce as a recipe that’s great to make in bulk and freeze, I thought I’d show you a fun alternative use!
This is one of those Friday night dinners, Saturday football lunches, or Monday night meals that’s so easy to pull together it should be illegal. And you can use storebought garlic bread or whip up a few slices of your own—whatever works!
And you can serve it with a big green salad to make it healthy.
Ahem.
 Here’s a freezer container of the spaghetti sauce I made the other day. I’ve got several more just like it, which makes me feel locked, stocked, and ready to go.
 This is the quickie version! But you can also slice a big loaf of French bread and make your own garlic bread. For a really fast shortcut, though, this is nice to keep in your freezer.
 In any event, you want the garlic bread slices to be really golden brown and crisp, so you’ll want to put them on a cookie sheet…
 And bake ‘em till they’re done.
Of course, we would never burn our garlic bread. Never.
Except on Wednesday afternoons in September.
 After the sauce is thawed, pour it into a microwave-safe bowl (if you’re in a hurry) or on the stovetop (if you’re not in a hurry.)
 Heat it up till it’s nice and piping hot.
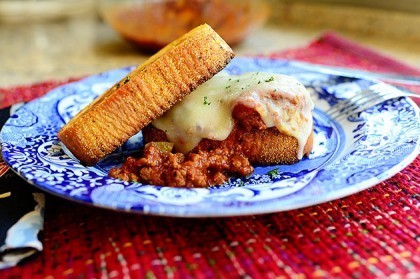
 Preheat the broiler, then spoon a nice portion of sauce over one of the slices of garlic bread.
 Let a little bit cascade over the sides so it looks nice and messy, which is a hallmark of both sloppy joes and my car interior.
 Now, you can serve it just like this…
 OR you can lay a slice or two of mozzarella on top…
 And melt it under the broiler real quick-like.
(Be sure to use an oven-proof plate!)
Then, to be fancy, prop a second piece of garlic bread over to the side. Not that you’d probably ever pick this up and eat it like a regular sandwich, but at least it’ll look yummy and abundant and inviting.
 As I said above: I promise my next cooking post will have nothing to do with spaghetti sauce.
But in the meantime, dig in!
Here’s are the handy printables, both for the sloppy joes and for the spaghetti sauce from the other day.
Enjoy, my friends!
Recipe: Italian Sloppy Joes
Prep Time:
|
Cook Time: 10 Minutes
|
Difficulty: Easy
|
Servings: 1
Print Recipe
3"x5" Cards
4"x6" Cards
Full Page
Ingredients
Leftover Spaghetti Sauce Thick Slices Of Garlic Bread (either Storebought Or Homemade) Mozzarella Cheese Slices Minced Fresh Parsley Preparation Instructions
Heat up the leftover spaghetti sauce until hot and bubbly.
Bake two garlic bread slices until golden brown and crisp.
Preheat broiler. Place one slice of garlic bread on an ovenproof plate. Spoon spaghetti sauce over the top, adding as much as you want. Top with a slice or two of mozzarella, then place it under the broiler just until the cheese melts. Sprinkle with parsley, prop the second piece of bread on the side, and serve with a knife and fork!
Posted by Ree on September 19 2012
Recipe: Spaghetti Sauce
Prep Time: 20 Minutes
|
Cook Time: 1 Hour
|
Difficulty: Easy
|
Servings: 18
Print Recipe
3"x5" Cards
4"x6" Cards
Full Page
Ingredients
5 pounds Ground Beef (I Used Ground Round)3 Tablespoons Olive Oil2 whole Large Yellow Onions, Diced2 whole Green Bell Pepper, Seeded And Diced6 cloves Garlic, Minced1 cup White Wine (or Low Sodium Beef Broth If You Prefer)2 cans 28 Ounce Crushed Tomatoes1 can (14 Ounce) Crushed Tomatoes1 can (small, 4-ounce) Tomato Paste1 jar Good Storebought Marinara Sauce (can Use Another Jar If You Like The Sauce To Be More Saucy Than Meaty)1 teaspoon Ground Oregano1 teaspoon Ground Thyme4 whole Bay Leaves2 Tablespoons Sugar2 teaspoons Kosher Salt1/2 teaspoon Crushed Red Pepper (optional)1/4 cup Finely Minced Fresh Parsley (or 3 Tablespoons Parsley Flakes), More To Taste1 whole Rind From One Wedge Parmesan (optional)1/2 cup Grated Parmesan Cheese (optional)2 pounds Spaghetti, Cooked Al Dente And Tossed With Olive Oil Extra Minced Parsley, For Serving Extra Parmesan Cheese, For Serving Preparation Instructions
IMPORTANT: This recipe can easily be halved! I just like to make a ton so I can freeze it.
In a large pot over medium-high heat, brown the ground beef until totally browned. Remove meat from pot with a slotted spoon and put into a bowl. Set aside.
Discard any grease in pot, but do not clean the pot. Drizzle in olive oil. When it is heated, throw in the diced onion and diced bell pepper. Stir it around for 1 1/2 minutes, then add the garlic. Stir and cook for an additional minute.
Pour in the wine and allow it to bubble up and reduce for about 1 1/2 minutes. Add crushed tomatoes, tomato paste, and marinara sauce. Stir to combine, then add oregano, thyme, sugar, salt, bay leaves, and crushed red pepper (if using). Stir, then add cooked ground beef and stir to combine. Place the lid on the pot and allow to simmer for 1 hour, stirring occasionally. Add a little water or some low-sodium broth if it needs more liquid
After an hour, add the minced parsley and the rind from a wedge of Parmesan (or grated Parmesan if you prefer--or both!) Stir to combine, then put the lid back on and allow it to simmer for another 30 minutes or so. Discard bay leaves before serving.
Serve a big bowl of oiled noodles and spaghetti sauce so guests can serve themselves. Top each serving with minced parsley and grated Parmesan (or Parmesan shavings) and serve with a big piece of garlic-cheese bread.
Amen.
Posted by Ree on September 16 2012

September 17, 2012
Spaghetti Sauce
 A-spaghetti without a-cheese is like a-kiss without a-squeeze!
An Italian waiter at Sardi’s in New York City said that to me when I was a little girl. It stuck.
A-spaghetti without a-cheese is like a-kiss without a-squeeze, and spaghetti without good sauce is like…well, limp, hopeless noodles.
This spaghetti sauce…is good sauce, my friends. It’s rich, meaty, a cinch to make, and it can be frozen and used on spaghetti, in lasagna, on top of garlic bread, or over the top of ricotta-stuffed pasta shells. And it can be made in bulk (below) and frozen, which makes me love it even more.
Let’s do this thing!
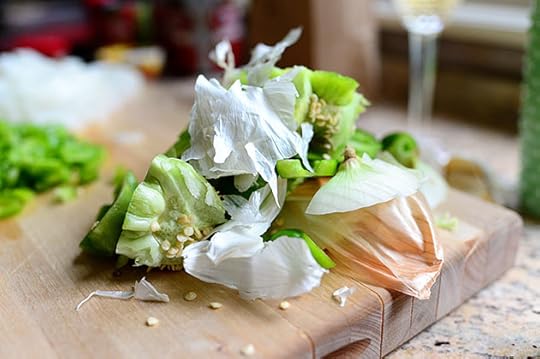
 The Cast of Characters: Ground Beef (I used ground round), garlic, onion, green bell pepper, crushed tomatoes, tomato paste, Parmesan cheese (not pictured), bay leaf, ground thyme, ground oregano, salt, pepper…
 and a mystery ingredient that’s either going to make you laugh or curse my name.
Or both.
But if you give it a chance, if you can see past everything you know about rules and propriety and good sense and purity, if you can reach deep into your heart to love me no matter what the ingredient winds up to be, you’ll end up with a fantastic plateful of spaghetti.
Let’s go on this journey together. I’m in.
Please note that I’m doubling my recipe because I already have a double batch of sauce in containers in my freezer and that’s evidently not enough for me. So whatever quantities you see me use, you can easily halve them.
 Lop off the top of two onions, then peel them and cut them in half from root to tip.
 Make vertical slices in the onion halves…
 Then slice in the other direction to dice ‘em up.
 Then lop off the tops and bottoms of the green peppers…
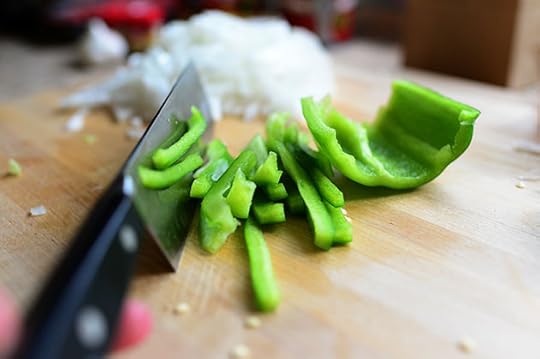 Slice them into strips…
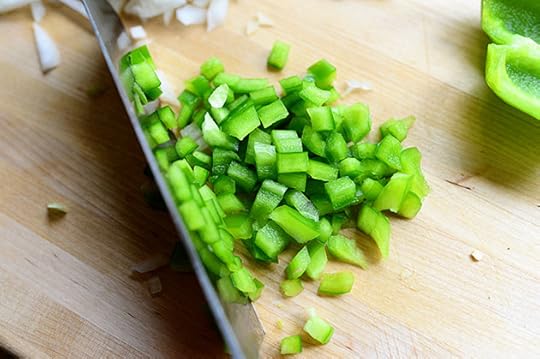 And dice up the strips.
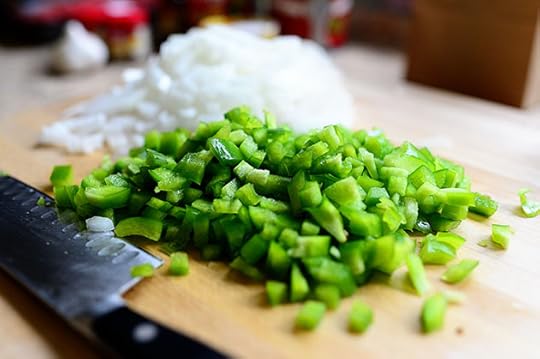 Veggies! Hooray.
 I love vegetable scraps.
I love lots of things.
I have a new plan. Assume I love everything. Then, when I come across something I hate, I’ll be sure to tell you. Sound constructive? Great! It’s a plan.
 I hate not loving garlic.
Translation: I love garlic.
Never mind. I can’t do it. I love loving love.
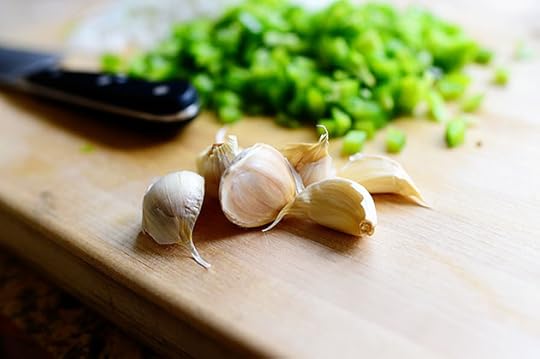
 Mince up a bunch! Like, five or six cloves. Or, preferably, more. Be brave! Be bold!
Carry breath mints!
 Now grab that beautiful beef, baby.
I aspire to alliterate.
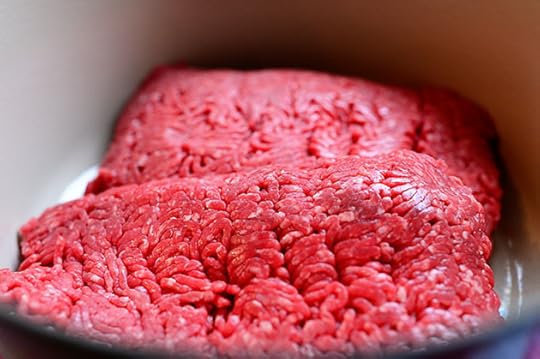 Throw it into a pot…
 And totally brown it up, crumbling it as you go.
 Remove it from the pot and throw it in a bowl for now, letting as much grease drain off as possible.
 Discard the excess grease in the pot (I didn’t have too much because my beef was very lean, unlike my bottom) and drizzle in some olive oil.
 A good couple/three tablespoons will do.
 When the oil is heated over medium heat, throw in the onion and green pepper…
 And cook them for a couple of minutes, until they start to get soft. What will also happen is that they’ll absorb all the wonderful flavor of the meat from the pan. Not that it matters, as all of this is eventually going to wind up in a big stew and cook to smithereens. But it makes me feel fancy anyway.
 Next, throw in the garlic. Since I was doubling the sauce, I could have added more.
I love not hating garlic.
 Stir it around and let the garlic cook for a minute or so, then pry the huge glass of wine away from your lips and pour it into the pot.
It’s better in the sauce!
I think.
 Stir it around and let the wine reduce for a couple of minutes…
 Then pour in a bunch of crushed tomatoes! I love all canned tomato products (whole, diced, stewed, puree, sauce) but for sauces I love to use crushed.
 It has a nice, hearty texture but no huge tomato chunks to contend with.
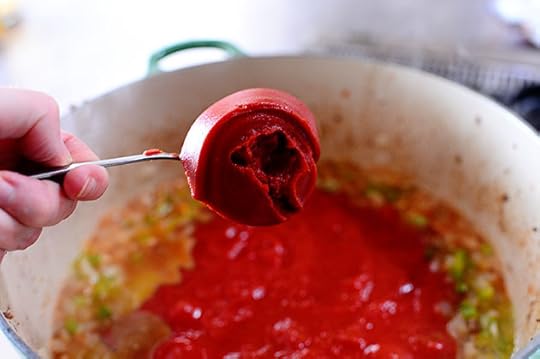 To deepen the flavor, add a nice plop of tomato paste.
 Plop! And look: the clump of tomato paste is fortifying itself against the enemy. It has already build a moat to keep attackers at bay.
I see things.
 Okay, stir it around, then add in some ground thyme…
 Ground oregano…
 Some sugar, to counteract the acidy tomato effect…
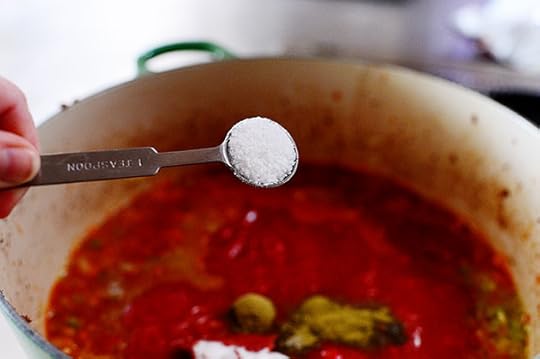 And salt.
 Stir it around and let it begin to heat up…
 Then reach into the mystery bag.
Wait! Stop for just a second.
Just remember one thing: I’ve always loved you.
And your outfit looks really pretty today.
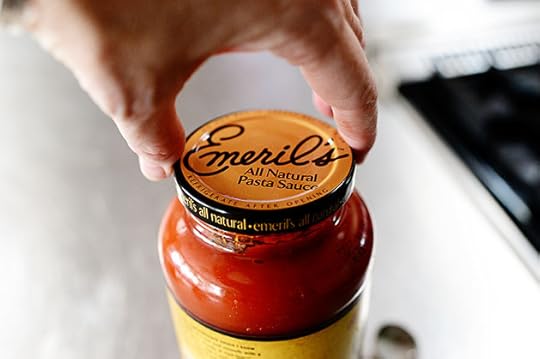
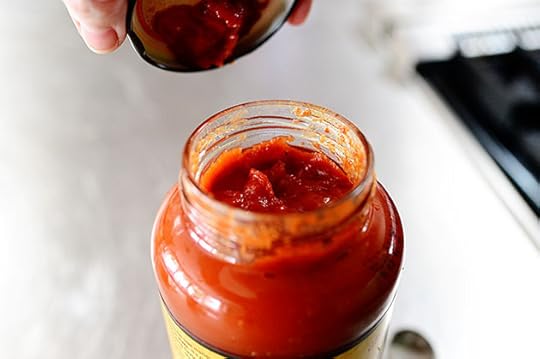
 Storebought marinara sauce!
*Grabbing onto your leg*
*Not letting you leave*
*Crying and screaming “If you leave me, I’m going with you!”*
Here’s the thing. You can totally leave this out. You can simply add the same amount in more crushed tomatoes (or any tomato product) and things will be just fine. And I do truly believe that if you browned up a bunch of ground beef and poured in a bunch of storebought marinara sauce, you’d never have the delicious, rich, homemade flavor of the stuff you could make yourself. But the one jar (or half jar, whatever your preference) of the storebought stuff is almost like adding…a dash of something. It spikes your homemade sauce with just another little dimension of flavor; you get the benefit of the hours and hours another entity (manufacturer, factory, Emeril) spent stewing their sauce.
Plus, it’s just good, clean, ornery fun to spend all this time and effort making sauce from scratch, then crack open a jar of storebought sauce and throw it in.
 I’m doing it…I’m doing it…
 I did it.
 Now I’ve really done it.
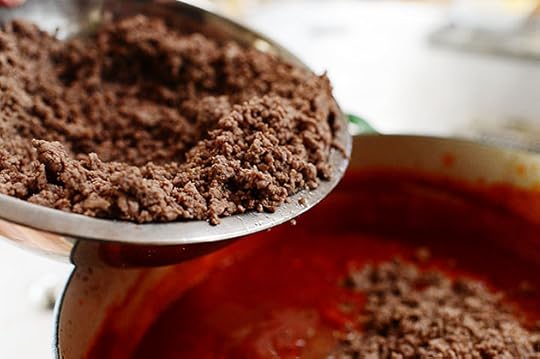 Next, grab the beef…
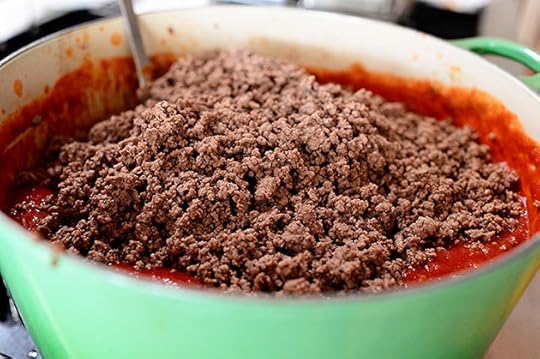 And throw it into the pot.
 Then stir it around…
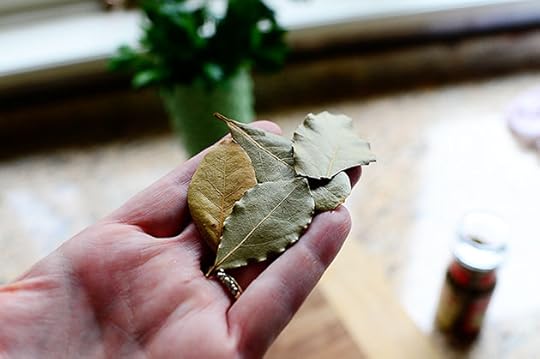 Grab some bay leaves…
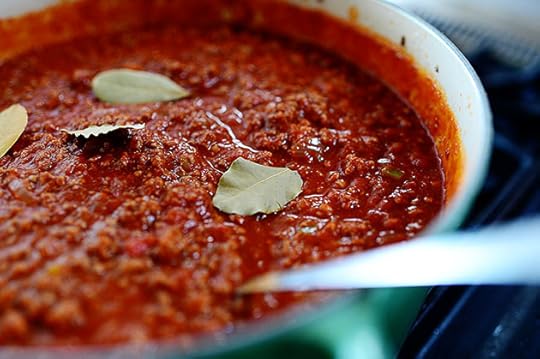 And throw them in, too.
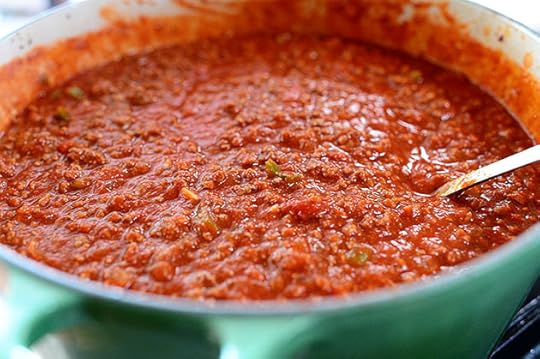
 Then reduce the heat to a simmer, put on the lid on the pot, and cook very, very gently for an hour or so. Stir it from time to time, watching Real Housewives reruns on your DVR in between stirs.
 After an hour, grab some parsley (or you can use dried parsley flakes).
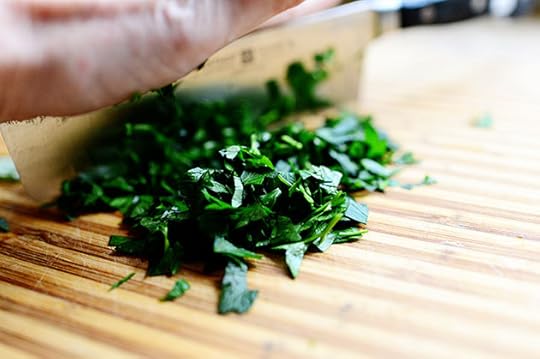 Chop it up…
 And keep on going until it’s really, really finely minced.
 Throw it in and stir it around.
 And next—this is just a nice little touch if you happen to have a wedge of Parmesan—cut the hard rind off of the end…
 And throw it right into the sauce.
If you don’t have a wedge of cheese, no problem. Just throw in some grated Parmesan and you’re good to go.
 Then violently allow it to simmer for another 30 minutes, give or take. Note that I did not say “allow it to violently simmer.” A violent simmer, of course, is called a boil.
Word order is so important.
 Guess what? It’s time to eat now.
 Drain the cooked pasghetti into a bowl and drizzle on some olive oil.
 Then toss it around so the noodles are nice and coated. And olive oily.
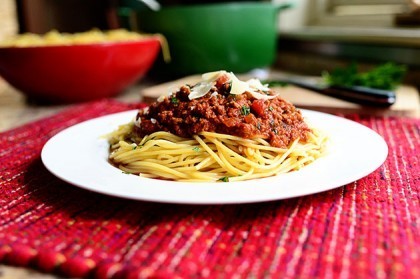
 To serve, mound some noodles onto a plate.
By the way, I don’t generally like to put a big pile of noodles and a big pile of sauce on a huge platter, then have everyone dig in and get their helping from the same platter. First of all, the platter gets totally messed up in a matter of seconds, and it’s difficult to salvage extra sauce if you want leftovers because it’s all mixed in with the pasghetti. Also, I just love the look of a neat individual plateful of spaghetti and sauce. It’s just so classically spaghetti sauce-ish.
 Pile on a bunch of sauce right on tpp.
Seriously. The deliciousness is hurting my eyes.
Ouch! Anyone have an Advil?
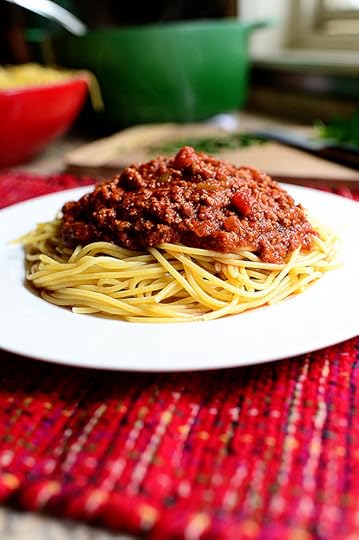 Hello, lover.
But wait! There’s more!
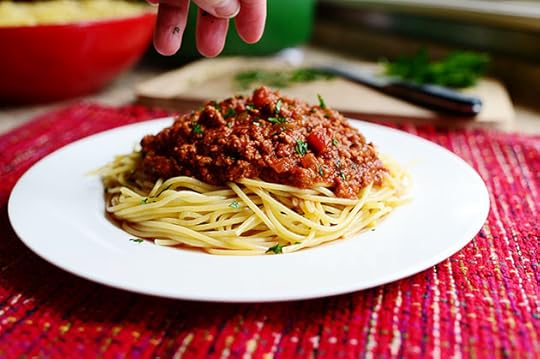 Sprinkle on some parsley for a little freshness and greenness and prettiness and color.
 But wait! There’s more!
 Parmesan. Nice, chunky shavings of Parmesan.
 But wait! There’s more!
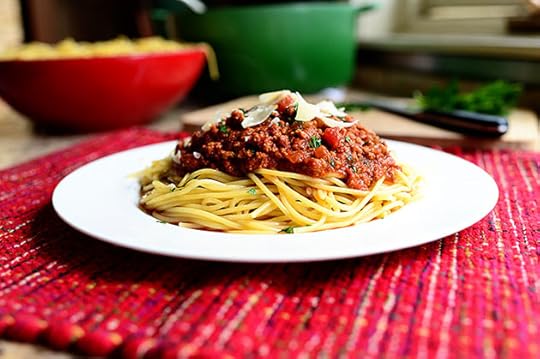
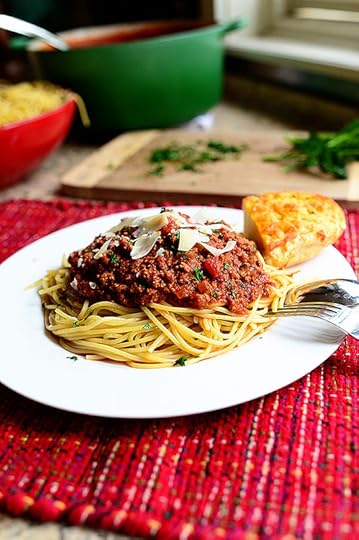 Garlic cheese bread. Oh, yes.
A-garlic bread without a-cheese is like a-kiss without a-squeeze.
Who said that? Freud?
 Never mind. It doesn’t matter. In fact, nothing matters anymore.
Nothing except…spaghetti sauce.
Enjoy, my friends!
Here’s the handy-dandy printable:
Recipe: Spaghetti Sauce
Prep Time: 20 Minutes
|
Cook Time: 1 Hour
|
Difficulty: Easy
|
Servings: 18
Print Recipe
3"x5" Cards
4"x6" Cards
Full Page
Ingredients
5 pounds Ground Beef (I Used Ground Round)3 Tablespoons Olive Oil2 whole Large Yellow Onions, Diced2 whole Green Bell Pepper, Seeded And Diced6 cloves Garlic, Minced1 cup White Wine2 cans 28 Ounce Crushed Tomatoes1 can (14 Ounce) Crushed Tomatoes1 jar Good Storebought Marinara Sauce (can Use Another Jar If You Like The Sauce To Be More Saucy Than Meaty)1 teaspoon Ground Oregano1 teaspoon Ground Thyme2 Tablespoons Sugar2 teaspoons Kosher Salt1/2 teaspoon Crushed Red Pepper (optional)1/4 cup Finely Minced Fresh Parsley (or 3 Tablespoons Parsley Flakes), More To Taste1 whole Rind From One Wedge Parmesan (optional)1/2 cup Grated Parmesan Cheese (optional)2 pounds Spaghetti, Cooked Al Dente And Tossed With Olive Oil Extra Parmesan Cheese, For Serving1 can (small, 4-ounce) Tomato Paste Preparation Instructions
IMPORTANT: This recipe can easily be halved! I just like to make a ton so I can freeze it.
In a large pot over medium-high heat, brown the ground beef until totally browned. Remove meat from pot with a slotted spoon and put into a bowl. Set aside.
Discard any grease in pot, but do not clean the pot. Drizzle in olive oil. When it is heated, throw in the diced onion and diced bell pepper. Stir it around for 1 1/2 minutes, then add the garlic. Stir and cook for an additional minute.
Pour in the wine and allow it to bubble up and reduce for about 1 1/2 minutes. Add crushed tomatoes, tomato paste, and marinara sauce. Stir to combine, then add oregano, thyme, sugar, salt, and crushed red pepper (if using). Stir, then add cooked ground beef and stir to combine. Place the lid on the pot and allow to simmer for 1 hour, stirring occasionally.
After an hour, add the minced parsley and the rind from a wedge of Parmesan (or grated Parmesan if you prefer--or both!) Stir to combine, then put the lid back on and allow it to simmer for another 30 minutes or so.
Serve a big bowl of oiled noodles and spaghetti sauce so guests can serve themselves. Top each serving with minced parsley and grated Parmesan (or Parmesan shavings) and serve with a big piece of garlic-cheese bread.
Amen.
Posted by Ree on September 16 2012

September 14, 2012
I Love Ya, Tomorrow!
I’m never sure if you would like for me to post the recipes for the upcoming Food Network episode each week.
Oh, wait a minute! I’ll just ask you!
Would you like for me to post the recipes for the upcoming Food Network episode each week?
Of course, the recipes are generally available on my page over on the Food Network website, but I like to make it as easy as possible for folks to find the recipes each week because I am a middle child want to please people.
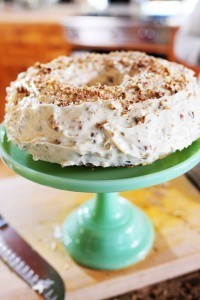
Carrot Cake
 On tomorrow’s episode, I make Sigrid’s glorious, blessed carrot cake, which has been in my life for…well, decades. Sigrid is one of my mom’s dearest friends, and her daughter Lee and my sister Betsy grew up together. Sigrid would deliver whole carrot cakes to our household for various occasions here and there, and no carrot cake I’ve ever tasted has been able to measure up.
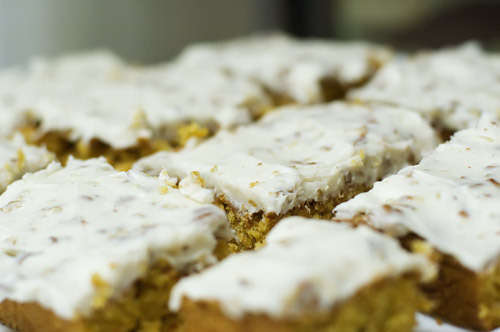 Several years ago, I made the cake here on PW Cooks in sheet ban form (though I love the Bundt approach Sigrid always took): Sigrid’s Carrot Cake -Step-by-Step Recipe. Mmmmm. I promise you’ll love it.
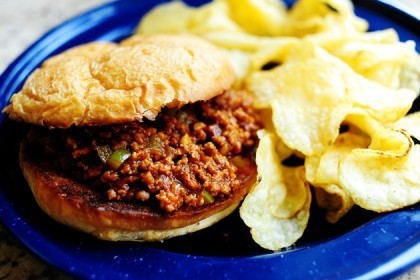
Sloppy Joes
 Good ol’ Sloppy Joes. These are seriously so good, so man-friendly, so hearty and drippy and wonderful. The step-by-step recipe is in my second cookbook, but here’s the step-by-step recipe from my archives:
Hearty, Drippy, Wonderful Sloppy Joes
By the way, I had a thought the other day.
Spaghetti Sauce, Chili, and Sloppy Joes are to food as Their, There, and They’re are to the English language.
Goodbye forever.
Chocolate-Dipped Granola Bars
 And finally, granola. Granola, granola, granola. I have not done this recipe as a step-by-step here on PW Cooks, and will try to do it in the next week or so. (The photo above is obviously before the granola was cut into bars.) It’s so delicious, so crunchy, so flavorful, and here’s what I do on the show:
1. Make the granola as it appears above.
2. Let it cool.
3. Cut it into bars.
4. Melt a bunch of milk chocolate.
5. Hold the bars parallel to the counter and lower them into the chocolate, dipping only the bottom half. The result is a granola bar that is plain on top and chocolate on the bottom. Heaven.
You can also dip the whole darn bar, or you can forget about bars and just break the pan up into darn clusters. And it’s super easy to make—and you can add or subtract ingredients (different kinds of nuts, cereal, candy, etc.) as you wish!
Note: After dipping in chocolate, the granola bars lose a little bit of their crispness. If you want a crunchy/chocolate bar, serve them as soon as you can.
Here are the printables!
Recipe: Sigrid's Carrot Cake
Prep Time: 20 Minutes
|
Cook Time: 45 Minutes
|
Difficulty: Easy
|
Servings: 12
Print Recipe
3"x5" Cards
4"x6" Cards
Full Page
Ingredients
Cake2 cups Sugar1 cup Vegetable Oil4 whole Eggs2 cups All-purpose Flour, Plus More For Dusting1 teaspoon Baking Powder1 teaspoon Baking Soda1 teaspoon Ground Cinnamon1/2 teaspoon Salt2 cups Grated Carrots Butter, For Greasing Icing1 stick Butter, Softened1 package (8 Ounce) Cream Cheese, Softened1 pound Powdered Sugar2 teaspoons Vanilla1 cup Pecans, Chopped Really Finely Preparation Instructions
For the cake: Preheat the oven to 350 degrees F. Mix together the granulated sugar, oil and eggs in a large bowl. In another bowl, sift together the flour, baking powder, baking soda, cinnamon and salt. Add the flour mixture to the sugar mixture and combine. Then add the carrots and mix well. Pour the batter into a greased and floured Bundt pan and bake until done, about 45-50 minutes. Leave to cool completely.
(Note: you can also make the cake in a sheet pan, cupcake pan, or loaf pan. Just adjust the baking time accordingly.)
Meanwhile, for the icing: In a larger bowl, cream the butter and cream cheese together. Add the powdered sugar and vanilla and blend. Then mix in the pecans. Spread the icing on the completely cooled carrot cake, then sprinkle some reserved chopped pecans all over the top.
Eat. Faint. Repeat as needed.
Posted by Ree on September 14 2012
Recipe: Sloppy Joes
Prep Time: 10 Minutes
|
Cook Time: 20 Minutes
|
Difficulty: Easy
|
Servings: 8
Print Recipe
3"x5" Cards
4"x6" Cards
Full Page
Ingredients
2 Tablespoons Butter2-1/2 pounds Ground Beef1/2 whole Large Onion, Diced1 whole Large Green Bell Pepper, Diced5 cloves Garlic, Minced1-1/2 cup Ketchup1 cup Water2 Tablespoons Brown Sugar2 teaspoons Chili Powder (more To Taste)1 teaspoon Dry Mustard1/2 teaspoon Red Pepper Flakes (more To Taste) Worcestershire Sauce, To Taste2 Tablespoons Tomato Paste (optional) Tabasco Sauce (optional; To Taste) Salt To Taste Freshly Ground Black Pepper, To Taste Kaiser Rolls Butter Preparation Instructions
Add butter to a large skillet or dutch oven over medium high heat. Add ground beef and cook until brown. Drain most of the fat and discard.
Add onions, green pepper, and garlic. Cook for a few minutes, or until vegetables begin to get soft.
Add ketchup, brown sugar, chili pepper, dry mustard, and water. Stir to combine and simmer for 15 minutes, adding salt and pepper to taste. Also add tomato paste, Worcestershire, and Tabasco if desired. Taste and adjust seasonings as needed.
Spread rolls with butter and brown on a griddle or skillet. Spoon meat mixture over the rolls, topping with a slice of cheese if it makes your skirt fly up. Serve hot with kettle cooked chips!
Posted by Ree on April 11 2010
Recipe: Chocolate-Dipped Granola Bars
Prep Time: 15 Minutes
|
Cook Time: 1 Hour
|
Difficulty: Easy
|
Servings: 16
Print Recipe
3"x5" Cards
4"x6" Cards
Full Page
Ingredients
6 cups Rolled Oats (not Quick Oats)4 Tablespoons Butter, Melted, Plus More For Greasing1/4 cup Vegetable Or Canola Oil1 teaspoon Salt1 cup Brown Sugar1/2 cup Honey1/4 cup Apple Juice1/4 cup Molasses3 teaspoons Vanilla Extract1-1/2 cup Rice Krispies1 cup Wheat Germ1/2 cup Finely Chopped Pecans1/4 cup Roughly Chopped Almonds8 ounces, weight Milk Chocolate Or Chocolate Almond Bark, Melted Preparation Instructions
Preheat the oven to 350 degrees F.
In a bowl, toss the oats with the canola oil, melted butter and salt. Spread the mixture out on 2 baking sheets and toast in the oven for 15 to 20 minutes, shaking the pan twice and making sure they don't burn. Remove from the oven and set aside.
Reduce the heat to 325 degrees F.
In a medium saucepan, combine the brown sugar, honey, apple juice and molasses. Heat the mixture slowly, stirring until all combined. Stir in the vanilla.
Toss together the toasted oats, rice cereal, wheat germ, pecans and almonds. Pour in the sugar mixture, stirring as you pour. Toss to combine; it will be sticky!
Press into 1 baking sheet (thoroughly greased with butter, or line pan with foil and grease foil) and bake until golden, about 20-25 minutes. Remove from oven and let cool. Cut pieces with a sharp knife and remove from the pan.
Dip the cooled granola bars straight into the melted chocolate so that the top is plain and the bottom is chocolate-covered. Set on parchment until set, sticking in the fridge to hasten this along if necessary.
Yum yum!
Posted by Ree on September 14 2012

September 12, 2012
What’s Your Favorite Hobby? (Winners Announced!)
The winners of the Le Creusets are:
#793 Geek Lady: “My hobby is making things. I’m not fussy about the method, and am always willing to try something new, whether I know the techniques or not…”
#27934 Nikki: “I really enjoy baking, especially any type of bread. something so rewarding and relaxing about that.”
#36662 Amy: “Cooking with my handsome husband.”
Congratulations, winners! Contact prizes@thepioneerwoman.com to claim your pot. (Har har.)
Today…
Because it’s Wednesday…
Because the weather is gloriously non-hot (otherwise known as cool)…
Because I like this pot…
(Please note that I did not say I like pot…)
And because I love ya…
 I’m giving away three (3) Le Creuset 9-Quart Round French Ovens, in this gawgeous “Marseilles” color.
TO ENTER
To enter the contest, just answer the following question in the Comments section of this post.
What is your favorite hobby?
Are you addicted to knitting? Sewing? Baking? Or could you drop everything at any given moment and play a round of golf? Are you in love with rock climbing? Quilting? Reading? Or is your favorite hobby watching reality TV? I’d love to hear what your favorite hobbies are, so shout it out in the Comments section of this post and you’re entered to win a pot!
THE RULES
One entry per person, please.
Winners will be announced Thursday.
Good luck!
____________________________________
Contest sponsored by Pioneer Woman, with cooperation from CHEFS Catalog.
*NOTE: Contest time has ended & comments are closed.

What’s Your Favorite Hobby?
Today…
Because it’s Wednesday…
Because the weather is gloriously non-hot (otherwise known as cool)…
Because I like this pot…
(Please note that I did not say I like pot…)
And because I love ya…
I’m giving away three (3) Le Creuset 9-Quart Round French Ovens, in this gawgeous “Marseilles” color.
TO ENTER
To enter the contest, just answer the following question in the Comments section of this post.
What is your favorite hobby?
Are you addicted to knitting? Sewing? Baking? Or could you drop everything at any given moment and play a round of golf? Are you in love with rock climbing? Quilting? Reading? Or is your favorite hobby watching reality TV? I’d love to hear what your favorite hobbies are, so shout it out in the Comments section of this post and you’re entered to win a pot!
THE RULES
One entry per person, please.
Winners will be announced Thursday.
Good luck!
____________________________________
Contest sponsored by Pioneer Woman, with cooperation from CHEFS Catalog.
Ree Drummond's Blog

- Ree Drummond's profile
- 2032 followers

