
Ree Drummond's Blog, page 47
December 19, 2012
Countdown to Christmas Giveaway (Winners!)
 The winners of the lovely orange mixers are:
#559 Carol J. “Living large with my honey down in Florida!”
#7513 Kolleen M. “I’ll be hosting Christmas Eve and Christmas Day at my house.”
Congratulations, winners! Contact prizes@thepioneerwoman.com to claim your mixers.
Today, because Christmas is less than a week (!) away, I’m giving away two (2) of these beautiful KitchenAid stand mixers in this gorgeous “Tangerine” color.
TO ENTER
To enter the giveaway, just answer the following question in the Comments section of this post:
“Where will you be on Christmas day?”
Will you be at home? At grandma’s house? At your parents’ house? On a beach in Tahiti? Just shout out your Christmas day plans and you’re entered to win one of the KitchenAids!
THE RULES
One entry per person, please.
Winners will be selected at random and announced Thursday.
Good luck!


Countdown to Christmas Giveaway
Today, because Christmas is less than a week (!) away, I’m giving away two (2) of these beautiful KitchenAid stand mixers in this gorgeous “Tangerine” color.
TO ENTER
To enter the giveaway, just answer the following question in the Comments section of this post:
“Where will you be on Christmas day?”
Will you be at home? At grandma’s house? At your parents’ house? On a beach in Tahiti? Just shout out your Christmas day plans and you’re entered to win one of the KitchenAids!
THE RULES
One entry per person, please.
Winners will be selected at random and announced Thursday.
Good luck!
December 17, 2012
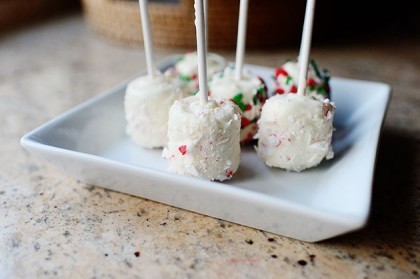
Marshmallow Pops
 These easy-to-make pops are reminiscent of my good friend Bakerella’s famous Cake Pops, and take almost no time to make. They’re a perfect treat to make with little kiddos, and the permutations and combinations for the coating and toppings are endless.
Marshmallow pops are everywhere, and you can have some serious fun with them. Use white or milk chocolate to coat them (I used white) or get ultra creative and use different colors (green, pink, blue) of meltable candy wafers. You can dunk them all the way to coat them completely as I did here, or you can just dip them halfway to give them a more “drippy” appearance. My friend Alice did a Rocky Road version, where she demonstrates both:
If you have a little Christmas party that needs a quick treat, or if you’re looking for a fun diversion for the kids in the days leading up to Christmas, these are your man.
These are your man? That made no sense.
Here’s how to make the pops:
 Grab some almond bark—white or chocolate or both!
 Pop ‘em out of the package…
 And throw ‘em in a double boiler.
 Stir the almond bark until it’s nice and smooth.
 Grab a stick…
 And dip the tip into the lusciousness.
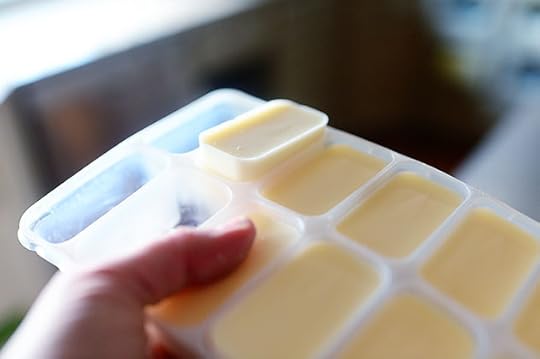
 Then stick the end of the stick into a marshmallow.
 Keep going until the sticks are all…well, stuck.
 Grab a buncha peppermints…
 And unwrap them.
 Throw them in a plastic bag…
 And whack ‘em with a rolling pin to crush them into bits.
The powderyer the better.
You didn’t know powderyer was a word?
 Throw the crushed peppermints into a bowl.
 Then start dipping the marshmallows one by one. I actually rolled the marshmallow on the surface of the melted almond bark rather than dunked it. Worked just fine.
 Shake and/or tap them to get the excess almond bark to drip off…
 Then sprinkle the crushed mints all over the surface.
 You can also do sprinkles!
You can also do chocolate instead of (or in addition to) white chocolate. Or colors.
And you can use any toppings you can possibly think of:
Crushed pretzels
Chopped nuts
Crushed candy
Crushed cookies
Sprinkles
Decorations
Anything!
 I only made a few yesterday, but my kids will make more today.
 These are really cute and fun…and sweet! Whew. A little goes a long way.
 Yay for marshmallow pops! They may very well be the easiest Christmas treat there is. Have fun with them.
Here’s the handy printable:
Recipe
Marshmallow Pops
Prep Time: 15 Minutes
Cook Time: 10 Minutes
Difficulty: Easy
Servings:12
Print Recipe
Ingredients
Regular Marshmallows1 package Almond Bark (white Or Chocolate) Or Meltable Candy Wafers Sprinkles, Chopped Nuts, Chopped Pretzels, Chopped Candy, Etc. Equipment: Lolipop Sticks (sold In Craft Stores) Preparation Instructions
Melt the chocolate or white (or both) almond bark in a double boiler.
One by one, dip the very tip of the lollipop stick into the melted chocolate, then stick that end of the stick into the marshmallow until it's not quite all the way through. Repeat with the rest of the marshmallows, standing them up as you go.
Next, roll the marshmallow in the chocolate to coat it, then tap the stick gently on the side of the double boiler to get rid of the excess. Using your fingers, sprinkle the topping of your choice all over the chocolate. Set them stick side up on a piece of waxed paper OR stick them into that crazy florist stuff that makes flowers stand up.
Have fun with the toppings and make no two marshmallow pops the same!
Posted by Ree on December 16 2012

December 14, 2012
Christmas Pot Giveaway
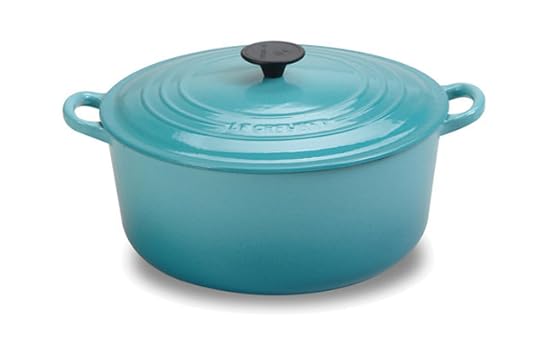 Today, to celebrate the coming of Christmas, I’m giving away pot.
I mean, I’m giving away A pot.
I mean, I’m giving away THIS pot:
A Le Creuset 7 1/2-Quart Round French Ovens, in this beautiful “Caribbean” color. Two of ‘em.
TO ENTER
To enter the contest, just answer the following question in the Comments section of this post:
What is your favorite Christmastime food?
What Christmas grub do you look forward to the most? Is it Christmas ham? Christmas morning breakfast? Christmas Eve roast beef? Christmas cookies? Just shout out your favorite Christmastime food and you’re entered to win the pot.
THE RULES
One entry per person, please.
Winners will be announced Saturday night.
Good luck!
____________________________________
Contest sponsored by Pioneer Woman, with cooperation from CHEFS Catalog.

December 12, 2012
Christmas Giveaway: Best Blender Ever
 Today is my last day of filming, and boy, are my spatulas tired. The new shows I’ve just shot will start airing in January. Let me know how they turn out! I’ll be sound asleep.
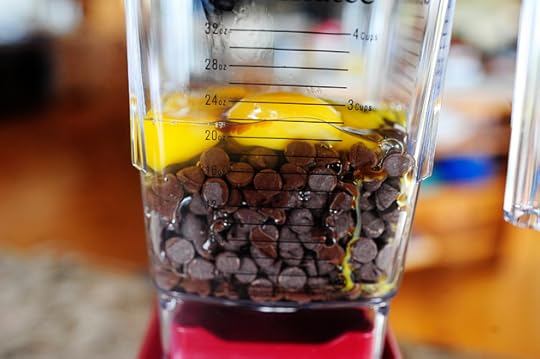
Today, because I’ve been using mine like crazy, I’m giving away three (3) of these awesome BlendTec WildSide blenders.
Before you said, “Eh. It’s a blender.” let me stop you! Saying a BlendTec is just a blender is like saying the following:
* Mount Everest is just a hill.
* The Sistine Chapel is just a church.
* Pots de Creme is just chocolate pudding.
 And speaking of Pots de Creme…
 Here’s my BlendTec at work!


 And that’s only the beginning. It’s such a powerhouse, and whether it’s making a smooth soup or crushing up the hardest ice you’ve ever seen, there’s pretty much nothing it can’t do. Plus, the buttons are clear and straightforward, and you don’t need an advance degree in technology to be able to operate it.
Amen.
 Included in the giveaway package is one BlendTec WildSide blender…
 And an extra pitcher, which is really handy if you’ve got a lot of recipes going on at once (or if you have a big group of friends over for margaritas!)
TO ENTER
To enter this blender giveaway, just answer the following questions in the Comments section of this post:
“What’s your favorite Christmas carol?”
I’m torn between “Have Yourself a Merry Little Christmas” and “O Holy Night.” So how about you? Just shout out your favorite Christmas carol and you’re automatically entered to win a blender.
THE RULES
One entry per person, please.
Winners will be announced Thursday!
Note: Giveaway sponsored entirely by Pioneer Woman. Over and out.

December 10, 2012
Christmas Finger Jello
 First of all, I sure hope these instructions don’t confuse the heck out of you.
Second, this is a really fun thing to make! It’s a Christmas version of the classic “Finger Jello” recipe, which I believe refers to any jello that is supplemented by an additional dose of plain gelatin, which renders it a little more hardy and easy to pick up with one’s fingers than regular jello would be. Rainbow Finger Jello involves layering several different colors of the gelatin-fortified jello, which results in an amazingly happy and pretty layered treat.
A couple of weeks ago, I whipped up a cute Christmas version. The kids loved it. But I think I wound up eating more squares than anyone. I kept walking by the fridge, and popping squares in my mouth. Repeatedly. Till they were all gone.
I seem to do that a lot.
 The Cast of Characters: You need two cans of sweetened condensed milk…
 Five boxes of jello: 3 red and 2 green.
 And nine envelopes of plain gelatin. There are usually four to a box.
Okay, I’m going to take a deep breath now so I’ll be able to explain this in a relatively coherent fashion. Please light a candle for me.
First, there are some important things to say:
1. This whole process will take you about 2 to 3 hours. Emphasis on 3 1/2.
2. The more organized/prepared you are ahead of time, the more smoothly it will go. Lay out mixing bowls, glass measuring cups, and fill up a tea kettle if you have one. You’ll need a continual stream of boiling water.
3. I did nine layers in total, but you can do as few as five or as many as 43,000…as long as the pan will hold them.
4. Be sure to spray your pan (9 x 13 inch) with cooking spray before you start. If you don’t, the bottom layer will definitely stick to the pan.
Next, there are only two elements you need to keep straight when you make this silly stuff:
The Colored Jello Layer
and
The Creamy Layer
We’ll start with the colored jello layer.
 The first thing to do is make one colored jello layer: Grab one envelope of plain gelatin…
 And pour it into a small mixing bowl.
 Pour in 1/4 cup of cold water…
 And stir it to dissolve. It’ll quickly start to set and look gelatinous.
 Next, measure a cup of boiling water (my tea kettle was at the lodge, and boy oh boy, did I wish I had it.)
 Pour the cup of boiling water into the gelatin/water mixture…
 Immediately pour in one 3-ounce package of red jello…

 Stir it gently (gently, so it won’t get all bubbly)…
 Then pour it into the pan.
 That’s layer number one!
 Carefully carry it to the fridge and set it on a shelf…
 Right next to your cattle vaccines.
Welcome to my world.
Now, the first layer just needs to chill out for 10 to 15 minutes to set.
 While that’s chilling, make the first batch of the creamy layer (which will cover 2 to 3 layers!) In a small measuring cup, measure 1/2 cup of cold water and pour in 2 envelopes of plain gelatin.
 Stir it around to dissolve the gelatin, then set it aside.
 In a separate bowl, pour one can of sweetened condensed milk.
 I’m purring right now.
I love sweetened condensed milk.
I’m sure that comes as no surprise to you.
 Grab a cup of boiling water and pour it into the bowl.
 Stir it around to combine the sweetened condensed milk with the boiling water…
 Then pour in the dissolved gelatin, stir it around, and add another 1/2 cup of boiling water.
Whew!
 Pull the first jello layer out of the fridge. This is me tipping the pan on its side to make sure it was, like, totally set.
 Scoop out a little over a third of the creamy mixture with a clean glass measuring cup or pitcher…
 And pour it over the jello layer.
 Poke the bubbles with a toothpick, or they’ll ruin your life later.
 Now stick this back in the fridge with the cattle vaccine! (You can’t really see the creamy layer, but it’s there, Maynard.)
 While the creamy layer is chilling, mix up a green jello layer following the method I used for the red layer above.

 Pull the pan out of the fridge once the creamy layer is set, then pour on the green jello.
 Now we’ve got three layers! Progress!
Stick it in the fridge to chill.
And the process continues.
 Creamy layer, then chill.
 Red layer, then chill.
 Creamy layer, then chill.
 Green layer, then chill.
 Creamy layer, then chill.
(Important note! Less than halfway through, you’ll need to mix up another batch of the creamy mixture. I used a little less than two batches of the stuff.)
 Red layer…
Then stop!
Or keep going! Whatever your heart tells you to do!
But I was out of jello, man.
 When the last layer is on, chill it for a good couple of hours to set the heck out of it.
 When it’s all chilled, you can cut it into squares (I did not spray my pan and as you can see, there was some stickage going on.)
 And serve ‘em up!
One thing you need to know, if you’ve never tried finger jello, is that it is decidedly firmer than jello made according to package directions. Of course, that’s the whole point; it needs to be firm in order to hold together and be “pick up-able.” But if you’re expecting it to have the slurp-through-your-teeth softness of normal jello, it won’t.
 I have to tell you, though…I love this stuff. There’s something so fun about it. You can make the squares as small as you’d like and just pop them in your mouth. The creamy layer is nice and, well, creamy…and they’re just a fun and festive treat.
Try them this week! Another approach you could take is to double the amounts of each layer and have fewer, thicker layers. Might be a little less time consuming.
Either way, have lots of fun. That’s what finger jello’s all about.
Here’s the handy printable!
Recipe
Christmas Finger Jello
Prep Time: 3 Hours
Cook Time:
Difficulty: Easy
Servings:12

Print Recipe
Ingredients
3 boxes Cherry Or Strawberry Jello (3 Ounces Each)2 boxes Lime Jello (3 Ounces Each)2 cans Sweetened Condensed Milk (14 Ounces Each)9 envelopes Plain Knox Gelatin Nonstick Cooking Spray Preparation Instructions
First: Get organized! Having a tea kettle full of water helps, as does having at least two or three mixing bowls and a couple of glass measuring cups. This moves faster if you have all the equipment ready!
Second: Spray a 9 x 13 inch Pyrex with cooking spray, then give it a gentle wipe with a paper towel to remove the excess.
COLORED JELLO LAYERS:
One layer at a time, mix 1 envelope Knox gelatin with 1/4 cup cold water in a small mixing bowl. Add 1 cup boiling water, followed by 1 box of either red or green jello. Stir gently to combine so bubbles won't form. Pour into pan. Place in the fridge for 10-15 minutes, or until set. In between each colored layer, pour a creamy layer.
CREAMY WHITE LAYERS:
***NOTE: The following mixture is enough for just under three creamy layers. You'll need two batches before the whole thing's done.
In a small glass measuring cup, measure 1/2 cup cold water. Stir in 2 envelopes of plain jello and stir to dissolve. Pour sweetened condensed milk into a medium-sized mixing bowl. Add 1 cup of boiling water. Pour dissolved gelatin mixture into the condensed milk mixture, then add another 1/2 cup of boiling water.
Once you've used all of the creamy mixture, repeat the method below to make another batch.
INSTRUCTIONS:
Begin by pouring either a red layer in the bottom of the pan. Stick the pan in the fridge for 10-15 minutes until it's set. While it's setting, mix up the first batch of the creamy mixture.
Remove the pan from the fridge and pour in a little more than 1/3 of the creamy mixture (or enough to coat the first colored layer.) Stick the pan in the fridge for 10-15 minutes until it's set. While it's setting, mix up the next colored layer.
Repeat the colored layer process with a green layer, followed by another creamy layer. When you're finished, you should have, beginning from the bottom:
Red
White
Green
White
Red
White
Green
White
Red
Note that you'll need to mix up the second batch of the creamy layer midway through the process to make sure you have enough for the middle layer. For the colored layers, just mix them right before you need them (when the previous layer is chilling in the fridge).
When all the layers are in the pan, chill for a good 2 hours to totally set everything. Cut into small squares and serve 'em as snacks!
Posted by Ree on December 9 2012

December 7, 2012
Tomorrow
 Tomorrow, our brand new Christmas episode airs on Food Network. It’ll feature (among other things!) these luscious little Chocolate Mint Brownie Bites, which we make for that jolly ol’ Santa fellow.
I hope you love the show. Lots of family, lots of food, lots of Christmas tree fun.
Lots of Basset Hounds in Santa hats. (But you didn’t hear that from me.)
Here’s the quick-print of the brownie bite recipe above. They’re pop-in-your-mouth delicious.
Recipe
Chocolate Mint Brownie Bites
Prep Time: 20 Minutes
Cook Time: 15 Minutes
Difficulty: Easy
Servings:18

Print Recipe
Ingredients
50 whole Andes Mints1 stick 1/2 Cup Butter, Softened1 cup Sugar2 ounces, weight Unsweetened Chocolate2 whole Eggs3/4 cups All-purpose Flour1/4 teaspoon Mint Extract1 Tablespoon Butter1 ounce, weight Bittersweet Chocolate, Chopped Fine Preparation Instructions
Preheat oven to 325 degrees. Spray mini muffin pan generously with baking spray.
Melt unsweetened chocolate in a bowl in the microwave. Remove from microwave and stir in 8 Andes mints until all melted. Let cool slightly.
In a mixer with the paddle attachment, cream 1 stick of butter and sugar. Beat in eggs one at a time. With the mixer on low, drizzle in the cooled chocolate mixture slowly, mixing until it's combined. Add flour and mix thoroughly. Scrape the sides of the bowl with a rubber spatula, add mint extract, then mix again.
Using a tablespoon or cookie scoop, scoop batter into mini muffin tins. Bake until done, about 13 to 15 minutes. Turn upside down out of pan and allow to cool.
Combine 25 unwrapped Andes mints in a bowl with the tablespoon of butter and chopped bittersweet chocolate. Microwave and stir until melted and smooth.
Dip the brownie bites in the chocolate, concentrating on the top "cone" part. Allow to set for a few minutes. Chop the remaining Andes mints and sprinkle them on the top.
Set in the freezer for 10 minutes if you need them to set right away. Yum!
Posted by Ree on July 22 2012

December 5, 2012
Countdown to Christmas: Purty Mixer Giveaway! (Winners Announced)
UPDATE: The winners of the KitchenAid mixers are:
#5666 Dana: “No, just started today!…..not even near half way through!”
#24448 Kathy W: “I am almost finished!”
Congrats to the winners—contact prizes@thepioneerwoman.com to claim your mixers!
Today…
Because I launched my new site design…
Because I could seriously use a 4,554 hour nap…
Because Christmas is coming…
And because I love ya…
 I’m giving away two (2) KitchenAid Artisan Stand Mixers…the color of each winners’ choice! I happen to love the beautiful “Aqua Sky” color above, but if you’re one of the winners, you can choose any color on this page:
KitchenAid Artisan Stand Mixers
To enter this giveaway, just answer the following question in the Comments section of this post:
Are you finished with your Christmas shopping?
Please say no so I don’t feel like a disorganized weirdo. But seriously…cough it up. Are you totally finished? Are you halfway there? Or have you not started yet? Just shout out the status of your holiday shopping and you’re entered to win one of the mixers.
THE RULES
One entry per person, please.
Winners will be randomly selected and announced Thursday night!
IMPORTANT NOTE: If you’re having trouble seeing the Comments link, click here to be taken to the comment form: Comment Form.
Love,
P-Dub
Giveaway sponsored by Pioneer Woman.

Countdown to Christmas: Purty Mixer Giveaway!
Today…
Because I launched my new site design…
Because I could seriously use a 4,554 hour nap…
Because Christmas is coming…
And because I love ya…
I’m giving away two (2) KitchenAid Artisan Stand Mixers…the color of each winners’ choice! I happen to love the beautiful “Aqua Sky” color above, but if you’re one of the winners, you can choose any color on this page:
KitchenAid Artisan Stand Mixers
To enter this giveaway, just answer the following question in the Comments section of this post:
Are you finished with your Christmas shopping?
Please say no so I don’t feel like a disorganized weirdo. But seriously…cough it up. Are you totally finished? Are you halfway there? Or have you not started yet? Just shout out the status of your holiday shopping and you’re entered to win one of the mixers.
THE RULES
One entry per person, please.
Winners will be randomly selected and announced Thursday night!
IMPORTANT NOTE: If you’re having trouble seeing the Comments link, click here to be taken to the comment form: Comment Form.
Love,
P-Dub
Giveaway sponsored by Pioneer Woman.
December 3, 2012
Bowtie Chicken Alfredo
 I did a whole bunch of cooking yesterday, and boy are my skillets tired!
But seriously, it was one of those days. Big ol’ ham. A bunch of ham glaze. New Christmas cookie recipes. Gravy made with the ham juices. Drop biscuits, stuffed mushrooms, and then I looked at my kitchen and cried.
Then my boys came in and asked what was for dinner in the middle of the afternoon. Then I looked at them and cried.
Then I decided to whip up this easy skillet pasta dish! It’s one of my kids’ faves, I had everything I needed in my pantry and fridge, and it made them keep their grubby hands off my Christmas cookies, which I hadn’t had a chance to photograph yet, which is why they weren’t allowed to touch them.
Children of foodbloggers. They’re going to need a serious support group one day.
“My mom…made cookies…and pies…and cakes…and she wouldn’t let me eat them until she took their BLESSED PICTURE!!!!!!”
 Start with a couple of boneless, skinless chicken breasts. The blank canvas of the meat world.
 Melt a couple of tablespoons of butter in a large skillet…
 Then throw in the chicken.
 Cook the chicken in the buttah until it’s nice and golden and lovely…and totally done in the middle.
 Remove the chicken from the skillet…
 And slice it into strips!
 And while you’re at the cutting board, mince up some garlic…
 And throw it in the skillet with a little more butter.
Stir the garlic around and cook it for a minute or so, just to release all the heavenly awesomeness of the garlic…
 Then grab a bottle of dry white wine from your bedside table.
 Pour in a half a cup, give or take four gallons.
Did I just say that out loud?
I love cooking with wine, man.
 Next, let the mixture bubble up and reduce a bit. And while it does, stand there and inhale the magic and give thanks for the homo sapien who first discovered that letting grapes ferment causes miracles to happen.
Oh! And you can use chicken broth if you drather!
Drather’s a word, you know. I larned it in school.
Anyway, once the liquid is reduced and a little thicker, close your eyes and take a moment. Things are about to get really good.
 Grab some half and half and pour in a good amount.
And I know I do this in every post, but please believe me: My thumb does not look like this in real life! It just doesn’t. It’s the lighting! It’s the weather! It’s the position of Venus!
But I do have that round scar in real life. And do you want to know what it’s from?
A wart. I have a scar on my thumb from a wart. My dad burned it off at his office.
I was six.
Goodbye forever.
 Next, splash in just a small amount of cream.
A small amount, because we’re making healthy choices here.
Ahem.
But seriously, you can definitely substitute milk for the half-and-half/cream—or at least sub milk for part of it if you want it not to be quite so rich. You’ll just want to let it cook quite a bit, and note that it won’t get as thick. But the Parmesan will help!
 Whisk it all around so it’s all combined, then let it bubble and thicken up a bit.
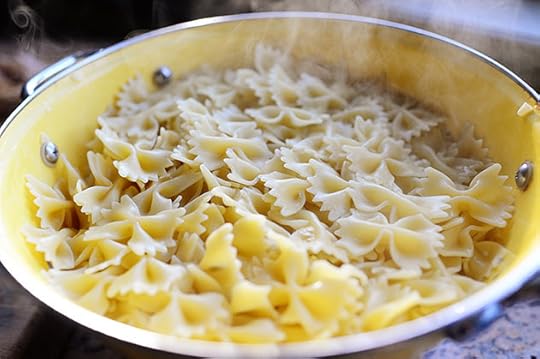
 Meanwhile, bawl up some bowtie pasta, which is one of my very favorite pastas in the world.
It has great crevices.
 Sprinkle in a little salt and pepper and keep cooking it until it’s nice and thick. If it gets too thick, just splash in a little chicken broth here and there. Chicken broth is the paint thinner of the cooking world!
That’s a really disturbing thought.
 Pasta’s ready!
 And so am I.
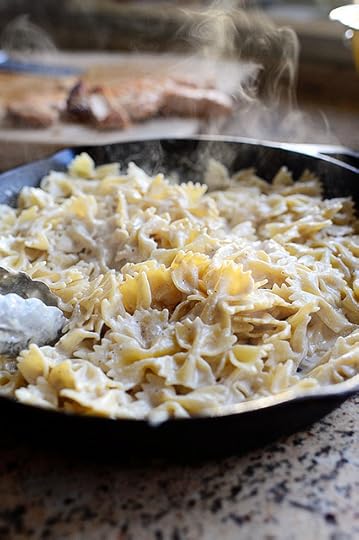
 Pour in a good amount of Parmesan. Grated, shaved…anything. I used the pre-shredded stuff in the plastic pot because I had it in my fridge and because I could. Made it an even quicker recipe!
 Pour the hot pasta right on top of the Parmesan…
 And start tossing it a bit.
 Yum. Ohhhh, yum.
 It was at this time that I deemed it appropriate to add more black pepper.
 And then I tossed in the chicken…
 And added some parsley!
 My kids pretty much inhaled this.
 And…uh…I might have inhaled a little myself.
Enjoy this super quick recipe, guys.
Here’s the handy dandy printable!
Recipe: Bowtie Chicken Alfredo
Prep Time: 5 Minutes
|
Cook Time: 20 Minutes
|
Difficulty: Easy
|
Servings: 6

Print Recipe
3"x5" Cards
4"x6" Cards
Full Page
Ingredients
12 ounces, weight Bowtie Pasta (farfalle)4 Tablespoons Butter2 whole Boneless, Skinless Chicken Breasts Salt And Pepper, to taste2 cloves Garlic, Minced3/4 cups Dry White Wine (may Substitute Low-sodium Chicken Broth)1/2 cup Half-and-half3 Tablespoons Heavy Cream Low Sodium Chicken Broth, As Needed For Thinning3/4 cups Parmesan Shavings Or Grated Parmesan2 Tablespoons Fresh Parsley, Minced Preparation Instructions
Cook pasta according to package directions. Drain and set aside.
Salt and pepper both sides of the chicken breasts. Heat 2 tablespoons of butter in a large skillet over medium-high heat. Add chicken breasts and cook until deep golden brown on both sides and done in the middle. Remove from the skillet, slice into thin strips, and set aside.
Add additional 2 tablespoons of butter to the skillet, followed by the minced garlic. Stir the garlic around the pan to avoid burning, and cook for 1 minute. Pour in wine (or broth), then let it bubble up and reduce for 1 1/2 to 2 minutes. Add half-and-half, cream, and extra salt and pepper, whisking constantly until it's all combined. Allow liquid to heat up and thicken for a few minutes. If it gets too thick, you may thin it with a little chicken broth.
When the sauce looks good, remove it from the heat. Add Parmesan to the pan, then throw the hot pasta right on top of it. Toss it a bit. Add the chicken and continue tossing until it's all combined. Again, if it gets too gloopy, splash in a little broth (you may return the pan to low heat if it needs it.)
Taste it, adjust seasonings, and top with minced parsley and extra Parmesan. Serve immediately!
Posted by Ree on December 2 2012

Ree Drummond's Blog

- Ree Drummond's profile
- 2032 followers

