
Ree Drummond's Blog, page 49
November 9, 2012
Turkey Essentials!
Thanksgiving will be here before you know it! As such, I’m giving away three (3) packages of what I consider to be turkey essentials. If you’re planning on making the bird this year…you’ll be all set!
Here’s what’s in each prize package:
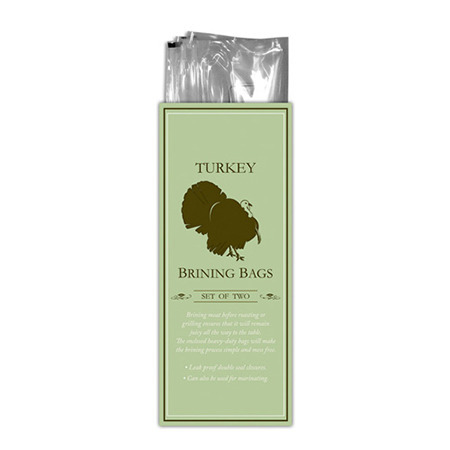 A package of heavy duty Brining Bags.
(Pssst. Here’s my favorite Brine Recipe. It’s delish, man.)
 An All-Clad Stainless Steel Roaster Set. You can’t hurt these things. You’ll still be roasting your turkey in this sucker in the year 2097.
Comes with a rack and two turkey lifters.
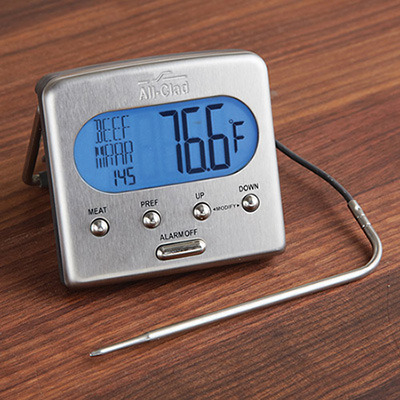 An awesome digital meat thermometer! I actually use the old fashioned kind, but I have used these digital ones and think they’re really nifty.
You’ve gotta have a good thermometer when you roast turkey. It’s, like, required.
 A good ol’ stainless steel baster. My favorite kind.
 A handy fat separator for gravy, baby.
 A flat whisk! I couldn’t make turkey gravy without it.
Well, I could, I suppose. With a normal, boring whisk.
But it wouldn’t be any fun.
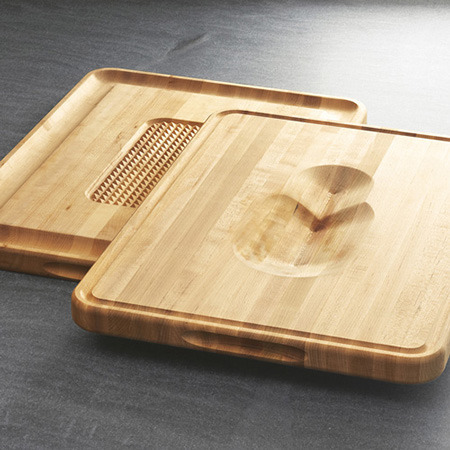 This cool reversible cutting board. I don’t have one of these. But I think it would be helpful! Securely holds the bird and catches the drippings at the same time.
 A Wusthof carving set. Have it. Use it. Love it.
I think that’s about all you need to make the best turkey in the world!
Oh. Except the turkey. But I’ll let you take care of that one.
TO ENTER
To enter the turkey essentials giveaway, just answer the following question in the Comments section of this post:
“What are your Thanksgiving plans this year?”
Are you hosting the whole shebang at your house? Are you going over the river and through the woods to grandmother’s house? Are you making frozen pizza and watching football? Or are you going down the street to your Uncle Peter’s house? Just shout out your Thanksgiving plans and you’re automatically entered to win this big, bad turkey package! (If you’re not cooking this year, save it for next year! You’ll be glad you have all this loot.)
THE RULES
One entry per person, pretty please.
Winners will be announced Sunday!
New yummy recipes all next week.
Good luck!
Giveaway sponsored by Pioneer Woman. Also known as Ree.
IMPORTANT NOTE: Winners will be announced on this post Sunday evening.


November 7, 2012
Breakfast, Lunch, Dinner, and Dessert
I’m on the road. Actually, I’m in the air—on my way back from a week of travel and so happy to be heading home.
I’ll be getting back to cooking as soon as I get home, but in the meantime…I’m hungry and can’t stop thinking about food. The peanuts on this flight just aren’t cutting the mustard. And where in the world did that phrase come from?
To celebrate—actually, to bemoan—the fact that I’m on a plane and am therefore nowhere near a stove, an oven, a mixing bowl, or a kitchen, here’s are the things I want to dive into right now. I chose one for each category: Breakfast, Lunch, Dinner, and Dessert.
(Note that in the interest of brevity, I did not include Second Breakfast.)
BREAKFAST
 One of my very favorite breakfast dishes is Migas! If you’ve never had Migas (pronounced MEE-gus), I need you to listen. I mean read. Please make it at the earliest possible convenience. It’s a dish I first had in Austin, Texas, and it’s everything that’s wonderful about scrambled eggs…but so much more. Peppers, onions, jalapenos, and fried corn tortillas cut into strips.
And cheese. And cilantro.
It’s beyond everything.
It’s delicious.
I love it so.
Here’s (very old! like four whole years ago!) step-by-step:
Migas
LUNCH
 For lunch, it doesn’t get any better than this Big Steak Salad, based loosely on a salad I once had at the five-star restaurant (okay, fine. my kids and I think so.) known as Dave and Buster’s.
They gots good games, man.
This salad has a delicious, slightly sweet vinaigrette and is topped with sliced cold steak…but what makes it irresistible is the pile of thinly fried onion strings on top, which sort of negates the whole “salad” angle, but I have to be me.
You’ll love it.
You’ll swoon.
Make it for lunch guests if you ever have lunch guests.
Here’s the step-by-step:
Big Steak Salad
DINNER
 I’ve made no secret of my love for easy pan sauces, and these Pork Chops with Garlic and Wine pretty much knock my ever-loving socks off.
Easy.
Flavorful.
Impressive.
Simple.
Here’s the handy-dandy printable:
Pork Chops with Garlic and Wine
And sorry. I can’t do only one.
 Chicken with Mustard Cream Sauce. So delicious it’s obscene.
Highly recommend.
Here’s the step-by-step:
Chicken with Mustard Cream Sauce
DESSERT
 And finally—and I promise I didn’t just pick this because Thanksgiving is upon us—Pecan Pie.
Pecan Pie. Why is it so ridiculously deliciously ridiculous?
It is.
Here’s my favorite version:
Good Ol’ Pecan Pie
Note that I don’t necessarily recommend eating all of these in the same day.
Necessarily being the operative word.
Lots of love,
P-Widdy

November 2, 2012
Tomorrow’s (Luscious, Scrumptious!) Recipes
The thirteen new episodes of Season 3 have all aired, and the new Thanksgiving episode will air November 17.
Here’s a peek!
 I hope you love the Thanksgiving episode. I tried to break down the meal planning in a simple way, and I picked my very favorite dishes in the universe.
In the meantime, some “older” (like, within the last year. ha.) episodes of my show will air for those who might not have caught them the first time around.
Tomorrow’s episode is “Chocolate Day,” where in addition to seeing me looking less made up and more disheveled because I hadn’t yet learned how to do my hair or makeup for television, you’ll also catch me making some of my very favorite chocolate recipes…along with a delectable soup recipe at the end.
Here are the recipes on the show tomorrow! Click on the pics to see the step-by-step recipes. I’m also including the printables at the bottom of this post.
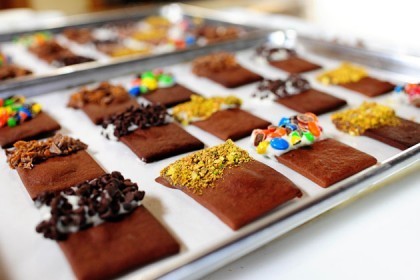
 Chocolate Cookie with Toppings Bar. These are so fun, and you can change up the candy/chocolate combination however you’d like.
 I also made these Chocolate Mint Truffles, which are a variation of these Sea Salt Truffles I posted a few years ago. I just added a little mint extract to the chocolate filling, then colored some coarse sugar with a tiny bit of green food coloring and sprinkled it on top for fun.
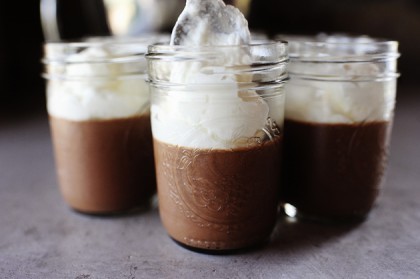
 And heavenly Pots de Crème a l’Orange, a creamy, dreamy chocolate treat that sounds a lot more fancy than it is! A cinch to make in the blender.
 And, because I really needed something salt: Corn and Cheese Chowder. Ridiculously yummy. Serve it in bread bowls, serve it in regular bowls…doesn’t matter. Just serve it.
Hope you enjoy, guys!
Recipe: Chocolate Cookies with Toppings
Prep Time: 2 Hours
|
Cook Time: 10 Minutes
|
Difficulty: Easy
|
Servings: 16
Print Recipe
3"x5" Cards
4"x6" Cards
Full Page
Ingredients
2 sticks Salted Butter, Slightly Softened1 cup Powdered Sugar1 whole Egg2 teaspoons Vanilla Extract2-1/2 cups Flour1/2 cup Cocoa Powder3/4 teaspoons Salt4 ounces, weight White Almond Bark4 ounces, weight Chocolate Almond Bark DIPPING BAR Pistachios, Finely Chopped M & M's, Slightly Chopped Toffee Bars, Chopped Assorted Nuts, Sprinkles, Candies Preparation Instructions
For the cookies: Cream the butter with the powdered sugar. Add the egg and vanilla and mix to combine. Add the flour, cocoa powder and salt, and mix together until the dough comes together. Place plastic wrap on the surface of the dough and refrigerate for 2 hours.
Preheat the oven to 375 degrees F. Line baking sheets with baking mats or parchment.
Roll out the cookie dough and cut out the cookies using a rectangular cookie cutter, re-rolling the scraps in order to use as much of the dough as possible. Place the cookies onto the prepared baking sheets. Bake for 7 to 9 minutes, in batches if necessary, being careful not to burn. Cookies will remain the same general size and shape after they bake.
Remove from the oven and place the cookies on a cooling rack. Allow them to cool completely.
Melt the almond barks in separate bowls in the microwave. Dip half of each cookie into the white almond bark and half into the chocolate bark. Immediately sprinkle or press toppings from the dipping bar over both sides of the cookies.
Gently set on parchment paper or another nonstick surface and allow to cool before serving.
Posted by Ree on February 16 2012
Recipe: Chocolate Truffles with Sea Salt
Prep Time: 2 Hours
|
Cook Time: 15 Minutes
|
Difficulty: Easy
|
Servings: 36

Print Recipe
3"x5" Cards
4"x6" Cards
Full Page
Ingredients
8 ounces, weight (up To 9 Oz.) Good Semisweet Chocolate8 ounces, weight (up To 9 Oz.) Good Bittersweet Chocolate1 can (14 Oz) Sweetened Condensed Milk1 Tablespoon Vanilla Extract8 ounces, weight Meltable Milk Chocolate Sea Salt Preparation Instructions
Heat dark chocolates and condensed milk in a double boiler over medium low heat until chocolate is melted. Stir—mixture will have a slight marshmallow texture. Stir in vanilla.
Remove from heat, cover and refrigerate for two hours.
Once chilled, roll in balls, then roll in melted milk chocolate coating. Sprinkle with sea salt or other fine, coarse sprinkles.
Posted by Ree on October 15 2009
Recipe: Pots de Creme a l’Orange
Prep Time: 2 Hours
|
Cook Time:
|
Difficulty: Easy
|
Servings: 12
Print Recipe
3"x5" Cards
4"x6" Cards
Full Page
Ingredients
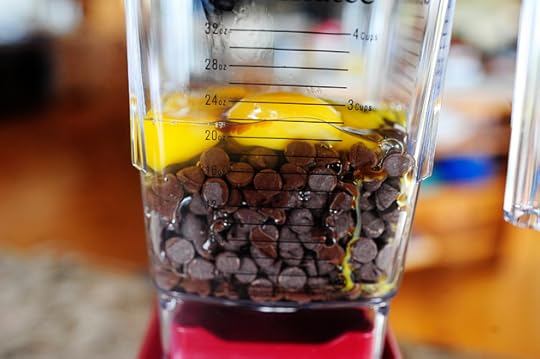
12 ounces, weight Semi-Sweet Chocolate Chips4 whole Eggs1 Tablespoon Grand Marnier, More To Taste1 dash Salt1 cup Very Hot Strong Coffee Fresh Whipped Cream, For Serving Thinly Sliced Orange Peel, For Garnish Preparation Instructions
Place the chocolate chips into a blender. Crack in the eggs, then add Grand Marnier and salt. Blend for a few seconds, or until combined.
Pour the coffee in a thin stream through the blender lid until it's all added. Blend another few seconds, or until smooth.
Pour mixture into small cups or jars, then refrigerate for at least 2 hours, or until chilled and set.
Top with plenty of sweetened whipped cream, then garnish with sliced orange peel.
Posted by Ree on February 13 2012
Recipe: Corn & Cheese Chowder
Prep Time: 15 Minutes
|
Cook Time: 20 Minutes
|
Difficulty: Easy
|
Servings: 12

Print Recipe
3"x5" Cards
4"x6" Cards
Full Page
Ingredients
4 Tablespoons 1/2 Stick Butter1 whole Onion, Chopped3 slices Bacon, Cut Into Pieces3 whole Bell Peppers, Finely Diced (red, Yellow, Orange)5 ears Corn, Kernels Sliced Off1/4 cup All-purpose Flour3 cups Chicken Stock Or Broth2 cups Half-and-half1 cup (heaping) Grated Monterey Jack1 cup (heaping) Pepper Jack1/3 cup Sliced Green Onions Bread Bowls Preparation Instructions
In a large pot, melt butter over medium-high heat. Cook onions for a couple of minutes. Add bacon and cook for another minute or so, then add diced bell peppers and cook for a couple of minutes. Finally, add corn and cook for a minute.
Sprinkle flour evenly over the top and stir to combine. Pour in broth and stir well. Allow this to thicken for 3 or 4 minutes, then reduce heat to low. Stir in half-and-half, then cover and allow to simmer/thicken for 15 minutes or so.
Stir in cheeses and green onions. When cheese is melted and the soup is hot, check seasonings. Add salt and pepper as needed.
Ladle into hollowed out boules and serve immediately.
Posted by Ree on October 23 2011

November 1, 2012
What Did You Do Last Night? (Winners Announced!)
The winners of the Le Creuset are:
#6933 David: “Went out for some Halloween fun with friends.”
#9338 Mrs. Mason: “We had a wonderful night! Took all the kiddos around our neighborhood, and then came home to hand out candy to the rest of the kids and watched Beetlejuice. It was loads of fun!”
#18812 Rhonda L: “We spent the evening at home playing with our two grand babies. They were full of energy and had a great time.”
Congrats to the winners! Contact prizes@thepioneerwoman.com to claim your pot!
Today…
Because it’s Thursday…
Because it’s November (how did that happen?)…
And because the holidays are just around the corner (how did that happen?)…
 I’m giving away three (3) Le Creuset 9-Quart Round French Ovens, in this gawgeous “Flame” color.
TO ENTER
To enter the contest, just answer the following question in the Comments section of this post.
“What did you do last night?”
What were your Halloween plans? Did you take the kids trick-or-treating? Did you stay home and watch Michael Myers movies? Did you go to a scary movie at the theater? Or did you stay home, eat chili, and put your feet up?
Just shout out what your Halloween night looked like and you’re automatically entered to win the Le Creuset.
(Note: If you’d rather not say what you did last night, no problem! Just say something along the lines of “Howdy” and you’re good to go!)
THE RULES
One entry per person, please.
Winners will be announced Friday.
Good luck!
____________________________________
Contest sponsored by Pioneer Woman, with cooperation from CHEFS Catalog.
NOTE: Contest time has ended and comments are now closed.

What Did You Do Last Night?
Today…
Because it’s Thursday…
Because it’s November (how did that happen?)…
And because the holidays are just around the corner (how did that happen?)…
I’m giving away three (3) Le Creuset 9-Quart Round French Ovens, in this gawgeous “Flame” color.
TO ENTER
To enter the contest, just answer the following question in the Comments section of this post.
“What did you do last night?”
What were your Halloween plans? Did you take the kids trick-or-treating? Did you stay home and watch Michael Myers movies? Did you go to a scary movie at the theater? Or did you stay home, eat chili, and put your feet up?
Just shout out what your Halloween night looked like and you’re automatically entered to win the Le Creuset.
(Note: If you’d rather not say what you did last night, no problem! Just say something along the lines of “Howdy” and you’re good to go!)
THE RULES
One entry per person, please.
Winners will be announced Friday.
Good luck!
____________________________________
Contest sponsored by Pioneer Woman, with cooperation from CHEFS Catalog.
October 29, 2012
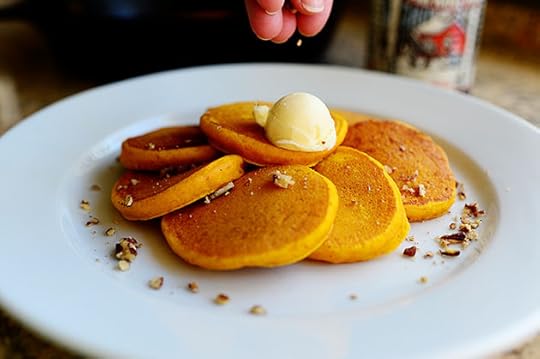
Silver Dollar Pumpkin Pancakes
 In my hometown when I was growing up, there was, inexplicably, a Dutch pancake restaurant called Pannekoeken Huis. I have no idea whether or not my family and I pronounced it correctly, but we just loved heading down to “Panna-kooken-hoos” and chowing down on the delicious breakfast offerings ranging from good ol’ bacon and eggs to big, poufy Pannekoeken that waitresses sporting braids and wooden clogs had to run to deliver to the tables before deflation occurred. Because at Pannenkoeken Huis, if a Pannekoeken fell before the waitress delivered it to the table…well, it was pretty much the end of the world.
Just what a Dutch pancake house was doing in a town of 35,000 in Northeastern Oklahoma is, to this day, a complete mystery to me. All I know is I loved it dearly, I miss it dearly, and I had a lot of memories there.
Oh, and Pannekoeken Huis is now a Chinese buffet. It’s called Hunan and it’s delicious. My younger daughter and I and go there sometimes when I take her over there for soccer practice. We load up our plates, return to the table, then I send her back for seconds because I’m too embarrassed to go myself.
My gosh, what was my point? Oh! I remember: The first time I ever heard of silver dollar pancakes was at Pannekoeken Huis. This is funny to me, because silver dollars are obviously an American currency, so what was a Dutch restaurant doing serving a dish with such an American influence?
These are the answers I hope to someday find in the hereafter.
Anyway, yesterday—because it’s that time of year—I made a batch of pumpkin pancake batter using my Perfect Pancake recipe as the base. But instead of proceeding with standard pancakes, I remembered the old days of Panna-kooken-hoos and went the silver dollar route. I inhaled them, my boys inhaled them, and when Marlboro Man and the girls got home from my older daughter’s soccer game two hours away, they inhaled them, too.
That was quite possibly the longest recipe headnote in the history of recipe headnotes. Until my next recipe headnote, which I think I’ll make longer, just to see if I can one-up myself.
I’m sorry you have to put up with me.
 The Cast of Characters: Cake flour, salt, sugar, baking powder, pumpkin puree, eggs, vanilla, whole milk, butter, and maple syrup.
Oh, and heavy cream. Not pictured, because I’m an airhead.
And pecans. Not pictured, because I’m an airhead.
And caramel sauce (optional). Not pictured, because I’m an airhead.
Are you seeing a pattern here?
 Measure three cups of cake flour…
 And throw it into a large bowl.
 Add some salt…
 Baking powder…
 And sugar.
Then stir it together and set it aside.
 Measure some canned pumpkin puree (or some fresh, if you’re into that kind of thing. Here’s how to make the fresh stuff if you’re interested!).
 Throw it into a separate bowl…
 Along with a couple of huevos…
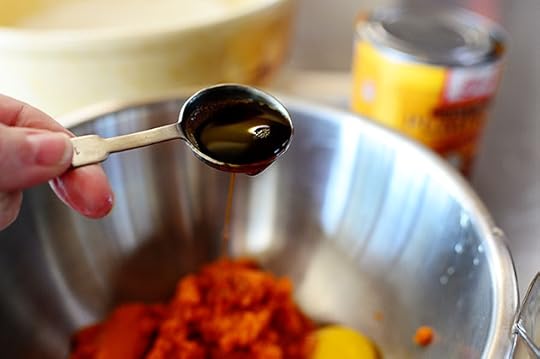 Some vanilla…
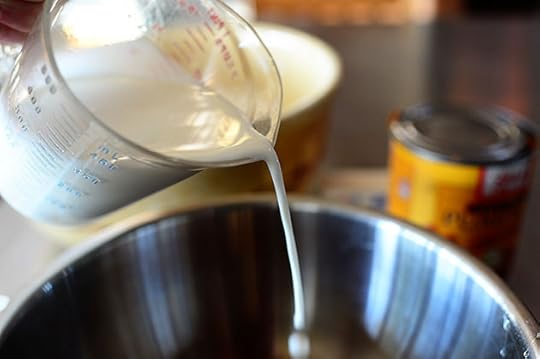 And some whole milk.
 When I cook or bake, I love to use whole milk. Makes me feel naughty.
And jiggly.
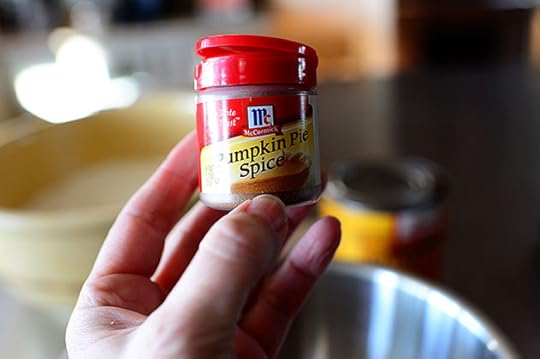 Then grab some of this…
 And sprinkle it in.
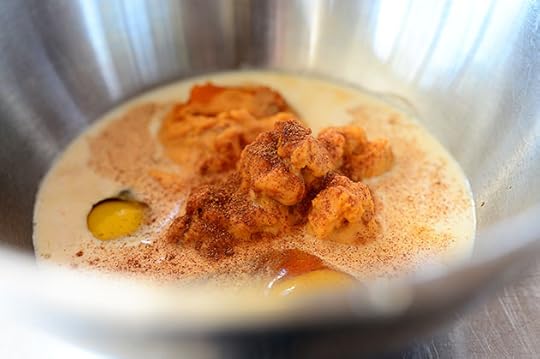
 Whisk it all together until it’s combined…
 And slowly pour it into the dry ingredients.
 Stir it gently as you pour it in…
 And if it seems overly thick, splash in an additional half-cup of milk at a time until it’s right. It should be pourable but not overly runny.
 I used a kitchen scoop to drop tablespoons of batter onto a lightly buttered skillet over medium-low to low heat. Any hotter than that and the pancakes will burn, which will ruin your entire day…or at least your pancakes.
 Then just let ‘em cook on both sides until they’re nice and golden brown.
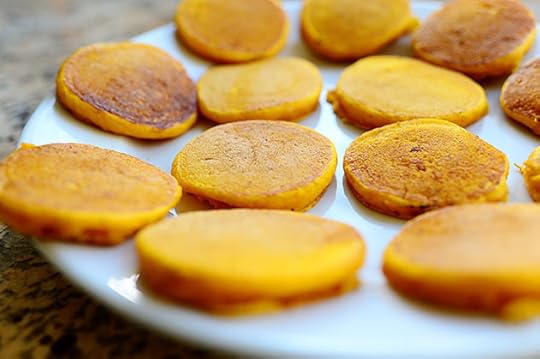 Pretty!
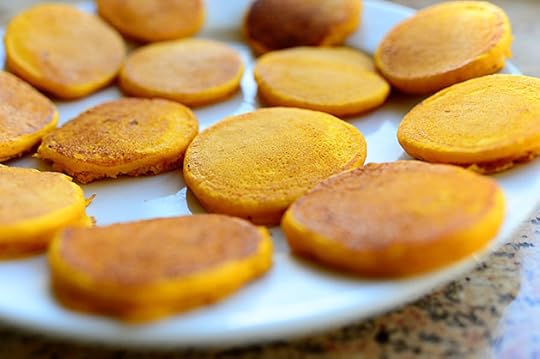 Yummy!
 Meanwhile, pour some heavy cream into the bowl of a mixer…
 Along with some maple syrup.
 Whip it together until light and fluffy.
 Meanwhile, Chapter 2: Chop some nuts. Or, if you’re lazy, disenchanted, disenfranchised, and malodorous like me, just chop them in the food processor.
 To serve ‘em up, arrange the pancakes in an overlapping circle, ending with one in the center.
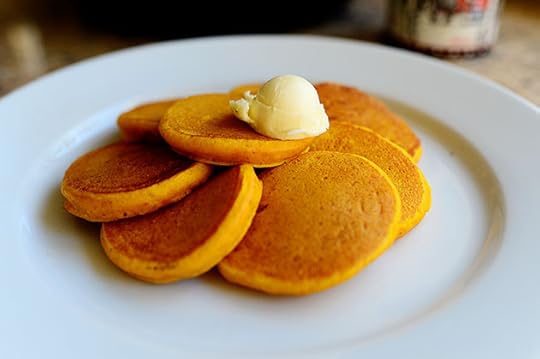 Add a plop of butter…
 Then sprinkle on some nuts…
 Look at that nut mid-air! The official photography term for this is “Mid-Air Nut.”
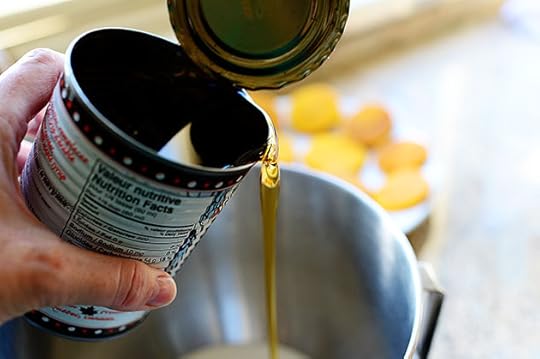
 Next, drizzle on some warm maple syrup.
 After the syrup, add a dollop of the maple whipped cream…
 Along with a fresh sprinkling of nuts.
 This is totally optional: Next, grab some caramel sauce…
 Drizzle on a zig-zag criss-cross pattern.
 Then cry because of the bliss you’re about to experience.
 Geez Louise. Over and out. Amen and Hallalujah.
These were divine!
 Oh, and you can also make big ones! The batter obviously works either way.
 These would make the perfect Halloween morning breakfast this week!
Enjoy, guys. Here’s the handy dandy printable!
Recipe: Silver Dollar Pumpkin Pancakes
Prep Time: 10 Minutes
|
Cook Time: 10 Minutes
|
Difficulty: Easy
|
Servings: 6

Print Recipe
3"x5" Cards
4"x6" Cards
Full Page
Ingredients
3 cups Cake Flour1 teaspoon Salt2 Tablespoons Baking Powder3 Tablespoons Sugar2 cups Canned Pumpkin Puree2 whole Eggs3 teaspoons Vanilla2-1/2 cups Milk1/4 teaspoon Pumpkin Pie Spice1/2 cup Heavy Cream3 Tablespoons Maple Syrup Butter, For Serving Maple Syrup, Warmed, For Serving Finely Chopped Pecans, For Serving Caramel Sauce, For Drizzling (optional) Preparation Instructions
(Note: Recipe can easily be halved.)
In a large bowl, combine cake flour, salt, baking powder, and sugar. Stir together and set aside.
In a separate bowl, whisk together pumpkin puree, eggs, vanilla, pumpkin pie spice, and milk. Slowly drizzle wet ingredients into dry ingredients, stirring gently with a spoon as you go. Once combined, if mixture needs more moisture, splash in a little more milk. Batter should be pourable.
Heat large skillet or griddle over medium-low to low heat. Smear a little bit of butter over the surface and drop tablespoon-sized amounts of batter onto the pan (more if you want larger pancakes.) Wait a minute or so, then flip to the other side. Pancakes should be light golden brown and set in the middle.
Whip cream with maple syrup (optional) until light and fluffy. Set aside.
Serve silver dollar pancakes in a circular pattern on a large plate, ending with one in the center. Top with butter, sprinkle with chopped nuts, and drizzle with warm syrup. Top the whole thing with the maple whipped cream and serve immediately! (Note: you can drizzle with a little caramel sauce, too!)
Posted by Ree on October 28 2012

October 26, 2012
Tomorrow’s Recipes!
On tomorrow’s new Food Network episode, I wear a shirt that looks like an English garden on steroids and with an ax to grind while making a lunch comprised of all my kids’ favorite foods after they spend a long morning working cattle. Each dish is chosen with one of my kids in mind and since there is some overlap in terms of what food is whose favorite, they have to guess at the end of the meal which one I picked for which kid.
I’m easily entertained, as you can see.
Here are the links to the step-by-step recipes, as well as the printable recipes below:
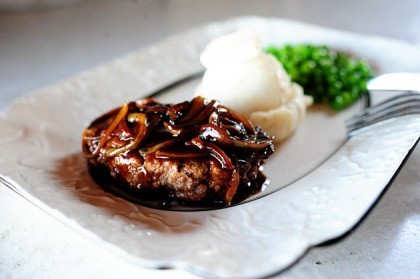
 For the main course, I whip up Salisbury Steak, and if you haven’t eaten Salisbury Steak in decades, it’s time to break it back in now. I’ve heard from lots of folks who’ve tried my recipe that a mere bite of the stuff immediately plunged them back into their elementary schoolroom in 1978.
Whether or not this was a positive experience varied from person to person.
 Rather than make the standard mashed potatoes or mac-and-cheese to go with it, though, I opted instead for Fettuccine Alfredo, which—between the color and the cheesiness—is sort of a cross between the two.
Warning: This Fettuccine Alfredo is absolutely criminal in its delicious decadence. Proceed at your own risk.
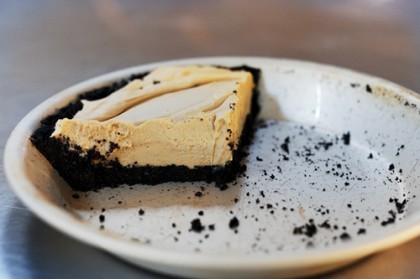
 For dessert, I made this Chocolate Peanut Butter Pie, and it’s no question my baby was target recipient. Chocolate and peanut butter are two of his primary food groups.
I also make a colorful, fun, and vintage vegetable dish (care to guess what it is?) that pulled it all together…then we all chowed down as if our very lives depended on it.
Then I dribbled a little Salisbury Steak gravy on my English garden shirt. And the world, once again, made perfect sense.
Hope you enjoy the episode, guys!
Hope you had a wonderful week, everyone!
I finish shooting today, and I’ll have a nice, new recipe here for you Monday morning.
Here are the printables for ya:
Recipe: Salisbury Steak
Prep Time: 10 Minutes
|
Cook Time: 20 Minutes
|
Difficulty: Easy
|
Servings: 6
Print Recipe
3"x5" Cards
4"x6" Cards
Full Page
Ingredients
MEAT MIXTURE1-1/2 pound Lean Ground Beef1/2 cup Seasoned Breadcrumbs2 teaspoons Dry Mustard1 cube Beef Bouillon, Crumbed (or Powdered Beef Base)4 dashes Worcestershire Sauce1 Tablespoon Ketchup Salt And Pepper Gravy1 whole Onion, Halved And Thinly Sliced (or Diced If You Prefer)2 cups Beef Broth4 dashes Worcestershire (additional)1 Tablespoon Ketchup (additional)1 teaspoon Kitchen Bouquet (optional)1 teaspoon Corn Starch Mixed With A Little Beef Broth To Make A Thin Paste Salt And Pepper, to taste More Broth If Needed For Thinning Mashed Potatoes, For Serving Buttered Peas, For Serving1 Tablespoon Olive Oil, For Frying1 Tablespoon Butter, For Frying Preparation Instructions
Combine all the ingredients for the meat mixture and knead until all combined. Form into 4 to 6 oval patties, then make lines across the patties to give them a "steak" appearance.
Fry in a skillet with oil and butter over medium-high heat on both sides until no longer pink in the middle. Remove from the pan and pour off excess grease.
Reduce the heat to medium and add in the sliced onions. Stir and cook for several minutes, or until golden brown and somewhat soft. Add the beef stock, Worcestershire, and ketchup. Stir and cook to reduce.
OPTIONAL: Add Kitchen Bouquet, which will give the gravy a deeper color and a bit more flavor.
OPTIONAL: Add 1 to 2 teaspoons of the cornstarch/broth mixture to give the gravy a little gloss and to thicken it up a bit without lightening it (as flour would.)
**Add a sprinkle of salt and pepper and more broth if needed for thinning.
Return the steaks to the gravy. Spoon gravy over the top and let them simmer and heat back up for a couple of minutes.
Serve with mashed potatoes and peas!
**NOTE: If you omit the Kitchen Bouquet, no problem. If you omit the cornstarch/broth mixture, just cook the liquid a little longer in order to reduce and thicken it a bit.
**Another optional thing is to add sliced mushrooms to the onions and cook them together. Yum!
Posted by Ree on March 18 2012
Recipe: Fettuccine Alfredo
Prep Time: 10 Minutes
|
Cook Time: 20 Minutes
|
Difficulty: Easy
|
Servings: 6

Print Recipe
3"x5" Cards
4"x6" Cards
Full Page
Ingredients
1 pound Fettuccine Noodles1 stick Butter1 cup Heavy Cream Salt and Pepper, to taste2 cups Freshly Grated Parmesan Cheese Preparation Instructions
Cook pasta according to package directions.
In a saucepan or skillet, warm butter and cream. Season with salt and freshly ground black pepper.
Grate Parmesan cheese and place half of it into a large serving bowl. Pour warm butter/cream mixture over the top.
Drain pasta and immediately pour it into the bowl.
Toss a couple of times, then sprinkle in the other half of the Parmesan.
Toss to combine, thinning with pasta water if necessary.
Serve immediately as a main course or accompaniment to meat or salad.
Delicious!
Posted by Ree on July 16 2009
Recipe: Chocolate Peanut Butter Pie
Prep Time: 15 Minutes
|
Cook Time: 7 Minutes
|
Difficulty: Easy
|
Servings: 8
Print Recipe
3"x5" Cards
4"x6" Cards
Full Page
Ingredients
FOR CRUST25 whole Oreos4 Tablespoons Butter, Melted _____ PEANUT BUTTER FILLING:1 cup Creamy Peanut Butter1 package (8 Ounce) Softened Cream Cheese1-1/4 cup Powdered Sugar1 package (8 Ounce) Cool Whip, Thawed Preparation Instructions
Crust:
Crush the Oreos until they’re fine crumbs. Pour melted butter over the top and stir with a fork to combine. Press into pie pan and bake at 350 degrees for 5 to 7 minutes, or until set.
Remove from oven and allow to cool completely.
Filling:
Beat the peanut butter with the cream cheese until smooth. Add powdered sugar and beat until smooth. Add in the thawed Cool Whip and beat mixture until smooth, scraping the sides as needed.
Pour filling into crust, evening out the top with a knife or spatula. Chill for at least an hour before serving.
Warning: This is ultra, ultra-rich. Cut small slivers—your guests will thank you!
Posted by Ree on September 12 2009

October 24, 2012
The Best Blender Ever…Again! (Winners Announced)
The winners of the Blendtec blenders are…
#13809 Stevie B: “I love spring. With all the new growth, everything just seems so bright and fresh!”
#36795 Cathy Brown: “SUMMER…..SUMMER……I want summer year around Please!”
Congrats to the winners! Contact prizes@thepioneerwoman.com to claim your new blenders.
 By popular demand, I’m giving away two (2) more of these awesome BlendTec WildSide blenders. I had this same giveaway a couple of weeks ago, and since the response was large I wanted to throw a couple more into the mix!
Here’s what I posted on the last giveaway:
Before you said, “Eh. It’s a blender.” let me stop you! Saying a BlendTec is just a blender is like saying the following:
* Mount Everest is just a hill.
* The Sistine Chapel is just a church.
* Pots de Creme is just chocolate pudding.
 And speaking of Pots de Creme…
 Here’s my BlendTec at work!


 And that’s only the beginning. The BlendTec is such a powerhouse, and whether it’s making a smooth soup or crushing up the hardest ice you’ve ever seen, there’s pretty much nothing it can’t do. Plus, the buttons are clear and straightforward, and you don’t need an advance degree in technology to be able to operate it.
Amen.
 Included in the giveaway package is one BlendTec WildSide blender…
 And an extra pitcher, which is really handy if you’ve got a lot of recipes going on at once (or if you have a big group of friends over for margaritas!)
TO ENTER
To enter this blender giveaway, just answer the following questions in the Comments section of this post:
“What’s your favorite season?”
Are you fall-crazy like me? Or do you prefer the heat and freedom of summer? Do you love to cozy up near the fire during wintertime? Or do you love the new life and promise of spring? Just shout out your favorite season of the year and you’re entered to win one of the blenders.
THE RULES
One entry per person, please.
Winners will be announced Thursday!
Note: Giveaway sponsored by Pioneer Woman. Over and out.
Contest is over and comments are now closed.

The Best Blender Ever…Again!
By popular demand, I’m giving away two (2) more of these awesome BlendTec WildSide blenders. I had this same giveaway a couple of weeks ago, and since the response was large I wanted to throw a couple more into the mix!
Here’s what I posted on the last giveaway:
Before you said, “Eh. It’s a blender.” let me stop you! Saying a BlendTec is just a blender is like saying the following:
* Mount Everest is just a hill.
* The Sistine Chapel is just a church.
* Pots de Creme is just chocolate pudding.
And speaking of Pots de Creme…
Here’s my BlendTec at work!
And that’s only the beginning. The BlendTec is such a powerhouse, and whether it’s making a smooth soup or crushing up the hardest ice you’ve ever seen, there’s pretty much nothing it can’t do. Plus, the buttons are clear and straightforward, and you don’t need an advance degree in technology to be able to operate it.
Amen.
Included in the giveaway package is one BlendTec WildSide blender…
And an extra pitcher, which is really handy if you’ve got a lot of recipes going on at once (or if you have a big group of friends over for margaritas!)
TO ENTER
To enter this blender giveaway, just answer the following questions in the Comments section of this post:
“What’s your favorite season?”
Are you fall-crazy like me? Or do you prefer the heat and freedom of summer? Do you love to cozy up near the fire during wintertime? Or do you love the new life and promise of spring? Just shout out your favorite season of the year and you’re entered to win one of the blenders.
THE RULES
One entry per person, please.
Winners will be announced Thursday!
Note: Giveaway sponsored by Pioneer Woman. Over and out.
October 22, 2012
Italian Pot Roast
 I made this scrumptious pot roast a couple of weeks ago and delivered it to the Lodge the night a couple members of the tv crew arrived from London for this new block of shooting, which will be over later this week. That was a very long sentence. Anyway, I’d actually started the roast the day before (you’ll see why in a bit) and kept it in the fridge overnight, then finished it off and delivered it to them after they arrived. I knew they’d be jet-lagged, and I thought they might want something hearty, homey, non-airplaney, non-peanuty, and non-pretzely to eat.
Did you know non-pretzely is a word? It is! According to me.
This is a scrumptious pot roast and slightly different than my regular weeknight pot roast, which is yummy in its own right. For this one, I cooked it ahead of time, refrigerated it, then skimmed off the fat the next day and reduced the cooking liquid into a thick, rich sauce. I happened to have thrown in peppers and artichokes, but the additions are really secondary to the sauce itself. You could just take the traditional approach and throw in carrots and onions when you start the cooking process if you want to just keep it simple.
‘Twas good. ‘Twas very, very good.
 Throw two chuck roasts (or one, if you don’t want to make that much) into a big pot and dump a couple of jars of roasted red peppers right over the meat.
(Or one jar, if you’d rather not make that much.)
(In other words, this recipe can easily be halved.)
Oh! And I got these peppers at my local Alco store. Do you have Alco where you live?
I love that place.
 These are a little different from typical roasted red peppers, as they still had the peel on. Oh, and I don’t think they were roasted.
But other than that, they’re exactly like typical roasted red peppers.
That made absolutely no sense.
 Grab a couple of cans of artichoke hearts.
 Drain them and toss them in, too.
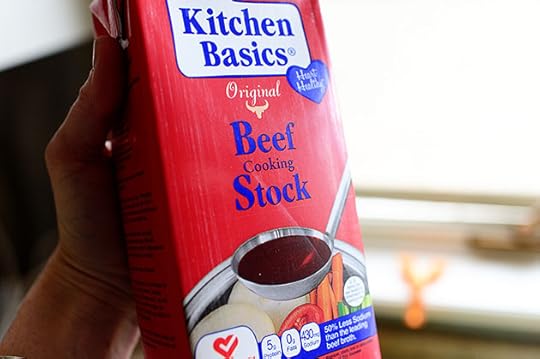 Then grab some beef stock…
 And pour it over the whole thing.
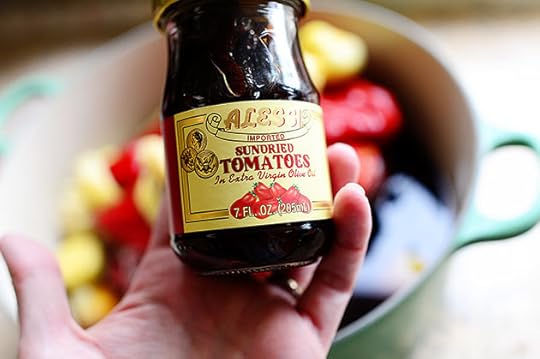 Oh, and I had some of these.
 So I added a few to the pot and poured in about a tablespoon of the oil they were packed in.
I was basically grabbing for any flavor I could find.
 I didn’t feel like walking outside and picking parsley, which happens to be the only herb left in my garden, because…well…I pretty much didn’t feel like walking at all.
 So I threw in some parsley flakes instead.
Please love me anyway.
 I also had a bag full of peeled garlic cloves, so I threw in five or six.
 And I quartered a couple of onions and threw those in, too.
Then I grated up the kitchen sink and tossed it into the pot.
Not really.
 This is a pot full of wonderment!
 Then things got really, really complicated: I put the lid on the pot.
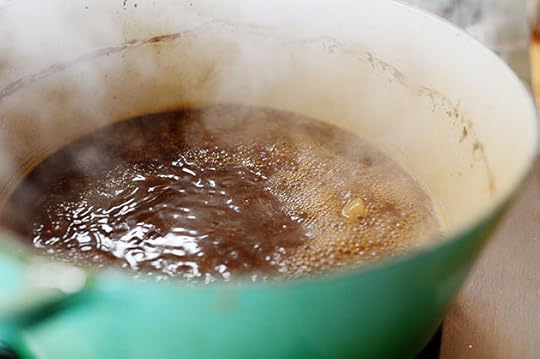
Then I put the pot in a 275-degree oven for four hours.
And that’s it.
Scary complicated!
 I stuck a fork right into the center of the meat to check its tenderness. The fork went straight through—basically, the meat was fall-apart tender—which meant it was done. If the fork had met with any resistance, I would’ve stuck it back in the oven for another 30-45 minutes or so.
 So here’s what happened next: I removed all the peppers, onions, artichokes, and garlic. Basically, everything but the cooking liquid and the meat.
 (That’s a sundried tomato. Not the meat.)
 And I threw it all in a bowl. As you can see, there are bits and pieces of onion and artichoke, but underneath the pile there are several artichokes still intact.
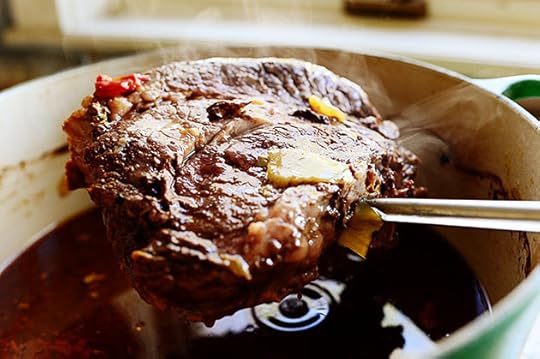 Then I removed the meat…
 And threw it into a separate bowl. I covered the veggie and meat bowls and put them in the fridge…
 Then I put the lid on the pot it was all cooked in and put it into the fridge, too! You could also transfer the liquid to smaller containers if you want. The point is, the liquid needs to be refrigerated for several hours or overnight.
And here’s why!
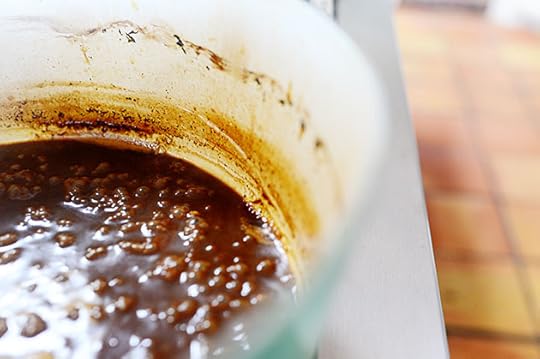
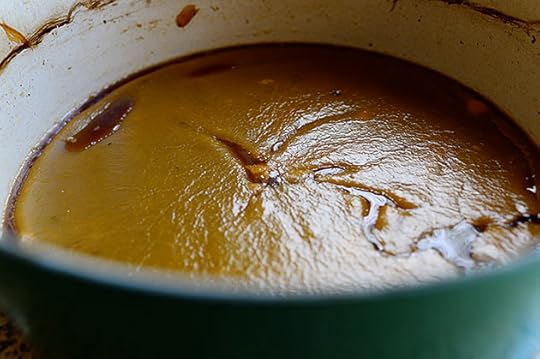 All the fat solidifies…
 So it’s easier to skim off and get rid of.
“All the better to skim you off with, my dear!”
 Now we’re left with a big bunch of yummy, flavorful liquid.
 So here’s what we’re gonna do: We’re gonna bring it to a bawl.
I mean boil.
 As it starts to boil, pour in some wine! I would have added this to the cooking liquid before I even put the roast in the oven, but I wanted to limit the wine flavor to the sauce/gravy just in case some of the meat wound up feeding my family, most of whom don’t love the flavor of wine with their beef.
Not that they’re persnickety or anything.
 Bring it to a boil…
 Then mix together a little flour with a little baking liquid to make a paste…
 And add just a tablespoon or two of the paste to the liquid as it boils. Don’t add too much at first: you just want to add a little structure and thickness to the sauce without totally glooping it up.
 This is after just a few minutes of boiling. The sauce looks nice and rich…but not quite there.
 Meanwhile, boil some egg noodles…
 And throw them onto a platter. Heat up the meat and vegetables in the microwave, then tear the meat into pieces and arrange it all over the noodles.
 Meanwhile, the sauce is really starting to reduce. When you start to see tiny bubbles all over the surface, it’s getting close.
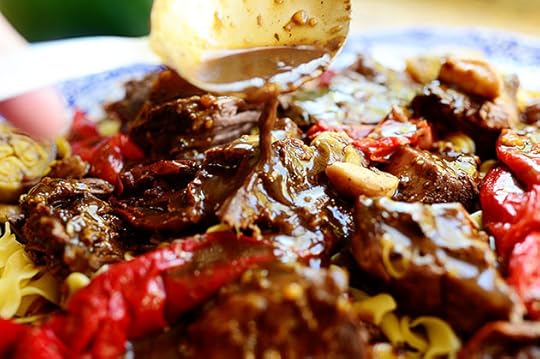
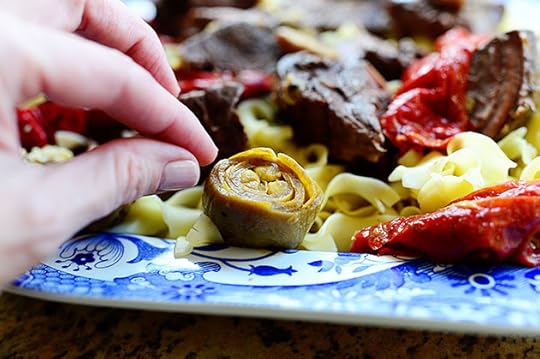 Arrange the veggies all around the chunks of meat.
 Don’t forget the garlic! Those cloves are sheer heaven.
 And oh my gosh.
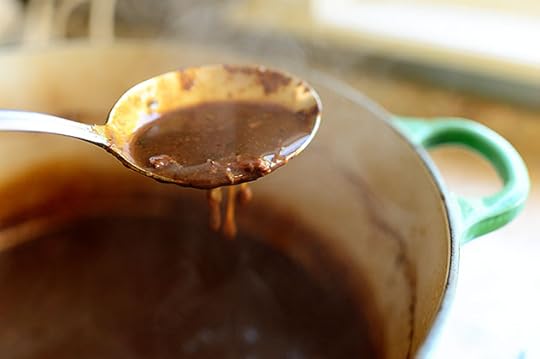 The sauce is ready.
 Slowly spoon the sauce all over the meat.
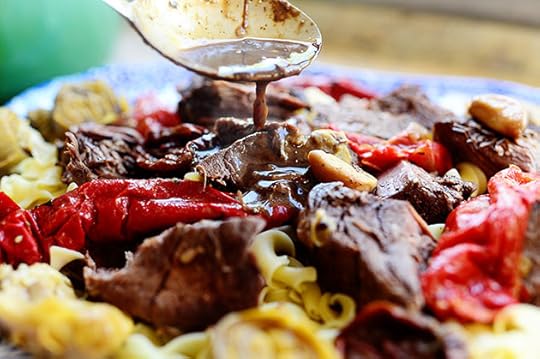 Amen…
Amen…
 And amen.
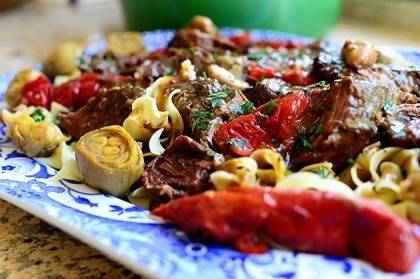
 This time, I was in the mood to walk. So I went outside and fetched me some parsley, man.
 Then I sprinkled it over the top.
Parsley flakes in the roast, fresh parsley on the roast. Makes perfect sense.
I think.
 Hello, lover. Will you marry me?
 So first I served myself a big ol’ bowl. It was divine.
 Then I transferred the rest of it to a big, foil pan and delivered it to our Lodge guests.
I received an email from the two ladies late that night saying they’d absolutely devoured it.
(Except they wrote it with a charming British accent.)
Here’s the printable recipe! It takes a little time, takes a little patience. But it’s so, so worth it.
Enjoy, my friends! Have a very happy Monday.
Recipe: Italian Pot Roast
Prep Time: 1Minute
|
Cook Time: 4 Hours
|
Difficulty: Easy
|
Servings: 12
Print Recipe
3"x5" Cards
4"x6" Cards
Full Page
Ingredients
2 whole Beef Chuck Roasts2 jars Roasted Red Peppers2 jars Artichoke Hearts, Drained6 whole Sundried Tomatoes (jarred)2 whole Yellow Onions, Peeled And Quartered28 ounces, fluid Beef Stock Or Beef Broth2 Tablespoons Parsley Flakes6 cloves Garlic, Peeled1 cup Wine (red Or White)2 Tablespoons Flour Salt And Pepper, to taste12 ounces, weight Egg Noodles Fresh Parsley, Minced Preparation Instructions
Preheat oven to 275 degrees.
Throw chuck roasts into a large, heavy pot. Pour on the roasted red peppers, the drained artichoke hearts, and the sun dried tomatoes. If the sun dried tomatoes are packed in oil, drizzle in about a tablespoon of the oil. Add onions, garlic cloves and beef broth, then place the lid on the pot and cook in the oven for four hours.
Remove the pot after four hours and use a fork to confirm that the meat is falling apart/fork tender. (If not, put back into the oven for 30 minute increments until totally tender.)
With a slotted spoon, remove the peppers, artichokes, onions, garlic, and sundried tomatoes and place them in a separate container. Remove the meat and place it in another separate containers. Cover the containers holding the veggies and meat and refrigerate them several hours or overnight. Place the lid on the pot and refrigerate it for several hours or overnight.
When you're ready to serve the roast, remove the meat and veggie bowls from the fridge and nuke them just to heat them up. Set aside.
Cook egg noodles according to package directions. Drain and set aside.
Remove the pot from the fridge and carefully skim off the solidified fat from the top of the liquid. Discard the fat. Mix flour with 1/2 cup of the cooking liquid and set aside.
Add wine to the cooking liquid then bring it to a boil over high heat. Boil the liquid for several minutes, until it reduces by at least half. When bubbles appear all over the surface of the liquid, drizzle in a tablespoon or so of the flour paste. Check thickness: if it's too liquidy, continue to boil for another minute or two. If it's too thick, add some more broth or water. You want to wind up with a rich, thick liquid/gravy.
Arrange cooked noodles on a large platter and arrange chunks of the meat and the intact artichoke hearts and peppers (and garlic cloves!) all around the meat. Spoon the thick gravy all over the top and sprinkle on minced fresh parsley.
Serve immediately! Very, very flavorful.
Posted by Ree on October 21 2012

Ree Drummond's Blog

- Ree Drummond's profile
- 2032 followers

