
Ree Drummond's Blog, page 50
October 18, 2012
Corn Dog Muffins
 Corn Dog Muffins are sweeping the nation!
Not really, but if you have kids in the house, you’re likely to have whipped up a batch somewhere along the way.
Corn dog muffins are basically just like corn dogs. Except they’re not on a stick, they’re in muffin pans. And they’re not fried, they’re baked. And the hot dogs aren’t whole, they’re cut into pieces.
But other than that, they’re exactly like corn dogs!
I make them using my go-to cornbread recipe, which (to warn you sweet cornbread enthusiasts) is decidedly NOT sweet. Not a hint of sugar in there. I don’t like sweet cornbread because my mom never made sweet cornbread and it is therefore against my religion. But if you like a little sweetness, sprinkle a tablespoon of sugar or two into the dry ingredients of the recipe. I don’t think you should, because sweet cornbread is wrong.
I just wanted to go on the record with that.
 Add some yellow cornmeal to a bowl…
 Then add some all-purpose flour.
(Pay attention to this flour. I’ll have a story in a minute.)
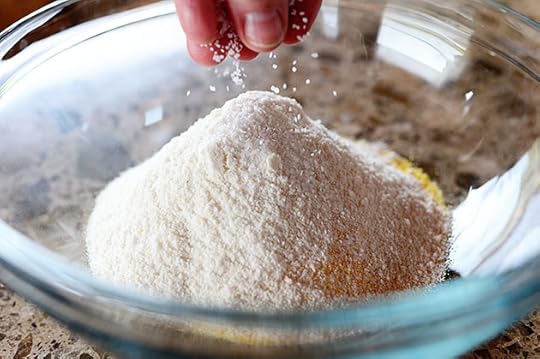 Sprinkle in some salt…
 And stir it around to combine.
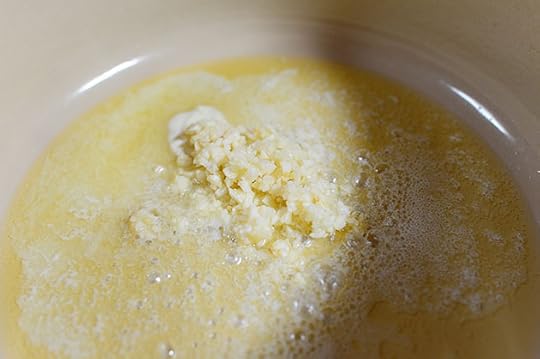
 In a bowl or pitcher, mix some buttermilk with a couple of eggs…
(My Shar Pei puppy added this egg to the pitcher, as you can plainly see.)
 And whisk it together.
 Then add baking powder and baking soda…
 And pour it into the dry ingredients.
 And here’s where the story gets interesting: Stir it all together, see that the texture is all wrong, and realize suddenly that instead of all-purpose flour, you accidentally grabbed the white cornmeal because your eyes are failing due to the fact that you’re 43 years old.
Laugh, then cry, then go start another batch of cornbread using flour this time.
 Okay, I’m back. Measure 1/4 cup shortening…
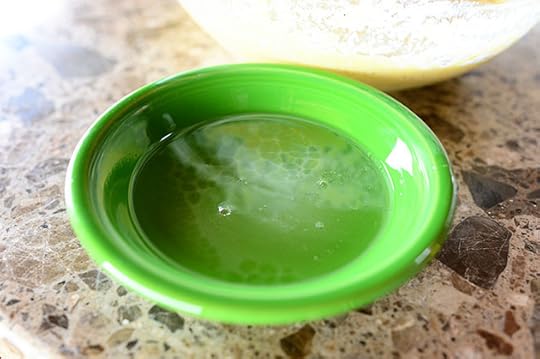 Melt it in a small dish…
 And drizzle it right into the bowl, stirring as you go.
 To make regular-sized muffins, fill the tins about 2/3 of the way full…
(Spray the muffin pan with nonstick baking spray first!)
 Then cut about a 1-inch piece of hot dog and press it right into the middle.
 For the mini corndog muffins, fill mini muffin tins about halfway, then cut a small, round slice of hot dog and press it into the center.
The two different sizes of muffins bake a little differently.
Here! I’ll show you!
 The mini-muffins become little “eyes” in a sense: the hot dog is perfectly visible right in the middle of the muffin. Adorable!
 But the regular-sized muffins…
Wind up with a nice surprise in the center.
Wouldn’t this be a fun way for a guy to pop the question to his girlfriend? He could wedge the engagement ring into the hot dog slice, bake up the muffins, and…
Just kidding.
 In other news, I just love artfully propping one half of a muffin or sandwich against the other half. It’s, like, so…artful.
Not.
Anyway, enjoy these fun kid-friendly treats, guys! And you can use my cornbread recipe, any other cornbread recipe…or you can take the super fast route and use a mix. Just make sure the mix isn’t sweet, because as I’ve firmly established, sweet cornbread is wrong. Morally, ethically, and urologically wrong!
Here’s the handy printable.
Recipe: Corn Dog Muffins
Prep Time: 15 Minutes
|
Cook Time: 15 Minutes
|
Difficulty: Easy
|
Servings: 6

Print Recipe
3"x5" Cards
4"x6" Cards
Full Page
Ingredients
1/4 cup Shortening1 cup Yellow Cornmeal1/2 cup All-purpose Flour1 teaspoon Salt1 cup Buttermilk1/2 cup Milk1 whole Egg1 Tablespoon Baking Powder1/2 teaspoon Baking Soda6 whole Hot Dogs Preparation Instructions
Preheat oven to 425 degrees.
Combine corn meal, flour, and salt in a mixing bowl. In a separate bowl, combine buttermilk, milk, and egg. Add baking powder and baking soda to the wet ingredients. Stir into the dry ingredients. Add ¼ cup melted shortening, slightly cooled, stirring constantly.
Grease muffin tins (whatever size you want) and fill them a little more than half full with batter. Cut a hot dog into pieces (small rounds if using mini muffin tins; 1-inch slices if using larger muffin tins.
Bake until cornbread is done, about 10 to 12 minutes. Remove from the pan and serve with ketchup and mustard!
Posted by Ree on October 18 2012


October 17, 2012
Lay Crewsay Giveaway! (Winners Announced!)
The winners of the Le Creuset braisers are:
#4174 Adrienne: “Waffles for dinner with scrambled eggs and bacon!”
#11072 Ginger C: “I just pulled a baked macaroni and cheese out of the oven and some baked oatmeal, stocking up for some breakfasts.”
#19876 Thomas: “I grilled a London Broil on my cast iron grill plate, on top of my stove, inside the kitchen!”
Congratulations, winners! Contact prizes@thepioneerwoman.com to claim your pots!
Okay, I know that’s not how you’re supposed to pronounce it.
But that’s how I pronounce it.
 Today, because I love ya, I’m giving away three of these awesome new 3 1/2 Quart Le Creuset brasiers. I have one of these puppies and I pretty much love everything about it. They’re shorter than Le Creuset’s traditional French ovens, and they’re perfect for stews, roasts, and anything you want to cook that doesn’t need all the space of the dutch ovens.
I’m in love. Well, as in love as one can be with a pot.
The winner can choose between the orange/red “Flame” color above…
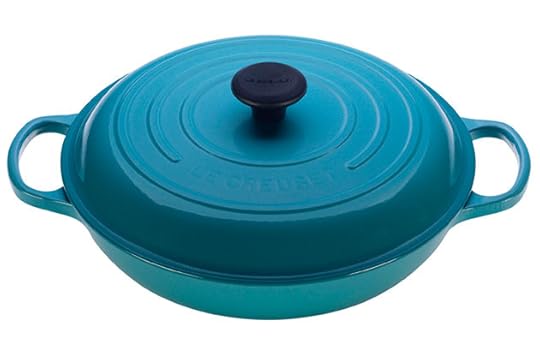 And this gorgeous turquoise color known as “Carribbean…”
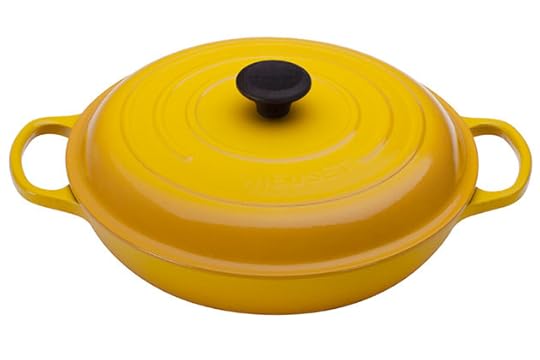 Or this bright yellow “Dijon” color.
I love these colors. Gorgeous!
TO ENTER
To enter this giveaway, just answer the following question in the Comments section of this post:
“What was the most recent thing you cooked/baked?”
Was it pot roast for dinner last night? Scrambled eggs for breakfast last Saturday? A wedding cake for your cousin last fall? Soufflé ten minute ago? Just shout out the last thing you whipped up in the kitchen and you’re automatically entered to win one of the Le Creuset brasiers!
THE RULES
One entry per person, please.
Winners will be announced Thursday.
Good luck!
Giveaway, like, totally sponsored by Pioneer Woman.
NOTE: Contest has ended and comments are now closed.

Lay Crewsay Giveaway!
Okay, I know that’s not how you’re supposed to pronounce it.
But that’s how I pronounce it.
Today, because I love ya, I’m giving away three of these awesome new 3 1/2 Quart Le Creuset brasiers. I have one of these puppies and I pretty much love everything about it. They’re shorter than Le Creuset’s traditional French ovens, and they’re perfect for stews, roasts, and anything you want to cook that doesn’t need all the space of the dutch ovens.
I’m in love. Well, as in love as one can be with a pot.
The winner can choose between the orange/red “Flame” color above…
And this gorgeous turquoise color known as “Carribbean…”
Or this bright yellow “Dijon” color.
I love these colors. Gorgeous!
TO ENTER
To enter this giveaway, just answer the following question in the Comments section of this post:
“What was the most recent thing you cooked/baked?”
Was it pot roast for dinner last night? Scrambled eggs for breakfast last Saturday? A wedding cake for your cousin last fall? Soufflé ten minute ago? Just shout out the last thing you whipped up in the kitchen and you’re automatically entered to win one of the Le Creuset brasiers!
THE RULES
One entry per person, please.
Winners will be announced Thursday.
Good luck!
Giveaway, like, totally sponsored by Pioneer Woman.
October 15, 2012
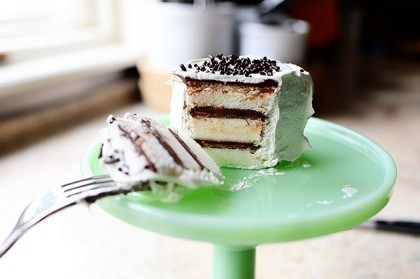
Itty Bitty Nutella Cakes
 These are hilariously, deliciously, unbelievably, shockingly, crazily easy to make.
Emphasis on hilariously and deliciously.
 This is one of those regular storebought rectangular angel food cake thingie ma-bobbers that you buy in the grocery store. Violently rip open the package…
 And slice the cake down the middle.
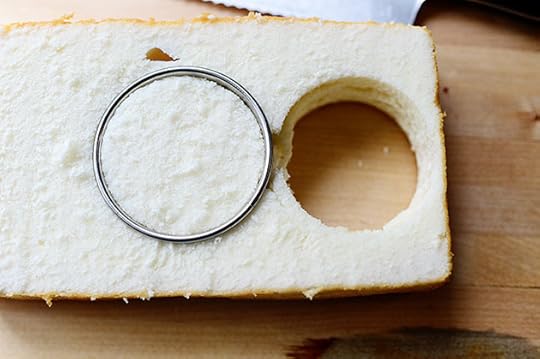
 After you slice the cake in half, cut shapes either with a round cutter…
 Like dees.
 Or you can use a square cutter like dees.
Or you can just cut squares without a cutter.
Or, if you’re one of those dextrous types, you can cut circles without a cutter.
Or you can do the Hokey Pokey and turn yourself about. Because really, when it comes right down to it, that’s what it’s all about.
 So then you have a few pieces like dees!
 Then cut the shapes in half with a small knife.
 Now you have a bunch of shorter shapes!
If that makes any sense.
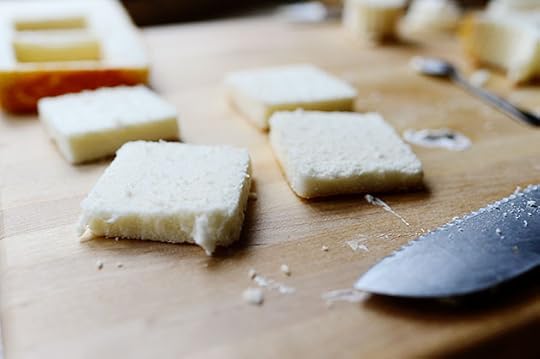 Here are the square ones.
Aren’t you glad you have me here to point out these things to you?
 So here’s what you do! Spread the slices with Nutella.
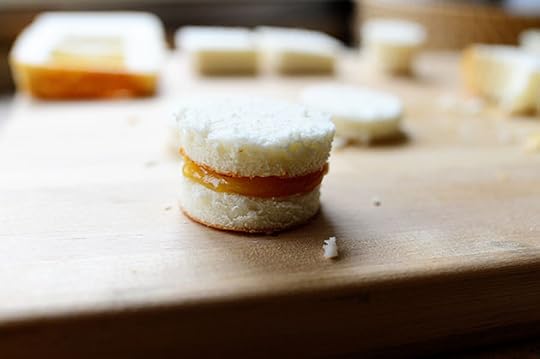
 Then stack three on top of one another, set the stack (or stacks, depending on how many you’re doing) in the freezer for about thirty minutes, just until the Nutella is set.
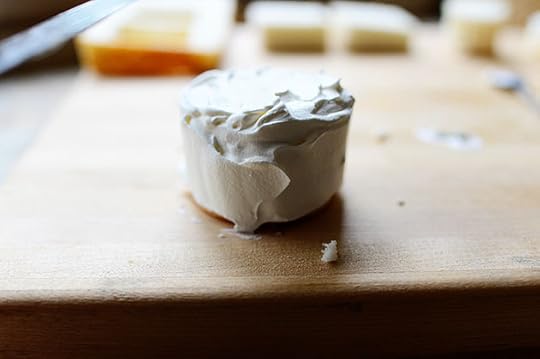
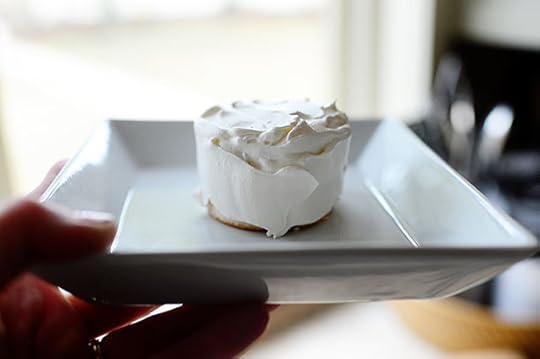
 Spread Cool Whip all over the cake, and either make fancy little peaks…
 Or make it really smooth. Sprinkle the tops with chocolate sprinkles if you’re feeling sassy.
 Then chow down!
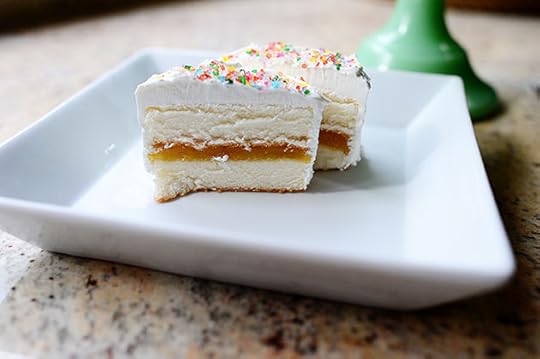
 It basically tastes like…well, an itty bitty Nutella cake!
And here’s the great part: you can make a whole bunch ahead of time and store them in an airtight container in the freezer. It only takes a few minutes for them to thaw, and they taste yummy cold.
 You can also use jarred lemon curd. Watch!
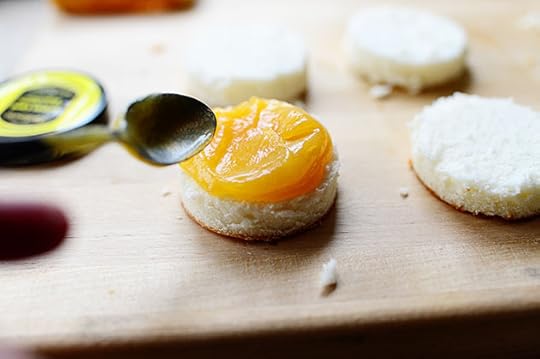
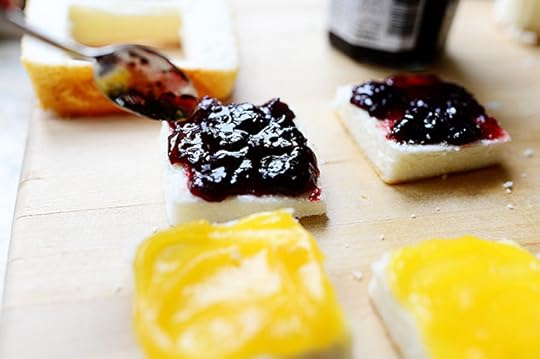 Or a combo of jam and curd.
 Just be sure to freeze them before spreading the Cool Whip on, or you’ll have a messy mess.
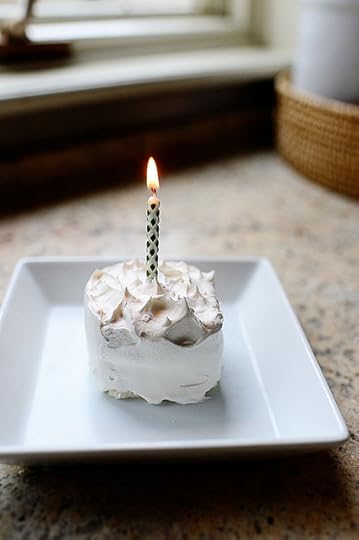 Happy birthday!
 The jam version can get a little sweet.
So when in doubt…stick to Nutella!
Have fun with these, guys. They’re fun for kiddo birthday parties or just for a quick after-dinner treat. The Nutella catapults them into…well, into Nutella Land. And that, as we know, is a wonderful land to visit.
Recipe: Itty Bitty Nutella Cakes
Prep Time: 20 Minutes
|
Cook Time:
|
Difficulty: Easy
|
Servings: 6
Print Recipe
3"x5" Cards
4"x6" Cards
Full Page
Ingredients
1 whole Storebought Angel Food Cake Or Pound Cake Nutella Cool Whip, Thawed In The Fridge Preparation Instructions
Slice the angel food cake (rectangular) in half lengthwise. Use a round or square cutter to cut out pieces (or cut squares freehand). Cut pieces in half through the middle so that they are the same shape, but shorter.
Spread Nutella on three thin slices of cake. Stack on top of one another and set on a dish in the freezer for 30 minutes, or until the Nutella is very set. Remove from the freezer and ice with soft Cool Whip, then place back into the fridge to harden the Cool Whip, about 30 more minutes. (Or you can serve it immediately.)
Make the cakes ahead of time, then store in the fridge in an airtight container. To serve, just pull them out five to ten minutes before you need them!
(Perfect for quick little birthday celebrations.)
Posted by Ree on October 14 2012

October 11, 2012
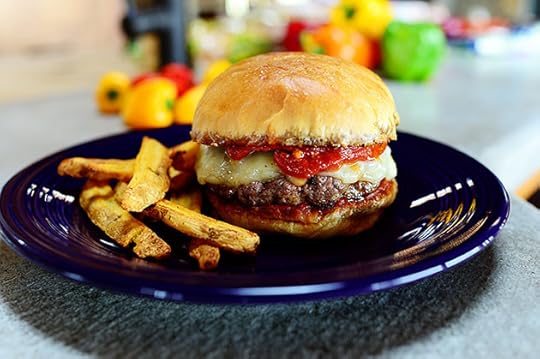
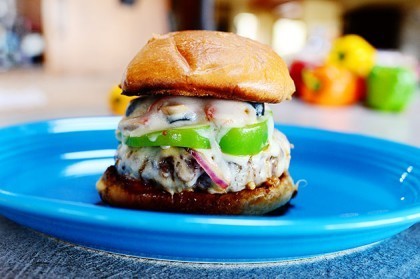
Supreme Pizza Burgers
A couple of weeks ago (or was it a couple of years ago? Or a couple of months ago? Or is it next week? I’m confused) I posted this luscious recipe for Pepperoni Pizza burgers:
 Pepperoni Pizza Burgers. Amen.
I took a bite and decided it was pretty much the most luscious thing I’d ever sunk my teeth into…
 But then I made this variation…and it blew the first one right out of the water.
Let me show you how I made it.
(Note: I’m using the first few process shots from the original Pepperoni Pizza Burger post, because the meat mixture and the process is exactly the same.)
 The Cast of Characters: Ground beef, Italian sausage, mozzarella cheese, marinara sauce, pepperoni, red onion, green bell pepper, canned (you heard me) mushrooms…and Kaiser rolls.
Also (not pictured, because I’m an airhead) Italian seasoning!
 Start by throwing some ground beef and Italian sausage into a bowl.
 Use your hands to knead the meat together.
 Add in some Italian seasoning and knead it around until it’s all combined.
 Form the meat mixture into patties…
 Then cook ‘em in a skillet over medium-high heat until they’re totally cooked in the middle, Maynard.
 Cook it for several minutes on the first side, then flip it over to the other side.
 Next, lay a couple of slices of cheese on top. This is Provolone, and I love how neatly the round slices fit the patty.
 Immediately lay a circle of pepperoni slices right on top.
 This is the variation: On top of the pepperoni (pretend I have a ring of pepperoni on top of the cheese; I left it out when I made this version but decided it would be even better with it) lay some very thinly sliced red onion, a ring of sliced green bell pepper, and a good amount of sliced black olives.
 Next—and I’m going for the totally classic, vintage-pizza-joint approach here—a pile of canned mushrooms.
 On top of the mushrooms, spoon a little bit of marinara sauce…
 Then lay another slices of cheese on top. This round provolone is really perfect for burgers, and it melts in a circle and drips down the sizes.
Don’t believe me? Just watch.
 To facilitate the melting of ingredients, I inverted a second skillet on top of the first one.
Of course, if you have one of those inventions known as a “lid,” that would be even better!
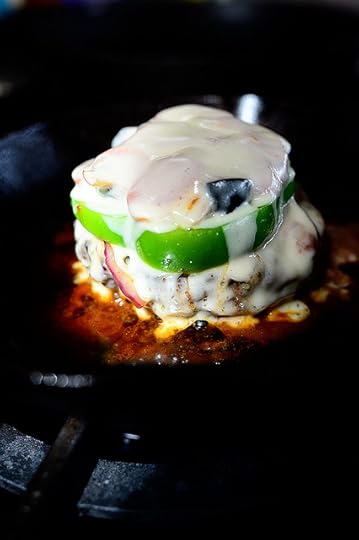 Holy…help me.
 Meanwhile, grill the rolls in a separate skillet with a good amount of melted butter.
 As soon as both halves of the roll are nice and toasted…
 Spoon a generous amount of marinara sauce on both the bottom and top half.
 Sprinkle Parmesan on each half…
 Then, uh…oh my goodness. Remove this drippy thing from the skillet…
 Then lay it on the bun.
 Lemme tell ya, guys: This tasted exactly like a supreme pizza…but in burger form. Just divine.
You’ll love it!
Here’s the handy dandy printable.
Recipe: Supreme Pizza Burgers
Prep Time: 5 Minutes
|
Cook Time: 15 Minutes
|
Difficulty: Easy
|
Servings: 4
Print Recipe
3"x5" Cards
4"x6" Cards
Full Page
Ingredients
1-1/2 pound Ground Beef1/2 pound Italian Sausage ( A Little More Is Fine!)1/2 teaspoon Italian Seasoning8 slices Mozzarella Or Provolone Cheese Pepperoni Slices8 Tablespoons Jarred Marinara Sauce, Plus A Little More Grated Parmesan Cheese4 whole Kaiser Rolls Or Good Hamburger Buns Thinly Sliced Red Onion1 whole Green Bell Pepper, Sliced Thick Sliced Black Olives Sliced Mushrooms Preparation Instructions
Combine ground beef, Italian sausage, and Italian seasoning in a bowl. Knead it together and form it into four large/thick patties. Fry the burgers on one side for several minutes, then turn the burgers. Lay 2 slices of cheese on each patty, followed by several slices of pepperoni. Add a couple of thin slices of red onion, a slice of green bell pepper, a pile of black olives, and a pile of mushrooms. Spoon a little more marinara sauce on top, the lay another slice of cheese on top of all the fillings. Place the lid on the skillet and allow burger to cook all the way through while the cheese melts and the pepperoni warms.
Split the rolls and toast them in butter in a skillet until nice and golden and crisp. Spread both halves with marinara sauce and sprinkle the sauce with Parmesan.
Lay the patties on the bottom buns, then top with the top buns. Serve immediately; hearty appetites are recommended!
Posted by Ree on October 11 2012

October 10, 2012
My Very Favorite Blender
 Today, because I love ya, I’m giving away two (2) of these awesome BlendTec WildSide blenders—the same kind I use and love on an almost daily basis in my kitchen.
Before you said, “Eh. It’s a blender.” let me stop you! Saying a BlendTec is just a blender is like saying the following:
* Mount Everest is just a hill.
* The Sistine Chapel is just a church.
* Pots de Creme is just chocolate pudding.
 And speaking of Pots de Creme…
 Here’s my BlendTec at work!


 And that’s only the beginning. The BlendTec is such a powerhouse, and whether it’s making a smooth soup or crushing up the hardest ice you’ve ever seen, there’s pretty much nothing it can’t do. Plus, the buttons are clear and straightforward, and you don’t need an advance degree in technology to be able to operate it.
Amen.
 Included in the giveaway package is one BlendTec WildSide blender…
 And an extra pitcher, which is really handy if you’ve got a lot of recipes going on at once (or if you have a big group of friends over for margaritas!)
TO ENTER
To enter the giveaway, just answer the following questions in the Comments section of this post:
“Have you started Christmas/holiday shopping yet?”
Are you one of those organized souls who begins in July? Or are you like me, and just crossing your fingers you get Halloween costumes before the end of October? Just shout out whether or not you’ve started your holiday shopping yet (and if so, how far along you are!) and you’re automatically entered to win a mixer!
Note: If you don’t celebrate the holidays, no problem! Just say something along the lines of “howdy” and you’re good to go.
THE RULES
One entry per person, please.
Winners will be announced Thursday!
Note: Giveaway sponsored by Pioneer Woman. Over and out.

October 8, 2012
Spinach Artichoke Pasta
 I love spinach artichoke dip. I’ve loved it for over half my life. And I’ll love it till the day I croak or become allergic to artichokes. Whichever comes first.
I posted my Spinach Artichoke Dip here over the (long, hot, thank goodness it’s over) summer, and it’s tremendously terrific. But a couple of weeks ago I decided to take a walk on the wild side and make a pasta version.
And then I died from bliss.
 The Cast of Characters: Butter, garlic, spinach, canned artichokes, flour, milk, cream cheese, Monterey Jack (or mozzarella), Parmesan, salt, cayenne pepper, and (not pictured because I’m an airhead) seasoned Panko breadcrumbs.
Don’t get too attached to that there cream cheese, though. You’ll find out why in a minute.
 We’ll start by quickly wilting the spinach! Melt some butter in a large pot over medium heat…
 Then throw in a bunch of minced garlic.
Like a whole heckuva bunch.
 Throw in two bags of baby spinach (it shrinks a lot!)…
 And stir it around until it just begins to wilt. This takes probably a minute, minute-and-a-half.
If only my love handles shrunk so quickly.
 Remove the spinach from the pot (set it aside on a plate) and melt a little more butter in the pot. Increase the heat to high.
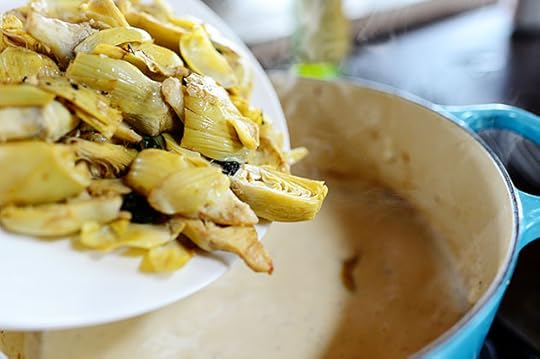
 Drain a couple of cans of artichokes and slice them in half (unless they’re already sliced)…
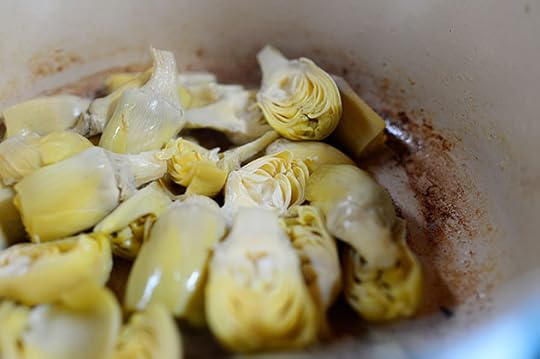 And throw them into the pot.
 Stir them around for a couple of minutes, just to get as much color on them as you can…
 Then remove them from the heat and set aside on a plate.
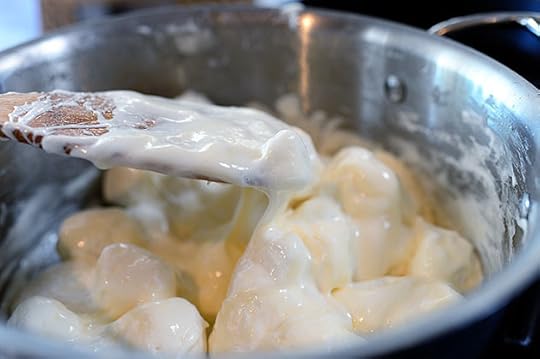
 Reduce the heat to low and add a little more butter to the pan (and notice all that awesome flavor on the sides).
 Sprinkle in a little bit of flour…
 And whisk it all together until it’s a very (in this case) weird looking paste.
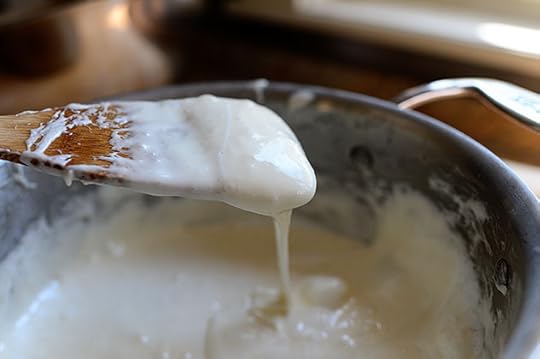
 Pour in the milk…
 And whisk it all together to combine.
 Add salt…
 And pepper, then whisk the white sauce and let it cook until it starts to thicken, about 2 to 4 minutes or so.
 Add a good amount of Parmesan…
 And the grated Mozzarella (or Monterey Jack.)
 Stir it around until the cheese melts, and if it seems overly thick, splash in a little chicken broth until it gets to the consistency you want. It shouldn’t be overly gloomy, but it does need to be thick enough to coat the pasta.
 Add the artichokes…
 And add some cayenne pepper for a nice kick.
 Oh dear mercy goodness lawsie mercy me. I could just stick a fork in the pot, polish off all the artichokes, and call it a day.
But I shan’t. For there is much left to do.
 Add the drained pasta to the pot…
 And stir it in with the artichokes. Again, if it seems overly thick/gloopy, a splash of chicken broth is your friend.
 Then add in the lusciously delicious garlic buttery spinach.
 And gently fold it in.
 Sprinkle in some crushed red pepper and stir it a bit…
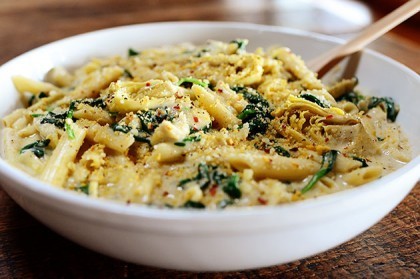
 Then pour it into a serving bowl.
 For a nice crunchy texture, sprinkle the top with a bunch of seasoned breadcrumbs!
You know what? I originally planned to bake this at this stage…but I couldn’t figure out any reason to do so!
Plus, I was ravenous. I wanted to eat, man.
 Oh! And here’s a bonus: It was at this point that I realized I’d completely forgotten to add the cream cheese.
And guess what? I didn’t miss it one bit. Might add a little richness and creaminess, but it had plenty of that going for it. It was so unbelievably good. Everything that’s marvelous about spinach artichoke dip…but with pasta.
Enjoy this, guys! Make it for friends sometime. They’ll come over again and again.
(Whether or not you consider that a good thing is outside the scope of my expertise.)
 Here’s the handy dandy printable.
Recipe: Spinach Artichoke Pasta
Prep Time: 10 Minutes
|
Cook Time: 20 Minutes
|
Difficulty: Easy
|
Servings: 10
Print Recipe
3"x5" Cards
4"x6" Cards
Full Page
Ingredients
6 Tablespoons Butter4 cloves Garlic, Finely Minced2 bags Baby Spinach2 cans Artichoke Hearts, Drained And Halved3 Tablespoons Flour3 cups Whole Milk1/4 teaspoon Cayenne Pepper Salt And Pepper, to taste1/2 cup Grated Parmesan Cheese1-1/2 cup Mozzarella Or Monterey Jack Cheese, Grated1/2 cup Low Sodium Chicken Broth (less Or More)12 ounces, weight Penne, Cooked Until Al Dente1/2 cup Seasoned Panko Breadcrumbs Crushed Red Pepper, To Taste Preparation Instructions
Melt 2 tablespoons butter in a large pot or skillet. Add garlic and throw in the spinach. Stir it around until it's wilted, about 1 minute. Remove spinach from heat and set aside.
Add 2 tablespoons butter to the same pot and raise the heat to high. Throw in the halved artichokes and stir it around until they get a little color, 1 to 2 minutes. Remove the artichokes from the pot and set them aside.
Reduce the heat to low. Add 2 tablespoons butter to the pot. When melted, sprinkle in flour and whisk until it's combined. Pour in milk and whisk to combine. Let it cook for 3 to 4 minutes, or until starting to thicken. Add Parmesan, Mozzarella/Monterey Jack, salt and pepper, and cayenne pepper. Stir to melt, and if it's overly thick, splash in chicken broth.
Add artichokes and pasta, tossing gently to combine. Gently fold in spinach, then pour the pasta into a serving bowl. Sprinkle the top with crushed red pepper flakes and plenty of Panko breadcrumbs for crunch.
Serve immediately!
Posted by Ree on October 7 2012

October 4, 2012
Nutella Krispie Treats
 I don’t know what happened, but all of a sudden we’re on a huge Rice Krispie Treat kick in our house. When I cleaned out my pantry and got it all organized and stocked again, several boxes of Rice Krispies (and several bags of marshmallows) wound up on my shelves…and we’ve already blown through them all. And it’s not even me. I’m not guilty. It’s my kids, specifically my two middle children. It’s like something has been awakened in them, some deep need they never knew they had, and they can’t be truly happy in life unless they’re mixing dry rice cereal with marshmallow goo.
And making a mess of their mother’s kitchen.
Needless to say, you can only make regular Rice Krispie treats for so long before you start throwing in some variations here and there. And since, according to my new maniacal pantry organization, the Nutella Center is approximately six inches away from the Marshmallow Center on the third shelf from the bottom, that was a natural place to start.
WHAT YOU NEED
Butter
Marshmallows
Salt
Nutella
Mini-Marshmallows
Pecans, very finely chopped
Semi-sweet chocolate
Chocolate sprinkles
Let’s have some crispy, crunchy fun!
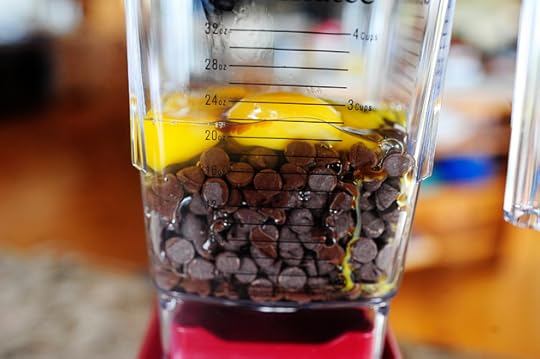
 First of all: This ingredient will come last, but we’re going to get it ready first. Throw some semi-sweet chocolate (either squares or chocolate chips) into a glass bowl and set it over a saucepan of simmering water. Stir it around until it’s all melted and smooth, then set it aside so it cools down a little bit.
 Throw four tablespoons of butter into a saucepan…
 And melt it over medium-low heat.
And there you have it! Nutella Krispie Treats! Enjoy, guys.
Just kidding.
I’ll never get tired of doing that.
 Throw in a bag of large marshmallows…
 And (you can’t see this, but that’s where faith comes in) a good dash of salt. These treats do not lack in the sweet department, and the salt helps balance that a bit.
 Stir around the marshmallows…
 Until they’re totally melted…
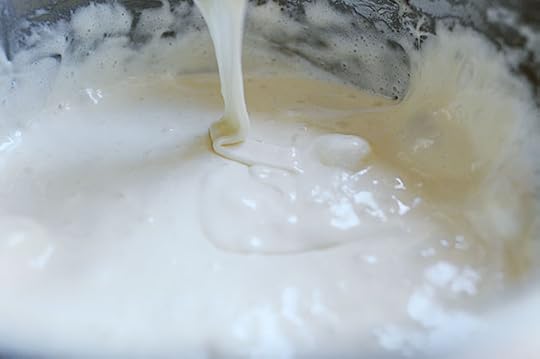 And perfectly smooth.
 Grab a big ol’ spoonful of Nutella…
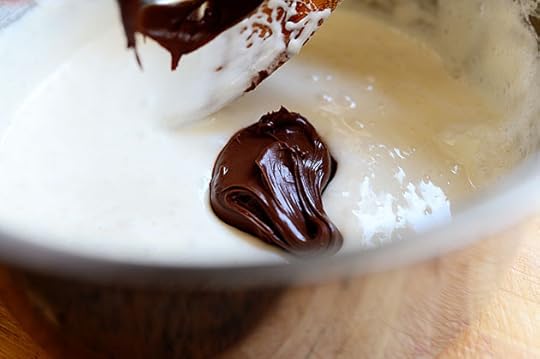 And plop it on in there.
 Then decide that wasn’t enough Nutella and add some more.
 Stir around the marshmallow/Nutella mixture until it’s all combined…
 And at the very end, throw in a little more butter just to finish it off and also to be naughty.
 Throw a bunch of Rice Krispies into a large bowl and pour in the Nutella/marshmallow mixture while folding with a big spatula. This is always a sticky, gooey mess, and the more gradually you can add in the sticky mixture, the better.
 When it’s almost totally mixed together, throw in some mini-marshmallows…
 And keep mixing until it’s all combined. You might need to get in there with your (very clean, sprayed with cooking spray) hands if the spatula isn’t doing the works.
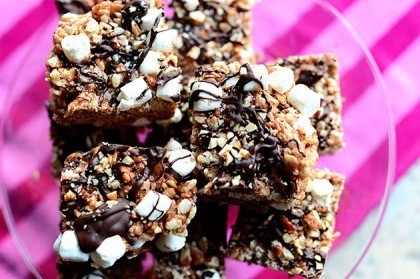
 Then press the mixture into a 9 x 13-inch pan that’s been generously, liberally, abundantly sprayed with cooking spray.
 Sprinkle on some chopped pecans all over the surface…
 And here’s where you can change it up however you’d like! Walnuts, toffee pieces, chopped up cookies…anything goes!
 Use a spoon to drizzle the chocolate all over the surface…
 And keep going until it’s chocolatey enough for you! I like the richness of semi-sweet chocolate, but you can also drizzle on milk chocolate almond bark OR white almond bark. (Or both, if you want both colors going on.)
(Or—double yum—you can do melted caramels/sweetened condensed milk and a little more salt for salted caramel treats. Mmmmm.)
 After the chocolate goes on, sprinkle on some more pecans.
 Set the pan in the freezer just long enough to set the chocolate (so it won’t make a huge mess when you slice the treats)…
 Then slice ‘em into squares!
 If you love Rice Krispie treats, these will make your skirt fly up. Unless you’re a boy. Or unless you’re like me and haven’t worn a skirt since 1999.
What I’m trying to say is this: Dig in!
Enjoy these, guys. They easy and fun.
Recipe: Nutella Krispie Treats
Prep Time: 3 Minutes
|
Cook Time: 7 Minutes
|
Difficulty: Easy
|
Servings: 12
Print Recipe
3"x5" Cards
4"x6" Cards
Full Page
Ingredients
6 Tablespoons Salted Butter10 ounces, weight Large Marshmallows1/8 teaspoon Salt1/3 cup Nutella6 cups Rice Krispies1-1/2 cup Miniature Marshmallows1 cup Pecans, Finely Chopped5 ounces, weight Semi Sweet Chocolate Melted Preparation Instructions
Melt 4 tablespoons in a large saucepan over medium-low heat. Add marshmallows and salt and stir until melted. Halfway through the melting process, add Nutella. When Nutella and marshmallows are melted, add additional two tablespoons of butter and stir until smooth.
Meanwhile, melt semi-sweet chocolate over a double boiler until smooth. Remove from heat and let it cool quite a bit.
Add Rice Krispies to a large bowl and fold in the Nutella mixture. When it's almost all combined, add mini-marshmallows to the bowl, then continue folding until everything's combined.
Immediately press mixture into a thoroughly greased 9 x 13-inch pan. Sprinkle with half the pecans. Drizzle semi-sweet chocolate in zig-zags all over the top of the treats. Sprinkle the other half on top.
Allow to set, then cut into squares.
Posted by Ree on October 3 2012

October 3, 2012
What’s Your Favorite Fast Food? (Winners Announced!)
The winners of the Wusthof knife sets are:
#2164 Emily V: “Chick-fil-A! Or as my daughter calls it “Chick-a-play”.”
#5453 Melissa Jackson: “Favorite fast food is probably El Pollo Loco! But if I’m craving a burger and fry gotta go with Jack in the Box!! Curly fries are the best!”
#23214 Sandy B: “I like way too much fast food, but my favorite would be gyros. Num num num num.”
Congrats, winners! Contact prizes@thepioneerwoman.com to claim your knives.
 Today, because good knives are essential for any kitchen, because the weather is crisp and cool, because I plan on not showering today, and because I love ya, I’m giving away three (3) six-piece sets of these fabuloso Wusthof knives.
They’re sharp. They’re awesome. They’ll take you far in life.
TO ENTER
To enter the giveaway, just answer the following wacky question in the Comments section of this post:
“What is your favorite fast food restaurant?”
Speaking of home cooking…ha! I thought it would be hilariously ironic to poll you on your favorite fast food chain as part of a giveaway on my home cooking website. So let’s have some fun. Are you a McDonald’s adherent? A Burger King addict? A Taco Bell freakazoid? Or are you a little more off the beaten path with your fast food choices?
Just shout out what your #1 fast food choice would be and you’re automatically entered to win the set of knives!
THE RULES
One entry per person, please
Winners will be announced Thursday!
Giveaway sponsored by Pioneer Woman. The question on this giveaway is just for fun. I’m weird. Amen.
NOTE: Contest has ended and winners have been announced. Comments are now closed.

What’s Your Favorite Fast Food?
Today, because good knives are essential for any kitchen, because the weather is crisp and cool, because I plan on not showering today, and because I love ya, I’m giving away three (3) six-piece sets of these fabuloso Wusthof knives.
They’re sharp. They’re awesome. They’ll take you far in life.
TO ENTER
To enter the giveaway, just answer the following wacky question in the Comments section of this post:
“What is your favorite fast food restaurant?”
Speaking of home cooking…ha! I thought it would be hilariously ironic to poll you on your favorite fast food chain as part of a giveaway on my home cooking website. So let’s have some fun. Are you a McDonald’s adherent? A Burger King addict? A Taco Bell freakazoid? Or are you a little more off the beaten path with your fast food choices?
Just shout out what your #1 fast food choice would be and you’re automatically entered to win the set of knives!
THE RULES
One entry per person, please
Winners will be announced Thursday!
Giveaway sponsored by Pioneer Woman. The question on this giveaway is just for fun. I’m weird. Amen.
Ree Drummond's Blog

- Ree Drummond's profile
- 2032 followers

