
Ree Drummond's Blog, page 43
April 18, 2013
My Mom’s Muffins
 My mom made these blessedly beautiful muffins when she was visiting over the weekend, and I just inhaled them. They’re textural and flavorful and—bonus!—oil free and butter free…which, to me, is an invitation to slather on softened butter and fruity jelly.
But that’s just me.
My mom makes muffins by grabbing ingredients, throwing them into a bowl, and mixing/tweaking until she thinks they’re right. But I nailed her down and made her record the quantities so I could share the recipe with you. Still, feel free to tweak and make them your own: Add more banana, applesauce, molasses, etc, to your taste—or change up the nuts you use (sunflower seeds would be yummy.)
I whipped up another batch yesterday, as I was experiencing withdrawal symptoms after finishing the last of my mom’s batch the day before. Here’s how to make ‘em.
 Start with whole wheat flour…
 And a little all-purpose flour to go with it.
Note: When she’s at home, my mom uses 1/2 cup whole wheat flour, 1/2 cup spelt flour, and 1/2 cup almond flour…but I couldn’t get the latter two without driving over an hour! The whole wheat/all-purpose version was just lovely; the version my mom usually makes is just a little different texture. And all almond flour is is finely ground almonds…so you could also make that yourself in a food processor. Lots of options!
But for now, I’ll just show you the simple version.
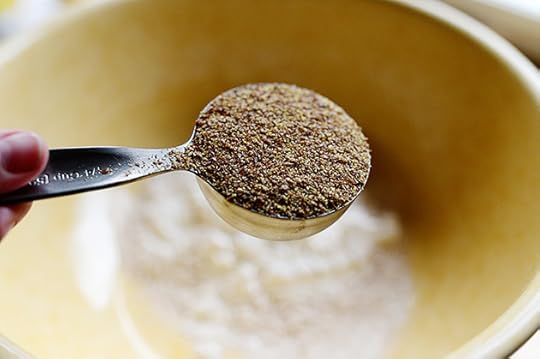 Grab some ground flaxseed…
 And throw it in. I did have this in my pantry because I love, love, love ground flaxseed. I add it to pancakes, muffins, even cookies if I’m feeling particularly sassy. Yum.
 Next comes a cup of regular oats…
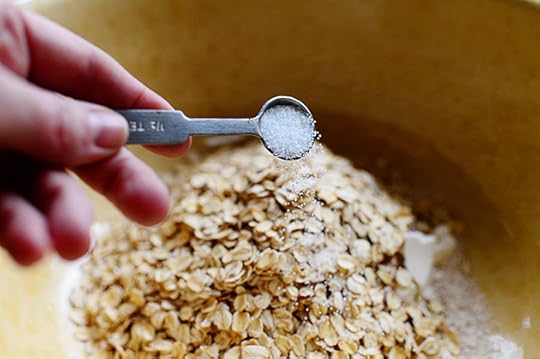 Salt…
Salt…
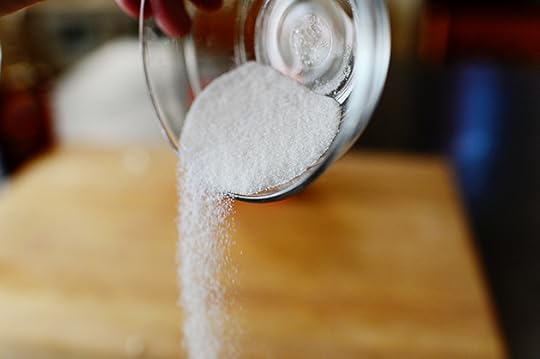
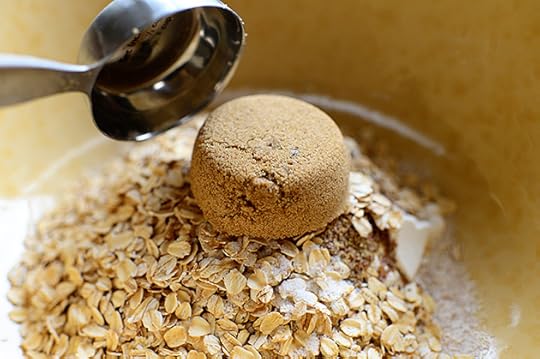 Brown sugar…
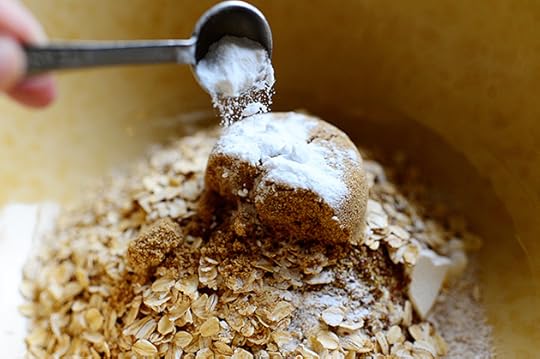 Baking soda…
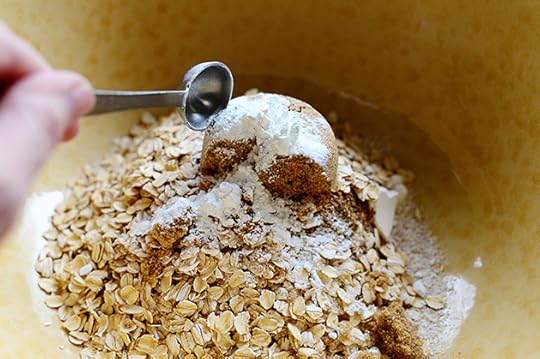 And baking powder.
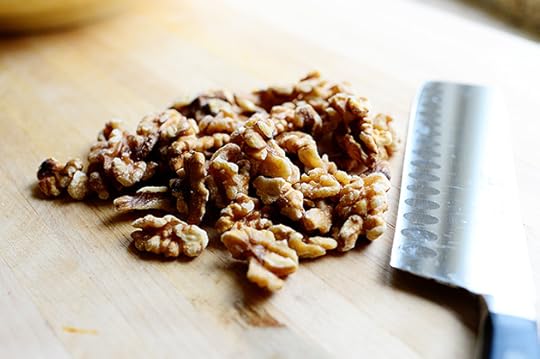 Then grab some walnuts…
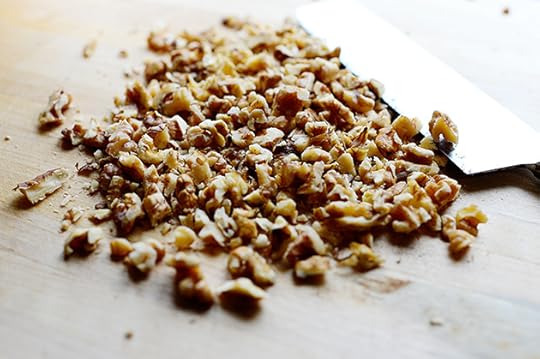 Give ‘em a rough chop…
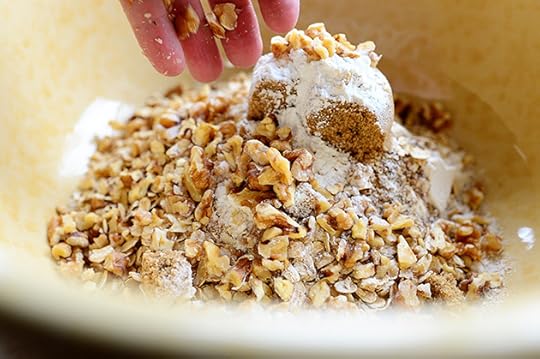 And throw ‘em on in.
The walnuts are delicious in the muffins, and you’ll want to leave some good-sized chunks. They add amazing texture!
 Now stir the dry ingredients together…
 And oh! I almost forgot. Cinnamon!
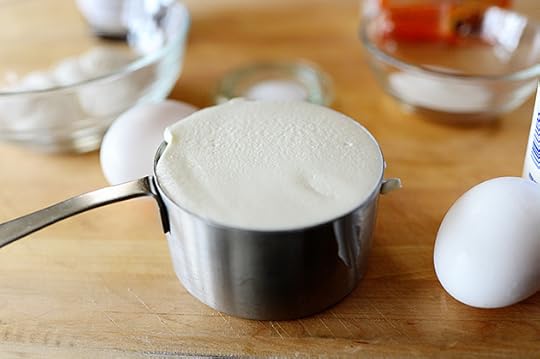
 Now, for the luscious wet ingredients: Start with a cup of buttermilk…
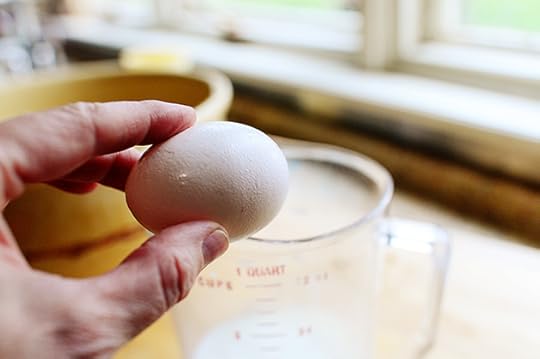 Then crack in an egg.
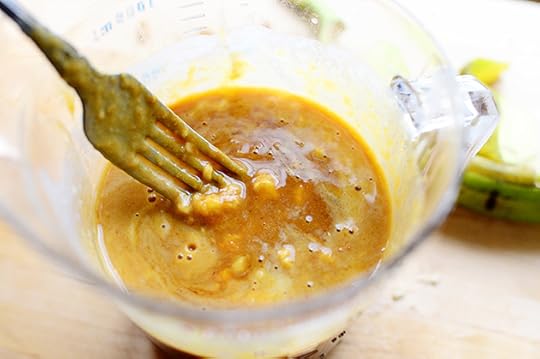
 Whisk it together with a fork…
 Then add a little applesauce. My mom likes to use these little individual packages so she doesn’t get stuck with a huge container of applesauce in her fridge. Handy!
 And now. You’re going to watch me do something very mature and evolved. You’re going to watch me handle a banana. This never happens in my life, because I loathe, abhor, hate, and despise the demonic fruit known as the banana.
But my mom put a banana in the muffins she made this weekend and I didn’t know it until after I’d devoured two of them and proclaimed how delicious they were.
So I’m going to persevere despite my lifelong aversion.
 Mash up the banana (this was far, far away from being ripe so I really had to smush away; it’s best to use a ripe (or even overripe) one.
 Then add it to the pitcher with the other ingredients. And I just have to say: BLECH! YUCK! UGH! It was all I could do to continue after this part. Have you ever seen anything more grody in your life than a mashed up banana? And that smell…I almost fainted.
But I surged on in spite of my adversity.
The muffins are totally worth it.
 Next, add some molasses…
 And mix it to combine.
 Next, slowly pour in the wet ingredients…
 Stirring gently as you go.
 Stop just as everything comes together; don’t mix the heck out of it! The batter should be wet and sticky; if it seems overly thick, splash in a tablespoon or two of buttermilk and see if that’s enough.
 Oops! Almost forgot the raisins. Stir them in really gently. (I would normally have stirred them into the dry ingredients. I’ll do better next time.)
 Now just use a scoop or 1/4 cup measure…
 And scoop ‘em into well-greased (I used Baker’s Joy spray) muffin tins.
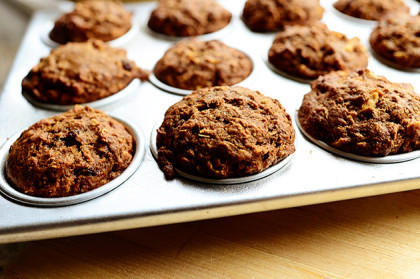
 Bake ‘em for 16-18 minutes, until they’re nice and poufy and done.
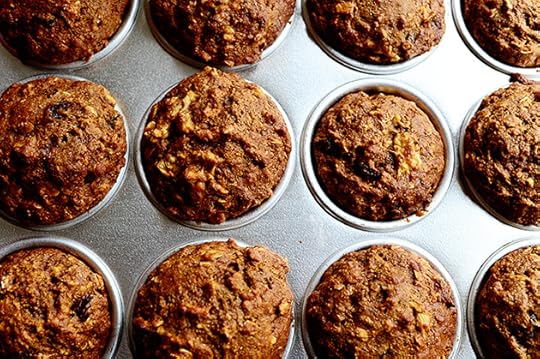 They smell…divine.
 And considering there’s no butter or oil in the muffins, here’s how I eat them.
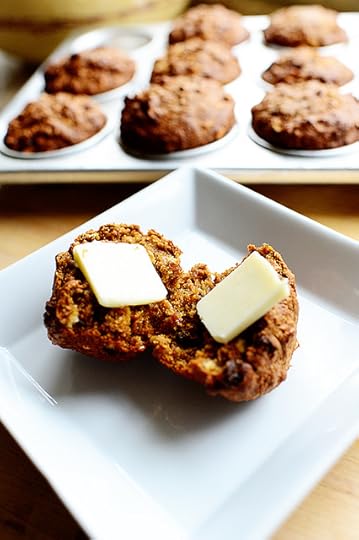 Step 1: Add butter.
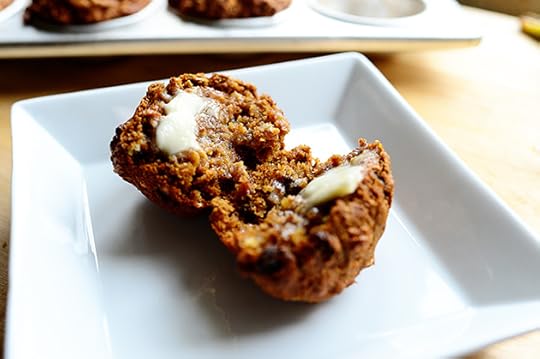 Step 2: Allow it to melt.
 Step 3: Add jelly.
Step 4: I think you can figure out Step 4.
Step 5: Repeat as needed.
 Enjoy these muffins, guys! They’re really dreamy, really addictive, and super divine.
Here’s the handy dandy printable:
Recipe
My Mom’s Muffins
Prep Time: 20 Minutes
Cook Time: 18 Minutes
Difficulty: Easy
Servings: 12
Print Recipe
Ingredients
1 cup Whole Wheat Flour1/2 cup All-purpose Flour1/4 cup Ground Flaxseed/flaxseed Meal1 cup Regular Oats1/2 cup Packed Brown Sugar1/2 teaspoon Salt1 teaspoon Baking Soda2 teaspoons Baking Powder1/2 teaspoon Ground Cinnamon1/2 cup Walnuts, Roughly Chopped1/2 cup Raisins1 cup Buttermilk1 whole Egg1/2 cup Applesauce1 whole Banana, Mashed With A Fork1/4 cup Molasses Extra Buttermilk As Needed For Thinning Preparation Instructions
Preheat the oven to 350 degrees. Thoroughly grease 1 muffin pan.
In a large bowl, combine flours, flaxseed meal, oats, brown sugar, salt, baking soda, baking powder, cinnamon, walnuts, and raisins. Stir together until combined.
In a separate bowl, mix together the buttermilk, egg, banana, and molasses.
Pour the wet ingredients into the dry ingredients, stirring until it just barely comes together. Batter should be wet and sticky; if needed, splash in a couple of tablespoons of buttermilk.
Scoop 1/4 cup helpings into muffin cups and bake for 16-18 minutes, or until deep golden brown.
Serve with softened butter and jelly if you're a rebel like me.
Posted by Ree on April 18 2013


April 15, 2013
Pesto Pasta Salad
 I made this colorful, crunchy, and yes, carb-filled salad for a late lunch yesterday. My mom was visiting and was making a batch of her healthy muffins when I said “Since you’re making your healthy muffins, I’m going to make us a salad for lunch!”
“Oh, sounds perfect,” my mom exclaimed.
“And I’m going to put noodles in it,” I said. “Because we’re worth it.”
I got no argument from my mom, so I moved forward with this fun, really tasty salad that I had actually started thinking about during the sermon at church yesterday. It has crunchy lettuce and colorful tomatoes and the carby wonderfulness of pasta…with a delicious pesto flavor throughout. Not that the sermon had anything to do with lettuce, tomatoes, pasta, or pesto. And I promise I did listen to the message of the sermon. It’s just that I listened while also fantasizing about what I was going to eat later.
Happens every single Sunday.
 Crack open a box of pasta. I like this stuff because it’s curly and delicious things get stuck in the crevices.
 Pour it into salted, boiling water and cook it until it al dente. The pasta will be eaten cold, so you want it to be nice and cooked through…but not mushy.
 Drain the pasta when it’s done, rinse it in cold water, and shake out as much of the excess water as you can.
 Add the pasta to a bowl with a few tablespoons of pesto. (I used the jarred stuff because it ain’t basil time yet.)
 Toss it around so the pasta is totally coated in the pesto…
 Then toss in a little grated Parmesan and stick the pasta in the fridge until it’s cold.
 While the pasta is cooling, get the other ingredients ready: Slice up some mozzarella…
 And cut it into cubes. (If I’d had some, I would have preferred to use the good, fresh, bright white stuff. But this was just fine.)
 Then grab a handful of grape or cherry tomatoes…
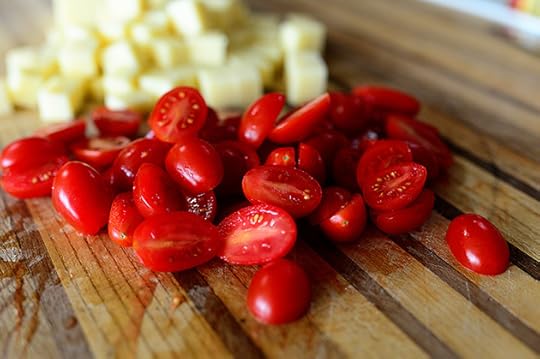 And slice ‘em in half.
 Next, slice up some Romaine lettuce…
 And slice some black olives in half. Kalamata olives would be yummy, too!
 Finally, mix together some mayonnaise, pesto, milk…
 And some sour cream (or you could use greek yogurt.)
 Stir it around, add some salt and pepper, and stir it until it’s nice and smooth. You want the dressing to be on the thin side, so splash in enough milk to get it to the consistency you want. It needs to be more of a pasta salad dressing that will pour and easily coat the pasta (rather than be thick and gloopy.)
 Now, you can assemble one huge salad on a platter or you can do individual servings. Start with a bed of lettuce, followed by a layer of pesto-coated pasta.
 Add a good amount of tomatoes…
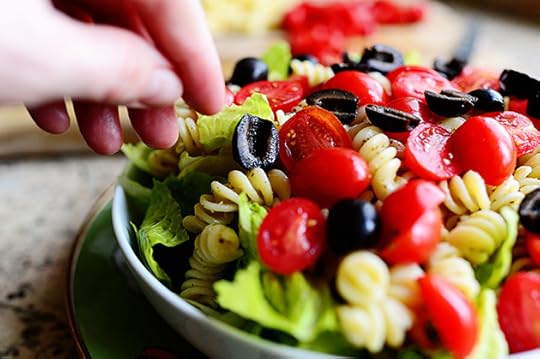 Then throw in some olives…
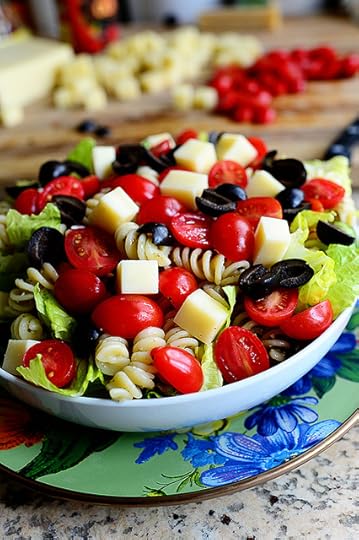 And chunks of cheese.
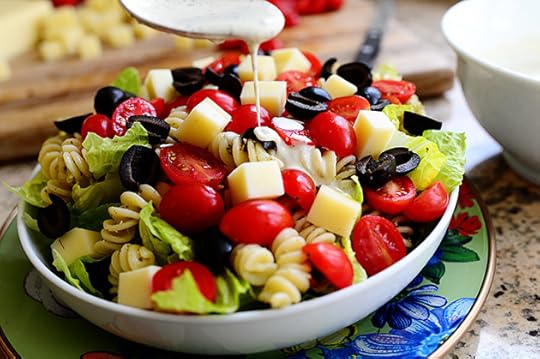 Then drizzle on the dressing!
 The dressing has to coat the lettuce, pasta, and other stuff, so don’t be shy!
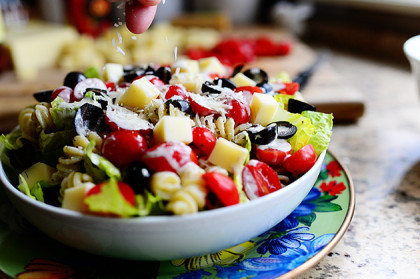
 Finally, sprinkle on a little more Parmesan…
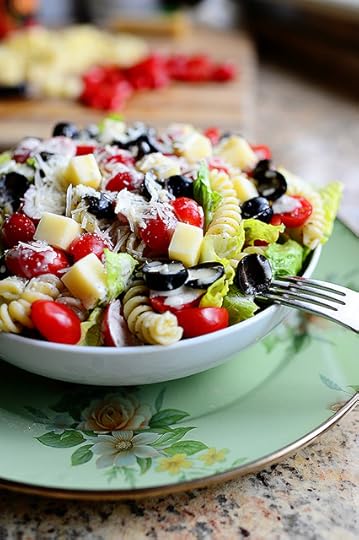 And serve it up!
Mmmm. This really was super tasty. The lettuce added a really nice crunch, and the pesto-coated noodles made for such a great flavor.
Loved it!
Here’s the handy dandy printable. Happy Monday, everyone!
Recipe
Pesto Pasta Salad
Prep Time: 1 Hour
Cook Time: 12 Minutes
Difficulty: Easy
Servings: 4
Print Recipe
Ingredients
8 ounces, weight Short Fusilli Or Rotini (corkscrew) Pasta1/3 cup Prepared Pesto1/2 cup Shredded Parmesan Cheese1/2 cup Mayonnaise1/2 cup Sour Cream1/4 cup Milk, More For Thinning1/2 teaspoon Salt1/2 teaspoon Pepper1 head (large) Romaine Lettuce, Sliced Into 1-inch Pieces1 cup Grape Tomatoes, Halved1/2 cup Black Or Kalamata Olives, Halved4 ounces, weight Mozzarella Cheese, Cut Into Cubes4 Tablespoons Pine Nuts (optional)8 Extra Parmesan, For Sprinkling Preparation Instructions
Cook the pasta in salted water according to package instructions. Then drain it and rinse in cold water. Allow pasta to dry slightly, then toss in a bowl with 4 tablespoons pesto. (Add more if you want the pasta to be more coated.) Add Parmesan and toss. Cover and refrigerate pasta until cold.
Make the dressing by whisking together the mayonnaise, sour cream, and milk with the rest of the pesto. Add salt and pepper, then taste and adjust seasonings as needed. The dressing needs to be somewhat thin and pourable in order to coat the lettuce and pasta later. Set the dressing aside.
If you're using pine nuts, toast them over medium-low heat in a small skillet until they brown slightly. Set them aside.
To assemble the salads, make a bed of lettuce in a large bowl, then add a generous layer of pesto-coated pasta. Add tomatoes, olives, and chunks of cheese. Spoon a good amount of dressing all over the top; it should be thin enough to seep down into the salad, not so thick it will stay on top of everything.
Sprinkle salads with pine nuts and a little extra Parmesan and serve!
Posted by Ree on April 15 2013

April 8, 2013
Edna Mae’s Sour Cream Pancakes
 These pancakes…aren’t just any pancakes.
They’re…wait for it…
They’re Edna Mae’s Sour Cream Pancakes!
Of course, you probably already figured that out based on the title of this post.
I’ve always been really great at building suspense.
Or not.
 I love this recipe so much, I put it in my first cookbook. It’s turned out to be one of the most-enjoyed recipes in the book.
 Recently, I was sharing with Edna Mae (she’s Marlboro Man’s precious grandmother) some of the nice things people have told me about her delicious pancakes, and it dawned on me that I’d never, in the six years since I first started posting about cooking, posted it here on my website.
What an outrage!
What an oversight!
INCONCEIVABLE!
Well, I’m righting that wrong right now. Alright? Righty-Oh.
Right on.
I’ll stop now.
 The ingredients couldn’t be more simple: Sour cream, flour, baking soda, sugar, salt, eggs, and vanilla!
 Sour cream is the star of the show.
 Measure a cup…
 And throw it into a bowl.
 Sprinkle in the flour, and it is at this time that I’ll point out that aside from the comments I hear from people who love these pancakes after they make them, I receive quite a few questions from people before they’ve made them for the first time.
“That can’t possibly be the right amount of flour…can it?”
Yes! It’s correct, baby! That’s what makes these glorious little wonders so…well, wonderful. They’re not weighed down with flour; they’re light and a decidedly different texture. You’ll be able to tell from the first bite.
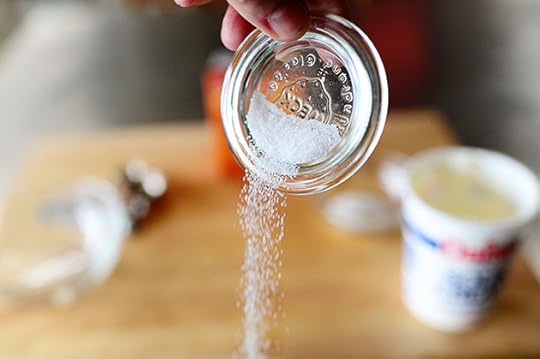
 Next, add baking soda…
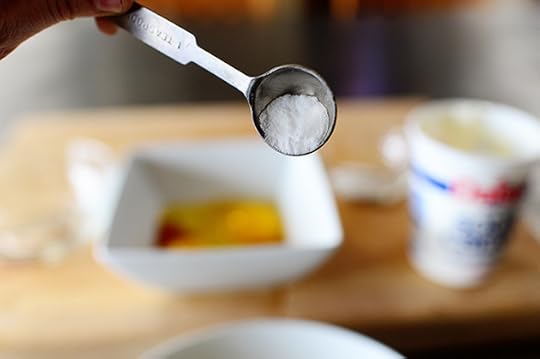
 Salt…
Salt…
 And sugar.
A note on the sugar: Edna Mae’s original recipe calls for 1 tablespoon. I sometimes do two or three, because it makes the pancakes a little sweeter…but if you prefer all the pancake sweetness to come from the syrup you pour over the top, go ahead and keep it at one.
I realize that made no sense. Sorry.
 Now, stir the sour cream and the dry ingredients until it just starts to come together.
 In a separate bowl, crack 2 eggs…
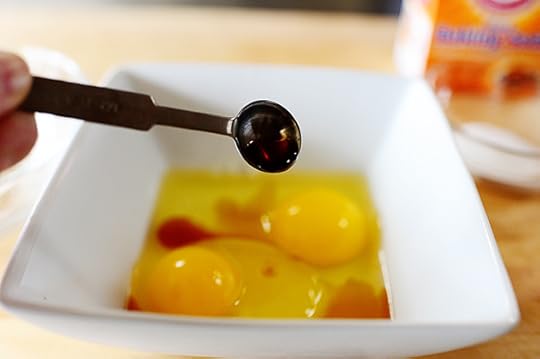 Add a little vanilla…
 And whisk it together until totally combined.
 Pour it into the bowl with the sour cream mixture…
 And whisk it until it just comes together. You don’t need to beat it to death, and you shouldn’t be concerned with lumps—that’s what it should look like.
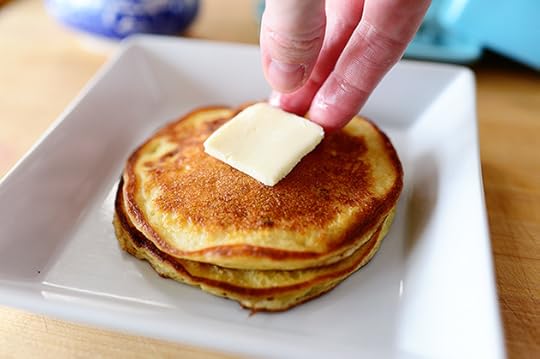
 To fry ‘em up, smear a whole bunch of butter on a griddle or skillet over medium-low heat (get the griddle totally heated before you do.)
 When the butter’s sizzling, grab 1/4 cup of batter…
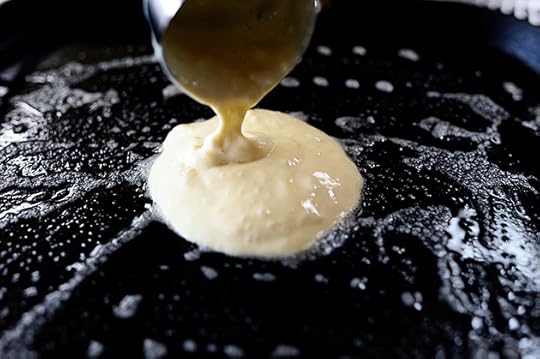 And pour it on.
 Let it cook for 2 minutes or so, and when the sides look like they’re starting to set and bubbles just start to form…
 Flip it over and let it cook for another 2 minutes or so.
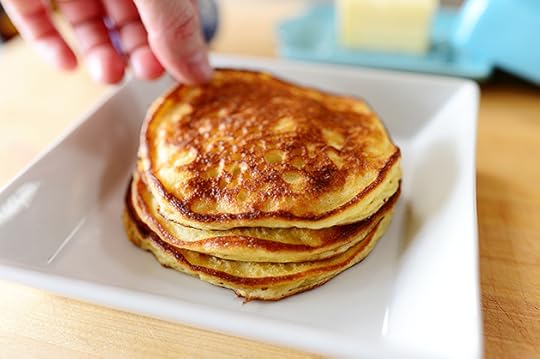
 Keep going with the rest of the batter until the pancakes are “done,” but note that they’ll be a little softer than regular pancakes. As long as both sides are nice and deep golden brown, they should be good to go!
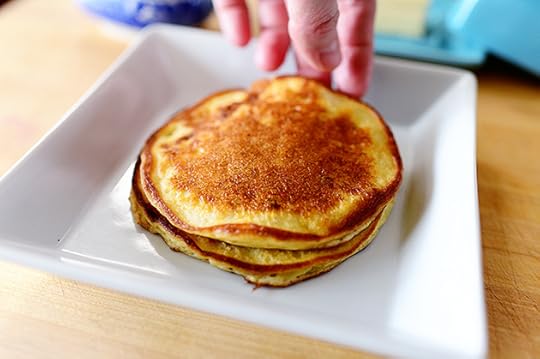
 So here’s how I roll with pancakes.
 Keep going…
 Keep going…
 Keep going…
 Okay. I think I’ll stop there.
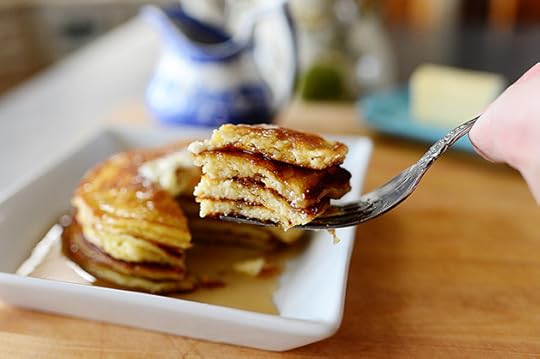
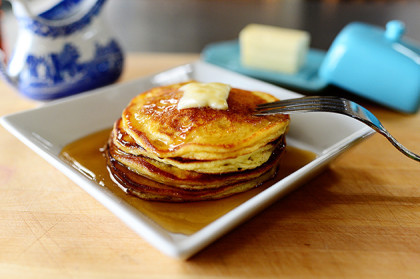
 Warm syrup is a must. A requirement of life. A mandate.
 Lean in for a minute. I wanna tell you a secret.
Come closer…
Come closer…
 You’re going to absolutely love these. They’re light but decadent, different but familiar. Lemme know how you like ‘em.
 Here’s the handy printable.
Have a wonderful Monday, everyone!
Recipe
Edna Mae’s Sour Cream Pancakes
Prep Time: 10 Minutes
Cook Time: 10 Minutes
Difficulty: Easy
Servings: 2
Print Recipe
Ingredients
1 cup Sour Cream7 Tablespoons All-purpose Flour2 Tablespoons Sugar1 teaspoon Baking Soda1/2 teaspoon Salt2 whole Large Eggs1/2 teaspoon Vanilla Extract Butter, For Frying And Serving Warm Syrup, For Serving Preparation Instructions
In a small bowl, whisk together eggs and vanilla. Set aside.
In a separate small bowl, stir together flour, sugar, baking soda, and salt.
In a medium bowl, stir together the sour cream with the dry ingredients until just barely combined (don't overmix.) Whisk in the egg mixture until just combined.
Heat a griddle over medium-low heat and melt some butter in the pan. Drop batter by 1/4 cup servings onto the griddle. Cook on the first side until bubbles start to form on the surface and edges are starting to brown. Flip to the other side and cook for another minute. (Pancakes will be a little on the soft side.)
Serve with softened butter and syrup.
Posted by Ree on April 8 2013

April 4, 2013
Pizza Potato Skins
 Raise your hand if you love potato skins.
ME ME ME ME ME ME ME ME ME ME!
Okay, so I think I’ve established that I love potato skins. I can’t help it, man. They’re just so 1984! And everything that’s 1984 is okay by me. Except tanning beds. *Shudder* But that’s another story for another time.
Usually when I make potato skins, I go old school and top them with melted cheddar, diced bacon, sour cream, and chives. But there are so many variations on the theme. Pizza, for instance! Imagine the possibilities. I whipped up these very simple pepperoni pizza beauties, but you can take off running and do whatever pizza topping makes your skirt fly up. So many possiblities!
 To make the potato skins, scrub the heck out of some small russet potatoes in order to get them nice and clean. When they’re dry, brush the whole surface of the potatoes with a little canola or olive oil.
 Sprinkle them with a little kosher salt, then put them in a 400 degree oven for about 30-45 minutes. You want the potatoes to be nice and tender, and you want the skin to be a little on the crisp side. The baking time will be determined by the size of the ‘taters, so just give ‘em a squeeze after 30-35 minutes (with a towel in your hand, of course! ha.) and monitor them till they’re done.
 They’re done now. Nice and tender. Nice and (somewhat) crispy skin. So split them in half…
 And use a spoon to scoop out the potato, leaving a little bit of a rim (for support) all the way around.
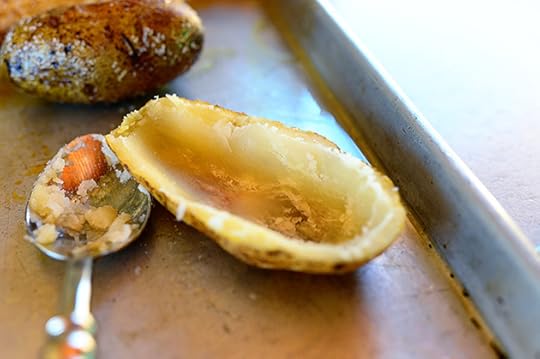 Like this!
 Now, melt a little butter and brush it really lightly on the inside of the potato…
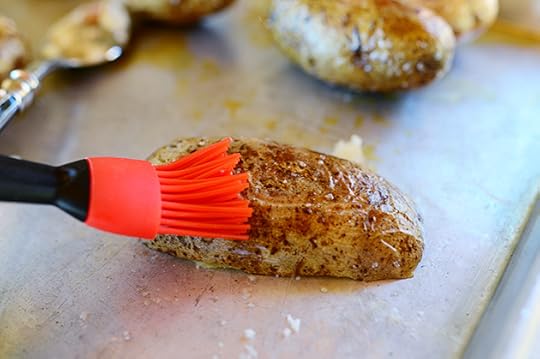 And the outside, too!
 Then put them back in the oven: First put them in skin side up for about 5-7 minutes…then use tongs to flip them over and put them back in the oven for a few more minutes, or until they’re nice and crisp and wonderful.
 Meanwhile, dice up some pepperoni. I used this whole piece, which was easy to dice up—but you can buy the sliced stuff and dice it up, too.
 Grate up some mozzarella, too! (You can use the good, fresh stuff if you have it. I done didn’t have it. I mean I didn’t done have it. Oh, never mind.)
 Finally, crack open a jar of the hard stuff!
I mean the jarred stuff.
And yes. You can make your own marinara sauce if you druther.
But this day, I just didn’t druther.
And you know what? The next time I make it, I probably won’t druther neither.
 To build the skins, spoon a little bit of pizza sauce into each skin.
 Sprinkle on a good amount of grated mozzarella…
 And some diced pepperoni.
Then put them back in the oven for 3 to 5 minutes, until the cheese melts and everything’s hot and bubbly.
 Sprinkle on some minced parsley right when they come out of the oven…
 And serve ‘em up!
You’ll love these. So easy…so tasty. And considering the pizza topping possibilities that exist in this universe of ours, you could have a whole party based on pizza potato skin variations alone. Here are some other ideas:
Crumbled cooked Italian sausage
Crumbled cooked hamburger
Diced red, green, or yellow bell pepper
Diced red onion
Sliced black olives
Sliced jalapenos
Diced Canadian bacon
Pineapple
Sliced or diced mushrooms
All different cheeses
Have fun with these!
Here’s the handy dandy printable:
Recipe
Pizza Potato Skins
Prep Time: 10 Minutes
Cook Time: 20 Minutes
Difficulty: Easy
Servings: 16

Print Recipe
Ingredients
8 whole Small Russet Potatoes Canola Oil Butter, Melted Kosher Salt Jarred Marinara Or Pizza Sauce Grated Mozzarella Cheese Diced Pepperoni Minced Fresh Parsley Miscellaneous Pizza Toppings: Cooked Sausage, Cooked Hamburger, Diced Bell Pepper, Diced Onion, Diced Mushrooms, Diced Canadian Bacon, Etc. Preparation Instructions
Preheat the oven to 400 degrees. Scrub potatoes very clean.
Rub the surface of each potato with canola oil. Sprinkle with salt and bake until the potatoes are tender and the skins are crisp, about 30 to 45 minutes.
Cut the baked potatoes in half, then use a spoon to scoop out most of the insides, leaving a bit of a rim all around. Brush the inside and outside of each half with melted butter. Place the potatoes skin side up and return to the oven for 5 to 7 minutes. Turn them over (using tongs) and put them back in the oven for a few more minutes, or until the potatoes are crisp. Remove them from the oven and set them aside.
To assemble the skins, fill each skin with a spoonful of marinara or pizza sauce. Add a good amount of grated cheese and sprinkle on some diced pepperoni. Return them to the oven for just a couple of minutes, or until the cheese is melted.
Sprinkle with minced parsley and serve immediately!
Posted by Ree on April 4 2013

April 1, 2013
Easter Leftover Sandwich
 Got leftover Easter eggs?
Got leftover Easter ham?
Got a hearty appetite?
Good! You’ve come to the right place!
I made this big honkin’ sandwich a few months ago, and it’ll be in my holiday cookbook, which is coming this fall assuming I finish said holiday cookbook. Whee! Oh, and I’d better go cook now.
Anyway, as I’ve explained to you before, it’s very difficult for me to save recipes for my cookbooks and not share them here. It’s a clinical affliction known as Saverecipesformycookbookitis.
I’ve got a wicked case of it, man.
 First of all, have you ever done this? If not, get ready to be inspired to make egg salad every day for the rest of your life. Peel your hard-boiled eggs and place it on top of a cooling rack you’d use for cookies or cakes. (The rack should be resting over a bowl.)
 Use the palm of your (very clean) hand and pop it right through!
 Then just keep doing it egg by egg…
 Until you have a bowl full of perfectly “chopped up” eggs.
 Add mayonnaise, grainy mustard, Worcestershire, salt, and pepper. You can also add chopped up pickles, olives, splash in a little pickle juice, Sriracha, Tabasco…anything you want to give it the flavor you’re lookin’ for.
 Stir it together, making sure to taste and adjust seasonings to make sure it’s just right!
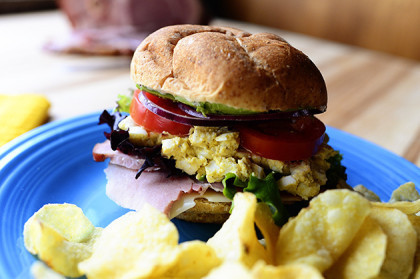
 To build the sandwich, halve the bread of your choice (I used a Kaiser roll) and spread one half with Dijon…
 Then spread the other half with mayonnaise and sprinkle it with salt and pepper.
 On the half with the Dijon, lay a slice of cheese. I used Swiss.
 Then lay on some of the leftover Easter ham.
 Meanwhile, on the mayo half, lay a bunch of luscious avocado pieces…
 And a few very thin slices of red onion, as well as two or three slices of Roma tomato, which I don’t have a photo of, because I’m an airhead.
 Grab a big scoop of egg salad…
 Plop it on top of the tomatoes…
 And spread it out into an even layer.
 Finally, lay on whatever lettuce or greens you have: green leaf, Romaine, or just mixed greens. Spinach or arugula would also be divine!
 Then take a deep breath and put the two halves together.
Serve it with chips…and a very, very, very, very, very big appetite.
Here’s the handy printable. I hope you all had a wonderful weekend!
Recipe
Leftover Easter Sandwich
Prep Time: 15 Minutes
Cook Time:
Difficulty: Easy
Servings: 8
Print Recipe
Ingredients
12 whole Hard Boiled Eggs1/2 cup Mayonnaise3 Tablespoons Grainy Dijon Mustard Salt And Pepper, to taste Several Dashes Worcestershire Sauce Leftover Baked Ham, Sliced Kaiser Rolls Or Other Bread Extra Mayonnaise And Dijon, For Spreading Swiss Cheese Or Other Cheese Slices Thinly Sliced Red Onion Avocado Slices Sliced Tomatoes Lettuce, Spinach, Or Arugula Preparation Instructions
Make egg salad by chopping the hard boiled eggs and mixing in a bowl with mayonnaise, Dijon, salt and pepper, Worcestershire (and you can also add chopped pickles, hot sauce, etc.) Taste and adjust seasonings.
Halve the rolls and spread one half with Dijon, the other half with mayonnaise. Sprinkle the mayonnaise-spread half with salt and pepper. Lay cheese and ham on the mustard half; lay avocado, onion slices, tomato slices, egg salad, and lettuce on the other half.
Bring the two halves together and chow down!
Variation: Add bacon! Yes, I said it.
Posted by Ree on April 1 2013

March 28, 2013
Pretty, Yummy Fruit Salad
 I think you’ll love this colorful, pretty fruit salad, which is drizzled with a lovely orange-vanilla syrup, which glosses it up and makes it visually irresistible, which makes you want to stand over the bowl and slurp up every single bite, which won’t leave any for your brunch guests.
So logic would probably tell you not not to make it.
But I think you should go ahead and chance it! It’s that good. Slightly citrusy, nice and sweet, with a little hint of vanilla lusciousness. So simple to make, and you can use any fruit you want—melon chunks, orange pieces, apples, pears…the works. And it’s perfect not just for Easter brunch, but for baby or wedding showers, special lunches…or just a weekday that calls for a beautiful bowl of color.
Here’s how to make it, Maynard!
Sorry I called you Maynard again.
Next year I’ll give it up for Lent. Promise.
 Add sugar and water to a small saucepan…
 Then zest a juicy orange and add the zest to the pan…
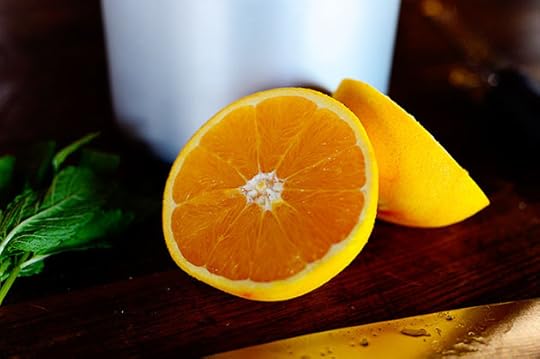 Then cut the orange in half…
 And squeeze the juice into the pan.
 Slice two vanilla beans in half…
 Then scrape out the caviar inside…
 And add it to the saucepan. Yum!
(Note: You can just add 2 teaspoons of vanilla extract if you don’t have vanilla beans. Still delicious!)
 Stir it around and bring the mixture to a boil over medium-high heat, then reduce the heat to low and simmer the syrup for a good 15-20 minutes, until it’s thickened a bit. After that, put the pan in the fridge to cool the syrup completely (or transfer the syrup into a little pitcher or bowl.) You want the syrup to be cold when you pour it on the fruit.
(You can make this the night before you need it!)
 When you’re ready to assemble the fruit salad, wash all the fruit you want to use. Anything colorful and gorgeous-looking will do.
 I did a bunch of strawberries…
 And threw them into a big bowl.
 Then halved a bunch of red grapes…
 And threw them in with the strawberries.
 Then did the same with green grapes, because they matched the bowl. And this is very important. Not really.
 Blueberries sounded good, too!
 Pour half of the cold syrup over the top…
 Then toss the fruit gently to coat it in the rest of the syrup as you drizzle it in. You can’t really see it in the photos, but the tiny flecks of vanilla bean really make this look special.
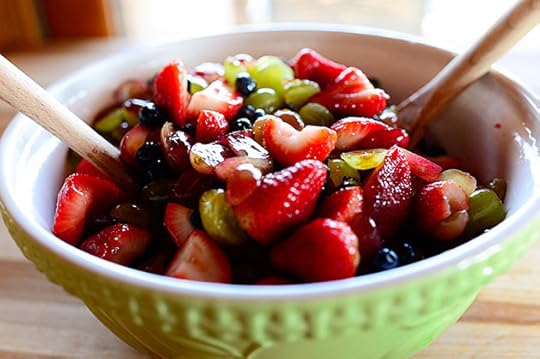 Simply gorgeous!
But fresh mint makes it…
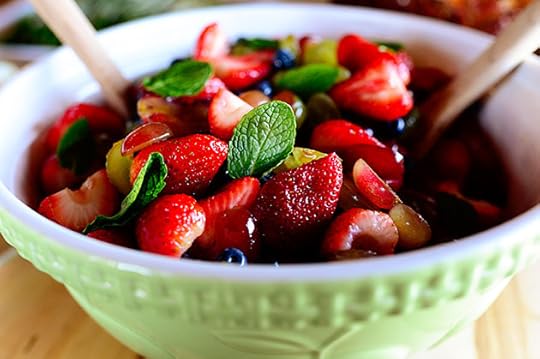 Well, simply gorgeous-er.
Hope you’re having a wonderful Holy Week, guys.
Here’s the handy dandy printable:
Recipe
Fruit Salad
Prep Time: 20 Minutes
Cook Time: 20 Minutes
Difficulty: Easy
Servings: 12

Print Recipe
Ingredients
1 cup Sugar1 cup Water Juice Of 1 Orange Zest Of 1 Orange2 whole Vanilla Beans, Caviar Scraped Out (or 2 Teaspoons Vanilla Extract)4 pints Strawberries, Hulled And Halved2 pints Blueberries2 cups Red Grapes, Halved2 cups Green Grapes, Havled Mint Leaves Preparation Instructions
Place the sugar, water, orange juice and orange zest into a small saucepan and stir to combine. Bring to a boil, then turn the heat to low and simmer for 15-20 to thicken slightly. Set aside to cool, then store in the fridge until cold.
Mix together all the fruit in a large bowl and pour the syrup over the top, tossing gently. Garnish with mint leaves and serve.
Posted by Ree on March 28 2013

March 27, 2013
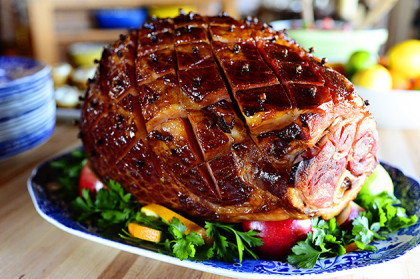
Glazed Easter Ham
 Easter is coming, the goose is getting fat!
Wait. That’s Christmas.
And Christmas isn’t coming. At least not for 272 more days.
Okay, now that I’ve both confused and depressed everyone: Here’s the recipe for the yummy glazed ham I made on my show last Saturday—the same ham I’ll be making this Sunday for Easter brunch. It’s totally easy, exceedingly delicious, and results in a purty and glossy ham that’ll make your guests say “Oooooooh!” with wide, expectant eyes and, hopefully, hearty appetites because this ham could feed an army.
Here’s how I made it.
 Get a big honkin’ bone-in ham. Fully cooked.
 Use a really sharp knife to score a diamond pattern all over the surface of the ham: First cut lines in one direction…
 Then cut in the other direction.
 Grab a handful of cloves and poke them into the center of each diamond…
 And keep going until the whole surface is dotted. I do this for looks more than flavor: I just think it looks lovely and traditional when it’s all done baking.
 Cover the ham with foil, then put it into the oven to warm it up. I do 325 for at least 2 to 2 1/2 hours, but I’d say just look at the instructions on the package and follow those. Some hams say to go 3 to 4 hours, some at a lower temperature. The whole goal here is just to heat the ham slowly…and it takes awhile to do that.
 While the ham is in the oven, you can make the glaze: Throw 3 cups of brown sugar into a saucepan…
 Along with 1/2 cup of grainy, spicy mustard for a nice tang…
 3 tablespoons apple cider vinegar for a little bite…
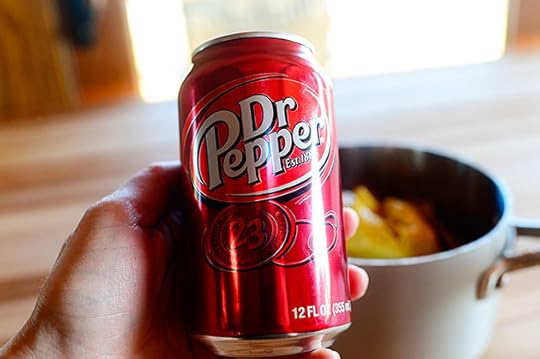 And the star of the show!
 A whole can of Dr Pepper.
You can use Coke. Heck, you could probably even use root beer. But please, for the love of all things good and caramelized, do not use diet pop.
(It’s the sugar we’re after here.)
Amen.
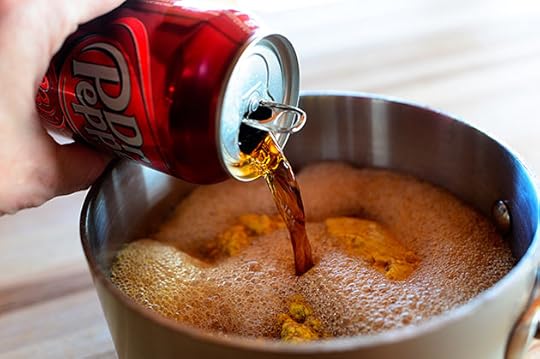
 Bring this mixture to a boil, then reduce the heat…
 And simmer it for a good 15-20 minutes until it’s gotten darker and thicker.
 After the ham has cooked for 1 1/2 to 2 hours, brush the surface with some of the glaze. Then pop it back into the oven, uncovered, for another 20 minutes or so.
 Pull it out and brush on more glaze, then pop it back in the oven.
 Then pull it out and brush on more glaze! Keep doing this until the ham is fully heated and the glaze is really gorgeous and glossy.
Note: On my Food Network episode last weekend, I only glazed it once because I had been at church and didn’t want to add too much more time before we ate. It was still totally delicious, but glazing the ham 2 or 3 (or 4) times really results in more of a masterpiece in terms of gorgeous surface.
 Mmmm. Easter feast!
Enjoy, guys. This ham’ll take you far in life.
Here’s the handy printable!
Recipe
Glazed Easter Ham
Prep Time: 20 Minutes
Cook Time: 3 Hours
Difficulty: Easy
Servings:18
Print Recipe
Ingredients
1 whole Fully Cooked Bone-in Ham (15-18 Pounds) Whole Cloves3 cups Brown Sugar1/2 cup Spicy Brown Mustard1 can Dr Pepper Or Coke3 Tablespoons Apple Cider Vinegar Preparation Instructions
Preheat the oven to 325 F.
Score the surface of the ham in a diamond pattern about 1/8-inch deep. Place cloves in the middle of each diamond. Place the ham in a large roasting pan with a rack, tent it with foil, and bake for 2 to 2/12 hours---or longer, depending on the package directions. (Some hams may require 3 to 3 1/2 hours at a lower temp; just check the package.)
Heat the brown sugar, mustard, vinegar and soda in a small saucepan until bubbly. Cook until reduced and a bit thicker, about 15 minutes.
After about 2 hours of baking time, remove the foil and brush the glaze on the ham in 20 minutes intervals (put the ham back in the oven, uncovered, in between) until it's nice and glossy. Remove from the oven and allow to rest 15-20 minutes before carving.
Posted by Ree on March 27 2013

March 26, 2013
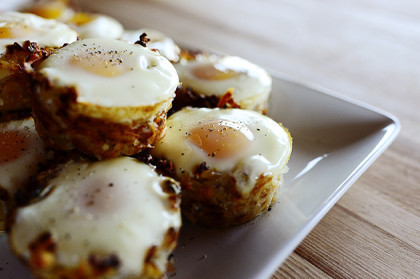
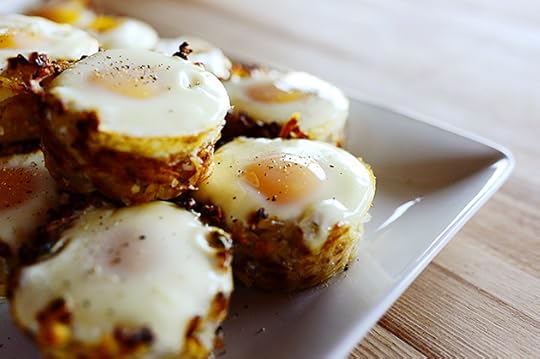
Eggs in Hash Brown Nests
 These are the perfect little side dish for Easter Brunch: Tender-but-crispy potato nests with a luscious baked egg in the middle. They go perfectly with ham for a more substantial brunch, or they’re great for a casual breakfast with a piece of bacon. Or two. Or three. Or nineteen.
I will say, when I first decided to try these out, I was excited. I’d seen different iterations of the little cutie-pies and I figured they’d be a piece of cake to whip up. But in fact, I had to go through quite a bit of trial and error before I cracked the dang code. And by the time I figured it all out, I think I’d shaved a good seven months off of my life expectancy.
I started off trying frozen hash brown potatoes, which I initially assumed would work fine. But they wound up being way, way too dry: During the initial baking of the nest, they shriveled to almost nothing, and after the egg baked inside the nests, the hash browns turned a very strange consistency—and there was hardly any potato flavor at all. Super dry, super weird.
Frozen Hash Browns = A no-go for this recipe. Like, totally.
After giving up on the frozen potatoes, I wound up fiddling with fresh potatoes in a couple of different ways: First I tried grating them from a raw state, which didn’t work at all. Too mushy. Didn’t crisp up. Produced angst. Made me crazy.
Finally, the best result came from grating almost-fully-baked potatoes: The consistency was perfect and the potato flavor was fabulous.
Then I slept for a month because I was so exhausted.
It would be a long, long time before I’d be able to trust again.
 Here’s how to make them! Start by baking a few potatoes. I scrubbed the potatoes, then baked them until they were not quite tender enough to eat: Soft, but with the tiniest bit of bite left. This will make them easier to grate, and will also allow more room for baking later.
 I let them cool almost completely (you could bake the potatoes Saturday night and keep them in the fridge), then peeled them with a paring knife.
 Grate all the potatoes, using the largest grating size. As you grate them, if you hear just a tiny bit of “crunch” signifying that the potato isn’t fully cooked, that’s just fine, Maynard.
Sorry I called you Maynard.
Next, season the potatoes generously with salt and pepper: Just toss them around with your hands as you sprinkle.
 Spray a muffin pan lightly with a little cooking spray…
 Then drop a small amount (a little less than 1/4 cup) into each muffin cup.
 Use your fingers to lightly press the center so that the potatoes spill over the top a bit. They’ll shrink when they bake, so don’t be afraid to really spill over the top.
 Sprinkle on a tiny bit more salt and pepper…
 Then give the tops just a very light spray again.
 Bake them for about 20-25 minutes (note the increased oven temp in printable recipe below) until they’re golden brown. Keep an eye on them so the ends of the potato shreds don’t burn.
You can see how much the potatoes shrink up!
 Now, I let the nests cool a bit (you can even bake them off an hour or two ahead of time and let them totally cool) before cracking in the eggs.
 Let the eggs bake for 10-15 minutes, until they get to the level of doneness you’re looking for. I still like to have a little softness to the yolks, and mine baked for probably 12 minutes or so.
* Note: Be assured that no matter what, all of your eggs will probably bake a little differently and won’t all look exactly the same on top. Some whites will look perfect, some might look a little funky. Some whites will cover the yolk, some will gloriously reveal the yolk.
But that’s the beauty of these things! They’re rustic.
Ha.
These are great with Easter Ham (I’ll post the recipe here next)! If you feel like you need a little practice before Sunday, you can pare down the amounts and do a practice run with one potato and two or three eggs. The instructions are the same whether you make a big batch or a small one.
These are totally delicious. My family loves them. My brother-in-law Tim likes to douse them with hot sauce. (I have to admit, I do too.)
Here’s the handy printable:
Recipe
Eggs in Hash Brown Nests
Prep Time: 15 Minutes
Cook Time: 1 Hour30 Minutes
Difficulty: Easy
Servings:12
Print Recipe
Ingredients
6 whole Medium Russet Potatoes (6 To 8) Salt And Pepper, to taste24 whole Large Eggs Non-stick Cooking Spray Preparation Instructions
Preheat the oven to 400 degrees.
Bake the potatoes until almost tender (potatoes should still have a little bite) 45 minutes to 1 hour. Allow to cool, and then peel and grate them. Season well with salt and pepper.
INCREASE OVEN TEMP TO 425 DEGREES.
Spray two muffin pans generously with cooking spray. Scoop 3 to 4 tablespoons of grated potato into each muffin cup. Use your fingers to gently press the sides and bottom in each muffin hole to make a nest (don't press the potatoes firmly against the pan; they should sit lightly in the pan.) Spray again (very lightly!) with cooking spray. Bake for 15 to 20 minutes. Watch and make sure they do not burn. (If they seem like they're not browning, kick up the temp to 450.) Remove when the nests are golden brown.
Allow the nests to cool. Crack an egg into each one. Sprinkle with salt and pepper and bake until the whites are set, about 15 minutes. Don't be concerned if some whites bake differently; no two nests will look alike!
Remove from the muffin pan with a spoon or fork and serve.
Posted by Ree on March 26 2013

March 25, 2013
Krispy Easter Eggs
 Imagine the Easter Bunny laying an egg.
Wait. That’s not anatomically possible.
And anyway, the Easter Bunny is a boy, right? It’s even more impossible than I thought!
Okay, let’s start this whole thing over. Imagine that the Easter Bunny’s wife is a chicken, and imagine her laying an egg. These sweet, crispy eggs with a fun candy surprise inside would be what came out!
Wait. I don’t think that’s possible either.
Sheesh. Leave it to me to take something as innocent as an Easter treat and turn it into something disturbing. Please don’t let me spoil this special time for you.
Haunting visuals aside, these adorable little ovoid (vocabulary word alert!) wonders are nothing more than Rice Kripie Treats that have been thrown into a wacky-looking Easter egg machine and, minutes later, come out the other end looking like Easter eggs. They’re super easy and fun to make with kids. The perfect Easter treat!
 Add the butter to a pot or large saucepan and melt it over medium heat.
 Throw in a bag of mini-marshmallows…
 And stir it until the marshmallows are melty and sinful.
 Throw in 6 cups of Rice Krispies…
 And stir it around gently until it’s all sticky and gooey and combined.
 Next, lightly spray the inside of a plastic Easter egg with cooking spray.
You know. Those plastic Easter eggs? The ones you think are taking over your house one minute, then the next minute, when you actually need them to photograph a recipe, you can’t find one to save your life so you drive over to your sister-in-law’s house and borrow hers?
Yes, those plastic Easter eggs.
 Stuff one half with the Rice Krispie mixture, then press a chocolate egg into the center. (The official Rice Krispie recipe calls for hollowing out a well and placing small candies in the center, but my motto is “Go Big Chocolate Easter Egg or Go Home.”)
 Fill the other half of the egg with more cereal mixture, then press the two halves together until they’re totally closed. The egg should be full enough to meet with a little resistance as you close the egg, but not so full that you feel like you’re crushing the life out of the cereal.
 A few seconds later, gently pull the egg out of…well, the egg! I found that the longer you let them sit in the plastic eggs, the harder it was to get out.
 Sprinkle them with different springy colors of sprinkles, and place them in an egg holder to let them set.
 Let the kids do this part!
Just have a broom nearby.
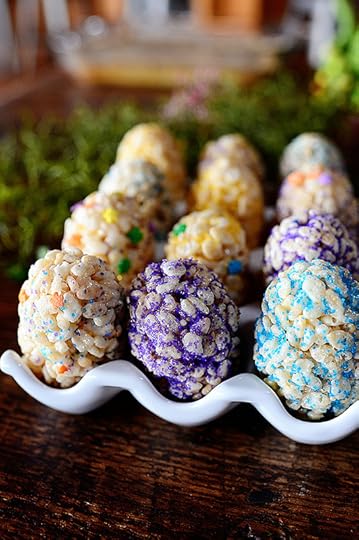 Lovely and adorable.
Recipe
Krispy Easter Eggs
Prep Time: 20 Minutes
Cook Time: 5 Minutes
Difficulty: Easy
Servings:12

Print Recipe
Ingredients
4 Tablespoons Butter1 package (10 Ounces) Mini Marshmallows6 cups Rice Krispies Assorted Sprinkles Small Chocolate Easter Eggs Plastic Easter Eggs Preparation Instructions
In a large saucepan, melt butter over low heat. Add marshmallows and stir until melted. Remove from heat, then add rice cereal and stir until well coated.
Lightly spray interior of the plastic eggs with non-stick cooking spray. If mixture is too sticky, you can also spray your hands. Fill both sides of the plastic egg with rice cereal mixture, slightly over-filling one side. Press chocolate egg in the center on one side of the egg, then close the plastic egg to shape it. (It should be full enough to meet with a little resistance as you close it.) Gently release the rice cereal egg from the mold, decorate with your choice of sprinkles and set aside in egg crate until set.
Posted by Ree on March 25 2013

March 22, 2013
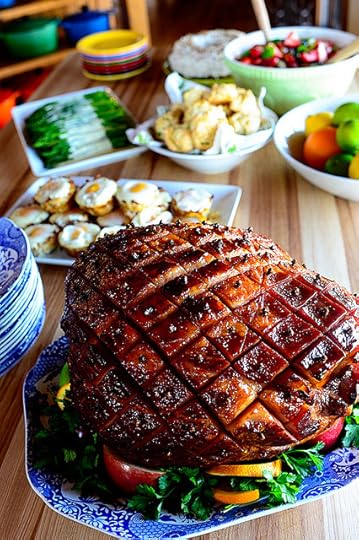
Tomorrow on Zee Food Network: Brunch Food!
 On tomorrow’s Food Network show, I make a big Sunday brunch for the whole family after church…including this luscious ham, which is glazed in an ingredient Marlboro Man gave up for Lent.
(You can probably guess what it is.)
 I also make drop biscuits (which I featured here recently) and a ridonkulously yummy ham gravy to go over the top.
 I also made these eggs…
 And this fruit salad with one of my favorite syrups in the world.
 But the star of the whole show are definitely my sister-in-law Missy’s Lemon-Blueberry Cupcakes, which she brought to the brunch that day. They are phenomenally delicious, and completely irresistible! Missy is the cupcake queen.
While the brunch on the show wasn’t on Easter Sunday (it was filmed in the wintertime!) all the food is very Easter Brunch-friendly. I’ll try to post some of the individual recipes here on The Pioneer Woman Cooks in the coming days so you can prepare for next weekend. Meantime, I hope you enjoy the show tomorrow!
Happy Friday, friends.
Love,
P-Widdy

Ree Drummond's Blog

- Ree Drummond's profile
- 2032 followers

