
Ree Drummond's Blog, page 39
August 5, 2013
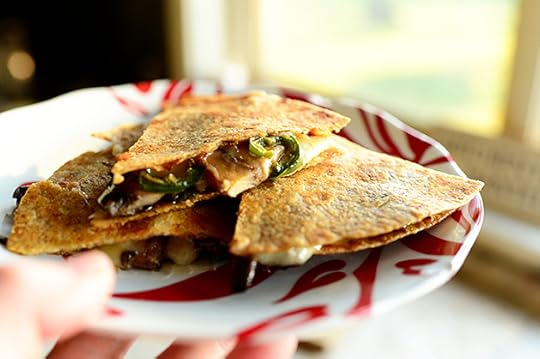
Philly Cheesesteaks
 Before I begin this post, I’d like to state for the record that I’m not from Philly. I’m not even from Pennsylvania. I’m not even from the Northeast. I’m not even from the east. I’m not even from. I’m not even. I’m not. I’m!
What I’m saying is, I have about as much authority to make a Philly Cheesesteak as I have to make bona fide Jambalaya from Louisiana. I get that.
But that just makes me want it more.
Love,
The Rebel
Here’s how I made it!
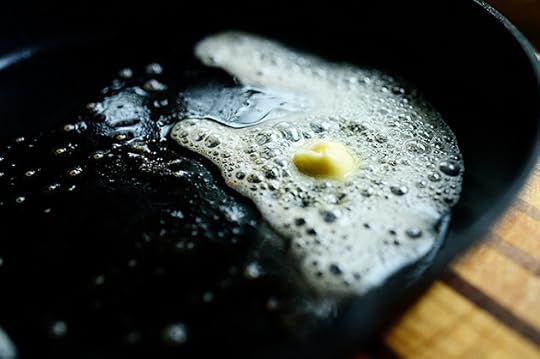
 First, I made a cheese sauce for the cheesesteaks. And before I continue, I would like to issue you a warning that what you are about to see will greatly disturb you if you are opposed to processed cheese products.
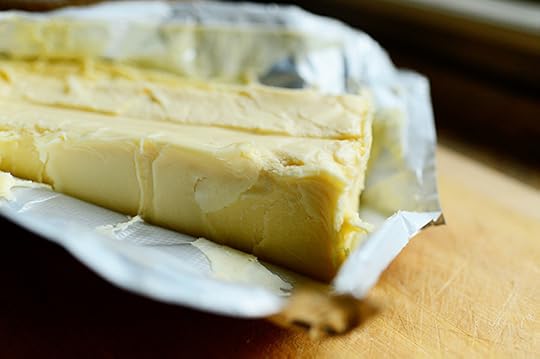 But this is the queso blanco version, which means it’s real fancy-like!
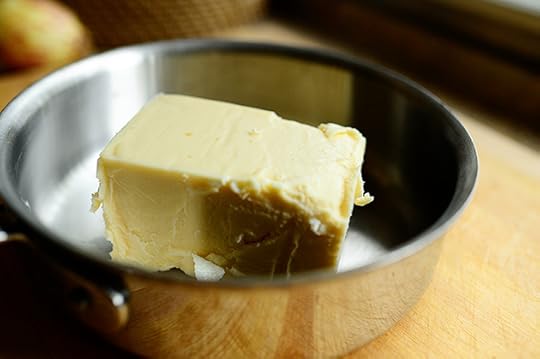 Throw half of it into a little saucepan…
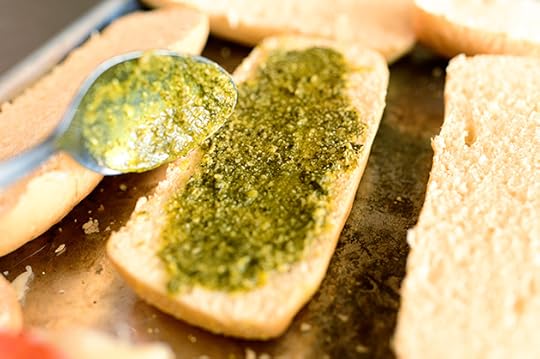
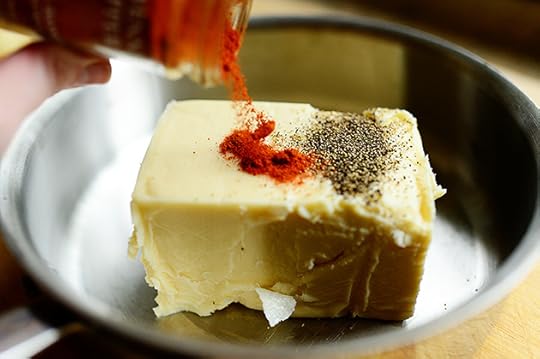 Then sprinkle on a little black pepper and cayenne, to give it a little zip.
Splash in a little milk…
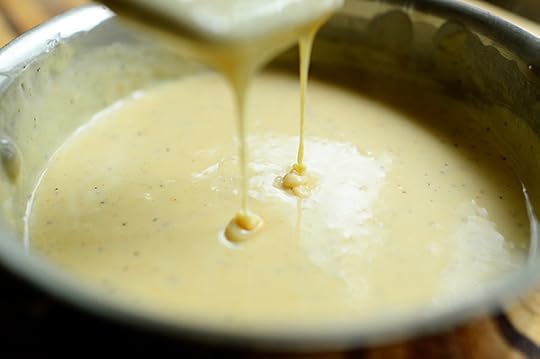 And heat it up over low heat until it’s nice and melted and smooth and evil. And hey! You can stir in some real cheese (Provolone, Swiss, etc.) if you want to have the best of both worlds.
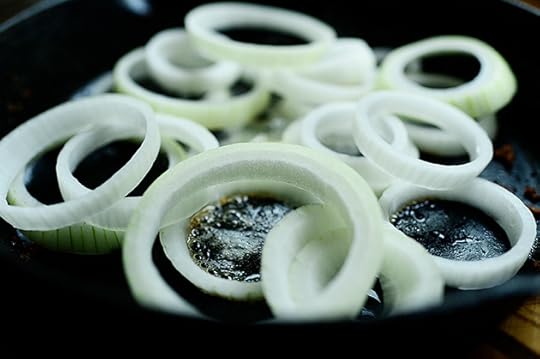
 Peel an onion…
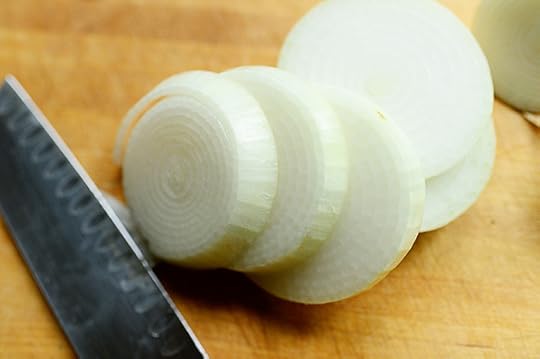 And cut it into thick slices.
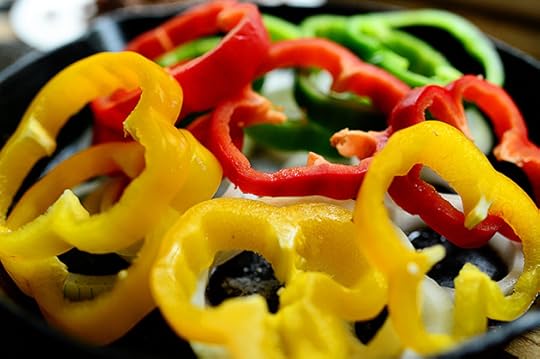
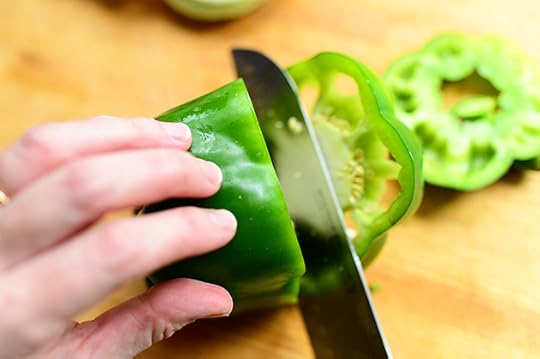 Then slice up a green bell pepper…
 And pull out the innards. Or pull out the innards, then slice it up. Whichever way your medulla oblongata dictates.
Or is it your cerebellum?
Or is it your cerebrum?
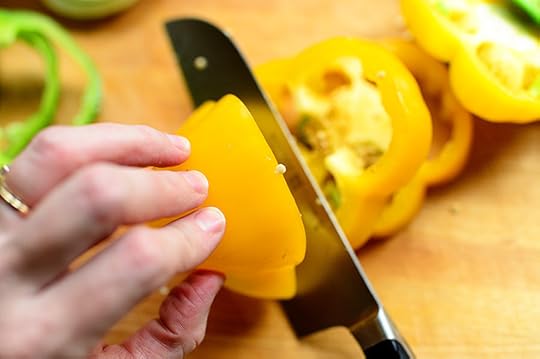 Do the same with a yellow bell pepper…
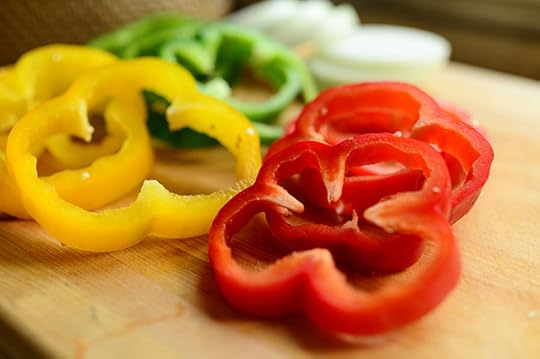 And a red one.
Of course, you can just do green. Or you can just do yellow. Or you can just do red.
But I like the combo!
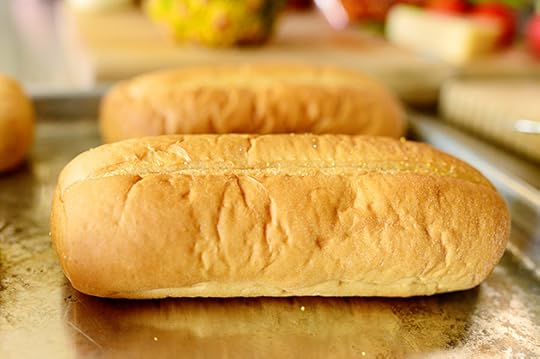
 Next, before you start cooking the meat and peppers, brown some rolls. Smear some butter on a griddle over medium heat…
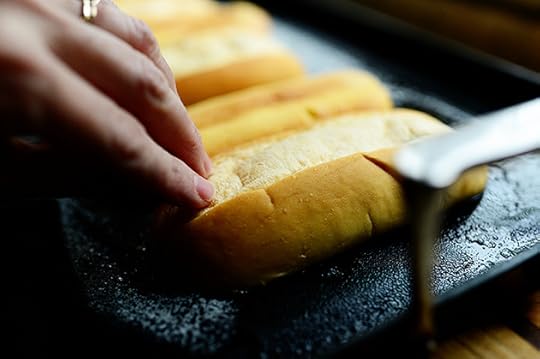 And lay some deli rolls, cut side down, on top of the butter.
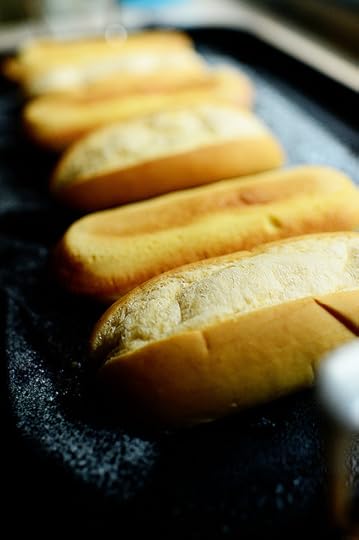 Then let ‘em cook until they’re golden brown, then set ‘em aside so they’re ready when you need ‘em.
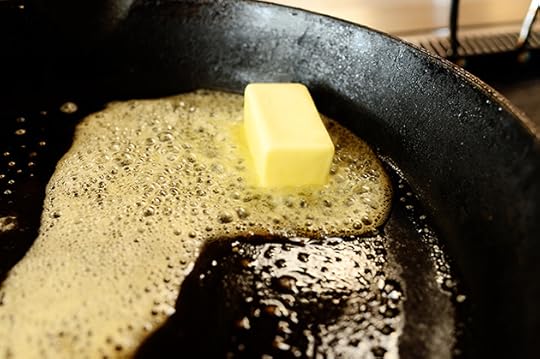
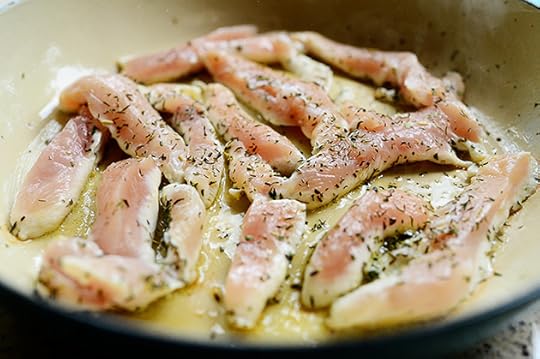
 Now it’s time to cook it all up! Throw some butter in a large skillet over medium-high heat…
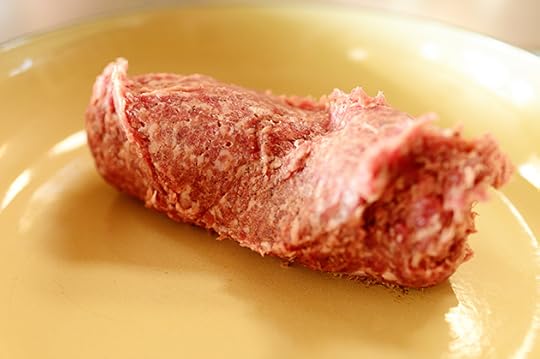
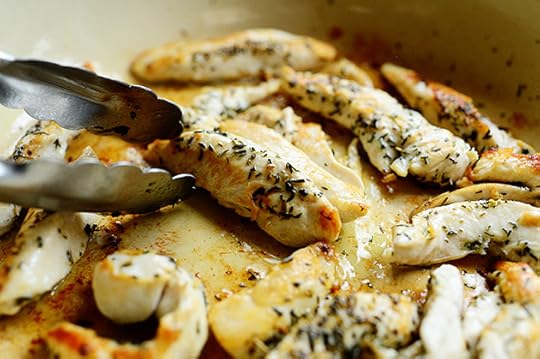
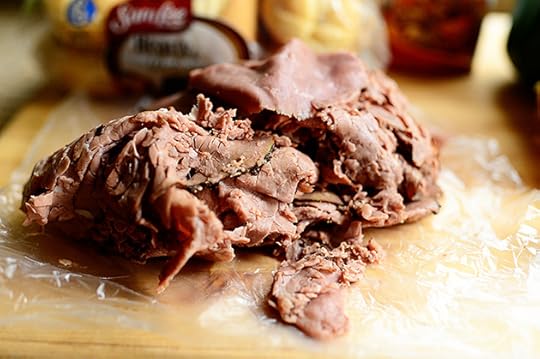 Then grab a pile of thinly shaved roast beef…
 And throw it in the skillet!
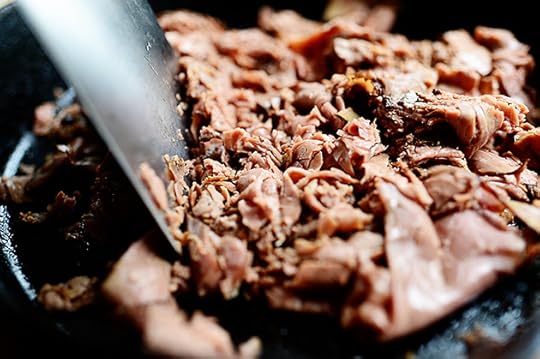 Use a spatula to move it around and smush it so that it breaks up a bit…
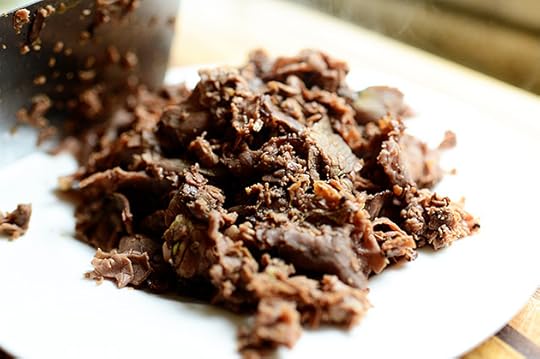 And after about a minute, remove it from the skillet and set it aside.
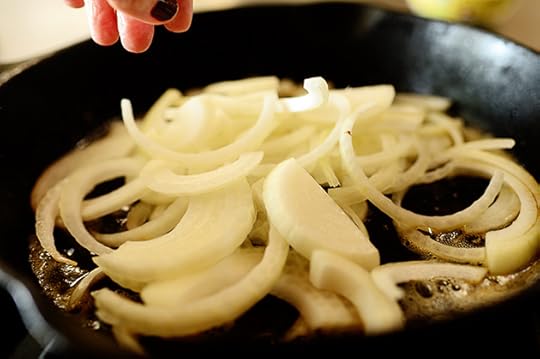
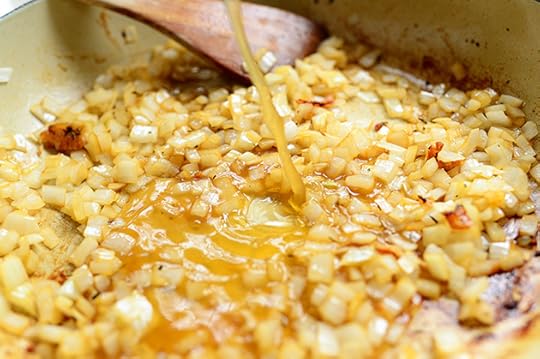
 In the same skillet, throw in a little more butter over medium-high heat…
 Then throw in the onions…
 And the peppers.
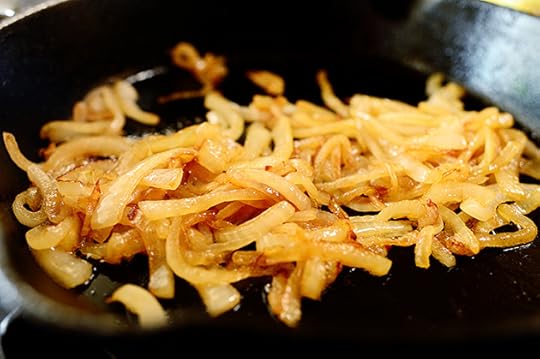
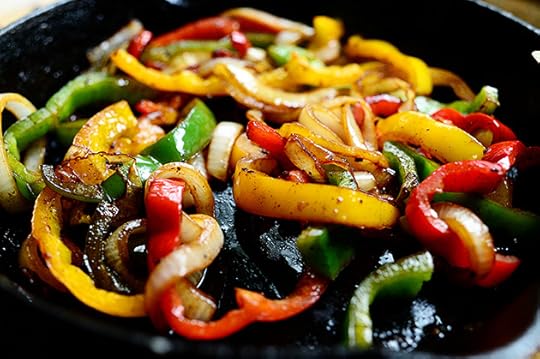 Reduce the heat to medium-low and stir around the onions and peppers until they’re cooked and soft but not mushy. It’ll take about 8-10 minutes or so. Be patient!
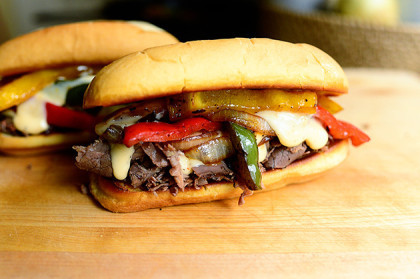
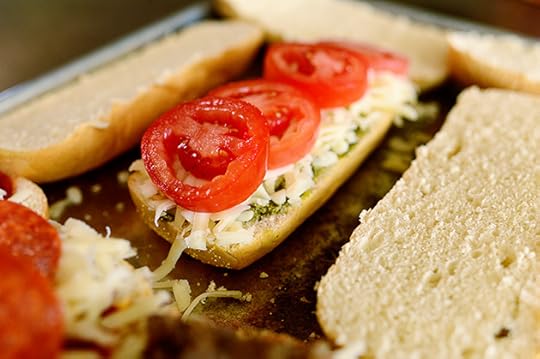
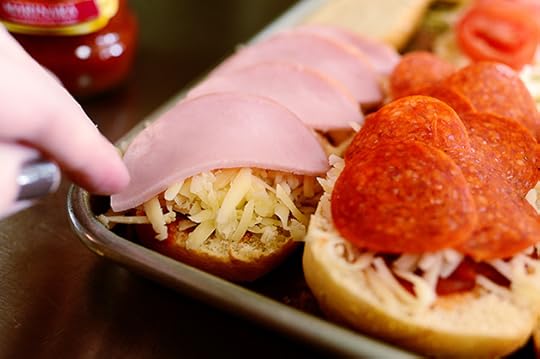
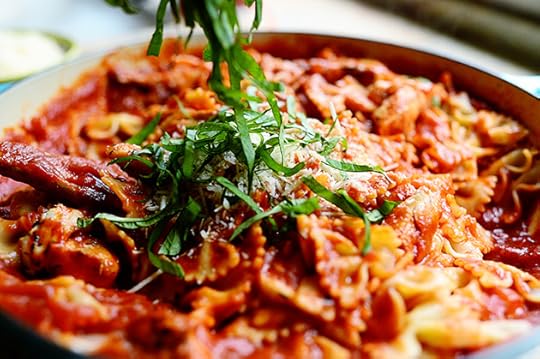
 To build the sandwiches, pile on a bunch of beef…
 Then pile on some more!
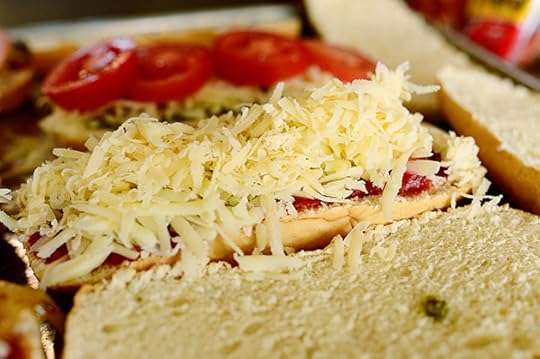
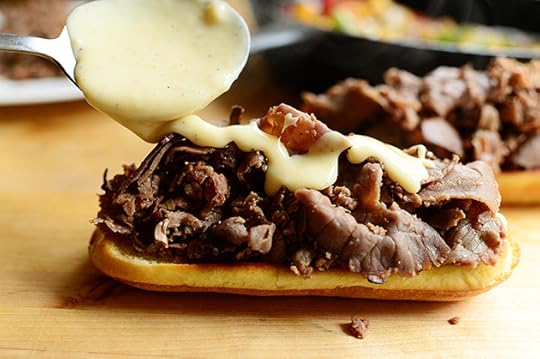 Spoon some cheese all over the meat…
 My gosh.
My gosh, my gosh, my gosh!
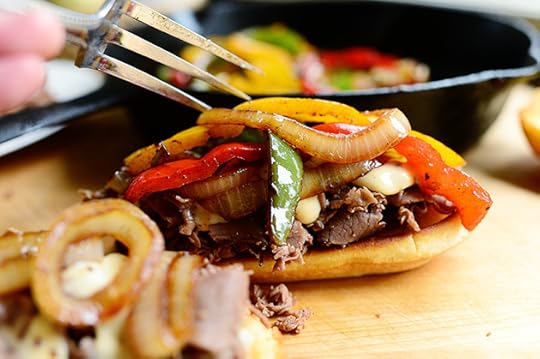 Pile on some peppers and onions…
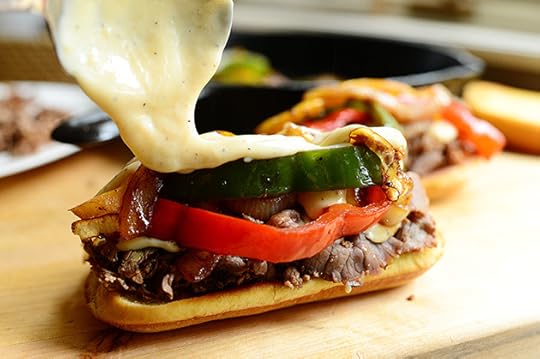 And add a little more cheese, please.
 I repeat: My gosh.
 Pop on the lids…
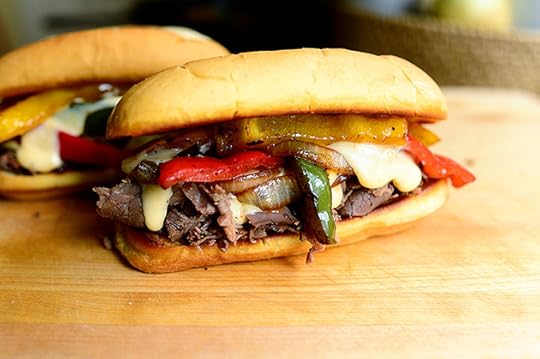
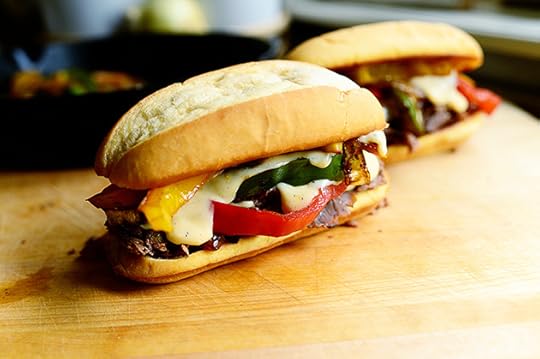
Then step back and take a really good, hard look at what you’ve created.
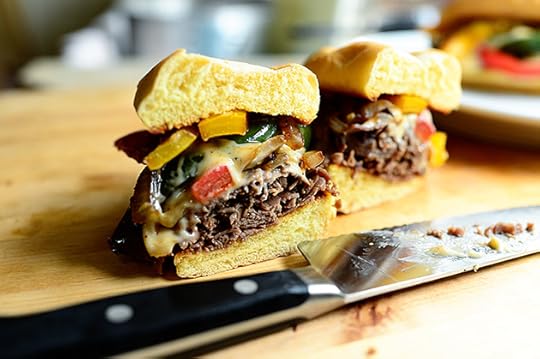 Then—and this is the most important part—dig in!
You’ll love these. Absolutely love them. They’re quick and easy and oh, so good.
Here’s the handy dandy printable!
Recipe
Philly Cheesesteaks
Prep Time: 10 Minutes
Cook Time: 20 Minutes
Difficulty: Easy
Servings: 6
Print Recipe
Ingredients
8 ounces, weight White Velveeta1/2 teaspoon Black Pepper1/4 teaspoon Cayenne Pepper1/4 cup Milk6 Tablespoons Butter6 whole Deli Rolls1-1/2 pound Thinly Shaved Good Quality Deli Roast Beef1 whole Yelow Onion, Peeled And Sliced Thick1 whole Green Bell Pepper, Seeded And Sliced Thick1 whole Yellow Bell Pepper, Seeded And Sliced Thick1 whole Red Bell Pepper, Seeded And Sliced Thick Optional: Spicy Mustard, Horseradish, Worcestershire Sauce, Hot Sauce Preparation Instructions
First make the cheese sauce by combining the Velveeta, black pepper, cayenne, and milk in a small pan. Heat over low heat, stirring occasionally, until it's melted and hot. Keep warm.
Melt 2 tablespoons butter on a griddle over medium heat, then place the deli roll halves on the griddle until golden brown. Set aside.
Heat 2 more tablespoons butter in a large skillet over medium-high heat. Throw in the roast beef and move it around with a spatula, breaking it up a bit as you go. Cook/warm for about a minute or so, then remove it to a plate and set it aside.
Add the remaining tablespoons butter to the same skillet and throw in the onions and peppers. Reduce the heat to medium-low and cook the veggies until dark golden and soft, about 8 to 10 minutes.
To build the sandwiches, place a pile of beef on the bottom half of each roll. Spoon cheese sauce over the beef. Top with peppers and onions, then top with more cheese sauce. Place the top half of the roll on top and serve immediately!
Options:
* Spread spicy mustard on the rolls before building the sandwiches
* Mix horseradish with mayo and spread it on the rolls before building the sandwiches
* Add a few dashes of Worcestershire or hot sauce to the meat and peppers while cooking.
* Add prepared horseradish to the cheese sauce.
Posted by Ree on August 5 2013


August 2, 2013
Recipes from Tomorrow’s Show!
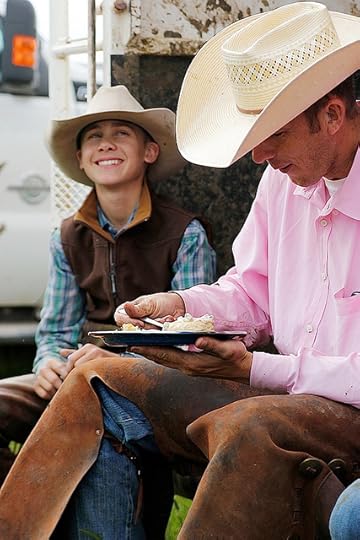
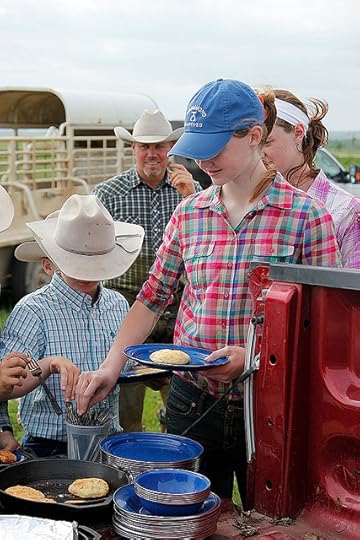 Tomorrow’s Food Network episode is really fun: We have a big calf-working on the ranch and I take a big breakfast, not lunch, because the crew started so, so early that day.
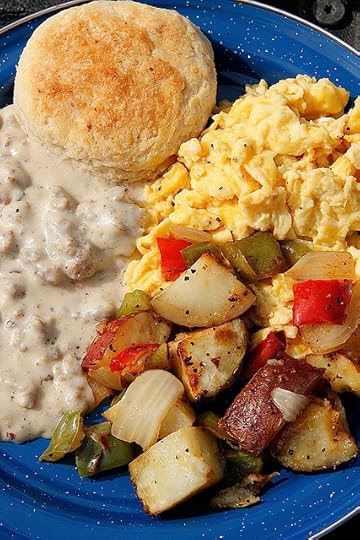
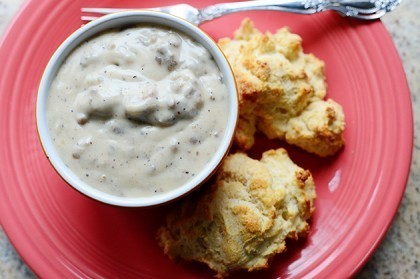
 I knew the guys would be especially hungry since it was such an early start, and since the breakfast would mark the end of that morning of cattle work, I took a big, rib-sticking breakfast of Biscuits, Sausage Gravy, Breakfast Potatoes, and Eggs.
 Glory be. It doesn’t get more cowboy-pleasing than this.
 See?
See?
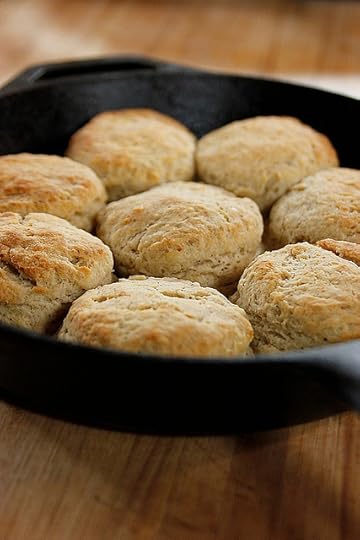
Note: The Sausage Gravy was my regular method/recipe (I pasted in the printable recipe below) but for the biscuits, I wound up adding some black pepper and a little ground sage to give them a little edge. I took it easy on the sage because I didn’t want the guys biting into them and tasting something wildly different…and the sage really just wound up giving them a nice, deep savory quality without screaming SAGE!
The Scrambled Eggs I made were just simple scrambled eggs with hot sauce added…
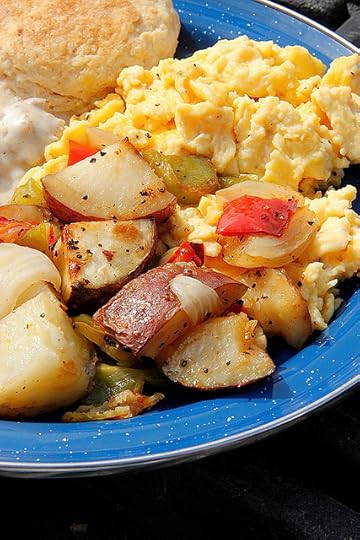 But it was these Breakfast Potatoes that I loved the most. These are so easy—I just mix everything in a huge bowl, pour them on baking sheets and bake them until they’re sizzling. The peppers give them color and interest…and, well, I could eat a ton of them.
Recipes below! For the biscuits, just add a couple of TEASPOONS (not tablespoons, guys—sorry!) of black pepper and a teaspoon of ground sage to the drop biscuit recipe below.
For the scrambled eggs, just do your favorite scrambled eggs and add a ridiculous amount of Louisiana Hot Sauce, Tabasco…even Sriracha!
And here’s the Best Breakfast Potatoes Ever recipe.
Hope you love the show! I promise lots of yummy food…
And chaps. Lots and lots of chaps.
Recipe
Best Breakfast Potatoes Ever
Prep Time: 15 Minutes
Cook Time: 45 Minutes
Difficulty: Easy
Servings: 12
[image error]
Print Recipe
Ingredients
1 bag (5 Pounds) Red Potatoes, Cut Into Chunks4 cloves Garlic, Minced1 whole Onion, Peeled And Roughly Chopped1 whole Green Bell Pepper, Seeded And Roughly Chopped1 whole Red Bell Pepper, Seeded And Roughly Chopped1/4 cup Olive Oil1/2 stick Butter, Melted1 teaspoon Seasoned Salt1/2 teaspoon Cayenne Pepper Kosher Salt And Freshly Ground Black Pepper Preparation Instructions
Preheat the oven to 425 degrees F.
In a large bowl, toss together the potatoes, garlic, onion, green bell pepper, red bell pepper, olive oil, butter, seasoned salt, cayenne pepper and some kosher salt and pepper.
Pour potatoes onto two rimmed baking sheets. Bake for 20 to 25 minutes, shaking the pan twice.
Raise the heat to 500 degrees and bake until crisp and brown, 10 to 15 minutes.
Sprinkle with a little more salt and pepper before serving.
Posted by Ree on August 2 2013
Recipe
Drop Biscuits and Sausage Gravy
Prep Time: 10 Minutes
Cook Time: 30 Minutes
Difficulty: Easy
Servings: 12
Print Recipe
Ingredients
Biscuits3 cups All-purpose Flour2 Tablespoons Baking Powder1/2 teaspoon Salt1-1/2 stick (3/4 Cup) Cold Butter, Cut Into Pieces1-1/4 cup Butermilk SAUSAGE GRAVY1 pound Breakfast Sausage, Hot Or Mild1/3 cup All-purpose Flour4 cups Whole Milk1/2 teaspoon Seasoned Salt2 teaspoons Black Pepper, More To Taste Preparation Instructions
BISCUITS
Preheat oven to 400 degrees.
Add flour, baking powder, and salt to the bowl of a food processor (or a large bowl.) Add butter pieces and pulse until butter is completely cut into the flour mixture (or use a pastry cutter if using a bowl.) While pulsing (or stirring) drizzle in the buttermilk until dough just comes together and is no longer crumbly.
Drop in clumps on two baking sheets, then bake for 15-17 minutes, or until golden brown. (Optional: Brush with melted butter when biscuits first come out of the oven.)
SAUSAGE GRAVY
With your finger, tear small pieces of sausage and add them in a single layer to a large heavy skillet. Brown the sausage over medium-high heat until no longer pink. Reduce the heat to medium-low. Sprinkle on half the flour and stir so that the sausage soaks it all up, then add a little more until just before the sausage looks too dry. Stir it around and cook it for another minute or so, then pour in the milk, stirring constantly.
Cook the gravy, stirring frequently, until it thickens. (This may take a good 10-12 minutes.) Sprinkle in the seasoned salt and pepper and continue cooking until very thick and luscious. If it gets too thick too soon, just splash in 1/2 cup of milk or more if needed. Taste and adjust seasonings.
Spoon sausage gravy over warm biscuits and serve immediately!
Posted by Ree on August 2 2013

July 31, 2013
French Bread Pizzas
 These are the facts of the case and they are undisputed: Sometimes we humans can’t spend four hours making dinner. In fact, sometimes we humans can’t spend two hours making dinner. Along those lines, sometimes we humans can’t spend one hour making dinner.
Especially if we humans have a houseful of kids and dogs, soccer practice (yes, it has already begun), football meetings (yes, they have already begun), and a million and four things going on.
Last night was one of those nights. So I made French Bread Pizzas!
And all the problems of the world were solved.
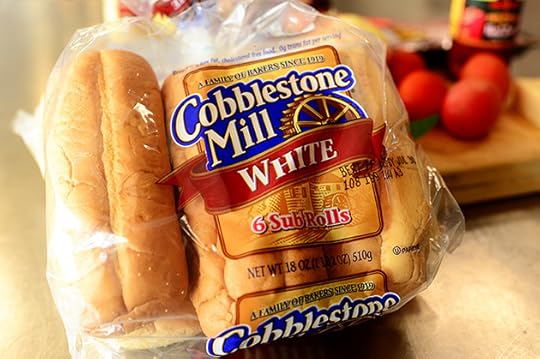 The thing about these French Bread Pizzas is…I didn’t even use French bread! I used these good ol’ deli rolls, because that’s what I have available in my smalltown grocery store, Maynard. If you can find small baguettes or crusty sandwich rolls, those would be good.
 But these work just fine, too!
And I’m sorry I called you Maynard.
 Then I just grabbed a whole bunch of stuff from my fridge and pantry! Some I wound up not using, other things (not pictured) I brought in at the last minute. Variety is the spice of life with these babies.
 The first thing I got started were some caramelized onions: I violently threw some butter in a skillet over medium heat…
 Then I angrily sliced up an onion and threw it in…
 And cooked ‘em…
 Until they were nice and golden brown.
Caramelized onions are my love language.
 I also done fried up some of that there sausage stuff.
You can use Italian sausage if you want to be cool.
But you can use this breakfast sausage stuff if you want to be like me.
Go ahead and brown the stuff, but if you really, really want to be like me, don’t take a photo of the browned sausage in the pan, okay? Because that would be way too linear and logical and my brain doesn’t work that way.
 I also was moved deep in my spirit to cut up a pineapple.
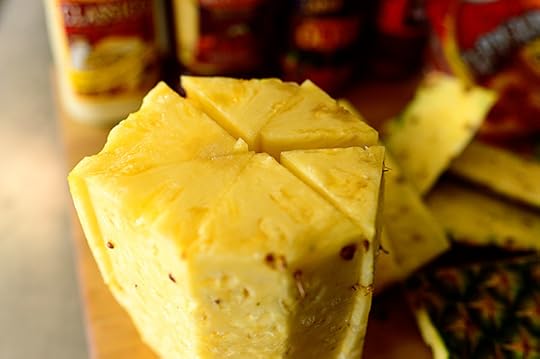 So that’s what I did!
 Thin slices. Eat one. Then eat another one. Then save the rest for the pizza.
 Once you’ve got all your toppings together, grate up a whole bunch of mozzarella cheese. You can use the good, fresh stuff if you have it…or just the stuff in the supermarket.
 Split the rolls in half and lay them all on a baking sheet…then grab the pizza sauce, which is nothing more than jarred marinara, man.
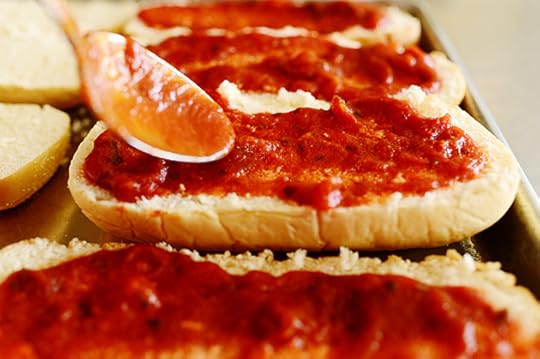 Spread it over half of the roll halves….
 Then pile on the cheese…
 And whatever toppings you’d like! There’s pepperoni for the dudes in my house…
 Cooked sausage, too!
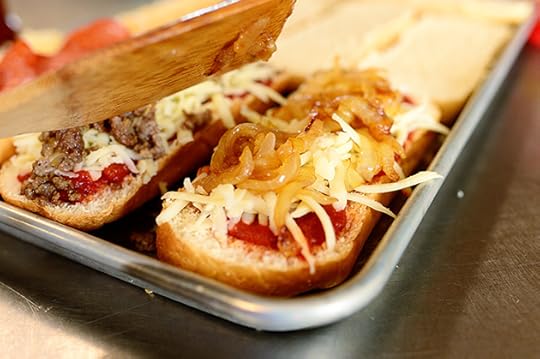 If you haven’t eaten them all yet, do a caramelized onion version.
Divine!
 And guess what? You can use jarred pesto as the pizza “sauce.”
It’s a world gone mad.
 All it needs is cheese and tomatoes!
 Raise your hand if you like Canadian bacon and pineapple!
 *Raising hand*
 If I’d had green bell peppers, I would’ve sliced ‘em thin and threw a couple of rings on here.
 Here, I did a four-cheese version. Only I didn’t use four cheeses. I used two. Which I guess makes it a two-cheese version. But I’ve never heard of a two-cheese pizza. So I guess what I made here was a cheese pizza. But I’m still going to call it a four-cheese pizza. Cool with you?
Thank you for indulging me.
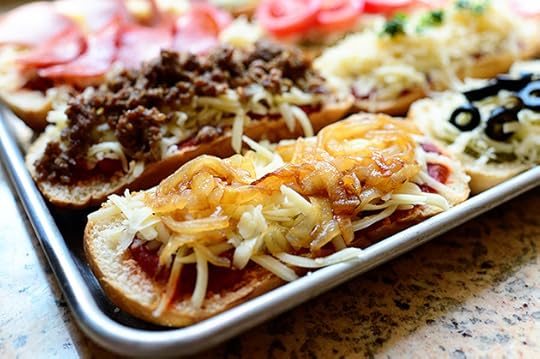 So that’s basically the story: I just built and built. Caramelized onions…
 Sausage…
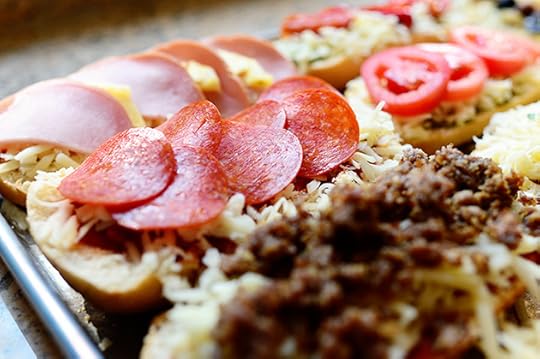 Pepperoni…
 Canadian Bacon/Pineapple…
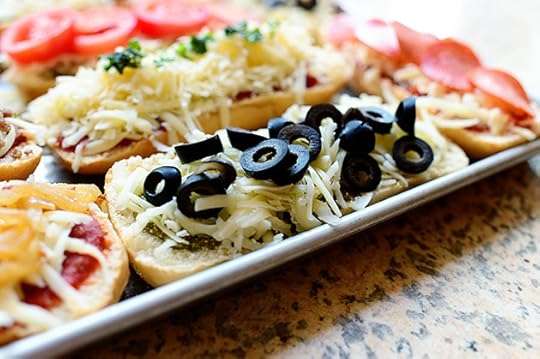 Black Olive…
 Four Cheese, which is actually Two Cheese, which is actually Cheese, which I’m actually going to call Four Cheese anyway. And here, because I had no parsley in my garden (it’s really inconvenient) I chopped up some basil and threw it on, which is going to turn black as soon as it hits the oven, but I tried…
 Tomato Basil…
 Oh! And strips of Roasted Red Pepper on a pesto base.
 Sausage, Olive, and Caramelized Onion on the same pizza. Scandal!
 And there you go! A nice colorful assortment. Now just throw ‘em in the oven! I put them on the lowest rack in a 375 degree oven at first, because I wanted to give the bread a chance to get a little crisp without cooking the toppings too much. After about 8-10 minutes, I cranked up the heat and moved them to the top rack for a couple of minutes.
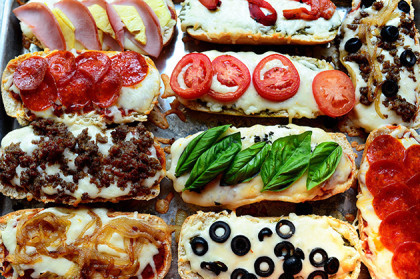
And here they are! A little something for everyone.
(I threw some basil leaves over the Four Cheese Two Cheese Cheese Four Cheese version after it came out of the oven to cover up the black flecks. Always have whole basil leaves around; they cover a multitude of sins.)
 I probably could have gone a little longer to get the cheese a little more brown…but I was hungry, man.
 Can’t beat good ol’ pepperoni. This is where Marlboro Man lives.
 I live anywhere caramelized onions reside. They are not only my love language, they’re also my life, my purpose, and my heart.
 But sausage pizza? Mmmmm. There’s something about it.
Enjoy these, guys! Nothing simpler in the world, and they’re perfect for a slumber party, football gathering, or just any weeknight when you don’t have a ton of time.
Here’s the handy dandy printable.
Recipe
French Bread Pizzas
Prep Time: 30 Minutes
Cook Time: 12 Minutes
Difficulty: Easy
Servings: 12
Print Recipe
Ingredients
6 whole Deli Rolls Or Crusty Italian Rolls Jarred Marinara Sauce Or Pizza Sauce Jarred Or Refrigerated Pesto2 pounds Mozzarella Cheese, Grated Grated Parmesan Cheese To Taste2 Tablespoons Butter1 whole Onion, Sliced1/2 pound Sausage (regular Breakfast Sausage Or Italian Sausage) Pepperoni Slices Canadian Bacon Slices Pineapple Chunks, Fresh Or Canned Roma Tomatoes, Sliced Sliced Black Olives Optional Ingredients: Goat Cheese, Sliced Bell Peppers, Various Cheeses, Pepperoncinis, Jalapeno Slices, Diced Red Onion, Any Other Pizza Topping You'd Like! Preparation Instructions
Preheat the oven to 375 degrees.
Slice rolls in half and lay them, cut side up, on a large baking sheet.
Top each half with a generous portion of either marinara or pesto. Next, top with a generous amount of grated mozzarella and Parmesan, if you'd like.
Add whatever toppings you'd like on top of the cheese!
Once all assembled, put the pan in the oven on the lowest rack for 8 to 10 minutes. Crank up the heat to 425 and put it on the highest rack until the cheese starts to bubble a bit and turn golden.
Remove and serve immediately! You can cut the pizzas in half right across the middle so there are mini-French Bread Pizzas for everyone.
Posted by Ree on July 31 2013

July 29, 2013
Skillet Chicken Lasagna
 My daughter and I returned home from Chicago yesterday after having a fun, city-centric time together through the weekend, which involved zero cooking, by the way. When we arrived home, my other daughter had left on a long-planned trip with her best friend’s family so I was met by a household of three men who were banging their forks on the table, dying to have something home cooked and hot.
And so, after hugging them, kissing them, and bopping them all on the head, I very quickly whipped up this variation of Bowtie Lasagna, a recipe submitted to Tasty Kitchen by member Rozanie centuries ago (okay, back in 2010.) That bowtie lasagna recipe is so easy and delicious (try it sometime!) Here’s how I changed it up yesterday:
* I used chicken instead of ground beef. Revolutionary! Ha.
* I used ricotta cheese instead of sour cream. Groundbreaking! Or not.
* I added a bunch of fresh basil. There goes crazy ol’ Ree again!
* I used herbes de provence instead of Italian seasoning. I’m just a rebel without a cause.
It turned out to be just the ticket: Quick, easy, and super satisfying for my poor starving male family members. And it left the whole evening in front of us, which meant plenty of room for Real Housewives of New Jersey, Falling Skies, and Real Housewives of New Jersey again.
I really hope this truce between Joe and Teresa has sustained itself since the episode was filmed. Just keep huggin’ it out, you two!
(Sorry. I’ll stop now.)
 First, take this.
 And pour it in boiling water. Cook it until it’s al dente, then drain it and set it aside.
 Now, grab some chicken breasts in any form (I used these pre-cut strips because they’re nice and thin and easy…but you could just dice up a chicken breast into small pieces) and sprinkle them with salt and some Italian seasoning. This is actually Herbes de Provence, which isn’t Italian seasoning at all. It’s French.
I’ve always been really good at geography.
 Pour some olive oil in a purty hot skillet…
 Then throw in the chicken in a single layer. And don’t touch it! Or everything will be ruined forever! Just let it sit and cook and get nice and brown on the first side.
 Then turn it over and let it get nice and brown on the other side.
 Yummy.
 Take the chicken out of the pan and chop it into pieces (unless you chopped it into pieces before you cooked it) and set it aside.
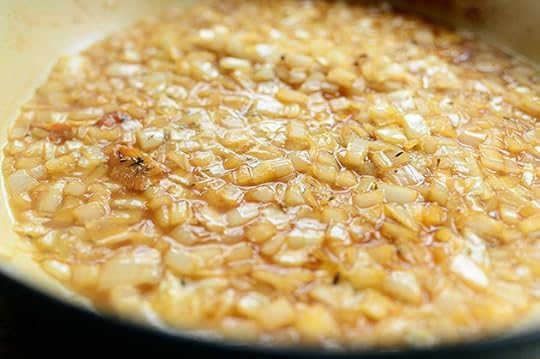
 Next, dice up an onion…
 Then throw it in the pan.
 Stir the onions around…
 And cook ‘em for a couple of minutes, until they start to soften.
 Grab some chicken broth…
 And pour it in with the onions.
Note: If this had just been for me, I would have used white wine instead.
 Scrape the pan to loosen up all the good stuff, then let it cook and reduce for a couple of minutes, until the broth reduces by about half.
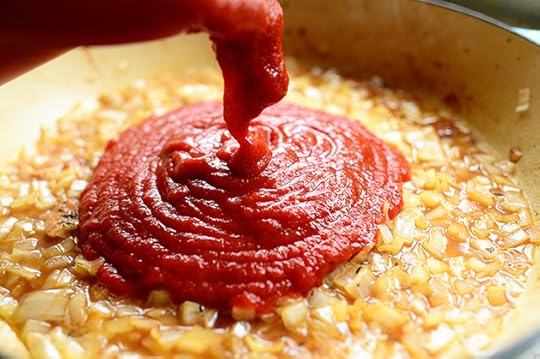 Then pour in some marinara sauce!
 Stir it around and let it simmer for for 5-10 minutes or so.
Note: If you’d rather make your own sauce from scratch, use canned crushed tomatoes and season the sauce with Italian seasoning, salt, pepper, and a little sugar. Then you’ll need to cook it down for a good 25-30 minutes to make sure the flavor is all there. (That’s why I used jarred marinara; I didn’t have time to wait!)
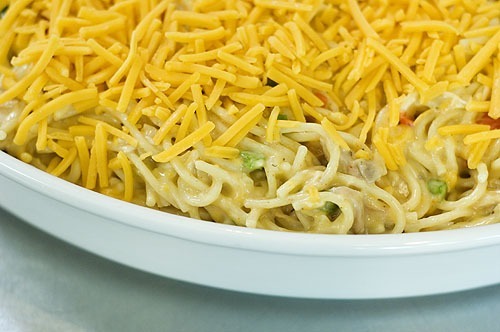
 Next, grate up some mozzarella. You can use fresh if you have it, but this is just the regular supermarket stuff.
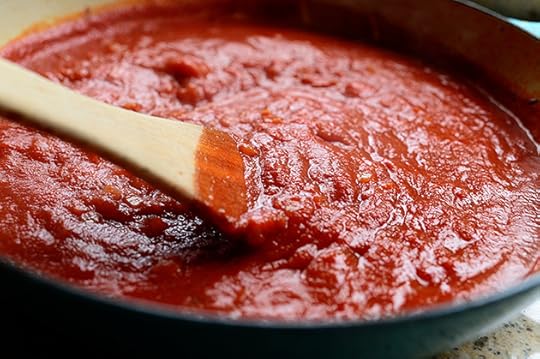
 After that, it’s just about throwing it all in the skillet: Start with the pasta…
 Then grab a big spoonful of ricotta cheese…
 And plop it on top. The original bowtie lasagna recipe called for sour cream here instead of ricotta, and it winds up being a little creamier. Either one is delicious! Ricotta is a little grainy (deliciously so) so if you prefer things smooth, you can go the sour cream route. I thought ricotta would make for a more authentic lasagna experience!
 Throw the mozzarella on top of the ricotta…
 Then throw on the chicken.
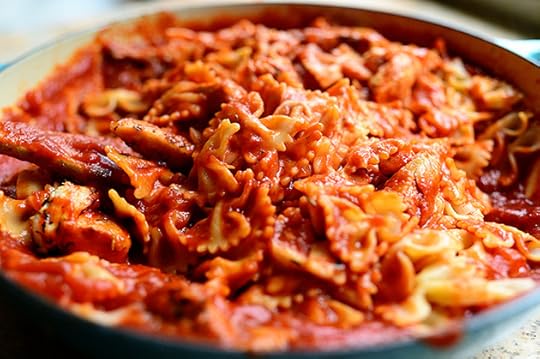 Toss it all together…
 Then throw on the Parmesan.
 Good news! I have basil in my garden! At long last. Oklahoma has been so blessedly cool this summer that the basil had a little bit of a late start…but now it’s bustin’ out all over, which means I can go on living.
 Grab a few leaves and stack ‘em up…
 Then roll ‘em up in a tight little roll…
 Slice up the roll into thin slivers…
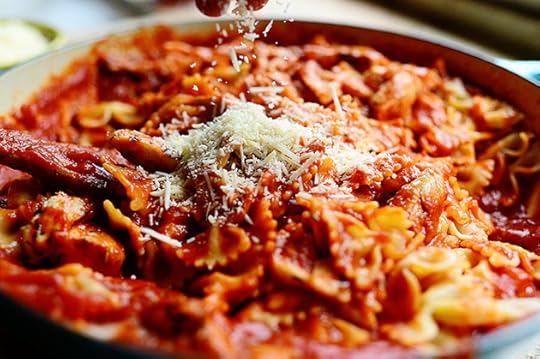
And sprinkle it over the top.
 Stir it and toss it around, then sprinkle a little more mozzarella and basil over the top.
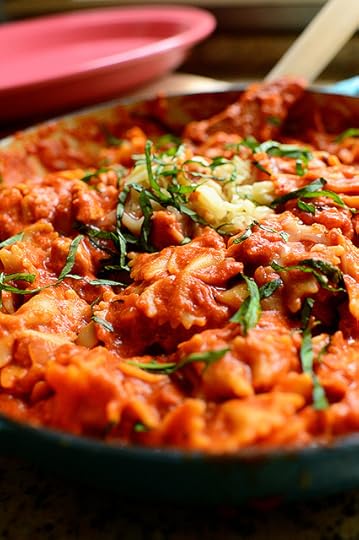
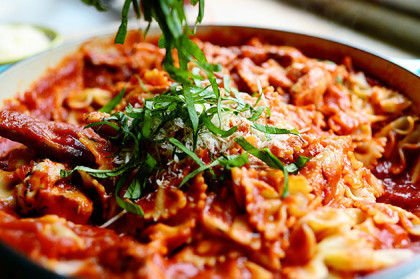
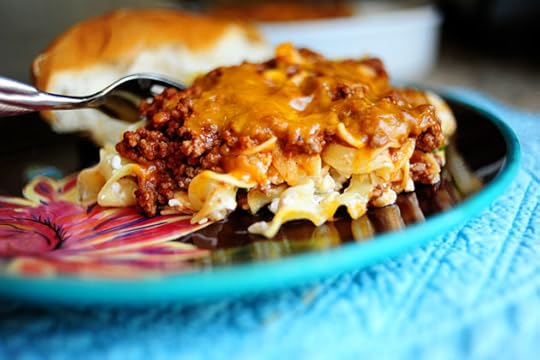
 And there it is. Just a big, gloopy skillet full of food…and it’s good! Nothing fancy about it…nothing weird. Just good ol’ satisfying grub.
 And sometimes, that’s pretty much all you need.
Here’s the handy printable! I’m also including the original Bowtie Lasagna recipe below in case you’d like to try that version.
Enjoy, guys!
Recipe
Skillet Chicken Lasagna
Prep Time: 10 Minutes
Cook Time: 20 Minutes
Difficulty: Easy
Servings: 8
Print Recipe
Ingredients
12 ounces, weight Bowtie Pasta, Cooked According To Package Instructions And Drained2 Tablespoons Olive Oil2 whole Boneless, Skinless Chicken Breasts, Sliced Or Diced1 Tablespoon Italian Seasoning Or Herbes De Provence Salt To Taste1 whole Medium Onion, Diced2 cloves Garlic, Minced1 cup Low Sodium Chicken Broth1 jar Good Quality Marinara Sauce, 14-16 Ounce Size1 teaspoon Red Pepper Flakes1/2 cup Whole Milk Ricotta Cheese1 cup Grated Mozzarella Cheese1/4 cup Grated Parmesan12 whole Basil Leaves, Chiffonade Or Chopped Extra Cheeses And Basil, For Serving Preparation Instructions
Heat the oil in a large skillet over medium-high heat. Season chicken with salt and herbs. Add chicken to the skillet and cook until golden brown. Remove the chicken to a plate.
Add onions and garlic to the same skillet and cook, stirring, for 3 minutes. Add broth, then scrape the bottom of the skillet to loosen the bits. Cook for another 2-3 minutes to let the broth reduce.
Add marinara sauce and red pepper flakes, then simmer for 10 minutes.
Turn off the heat and add the cooked and drained pasta, ricotta, mozzarella, Parmesan, and basil. Add the cooked chicken on top. Toss to combine, then add more of any of the above ingredients until the sauce is just how you like it.
Serve with a sprinkling of Parmesan and a little basil on top.
Posted by Ree on July 29 2013
Recipe
Bow-tie ‘Lasagna’
Prep Time: 10 Minutes
Cook Time: 15 Minutes
Difficulty: Easy
Servings: 6

Print Recipe
Ingredients
1 pound Ground Chuck5 cups Bow Tie Noodles3 cups Spaghetti Sauce (or Pizza Sauce, Whatever You Prefer)1 Tablespoon Olive Oil1 teaspoon Salt1/2 teaspoon Garlic Powder1 teaspoon Italian Seasoning (or More, Make It To Your Taste)1/2 cup Mozzarella Cheese1/2 cup Sour Cream Preparation Instructions
I am a "make it and taste it as I go" cook. I made this in a hurry tonight, and was amazed at the results; my girls could NOT get enough of it. (I love that kind of response, don't get it as often as I wish.)
Fry ground chuck in small pan. Meanwhile, cook noodles according to package directions.
After noodles are cooked, drain and drizzle with olive oil. Mix in your spaghetti sauce. (I can't guarantee your results on this, because I'm spoiled; I am a "home canner" and have the BEST sauce on my shelf, a home canned marinara sauce that I use for lots of stuff—pizza, spaghetti, and of course, THIS.)
Add your fried hamburger, seasonings, cheese, and sour cream. Fold together and allow it all to combine and melt together, over low heat, for about 5 minutes, or until cheese is melted.
Serve to your family and be prepared to have it disappear before your very eyes.
Posted by rozanie on July 29 2013

July 26, 2013
Simply the Best, Food Edition
On tomorrow’s Food Network show, I list a bunch of “Bests” in my world: Everything from the Best Grilled Cheese to the Best Scrambled Eggs…and a few non-food bests, too (Best Horse, anyone?) I think you’ll love the show, as I picked my favorite recipes in a handful of categories. (Best Grilled Cheese makes an appearance!)
As I did last week before the Freezer Cooking show aired, I’m going to share a whole bunch of “Bests” here, too. These are my tried-and-true favorites…I hope you find some new favorites, too!
(Click on the photos or links to see the step-by-step for each recipe below.)
Best Main Dish Salad
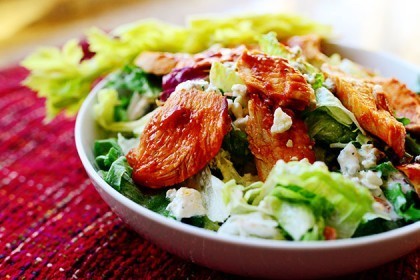
 Chipotle Steak Salad. I could eat this morning, noon, and night. Medium rare steak sliced and draped over greens with a smoky, spicy, creamy dressing. Simply too good for words.
Best 16-Minute Meal
 Of all my 16-Minute Meals, this Beef with Snow Peas is absolutely, positively my favorite. The flavor is just incredible and it couldn’t be easier. My girls inhale this!
Best Pancakes
 Edna Mae’s Sour Cream Pancakes. So light, so sweet and delicious. These are the pancakes I make when I want my kids to love me.
Best Pasta
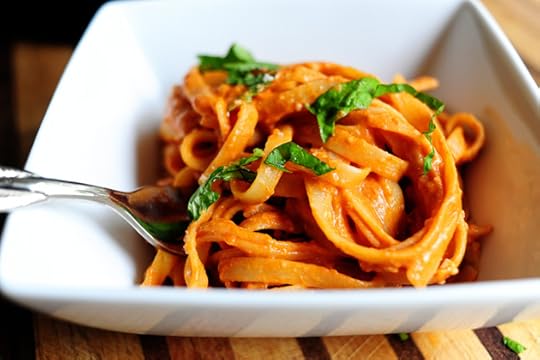 Okay, so it’s basic. But that’s what makes this so delicious! Pasta with Tomato Cream Sauce is my favorite category of pasta, and you can add grilled chicken, shrimp, wine, herbs—anything to dress it up however you’d like. It’s to die for.
Best Cake
 It’s unconventional. It’s weird. And it’s the most delicious cake you’ll ever eat in your life. It’s Tres Leches Cake, and I insist that you try it! You’ll absolutely die from bliss.
Best Soup
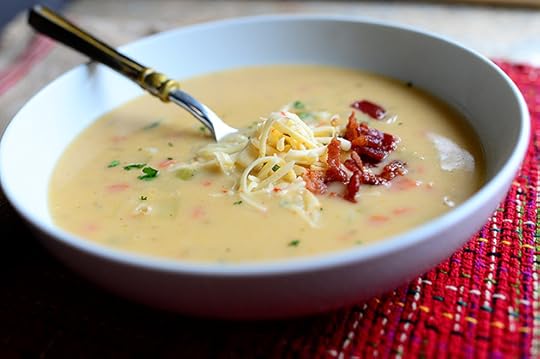 I have a lot of soups on this website o’ mine. So I hope it makes an impression on you to read that this Potato Soup is absolutely my favorite soup around. It makes my skirt fly up. Like, way over my head. I’m sorry if that disturbs you.
Best Circular Bread Item
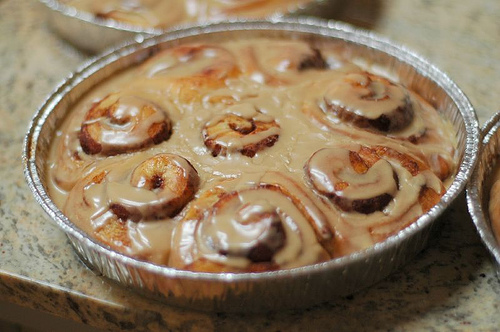 If there were such a category, these Cinnamon Rolls, which I’ve eaten since I was in my mother’s womb, would definitely take the prize. Start gearing up for the holidays! Deliver these to everyone you love.
Best Quesadilla
 I’ve more than established that I am a quesadilla lover beyond any quesadilla lover in North America. I crave them when I’m pregnant. I mean…I craved them when I WAS pregnant. I mean…never mind. Just be sure you make these Grilled Chicken & Pineapple Quesadillas sometime before you leave this earth.
Best Adult Beverage
 Mango Margaritas. They are out of this world delicious, and you really have to sip slowly or…well, things happen. You start telling people you love them whether you know them or not.
Best Sandwich
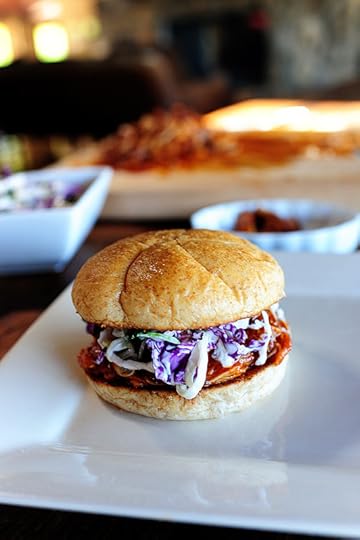 I want to marry this Barbecue Chicken Sandwich. Between the soft, slow-cooked garlic cloves, the tender chicken, and the crunchy cilantro slaw…it’s pretty much got everything in life that I look for.
Best Chocolate Dessert
 Choosing my favorite chocolate dessert is like choosing my favorite child…but I am love this Chocolate Strawberry Nutella Cake right now. What I love is how versatile it is: you can make one layer or four, depending on how outrageous you want to be. And it’s just so good.
Best Appetizer
 There’s not much I love more than Bruschetta. It’s so fresh, so herby, so divine. I want some right now! Will you make me some right now?
Best Pie
 Okay, so it’s not made with Key limes. But this Key Lime Pie is still divine. So easy…so luscious.
Best Pizza
 I never met a pizza I didn’t like. And I’ve always loved this BBQ Chicken Pizza, inspired by my old 80′s experiences at California Pizza Kitchen. The chicken is yummy, the red onions give it color and flavor, and the cilantro at the end totally makes it.
Best Use of Canned Biscuits
 Have you made this Orange Vanilla Monkey Bread yet? If not, you haven’t lived. I’m not kidding. You have not been alive! Okay, thanks.
Best Cookies
 I came very close to choosing these cookies instead, but I wound up going with these Citrus Butter Cookies just because they’re irresistible and pretty.
Best Comfort Food
 Nothing says “comfort food” to me like these Chicken and Noodles. My mom made it. My grandmother made it. I make it. Everyone loves it.
Best Noodles
 Sesame Noodles. Eat them alone or with cold steak sliced over the top. Just eat them. One bite and you’ll see what I mean.
Best Vegetable
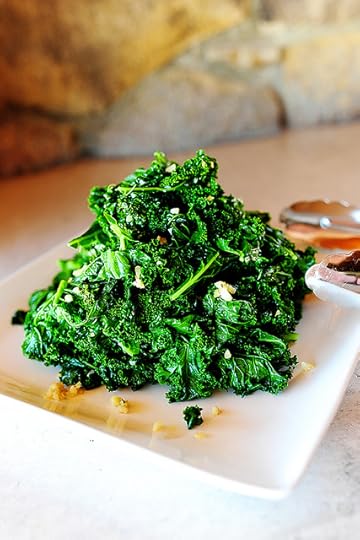 I’m on a kale kick these days and this panfried version makes my heart go pitter-pat. I love it!
Okay, that’s all the “Bests” for now!
Hope you enjoy the show this weekend, guys. It was a fun one to make.
Love,
P-Widdle Diddle

July 22, 2013
Chicken Taco Salad
 I love taco salads of any kind. I make one similar to this one, but I do drippy, rich taco meat and add a bunch of beans. I went the chicken route yesterday because I had some boneless, skinless breasts I needed to use…and the salad wound up being just what I needed to get through the last eight hours of the day.
Well, that and the new Real Housewives of New Jersey episode.
But that’s my own issue I need to deal with.
 First, cook the chicken: Sprinkle both sides of two chicken breasts with whatever seasoning mix you like. I did a mix of cumin, spicy seasoned salt, and cayenne, but any ol’ seasoning will do.
 Heat a little oil with some butter in a large skillet over medium to medium-high heat…
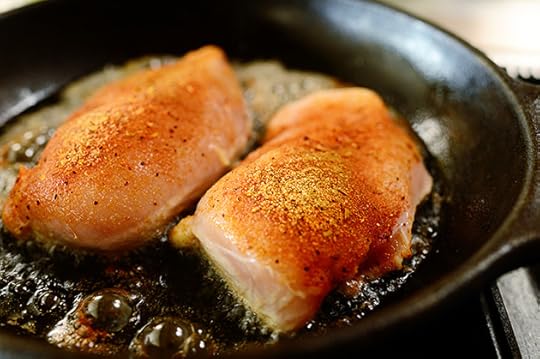 And throw in the chicken!
 Cook the chicken on both sides until the outside is super golden and yummy-looking and the inside is done.
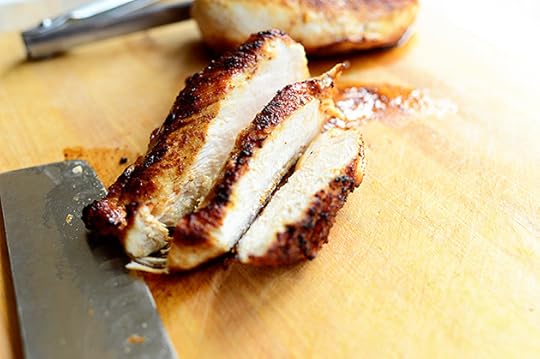 Slice them into strips…
 Then slice the strips in half…
 And dice it into cubes. Toss them all around together so all the seasoning gets all over the place and it’s nice and messy.
Messy usually equals yummy, after all.
 Next, whip up the super simple dressing to the flavors will have a chance to meet, fall in love, get married, and have many children. Pour some ranch dressing into a bowl…(I used bottled. Scandal!)
 Then add some salsa. As spicy or non-spicy as you’d like!
 Stir it around, then add a little more salad if you’d like it to be more…well, salsa-y.
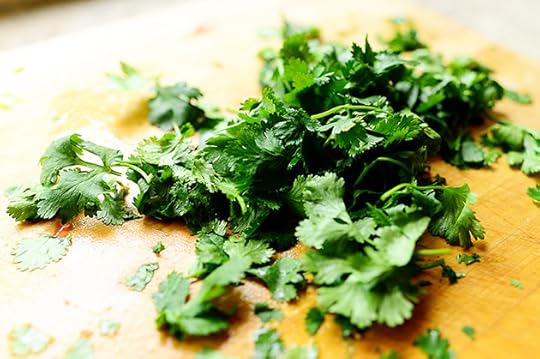
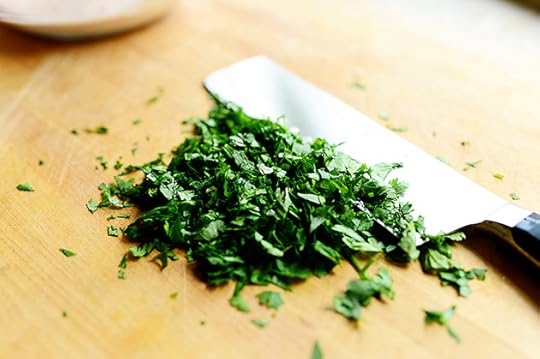 Mince up some cilantro…
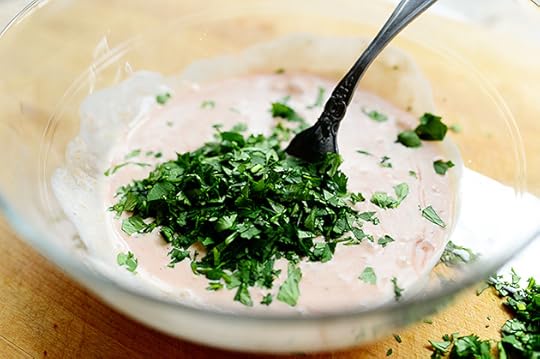 Throw it into the bowl…
 And stir it to combine. So delicious…and it took me approximately 1 1/2 minutes!
 Next, get the other salad ingredients ready: I grabbed two cobs of corn and shucked ‘em like there was no tomorrow.
 Then (speaking of scandal), to give the corn some immediate flavor, I rolled it in the skillet I used to cook the chicken. This was just to moisten it up and give it a little flavor before then throwing it on the grill pan, which I forgot to take a photo of because I’m an airhead. But basically, I grilled the corn until it got some nice color on the outside. You could also just do this right in the skillet, I imagine!
 I got impatient and took it off early because I wanted to eat, but the point is to get as much color on the corn as possible.
 Then just slice the kernels right off!
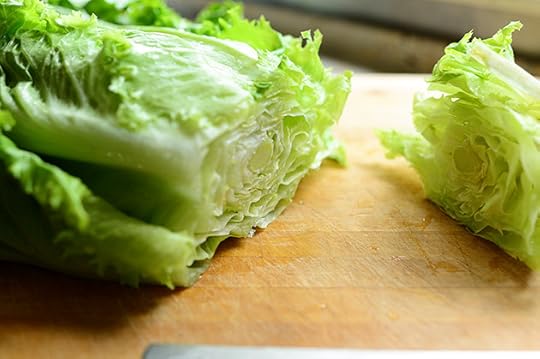 For the lettuce, I used Green Leaf because it seemed like the right thing to do at the time. Oh, and that’s all I had in my fridge.
But any ol’ lettuce will do.
 I decided to shred it because I wanted that authentic taco experience…but you can just chunk it up if you prefer.
 Keep going till it’s all nice and shredded!
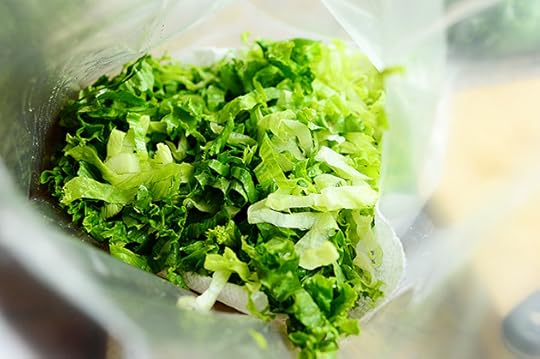 If you’re doing this ahead of time, just throw it into a plastic bag with a couple of paper towels and keep it in the fridge.
**Most of the ingredients for this salad can be prepped ahead of time and kept in the fridge!
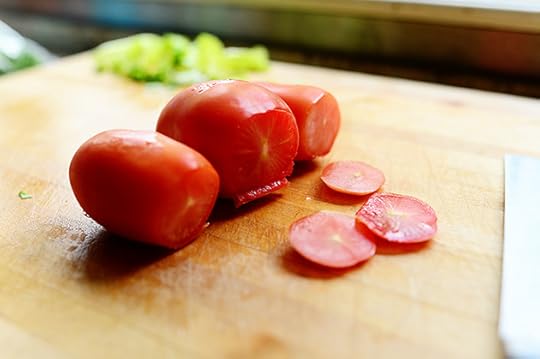 Grab some Roma tomatoes and lop off the stem end.
 Slice them all in half, then turn them cut-side down.
 Then slice each one into 4 or 5 slices…
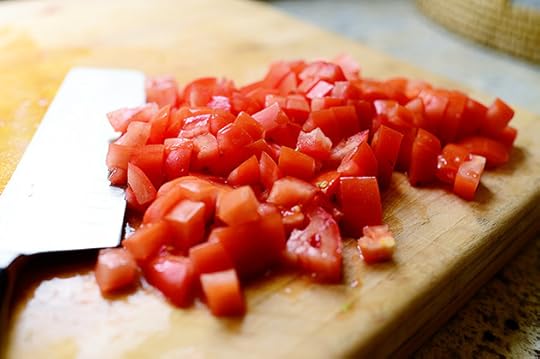
 And cut in the opposite direction to dice them.
 I do this conveyor belt method whenever I have to dice up tomatoes. I just dice one, shove it over to the right, then bring another one it its place.
 We all have our systems!
 This is another thing I do: Slide the cutting board to the edge of the countertop, then hold the bowl under the surface of the board. Then I swipe the tomatoes into the bowl instead of picking them up and transferring them.
Raise your hand if you do that, too.
 Next, grab some cilantro and give it just a rough chop. You mostly want whole leaves and not a lot of stems.
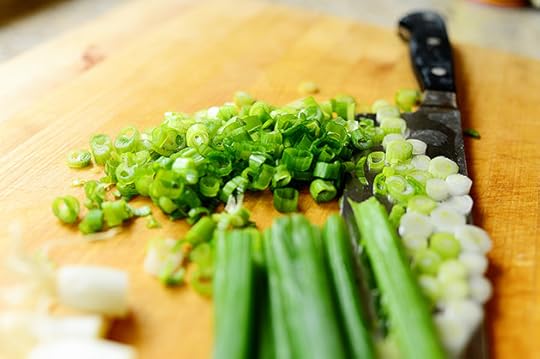 Then slice up some green onions.
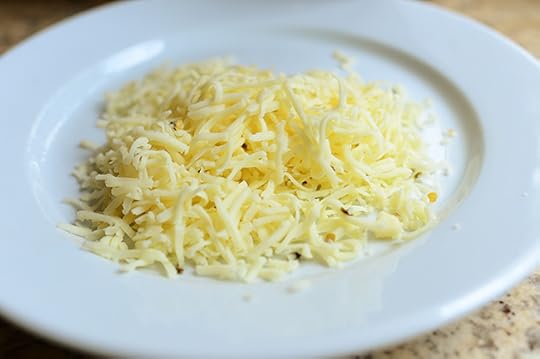 Grate up some Pepper Jack cheese. Or cheddar. Or jack. Or Cheddar Jack. Or Colby. Or whatever your sweet little soul requires.
 Next, throw some tortilla chips into a plastic bag. I used the good old fashioned yellow corn tortilla chips, but you can use white corn, blue corn…or you can totally throw convention to the wind and use some gnarly and delicious flavored tortilla chips, like Taco Doritos or something crazy like that.
 Use your fist to smash them up…
 Until they’re all broken up but still have some big chunks.
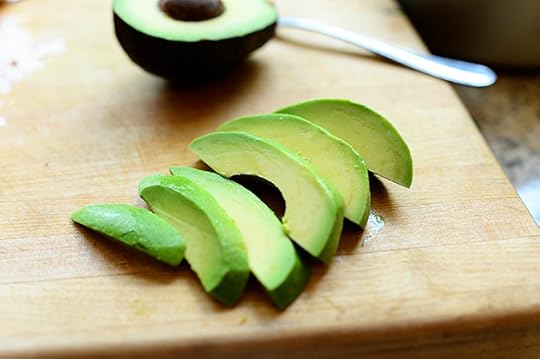 Finally, slice up an avocado…
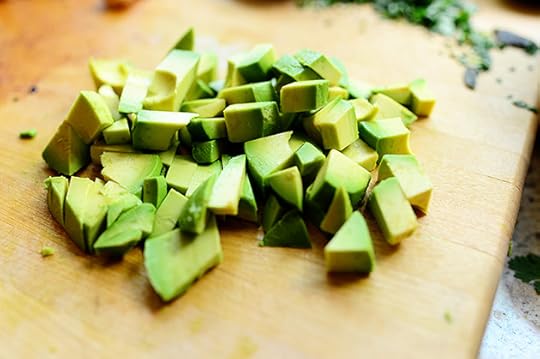 And cut it into a dice.
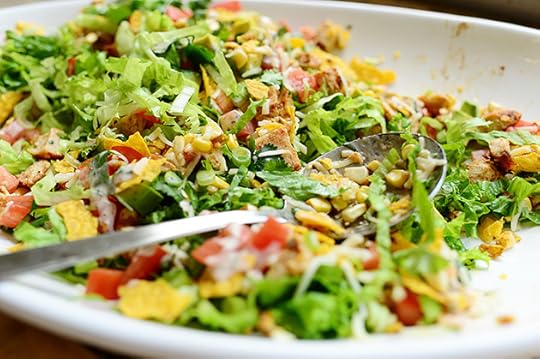
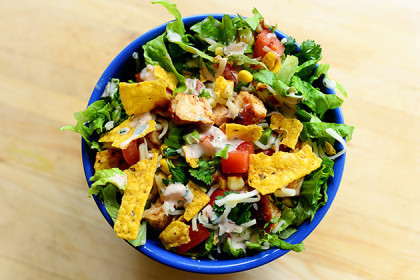
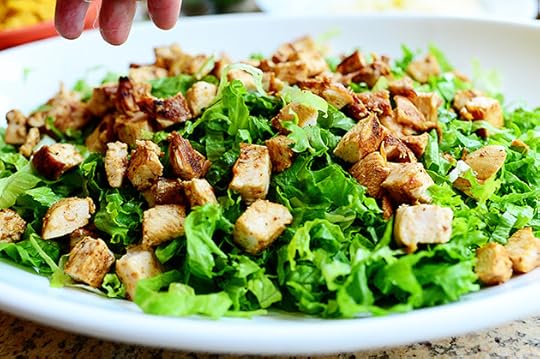 To build the big ol’ salad, heap the shredded lettuce on a platter or in a bowl and sprinkle the cubed chicken all over the top.
 And there you have it! Taco salad.
Just kidding.
 Next comes a layer of diced tomatoes…
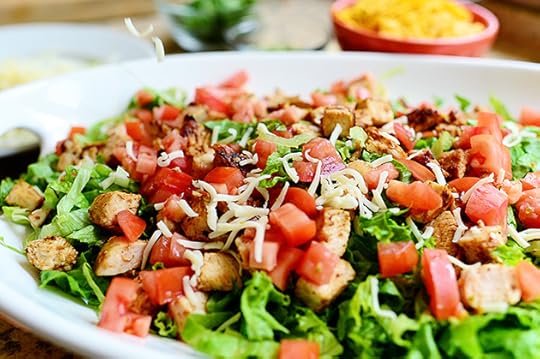 A layer of cheese…
 A layer of corn and diced avocado…
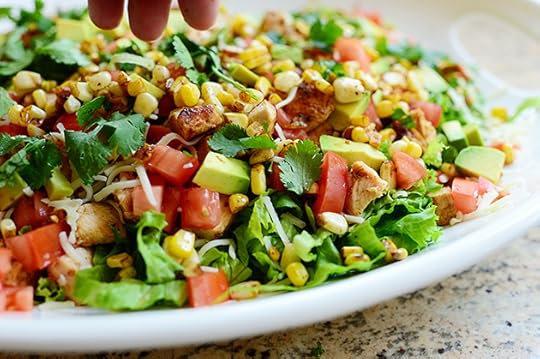 A sprinkling of cilantro…
 And a sprinkling of green onions.
 Finally, a sprinkling of crushed chips and a drizzle of dressing all over the top.
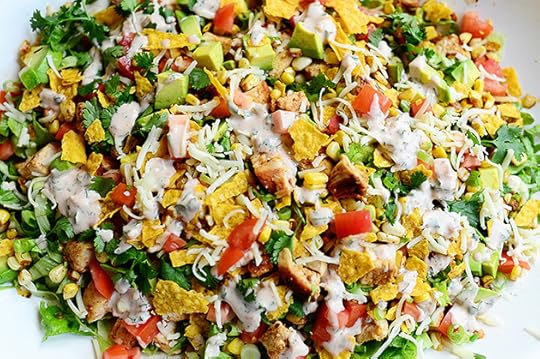 What a salad!
 This platter will feed an army of salad lovers, of which I am one.
 Serve more crushed chips on the side so everyone can pile on as much as they want.
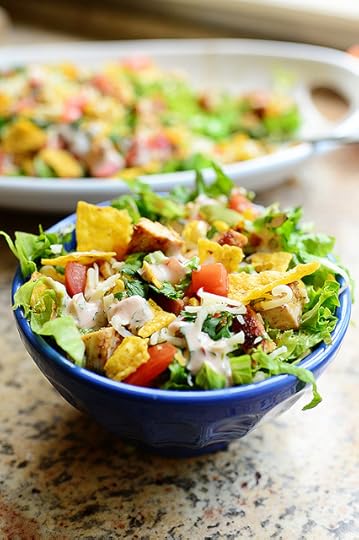 Pile it in individual bowls or on plates.
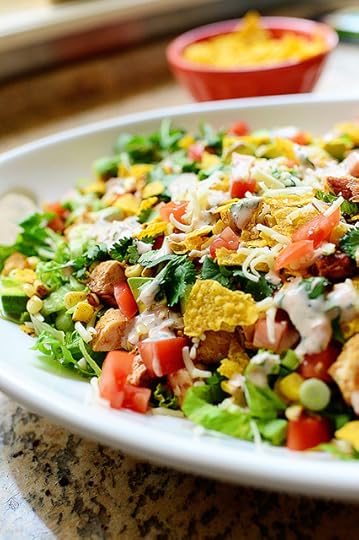
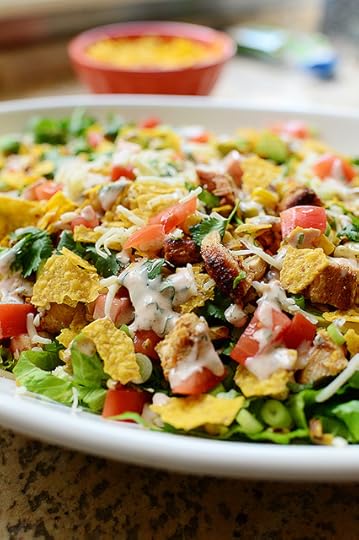
This is the entire package: Color, crunch, flavor. So much going on!
 It disappears really quickly. Especially if I’m on the premises.
Here’s the handy printable!
Recipe
Chicken Taco Salad
Prep Time: 20 Minutes
Cook Time: 15 Minutes
Difficulty: Easy
Servings: 8
Print Recipe
Ingredients
FOR THE DRESSING:3/4 cups Ranch Dressing (bottled Is Fine)1/4 cup Salsa (as Spicy As You'd Like)3 Tablespoons Finely Minced Cilantro Chicken2 whole Boneless, Skinless Chicken Breasts2 Tablespoons Seasoning (taco Seasoning, Or Your Own Mix)1/4 cup Vegetable Oil2 Tablespoons Butter SALAD:1 head Green Leaf Lettuce (1 Large Head Or Two Regular Heads), Shredded Thin3 whole Roma Tomatoes, Diced1/2 cup Grated Pepper Jack Cheese2 ears Corn, Shucked2 whole Avocados, Diced3 whole Green Onions, Sliced1/2 cup Cilantro Leaves Tortilla Chips Of Your Choice (flavored Or Not), Crushed Slightly Preparation Instructions
First, make the dressing by combining all the ingredients in a bowl and stirring together. Cover and refrigerate.
Next, make the chicken: Generously season both sides of the breasts. Heat the oil and butter in a large skillet over medium-high heat. Cook the chicken on both sides until deep golden brown on the outside and done in the middle, about 4 minutes per side. Remove and set aside to cool for 10 minutes, then cut it into cubes.
Place the ears of corn in the skillet you used to cook the chicken and roll it around so that the flavorful oil/butter mixture coats the corn. Grill it on a grill pan or cook it in a separate skillet until the corn is still crisp but has color on the outside. Slice off the kernels with a sharp knife and set aside.
To assemble the salad, pile shredded lettuce, chicken, tomatoes, cheese, corn, avocado, green onion, cilantro, and crushed chips on a big platter. Drizzle the dressing all over the top, serving part on the side if you'd like.
Serve it in individual bowls.
Posted by Ree on July 22 2013

July 19, 2013
Freezer Cooking!
 Tomorrow’s Food Network episode is one of my favorites so far, for a couple of reasons. One, it chronicles the last day of a week of freezer cooking (cooking and freezing meals and ingredients for later)…and I happen to love freezer cooking. Two, it chronicles an epic supermarket trip my boys and I took, and they really made me laugh that day. They were nutso.
There’ll be recipes and ideas on the show, but I thought I’d list some of my favorite freezer-friendly recipes for you, as well as give little freezer tips here and there. This is by no means comprehensive…I could go on all day!
MY APPROACH
First, my overall approach to freezer cooking: Generally speaking, I do a mix of one-dish meals—things like casseroles, soups, stews, and chilis—but I also like to prepare ingredients up to a certain stage and freeze them so I can grab them and start cooking some of my favorite meals. One of the things that some folks don’t love about freezer cooking is that there are sooooo many casseroles, which can get to be a little old after awhile…but if I have a bunch of individual ingredients prepped and ready to go, not everything has to wind up being in casserole form. (I’ll give you some examples in a minute.)
Also note: When you have a freezer full of food, you can then fill your fridge with salad greens, spinach, and other veggies so you can make a big, healthy salad on the side. Perfect!
MY CONTAINERS
When I do freezer cooking, I almost never freeze things in nice baking dishes or Pyrex pans—primarily because I don’t want to tie them up for such a long time.
 I’m an ardent fan of foil baking pans of various sizes: You can buy them in bulk at warehouse clubs, and in most cases you can wash and reuse them a time or two…or, if you’re not in the mood to wash anything, you can just toss them once the food is gone.
 Plastic freezer bags of various sizes are another favorite freezer vessel of mine, and my general approach is filling the bag, then totally flattening it as I seal it. So whether it’s taco meat or soup, they freeze flat and allows me to stack them as high as they’ll go. This is much better than filling ‘em in an upright position, which makes ‘em more bulky.
 I also love these food storage containers for stews, soups, sauces, etc. They are totally handy and can easily be reused.
More rarely, I’ll whip out my trusty vacuum sealer…but sometimes it can be a pain. I usually just use it when want to cut up a large piece of meat into smaller steaks or freeze pieces of raw chicken. Usually, Ziplocs are good enough for me.
LABELING
 Labeling is very important from two angles: First, it’s always a good idea to know how many centuries ago something was cooked. Second, in the case of foil-covered pans or storage containers, you generally can’t see clearly what’s inside. Labeling keeps you from having to “break the seal” and peel the foil back or open a container. A Sharpie is my favorite tool, as it writes as clearly on foil as it does on plastic.
One helpful thing you can do is to write, along with what the dish is and the date, baking/warming instructions on each package, i.e. “375/40 minutes.” Of course, you’ll need to add the thawing time to that (or adjust the baking time accordingly.)
FREEZER-FRIENDLY INGREDIENTS
While I have a zillion one-dish recipes (casseroles, etc.) that I love to cook and freeze, one of my favorite freezer cooking tricks is making ready-to-go ingredients in bulk. Here are some things I do…and why:
 Grilled chicken breasts. I love grilling up a whole bunch of marinated chicken breasts, then freezing them whole in packages of 2 or 4. (I don’t want to put a whole bunch in one large bag because then I’d have to open and close it, which would affect the quality over time.) If you have frozen grilled chicken breasts, you can thaw them out and:
* Slice them and put them on top of a Caesar Salad
* Dice them and put them on top of a Cobb Salad or Chef’s Salad
* Chop them, quickly saute in a little oil and taco seasoning, and put them on tacos or inside quesadillas.
* Dice them and stir them into Tortilla Soup.
* Leave them whole and put them inside panini.
* Shred them and put them in chilis, soups, or pastas.
 Or cut ‘em in half, melt cheese on top, throw on some bacon, and make these sliders!
That’s a whole lot of dinner options right there, and you don’t have to worry about stocking your fridge with raw chicken all the time; it’s cooked up, all ready to go! You just have to remember to remove it from the freeze and thaw it out.
 Browned Hamburger. Oh, the possibilities. I freeze it in smaller bags and larger bags so I’ll have the right quantity for what I need. Here are the worlds that are opened up:
 Tacos. Throw it into a skillet with tomato sauce and taco seasoning and heat it up real quick, and you can have regular tacos, taco salads, nachos, even…
 Taco Pizza with shredded lettuce and diced tomatoes on top! (The recipe I linked to doesn’t have meat on it, but you’d just put it on top of the cheese layer.)
* Make a quick Spaghetti Sauce! (see below.)
* Make chili and sloppy joes (see below!)
 Uncooked hamburger patties. Flash freeze them on a sheet pan for 30 minute so, then freeze in zipper bags 2, 4, or 6 at a time. I love just forming a slew of patties all at once, then not having to worry about it.
 All the better to make Patty Melts with, my dear!
BREADS AND BREAKFASTS
Pie Crust. Formed into disks and stored in ziplocs. To use, just remove, let thaw for 30 minutes or so, then roll out.
Pizza Dough. Unrisen, stored in ziplocs.
 Muffins of all varieties! I love these muffins from my mom
 Sweet rolls of all shapes and sizes. These Blueberry Lemon Sweet Rolls are divine, and you can freeze them, unrisen and unabaked…then thaw and bake them later. Or you can freeze them all ready to go and warm them when you’re ready.
 Baked French Toast. I make full batches, and freeze them in smaller foil containers (either round or square) before the baking stage. Then I just pop ‘em in the oven straight from the freezer. Yummy breakfast!
* You can also do a savory version using crumbled sausage, onion, cheese, etc.
 Cooked, crumbled breakfast sausage for things like these breakfast burritos.
SOUPS, STEWS, AND SAUCES
(Freeze these flattened in Ziploc bags, or in storage containers. Then just thaw them out and heat them up!)
 Spaghetti Sauce. Fabulous!
 Sunday Night Stew. I swear, it gets better the longer it freezes.
 Sloppy Joes. Crowd-pleasing!
 Thick, hearty Chili, of course! Serve it on its own piled high with onions, cheese, and cilantro…or make Frito pies, pile it on baked potatoes…or on nachos.
Yum.
CASSEROLES
Either thaw them completely before baking, or bake, covered in foil, at a lower temperature for 30-45 minutes before increasing to the regular temperature for the normal cooking time.
 Lasagna, of course.
 Chicken Spaghetti…naturally.
 Chicken Pot Pie. (I make this on the show tomorrow.) I love using these round foil cake pans for pot pie. The perfect size!
 Sour Cream Noodle Bake. Luscious and ooey gooey.
 Turkey Tetrazzini. Feeds a crowd.
OTHER STUFF
 Then there’s other stuff, like Hot Ham & Roast Beef Sandwiches. Make a ton, then just toss ‘em in the oven as you need ‘em.
 And Calzones! Flash freeze them after you assemble them but before baking them. Then just bake them straight from the freezer when you need them and serve with marinara sauce.
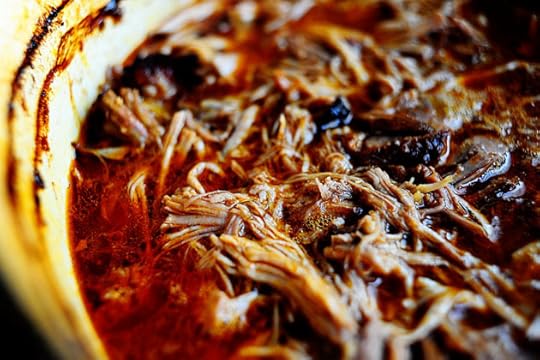 Spicy Dr Pepper Pulled Pork makes a ton and can be frozen in smaller batches to serve as is, or as a topping for tacos, nachos, etc…
 Or for sandwiches like this.
I’ll stop there—I don’t want to overload you! Hope this gives you some great ideas for the fall when school starts. And remember to serve big salads with all this stuff: load it with raw veggies so you have a nice balance.
Hope you love the show tomorrow, guys. I’ll post more freezer ideas in the coming weeks!
Love,
P-Widdle-Diddle

July 15, 2013
Jalapeño Quesadillas
 Warning: This is a ridonkulously simple recipe. If you’re looking for complicated cooking today…you’ve come to the wrong place, baby!
I’ve more than established how very much I love quesadillas. There are approximately nine quadrillion quesadillas on this website o’ mine, and I can’t promise that by the time I close shop here—at 11:43 am on my 97th birthday—the total won’t be up to fifteen octillion.
That’s how much I love quesadillas.
This is a very, very simple version and capitalizes on the natural deliciousness of fresh jalapeño…but without that pesky burn-your-lips-and-tongue-and-make-your-brow-pour-sweat factor.
This is a super simple appetizer to whip up if someone awesome and cool stops by your house unexpectedly.
(Or, better yet, someone nerdy and quirky. That’s my favorite kind!)
 First, slightly brown the tortillas in a skillet with a little butter.
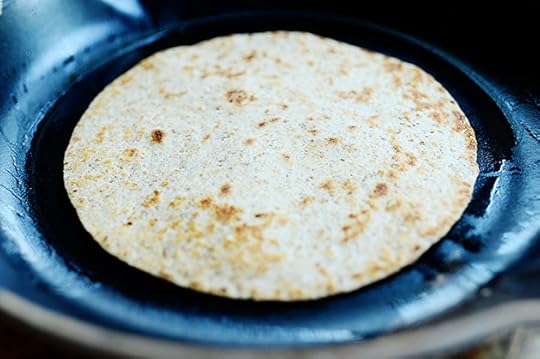 I like to do this when I make quesadillas just to get the tortillas “started” and because I’m weird. Don’t crisp or brown them too much—it’s just about getting them warmed up a bit.
 Remove the tortillas to a plate and set ‘em aside for a minute.
 Lop off the tops and bottoms of some jalapeños, then slice them as thinly as you can. You don’t even have to remove the seeds or membranes!
 Melt a little butter in a separate skillet over medium heat…
 And throw in the jalapeños!
 Stir them around and cook them for a good 8-10 minutes, or until they’re nice and brown (and as you can see, most of the seeds and membranes fall out naturally). Crank up the heat if they need to get more color. Set ‘em aside when they’re done.
 Grate up some Monterey Jack cheese…
 And lay it on one of the tortillas in the skillet over medium heat.
That was the most clunky, awkward sentence of my life.
 Lay a bunch of the cooked jalapeños all over the cheese…
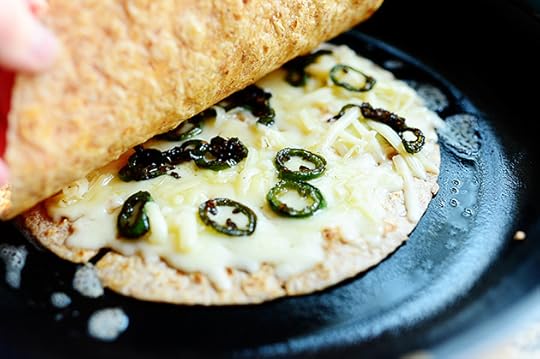 Then put another tortilla on top…
 And flip it over to the other side.
 Cook it until the cheese is all melted and warm, then remove it from a cutting board and cut the quesadilla into sixths.
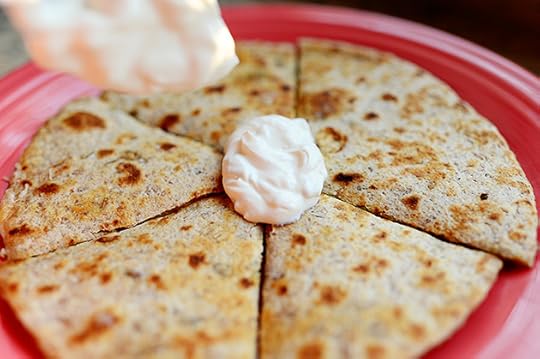 Set it on a plate and plop a dollop of sour cream right in the middle…
 And add a few cilantro leaves.
 Then chow down!
 These are so yummy, so flavorful, slightly spicy, absolutely delicious!
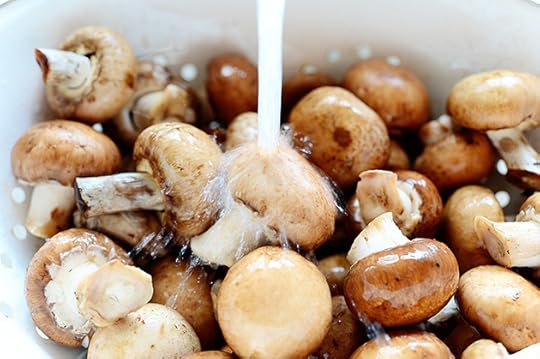 And here’s a variation: Rinse a bunch of mushrooms…
 And slice them up.
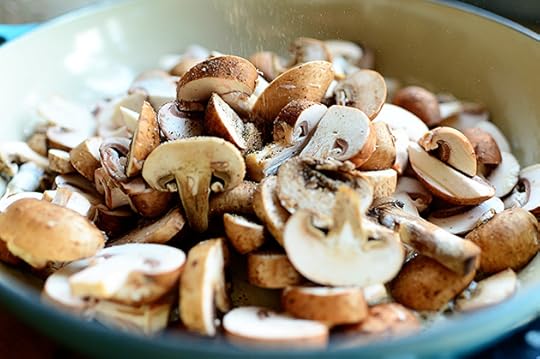 Heat a little butter in a pan, throw in the mushrooms, and sprinkle them with salt and pepper.
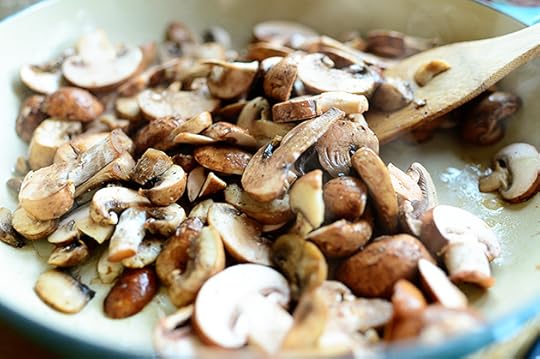 Then stir them around…
 And cook them over a 10-15 minute period, until they’re nice and cooked and deep golden brown.
I want to marry sauteed mushrooms. That’s all there is to it.
 Build the quesadilla with cheese, mushrooms, and a bunch of jalapeños (not shown because I’m an airhead.)
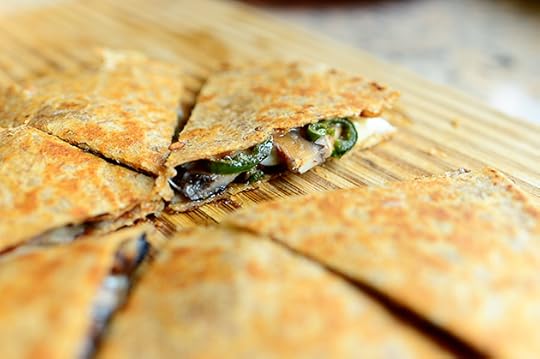 Then cook it, slice it, and serve it up!
 Totally luscious deliciousness. And so ding dang easy.
Here’s the handy dandy printable.
Recipe
Jalapeño Quesadillas
Prep Time: 5 Minutes
Cook Time: 10 Minutes
Difficulty: Easy
Servings: 4

Print Recipe
Ingredients
6 Tablespoons Butter4 whole Whole Wheat (or Regular) Tortillas1-1/2 cup Monterey Jack Cheese, Grated3 whole Jalapenos, Sliced Very Thin8 ounces, weight Mushrooms, Sliced (optional) Sour Cream For Serving Cilantro Leaves For Serving Preparation Instructions
Lightly brown both sides of the tortillas in butter, in a skillet over medium heat. Remove to a plate.
Add butter to a separate skillet over medium heat, then add the sliced jalapenos. Stir and cook them for 8-10 minutes, or until deep golden brown. Remove from heat and set aside.
Add one tortilla back to the skillet you browned it in, and top with half the cheese. Top with half the jalapeños, then another tortilla. Cook on both sides, until tortillas are golden and the cheese is melted.
Cut into six wedges, then serve with sour cream and cilantro.
Optional: Cook the mushrooms in butter over medium heat until deep golden brown, about 10-15 minutes. Build quesadillas with cheese, mushrooms, and cooked jalapenos. Divine!
Posted by Ree on July 15 2013

July 12, 2013
Recipes from Tomorrow’s Show!
Tomorrow’s Food Network show is a wild and crazy one! I take a handful of my favorite quick recipes and put them up against the clock, trying to finish each one in ever-decreasing amounts of time. So the first recipe takes 30 minutes, the second recipe takes 20 minutes, the third recipe takes 10 minutes…and I even throw in a 5-minute one at the end. I’m just a wild and crazy gal!
In my mind.
I won’t tell you which recipes fit into which time slots. See if you can guess!
It’s a fun show because it’s a little challenge I give myself, and I like to give myself challenges. It’s fun. Like that thing where you say, “If I get this piece of paper into the trash can from here, I’m the coolest person in the world! If I don’t…I’m a total loser.”
You do that too, right?
Here are the recipes from the show tomorrow. Printable recipes below!
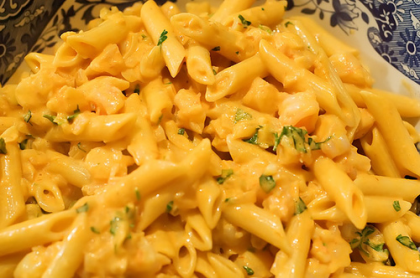
 Penne a la Betsy! One of the most loved recipes on my website and/or cookbooks, this pasta dish (which my sister Betsy has always made for me) is so delicious, you won’t believe how fast it is. You’ll love, love, love it!
 Buffalo Chicken Salad. I posted this last fall, and it’s become one of my favorite salads. Such a cinch, and soooooo flavorful. It’s like eating a platter of wings, but in salad form.
 Mini Meatball Sandwiches. Easy homemade meat-a-balls in sauce become adorably awesome sliders.
 And these Green Chile Enchiladas. Ohhhh, boy. So ridiculously simple—so ridiculously good!
Hope you love the show, guys. Lots and lots of frenzied cooking!
Well…frenzied being a relative term.
Here are the printables!
Recipe
Penne a la Betsy
Prep Time: 25 Minutes
Cook Time: 25 Minutes
Difficulty: Easy
Servings: 6
Print Recipe
Ingredients
3/4 pounds Penne Pasta1 pound Shrimp3 Tablespoons Butter3 Tablespoons Olive Oil1 whole Onion (small)2 cloves Garlic1/2 cup White Wine, Or To Taste1 can Tomato Sauce (8 Oz)1 cup Heavy Cream Fresh Parsley, to taste Fresh Basil - To Taste Salt To Taste Pepper To Taste Preparation Instructions
Cook the penne pasta until tender-firm, also known as al dente.
Peel, devein and rinse (under cool water) 1 pound of extra large shrimp. Heat about 1 tbsp. butter and olive oil in a skillet. Add the shrimp and cook for a couple minutes until just opaque. Do not overcook them. Remove from heat and let cool for a few minutes. Now, put the cooked shrimp on the cutting board and pull off the tails. Chop the shrimp into bite –sized pieces and set aside.
Finely dice one small onion. Mince two cloves of garlic.
In a large skillet heat 2 tablespoons of butter and 2 tablespoons olive oil. Add the garlic and onion and sauté, stirring occasionally. After the garlic and onions have cooked a bit add your white wine. Let the wine evaporate for a few minutes, stirring occasionally. If you would rather not use wine, you can use low-sodium chicken broth instead (about ½ cup).
Now add an 8-ounce can of plain tomato sauce. Stir well until combined. Then add 1 cup of heavy cream. Continue stirring. Turn heat down to low and let simmer.
Now chop your herbs, about a tablespoon of chopped parsley and about the same amount of chopped basil, or if you’re feeling very proper, chiffonaded.
Now add your chopped shrimp back into the tomato cream sauce. Give it a stir and add salt and pepper to taste. Throw in your herbs and stir until combined. Finally add your cooked penne pasta and give it a good stir.
Posted by Ree on July 12 2013
Recipe
Buffalo Chicken Salad
Prep Time: 10 Minutes
Cook Time: 10 Minutes
Difficulty: Easy
Servings: 2
Print Recipe
Ingredients
1 whole Boneless Skinless Chicken Breast Salt And Pepper, to taste2 Tablespoons Olive Oil2 Tablespoons Butter1/2 cup Louisiana Hot Sauce (Frank's, Etc.) Salad Greens: Iceberg, Romaine, Mixed Greens1/2 cup Blue Cheese Dressing Extra Blue Cheese Crumbles Celery Hearts, Leaves Intact Preparation Instructions
With a sharp knife, carefully slice the chicken breast in half from top to bottom---meaning you'll have two similarly-sized chicken breasts that are much thinner. Heat olive oil and butter in a small skillet over medium-high heat. Salt and pepper both sides of the chicken breast pieces and pan fry them on both sides until they're done. Get as much golden brown color on the chicken as you can. When it's done, remove the chicken from the skillet and pour off any excess fat/oil (but don't clean the pan.)
Return the chicken to the skillet and pour over the hot sauce. Turn the chicken to coat it on both sides and let it sit in the sauce while you prepare the other ingredients. (Heat should not be on under the skillet.)
Toss the lettuce in a large bowl with just enough salad dressing to lightly coat it (thin the dressing with a little milk if it's too gloopy.) Heap tossed salad into two individual bowls. Sprinkle blue cheese crumbles over the top. Slice the chicken into thin slices (on the bias) and arrange them over the top of each salad. (Dip the slices back into the sauce if necessary to really coat them.)
Top the whole thing with more blue cheese crumbles and serve with celery hearts.
Posted by Ree on July 12 2013
Recipe
Mini Meatball Sandwiches
Prep Time: 16 Minutes
Cook Time: 20 Minutes
Difficulty: Easy
Servings: 6
Print Recipe
Ingredients
1 pound Ground Chuck Or Ground Beef1/2 cup Panko Or Other Bread Crumbs1 clove Garlic, Minced1/2 teaspoon Salt Freshly Ground Black Pepper1/2 cup Milk2 Tablespoons Olive Oil1/2 whole Medium Onion, Diced1 jar (large) Marinara Sauce12 whole Dinner Rolls (or Slider Rolls)4 slices Provolone Cheese, Cut Into Four Wedges Each Preparation Instructions
Mix meat with bread crumbs, garlic, salt, pepper, and milk. Knead together with hands. Roll into heaping tablespoon-sized rolls.
Heat olive oil in a large skillet over medium heat. Add onions and cook for one minute. Add meatballs between the onions and brown for one minute. (You might have to do this in two batches, depending on the size of your skillet.)
Pour in jar of marinara; shake pan gently to mix. Put on lid and allow to simmer for 20 minutes.
When ready to serve, cut each dinner roll in half. Place a wedge of Provolone on the top and bottom of each roll. Spoon a meatball with the sauce onto the bottom bun; top with the top bun.
Serve immediately!
Posted by Ree on July 12 2013
Recipe
Easy Green Chile Enchiladas
Prep Time: 5 Minutes
Cook Time: 10 Minutes
Difficulty: Easy
Servings: 4
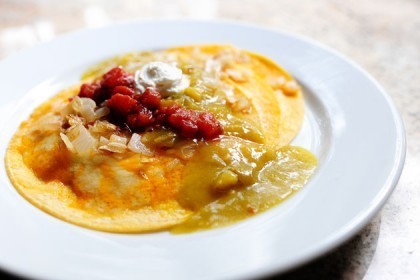
Print Recipe
Ingredients
1 whole Onion, Diced2 Tablespoons Butter1 can (15 Ounce) Green Enchilada Sauce2 cans (4 Ounce) Chopped Green Chilies12 whole Corn Tortillas2 cups Freshly Grated Cheddar (or Cheddar-jack) Cheese (or Any Cheese You'd Like) Sour Cream Salsa Pico De Gallo (optional) Guacamole (optional) Cilantro Leaves, Optional Preparation Instructions
In a small skillet, saute onions with the butter over medium-low heat until the onions are nice and golden brown.
In a small saucepan, combine green enchilada sauce with green chilies and heat until very warm.
In the oven (on a baking sheet) or microwave, melt cheese all over the top of each tortilla so that it covers most of the surface area.
To serve, stack three cheesy tortillas on top of one another. Spoon green sauce over the top and add salsa, sour cream, pico de gallo, and cilantro as needed.
Delish and so, so easy!
(Save extra sauce for use on nachos, quesadillas, chicken, etc.)
Posted by Ree on July 12 2013

July 10, 2013
Le Creuset Giveaway! (Winners!)
The winners of the Le Creuset braisers are:
#143 Wendy: “Tacos for dinner two nights ago. We bought a grill recently after 2 years of not having one and my husband has been cooking on the grill the last 2 nights. He loves to cook and yes it was delicious!”
#7247 Alicia A: “Steak and potato last night for dinner!”
#42056 Debbie F: “Tuna pasta salad and fruit. Great summer food.”
Congrats to the winners! Contact prizes@thepioneerwoman.com to claim your pots, and please specify the color you’d like when you email. Enjoy!
 Today, because I love ya, I’m giving away three of these awesome 3 1/2 Quart Le Creuset brasiers. I have a couple of these puppies and I pretty much love everything about them. They’re shorter than Le Creuset’s traditional French ovens, and they’re perfect for stews, roasts, and anything you want to cook that doesn’t need all the space of the dutch ovens. And they’re awesome for serving at parties because you can mound the food up and everything looks really yummy and abundant.
I’m in love.
Well, as in love as one can be with a pot.
The winner can choose between the orange/red “Flame” color above…
 And this gorgeous turquoise color known as “Carribbean…”
 Or this bright yellow “Dijon” color.
I love these pots. Gorgeous!
TO ENTER
To enter this giveaway, just answer the following question in the Comments section of this post:
“What was the most recent thing you cooked/baked?”
Was it pizza for dinner last night? Coffee cake for breakfast this morning? Pasta for lunch last week? Ramen noodles your freshman year in college? Just shout out the last thing you whipped up in the kitchen and you’re automatically entered to win one of the Lay Crewsay (I mean Le Creuset) brasiers!
THE RULES
One entry per person, please.
Winners will be announced Thursday.
Good luck!
Giveaway, like, totally sponsored by Pioneer Woman.

Ree Drummond's Blog

- Ree Drummond's profile
- 2036 followers

