
Ree Drummond's Blog, page 36
November 13, 2013
Turkey Essentials!
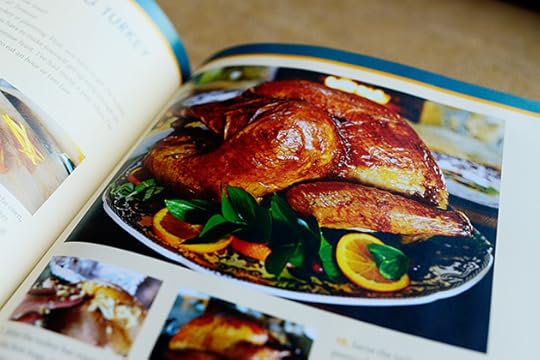
 Thanksgiving is just around the corner! As such, I’m giving away three (3) packages of what I consider to be the essential tools you need to roast a turkey. If you’re planning on making the bird this year…you’ll be all set!
Here’s what’s in each prize package:
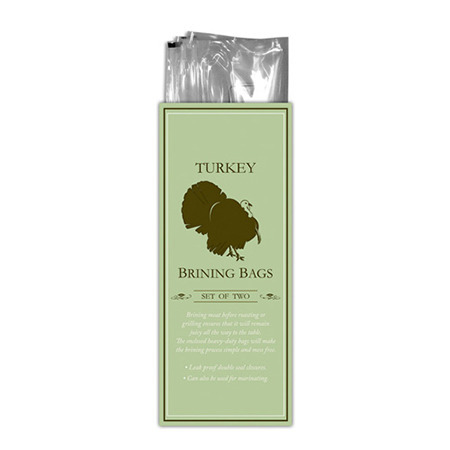 A package of heavy duty Brining Bags.
(Pssst. Here’s my favorite Brine Recipe. It’s delish, man.)
 An All-Clad Stainless Steel Roaster Set. You can’t hurt these things. You’ll still be roasting your turkey in this sucker in the year 2097.
Comes with a rack and two turkey lifters.
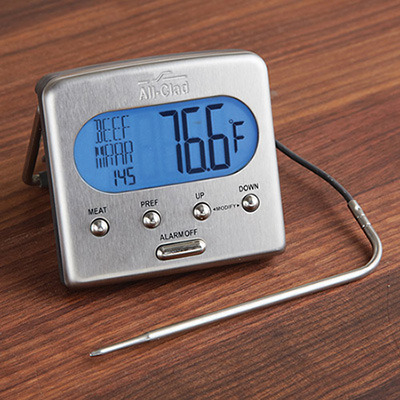 An awesome digital meat thermometer! I actually use the old fashioned kind, but I have used these digital ones and think they’re really nifty.
You’ve gotta have a good thermometer when you roast turkey. It’s, like, required.
 A good ol’ stainless steel baster. My favorite kind.
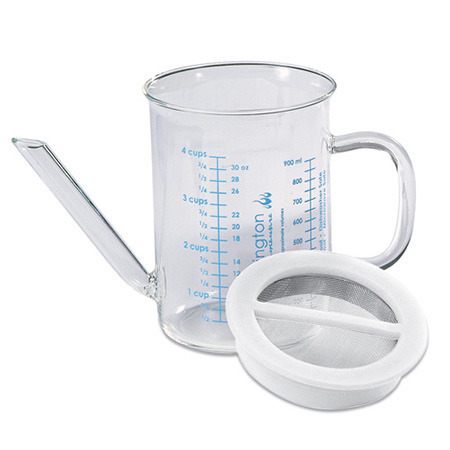 A handy fat separator for gravy, baby.
 A flat whisk! I couldn’t make turkey gravy without it.
Well, I could, I suppose. With a normal, boring whisk.
But it wouldn’t be any fun.
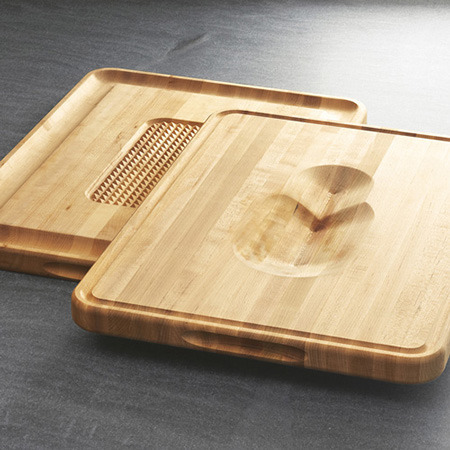 This cool reversible cutting board. I don’t have one of these. But I think it would be helpful! Securely holds the bird and catches the drippings at the same time.
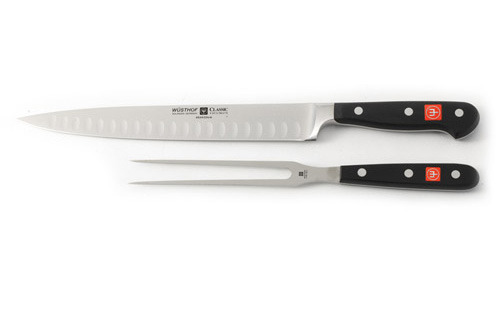 A Wusthof carving set. Have it. Use it. Love it.
 A signed copy of my new holiday cookbook…
 Because there are lots of turkey instructions inside!
I think that’s about all you need to make the best turkey in the world!
Oh. Except the turkey itself. But I’ll let you take care of that one.
TO ENTER
To enter the turkey essentials giveaway, just answer the following question in the Comments section of this post:
“What are your Thanksgiving plans this year?”
Are you hosting the whole shebang at your house? Are you going over the river and through the woods to grandmother’s house? Are you making frozen pizza and watching football? Or are you going down the street to your Uncle Peter’s house? Just shout out your Thanksgiving plans and you’re automatically entered to win this big, bad turkey package! (If you’re not cooking this year, save it for next year! You’ll be glad you have all this loot.)
THE RULES
One entry per person, pretty please.
Winners will be announced Friday!
Good luck!
Giveaway sponsored by Pioneer Woman. Also known as P-Dub.


November 11, 2013
Roasted Spaghetti Squash with Kale
 I love spaghetti squash. It’s such a wonderfully bizarre vegetable. And there’s no end to the ways you can prepare it. You can treat it as the vegetable that it is, or you can treat it as a substitute for noodles; my friend Hyacinth tops it with marinara sauce for her kids just as she would regular spaghetti.
I posted a recipe for spaghetti squash a few years ago; it has a little bit of a sweetness from maple syrup and it’s out-of-this-world delicious:
Spaghetti Squash with Maple Syrup and Shallots
But Saturday, I roasted up a squash and added some delicious kale. It was heaven—the perfect thing to eat before the luscious, rich Thanksgiving food starts rearing its tasty head here in about 2 weeks or so. (And by the way: I can’t wait for that to happen.)
Here’s how to make it!
 Grab a spaghetti squash.
 This is a bigg’un, but you can get any size you want.
 Now, you need to cut the spaghetti squash in half. This isn’t the easiest thing in the world, as the skin can be a little on the tough and obstinate side, if the skin of a squash can be described as obstinate, which I evidently just decided it could. So be careful, man! I insert the knife sorta kinda into the center and carefully push it through the skin.
 Slice downward to cut through the squash, using your other hand to support the squash. Just keep that there hand out of the way of the knife!
 Repeat it in the other direction, and don’t be afraid to just do a Samurai chop toward the end to get the darn thing to break in half.
 With a spoon, scrape out the seeds and pulp in the center…
 And throw it onto a plate. You don’t need this anymore.
 Place the squash halves, cut side up, on a large baking sheet. Drizzle them with a little olive oil…
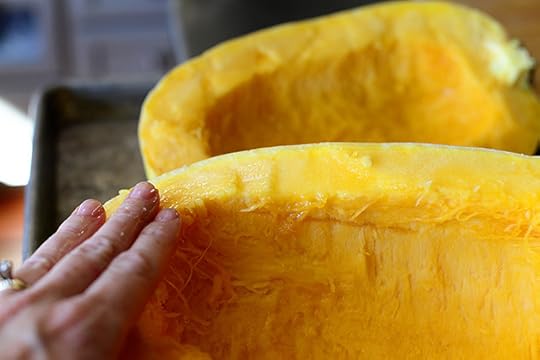 And rub it all over the surface with your grubby (I mean spic and span clean) fangers. Then throw the pan into the oven and let the squash roast for a good hour.
And note: If you give up and decide cutting through the squash isn’t in the cards for you, just put it into the oven and roast it whole as I did in the recipe linked above. You can cut it in half and remove the seeds after it has cooked, just note that the squash won’t have any of that nice roasted color.
Update: If you are roasting the squash whole, poke a sharp knife in the surface a few times to decrease the likelihood that it will break apart. (It won’t always break apart, but just in case…)
 While the squash is cooking, prepare the kale!
 Strip the leaves off the stalks…
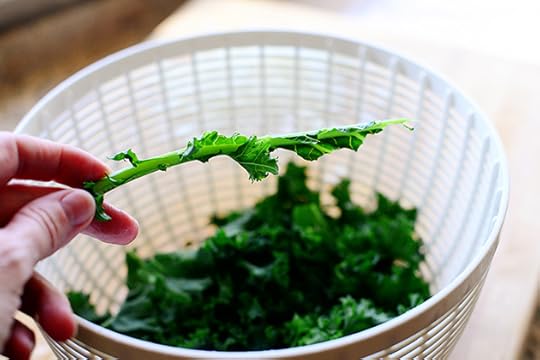 Until the stalks are totally naked.
Huh huh. I said ‘naked.’
 Rinse the kale really well with cold water—or, if you have time, soak it in a bowl of cold water to make sure all the grit is out.
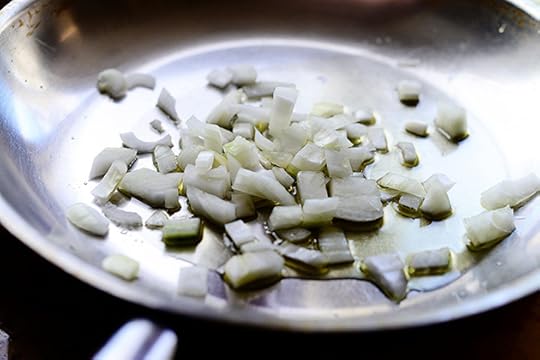 Now, heat a little olive oil in a large skillet over medium to medium-high heat and throw in some diced onion.
 Stir it around and cook it for a few minutes, until they’re starting to turn color.
 Then throw in the kale.
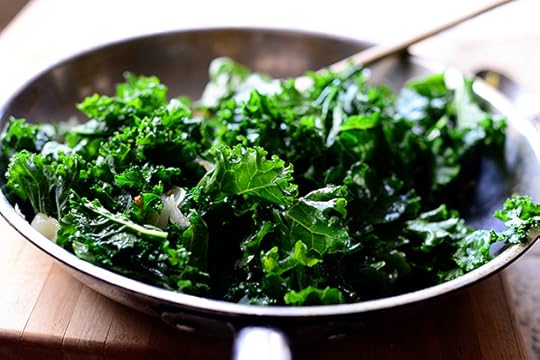 Add salt and pepper, then stir the kale around and cook it for a few minutes.
 You want the kale to be partially wilted. Somewhat soft, but still with a little bit of texture.
Now, just set this aside!
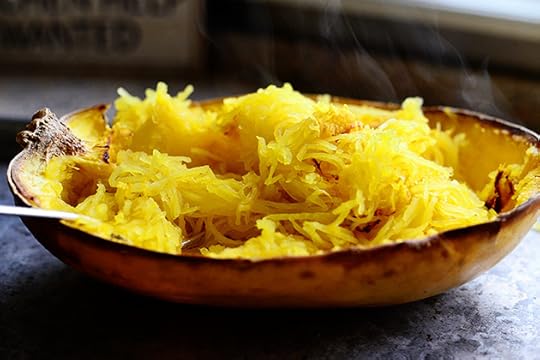
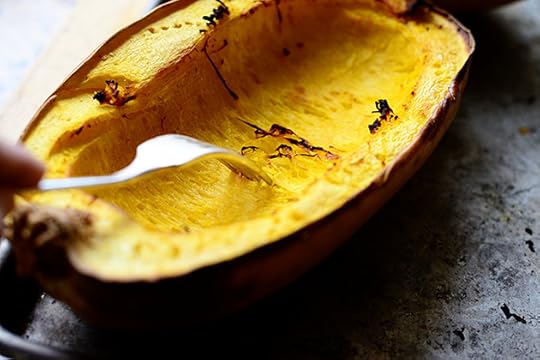 After an hour or so, poke the squash a couple of times and make sure it’s nice and soft. If the fork doesn’t go in easily, just pop it back in the oven for another 10-15 minutes.
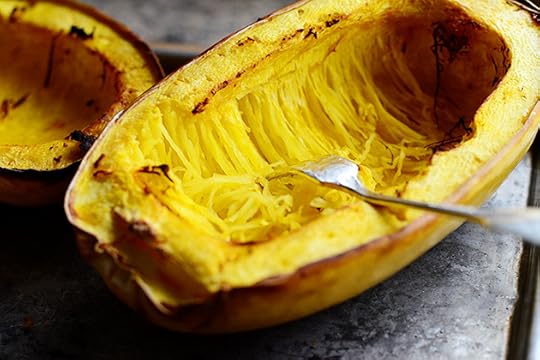 When it’s ready, use the fork to scrape the squash to loosen it from the shell. You’ll immediately see the grain; just keep scraping in that direction.
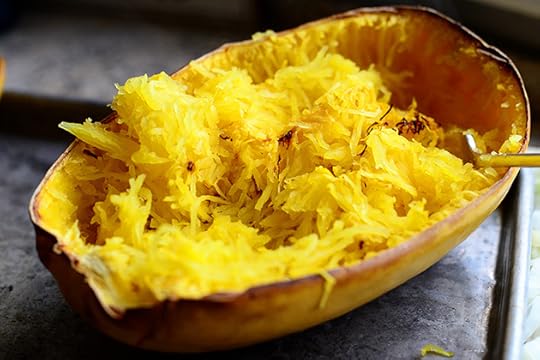 Keep going until it’s all scraped out…
 Then repeat with the other half of the squash.
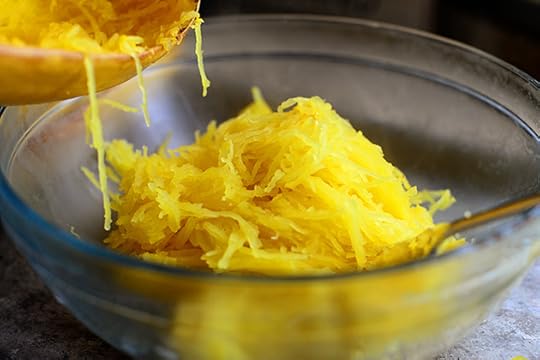 Throw it all into a big bowl…
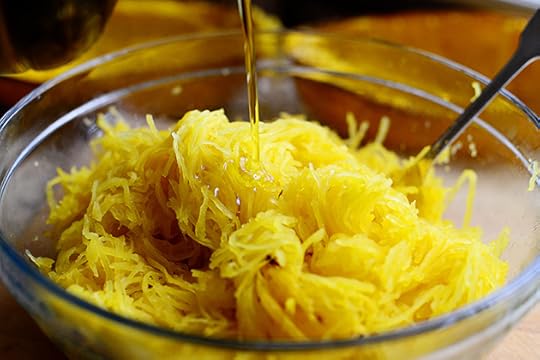 Then drizzle in a little olive oil, vinegar (you can add them separately or whisk them together before you drizzle them in.)
And you can definitely leave out the vinegar. It adds a nice little bite, but it’s still good without it!
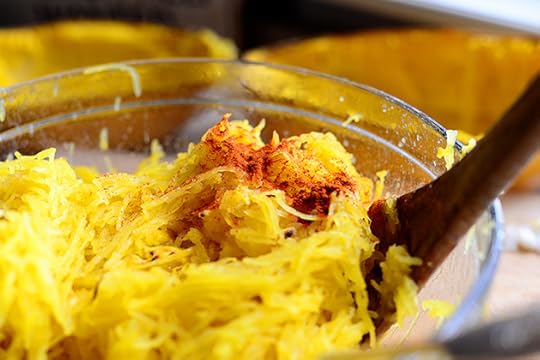 Sprinkle in salt and pepper, along with a little chili powder to keep you on your toes, and toss it gently to combine.
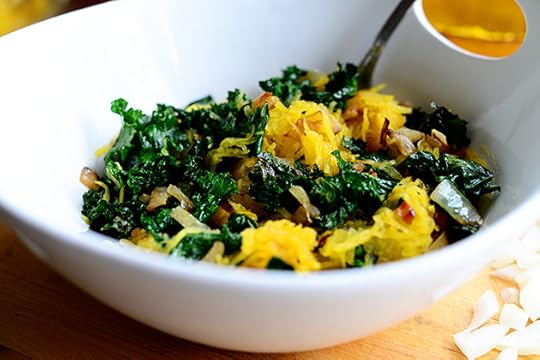
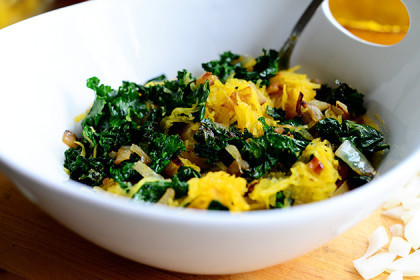
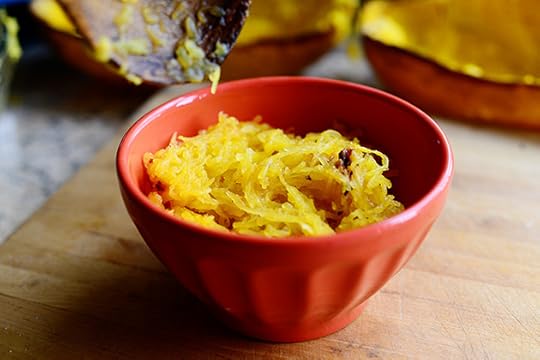 Add some squash to a bowl…
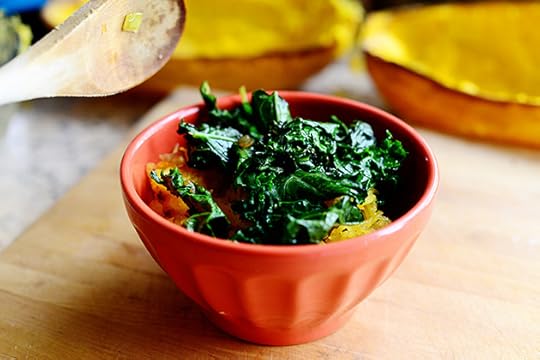 Top it with the cooked kale…
 Then dig in!
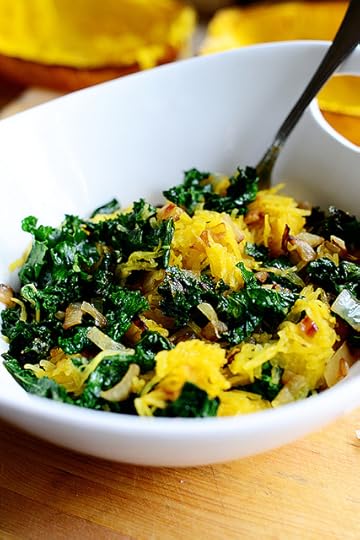 You can also just toss the squash and the kale together.
Or, another option: You can saute the roasted squash and kale together like Elise/Simply Recipes did in this Spaghetti Squash and Chard Saute. She didn’t pre-cook the chard; she simply sauteed it with the cooked squash. Either way works fine!
 Yum, yum, yum, this was god. And are some ways you could make it even more delicious:
* Add Parmesan shavings over the top.
* Stir in feta crumbles.
* Add garlic to the kale and onions while they cook.
* Use butter instead of olive oil to saute the onions and kale.
 Dig in! This is delicious as a side dish, of course, but it’s really fantastic on its own.
Note: With this amount of kale, you will mostly likely have some spaghetti squash leftover (especially if you use a huge one as I did.) Just store it in the fridge and snack on it till it’s gone! Again, you can treat it as pasta and serve marinara sauce over it…or you can brown a little butter, add some sage, and drizzle that on. Oh my!
Here’s the handy dandy printable:
Recipe
Roasted Spaghetti Squash and Kale
Prep Time: 5 Minutes
Cook Time: 1 Hour
Difficulty: Easy
Servings: 8
Print Recipe
Ingredients
1 whole Spaghetti Squash Olive Oil Salt And Pepper2 bunches Kale, Stalks Removed And Torn Into Pieces1/2 whole Onion, Diced1/2 teaspoon Chili Powder1 teaspoon Balsamic Vinegar Preparation Instructions
Preheat the oven to 350 degrees.
With a sharp knife, VERY CAREFULLY cut the spaghetti squash in half lengthwise. (Stick the knife into the center of the squash, then cut down. Again---be careful!) Scoop out the seeds and pulp in the center and discard. Place the squash, cut side up, on a large baking sheet. Rub a little olive oil over the cut surface, then place the pan in the oven for 1 hour or until a fork is easily inserted into the squash.
While the squash is cooking, saute the kale: Heat 1 tablespoon olive oil in a large skillet over medium-high heat. Add the onion to the pan and cook for 3 to 4 minutes, or until starting to turn color. Throw in the kale, sprinkle in some salt and pepper, and stir to saute until the onions are golden about the kale is partly cooked, about 5 minutes. Set aside.
When the squash is cooked, use a fork to scrape the stringy squash out of the shell. Add the squash to a bowl. Mix together 1 tablespoon olive oil with the balsamic vinegar. Drizzle it over the squash, sprinkle with salt and pepper, and add the chili powder. Toss to combine.
Add the squash to individual bowls, then top with a good amount of sauteed kale. You will have squash left over!
(Or, you can toss all the kale and half the squash together.)
Posted by Ree on November 11 2013

November 4, 2013
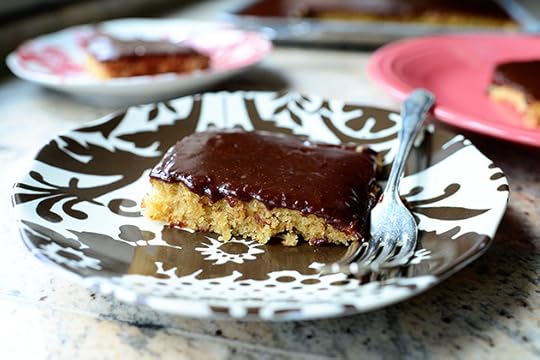
Peanut Butter Cake with Chocolate Icing
 I’ve been wanting to take the chocolate sheet cake recipe I’ve made for my entire married life—the same sheet cake recipe my mother-in-law handed me when I became engaged to her son, the same sheet cake that has gotten me through some wild ups and downs in life, the same sheet cake recipe that should be canonized it’s so delicious and perfect, if a recipe could even be canonized, which it couldn’t, but that’s how good it is—and turn it into a peanut butter version, but for some unknown reason, I never have done it.
Until yesterday.
And I’ll just say it: Yesterday was my very favorite day ever.
Come along! I’ll show you why!
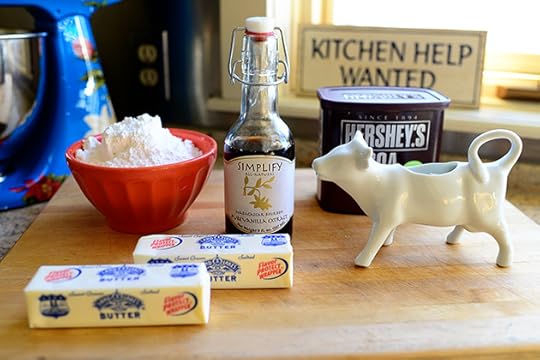
 Here’s what you need for the cake: Flour, sugar, salt, butter, peanut butter, baking soda, buttermilk, eggs, and vanilla.
Amen.
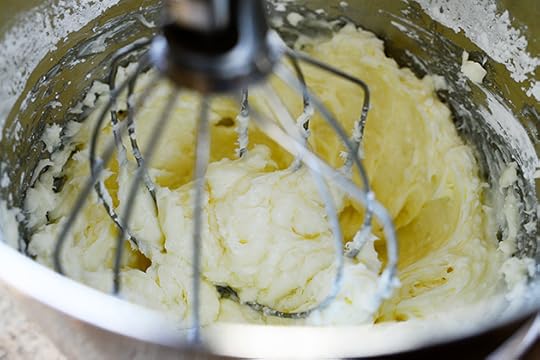
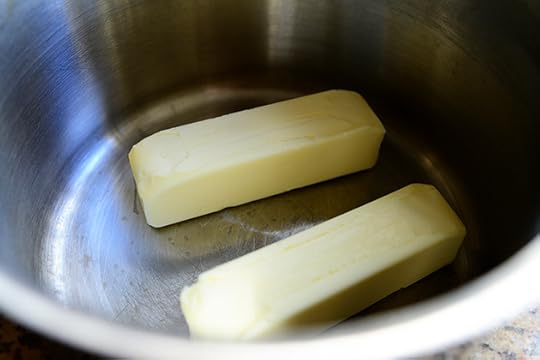 Start with just under 2 sticks of butter. I actually tried it with 2 full sticks, but wound up deciding it needed a little less because I wanted to add more peanut butter and I didn’t want the cake to be too oily.
Boy, that was a long explanation.
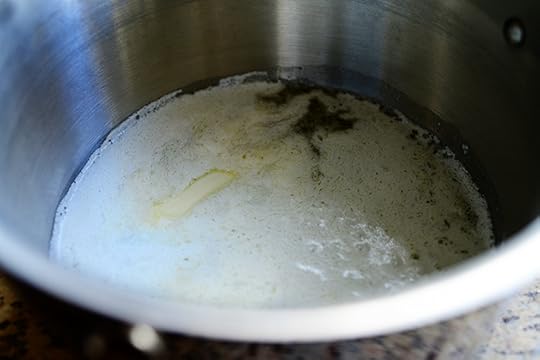 When the butter melts…
 Grab some peanut butter…
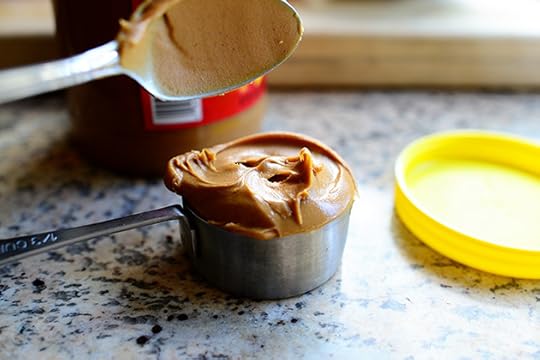 And measure half a cup.
(Note: I used a 1/3 cup measure here, heaped it in there, then wound up wanting more peanut butter flavor in the case. Hence the half cup measure.)
(Boy, that was a long explanation.)
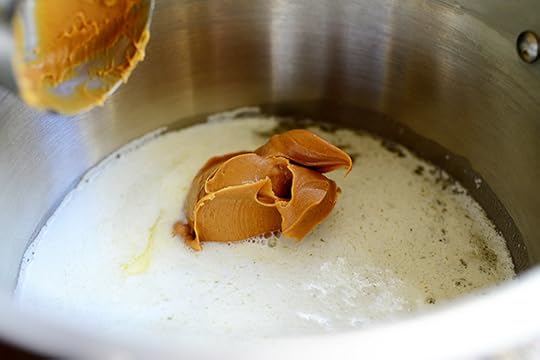 Plop the peanut butter into the pan with the butter…
 And stir it till it’s smooth.
And this right here is pretty much the only difference between the chocolate sheet cake and this peanut butter version: Instead of adding cocoa at this stage, I added peanut butter. A simple change that completely alters the entire cake.
Just like that bottle of Sun-In completely altered my entire head of hair in the summer of 1985.
But that’s another story for another time.
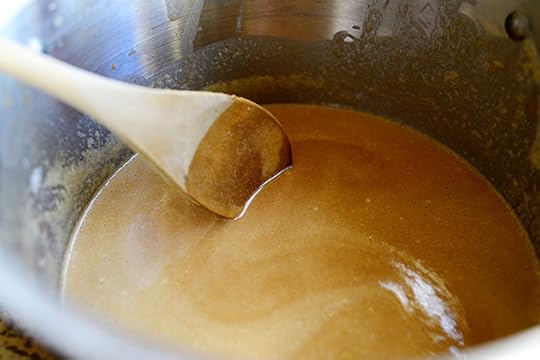
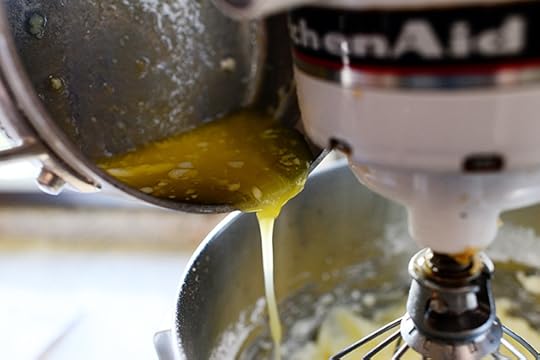
 Pour in the boiling water…
 Then let the mixture bubble up for about 10 seconds or so before turning off the heat and setting it aside.
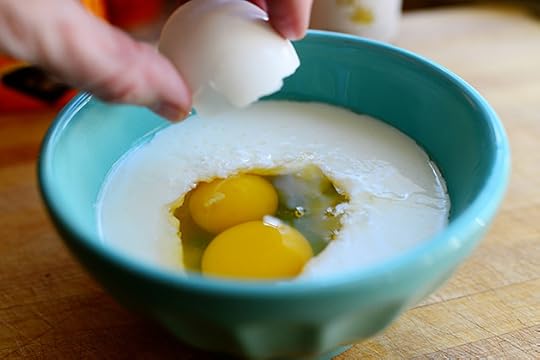 Now make the buttermilk mixture! Add 2 eggs to the buttermilk…
 Along with baking soda…
 And vanilla.
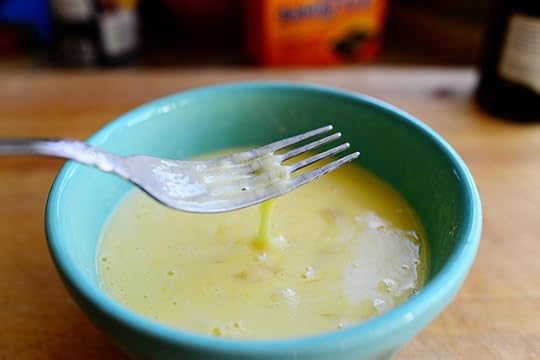 Whisk it around and set it aside.
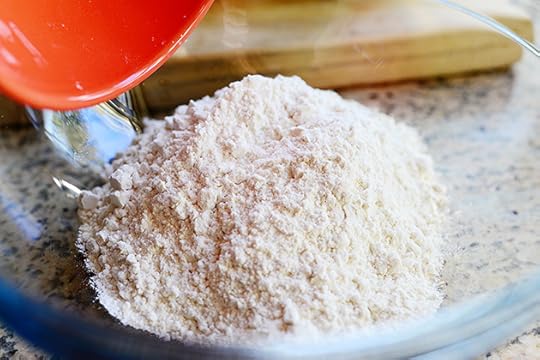 For the dry ingredients, mix 2 cups flour…
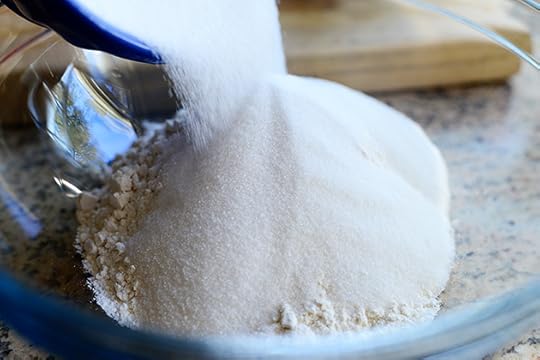 With 2 cups sugar…
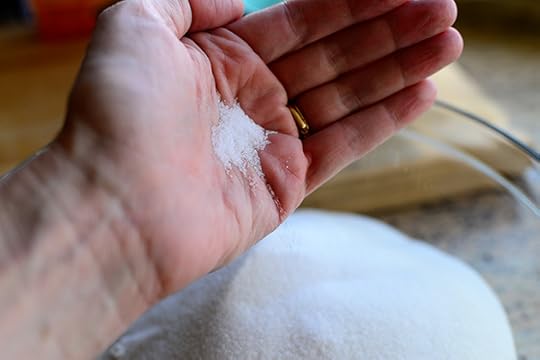 And 1/4 teaspoon of salt.
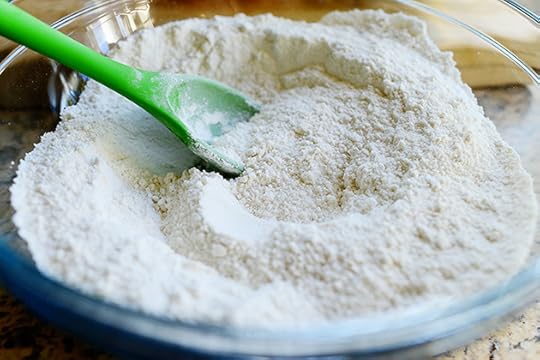 Stir it around…
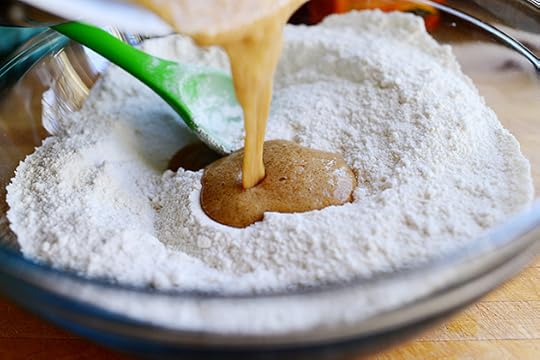 Then pour in the peanut butter mixture…
 And stir it until it’s halfway combined.
 Next, pour the buttermilk mixture into the peanut butter…
 And gently fold it together…
 Until it’s all combined.
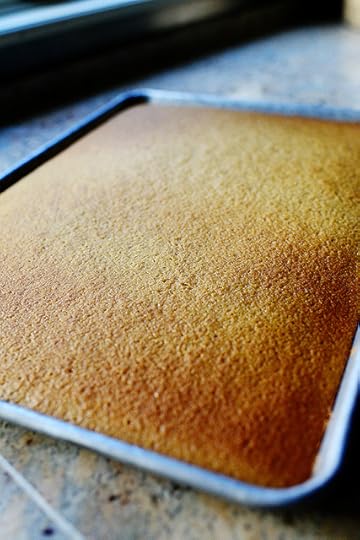
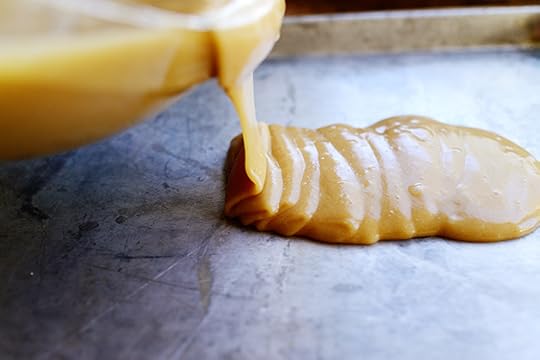 Now, pour the luscious batter into a half-sheet pan, also known as a sheet cake pan, also known as a sheet pan, also known as an 18 x 12-inch pan you can get at restaurant supply stores or kitchen stores, also known as I have an addiction to these and use them for everything.
 And speaking of everything…this batter is everything.
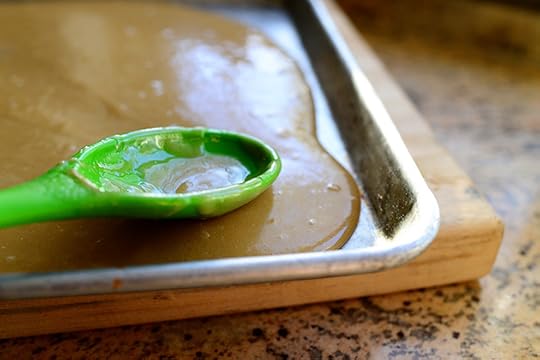 Smooth it all out so the surface is even, then violently place it into a 350 degree oven for 20 minutes.
 While the cake was baking, I made the icing so that I could get it on the warm cake right out of the oven. But rather than make a matching peanut butter frosting, which I was afraid would be too overwhelming, I stuck with the regular chocolate icing that goes with the chocolate sheet cake.
You know why?
Because…”Two great tastes that taste great together!”
If you can name the product that goes with that jingle, you watched way too much TV in the early eighties.
Like me.
 Place just under 2 sticks of butter in the same saucepan, which you just washed because you didn’t want to dirty another pan because your sink’s already full of enough dirty dishes.
Boy, that was a long explanation.
 Melt the butter…
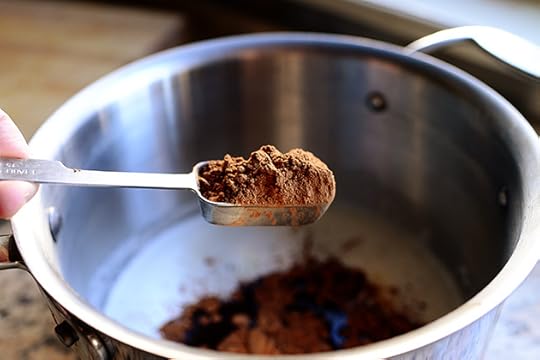 Then add 4 heaping tablespoons of cocoa.
 Whisk it together…
 Then add 6 tablespoons of milk. I put my milk in this little cow creamer, because it absolutely cracks me up to watch milk pour out of the cow’s mouth.
I’m easily entertained.
And here’s where my being married to a cattle rancher messes with me. I think to myself, milk would never come out of a cow’s mouth. Cows don’t drink milk. Cows eat grass. Now, calves drink milk. Calves drink milk a lot, as long as they’re still nursing. So really, these should be CALF creamers, not COW creamers. But even then, milk would be going INTO a calf’s mouth, not out. If milk were coming out of a calf’s mouth, the calf would probably be sick. Which makes me want to stop talking about it and get out there and doctor the sick calf.
Even though the sick calf only exists in my mind.
Goodbye.
 Sift in the powdered sugar…
 Add the vanilla…
 And whisk it all together.
 Meanwhile…the cake is ready!
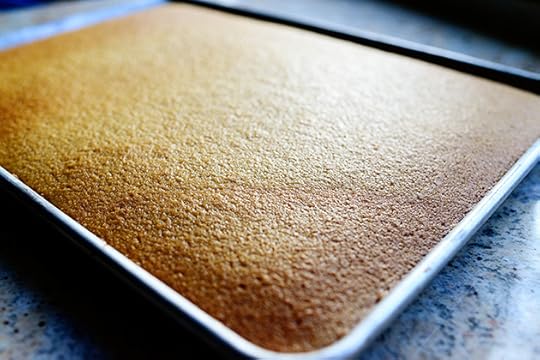 Mmmm. You can’t imagine how delicious this smells. It filled my house with peanut buttery goodness heaven bliss wonderment.
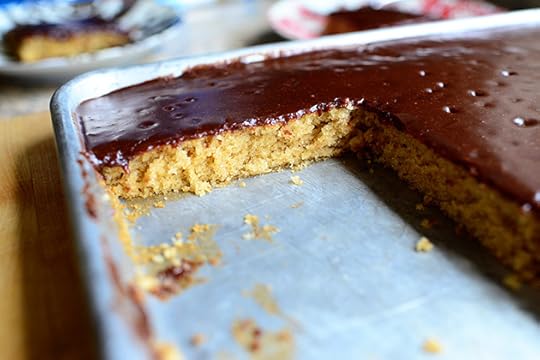
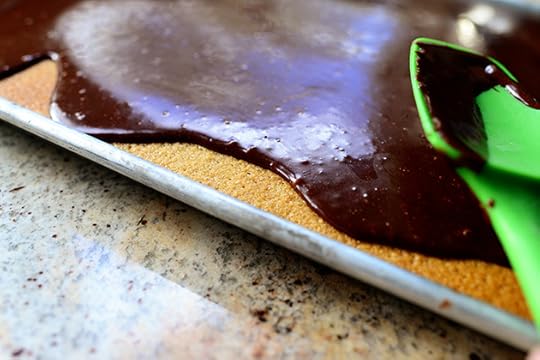
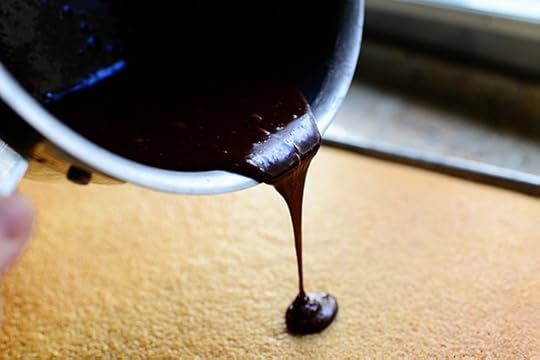 Right when the cake comes out of the oven, drizzle the warm icing on top.
 Luscious, luscious, luscious!
 Luscious!
Oh, and don’t worry if you see little powdered sugar lumps. The world is an imperfect place. Be part of that beautiful imperfection!
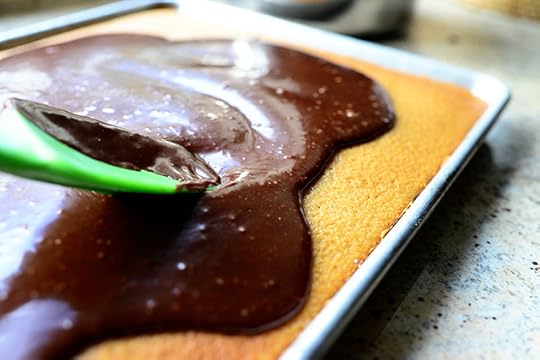 Smear the icing all over the surface…
 And here’s where you can start to get excited.
And I mean excited.
 Hello, love-muffin!
 It’s best if you eat this warm.
 Here’s where you can start to get excited. Again.
Wow.
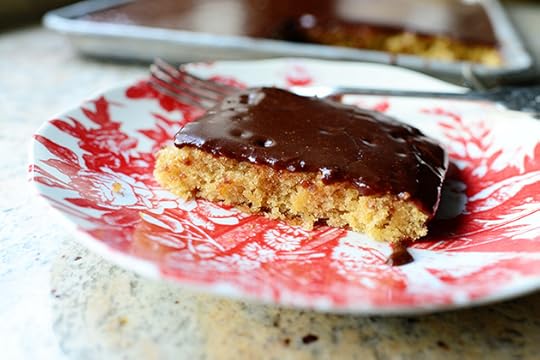
 Look how pretty and moist!
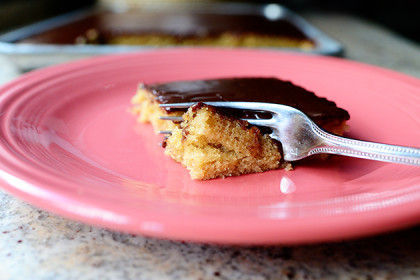
 So basically…we inhaled this. All six of us.
Nine of us, if you count seconds.
This is delightful! Make it the next time you need a comforting cake to go with your big glass of cold milk.
In other words: Make it today.
Here’s the handy dandy printable, both for the peanut butter cake and for the original chocolate sheet cake.
Be good! (Ha.)
Recipe
Peanut Butter Cake with Chocolate Icing
Prep Time: 10 Minutes
Cook Time: 30 Minutes
Difficulty: Easy
Servings: 16
Print Recipe
Ingredients
Cake2 cups All-purpose Flour2 cups Sugar1/4 teaspoon Salt1/2 cup Buttermilk2 whole Eggs1 teaspoon Baking Soda1 teaspoon Vanilla1-3/4 stick Butter1/2 cup Peanut Butter1 cup Boiling Water Icing1-3/4 stick Butter4 Tablespoons (heaping) Cocoa Powder6 Tablespoons Milk1 pound Powdered Sugar, Sifted1 teaspoon Vanilla Preparation Instructions
Preheat oven to 350 degrees.
In a large bowl, stir together flour, sugar, and salt. Set aside.
In a small bowl, whisk together buttermilk, eggs, baking soda, and vanilla. Set aside.
In a medium saucepan, melt 1 3/4 sticks butter. Stir in peanut butter until smooth. Add boiling water, let the mixture bubble up for about 10 seconds, then remove from heat.
Pour the peanut butter mixture over the flour/sugar mixture and stir until halfway combined. Pour in the buttermilk mixture and stir gently until the batter is smooth. Pour the batter into a sheet pan or jelly roll pan and smooth the surface. Bake for 20 minutes, then remove it from the oven.
While the cake is baking, make the icing: Melt 1 3/4 sticks butter. Stir in the cocoa powder, then the milk. Remove from heat and add vanilla and powdered sugar and stir until smooth. Add more powdered sugar if you want it a little thicker.
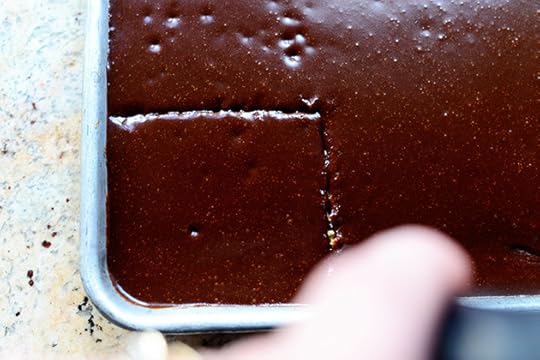
Pour the icing over the warm cake right out of the oven and smooth the surface. Allow to sit for 10 minutes before cutting into squares and serving warm.
Posted by Ree on November 4 2013
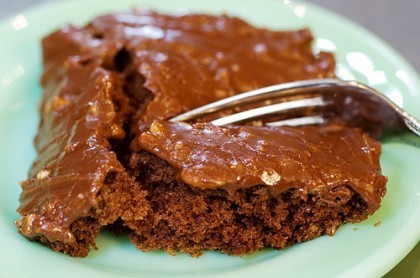
Recipe
The Best Chocolate Sheet Cake. Ever.
Prep Time: 20 Minutes
Cook Time: 20 Minutes
Difficulty: Easy
Servings: 24
Print Recipe
Ingredients
FOR THE CAKE:2 cups Flour2 cups Sugar1/4 teaspoon Salt4 Tablespoons (heaping) Cocoa2 sticks Butter1 cup Boiling Water1/2 cup Buttermilk2 whole Beaten Eggs1 teaspoon Baking Soda1 teaspoon Vanilla _____ FOR FROSTING:1/2 cup Finely Chopped Pecans1-3/4 stick Butter4 Tablespoons (heaping) Cocoa6 Tablespoons Milk1 teaspoon Vanilla1 pound (minus 1/2 Cup) Powdered Sugar Preparation Instructions
Note: I use an 18x13 sheet cake pan.
In a mixing bowl, combine flour, sugar, and salt.
In a saucepan, melt butter. Add cocoa. Stir together.
Add boiling water, allow mixture to boil for 30 seconds, then turn off heat. Pour over flour mixture, and stir lightly to cool.
In a measuring cup, pour the buttermilk and add beaten eggs, baking soda, and vanilla. Stir buttermilk mixture into butter/chocolate mixture. Pour into sheet cake pan and bake at 350-degrees for 20 minutes.
While cake is baking, make the icing. Chop pecans finely. Melt butter in a saucepan. Add cocoa, stir to combine, then turn off heat. Add the milk, vanilla, and powdered sugar. Stir together. Add the pecans, stir together, and pour over warm cake.
Cut into squares, eat, and totally wig out over the fact that you’ve just made the best chocolate sheet cake. Ever.
Posted by Ree on November 4 2013

November 1, 2013
Chipotle Chicken Chili
 I’ll be on The Chew today, and I wanted to share the recipe I’ll be cooking since it’s one of my favorites from my new cookbook (here’s a peek if you’d like to look inside!) It’s Chipotle Chicken Chili, and it’s exactly what the title says: Chicken chili with a great chipotle flavor. But what the title doesn’t say is that this chili is a dream. It’s easy to make, easily changeable (I use turkey instead of chicken on The Chew today), and so thick and luscious. It really is one of my favorite things to chow down on these days, and perfect for the cold weather we’re entering into!
Oops. Ended with a preposition.
“…and perfect for the cold weather into which we’re entering.”
Okay, I feel better now.
 Mince up some onion and garlic…
 And throw it into a pot with a little oil.
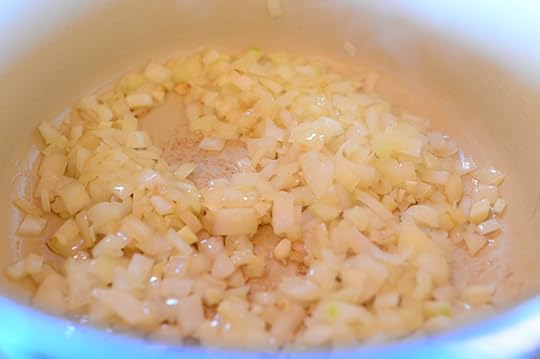 Stir and cook it around for a few minutes, until the onions start to get translucent-ish.
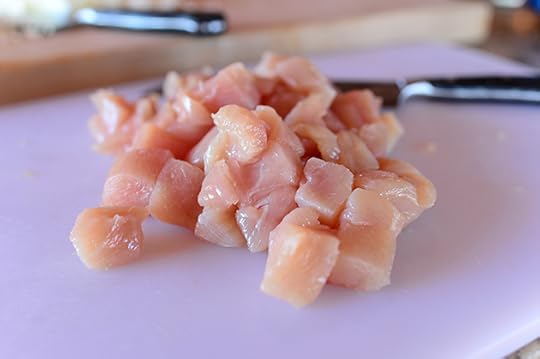 Cut up whatever meat you’re using into cubes. This is chicken breast, but as I said, I use Turkey on The Chew…and you could also use stew meat, ground beef, ground turkey, pork, etc. You’ll just need to adjust the simmering time to fit whatever meat you’re using (i.e. beef stew meat will take a little longer to get tender.)
 After the onions have cooked, throw the meat into the pot…
 And stir it around until it’s starting to brown on the outside.
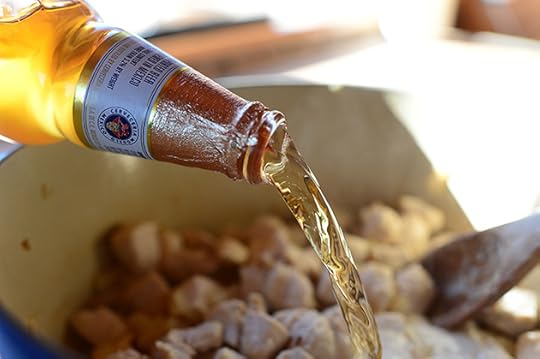 Next, crack open a bottle of the hard stuff! Add 3/4 of a bottle of beer. This is a good Mexican beer, but you can use whatever kind you want. And if you aren’t the beer type, just use low sodium chicken or beef broth (depending on the meat you’re using) instead!
 Let the beer bubble up and cook for a few minutes…
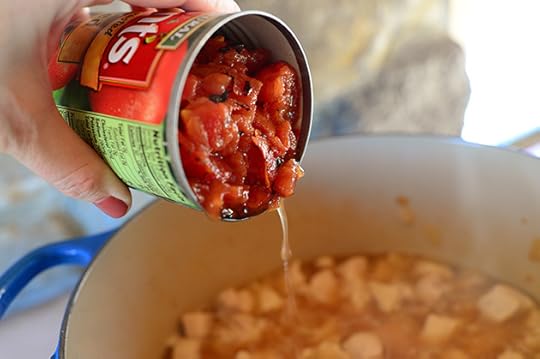 Then pour in a can of diced tomatoes, juice and all.
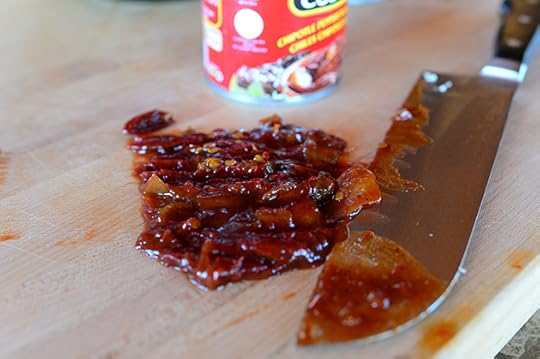 Then, if you love spicy food, which I do, mince up three canned chipotle chilies packed in adobo sauce (these are in the Hispanic Foods section of the grocery store)…
 And add them in to the chili.
Now, about the chipotle peppers: They’re spicy, man. There ain’t no getting around it. Three chipotle peppers results in a very spicy chili. I love spicy food more than life itself, but I realize a lot of people don’t. So you could definitely pull back to one minced chipotle pepper, which would give the chili a slight spice and great smokiness…or, to be safe, you could leave out the chipotle altogether. The chili is still delicious without it!
The best approach with chipotles, if you’re unsure, is just to start with one pepper or half of a pepper and work your way up.
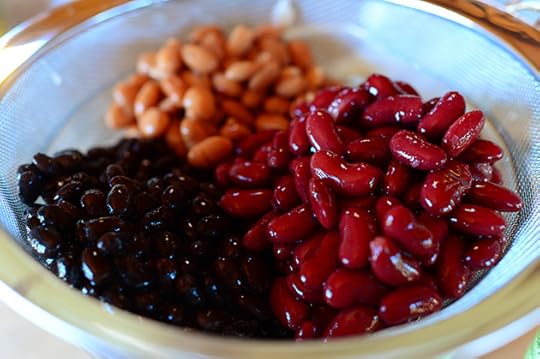 Okay, after you’ve settled the spice issue, drain and rinse whatever kind of canned beans you like. I did a mix of kidney, pinto, and black, but you can use all of one kind if that’s what you have.
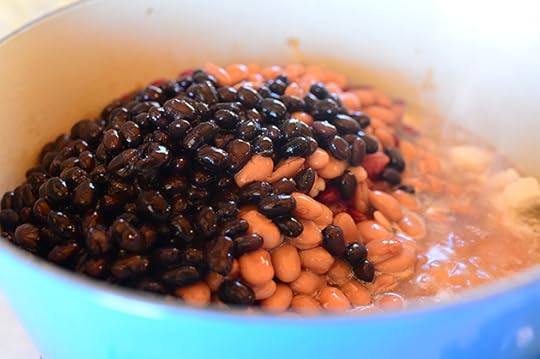 Throw the beans right into the pot…
 And stir it around to combine everything.
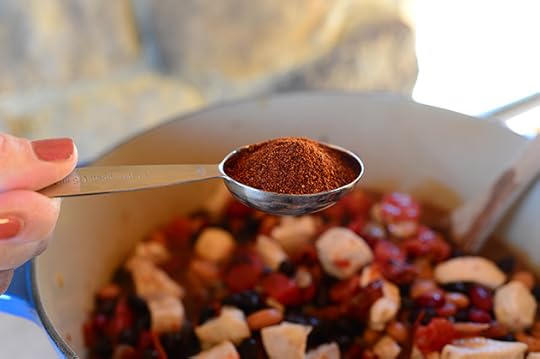 Add a tablespoon of chili powder (and again, you can start with a teaspoon and work your way up here if you’re unsure.)
 And a good tablespoon of cumin.
I want to marry cumin. I love it so much.
 Next, add about a teaspoon of salt…
 And stir everything around to combine.
 Cover the pot and simmer the chili for 1 hour…
And now it’s time to thicken it.
 My favorite way to thicken chili is to use masa harina. Masa is a corn flour used to make tortillas (I use both all-purpose flour and masa harina mixed together to make a flour/corn tortilla that I love) and you can find it in the same aisle as the chipotle peppers. Grab a small amount…
 And mix it with the beer that’s left in the bottle from earlier.
That is, if you didn’t drink it already. If you drank it already, just mix the masa with a little warm water.
 Mix it all together until it’s a smooth paste…
 Then pour it right into the pot!
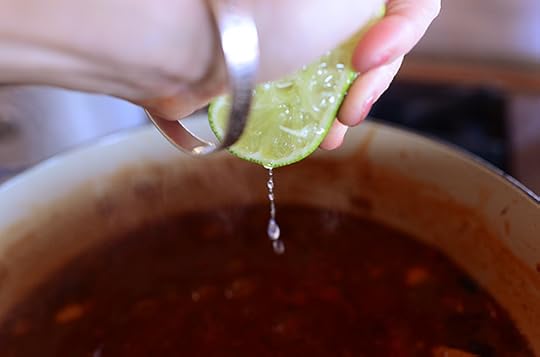 Next, squeeze in the juice of a lime…
 And stir everything together. Let it cook for another 10 minutes or so; the masa will thicken the chili and give it the MOST incredible corn flavor.
And by the way, I use masa to thicken whatever chili I’m making. The flavor it adds to the mix is just irreplaceable. It is heaven.
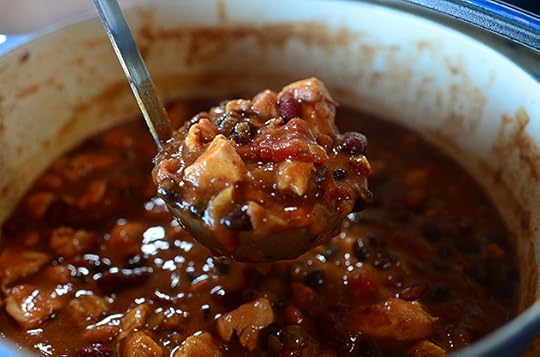 Hello, beautiful!
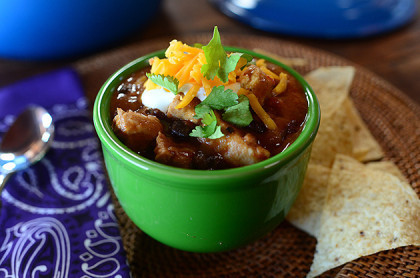
 Serve the chili in a bowl…
 With a good amount of sour cream, grated cheddar, and cilantro, which really freshens it up. An extra squeeze of lime is always good, too!
 Now, this is obviously the classic way to serve chili…but here are other thangs you can do with it:
* Serve it in baked potato skins.
* Serve it over Fritos.
* Serve it with cornbread.
* Serve it in tacos; top with lettuce and tomato. Yum!
Have fun with this chili, guys! It’s thick, rich, and lovely.
Here’s the handy dandy printable.
Recipe
Chipotle Chicken Chili
Prep Time: 10 Minutes
Cook Time: 1 Hour15 Minutes
Difficulty: Easy
Servings: 12
Print Recipe
Ingredients
2 Tablespoons Olive Oil1 whole Onion, Diced4 cloves Garlic, Minced2 pounds Boneless, Skinless Chicken Breasts, Cut Into A Large Dice1 bottle (12 Ounce Bottle) Good Beer1 can (14 Ounce Can) Diced Tomatoes3 whole Chipotle Peppers In Adobo Sauce, Minced (use Less If Desired)1 can (14 Ounce Can) Pinto Beans, Drained And Rinsed1 can (14 Ounce Can) Black Beans, Drained And Rinsed1 can (14-ounce Can) Kidney Beans, Drained And Rinsed1 Tablespoon Chili Powder1 Tablespoon Ground Cumin1 teaspoon Salt, More To Taste1/4 cup Masa Harina1 Lime, Juiced Sour Cream, For Serving Grated Sharp Cheddar Cheese, For Serving Cilantro, For Serving Lime Wedges For Serving Preparation Instructions
Heat olive oil in a large pot over medium heat then add the onions and garlic. Cook for a few minutes until onions soften. Add the chicken and cook until lightly browned. Add 3/4 of the beer, reserving the rest, then cook for a couple of minutes to reduce.
Add the tomatoes, chipotles, beans, chili powder, cumin and salt. Stir to combine, then cover the pot and cook for 1 hour.
Combine the masa harina with the rest of the beer and stir to make a paste. Add this into the chili, along with the lime juice. Stir and cook for 10 more minutes or until thick.
Serve with sour cream, cheese, cilantro, and another squeeze of lime!
Posted by Ree on November 1 2013

October 30, 2013
My Favorite Knife, My Favorite Cutting Board (Winners!)
The winners of the knife and cutting board sets are:
#2204 Emily: “Chili and cornbread muffins for a family get-together last night.”
#18633 Alexa K: “I made taco salad last night!”
#22647 Yasmine: “Maple almond granola!”
Congratulations, winners! Contact prizes@thepioneerwoman.com to claim your prizes.
 Today, to celebrate the release of my new cookbook yesterday…
 I’m giving away three (3) of these Wusthof Nakiri knives (my favorite knife in the world)…
 Along with a beautiful, fabulously useful John Boos end-grain maple cutting board. You will fall madly in love with this board—it’ll become your best friend, your constant companion, and you’ll love it more the more you use it. It’s as practical as it is beautiful.
This knife and this cutting board will take you far in life…and in my cookbook! I use this knife almost exclusively, and I love it just as much now as I ever have.
If you’re interested, just shout out the last thing you cooked in the Comments section of this post—whether it was Kraft Macaroni and Cheese or Thai Duck Curry!
Winners will be selected at random and announced Thursday.
Good luck!
Giveaway sponsored by Pioneer Woman.

My Favorite Knife, My Favorite Cutting Board
Today, to celebrate the release of my new cookbook yesterday…
I’m giving away three (3) of these Wusthof Nakiri knives (my favorite knife in the world)…
Along with a beautiful, fabulously useful John Boos end-grain maple cutting board. You will fall madly in love with this board—it’ll become your best friend, your constant companion, and you’ll love it more the more you use it. It’s as practical as it is beautiful.
This knife and this cutting board will take you far in life…and in my cookbook! I use this knife almost exclusively, and I love it just as much now as I ever have.
If you’re interested, just shout out the last thing you cooked in the Comments section of this post—whether it was Kraft Macaroni and Cheese or Thai Duck Curry!
Winners will be selected at random and announced Thursday.
Good luck!
Giveaway sponsored by Pioneer Woman.
October 29, 2013
Popcorn Balls!
My new holiday cookbook comes out today, and I’m so excited. For so long, as I was working on the cooking and writing and editing, today was just this distant, faraway date that I never thought would get here. But it’s here! Time actually marched on! I really hope you enjoy the book, guys. It was a labor of love, and my camera is a sticky mess.
 To celebrate, I wanted to share one of my favorite Halloween recipes from the book since Halloween is, well…this week.
 Popcorn balls!
And while we’re on the subject: How do you feel about popcorn balls? My whole life, I’ve been a little on the fence about them. I love the idea of them, but oftentimes, they wind up being a little unremarkable. Either too sweet and sticky or not sweet and sticky enough. So for these, while I start with slightly sweet kettle corn as the base, I decided to steer clear of the syrup/candy approach.
I’ll show you what I did instead!
 I made kettle corn, but you can use whatever popcorn you want. Heck, even microwave a bag—I won’t tell anyone! Pour a little peanut oil into a saucepan—one that has a tight-fitting lid.
 Then pour in popcorn kernels. Shake the pan a bit to make sure all the kernels are coated. Turn on the saucepan over medium-high heat.
 When the oil is starting to sizzle but before the corn starts popping, pour in some sugar and gently shake the pan to coat all the kernels.
 Then, when the first couple of kernels start to pop…
 Put on the lid and hold it tight with one hand while you use the other hand to gently shake the pan back and forth on the burner. You want to keep the kernels moving around the whole time they pop.
And please be careful! Don’t shake too vigorously—just a steady movement back and forth.
 Remove the pan from the heat when it sounds like the popping has slowed down considerably. You have popcorn!
 Pour the popcorn onto a baking sheet lined with parchment or a nonstick baking mat…
 Then use a spatula to quickly break up the big clusters of popcorn. The popcorn shouldn’t be too sticky at this point—just slightly sweet! But try not to snack on it…they’re for the popcorn balls. Note that this will be highly difficult.
 Let the popcorn cool while you make the sticky mixture.
 Melt a little butter in a pot…
 Then throw in some marshmallows. I used about a half a bag of mini marshmallows, but you can use big ones or marshmallow creme.
 Stir as the marshmallows heat up and melt…
 Then (this is totally optional!) add a couple of drops of orange or yellow food coloring.
 Stir it to mix it in, and if you want a deeper color, add in a little more coloring.
 Pour in the popcorn and quickly stir it with the spatula to coat it.
 I love how it looks like there are cobwebs all over the place. You could even take this big hunk out of the pan as it is not and plop it on a serving plate for a kids’ party if you can get the cobwebs to stay. Looks creepy!
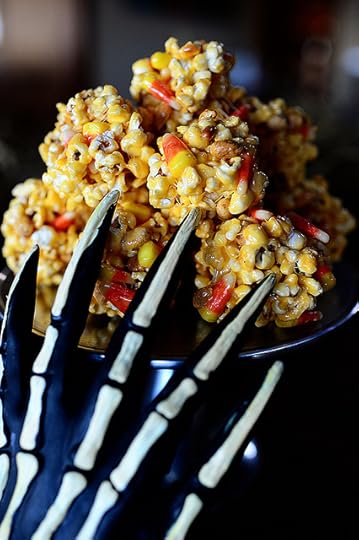
 But I’m moving forward with zee balls: Add some candy corn…
 And some shelled peanuts. Yum!
And you can do lots of different candy/nut combinations: Reese’s Pieces, sunflower seeds, pistachios, etc.
 Stir it around quickly before the mixture sets up.
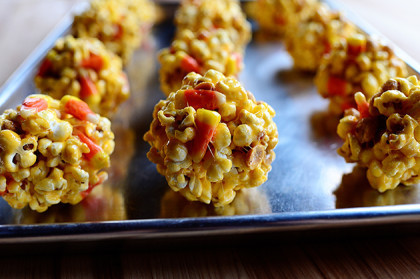
 Then give your hands a light spray of cooking spray and form the popcorn mixture into 2 to 3 inch balls.
 Set ‘em on a baking sheet as you form them…
 Then let ‘em set completely at room temperature before packaging them individually…
 Or serving them on a platter or cake stand! So fun and cute…
And kids aren’t the only ones who gobble them up.
Here’s the handy dandy printable, guys. Happy (almost) Halloween!
Recipe
Popcorn Balls
Prep Time: 10 Minutes
Cook Time: 10 Minutes
Difficulty: Intermediate
Servings: 12
Print Recipe
Ingredients
1/4 cup Peanut Oil6 Tablespoons Popcorn Kernels1/2 cup Sugar4 Tablespoons Butter6 ounces, weight Mini Marshmallows (about Half A Package) Orange Food Coloring (optional)1 cup Candy Corn1/2 cup Shelled Unsalted Peanuts Cooking Spray Preparation Instructions
Add the oil to a medium saucepan (one that has a tight-fitting lid) over medium-high heat. Add the popcorn and shake the pan gently to make sure the kernels are coated. When the oil starts to sizzle, but before the corn starts popping, add the sugar to the pan. Shake the pan again, and when the first couple of kernels pop, place the lid on the pan and shake the pan gently with the other hand while you hold the lid in place. Keep doing this as the popcorn pops, until the popping slows down.
When almost all the kernels have popped, pour the popcorn onto a parchment paper-lined baking sheet, separating the kernels slightly with a spatula or spoon. Let the popcorn cool slightly.
Meanwhile, melt the butter in a separate pot over low heat. Add the marshmallows, stirring as they melt. When the marshmallows are almost melted, add 2 or 3 drops of orange food coloring (this is optional!) Stir it to combine.
Remove the pot from the heat and add the popcorn to the pot, stirring immediately to coat it as quickly as possible. Right after stirring, add the candy corn and the peanuts and stir until the candy and nuts are totally worked in.
Spray your hands lightly with cooking spray and form the popcorn mixture into individual balls 2 to 3 inches in diameter. Set them aside and let them cool and set completely! Serve at room temperature.
Posted by Ree on October 29 2013

October 25, 2013
A Peek at Tomorrow’s Show!
We took a week off from new shows last week, but a brand new episode airs on Food Network tomorrow. I would love to hear what you think of the format of the show, as it’s a little different from others! Basically, I’m on the go, driving my pick-em-up-truck throughout the entire episode, delivering delectable treats to my family and friends for one reason and one reason only—so I can get them out of my house because I lack the will power not to eat them all.
So anyway, as I deliver them, I flash back to my making them in the kitchen earlier that day. Afterward, let me know if you loved it or hated it or liked it or sort of loved it or really liked it or sorta kinda maybe strongly disliked it or adored it.
But those are your only options!
Ha.
Format of the show aside, here’s a little peek at the recipes I’ll be making! I shared some of these photos back in July or August, when the episode was shot, but wanted to bring them up to the forefront in case’n you done plum forgotted.
Nice English, Ree.
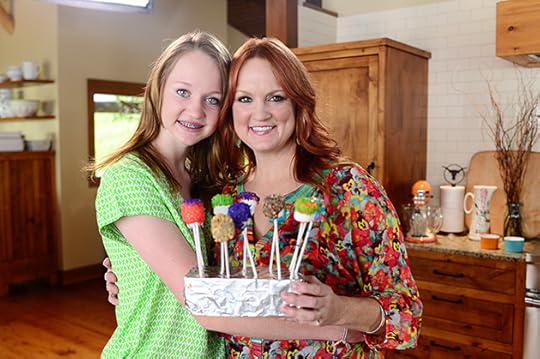 This was the episode I shot with my daughter, who loves being in the kitchen with me. She also loves being in the kitchen without me.
 We didn’t do anything crazy.
 Just marshmallow pops!
 But boy, did we make marshmallow pops.
Here’s the very simple recipe!
Marshmallow Pops
Cover them with orange and brown/black sprinkles for Halloween…and change them up according to whatever holiday or occasion it is!
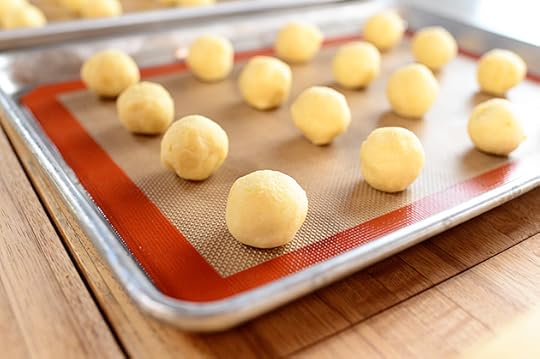 I also made these…
 Which turned into these. Oh, did I love them.
They’re basically my Citrus Butter Cookies, but I did a little tropical twist with coconut, played up the lime, and died of bliss.
Here’s the original step-by-step cookie recipe:
Citrus Butter Cookies
And here’s the modified recipe with the coconut and citrus alteration on the Food Network website:
These cookies are lovely. Light, buttery, and lovely.
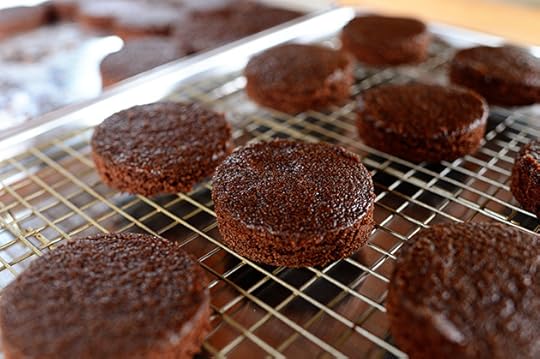 For the grand finale, I turned these discs of chocolate sheet cake…
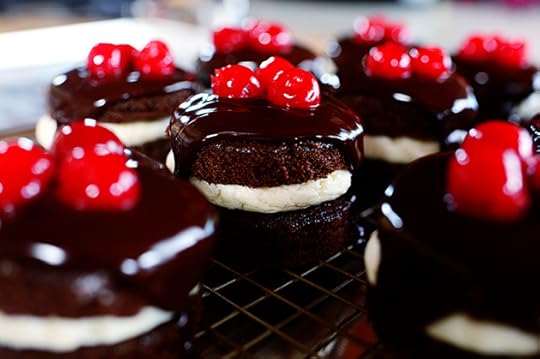 Into these.
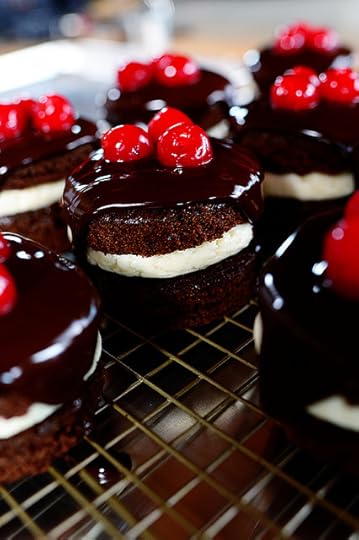 I’ll post a step-by-step recipe here very soon (hopefully I can get it done in the next week), but you’ll see all the steps on the show tomorrow.
That’s all, my friends! After this show, you’re going to want to eat a bag of pretzels because it’s so darn sweet.
(But that’s not necessarily a bad thing.)
Have a wonderful weekend, guys!
Love,
P-Dubster

October 21, 2013
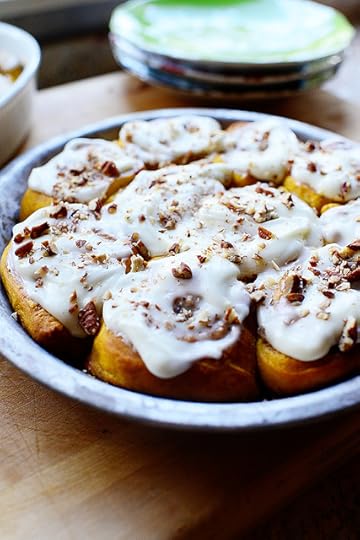
Pumpkin Cinnamon Rolls
 We all know about the original cinnamon rolls. My mom made them my whole life, I’ve made them my whole life, and they are hands-down the best cinnamon rolls in the yoo-nee-verse.
 And we all know that I like to play with the original rolls and come up with different variations, like these Caramel Apple Sticky Buns from 2009.
 And this Chocolate Chip Cookie version from 2010.
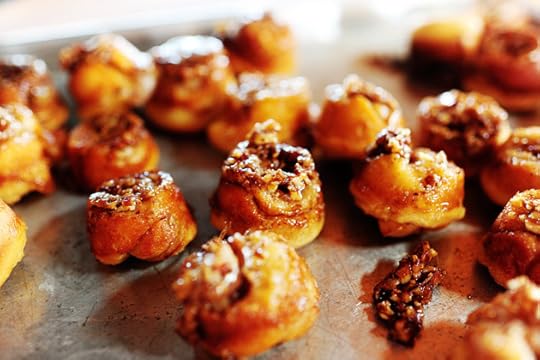 And this Sticky Pecan Mini-Bun version from 2011.
 And this Blueberry Lemon Sweet Roll version from 2012.
I’ve also done an orange marmalade version, a fruit-and-nut version…and a new caramel apple version in my upcoming holiday cookbook.
I think I have some sort of sweet roll problem!
 But you know what? In all my years of trying different versions, it occurred to me over the weekend that I’ve never made a pumpkin version.
Until yesterday, when my life changed forever.
Here’s how I made them.
THE DOUGH
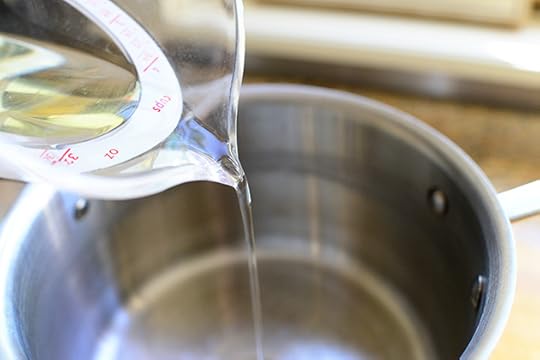 The dough starts just like the original recipe: In a medium saucepan, pour some vegetable oil…
 Some whole milk…
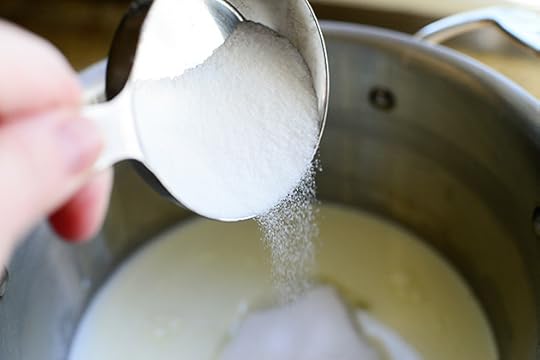 And some sugar. This is the glorious basis of the dough that has followed me throughout my life and made the world a better place.
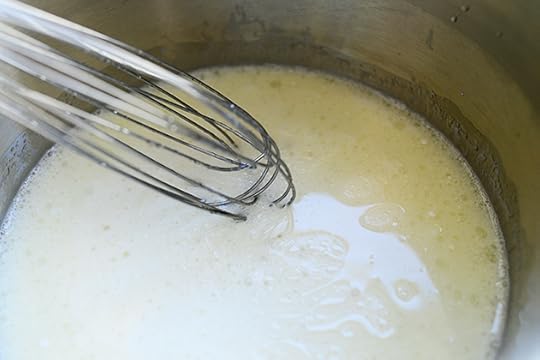 Stir or whisk it all together…
 Then turn on the heat and warm the mixture until it’s “scalded” as my mom used to say, which means hot but not boiling.
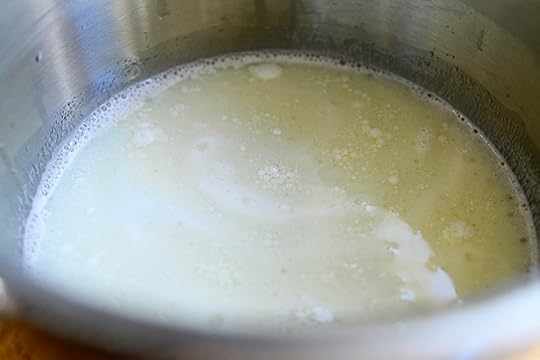
Then, just remove the pan from the stove and let it cool just a little bit. It needs to be decidedly warm to the touch, but not in the “hot” category. But it definitely needs to be warmer than the “lukewarm” category.
Confused?
So am I.
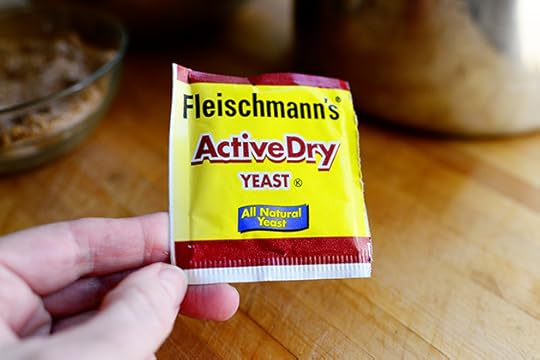 When the mixture is cooling to the point that it’s not cool but warm, but not lukewarm, but not hot, grab a packet of active dry yeast…
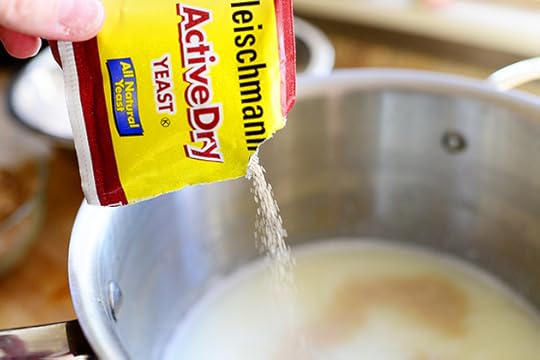 And sprinkle it over the surface.
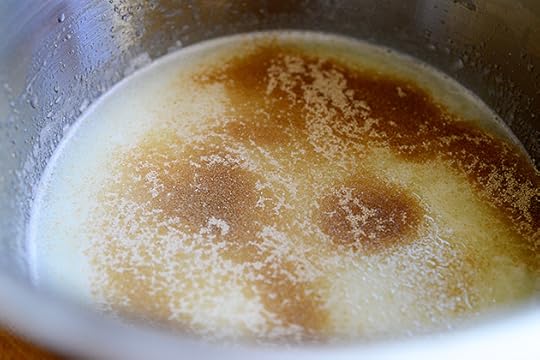 Let the yeast sit on the liquid for about 5 minutes…
 Then crack open a can of the crazy orange stuff…
 Measure a cup…
 And throw it into the pan on top of the yeast.
 Whisk it until it’s combined…
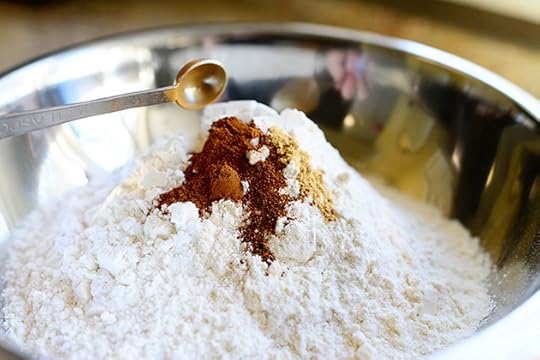 Then make the flour mixture: Combine all-purpose flour with a little cinnamon, nutmeg, and ginger.
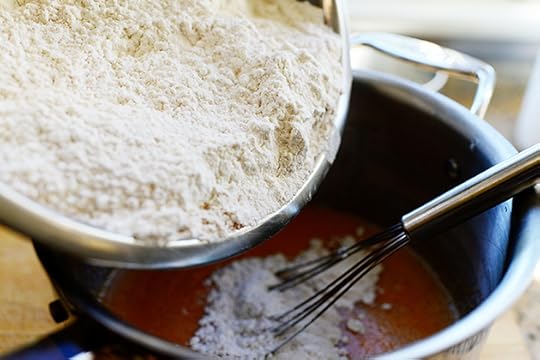 Then sprinkle in the flour mixture…
 And stir it until it all comes together. Then just lay a tea towel over the top, set the pan in a warm, draft-free place, and let it rise for 1 hour.
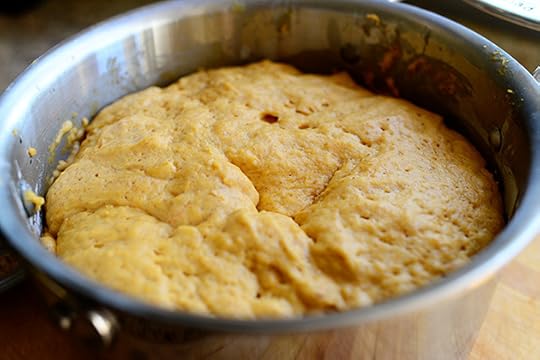 When the hour is up, it should look like this! If the mixture is flat and lifeless at this stage, then a) the milk mixture was way too hot when you sprinkled in the yeast OR b) the milk mixture was way too cool when you sprinkled in the yeast OR c) You set the saucepan in a cold place. Try heating a griddle or skillet for 30 seconds or so, then turning the heat off, then setting the saucepan on the griddle/in the skillet, and covering it. The extra warmth may help it along.
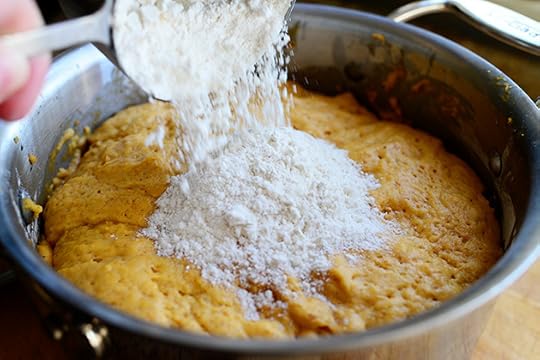 Now it’s time for the second addition of dry ingredients: Add 1/2 cup flour…
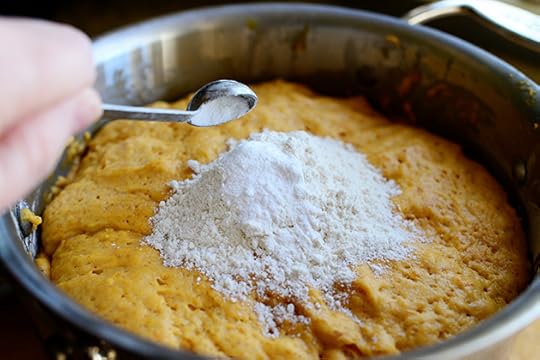 A scant 1/2 teaspoon baking soda…
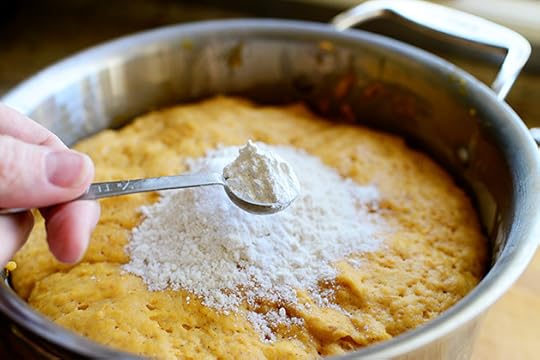 A heaping 1/2 teaspoon baking powder…
 And a teaspoon of salt.
 Stir this a few times until it all comes together.
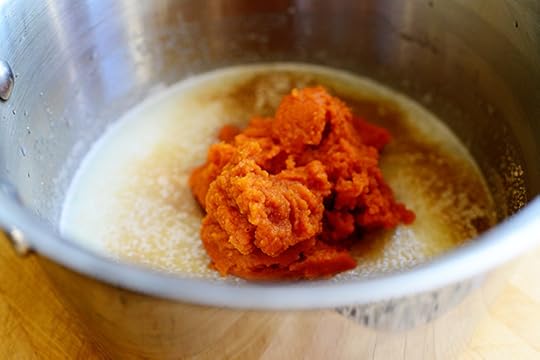
THE ROLLS
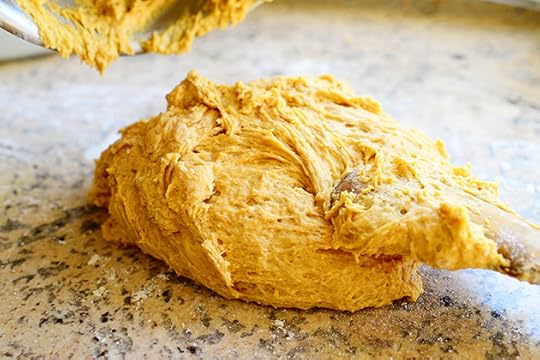 To make the rolls, turn the dough out onto a floured surface. You’ll notice my dough is very, very sticky. While I definitely want it to be soft, this wound up being too sticky to work with—and that’s because on the second addition of flour above, I started with 1/4 cup instead of 1/2 cup since I wasn’t quite sure what it would need.
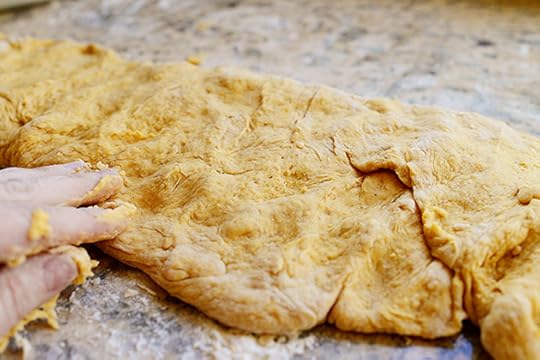 So I just kept sprinkling flour over the top and working it in until it was just barely to the stage where I could work with it. I didn’t want the dough to be tough; soft dough is your friend with these rolls. So feel free to add in enough dough to make it workable, but be prepared to stop just when it’s un-sticky enough to work with.
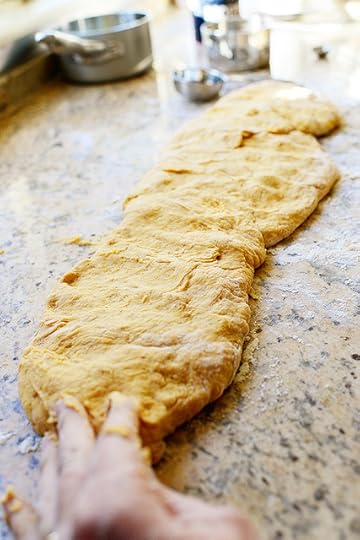 Form the dough into a rough rectangle shape…
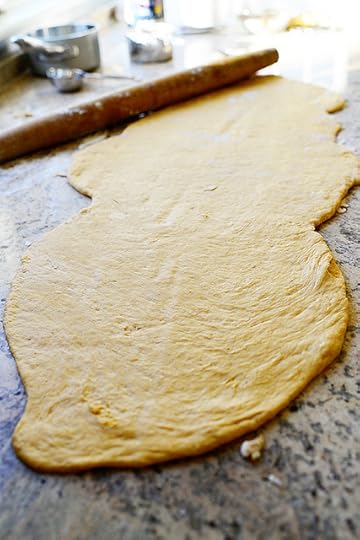 Then flour a rolling pin and roll it out flat. It should be (roughly) 10 inches by 30 inches. Translation: A big ol’ rectangle o’ dough.
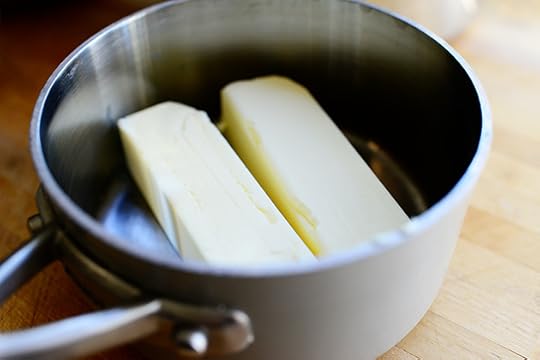 Now, somewhere along the way, I sneakily threw some butter into a saucepan…
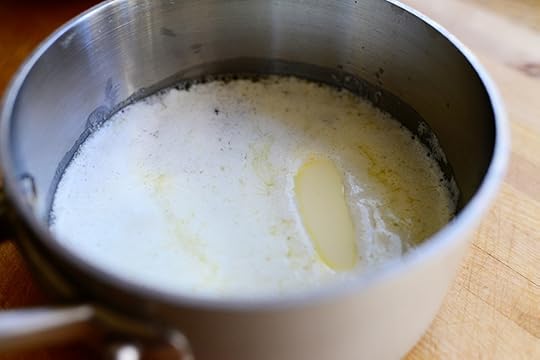 And then I even more sneakily melted it.
 So now it’s time to drizzle about a cup of melted butter all over the surface of the dough…
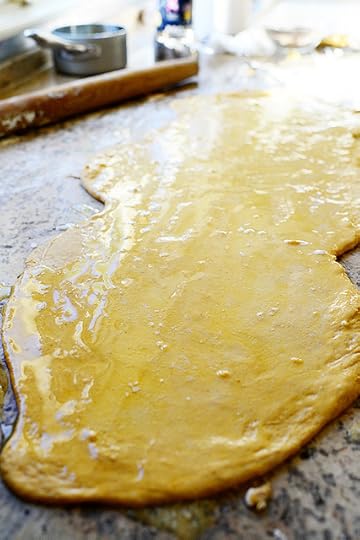 And use your fingers to spread it out until it covers every last inch.
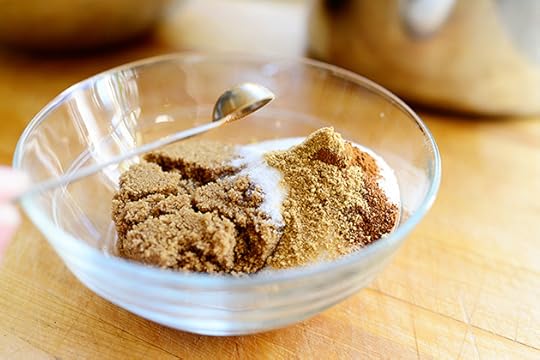 For the filling, mix together sugar, brown sugar, cinnamon, nutmeg, ginger, and a little salt.
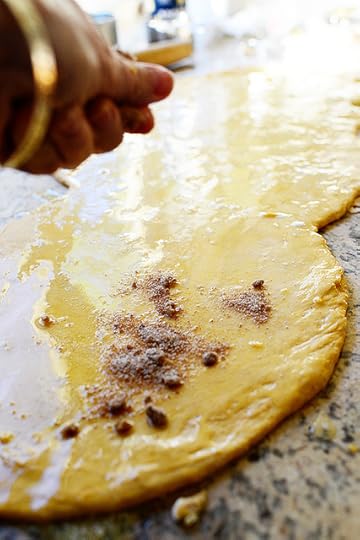 Then sprinkle it all over the surface…
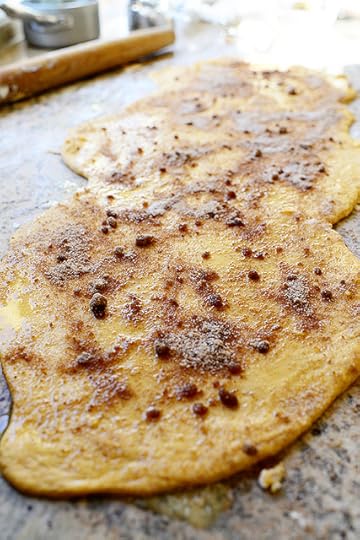 Until it’s totally covered. Those lumps are clumps of brown sugar, and they don’t bother me at all. In fact, I like them. They remind me that the world is a beautiful, imperfect, lumpy place.
Just like my bottom.
 Next, chop up some pecans…
 And sprinkle some of those over the top.
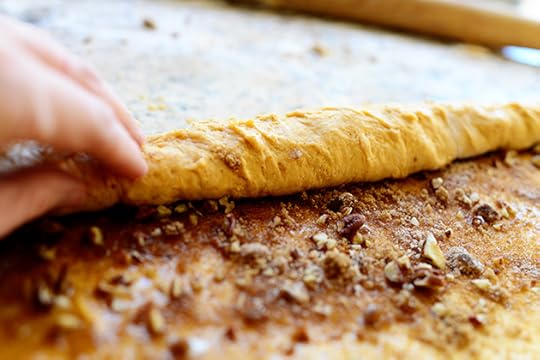 And then, using what I like to call the typewriter maneuver, use the fingers of both hands to roll the dough toward you into a tight roll, going back and forth down the line of dough…
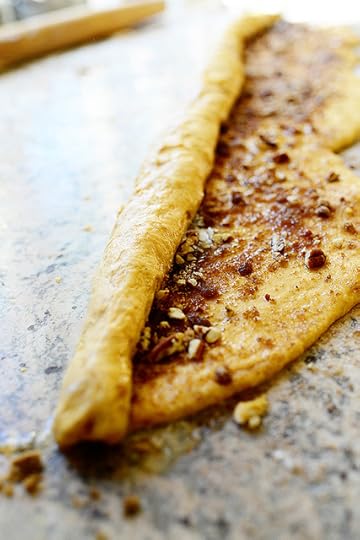 Until it’s all…
 Rolled up. Bring up the end and pinch it closed…
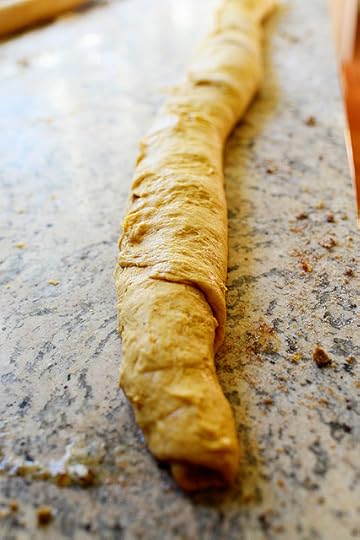 And keep going until it’s a nice, neat (relatively speaking) log of love.
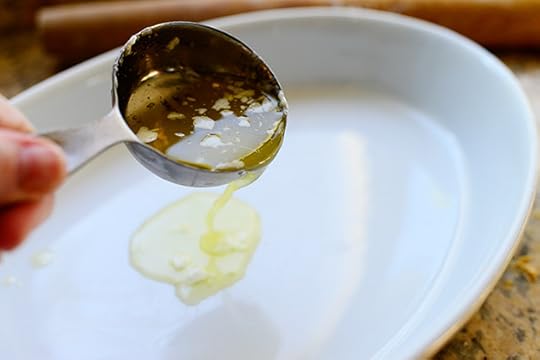 Drizzle a little extra butter into pie pans or baking dishes…
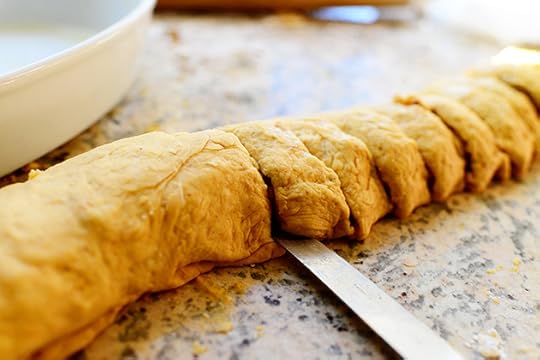 Then slice the rolls with a sharp knife…
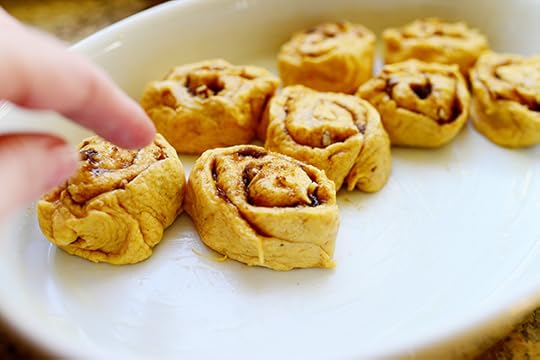 And lay them in the pan.
 Leave a little space to allow for rising.
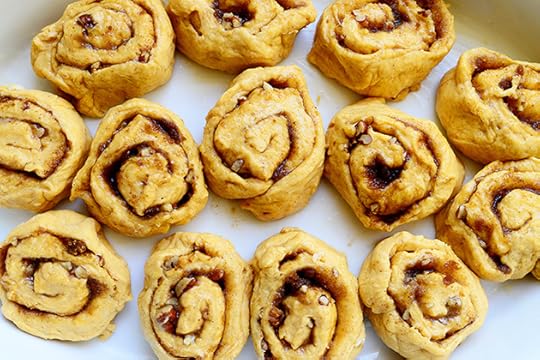
 This recipe will fill about 3 standard pie pans or 1 good sized baking dish with a little extra left over.
 Set them aside in a draft-free place, cover them with a dish towel, and let them rise for 20 minutes or so until they’re nice and puffed. Put them in a 375 degree oven to bake for about 15 to 18 minutes.
THE FROSTING
 And while they’re baking, make the frosting! Start with cream cheese (I made too much; you really only need 1 package.)
 Powdered sugar…
 And milk.
 Beat it until it all comes together…
 Then drizzle in a little more melted butter.
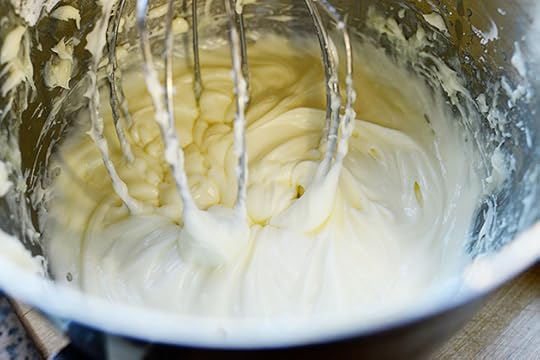 Mix it until it’s nice and fluffy. You could also do more of a glaze, as I use for my regular cinnamon rolls; it basically pours over the rolls and settles into the cracks. For these, I thought a thicker frosting would be fun…but either would be heavenly.
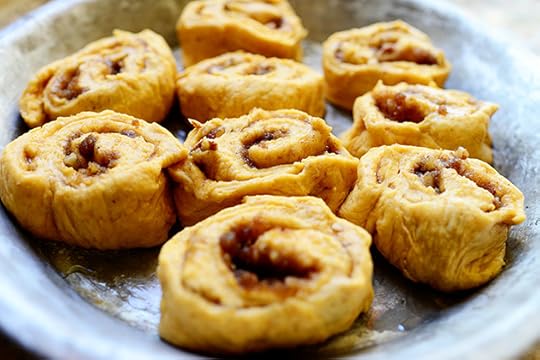
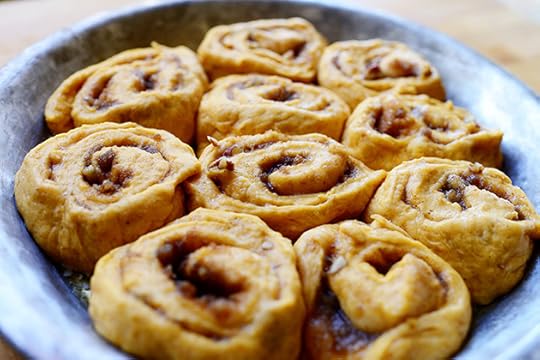
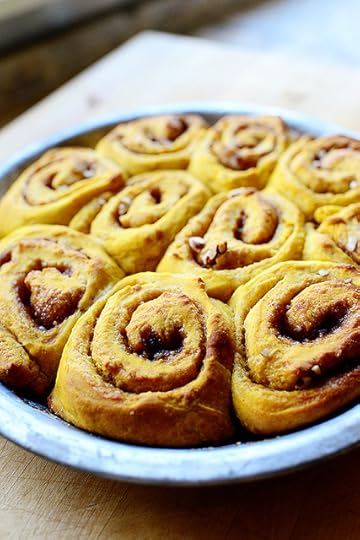 The rolls are done!
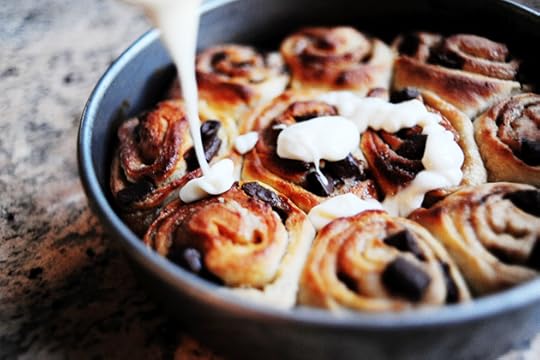
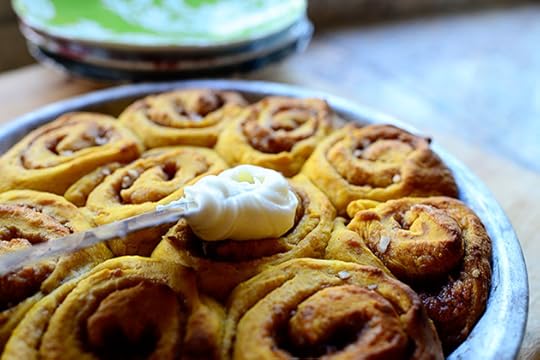 So pretty much the second they come out of the oven…
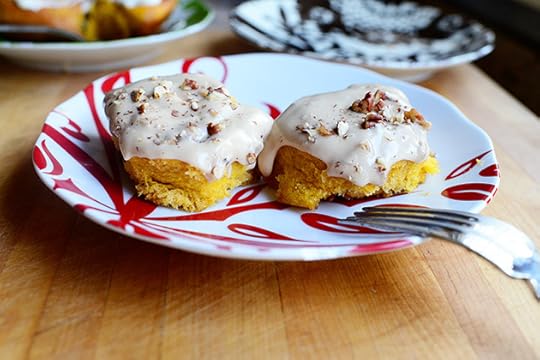
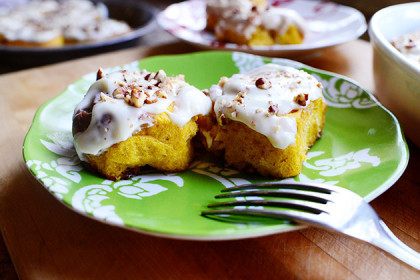
 You’ll want to smear a good amount of frosting over each roll.
 Spread it around so it covers each roll really well…
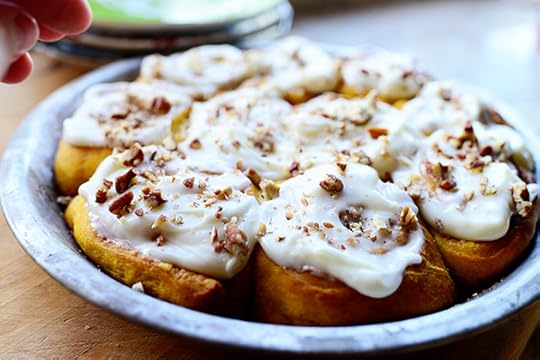 Then sprinkle on some of the chopped pecans.
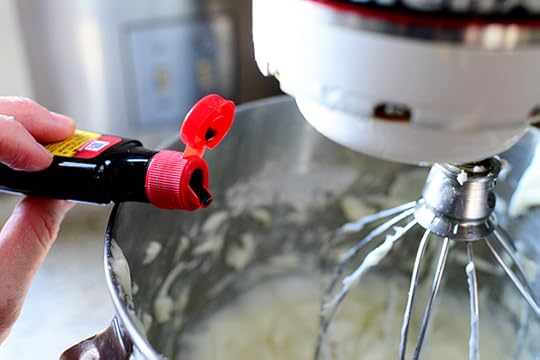 Another approach you can take with the frosting is to add a little maple extract…
 And a little more milk…
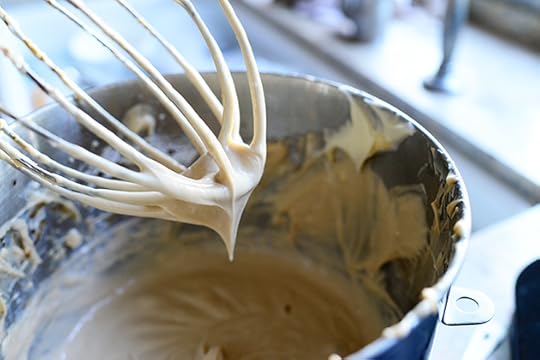 Which gives it a little different flavor and a pretty color.
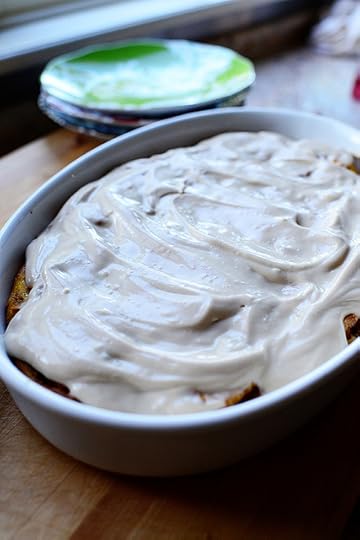 For the other pan, I spread the maple icing all over the surface as if I were icing a cake.
 It’s a world gone mad, I tell you.
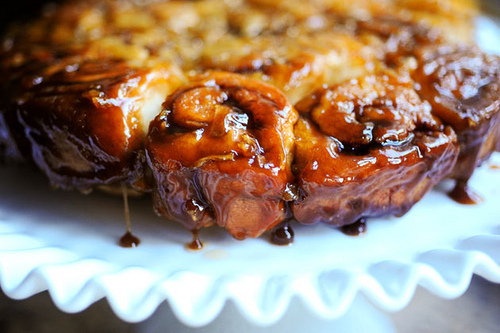
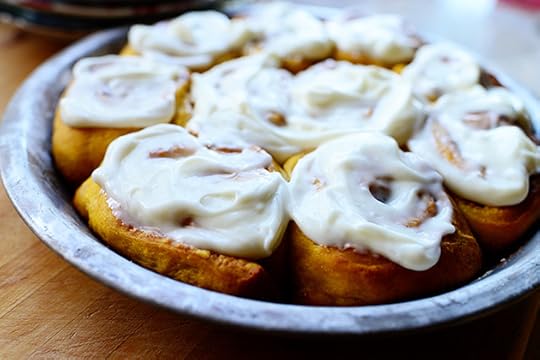
And just wait till you taste them. Good gracious sakes alive.
 The color is gorgeous and the flavors of pumpkin and spice really shine through without being totally overwhelming.
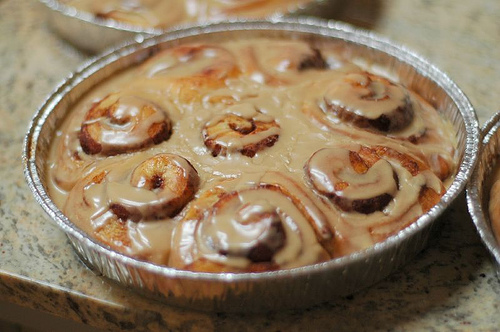
 Here’s the maple version. I may have laid on the frosting a little thick.
But as Confucius always said: Life is too short for frosting-related regrets!
These are super fun to make. Whip them up with your kid, your friend, or your honey!
Here’s the handy-dandy printable.
Recipe
Pumpkin Cinnamon Rolls
Prep Time: 1 Hour30 Minutes
Cook Time: 15 Minutes
Difficulty: Easy
Servings: 24
Print Recipe
Ingredients
Dough1-1/2 cup Whole Milk1/2 cup Vegetable Oil1/2 cup Sugar1 package (2 1/4 Teaspoons) Active Dry Yeast1 cup Pumpkin Puree4 cups All-purpose Flour1/2 teaspoon Ground Cinnamon1/4 teaspoon Ground Nutmeg1/4 teaspoon Ground Ginger1/2 cup (additional) All-purpose Flour1/2 teaspoon Baking Soda1/2 teaspoon (heaping) Baking Powder1/2 teaspoon Salt Filling1 stick 1/2 Cup Butter, Melted1/2 cup Sugar1/2 cup Brown Sugar1/2 teaspoon Cinnamon1/4 teaspoon Ground Nutmeg1/2 teaspoon Ground Ginger1 cup Finely Chopped Pecans FROSTING8 ounces, weight Cream Cheese, Softened1/2 pound Powdered Sugar1/4 cup Whole Milk2 Tablespoons Butter, Melted Dash Of Salt Extra Flour, For Rolling Extra Milk, For Thinning Extra Butter, For The Baking Pans Preparation Instructions
MAKE THE DOUGH
In a large saucepan, combine 1 1/2 cups whole milk, 1/2 vegetable oil, and 1/2 cup sugar. Heat until hot but not boiling, then remove the pan from the stove and allow it to cool until the mixture is warm to the touch but not too hot. Sprinkle the yeast over the surface of the liquid and allow to sit for 5 minutes. Stir in pumpkin puree until combined.
Combine 4 cups of flour with 1/2 teaspoon cinnamon, 1/4 teaspoon nutmeg, and 1/4 teaspoon ginger. Sprinkle it into the saucepan and stir until it just comes together. Cover the saucepan with a dish towel and set in a warm, draft-free place for 1 hour.
After 1 hour, the mixture should be very puffy and at least doubled in size. Stir in 1/2 cup flour, baking soda, baking powder, and salt until totally combined.
MAKE THE ROLLS
Preheat the oven to 375 degrees. Drizzle butter into 3 pie pans (or a larger baking dish) and smear it all over the bottom of the pans.
Turn out dough onto a floured surface and press it into a rectangular shape. If it is overly sticky, sprinkle generously with flour and handle it/flour it until it's easier to handle. Flour a rolling pin and roll the dough into a large rectangle about 10 inches by 30 inches.
Drizzle the melted 1 stick of butter over the dough and smear it all over the surface with your fingers. Mix together 1/2 cup sugar, 1/2 cup brown sugar, and the cinnamon, nutmeg, and ginger. Sprinkle this all over the surface of the dough, covering all the melted butter. Sprinkle with 1/2 cup to 3/4 cup chopped pecans.
Starting at the top, use a "typewriter" motion to roll the dough toward you into a large log. Roll it tightly as you go so the rolls with be nice and neat. When it's all rolled, pinch the seam closed and turn the roll over so that the seam is facing down.
Slice 1/2 to 3/4 inch slices and place them in the buttered pan(s). Allow them to rise for 20 minutes, then bake for 15-18 minutes or until nice and golden brown around the edges.
MAKE THE FROSTING
While the rolls are baking, making the frosting by combining all the frosting ingredients in the bowl of an electric mixer. Beat until fluffy, adding more milk if you'd like a thinner icing. Add maple flavoring if using and beat until combined.
FINISH THE ROLLS
Ice rolls the second they come out of the oven. Sprinkle extra nuts over the frosting, then allow them to sit for 15 minutes before serving.
Delicious!
Posted by Ree on October 21 2013

October 16, 2013
Homemade Applesauce
 Homemade applesauce is one of those things that makes you wonder, after you whip up a batch, why more folks don’t make it. It truly is one of the easiest and most delicious treats-snacks-condiments-ingredients you can make from scratch, and it doesn’t take much time at all. And, most importantly, it makes you a more contented, well-rounded individual with shinier hair, a slimmer waist, a sharper mind, and a more pleasant disposition.
Okay, so not necessarily on those last few items.
But it is really easy to make!
And oh, the things you can do with homemade applesauce. Here’s just a slight smattering.
* Make silver dollar applesauce pancakes. Whoa. The flavor.
* Make muffins like these. Tremendously good!
* Top cooked pork chops, as in this recipe. Just sub applesauce for the large apple chunks. Applesauce and pork chops go together. Just ask Peter Brady!
* Substitute apple sauce for the oil in many baked goods. It’s a healthy choice, baby.
* Spoon warm applesauce over vanilla (or caramel!) ice cream and sprinkle with a little cinnamon. To die for!
* Make regular French Toast and top with a big spoonful of applesauce.
* Eat a small bowl of chilled applesauce for breakfast, or as a side dish for lunch or dinner.
Homemade applesauce for president!
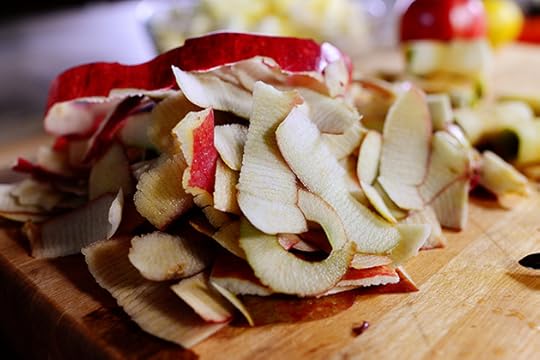 You need to start by peeling a bunch of apples. Sometimes I just hurriedly peel them, but sometimes I start at the top and peel in one continuous coil, and if I make it to the bottom without the coil breaking, everything in my life is going to turn out okay…or I’m the grooviest, coolest person in the world…or something like that.
You do that too, right? Like right before you try to toss something into a trash can, and you tell yourself if you make it, you’re the winner of everything? And if you miss it, everything in your life will implode?
Great. I’m so glad you do that, too!
 Core the apples, too…
 Then slice them into 8-slices each. I used one of those combination corer/slicers, which made it go really fast, but you could also just cut around the core and slice that way.
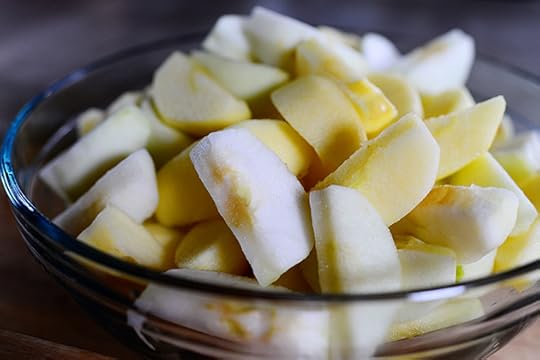
You basically need all the apple flesh you can get!
Oh, and on that note: You can use whatever apples you want. Some folks have specific varieties of apples they like to use when they make applesauce, but since I often just use an assortment based on what I have in my fridge, I’ve conditioned myself to believe the variety of apples doesn’t really matter. I used a mix of Honey Crisp and Macintosh. I think.
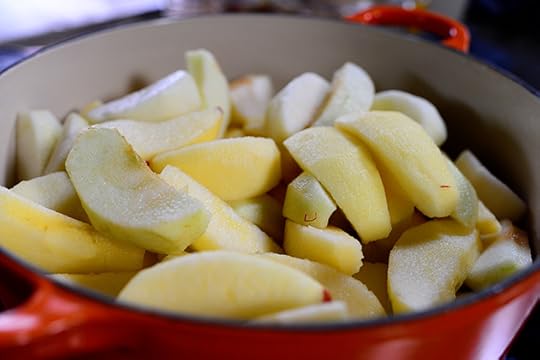 Throw them in a pot big enough to hold them…
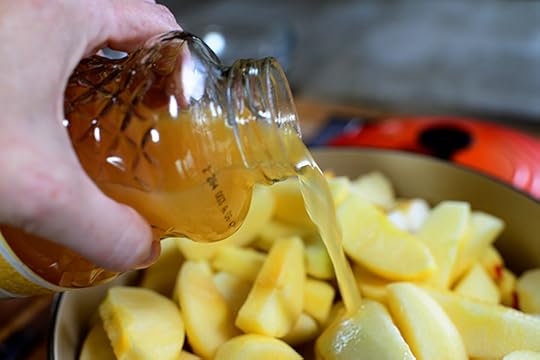 Then pour in about a cup of apple juice. You can also do apple cider or just straight-up water. You just need a little liquid to help things along.
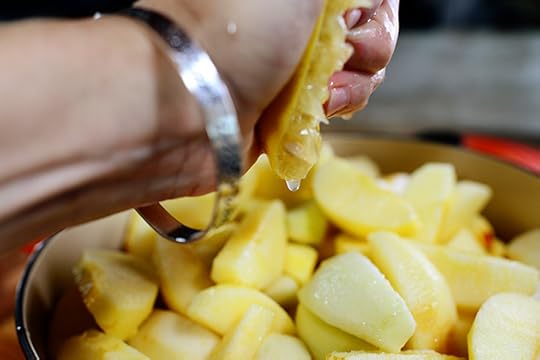 Next up: Squeeze in the juice of a lemon…
 And, for glorious sweetness and deeper color, add half a cup of brown sugar. You can use regular sugar instead, but I love the color the darker sugar brings to the equation. You could also sub some maple syrup for some of the sugar if you want to go that direction. Also, you can add more sugar to make it much sweeter if that makes your skirt fly up. The world is your applesauce!
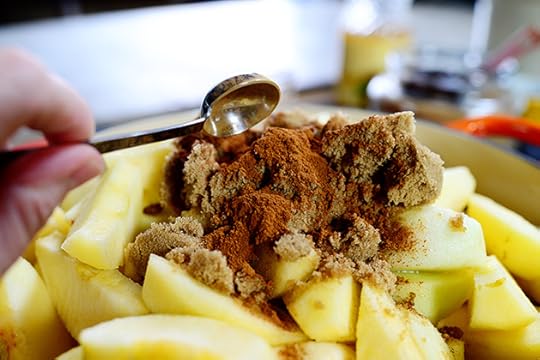 Next, add a little cinnamon. This is totally optional, too! You can leave out spices if you’d rather just have the natural apple flavor by itself. Or you can up the spices and add ground cloves, ground nutmeg, or a little allspice. You’re the boss with applesauce.
And while we’re on the subject: I never have added butter to my applesauce. Many people do. But I don’t. It’s delicious if you do. But it’s delicious if you don’t, and butter-free applesauce is much more pure and holy. And if you’re looking to use applesauce as a substitute for oil/fat in muffins and other baked goods, the presence of butter kind of defeats that purpose.
Write this day on your calendar. It’s probably the only time in history I’ll be suggesting that butter not be used.
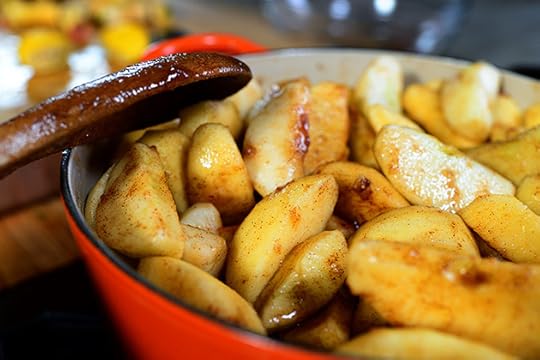 Now just stir the apples over medium to medium-high heat, then cover the pot and let them cook for 25 minutes or so.
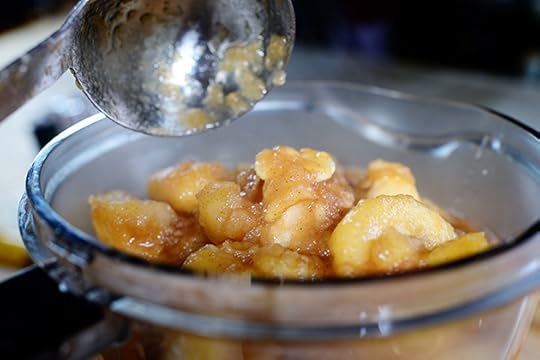
 The apples should be partly broken up, partly still intact, and very soft and tender.
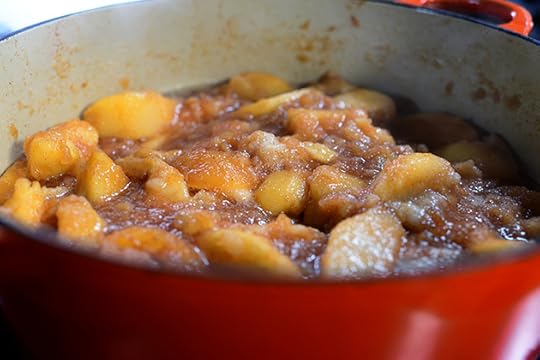
 Now, you can take one of two approaches with the texture of the applesauce: You can use a potato masher (or forks or whisks) to break up the apples by hand, which will leave you with a more textured and chunky applesauce, or you can puree it to make it smooth. I prefer the latter, because that most closely resembles my childhood experience with applesauce, and however I ate things as a child is exactly how I want to eat things as adults. Absolutely, positively no exceptions.
Not that I’m particular or anything.
 To puree the applesauce, I transfer all the contents of the pan to a food processor. You can use a blender or food mill, too—whatever your poison. Just keep in mind that if you use a blender especially, and if you puree the applesauce while it’s still hot as I did, you should do it in smaller batches to avoid the hot applesauce spraying everywhere.
This has been a public service announcement.
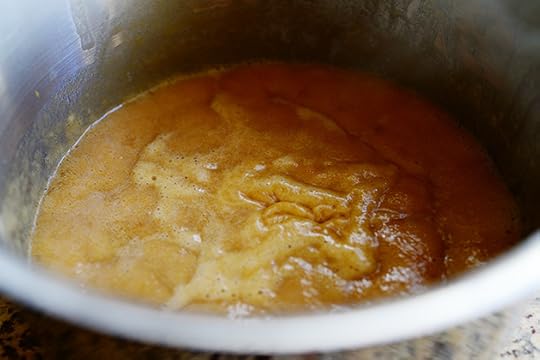
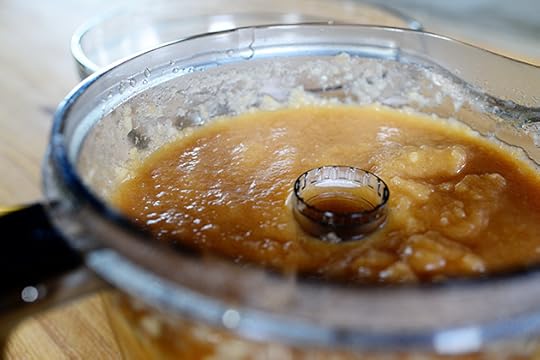 Just puree it until it’s the consistency you want. You can stop just short of it being totally smooth, or you can keep on going until it looks and feels like velvet.
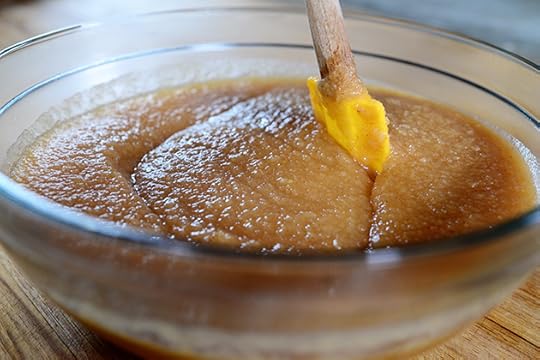 This is sort of in between: No huge chunks, but just a nice applesauce texture.
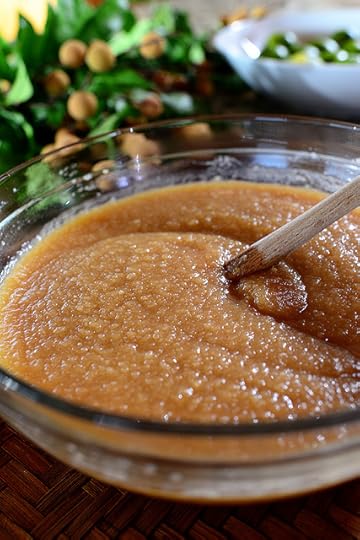 Now, you can just store it in a bowl, covered in the fridge…
 Or you can use a wide-mouth funnel…
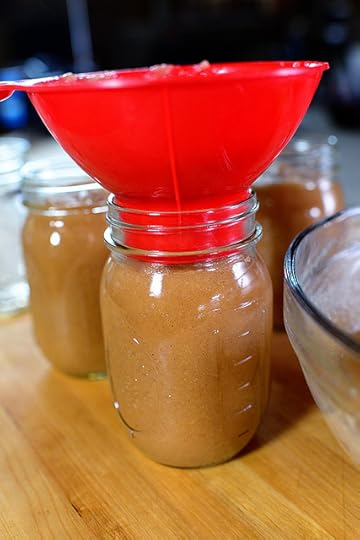 To transfer it to mason jars. With the lids on, the applesauce will stay good in the fridge for awhile, and the mason jars make it easy to just grab smaller portions.
You can also can the applesauce, but the canning side of things is another story for another time, and for this size of batch, I will just store it in the fridge. It’ll be gone before I know it!
Here’s the handy printable. This quantity yielded about 6-7 cups of applesauce, so you can halve it…or triple, quadruple, or quintuple it if you’ve got a pot big enough! Just adjust the cooking time to ensure the apples are tender and you’re good to go.
Have fun, my friends!
Recipe
Homemade Applesauce
Prep Time: 15 Minutes
Cook Time: 25 Minutes
Difficulty: Easy
Servings: 12

Print Recipe
Ingredients
6 pounds Apples, Peeled, Cored, And Cut Into 8 Slices1 cup Apple Juice Or Apple Cider Juice Of 1 Lemon1/2 cup Brown Sugar, Packed1 teaspoon Cinnamon, More Or Less To Taste Optional Ingredients: Nutmeg, Maple Syrup, Allspice, Butter Preparation Instructions
Combine all ingredients in a large pot and cook over medium heat, stirring occasionally, for 25 minutes.
Carefully puree in a food processor or blender (don't fill too full; split into two portions if needed) until smooth.
Store in the fridge and serve by itself, over pork chops, over ice cream, over pancakes...or any place where applesauce is needed!
Posted by Ree on October 16 2013

Ree Drummond's Blog

- Ree Drummond's profile
- 2036 followers

