
Ree Drummond's Blog, page 32
March 10, 2014
Amazing “Surprise Inside” Giveaway (Winner!)
The winner of the awesome “Surprise Inside” Giveaway is…
#26627 Cookies4Kids: “The last thing I baked was a cinnamon chocolate banana bread, and the Starbucks lemon loaf.”
Congratulations! Contact prizes@thepioneerwoman.com to claim your package!
 My friend Amanda Rettke’s new cookbook comes out tomorrow, and it is incredibly fun, aspirational…and inspirational!
It’s Surprise Inside: Amazing Cakes for Every Occasion—with a Little Something Extra Inside, and I’ve been waiting for it for a long, long time.
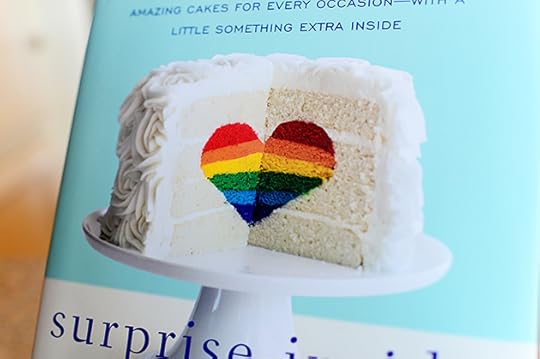 Amanda is, in one word, amazing. Her creative cakes are legendary online, but in this book she takes it a thousand steps further. The cake projects are so much fun, and her detailed instructions make them actually seem doable…even for someone like me, who’s much more comfortable in front of a skillet than she is with a pastry bag in her hand.
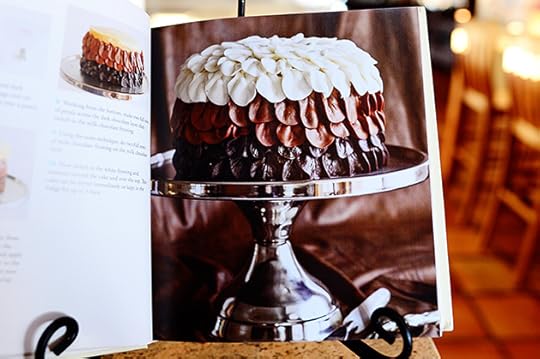
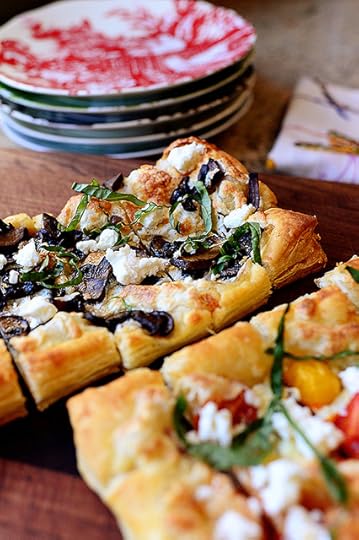
Here’s are some of my favorite cakes in the book.
 How much fun would this be for a birthday or baby shower?
Or an Easter egg decorating party!
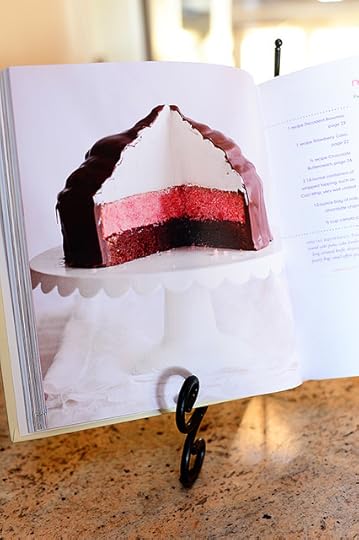
 And I’m in love with this Ombre cake. It’s not too tricky inside—just three different cake flavors—but it’s the outside that’s especially stunning. Wow!
 This is probably one of the three cakes that I’ve been unable to get off my mind since I first saw it. It’s toward the top of my list of cakes I want to try.
 A house! And you might look at this and think “impossible,” but once you read Amanda’s instructions, it all makes perfect sense.
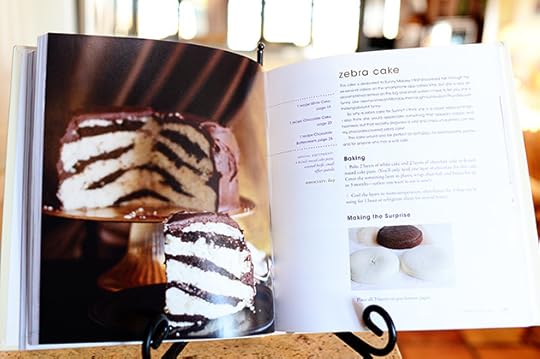 Love, love, love the zebra cake…probably because the lines don’t have to be perfectly straight. Ha.
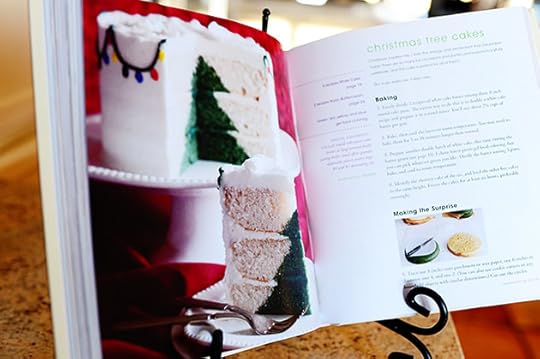 The Christmas Tree cake is just amazing…
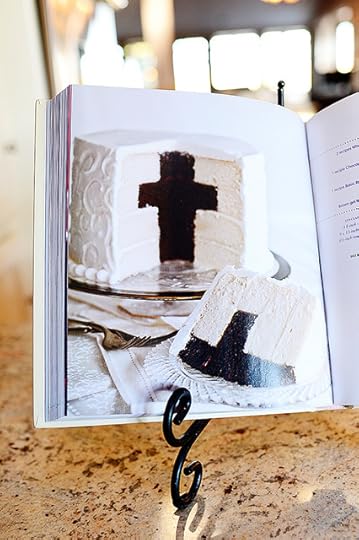 The Cross Cake is just perfect…
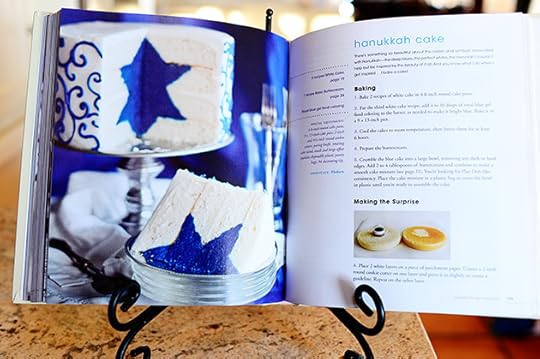 And the Hanukkah Cake? Stunning!
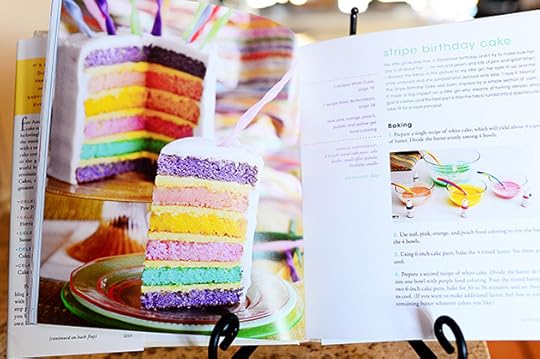
 I take back what I said earlier about the pastel stripe cake being perfect for an Easter egg decorating party.
 How perfect would this be?
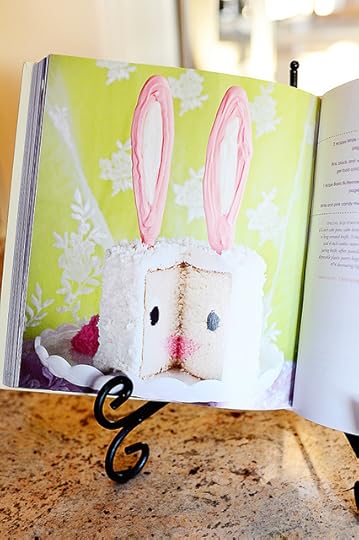
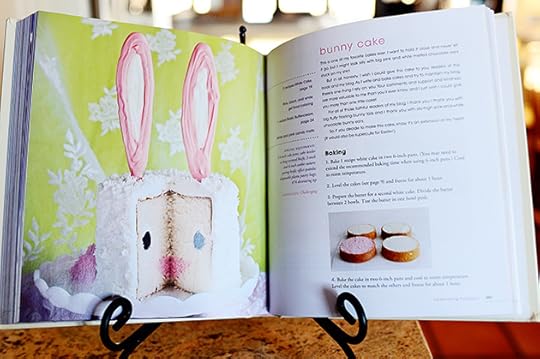
 Here’s a glimpse at some of the instructions for the Bunny cake. Incredibly detailed, incredibly helpful.
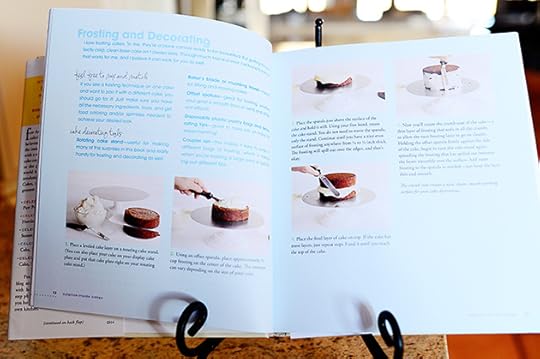 There are also basic recipes for different flavors of cake and buttercream, as well as tips and instructions for baking and frosting.
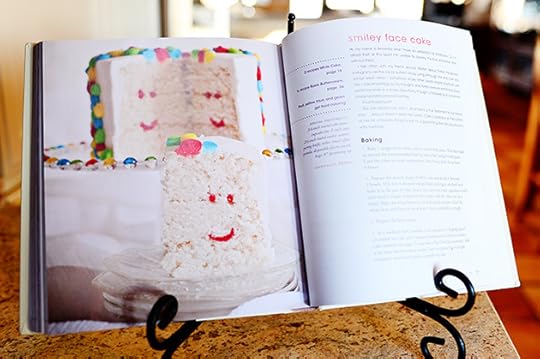 I’ll end by showing you the cake that makes me smile the most.
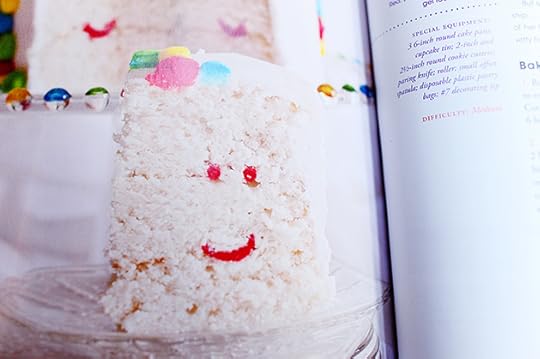 It’s not the most elaborate cake in the book, but I think it’s so charming. Every slice has this little grin inside. So adorable!
THE GIVEAWAY
Today, to celebrate tomorrow’s release of Amanda’s book, I’m giving away a copy of It’s Surprise Inside: Amazing Cakes for Every Occasion—with a Little Something Extra Inside…
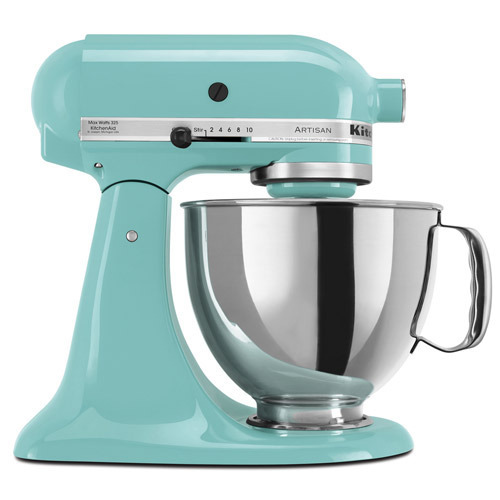 Along with this gorgeous KitchenAid Artisan Stand Mixer in this “Aqua Sky” color…
 These stunningly awesome latte mixing bowls (set of 3)…
 Not to mention 2 of these Chicago Metallic 9-inch Round Cake Pans…
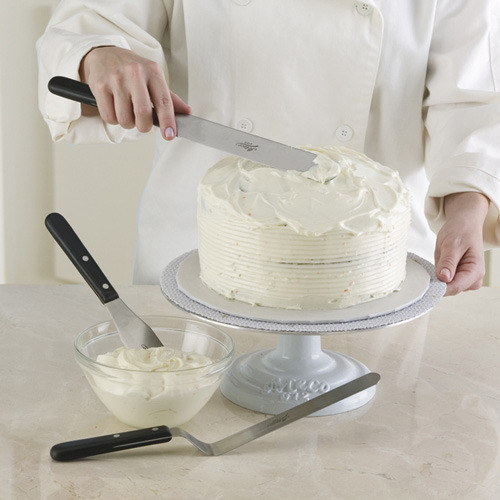 This 3-piece decorating spatula kit…
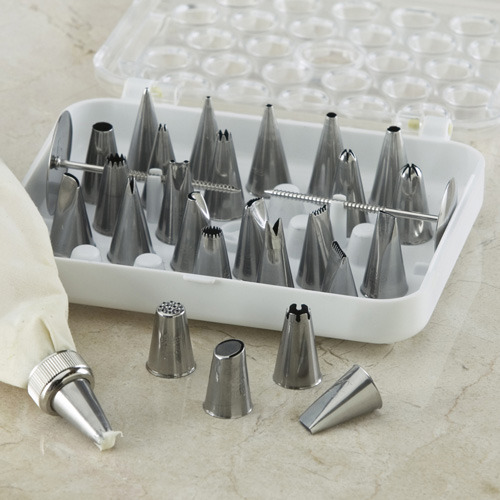 And this Ateco cake decorating kit!
If you’re wanting to tackle some of the cakes in Amanda’s book, I think these things will be a great start!
TO ENTER
To enter this giveaway, just answer the following question in the Comments section of this post:
“What is the last thing you baked?”
Was it a pan of brownies? A nine-tiered wedding cake? A piece of toast? A cherry pie?
Just shout out the last thing you baked—no matter what it is—and you’re entered to win this great bunch of baking loot.
THE RULES
One entry per person, please.
Winners will be announced Tuesday evening.
Good luck!
And be sure to check out Amanda’s new cookbook! It’ll definitely make you want to dive in and give a surprise-inside cake a try.
And here’s Amanda’s website: I Am Baker
Giveaway sponsored by Pioneer Woman.


Amazing “Surprise Inside” Giveaway!
My friend Amanda Rettke’s new cookbook comes out tomorrow, and it is incredibly fun, aspirational…and inspirational!
It’s Surprise Inside: Amazing Cakes for Every Occasion—with a Little Something Extra Inside, and I’ve been waiting for it for a long, long time.
Amanda is, in one word, amazing. Her creative cakes are legendary online, but in this book she takes it a thousand steps further. The cake projects are so much fun, and her detailed instructions make them actually seem doable…even for someone like me, who’s much more comfortable in front of a skillet than she is with a pastry bag in her hand.
Here’s are some of my favorite cakes in the book.
How much fun would this be for a birthday or baby shower?
Or an Easter egg decorating party!
And I’m in love with this Ombre cake. It’s not too tricky inside—just three different cake flavors—but it’s the outside that’s especially stunning. Wow!
This is probably one of the three cakes that I’ve been unable to get off my mind since I first saw it. It’s toward the top of my list of cakes I want to try.
A house! And you might look at this and think “impossible,” but once you read Amanda’s instructions, it all makes perfect sense.
Love, love, love the zebra cake…probably because the lines don’t have to be perfectly straight. Ha.
The Christmas Tree cake is just amazing…
The Cross Cake is just perfect…
And the Hannukah Cake? Stunning!
I take back what I said earlier about the pastel stripe cake being perfect for an Easter egg decorating party.
How perfect would this be?
Here’s a glimpse at some of the instructions for the Bunny cake. Incredibly detailed, incredibly helpful.
There are also basic recipes for different flavors of cake and buttercream, as well as tips and instructions for baking and frosting.
I’ll end by showing you the cake that makes me smile the most.
It’s not the most elaborate cake in the book, but I think it’s so charming. Every slice has this little grin inside. So adorable!
THE GIVEAWAY
Today, to celebrate tomorrow’s release of Amanda’s book, I’m giving away a copy of It’s Surprise Inside: Amazing Cakes for Every Occasion—with a Little Something Extra Inside…
Along with this gorgeous KitchenAid Artisan Stand Mixer in this “Aqua Sky” color…
These stunningly awesome latte mixing bowls (set of 3)…
Not to mention 2 of these Chicago Metallic 9-inch Round Cake Pans…
This 3-piece decorating spatula kit…
And this Ateco cake decorating kit!
If you’re wanting to tackle some of the cakes in Amanda’s book, I think these things will be a great start!
TO ENTER
To enter this giveaway, just answer the following question in the Comments section of this post:
“What is the last thing you baked?”
Was it a pan of brownies? A nine-tiered wedding cake? A piece of toast? A cherry pie?
Just shout out the last thing you baked—no matter what it is—and you’re entered to win this great bunch of baking loot.
THE RULES
One entry per person, please.
Winners will be announced Tuesday evening.
Good luck!
And be sure to check out Amanda’s new cookbook! It’ll definitely make you want to dive in and give a surprise-inside cake a try.
Giveaway sponsored by Pioneer Woman.
March 6, 2014
Slice-Baked Potatoes
 When Marlboro Man, the kids, and I were in Colorado last month, we ordered Twice-Baked Potatoes one night. Instead of the traditional twice-baked potatoes our souls were used to—the hollowed-out potato halves stuffed with luscious filling and baked—they brought plates of curious potato rounds, each with a layer of melted cheese on top. We all looked at one other with panicked expressions. What were these frightening little discs? Who would mess with the simple beauty of a traditional twice-baked potato? What has happened here in Colorado? When did everything go so horribly wrong?
(I suggested under my breath that it was all the marywanna. But Marlboro Man and the kids didn’t hear me.)
After closer examination—i.e., after we all got over our initial trauma and took a bite—we discovered that they were simply reconstructed little twice-baked potatoes; but instead of potato halves, they used potato slices. A simple and clever twist on the twice-baked theme!
I’d been meaning to recreate these once we returned from our ski trip and I could move my limbs again, and yesterday I finally got around to it.
Deliciousness ensued!
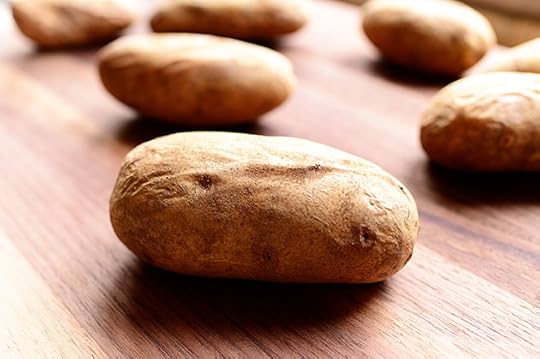
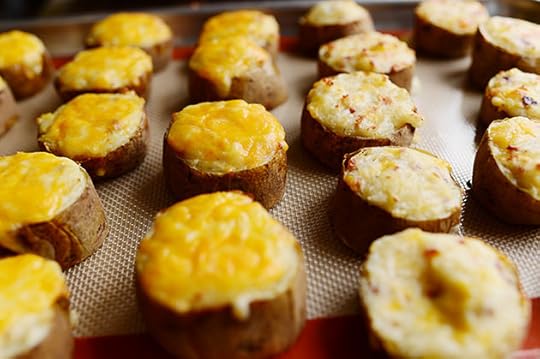
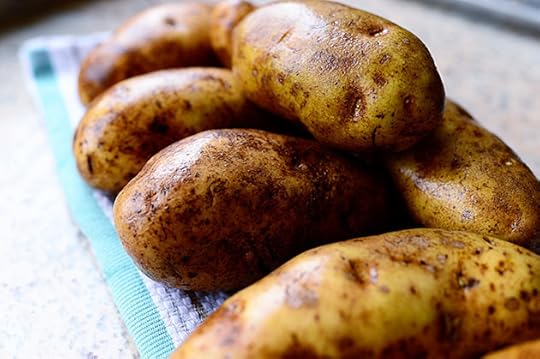 First, scrub a bunch of russet potatoes till they’re really clean.
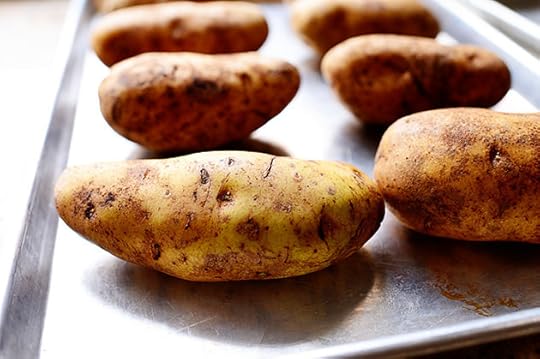 Dry them, set them on a baking sheet, and bake them at 375 for 30 minutes, or until they’re super tender.
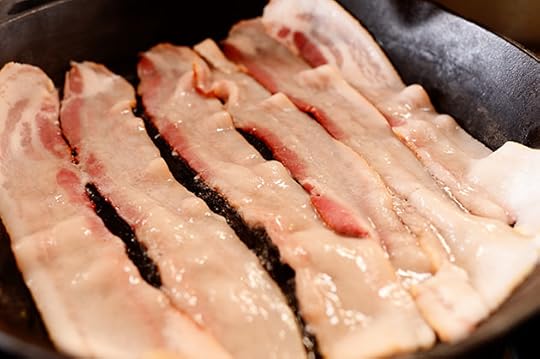 While the taters are a-bakin’, fry up some bacon…
 Until it’s nice and crisp but not burned but not chewy but perfectly crisp.
You got all that?
Good. Will you please explain it to me?
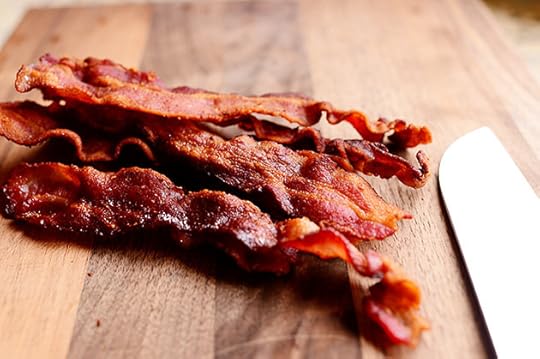 After the bacon is cooked, violently throw it onto a cutting board in a neat pile…
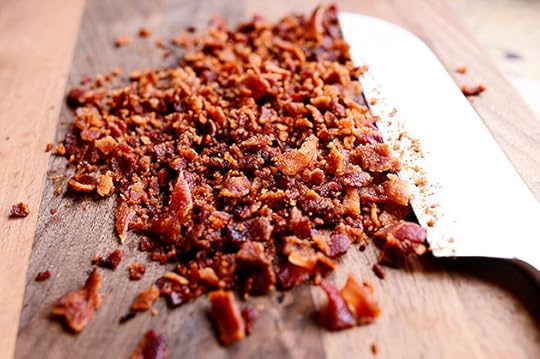 Then chop it up into small pieces. Then go hide it somewhere until you need it so you won’t accidentally eat it all with a spoon.
(That may or may not have happened in my kitchen once or dozens of times.)
 The taters! They’re done!
 So now the fun begins. Transfer the taters to a cutting board.
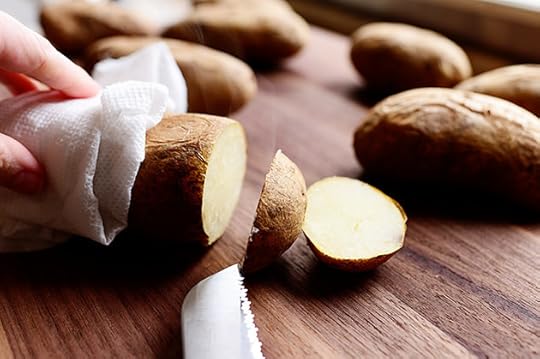 Then lop off the ends…
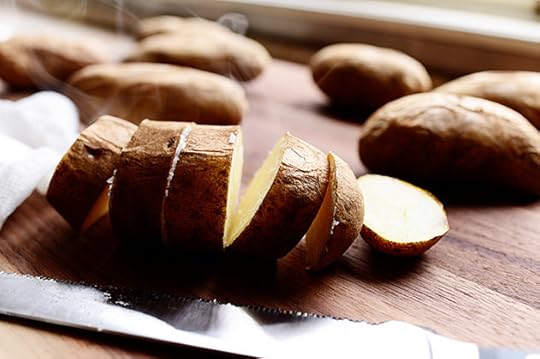 And slice them into nice, chunky slices. If I had any sense of measurement, I would at this time tell you to slice “half-inch” slices or “1-inch slices” or “three-fourths inch slices.”
But I’m not that kind of girl.
 Keep going until they’re all sliced up. Throw the little annoying end pieces into a pile; you can decide later whether to work them into the mix or whether to kick them to the curb.
(I kicked them to the curb.)
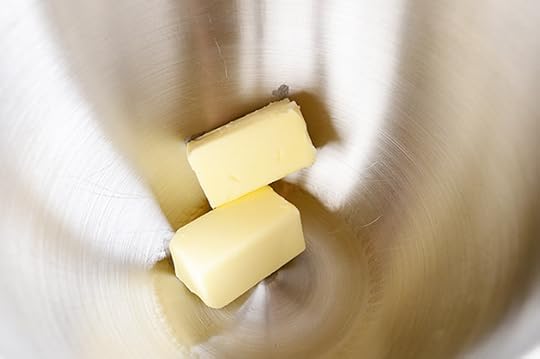 Throw softened butter into a mixing bowl.
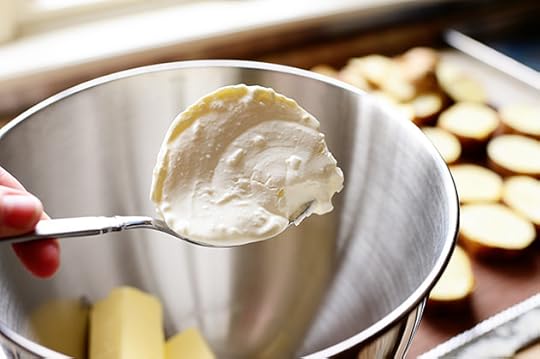 Then grab some sour cream (or Greek yogurt if you’re trying to be a good kid) and throw it into the bowl.
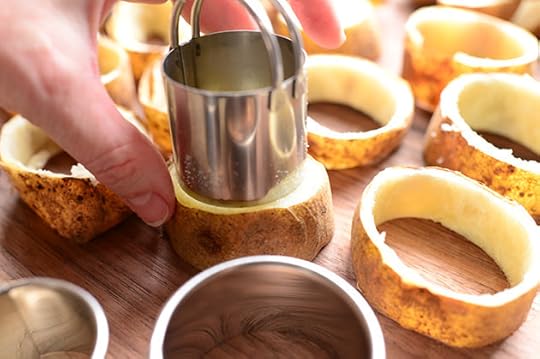
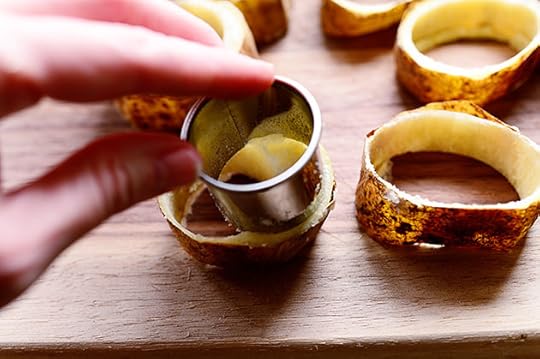
 Now, this isn’t 100% required, but if you have them it makes the next step really easy: Grab some different biscuit cutters approximately the same size as the potato slices.
 Now, since the potato slices are oblong in shape, you can slightly bend a round cutter to fit. (It’ll bend back, man!)
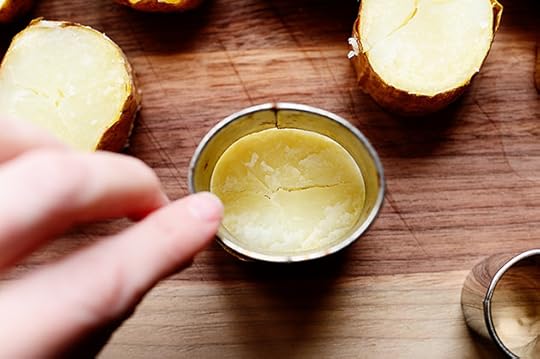 Then place it over one of the slices of potatoes, making sure the cutter fits inside the edge.
 Then just press down…
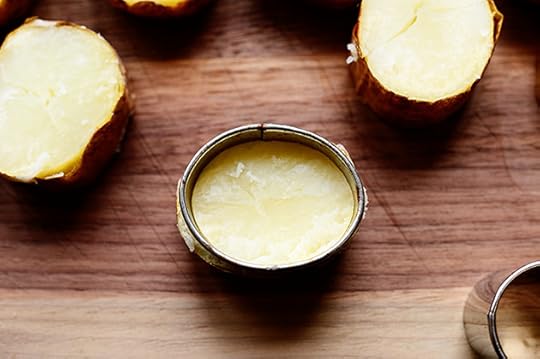
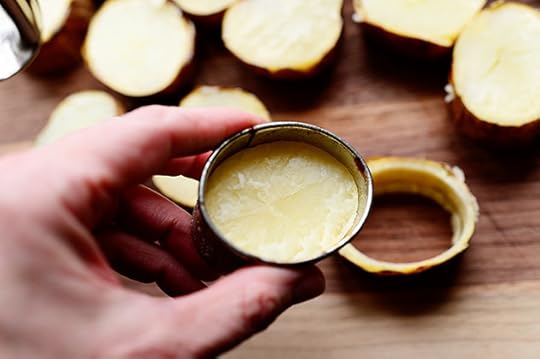 And lift it out!
 And that’s what you’ve got left! A nice little potato ring.
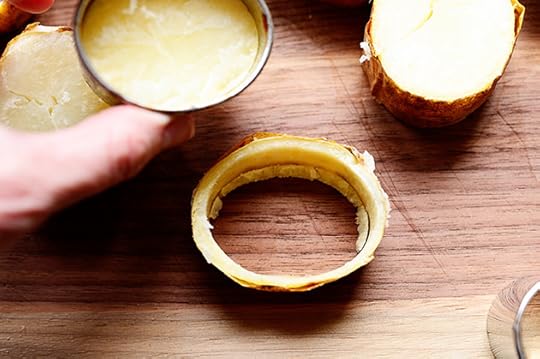
 If you don’t want to bend your cutter, just squeeze the potato slice to conform!
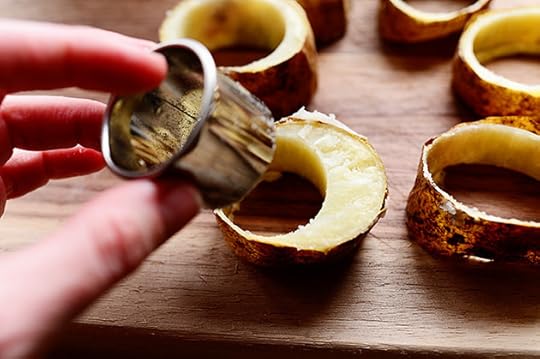 Or, if you don’t have one that perfectly fits, just make one cut over to one side…
 And a second cut over on the other side.
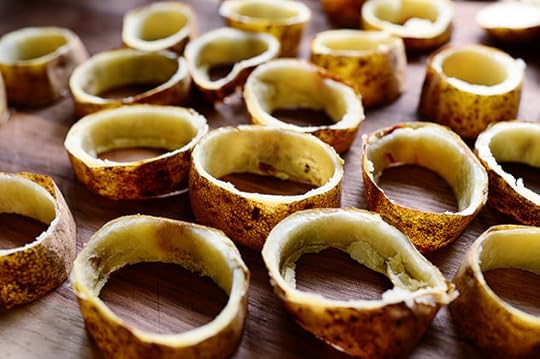 Keep on going…
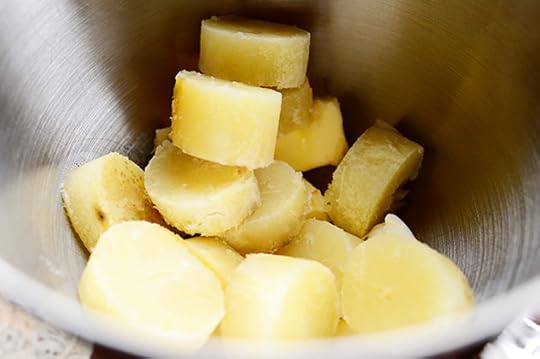 And drop the potato rounds into the mixing bowl as you go. They’ll be nice and warm, so they’ll start melting the butter and warming the sour cream.
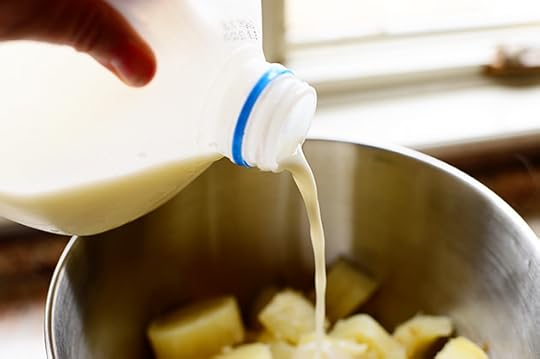 When you’ve finished cutting holes in all the potato slices, you’ll have a bunch of potato innards in the bowl. So add some milk…
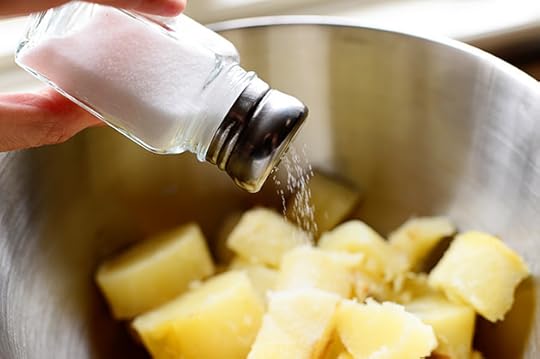 Some salt…
 Some pepper…
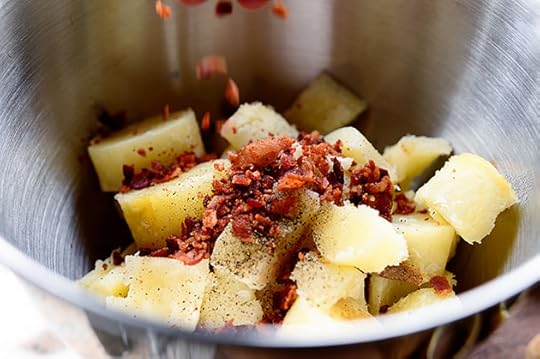 And the bacon…
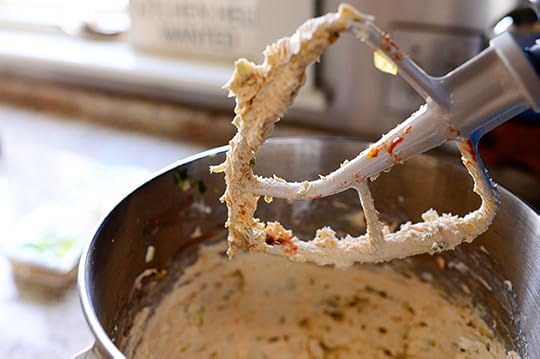
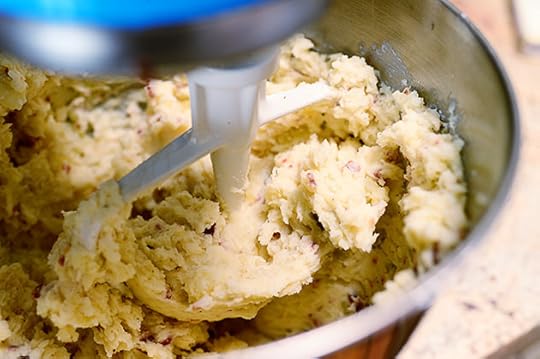 Mix it on low using the paddle attachment until it’s all combined.
*Note: I’m using the mixer so the potato mixture will be really smooth, but you can just use a potato masher if that’s easier! Either one will work fine.
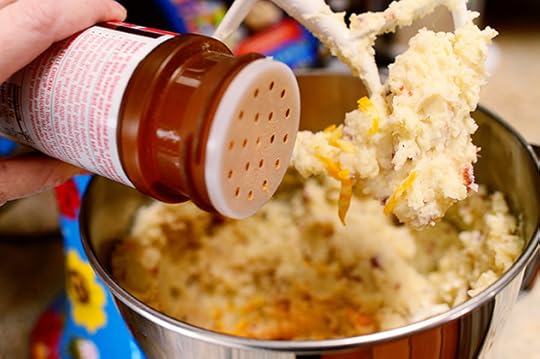 Then I added some grated cheese and, for a little more flavor because I tasted it and thought it was lacking in zip, a little seasoned salt.
 Be sure to taste it when you’re finished mixing to make sure it’s absolutely perfect.
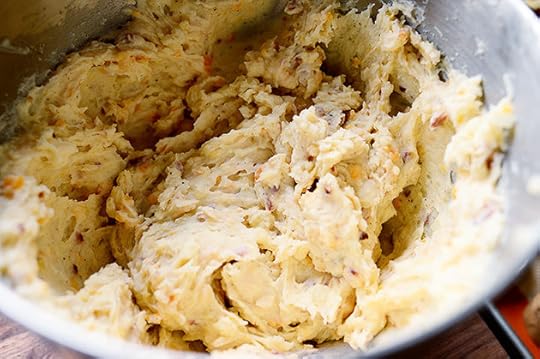 And…it’s perfect!
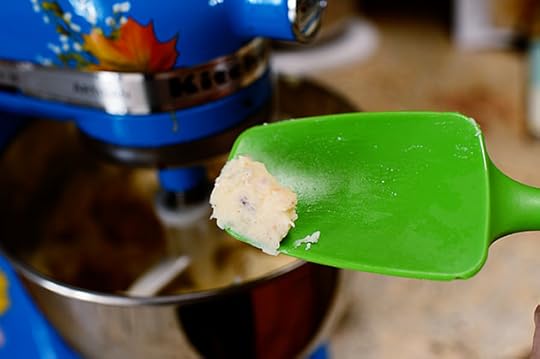
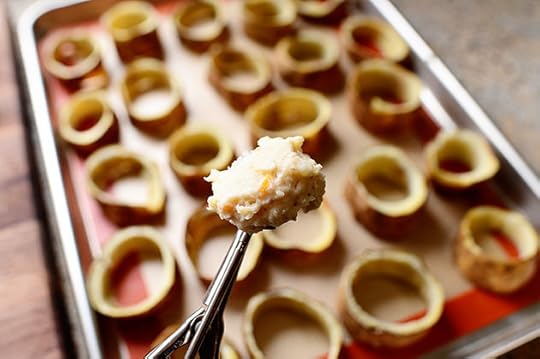 Now it’s time to fill the potato slices. Originally, I was going to use a piping bag, but decided a scoop would be easier.
 As with the cutters, just find a scoop (or spoon!) that’s approximately the same size…
(You can see me there. Hi! *Waving*)
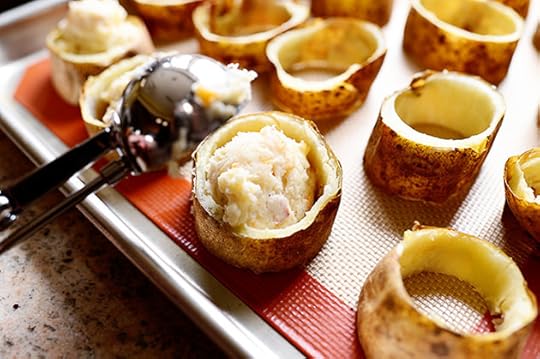 And fill the hole with potato filling.
 And keep going until you’ve got them all filled. (You should have a little filling left over, which you can now eat as an appetizer.)
(You’re welcome.)
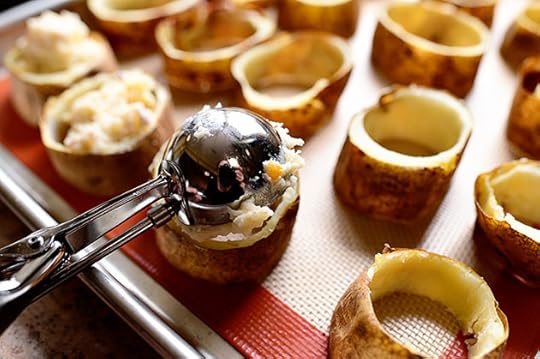
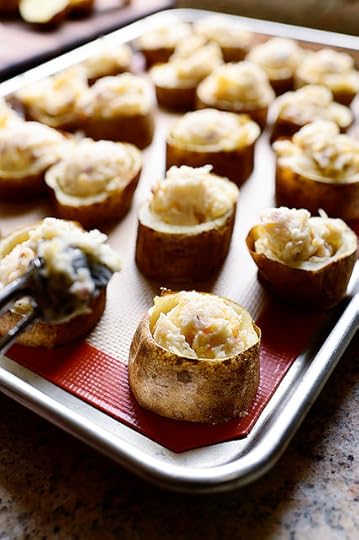
 Next, use a spatula or knife to smooth out the surface.
*Note: I smoothed these out to be flush/even with the top of the peel, but I found out after baking them that it would actually have been better to overfill them a little. (They slightly sink after baking.) So mounding the filling is fine.
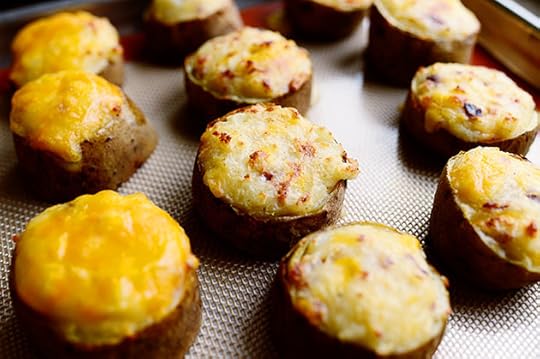
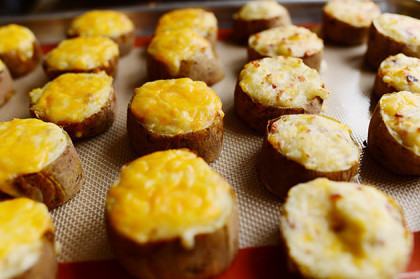
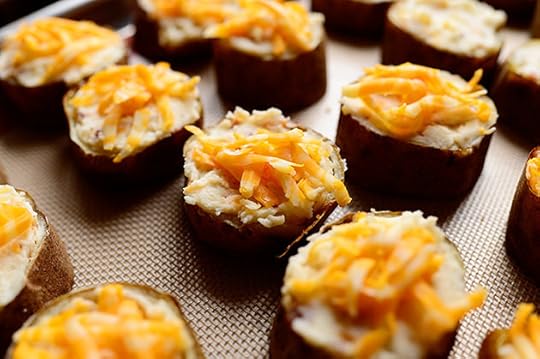 I wasn’t sure whether I’d prefer them plain or cheesy, so I did half with and half without.
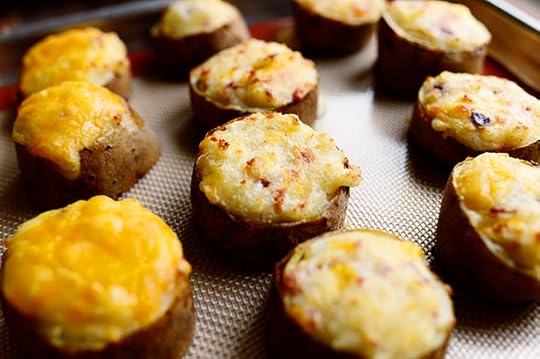 Then I just baked them at 375 for about 8 minutes, then broiled them for about 4.
 I stood watch while the broiler was on, because I didn’t want the cheese to burn—I just wanted it to go a little past that soft melted cheese stage and into the firmer melted cheese stage without going into the burned melted cheese stage.
GOSH DANG, I’M PICKY SOMETIMES!
 Aren’t these fun? What I love about them is that they’re as perfect for a weeknight dinner as they would be for an elegant dinner party! And you can make them well in advance, keep them in the fridge, then just bake them off right before. Or even freeze them, unbaked!
 The only tricky part is that if you try to remove them from the pan right away, the soft potato filling tends to stick/stay behind a little. So the remedy is to let them sit on the pan for a good 10 minutes before serving them. This actually is best anyway, because it gives the potatoes a chance to calm down and cool slightly.
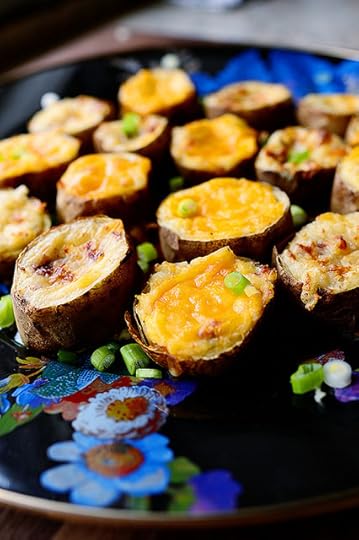 A sprinkling of sliced green onions at the end is just what it needs to finish the job.
Hope you enjoy these, guys! They’re lots of fun…
And they have butter, sour cream, and cheese in them.
And that’s pretty much all that needs to be said.
Here’s the handy dandy printable!
Recipe
Slice-Baked Potatoes
Prep Time: 20 Minutes
Cook Time: 45 Minutes
Difficulty: Easy
Servings: 8
Print Recipe
Ingredients
8 whole Russet Potatoes, Scrubbed Clean1/4 cup Milk1 stick Butter, Softened3/4 cups Sour Cream6 slices Thin Bacon, Fried Crisp And Chopped1/2 cup Grated Cheddar-jack Cheese Salt And Pepper, to taste Seasoned Salt, To Taste2 whole Green Onions, Sliced Preparation Instructions
Preheat the oven to 375 degrees. Place the potatoes on a baking sheet and bake for 30 to 35 minutes, or until the potatoes are tender and the skins are slightly crisp.
On a cutting board, cut off the very end pieces of each potato, then slice the potato into 3 to 4 equal slices. Lay the slices flat and use a round cutter or a spoon to remove most of the insides. Leave a very thin rim of potato around the edge for structure. As you go, dump the insides into a mixing bowl with the butter and sour cream.
Add milk and mix the potato mixture together until smooth. Add bacon, salt, pepper, seasoned salt, and cheese, and mix together. Taste and make sure the mixture is seasoned adequately.
Use a scoop or spoon to fill the potato slices with the potato mixture. Slightly mound the mixture in the slices, as it will settle after baking. Top with additional cheese if desired, and bake at 375 for 8 minutes, or until the cheese is melted. Turn on the broiler and broil for 3 to 4 minutes, watching very carefully so you won't burn them.
Remove from oven and let sit on the baking sheet for at least 10 minutes before removing with a spatula and serving. (Note: Filling will be soft, so the longer they sit after baking, the easier they'll be to remove.)
Can make these well in advance and keep in the fridge or freezer, unbaked!
Posted by Ree | The Pioneer Woman on March 6 2014

March 5, 2014
My Waffle Maker! (Winners!)
The winners of the waffle makers are…
#31814 Vivian P: “Sadly my Belgian waffle maker broke after a year…so I made a Dutch Babbie oven pancake but miss having waffles.”
#49274 Amanda G: “I didn’t really get to have breakfast today other than my very large cup of hot tea. I don’t get out of bed early enough to eat at home before work and it was too busy at work to take time to eat.”
Congrats, winners! Contact prizes@thepioneerwoman.com to claim your waffle makers!
 I’m going to start giving away different cooking and baking equipment I use in my recipe posts here on The Pioneer Woman Cooks. I’ve done that for a long time, but mostly with mixers, Le Creuset pots, and knives. Watch for other fun giveaways in the coming weeks and months: If you see it in a recipe post one week, you might see it in a giveaway post the next!
 Today, because I posted my luscious waffle recipe a couple of weeks ago, I’m giving away two (2) of these Breville Smart Waffle Makers.
 When I got one of these recently, it was because my old waffle maker was kaput, and I wasn’t sure I’d want or need all the bells and whistles (you can easily adjust the browning level of the waffles, and you can set it to different settings for Classic, Belgian, Chocolate, or other varieties.) The verdict, however, is that I am absolutely loving it so far.
 It makes glorious waffles!
TO ENTER
To enter the giveaway, just answer the following question in the Comments section of this post:
“What did you have for breakfast this morning?”
Did you have an extra large coffee? A doughnut? A bowl of oatmeal with fruit? A cheese omelet? A granola bar? A fried egg? Or, dare I say it, a waffle?
Just shout out what you had for breakfast today (even if you haven’t had breakfast yet!) and you’re entered to win the waffle maker.
RULES
One entry per person, please.
Winners will be selected at random and announced Thursday.
Good luck!
Giveaway sponsored by Pioneer Woman.
NOTE: WINNERS HAVE BEEN ANNOUNCED AND COMMENTS ARE CLOSED.

My Waffle Maker!
I’m going to start giving away different cooking and baking equipment I use in my recipe posts here on The Pioneer Woman Cooks. I’ve done that for a long time, but mostly with mixers, Le Creuset pots, and knives. Watch for other fun giveaways in the coming weeks and months: If you see it in a recipe post one week, you might see it in a giveaway post the next!
Today, because I posted my luscious waffle recipe a couple of weeks ago, I’m giving away two (2) of these Breville Smart Waffle Makers.
When I got one of these recently, it was because my old waffle maker was kaput, and I wasn’t sure I’d want or need all the bells and whistles (you can easily adjust the browning level of the waffles, and you can set it to different settings for Classic, Belgian, Chocolate, or other varieties.) The verdict, however, is that I am absolutely loving it so far.
It makes glorious waffles!
TO ENTER
To enter the giveaway, just answer the following question in the Comments section of this post:
“What did you have for breakfast this morning?”
Did you have an extra large coffee? A doughnut? A bowl of oatmeal with fruit? A cheese omelet? A granola bar? A fried egg? Or, dare I say it, a waffle?
Just shout out what you had for breakfast today (even if you haven’t had breakfast yet!) and you’re entered to win the waffle maker.
RULES
One entry per person, please.
Winners will be selected at random and announced Thursday.
Good luck!
Giveaway sponsored by Pioneer Woman.
March 3, 2014
Pancake Mini-Muffins
 Tomorrow is Shrove Tuesday, which the day before Ash Wednesday, which is the day the Christian season of Lent begins, which is typically the time of year I wrestle mightily with whether to give up coffee or wine and I wind up choosing wine because giving up coffee would be next to impossible, which, of course, is an indication that I should give up coffee since the whole purpose of Lent is sacrifice, but I’ll just be honest: I haven’t got the guts. Which, of course, means that coffee is exactly what I should give up. Which, of course, is precisely why I can’t give it up.
I’m so glad we had this talk.
Shrove Tuesday (more commonly known as Fat Tuesday) is also sometimes referred to as “Pancake Tuesday” since feasting on rich, indulgent foods (uhh…pancakes, anyone?) is a tradition just before Lent. Growing up, our Episcopal church held an annual Shrove Tuesday pancake supper, and I always remember it being so much fun—especially knowing that the next day, the party was totally over for the next 40 days.
Since I’d had pancakes on the brain, and since my two boys had had their two best friends spend the night, I made a double batch of pancake batter yesterday morning. Once the four hooligans had wolfed down approximately 30,000 regular pancakes, I looked at the rest of the batter and decided to have some fun with it.
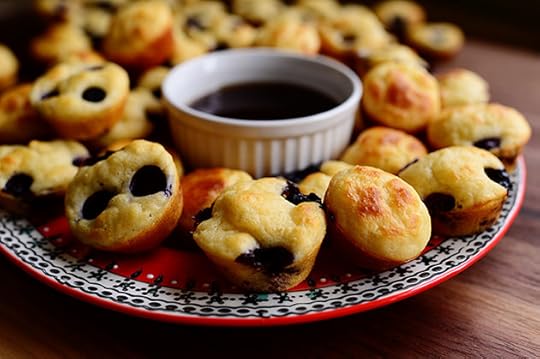
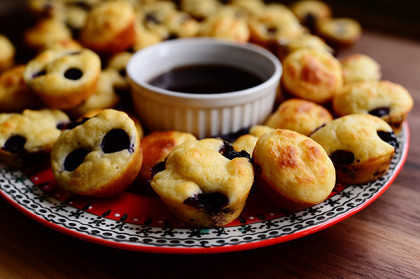
These mini-muffins are as delicious as they are fun! Make as many as you want, serve them with a dish of warm syrup, and watch everyone dig in!
(Note: If you’d like to consider some other pancake possibilities for your Shrove Tuesday pancake feast, here is my Pancake Archive!)
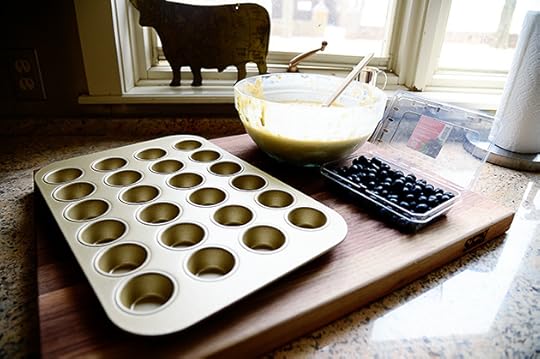 Start with pancake batter. You can use mine, or you can use whatever favorite of yours you like to use, or (gulp, please forgive me…) you can use a mix.
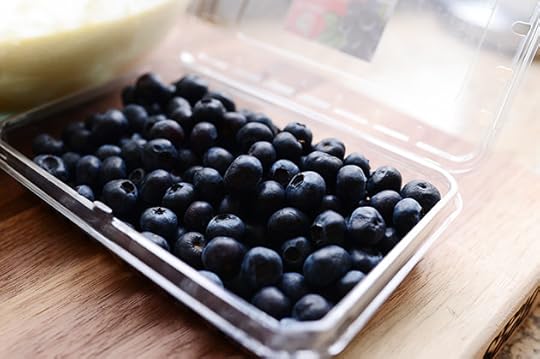 Then grab some blueberries.
Or not, if you want plain pancake muffins. Either is delicious.
(Or how about this? Mini chocolate chips.)
(There, I said it.)
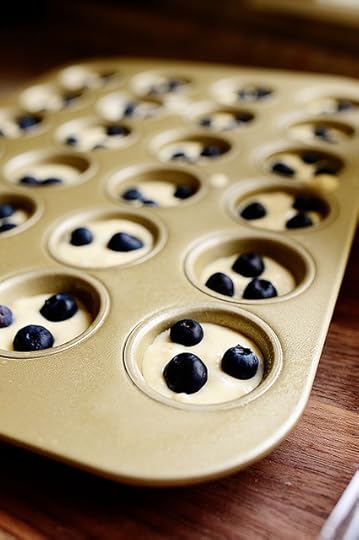
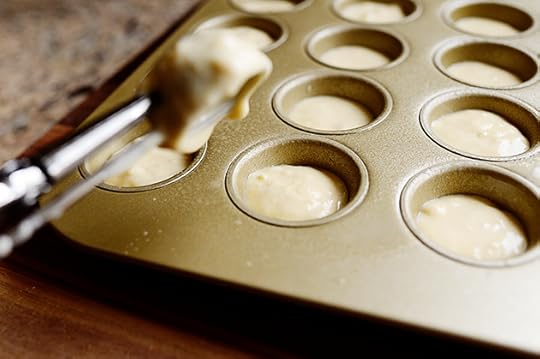 Spray a mini-muffin pan really generously with baking spray and fill the cups 2/3 of the way full with batter.
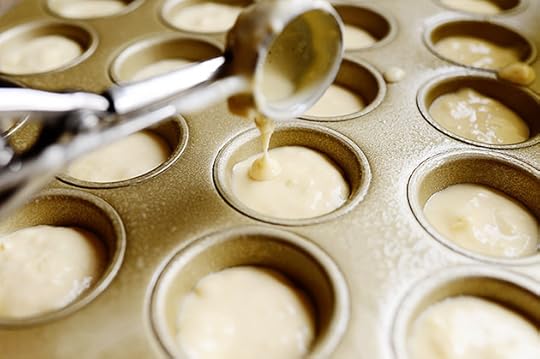 I use a small kitchen scoop. Makes it really easy to fill them really quickly, which means you’ll get to eat them sooner.
Ergo, small kitchen scoops are necessary to sustain life.
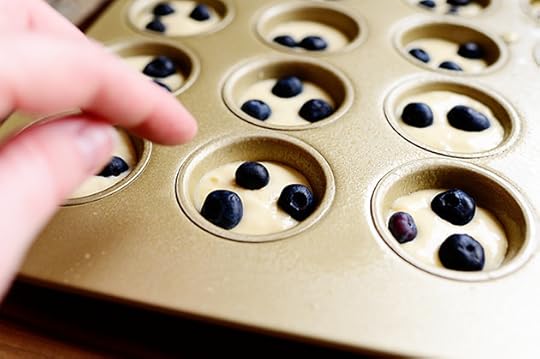 If you’re going the blueberry route, drop 2 to 3 blueberries in each cup, leaving space in between them.
 Now pop them in a 425 degree oven for about 8 to 9 minutes!
This first batch, I baked at 400 for about 11 minutes and they were fine. But I liked the slightly crispy edges and darker golden color of the batch at 425. (Plus, the latter batch puffed just a little more.) Just keep an eye on them whatever temp you use.
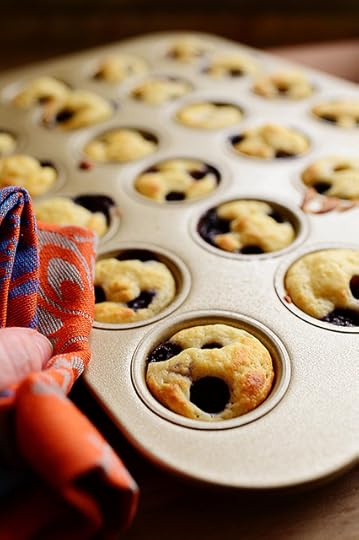 Take them out when they’re nice and golden.
 Let them sit in the pan for a couple of minutes, then turn them out. You may need to use a small, sharp knife here and there, but generally speaking, they should come out easily.
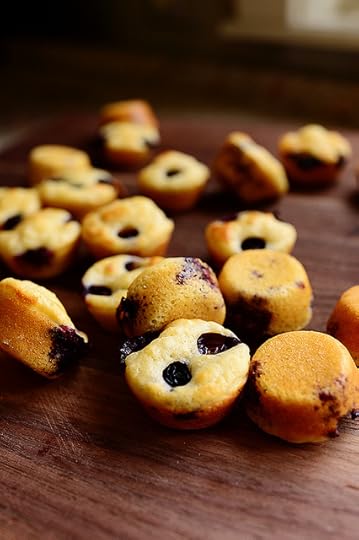 Yum. They look like normal little muffins…but one bite and you instantly know they’re pancakes!
 Here are the plain ones. I really can’t make up my mind which ones are better. The blueberries are lovely and juicy and fruity and all…but with these plain ones you just get that good, unadulterated pancake goodness.
 But the good thing is…
 You don’t have to choose!
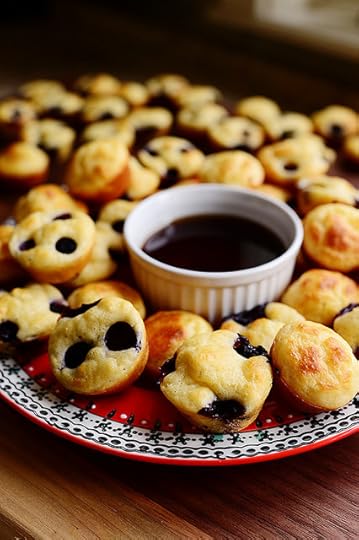 Talk about fun. If you have a bunch of kids over to your house, just set this plate in front of them and watch them disappear.
The muffins. Not the kids.
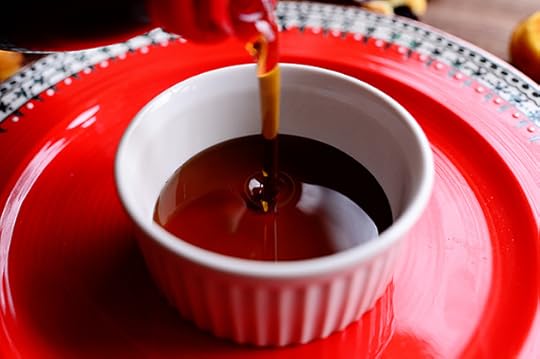
 There’s butter in the batter, so no need to mess with that step. Just dunk ‘em in warm syrup and you’re good to go.
You’ll love these!
Here’s the handy dandy printable.
Recipe
Pancake Mini-Muffins
Prep Time: 15 Minutes
Cook Time: 10 Minutes
Difficulty: Easy
Servings: 8
Print Recipe
Ingredients
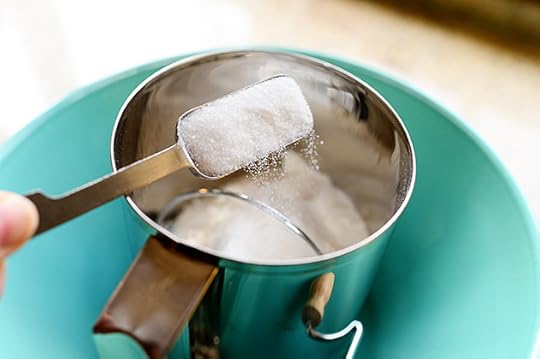
3 cups All-purpose Flour1 Tablespoon Baking Powder3 Tablespoons Sugar3/4 teaspoons Salt2-1/2 cups Milk1 Tablespoon White Vinegar2 whole Eggs1 Tablespoon Vanilla Extract4 Tablespoons Butter, Melted Blueberries (optional) Warm Syrup, For Serving Preparation Instructions
Preheat the oven to 425 degrees. (**See note below.)
Sift together flour, baking powder, sugar, and salt. Set aside.
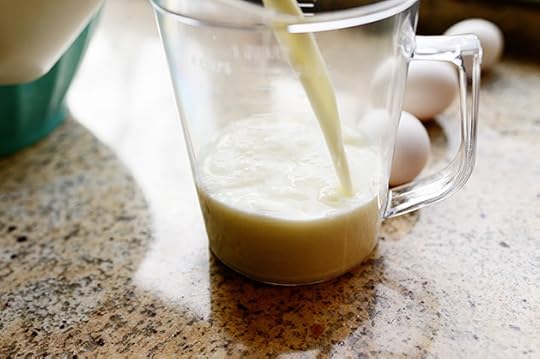
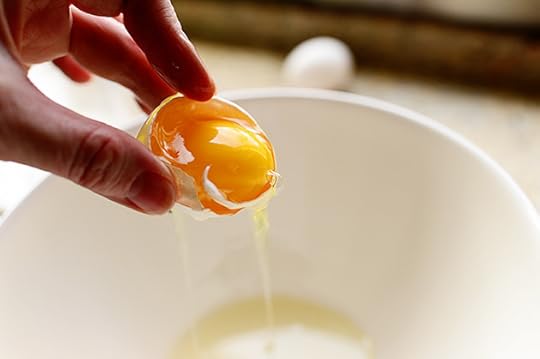
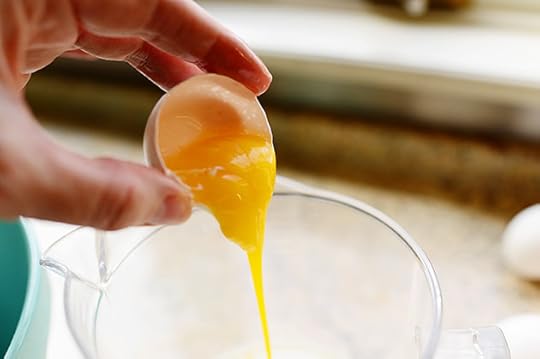
Stir together the milk and vinegar and let it sit for 1 minute. Whisk in eggs and vanilla.
Combine dry ingredients and wet ingredients, then stir in melted butter. If batter is too thick, stir in a little milk.
Spray a mini-muffin pan generously with baking spray. Fill cups 2/3 full. If using blueberries, drop 2 to 3 blueberries into each cup.
Bake for 8 to 9 minutes, or until golden brown on top. Let sit in the pan for 1 to 2 minutes, then turn them out of the pan. (Use a small knife if any are stubborn.)
Serve warm with warm syrup!
**425 will result in crisper edges. For a softer muffin, bake at 400 for 11 minutes.
Posted by Ree | The Pioneer Woman on March 3 2014

February 28, 2014
Puffed Pastry Pizza
 The Oscars is this Sunday night, and if you’re the kind of human that likes to put on your favorite new top, dab on a little extra lip gloss, brush your hair until it shines, and settle in with a glass of wine just as the ceremony is beginning, I have the perfect little treat for you.
(I’ll probably be wearing yoga pants and have my hair in a knot on top of my head, judging from my typical Sunday evenings. But don’t be like me.)
Puffed Pastry Pizzas are not just alliterative…they’re also completely delightful. They have a nice light texture, you can change up the toppings, and most of all, they’re so incredibly easy to make with really impressive results. My idea of fun, if I were having a group of girlfriends over to watch the Oscars, which I’m not because I live too far out of town and five miles down a gravel road and everyone would wind up getting home way too late for a Sunday night in rural America, but that’s okay; I can fantasize anyway, would be to make a slew of the pizzas, each a different variety, then slice them up and serve them on huge, honking platter. What a presentation!
But here’s the good news: you don’t have to have an Oscar party to have an excuse to make these babies. They’re allowed on any night of the week/year/decade/century!
Here’s how to make them.
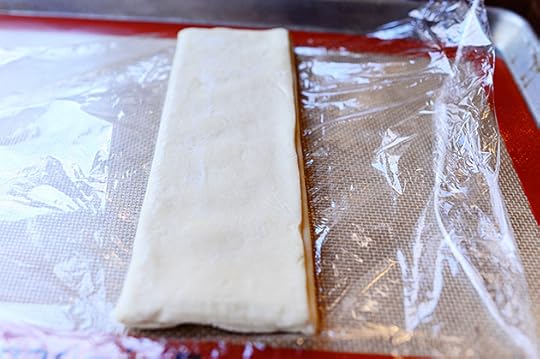
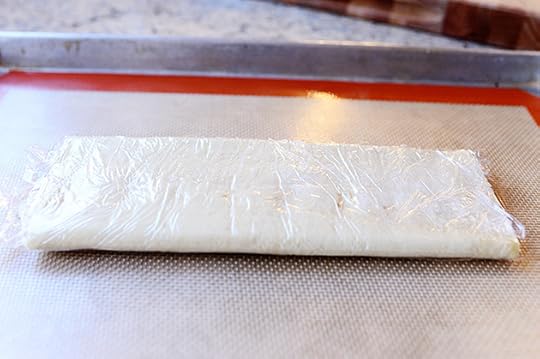 First: Puffed Pastry! This is one sheet of the frozen stuff, and I removed it from the package it came in, wrapped it in plastic wrap, and stuck it in my fridge. I actually meant to make the pizzas the day before I did, but didn’t get around to it…and it wound up being fine in the fridge for that 24 hour period. It says this on the package, but you can also take it straight out of the freezer and lay it on the counter for 45 minutes for a “quick thaw” right before you make the pizzas.
Just keep in mind you’ll need to factor in the time to thaw your puffed pastry!
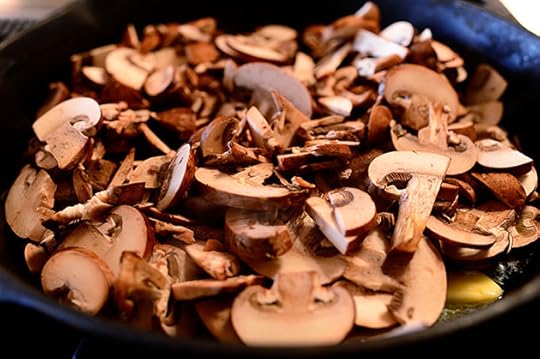
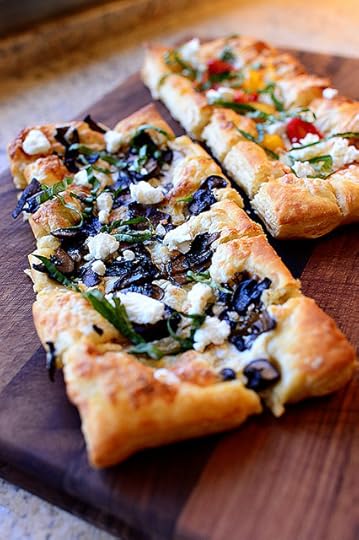
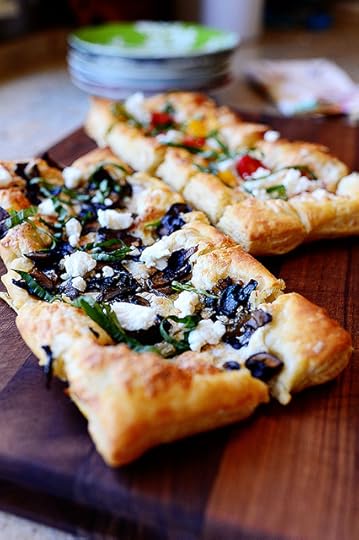
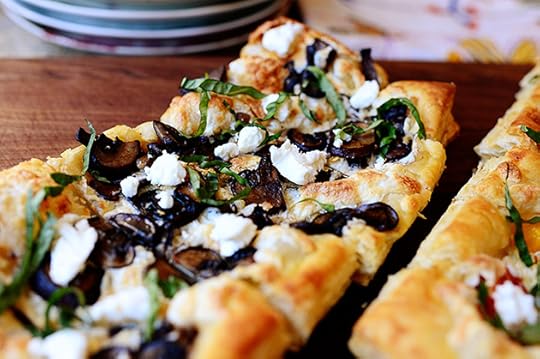
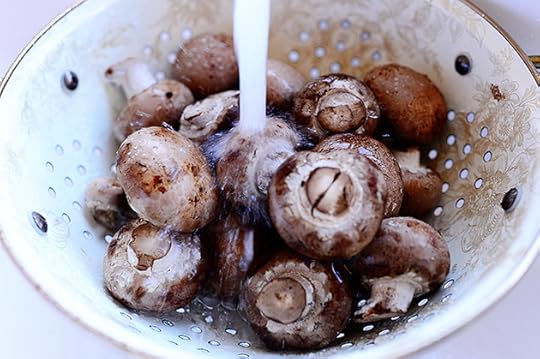 Now, for the toppings of the pizza (I’m making two pizzas, two varieties): First, wash some mushrooms. These are Baby Bellas, but you can use regular white mushrooms instead!
Oh, and I wash mushrooms. I’ve read for years that you’re supposed to wipe mushrooms clean with a damp cloth. But I choose to rebel against this for one very important reason:
I don’t like to ingest dirt.
Amen.
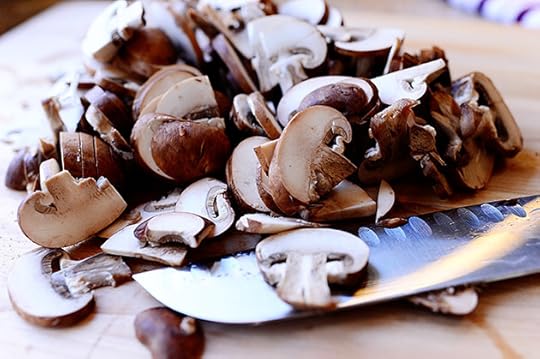 Slice the mushrooms thinly…
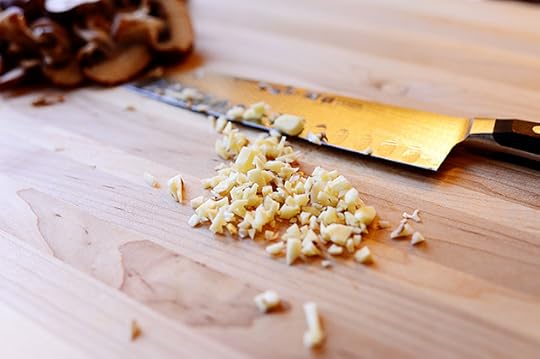 Then mince up some garlic!
 Melt some butter in a skillet over medium-high heat…
 Then throw in the mushrooms…
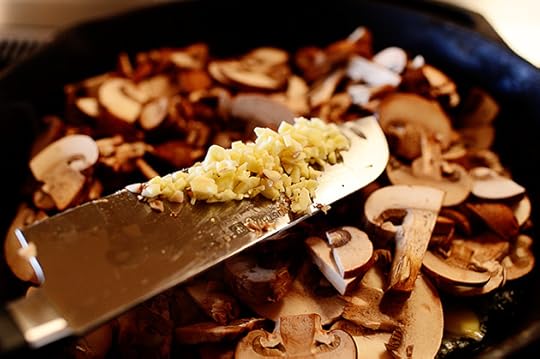 And the garlic.
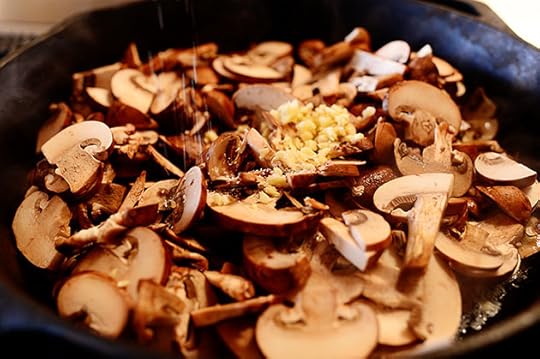 Then sprinkle in some salt and pepper!
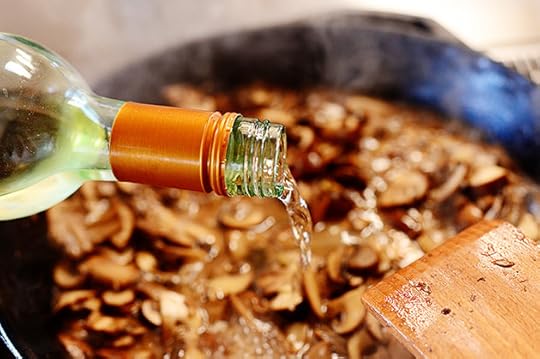 Stir the mushrooms around, then grab the bottle of wine you’ve been keeping in your bedside table and pour in a healthy splash.
Healthy, of course, being a relative term.
(And the wine is optional! You can use broth instead, or just cook the mushrooms without any added liquid.)
(But wine, for me, is never optional.)
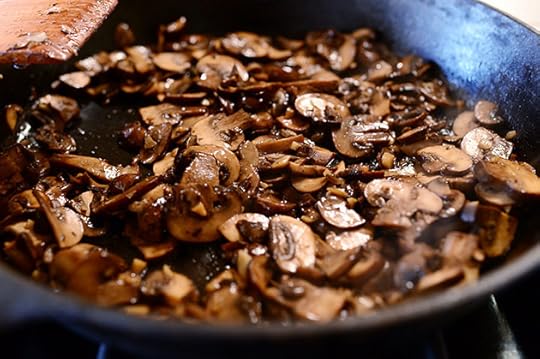 Cook the ‘shrooms for about 5-7 minutes, until they’re nice and cooked and whatever liquid you’ve added has all but disappeared. Then just remove them from the heat and set them aside.
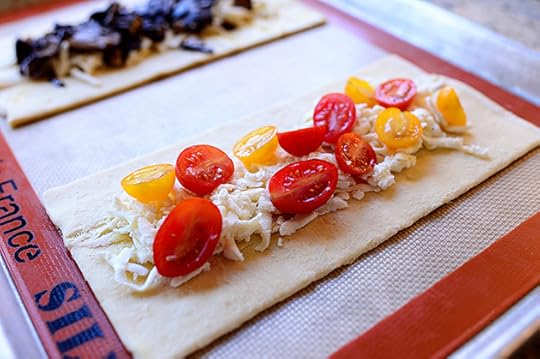
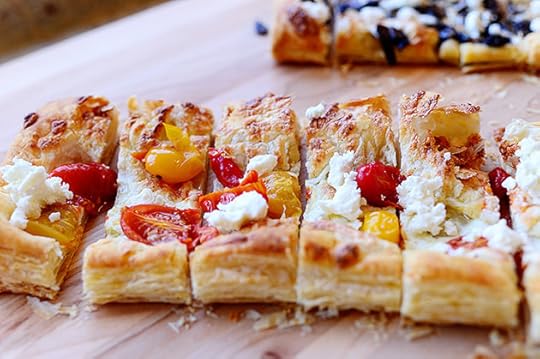
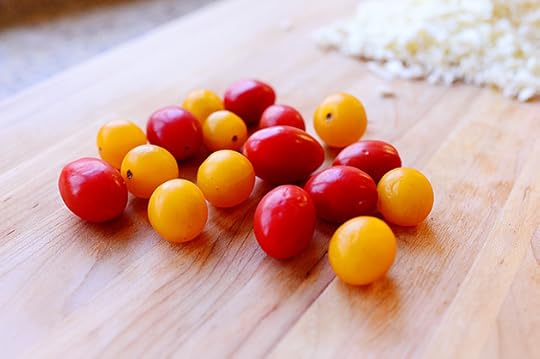 The toppings for the other pizza are a cinch! Just grab some yellow and red grape/cherry tomatoes…
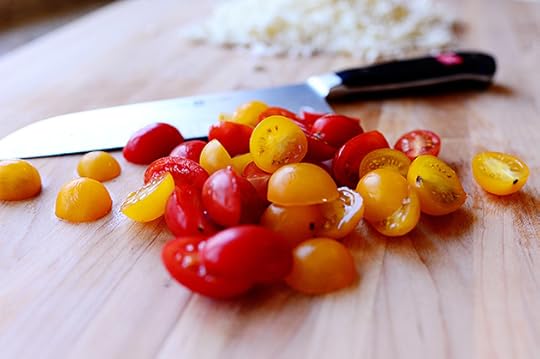 And slice ‘em in half!
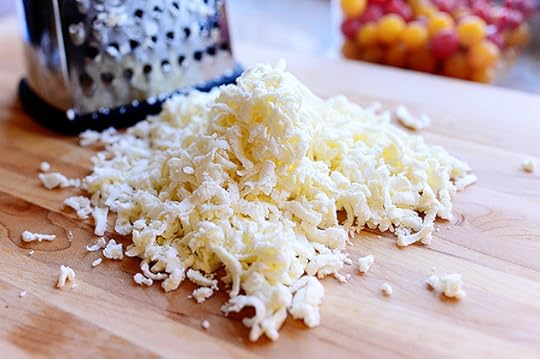 Finally, grate up some mozzarella. You won’t need too much, and just as was the case with my Chicken Mozzarella Pasta on Monday, you can use the fresh stuff that I’m using here, or you can use regular ol’ supermarket mozzarella. Either one is fine!
 Now it’s time to make the pizzas: First, preheat the oven to 415 degrees. (Is that precise enough for you? Haha. I’m sorry. It’s just that 415 degrees is my puffed pastry temperature and I’m afraid to jinx it by changing it now.) When it’s preheated, unwrap the puffed pastry…
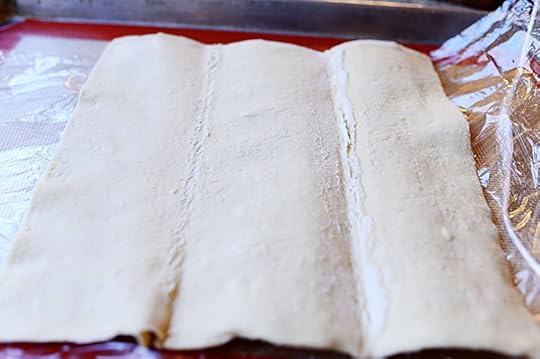 And carefully open the sides so that you have one big piece.
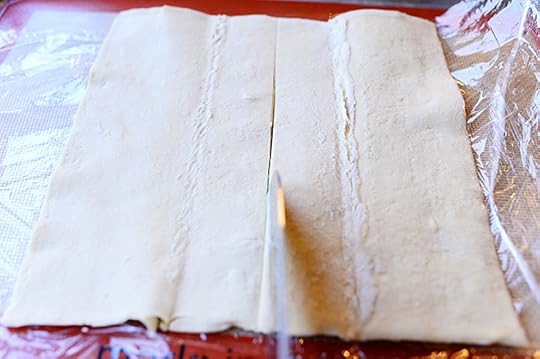 Then just slice it in half right down the middle so you have two equal pieces.
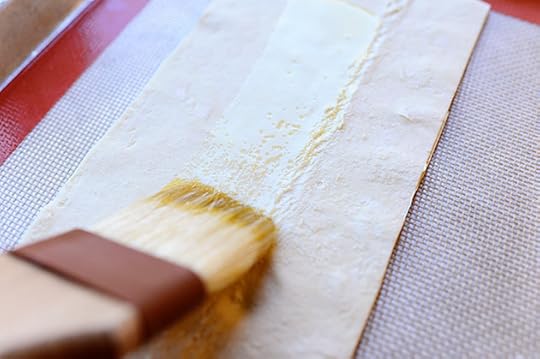 This isn’t 100% necessary, but I do it for luck: Brush a very light strip of olive oil right down the center.
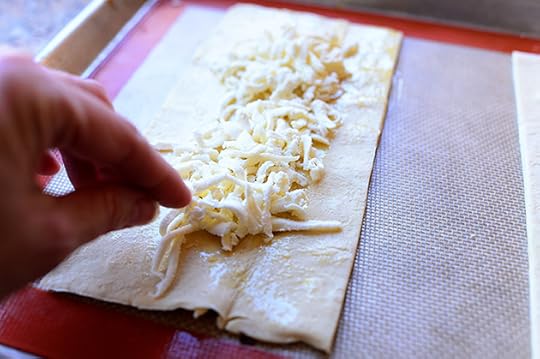 Then sprinkle a small amount (this is almost too much!) of mozzarella on top.
 Do the same with the second half.
You don’t want to lay on too much cheese, as it can cause some chaos as the pastry puffs in the oven, so just keep it light! The star of the pizzas really is the puffed pastry itself.
(Don’t tell the toppings I said that.)
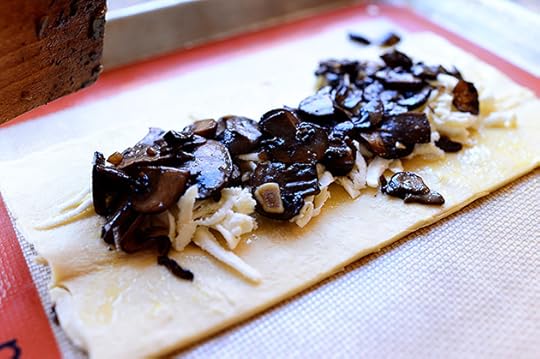 Now spoon some of those glorious mushrooms over one of the pizzas…
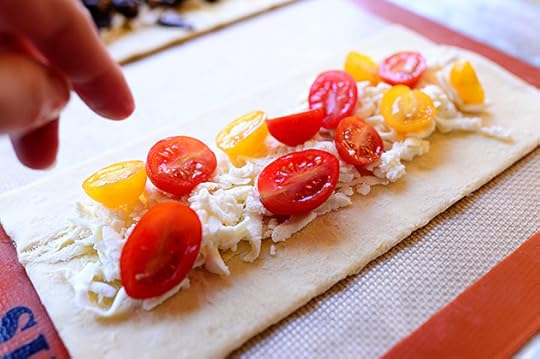 And add the tomato halves over the other one.
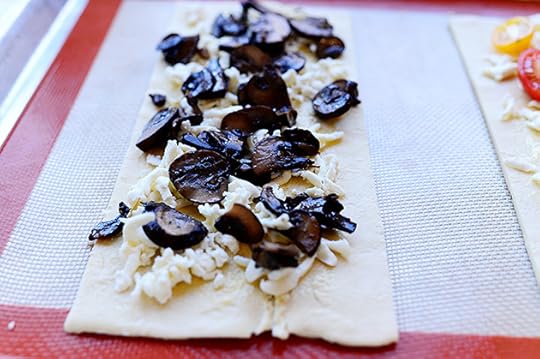 Spread the toppings out a bit so that there’s not a really heavy, defined strip of ingredients down the middle: You want them to be pretty well distributed, with just a small strip of pastry around the edge.
 Then just pop ‘em in the oven for 15 minutes!
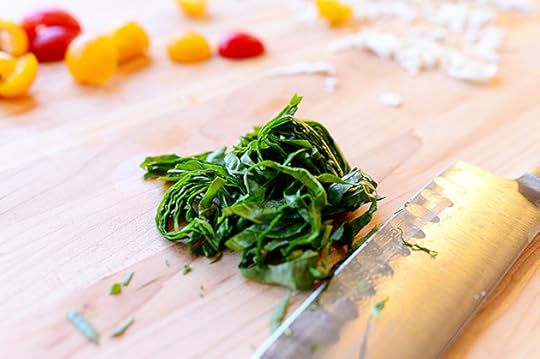 While they’re in the oven, chiffonade some basil. You’ll be glad you did.
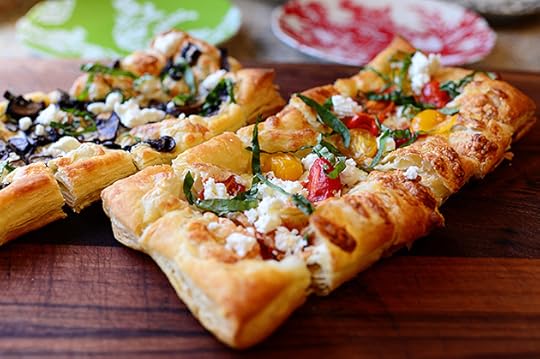
 The pizzas are done!
Now, a couple of things: First, don’t be alarmed if you look in the oven during baking and you see crazy things happening on one or both of the pizzas. Sometimes, because of the toppings, one little area of the pastry will puff up and freak out on you…but it’s totally fine! If it’s a really big puff/air bubble, I’ll reach in with a sharp little knife and pierce it (“I pierced the toast!” Name that movie), which can cause it to settle down.
Or, usually, after you take the pizzas out of the oven, you can just press the bubble down or wait and watch it settle down by itself!
Either way, it’s always best to let the pizzas sit for a good 10 minutes before you serve them. Helps the pastry settle down and the toppings cool down a bit, and it will help hone your skills of patience, which you’ll need because these pizzas are so gloriously inviting.
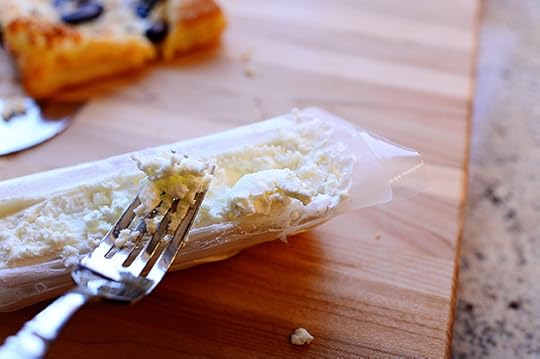 Slice them up into small strips and then…for a final touch of deliciousness…crumble some goat cheese…
 And sprinkle it all over the pizza!
 Goat cheese—along with coffee ice cream, hummus, wine, The Godfather, Gone With the Wind, Basset Hounds, the smell of citrus, Real Housewives, waffles, poached eggs, puffed pastry pizza, and Dr Pepper lip balm—is my life.
 Finally, sprinkle on the basil!
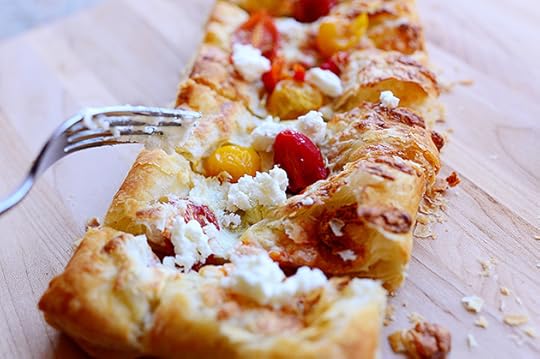
 And…done.
 Grab some plates! Pour some wine! Invite your friends! Unless you live far out of town and five miles down a gravel road! And then never mind!
 You will absolutely, positively love these.
 And as for toppings? Use whatever your heart desires. Thin prosciutto, regular shaved ham, diced bell pepper, olives, shrimp, any veggies and cheese you want.
 And you can make two of them…or six or ten or twelve! Just up the toppings accordingly.
 The great thing is…
 The puffed pastry does most of the work. Just look at that glorious stuff!
Enjoy these, guys. They’re yummy.
 Oh! And they store well in the fridge. Just reheat them (or, heck, eat them cold) the next day.
Here’s the handy dandy printable!
Recipe
Puffed Pastry Pizza
Prep Time: 1 Hour
Cook Time: 15 Minutes
Difficulty: Easy
Servings: 4

Print Recipe
Ingredients
1 whole Sheet Frozen Puffed Pastry Olive Oil For Brushing1/2 cup Fresh Mozzarella, Grated1 Tablespoon Butter8 ounces, weight Mushrooms, Washed And Sliced2 cloves Garlic, Minced1/4 cup White Whine Salt And Pepper, to taste8 whole Yellow And/or Red Grape Tomatoes, Halved1/4 cup Goat Cheese (chevre)12 whole Basil Leaves (chiffonade) Preparation Instructions
Thaw the puffed pastry on the counter for 45 minutes or in the fridge for several hours.
When thawed, carefully open the sheet, then slice it in half down the middle. Place both halves on a baking sheet lined with parchment or a baking mat.
Preheat oven to 415 degrees, then start on the pizza toppings.
In a large skillet over medium-high heat, saute mushrooms and garlic in the butter for 2 minutes, then pour in the wine and season with salt and pepper. Allow to continue cooking for 5-7 minutes, until mushrooms are cooked down and liquid is mostly gone. Remove from heat and set aside.
To build the pizzas: Brush a thin layer of olive oil in the center part of each half of puffed pastry.
On each half, sprinkle on half the cheese so that it covers all but a 1/2 inch border all around the pastry.
On one half, sprinkle on the cooked mushrooms. On the other half, sprinkle on the halved tomatoes. Press both mushrooms and tomatoes lightly into the cheese.
Place the pan in the oven and bake for 15 minutes pastry could go crazy and puff up in areas here and there, but don't worry! It'll be fine.
Remove from the oven and sprinkle the goat cheese crumbles on both halves. Allow the pizzas to sit for 10 minutes. If there are any big air bubbles/puffs, just give them a little smush or wait and they'll calm down.
Sprinkle on basil, slice into pieces, and serve!
Posted by Ree | The Pioneer Woman on February 28 2014

February 26, 2014
Cream Cheese Wontons
 Once a week, my four kids and I pack up the pickup, leave the ranch, and head to the big city to our homeschool co-op, where we have a day of shared learning, fellowship with other students, and—most importantly—a big, honkin’ lunch at Panda Express, which, blessedly, is a three minute drive from the building where our co-op is held. We have to leave our house at 6:45 on co-op day, and I’d be lying if I said that part of my motivation for getting up and out the door wasn’t the fact that I’ll have get to have Panda Express sometime in the next few hours.
I’m very driven by the promise of food.
Also, I live in a small town. It doesn’t take much to excite me.
And drive-thru Asian food really, really, really excites me.
Anyway, I always break away from the co-op a little before lunch to go grab “Panda,” which my girls and I now call it since we’re on a first name basis, and one of the things we always get along with our Broccoli Beef and Beijing Beef and Kung Pao Chicken and Chow Mein Noodles is Cream Cheese Rangoon, which is basically a cream cheese mixture fried inside of wonton wrappers. It’s a delightful little treat and something we can’t get at home…
Or can we?
Well, yes we can!
Here. I’ll prove it to ya.
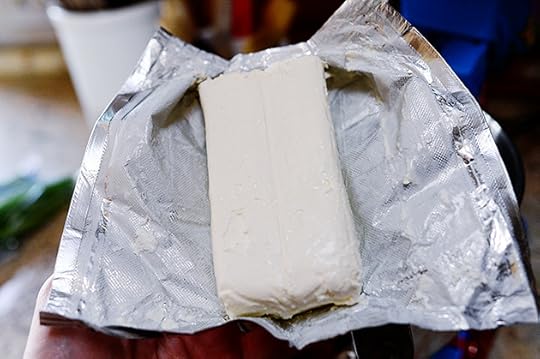 First, make the cream cheese filling, which is really simple: Into a mixer (or you can use a regular bowl and mix it by hand) add package of straight-from-the-fridge (otherwise known as cold) cream cheese…
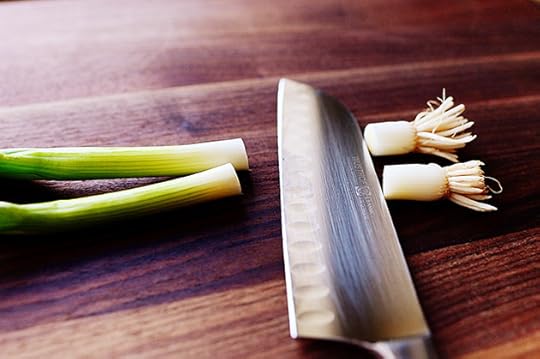 Then lop off the ends of a couple of green onions…
 And chop them up pretty finely.
 Throw the green onions into the mixer with the cream cheese…
 Then grab some Sriracha, which is a mysteriously delicious Asian-style hot sauce made here in the good ol’ U.S.A.
 I squeezed in a couple of teaspoons (but wound up adding more later). Also, you can leave this out completely if you prefer just straight-up cream cheese. But, and I hate to be cliché here, but I put Sriracha in everything.
 Mix it all together, scraping it a couple of times to make sure it’s all combined.
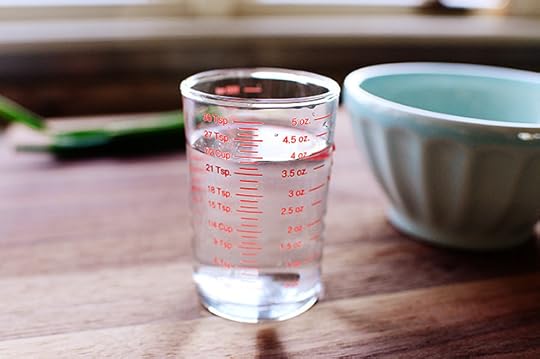 Now measure 1/2 cup of water.
Note: I got this little measuring glass at The Wal Marts, otherwise known as Wal Marts, otherwise known as Walmart, and I love it!
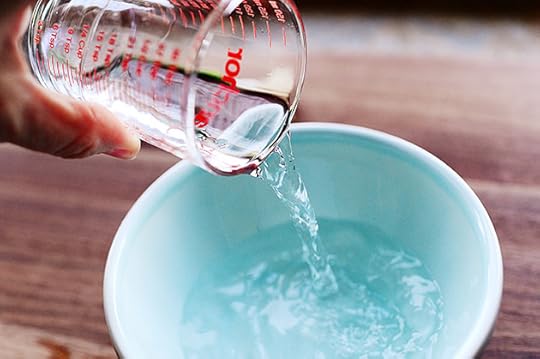 Pour it into a bowl…
 Then crack in an egg…
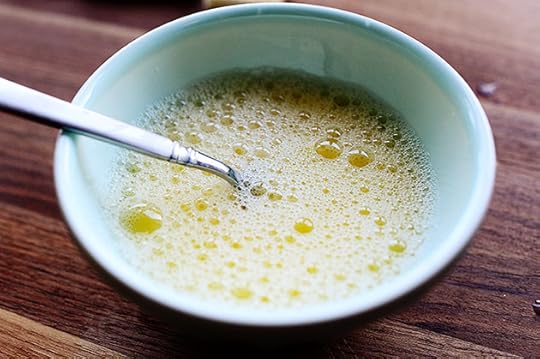 And whisk it all together. This will be the glue that holds the wontons together!
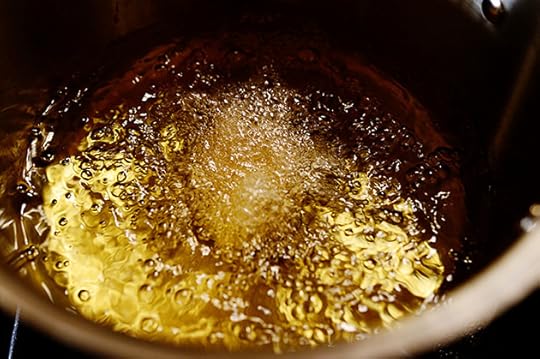
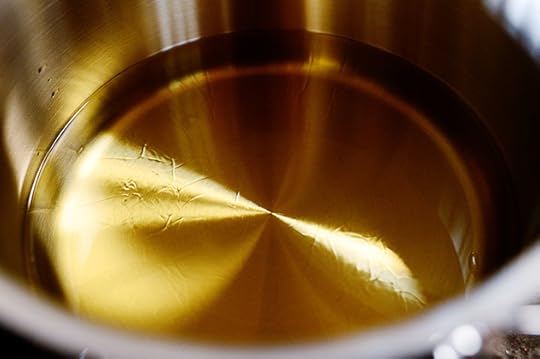 You need to start heating up an inch or two of oil in a medium saucepan over medium-low heat. You don’t want the oil to get too hot, as the wonton wrappers fry (and can burn) so, so quickly. If you have an oil thermometer, shoot for 335-340—I’ve found that 350 can be too high.
Or, if you don’t have a thermometer, just heat the oil, slice a square of a wonton wrapper, and drop it into the oil. It should immediately start to gently sizzle…but if it burns or browns too quickly, you’ll know you need to back up the heat a bit.
Also: Please be careful frying with oil if you have young’uns in the house! I always try to remember to put oil on the backburner of the stove, even now that my kids are bigger. It’s a good habit to get into!
I’ll stop being bossy now.
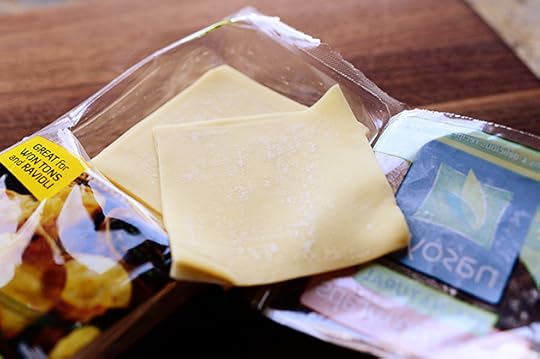 Now comes the fun part, also known as the challenging part, and it isn’t really that challenging, it just takes a little practice. Open a package of wonton wrappers, take out one, then cover the rest of the package with either plastic wrap or a dish towel. They dry out really quickly, so if you’re not working with them, they need to stay covered.
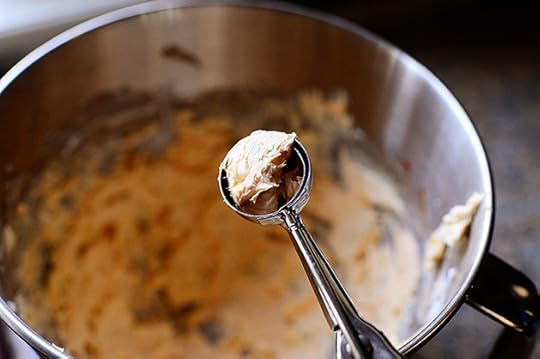 Grab a small amount of the cream cheese mixture…
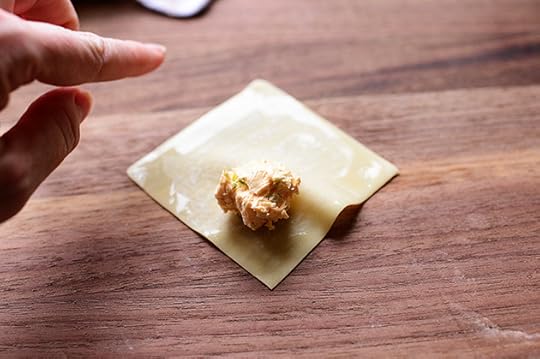 …And place it on the bottom corner of the wrapper. Then just dip your finger in the egg wash and run it all around the border of the wrapper.
 Tucking the cream cheese inside, roll up the corner of the wonton wrapper until you reach the halfway point.
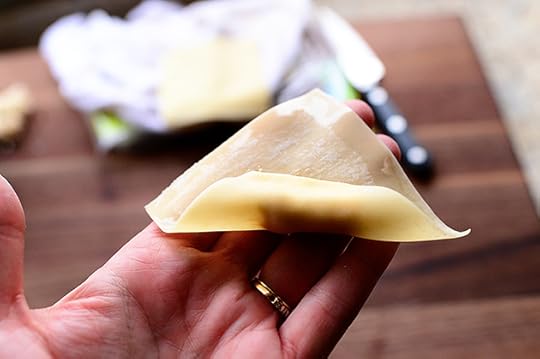 This is a little difficult to photograph while doing it myself (ha), but basically, you hold the wonton in your hand…
 Then bring the two ends together and criss-cross them, using a dab of egg wash to stick them together.
This is the method I prefer using to form wontons, and I learned it from one of my best blogging friends, Jaden of Steamy Kitchen. She has a great video that demonstrates the two ways she likes to form wontons, and it’s really helpful. I prefer this way to the other method, which involves folding it into a triangle before pinching the ends together. I’ve found that the rolling method—the one I use in this post—decreases the likelihood that the wontons will puff up (and/or burst) while frying, which will ruin your day if you’re making wontons.
But that’s just me! Try both ways and see which one you like.
And again, be sure to watch Jaden’s video! She explains things really well.
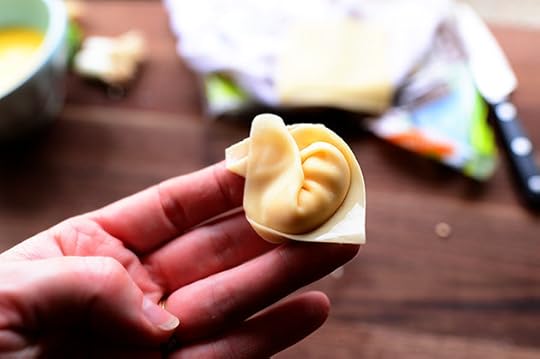
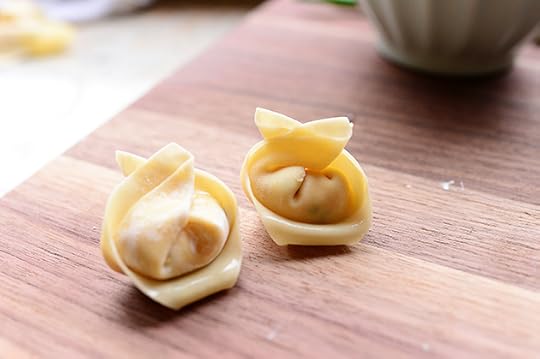
 As I form the wontons and set them down, I tuck the pointed end under so it’s a neat little package.
 Then I just kept going…
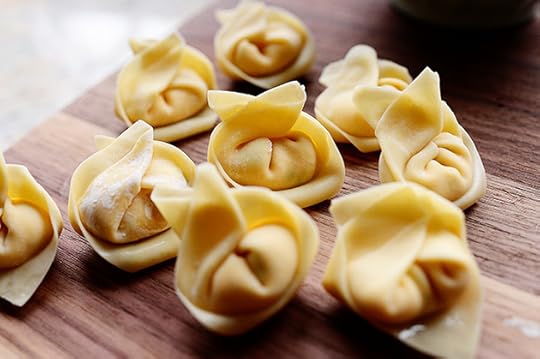 Until I had a whole bunch. Each time, I covered the assembled wontons with a lightweight dishcloth to make sure they didn’t dry out.
 Now you just need to fry them up! I’m just doing one here to demonstrate, but you can do 4 or 5 at a time if you’re feeling sassy.
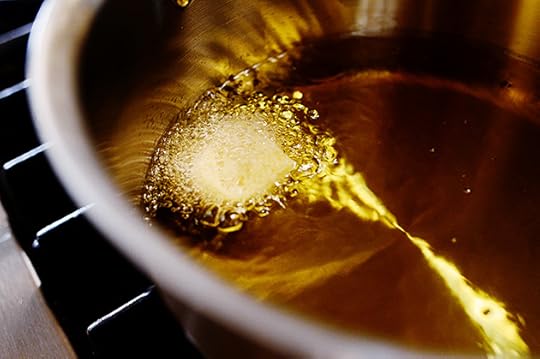 Once in the oil, they should immediately (gently) sizzle and float to the top.
 I manage them with a spatula just a little bit to make sure they’re browning evenly.
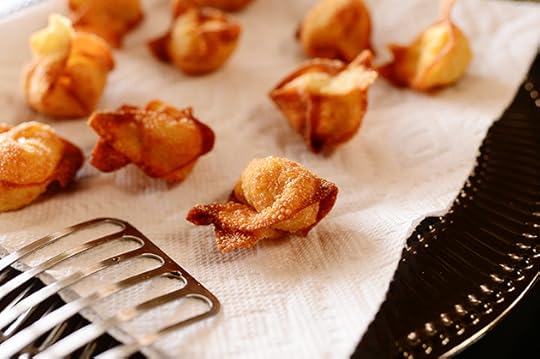 And speaking of browning, you really want to take them out of the oil the second you start to notice they’re turning golden. They’ll keep browning for a few seconds after you take them out, and it takes no time at all for the wrappers to burn!
All in all, I’d say the wontons take 45 seconds to cook. Super quick! Don’t take your eyes off of ‘em.
Drain the wontons on a paper towel, and keep going until they’re all fried.
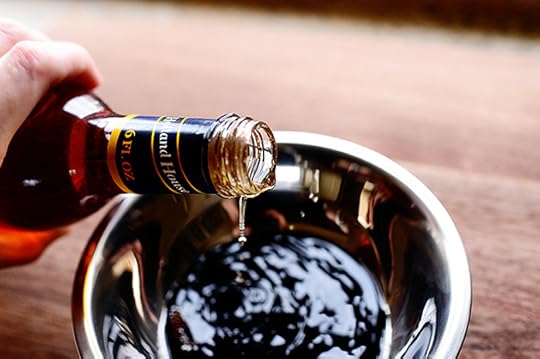
 Now, you don’t have to get in a huge hurry to serve the wontons—in fact, it’s best to wait a few minutes since the cream cheese mixture can get a little hot—so you can whip up a super easy dipping sauce in the meantime. (Or you can also crack open a jar of ready-made sauces; there are lots of them in the Asian Foods aisle of the supermarket.) I started with a little soy sauce…
 Then added a good amount of honey…
 Some sherry (rice wine vinegar would be better!)…
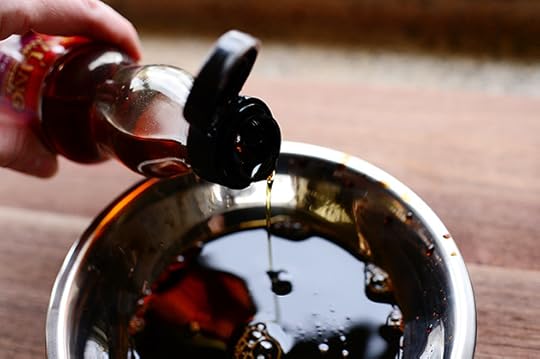 A teeny bit of sesame oil (and I mean teeny; a little goes a long way!)
 And some more Sriracha.
Then just mix it together!
Or you can keep it super simple and just serve them with some soy sauce. Easy as pie.
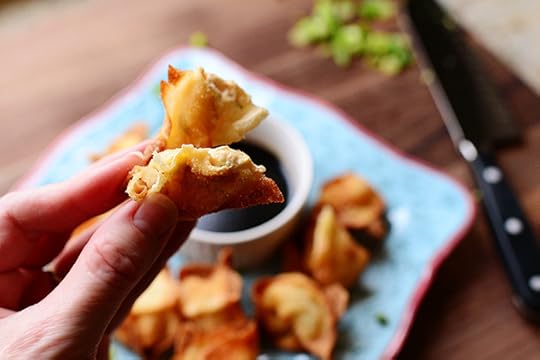
 Yum. So good! Crispy, light, and a luscious creamy filling.
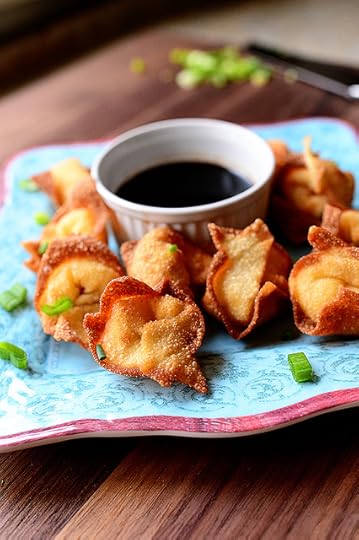 These little babies are perfect for an Oscar party, a cocktail party…or just a night of TV by yourself!
 You definitely won’t be able to eat just one.
Here’s the handy dandy printable!
Recipe
Cream Cheese Wontons
Prep Time: 20 Minutes
Cook Time: 10 Minutes
Difficulty: Intermediate
Servings: 24

Print Recipe
Ingredients
8 ounces, weight Cream Cheese2 whole Green Onions, Light Green And Dark Green Parts, Chopped1 Tablespoon Sriracha Or Other Hot Sauce (more To Taste)1 whole Egg1/2 cup Water24 whole Wonton Wrappers Vegetable Oil, For Frying Dipping Sauce:2 Tablespoons Low Sodium Soy Sauce3 Tablespoons Honey1 teaspoon Vinegar Or Rice Wine Vinegar1/4 teaspoon Sesame Oil1 Tablespoon Sriracha, Or Other Hot Sauce Preparation Instructions
Note: While working with the wonton wrappers, keep the opened package covered in plastic wrap and a towel as you're working on each wonton. They dry out quickly!
In the bowl of a mixer (or you can do it by hand,) mix together the cream cheese, green onions, and Sriracha/hot sauce until totally combined (scrape the mixer bowl if necessary.)
In a separate bowl, mix together the egg and water.
One at a time, assemble the wontons: place approximately 1/2 teaspoon mixture on on corner of a wonton wrapper. Use your finger to "paint' the egg wash all around the edges of the wrapper. Roll the wrapper on a diagonal, starting with the cream cheese corner and stopping when half the wrapper is rolled and the cream cheese mixture is inside. Bring up the two ends and use the egg wash to stick them together. Allow the remaining pointed end to naturally tuck backward. (The wontons should resemble tortellini.)
As you work, place the assembled wontons under plastic wrap or a light towel to keep them from drying.
Heat 2-3 inches of oil in a large saucepan or medium skillet to just under 350 degrees (you don't want the oil too hot or it will burn the wontons! Experiment with a spare sheet of wonton wrappers to check.
About 4 to 5 at a time, fry the wontons for about 45 seconds to 1 minute, flipping carefully midway through to make sure they brown evenly. Remove it when you still think it could stand to slightly, brown a teeny bit more (because it will slightly brown in the seconds after you remove it from the pan!)
Drain the wontons on a paper towel and serve them with teriyaki sauce, hoisin sauce, etc.
If you'd like to make your own sauce, Mix together the sauce ingredients above. Taste and amounts as needed.
**It's good to wait 5-10 minutes before serving the wontons, as the cream cheese filling can be quite hot.
Posted by Ree | The Pioneer Woman on February 26 2014

February 24, 2014
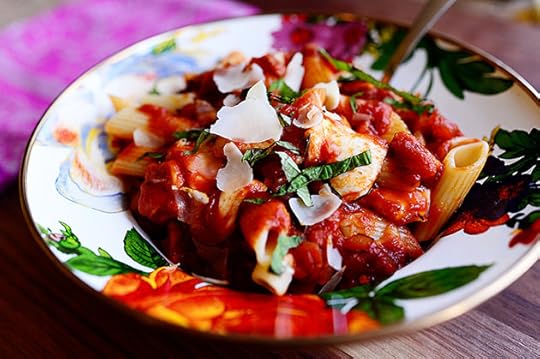
Chicken Mozzarella Pasta
 This delicious pasta really is the total package: Hearty, easy, full of cheese, and bursting with carbs! All the qualities I look for in a friend.
That made no sense. What a great (and fitting) way for me to kick off Monday morning!
Anyway, you really will love this pasta, as you get a bunch of deliciousness without a whole lot of effort. It’s a great presentation if you’re having company over (Does anyone have company over anymore? Do people still call guests ‘company?’ Or is that just another old term I’ve hung onto through the years, along with ‘television set?’ and ‘fella?’) or just makes a perfect weeknight meal.
Here’s how to make it!
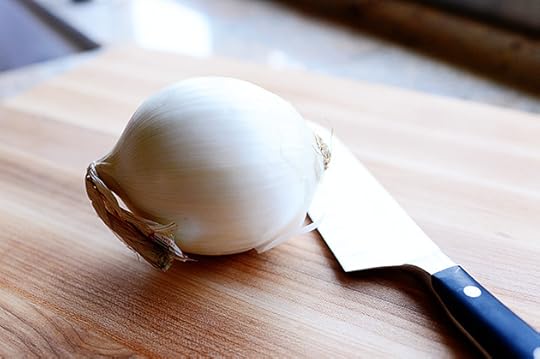 Grab one of them onion things.
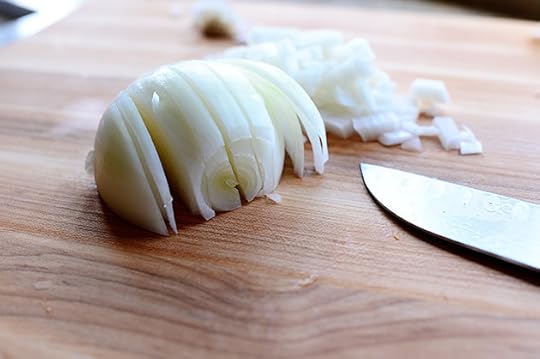 Peel it, cut it in half, then make vertical slices…
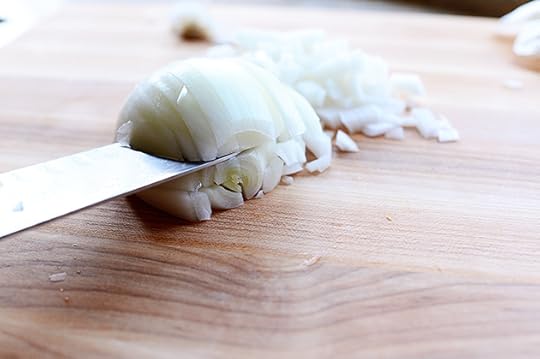 Horizontal slices…
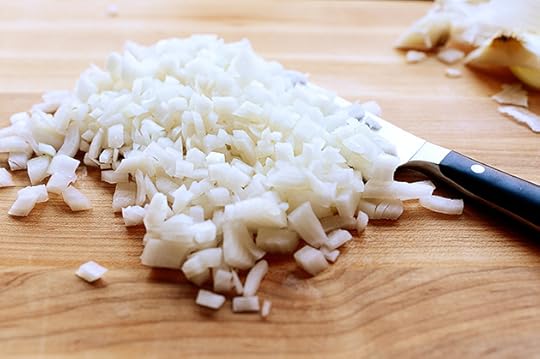 And then dice it up!
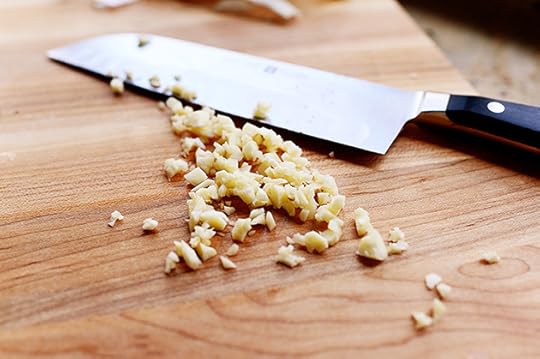 And hey! Mince up some garlic while you’re at it!
Sorry to shout!
Oops, I did it again!
This could go on all day!
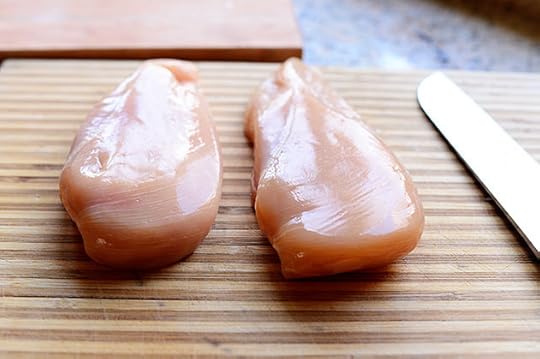 Next, grab a couple of chicken breasts…
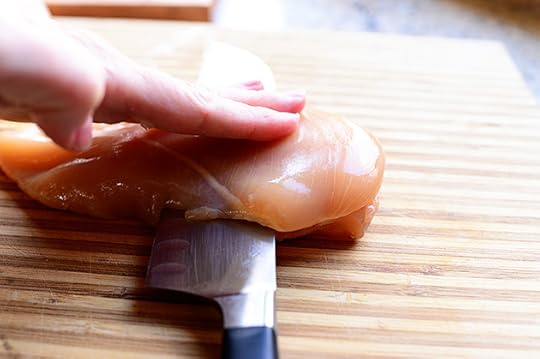 And to cut it into small bites, slice it across the middle like this…
 (Now you have two equal halves)…
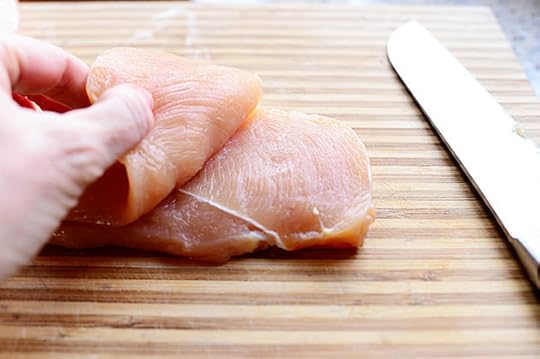
 Then slices the stacked halved into strips…
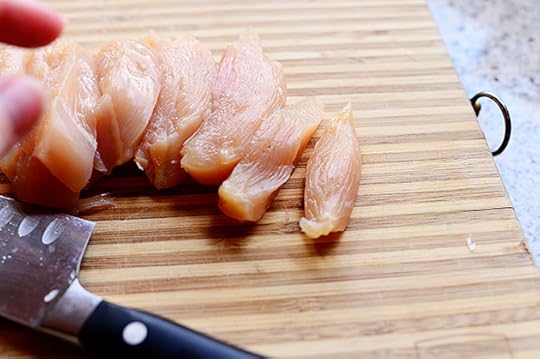
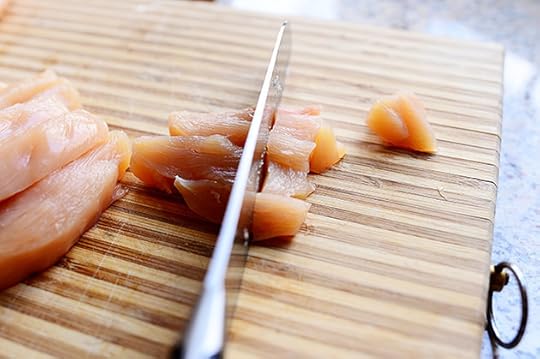 And cut the strips into small chunks…
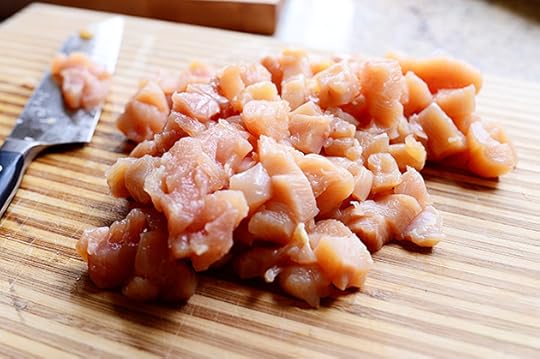 Until you have a great bit pile of really grody looking chicken.
But it won’t be grody for long!
 Heat a big ol’ skillet over medium-high heat, add a little olive oil, and throw in the chicken in a single layer. Sprinkle it with salt and pepper and let it sit in the pan, undisturbed, for about 3 minutes or so.
 After that, you can stir/cook it around for a couple of minutes. Basically, you just want to get it slightly golden on the outside and cook it most of the way (it will finish cooking in the sauce later.)
 Remove it to a plate and set it aside, and when your daughter comes into the kitchen and asks if the food is ready yet, answer “Yes. It will be ready shortly.”
Then, when she says, “Wait. Is the answer ‘yes’ or is the answer ‘it will be ready shortly?’” just look at her, smile, and say, “You do?” It will completely confuse her and she’ll run from the kitchen in fear.
I employ this effective parenting technique at least once a week in our house, and my children have never been more well-adjusted.
Or more confused.
 As soon as your daughter leaves the room and the chicken is out of the skillet, throw in the onions and garlic…
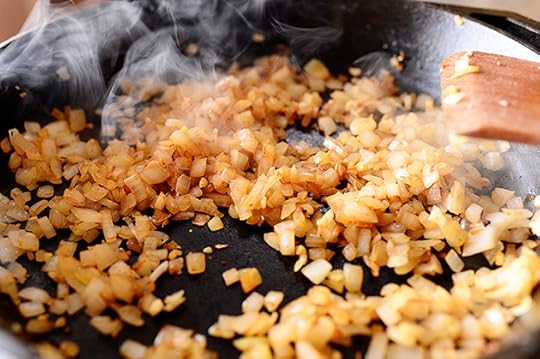 And quickly stir/cook it around for a couple of minutes, until the onions are nice and deep golden brown.
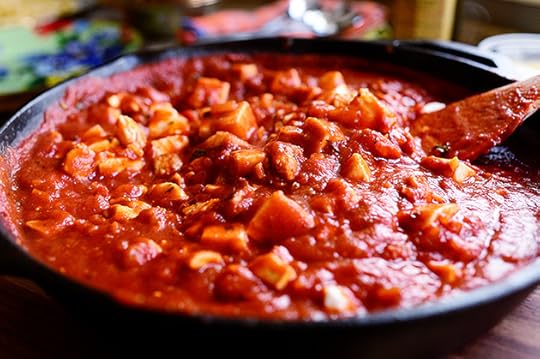
Now, at this point in your life, you can add wine, crushed tomatoes, tomato paste, herbs, and spices and spend a really long time cooking your own sauce until it’s perfect.
 Or, if you need to move this along a little quicker, you can reach for a jar of good quality marinara sauce and call it a day!
I would never, ever judge you for it.
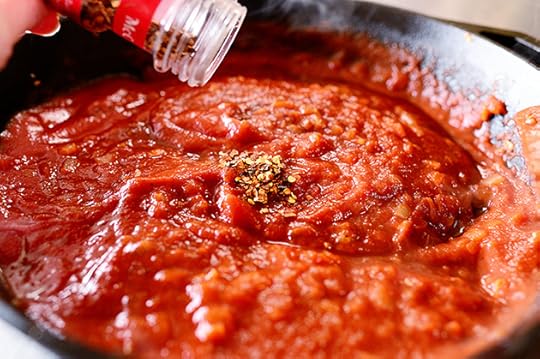 To give the sauce a nice kick (and you’ll really like it in the finished dish) add a nice amount of red pepper flakes.
Also, somewhere along the way, splash in 1/2 cup of water to make the sauce…well, saucy.
 Add the chicken back in the pan…
 And stir it all to combine.
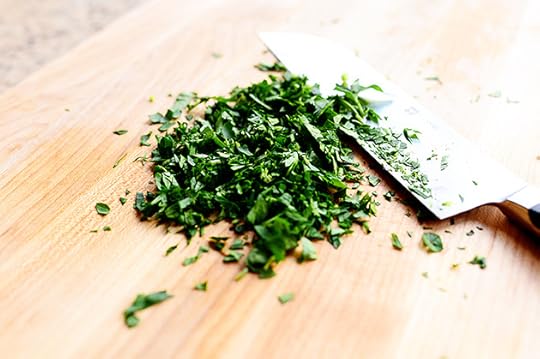 Mince up some fresh parsley…
 And add it into the sauce. Stir it in and cook the sauce for a good 7-8 minutes, stirring occasionally. Give it a taste and add more red pepper flakes or water if it needs a little thinning.
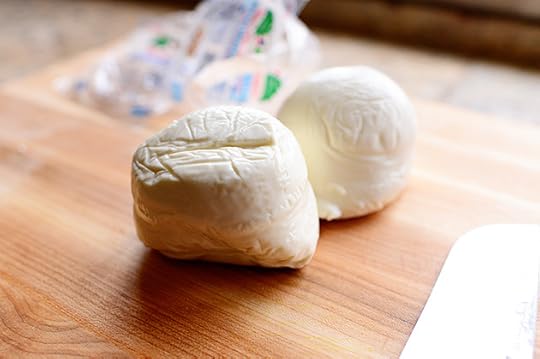 Then grab a ball of fresh mozzarella…
(Side note: I made a little more than the recipe below specifies, so don’t be thrown off by my quantities.)
 Slice it up…
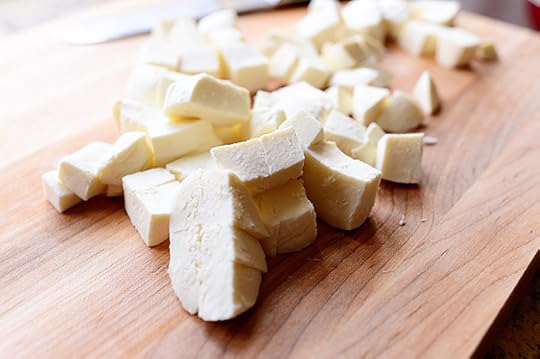 And cut it into cubes.
NOTE: If you can’t get fresh mozzarella, you can absolutely use the regular mozzarella sold in supermarkets! I’ve used it in this dish before, and it’s delicious, too. Just melts a little differently.
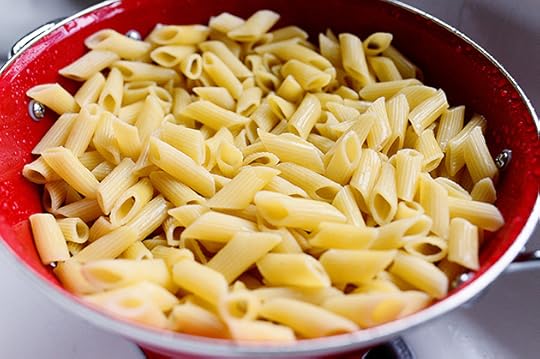 Meanwhile, drain the pasta that you’ve been cooking this whole time…
 And pour it onto a purty platter.
Alliteration alert!
(And again, don’t be thrown off by my amount of pasta, which is a little more than the recipe below. I was hungry, man.)
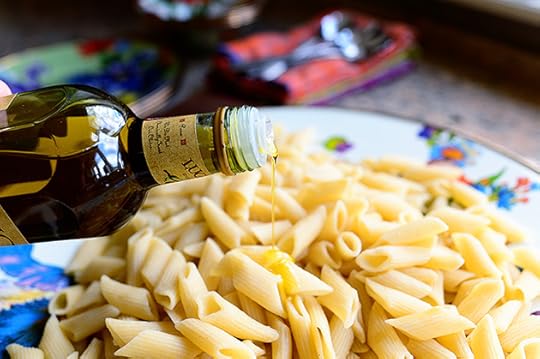 Drizzle a little olive oil all over the pasta, because this is a free country and you can.
 Then, because nothing has changed on the free country front, sprinkle some Parmesan shavings all over the pasta.
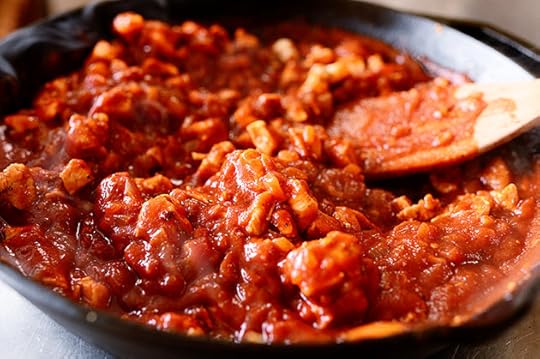
 The pasta’s ready…now let’s finish off the sauce!
 Give the sauce a stir and make sure it’s super-duper hot. This is essential.
 Then throw in the chunks of mozzarella!
You heard me.
I mean you read me.
I mean…
Oh, never mind.
 Gently stir the mozzarella into the sauce, then let it sit for just a couple of minutes.
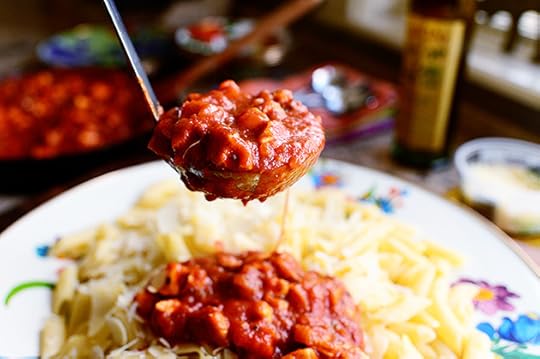 When you notice the mozzarella is starting to soften (but is still in nice big chunks), spoon it all over the pasta!
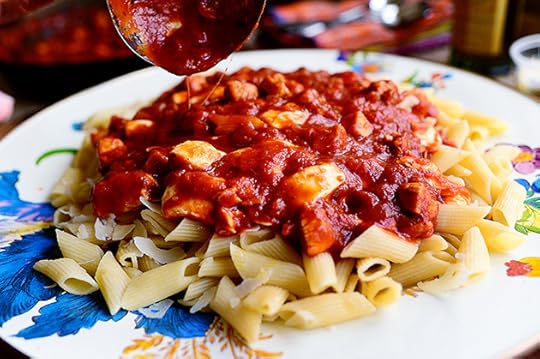 Ohhhh, baby. How good does this look?
 The key here is for both the pasta and the sauce to be incredibly hot. You want that mozzarella super soft.
 Then, for a finishing touch, grab some basil leaves…
 Roll ‘em up…
 Cut ‘em up…
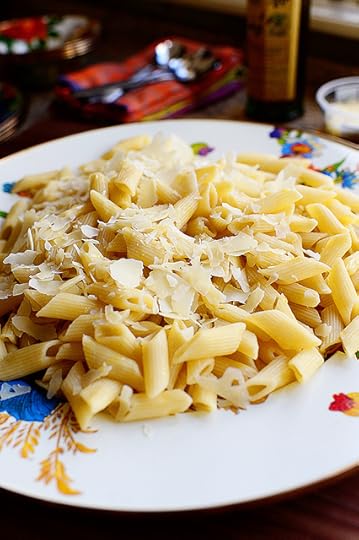
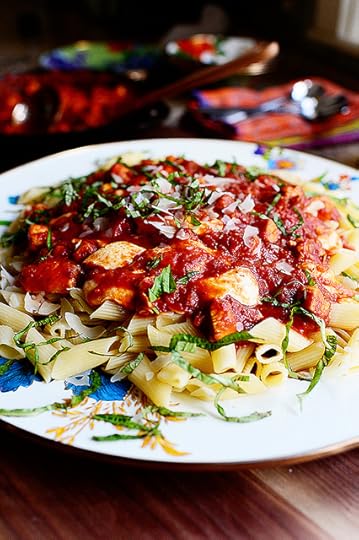 And sprinkle the basil all over the top along with some more Parmesan shavings.
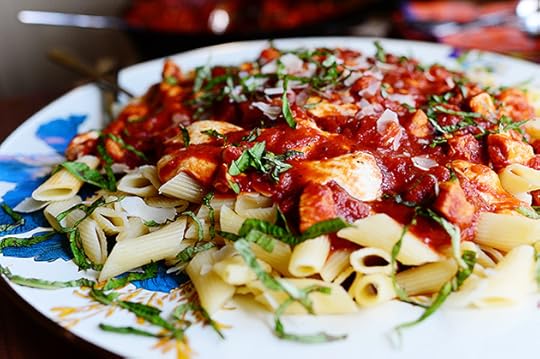 And…wow. Look at the pasta! Look at the sauce! Look at the soft chunks of mozzarella!
 Look at me eat it!
You will absolutely love this. It’s ridiculously simple, but oh so good.
Here’s the handy dandy printable.
Happy Monday, everyone!
Recipe
Chicken Mozzarella Pasta
Prep Time: 10 Minutes
Cook Time: 15 Minutes
Difficulty: Easy
Servings: 6

Print Recipe
Ingredients
1 pound Penne Or Rigatoni2 Tablespoons Olive Oil, Plus More For Drizzling2 whole Boneless, Skinless Chicken Breasts, Cut Into Small Bite-sized Pieces Salt And Pepper1 whole Large Onion, Finely Diced2 cloves Garlic, Minced1 jar (25 Ounce) Good Quality Marinara Sauce1/2 teaspoon Crushed Red Pepper Flakes (more To Taste)1/2 cup Water2 Tablespoons Minced Fresh Parsley8 ounces, weight Fresh Mozzarella, Cut Into Medium Cubes1/4 cup Parmesan Shavings Extra Parmesan, For Serving12 whole Basil Leaves (chiffonade) Preparation Instructions
Cook pasta according to package directions.
Heat olive oil over medium-high heat. Add chicken pieces in a single layer and sprinkle with salt and pepper. Allow to cook without stirring for 2 minutes, or until golden. Stir chicken around to brown on all sides. Remove to a plate.
In the same skillet over medium-high heat, add the onions and garlic and stir immediately to start cooking. Cook for 2 to 3 minutes, stirring occasionally, until the onions are deep golden.
Reduce the heat to low and pour in the marinara sauce, red pepper flakes, and the water. Stir until the onions and garlic are mixed in, then add the chicken back into the pan. Add the parsley, stir to combine, then allow to simmer, stirring occasionally, for about 7-8 minutes.
Make sure the sauce is bubbly and very hot, then gently stir in the mozzarella. Let it sit, undisturbed, for 2 to 3 minutes, until you can see that the mozzarella is very soft.
Drain the pasta and pour it onto a platter. Drizzle with a little olive oil. Immediately sprinkle on 1/4 cup Parmesan shavings (or grated Parmesan.) Pour on the sauce, sprinkle with extra Parmesan and the chiffonade of Basil, and serve immediately!
* NOTE: The mozzarella should be very soft but should still be in visible chunks rather than distributed throughout the sauce. It's better for the chunks to be on the firm side than the falling-apart side! You can always heat it a little more to get the cheese to the consistency you want.
Posted by Ree on February 24 2014

February 20, 2014
Waffles!
 Oh my GOSH, I love waffles. We had them a couple of times when we were in Colorado, and no offense to pancakes or anything…but I was reminded just how lovely good waffles are.
Once I got home from the trip, I decided to make waffles.
Then I made them again.
Then I made them again.
Then I made them again.
I fiddled and fiddled (much to my family’s profound bliss) and here’s the resulting recipe, which darn well better be perfect because I’m not making waffles again any time soon. Until tomorrow.
Anyway, next time you have a hankering for waffles, fire up the waffle iron and give these beautiful babies a try. (If you don’t have a waffle iron, you can thin the batter with just a little milk and make pancakes.)
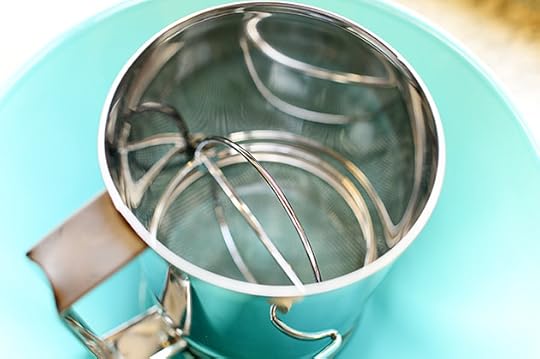 Set a sifter into a bowl.
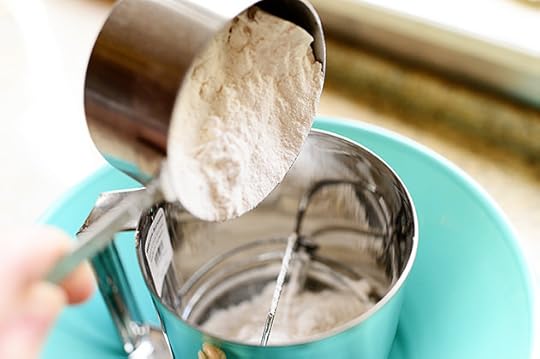 Add flour…
 Baking powder…
 Sugar…
 And a leetle salt.
 In a separate container, measure the milk…
 Then separate four eggs, placing the egg whites in a separate bowl…
 And adding just 2 of the egg yolks to the milk.
This is really where my fiddling came into play this week. I started with 3 eggs and used all of the whites and yolks. Then I repeated with 3 eggs but only used 2 of the yolks. I ultimately went with 2 yolks and 4 whites because that texture wound up being the most heavenly, although I realize having 2 leftover egg yolks might upset some human beings’ sense of symmetry and order. And for that, I send my love and apologies.
 Next, add in a good amount of vanilla for flavor…
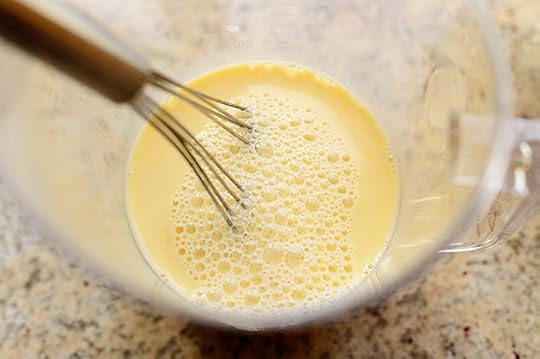 Then whisk the mixture together and set it aside.
Note: You can sub buttermilk for milk, or you can add a teaspoon of white vinegar to the milk and let it sit for 5 minutes to turn into buttermilk.
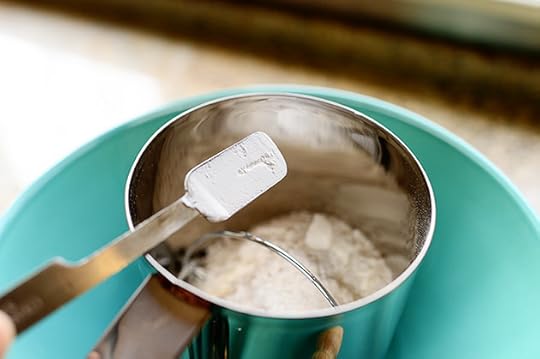
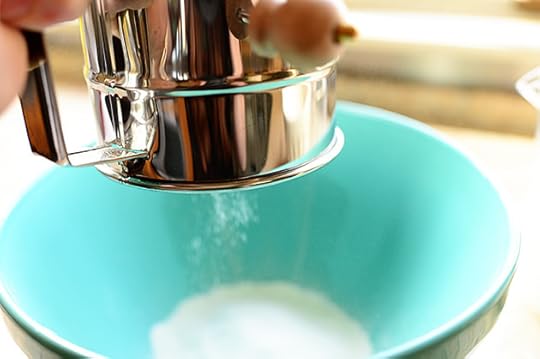 Sift the flour, baking powder, sugar, and salt together…
 And set it aside.
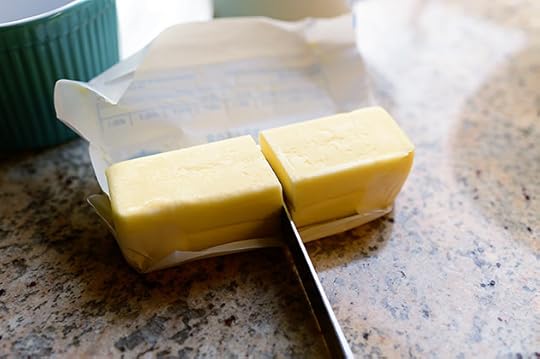 Next grab a stick of salted butter…
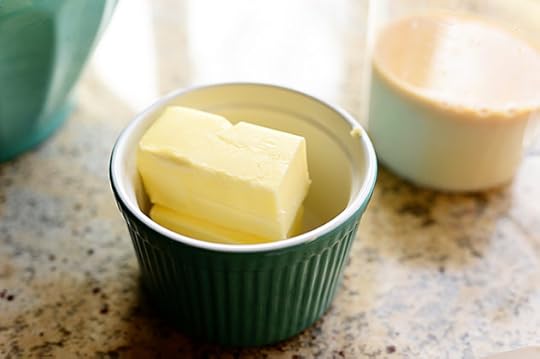 Put it into a microwave-safe bowl…
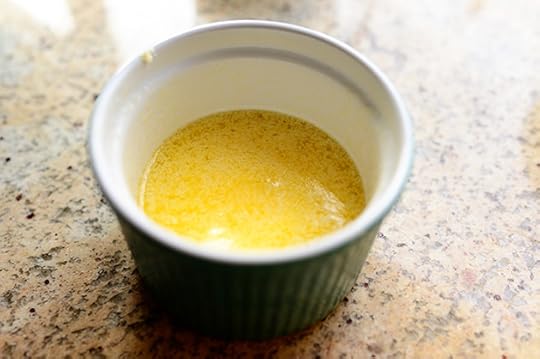 And nuke it for 30 seconds or so, till the butter’s melted.
 Finally, whisk/beat the egg whites…
 Until you think your arm has fallen off…
 Or until they’re stiff. These actually aren’t to the “stiff” stage yet, as I tried them with soft peaks in this batch of waffles. Ultimately, I decided they needed to be beaten all the way…so just keep going until you think your arm has not only fallen off, but that it’s on the floor in flames.
I think I need to work on my upper body strength.
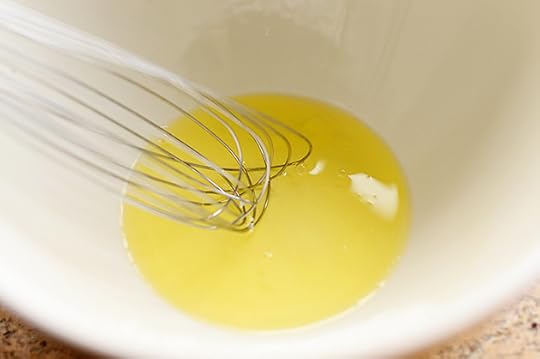
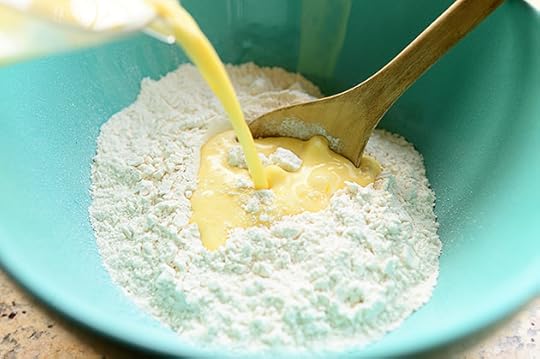 Now, pour the milk/yolk/vanilla mixture into the sifted dry ingredients…
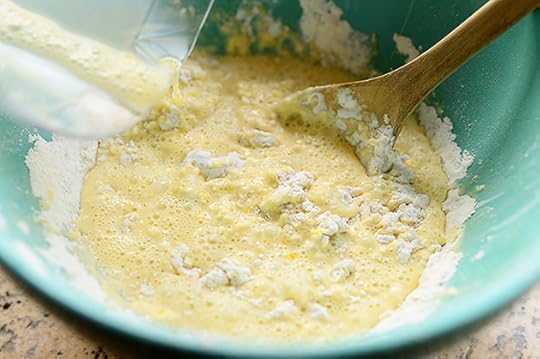 And very gently stir until they’re just about halfway combined.
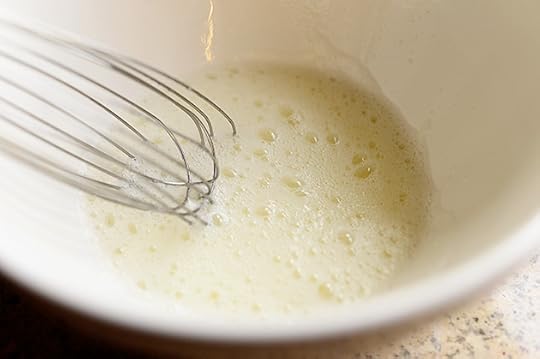
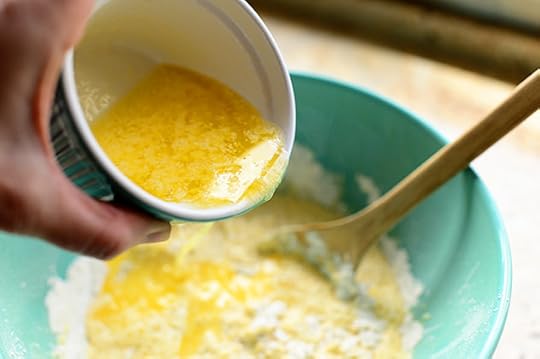 Then pour in the melted butter. Now, at first glance, a stick of melted butter may seem like a lot. And that is because a stick of melted butter IS a lot. There’s no getting around it. But from my understanding, this is what sets waffle batter apart from pancake batter: Waffle batter has a higher percentage of fat, which helps the waffles brown more lusciously in the waffle iron, and also helps with the lovely waffle texture. Some recipes use vegetable oil for the fat…but butter is more my wheelhouse, baby.
 Again, very gently stir in the butter until it’s just combined.
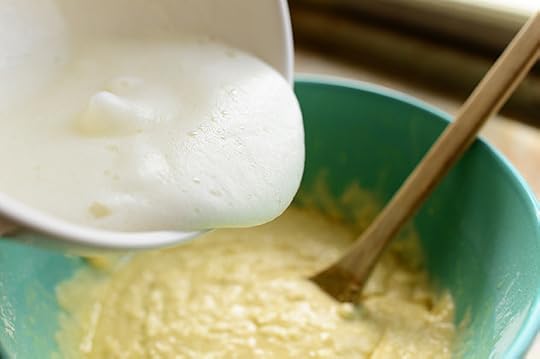 At the very end, pour in the beaten whites (and remember: yours will be more stiff than these)…
 And gently fold the whites into the batter. And by “fold” I definitely mean fold. No vigorous stirring allowed here!
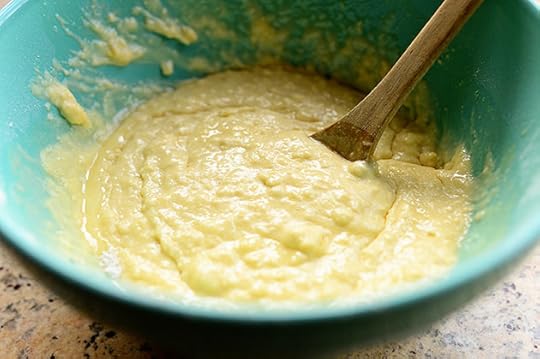
 Stop just short of the whites being totally mixed in.
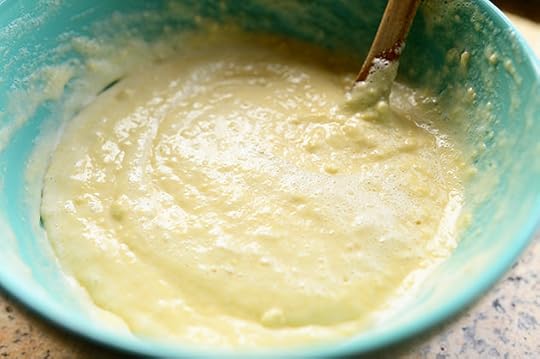
What a nice batter!
 Pour the batter into the preheated waffle iron…
 Then cook it for its recommended time, which is usually longer than you think it’s going to take. I didn’t let mine go the whole time, but it did turn out to be a good 4-plus minutes.
 In other news…I just can’t get away from these repeating numbers.
But that’s another story for another time.
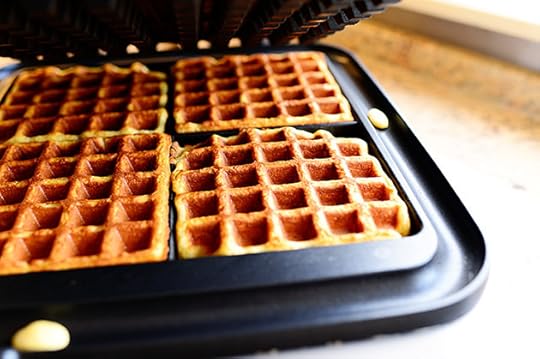 You need that time to ensure that the waffles are nice and deep, deep golden brown and crisp.
 Oh, man. I love life.
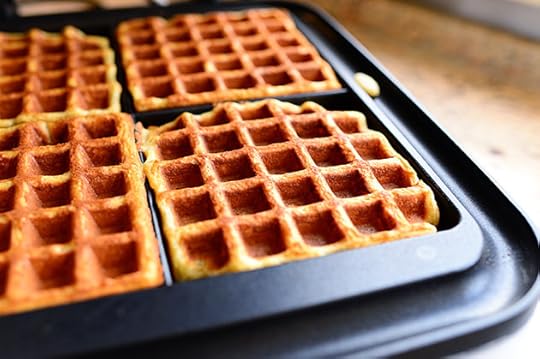
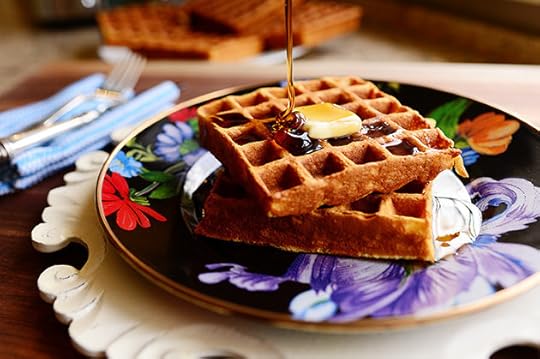
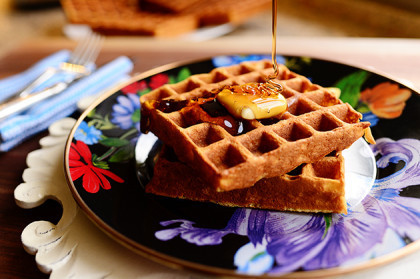
 Now, here’s the most important thing about waffles: You have to serve them immediately. As in, the second they come out of the waffle iron!
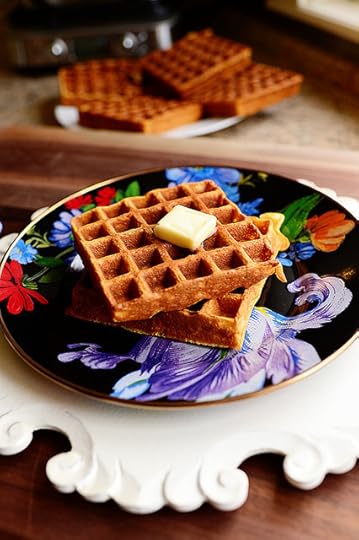
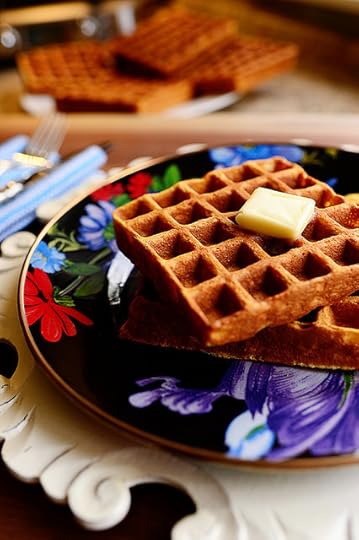 So have the extra butter ready…
 As well as the warm syrup.
 Now, I just said this, but it bears repeating: I love life.
 I’m not kidding. I want to marry life.
And these waffles can be my maid of honor.
That was quite possibly the worst metaphor I’ve come up with in quite some time.
But these waffles will definitely make up for it.
Here’s the handy dandy printable!
Recipe
Waffles
Prep Time: 10 Minutes
Cook Time: 10 Minutes
Difficulty: Easy
Servings: 8
Print Recipe
Ingredients
2 cups All-purpose Flour3 teaspoons Baking Powder1/2 teaspoon Salt1/4 cup Sugar1-1/2 cup Milk2 whole Egg Yolks1 Tablespoon Vanilla Extract1 teaspoon (additional) Vanilla Extract1 stick (1/2 Cup) Salted Butter, Melted4 whole Egg Whites Preparation Instructions
Preheat the waffle iron to the regular setting.
Sift together the flour, baking powder, salt, and sugar in a bowl.
In a separate bowl, whisk together milk, 2 egg yolks, and vanilla. Pour over the dry ingredients and very gently stir until halfway combined. Pour in the melted butter and continue mixing very gently until combined.
In a separate bowl (or using a mixer), beat the egg whites with a whisk until stiff. Slowly fold them into the batter, stopping short of mixing them all the way through.
Scoop the batter into your waffle iron in batches and cook according to its directions (lean toward being a little deep golden and crisp!) Remove and serve immediately with softened butter and warm syrup.
Posted by Ree on February 20 2014

Ree Drummond's Blog

- Ree Drummond's profile
- 2036 followers

