
Ree Drummond's Blog, page 35
December 12, 2013
Kitchen Tool Gift Guide + Giveaway
 Here are some of my favorite kitchen tools that I’ve given as gifts through the years. Sometimes I give them by themselves (in the case of, say, the knife) but it’s also fun to bundle a bunch of different tools and give an assortment.
Links below, but note that most of these things can be found in most kitchen stores. So shop around for the best prices!
 Stainless Steel Flat Whisk. I can’t live without this. It flattens against the bottom of a skillet and scrapes the surface for making gravies, sauces…the works!
 LamsonSharp Pro Slotted Turner, also known as…a spatula! I reach for this baby time and time again for everything from eggs to burgers. The quality is great, the handle is comfy…but it’s the ultra-sharp edge that I love. You can scrape along the pan and scoop up anything.
 Four-Sided Stainless Steel Box Grater. I’ve well established that the pre-grated cheese you buy in the store is against my religion, and this perfectly rectangular, four-sided grater is my very best friend. There are lots of models with more slanted sides, but I prefer this boxy one myself.
 Cilio Olivewood Spatula. Does the same trick as the slotted wonder up above, but with a gentler touch on skillets with a more delicate surface. I love this thing. It’s gorgeous, adds warmth among all the stainless craziness, and lasts for a long, long time.
 Wusthof Nakiri Knife. I have a problem, and that is that I don’t believe there is any other knife in the world besides this one. It’s all I use. I adore it. I can’t live without it. I give thanks for it. It’s the best.
 Microplane Zester.These zesters (they actually began as wood planers for carpenters!) are indispensable, as they can neatly scrape all the zest off an orange, and grate nutmeg and chocolate like there’s no tomorrow. They have lots of styles with plastic handles now, but I prefer this no-handle original.
 Various sizes of stainless measuring scoops. Oh, am I in love with these. Scoop cookie dough in different sizes according to how big you want your cookies, fill muffin tins with batter, scoop ice cream, melon balls…anything! Gift them in single sizes, or give the whole set. Once you’ve had these at your disposal, you can’t imagine cooking or baking without them.
 And…if you want to spread icing on a cake, spread melted chocolate on a pan, or spread any kind of substance on a flat surface without contorting your body, this Offset Stainless Steel Icing Spatula is what you need. (And pssst. The mini version is perfect for cupcakes and cookies.)
THE GIVEAWAY
Today, because Christmas is coming (yippee!), I’m giving away a complete set of all of these indispensable kitchen tools.
To enter, just shout out your favorite kitchen tool in the Comments section of this post!
One entry per person.
Winner will be announced Friday!
Good luck.
Giveaway sponsored by Pioneer Woman. No affiliate links above; no paid advertisements.


December 9, 2013
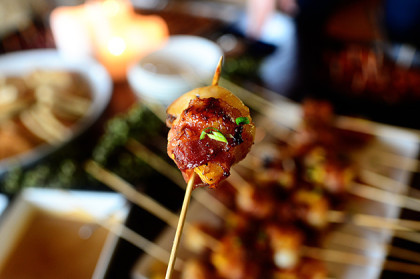
Skewers of Glory
 I made these addictive little wonders on my Christmas episode over the weekend, along with lots of other quick-and-easy party food. If you missed the show over the weekend, you can catch it again today at 5 eastern/4 central. Hope you enjoy it! There’s lots of good grub, man.
These skewers of glory are in my new holiday cookbook, and in the book I call them—wait for it—Skewers of Glory. And that’s because that’s exactly what they are. Sizzling bacon wrapped around shrimp, pineapple, and brushed in a ginger-spiked teriyaki sauce? Well, ‘glory’ was pretty much the only word I could come up with.
These are perfect for any Christmas or New Year’s (or any other) cocktail party, and these disappear almost instantly.
Here’s how to make them!
 First, start soaking some wooden skewers in a pan of water so they don’t burn up in the oven later. Make sure they soak about an hour or so before you use them!
 Next, whip up an easy marinade to brush on the skewers: I started with a thick teriyaki sauce, and have you noticed that some teriyaki sauces are thick and some are watery and thin? It’s such a confusing world we live in!
 Anyway, I doctor up the teriyaki with some good stuff. Minced ginger, for one. One of the most glorious ingredients known to man.
 Throw that on in there along with some green onion and a little lemon juice.
 And for some heat, some red pepper flakes.
You can leave this out if you don’t like spicy food.
Just please reconsider your position. Spicy food is one of my reasons for living.
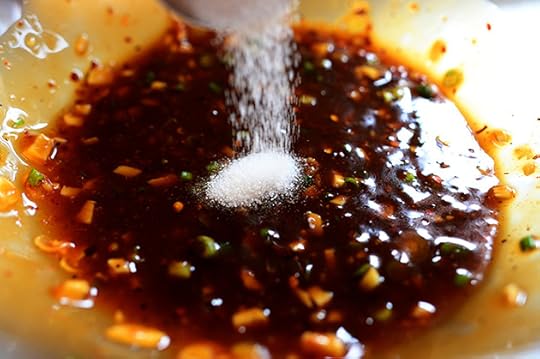 This teriyaki sauce wasn’t overly sweet, believe it or not, so I added a little sugar.
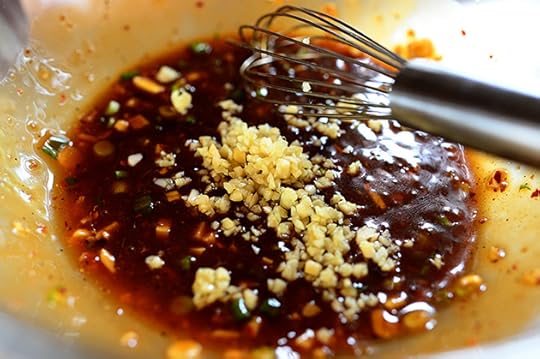 And some minced garlic!
Oh, the flavors.
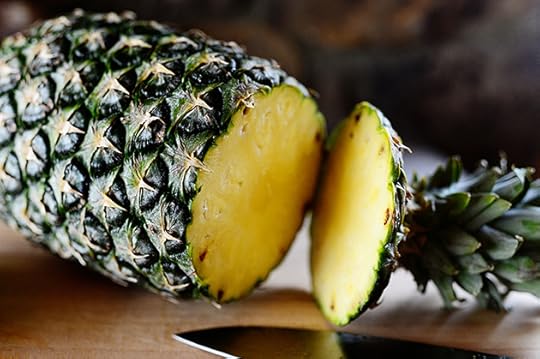 Whisk the sauce together and set it aside, then get started on the other ingredients for the skewers: Lop the top off a pineapple…
 Then slice off the rind…
 Cut the pineapple into wedges…
 Slice the hard, center core off of each piece, then slice it into chunks.
 Grab a (peeled, deveined, no tail) shrimp and lay one of the pineapple chunks on top of it.
 Then grab half a slice of bacon, wrap it around to cover as much of the surface as possible, then thread a skewer through so that it anchors everything together. This takes a little practice, as the shrimp is slippery and it’s a little tricky getting everything to hold together while you get the skewer in, but it’s things like this that make life exciting.
 Keep going until they’re all assembled, laying them on a rack set on a baking sheet.
Very Important Note: Do not assemble the skewers ahead of time! The pineapple has an enzyme that completely eats away at the shrimp, and if you allow them to sit for a long time before baking, the shrimp will turn into a weird, pasty substance that might have resembled shrimp once. So while you can make the sauce and prep the pineapple ahead of time, hold off on assembling until they’re ready to go in the oven! They’re fine after baking, as the heat takes care of everything.
 Brush them generously with the sauce.
 And this is why you definitely want to examine the bottle of teriyaki before you buy it; you want it to be thick and viscous enough to stick! (Note: If you wind up with a thin teriyaki, no sweat: Just add enough honey to thicken it up a bit.)
 Put them in a 400 degree oven for about 10-12 minutes, then pull them out…
 Brush a second coating on top, and pop them back in the oven until the bacon is sizzling and the shrimp is totally cooked, about 7 or 8 (or more, if they need it!) minutes.
 Then arrange them on a platter, sprinkle them with more sliced green onions…
 And serve them hot or at room temperature.
 These are absolutely divine! You (and your guests) will love them.
Here’s the handy dandy printable.
Recipe
Skewers of Glory
Prep Time: 30 Minutes
Cook Time: 20 Minutes
Difficulty: Easy
Servings: 30
Print Recipe
Ingredients
1/2 cup Thick Teriyaki Sauce3 cloves Garlic, Minced1 Tablespoon Fresh Minced Ginger1 Tablespoon Sugar1/2 teaspoon Red Pepper Flakes Juice Of 1/2 Lemon Dash Of Kosher Salt2 whole Green Onions, Sliced1 whole Fresh Pineapple, Cut Into Chunks2 pounds Jumbo Shrimp, Peeled And Deveined, Tails Off1 pound Thin Bacon, Cut In Half Crosswise. Preparation Instructions
Preheat the oven to 400 degrees.
Soak 30 wooden skewers in water for 1 hour.
Make the marinade by combining teriyaki sauce, garlic, ginger, sugar, red pepper flakes, lemon juice, salt, and green onions. Stir together and set aside.
Place a chunk of pineapple on top of a shrimp, then wrap the whole thing in half a slice of bacon. Thread a skewer through the whole thing to anchor it all together. Repeat with the rest of the shrimp, pineapple, and bacon.
Brush all the skewers with the marinade then bake them for 10 to 12 minutes. Remove them from the oven and brush again, then return them for 7 to 8 minutes, or until the bacon is sizzling and the shrimp is cooked.
Arrange them on a platter and sprinkle them with sliced green onion. Serve warm or at room temperature!
(Note: Assemble the skewers just before putting them in the oven, as they don't do well assembled ahead of time.)
Posted by Ree on December 9 2013

December 6, 2013
Food from the Christmas Show!
As I explain over on Confessions of a Pioneer Woman today, my Christmas episode airs tomorrow on Food Network. Marlboro Man and I have some good friends over for a Christmas party, and I had so much fun pulling together all the food. While I did some prep ahead of time, I essentially wound up being able to make several dishes in just under three hours, and wound up with an exceedingly tasty (and dude-friendly) spread of festive food.
Here are just a few things I served. I’ll share a couple of the step-by-steps next week!
 Quick and easy way to make regular ol’ cheese and crackers look extra special: arrange them on a tiered platter!
 Beef, glorious beef…along with stuff for mini sandwiches.
 The stuff that dreams are made of.
 These were super fun and festive…
 And these. Holy moly, you won’t believe the deliciousness. I call these Skewers of Glory and they’re in my new cookbook.
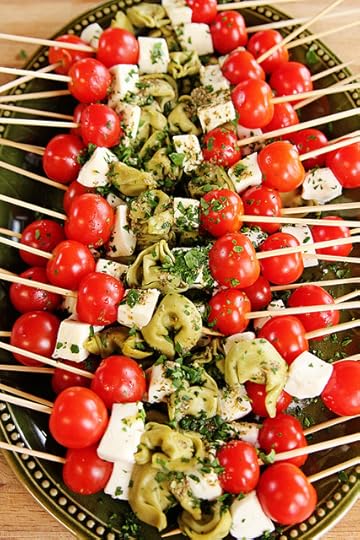 And these were a total cinch: cherry tomatoes, chunks of fresh mozzarella, and cooked spinach tortellini. Then I made a pesto dressing and spooned it over the top. So fresh, cool, and flavorful!
There are other things, too: sausages, cheese dip, etc.
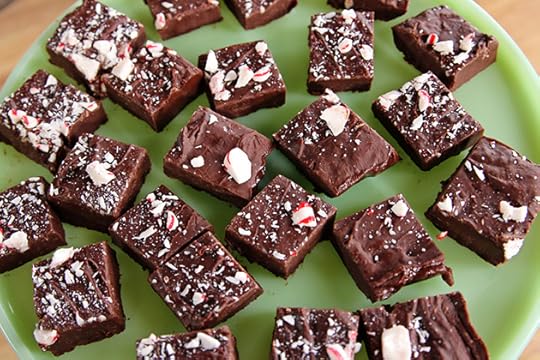 But oh, will you love this fudge. It took me ten minutes to make, and I couldn’t quit popping it in my mouth.
 Hope you enjoy the show, guys! The food is really delicious, and really simple…which leaves more time for enjoying friends and family.
And that’s really what the holidays are all about.

December 4, 2013
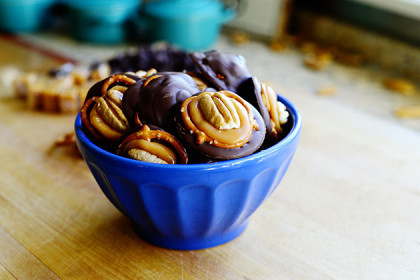
Pretzel Turtles
 First of all, in case you didn’t know, mini pretzels are sweeping the nation. No, really—they are! All you need to do is Google “Pretzel Treats” and you’ll find quadrillions of recipes for various goodies using miniature pretzels (either square or twists) as a base. Pretzel treats are a really perfect for Christmastime because you can use different colors of sprinkles and candies to decorate them, and they’re easy treat to make with young kids. And the center of all of it is a good ol’ salty pretzel, which always makes anything sweet taste a little bit better.
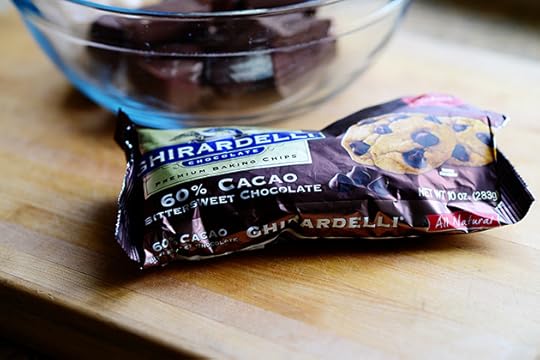
A couple of days ago, I made a quick batch of turtles using mini pretzels. My good friend Jaden has a version on her website using—wait for it—Rolo candies. (See the recipe here. Fabulous!) But since I didn’t have any Rolos on standby, I just took the old school route and used caramels and melting chocolates.
These would be perfect on a tiered cake stand as part of a holiday buffet…or just wrapped in little cellophane bags and given to friends at Christmas.
Or Valentine’s Day.
Or June 11.
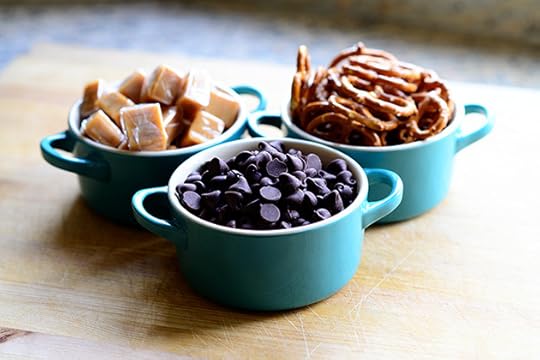 All you need are mini pretzels, caramels, pecans (not shown here because I’m a 44-year-old airhead) and some kind of chocolate. I used a mix I’ll tell you about in a minute, but if you have a good candy store nearby, a good milk chocolate would be perfect.
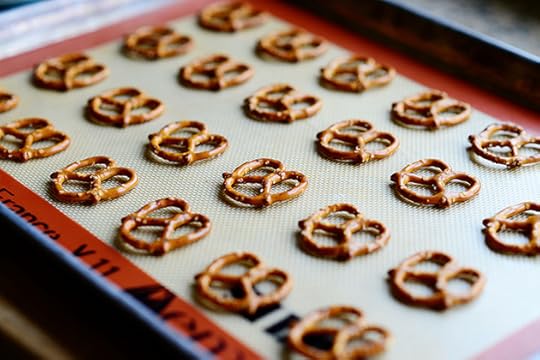 Preheat the oven to 325 degrees and lay mini pretzels all over a baking sheet lined with either parchment paper or a baking mat like this.
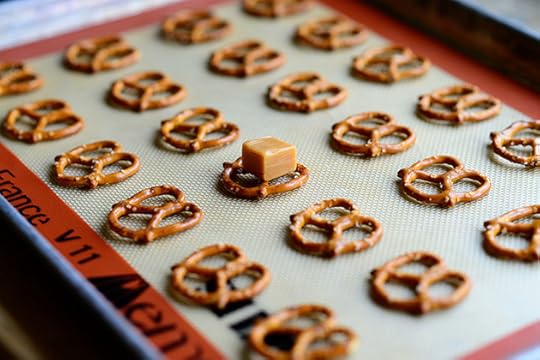 Unwrap the caramels, and one by one, set them on the pretzels…
 Until they’re all covered!
 Now just pop the pan in the oven for about 4 to 5 minutes or so…
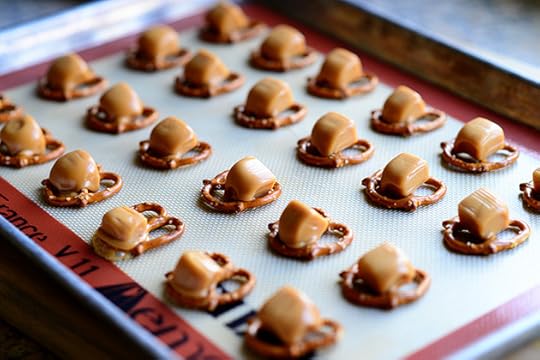 Until the caramels have softened but haven’t started melting all over the universe yet. Keep your eye on them!
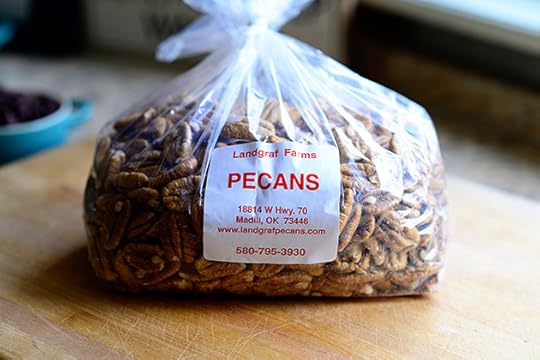 Now grab some pecan halves. I just got these as a gift, which is one of the things I love about Christmastime. Pecans, pecans, pecans!
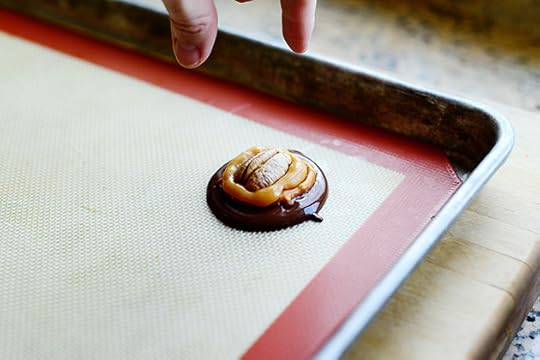
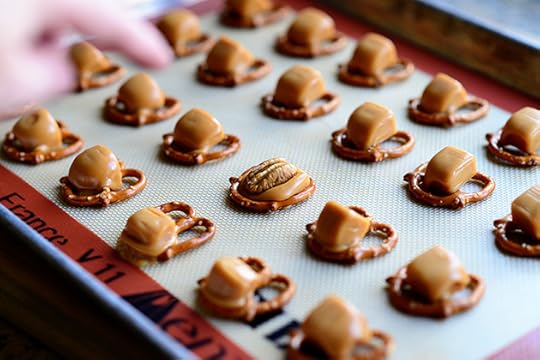 Just grab a pecan half and carefully press it onto one of the caramels. Press lightly; you just want the pecan to be secured and the caramel to perfectly fit within the pretzel.
 Then just keep on going until they’re all done! Now you just need to let them cool completely, so set them aside…
And start melting the chocolate as they cool! I didn’t have any good milk chocolate for melting, so I wound up grabbing some chocolate almond bark…
 Then grabbing some good bittersweet chocolate I had on hand…
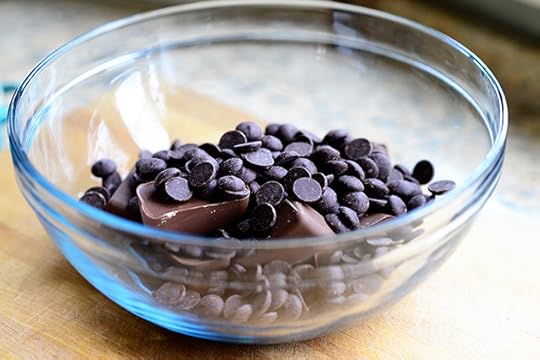 And mixing that in. I did this because even though chocolate almond bark is great for melting, the flavor doesn’t really scream “Chocolate.” And that’s probably because it isn’t really chocolate. It’s almond bark. Long story.
 So basically, I used the almond bark for “filler” and spiked it with a sharper, good-quality chocolate. But this was sort of a wing-it type of thing; once again, just a good quality milk chocolate would be perfection.
 So once the pretzel/caramel/pecan thingies are cool, remove them from the tray.
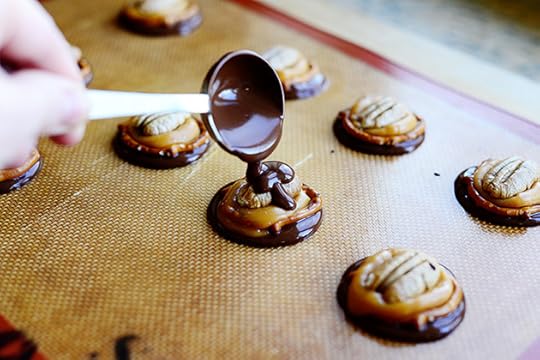
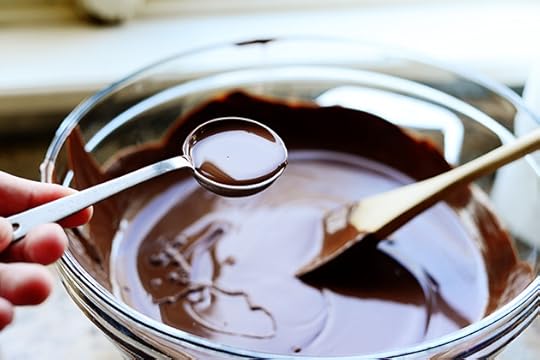 Then grab a tablespoon of the melted chocolate…
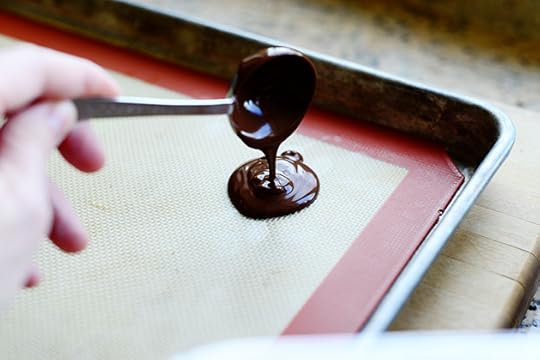 And pour half of it on the tray.
 Then just drop one of the pretzels right on top!
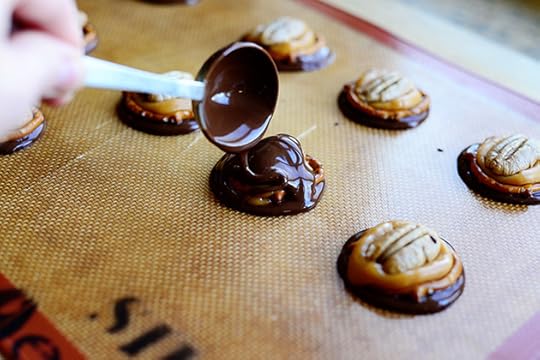
 That first one was a little bit, because I used closer to a tablespoons…but the second one, at half a tablespoon, was just right.
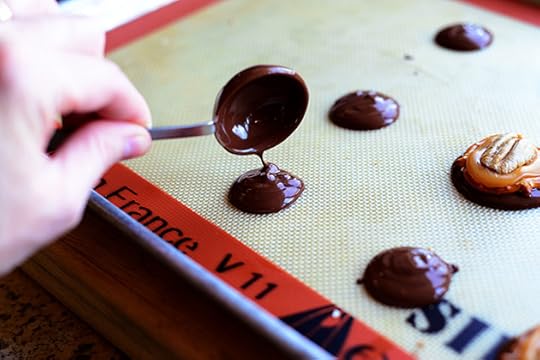 So just keep going, drizzling several rounds of chocolate at once…
 And carefully dropping on the pretzels. They’ll sink naturally into the chocolate, so no need to really press them in. Just make sure they stay centered on the chocolate as they settle.
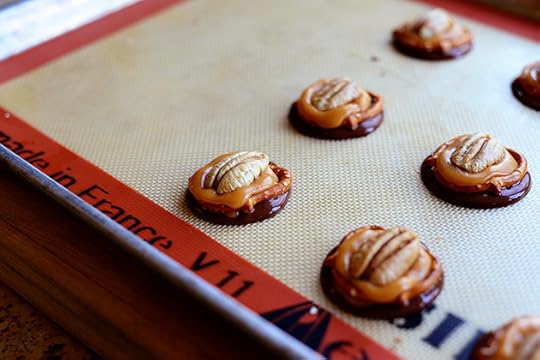
 Then you just need to let them set! You can do this at room temperature, but expect it to take quite awhile. Or, you can hasten it along by putting the turtles in the fridge for 30 minutes or so; just keep in mind that the caramel will be really firm—too firm to chew—when you first pull it out of the fridge.
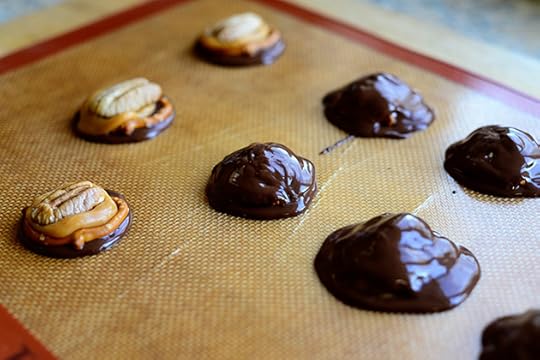
 Now, I did a few of them on a separate baking mat so I could have a little extra fun.
 I drizzled more chocolate…
 All over the top…
 Until it was all coated.
 Then I repeated with the rest of them…
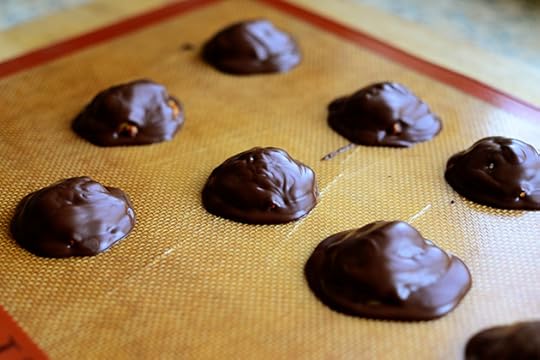 And popped ‘em into the fridge to cool! This is just a more substantial version of the other ones and keeps the pretzel and caramel “enclosed” in chocolate. It’s also more in line with the original turtle-style candy!
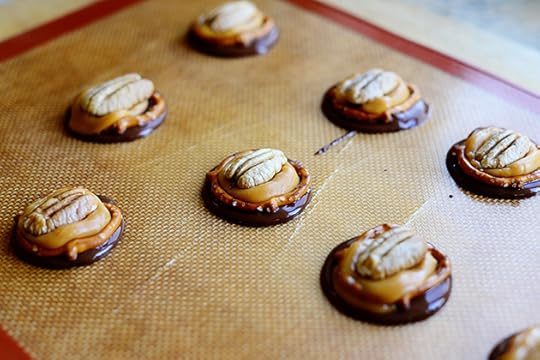
 Either option is just lovely. The only thing I’d change (and I added this in the printable below) is to toast the pecan halves and let them cool before making the candies. I think that would bump up the flavor even more. And as I’ve said approximately four million times already in this post, good milk chocolate is the way to go.
 Yay for mini pretzels!
Here’s the handy printable.
Recipe
Pretzel Turtles
Prep Time: 5 Minutes
Cook Time: 10 Minutes
Difficulty: Easy
Servings: 24
Print Recipe
Ingredients
24 whole Mini-pretzel Twists24 whole Individually Wrapped Caramel Squares, Unwrapped8 ounces, weight Good Quality Milk Chocolate, Melted24 whole Pecan Halves Preparation Instructions
Preheat oven to 325 degrees.
Place the pecan halves in a single layer on a baking sheet and put in the oven for 5 to 6 minutes, shaking the pan once halfway through, until they're lightly toasted. Remove them after they're toasted and put them on a plate to cool.
Line the baking sheet with parchment paper or a silicone baking mat. Arrange the pretzels neatly on the pan, then top each pretzel with an unwrapped caramel. Place the pan into the oven for 4 to 5 minutes, or until the caramels are softened (but definitely not melting.) Remove the pan from the oven.
Gently press a pecan half onto each caramel, just enough for the caramel to fill the pretzel. Set them aside to cool completely.
Meanwhile, melt the chocolate. When the pretzel/caramels are cooled, remove them from the baking sheet. Spoon small dollops (1 1/2 teaspoon helpings) of chocolate all over the baking mat, then lightly drop each pretzel onto the middle of each dollop, making sure they're centered.
Allow them to cool completely before serving (you can hasten this along in the fridge.)
Variation: Spoon a little melted chocolate all over the tops of the turtles to cover the whole thing in chocolate.
Posted by Ree on December 4 2013

December 3, 2013
Christmas Delights
I actually love that Thanksgiving was so late this year, because all of a sudden…BOOM! It’s already Christmastime! And while I wish I had another month or seven to think about Christmas shopping, I’m glad we can go ahead and start making Christmas treats now.
I’ll be sharing some new holiday treats over the next couple of weeks, but before I start, I wanted to share some oldies (but goodies) from this here website o’ mine. All of these treats are perfect for enjoying at home or delivering to friends, neighbors, and family. Note that in this compilation, you will see all degrees of photo quality.
Translation: You’ll see some kinda bad food photos. But that’s part of my history, man! I is who I is and that’s all that I is.
I mean was.
I mean am.
I mean never mind.
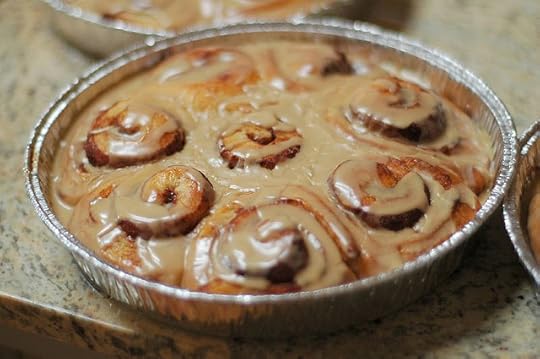 Cinnamon Rolls. These are the king. The top. The best. The most luscious, decadent thing you can deliver to your friends at Christmastime, especially if they’re still warm. My mom delivered them to friends throughout my childhood, and I’ve carried on the tradition. I want you to carry on the tradition, too!
 Chex Party Mix. I know what you’re thinking. Yeah, yeah, yeah, Chex Party Mix, yada yada yada. But trust me. Make this one. There’s a tiny addition of a simple ingredient that completely transforms the whole thing. Again: trust me. You’ll love it!
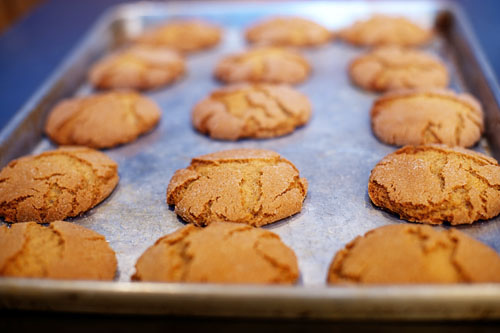 Spicy Molasses Cookies. Oh my gosh, are these good. And by all means, substitute butter for the shortening if that’s more in line with your belief system. Either way, these cookies are absolutely, positively lovely. Flavor all over the place!
 Chocolate Candy Cane Cookies. I’m cheating here a bit because the photo I’m showing you above is the new photo from my holiday cookbook. But if you click on the recipe link, you’ll get to see my old, old (circa 2008) photos of these same cookies in all their crazy-dull glory! Don’t let them deter you, though…these cookies are an absolute treasure. I make them almost every year and never get tired of them! And they always make Christmas cookie plates look extra festive and pretty.
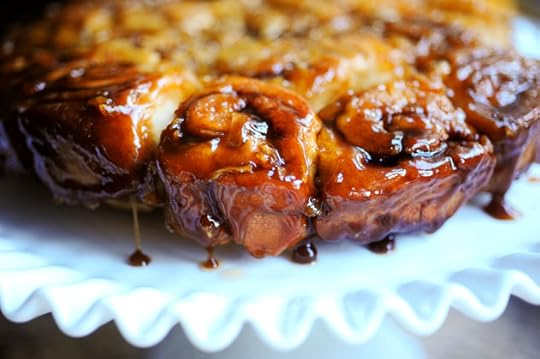 Caramel Apple Sticky Buns. Goodness gracious sakes alive. Same dough as the cinnamon rolls above, but with more of a caramelized topping. It’s a world gone mad, I tell you!
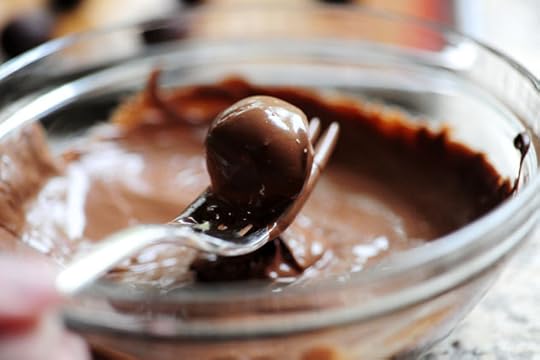 Super easy Chocolate Truffles with Sea Salt. Or sprinkles. Or glitter. Or any old edible topping you want! The truffle mixture is really simple. I love making these!
 Crispy Chocolate Almond Sticks. Another super-easy throw-together treat for Christmas deliveries. Just use storebought Italian breadsticks and whip up a mixture of melted chocolate, Nutella, and chopped almonds. These little babies are addictive!
 Brandy Snaps. Delightful! Light, crisp, filled with brandy-spiked cream. These have a little bit of a learning curve…just bake them until the surface is totally covered with bubbles that are about to burst/are bursting and you’ll be fine.
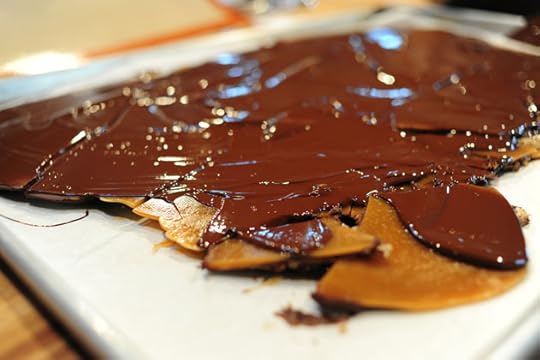 Lia’s Butter Toffee. This is magnificently delicious toffee, and if you use a candy thermometer and follow the instructions, it’ll turn out perfect every time. I love how thin Lia spreads out the toffee mixture; makes it nice and crisp, the way toffee should be.
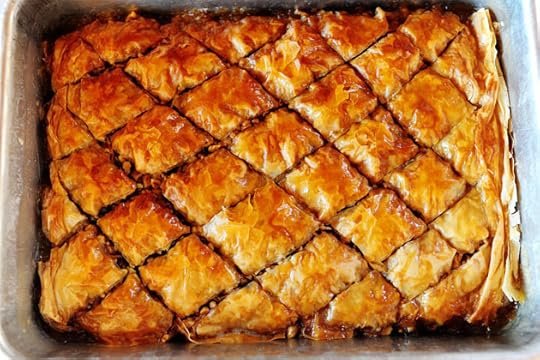 Baklava! Mmmm. Golden brown, sticky, and gorgeous. What I love about baklava is that you can change up the filling and make whatever kind you like. And it just gets better as it sits. Not that it has a chance to sit very long.
 Christmas Finger Jello. If you have the time, patience, psychological soundness, and intestinal fortitude to take this on, it will be totally worth it! (If you don’t…well, I understand. Ha.) I do a heart-shaped version of these in my new holiday cookbook, and even though I always, halfway through the process, curse myself for signing on for such torture, I’m always so glad when I’m finally finished. These treats are so fun, and are like eating a cold, refreshing gummy bear! I love them. And I hate them. But I love them.
 Marshmallow Pops! The possibilities for color and decorations are endless, and they’re always a hit. Perfect treat to make with kiddos!
 And finally, Brown Sugar Oatmeal Cookies. These aren’t overtly Christmasy in nature…but they’re a good, hearty, chewy treat.
Hope you find some new treasures here!
Love,
P-Dub

November 29, 2013
Leftover Turkey Recipes!
Happy Day-After-Thanksgiving, everyone! I hope you had a wonderful day of food, family, friends, fun…and The Godfather.
I also hope you wound up with a nice-sized bag of leftover turkey, because I have some delicious recipes that’ll use it right up! Just click on the links below to be taken to the step-by-step recipes.
 Leftover Turkey Pot Pie. The wonderfulness of this leftover recipe is made even greater if you have a leftover pie crust laying around! This is comfort food at its very best and most delicious. You’ll love, love, love it.
 Turkey Tetrazzini. This is comfort food at its very best and most delicious, Chapter Two. A splash of white wine gives this a yummy edge, and it’s good to serve family members as they go to and fro.
 Leftover Turkey and Swiss Panini. If you don’t have a panini press, just make this in a skillet as you would a regular grilled cheese. You can even press it a bit by putting a heavy skillet on top while it grills. This is totally yummy!
 Leftover Thanksgiving Panini. If you want a way to use everything—the turkey, dressing, cranberry sauce, and gravy—this is it. The mustard is the secret—it cuts through all the flavors and adds a nice tang—and you seriously won’t believe how good this is. (Note: I’m linking to my recipe on the Food Network website, as I haven’t posted this step-by-step on my website yet.)
 Leftover Turkey Spring Rolls. These are phenomenally delicious, and such a nice, crunchy contrast to all the rich Thanksgiving food. It’s only 8:34, we’re heading out to work calves, but I’m craving one of these for breakfast right now.
 And finally, if you have a can of unused pumpkin pie filling, freeze it in muffin tins and whip up some Pumpkin Smoothies. I’ve been championing them for the past two weeks because they’re just that good.
Hope one of these makes your Black Friday delicious!
Love,
P-Dub

November 25, 2013
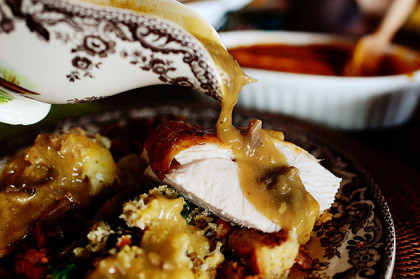
Giblet Gravy
 This is an updated version of my old (ancient) post about how to make Turkey Gravy, which I posted back in the dark ages of 2007. And in internet years, let me tell you—that was a very, very long time ago! This is essentially the exact same method, only the photos are new and therefore much less grody, as many of my food photos were back in the dark ages of 2007, and hopefully, the instructions are even more clear. But feel free to hop between the two posts if it helps.
Gravy is everything. Absolutely everything. You can have a perfect turkey and luscious mashed potatoes, but if you don’t have a dark, decadent gravy to spoon over the top, what’s the point of even living?
Okay, so maybe that’s a little dramatic.
But the good news is this: Making good gravy isn’t difficult! It just takes patience, perseverance, and the sheer will to make gravy so good, even your picky and opinionated Uncle Festus will come back for seconds.
Here’s how to do it!
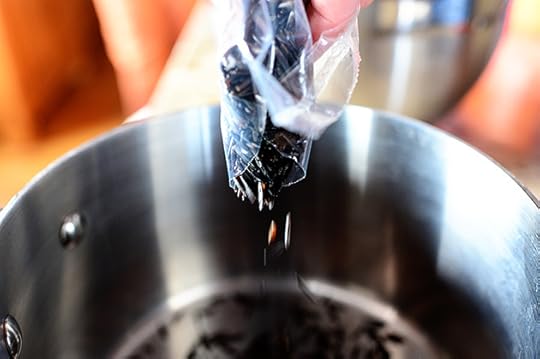
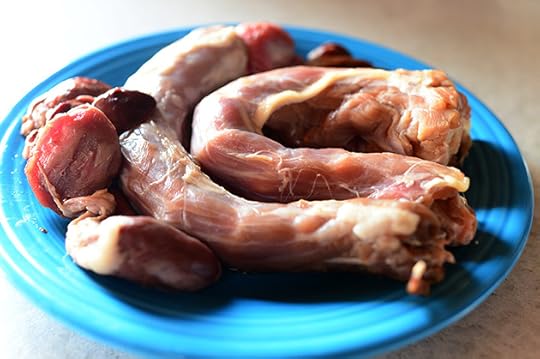 First of all (speaking of grody), you need to boil the neck and giblets, also known as the bizarre stuff you find in the bag inside the raw turkey. I always take them out of the turkey and rinse them, then store them in a ziploc bag in the fridge overnight (because I’m brining the turkey overnight, and I remove the interior bag first.)
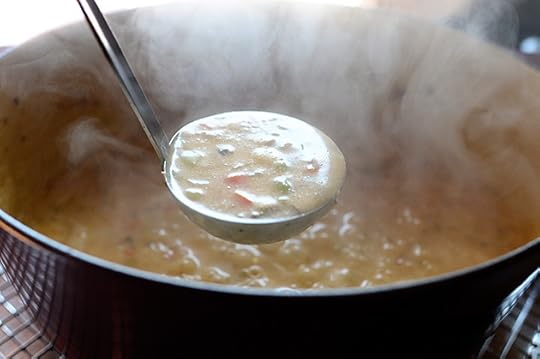
 So while the turkey is roasting the next day, place the neck and giblets into a medium saucepan, cover it with water by about 2 inches, and bring it to a boil. After it boils, reduce the heat to a strong simmer and cook them for about 45 minutes to 1 hour, until the meat is totally cooked through.
 Remove the neck and giblets from the water (but keep the water on standby; you’ll need it later!) and when they’re cool enough to handle…
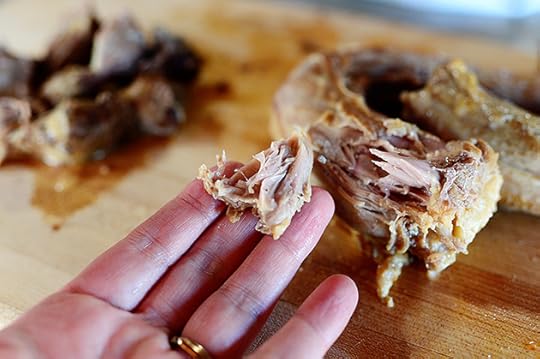 Use your fingers to pick off as much of the neck meat as you can, trying very hard not to think about the phrase “neck meat” while you’re doing this.
 This is good stuff! And it’s luscious in the gravy, baby.
 You also need to chop up the giblets, which are my favorite part of the gravy.
 I like them diced pretty finely, though, as the flavor is pretty durn strong.
Now just set all the neck and giblet meat aside while you make the gravy!
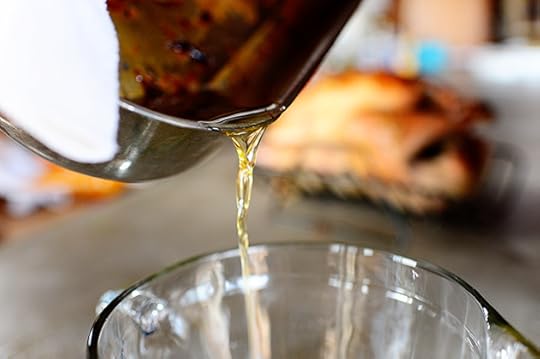 Now, after you remove the turkey from the oven and remove the turkey from the roasting pan, carefully (don’t burn yourself!) pour all the drippings from the pan into a large heatproof pitcher. (Set the roasting pan aside, but don’t wash it!) Let the liquid sit undisturbed for a bit, long enough for the fat to separate from the drippings.
The separation will be obvious: The fat rises to the top, and it’s a thick, greasy liquid. The drippings stay at the bottom, and they’re more of a cloudy liquid filled with little bits.
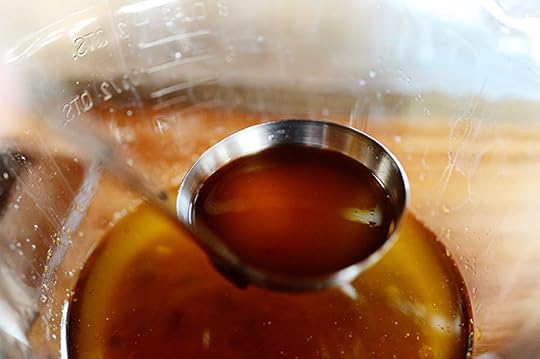 After the two are totally separated, use a ladle to carefully skim off the fat and transfer it to a separate bowl. Just lower the ladle straight down and slowly allow the fat to spill over the sides and into the well. (You can also use a fancy fat separator…I just don’t have one of those.)
 Now, when you’re ready to make the gravy, set the roasting pan over the stove (I usually straddle it over two burners) and turn on the heat to medium. Pour in some of the fat (how much you add depends on how much gravy you want to make.)
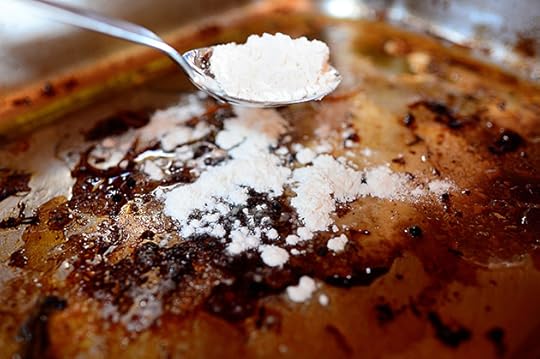 When the fat is heated, sprinkle in some flour. Again, how much you add depends on how much gravy you want to make!
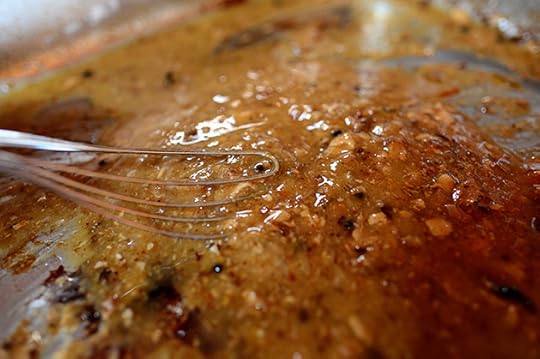 Whisk it all together and check the consistency: Basically, you want to make a nice paste. If it seems overly greasy, whisk in a little more flour until it looks right. If it seems too thick and it’s hard to stir, drizzle in a little more fat.
 When the consistency is right, you then need to take the time to cook the roux so it gets nice and brown! Just whisk it constantly as it cooks, and when the color looks nice and deep golden brown…
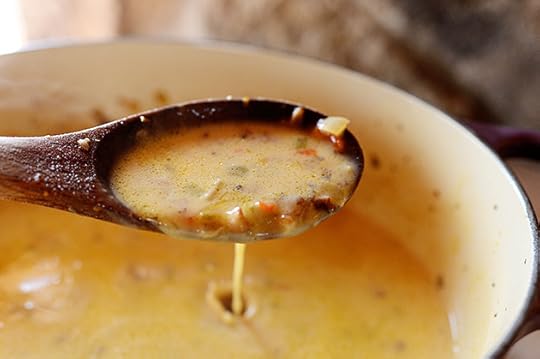
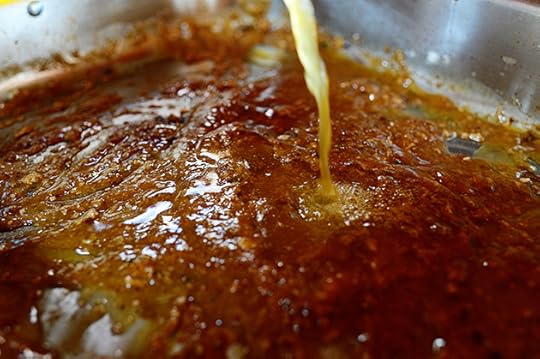 Pour in a good amount of low-sodium broth: You can use chicken, turkey, or vegetable—whatever makes your skirt fly up. After that, pour in half the reserved turkey drippings (you can always add the rest later if the gravy needs it.)
 Whisk in the broth and cook it for long enough for the gravy to get nice and thick; this can take from 5 to 10 minutes (or more, depending on how much volume you’re talking about) so just be patient and keep on whiskin’!
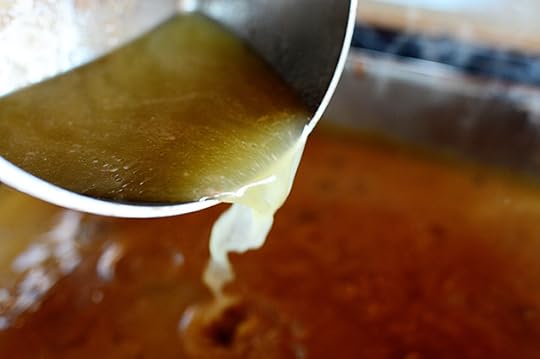 If the gravy isn’t thick enough, keep cooking it until it thickens. If it gets too thick, you can always thin it with some of the giblet broth.
So while I’m at it, let me give you the breakdown so we have it straight:
Fat = the grease that separates from the drippings. This is combined with flour in the roasting pan to make the roux.
Drippings = the cloudy, messy liquid that separates from the fat. This is added to the roux along with the broth to make the gravy more flavorful.
Broth = I usually use storebought, either turkey, chicken, or vegetable. This is added to the roux to make the gravy. Always use low-sodium (or, even better, no-sodium broth) to control the saltiness of the gravy.
Giblet broth = the liquid left in the saucepan after you boil the neck and giblets. This is used to thin the broth if it gets too thick.
 The very last thing to do is to add the shredded/chopped neck/giblets to the gravy…
 Along with (after you taste it) salt and pepper. Note that if you brined the turkey, you likely won’t need much salt at all! So always, always, always taste the gravy before adding any salt.
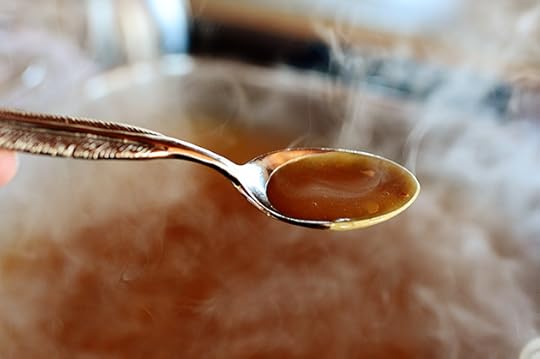
Mmmm. GRAVY!
Sorry to shout. I just can’t control myself.
 Ahh. There’s nothing better in the world.
 Enjoy every single bite!
The printable below, but in a nutshell:
1. Boil the neck and giblets in a saucepan of water.
2. Chop the giblets and pull the meat off the neck.
3. Reserve the giblet water.
4. Roast the turkey, then pour all the pan drippings into a pitcher or bowl.
5. Allow the drippings to separate from the fat.
6. Skim off the fat and put in a separate bowl.
7. Add fat back to the roasting pan over medium heat.
8. Whisk in flour, cook the roux until brown.
9. Add storebought broth (or homemade if you have it!)
10. Add the separated drippings (start with half, work your way up.)
11. Stir until thick, add more broth or giblet broth if needed.
12. Add giblets and neck meat.
13. Add salt and pepper (taste first!)
14. Serve hot and bubbly!
Enjoy!
Recipe
Giblet Gravy
Prep Time: 5 Minutes
Cook Time: 20 Minutes
Difficulty: Easy
Servings: 12
Print Recipe
Ingredients
Giblets And Neck, Saved From The Uncooked Turkey Drippings From Roasted Turkey1/2 cup All Purpose Flour (more If Needed)4 cups No-sodium Chicken, Turkey, Or Vegetable Broth, More If Needed Salt And Pepper (gravy Won't Need Much Salt) Preparation Instructions
First, take the giblets and neck from the raw turkey and cover them with water by 2 inches in a small saucepan. Bring to a gentle boil over medium heat, then reduce the heat to low and simmer it for 1 hour to both to cook the meat and to make a giblet broth for the gravy.
Remove the giblets and neck from the water (don’t worry; they’re supposed to look really grody) and set them aside. Keep the giblet broth in the saucepan for later.
When you’re ready to make the gravy, pour all the drippings from the turkey roasting pan into a bowl. Set the pan back onto the stove.
Let the drippings sit and separate naturally, then use a ladle to carefully separate the fat from the liquid drippings (the fat will be on top, while the drippings will settle at the bottom).
Turn the heat to medium and add about 1 cup of the fat back into the roasting pan. Sprinkle the flour all over the fat and immediately begin whisking it around to make a paste. Add more flour or fat as needed to create the right consistency: You want the mixture to be a stirrable paste and not overly greasy. If it looks a little greasy, whisk in a little more flour.
Once the paste/roux is the right consistency, whisk it slowly for a few minutes, allowing it to cook to a deep golden brown color. A nice brown roux is the secret to good gravy, baby!
Once the roux is ready, pour in 1 cup of the drippings (the stuff that separated from the fat earlier) and the chicken or turkey broth, whisking constantly. Then just let the gravy cook and thicken, whisking constantly for 5 to 8 minutes.
Meanwhile, use your fingers to remove as much of the neck meat as you can and chop up the giblets into fine pieces. Add as much of the meat to the gravy as you’d like: Add it all if you like a really chunky giblet gravy, add a little less if you like the gravy more smooth.
If the gravy seems too thick, add more broth and/or a little of the reserved giblet broth (the water used to cook the giblets.)
Finally, season the gravy with a little bit of salt and plenty of black pepper! (Be sure to taste it and make sure the seasoning is perfect.)
Serve the gravy piping hot at the table.
** Note: You should be prepared to add more broth, so have extra on hand!
Posted by Ree on November 25 2013

November 20, 2013
Broccoli Wild Rice Casserole
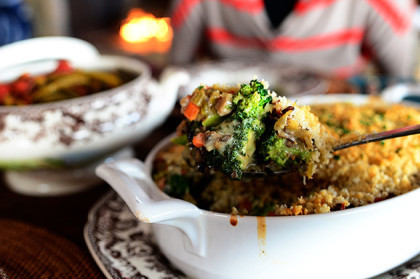
 This is one of my very favorite Thanksgiving recipes from my new cookbook, and if I could eat it for breakfast right now, I could. It’s meant to be a play on the familiar, blessed broccoli rice casserole, which uses the bright orange cheese and cream of mushroom soup…but this one’s a little more rustic, contains wild rice instead of white, has no cheese, and is made entirely from scratch.
But other than that, it’s exactly the same!
Ha.
You will love this casserole, my friends. It’s beautiful, it’s tasty…and it really is a cinch to make.
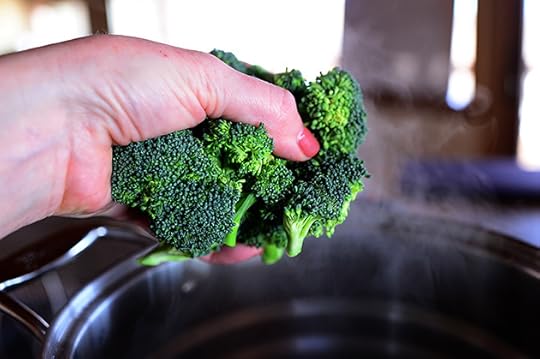 First, take your very disturbing looking hand and throw a bunch of broccoli into a pot of boiling water.
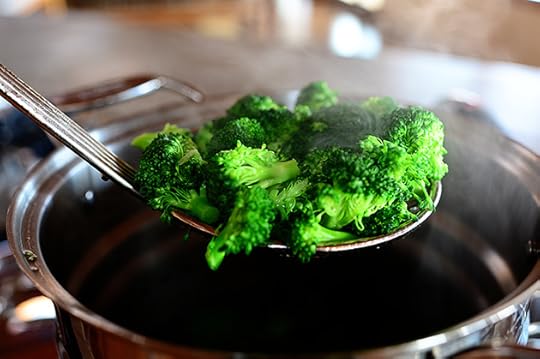 Bawl it—I mean boil it—for about a minute or so, then remove it with a slotted spoon…
 And plunge it into ice water to stop the cooking process. This is known as blanching, which reminds me of “A Streetcar Named Desire,” which reminds me of Vivien Leigh, which reminds me that Gone with the Wind will be on TV all day next Wednesday, which means I have something hugely exciting to look forward to while I prepare the ingredients for this Broccoli Wild Rice Casserole.
And with that, everything just came full circle.
I love it when that happens!
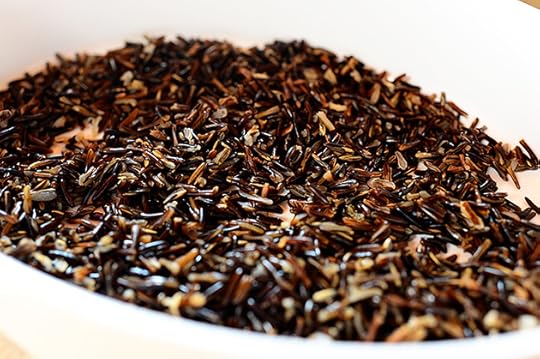
 You also need to cook some wild rice, and I mean the real stuff! I wanted to use wild rice for this casserole because it’s hearty and slightly chewy and holds up really well…and because I love the color of wild rice. It’s just so…so…
Brown. Actually, a nice dark taupe.
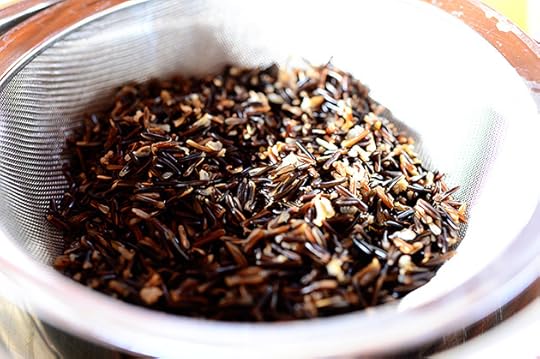 Wild rice takes awhile to cook, so just be sure to read the package directions! This was about 35-40 minutes in, and the rice had just started bursting open. You can let it go longer, but since it’s going to continue cooking in the oven, I wanted to give it a little breathing room.
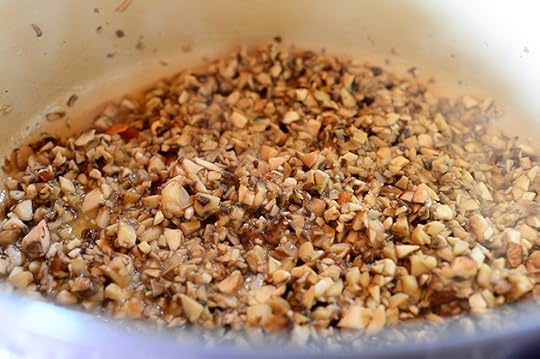
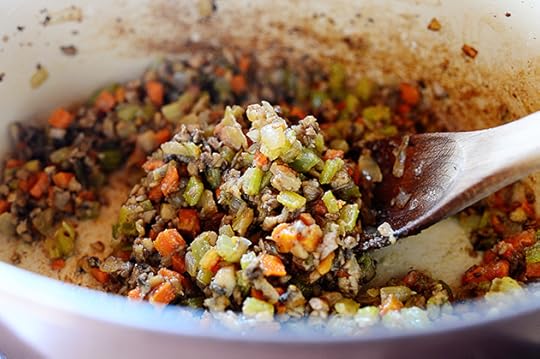
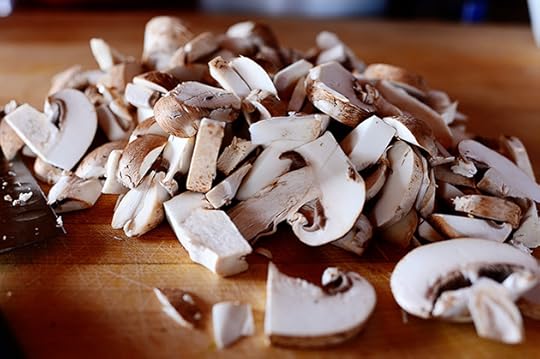 Next, start on the luscious liquid mixture, which is sort of a play on cream of mushroom soup, which is used in all manner of broccoli rice casseroles. Cut up some mushrooms…
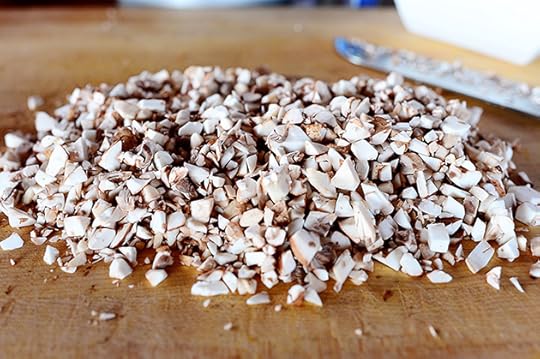 And keep going until they’re pretty finely chopped.
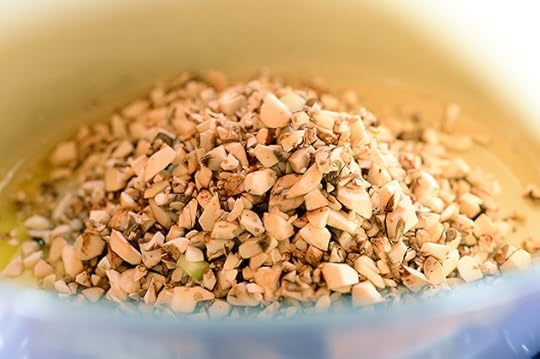 Heat a large pot over medium-high heat, then melt 6 tablespoons of the butter. Add the mushrooms along with some chopped onions…
 And cook the mushrooms, stirring them occasionally, for 3 to 4 minutes, until a lot of the liquid is reduced.
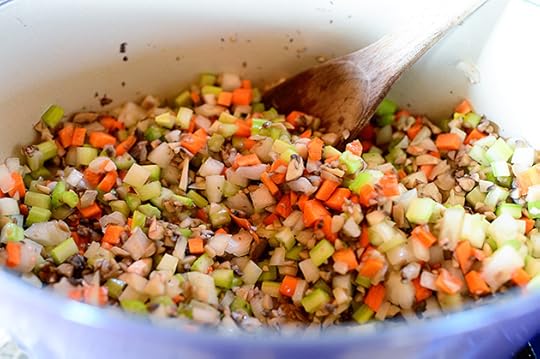 Then add finely diced carrots and celery…
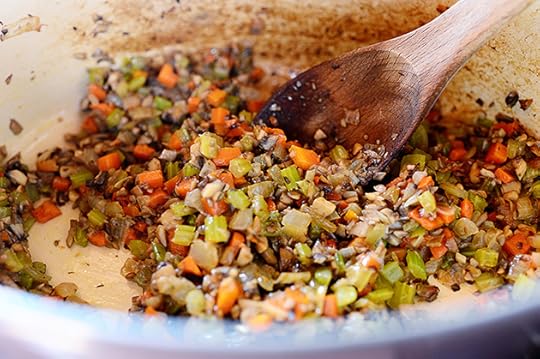 And cook for 3 to 4 minutes, until the vegetables are soft and the mixture begins to turn darker in color.
 Sprinkle the flour on the vegetables and stir it until it’s all mixed together…
 And cook it for another minute or so.
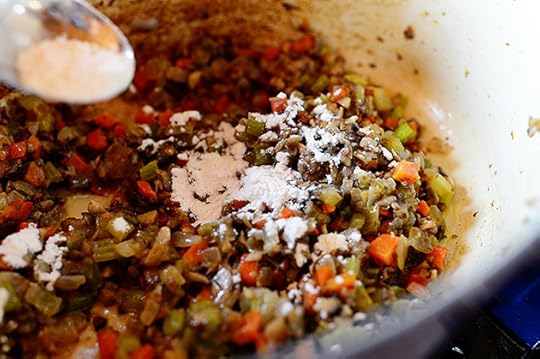
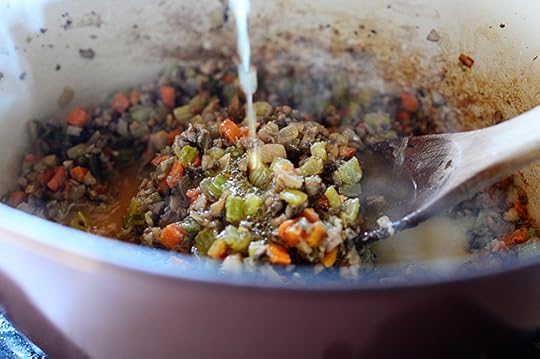 Then pour in zee broth…
 And stir it to combine. Bring the mixture to a gentle boil and allow it to thicken, about 3 minutes.
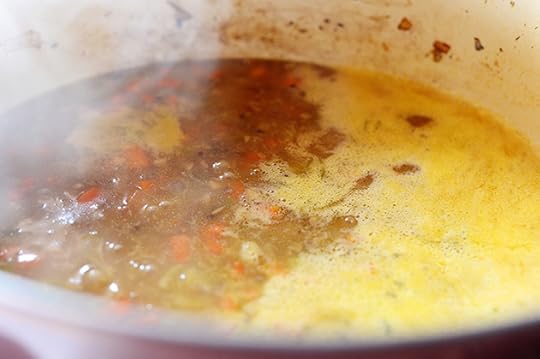
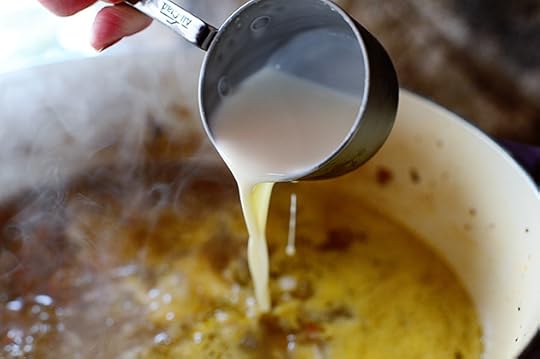 After that time, pour in a little heavy cream, stirring to combine.
 Then just let it cook until it’s a nice thick soup consistency! You don’t want it to be overly thick like a gravy…just slightly thick but still nice and liquidy.
 Now, you could just mix the rice, broccoli, and sauce all together and put it in a casserole, but I wanted to keep the elements somewhat separate so every bite was different. So layer half the rice in the bottom of a buttered pan…
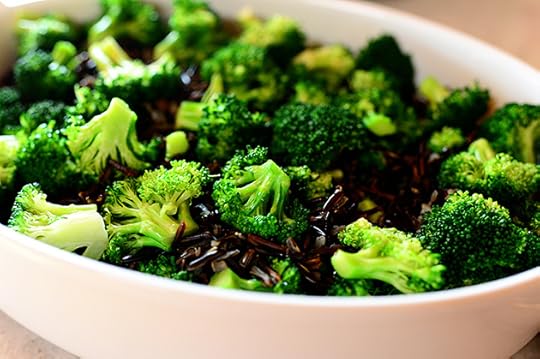 Then layer on half the broccoli…then do another layer of both.
 Then, using a ladle…
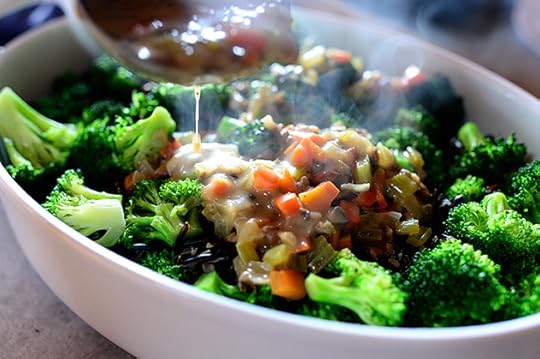 Pour that beautiful sauce all over the top.
 Keep going until all the sauce is in there!
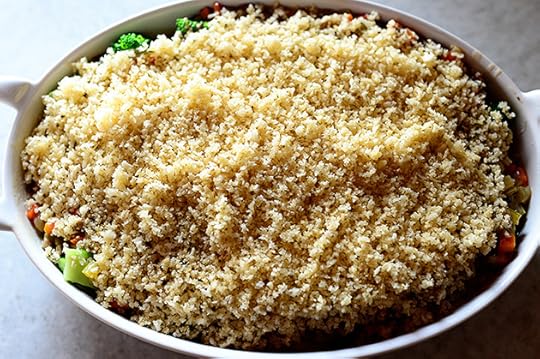
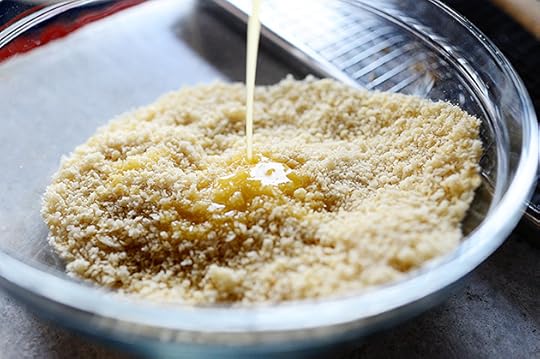 Next, mix some panko breadcrumbs with a little melted butter in a bowl…
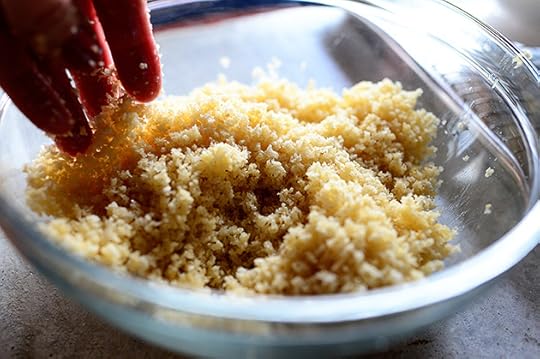 Toss them till they’re coated…
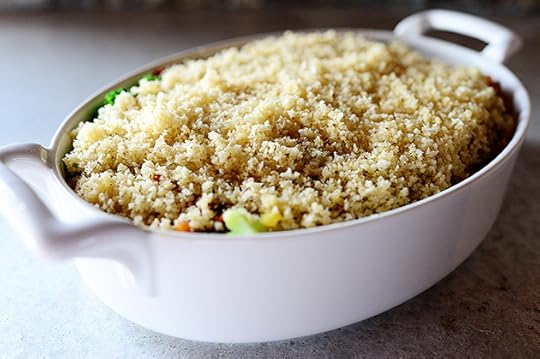 And sprinkle them all over the top of the casserole.
 Cover the casserole with foil and pop it in the oven and bake it at 375 for about 20 minutes…
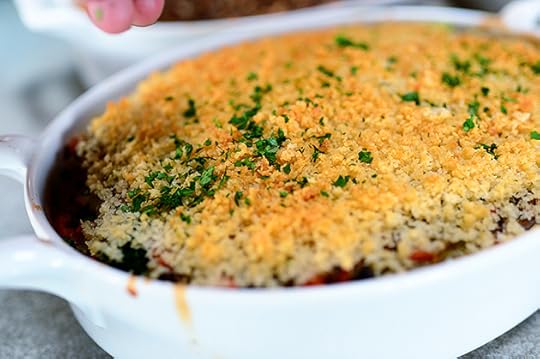 Then remove the foil and bake it for another 15 minutes until the top is nice and golden. Then sprinkle on some minced parsley…
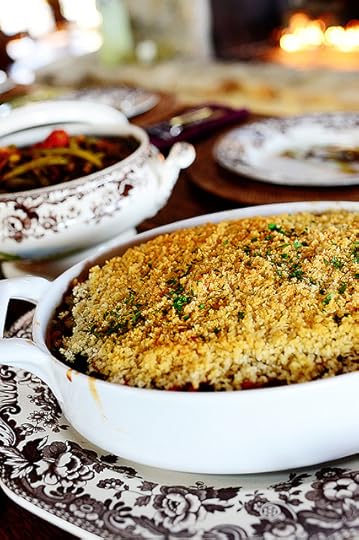 And plop it on your Thanksgiving table with all the other delights you’ve prepared while watching Gone with the Wind and The Godfather!
This…is…tremendously delicious. Lots of texture, lots of color, lots of goodness. Hope you love it!
Here’s the handy dandy printable.
(P.S. Thanksgiving is next week! Raise your hand if you’re excited.)
Recipe
Broccoli Wild Rice Casserole
Prep Time: 20 Minutes
Cook Time: 1 Hour15 Minutes
Difficulty: Easy
Servings: 12
Print Recipe
Ingredients
2 cups Uncooked Wild Rice8 cups Low-sodium Chicken Broth, More If Needed For Thinning3 heads Broccoli, Cut Into Small Florets1 pound White Button Or Crimini Mushrooms, Finely Chopped1/2 cup (1 Stick) Butter1 whole Medium Onion, Finely Diced2 whole Carrots, Peeled And Finely Diced2 stalks Celery, Finely Diced4 Tablespoons All-purpose Flour1/2 cup Heavy Cream1 teaspoon Salt, More To Taste1 teaspoon Black Pepper1 cup Panko Breadcrumbs Preparation Instructions
Add the wild rice into a medium saucepan with 5 cups of the chicken broth. Bring it to a boil over medium high heat, then reduce the heat to low and cover the pan. Cook the rice until it has just started to break open and is slightly tender, about 35 to 40 minutes Set it aside.
Meanwhile, blanch the broccoli by throwing the florets into boiling water for 1½ to 2 minutes, until bright green and still slightly crisp. Immediately drain the broccoli and plunge it into a bowl of ice water to stop the cooking process. Remove it from the ice water and set it aside.
Heat a large pot over medium-high heat, then melt 6 tablespoons of the butter. Add the onions and the mushrooms and cook, stirring them occasionally, for 3 to 4 minutes, or until the liquid begins to evaporate. Add the carrots and celery and cook for 3 to 4 minutes, until the vegetables are soft and the mixture begins to turn darker in color.
Sprinkle the flour on the vegetables and stir to incorporate it, then cook for about a minute. Pour in the remaining 3 cups of broth and stir to combine. Bring the mixture to a gentle boil and allow it to thicken, about 3 minutes. Pour in the heavy cream, stirring to combine. Let the mixture cook until it thickens. Season with the salt and pepper, then taste and adjust the seasonings as needed.
Add half the cooked rice to the bottom of a 2-quart baking dish, then lay on half the broccoli. (You can do one layer of each or two layers of each. Using a ladle, scoop out the vegetable/broth mixture and spoon it evenly all over the top. Continue with the rest of the sauce, totally covering the surface with vegetables.
Melt the remaining 2 tablespoons of butter, then pour it into a separate bowl with the panko breadcrumbs. Toss the mixture together to coat the breadcrumbs in butter, then sprinkle the breadcrumbs all over the top.
Cover with foil and bake the casserole for 20 minutes, then remove the foil and continue baking for 15 minutes or until golden brown on top. Sprinkle on the parsley after you remove it from the oven.
Posted by Ree on November 20 2013

November 18, 2013
Roasted Butternut Squash with Pine Nuts and Parmesan
 Last week, my two childhood friends and I were in Chicago for my holiday cookbook signing. We arrived in the city around lunchtime, and since our hotel rooms weren’t ready yet and I therefore couldn’t immediately check in, change into my yoga pants, crawl under the covers, begin sucking my thumb, and turn on the TV to see if this was one of the blessed hotels in America that carries Bravo, we decided to go have lunch.
After asking around here and there, we landed at The Purple Pig. And I know I’m probably a little slanted because I get excited about dining out, period, and pretty much think everything someone else cooks for me is the best thing I’ve ever eaten…but honestly, this was one of the best meals I’ve ever had. I loved it. Absolutely loved it. The whole menu is a compilation of small, shareable dishes and plates, and my two friends and I split probably a total of five hundred thousand things. At least it felt like that many. But we just couldn’t choose!
It was a feast for the senses. We shared everything from roasted beets with goat cheese to fried eggplant balls, but our overwhelming favorite was a little dish of roasted butternut squash with pumpkin seeds and Parmesan. It was so simple, but the textures and flavors were just perfect…and yesterday, because my sister was visiting, I set out to recreate it.
I needed it to be in my life again.
 Start with a butternut squash. This is on the small side, which is great if you’re just making this for yourself, but you can go as big as your heart tells you to go.
 Lop off the top and bottom…
 Use a nice, sharp knife to slice off the skin…
 Then slice the whole darn squarsh in half and scoop out the seeds.
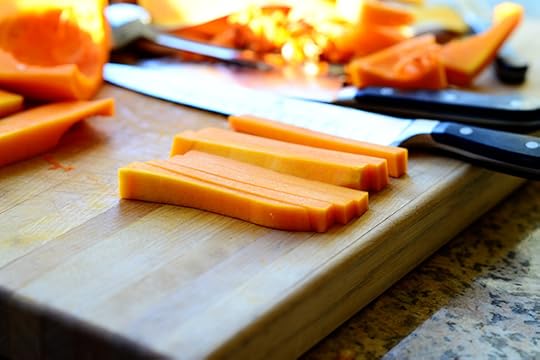 I wanted to cut the squash into a nice, neat dice, so I cut the halves into large pieces, cut the pieces into slices, cut the slices into matchsticks…
 And cut the matchsticks into a dice.
 Then I kept on going, chatting with my sister about matters of global relevance and Real Housewives (those are two entirely separate things), until most of the squash was diced. I left out the little areas that held the seeds because they don’t dice as neatly, but I used as much as I could.
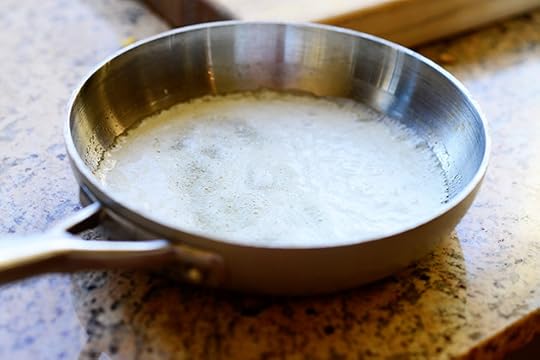 Meanwhile, I melted some butter. It seemed like the right thing to do.
 Then I carefully skimmed the solids off the top…
 Until they were mostly gone.
 The squarsh goes into a bowl, by garsh!
 Then I drizzled in a little bit of the butter. Didn’t need much! I just wanted to add enough to moisten the squash and make sure it sizzled in the oven.
 Next came salt and pepper…and if I’d been smart, I would have added a touch of chili powder.
Next time!
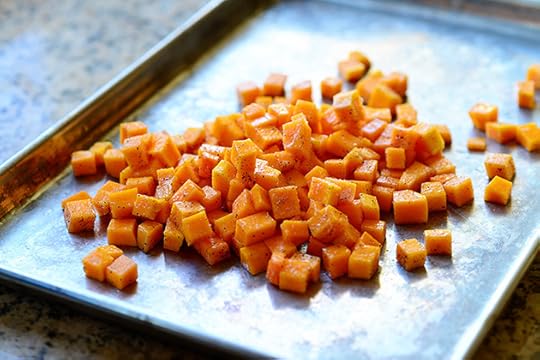 Tossed it all together, poured it onto a baking sheet…
 Spread them out into an even layer, then popped ‘em into the oven. I did 375 for the first 20-25 minutes until they were starting to sizzle and soften, then I cranked up the heat to 400 to finish them off and make sure they got nice and brown on the edges.
Would you like to see?
Are you sure?
Can you HANDLE the squarsh?
(Goodness, ‘squarsh’ is fun to say out loud.)
Okay…here it is.
 Lovely!
 And…lovely. This is exactly what the squash looked like at The Purple Pig: almost oven-fried in texture, with nice color all around the edges.
 Next up, I grated some Parmesan…
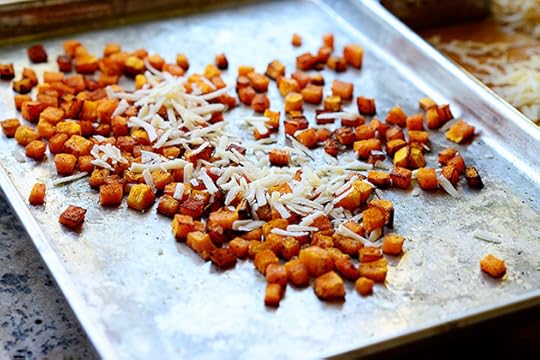 And sprinkled it all over the squash while it was still on the pan. (A few minutes elapsed between my pulling the squash out of the oven and sprinkling on the Parmesan, so the pan wasn’t at its hottest.) I tossed it around immediately…
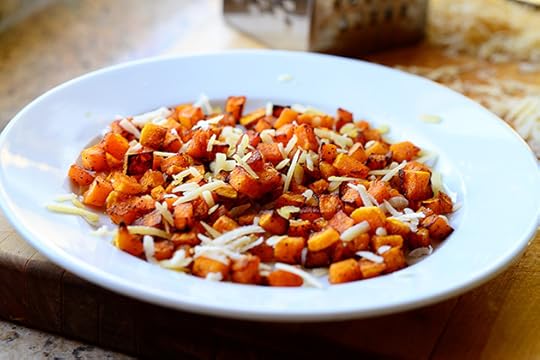 Then I transferred it all to a plate before the cheese began to melt.
 Next, I grabbed these! Now, The Purple Pig uses pumpkin seeds, but I didn’t have any. So I thought pine nuts would be the next best thing.
 I toasted the pine nuts in a skillet over medium heat until they were nice and flavorful…
 Then I added them to the plate and tossed them with the squash.
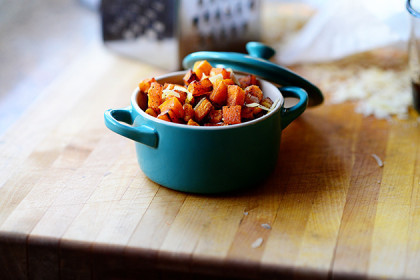
 And…here it is! This is how The Purple Pig serves a lot of their dishes—in little ramekins and bowls—and I wanted to be just like them.
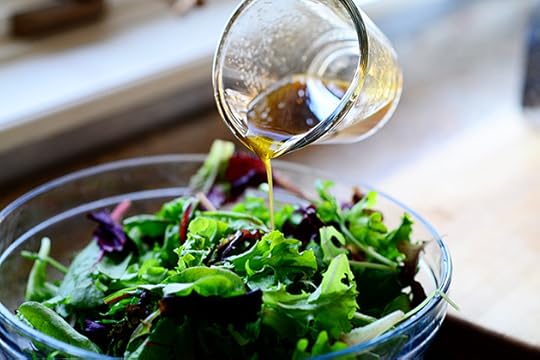 But here’s another way you can serve it: Salad greens tossed in a simple balsamic vinaigrette…
 And the squash poured all over the top.
It was nothing short of divine. Just divine.
I wished I’d made twice the amount of squash. I could have kept going. Total loveliness. If you like butternut squash, you will love this. If you don’t like butternut squash…well, you will love this.
Here’s the handy dandy printable!
Recipe
Roasted Butternut Squash with Pine Nuts and Parmesan
Prep Time: 10 Minutes
Cook Time: 45 Minutes
Difficulty: Easy
Servings: 4
Print Recipe
Ingredients
1 whole Butternut Squash, Whatever Size You Want (a Small Squash Serves Two To Four)4 Tablespoons Butter Salt And Pepper, to taste1/4 cup Freshly Grated Parmesan (more To Taste)3 Tablespoons Pine Nuts Optional: Salad Greens And Balsamic Vinaigrette Preparation Instructions
Preheat the oven to 375 degrees.
Use a knife to lop off the top and bottom off the squash. Slice the skin off the sides, then cut the squash in half lengthwise and remove the seeds. Cut the squash into large pieces, cut the pieces into slices, cut the slices into matchsticks, then cut the matchsticks into a dice. Place in a bowl and set aside.
Melt the butter in a small pan, or in a bowl in the microwave. Use a spoon to skim off the solids so most of them are gone. (Note: It's easier if you go ahead and melt the whole stick, then reserve the rest for another use.)
Drizzle 4 tablespoons of the skimmed butter into the bowl with the squash. Add salt and pepper and toss to combine. Pour the squash onto a baking sheet and spread them into a single layer.
Bake for 20-25 minutes, then crank up the heat to 400 and continue roasting for 15 minutes or so, until the squash is sizzling and golden brown around the edges. Remove the pan from the oven and set aside.
Grate the Parmesan and sprinkle it over the squash. Toss it quickly so that the cheese won't melt (it should only soften), then transfer the mixture to a plate.
Toast the pine nuts in a skillet over medium-high heat, stirring frequently. Add those to the plate with the squash and toss to combine.
Add more Parmesan if you'd like, then serve the squash in small dishes or over a salad tossed in vinaigrette.
Posted by Ree on November 18 2013

November 13, 2013
Turkey Essentials (Winners Announced!)
The winners of the Turkey Essentials prizes are:
#7880 Deb B: “All the family is coming to my house this year!”
#14860 Val S: “Cooking the whole shebang myself.”
#18307 Sharletta: “A big turkey with mashed potatoes, cranberry sauce, pie, etc at our house.”
Congratulations, winners! Contact prizes@thepioneerwoman.com to claim your prizes.
 Thanksgiving is just around the corner! As such, I’m giving away three (3) packages of what I consider to be the essential tools you need to roast a turkey. If you’re planning on making the bird this year…you’ll be all set!
Here’s what’s in each prize package:
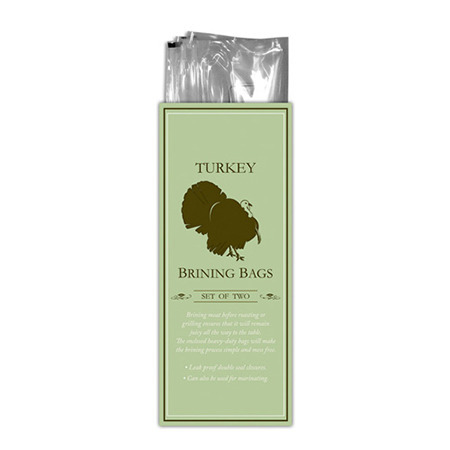 A package of heavy duty Brining Bags.
(Pssst. Here’s my favorite Brine Recipe. It’s delish, man.)
 An All-Clad Stainless Steel Roaster Set. You can’t hurt these things. You’ll still be roasting your turkey in this sucker in the year 2097.
Comes with a rack and two turkey lifters.
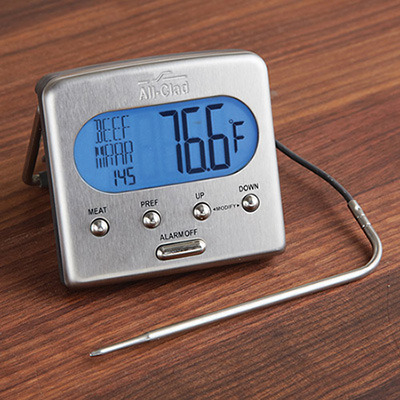 An awesome digital meat thermometer! I actually use the old fashioned kind, but I have used these digital ones and think they’re really nifty.
You’ve gotta have a good thermometer when you roast turkey. It’s, like, required.
 A good ol’ stainless steel baster. My favorite kind.
 A handy fat separator for gravy, baby.
 A flat whisk! I couldn’t make turkey gravy without it.
Well, I could, I suppose. With a normal, boring whisk.
But it wouldn’t be any fun.
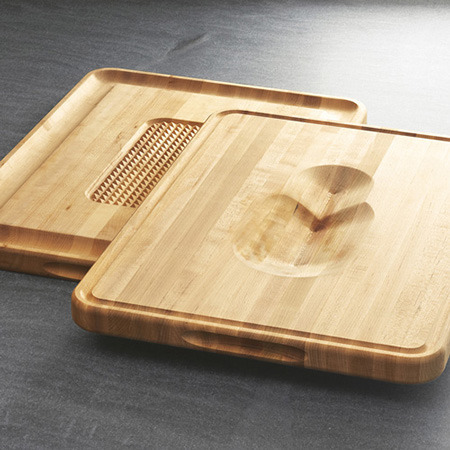 This cool reversible cutting board. I don’t have one of these. But I think it would be helpful! Securely holds the bird and catches the drippings at the same time.
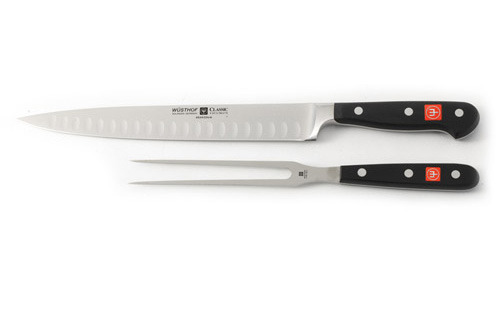 A Wusthof carving set. Have it. Use it. Love it.
 A signed copy of my new holiday cookbook…
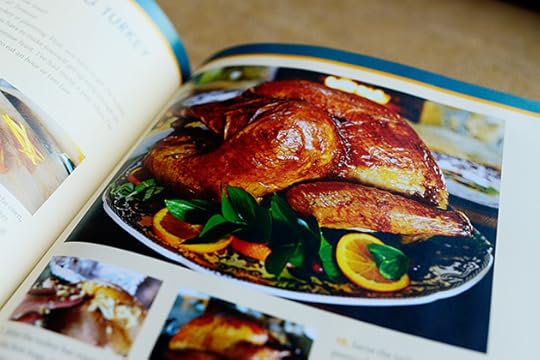 Because there are lots of turkey instructions inside!
I think that’s about all you need to make the best turkey in the world!
Oh. Except the turkey itself. But I’ll let you take care of that one.
TO ENTER
To enter the turkey essentials giveaway, just answer the following question in the Comments section of this post:
“What are your Thanksgiving plans this year?”
Are you hosting the whole shebang at your house? Are you going over the river and through the woods to grandmother’s house? Are you making frozen pizza and watching football? Or are you going down the street to your Uncle Peter’s house? Just shout out your Thanksgiving plans and you’re automatically entered to win this big, bad turkey package! (If you’re not cooking this year, save it for next year! You’ll be glad you have all this loot.)
THE RULES
One entry per person, pretty please.
Winners will be announced Friday!
Good luck!
Giveaway sponsored by Pioneer Woman. Also known as P-Dub.
The winners have been announced and the giveaway is now closed.

Ree Drummond's Blog

- Ree Drummond's profile
- 2036 followers

