
Ree Drummond's Blog, page 41
June 10, 2013
I Love Migas!
I was in Austin over the weekend, and I had the best (and most delicious!) time.
One of the things on my agenda for the weekend was eating Migas, which I first tried in Austin many moons ago when I was visiting my seestor Betsy, and which remains one of my all-time favorite breakfast dishes. My friend Sheila loves Migas too, so on Saturday, when we joined a group of our friends for lunch, that’s exactly what we both ordered.
 This was the plate of Migas both Sheila and I were served.
Here’s the scoop on Migas (pronouned MEE-guz). It’s a different dish in Tex Mex cuisine than in more authentic forms, but the Tex Mex version is the one I’m talking about. It’s a scrambled egg dish loaded with onions, tomatoes, peppers, and cheese, and—the defining ingredient—corn tortillas. These give the eggs an incredible corn flavor and texture. Delicious!
 After I went to Austin years ago and first tried Migas, I started making them myself at home. I put the recipe in my first cookbook and posted it here back in ancient times. Here’s a link to the step-by-step post. Pardon the not-great photos!
Migas Step-by-Step
For your convenience, here’s the handy dandy printable. Try it this week: To die for!
Recipe
Migas
Prep Time: 15 Minutes
Cook Time: 15 Minutes
Difficulty: Easy
Servings: 6

Print Recipe
Ingredients
4 whole Corn Tortillas1 whole Jalapeno, Seeds And Membranes Removed, Finely Diced4 whole Plum Tomatoes, Roughly Chopped1 whole Green Pepper, Roughly Chopped1 whole Red Bell Pepper, Roughly Chopped1 whole Medium Onion, Chopped12 whole Large Eggs1 cups Cotija Cheese, Grated (may Use Cheddar, Monterey Jack, Etc.)1/3 cup Cilantro, Chopped1 Tablespoon Butter1 Tablespoon Olive Oil1/4 cup Half-and-half Preparation Instructions
In a bowl, whisk together eggs and half & half. Salt and pepper eggs, then set aside.
In a small skillet over medium heat, heat oil and fry each corn tortilla just until crisp. Remove to a paper towel-lined plate to drain. Chop tortillas and set aside.
In a large skillet over medium-high heat, melt the olive oil with the butter. Add onions and bell peppers and cook until starting to turn brown/black, about 3 to 4 minutes. Add in diced jalapenos and stir to combine. Add tomatoes to the skillet and stir around, then add tortilla pieces, stirring gently to combine.
Reduce heat to low.
When the heat has decreased, pour egg mixture into skillet. Stir gently to cook with the peppers, folding mixture very gently as it cooks. Add in grated cheese and chopped cilantro, and stir to combine. Serve with black beans and iced coffee.
Delicioso!
Posted by Ree on September 29 2008


June 7, 2013
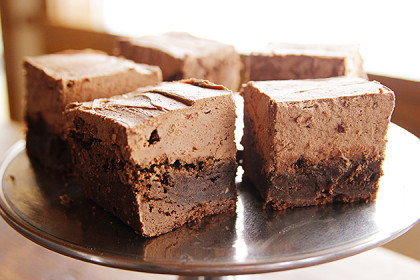
Mocha Brownies
 I make these ridiculously rich and delicious mocha brownies on tomorrow’s new Food Network episode, and I wanted to share the recipe with you today. This recipe is in my first cookbook and I just realized today that I’ve never posted the step-by-step recipe here.
What kinda food blogger am I?
Here’s the handy dandy printable recipes of the marvelous mocha brownies. They’re wonderful, and keep two things in mind:
1. You can easily halve the icing recipe if you want a less-thick layer.
2. You can bake the brownies in a 9 x 13 inch pan if you want the brownies a little thinner.
Enjoy these, guys! Hope you like the show tomorrow. In addition to the brownies, I make roasted chicken legs, yummy cowboy beans, and luscious deviled eggs.
Amen!
Recipe
Mocha Brownies
Prep Time: 20 Minutes
Cook Time: 45 Minutes
Difficulty: Easy
Servings: 20
Print Recipe
Ingredients
Brownies4 ounces, weight Unsweetened Chocolate2 sticks 1 Cup Butter2 cups Sugar4 whole Eggs3 teaspoons Vanilla Extract1-1/4 cup All-purpose Flour Icing2 sticks 1 Cup Butter, Softened5 cups Powdered Sugar1/4 cup Cocoa Powder1/4 teaspoon Salt3 teaspoons Vanilla Extract1/2 cup Strongly Brewed Coffee, Cooled (more To Taste) Preparation Instructions
Preheat the oven to 325 degrees F. Spray an 8-inch square baking pan with nonstick baking spray.
For the brownie batter: Place the chocolate in a microwave-safe bowl. Melt the chocolate in the microwave in 30-second increments, being careful not to let it burn. Set it aside to cool slightly.
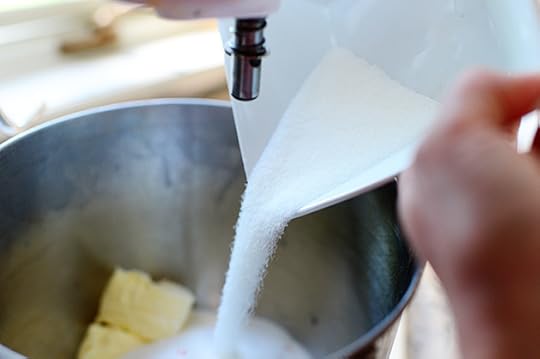
In a medium mixing bowl, cream the butter and granulated sugar. Beat in the eggs. With the mixer on low speed, drizzle in the melted chocolate. Add the vanilla extract and mix. Add the flour to the bowl and mix just until combined; do not over mix.
Pour the batter in the prepared baking pan. Spread it to even out the surface. Bake until the center is no longer soft, 40 to 45 minutes. Set the brownies aside to cool completely before icing.
For the icing: In a large mixing bowl, combine the butter, powdered sugar, cocoa powder, salt and vanilla. Mix until slightly combined, then add 1/2 cup of the coffee. Whip until the icing is light and fluffy. If the icing is overly thick, add 1/4 cup more coffee. It should be very light and fluffy.
Ice the cooled brownies, spreading the icing on thick. Refrigerate until the icing is firm, and then slice the brownies into squares.
Notes
Cook Notes: Can also serve in a bowl topped with coffee ice cream and hot fudge sauce. Sinful!
Note: Icing recipe can easily be halved.
Bake brownies in a 9 x 13 inch pan if you want them a little thinner.
Posted by Ree on June 7 2013

June 6, 2013
Land O’ Lakes on the Ranch
Disclosure: I’ve partnered with Land O’Lakes for an exclusive endorsement of Land O Lakes Butter . This post is sponsored by Land O’Lakes. Photos, words, thoughts, and weird musings are all mine.
A few weeks ago, some of the folks from Land O’Lakes made the long, Midwestern trek from Minnesota all the way down to our ranch in Oklahoma so we could shoot some more cooking videos together. This is our second year to do this, and we had a great time together again.
I love Land O’Lakes, and not just because we’ve been working together over the past year. It’s because it’s a good, solid company run by good, solid people… and we have really similar approaches to food: Delicious, simple, and family-friendly. The Test Kitchen at Land O’Lakes is a wonderful place in this world of ours, and Becky, who runs the Test Kitchen, has become a real friend. I just love her.
Then there’s the small matter of Land O’ Lakes Butter itself, which has been stacked in my fridge since the dawn of time, and even before then. I love it, I believe in it, I use it…and that’s a big part of why I love working with Land O’ Lakes.
I’ll link to the first of our new videos below. But first, here are a few behind-the-scenes peeks!
We started the long day bright and early. The video production team had all their gear set up, and the Land O’Lakes team was scurrying around making sure all the essentials were in place.
 This is Pat, who works with Land O’Lakes as a food stylist. She traveled along with the team to manage the food portion of the shoot, which means she prepared the grocery list then prepped several takes worth of the recipes I was to make on camera, just so we could get all the shots we needed.
Pat is lovely!
 This was the stuff Pat arranged for the first video. We made caramelized onions to put on top of burgers, corn casserle, and cobbler.
 I sincerely wish Pat lived with me so she could lay out everything before I cook. Man, oh man, does it make things easier.
 A monitor was set up in the living room so that the Land O’Lakes team could watch the shoot as it happened and give feedback about things they thought needed tweaking.
For the record, they made no tweak requests regarding my hair. Though they probably should have.
 Thank you, girls, for taking it easy on me! I had the feeling I was being watched. Probably because I was. Oh, and that’s Becky from the Test Kitchen on the far left (hi, Becky!) along with Heather, Emily, and Joan. Awesome team!
 Our first video had a grilling theme, so Josh (along with my kids) stopped by for the cookout. Here, you can see my two girls recognizing a prime photobombing opportunity.
 Yep. There they go. And I’m not sure if my boy in the foreground is also photobombing… or if he’s just a deer caught in the headlights.
 I’m gonna go with deer in the headlights. And look! My girls are still photobombing away.
I wonder if they’ll ever outgrow it?
 Next, it was time to move out to the deck! It was green and beautiful that day… but unseasonably cold, as in frigid, and everyone had to tell themselves it was mid-July and they were hot and sweaty while trying not to let their teeth chatter while the cameras were rolling.
 When this photo was taken, I was in the kitchen getting ready to bring out the last of the cookout food… and trying to warm up as much as I could.
 And then I headed out and joined ’em!
 A piece of trivia: You may be wondering where my beloved husband is in these photos. Well, he was supposed to have been in the cookout video, too, of course, but my strapping, strong, masculine, and invincible husband was… (Are you ready?) … sick that day.
And when I say he was sick, I don’t mean he woke up feeling a tad under the weather. I mean he had a fever and was shivering.
So I gave him two ibuprofen, a glass of orange juice, a hug and not a kiss because I didn’t want his gross germs, and told him the kids and I had to leave him for a few hours.
Poor Marlboro Man.
(Oh, and he’s just fine now!)
 It didn’t take too long to shoot the outdoor scene; the crew was really quick and efficient! And before it was over, we’d all eaten a juicy burger, delicious corn casserole, and scrumptious blackberry cobbler.
Yummmmmmmm!
 This is me getting ready to shoot the blackberry cobbler recipe in the kitchen. Just before this photo was taken, I adjusted the focus on my camera and handed it to one of the gals, so they could snap a pic.
I really nailed it on the focus, didn’t I?
Not.
 This is me talking to Johnna about the next scene.
 This is me doing goodness knows what.
 And this is me with the team, and I’m in a different top because we’d just filmed a different recipe!
And again, I really nailed it on setting up that sharp focal point.
 And this is what I cooked for that video. Chicken Bacon Ranch Tacos. Recipe coming soon!
 And finally, this is my baby after he’d finagled the “Action!” board thing (to this day, I don’t know what it’s really called.)
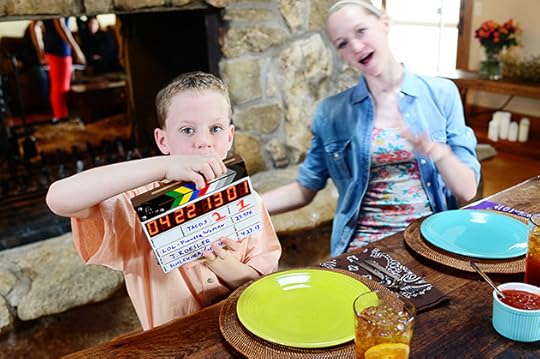 Oh, did he have fun.
 As did Miss Photobomber herself.
Here’s the first cooking video, Great Grilling Sides, over on Land O’Lakes. Hope you love it!
(Lots of other videos on the same page. Hope you enjoy!)

May 31, 2013
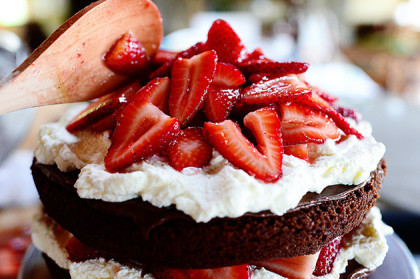
Chocolate Strawberry Nutella Cake
 I made this cake on a whim. I didn’t feel like making ganache, so in desperation, I reached for the the half-eaten tub of Nutella I’d hidden on the top shelf of our pantry to keep out of my kids’ grubby hands and used it for the chocolate “icing” layer. I probably don’t need to tell you the bliss that ensued.
I wound up making this on the first episode of the new season of my Food Network show, which starts tomorrow morning. Because I was feeling obnoxious, I decided to double the original recipe and make a four layer monstrosity, which was delicious and hilarious all at the same time.
Delicious, because…well, you’ll see when you read the recipe.
Hilarious, because…well…
 This happened.
But that’s another story for another time!
If you just stick to the 2-layer version below, all will be right with the world.
 Place 2 sticks of butter in a saucepan over medium heat.
 Let it melt…
 Then add 4 tablespoons cocoa powder…
 And stir it together until smooth.
 Add 1 cup of boiling water, let it bubble up for 30 seconds or so, then remove from heat.
 In a large bowl, stir together the flour, sugar, and salt.
 Pour in the chocolate mixture and stir it until it’s about halfway combined.
 Mix together the buttermilk, eggs, vanilla, and baking soda until it’s smooth…
 Then mix it into the chocolate/flour mixture until it all comes together. This is the basic chocolate sheet cake recipe I’ve been using for years, the one my mother-in-law handed to me with a wink and a nod when I became engaged to her son. It’s the best all-purpose chocolate cake in the Milky Way galaxy.
 Line 2 9-inch round cake pans with a round of parchment paper…
 Then spray the parchment with nonstick baking spray.
 Pour the batter evenly into the pans…
 And bake them for 18 to 20 minutes, or until no longer jiggly in the center.
 Turn the cakes out of the pans…
 Carefully peel off the parchment, and set them aside to cool completely.
 Meanwhile, prepare the toppings: Hull and slice the strawberries…
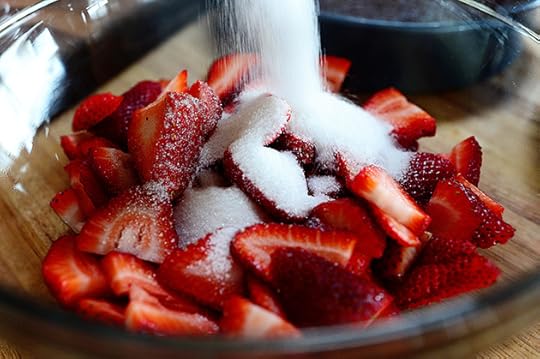 Then sprinkle on the sugar…
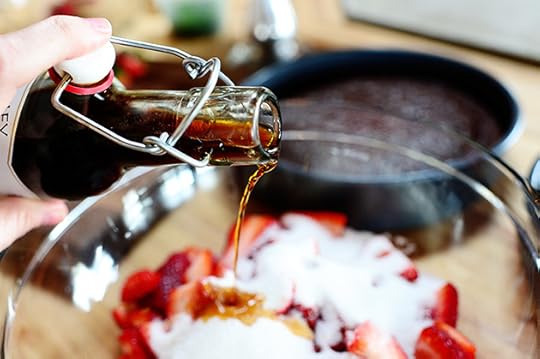 Add the vanilla…
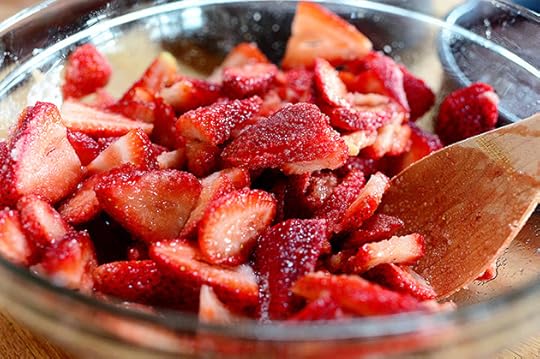 And stir them around.
 Let them sit and macerate for 15 minutes…
 Then drain off the excess juices.
 Whip the heavy cream with the sugar until stiff. Now it’s time to assemble the cake!
 Place one cake layer upside down on a cake stand so that the top will be perfectly flat.
 Grab 3/4 cup of Nutella…
 And spread it into a single layer.
 Plop half the whipped cream over the top…
 And spread it into a single layer.
 Then sprinkle on half the strawberries.
 Place the other cake layer upside down on top of the berries…
(And by the way, it appears in some of these photos that the cake is burned, but it definitely isn’t. It’s just my subpar photography skills.)
(Amen.)
 Then add another layer of Nutella…
 The rest of the whipped cream…
 And the rest of the strawberries.
Yummy!
 Use a serrated knife to cut slices and serve ‘em up! This is crazy good, man.
Variation
Halve all the quantities to make a 1-layer cake if you’d like something a little smaller.
Double all the quantities to make a 4-layer cake if you’d like to make an impression! (Cautionary Tale: See photo near the top of this post.)
Substitute blueberries, blackberries, or raspberries (or a combination thereof) for the strawberries.
Here’s the handy dandy printable:
Recipe
Chocolate Strawberry Nutella Cake
Prep Time: 20 Minutes
Cook Time: 18 Minutes
Difficulty: Easy
Servings: 12
Print Recipe
Ingredients
Cake2 sticks Butter4 Tablespoons (heaping) Cocoa Powder1 cup Boiling Water2 cups Flour2 cups Sugar1/4 teaspoon Salt1/2 cup Buttermilk2 whole Eggs1 teaspoon Baking Soda1 teaspoon Vanilla1-1/2 cup Nutella Strawberries2 pints Strawberries, Hulled And Sliced1/4 cup Sugar1 teaspoon Vanilla Whipped Cream2 cups Heavy Cream1/2 cup Powdered Sugar Preparation Instructions
Preheat the oven to 350 degrees. Line 2 round baking pans with parchment, then spray the parchment with baking spray.
In a medium saucepan, melt the butter. Add the cocoa and stir it until smooth. Pour in the boiling water, let the mixture bubble up for 20 seconds or so, then turn it off and set it aside.
In a measuring pitcher or bowl, mix together the buttermilk, baking soda, eggs, and vanilla. Set aside.
In a large mixing bowl, mix together the sugar, flour, and salt. Stir in the hot chocolate mixture, stirring gently until it's halfway combined and less hot. Pour in the buttermilk mixture and continue stirring gently until the batter is all combined.
Pour the batter into the pans and bake them for 17-20 minute, until they're just set. Remove them from the pans and set them aside to cool completely.
Meanwhile, prepare the strawberries by stirring them with the sugar and the vanilla. Let them macerate for 15 minutes, then drain off the excess juice.
Whip the cream with the powdered sugar.
To assemble, turn one layer upside down on a serving platter. Spread half the Nutella all over the surface. Spread on half the whipped cream and top with half the strawberries Place the other layer upside down on top and repeat with the rest of the Nutella, whipped cream, and strawberries. Keep chilled until serving. Cut with a serrated knife!
Note: Don't assemble more than an hour before serving.
Posted by Ree on May 31 2013

May 27, 2013
Homemade Lemonade
 Making a big ol’ batch of lemonade is one of my favorite summertime rituals, and I’d be seriously lost and forlorn in the wilderness if something happened to the worldwide lemon crop one year and I wasn’t able to make it. No mix or frozen concentrate can possibly give you the same fresh lemony flavor as the real stuff; plus, when you make your own, you can control the level of sweetness to suit your tastes. If you like things a little sweeter, you can up the syrup; if you like things so tart, your face contorts…you can ease up on the syrup a bit.
And a plus: Your hands will smell like lemons all day!
Mmmmm.
Here’s all you need, man:
4 cups sugar
2 dozen lemons
Water
Ice
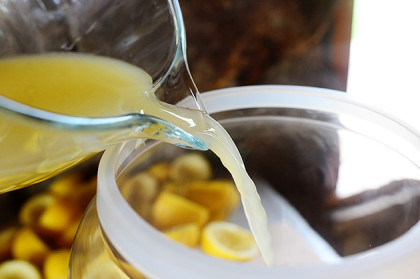
 A few hours (or a whole day) in advance, make a sugar syrup by combining 6 cups of water…
 With the sugar in a large saucepan.
 Heat it over medium heat until the sugar dissolves. Set the syrup aside and let it cool, or store it in the fridge, covered, until you’re ready to make the lemonade. It’ll be slightly thick and viscous.
I’m obsessed with the word viscous right now. I apologize in advance.
 Juice all the lemons into a pitcher.
 This will exhaust you and make you want to take a nap.
Or maybe that’s just me.
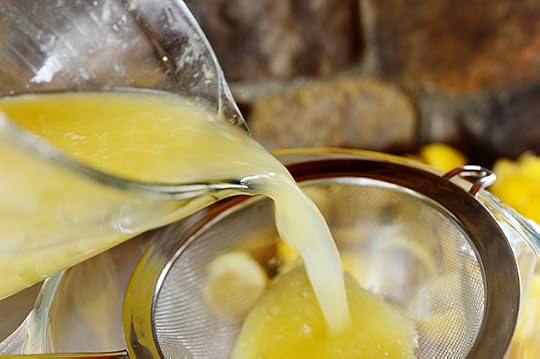 Then pour it through a fine mesh strainer to strain out all the pulp.
 Smush it all around to get out every last bit of juice.
If you have time, refrigerate the juice until it’s chilled…but you don’t have to.
 Pour the juice into a serving vat or tub…
 Then pour in about 2/3 to 3/4 of the syrup. Set the remaining syrup aside.
 Just before serving the lemonade, fill the vat with ice…
 Then pour in 8 cups (or so) of cold water.
 Stir it around until the juice and water are well combined.
 Then be sure to give it a taste. If it seems overly tart, add in the rest of the sugar syrup. If it seems too strong overall, add in another 2 cups of water. Don’t be afraid to play with the quantities to suit your taste…
 And keep in mind that the ice itself will add some water content.
 When it’s totally perfect, serve it up!
Nothing better in the world.
Notes
Both the sugar syrup and the lemon juice can be prepared the day before, then stored in the fridge.
Variations
Add 2 cups raspberries, blueberries, blackberries, or sliced strawberries to the lemonade for different flavors.
Make hard lemonade by adding 2 cups light rum or tequila to the lemonade. (Naughty! Adults only!)
Here’s the handy printable:
Recipe
Homemade Lemonade
Prep Time: 2 Hours
Cook Time:
Difficulty: Easy
Servings: 18
Print Recipe
Ingredients
4 cups Sugar6 cups Water24 whole Lemons, Juiced8 cups Water (additional) Lots Of Ice! Preparation Instructions
Heat 4 cups sugar with 6 cups of water in a medium saucepan until it's dissolved. Set this in the fridge to cool.
Chill the lemon juice if you have the time.
Pour the lemon juice into a large vat. Pour in 3/4 of the syrup, then top off the vat with ice. Pour in 8 cups of water (give or take), stir it around, then give it a taste. Add more syrup if it needs sweetness, or more water if it needs dilution.
Serve immediately!
Add 2 cups raspberries, blueberries, blackberries, or sliced strawberries to the lemonade for different flavors.
Make hard lemonade by adding 2 cups light rum or tequila to the lemonade. (Naughty! Adults only!)
Posted by Ree on May 27 2013

May 24, 2013
$6510 for Oklahoma (DONATION UPDATE)
UPDATE: Only one of three winners specified their choice of charity—Samaritan’s Purse. Samaritan’s Purse is doing great work in Moore, so I directed the full amount ($6,510) there rather than splitting it into smaller amounts. Donation went through early Wednesday morning. Thank you all for being a part of this!
 First of all, thank you for all your entries, guys! Over 65,000 of you entered to win the mixers. Multiply that by a dime and you raised $6,510, which will be donated Monday morning to relief efforts in Moore, Oklahoma. Each one of your comments/entries is responsible for this, so thank you so much.
Here are the winners of the mixers! Each winner may request the relief organization for 1/3 of the donation to be sent; however, if they do not have a preference, I will choose the charity myself.
NOTE: I will announce Monday morning exactly where the donation was sent. Thanks again for participating! Please keep prayin’ for the people who’ve suffered as a result of the tornado in Oklahoma. They’ll need help for a long time.
MIXER WINNERS
#901 Liesel: “We had Steak and Shake (burgers and fries) after a long Confirmation ceremony. Not my first choice, but it was late, we were all hungry and it was one of the few somewhat-decent places still open!”
#14496 Kelly: “Chicken with fettuccini alfredo.”
#55924 Jean H: “Appetizers for dinner (kid style)- apple slices, cheese cubes, crackers, carrots, and grapes. The kids love it and we can eat it at the park. Praying for all affected in Oklahoma.”
Congratulations, winners! Contact prizes@thepioneerwoman.com to claim your mixers, and when you write, please specify if you have a preference for a relief organization for the Oklahoma tornado efforts. (If you do not, I will select the best place to send the donation!)
Thanks again, everyone, for participating!
Love,
Ree

$6510 for Oklahoma (and Mixer Winners Announced!)
First of all, thank you for all your entries, guys! Over 65,000 of you entered to win the mixers. Multiply that by a dime and you raised $6,510, which will be donated Monday morning to relief efforts in Moore, Oklahoma. Each one of your comments/entries is responsible for this, so thank you so much.
Here are the winners of the mixers! Each winner may request the relief organization for 1/3 of the donation to be sent; however, if they do not have a preference, I will choose the charity myself.
NOTE: I will announce Monday morning exactly where the donation was sent. Thanks again for participating! Please keep prayin’ for the people who’ve suffered as a result of the tornado in Oklahoma. They’ll need help for a long time.
MIXER WINNERS
#901 Liesel: “We had Steak and Shake (burgers and fries) after a long Confirmation ceremony. Not my first choice, but it was late, we were all hungry and it was one of the few somewhat-decent places still open!”
#14496 Kelly: “Chicken with fettuccini alfredo.”
#55924 Jean H: “Appetizers for dinner (kid style)- apple slices, cheese cubes, crackers, carrots, and grapes. The kids love it and we can eat it at the park. Praying for all affected in Oklahoma.”
Congratulations, winners! Contact prizes@thepioneerwoman.com to claim your mixers, and when you write, please specify if you have a preference for a relief organization for the Oklahoma tornado efforts. (If you do not, I will select the best place to send the donation!)
Thanks again, everyone, for participating!
Love,
Ree
May 23, 2013
Mixer Giveaway for Oklahoma
Note: For every entry received in this mixer giveaway, I will donate 10 cents to Oklahoma tornado relief efforts on behalf of PW friends/readers.
 Today I’m giving away three (3) KitchenAid Artisan Stand Mixers…in the color of each winner’s choice!
For this giveaway, to keep the focus on the great need following Monday’s devastating tornado, I will donate a dime for every entry received to tornado relief efforts in Oklahoma. (If there are a thousand entries, it’ll be a hundred bucks; ten thousand entries, a thousand bucks…and so on.) The donation will be made on behalf of PW friends/readers and will be given to the tornado-related charity of each mixer winner’s choice. (If winners do not have a preference, I’ll direct the entire sum to the organization where I feel it’ll be most effective.)
Nothing required on your part: Just enter to win the mixer and your entry turns into a dime. There’s no cap on the amount; we’ll just see where it goes. This is just a small way we can all help together!
TO ENTER
To enter this giveaway, just answer the following question in the Comments section of this post:
What did you have for dinner last night?
Did you feast on pepperoni pizza? Steak and potatoes? Apple Jacks? Tacos? Quinoa salad? Just shout out what was on the menu last night and you’re automatically entered to win a mixer…and your entry will turn into a dime.
THE RULES
Giveaway will end at midnight (Pacific Time) Thursday.
Winners will be announced Friday, along with the donation amount and where the donation(s) will be made.
Giveaway sponsored by Pioneer Woman.

May 20, 2013
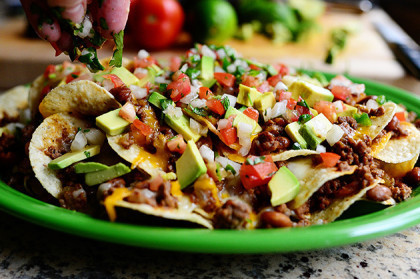
Loaded Nachos
 I take nachos very seriously.
Very, very seriously.
No, I’m serious. Don’t even joke about it. I’m not even kidding.
I’m being serious here.
Dead serious.
Actually, no I’m not. Just kidding!
See? That right there is the perfect example of why I’m terrible at prank calls. I can’t keep it going. My sister Betsy could keep a prank call going for hours if she ever had the chance. She never cracked. Not once. But me? I’d deliver the first line or two, then I’d either become crippled from laughing or I’d say “Never mind, just kidding” and hang up. Honestly, my middle name should be Just Kidding. It’s what I always say when I lose my nerve.
What I’m saying is, we really do love nachos in our house. And while my husband and kids prefer a more pared-down, simple approach, I like to load mine with everything I can get my hands on.
Here’s a version I made last night! It straddles the fence between what they want and what I want.
That pretty much defines everything I cook around here.
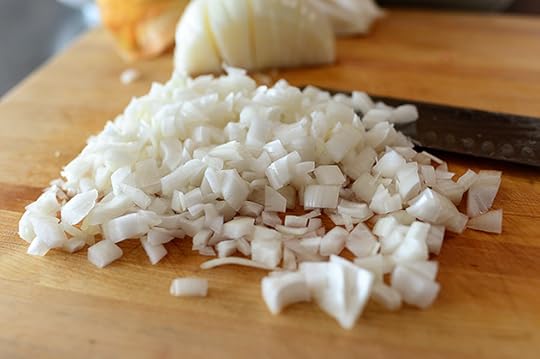 Dice up half the onion…
 And throw it into a skillet with a little olive oil over medium-high heat.
 Cook the onions for a minute or two, then throw in the ground beef…
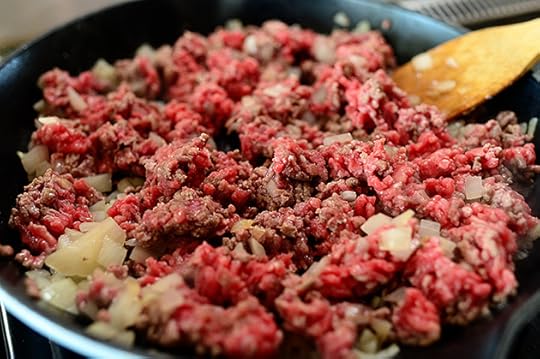 Break it up…
 And let it cook until the meat is totally browned.
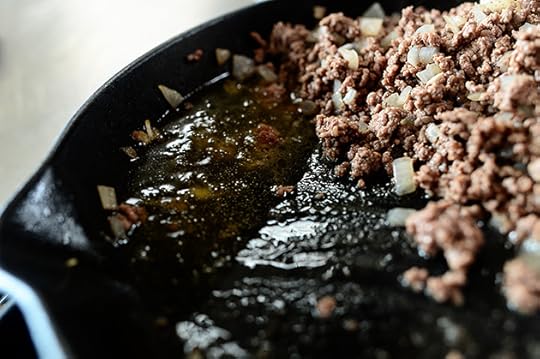 Drain off the fat…
 Then add the chili powder, paprika, cumin, crushed red pepper, salt and pepper.
 Stir it around to mix in the spices…
 Then crack open the beans. I like Ranch Style beans because they’re just so ranchy (not to be confused with raunchy) but you can use any ol’ bean you like.
 Pour ‘em right into the skillet.
 Stir it around, then pour in the hot water to make it a little more saucy. Reduce the heat to low and simmer away while you get the rest of the ingredients ready.
 Next up…
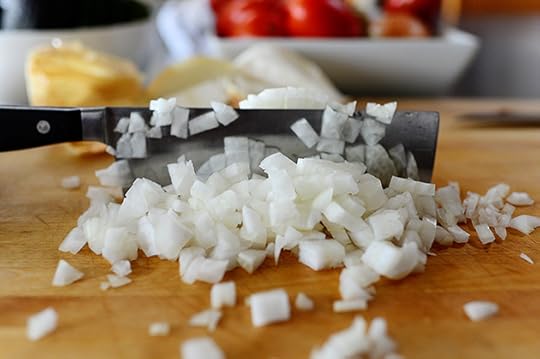 Dice the rest of the onion.
 Lop off the tops of all the tomatoes, then cut them into slices, then cut the slices into strips…
 And cut them in the opposite direction to dice them.
 For heat, lop off the top and bottom of a jalapeno…
 Then cut it into thin strips and cut the strips into a fine dice.
 Throw the onions, tomatoes, and jalapeno into a bowl and tell ‘em you’ll be right back.
 Tear the leaves off of half a bunch of cilantro and give it a rough chop…
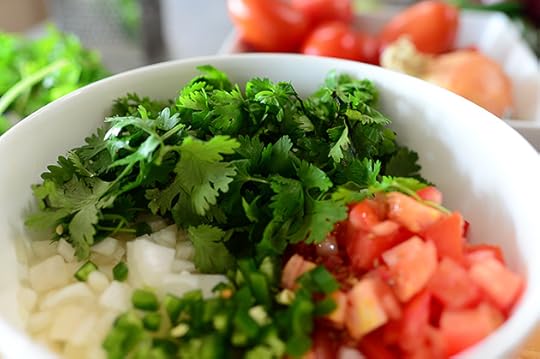 Then throw it into the bowl.
 Slice a lime in half…
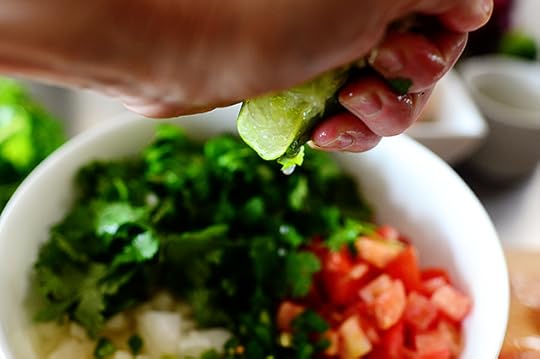 Then squeeze in the juice.
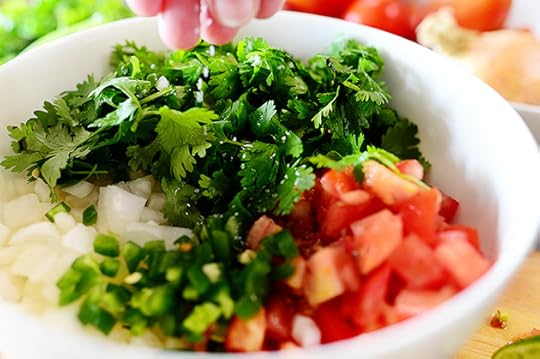 Sprinkle in a little salt…
 And stir it together. Pico de Gallo, baby!
 I actually prefer pico de gallo chunky like it is in the previous photo, but I wound up dumping it out and chopping it up a little more finely for the more persnickety people in my household.
I’m not going to name any names.
 Slice a couple of avocados in half, then pit them and scoop out the good stuff.
 Slice the avocados into strips…
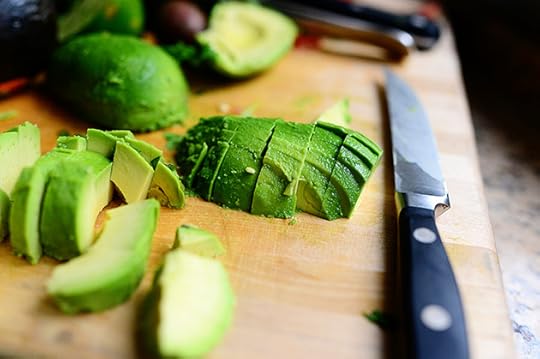 Then dice ‘em up.
 Finally…the cheese! I grated both cheddar and Monterey Jack, but I didn’t mix them up.
I’ll show you why in a minute!
 To assemble the nachos, make a single layer of chips on a platter or plate.
 Grab a big scoop of the beef/bean mixture…
 And sprinkle it all over the chips. Don’t be afraid to get some juice on there and really make these messy!
 Sprinkle on a layer of cheddar…
 Then throw on another layer of chips…
 Another layer of beef and beans…
 Then a nice layer of Monterey Jack.
 I couldn’t resist a final layer of chips.
 And another layer of beef and beans.
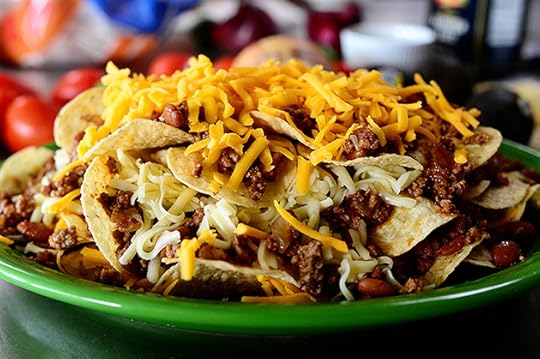 And another layer of cheddar.
 Next, I nuked the nachos at 45-second intervals until the cheese was perfectly melted.
I would like to get a t-shirt that reads “I Nuked the Nachos.”
 I’m naughty.
 But I had to do this.
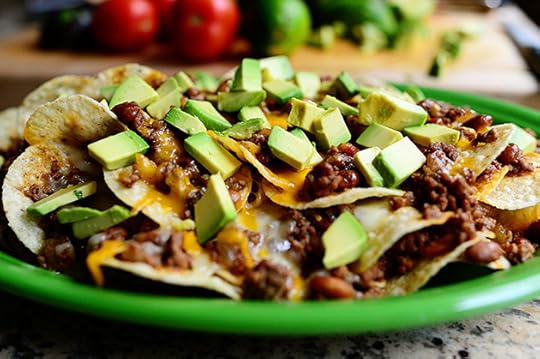
 And then I had to do this. Hey, they’re veggies! So that makes the whole platter of nachos healthy.
Maybe.
 I know for sure it makes them delicious!
 I have firsthand experience with this.
Enjoy these, guys! They’re totally yummy. And you can add whatever extras you like: Sour cream, chopped black olives—anything. And what I love about these is that the chips toward the bottom start to soften a bit under all the gooey ingredients, while the top ones stay more crisp. So the bottom ones are like mini enchiladas or soft tacos after awhile. Divine!
Here’s the handy dandy printable.
Recipe
Loaded Nachos
Prep Time: 10 Minutes
Cook Time: 15 Minutes
Difficulty: Easy
Servings: 8
Print Recipe
Ingredients
1 Tablespoon Olive Oil1 whole Yellow Onion, Diced2 pounds Ground Beef1/2 teaspoon Chili Powder1/2 teaspoon Paprika1/2 teaspoon Cumin1/4 teaspoon Crushed Red Pepper1/2 teaspoon Salt1/2 teaspoon Pepper1 can (14-5 Ounce) Pinto Beans, Chili Beans, Or Ranch Style Beans1/2 cup Hot Water Tortilla Chips1-1/2 cup Grated Cheddar Cheese1-1/2 cup Monterey Jack Cheese6 whole Roma Tomatoes, Diced1 whole Jalapeno, Diced Finely1/2 bunch Cilantro Leaves, Chopped Juice Of 1 Lime1/2 teaspoon Salt1 whole Avocado (pitted And Diced) Sour Cream (optional) Preparation Instructions
In a skillet over medium-high heat, add the olive oil and half the onion. Cook it until starting to soften, then add the ground beef. Cook the meat until it's totally browned, then drain the fat. Add the chili powder, paprika, cumin, crushed red pepper, salt, and pepper and stir to combine. Add the beans and hot water and stir. Reduce the heat to low and simmer while you prepare the other ingredients.
To make the pico de gallo, combine the other half of the onion with the tomato, jalapeno, cilantro, lime juice, and 1/2 teaspoon salt. Stir it together and set it aside.
To build the nachos, place a layer of tortilla chips on a platter or plate. Top with a layer of the beef/bean mixture, then all but 1/4 cup of the cheddar cheese. Add another layer of chips, another layer of the beef/bean mixture, and the Monterey Jack cheese. Add a final small layer of chips, then a small layer of beef and beans, then a final sprinkling of cheddar.
Microwave in 45 second increments until the cheese is melted and bubbly. (You may also place the platter into a 325 degree oven if it's heatproof. Just leave it in until the cheese is melted.)
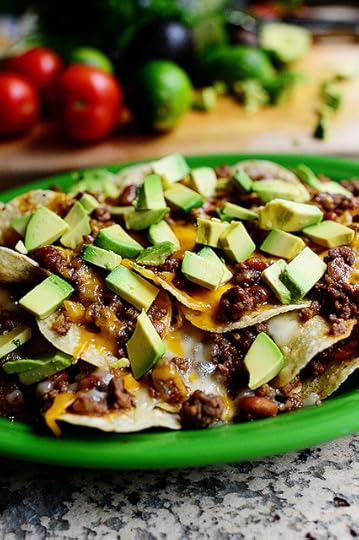
Immediately sprinkle on the diced avocado and plenty of pico de gallo.
Optional: Add dollops of sour cream here and there!
Serve immediately!
Posted by Ree on May 20 2013

May 13, 2013
Chocolate Chocolate White Chocolate Chip Cookies
 There’s nothing about these lusciously rich cookies that isn’t wonderful. Or luscious. Or rich. Or wonderful. But before you make them, I need to make sure you understand one thing:
You absolutely must eat these with an ice cold glass of either 1% or 2% milk.
Let me repeat that in case you didn’t grasp it the first time.
You absolutely must eat these with an ice cold glass of either 1% or 2% milk.
Now, let me explain this directive. The milk is necessary, because the cookies are so rich, you have to have something to wash them down. The 1% or 2% is necessary, because whole milk would be just too much decadence at once, and skim milk just wouldn’t be able to compete with the wonderment.
Also, I need to acknowledge that the name I gave these cookies makes no logical sense at all. But neither does anything else I say. So in that way, I’m a paragon of consistency.
Ignore me. Just ignore me.
And enjoy these cookies, my friends!
 Here’s what you need, love-muffin!
Sorry I called you love-muffin. I’m trying to quit.
 Add the butter to the bowl of an electric mixer.
 Then add sugar…
 And beat it with the paddle attachment until it’s light and fluffy.
 Scrape the inside of the bowl once, then mix it again for a few seconds.
 Beat in the eggs, once at a time…
Oh! Wait one second. First look at the photo above. Now imagine the sound effect *bleep*.
 Now imagine the sound effect *bloop*.
I like to make sounds while I bake. I’m trying to quit that, too.
 After the eggs are beaten in, add a tablespoon of vanilla extract…
 And mix it until it’s all combined.
 Now, into a sifter, measure the flour and the cocoa…
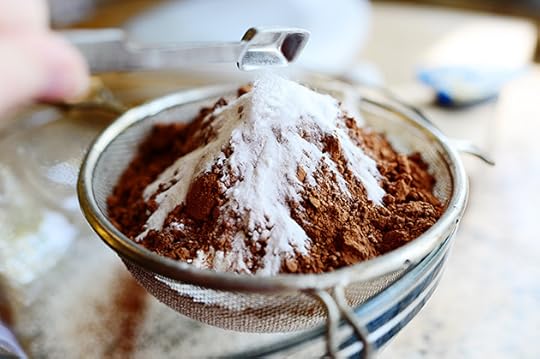 Then add the baking soda…
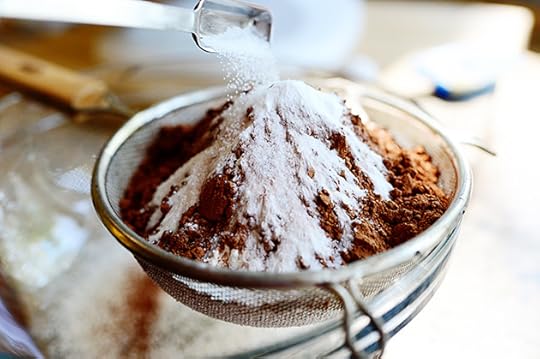 And the salt.
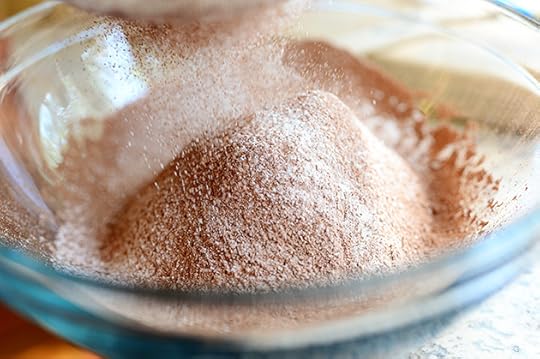 Sift it together…
 Then mix in big spoonfuls at a time until it’s all combined.
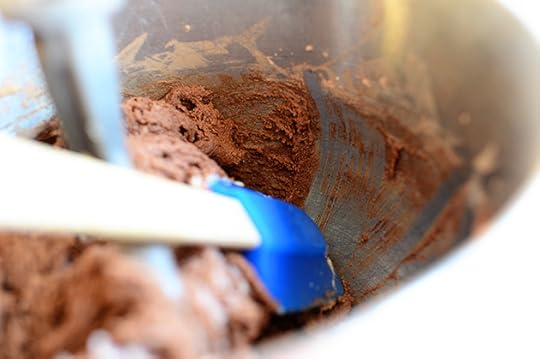 Give it a good scrape…
 Then give it one more mix and for the love of Pete, please do not even take one bite of this dough. It’s so irresistible, you’ll then eat half the bowl of dough. And then the yield I’m giving you for this recipe will no longer be correct. And then you’ll be mad at me.
 Next, add the semi-sweet chips…
 And the white chocolate chips.
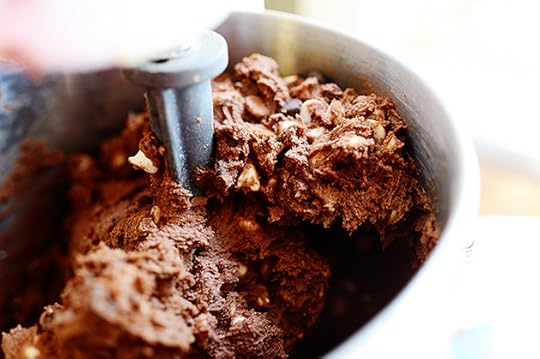 Stir it around…
 Till it’s all combined! And the same admonition applies: Don’t. Try. Bite. Half. Gone. Yield. No. Correct. Mad. Me.
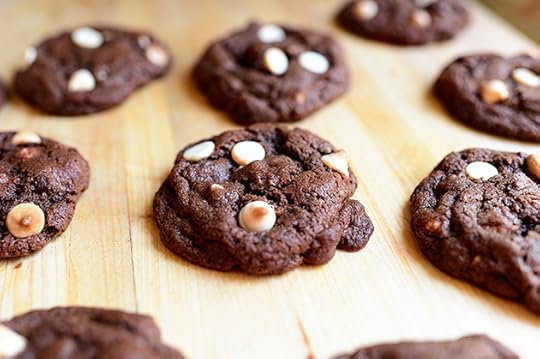
 Drop or scoop heaping tablespoons of the dough onto a baking sheet…
 And then, and this is truly optional, press about three white chocolate chips into the surface. This is just to make the cookies extra popalicious.
 That was a weird word. I won’t use it again.
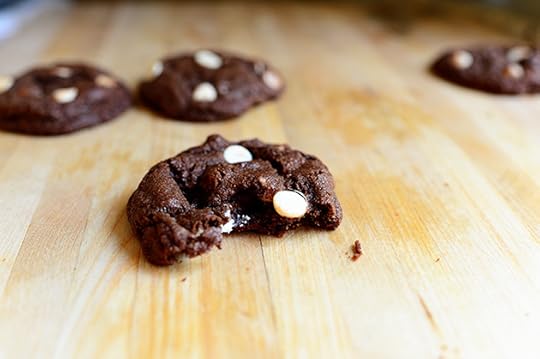
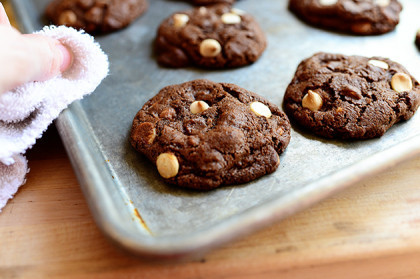
 Bake ‘em until they’re just barely, barely set, then let them cool on the cookie sheet about 5 minutes before removing them.
 Oh, baby.
 Serve ‘em with an ice cold glass of 1% of 2% milk!
Not whole milk.
Not skim milk.
Please don’t forget.
 Enjoy these, guys.
Here’s the handy dandy printable!
Recipe
Chocolate Chocolate White Chocolate Chip Cookies
Prep Time: 10 Minutes
Cook Time: 12 Minutes
Difficulty: Easy
Servings: 36
Print Recipe
Ingredients
2-1/2 sticks Butter, Softened2 cups Sugar2 whole Eggs3 teaspoons Vanilla Extract2 cups Flour3/4 cups Cocoa Powder1-1/2 teaspoon Baking Soda1 teaspoon Salt1-1/2 cup Good Quality Semi-sweet Chocolate Chips2 cups Good Quality White Chocolate Chips Preparation Instructions
Preheat oven to 350°F.
Using a mixer, cream butter and sugar until fluffy, scraping the sides once.
Add eggs one at a time, mixing after each addition. Mix in vanilla.
Sift together dry ingredients, then add in batches to the mixer, mixing until just combined after each addition.
Gently blend in chocolate chips and white chocolate chips.
Using a cookie scoop, add 1 tablespoon portions to baking sheet. Dot the top of each cookie with 3 white chocolate chips if you'd like them to really show up on top. Bake for 9 to 11 minutes or until cookies are barely done but still soft and chewy.
Let cool on a baking rack. Yummy!
Posted by Ree on May 13 2013

Ree Drummond's Blog

- Ree Drummond's profile
- 2032 followers

