
Ree Drummond's Blog, page 60
March 19, 2012
Salisbury Steak, Mashed Potatoes, and Peas
 I felt like making Salisbury Steak week before last. So guess what? I did! You can find out what sparked the craving here.
I was going for the true TV dinner/school lunch effect here…and it wound up being really yummy! My kids did wind up scraping off the big chunks of onions, so if you have onion-sensitive humans in your home, dice them finely instead.
I went for high impact with the way this one looked, but I provide you a couple of options if you don't need the high-gloss look of the gravy.
Let's make it, baby!
 Start by halving an onion and slicing it really thin. I wanted to go heavy on the onions here, but you can both decrease the quantity an/or finely mince them if you prefer that approach. Set the onions aside.
 Throw some ground beef into a bowl and add 1/2 cup of seasoned breadcrumbs.
 Next, add in some dry mustard…
 Some beef base or crumbled beef bouillon…
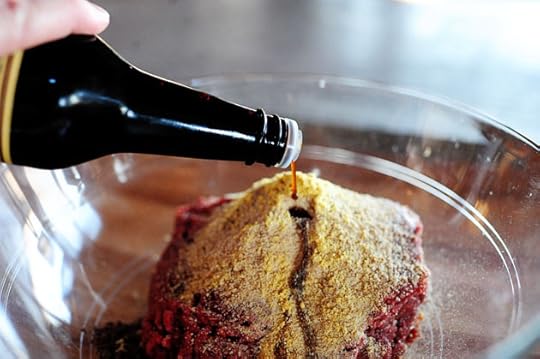 Some Worcestershire…
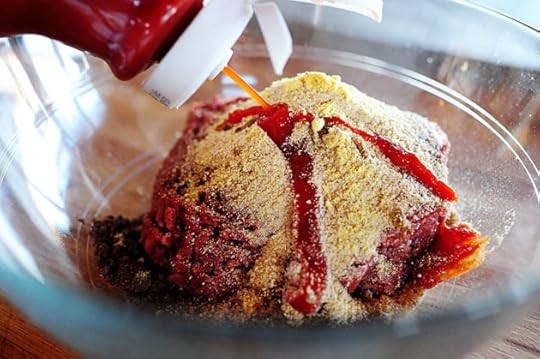 Some ketchup…
And some salt and pepper.
 Use a rubber spatula (or your clean, clean hands) to smush the mixture together until it's all combined…
 Then take out a little at a time and roll it into a cylinder. I realize this looks grody.
Oh, and if you could possibly mix all the ingredients together a little better than I did, that'd be GRITE.
 From there, form it into oval patties and use your pinkie to make little indentations that sort of kind of make it look like a steak, then fry the "steaks" in a little bit of butter and oil in a skillet over medium-high heat.
 Flip them to the other side and reduce the heat to medium. Cook the steaks until they're done in the middle, about 8-10 minutes total.
 Remove the steaks from the skillet and set them aside.
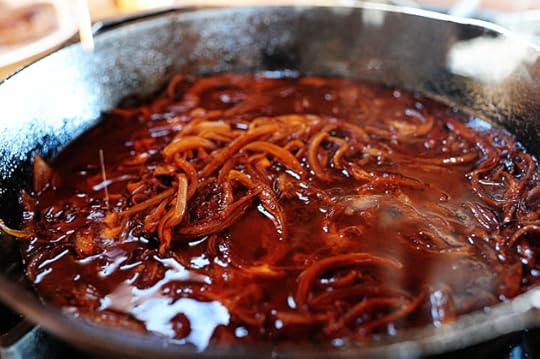
 Pour off any excess grease in the pan, then throw in the onions and cook them around for 4 to 5 minutes, or until they've gotten pretty soft.
 Next, pour in a good amount of beef broth and stir it around.
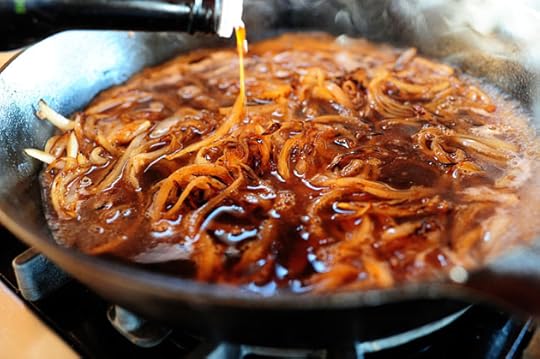 Add some Worcestershire…
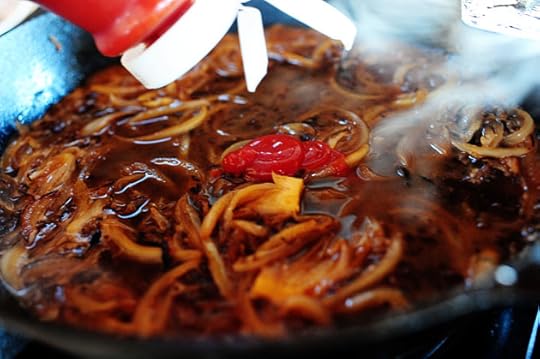 And some ketchup…
 And—avert your eyes, foodies—this. This is an ENTIRELY OPTIONAL INGREDIENT, but I am not ashamed. Basically, it's something you add to gravies and sauces if you want to boost the flavor and achieve a little bit of a deeper color (and some food stylists brush it on turkeys and things they want to have a nice, brown color.) It's relatively harmless—has no MSG or anything.
Note, though, that I don't use it very often. It isn't necessarily a crucial ingredient for everyday home cooking.
 But for this? Why not. I thought I'd whip it out.
Just a teaspoon or so.
 Next, as long as I'm being weird, I also decided to add a tiny bit of slurry (cornstarch/liquid mixture) to the mix. Just mix together a little cornstarch with a little broth…
 Then just add 1 to 2 teaspoons or so of the liquid—not enough to really gum up the gravy, but enough to give it just a teeny, tiny bit of thickness. It also gives the gravy a nice, pretty gloss.
But you could easily leave it out if you prefer; just cook down the sauce and let it thicken naturally.
You could also use flour instead! It can lighten the color of the gravy, though…which isn't what I was shooting for here.
 Next, just cook the gravy and let it bubble up and thicken for a minute or two.
 Then add the steaks back into the pan.
 Spoon the sauce—onions and all—over each steak, then let them simmer for another couple of minutes.
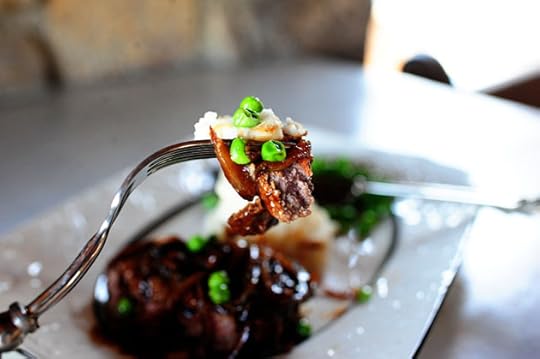
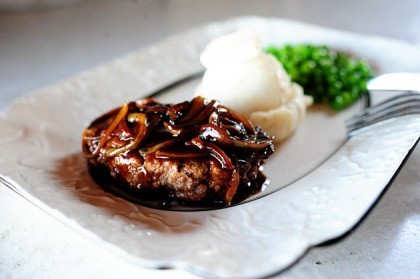
 To serve it up and make it look like a combination school lunch and TV dinner, I used an ice cream scoop to serve up some Creamy Mashed Potatoes.
 Then I added a steak and a side of buttered peas. Poifect!
 Tell me this doesn't look yummy.
(Note: Lighting issues make the sauce look much darker than it is. It was actually nice and golden brown and lovely)
 Tell me you don't want to dig in, just to take a brief plunge back into either 1968 or your school cafeteria.
Or your freezer, if you happen to have one in there!
Tell me this doesn't make you want to watch Kramer v. Kramer.
(Oops. Wrong website section.)
Enjoy this, guys! It's fun.
Oh, and P.S.
 When you eat it, don't just do this.
 Do this.
Here's the handy printable!
Recipe: Salisbury Steak
Prep Time: 10 Minutes
|
Cook Time: 20 Minutes
|
Difficulty: Easy
|
Servings: 6
Print Recipe
3"x5" Cards
4"x6" Cards
Full Page
Ingredients
MEAT MIXTURE1-1/2 pound Lean Ground Beef1/2 cup Seasoned Breadcrumbs2 teaspoons Dry Mustard1 cube Beef Bouillon, Crumbed (or Powdered Beef Base)4 dashes Worcestershire Sauce1 Tablespoon Ketchup Salt And Pepper Gravy1 whole Onion, Halved And Thinly Sliced (or Diced If You Prefer)2 cups Beef Broth4 dashes Worcestershire (additional)1 Tablespoon Ketchup (additional)1 teaspoon Kitchen Bouquet (optional)1 teaspoon Corn Starch Mixed With A Little Beef Broth To Make A Thin Paste Salt And Pepper, to taste More Broth If Needed For Thinning Mashed Potatoes, For Serving Buttered Peas, For Serving1 Tablespoon Olive Oil, For Frying1 Tablespoon Butter, For Frying Preparation Instructions
Combine all the ingredients for the meat mixture and knead until all combined. Form into 4 to 6 oval patties, then make lines across the patties to give them a "steak" appearance.
Fry in a skillet with oil and butter over medium-high heat on both sides until no longer pink in the middle. Remove from the pan and pour off excess grease.
Reduce the heat to medium and add in the sliced onions. Stir and cook for several minutes, or until golden brown and somewhat soft. Add the beef stock, Worcestershire, and ketchup. Stir and cook to reduce.
OPTIONAL: Add Kitchen Bouquet, which will give the gravy a deeper color and a bit more flavor.
OPTIONAL: Add 1 to 2 teaspoons of the cornstarch/broth mixture to give the gravy a little gloss and to thicken it up a bit without lightening it (as flour would.)
**Add a sprinkle of salt and pepper and more broth if needed for thinning.
Return the steaks to the gravy. Spoon gravy over the top and let them simmer and heat back up for a couple of minutes.
Serve with mashed potatoes and peas!
**NOTE: If you omit the Kitchen Bouquet, no problem. If you omit the cornstarch/broth mixture, just cook the liquid a little longer in order to reduce and thicken it a bit.
**Another optional thing is to add sliced mushrooms to the onions and cook them together. Yum!
Posted by Ree on March 18 2012
Recipe: Creamy Mashed Potatoes
Prep Time: 1 Hour
|
Cook Time: 30 Minutes
|
Difficulty: Easy
|
Servings: 10
Print Recipe
3"x5" Cards
4"x6" Cards
Full Page
Ingredients
5 pounds Russet Or Yukon Gold Potatoes3/4 cups Butter1 package (8 Oz.) Cream Cheese, Softened1/2 cup (to 3/4 Cups) Half-and-Half1/2 teaspoon (to 1 Teaspoon) Lawry's Seasoned Salt1/2 teaspoon (to 1 Teaspoon) Black Pepper Preparation Instructions
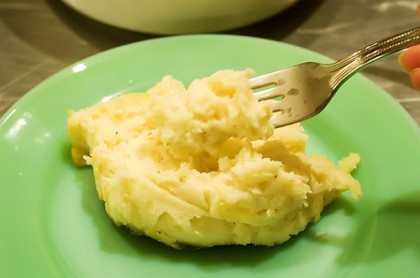
Peel and cut the potatoes into pieces that are generally the same size. Bring a large pot of water to a simmer and add the potatoes. Bring to a boil and cook for 30 to 35 minutes. When they're cooked through, the fork should easily slide into the potatoes with no resistance, and the potatoes should almost, but not totally, fall apart.
Drain the potatoes in a large colander. When the potatoes have finished draining, place them back into the dry pot and put the pot on the stove. Mash the potatoes over low heat, allowing all the steam to escape, before adding in all the other ingredients.
Turn off the stove and add 1 ½ sticks of butter, an 8-ounce package of cream cheese and about ½ cup of half-and-half. Mash, mash, mash! Next, add about ½ teaspoon of Lawry's Seasoning Salt and ½ a teaspoon of black pepper.
Stir well and place in a medium-sized baking dish. Throw a few pats of butter over the top of the potatoes and place them in a 350-degree oven and heat until butter is melted and potatoes are warmed through.
Note: When making this dish a day or two in advance, take it out of the fridge about 2 to 3 hours before serving time. Bake in a 350-degree oven for about 20 to 30 minutes or until warmed through.
Posted by Ree on June 26 2009


March 16, 2012
Seafood Pasta
 Since I left the ranch five days ago—first New York, now Baaaahhhhhston—I've been eating seafood as if my life depended on it. I'm on a jag. Please send help before I start eating shrimp for breakfast.
This is a tweak version of an older recipe here, one that can be adapted in many different ways depending on the seafood you have, the pasta you want to use, and the kind of sauce you're in the mood for. I made it for dinner when my mom and Betsy were visiting a couple of months ago (a get-together that'll be featured on tomorrow's Food Network episode) and I made it again last week, when I decided to take some new pictures of its splendorous glory.
Or its glorious splendor. Not sure which.
 Begin by quickly browning scallops in a skillet with a little olive oil and a little butter.
 You don't need to cook the heck out of them; just get as much color on the outside as you can in as little time as possible—just about 45 seconds to 1 minute per side.
 Remove the scallops to a plate, and gaze upon their beauty.
I love scallops. Deeply.
 Do the same with the shrimp, adding them in a single layer…
 And removing them to a plate once they're brown. (Again, don't worry about cooking them completely at this point.)
 Add a tiny bit more oil to the pan, then throw in a bunch of chopped garlic. Stir it around for just a few seconds, the (forgive the no-picture thing) pour in some dry white wine. Let this bubble up and reduce…
 Then pour in a large can of tomatoes—either whole or diced, add salt and pepper and a little crushed red pepper, then let it cook for about 10 to 15 minutes.
(And this is where you can change the direction of this recipe: if you don't want to go the tomato route, you can do some chunky items like quartered artichoke hearts, kalamata olives, mushrooms, even zucchini and other veggies to take a more primavera approach. Just brown the veggies a bit and splash in a little chicken broth for some liquid, as this is going to eventually bake with the pasta in the oven.)
 Cook the pasta until it's cooked but still quite firm—just a little under the amount of time you'd cook it if you were serving it right away.
 Next, take two large sheets of heavy duty aluminum foil and overlap them on an ovenproof platter with a little depth to it OR just a regular rectangular baking dish of some sort. Overlap the sheets by about 6 inches, then use your hands to smooth the foil against the bottom of the platter.
 Pour the cooked pasta into the platter/dish…
 Then pour all the contents of the skillet over the pasta.
 Note that you want to have a little extra liquid here since it's going to bake in the oven, so if it seems like it needs a little more juice, just splash a little bit of chicken broth over the top.
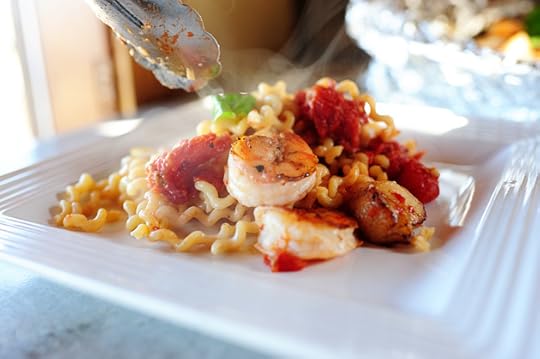
 Next, pour on the shrimp and the scallops, making sure to get all the lovely juices from the plate.
 Gosh. In my current seafood-loving state of mind, I see this as a platter full of dang bliss right here.
My goodness.
 But wait—don't eat it yet. Gather up the ends of the foil and tightly fold them down, gathering up the sides into a neat little package. Then put the whole thing into a 350 oven for 15 minutes, just until the seafood is fully cooked and all the ingredients have met and fallen in love and gotten married.
 To serve it, just open up the foil…
 And (this is an optional–albeit decadent–little touch) drizzle on a little bit of warm cream all over the top. The cream will just settle in a bit and add some incredible richness and sin to the whole thing, and as you use tongs to serve it up, it'll evenly distribute over all the pasta and sauce.
And the world will make perfect sense again.
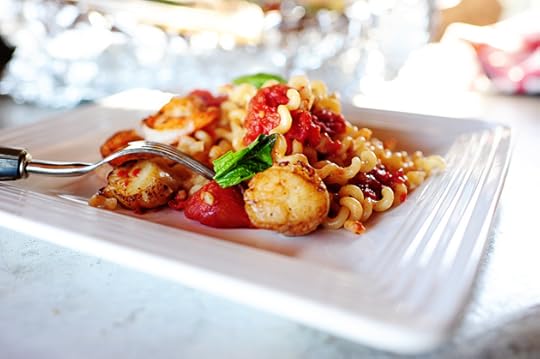
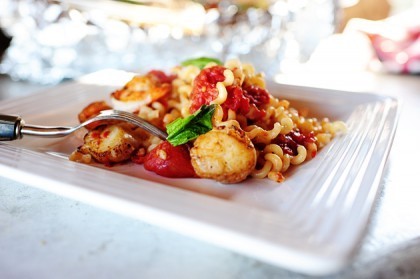
 Right before you serve it, tear a bunch of basil leaves and sprinkle them over the top.
Seafood.
Pasta.
Tomatoes.
Cream.
Basil.
I'm sorry, but the world doesn't get any better than that.
 Oh, baby.
 Oh, sweetheart.
 Oh, my.
Enjoy this, guys! It's the perfect Friday night dinner.
Recipe: Seafood Pasta
Prep Time: 5 Minutes
|
Cook Time: 30 Minutes
|
Difficulty: Easy
|
Servings: 12
Print Recipe
3"x5" Cards
4"x6" Cards
Full Page
Ingredients
2 Tablespoons Olive Oil2 Tablespoons Butter1 pound Scallops1 pound Shrimp5 cloves Garlic3/4 cups Dry White Wine28 ounces, weight Whole Or Diced Tomatoes Salt And Pepper, to taste1/4 teaspoon Crushed Red Pepper1/4 cup Heavy Cream, Warmed12 whole Basil Leaves Torn Chicken Broth, If Needed For Splashing In A Little Liquid Preparation Instructions
Preheat oven to 350 degrees. Cook pasta for just over half the cooking time (it should still be a little firm.)
Heat 1 tablespoon olive oil and 1 tablespoon butter in a heavy skillet over medium-high heat. Brown the scallops just until they get great color on the outside, about 45 seconds to a minute per side. Remove to a plate and set aside.
Add another tablespoon of both olive oil and butter to the skillet. When hot, throw in shrimp and brown them, too. (Don't completely cook scallops or shrimp.) Remove to a plate and set aside.
Add a small splash of oil to the pan. Cook the garlic for 30 seconds, then pour in the wine. Let it bubble up and reduce for a minute or two, then pour in the tomatoes (including juice.) Add salt, pepper, and red pepper flakes, then cook the sauce over medium-high heat for 10-15 minutes.
Tear off two large sheets of heavy duty aluminum foil. Overlap them on an ovenproof platter (make the overlap about 6 inches or so) with some depth or in a baking sheet. Use your hands to press the foil flat against the platter.
Pour the pasta onto the platter, then pour all the sauce over the pasta (juice and all). Next, pour on the seafood, making sure to add all the juices that may have dripped on the plate.
Gather up the two ends of the foil and roll them down so that they're tightly sealed---do the same with the shorter sides.
Place the platter into the oven and bake for 15 minutes, until the seafood is fully cooked and the flavors have all had a chance to meet and fall in love.
To serve, open the foil and drizzle a little warm cream all over the top. Throw on basil at the end and serve.
Posted by Ree on March 16 2012

March 15, 2012
Things I Ate in New York
After my daughter and I snorted and slothed around our hotel room all day Sunday, we actually got up and left the hotel in order to eat.
Here are some things I consumed in the Big Apple.
It's stuff I never eat in my everyday life.
I'm still in Heaven.
 We met up with my dad and Patsy and ate at La Bonne Soupe, a little French bistro on 55th Street.
 Sorry for the lighting, but it was a cozy, dark little place. I had this beet-and-goat-cheese salad, which is one of my favorite salads in the world. I made one last summer with small roasted beets cut in half, but this one started with a layer of thinly sliced beets on the bottom, then topped with greens, big chunks of goat cheese, and candied pecans.
Beets. That's all I can say.
Beets with goat cheese? Fugghetaboutit.
 My daughter had lasagna, but because it was a French place, the lasagna was made with crepes!
It was yummy.
 For dessert, I had tarte tatin, which is one of my favorite desserts.
It was so good, and not too sweet, which was really nice. Some of the tartness of the apples was still there. Divine!
 The next evening, we went to Marea, a place my dad, Patsy, my sister Betsy, and I had eaten a year ago.
When my dad told me he and Patsy were going to join me in New York this week, the first thing he said was "Hey, do you think we could eat at that one place again?"
I knew exactly what he meant.
 A single chunk of trout, creme fraiche, and beet puree.
I cried.
 Marea comes around to the table and offers different varieties of bread.
 I chose olive focaccia. I like bread with little surprises inside.
 This was my salad, and it was ridiculous. Chunks of succulent lobster sitting on a bed of burrata, which is a special kind of creamy, fresh mozzarella cheese.
It was creamy and a little loose, but still stringy.
(Appetizing description, no? Ha.)
It was so good.
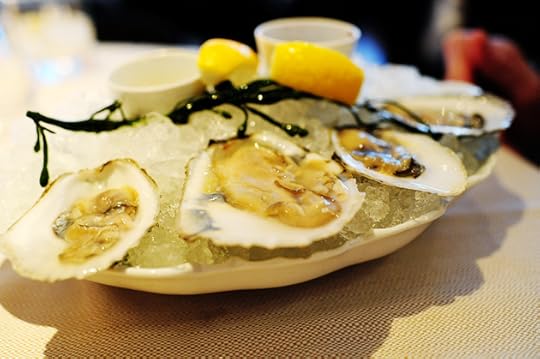 My dad got oysters. BORING!
Just kidding.
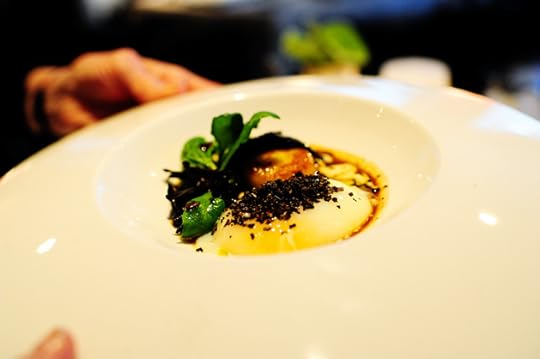 I ordered this for my dad because he loves runny eggs like his daughter does. Slow-poached egg sprinkled with something truffle-ish, a scallop, and a couple of other things I've never heard of in my life.
 Guess what I got for dinner? The exact same thing I got last time! The photo does not do it justice, but it's octopus and bone marrow pasta. Chunks of braised octopus (you could even see the little suckers on the arms) and soft pieces of bone marrow on top of homemade fusilli.
It is one of the five best things I've ever eaten.
 Look at Patsy's dessert. Prickly Pear Sorbet is at the center of things, but the fruit presentation?
So pretty.
 My dad ordered this. Doughnuts. Zabaglione. Chocolate sauce.
Sheesh.
And I got something for dessert that was so good, I forgot to take a photo.
Are you ready?
Brown butter ice cream in a stemless wine glass.
At the table, the waiter poured a shot of rum over the top, followed by a shot of espresso.
It turned into a buttered rum ice cream with a coffee flavor.
There's no way I could eat like this all the time. For one thing, it might lose its luster after awhile.
Actually, it probably wouldn't. But still…
New recipe posted tomorrow!
Love,
P-Widdy

March 12, 2012
New York Style Chopped Salad
 I made a salad last Friday that was inspired by some scrumptious and enjoyable salad bar experiences I've had during recent trips to New York City…where my older daughter and I happen to be visiting this week.
Here's how the New York salad bars go, and maybe I need to get out more, but I just think it's miraculous: There are different selections of greens, then basically any and every salad topping you can think of: kidney beans, avocado, mushrooms, olives, tomatoes, etc. Like, at least fifty toppings.
Then the guy/gal behind the counter says "What greens do you want?" And you tell them the greens you want. And they grab some of those greens with tongs and throw them into a clean stainless bowl.
Then you basically go up and down the rows of toppings, shouting out all the goodness you want them to add into the bowl, which is everything if you're me.
Then the guy says "What kind of dressing do you want?" And you tell him "blue cheese" if you're me, and he plops some of that into the bowl.
Then he tosses it like nuts, then he asks you one final—and very important—question:
"Do you want it chopped?"
And you say yes. A thousand times yes.
 So here's what I'm thinking: How fun would it be to have a salad party? But here's the angle: Have all your buddies each bring a different topping.
It'll, like, totally cut down on your prep time.
And it'll be fun for everyone to be involved!
Or you can just prep it all yourself.
 Among other things, you can have sliced hard boiled eggs…
 Diced red and yellow bell pepper…
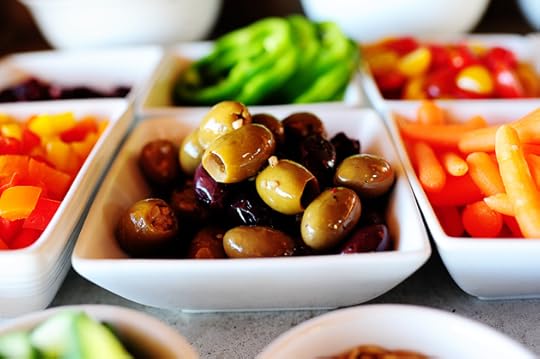 A buncha olives…
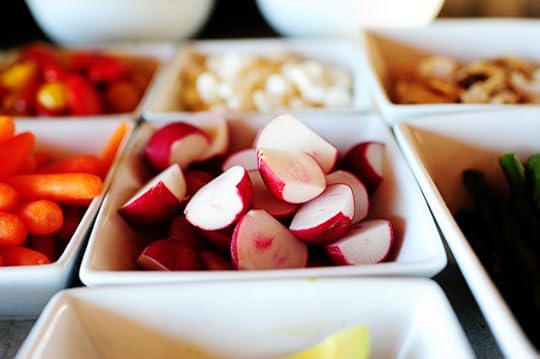 Radishes…
I love radishes. The pepperier the better.
I realize pepperier is not a word.
 Grilled chicken, cut into pieces…
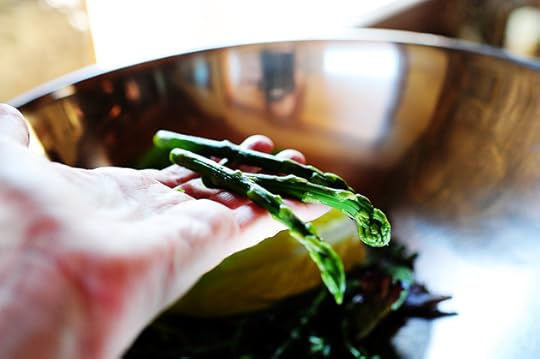
 Asparagus! I blanched it, then cut it into pieces.
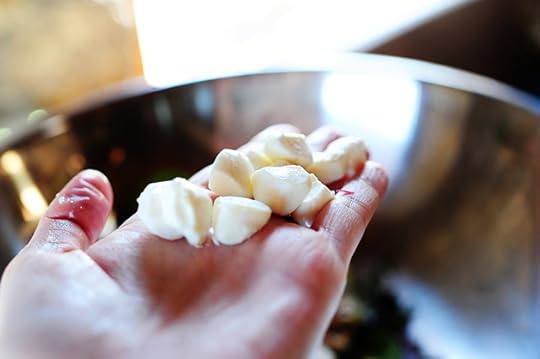
 Miniature marshmallows! Just kidding. These are little balls of fresh mozzarella. Dangerous for me, because all I want to do is pop them in my mouth until they're all gone.
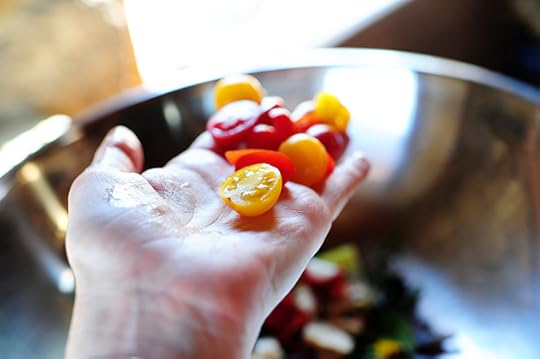
 And of course: tomatoes. I love halved grape tomatoes. They bring me joy.
And basically you can keep going with whatever ingredients you'd like!
 For each individual salad, throw in the greens of choice. I chose mixed greens.
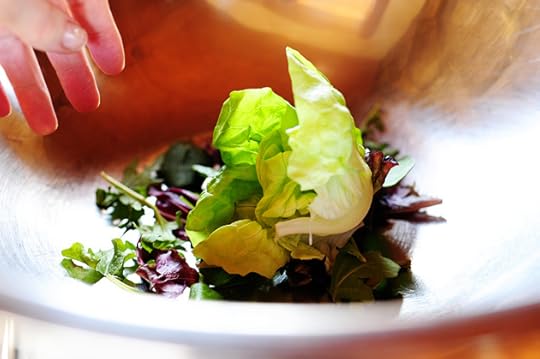 I also chose Bibb.
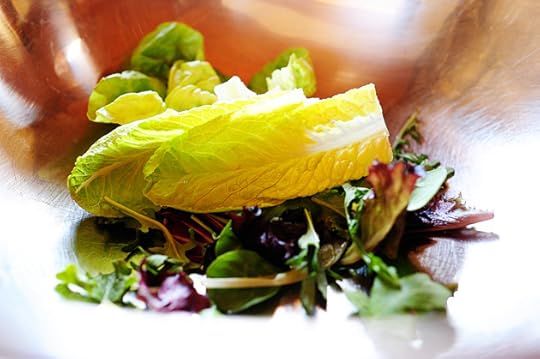 I also chose Romaine hearts.
Sorry. Couldn't make up my mind.
 Then I threw in asparagus…
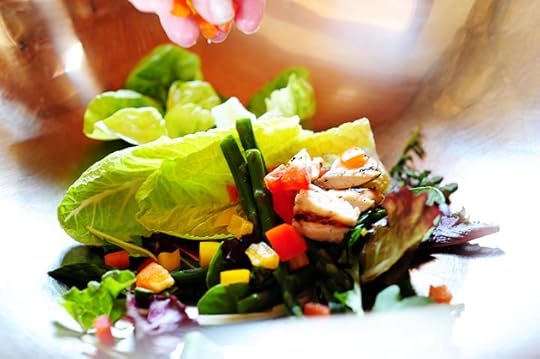 Chicken, bell peppers…
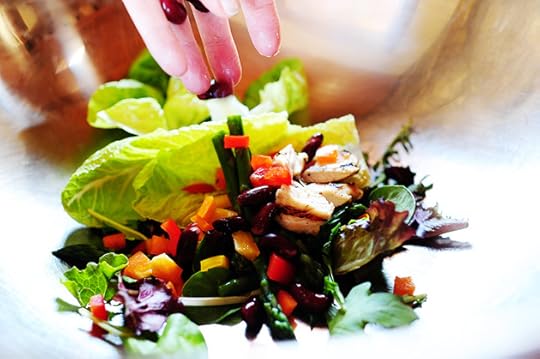 Some kidney beans…
 Mozzarella…
 Tomatoes…
 (Prayer of St. Francis.)
(Amen.)
 Green bell pepper rings. I didn't feel like dicing anymore.
 More Romaine. You know, because I was afraid I wouldn't have enough.
Geez.
 So once you have the bowl all loaded up, drizzle in a little dressing.
Blue cheese is my poison. What's yours?
 So then it's all about the toss! Get everything coated evenly…
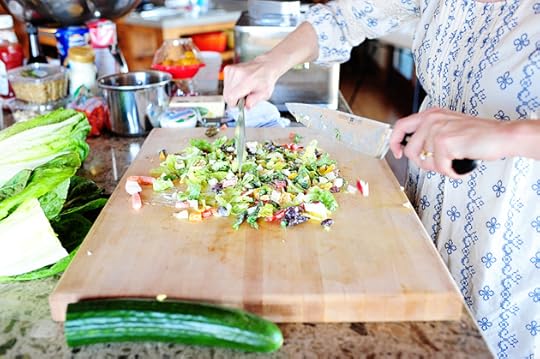
 Then it's all about the chop! Pour the salad onto a cutting board…
Then grab two knives and get ready to have a little fun, man.
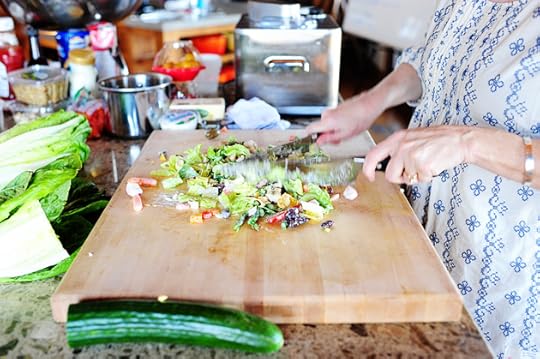 Chop chop chop!
 If things fly, that's good.
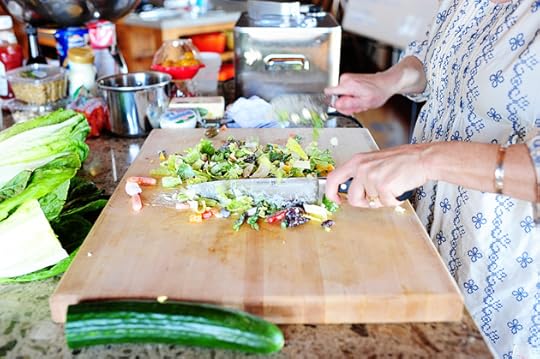
 Just keep on chopping…
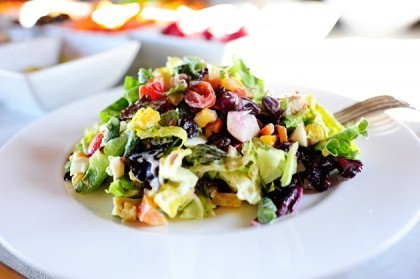
 Until it's to the level of…um…choppedness you want. This looks perfect!
 Then just serve it up on a plate!
The last time I ordered one of these in New York, I chose so many toppings that the salad wouldn't fit in the size I ordered.
I had to upgrade a size.
It was a little embarrassing.
 Man, was this a fabulous Friday salad!
It'll make a magnificent Monday salad, too.
And a tremendous Tuesday salad.
And a wonderful Wednesday salad, of course.
I'll stop now.
Love,
P-Dub
Recipe: New York Style Chopped Salad
Prep Time: 45 Minutes
|
Cook Time:
|
Difficulty: Easy
|
Servings: 12
Print Recipe
3"x5" Cards
4"x6" Cards
Full Page
Ingredients
Greens3 cups Mixed Salad Greens3 cups Bibb Lettuce8 whole Romaine Leaves FIXINS Grape Tomatoes, Halved Kidney Beans, Drained And Rinsed Garbanzo Beans, Drained And Rinsed Pitted Mixed Olives Sliced Or Diced Bell Pepper Hard Boiled Eggs, Peeled And Sliced Avocado, Sliced Mushrooms, Sliced Cheese, Grated Fresh Mozzarella, Cubed Cucumbers, Halved Then Sliced Asparagus, Blanched And Sliced Into Pieces Sunflower Seeds Sliced Almonds FOR THE DRESSING: Dressings Of Your Choice Preparation Instructions
Lay out different greens and all the fixins in small dishes.
Have a big stainless bowl with tongs. Have everyone build their own salad by throwing what they want into the bowl. Toss with dressing, then pour tossed salad onto a cutting board.
With two knives, quickly chop the salad so that it's chopped into smaller pieces.
Transfer to a plate and sprinkle with a little salt and pepper.
Posted by Ree on March 11 2012

March 9, 2012
Perfect Sunny-Side Up Eggs
On tomorrow's Food Network show, my best friend Hyacinth's boys come over to our house for a sleepover while my girls go to Hy's house for a sleepover. Food-wise, I churn out two meals for the dudes during the time they're here: breakfast food for dinner, and dinner food for breakfast.
Boys drive a hard bargain, man. They'll eat you out of house and home.
It's actually shocking sometimes.
Girls, on the other hand, eat apple slices and carrot sticks and cubes of cheese and Triscuits and they're totally, blissfully happy.
I enjoy being a girl.
 Meat. Boys like meat. This is one of the things I make on the show.
It's one of Marlboro Man's favorite things in the entire world.
Here's the step-by-step recipe:
Yummy Steak Bites
(Printable recipe below.)
 To go with the steak, I make these "perfect" sunny-side up eggs. They're so easy to make and are almost artificial-looking once you're finished with them.
Think the display case at Denny's or IHOP.
Here's the benefit to this sunny-side-up method: With true sunny-side-up eggs, you crack an egg into a skillet and let it cook until the underside is done. However, because the top of the egg never touches the heat at all, the whites can be on the slimy side…and the yolks can be way too runny and cool. Some people like eggs like this. Rocky Balboa, for example. But I don't happen to be one of them.
One method for remedying this involves steaming the eggs by sticking the lid on the skillet while the eggs are cooking.
But I like this method better.
Probably because it involves fat.
I'm sorry. I have to be me.
 Important: You need a nonstick skillet. I've tried this method with regular skillets and it just never works for me. Add a small amount of canola oil to the skillet—not enough to have much depth to it at all. (Note: you can also use butter OR bacon grease if you're into those sorts of things. But those bring along some particles and some color, and you won't wind up with as pristine an egg. Not that that really matters in the grand scheme of human history, but I thought I'd mention it.)
Heat the canola oil over medium heat. You don't want it too, too hot, as you're going to cook the eggs pretty slowly. You don't want the oil so hot that the egg sizzles and turns white the second you crack it in! The whites should remain clear for several seconds before they start to turn white.
Sorry to be bossy. I've had lots of trial and error with this one and I want to save you the emotional pain.
Oh, and one other thing. I snapped some of these very photos as I was filming the segment for the TV show (a few of them were taken weeks earlier) so I missed photographing some steps along the way. I blame my nervousness in front of the camera, my preoccupation with my hair, and my third grade teacher.
So here's what you do:
 1. Once the oil is mildly hot, crack in an egg. (Note: three is about as many as I can tend to at a time.) The oil should not cover the whites; if anything, it should just come over the edges a tiny bit.
 2. Once the eggs begin to turn white, use a small spoon to carefully spoon the hot oil over the whites only. Go from egg to egg, spooning the oil over the whites. This will help the whites cook slowly so that they won't be slimy. *Important: Don't spoon any oil over the yolks yet!
3. After a minute or two, touch the whites of one of the eggs and make sure they're set/not jiggly and loose. At that time, you can spoon oil over the yolks to help them set on the surface.
*Note: The reason you need to wait before spooning hot oil over the yolks is that immediately after cracking the eggs into the pan, there is still egg white covering the yolk. If you were to spoon the hot oil over the yolk immediately, it would cause the white on the yolk to turn white, which will result in the yolk having a cloudy covering like the yolk in these two photos:

 And that's a tragic thing! On the other hand, if you wait, the egg will settle into the skillet and the whites will sheet over the sides of the yolk and eventually leave mostly yolk there. So a minute or two into the process, if you spoon the hot oil over the yolk, you won't get that cloudy appearance.
To repeat: the two photos above are a cautionary tale.
I'm exhausted.
 4. Continue spooning the oil over the egg until it appears to be as done as you'd like. (You can gauge it by lightly jiggling it or poking it with the spoon.)
5. Remove the eggs from the pan with a slotted spatula, then–this is important–drain them briefly on a paper towel before serving. (I fold a paper towel and hold it in my left hand, then place the egg on the towel with my right hand, then I just slide it onto the plate! You can also just keep the egg on the spatula and pat the bottom of the spatula on the paper towel to try to get most of the oil off the egg.)
And that's it! This is a neato method, guys. Once I learned it and practiced a bit, I had some fun with it. It's particularly fun if you're cooking for guests and you want your breakfast dish to look really yummy and inviting. It's also great for foodbloggers or food stylists who need picture-perfect eggs.
But it's also a lot of fun for kids because the eggs stay bright yellow and white and look like…well, like fake eggs, which kids get a kick out of. The only thing you really need to keep an eye on is the oil/fat and making sure you dab it/drain it off as much as you can.
Enjoy!
Recipe: Perfect Sunny-Side Up Eggs
Prep Time: 2 Minutes
|
Cook Time: 5 Minutes
|
Difficulty: Easy
|
Servings: 3

Print Recipe
3"x5" Cards
4"x6" Cards
Full Page
Ingredients
3 whole Eggs4 Tablespoons Canola Oil (more Or Less As Needed For Size Of Skillet) Preparation Instructions
First, heat the canola oil in a nonstick skillet over medium heat. You don't want it too, too hot, as you're going to cook the eggs pretty slowly. You don't want the oil so hot that the eggs sizzles and turns white the second you crack it in! The whites should remain clear for several seconds before they start to turn white.
1. Once the oil is mildly hot, crack in the eggs (that's about as many as I can tend to at a time.) The oil should not cover the whites; if anything, it should just come over the edges a tiny bit.
2. Once the eggs begin to turn white, use a small spoon to carefully spoon the hot oil over the whites only. Go from egg to egg, spooning the oil over the whites. This will help the whites cook slowly so that they won't be slimy. *Important: Don't spoon oil over the yolks yet.
3. After a minute or two, touch the whites of one of the eggs and make sure they're set/not jiggly and loose. At that time, you can spoon oil over the yolks to help them set on the surface.
*Note: The reason you need to wait before spooning hot oil over the yolks is that immediately after cracking the eggs into the pan, there is still egg white covering the yolk. If you were to spoon the hot oil over the yolk immediately, it would cause the white on the yolk to turn white, which will result in the yolk having a cloudy covering. And that's a tragic thing! On the other hand, if you wait, the egg will settle into the skillet and the whites will sheet over the sides of the yolk and eventually leave mostly yolk there. So a minute or two into the process, if you spoon the hot oil over the yolk, you won't get that cloudy appearance.
4. Continue spooning the oil over the egg until it appears to be as done as you'd like. (You can gauge it by lightly jiggling it or poking it with the spoon.)
5. Remove the eggs from the pan with a slotted spatula, then–this is important–drain them briefly on a paper towel before serving. (I fold a paper towel and hold it in my left hand, then place the egg on the towel with my right hand, then I just slide it onto the plate! You can also just keep the egg on the spatula and pat the bottom of the spatula on the paper towel to try to get most of the oil off the egg.)
Serve immediately!
Posted by Ree on March 9 2012
Recipe: Steak Bites
Prep Time: 5 Minutes
|
Cook Time: 10 Minutes
|
Difficulty: Easy
|
Servings: 2
Print Recipe
3"x5" Cards
4"x6" Cards
Full Page
Ingredients
1 pound Sirloin Steak (without Much Gristle) OR Pre-cut Beef Tips Kosher Salt To Taste Fresh Ground Black Pepper To Taste2 Tablespoons Butter Preparation Instructions
Trim off the large obvious piece of fat that runs along the side of the meat. Next, cut strips less than 1-inch wide. Rotate the meat and cut into small bite-sized pieces. If you see any more large chunks of fat, gristle or long silvery membrane, cut them off.
Sprinkle generously with kosher salt and freshly ground pepper. Toss the meat around a bit to thoroughly coat with the seasonings.
Next, turn on your ventilation fan overhead. Heat the skillet over medium high to high heat. As the pan heats, add about 2 tablespoons butter to the skillet. Allow the butter to melt, then brown, before you add the meat.
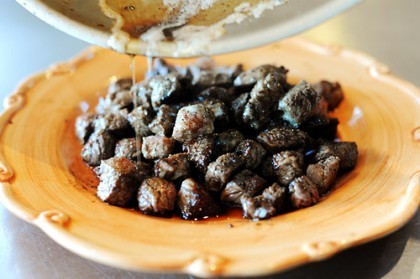
Place some of the meat in the pan in a single layer. It should sizzle loudly when it hits the pan – if it doesn't, the pan isn't hot enough. Don't stir or disrupt the meat for 30-45 seconds. You want it to sizzle and brown on one side. Scoop as many steak bites as you can with your spatula and flip them over. Repeat until all the meat is turned. Cook for an additional 30 to 45 seconds—just long enough to sear the outside of the meat but NOT cook the inside.
Remove the meat to a clean plate. Add a little more butter to the pan and repeat the cooking process with the next batch just as before. Lastly, when all the meat is nicely browned and removed to the plate, pour all that browned/blackened butter all over the meat. And enjoy!
Posted by Ree on August 3 2009

March 5, 2012
Pork Chops with Pineapple Fried Rice
 I cooked and feasted on this a few days before we left on our ski vacation, and because I've been so busy sharing all the restaurant grub I inhaled on my trip, I'm just now getting around to sharing this exceedingly delicious dish that looks way, way more complicated than it is. That was a very long sentence.
And here's a bonus: aside from the pork chops and the pineapple, everything is a pantry or freezer item…and the results are just out-of-this-world delicious.
Just note: the pork chops in this post are a meal in themselves, and you can serve them with salad, noodles, mashed potatoes…anything.
The pineapple fried rice in this post can also be a meal in itself—either a vegetarian one, or a more meaty one if you add cubed cooked chicken.
Many possibilities!
 The Cast of Characters: Pork chops, onion, soy sauce, honey, rice wine vinegar, Sriracha, pimentoes, frozen peas, and rice.
Oh. And pineapple.
 Start by cutting a fresh pineapple into spears, then skewering the spears and grilling them up on a grill pan (or grill, if you have the climate! Just be sure to soak the wooden skewers for a couple of hours first.) You can also just slice and throw the pineapple into a sizzling skillet just long enough to get a little color on the outside. Set it aside for a bit, then slice it into pieces.
Grilled pineapple makes an excellent snack, by the way!
It's also good in Barbecue Chicken Quesadillas. But you didn't hear that from me.
 Next, follow the directions on the bag of rice to make 2 cups. Set it aside, too.
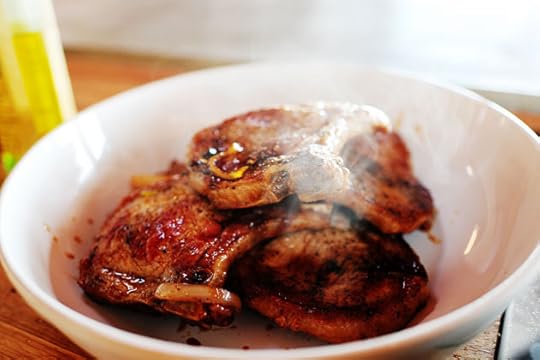
 Now make the pork chops: Heat a little butter and oil in a skillet. Throw in the pork chops…
 And cook them on both sides until they've got some nice color.
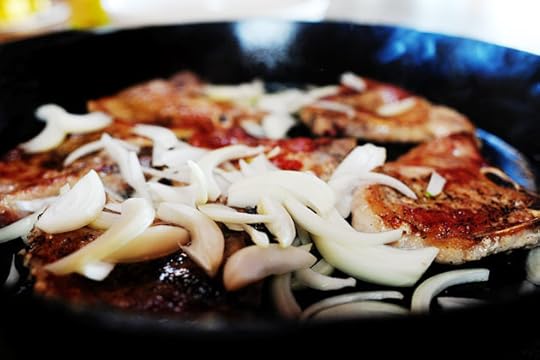 Throw in some sliced onions…
 Then shake the pan a bit and use tongs to get them into the crevices between the chops. Shake the pan and stir them around for a couple of minutes, until they start to turn golden brown and become translucent.
 Add in about 4 tablespoons of soy sauce…
 1 tablespoon of rice wine vinegar…
 A couple of tablespoons of honey…
 And a tablespoon (give or take, depending on your ability to HANDLE the heat) of Sriracha.
 Then just shake the pan around/move the chops around, and simmer the sauce on low for several minutes. The chops will finish cooking and the sauce will become fantastically flavorful.
 Take out the chops…
 And let the sauce cook another 30-45 seconds more on medium-high heat if it needs a little more thickening.
 Then just pour the whole thing over the chops!
Without cleaning the pan, add just a little bit of peanut oil and return it to medium-high heat.
 Throw in a bunch of minced garlic…
(Note: use WAY less oil than this—just a scant teaspoon or so.)
 Crack in a couple of eggs…
 And immediately stir it around with tongs to give it a rough scramble.
 Then throw in the frozen peas!
And okay. If you're organized, you can take out the peas a little in advance and thaw them.
But that's not the kind of operation I run out here.
 Throw in the drained pimentos, but forget to take a photo of this step because you're an airhead. Wait, that's me. So never mind. Then drizzle in a little bit of soy sauce…
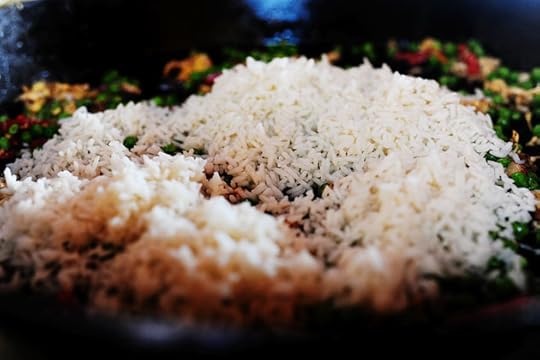 And throw in the cooked rice!
 Use a spatula to turn the rice over here and there and "fry" it with the rest of the ingredients.
I love fried rice.
I've loved it my entire life.
Except that phase when I was six when all I wanted to eat were potato chip sandwiches.
Thankfully, I moved on from there.
 Finally, throw in the slices of grilled pineapple!
 And stir it around and cook it for another minute or so.
Then give it a taste. If it needs a little more flavor add a little bit of soy sauce.
Divine, I tell you.
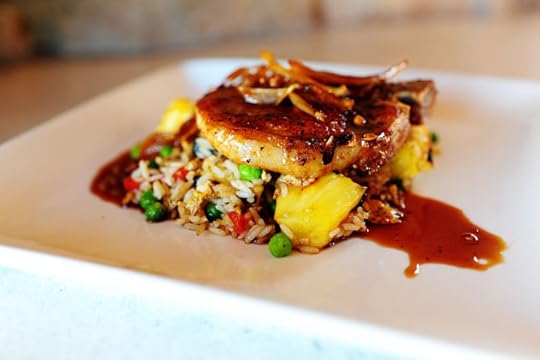
 To serve it up, spoon some fried rice onto a plate.
(Vegetarians: Dig in! This is a meal in itself.)
(Unless you don't eat eggs.)
(Never mind. I'll stop micromanaging now.)
 Then just throw a pork chop with some onions on top of the rice…
 Then tip the bowl and drizzle on some of the sauce from the chops.
 Again, take note: Except for the pork chops and the pineapple, absolutely everything in this meal came from the pantry or freezer.
Beautiful meals can be made from what you have on hand, my friends. And that is a wonderful thing.
 And remember:
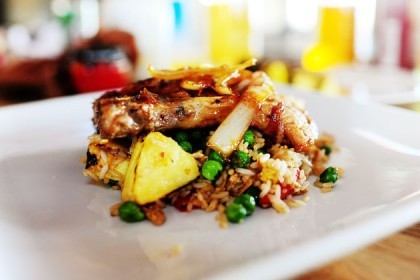
The pork chops are great with a salad or noodles.
The pineapple fried rice is awesome by itself or with chicken or fish.
Just have fun with it. Do with it what you will.
And most of all: eat it!
Here's the handy dandy printable:
Recipe: Pork Chops with Pineapple Fried Rice
Prep Time: 15 Minutes
|
Cook Time: 30 Minutes
|
Difficulty: Easy
|
Servings: 6
Print Recipe
3"x5" Cards
4"x6" Cards
Full Page
Ingredients
1/2 whole Pineapple, Cut Into Spears And Skewered2 cups White Or Brown Rice, Cooked6 whole Pork Chops1 Tablespoon Butter1 Tablespoon Peanut Oil Or Canola Oil1 whole Large Onion, Sliced4 Tablespoons Soy Sauce1 Tablespoon Rice Wine Vinegar2 Tablespoons Honey1 Tablespoon Sriracha, Or Other Hot Sauce Salt To Taste3 cloves Minced Garlic2 whole Eggs1 jar (small) Drained Pimentos1-1/2 cup Frozen Peas2 Tablespoons Soy Sauce (additional) Preparation Instructions
Cook rice according to package instructions. Set aside.
Grill or saute pineapple spears until they have good marks/color on the outside. Slice, then set aside.
(Note: soak wooden skewers in water for a few hours first.)
Heat butter and oil over medium high heat, then add the pork chops to the pan. Saute on both sides until they have nice color.
Throw in the sliced onions and work them into the crevices between the chops. Shake the pan and move the onions around and let them cook for a good couple of minutes.
When the onions are starting to soften, add soy sauce, rice wine vinegar, honey, and hot sauce. Shake the pan, stir it around, and let it cook and bubble up for a good couple of minutes until the pork chops are completely cooked and the sauce is thicker. Remove the pork chops to a bowl, then let the sauce bubble up and cook for another 30 to 45 seconds. Pour it over the pork chops. Set aside.
Add a small amount of oil to the same pan (without cleaning it) and return it to the stovetop over medium-high heat. Add garlic and stir it around, then crack in the eggs and immediately stir them to scramble them a bit. Add peas, pimentos, and a couple of tablespoons (additional) soy sauce. Add cooked rice and stir it around to cook for a couple of minutes.
To serve, pile rice on a plate, then top with a pork chops and onions from the sauce. Drizzle a little bit of sauce over the top.
Divine!
Posted by Ree on March 5 2012

March 4, 2012
My Last Breakfast in Colorado
Our family vacation has come to an end, but we built some wonderful new memories in the family togetherness, skiing…and eating realm.
Friday, Marlboro Man and I left our skis on the rack and spent the morning together.
Breakfast was at the top of the list.
 We settled on this place in Lionshead Village…and it really is a little diner!
 Here's the inside. No tables, just a three-sided eating bar wrapped around the kitchen.
I love the setup. So simple.
 Just as we arrived, this Dutch pancake was delivered to a very nice woman who did not find it strange at all that a redheaded gal with puffy eyes was politely asking her if she could snap a quick photo of its beauty.
Look at that thing! Caramelized apples in the center, crisp edges…and I'm told the bottom center is almost like a custard.
Why did I not order this?
I'm crazy, that's why.
 Everything looked so amazing, though, I didn't even care what I got. So I just asked them to pick for me!
I love doing that.
 Marlboro Man does not share my sense of restaurant ordering adventure, however, and he stuck with what he knows: Biscuits and Gravy. I took a bite, and it was so yummy. The sausage was in such fine little bits, the gravy had a really fantastic texture.
Now, would you like to see what I wound up with?
Here it is:
 It's called a Truck Driver's Special. A big pile of hash browns topped with pork green chili, a good layer of melted cheese, and two beautiful fried eggs.
Perfect!
I was able to eat about a third of it. It was utterly delicious.
There's only one problem, though.
I can't stop thinking about this pancake.
Swimming in regret,
Pioneer Woman

March 2, 2012
Green! (Winners Announced)
The winners of the green KitchenAid mixer are:
#1652 Kait: "Going home to my dog tonight, and then to a concert tomorrow. Sunday is totally open though and I couldn't be more pleased."
#8361 Carolyn: "Cleaning and laundry. How fun!"
#48726 bridget: "Relaxing after the bar exam, playing with my (neglected) cat. Already went for art and wine last night."
Congrats to the winners! Contact prizes@thepioneerwoman.com to claim your mixers.
Have a wonderful Sunday, guys.
 Today, because I love ya, I'm giving away three of these KitchenAid Artisan Stand Mixers in this pretty "Green Apple" color.
You'll love this mixer. It'll take you far in life.
 I used my KitchenAid to whip up the frosting for this birthday cake, which I demonstrate on tomorrow's Food Network show. You won't believe how simple it is!
TO ENTER
To enter the giveaway, just answer the following question in the Comments section of this post:
"What are your plans this weekend?"
Are you catching up on laundry? Starting your spring cleaning? Heading to the beach? The mountains? The prairie? Knitting? Crocheting? Cooking?
Just shout out your weekend plans and you're automatically entered to win the mixer.
THE RULES
One entry per person, pretty please.
No entries after noon Saturday.
Winners will be selected at random and announced Saturday night.
Good luck and have a wonderful weekend, guys!
Love,
P-Dub
Contest sponsored by Pioneer Woman with cooperation from CHEF'S Catalog.

Green!
Today, because I love ya, I'm giving away three of these KitchenAid Artisan Stand Mixers in this pretty "Green Apple" color.
You'll love this mixer. It'll take you far in life.
I used my KitchenAid to whip up the frosting for this birthday cake, which I demonstrate on tomorrow's Food Network show. You won't believe how simple it is!
TO ENTER
To enter the giveaway, just answer the following question in the Comments section of this post:
"What are your plans this weekend?"
Are you catching up on laundry? Starting your spring cleaning? Heading to the beach? The mountains? The prairie? Knitting? Crocheting? Cooking?
Just shout out your weekend plans and you're automatically entered to win the mixer.
THE RULES
One entry per person, pretty please.
No entries after noon Saturday.
Winners will be selected at random and announced Saturday night.
Good luck and have a wonderful weekend, guys!
Love,
P-Dub
Contest sponsored by Pioneer Woman with cooperation from CHEF'S Catalog.
March 1, 2012
My Third Meal in Colorado
 We ate here last night after went inner tubing down the mountain.
I was a little dizzy and motion sick. I'm a blast to travel with!
 Evidently, Bart and Yeti were doggies when the restaurant was opened many, many years ago. Rest their sweet furry souls.
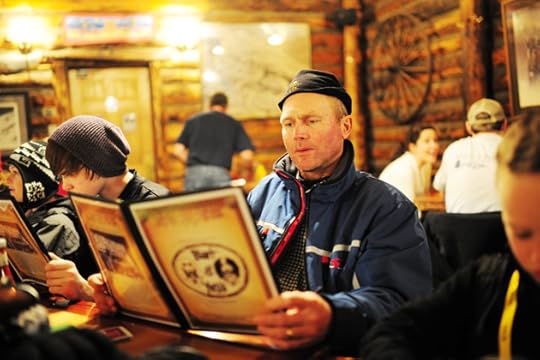 It's a great place. Cozy atmosphere. Nice and casual.
Tim had a hard time deciding what to order.
 You'll be happy to know that I actually did not order from the appetizer menu.
For once.
And you know what I got? A salad. A simple, unadorned Caesar salad. It's all my tummy could handle.
Well, that and three of Tim's batter-dipped onion rings he ordered with his burger. Best onion rings I've ever tasted. Beer was involved.
Oh, and 1/5 of Missy's nachos.
"I'll just have a salad."
Ahem.
 My baby has a scratch on his head not related to skiing, and he had a hard time deciding what to order, too.
But eventually he made up his mind.
And he said I could take a picture of it for you.
Are you ready?
Here it is.
 A peanut butter and jelly sandwich.
He ate the whole dang thing, too.
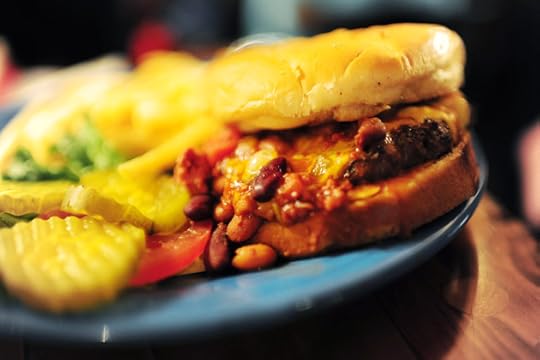 Marlboro Man said I could take a photo of his chili cheeseburger, which was the single item at the dinner table that most made me regret my salad.
Then I took a bite and confirmed every speck of my regret.

Ree Drummond's Blog

- Ree Drummond's profile
- 2032 followers

