
Ree Drummond's Blog, page 64
December 20, 2011
Duchess Potatoes
 I made these duchess potatoes for PW Cooks in early November, but decided to wait to post them at Christmastime once I decided to make them on the Christmas special instead of mashed potatoes. I decided to make duchess potatoes instead of mashed potatoes on the Christmas special because…well…I'd already taken the liberty of making my mashed potatoes on the very first episode of Season 1 (I've always been really good with patience) so I knew they were out the window. Second, Christmas dinner is the perfect time to make duchess potatoes if you're going to make duchess potatoes, because they're fancy and frilly and lovely while still having the yummy comfort-food factor of the mashed ones. Third, they go swimmingly with roast beef. And fourth, they're chock full of egg yolks, which…well, there's nothing more to say.
Egg yolks.
Egg yolks, egg yolks, egg yolks.
There is no substitute.
By the way, an annual reminder of the homeschooling slogan I made up about eight years ago that I invite all of you plaster on t-shirts as you wish:
Homeschooling. There is no substitute.
Get it?
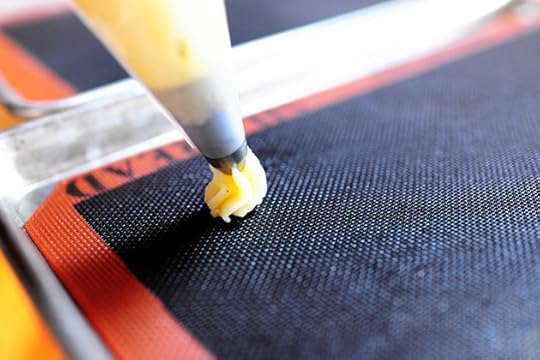
 Peel a bunch of potatoes, then boil 'em until they're fork tender. Drain 'em and give yourself a steam facial.
 Pour 'em out onto a couple of large baking sheets, then put the pans in a preheated 375 degree oven for about 10 minutes just to dry them out a bit. When I make mashed potatoes, I always mash them over low heat before adding in all the butter, cream, and good stuff. This step serves the same purpose.
 Next, process the potatoes through a food mill OR a ricer, and I realize that food mills and ricers aren't something everyone has lying around. But they're really handy in cases like this, because they ensure that the potatoes are lump-free and gives the duchess potatoes a nice, smooth texture.
If you don't have a ricer or food mill, no biggie! Just mash them, making a point to get all the lumps out.
 Stir the potatoes around for just a minute to cool 'em off a bit more…
Then close your eyes and make peace with what you're about to do.
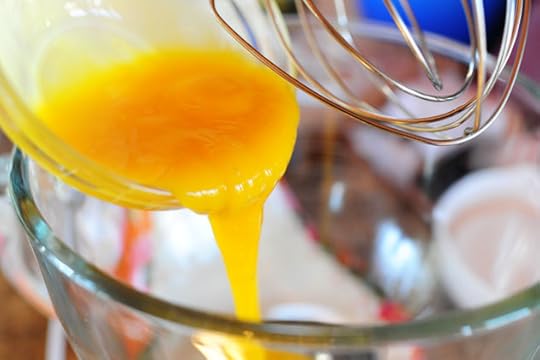
 Add softened butter, heavy cream, and whole bunch of egg yolks, which are one of the defining ingredients of duchess potatoes.
By the way, I was reviewing the pages of my new cookbook the other day and boy, oh boy does it require a lot of egg yolks.
Egg yolks, egg yolks, egg yolks.
There is no substitute.
 Stir in the yolks a bit, then add quite a bit of salt (you're seasoning a lot of taters)…
 Quite a bit of black pepper (you're seasoning a lot of taters)…
 And a little nutmeg if you have it. Yum and yum and yum yum yum.
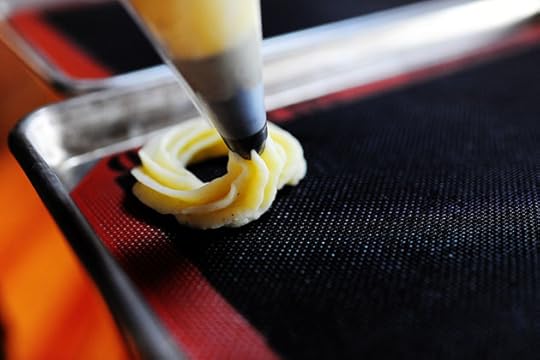
 Now just stir the mixture around, using a rubber spatula to gently fold and smear until it's all combined. Give it a taste and make sure it's decadent and adequately salted and divine, then put it into a pastry bag with a large star tip.
 Then do this.
 Basically, you just want the potato mixture to fall out onto the pan while you sort of guide it into a circle that…well, circles in on itself.
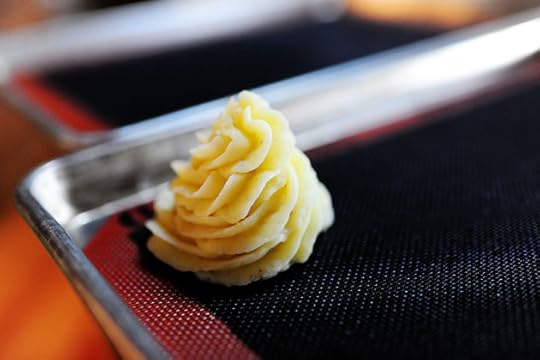 Lovely!
 Keep going till you have them all piped (you'll probably need to refill the bag halfway through; it's quite a lot of potatoes! Then just place them in the fridge, uncovered, for at least 20-30 minutes or so.
 Mix together an egg and some heavy cream.
And okay, fine. You can use milk. But only if you be skinny and unadventurous.
 Pull the potatoes from the fridge…
 Then very lightly dab on a small amount of egg wash.
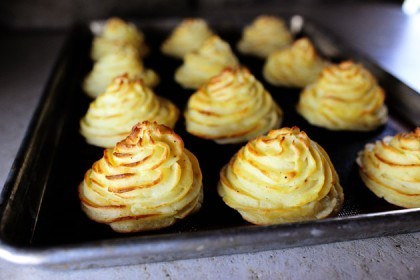
Pop 'em back into the oven and bake them for about 20 to 25 minutes, or until the potatoes are nice and warm and they have golden brown edges.
 Pull 'em out before they get too brown.
 Delightful. Just delightful. All the goodness of mashed potatoes (and with the addition of the egg yolk richness!) but with a fancy-schmancy edge.
 Impress your friends! Impress your guests! Impress your Uncle Festus!
These are ta die fer.
(Brussels Sprouts coming tomorrow.)
Here's the handy printable!
Recipe: Duchess Potatoes
Prep Time: 45 Minutes
|
Cook Time: 20 Minutes
|
Difficulty: Easy
|
Servings: 16
Print Recipe
3"x5" Cards
4"x6" Cards
Full Page
Ingredients
5 pounds Russet Potatoes, Peeled And Boiled Until Fork Tender8 whole Egg Yolks1 stick Butter, Softened2 teaspoons Salt, More Or Less To Taste Plenty Of Black Pepper 1/4 Teaspoon Nutmeg (more To Taste)1-1/4 cup Heavy Cream1 whole Egg Preparation Instructions
Preheat oven to 375 degrees. Lay boiled potatoes on a baking sheet and place into the oven for 10-15 minutes, or until slightly dried on the surface.
Remove the potatoes from the oven and process potatoes through a ricer or food mill. Allow to cool in a bowl for about 5 minutes. Add egg yolks, butter, a couple of generous pinches of salt, a generous pinch of pepper, a pinch of nutmeg and 3/4 cup cream. Stir with a rubber spatula to combine. Taste and make sure the potatoes have been adequately salted.
Transfer to a large pastry bag and pipe through a large star tip in a circular/upward spiral motion.
Make an egg wash by mixing 1 egg with 1/2 cup heavy cream. Lightly brush the piped potatoes with egg wash. (This is a little easier if you chill the piped potatoes for half an hour or so.)
Bake at 375 until golden brown around the edges. Serve on a pretty platter!
Make the potatoes ahead of time and store in the fridge, then bake them at the last minute!
Posted by Ree on December 20 2011


December 19, 2011
Prime Rib
 I'm not sure there's anything more special and delicious at Christmastime than a beautiful, perfectly cooked piece of roast beef. This is my version of prime rib, which is as good the next day, sliced cold right out of the fridge, as it is served warm on a plate with potatoes, mushrooms, and brussels sprouts. That was the menu I fixed for the Christmas special on Food Network (it'll be on again today at 6:00 eastern time if you'd like to see the grub in living color) and it's the menu I'll be fixing again toward the end of this week.
It's also the menu I want to eat in Heaven.
Prime rib sounds impressive, and it is. But in this case, impressive doesn't need to mean complicated or difficult. The best friend you can have when roasting a nice cut of beef is a reliable meat thermometer: it's the best insurance against overcooking it…which is a tragedy of epic proportions.
Here's how I make mine.
(Note: photos below are from a couple of different prime ribs I've made over the past couple of months. Don't be confused if you see different pans/different pieces of meat!)
 I start with a whole (I use boneless) ribeye, sometimes called a rib loin, about 13-14 pounds. If you were to cut this into slices, you'd have a bunch of boneless ribeye steaks. (And the price reflects this. Wow.)
Note that I am going to cut this piece of meat in half and roast it in two pieces. If you don't have a large crowd to feed, you could easily buy half this amount!
Either way, though, prime rib is pricey…which is why it's usually reserved for holidays or other special occasions.
 I don't have many step-by-step photos for this, so here's the final photo of my salt "crust." I just combined kosher salt, crushed tri-color peppercorns (I put them in a Ziploc bag and whacked them with a rolling pin), plenty of minced garlic, and a bunch of rosemary leaves and thyme leaves. This isn't a hard, crack-it-open salt crust; it's a light coating of flavor that's both pretty and scrumptious. I absolutely love it.
 I made prime rib again for a dinner party a couple of weeks ago, and I chopped the rosemary and thyme rather than leaving the leaves whole. I didn't like it as much; it was missing that "evergreen in the snow" look of the original.
Live and learn.
 Begin by heating a heavy iron skillet over very high heat. Also known as high heat. Ha. Drizzle in plenty of olive oil…
 And brown each piece of meat on both sides, about 3 minutes per side.
 After the meat is browned, transfer it to a roasting pan with the fat side up. Pour half the salt mixture all over the top, letting it cascade over the sides a bit. Repeat with the other half of the meat.
Throw the meat into a preheated 500 degree oven and roast it for 20 to 25 minutes. This will start the cooking process and ensure that the prime rib will have beautiful, sizzly color.
 After that time, reduce the heat to 300 degrees and insert the meat thermometer so that the probe goes right into the middle of the meat. Continue roasting the meat for an additional 25 to 30 minutes for rare…longer for medium rare. Just watch the thermometer and remove it when it's 5 to 10 degrees before the temperature you want, because it will continue cooking after you remove it from the oven.
 Remove the meat from the pan and let it rest, covered in foil, on the cutting board for at least 20 minutes. (Never cut into roast beef immediately after removing it from the oven! It's against the law.)
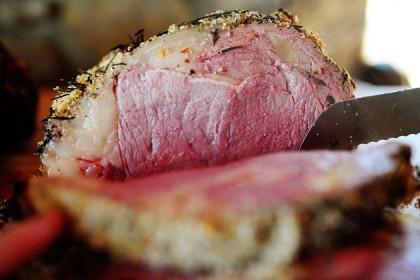
 This is a really nice medium-rare and is on the verge of being too cooked for me. But it's perfect for a crowd!
 Mmmmm. Beaut-ee-ful. And again, if I were serving just my family (as you'll notice if you watched the Christmas special) I would have gone much more rare than this.
 Now this? This is too done. Still yummy, of course, but there's just not enough red going on. I'd consider this medium. There's a little bit of pink, but not enough to count. (Note that this does make yummy thin-sliced roast beef for sandwiches later.)
(Though again…my beef doneness tolerance is a little skewed considering I live among ranchers.)
Just remember to watch the meat thermometer! Again, it's your best friend.
Tomorrow: Potatoes!
Here's the printable:
Recipe: Prime Rib
Prep Time: 15 Minutes
|
Cook Time: 1 Hour
|
Difficulty: Easy
|
Servings: 12
Print Recipe
3"x5" Cards
4"x6" Cards
Full Page
Ingredients
4 Tablespoons Olive Oil1/2 cup Kosher Salt4 Tablespoons Tri-color Peppercorns (or Any Peppercorns)3 sprigs Rosemary3 sprigs Thyme1/2 cup Minced Garlic Preparation Instructions
Preheat oven to 500°F
Cut rib loin in half (roast halves separately for more controlled/even cooking.)
Sear both halves in olive oil over very high heat until nice dark golden color. Place tricolor peppercorns into a bag, crush pepper corns with a rolling pin. Strip the leaves from the rosemary and thyme springs. Mix salt, crushed peppercorns, rosemary leaves, thyme leaves and garlic.
Pour olive oil over the rib loin and pour on the rub mix. Pat slightly to get it to stick to the meat. Roast for 20 minutes at 500 degrees, then reduce heat to 300°F and roast for another 20 to 25 minutes or until a meat thermometer registers 125 for rare/medium rare (roast will continue to cook slightly after removing from the oven.)
NOTE: If you'd like the meat more cooked, leave it in the oven longer. Just keep an eye on the meat thermometer and don't let it cook past medium rare!
Remove from oven and let rest for 15-20 minutes before slicing.
NOTE: You can buy half this quantity of meat and just proceed with the preparation instructions. You'll wind up with one prime rib instead of two!
Posted by Ree on December 19 2011

December 17, 2011
Decorating Cinnamon Rolls as Gifts
 My Christmas special is on Food Network this morning (here's a list of the dates & times it will be on!) and over the next week, I'll be posting some of the recipes from the show. I cooked, photographed, and snarfed down some of them as early as October, and it's been hard for me to wait this long to post them. I don't do very well with stored up posts. I get impatient and want to post them all on the same day. But I'm working through that in therapy.
Among the offerings on the Christmas show:
Prime rib. Rosemary garlic salt crust. Medium rare. Juicy. Ridiculously good.
That's the way to a man's heart right there, baby.
 Duchess potatoes. Fancy mashed potatoes, basically, but with egg yolks to make them extra rich and to make them hold together when they bake. And riced instead of mashed. Oh, and piped instead of plopped.
But other than that, exactly like mashed potatoes!
Yum times infinity.
 Brussels sprouts with cranberries. My kids' absolute favorite!
Not really.
But the Christmas show begins with the best part.
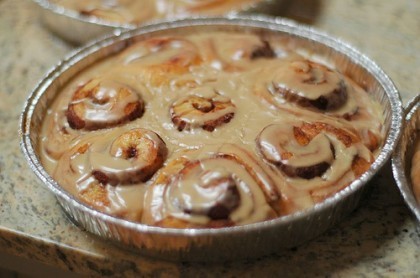
 The Christmas show begins…with cinnamon rolls! Since baking and delivering cinnamon rolls to your friends and neighbors is such a fun and personal Christmas gift, I wanted to show you how my best friend Hyacinth (above, with King Charles) wrapped our rolls on the show. They turned out so sweet.
For years, Hyacinth and I have gotten together at Christmastime to make cinnamon rolls for our friends. She takes some, I take some, and we try not to overlap and deliver them to the same people since we share the same friendsWe started the tradition when our (eight) children were little; they'd all come over and Hy and I would make a triple (sometimes quadruple) batch of rolls while the kids either ran circles around the kitchen or went outside and played with cow patties. And Hy and I would keep our cinnamon roll factory moving forward: I spearheaded the dough and the filling and the baking; she'd take care of making the icing and wrapping the pans for delivery.
Our style of wrap has evolved through the years, beginning with plastic wrap and curling ribbon (sometimes we'd take a walk on the wild side and use red AND green) and taking tours through foil and tinsel…cellophane and satin ribbon…burlap and twine.
 This year Hyacinth came up with this lovely idea, and it turned out to be my favorite yet considering my own decorating creativity still hasn't progressed beyond curling ribbon.
Here's how Hyacinth did it:
1. You'll need a square of bandana fabric (or you can use any fabric) approximately 24″ x 24″ square. Before cutting the fabric, though, sweep the fabric up and around the foil pans you're going to use for the cinnamon rolls to make sure it's large enough to make a plume.
2. You'll also need liquid fabric starch (not spray starch). After cutting the fabric squares, follow the instructions on the bottle to wash them in heavy starch.
3. After the fabric squares are dry, use a spray bottle of water to moisten them just before ironing. Iron them so that they're crisp and somewhat stiff.
4. Let the pans of cinnamon rolls cool, then cover the individual pans with a couple of layers of plastic wrap.
5. Lay a fabric square upside down and set a pan of rolls in the middle. Gather the fabric up around the pan, securing it with a piece of twine tied in a bow. Then just tie on some raffia ribbon, some decorative ribbon, and attach some berries or other fun things.
 Without the liquid starch step, the fabric would be floppy and sad. Look how proud and lovely it looks!
 At the end, tie on little gift tags with the raffia ribbon.
You can print these out right here. They're very cute!
 Printable Holiday Gift Tags for Cinnamon Rolls.
(Thank you to my friend Amy for creating these!)
 Then take a photo! And give thanks for creative friends like Hyacinth and Amy.
Here's the post with the step-by-step instructions for the cinnamon rolls my mom made my whole life and the cinnamon rolls I make now, aka The Best Cinnamon Rolls in All Creation.
Cinnamon Rolls
And here's a post with miscellaneous notes on the dough, and making cinnamon rolls ahead of time:
Notes on Cinnamon Rolls
No go forth and conquer! If you've made the rolls before, give this method of decoration a try. You can use whatever fabric you'd like (an assortment of scraps would be fun) and you can decorate the ribbons with all sorts of fun little adornments.
If you haven't made cinnamon rolls before…give it a try this year! Do not be afraid of the yeast. You don't have to knead this dough, and you absolutely can not mess it up.
And the rolls are the perfect way to say Merry Christmas.
Love,
Pioneer Woman
Recipe: Cinnamon Rolls
Prep Time: 2 Hours
|
Cook Time: 30 Minutes
|
Difficulty: Easy
|
Servings: 8
Print Recipe
3"x5" Cards
4"x6" Cards
Full Page
Ingredients
1 quart Whole Milk1 cup Vegetable Oil1 cup Sugar2 packages Active Dry Yeast, 0.25 Ounce Packets8 cups (Plus 1 Cup Extra, Separated) All-purpose Flour1 teaspoon (heaping) Baking Powder1 teaspoon (scant) Baking Soda1 Tablespoon (heaping) Salt Plenty Of Melted Butter2 cups Sugar Generous Sprinkling Of Cinnamon _____ MAPLE FROSTING:1 bag Powdered Sugar2 teaspoons Maple Flavoring1/2 cup Milk1/4 cup Melted Butter1/4 cup Brewed Coffee1/8 teaspoon Salt Preparation Instructions
For the dough, heat the milk, vegetable oil, and sugar in a medium saucepan over medium heat to just below a boil. Set aside and cool to warm. Sprinkle the yeast on top and let it sit on the milk for 1 minute.
Add 8 cups of the flour. Stir until just combined, then cover with a clean kitchen towel, and set aside in a relatively warm place for 1 hour. After 1 hour, remove the towel and add the baking powder, baking soda, salt, and the remaining 1 cup flour. Stir thoroughly to combine. Use the dough right away, or place in a mixing bowl and refrigerate for up to 3 days, punching down the dough if it rises to the top of the bowl. (Note: dough is easier to work with if it's been chilled for at least an hour or so beforehand.)
Preheat the oven to 375°F.
To assemble the rolls, remove half the dough from the pan/bowl. On a floured baking surface, roll the dough into a large rectangle, about 30 x 10 inches. The dough should be rolled very thin.
To make the filling, pour 3/4 cup to 1 cup of the melted butter over the surface of the dough. Use your fingers to spread the butter evenly. Generously sprinkle half of the ground cinnamon and 1 cup of the sugar over the butter. Don't be afraid to drizzle on more butter or more sugar! Gooey is the goal.
Now, beginning at the end farthest from you, roll the rectangle tightly towards you. Use both hands and work slowly, being careful to keep the roll tight. Don't worry if the filling oozes as you work; that just means the rolls are going to be divine. When you reach the end, pinch the seam together and flip the roll so that the seam is face down. When you're finished, you'll wind up with one long buttery, cinnamony, sugary, gooey log.
Slip a cutting board underneath the roll and with a sharp knife, make 1/2-inch slices. One "log "will produce 20 to 25 rolls. Pour a couple of teaspoons of melted butter into disposable foil cake pans and swirl to coat. Place the sliced rolls in the pans, being careful not to overcrowd. (Each pan will hold 7 to 9 rolls.)
Repeat the rolling/sugar/butter process with the other half of the dough and more pans. Preheat the oven to 375°F. Cover all the pans with a kitchen towel and set aside to rise on the countertop for at least 20 minutes before baking. Remove the towel and bake for 15 to 18 minutes, until golden brown. Don't allow the rolls to become overly brown.
While the rolls are baking, make the maple icing: In a large bowl, whisk together the powdered sugar, milk, butter, coffee, and salt. Splash in the maple flavoring. Whisk until very smooth. Taste and add in more maple, sugar, butter, or other ingredients as needed until the icing reaches the desired consistency. The icing should be somewhat thick but still very pourable.
Remove pans from the oven. Immediately drizzle icing over the top. Be sure to get it all around the edges and over the top. As they sit, the rolls will absorb some of the icing's moisture and flavor. They only get better with time… not that they last for more than a few seconds. Make them for a friend today! It'll seal the relationship for life. I promise.
Posted by Ree on September 3 2009

December 14, 2011
Chicken Soup
 If you need a break from the heavy food and treats of the holiday season, put a pot of chicken soup on your stove. Serve it with toast or warm dinner rolls, and your family will think they've died and gone to Heaven.
It's so, so good for your heart and soul and mind.
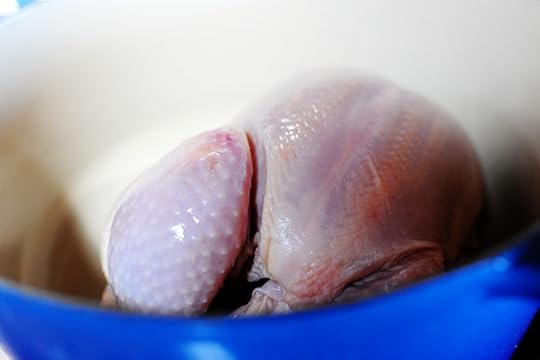 Throw a chicken in a pot.
 Place a bayleaf right in the middle of the chicken, because it looks nifty.
 Peel several carrots and several parsnips.
I want to marry parsnips. I want them in my life forever. I want to lock them in. I need a firm commitment.
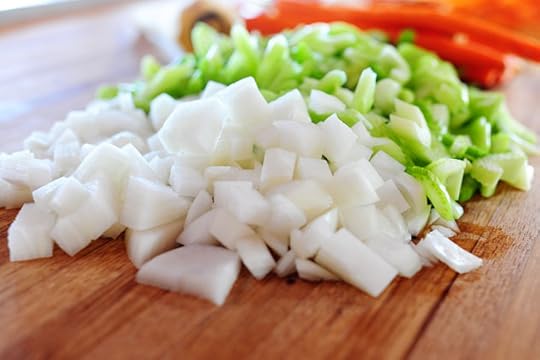 Chop up some onion…
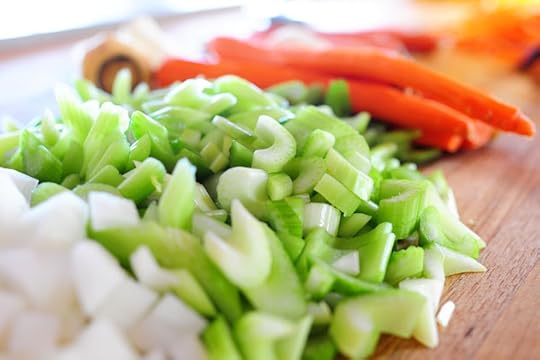 Slice up some celery…
 Then chop up the carrots and parsnips in chunks.
 Shortcut alert! Unsalted chicken broth, baby. Why? Because of the flavor and the color. Just use enough to cover the chicken about 3/4 of the way up. OR you can use half broth and half water. OR you can use 2/3 broth and 1/3 water. OR you can use 2/3 water and 1/3 broth. Whatever floats your boat!
 Then throw in the carrots and parsnips…
 And the onions and the celery and a teaspoon or so of salt. (You can add more later if you need to.)
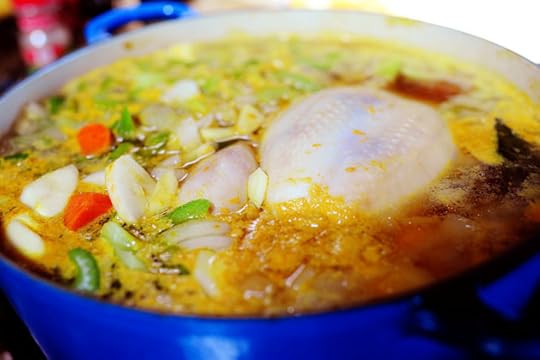 Bring the contents of the pot to a boil, then reduce the heat to low and cover. Simmer it for a good hour-and-a-half or two hours so that the flavors will meld and become beautiful and deep and magical.
 At the end of the cooking time, carefully remove the chicken from the pot and place it on a plate or cutting board.
 Remove as much of the meat as you can, then shred it or chop it into pieces.
 Return the chicken to the pot and keep it on a simmer until you're ready to serve the soup. Give it a taste and add a little more salt if it needs it.
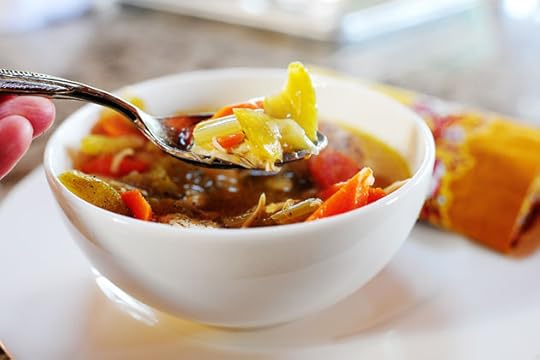
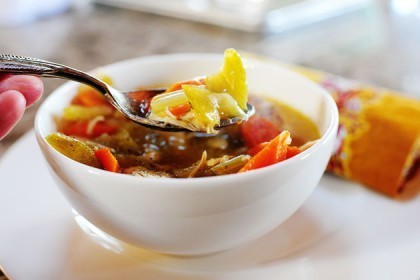
 After you dish it up, sprinkle on a little black pepper. Yum!
 This soup is very, very chunky. I should have called it Chunky Chicken Soup. Live and learn.
You can alter this as much as you'd like by adding fewer vegetables or more liquid. But I love it chunky. The carrots are dreamy, the celery tender and divine, and the parsnips…my goodness. They're so absolutely delicious.
Here's the printable!
Recipe: Chicken Soup
Prep Time: 20 Minutes
|
Cook Time: 2 Hours
|
Difficulty: Easy
|
Servings: 12
Print Recipe
3"x5" Cards
4"x6" Cards
Full Page
Ingredients
1 whole Chicken1 whole Bay Leaf64 ounces, fluid Unsalted (or Low Sodium) Chicken Broth (you May Use Half Broth And Half Water If Desired.)1 whole Large Onion, Chopped3 whole Ribs Of Celery, Sliced3 whole Carrots, Peeled And Chopped3 whole Parsnips, Peeled And Chopped1/2 teaspoon Salt Ground Black Pepper Preparation Instructions
Place all ingredients but the pepper into a pot. Bring to a boil, then reduce to a simmer. Cover and simmer for 1 1/2 to 2 hours, or until chicken is done, vegetables are tender, and soup flavor is divine. Taste and adjust seasonings as needed.
Serve in a bowl, then sprinkle black pepper over the top.
*Note: Adjust broth levels and/or vegetable amounts as needed.
Posted by Ree on December 14 2011

December 12, 2011
Baklava
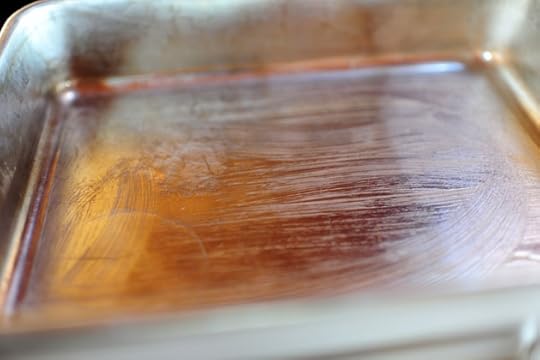
 Baklava is yummy…but it's yummiest when it's homemade. And it doesn't have to be my home that makes it. It can be anyone's home. I just think homemade baklava tends to have a little more flavor…a little more freshness…a little more somethin' somethin' than a lot of the baklava you buy.
Not that I buy a lot of baklava in Pawhuska, Oklahoma. But still.
Baklava makes a great Christmas treat: give a whole pan to someone you love or split it up into portions and gift them in little boxes or bags. Your recipients will love you even more than they already do. Whether or not this is a desired outcome is something only you can decide. Just know it will happen.
Here's how you make it:
First: Imagine a photo of a package of phyllo dough. Thank you for your cooperation.
Now, about the phyllo dough: It's sold in frozen packages, so you need to remove the package from the freezer and let it thaw in the fridge 24 hours before you want to make the baklava. Then, about an hour beforehand, remove the package from the fridge and let it sit on the counter.
 When you're ready to make the baklava, throw chopped pecans or walnuts into a bowl or onto a baking sheet. Sprinkle on a teaspoon of cinnamon and toss them around to combine. Set these aside.
 Preheat the oven to 350 degrees, then butter a rectangular baking pan.
Then melt plenty of butter 'cause you're gonna need it.
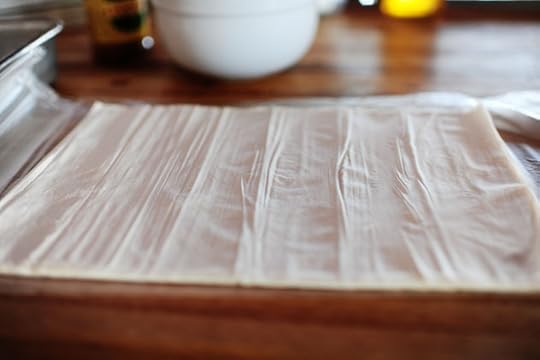 Unwrap the phyllo and lay the sheets flat. Size up how they compare to the size of the baking pan, and use a sharp knife to trim them if necessary in order for them to fit. Then set 2/3 of the package over to the side and cover it with a piece of plastic wrap, then a slightly damp towel on top of the plastic wrap. (The phyllo dries out very, very quickly, so work fast! Only retrieve a few sheets at a time as you need them.)
 Brush the entire surface of the top sheet of phyllo with melted butter.
 Then grab that sheet and the sheet underneath it (total: 2 sheets!) and place them in the bottom of the baking pan, butter side down, pressing lightly to fit into the pan.
 Repeat this with two more sheets…then two MORE sheets. So now, you now six sheets of phyllo dough, three of them buttered, in the bottom of the pan.
 Brush the top sheet with butter, then arrange the nuts in a single layer.
 Next, repeat the butter-then-lay-on-two-sheets-of-phyllo step, butter side face down.
So the layers so far, starting at the bottom:
Buttered sheet of phyllo face down
Another sheet on top of that
Buttered sheet of phyllo face down
Another sheet on top of that
Butter the top
Layer of nuts
Buttered sheet of phyllo face down
Another sheet on top of that
Geez. And here's a note: if it's easier to remember, you can just butter every single layer of phyllo before laying it on the next piece. I do every other sheet like this because I'm not sure buttering every sheet is absolutely necessary, and the syrup at the end makes everything nice and moist.
After that, repeat with another two or three layers of nuts, topping each layer of nuts with two sheets of phyllo.
 End with a total of four to six sheets of phyllo, buttering the top layer (which I forgot to do before cutting, so I had to do it after.) Then, with a very sharp knife, make a cut from one corner to the next.
 Then continue making a diagonal criss-cross pattern with the knife until you have a bunch of diamond-shaped pieces. (This is much easier if you butter the top sheet first! Don't be like me.)
Place the pan in the oven for 45 minutes or so, until it's nice and golden brown and crisp and beautiful.
 While the baklava is baking, add some butter to a saucepan with plenty of honey.
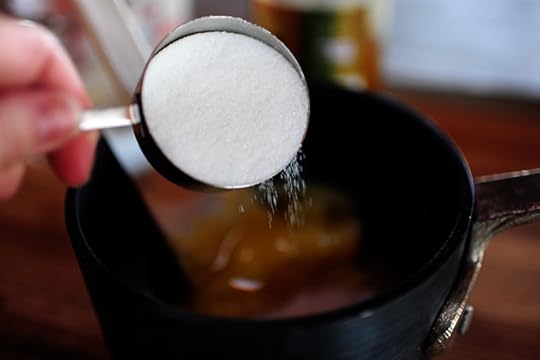 Add some sugar…
 A good amount of vanilla…and a little water. Bring this to boil, then reduce the heat to low and let it simmer and thicken while the baklava continues to bake. Remove it from the heat and let it sit for 10 to 15 minutes.
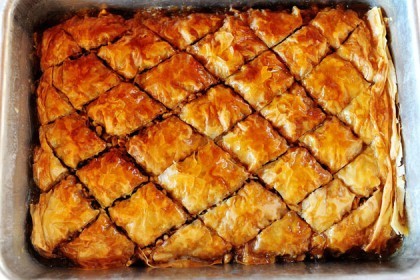
Then, this is important: Please be like me and remove the baklava from the oven and immediately drizzle the honey mixture over the top, starting with about half the mixture and working your way up until you think the baklava has enough stickiness and moisture. But by all means, completely forget to photograph this process! But only if you want to be like me.
(Sorry.)
 The most important thing, though, is to let the baklava sit, uncovered, on the counter for several hours before you dig in.
 It needs to do that for the stickiness to really set in and for the flavors to meld and merge and for the whole thing to hold together.
 Baklava
You'll love it with your coffee.
You'll love it with your Sprite.
You'll love it in the morning.
You'll love it in the night.
Try baklava soon! It's fun to make, and you can alter the filling ingredients in so many interesting (if unconventional) ways: mini chocolate chips, raisins, different nuts…you can even add flavored syrups to the honey mixture. Such a treat!
Here's the handy printable:
Recipe: Baklava
Prep Time: 20 Minutes
|
Cook Time: 45 Minutes
|
Difficulty: Intermediate
|
Servings: 16
Print Recipe
3"x5" Cards
4"x6" Cards
Full Page
Ingredients
1 package Phyllo Dough4 cups Chopped Walnuts Or Pecans1 teaspoon Cinnamon1-1/2 stick Butter, Melted2 cups Honey1/2 cup Water1/2 cup Sugar3 teaspoons Vanilla Extract Preparation Instructions
Remove phyllo dough package from freezer and place in the fridge for 24 hours to thaw. Remove from fridge 1 hour before using.
When working with the phyllo dough, only remove the sheets you immediately need, keeping the other sheets covered in plastic wrap, then a damp cloth.
Toss together the chopped walnuts and cinnamon. Set aside.
Preheat oven to 350 degrees. Thoroughly butter a rectangular baking pan. Make sure the sheets of phyllo will generally fit the pan (if they're a little bigger, that's okay.) If they're much bigger, just trim them with a sharp knife.
Butter the top sheet of phyllo with melted butter, then grab it and the unbuttered sheet below it. Set the two sheets in the pan, buttered sheet face down. Press lightly into the pan. Repeat this twice more, so that you have six sheets of phyllo in the pan, three of the sheets buttered.
Sprinkle on enough walnuts to make a single layer. Butter two sheets of phyllo and place them on top of the walnuts. Add more walnuts, then two more buttered phyllo sheets. Repeat this a couple more times, or until you're out of walnuts. Top with 4 more buttered phyllo sheets, ending with a buttered top. Cut a diagonal diamond pattern in the baklava using a very sharp knife.
Bake for 45 minutes, or until the baklava is very golden brown.
While the baklava is baking, combine 1 stick of the butter, honey, water, sugar, and vanilla in a saucepan. Bring to a boil, then reduce the heat to low.
When you remove the baklava from the oven, drizzle half the saucepan evenly all over the top. Allow it to sit and absorb for a minute, then drizzle on a little more until you think it's thoroughly moistened. You'll likely have some of the honey mixture leftover, which you can drink with a straw. Just kidding.
Allow the baklava to cool, uncovered, for several hours. Once cool and sticky and divine, carefully remove them from the pan and serve with coffee (or give as gifts!)
Posted by Ree on December 11 2011

December 9, 2011
Peppermint Ice Cream
 I love making homemade ice cream. It's one of my callings in life. For years and years, though, I used an old wooden ice cream maker that required ice and rock salt to be packed around the edges. It worked fine for me and brought many calories and fat grams into my life. It was my friend and companion.
It was loud, though. So, so loud. It made me nervous and jittery. And it required lots of babysitting—filling in more ice, sprinkling on more salt, unjamming it when it jammed. So when my trusty old machine gave out on me a few months ago, I decided to spring for one of those fancy-schmancy ice cream makers—the kind that require no ice. The kind that require only the turn of a knob.
It has completely altered the course of my life. I am an ice cream-makin' fool.
Later this morning I'll be featuring and giving away the ice cream maker on PW Home and Garden. For now, though, here are two holiday-friendly ice creams, both of which begin with the same basic ice cream recipe. They're divine!
 The Cast of Characters: Heavy cream, half-and-half, sugar, egg yolks, and mint candy of your choice: peppermint OR Andes mints.
 Add the half-and-half to a saucepan…
 And add in a cup of sugar. Stir it together and heat it up over medium heat. Set this aside.
 Add the egg yolks to a mixer (or you can just whisk it in a bowl.)
 And add a cup of sugar here, too.
 Whip it until the yolks are light yellow in color.
 Retrieve a small amount of the warm half-and-half/sugar mixture…
 And very slowly drizzle the hot mixture into the egg yolk mixture while the mixer is on medium-low speed. Then repeat this a couple more times. This tempers the egg yolk mixture so that when you add it to the saucepan in a minute, it won't scramble.
 After you temper the egg mixture, pour it into the saucepan with the half-and-half mixture. Stir in the vanilla.
 Simmer this mixture over low heat for 5 to 7 minutes, or until it gets nice and thick.
 After it's thick, pour the mixture through a fine mesh strainer into a bowl…
 Then, to add insult to injury, add some heavy cream to the bowl. My goodness, do I love homemade ice cream.
 Now cover this delectable concoction with plastic wrap and refrigerate it until it's cold, a couple of hours or so.
 When it's thoroughly chilled, pour it into your ice cream maker and freeze it according to its directions.
(Alert: I'm giving away three of these lovelies over on PW Home and Garden. Drop in and enter if you'd like one!)
 While the ice cream is freezing, throw some peppermint candies into a ziploc back and whack 'em like crazy.
 I took out the larger chunks here out of respect for the dental work of those who might eat this.
It's the kinda gal I am.
 I can tell when the ice cream maker nearing the end of its cycle because it starts working harder to churn the now-thick mixture. That's when I dump in the candy so I can let the machine do the stirring!
I'm lazy.
 Or, you can dump the newly frozen ice cream into a bowl and stir in the candies. Whichever works!
 After you've stirred in the candy, transfer the ice cream to a freezer container and stick it in the freezer for at least 24 hours. But about 2 hours after you stick it in the fridge, open the container and give it another stir to make sure the candies aren't settling to the bottom of the container. Return it to the freezer and continue freezing it until it's hard.
 You can make another batch with Andes mints!
 Just chop 'em up…
 And add them to the ice cream at the end of the ice cream maker stage.
 Goodness gracious. YUM.
 Then just transfer it to a freezer container…
 Then stick on the lid and allow it to freeze until hard.
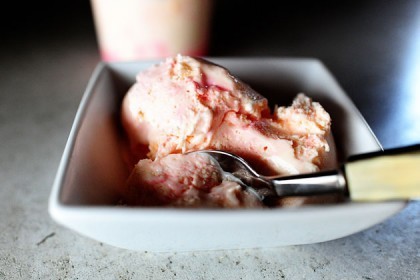
 Here's the peppermint. So delish. But notice—this hadn't been in the freezer long enough for it to become frozen solid.
I couldn't wait, man.
 The Andes mint version, on the other hand, had frozen for a couple of days.
 Poifect!
These are fun Christmas ice creams, guys, and you can eat them plain OR sandwich them between chocolate cookies. Have fun with them!
Here's the handy printable:
Recipe: Peppermint Ice Cream
Prep Time: 24 Hours
|
Cook Time:
|
Difficulty: Easy
|
Servings: 8
Print Recipe
3"x5" Cards
4"x6" Cards
Full Page
Ingredients
3 cups Half-and-half2 cups Sugar1 teaspoon Vanilla8 whole Large Egg Yolks3 cups Heavy Cream1/2 cup Crushed Peppermint Candies OR Chopped Andes Mints Preparation Instructions
Pour the half-and-half into a heavy saucepan. Add the sugar and stir to combine. Bring the mixture to a simmer over low heat, stirring occasionally.
In a separate bowl, beat the egg yolks until they're light yellow in color. Temper the egg yolks by slowly drizzling in about 2 cups of the hot half-and-half mixture while whisking quickly. Pour the tempered egg yolk mixture into the saucepan, whisking gently as you add it. Simmer over low heat until it gets very thick, 5 to 7 more minutes.
Pour the mixture through a fine mesh strainer into a medium bowl, pressing with a spoon or spatula to gently force it through. Pour in the heavy cream, then stir to combine. Stir in vanilla. Cover and refrigerate this mixture until it's totally cool.
Freeze the mixture in an ice cream maker according to its directions. After the cycle is completed, stir in the chopped peppermints or Andes mints and immediately transfer to a freezer container and place in the freezer. A couple of hours later, open the container and stir again to make sure the candies are distributed.
Freeze for another 24 hours or until frozen hard and solid.
Posted by Ree on December 9 2011

December 7, 2011
Mulled Apple Cider
 Mmmm. Hot apple cider. 'Tis so, so, so, so good. I always love it when I'm Christmas shopping somewhere and one of the stores has heated carafes of cider available. The smell is almost better than the taste.
Raise your hand if you still haven't bought one Christmas gift. *Raising hand*
I've made this apple cider recipe for years, and I've always loved the addition of maple syrup. But rather than use storebought juice, I like juicing the apples myself; it gives the cider a nice pulpy quality. (You can also use half storebought, then fill in the rest with fresh-squeezed apple juice. Or you can use storebought apple cider. Anything works fine.)
Yum.
(Adapted from this recipe on Allrecipes.)
 The Cast of Characters: apples (or unfiltered apple juice), orange, lemon, cinnamon sticks, ground or whole cloves, allspice berries, and maple syrup.
 Slice the peel off the orange and lemon, avoiding as much of the white junk as possible. Throw the peel into a medium saucepan.
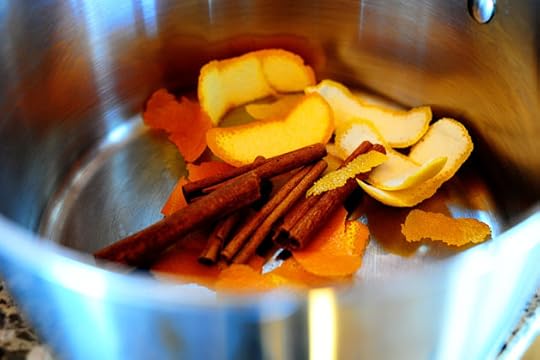 Throw in the cinnamon sticks…
 The allspice berries and the cloves (I was out of whole cloves so I had to use ground; either one is fine)…
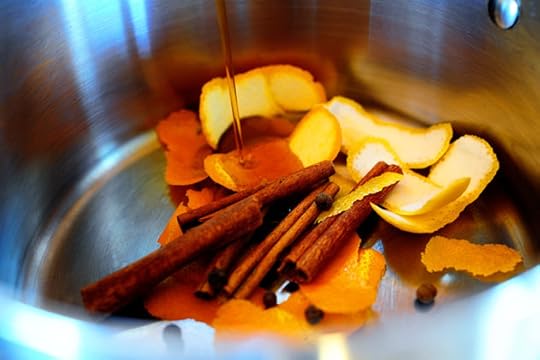 Then add the maple syrup.
 Next, either grab a jug of storebought apple cider OR your Jack LaLanne juicer.
I cherish mine. My mother-in-law got it for me.
Long live Jack.
 Juice those apples, then pour the juice into the saucepan!
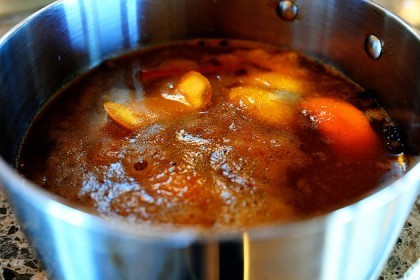
Bring it to a gentle boil, then reduce the heat to low and simmer the cider for a good 20-30 minutes. Then turn off the heat and, if you're feeling particularly festive, stir in the rum!
But only if you want to.
 I ladled mine into a teapot…but you can just serve it straight out of the saucepan. And you can strain out the spices and peel if you want…but I kind of like the rustic nature of just leaving it all in there.
 Serve in a teacup or mug with a cinnamon stick.
 Mmmmmm. This'll keep you warm, baby.
Especially if you add the rum.
But you didn't hear that from me.
Recipe: Hot Apple Cider
Prep Time: 10 Minutes
|
Cook Time: 30 Minutes
|
Difficulty: Easy
|
Servings: 12
Print Recipe
3"x5" Cards
4"x6" Cards
Full Page
Ingredients
4 whole Cinnamon Sticks1/8 teaspoon Ground Cloves8 whole Allspice Berries Orange Peel From 1 Orange Lemon Peel From 1 Lemon1/2 cup Maple Syrup6 cups Unfiltered (fresh Squeezed Is Great) Apple Juice1/2 cup Dark Rum (optional) Preparation Instructions
(Adapted from AllRecipes.com.)
Place cinnamon sticks, ground cloves, allspice berries, orange peel, and lemon peel in a medium saucepan. Pour in maple syrup and apple juice, then bring to almost a boil. Reduce the heat to its lowest setting and simmer for 30 minutes. Remove from heat and serve in mugs.
(Add a splash of rum for an adults-only version! Yum, yum, yum.)
Posted by Ree on December 7 2011

December 5, 2011
Sticky Pecan Mini-Buns
 These were good. These were very, very good.
Delicious, in fact!
There's a nice grocery store named Petty's in Tulsa, Oklahoma and for years and years they've sold packages of mini-pecan rolls. Any time I'm in the general area, I pick up a package for my husband and kids to enjoy for breakfast the next day. Then I eat them on the way home and throw away the empty evidence.
Here's my make-at-home version of the little one-bite wonders. None of that annoying find-a-place-in-town-to-ditch-the-empty-packaging nonsense to worry about!
I like that in a sticky mini-bun recipe.
STEP 1
Make a half-recipe of this cinnamon roll dough.
STEP 2
 Melt a stick of butter in a small skillet or saucepan.
 Throw in a cup of finely chopped pecans.
 Then add a cup of corn syrup. Light or dark, whichever you have on hand.
 And a couple of teaspoons of vanilla.
 Then stir 'em around, let 'em bubble up, then turn off the heat and set 'em aside.
STEP 3
 Roll out the dough into a 30 inch-by-8 inch rectangle—in other words, wide and narrow. Drizzle on melted butter…
 And sprinkle on some sugar.
 If you think you've added enough sugar…add a little more.
A healthy and mature approach, to be sure.
 Next, sprinkle on some cinnamon.
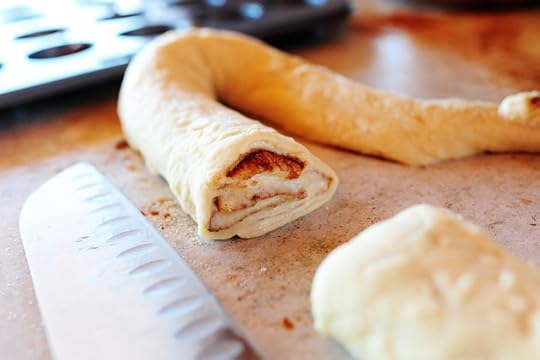
 Then roll it into a neat and tidy roll.
STEP 4
 Spoon some of the pecan mixture into mini-muffin tins, making sure to get plenty of syrup in with the pecans.
 Then slice 1/2-inch slices and lay them, cut side up, in the tins.
 This looks like a colon. I'm sorry.
Actually, it looks like a pancreas.
Actually, never mind.
 Let them rise for 15 to 20 minutes or so
 Bake them for 15 to 18 minutes, until they're golden brown.
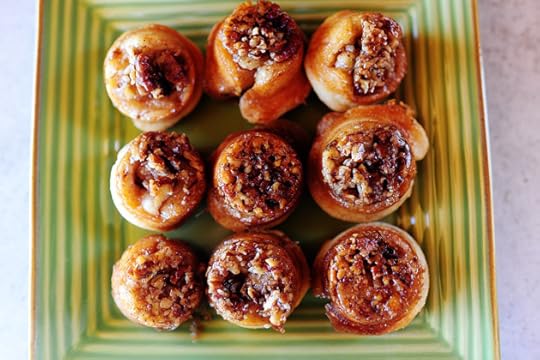
Turn them out of the pan, and don't fall to pieces if a few pieces fall off. Just use a knife or spoon to quickly stick them back on.
 Yum.
Yum.
 Yum.
Yum.
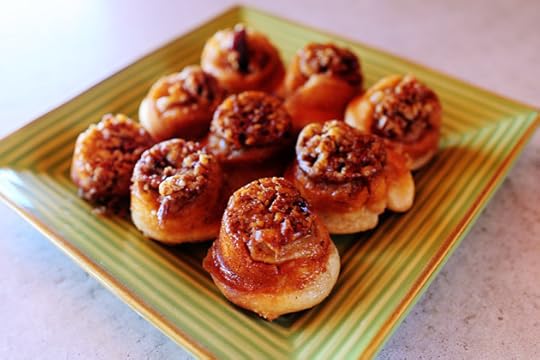
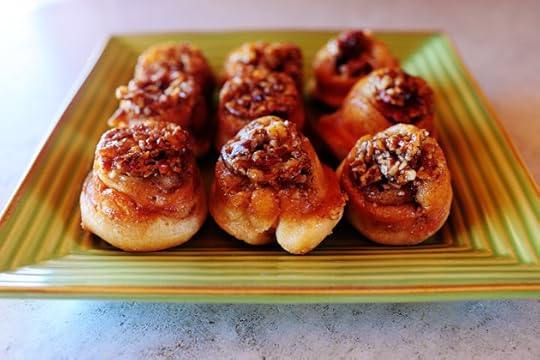 And yum. These are delightful and bite-sized and try eating just one or two of them. It can't be done.
Enjoy, guys!
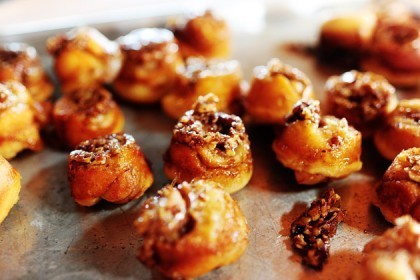
Recipe: Sticky Pecan Mini-Buns
Prep Time: 1 Hour30 Minutes
|
Cook Time: 15 Minutes
|
Difficulty: Easy
|
Servings: 36
Print Recipe
3"x5" Cards
4"x6" Cards
Full Page
Ingredients
2 cups Whole Milk1/2 cup Canola Oil1/2 cup Sugar2-1/2 teaspoons Active Dry Yeast4 cups Flour1/2 cup (additional) Flour1/2 teaspoon (heaping) Baking Powder1/2 teaspoon (scant) Baking Soda2-1/2 teaspoons Salt2 sticks Butter3/4 cups Sugar2 Tablespoons Cinnamon1 cup Finely Chopped Pecans1/2 cup Light Corn Syrup2 teaspoons Vanilla Extract Preparation Instructions
To make the dough: heat milk, canola oil, and 1/2 cup of sugar in a large saucepan until just before boiling (but do not boil.) Remove from heat and set aside to cool a bit until warm/lukewarm.
Sprinkle yeast over the top of the liquid, then add 4 cups of flour. Stir to combine, then cover pan with a dishtowel and allow to rise for 1 hour.
After 1 hour, stir in additional 1/2 cup flour, baking powder, baking soda, and salt. Set aside.
In a separate pan, melt 1 stick of butter and add chopped pecans, corn syrup, and vanilla. Stir to combine, then remove from heat and set aside.
Melt additional 1 stick of butter. Set aside.
To make the rolls, preheat the oven to 375 degrees. Roll out dough into a 30 x 8-inch rectangle. Pour on 1 stick of melted butter, then sprinkle sugar and cinnamon evenly over the surface. Starting at the far end, roll the dough into a long roll, rolling toward you. You'll end up with a 30-inch-long roll of dough. With a sharp knife, cut into thin slices, about 1/2-inch thick.
Spoon 1/2 to 1 teaspoon of the pecan/butter/syrup mixture into mini-muffin tins. Set sliced rolls into each muffin tin, pressing slightly to secure them to the pecans below.
Bake for 15-18 minutes, or until golden brown. Remove pans from oven and invert carefully so that rolls turn out and pecans stay stuck to the bottoms (which are now the tops!) If a little pecans stick in the tins, just dig them out with a spoon and reapply them to the rolls.
These are divine with coffee in the morning.
Posted by Ree on December 4 2011

December 2, 2011
Mini Corn Loaves with Cranberries and Pecans
 This is a variation of the Blueberry Corn Mini-Muffins I posted a few weeks ago, and proof that you can pretty much use the following cornbread mix to create whatever fun variety of muffin or bread you'd like. The same day I made the mini-muffins in the link above, I also whipped up some cute little mini-loaves (made with an adorable mini-loaf pan I got recently) and served them with a scrumptious maple butter.
And the heavens burst forth with song. They were so delicious.
Note: The process shots for the cornbread batter below are the same ones I used in the mini-muffin post, as the recipe is exactly the same at that stage.
[image error]The Cast of Characters: flour, cornmeal, shortening salt, sugar, buttermilk, milk, egg, baking powder, and baking soda. This is the basic skillet cornbread recipe I've used for years, which is heavy on the corn flavor and texture. I like corn muffins to have that cornbread texture, not a light and fluffy muffin texture.
Oh, and I added a little vanilla to give them a little flavor.
Oh, and I added a little sugar to give them a little sweetness.
 Mix the flour and cornmeal in a bowl.
 Add in the salt…
[image error]The baking powder…
 And the sugar.
 In a bowl, combine the buttermilk…
 The milk…
 The egg…
 And the baking soda. Mix it together until it's all combined…
 Then pour it into the dry ingredients and stir to combine.
 Melt the shortening in the microwave for about 25 seconds…
[image error]Pour it into the batter, stirring gently.
*Note: The melted shortening gives the mini-loaves a nice texture and crispness on the crust…but you can leave it out of the recipe if you wish. They'll still be yummy!
 Then add a splash of vanilla and stir it to combine.
 Next, add dried cranberries…
 And some chopped pecans. You can chop them as rough or as fine as you'd like.
 Then pour the batter into greased mini-loaf pans or muffin pans and bake them for about 13 to 15 minutes on 400 degrees.
 Cute! And yum.
 Now, right after you remove them from the oven, mix together a small amount of maple syrup and melted butter…
 And brush this over the top of each of the loaves. This'll give 'em a little bit of a sticky glaze and a little punch of flavor.
 Then turn 'em out of the pan…
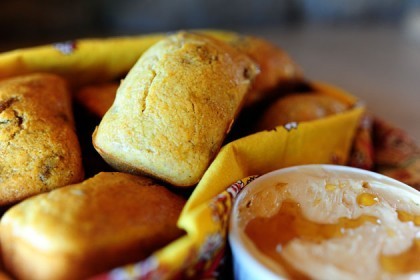
 And put 'em in a serving basket.
 But wait! There's more! Mix together maple syrup with some softened butter…
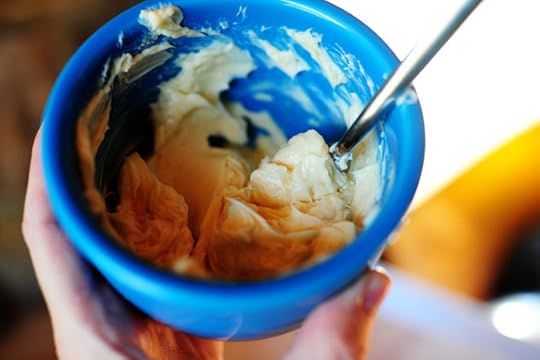 Stir it around to combine…
 Then smear it into a ramekin and drizzle the top with a little more maple syrup.
 Then tear open a loaf, smear on plenty of butter, and dig in!
I repeat: Yum. Double yum. These would be great to deliver to friends at Christmastime. And speaking of that…Christmas recipes begin next week!
Ho ho ho and amen.
Here's the handy printable.
Recipe: Mini Corn Loaves with Cranberries and Pecans
Prep Time: 15 Minutes
|
Cook Time: 15 Minutes
|
Difficulty: Easy
|
Servings: 12
Print Recipe
3"x5" Cards
4"x6" Cards
Full Page
Ingredients
1 cup Yellow Cornmeal1/2 cup All-purpose Flour1 teaspoon Salt1 Tablespoon Baking Powder2 Tablespoons Sugar1 cup Buttermilk1/2 cup Milk1/2 teaspoon Baking Soda1 whole Egg1/4 cup Shortening1/2 teaspoon Vanilla1 cup Dried Cranberries1/2 cup Chopped Pecans MAPLE BUTTER1 stick Softened Butter2 Tablespoons Maple Syrup Preparation Instructions
Preheat oven to 400 degrees. Combine corn meal, flour, salt, and baking powder in a mixing bowl. In a separate bowl, combine buttermilk, milk, egg, and baking soda. Stir to combine. Add melted shortening, stirring constantly. Add vanilla extract, then stir in dried cranberries (you can use a little more or a little fewer if you'd like.)
Pour into a greased mini-loaf, mini-muffin, or muffin pan, trying to make sure cranberries stay evenly distributed. Bake for 12-15 minutes or so, or until golden brown. Cool for a few minutes after removing from the oven, then turn out of the pan and allow to cool.
To make the maple butter, combine the softened butter and maple syrup. Stir until totally combined, then spread into a ramekin, drizzle the top with maple syrup, and serve with the warm muffins. (Butter can be made ahead of time and stored in the fridge.)
Posted by Ree on December 2 2011

November 28, 2011
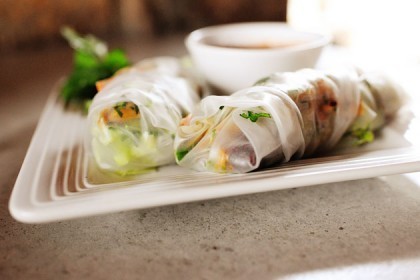
Leftover Turkey Spring Rolls
 Ahhh…Thanksgiving. How was it, everyone? While we had a wonderful time, I wasn't the one who did the cooking this year. My sister-in-law Missy took on the whole load, and I loved not getting up at 6:00 am to put the turkey in the oven. I can't remember the last time I slept in on Thanksgiving.
While I did enjoy the break, I was a little bummed out not to have leftover turkey to whip up some more leftover turkey recipes. Fortunately, though, I whipped out a couple of things a few weeks ago—including these positively scrumptious and light turkey spring rolls, which rocked my world in a wonderful way.
These are perfect for post-Thanksgiving bloat: they're light and crisp and crunchy and green.
And wonderful.
Did I just say bloat? Sorry.
 The Cast of Characters: leftover turkey, finely diced carrots, cucumbers, cilantro, cellophane noodles, green leaf lettuce, sprouts (alfalfa, bean, etc.) soy sauce, rice wine vinegar, and sesame oil.
Add or substitute other things that appeal to you! Avocado, for instance, would be sublime.
 These are cellophane noodles, which I'm completely obsessed with lately. They're very boingy and take on the flavor of whatever you toss them with so wonderfully.
 You can follow the directions on the package, but basically you put the little clusters of noodles in a bowl…
 And pour boiling water over the top…
 Then let them sit for a little bit until they're soft and boingy and perfect.
 Like this! Mmmmm. Me likey. Me likey a lot.
 To get the ingredients ready, cut strips of cucumber, sticking mostly to the firm perimeter and staying away from the seeds and soft areas. Set these aside for a minute.
 Into a bowl, throw some finely minced carrots (you don't want to bite into big chunks when you eat the spring rolls later.)
 And some chunks of leftover turkey.
 Then just drizzle in some soy sauce…
 Some rice wine vinegar…
 And some sesame oil in whatever quantity you want. The idea is just to moisten the turkey and really inject it with some fabulous flavor, so just add and taste until you love it.
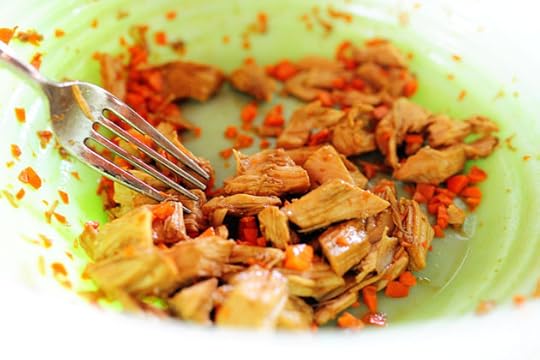 Stir it around…
 Then throw in the minced cilantro and stir it around.
 And now for the really fun part.
 These are rice paper wrappers, and I love them more than life itself. They make for the most beautiful and delicious spring rolls.
 So you just take the same approach with these that you take with the cellophane noodles: just submerge them in the warm water…
 Then carefully take them out when they're soft and look like one of those peel-off masks you and your friends used at slumber parties when you were twelve.
 Lay the wrapper on your work surface, then lay on a small little pile of noodles…
 A couple of pieces of lettuce…
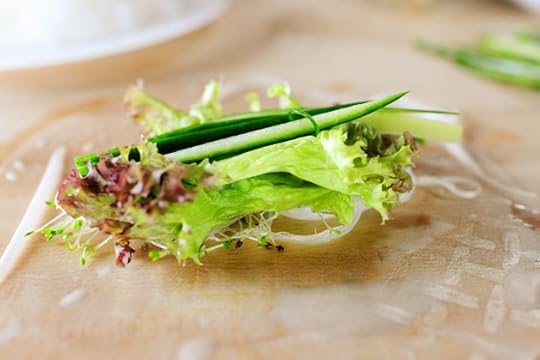 A few strips of cucumber…
 And a good amount of the yummy turkey mixture.
 And now. I need to say something. If you want a precise tutorial on how to roll up a spring roll, please don't rely on me. But here's how I, in all my imperfection, do it.
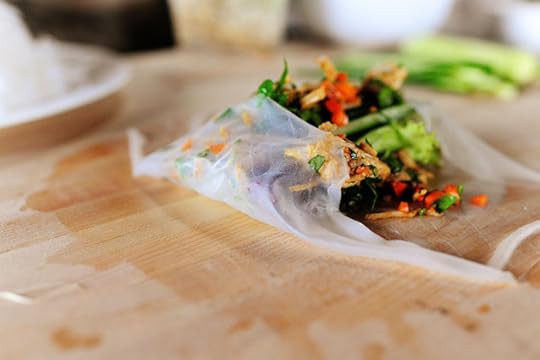 Fold up both sides…
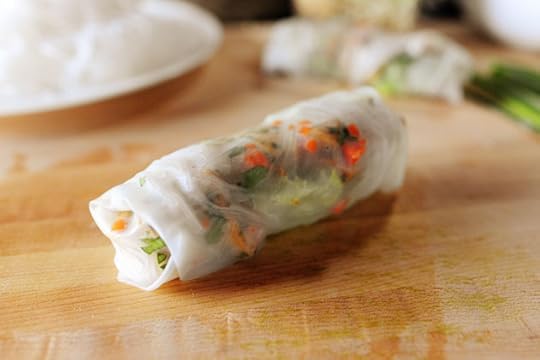 Then roll it on up, baby.
 I love life. Gosh, did I love these suckers.
 Oh, and I mixed up some strange concoction of cranberry sauce, honey, soy sauce, rice wine vinegar, and probably something else. It was okay, but I probably would have been better served to just dip them in soy sauce.
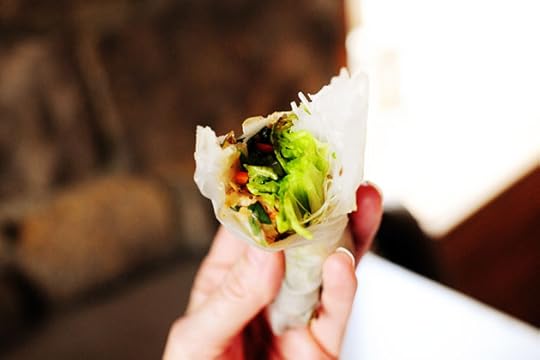 I repeat: I love life.
Gosh, were these good.
Oh! And I have to show you something funny.
Look at what I made with the extra noodles, turkey mixture, and other stuff.
 So unlike anything I'd make on a normal day around here…but it was fun to mess around with it.
Oh, and it was fun to eat it, too.
I repeat: I love life.
You'll love these, guys. Try them with your turkey now, or with chicken later.
Shrimp and veggies, too. That's probably my fave.
Here's the handy printable:
Recipe: Leftover Turkey Spring Rolls
Prep Time: 15 Minutes
|
Cook Time:
|
Difficulty: Easy
|
Servings: 8
Print Recipe
3"x5" Cards
4"x6" Cards
Full Page
Ingredients
(Quantities Depend On How Much Leftover Turkey You Have And How Many Spring Rolls You Want To Make) Rice Paper Wrappers Chunks Of Turkey Soy Sauce Rice Wine Vinegar Sesame Oil Chopped Cilantro Finely Diced Carrots Strips Of Cucumber Leafy Lettuce Alralfa Or Bean Sprouts Cellophane Noodles Preparation Instructions
Prepare cellophane noodles according to package instructions.
Prepare rice paper wrappers according to package instructions.
Mix together chunks of turkey with soy sauce, rice wine vinegar, sesame oil, minced carrots, and chopped cilantro. Taste and adjust whatever seasonings you'd like.
Lay softened rice paper wrapper on work surface, then layer in softened noodles, lettuce, cucumber strips, sprouts, and turkey mixture. Roll up and serve with soy sauce for dipping.
Posted by Ree on November 27 2011

Ree Drummond's Blog

- Ree Drummond's profile
- 2032 followers

