
Ree Drummond's Blog, page 66
November 3, 2011
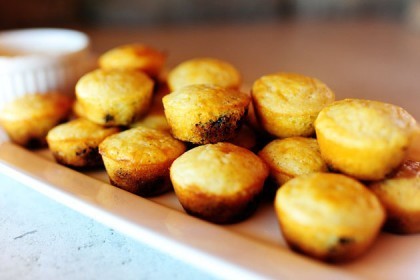
Blueberry Cornbread Mini-Muffins
[image error]I made these little corn muffins just before my mom and sister arrived for a weekend visit a couple of weeks ago, and I almost wolfed them all down before they got here.
Here was the problem: the muffins themselves were divine: moist, distinctively corny, but with yummy blueberries peppered throughout. But as if that wasn't enough, I made a vanilla bean butter to spread on the little babies. It wasn't my fault! My soul made me do it. How could I be expected to practice restraint in the presence of such deliciousness?
Thank you for listening.
[image error]The Cast of Characters: flour, cornmeal, shortening salt, sugar, buttermilk, milk, egg, baking powder, and baking soda. This is the basic skillet cornbread recipe I've used for years, which is heavy on the corn flavor and texture. I like corn muffins to have that cornbread texture, not a light and fluffy muffin texture.
Oh, and I added a little vanilla to give them a little flavor.
Oh, and I added a little sugar to give them a little sweetness.
Oh, and guess what else I added? Dried blueberries! They work so well in baked goods, because they don't bleed all over everything. And because of the moisture and the heat, they plump up and become tender and juicy.
 Mix the flour and cornmeal in a bowl.
 Add in the salt…
[image error]The baking powder…
 And the sugar.
 In a bowl, combine the buttermilk…
 The milk…
 The egg…
 And the baking soda. Mix it together until it's all combined…
 Then pour it into the dry ingredients and stir to combine.
 Melt the shortening in the microwave for about 25 seconds…
[image error]Pour it into the batter, stirring gently.
*Note: The melted shortening gives the muffins a nice texture and crispness on the crust…but you can leave it out of the recipe if you wish. They'll still be yummy!
 Then add a splash of vanilla and stir it to combine.
 Next, stir in the dried blueberries (most of them are under the surface of the batter and you can't see them in this photo…but they're there.
By the way: dried blueberries are a wonderful snack. Amen.
 Fill greased mini-muffin pans with the batter, then bake 'em in a 400 degree oven for about 12 minutes, or until they start turning golden brown.
[image error]Mmmm. They look (and smell) divine.
[image error]While they're baking (or even way ahead of time)…you can do this. Softened butter.
 Vanilla bean. I dream about them.
 Split the bean, scrape out the caviar…
 And stir it into the butter.
 I decided to add a little sugar…but you don't have to.
 Spread the butter into a ramekin…and don't pay any attention to those other naughty butters in the back. I'll cover those in another post.
[image error]Serve the warm muffins with the butter. And a knife. And an appetite for goodness.
 Wish me luck. I'm goin' in.
 See how nicely those dried blueberries behaved? No bleeding anywhere, and just look how plump and juicy they are!
 Enjoy these, guys. They're really, really delicious. I'd actually recommend doubling the recipe if you have more than three or four people to feed. These disappear very, very quickly.
I learned that firsthand a couple of weeks ago.
Recipe: Blueberry Corn Mini-Muffins
Prep Time: 10 Minutes
|
Cook Time: 12 Minutes
|
Difficulty: Easy
|
Servings: 24
Print Recipe
3"x5" Cards
4"x6" Cards
Full Page
Ingredients
Muffins1 cup Yellow Corn Meal1/2 cup All-purpose Flour1 teaspoon Salt1 Tablespoon Baking Powder2 Tablespoons Sugar1 cup Buttermilk1/2 cup Milk1/2 teaspoon Baking Soda1 whole Egg1/4 cup Shortening (Melted)1/2 teaspoon Vanilla8 ounces, weight Dried Blueberries VANILLA BUTTER1 stick 1/2 Cup Butter, Softened1 whole Vanilla Bean2 Tablespoons Sugar Preparation Instructions
Preheat oven to 400 degrees. Combine corn meal, flour, salt, and baking powder in a mixing bowl. In a separate bowl, combine buttermilk, milk, egg, and baking soda. Stir to combine. Add melted shortening, stirring constantly. Add vanilla extract, then stir in dried blueberries (you can use a little more or a little fewer if you'd like.)
Pour into a greased mini-muffin pan, trying to make sure blueberries stay evenly distributed. Bake for 10 minutes or so, or until golden brown.
Posted by Ree on November 3 2011


November 1, 2011
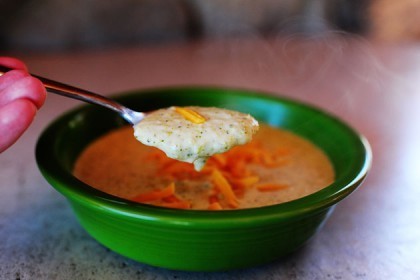
Broccoli-Cheese Soup
 Broccoli-cheese soup is my life. There's something about it that triggers a happy, peaceful memory. I just don't know what the memory is. So I guess technically, it isn't really a memory at all. I think a memory, by definition, is something that someone actually has to remember.
Never mind. Broccoli cheese soup is my life. I should have stopped there to begin with.
Here's how I make it!
 The Cast of Characters: Butter, chopped onion, flour, milk, half-and-half, broccoli, nutmeg (I have fresh, but any nutmeg is fine), cheese, and salt and pepper if you need it.
 Melt the butter in a pot and saute the onions until they're beginning to turn translucent, about 3 minutes or so.
(You'll notice I am not providing you a photo of the onions sauteing in the butter. This is because I am an airhead.)
[image error]Sprinkle in the flour and stir it into the onions. Let it cook for a minute or so…
(You'll notice I am not providing you a photo of the flour being stirred into the onions. This is because my brain was not present on the day I cooked this soup. Just follow my written instructions and forget I ever existed visually. But only for a moment.)
 Okay, I'm back visually. Pour in the milk, stirring as you add it.
 Pour in the half-and-half too, because you're naughty.
 Add in the nutmeg (makes the soup extra delicious!)…
 Then toss in the broccoli and add in a little salt (just go a little easy on the salt because the cheese has plenty)…
[image error]And plenty of pepper. Yum.

[image error]Then just cover the pot and simmer the soup on low for 20 to 30 minutes, or until the broccoli is nice and tender. This'll give the soup time to develop some nice broccoli flavor, and it'll give you time to grate up the cheese.
 Next, throw in the cheese. This is mild cheddar cheese, but you can use sharp cheddar, Monterey Jack, Pepper Jack, even a little goat cheese or gruyere to make things really luscious. You pick the cheese!
 Now it's time to make another decision. What consistency would you like your broccoli-cheese soup to have? You could leave it like it is now. You could mash it with a potato masher to break it up a little bit.
 Or you could totally puree it, either with an immersion blender OR with a blender in one or two batches, depending on how large your blender is.
I happen to like it pureed, so that's the path I'm choosing in life.
*Note: You can also choose to puree it before adding the cheese, but I don't find that it really matters much when you add it. Still tastes delicious either way.
[image error]Whizzzzzzzzzzzz! Just look at the goodness in that blender.
[image error]Pour it back into the pot when it's blended, just to make sure it's nice and hot. Splash in a little milk or chicken broth if it needs just a little thinning. The soup shouldn't be perfectly smooth, though—nice and textured is good.
 Don't have a fancy, crusty bread bowl? Just use a Kaiser roll. Your kids won't care one bit!
 Just lop off the top and pull out the innards, leaving a little rim for support. I didn't do this for the photo, but if you pop the rolls in a 350 degree oven for a few minutes, it'll crust them up and make them hold the soup a little better.
[image error]Cute little bread bowl knockoff. I certainly wouldn't pass muster at an elegant dinner party…but we don't have elegant dinner parties 'round this joint.
[image error]So, so good. Yum!
 And of course, regular bowls work too.
So many great broccoli-cheese soups out there, my friends, and I don't think I've ever met one I didn't like. So take this and run with it—make it all yours by switching up the cheese, even adding a dash or two of Worcestershire, Tabasco, or whatever you can think of.
But most importantly: enjoy. Broccoli-cheese soup deserves to be savored.
Here's the handy-dandy printable!
Recipe: Broccoli Cheese Soup
Prep Time: 10 Minutes
|
Cook Time: 30 Minutes
|
Difficulty: Easy
|
Servings: 10
Print Recipe
3"x5" Cards
4"x6" Cards
Full Page
Ingredients
1 whole Onion, Diced1 stick 1/2 Cup Butter1/3 cup Flour4 cups Whole Milk2 cups Half-and-half4 heads Broccoli Cut Into Florets1 pinch Nutmeg3 cups Grated Cheese (mild Cheddar, Sharp Cheddar, Jack, Etc.) Small Dash Of Salt (more If Needed) Freshly Ground Black Pepper Splash Of Chicken Broth If Needed For Thinning Preparation Instructions
Melt butter in a pot over medium heat, then add the onions. Cook the onions for 3 to 4 minutes, then sprinkle the flour over the top. Stir to combine and cook for 1 minute or so, then pour in milk and half-and-half. Add nutmeg, then add broccoli, a small dash of salt, and plenty of black pepper.
Cover and reduce heat to low. Simmer for 20 to 30 minutes, or until the broccoli is tender. Stir in cheese and allow to melt.
Taste seasonings and adjust if needed. Then either serve as is, or mash it with a potato masher to break up the broccoli a bit, or transfer to a blender in two batches and puree completely. (If you puree it in a blender, return it to the heat and allow to heat up. Splash in chicken broth if needed for thinning.)
Enjoy!
Posted by Ree on November 1 2011

October 31, 2011
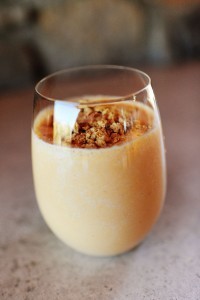
Pumpkin Smoothie
 Leesten. And heer me. You must make these tonight, tomorrow, and next week. As simple and throw-together as they are, I promise they'll be one of the most delectable things you've ever put in your mouth.
They're pumpkin smoothies. And they'll rock your world.
I had my doubts myself before I ever made a pumpkin smoothie for the first time. I imagined a watery, semi-creamy concoction that would likely taste like three-week old pumpkin pie juice. (Huh? Gross.) Instead, it turned out to be one of the creamiest, most delicious treats I'd ever tasted—almost like a pumpkin milkshake, but not nearly as sinful.
Using pumpkin pie filling, frozen solid before blending, gives the smoothie a lovely built-in sweetness and flavor, and the vanilla yogurt takes the flavor over the top. If you'd like to have a little more control over the sugar in your smoothie, though, you can sub pumpkin puree (make your own; it's a cinch!) and plain yogurt, then add in whatever sweetener (sugar, honey, agave nectar, orange juice, etc) you'd like.
But boy, oh boy. Try it this way first.
You've gotta trust me on this one.
 The Cast of Characters: Pumpkin pie filling, vanilla flavored yogurt, whole milk, cinnamon, and cinnamon graham crackers. (You can see here that I've already frozen the pumpkin pie filling in a container. That's the first step!)
 Start by throwing the graham crackers into a plastic bag, then crush them by banging them with something. In my case, the cinnamon was the closest thing to me.
 Start by adding the milk to a blender.
[image error]Then add the vanilla yogurt.
[image error]Grab the frozen pumpkin pie filling…
 And drop it in.
 Then add a few dashes of cinnamon.
 Turn on the blender and blend it until the frozen pie filling is totally broken up.
 They're nice and cold now, so serve it up immediately.
I love these little dang stemless wine glasses. I use 'em for everything.
 Get overly excited, please, and slosh a little over the side.
 I walked away for a few moments. that's why it got a little foamy on top.
 Sprinkle quite a few graham cracker crumbs on the top of each glass.
 Absolutely delicious.
Here's one pre-separation. Creamy, dreamy, and out of this world.
Here's the tremendously delicious printable. Well, the printable isn't tremendously delicious. But the recipe on the printable is. Never mind.
Recipe: Pumpkin Smoothie
Prep Time: 5 Minutes
|
Cook Time:
|
Difficulty: Easy
|
Servings: 8
Print Recipe
3"x5" Cards
4"x6" Cards
Full Page
Ingredients
1 can (15 Ounce) Pumpkin Pie Filling3 cups Whole Milk1/2 cup Vanilla Yogurt A Few Dashes Of Cinnamon Cinnamon Graham Crackers, Crushed Preparation Instructions
Well ahead of time, place pumpkin pie filling into a freezer-safe container. Freeze for a few hours or until frozen solid.
To make the smoothie, add milk, and yogurt to a blender. Drop in the frozen pumpkin pie filling and blend until the frozen filling is completely pulverized.
Pour into individual glasses and sprinkle the tops with graham cracker crumbs. Serve immediately!
*Note: Make a lower-calorie smoothie by using unsweetened/unflavored pumpkin puree, nonfat plain yogurt, and the sweetener of your choice.
*Can also sprinkle with cinnamon and/or nutmeg instead of graham cracker crumbs.
Posted by Ree on October 30 2011
[image error]
October 27, 2011
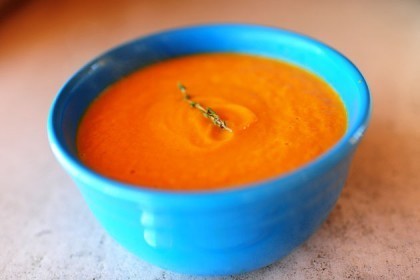
Carrot-Thyme Soup with Cream
 I realize this is a freaky photo. Sorry.
This is the perfect soup for Halloween night, because it's creamy and rich and hearty and satisfying…and it color-coordinates with all the pumpkins you might have on your porch or your dining table at this time of year. And whenever possible, I like to color-coordinate the food I cook with our holiday decor. It helps me sleep better at night.
No. Not really.
But this is a glorious soup. I posted a creamy carrot soup on my site a long, long time ago, but this one—spiked with plenty of fresh thyme, honey, and cream—is a little more stepped up. A little more set apart. A little more dreamy.
Honey, cream, and carrots: life doesn't get much better than that.
 The Cast of Characters: Baby carrots, vegetable stock (chicken stock is fine), fresh thyme, honey, cream, and (not pictured) salt. So simple, it's almost embarrassing.
But only almost.
[image error]Add the carrots to a pot…
 Then pour in the vegetable stock.
[image error]And excuse me. But would you look at this glorious vegetable stock? Look at that color! So vibrant and rich and colorful. My goodness.
Tulsa-area residents: This came from the wonderful and blessed Reasor's. Man, do I love that place with a fiery passion. If only they'd open one up in our hay meadow.
(And by the way: chicken broth/stock will work just fine. I would normally have used it if this beautiful liquid hadn't been in my pantry.)
 After you add the stock…
 Throw in a couple of sprigs of fresh thyme.
Just bring this to a quick boil, then reduce the heat to low and simmer it for a good 45 minutes. The flavors will meld and marry and mash together and become one.
 Next, throw the whole mixture in a blender. If your blender's on the small side, you can puree the soup in two batches. Or you can use an immersion blender if you'd rather not pour it back and forth.
 Blend it until the soup is totally smooth. I'm pretty sure I just left the thyme in there and pureed it to smithereens along with everything else, but you can remove it first if you wish.
 While the soup is hot, pour in the honey…
 And the cream. Then give it a really quick pulse or two…and that's it!
 Check the consistency; if it needs a little thinning, splash in a little warm broth.
 On a photographic note, do you know how difficult it is to shoot a bright orange soup inside a bright turquoise bowl? You wouldn't think this combination would be difficult, but it is.
 As for slurping down the soup itself?
Well, that wasn't difficult at all.
Recipe: Carrot-Thyme Soup with Cream
Prep Time: 5 Minutes
|
Cook Time: 45 Minutes
|
Difficulty: Easy
|
Servings: 8
Print Recipe
3"x5" Cards
4"x6" Cards
Full Page
Ingredients
3 pounds Baby Carrots2 quarts Vegetable Stock Or Chicken Stock2 sprigs Fresh Thyme1/3 cup Honey1/2 cup Heavy Cream Dash Of Salt Preparation Instructions
Combine carrots, stock, and thyme in a pot. Bring to a boil, then reduce the heat to low and simmer for 45 minutes to 1 hour.
Remove from heat and transfer soup in two batches to a blender (or you may use an immersion blender.) Puree soup completely, then stir in honey and cream. Taste, then add salt as needed.
Use a little warm broth if the soup needs thinning.
Serve while warm with a sprig of thyme on top.
Posted by Ree on October 27 2011
[image error]
October 26, 2011
Corn & Cheese Chowder
 Last week, I whipped up three yummy soups, all perfect for Halloween night and all guaranteed to:
1. Give your trick-or-treaters a nice warm head start before they take off on their quest to fill their bags to the brim with candy
2. Possibly cut down on the number of pieces of candy your child will consume while he is trick-or-treating
3. I can't think of a third thing.
Today's recipe is a scrumptious, thick, delicious corn chowder made extra luscious with cheese. I served it in a bread bowl because corn chowder in a bread bowl is one of life's great extravagances.
(In a moment of soupy serendipity, at the exact time I was cooking my Halloween soups last week [Broccoli Cheese among the three varieties] A Cozy Kitchen posted this beautiful broccoli-cheese bread bowl on the Tasty Kitchen Blog. I'll post my broccoli-cheese version later this week…but that one looks utterly divine.)
And now. For zee chowder, baby.
 The Cast of Characters: Butter, chopped onion, bacon pieces (either uncooked or cooked), fresh corn kernels, diced bell pepper (I used yellow, orange, and red; pretty!), sliced green onions, grated Monterey jack, grated pepper jack (or you can do any cheese combo!), flour, and…
NOT PICTURED because I'm rusty with Cast of Characters photos and because I'm an airhead: salt, pepper, chicken broth and half-and-half.
 In a good-sized pot, saute the chopped onions in butter.
 Add the bacon and saute it for a couple of minute, or until the onions and bacon become best friends forever.
 Next, throw in the diced bell peppers…
 And saute them around for a couple of minutes.
 Next goes the corn.
 Cook it for a couple of minutes.
 And now. This is important. Use your freakiest, most disturbing-looking alien hand you have…well, on hand. And with that hand, sprinkle in some flour.
(If you do not have a freaky, disturbing-looking alien hand, you can have mine.)
(No, really. You can.)
 Stir to incorporate the flour, then pour in the broth.
 Stir this around and let it thicken for a couple of minutes…
[image error]Then pour in the half-and-half. You can also use milk. You can also use half milk and half half-and-half.
Either way, we're getting ready to add enough cheese to render this choice irrelevant.
 Now it's just a matter of letting it simmer and thicken for 10-15 minutes or so.
 Yum!
Yum!
 Now just dump in a bunch of green onions…
 And a bunch of cheese.
 Stir it around, check the seasonings, and add some black pepper.
Now you can just stick on the lid and turn off the stove for a little while; it'll stay warm for awhile.
 Behold zee boule.
 Lop off the top, then pick out the innards, leaving a small margin of bread in tact.
 Gnaw on these if you're hungry, or stick 'em in a baggie and save 'em…or feed 'em to the ducks.
 Then grab a ladle…
 And fill up the hollowed-out boule with the creamy, wonderful, slightly crunchy goodness.
 This is a rather large boule, I will say that. But some stores sell them smaller than this (or, if not, I'll show you a trick with my next soup post.)
To die for. If you have corn-loving trick-or-treaters in your house, they'll love this.
Enjoy!

October 24, 2011
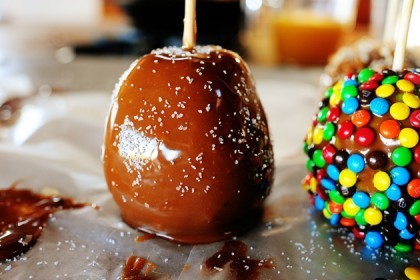
Salted (and Other) Caramel Apples
[image error]Happy week-before-Halloween! My girl and I made caramel apples a couple of weeks ago, and we had so much fun, we're doing it again tomorrow.
The great thing about caramel apples is, the possibilities are endless. Whether you leave the caramel plain and glossy and beautiful…or decorate it with everything you can get your hands on…the end result is always individual and special.
And oh-so-delicious, which is the most important part.
 Apples! Any variety, any size. I like to give them a good rinse under hot (as hot as my fingers can handle) water, then dry them with a rough dishtowel, rubbing kind of vigorously as I dry them. The wax coating on apples can create problems later when it comes to the caramel sticking, and this seems to help a little bit.
 Caramel. You can use the individually wrapped squares, of course, but unwrapping them is grueling and torturous and kills my joy. If you have them available, these caramel melts are so nice and easy. I used about three (11-ounce) bags. Maybe I used four. I've slept since then.
Note: True caramel apples, of course, are those that involve making your own caramel (with brown sugar or corn syrup or sweetened condensed milk or all of the above). In my caramel-loving opinion, that sure makes for a delicious caramel apple, but if you're planning on coating the caramel apple with all sorts of adornments, the caramel squares or melts are really just fine. And using a candy thermometer can sometimes kill my joy, too.
I'm weird like that.
 You'll also need toppings. Mini M&M's are nice and cute and colorful.
[image error]Chocolate chips.
 Coconut. Blech. I don't like it. But lots of people do, and they to on to lead very normal lives!
 Slivered almonds.
 And crushed pretzels.
Other stuff you can use alone or with other things: crushed Heath bar, crushed pecans, graham cracker crumbs, crushed saltines, crushed cashews, etc. Another thing you can do is melt different colors of candy melts, put each color in its own disposable pastry (or Ziploc) bag, and pipe the different colors all over the apples in a vertical design.
 Throw the caramel pieces in a double boiler, a glass bowl set over a pot of simmering water, or–if you're lazy like me–a pot. Beware if you use a heavy cast iron pot like this, though: it can get too hot and burn the caramel before it all has a chance to melt.
But I love walking on the wild side.
 As the caramel is melting, add 2 or 3 tablespoons of heavy cream (I splashed in a little more than that; oops), a little vanilla extract for flavor, and a little salt. I think a little salt gives the caramel apples a wonderful flavor no matter what topping you use.
Note: You do have to be careful about adding too much cream or vanilla to the melted caramel, as it can lose the thickness/stickiness necessary to stick to the apples.
 Here I am with the chopsticks again.
I love them. And I don't care who knows it.
 Stick the chopsticks into the bottom of the rinsed and dry apples, then dip them, turning them as you go.
[image error]I like to cover the entire apple up to the base of the stick; I had to tilt the pot to get it to coat.
 Let the excess drip into the pan, then head on over to the toppings.
 You really only have about 30 to 45 seconds before the caramel starts to set enough to make coating the caramel apples a little difficult. So go ahead and roll them or dip them in whatever dry ingredient as soon as you can. It might take an apple or two to get the hang of coating things while the caramel is still really soft and melted without creating a gloopy mess on the plate of toppings…but the good thing is, the trial-and-error is so delicious.
 My girl did the M&M versions. Don't be concerned that the M&M's will melt–they won't!
 This one's my favorite. I made three of them.
 Kosher salt! Yum, yum, and yum.
Why is salted caramel so heavenly?
[image error]It's fun, too, to mix things up. This is kosher salt, crushed pretzels, slivered almonds, and chocolate chips.
IMPORTANT: In my experience refrigerating the caramel apples right after topping/coating them really encourages that caramel to stay put better. I usually have waxed paper sitting on three or four quarter-sheet pans, so that as soon as I finish three or four apples, I get them straight in the fridge. And keep 'em in there for a good couple of hours at least. (You can lick the caramel pan clean to tide you over in the meantime.)
 Once they're nice and set, you can serve them on a platter…or wrap the ends in cellophane or plastic wrap and hand them out as treats.
[image error]And this is the all-pretzel version. Delicious.
Have fun with these, guys!
Recipe: Salted (and Other) Caramel Apples
Prep Time: 30 Minutes
|
Cook Time: 20 Minutes
|
Difficulty: Easy
|
Servings: 8
Print Recipe
3"x5" Cards
4"x6" Cards
Full Page
Ingredients
8 whole Apples (more, If Apples Are Small)4 packages (11-ounce Each) Caramel Melts2 Tablespoons Heavy Cream (a Little More Is Fine)1 teaspoon Vanilla Dash Of Salt Toppings: Mini M&Ms, Crushed Pretzels, Kosher Salt, Chocolate Chips, Coconut, Crushed Pecans, Crushed Saltines, Etc. Chopsticks Preparation Instructions
Melt caramel with cream in a double boiler or glass bowl set over a pot of simmering water. Add vanilla and salt and stir until smooth.
Stick one chopstick in the bottom of each apple. One at a time, dip the apple in the caramel, coating it all the way to the base of the stick. Allow excess to drip back into the pan for a couple of seconds, then carefully roll the apple in whatever topping you'd like. (There's a small window of opportunity for the toppings to easily stick!)
Repeat with all the apples, refrigerating apples as soon as they're coated. Once cool, wrap apples with cellophane or plastic wrap.
Posted by Ree on October 24 2011

October 20, 2011
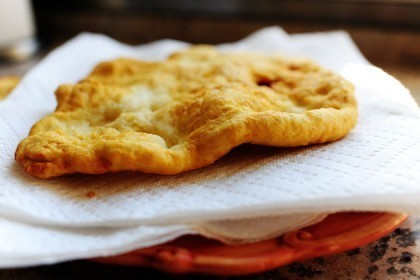
Indian Fry Bread and Indian Tacos
 For today's State Fair Recipe, I'm going to show you how to make Indian Fry Bread, a Native American quick bread that's fried and served either on its own, drizzled with honey, sprinkled with cinnamon sugar, or topped with ground beef and other taco ingredients.
In the second part of the post, I'm going to go ahead and show you what the fry bread looks like as a base for Indian Tacos. However, the fry bread in the Indian Taco photos is not the right fry bread. It's the wrong fry bread. It's the wrong fry bread because I messed it up. But I'd already made the taco toppings and was running out of time, so I went ahead and finished the tacos, planning to make a better batch of fry bread later.
And that's what I did. So basically, the fry bread and the tacos were made on different days. And more importantly: the day I made the tacos, I was wearing black leggings. The day I made the right fry bread, I was wearing jeans. Important distinction. Didn't want to leave anything out.
First, here's the fry bread. There are so many different recipes and methods and if you're looking for the authentic, 100% correct way to make Indian Fry Bread, you don't want to rely on me. Others can show you the way much better than I can.
But it really is a cinch once you get the hang of it. And it's so, so, so, so good.
THE FRY BREAD
 Add flour to a bowl.
 Then add baking powder.
 Some recipes call for yeast, and some don't have any leavening at all. But the baking powder seems to work best for me.
 Next, add some salt.
[image error]Now just stir the flour mixture together…
 While you slowly drizzle in some milk.
[image error]Give it a stir for a little longer to incorporate the milk as much as possible…
 Then slowly drizzle in about 1/2 cup of water as you continue to stir gently.
 Stop just when it comes together; don't stir the heck out of it. And add more water if you need to—just enough to make it finally come together.
 And now. This really makes a difference. Cover the bowl with a dish towel and let it sit for 30 minutes…45 if you have it. This really makes a difference in how the dough handles, and how it fries up, which I learned the hard way the other day when I made fry bread and it didn't turn out as well.
 This also makes a difference. With my other batch of fry bread (the one I made the other day) one of the mistakes I made was using canola oil to fry the bread. But it just didn't do the trick like Crisco. (And confession: I didn't quite have enough Crisco so I topped it off with some lard. Yes, I said lard.)
[image error]When you're ready, grab a little bunch of dough.
 Using your fingers, begin pressing in the center of the ball and continue to press, stretching slightly as you go. I like the texture of the fry bread using this method much better than if I use a rolling pin…but it could be because with the rolling pin I always tend to roll it out a little thin. I like the lumpiness of pressing it. But I'm weird and don't know anything.
 Fry them on one side until golden brown, about a minute or so (make sure your grease is hot enough)…then carefully turn them over (I use tongs so the oil won't splash) and continue frying them for about 30 to 45 seconds.
 Remove them from the pan…
 And let them drain on paper towels.
 If you want a bigger piece, just start with a larger ball of dough.
 Mmmm. Good one. This'll make a nice taco, man.
 Plenty of surface area for all those ingredients!
 Just drain them on paper towels until you need them.
Now, here's what you can do from here:
Eat them as they are. Simple and yummy.
Drizzle on honey.
Mix softened butter and honey together and spread it on.
Sprinkle on lots of cinnamon sugar.
Sift on lots of powdered sugar.
Or you can make Indian Tacos!
INDIAN TACOS
 FLASHBACK: This was my fry bread a few days ago. It tasted really good. It was just missing a little bit of puffiness/texture. I didn't let the dough sit and rest, and I think I messed with it too much. Oh, and I used less baking powder.
 I'd fried up a bunch of ground beef the day before (I do this sometimes. Habit of mine.) so when I heated it up I added in some different seasonings: cumin, chili powder, salt, pepper. You can add some Mexican red sauce, too, to make it drippy and saucy and wonderful.
I didn't do that, though. I was too busy wandering around in the smoldering aftermath of my freaky fry bread.
 Then I chopped up some lettuce…
 Some tomato…
 And green onions.
 And piled on the meat…
 The lettuce…(and here's where you imagine all of this happening on top of one of those golden brown puffy things at the beginning of this post.)
 Tomatoes…
[image error]Sour cream…
 Green onions…
 And salsa. Yum!
Now, it does look like the fry bread is thin and crisper here, but really, they were soft enough to fold. And shove in my mouth. So scrumptious.
But imagine those glorious taco toppings on this beauty. Too delicious for words!
Here's the handy printable for the fry bread.
Recipe: Indian Fry Bread
Prep Time: 30 Minutes
|
Cook Time: 10 Minutes
|
Difficulty: Easy
|
Servings: 6
Print Recipe
3"x5" Cards
4"x6" Cards
Full Page
Ingredients
3 cups All-purpose Flour3 teaspoons Baking Powder1/2 teaspoon Salt3/4 cups Milk Water As Needed To Get Dough To Come Together Vegetable Shortening Or Lard For Frying Preparation Instructions
Stir together flour, baking powder, and salt in a medium bowl. Stir with a fork as you pour in the milk; keep stirring for a bit to get it to come together as much as possible. Add just enough water (about 1/4 to 1/2 cup) to get it to come together. Cover the bowl with a dish towel and let it sit for 30 minutes.
When you're ready to make the fry bread, heat about 1 to 2 inches shortening/lard in a large skillet over medium-high heat. Grab a plum-sized piece of dough (or larger if you want larger fry bread) and press it into a circle with your fingers: place it on a clean surface and begin pressing in the center and work your way out, stretching it as you go.
When the circle is about 4 to 7 inches (however big you want it) carefully drape it into the skillet. Allow it to fry on one side until golden brown, about 1 minute, then carefully flip it to the other side using tongs. Fry it for another 30 to 45 seconds.
Remove the fry bread to a paper towel-lined plate and allow it to drain while you fry the other pieces.
Serve warm!
Posted by Ree on October 19 2011

October 18, 2011
Classic Corn Dogs and Cheese-on-a-Stick
 For the second State Fair recipe, I whipped up some hot dogs and cheese-on-a-stick reminiscent not just of state fairs and carnivals…but also of shopping malls in the eighties: this is said to be the same batter recipe used by the famous Corn Dog 7 chain of stores, and if you don't remember Corn Dog 7, you're way too young and probably don't have slack abdominal muscles or jowls yet. I feel very sorry for you!
Corn Dog 7 had fabulous hot dogs, of course…but their Cheese-on-a-Stick was what I loved the most as I traipsed through the mall with my best friend Jenn, buying things like neon pink fingerless gloves and Soloflex posters and Duran Duran tapes.
I miss the Eighties so much it hurts. I'm going to go text Jenn right now.
One thing about this blessed, glorious batter: if you have any left over, it makes perfect pancakes the next day. And for that matter, you can use the batter to coat and fry cooked breakfast sausage links, then serve them with pancakes syrup for "dipping." The possibilities are endless. And fattening. And endlessly fattening.
First things first: Use chopsticks for sticks! You can buy chopsticks in bulk at Asian markets, and they're nice and cheap. And sturdy.
 Stick 'em into the hot dogs so that they're about 2/3 of the way through.
 For the sticks of cheese, I used big skewers…but if you're serving to kids, I'd stick with the chopsticks to avoid the sharp point. I used cheddar, jalapeno jack, and (just for kicks) Havarti with Dill.
[image error]Now it's time to make the batter! Into a large bowl (this one wasn't large enough) add Krusteaz pancake mix. I don't think any alarms would go off if you used Bisquick or Aunt Jemima. But the Corn Dog 7 recipe called for Krusteaz, and I do what Corn Dog 7 tells me to do.
Seriously. Just do what Corn Dog 7 tells you to do and you're good to go.
 To the pancake mix, add some yellow corn meal. This gives the batter some good texture, and also makes the pancakes you might make with the leftover batter out-of-this-world delicious.
[image error]Stir it together…
 Then beat together a couple of eggs.
 Pour it into the dry mixture…
 Then pour in 5 to 6 cups of water. I started with about 4 cups of water, then worked my way up from there.
 This is way too thick and gloopy.
 This is a little too thin. (I added too much water, then had to sprinkle in a little more pancake mix to thicken it back up.
 This is just right.
 I transferred the batter to a cylindrical crock I had to make it easier to dip in the whole hot dog…then one-at-a-time, I dipped…
 Then plunged it into hot canola oil, stick and all. Fiddle around with tongs a bit to turn it over so that it browns evenly…
 Then, when it's nice and deep golden brown, remove it from the oil and let it drain on a paper towel-lined plate. And don't worry if it has a couple of tails or lumps. Just call it rustic and you're good.
Or maybe…or maybe "artisan" is a better word.
Artisan Corn Dogs. I like the sound of that.
 Do the same with the cheese.
[image error]Dip…
 Dunk…
Dunk…
 And remove when it's deep golden brown. Artisan Cheese-on-a-Stick.
 My goodness. So, so good.
About frying the cheese: It's a little trickier than the corn dogs, because you walk a fine line between not frying it long enough (and the cheese not fully melting) and frying it too long (the outside gets too brown OR the cheese bursts through the batter and starts bubbling in the oil.) It might take you a couple of pieces before you get the hang of it.
 But when you do? Oh, dear. Is it ever worth it.
 Here's the Havarti. Good. Very, very good.
 Serve the corn dogs…
 And the cheese…
 With a yummy, spicy mustard.
 Mmmmm. This really hit the spot the other day.
[image error]I'm going to call this "A Portrait of a Corn Dog."
 I'm going to call this "Corn Dog Sleeping Under the Stars."
You know what else I'm going to do? I'm going to stop now.
 Whip these up sometime, guys! They're fun to make and really, really yummy. Marlboro Man and the boys, the corn dog connoisseurs in our house, love them because they're crispy on the outside and soft on the inside. Yum.
Enjoy!
Recipe: Classic Corn Dogs and Cheese-on-a-Stick
Prep Time: 10 Minutes
|
Cook Time: 20 Minutes
|
Difficulty: Easy
|
Servings: 18

Print Recipe
3"x5" Cards
4"x6" Cards
Full Page
Ingredients
6 cups Krusteaz Pancake Mix2 cups Yellow Corn Meal2 whole Eggs, Slightly Beaten6 cups Water, More If Needed To Thin Batter Hot Dogs Cheese, Cut Into 1/2-inch X 3 Inch Sticks Chopsticks Canola Oil, For Frying Spicy Mustard, For Serving Preparation Instructions
**USE CAUTION WHEN FRYING WITH OIL. KEEP POT ON THE BACK BURNER TO PROTECT SMALL KIDDOS**
In a large bowl, combine pancake mix and cornmeal. Stir to combine. Add eggs and water, adding more water as needed for the batter to become slightly thick (but not overly gloopy.) Start out by adding 4 cups, then work your way up to 6 cups or more.
Heat canola oil over medium-high heat. Drop in a bit of batter to see if it's ready: the batter should immediately start to sizzle but should not immediately brown/burn.
Insert sticks into hot dogs so that they're 2/3 of the way through. Do the same with the cheese sticks.
Dip the hot dogs into the batter and allow excess to drip off for a couple of seconds. Carefully drop into the oil (stick and all) and use tongs or a spoon to make sure it doesn't hit the bottom of the pan and stick. Flip it here and there to ensure even browning, and remove it from the oil when the outside is deep golden brown, about 2 to 3 minutes.
Repeat with cheese, allowing it to get as golden as possible so that cheese will melt completely.
Serve with spicy mustard.
Posted by Ree on October 18 2011

October 17, 2011
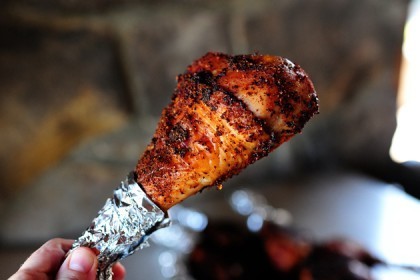
Caveman Pops (aka Roasted Turkey Legs)
 While a few state fairs are happening right now, the one in my state (as is the case with many others) has drawn to a close. But do not mourn, my friends: all this week on PW Cooks, I'll be posting some yummy state fair-inspired recipes. If you find yourself missing some of your favorite state fair treats, try whipping up some at home!
The parking's much better at your place, anyway.
For the first recipe, I whipped up some big ol' roasted turkey legs. While my method and seasonings aren't an exact match, they're still super good and super fun to serve a bunch of hungry people.
 Turkey legs! They're like chicken legs. Only…bigger. Oh, and they're made from turkey instead of chicken.
Aren't you glad you have me here to explain these things?
First, we'll make the brine. Brining poultry, if you have the time, makes such a difference in terms of flavor. Brining turkey…well, try to find the time. Please. I beg you.
 To some water, add some sugar…
 Some salt…
 Some brown sugar…
 Some Montreal seasoning (or any season salt or season blend that floats your boat.)
[image error]And a bay leaf!
 Bring it to a boil, then remove it from the heat.
[image error]Let the brine cool slightly, then pour it into a bucket or bowl of ice. (Or, if you have the time, which I clearly didn't, you can cool the mixture in the fridge.)
[image error]Once the brine is totally cool, add in the big, fat turkey legs.
 Make sure they're submerged, then cover the container and allow them to brine in the refrigerator for at least 4 to 6 hours–a little longer if you can!
 While the legs are brining, make a rub of whatever stuff you can find. I did some chili powder and a little more of the Montreal seasoning…
(And yes, I realize Montreal seasoning is intended for steak. But the word "steak" is man-made. What is in a name? What if you took the word "steak" out of the equation? You'd be left with a delicious savory seasoning that you can rub onto your brined turkey legs without feeling weird.)
(I'm so glad we had this talk.)
[image error]I also added some paprika and some onion salt.
 Stir it all up and set it aside until the legs are finished brining.
And now.
What you are about to see may shock and disturb you.
Just…
Well, you'll understand in a second.
 Told you! But listen. It's very difficult to rub spices all over a turkey leg and take a photo at the same time.
I don't know why, but this photo cracks me up. It's just so…not right.
[image error]The point is, rub the dang rub all over the dang turkey legs, working it into/under the dang skin.
 Stick them into a 400 degree oven and roast 'em for about 20 minutes, then reduce the heat to 300 and roast for another 10-15 minutes.
 I wrapped the bottom of the legs in foil to make 'em easier to grab and eat.
 This is why I call them Caveman Pops. They just look like something they'd dig.
Uuug. Ooog. Uuga Oooga.
Grunt.
[image error]This also looks like something I'd dig. And oh, did I dig it. I had to cheat the brining time quite a bit because of time constraints, and they still turned out to be juicy and wonderful—and very, very spicy!
Here's the printable:
Recipe: Caveman Pops (aka Roasted Turkey Legs)
Prep Time: 6 Hours
|
Cook Time: 30 Minutes
|
Difficulty: Easy
|
Servings: 10
Print Recipe
3"x5" Cards
4"x6" Cards
Full Page
Ingredients
10 whole Turkey Legs BRINE:4 quarts Water1 cup Kosher Salt1 cup Sugar1 cup Brown Sugar2 Tablespoons Seasoning Blend (I Used Montreal)1 whole Bay Leaf Dry Rub2 Tablespoons Chili Powder (less If You Don't Like Things Too Spicy!)2 teaspoons Seasoning Blend (I Used Montreal)2 teaspoons Paprika2 teaspoons Onion Salt Preparation Instructions
In a pot, combine water with the salt, sugar, brown sugar, 2 tablespoons seasoning blend, and bay leaf. Bring to a boil then remove from heat. Allow to cool, then pour into a large container or bowl filled with ice. When mixture is cold, submerge turkey in the brine. Cover the container and brine in the refrigerator for 4 to 6 hours, more if you have time.
Preheat oven to 400 degrees. Mix the dry rub ingredients. Remove the turkey legs from the brine and rinse them under cold water. Pat them dry. Rub the dry rub all over the turkey legs, getting under the skin when you can.
Roast on a baking sheet in the oven for 20 minutes, then reduce the heat to 300 and roast for another 15 minutes.
Remove them from oven and wrap the bottom of the legs with aluminum foil for serving.
Dig in!
Posted by Ree on October 16 2011
[image error]
October 14, 2011
A Tasty Handful
I'm cooking today and through the weekend, gearing up for a fun recipe theme I have planned for next week.
Meantime, because I've been in Tasty Kitchen mode all week, I wanted to share a small handful of yummy recipes from over yonder.
I would eat all of these right now. Twice. Without shame.
 Stuffed French Toast by manda2177, prepared by Savory Sweet Life.
 Bowtie Lasagna by Rozanie, prepared by…well, by me. (The boys loved this.)
 Perfect Pumpkin Cheesecake by A Farmgirl's Dabbles, prepared by Cookin' Canuck.
 Gooey Butter Cake by The Newlywed Chefs, prepared by How Sweet Eats. (Oh, yum.)
 Baked Eggs in Spicy Tomato Sauce by Apricosa, prepared by A Cozy Kitchen. I want this right now. I love eggs with tomato sauce.
Have a wonderful, delicious weekend, everyone! See you Monday with a fun new recipe.

Ree Drummond's Blog

- Ree Drummond's profile
- 2032 followers


![[image error]](http://static.thepioneerwoman.com/cooking/files/2011/11/blueberrycorn.jpg)
![[image error]](http://static.thepioneerwoman.com/cooking/files/2011/10/saltedcaramel.jpg)